1
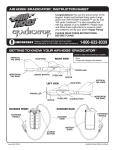
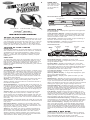
E
HEAD UNIT
1
2
3
4
5
6
7
8
9 10
Your view will be
from inside of your
car. Your car will
not be visible on
the track.
Rearview Mirror Panel
Track Selection Display
Rearview Mirror
1
2
3
4
Lap Counter
Model 8012
5
6
7
8
9 10
Position Indicator
P/N 82347800 Rev.A
COCKPIT VIEW
NASCAR® i•RACER™
For 1 player / Ages 8 and up
INSTRUCTION MANUAL
OBJECT OF THE GAME
This game consists of an 8-race NASCAR® circuit. In the
Championship Race Mode, after racing on the first track,
you will advance to the second track, and so on, until you
have completed all 8 tracks. The goal is to place 1st on
each track to maximize your score. In the Single Race
mode, you will be able to practice on any of the 8 tracks.
SETTING UP YOUR i•RACER
HAND UNIT
To install the batteries, unscrew the battery compartment
door located on the underside of the hand unit, install two
AA batteries (we recommend alkaline), making sure to
align the + and - with the markings in the bottom of the
battery compartment, and replace the battery compartment door.
Rearview Mirror - Displays the opponent cars approaching from behind.
Track Selection Display - Displays the track layout you
selected or are racing on. The dot represents your position on the track. The short line sticking up inside of the
track is the Start / Finish Line.
Lap Counter - Displays the number of laps remaining in
the race. All races are 4 laps in length.
Position Indicator - Indicates your position in the race.
You start all races in the 10th position.
Instrument Panel
Damage
Meter
Race Mode
Display
Car Damage
Display
RPM
Display
Steering Wheel
Display
Speed
Display
Gear Shift
Display
Transmission
Selection Display
Fuel
Gauge
Time / Points
Display
HEAD UNIT
To adjust the head unit to fit comfortably and securely on
your head, slide the stereo headphones closer to or further from the viewing unit, slide the top strap closer to or
further from of the stereo headphones, and loosen or
tighten the elastic back strap by repositioning the Velcro®
fastening strip.
GETTING STARTED
HAND UNIT
Race Mode Display - Displays the race mode
(Championship Race or Single Race) that you selected
using the Selector Dial.
Damage Meter - Displays how badly your car is damaged. Bars are added with each collision you have. You
must make a pit stop to have the damage repaired before
the Damage Meter is full, otherwise the damage will be
irreparable and the race will be over.
A and B Buttons - There are two buttons, marked A and
B, located on the underside of the hand unit. The A button
is the Accelerator / On / Enter button and the B button is
the Brake button. These can be controlled by holding the
hand unit in your right hand and using the first finger of
your right hand to press the A button and the second finger to press the B button.
Car Damage Display - Displays where damage has
occurred on your car.
Volume - The volume control toggle is located near the A
and B buttons, on the forward facing side, under the
Steering Wheel. Use this button to control the volume of
the stereo headphones.
RPM Display - Displays how fast your engine is revving.
Each bar represents 1000 RPM (Revolutions Per Minute).
If you are in the Manual Transmission (MT) Mode and
allow your RPMs to remain in the red area too long before
shifting to a higher gear, engine damage will occur.
Gear Shift Buttons - On the top side of the hand unit, in
the upper right corner, are the Shift Up (+) and Shift Down
(-) buttons. These buttons can be controlled by pressing
with your right thumb. They are only active if you selected
the Manual Transmission (MT) option at the beginning of
your race.
Selector Dial - To switch between Championship Race
mode, Single Race mode, Pause, or Best Lap / High
Score mode, turn the Selector Dial, located near the middle of the hand unit, to the desired position. NOTE: The
Best Lap / High Score mode can not be accessible before
race over.
Reset Button - The Reset Button will reset all scores and
times back to 0 as well as correct minor malfunctions that
may occur.
New Game Button - Pressing in and holding the New
Game button for 2 seconds will begin a new game. You
will need to select new race, track, and transmission settings prior to starting your new race.
Steering - You steer your car by grasping the Steering
Wheel with your left hand and turning the wheel right or
left to steer in the desired direction. You also use the
Steering Wheel to switch between race courses (in the
Single Race mode) and between Manual and Automatic
Transmissions when starting a new game.
Steering Wheel Display - A single bar displays the position of your Steering Wheel.
Speed Display - Displays the speed at which you are
driving.
Gear Shift Display - Displays the gear in which you are
currently driving. Once you have reached the maximum
speed or dropped below the speed range for the gear in
which you are driving, the display will prompt you to shift
by flashing on the appropriate gear.
Fuel Gauge - Displays how much fuel remains in your
car. Each race takes 1.5 tanks of fuel to complete. If your
fuel gets too low the bottom bar will flash, warning you to
make a pit stop as soon as possible. If you run out of fuel
before making a pit stop, the race will be over.
Transmission Selection Display - Displays MT (Manual
Transmission) or AT (Automatic Transmission) depending
on the mode that you select prior to the start of the race.
Time / Points Display - Displays the total time of the
race, from start to finish. It will also display the best lap
time and total points earned in the Championship Race
mode, when the Selector Dial on the Hand Unit is set to
Time / Points Display. To toggle between time and points,
press the A (Accelerator / On / Enter) button on the hand
unit.
STARTING A NEW GAME
Press the A (Accelerator / On / Enter) button to start up
your i•Racer. There is no “OFF” button. The game shuts
off by itself after about one minute of inactivity.
Press in and hold the New Game button for 2 seconds.
SINGLE RACE MODE
The object of this mode is to practice your driving on the 8
tracks. Your i•Racer will display your lap times but no
points will be awarded.
Turn the Selector Dial on the Hand Unit to Single Race.
Press the A (Accelerator / On / Enter) button to accept
your Single Race mode selection.
Next, you will need to select the track on which you would
like to race. The currently selected track is blinking in the
Track Selection Display portion of your Rearview Mirror
Panel. To switch to a different track, move the Steering
Wheel. When you see the track layout on which you
would like to race displayed in the Track Selection
Display, press the A (Accelerator / On / Enter) button to
accept that track.
Lastly, you will need to select your desired Transmission
mode. The currently selected mode is blinking in the
Transmission Selection Display portion of your Instrument
Panel. To switch to the opposite mode, move the Steering
Wheel. After selecting either MT (Manual Transmission) or
AT (Automatic Transmission), press the A (Accelerator /
On / Enter) button to accept that mode. NOTE: If you
chose the MT (Manual Transmission) mode, you will have
to shift gears using the Shift Up (+) and Shift Down (-)
buttons in order to accelerate properly.
You will hear 3 tones and the race will start.
CHAMPIONSHIP RACE MODE
The object of this mode is to race on each of the 8 tracks
and get the highest scores possible. You will receive
bonus points for placing 1st, 2nd or 3rd. If you finish in
one of the top three positions, you will also receive bonus
points for each bar remaining in each of your gauges.
Turn the Selector Dial on the Hand Unit to Championship
Race. Press the A (Accelerator / On / Enter) button to
accept your Championship Race mode selection.
In this mode you do not select the track you would like to
race on. Your i•Racer will automatically cycle through all 8
tracks.
You will still need to select your desired Transmission
mode. The currently selected mode is blinking in the
Transmission Selection Display portion of your Instrument
Panel. To switch to the opposite mode, move the Steering
Wheel. After selecting either MT (Manual Transmission) or
AT (Automatic Transmission), press the A (Accelerator /
On / Enter) button to accept that mode. NOTE: If you
chose the MT (Manual Transmission) mode, you will have
to shift gears using the Shift Up (+) and Shift Down (-)
buttons.
You will hear 3 tones and the race will start.
PIT STOPS
2. Insert two (2) AA batteries (we recommend alkaline),
making sure to align the + and - with the markings in
the bottom of the battery compartment.
3. Replace the battery compartment door.
ADULT SUPERVISION IS RECOMMENDED WHEN
CHANGING BATTERIES.
CAUTION:
• Do not play for extended periods of time. Eye fatigue
may occur.
• Do not play while walking, running, driving, or
participating in other activities.
• As with all batteries, the batteries used with this
product should be kept away from small children. If
a battery is swallowed, consult a physician immediately.
• Always follow the game and battery manufacturers’
instructions.
• The batteries might leak if improperly installed, or
explode if recharged, disassembled or heated.
This device complies with Part 15 of the FCC Rules.
Operation is subject to the following two conditions: (1)
this device may not cause harmful interference, and (2)
this device must accept any interference received, including interference that may cause undesired operation.
Warning: Changes or modifications to this unit not
expressly approved by the party responsible for compliance could void the user’s authority to operate the equipment.
NOTE: This equipment has been tested and found to
comply with the limits for a Class B digital device, pursuant to Part 15 of the FCC Rules. These limits are
designed to provide reasonable protection against harmful
interference in a residential installation. This equipment
generates, uses, and can radiate radio frequency energy
and, if not installed and used in accordance with the
instructions, may cause harmful interference to radio communications. However, there is no guarantee that interference will not occur in a particular installation. If this equipment does cause harmful interference to radio or television reception, which can be determined by turning the
equipment off and on, the user is encouraged to try to correct the interference by one or more of the following measures:
Reorient or relocate the receiving antenna.
Increase the separation between the equipment and
receiver.
Connect the equipment into an outlet on a circuit different
from that to which the receiver is connected
If your Car Damage is high or your Fuel Gauge is low,
look for the “PIT” sign on the left side of the screen. When
you see the pit area, steer to the left to enter. If your Car
Damage is extremely high or your Fuel Gauge is extremely low, your Crew Chief will tell you to head for the pits.
Your first pit stop in each race will not cost you a position.
If you need to make additional pit stops due to car damage, you will lose positions. How many you lose will be
determined by how severely your car is damaged and
how long it takes for your pit crew to repair your car. You
will need to make one pit stop for fuel in each race, as it
takes 1.5 tanks of fuel to complete each race.
Consult the dealer or an experienced radio TV technician
for help.
SPEED
•
MAINTENANCE
•
•
•
•
The maximum speed of your car is 200MPH.
The Speed Limits for turns are:
Tight Curve: Inside Lane - 120MPH, Middle Lane 130MPH, Outside Lane - 140MPH
Medium Curve: Inside Lane - 140MPH, Middle Lane 150MPH, Outside Lane - 160MPH
Big Curve: Inside Lane - 160MPH, Middle Lane 170MPH, Outside Lane - 180MPH
OIL SLICKS
Oil Slicks will appear in some of your races. Before they
appear, your Crew Chief will warn you. You must avoid
them by changing lanes before you get to them or you will
lose control of your car.
CRASHING
If you crash into the track barricades or into the car ahead
of you, red “Crash Sparks” will be displayed on the sides
of the screen and your Hand Unit will vibrate.
REPLACING THE BATTERIES
1. Remove the screw on the battery compartment door
(located on the underside of the hand unit). Remove the
battery compartment door. Remove the old batteries.
•
•
•
•
•
•
•
Handle this game carefully.
Store this game away from dusty or dirty areas.
Keep away from moisture or temperature extremes.
Do not disassemble this game. If a problem occurs,
press the reset button. If problems continue, remove
and replace the batteries – or try new batteries. If problems persist, consult your warranty card for replacement instructions.
Use only the batteries that are recommended for this
game.
Do not mix old and new batteries.
Do not use rechargeable batteries.
Do not mix alkaline, standard (carbon-zinc) or rechargeable (nickel-cadmium) batteries.
Do not attempt to recharge non-rechargeable batteries.
Remove worn out batteries from the game.
The supply terminals are not to be short-circuited.
Batteries must be inserted with terminals matched up to
the correct polarity game contacts.
Keep this manual because it contains important
information.
RADICA: ®
© 1999 RADICA CHINA LTD.
PRODUCT SHAPE™
PATENTS PENDING
ALL RIGHTS RESERVED
NASCAR IS A REGISTERED TRADEMARK OF
NASCAR USED UNDER LISCENSE BY RADICA®