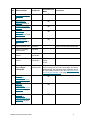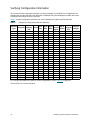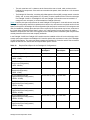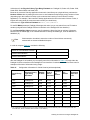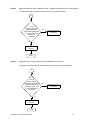
1
® ADIC Pathlight VX Site Preparation Guide ADVANCED DIGITAL INFORMATION CORPORATION www.adic.com Copyright © 2003-2006 ADIC The information contained in this document is subject to change without notice. This document contains proprietary information which is protected by copyright. All rights are reserved. No part of this document may be reproduced, modified, distributed, or translated to another language without prior written consent of ADIC. ADIC USA 11431 Willows Road NE Redmond, Washington 98052-4952 Tel.: 1-800-336-1233 Fax: 1-425-881-2296 This document may describe designs for which patents are pending, or have been granted. By publishing this information, ADIC conveys no license under any patent or any other right. ADIC shall not be liable for errors contained herein or for incidental or consequential damages (including lost profits) in connection with the furnishing, performance or use of this material whether based on warranty, contract, or other legal theory. ADIC makes no representation or warranty with respect to the contents of this document and specifically disclaims any implied warranties of merchantability or fitness for any particular purpose. Further, ADIC reserves the right to revise or change this document without obligation on the part of ADIC to notify any person or organization of such revision or change. Every effort has been made to acknowledge trademarks and their owners. All trademarks within this document are the property of their respective owners. Trademarked names are used solely for identification or exemplary purposes, and any omissions are unintentional. ADIC is a registered trademark of Advanced Digital Information Corporation. Published: March 2006 Document Number: 6-01256-07 Rev A Contents 1 About This Guide and Pathlight VX 1 Product Safety Statements . . . . . . . . . . . . . . . . . . . . . . . . . . . . . . . . . . . . . . . . . . . . . . . . . . . . . . . . . . . Precautions . . . . . . . . . . . . . . . . . . . . . . . . . . . . . . . . . . . . . . . . . . . . . . . . . . . . . . . . . . . . . . . . . . . . . . . Servicing the System . . . . . . . . . . . . . . . . . . . . . . . . . . . . . . . . . . . . . . . . . . . . . . . . . . . . . . . . . . . . . System Placement and Exposure . . . . . . . . . . . . . . . . . . . . . . . . . . . . . . . . . . . . . . . . . . . . . . . . . . . Grounding . . . . . . . . . . . . . . . . . . . . . . . . . . . . . . . . . . . . . . . . . . . . . . . . . . . . . . . . . . . . . . . . . . . . . Ventilation . . . . . . . . . . . . . . . . . . . . . . . . . . . . . . . . . . . . . . . . . . . . . . . . . . . . . . . . . . . . . . . . . . . . . Waste Electrical and Electronic Equipment Directive . . . . . . . . . . . . . . . . . . . . . . . . . . . . . . . . . . . . . . . Product Model Number . . . . . . . . . . . . . . . . . . . . . . . . . . . . . . . . . . . . . . . . . . . . . . . . . . . . . . . . . . . . . . Explanation of Symbols and Notes . . . . . . . . . . . . . . . . . . . . . . . . . . . . . . . . . . . . . . . . . . . . . . . . . . . . . Other Documents you Might Need . . . . . . . . . . . . . . . . . . . . . . . . . . . . . . . . . . . . . . . . . . . . . . . . . . . . . Getting More Information or Help . . . . . . . . . . . . . . . . . . . . . . . . . . . . . . . . . . . . . . . . . . . . . . . . . . . . . . 2 Getting Started 1 2 2 2 2 2 2 3 3 3 3 5 Intended Audience. . . . . . . . . . . . . . . . . . . . . . . . . . . . . . . . . . . . . . . . . . . . . . . . . . . . . . . . . . . . . . . . . . 5 How This Book is Organized . . . . . . . . . . . . . . . . . . . . . . . . . . . . . . . . . . . . . . . . . . . . . . . . . . . . . . . . . . 5 Pre-Installation Checklist . . . . . . . . . . . . . . . . . . . . . . . . . . . . . . . . . . . . . . . . . . . . . . . . . . . . . . . . . . . . . 7 3 Gathering Systems Assurance Information 13 Verifying Configuration Information . . . . . . . . . . . . . . . . . . . . . . . . . . . . . . . . . . . . . . . . . . . . . . . . . . . . Site Readiness Checklist. . . . . . . . . . . . . . . . . . . . . . . . . . . . . . . . . . . . . . . . . . . . . . . . . . . . . . . . . . . . Customer Ecosystem Checklist . . . . . . . . . . . . . . . . . . . . . . . . . . . . . . . . . . . . . . . . . . . . . . . . . . . . Verifying Site Requirements . . . . . . . . . . . . . . . . . . . . . . . . . . . . . . . . . . . . . . . . . . . . . . . . . . . . . . . . . Verifying Environmental Requirements . . . . . . . . . . . . . . . . . . . . . . . . . . . . . . . . . . . . . . . . . . . . . . Verifying Power Requirements . . . . . . . . . . . . . . . . . . . . . . . . . . . . . . . . . . . . . . . . . . . . . . . . . . . . Verifying Power Connections and Rack Requirements . . . . . . . . . . . . . . . . . . . . . . . . . . . . . . . . . . Verifying Tool Requirements . . . . . . . . . . . . . . . . . . . . . . . . . . . . . . . . . . . . . . . . . . . . . . . . . . . . . . . . . Planning for Networking Requirements . . . . . . . . . . . . . . . . . . . . . . . . . . . . . . . . . . . . . . . . . . . . . . . . . Supported Browser Versions . . . . . . . . . . . . . . . . . . . . . . . . . . . . . . . . . . . . . . . . . . . . . . . . . . . . . . Planning System Notifications . . . . . . . . . . . . . . . . . . . . . . . . . . . . . . . . . . . . . . . . . . . . . . . . . . . . . . . . 14 16 17 17 17 18 19 23 24 24 25 4 Planning to Install and Configure Pathlight VX 27 Planning for Pathlight VX Installation and Configuration . . . . . . . . . . . . . . . . . . . . . . . . . . . . . . . . . . . . 27 Pathlight VX Site Preparation Guide iii Installation, Configuration, and Integration Requirements. . . . . . . . . . . . . . . . . . . . . . . . . . . . . . . . Gathering Configuration Information for Virtual Libraries . . . . . . . . . . . . . . . . . . . . . . . . . . . . . . . . Pathlight VX Advanced Features. . . . . . . . . . . . . . . . . . . . . . . . . . . . . . . . . . . . . . . . . . . . . . . . . . . . . . Preparing for Early Tape Creation Settings . . . . . . . . . . . . . . . . . . . . . . . . . . . . . . . . . . . . . . . . . . . Preparing for Storage Policy Settings . . . . . . . . . . . . . . . . . . . . . . . . . . . . . . . . . . . . . . . . . . . . . . . Preparing for Physical Exports and Virtual Imports . . . . . . . . . . . . . . . . . . . . . . . . . . . . . . . . . . . . . 28 29 41 42 42 44 5 Planning to Configure Physical Libraries and Remotely Manage the Pathlight VX 45 Planning for Physical Library Configuration and Pathlight VX Remote Management . . . . . . . . . . . . . . Pathlight VX Connectivity to an External Aggregation Device. . . . . . . . . . . . . . . . . . . . . . . . . . . . . Pathlight VX Connectivity to Physical Libraries . . . . . . . . . . . . . . . . . . . . . . . . . . . . . . . . . . . . . . . . Pathlight VX and Physical Library Remote Management . . . . . . . . . . . . . . . . . . . . . . . . . . . . . . . . Pathlight VX Physical Library Partitioning Details . . . . . . . . . . . . . . . . . . . . . . . . . . . . . . . . . . . . . . Physical Library eVPS LUN Mapping for Libraries with a SNC . . . . . . . . . . . . . . . . . . . . . . . . . . . . Physical Library eVPS LUN Mapping for Libraries with IOBs . . . . . . . . . . . . . . . . . . . . . . . . . . . . . Physical Library LUN Mapping for Libraries that Use Tape Drive Connections . . . . . . . . . . . . . . . 45 46 50 52 52 53 55 57 A Glossary 59 B Index 65 iv Contents About This Guide and Pathlight VX This guide contains information and instructions necessary to prepare a customer site for installation of a Pathlight VX-450 or Pathlight VX-650. The Pathlight VX-450 uses AX100SC enclosures as the RAID component, while the Pathlight VX-650 uses CX300 enclosures as the RAID. All of the information referred to in this guide should be documented in the PVX Site Preparation Worksheet. This is a tool intended for Pre-Sales Engineers, Key Account Program Managers (KAPM), and Installing SEs to gather the information collected during site planning and preparation. A blank template can be found at this location: • https://csweb01hq.adic.com/manuals/pvx_man/PVX_Site_Preparation_Worksheet.xls Upon completion of each section, the worksheet should be sent to the Installation Coordinator at [email protected]. A master copy will then be stored on CS Web for other ADIC TMs who are involved with the site preparation and installation. The completed information is stored by customer, location, and serial number on an internal file server. Note Be sure to read all operating instructions in this manual and in the System, Safety, and Regulatory Information Guide (part no. 6-00618-03) before operating this product. Product Safety Statements Pathlight VX is designed for advanced backup and restore from disk. Any other application is not considered the intended use. ADIC will not be held liable for damage arising from unauthorized use of the product. The user assumes all risk in this aspect. This unit is engineered and manufactured to meet all safety and regulatory requirements. Be aware that improper use may result in bodily injury, damage to the equipment, or interference with other equipment. WARNING BEFORE STARTING UP OR USING THIS EQUIPMENT, READ THE SYSTEM, SAFETY, AND REGULATORY INFORMATION GUIDE. KEEP THE GUIDE FOR FUTURE REFERENCE. Pathlight VX Site Preparation Guide 1 Precautions To ensure system safeguards are met, observe the rules presented in this section. Servicing the System • Read and follow all instructions in the order presented. • Follow all warnings that appear on the Pathlight VX and in the supporting documents. • Remove rings, watches, or other jewelry and neckties before you begin any procedures. • Use caution near any moving part and any part that may start unexpectedly such as fans, motors, solenoids, and so on. • Always use the correct tools for the job. • Always use the correct replacement parts. • Keep all paperwork, including incident reports, up to date, accurate, and complete. System Placement and Exposure • Do not store the system in temperatures less than 15°C (59°F) or greater than 32°C (90°F). • Situate the system away from heat sources such as radiators, heat registers, or furnaces. • Do not install hardware components, specifically, disk processor enclosures (DPEs), disk array enclosures (DAEs), and AX100SC enclosures at the top of a rack if the bottom of the rack is empty. Doing so can cause the rack to become unstable and tip over. Grounding Ground circuit continuity is vital for safe operation of the system. Never operate the system with grounding conductors disconnected. Remember to reconnect any grounding conductors removed for or during any servicing procedure. Ventilation Install product components so that the location or position provides adequate top and bottom ventilation. Waste Electrical and Electronic Equipment Directive This product contains materials that are recyclable under the Waste Electrical and Electronic Equipment (WEEE) directive of the European Union. This product should not be disposed of as unsorted municipal waste. Information about ADIC’s WEEE program may be found at weee.adic.com. 2 About This Guide and Pathlight VX Product Model Number The Pathlight VX model numbers are the Pathlight VX-450 and the Pathlight VX-650. Explanation of Symbols and Notes The following symbols appear throughout this document to highlight important information. WARNING INDICATES A POTENTIALLY HAZARDOUS SITUATION WHICH, IF NOT AVOIDED, COULD RESULT IN DEATH OR BODILY INJURY. CAUTION Indicates a situation that may cause possible damage to equipment, loss of data, or interference with other equipment. Note Indicates important information that helps you make better use of your system. Other Documents you Might Need The following documents are also available for the Pathlight VX. These documents can be found on the Product Documentation CD shipped with each Pathlight VX system and at www.adic.com/manuals: • Pathlight VX User Guide (part number 6-00020-03) Note Release Notes are also available for the Pathlight VX. The Release Notes describe changes to the system and software/firmware since the last release, provide compatibility information, and known issues and workarounds. The Release Notes are provided with the Pathlight VX and describe resolved issues at www.adic.com/manuals. Getting More Information or Help iSurety™, ADIC's comprehensive service approach, leverages advanced data access and diagnostics technologies with cross-environment, multi-vendor expertise to resolve backup issues faster and at lower cost. Accelerate service issue resolution with these exclusive ADIC iSurety services: • Customer Service Center Website - Register products, license software, browse Educational Service courses, check backup software and operating system support, and locate manuals, FAQs, firmware downloads, product updates and more in one convenient location. Benefit today at www.adic.com/csc. • Online Service Requests - Submit online service requests, update contact information, add attachments, and receive status updates via e-mail. Online Service accounts are free from ADIC. That account can also be used to access ADIC's KnowledgeBase, a comprehensive repository of product support information. Sign up today at www.adic.com/onlinesr. Pathlight VX Site Preparation Guide 3 • iLink - Securely links ADIC hardware and the diagnostic data from the surrounding storage ecosystem to ADIC's Global Services Team for faster, more precise root cause diagnosis. iLink is simple to set up through the internet and provides secure, two-way communications with ADIC's Secure Service Center. More iLink information can be found at www.adic.com/ilink or e-mail the iLink team at [email protected]. iLink is currently available with ADIC's Scalar i500, Scalar 1000, Scalar i2000, Scalar 10K, and Pathlight VX disk-based backup solutions. • Product Support Updates - ADIC provides e-mail notifications of new information or upgrades that can improve product function and reduce service activities. You select the products and types of updates you wish to receive. Sign up today at www.adic.com/ProductUpdates. For further assistance, or if training is desired, contact ADIC: 4 ADIC Technical Assistance Center in the USA: 800-827-3822 ADIC Technical Assistance Center in Europe: 00800 9999 3822 For worldwide support telephone numbers: www.adic.com/techsup About This Guide and Pathlight VX Getting Started This guide contains information and instructions necessary to prepare a customer site for installation of a Pathlight VX-450 or Pathlight-VX-650. All references to Pathlight VX apply to both models. All of the information referred to in this guide should be documented in the PVX Site Preparation Worksheet. This is a tool intended for Pre-Sales Engineers, Key Account Program Managers (KAPMs), and Installing SEs to gather the information collected during site planning and preparation. A blank template can be found at this location: • https://csweb01hq.adic.com/manuals/pvx_man/PVX_Site_Preparation_Worksheet.xls Upon completion of each section, the worksheet should be sent to the Installation Coordinator at [email protected]. A master copy will then be stored on CS Web for other ADIC TMs who are involved with the site preparation and installation. The completed information is stored by customer, location, and serial number on an internal file server. Intended Audience This book is intended for ADIC-trained individuals who install and configure the Pathlight VX. Additionally, Pre-Sales Engineers who visit the installation site to help the customer prepare for the installation and system engineers (SEs) who install the Pathlight VX should consult this material. For particular installations, this guide may also be helpful to KAPMs. How This Book is Organized This book is organized as follows: • Chapter 1, About This Guide and Pathlight VX on page 1. This chapter provides information on this book’s purpose, symbols, and product safety statements. It also explains how to obtain product assistance from ADIC. • Chapter 2, Getting Started. This chapter provides information on this book’s intended audience, organization, associated documents, and a general checklist of tasks necessary to thoroughly plan a Pathlight VX installation. • Chapter 3, Gathering Systems Assurance Information on page 13. This chapter specifies system assurance requirements (environmental, power, rack, tool, and networking pre-requisites) that must be met to successfully install a Pathlight VX at the customer site. A Pre-Sales Engineer and, in some cases, a KAPM, should verify that the necessary systems assurance information has been gathered and the installation requirements have been met. Pathlight VX Site Preparation Guide 5 6 • Chapter 4, Planning to Install and Configure Pathlight VX on page 27. This chapter specifies pre-installation information that must be determined and recorded. This section contains installation recommendations on issues particular to each installation site, including virtual configuration capacity, Pathlight VX connectivity to the customer’s network, and remote management of the Pathlight VX. This information can be gathered by either a Pre-Sales Engineer, Systems Engineer (SE), or a KAPM at the customer site. • Chapter 5, Planning to Configure Physical Libraries and Remotely Manage the Pathlight VX on page 45. This chapter provides information necessary to configure one or more physical (tape) libraries attached to the Pathlight VX, determine when an aggregation device is required, and remotely manage the Pathlight VX. Prior to the Pathlight VX installation, this information can be gathered by a SE and KAPM at the customer site. Getting Started Pre-Installation Checklist Use Table 1 to verify that you have the names of all the people you might need to contact and to track high-level milestones in the preparation and installation process. Note While specific installation tasks may differ for a pre-racked Pathlight VX and an unracked Pathlight VX, in general, the following tasks must be completed for any Pathlight VX installation. Do not check these tasks as complete until the related checklists and forms have been filled in throughout the rest of this guide. Table 1 Contact Information Information and Instructions Notes Step Milestone/Name Task Owner 1 ADIC Pre-Sales Contact Pre-Sales Name: Phone: E-mail: 2 ADIC Sales Contact Pre-Sales Name: Phone: E-mail: 3 KAPM (if assigned) Pre-Sales Name: Phone: E-mail: 4 Customer Name Pre-Sales 5 Customer Contact Pre-Sales Name: Phone: E-mail: 6 Alternate Customer Contact Pre-Sales Name: Phone: E-mail: 7 Delivery Contact Pre-Sales Name: Phone: E-mail: 8 Identification of Delivery Restrictions Pre-Sales 9 Post-Install Technical Contact Pre-Sales 10 Post-Install Special Instructions Pre-Sales Pathlight VX Site Preparation Guide The name of the company. The name of the customer contact for shipment-related information. Name: Phone: E-mail: Specify the nature of the delivery restrictions in Table 5 on page 16. The name of the customer contact for service-related issues after the installation is complete. Determine whether there are special instructions for contacting the customer for service-related issues after the install is complete. These instructions also need to be communicated to EMC when the account is opened. 7 Information and Instructions Notes Step Milestone/Name Task Owner 11 Partner Name Pre-Sales 12 Partner Contact Pre-Sales 13 Sizing Tool Worksheet Complete Pre-Sales A Pre-Sales tool used to ensure that ADIC is providing the correct product configuration to the customer. This worksheet can also be used to discuss sizing requirements directly with the customer. 14 Visio diagrams complete Pre-Sales The diagrams provide an overview of the customer’s environment and define how the system is to be cabled. 15 Verify Certification and Compatibility Pre-Sales 16 PVX Compatibility Guide [email protected] (Interoperability Evaluation Team) See CS Web for the internally-tested matrix: https://csweb01hq.adic.com/downloa ds/doc_frm/CompatibilityTestMatrix.x ls 17 Pathlight VX Partner Certification [email protected] (Technical Alliance Managers) Use this path for additional links to partner Web pages for partnerspecific compatibility information: http://www.adic.com/adicCorporateS hell.jsp?Page=corporatePartnerMatri x 18 Pathlight VX Installation Records Consult this information to determine whether similar environments have been installed. Refer to the Install Tracking spreadsheet on the public file server. 19 Pre-Order Review Complete Contact Service Program Management E-mail Jim Hibbard The Pre-Order Review is a verification step in the event that the compatibility information for the customer’s configuration does not appear on the Compatibility Guide (which means the customer’s specific configuration has not been tested). 20 Systems Assurance Information Complete Pre-Sales 8 Name: Phone: E-mail: Perform the following steps to ensure the customer’s environment is certified and compatible with Pathlight VX Review the following worksheets and verify that all requirements have been met. These tasks are usually performaned with the customer at the installation site. See Gathering Systems Assurance Information on page 13. Getting Started Step Milestone/Name Task Owner Information and Instructions Notes 21 Verifying Configuration Information on page 14 22 Site Readiness Checklist on page 16 23 Customer Ecosystem Checklist on page 17 24 Planning for Networking Requirements on page 24 25 Planning System Notifications on page 25 26 Proposed Install Date Pre-Sales 27 Customer Purchase Order Number Pre-Sales 28 ADIC Sales Order Number Install Coordinator 29 ADIC Install SE Contact Install Coordinator Name: Phone: E-mail: 30 Planning to Install and Configure Pathlight VX Pre-Sales and Installing SEs Review the following worksheets and verify that all requirements have been met. These tasks are usually performed with the cuctsomer at the installation site or on a pre-install conference call. See Planning to Install and Configure Pathlight VX on page 27. 31 Gathering Configuration Information for Virtual Libraries on page 29 32 Gathering Configuration Information for FC Port Parameters on page 31 33 Gathering Configuration Information for FC Port Parameters on page 31 Pathlight VX Site Preparation Guide Customer’s anticipated install date. 9 Information and Instructions Notes Step Milestone/Name Task Owner 34 Gathering Configuration Information for FC Host Parameters on page 32 Alternate FC Host Configuration table on page 35 35 Gathering Configuration Information for Virtual and Physical Media on page 38 36 Pathlight VX Advanced Features on page 41 37 Customer Pre-Install Meeting Date Install Coordinator or KAPM Prior to installation, it is recommended to schedule a conference call with the customer, Pre-Sales SE, Installing SE, Install Coordinator, and KAPM (if assigned) to verify all of the site preparation information is discussed. 38 Primary Installation Contact Install Coordinator Indicates whether the customer or business partner should be contacted for all installation communication. 39 Installing SE Planning to and Pre-Sales Configure Physical Libraries and Remote Management Complete 40 Pathlight VX Connectivity to an External Aggregation Device on page 46 41 Pathlight VX Connectivity to Physical Libraries on page 50 42 Pathlight VX and Physical Library Remote Management on page 52 43 Pathlight VX Physical Library Partitioning Details on page 52 10 Review the following worksheets and verify that all requirements have been met. These tasks are usually performed with the customer at the installation site or on a pre-install conference call. See Planning to Configure Physical Libraries and Remotely Manage the Pathlight VX on page 45. Getting Started Step Milestone/Name Task Owner Information and Instructions Notes 44 Physical Library eVPS LUN Mapping for Libraries with a SNC on page 53 45 Physical Library eVPS LUN Mapping for Libraries with IOBs on page 55 46 Send all Pre-Sales documentation to the E-mail Install Install Coordinator Coordinator 47 Install SR Number Install Coordinator 48 EMC Contact Install Coordinator 49 EMC Entitlement Complete Install Coordinator 50 Actual Install Date Complete Installing SE 51 Successful Install Installing SE Please indicate if it was a successful Install, and if not please describe what issues impacted the install. 52 Test Backup Performed Installing SE Please indicate if you were able to run a backup in the customer's environment to verify the entire configuration. If not, please indicate any remaining open items to complete the backup environment. Pathlight VX Site Preparation Guide Upon completion of each section, the worksheet should be sent to the Installation Coordinator at [email protected]. A master copy will then be stored on CS Web for other ADIC TMs who are involved with the site preparation and installation. The completed information is stored by customer, location, and serial number on an internal file server. All preceding information must be available in order to create the Install SR. Name: Phone: E-mail: The process performed by ADIC staff that ensures the system is registered for service and support from EMC. The worksheet collects information such as site contact information, DPE serial numbers, IP addresses, modem (Y/N), and the start date for the service contract. Date: Hours: Trips: Date the Install was completed, Hours spent onsite performing the install and number of trips required. 11 Information and Instructions Notes Step Milestone/Name Task Owner 53 Run Book Complete Installing SE The Run Book consists of the Sizing Tool Worksheet, the Visio diagrams, the Statement of Work, and the Site Preparation Worksheet. The Run Book provides a record of how the system was configured at the initial installation, and is provided to the customer. 54 Knowledge Transfer Complete Installing SE Review Knowledge Transfer Checklist with customer prior to leaving site. Refer to: • https://csweb01hq.adic.com/training /6103%20PVX%20Onsite.zip 55 Send all Post Install Documentation to the Install Coordinator E-mail Install Coordinator Upon completion of installation, the Worksheet, updated Visio, and a Pathlight VX Capture State should be sent to the Installation Coordinator at [email protected]. Master copies will then be stored on CS Web for future reference. The remainder of this guide contains detailed, task-specific checklists to help the Pre-Sales Engineer and SE (either a Professional Services Systems Engineer or a Customer Support Engineer) determine that all required information, tools, and equipment are available for the installation. 12 Getting Started Gathering Systems Assurance Information This chapter specifies systems assurance information that must be gathered before the Pathlight VX is installed. Systems assurance information includes environment, power, rack, tool, and networking requirements that must be met to successfully install a Pathlight VX at the customer site. Either the PreSales Engineer or the Key Account Program Manager (KAPM) should gather this information and verify that the requirements have been met when surveying the customer site. This chapter consists of the following sections: • Verifying Configuration Information on page 14 • Site Readiness Checklist on page 16 • Verifying Tool Requirements on page 23 • Planning for Networking Requirements on page 24 Pathlight VX Site Preparation Guide 13 Verifying Configuration Information This section provides component information for various Pathlight VX configurations. Configurations are available that use either 500 GB or 320 GB disks, but Pathlight VX systems shipped from ADIC will consist of disks that are entirely one size or the other. Table 2 provides configuration information for various Pathlight VX systems with 500 GB disks. Table 2 Pathlight VX Configurations with 500 GB Disks Licensed DET Usable Product SFP Qty of Qty of Qty of Enable Capacity Controller Capacity Switch Type Qty DPE DAE Blades (TB) Option (TB) CX300 CX300 CX300 CX300 CX300 CX300 CX300 CX300 CX300 CX300 CX300 CX300 CX300 CX300 CX300 CX300 CX300 CX300 CX300 CX300 CX300 CX300 CX300 CX300 Entry Entry Standard High Perf High Perf High Perf High Perf High Perf High Perf High Perf High Perf High Perf High Perf High Perf High Perf High Perf High Perf High Perf High Perf High Perf High Perf High Perf High Perf High Perf 6 12 18 13 18 24 30 36 19 25 31 36 42 48 54 25 31 37 43 49 54 60 66 72 No No No Yes Yes Yes Yes Yes Yes Yes Yes Yes Yes Yes Yes Yes Yes Yes Yes Yes Yes Yes Yes Yes 0 0 0 12 12 12 12 12 14 14 14 14 14 14 14 16 16 16 16 16 16 16 16 16 1 1 1 2 2 2 2 2 3 3 3 3 3 3 3 4 4 4 4 4 4 4 4 4 1 2 3 2 3 4 5 6 3 4 5 6 7 8 9 4 5 6 7 8 9 10 11 12 Yes Yes Yes Yes Yes Yes Yes Yes Yes Yes Yes Yes Yes Yes Yes Yes Yes Yes Yes Yes Yes Yes Yes Yes 1 1 2 2 2 2 2 2 2 2 2 2 2 2 2 2 2 2 2 2 2 2 2 2 5.9 11.8 17.7 12.0 17.9 23.8 29.8 35.7 18.2 24.1 30.0 35.9 41.8 47.7 53.6 24.4 30.3 36.2 42.1 48.0 53.9 59.8 65.7 71.6 Racked Weight 850 934 1023 1061 1145 1229 1313 1397 1239 1323 1407 1491 1575 1659 2357 1418 1502 1586 2284 2368 2452 2536 2620 2704 For LTO tape information as it relates to various configurations, refer to Table 20 on page 28. Contact ATAC for License information. 14 Gathering Systems Assurance Information Table 3 provides configuration information for various Pathlight VX systems with 320 GB disks. Table 3 Pathlight VX Configurations with 320 GB Disks Licensed DET Usable Product SFP Qty of Qty of Qty of Enable Capacity Controller Capacity Switch Type Qty DPE DAE Blades (TB) Option (TB) AX100 CX300 CX300 CX300 CX300 CX300 CX300 CX300 CX300 CX300 CX300 CX300 CX300 CX300 CX300 CX300 CX300 CX300 CX300 CX300 CX300 CX300 CX300 CX300 CX300 Entry Entry Entry Standard High Perf High Perf High Perf High Perf High Perf High Perf High Perf High Perf High Perf High Perf High Perf High Perf High Perf High Perf High Perf High Perf High Perf High Perf High Perf High Perf High Perf 5 4 8 12 8 12 16 20 24 13 16 20 24 28 32 36 17 20 24 28 32 36 40 43 47 No No No No Yes Yes Yes Yes Yes Yes Yes Yes Yes Yes Yes Yes Yes Yes Yes Yes Yes Yes Yes Yes Yes 0 0 0 0 12 12 12 12 12 14 14 14 14 14 14 14 16 16 16 16 16 16 16 16 16 2 1 1 1 2 2 2 2 2 3 3 3 3 3 3 3 4 4 4 4 4 4 4 4 4 0 1 2 3 2 3 4 5 6 3 4 5 6 7 8 9 4 5 6 7 8 9 10 11 12 No Yes Yes Yes Yes Yes Yes Yes Yes Yes Yes Yes Yes Yes Yes Yes Yes Yes Yes Yes Yes Yes Yes Yes Yes 1 1 1 2 2 2 2 2 2 2 2 2 2 2 2 2 2 2 2 2 2 2 2 2 2 Racked Weight 4.2 3.8 7.7 11.5 7.9 11.8 15.6 19.4 23.2 12.0 15.9 19.7 23.5 27.4 31.2 35.0 16.2 20.0 23.8 27.6 31.5 35.3 39.1 42.9 46.8 850 850 934 1023 1061 1145 1229 1313 1397 1239 1323 1407 1491 1575 1659 2357 1418 1502 1586 2284 2368 2452 2536 2620 2704 Use Table 4 to record the firmware and flare code information for hardware upgrades that include a DPE: Table 4 Firmware and Flare Code Compatibility System Serial Number being upgraded: Installed Pathlight VX FW: New Pathlight VX FW: Installed EMC Flare Code: New EMC Flare Code: • Are Pathlight VX and EMC Flare levels compatible? • Does EMC need to be dispatched to upgrade the Flare? To verify compatibility, refer to: https://csweb01hq.adic.com/downloads/pvx_frm.htm Pathlight VX Site Preparation Guide 15 Site Readiness Checklist Table 5 lists tasks that must be completed to prepare the customer site for the Pathlight VX installation. Best practice is to verify that these things are available before the Installation Engineer appears on site. Table 5 Site Readiness Checklist Readiness Question Are the environmental requirements met and ready for the installation? Refer to Verifying Environmental Requirements on page 17. Are the power requirements met and ready for the installation? Refer to Verifying Power Requirements on page 18. Are the rack requirements met and ready for the installation? Refer to Verifying Power Connections and Rack Requirements on page 19. Are the network requirements met and ready for the installation? Refer to Planning for Networking Requirements on page 24. Is the browser used supported by Pathlight VX? Refer to Supported Browser Versions on page 24. Is the installation location within a 100 mile radius of an EMC Service Center? Refer to the PVX Service Plan document at this location: https//csweb01hq.adic.com/manuals/ pvx_man.htm. Are the weight and spacing requirements met and ready for the installation? Are there any special shipping instructions? For example, does an ADIC engineer need to be scheduled for delivery of the unit (the library will not fit through a door while it is in the crate, there is no loading dock, there is no room to store the unit until it can be uncrated, etc.). Record special shipping instructions: 16 Gathering Systems Assurance Information Customer Ecosystem Checklist Table 6 lists questions that help verify that the customer’s ecosystem is ready for the installation. Table 6 Customer Ecosystem Checklist Readiness Question Has the customer disabled Test Unit Ready (TUR) Requests on Windows 2000 and Windows Server 2003 Systems [required]? Refer to “Configuring the Pathlight VX” in the Pathlight VX Installation Guide. Also consult this bulletin: https://csweb01hq.adic.com/ bulletins/pvx_bul/60025.pdf Are Single Initiator Zoning practices implemented [best practice]? Is HBA Persistent Binding enabled [best practice]? Have you verified that disks are dedicated to a single HBA, and tapes are likewise dedicated to a single HBA (there is no concurrent disk and tape on a single HBA) [best practice]? Refer to https://csweb01hq.adic.com/bulletins/misc_bul/Info3.htm Can the customer allow iLink outbound connectivity? Refer to: http://www2.adic.com/ilink/ Specify the customer-preferred Remote Connectivity Option: Webex or Modem. Pathlight VX customers have the option of allowing either Webex or a modem for ADIC to remotely connect to the Pathlight VX head and EMC to remotely connect to the Navisphere host. The preferred method for connectivity is Webex. If the customer chooses the modem option, EMC will need to be directed to configure the modem at time of the PVX/EMC disk subsystem installation. If neither of these options is acceptable to the customer, a Service Uplift fee will be required. Verifying Site Requirements This section lists requirements for the Pathlight VX installation site, including environmental, power, rack, tool, and local area network (LAN) connection pre-requisites. Verifying Environmental Requirements This section lists the operating and non-operating temperature ranges for the Pathlight VX. Table 7 lists temperature and humidity requirements for the installation site. Table 7 Temperature and Humidity Requirements for the Installation Site Operating State Temperature Humidity Altitude Operating 15 to 32°C (59 to 90°F) 20 to 80% non-condensing –60.96 to 3,048 m (-200 to 10,000 ft.) Non-operating –40 to 70°C (–40 to 158°F) 10 to 90% non-condensing –60.96 to 12,192 m (–200 to 40,000 ft.) Pathlight VX Site Preparation Guide 17 Verifying Power Requirements This section provides the power requirements for the Pathlight VX. Table 8 lists power requirements for the installation site. Table 8 Power Requirements for the Installation Site Power Requirement Volts AC 100-240 VAC +/- 10%a (50-60 Hz) Amps 36 Amps maximum @ 100 VACb Pre-racked Pathlight VX Power Requirements 2 NEMA L6-30 connectors a. b. The Volts AC requirement is 240 VAC in Australia. The Amps requirement is for the 11.5 TB Standard Configuration. Entry-Level Configurations will generate fewer Amps and High-Performance Configurations will generate more Amps. Table 9 lists the power consumption of the Pathlight VX components. Table 9 Power Consumption of Pathlight VX Components Component Power Consumption in Watts Amperage @ 110 VAC SNC 176 watts 1.6A FC switch 170 watts 1.54A ~ 300 watts ~ 2.7A AX100SCa 250 watts ~ 2.8A DPEb 578 watts 5.4A DAEc 294 watts 2.71A MS Pathlight VX-450 (Total) ~ 896 watts ~ 8.64A Pathlight VX-650 (Total) ~ 1518 watts ~ 13.95A a. AX100SC power consumption is doubled in the 4.2 TB Pathlight VX-450 because this configuration contains 2 AX100SC enclosures; 2 x 250 watts (500 watts total). b. Power consumption is greater in a High-Performance Configuration with more DPEs. For example, the 24.1 TB High Performance configuration contains 3 DPEs, so it consumes 3 x 578 watts (1734 watts total) for the DPEs. c. Power consumption is greater in each 5.9 TB increment. For example, the 17.7 TB Standard Configuration contains 3 DAEs, so it consumes 3 x 294 watts (882 watts total) for the DAEs. 18 Gathering Systems Assurance Information Verifying Power Connections and Rack Requirements The Pathlight VX is a modular system that is mounted in a rack.1 The Pathlight VX rack must meet the following requirements. Verify Power Cord If the Pathlight VX is shipping in a rack, identify the power cord that will be used: Table 10 Power Cords for Pathlight VX Components for Racked Systems Customer Power Connection Cord Length (ft/m) Cord Gauge Max Cord Assembly Rating North America L6-30 Socket L6-30 Plug 14/4.2 3 x 10AWG 240V/30A 3-01505-07 Europe/ International L6-30 Socket 30/32A Cable Mount Plug w/ PVX Sleeve 14/4.2 3 x 12AWG 250V/30A 3-01505-06 Australia L6-30 Socket 3 Round Pins. 14/4.2 Industrial Angle Plug - IP66 3 x 12AWG 250V/30A ADIC Part Number Description 3-01505-04 PVX Rack Connection If the Pathlight VX is not shipping in a rack, identify the power cord that will be used: Table 11 Power Cords for Pathlight VX Components for Non-racked Systems ADIC Part Number Description Component Connection Customer Power Connection Cord Length (ft/m) Cord Gauge Max Cord Assembly Rating 1-01013-01 UK C13 BS1363 8.2/2.5 3 x 16AWG 250V/10A 1-01033-01 Europe C13 CEE 7/VII 8.2/2.5 3 x 16AWG 250V/10A 1-01034-01 North America C13 N5/15 7.5/2.3 3 x 18AWG 125V/10A Note Power cords for DPEs and DAEs are ordered as separate items only for nonracked systems. In racked systems, the power cords for DPEs and DAEs are included in the BOM. To review the number of power cords required for each configuration, see Table 12 on page 21. You can also use the Configurator tool during order entry to determine the number of power cords required. 1. Pathlight VX systems larger than the 35.9 TB High-Performance Configuration are installed in 2 adjacent racks. Pathlight VX Site Preparation Guide 19 Rack Dimensions The rack must be 19 inches wide and at least 30 inches deep. The rack must accommodate rail mounting lengths between 24 inches and 34 inches. rack depth - 30 inches minimum rack width - 19 inches component rail mounting length - 24 inches to 34 inches Rack Mounting Holes Additionally, the rack must have one of these types of mounting holes: • Square, unthreaded mounting holes • Round, unthreaded mounting holes • Threaded mounting holes for use with 10-32 hardware • Threaded mounting holes for use with M5 hardware Rack Space Requirements Each Pathlight VX configuration has different rack space requirements needed to install the components. • For the Pathlight VX-450, the rack height can vary, however, the rack must provide 8 contiguous rack units of space for the 4.2 TB Pathlight VX-450. • For the Pathlight VX-650, the rack must be 40 rack units high. The vertical requirements of the Pathlight VX vary from 30 contiguous rack units in the smallest configuration (3.8 TB Entry-Level Configuration) to 56 rack units in the largest system (71.6 TB High-Performance Configuration). Several rack space requirements apply to all Pathlight VX configurations. 20 Gathering Systems Assurance Information • The rack must have a 4 ft. clearance at the front and the rear to install, cable, and service the Pathlight VX components. If the rack has removable side panels, there should be a 4 ft. clearance on the sides. • The Pathlight VX Controller, consisting of the Management Server (MS), storage network controller (SNC), and, in some configurations, the FC switch, must be installed at 26-to-30 rack units height in a Pathlight VX-650. In a Pathlight VX-450, the Pathlight VX Controller must be installed in 4 contiguous rack unit space (to accommodate the Pathlight VX bezel). Table 12 lists the rack space requirements for each Pathlight VX configuration. In the left column, locate the Pathlight VX configuration that will be installed at the customer site, and reserve the required amount of rack space for the system. All Pathlight VX-650 configurations (24 total) require a minimum of 30 contiguous rack units for installation, although the actual rack units occupied by the components may be less, as shown in the “Actual Units of Required Rack Space” column. It is a best practice to keep open space for adding additional components in the event of an upgrade, and to maintain product consistency with respect to the vertical placement of the bezel and company trademark. In the Pathlight VX-650, the Pathlight VX Controller must be installed at 26-to-30 rack units height, which creates open space between the Pathlight VX Controller and the disk enclosures in many of the Pathlight VX-650 configurations. The open rack space between the Pathlight VX Controller and the disk enclosures explain the need for the “Actual Units of Required Rack Space” column. Table 12 Required Rack Space for the Pathlight VX Configurations Pathlight VX Configuration Contiguous Units of Rack Space Actual Units of Rack Space 4.2 TB Pathlight VX-450 8 rack units 8 rack units 3.8 TB or 5.9 TB Pathlight VX-650 (1 DPE: 1 DAE) 30 rack units (1 rack) 10 rack units 7 11.8 TB Pathlight VX-650 (Entry-Level Configuration) (1 DPE: 2 DAEs) 30 rack units (1 rack) 13 rack units 9 17.7 TB Pathlight VX-650 (Standard Configuration) (1 DPE: 3 DAE) 30 rack units (1 rack) 16 rack units 12 12.0 TB Pathlight VX-650 (High-Performance Configuration) (2 DPEs: 2 DAEs) 30 rack units (1 rack) 18 rack units 14 17.9 TB Pathlight VX-650 (High-Performance Configuration) (2 DPEs: 3 DAEs) 30 rack units (1 rack) 21 rack units 16 23.8 TB Pathlight VX-650 (High-Performance Configuration) (2 DPEs: 4 DAEs) 30 rack units (1 rack) 24 rack units 18 29.8 TB Pathlight VX-650 (High-Performance Configuration) (2 DPEs: 5 DAEs) 30 rack units (1 rack) 27 rack units 20 35.7 TB Pathlight VX-650 (High-Performance Configuration) (2 DPEs: 6 DAEs) 30 rack units (1 rack) 30 rack units 22 Pathlight VX Site Preparation Guide Number of Power Cords 21 Table 12 Required Rack Space for the Pathlight VX Configurations (Continued) Pathlight VX Configuration Contiguous Units of Rack Space Actual Units of Rack Space Number of Power Cords 18.2 TB Pathlight VX-650 (HighPerformance Configuration) (3 DPEs: 3 DAEs) 30 rack units (1 rack) 25 rack units 18 24.1 TB Pathlight VX-650 (High-Performance Configuration) (3 DPEs: 4 DAEs) 30 rack units (1 rack) 28 rack units 20 30.0 TB Pathlight VX-650 (High-Performance Configuration) (3 DPEs: 5 DAEs) 31 rack units (1 rack) 31 rack units 22 35.9 TB Pathlight VX-650 (High-Performance Configuration) (3 DPEs: 6 DAEs) 34 rack units (1 rack) 34 rack units 24 41.8 TB Pathlight VX-650 (High-Performance Configuration) (3 DPEs: 7 DAEs) 30 rack units (1 rack) 37 rack units 26 47.7 TB Pathlight VX-650 (High-Performance Configuration) (3 DPEs: 8 DAEs) 30 rack units (1 rack) 40 rack units 28 53.6 TB Pathlight VX-650 (High-Performance Configuration) (3 DPEs: 8 DAEs) 30 rack units (1 rack) 13 rack units (2 rack) (adjacent racks) 43 rack units 28 24.4 TB Pathlight VX-650 (High-Performance Configuration) (4 DPEs: 4 DAEs) 32 rack units (1 rack) 32 rack units 22 30.3 TB Pathlight VX-650 (High-Performance Configuration) (4 DPEs: 5 DAEs) 35 rack units (1 rack) 35 rack units 24 36.2 TB Pathlight VX-650 (High-Performance Configuration) (4 DPEs: 6 DAEs) 38 rack units (1 rack) 38 rack units 26 42.1 TB Pathlight VX-650 (High-Performance Configuration) (4 DPEs: 7 DAEs) 27 rack units (1 rack) 14 rack units (2 rack) (adjacent racks) 41 rack units 28 48.0 TB Pathlight VX-650 (High-Performance Configuration) (4 DPEs: 8 DAEs) 30 rack units (1 rack) 14 rack units (2 rack) (adjacent racks) 44 rack units 30 53.9 TB Pathlight VX-650 (High-Performance Configuration) (4 DPEs: 9 DAEs) 30 rack units (1 rack) 17 rack units (2 rack) (adjacent racks) 47 rack units 32 59.8 TB Pathlight VX-650 (High-Performance Configuration) (4 DPEs: 10 DAEs) 30 rack units (1 rack) 20 rack units (2 rack) (2adjacent racks) 50 rack units 34 22 Gathering Systems Assurance Information Table 12 Required Rack Space for the Pathlight VX Configurations (Continued) Pathlight VX Configuration Contiguous Units of Rack Space Actual Units of Rack Space Number of Power Cords 65.7 TB Pathlight VX-650 (High-Performance Configuration) (4 DPEs: 11 DAEs) 30 rack units (1 rack) 23 rack units (2 rack) (adjacent racks) 53 rack units 36 71.6 TB Pathlight VX-650 (High-Performance Configuration) (4 DPEs: 12 DAEs) 30 rack units (1 rack) 26 rack units (2 rack) (adjacent racks) 56 rack units 38 Additional Rack Requirements Verify the Pathlight VX rack meets these additional requirements: • The rack has a reliable branch circuit ground connection available to all installed equipment. Do not rely on a connection to a branch circuit, such as a power strip. • The rack is mechanically anchored to the building structure to ensure stability in the event of an earthquake. Prepare the installation site for mounting bolts to secure the stabilizer brackets to the site floor. • The rack ventilates from front to back, so adequate clearance is required to service and cool the system. Verifying Tool Requirements Table 13 lists the tools required to install the Pathlight VX. Verify that the tools will be onsite and available for the installation. Table 13 Tool Tools Required to Install the Pathlight VX Description 1 No. 1 Phillips screwdriver 2 No. 2 Phillips screwdriver 3 Large flatblade screwdriver 4 Tape measure or some type of measuring device 5 Crossover Ethernet cable 6 14-mm (9/16-inch) socket wrench 7 Adjustable wrench Note While not required, a 90° Phillips screwdriver is recommended for racks that do not have removable side panels or otherwise do not have access to the rack sides. Pathlight VX Site Preparation Guide 23 Planning for Networking Requirements At the installation site, the LAN administrator must configure the following network settings before the Pathlight VX can be connected to the customer LAN and be available for remote administration. Use Table 14 to specify network settings for the installation site. Table 14 Networking Requirements for the Installation Site Required Networking Parameters Settings MS Hostname MS IP address If installing a Pathlight VX-450: IP address for each AX100 enclosure IP of AX100SC1: If installing a Pathlight VX-650: IP address for each Storage Processor on a DPE (2 per DPE) First Controller (SP A) IP of AX100SC2: Second Controller (SP B) DPE A DPE B DPE C DPE D Default gateway IP address Subnet mask Domain name (optional) Primary DNS (optional) Supported Browser Versions The Pathlight VX Service and User Interfaces support these Internet browsers: • Internet Explorer 5.5 and later versions • Netscape 7.x Note For best results when using an Internet browser to access the Pathlight VX Service and User Interfaces, verify these settings: • JavaScript (active scripting) is enabled in the Security settings of the browser. • Pop-up blocker is disabled. • Page caching is disabled. Determining Internet Explorer Browser Version Use this procedure to determine the Internet Explorer version used by the customer. 1 On customer network where Pathlight VX will be installed, launch Internet Explorer. 2 On the menu bar, select Help→ About Internet Explorer. 24 Gathering Systems Assurance Information The About window appears. 3 Under the Internet Explorer logo, locate the version number. 4 If the version number is lower than 5.5, upgrade to version 5.5 or 6.0. Determining Netscape Navigator Browser Version Use this procedure to determine the Netscape Navigator version used by the customer. 1 On customer network where Pathlight VX will be installed, launch Netscape Navigator. 2 On the menu bar, select Help→ About Netscape. The About information appears in a Navigator window. 3 Locate the version number at the top of the page. 4 If the version number is lower than 7.0, upgrade to 7.0 or higher. Continue with Planning to Install and Configure Pathlight VX on page 27. Planning System Notifications Completing the tables in this section provides the information necessary to set up system notifications. This information should be discussed in the Pre-Sales and Pre-Installation call. Table 15 assists in gathering and recording user account information. • The Password column exists in the table only as a reminder that the GUI prompts for a password for each account that is set up. The best practice is to avoid recording account passwords anywhere except by entering them in the GUI. • Valid values for the Privilege column are Administrator or User. Table 15 Create User Accounts User Name Pathlight VX Site Preparation Guide Password Privilege 25 Table 16 is a checklist that verifies specific parameters have been set up correctly for support notification. Table 16 Notification Parameters Configuration Task Are you prepared to configure e-mail notifications? Refer to “Configuring E-mail Notifications” in the Pathlight VX Installation Guide. Are you prepared to enable Pathlight VX Notification? Refer to “Enabling the Pathlight VX Support Notification” in the Pathlight VX Installation Guide. Are you prepared to create the system notifications? Refer to “Creating a Pathlight VX System Notification” in the Pathlight VX Installation Guide. Specify the Alert Level. Alert Level High High and Medium All Are you prepared to create the user accounts? Refer to “Creating Virtual Elements and User Accounts” in the Pathlight VX Installation Guide. Will the customer enable NTP? Refer to “Setting Up the Date, Time, and NTP Server” in the Pathlight VX Installation Guide. Table 17 verifies that you are ready to configure system notifications. When enabled, a system notification sends e-mail to the designated recipient when Pathlight VX events and conditions occur that require repair or warn of an impending system failure. Table 17 System Notifications System Notification ([email protected]) E-mail Address Alert Level SMTP Address: Table 18 verifies you are ready to configure the enclosure notifications for a AX100SC disk subsystem. Setting up e-mail notification for the AX100SC enclosures is NOT the same as setting up a support or system notification for the Pathlight VX. The procedures to set up Pathlight VX support and system e-mail notifications apply to events and conditions detected on the entire system and all Pathlight VX components. See the Pathlight VX Maintenance Guide for more information. Table 18 AX100SC Enclosure Notification Enclosure Notification (AX100SC disk subsystem only) E-mail Address 26 Alert Level Enabled Y/N SMTP Address: Gathering Systems Assurance Information Planning to Install and Configure Pathlight VX This chapter contains information-gathering tasks related to installing and configuring the Pathlight VX at the customer site. The Pre-Sales Engineer and, in some cases, the Key Account Program Manager (KAPM), should use these tables to document the installation information gathered during the design phase with the customer. The information can then be available to the resources assigned to the Installation tasks so that the deployment is executed as designed. Record all requested information. For the responsibilities of ADIC personnel and sub-contractors, shipping and receiving details, and specific site installation requirements, refer to the Statement of Work (SOW). The SOW should be included in the documents provided by the Installation Coordinator as received by the PreSales Team when architecting the Pathlight VX. Planning for Pathlight VX Installation and Configuration Make sure that the tasks listed in Table 19 have been completed. Table 19 Planning for Pathlight VX Installation and Configuration Task Description Page 1 Gathering Configuration Information for Virtual Libraries. 29 2 Gathering Configuration Information for FC Port Parameters. 31 3 Gathering Configuration Information for FC Host Parameters. 32 4 Gathering Configuration Information for Virtual and Physical Media. 38 5 Review Pathlight VX Advanced Features. 41 Pathlight VX Site Preparation Guide 27 Installation, Configuration, and Integration Requirements Pathlight VX installation involves two phases: hardware installation and configuration, and integration of the Pathlight VX in the customer environment. This section provides information about Pathlight VX configurations, and specifies requirements that must be met to successfully install, configure, and integrate the Pathlight VX in the customer’s environment. Table 20 provides details on the maximum number of virtual media, drives, and libraries that are supported for each Pathlight VX configuration. Table 21 on page 30 through Table 27 on page 39 are used to gather information to configure the FC Host(s) and FC ports, configuring virtual drives, virtual libraries, and media. Table 29 on page 41 provides brief descriptions of the Pathlight VX Advanced Features (Archive, Early Tape Creation, and Storage Policies). Pathlight VX Virtual Capacity - Libraries, Drives, and Media The maximum number of virtual tapes, drives, and libraries that can be created on a Pathlight VX depend on the disk capacity of the system. If disk extension is enabled, ensure the number of virtual drives concurrently mounted will not exceed available disk space. Note Pathlight VX supports up to 32 virtual libraries and either 20 or 40 virtual drives (depending on the number of FC blades on the SNC). Pathlight VX supports only one virtual drive type per virtual library (you cannot mix virtual drive types per virtual library). Pathlight VX supports both LTO-1, LTO-2, and LTO-3 virtual media. To determine the maximum virtual capacity of the customer’s Pathlight VX, locate the ordered configuration in the first column (Pathlight VX Configuration) in Table 20. Tape counts are calculated and may differ by ±1. CAUTION Table 20 Virtual Capacity - Libraries, Drives, and Tapes Maximum Number of Virtual Librariesa Maximum Number of Virtual Drivesb Maximum Number of LTO-1 Virtual Tapesc Maximum Number of LTO-2 Virtual Tapesc Maximum Number of LTO-3 Virtual Tapesc 4.2 TB 6 20 42 21 10 3.8 TB 6 20 38 19 9 5.9 TB 6 20 59 29 14 11.8 TB 6 20 118 38 19 17.7 TB 6 40 177 88 44 12.0 TB 6 40 120 60 30 17.9 TB 6 40 179 80 40 23.8 TB 6 40 238 119 59 29.8 TB 6 40 298 149 74 35.7 TB 6 40 357 178 89 Pathlight VX Configuration 28 Planning to Install and Configure Pathlight VX Table 20 Virtual Capacity - Libraries, Drives, and Tapes (Continued) Maximum Number of Virtual Librariesa Maximum Number of Virtual Drivesb Maximum Number of LTO-1 Virtual Tapesc Maximum Number of LTO-2 Virtual Tapesc Maximum Number of LTO-3 Virtual Tapesc 18.2 TB 6 40 182 91 45 24.1 TB 6 40 241 120 60 30.0 TB 6 40 300 150 75 35.9 TB 6 40 359 179 89 41.8 TB 6 40 418 209 104 47.7 TB 6 40 477 238 119 53.6 TB 6 40 536 268 134 24.4 TB 6 40 244 122 61 30.3 TB 6 40 303 151 75 36.2 TB 6 40 362 181 90 42.1 TB 6 40 421 210 105 48.0 TB 6 40 480 240 120 53.9 TB 6 40 539 269 134 59.8 TB 6 40 598 299 149 65.7 TB 6 40 657 328 164 71.6 TB 6 40 716 358 179 Pathlight VX Configuration a. Up to 6 virtual libraries can be created in Pathlight VX without engaging the ADIC Technical Assistance Center (ATAC). To create more than 6 virtual libraries, contact ATAC. Refer to Getting More Information or Help on page 3. b. The maximum number of virtual drives spans the number of virtual libraries created. For example, a system with 40 virtual drives and 6 virtual libraries must span the 40 drives across all 6 libraries. c. If the Disk Extension (Storage Policies) Advanced Feature will be enabled on the Pathlight VX, tape capacity will be significantly increased. For more information, contact ATAC. Refer to Getting More Information or Help on page 3. Gathering Configuration Information for Virtual Libraries Pathlight VX enables virtual libraries to be created that emulate physical (tape) libraries and to enable the virtual libraries to be visible to one or more FC Hosts in the customer environment. To successfully create and configure virtual libraries on Pathlight VX, certain configuration information needs to be gathered. In Table 21 on page 30, for each virtual library to be created on the Pathlight VX, record the type of physical library it emulates, the virtual library name, the type of physical library it emulates, the number of slots available in the physical library it emulates, the number of drives available, the system name of each FC blade (on the SNC hosting the backup application), and whether extended bar codes will be used. CAUTION Switching devices across FC blades changes the device path to the virtual device and impacts the Host’s view of devices from the SAN network. Making these changes requires reconfiguration of both the FC Host(s) and the backup application. Pathlight VX Site Preparation Guide 29 Valid values for the Physical Library Type Being Emulated are: Pathlight VX, Scalar 100, Scalar 1000, Scalar i500, Scalar i2000, and Scalar 10K. Because the customer’s backup application views each virtual library as a physical library, estimate the Number of Slots value by making sure there are no slot limitations and specifying a large number of slots (depending upon the customer’s backup cycle needs and the licensing on the customer’s backup application). For example, if the customer’s backup applications license on the basis of drives or slots, it impacts how many slots the customer wants to define per virtual library. Valid values for Type of Drives Emulated are LTO-1, LTO-2, or LTO-3. For the FC Blade parameter, Pathlight VX assigns this value, but you can switch from one FC blade to another (using either the Pathlight VX Service Interface or the Pathlight VX User Interface). For the Extended Bar Codes parameter, specify whether the library(ies) has an ordinary 6-character barcode such as 000006 (N), or an extended barcode to identify the media type, such as 000006L1 or 000006L2 (Y). If disk extension is enabled, ensure the number of virtual drives concurrently mounted will not exceed available disk space. Note In order to complete Table 21, consider the following: Number of virtual libraries to create: Licensed virtual libraries: Licensed virtual drives: After the Pathlight VX is installed, you can specify most of this information in Table 21 through either the Pathlight VX Service Interface or the Pathlight VX User Interface. Consult the data in the first three rows for examples of the kind of information being sought. Table 21 Configuration Information for Virtual Libraries (with sample data) Number of Drives FC Bladea Extended Barcodes Y/N LTO-2 6 FCB1 Y 1000 LTO-3 6 FCB1 Y 1000 LTO-3 6 FCB2 Y Virtual Library Name Physical Library Type Being Emulated Number of Slots Type of Drives Emulated pvx01 Pathlight VX 1000 pvx02 Pathlight VX pvx03 Pathlight VX a. Any virtual device viewable across an FC blade is available across both FC blade FC ports on the SNC (ports FCBn-FC1 and FCBn-FC3, where n indicates either FC blade 1 or FC blade 2). 30 Planning to Install and Configure Pathlight VX Gathering Configuration Information for FC Port Parameters Once Pathlight VX is attached to the host, the FC port settings are automatically detected. At install, log into Service > Port Configuration > Configure and update Table 22 to record the settings used to define the FC port parameters of the Pathlight VX. You can configure FC ports 1, 3, and 6 on each blade. FC port 6 is reserved for connections to physical libraries, and therefore some of the options available to ports 1 and 3 are not available to port 6. See "Configuring FC Port Parameters" in the Pathlight VX Installation Guide. For the Connection Options parameter, valid values are: Loop, Point-to-Point, or Loop Preferred. General guidelines to determine the Connection Option setting include: • If you connect direct to a HBA (NL_Port), use Loop. • If you connect to a switch (N_Port), use Point to Point. • If you connect to either a host or switch, you can use Loop Preferred. However, note that this setting requires negotiation between the two connection points, which can result in varying Port Mode settings. Additional configuration information for the Connection Option setting includes: • If you specify Point-to-Point, you should be able to use the default values provided on either the Pathlight VX Service Interface or the Pathlight VX User Interface. • If port 6 on one or both FC blades is cabled to an external aggregation switch, port 6 should be set up in Point-to-Point mode. • If the specific network environment causes you to specify either Loop or Loop Preferred, determine the following values based on the customer environment. • Blade ID values are FCB1 or FCB2. • FC port values are 1, 3, or 6. • For the Loop ID parameter, valid values are: any number between 0 and 125. • For the Speed parameter, valid values are: Auto, 1 GB/sec, or 2 GB/sec. • For the Frame Size parameter, valid values are: 512, 1024, or 2048. • For the Port Mode parameter, valid values are: Target or Target & Initiator. Target mode is not available for port 6. After the Pathlight VX is installed, you can specify most of this information in the Pathlight VX Service Interface. The field names on the Pathlight VX Service Interface are identical to the headings in Table 22. Table 22 Blade ID Configuration Information for FC Port Parameters FC Port Loop ID Pathlight VX Site Preparation Guide Speed Frame Size Port Mode Connection Options 31 Gathering Configuration Information for FC Host Parameters In Table 23, record the settings used to define the FC Host parameters for each Virtual Library created in the Pathlight VX. • Virtual Library Name is the virtual library being mapped to the FC Host. • For the FC Blade for Host column, specify the FC blade that is mapped to the particular FC Host. • For a Pathlight VX-450 or a Pathlight VX-650 (Entry-Level Configuration), the valid value is: FC Blade 1. • For a Pathlight VX-650 (Standard Configuration or High-Performance Configuration), valid values are: FC Blade 1 and FC Blade 2. • For the Host Name column (the name of the FC Host), valid values are any alphanumeric characters that identify the FC Host at the customer site. • Type refers to the available Operating Systems running on the host, valid values: AIX, AS400, Gateway, Generic, HP-UX, Linux, Netware, NT, Solaris, Switch, Unisys, or unknown. • WWN represents the system-generated address of the FC Host. • Configure LUN Mapping refers to the method to map virtual libraries to the FC Hosts. This value should be the result of a discussion with the customer. The Pathlight VX allows you to either manually map each device to a LUN, or it can automatically map each device to a LUN. When automatically assigning LUNs, the Pathlight VX allows you to assign LUNs sequentially, even numbers or odd numbers only. For a Pathlight VX with a dual-FC blade configuration, ADIC recommends mapping one blade with even numbers and the other blade with odd numbers. Valid values are: Manual, Sequential, Even or Odd. Note If configuring the LUNs manually, please specify each individual device and its corresponding LUN in Table 23. • The Device column identifies the device type, where valid values are either the Pathlight VX Controller, a virtual library, or virtual drives 1 - 40. • LUN refers to a unique identification number. Specify a number for each device. Value values are integers from 0 to 127, or select None of this device should not be presented to the host. After the Pathlight VX is installed, you can specify most of this information through either the Pathlight VX Service Interface or the Pathlight VX User Interface. You can either configure or modify the Host Name and Type settings, and configure the LUN settings. The field names for the Pathlight VX Interface are identical to the headings of Table 23. Table 23 Configuration Information for FC Host Parameters Virtual Library Name 32 FC Blade Host Name Type WWN Configure LUN Mapping Device LUN Planning to Install and Configure Pathlight VX Table 23 Configuration Information for FC Host Parameters (Continued) Virtual Library Name FC Blade Host Name Pathlight VX Site Preparation Guide Type WWN Configure LUN Mapping Device LUN 33 Optionally, you can also use Table 24 on page 35 and Table 25 on page 36 to define which hosts will be configured to what virtual device LUNs and their LUN instances. You need to duplicate the information in these tables for every virtual library and its drives that are created. In Table 24 and Table 25, virtual devices are presented to each blade in an alternatively distributed, sequential order by default. For example, virtual Library Lib1 is presented as "LUN126" to Back1 from FCB1, virtual device D1 is presented as "LUN1" to Back1 from FCB1, virtual device D2 is presented as "LUN2" to Back 1 from FCB2, virtual device D3 is presesnted as "LUN3" to Back1 from FCB1, virtual device D4 is presented as "LUN4" to Back1 from FCB2, and so on. In Table 25, Back2 begins its drive assignments from virtual device D21 presented as LUN21" from FCB1 and continues with the pattern above. CAUTION 34 All mapped LUNs must be visible to FC1 and FC3 on both blades FCB1 and FCB2. There can be no channel zoning. Planning to Install and Configure Pathlight VX Pathlight VX Site Preparation Guide Table 24 Mapping Virtual Drives Lib1 to D20 (optional; with sample data) FCB1 CC Lib1 D1 LUN FCB2 CC LUN D3 D2 D5 D4 D7 D6 D9 D8 D11 D10 D13 D12 D15 D14 D17 D16 D19 D18 D20 Host Host Name WWN Back1 0 Back2 0 126 1 2 3 4 5 6 7 8 9 10 11 12 13 14 15 16 17 18 19 20 35 36 Table 25 Mapping Virtual Drives Lib21 to D39 (optional; with sample data) FCB1 CC D21 LUN FCB2 CC LUN D23 D22 D25 D24 D27 D26 D29 D28 D31 D30 D33 D32 D35 D34 D37 D36 D39 D38 D40 Host Host Name WWN Back1 0 Back2 0 21 22 23 24 25 26 27 28 29 30 31 32 33 34 35 36 37 38 39 40 Planning to Install and Configure Pathlight VX When integrating an FC device to the customer SAN, the SE must document the customer’s SAN configuration using the information provided in Table 26. The SE should then review the completed information with the ADIC Pathlight VX Compatibility Guide on CS Web, and anticipate and resolve any compatibility issues. Please contact Service Program Management for more information. • • Host Parameters: • For the Name parameter, valid values are: any alphanumeric combination allowed by the FC Host. • For the OS & Level parameter, valid values are: any valid operating system (including AIX, AS/ 400, LINUX, HP-UX, or NT), including their version and release numbers. HBA Parameters: • For the Vendor parameter, specify the vendor of the HBA used by the customer. • For the Model parameter, specify the HBA model used by the customer. • For the Driver parameter, specify the HBA driver used by the customer. • For the Version parameter, valid values are the version and release level of the HBA host. Complete Table 26 for each Virtual Library being created. Virtual Library Name: Table 26 Host and HBA Parameters (with sample data) Host HBA Virtual Host Drives Name Assigned HBA Port ID ID Server Mfg and Model OS & Level Backup App and Level Vendor Model HBA Driver HBA F/W Ver D1-D20 Back1 hba1 port1 Sun Sunfire Solaris NBU 5.1 Qlogic 9 QLA2342 IBM 4.18 D21-D40 Back2 hba1 port2 IBM Netserver WinXP NBU 5.1 Qlogic SP2 QLA2342 IBM 4.18 Pathlight VX Site Preparation Guide 37 Gathering Configuration Information for Virtual and Physical Media and gather corresponding virtual and physical media information for libraries. The information in these two tables affects sizing, and should be defined in Pre-Sales design and discussed in the Pre-Installation call. If one or more physical (tape) libraries will be connected to the Pathlight VX, then the barcode label (volser) of each physical tape volume must match the barcode label (volser) of its corresponding virtual tape (volume). If no physical library is attached to Pathlight VX, omit the physical volser range. In Table 27, record the settings for virtual media. In Table 28 on page 40, record the corresponding settings for physical media. • For the Assigned Virtual Library type parameter, define the Virtual Library Names in the Virtual Library worksheet before entering this data. • For the Virtual Media Type parameter, specify the type of tape, LTO-1, LTO-2 or LTO-3. • For the Virtual Volser Range parameter, define the barcode layout for the virtual media. For example, if the library contains 50 tapes, then the barcode range would be 000000 to 000049. The GUI will prompt you for only the Starting Barcode. Note • The Physical Volser Range parameter in Table 28 on page 40 will be a subset of the Virtual Volser Range value. For the Entry Method parameter, specify the method for the virtual media to be entered in the virtual library. Set the virtual media’s entry method to be the same as you would use for physical media in a tape library. • If you normally enter tapes through the library’s I/E station, select I/E Station. • If you have a number of media to enter and you would normally enter the media through the library’s door, select Slot. Note If Slot is selected as the entry method, the Pathlight VX’s backup application interprets this action as the physical library’s door being open, and re-inventories the library for new media. • For the Export Rule (Media Specific) parameter, specify the destination for virtual media physical counterparts when exported from the Pathlight VX. Valid values are I/E station or Library slot (offline media). The value needs to be specified for each row and entry method if different from the default export rule. • For the Creation Method parameter, specify either Create from Physical or Virtual Only, where "Create from Physical" maps to the "Creating Virtual Media - Define Unknown Media Screen" heading, and "Virtual Only" maps to the "Creating Virtual Media - Define Virtual Media Screen" heading in the Pathlight VX Installation Guide. See "Creating Virtual Media" in the Pathlight VX Installation Guide for more information on each option. Note Creating virtual from Physical can consume extended periods of time if data needs to be written to the virtual tape (virtualized). Plan accordingly. To assist in completing Table 27 and Table 28 on page 40, record the following values: Licensed Virtual Media: Default Export Rule: Total Virtual Media to Create: Available Volser Quantity: Default Media Access Rule: 38 Planning to Install and Configure Pathlight VX Table 27 Configuration Information for Virtual Media (with sample data) Assigned Virtual Library Virtual Media Type Quantity of Virtual Media (min) pvx01 LTO-2 15 pvx02 LTO-2 pvx03 LTO-2 Virtual Volser Range DVR001-DVR015 Entry Method Export Rule (Media Specific) Creation Method I/E Station N/A 217 000001L2-000217L2 After you record the configuration information for virtual media in Table 27, record the corresponding physical media information in Table 28 on page 40. Note The Assigned Virtual Library column associates the rows in Table 27 to the corresponding rows in Table 28 on page 40. • For the Physical Volser Range parameter, specify a subset of the Virtual Volser Range value in Table 27, or enter N/A if there is no corresponding physical media. • For the Assigned PVX Pool parameter, valid values are Cleaning, Internal Backup, Service, Disk Extension, or Application. • For the Assigned PVX Policy parameter, obtain the values from the Sizing Tool. You can define custom valid values for a specific host; the values can be whatever is helpful, such as Differential, Incremental, or Full. • For the Media Access Rule (Media Specific) parameter, the value is intended to indicate whether a Media Access Rule setting for a specific media ID is different than the Default Media Access Rule defined for the virtual library. Valid values include N/A, Default Media Access Rule, Scratch, Direct Access, Virtual, or Unknown. Pathlight VX Site Preparation Guide 39 40 Table 28 Configuration Information for Physical Media (with sample data) Quantity Assigned Physical of Physical Volser Physical Virtual Media Range Media Library Type (min) Assigned PVX Pool Media Access Assigned Physical Rule Notes PVX Policy Library (Media Specific) pvx01 N/A Application Incremental N/A pvx02 300 DET0001DET300 Disk Extension pvx03 217 000001L200217L2 Application Full N/A virtual media with no physical counterparts i2K01hq N/A N/A i2K01hq Default existing media in physical library Planning to Install and Configure Pathlight VX Pathlight VX Advanced Features Pathlight VX offers the following Advanced Features that can be enabled through either the Pathlight VX Service Interface or the Pathlight VX User Interface. • Archive enables you to remove physical application media from a library while retaining their virtual counterparts in a defined operation window. • Early Tape Creation enables exports of virtual media to complete faster by expediting the creation of their physical counterparts in a defined operation window. • Storage Policies enables you to use specified physical media to extend disk capacity and create multiple copies of your virtual media. Note For new installations, Archive and Early Tape Creation cannot be enabled if Storage Policies is enabled. For more information about Pathlight VX Advanced Features, refer to "Enabling Pathlight VX Advanced Features" in Chapter 9 of the Pathlight VX Installation Guide. In Table 29, specify the Advanced Features to be enabled when the Pathlight VX is installed. Once Disk Extension is enabled, it cannot be disabled. Note Table 29 Pathlight VX Advanced Features Option Will be Enabled (Y or N) Archive Early Tape Creation Storage Policies Pathlight VX Site Preparation Guide 41 Preparing for Early Tape Creation Settings Table 30 assists in gathering information for Early Tape Creation (ETC). • Maximum number of Physical Drives to use, the maximum value is equal to 1 less than the total number of physical drives. • The valid values for the Media Percentage parameter are percentages from 75 to 99. Specify the percentage at which ETC initiates for the associated media. • The Start Time and End Time values are times during which the system runs ETC, typically outside of production hours. You can configure ETC to run all day. Table 30 Early Tape Creation Settings Setting Values Maximum number of Physical Drives to use: Media Percentage: Early Tape Creation Window Start Time: _________ AM PM End Time: _________ AM PM All Day (Y/N): Preparing for Storage Policy Settings Table 31 on page 43assists in gathering information for Storage Policies. The table provides three columns in the event that up to three storage polices will be set up. If you are setting up more than three storage polices, you can duplicate this table as many times as necessary to provide for the number of policies you are setting up. • The Storage Policy Application window values for Start Time, End Time, and Days of Week values specify the times and days during which storage policies are suspended. • All Day (Y/N) means the Storage Policy should be suspended for the entire day for the specified day(s) of the week. • All means Storage Policies should be suspended every day of the week at the specified time. • Use the Storage Policy Reference fields in the table to specify the Storage Policy being defined. For example, one column might specify Oracle dbase policy, and another column might specify Exchange policy. • The Copies to Disk Extension Pool parameter refers to the number of physical copies of virtual media to be created. Multiple copies of virtual media protects against physical media failures. If multiple copies are created, each copy is created on separate physical media so the loss of one tape does not result in total data loss. Valid values are 1 through 4 (1 is the default value). Note 42 Copies generated on Disk Extension by Storage Policies can NOT be exported by Pathlight VX. Planning to Install and Configure Pathlight VX • The Minutes Before Copy parameter refers to the number of minutes that virtual media must be idle before the Pathlight VX backup application is done using it. For example, if media is used for multiple backup jobs, but it might be unloaded between jobs, then this parameter should be set to 0 minutes. If the media is usually filled during a single job, or is only used for a single job, then this parameter should be set to a low value. For virtual media that does not need to be copied to physical media (tape), check the Never Copy box. • The Never Copy (Y/N) parameter allows you to specify that you never want to make Disk Extension copies. The default value is N, which means that you do not want to enable the Never Copy setting, because you want to make Disk Extension copies. • The Virtual Media on Disk: Never Remove (Y/N) parameter allows you to specify whether data should ever be removed from the Pathlight VX disk. If data should always reside on disk, check the Never Remove box. If data should be removed from disk when the disk threshold (watermark) is reached, do not check the box. The default value is N, which means that you do not want to enable the Never Remove setting, because you want to migrate virtual tape to physical tape. Note Table 31 Data removal from disk only occurs when the disk fills to more than 85% capacity. When this internal threshold is reached, Pathlight VX clears out virtual media until the disk usage falls to less than 75% of capacity. To determine if specific virtual media is still on disk, refer to the On Disk parameter of the Detail Media Report, accessed from the Virtual Media Summary Report. Storage Policies Settings Setting Description Value Number of Storage Policies to Create Storage Policy Application Window • Start Time: _________ AM PM • End Time: _________ AM PM • All Day (Y/N) • Days of Week: S M T W T F Sa All 1 2 3 Storage Policy Reference Storage Policy Settings Copies to Disk Extension Pool: Minutes Before Copy: Never Copy (Y/N): Virtual Media on Disk: Never Remove (Y/N): Pathlight VX Site Preparation Guide 43 Preparing for Physical Exports and Virtual Imports As part of system tuning, specify the maximum number of physical exports and virtual imports. Valid values are 1 to 1 less than the total physical drives in the attached physical libraries. You specify this number through the Service login only. The default value is half the number of physical drives. Specify the maximum number of physical exports and virtual imports: _______________________ This parameter optimizes the use of physical drives between DET and Physical Export. Lessen the number to increase DET resources. Once you have completed these tasks, continue with Planning to Configure Physical Libraries and Remotely Manage the Pathlight VX on page 45. 44 Planning to Install and Configure Pathlight VX Planning to Configure Physical Libraries and Remotely Manage the Pathlight VX This section specifies information needed to configure one or more physical (tape) libraries attached to the Pathlight VX, determine when an aggregation device is required, and remotely manage the Pathlight VX. This information must be gathered before the Pathlight VX is installed. The Systems Engineer (SE) and the Key Account Program Manager (KAPM) should gather the specified information and assign tasks to installers. For more comprehensive information about attaching and configuring physical libraries, refer to "Configuring a Physical Library for Pathlight VX" in the Pathlight VX Installation Guide. Planning for Physical Library Configuration and Pathlight VX Remote Management Table 32 lists the tasks that must be completed to configure physical libraries and remotely manage the Pathlight VX. Table 32 Planning to Configure Physical Libraries and Remotely Manage the Pathlight VX Task Description Page 1 If an aggregation device will be used with Pathlight VX, record information for Pathlight VX Connectivity to an External Aggregation Device. 46 2 Record information for Pathlight VX Connectivity to Physical Libraries. 50 3 Record information for Pathlight VX and Physical Library Remote Management. 52 Pathlight VX Site Preparation Guide 45 Pathlight VX Connectivity to an External Aggregation Device Up to four physical (tape) libraries can be connected to the Pathlight VX. Depending on the library type and number of libraries attached to the Pathlight VX, the customer may need to provide an external aggregation device so the required number of port connections are available. The aggregation device must be an FC switch. ADIC recommends that a Brocade FC switch be used as an aggregation device. Although customers can use a different vendor’s FC switch for aggregation, ADIC only provides technical support for a Brocade FC switch used with the Pathlight VX. To decide whether or not a Pathlight VX installation will require an aggregation device (AD), use the plan described in Figure 1. Figure 1 Aggregation Device Decision Path: Overview Start Installing a Pathlight VX-450 or Pathlight VX-650 Entry-Level Configuration? yes Go to A Figure 2 on 47 yes Go to B Figure 3 on 47 yes Go to C Figure 4 on 48 no Installing a Pathlight VX-650 Standard Configuration? Installing a Pathlight VX-650 HighPerformance Configuration? 46 Planning to Configure Physical Libraries and Remotely Manage the Pathlight VX Figure 2 Aggregation Decision Path: Pathlight VX-450 / Pathlight VX-650 (Entry-Level Configuration) Configurations with one blade that has one FC port for physical libraries. A Can all device LUNs in all physical libraries be accessed by Pathlight VX on one FC port on the Pathlight VX FC blade? yes Aggregation device not required no Aggregation device required Finish Figure 3 Aggregation Device Path: Pathlight VX-650 (Standard Configuration) Configurations with two blades, both of which have one port for physical libraries. A Can all device LUNs in all physical libraries be completely and equally accessed by one FC port on both Pathlight VX FC blades? yes Aggregation device not required no Aggregation device required Finish Pathlight VX Site Preparation Guide 47 Figure 4 Aggregation Device Path: Pathlight VX-650 (High-Performance Configuration) Configurations that use an internal switch with three FC ports for physical libraries. A Can all device LUNs in all physical libraries be accessed on 3 or fewer FC ports on the Pathlight VX internal switch? yes Aggregation device not required no Aggregation device required Finish If the customer will use an external aggregation device with the Pathlight VX, then record information about the device in Table 33. Table 33 Aggregation Device Information Y/N Preparation Information Is an aggregation device needed for the Pathlight VX? Is an external aggregation device available at the installation site? Is the aggregation device already installed? Is the aggregation device dedicated to the Pathlight VX? Is the aggregation device a Brocade 3800 (supported model)? Will ADIC provide the aggregation switch? Do you have an aggregation switch connection diagram? 48 Planning to Configure Physical Libraries and Remotely Manage the Pathlight VX Use Table 34 to record the model and firmware information about the aggregation device. Table 34 Aggregation Device Model Information Description Model Information Aggregation Device Model: Aggregation Device Manufacturer: Aggregation Device Firmware: Follow these guidelines when connecting an aggregation device: • The aggregation device must be dedicated exclusively to a Pathlight VX physical library. The aggregation device cannot be used for Inter-Switch Link (ISL) connections to customer SANs. CAUTION • The aggregation device must be dedicated to the Pathlight VX; it cannot be used as an aggregation device for the broader fabric domain, even when the device is zoned. Any non-compliance with this guideline could result in the loss of data. If the device is zoned, the zone must allow access between Pathlight VX I/O blades, the physical library controller, and any of the respective drive resources. CAUTION If the components of the Pathlight VX cannot communicate as described in this guideline, the Pathlight VX will not function. CAUTION The aggregation device must not be connected to a Pathlight VX internal switch. • Physical drives and libraries dedicated to Pathlight VX can be attached only to internal switch ports 12, 13, 14 (not used as ISLs to aggregation switches). • Aggregation devices can connect only to the FCB1-FC6 and FCB2-FC6 ports. • Both Pathlight VX I/O blades and the Pathlight VX MS HBA must be mapped from the physical library to have access to all physical library controllers and drive LUNs. • When mapping multiple partitions from a physical library to each Pathlight VX FCB and the MS HBA, the strategy must always map the drive members after each respective partition to ensure Pathlight VX can properly associate the correct drive members to the correct physical library. Note • When you configure port 6 on the FC blade to communicate with an aggregation device, the Connection Options field must be set to Point to Point. Refer to "Configuring FC Port Parameters" in Pathlight VX Installation Guide. When Disk Extension Tape (DET) policy management is enabled, best practice is to dedicate a partition for DET media. This partition should not have more than four drives. Note Consult "Configuring a Physical Library for a Pathlight VX" in Pathlight VX Installation Guide for cabling information. Pathlight VX Site Preparation Guide 49 Pathlight VX Connectivity to Physical Libraries CAUTION Physical libraries must be operating in native mode in order to function properly with Pathlight VX. For example, a Scalar i2000 cannot be set up to emulate a Scalar 100; it must be operating as a Scalar i2000. To verify connectivity between Pathlight VX and one or more attached physical (tape) libraries, installers need information on the director/switch model and firmware, hostname, FC Host OS and level, and HBA (including driver and firmware information). Collect this information from the customer and record these values in Table 35. The SE should review the support information for both the physical library and the library drives (including firmware level for both) to verify Pathlight VX connectivity to the library and drives. CAUTION Pathlight VX does not support using mixed drive types (LTO-1, LTO-2 and LTO-3 drives) in the same physical library. • For the Physical Library Names row, enter the library or partition name. Add as many columns as are required. • For the Library Type row, reference the list of supported libraries. Table 35 Physical Library and Library Drive Information Physical Library Names: Library Type: Number of Drives: Drive Type: Physical Media Type: Additional summary information for physical library connectivity is required because there might be specific connectivity required for each physical library SNC/IOB. Use one set of Table 36 and Table 37 on page 51 for each SNC. Table 36 Physical Library’s SNC Fibre Port Configurations Description FC 1 FC 2 Loop ID: Speed: Frame Size: Port Mode: Public/Private: Connection Type: Host Type setting: 50 Planning to Configure Physical Libraries and Remotely Manage the Pathlight VX Table 37 Physical Library’s SNC SCSI Channel Parameters Description SCSI 1 SCSI 2 SCSI 3 SCSI4 Channel Zoned FC 1: x x x x Channel Zoned FC 2: x x x x Channel Mode: Initiator Initiator Initiator Initiator Initiator ID: 7 7 7 7 Bus Reset on Power up: Enable Enable Enable Enable Enable Termination: Enable Enable Enable Enable Alternate Initiator ID: Auto Auto Auto Auto Use one set of Table 38 and Table 39 for each I/O Blade. Use Table 38 to prepare to configure the ports of the physical library. Each column in the table represents an FC port on an I/O blade or SNC. The table represents a single SNC or I/O blade. There are six columns because the Scalar i2000 has 6 ports. A Scalar i2000 with 8 drives would have two I/O blades, so the table would have to be duplicated to make room to record the information for the second blade. The columns in the table represent the ports that must be communicating with the Pathlight VX. Table 38 Physical Library’s I/O Blade Fibre Port Configurations Description FC 1 FC 2 FC 3 FC 4 FC 5 FC 6 Loop ID: Speed: Frame Size: Port Mode: Public/Private: Connection Type: Table 39 Physical Library’s I/O Blade Channel Zone Configurations Description FC 3 FC 4 FC 5 FC 6 Channel Zoned FC 1: x x x x Channel Zoned FC 2: x x x x Pathlight VX Site Preparation Guide 51 Pathlight VX and Physical Library Remote Management The Pathlight VX’s connection to the customer network enables the system to be remotely configured, managed, and monitored. If Pathlight VX will be attached to one or more physical (tape) libraries, then the IP address and network information for the library and library components must be recorded (in Table 40) to be able to perform operations on the libraries. Record the requested information for each physical library that will be attached to the Pathlight VX. Table 40 Physical Library’s IP Address and Network Information Network IP Address: Gateway: Subnet Mask: Hostname: Not all libraries have both RMU and SNC components. Note Scalar 1000, i2000, and 10K libraries have an Event Notification feature that forwards information about events on the library and library’s SNC to the notification recipient. If the Pathlight VX will be attached to a Scalar 1000, i2000, or 10K library, then information about SNMP settings is required to enable the library’s Event Notification feature. Record these values in Table 41. Table 41 Physical Library’s SNMP Settings for Library E-mail Notification SNMP Server IP Address: SNMP Account: Sender E-mail Address: Pathlight VX Physical Library Partitioning Details Use Table 42 to verify that the physical library is licensed to partition per the configuration’s requirements. Table 42 Physical Library Partitioning License Information Number of Physical Slots Available: Number of Physical Slots Licensed: Number of Partitions Required: 52 Planning to Configure Physical Libraries and Remotely Manage the Pathlight VX Use Table 43 to prepare to configure the partitions on the physical library. When attaching physical libraries on Pathlight VX that is running Policy Management, the best practice is that DET should have a separate dedicated partition. Note • For the Number of Drives values, the best practice is to specify a maximum of 4 drives for DET. • For the Media Type Checking and Return Identifier values, note that the settings can vary from site to site and across firmware versions. Consult "Configuring a Physical Library for Pathlight VX" in Pathlight VX Installation Guide. Table 43 Physical Library Partition Information Description Application Partition DET Partition Other Partition Number of Media (min): Number of Slots (min): Number of Drives (min): Physical Library eVPS LUN Mapping for Libraries with a SNC Use Table 44 through Table 46 on page 54 to prepare to map LUNs for libraries that have a SNC, such as the Scalar 24, Scalar 100, Scalar 1000, and Scalar 10K. The tables provide information regarding what drives are mapped to which blades on the MS. Sample data is provided in the first two tables. In Table 44 on page 54, device positions 1200 and 1201 are daisy-chained together to make room for the Library on SCSI 1. The Pathlight VX is sensitive to when partitions and LUNs are mapped. A partition and its drives should be mapped as LUNs together, prior to proceeding on to map the next partition and its drives as LUNs. For example, consider a scenario where there are two partitions on a library. • The first library partition and its 2 drives comprise 3 LUNs. • The second library partition and its 2 drives comprise 3 LUNs. You must map the first library partition and its LUNs prior to mapping the second library partition and its LUNs. In the example above: • • Map the first partition’s LUNs: • Part1 = LUN1 • Part1D1 = LUN2 • Part1D2 = L UN3 Map the second partition’s LUNs: • Part2 = LUN4 • Part2D1 = LUN5 • Part2D2 = LUN6 Pathlight VX Site Preparation Guide 53 54 Table 44 SNC 1 Physical Library Application Partition Information (with sample data) eVPS LUN Definitions SNC 1 (Lib 1_APP) Library Port Field HBA WWPN Lib 1202 Host Type PVX_IOB1 NT 0 Y 1 2 and 3 4 5 PVX_IOB2 NT 0 Y 1 2 and 3 4 5 0 Y 1 2 and 3 4 5 Planning to Configure Physical Libraries and Remotely Manage the Pathlight VX Table 45 APP Partition LUN SCSI 3 SCSI 4 Server Name PVX MS_HBA Linux CC LUN DET Paritition LUN SCSI 1 SCSI 2 1200/1201 1203 SNC 2 Physical Library Application Partition Information (with sample data) eVPS LUN Definitions SNC 2 (Lib 1_APP) Library Port Field HBA WWPN SCSI 3 SCSI 4 1204 1205 1206 1207 Host Type PVX_IOB1 NT 0 Y 6 7 8 9 PVX_IOB2 NT 0 Y 6 7 8 9 0 Y 6 7 8 9 Table 46 APP Partition LUN SCSI 2 Server Name PVX MS_HBA Linux CC LUN DET Partition LUN SCSI 1 SNC 1 Physical Library DET Partition Information (with sample data) eVPS LUN Definitions SNC 1 (Lib 2_DET) Library CC LUN DET Partition LUN APP Partition LUN SCSI 2 SCSI 3 Lib 1200/1201 1202 SCSI 4 Server Name Host Type PVX_IOB1 NT 0 Y 1 2 and 3 4 5 PVX_IOB2 NT 0 Y 1 2 and 3 4 5 0 Y 1 2 and 3 4 5 PVX MS_HBA Linux Port Field HBA WWPN SCSI 1 1203 Physical Library eVPS LUN Mapping for Libraries with IOBs Use Table 47 through Table 49 on page 56 to prepare to map LUNs for libraries that have I/O blades, such as the Scalar i2000. The tables provide information regarding what drives are mapped to which blades on the MS. Sample data is provided in the first two tables. For the Partition LUN columns, specify whether the Library Partition is dedicated for DET or Application Media. Also specify the Host LUN number associated with the Library Partition. The Pathlight VX is sensitive to when partitions and LUNs are mapped. Refer to the discussion and examples under Physical Library eVPS LUN Mapping for Libraries with a SNC on page 53. Pathlight VX Site Preparation Guide 55 56 Table 47 I/O Blade 1,1,1,3 (with sample data) eVPS LUN Definitions I/O Blade 1,1,1,1,3 Partition LUN Port Field HBA WWPN Fibre5 Fibre6 1,1,1,2,1,1 1,1,1,3,1,1 1,1,1,4,1,1 Host Type PVX_IOB1 NT 0 1 4 2 (DET) 3 (DET) 5 (APP) 6 (APP) PVX_IOB2 NT 0 1 4 2 (DET) 3 (DET) 5 (APP) 6 (APP) 0 1 4 2 (DET) 3 (DET) 5 (APP) 6 (APP) Planning to Configure Physical Libraries and Remotely Manage the Pathlight VX Table 48 I/O Blade 1,1,1,4 (with sample data) eVPS LUN Definitions I/O Blade 1,1,1,1,4 Partition LUN Server Name Host Type PVX_IOB1 NT 0 PVX_IOB2 NT 0 Port Field HBA WWPN PVX MS_HBA Linux Table 49 APP Part LUN 1,1,1,1,1,1 Fibre4 Server Name PVX MS_HBA Linux CC LUN DET Part LUN Fibre3 CC LUN DET Part LUN Fibre3 APP Part LUN 1,1,1,5,1,1 Fibre4 Fibre5 Fibre6 1,1,1,6,1,1 1,1,1,7,1,1 1,1,1,8,1,1 0 I/O Blade 1,1,1,5 (with sample data) eVPS LUN Definitions I/O Blade 1,1,1,1,5 Partition LUN Server Name Host Type PVX_IOB1 NT 0 PVX_IOB2 NT 0 PVX MS_HBA Linux Port Field HBA WWPN Fibre3 Fibre4 CC LUN DET Part LUN APP Part LUN 1,1,1,9,1,1 1,1,1,10,1,1 0 Fibre5 Fibre6 1,1,1,11,1, 1 1,1,1,12,1,1 Once the tasks in this chapter have been completed, make sure that the Pathlight VX installers and installation coordinators have access to all data relating to planning the Install and Configuration. This includes the Pathlight VX Site Preparation Worksheet, Sizing Tool, and Visio diagrams. If there is any information described in the previous chapters not available, please also communicate this to the installing engineers so the information can be collected prior to the installation. For information about installing and configuring the Pathlight VX, refer to the Pathlight VX Installation Guide. Physical Library LUN Mapping for Libraries that Use Tape Drive Connections Some libraries present the device LUN that represents the physical library on the same communication path as a tape drive. In order to communicate to the library, Pathlight VX must access the device LUN that represents the physical library using a tape drive connection. The following ADIC libraries have the capability of communicating using a tape drive connection: • Scalar i500 • Scalar 100 with LTO3 and firmware version 6.03.0004 and later (optional feature) • Some Non-ADIC physical libraries supported on Pathlight VX (check respective product documentation) Please contact ATAC for more information regarding the latest configuration requirements that are necesssary in order for Pathlight VX to function with libraries that use the drive control path feature. Use Table 50 on page 58 to prepare to map LUNs for libraries that communicate with Pathlight VX using tape drive connections, such as the Scalar i500. • Use the World Wide Port Name (WWPN) column to enter WWPN information of the IOB and MS HBA to help reconcile which PVX WWPNs to use when configuring switch zoning to a Scalar i500. • Use the DET Partition Control Path column to specify which drive presents the library LUN for the DET media partition. • Use the APP Partition Control Path column to specify which drive presents the library LUN for the application media partition. • Use the Library Device LUN Definitions columns to specify the address of the tape drives. Tape drives are addressed by module and tape drive bay within a module. The tape drive bays within a module are numbered from top to bottom. The address of a tape drive follows the format of: <module><drivebay>. The control module is numbered 0 (zero). Modules stacked above the control module are addressed with positive integer digits. Modules stacked below the control module are addressed with negative integer digits. For example: [0,1] The control module is 0, the CM drive location is 1. [1,3] The module above the CM is 1, the drive location is 3. [-1,2] The module below the CM is -1, the drive lcoation is 2. In Table 50 on page 58, drives 1 - 4 are Application Partition Drive members, and drives 5 - 6 are DET partition drive members. Pathlight VX Site Preparation Guide 57 58 Table 50 Sample Scalar i500 LUN Mapping (with sample data) Library Device LUN Definitions Drive 1 Drive 2 Drive 3 Drive 4 Drive 5 Drive 6 Planning to Configure Physical Libraries and Remotely Manage the Pathlight VX DET Partition Control Path APP Partition Control Path 0,1 0,2 1,1 1,2 1,3 1,4 Gateway Drive 5 Drive 1 0 0 0 0 0 0 Gateway Drive 5 Drive 1 0 0 0 0 0 0 Drive 5 Drive 1 0 0 0 0 0 0 Server Name OS Type PVX_IOB1 PVX_IOB2 PVX MS_HBA Linux WWPN Glossary AMC (ADIC Management Console) Contains client-server software. The AMC server is used to manage the storage area network (SAN) and the library. AMC version 4.0 is the first version of the software to provide access to two clients, the AMC client (which manages the SAN) and the LMC client (which manages the Scalar i2000 library). Pathlight VX is supported by AMC. ATAC (ADIC Technical Assistance Center) The ADIC customer help desk. Availability A RAS attribute that is designed to maintain the usability of a storage solution. AX100SC (AX100 single controller enclosure) A highly available, cost-effective alternative to direct-attached storage that uses Fibre Channel as an interconnect interface. Blade See FC Blade. Category A logical grouping of the SAN components belonging to a specific view. For example, subnet, department, location, etc. CE (Customer Engineer) An ADIC team member providing on-site installation, configuration, preventative maintenance, and remedial maintenance of an ADIC solution. Channel zoning A method of subdividing a SAN into disjoint zones on a per-channel basis in order to enhance security and qualify access. COD (Capacity on Demand) An ADIC library feature that allows you to have a larger physical library (i.e., more slot capacity than you currently need) but only be licensed to use a subset of the total capacity of the physical library. A license upgrade enabling more capacity to you is allowed without causing a system interruption. Pathlight VX Site Preparation Guide 59 Community strings Statements describing administrative relationships between SNMP agents and community members. DAE (disk array enclosure) An intelligent, highly available, high-performance, high-capacity disk-array storage system that uses Fibre Channel Arbitrated as its interconnect interface. A DAE connect to another DAE or a DPE, and is managed by storage-system software in the DPE. Data path One of the many possible paths over which data can move in the SAN environment, potentially involving many components or connections between initiators and targets. DNS (Domain Name Service) A service that translates domain names into IP addresses. DPE (disk processor enclosure) A highly available, high-performance, high-capacity system that uses Fibre Channel as an interconnect interface. Drive carrier The metal and plastic assembly of the disk modules on either a DPE or a DAE that provides smooth, reliable contact with the enclosure slot guides and the midplane connectors. Enclosure ID switch A switch located between the power supplies at the rear of the disk enclosure. eVPS (extended Virtual Private SAN) A virtual LUN mapping scheme for Fibre Channel hosts that runs on the SNC. It allows each host to see the LUN map as if the LUN map began at “1”, subject to an overall device total of 2048, and a per-host device total of 256. FC (Fibre Channel) A high-speed data transfer architecture. Using optical fibre to connect devices, Fibre Channel communications are serial communications that occur at full duplex and attain data transfer rates of 200 MBps. FC (Fibre Channel) Blade A hardware component responsible for the data interface between hosts and storage devices. See, for example, FCB. Fibre Channel Arbitrated Loop (FC-AL) An arrangement of Fibre Channel stations such that messages pass from one to the next in a ring. Fibre Channel (FC) Switch A high speed data transfer component of the architecture in Pathlight VX that provides interconnect capabilities between devices. FRU (Field Replaceable Unit) The smallest component that can be replaced at a customer installation. 60 Glossary Host initiator A host bus adapter that provides the host with a Fibre Channel port capable of initiating SCSI commands at the host’s request. HBA (Host Bus Adapter) An I/O adapter that connects a host I/O bus to a computer’s memory system. HRS (Host Registration Service) A service that presents host information that the AMC server uses to manage host access and data retrieval. This information includes host name, host type, host connection and the online or offline status. I/O Blade See FC blade. I/E station (Insert/Eject Station) A door on the front of the library into which cartridges to be imported are placed manually or cartridges to be exported are placed by the picker. IP (Internet Protocol) A protocol that specifies the formats of packets and addresses. Addresses are formulated as dotted quads: for example, 123.456.789.123. Library An ADIC physical library product including the Scalar 24, Scalar 100, Scalar 1000, Scalar 10K, and Scalar i2000. Link Control Card (LCC) The component of the DAE that controls access between the disk modules and the rest of the system. Logical Unit An object in a target device that processes SCSI commands. LTO (Linear Tape Open) A type of media or drive. LUN (Logical Unit Number) A unique identifier for a logical unit. LVD (Low Voltage Differential) A type of parallel SCSI interface. MAC address An IEEE defined globally unique address for Ethernet controllers: “Medium Access Control.” Management Server In Pathlight VX, the computer that hosts the application and serves as the management point. Media The tapes in cartridges used for storing data or cleaning drives. Media filter A filter used to refine the list of drives, slots, etc. It is displayed in a dialog box. Pathlight VX Site Preparation Guide Media ID A barcode number associated with a particular piece of media. Media type A format/size of media, for example, LTO-1, LTO-2, or LTO-3. Midplane The DPE component that distributes power and signals to all the enclosure components. All FRUs plug directly into midplane connectors. NDMP (Network Data Management Protocol) An open standard protocol for enterprise-wide backup of heterogeneous network-attached storage. NEMA (National Electrical Manufacturer’s Association) An association that sets the standards for the cabinets (racks) where the left and right mounting rack rails are 19 inch apart. NVRAM (Non-Volatile Random Access memory) A type of memory that retains its contents when power is turned off. Partition An abstraction of an underlying physical library that may present a different personality, capacity, or both to a host. It is a representation of real physical elements, combined to create a grouping that is different from the physical library. Assumptions made about partitions in a disk environment, where this term originated, are not identical to assumptions about partitions of physical library storage. PCB (Printed Circuit Board) A thin plate on which chips and other electronic components are placed. A board. A blade. Point to Point A Fibre Channel topology. POST (Power On Self Test) A diagnostic testing sequence run when power is initially turned on. RAS (Reliability, Availability, and Serviceability) Three key attributes of computing system design. Reliability A RAS attribute that is designed to prevent failure of a storage solution. SAN (Storage Area Network) A SAN is a dedicated, high-performance network whose primary purpose is the transfer of data along FC or high-speed Ethernet connections between servers, interconnect devices, and storage peripherals. SCSI (Small Computer System Interface) A parallel interface standard. SE (Systems Engineer) An ADIC team member providing service and ongoing maintenance of an ADIC solution. 62 Glossary Serviceability A RAS attribute that is designed to accurately diagnose and report failures, as well as minimize downtime in a storage solution. SFP (small form-factor-pluggable) A hot-swappable input/output device that plugs into an Ethernet port or slot, linking that port with the network. SNC (storage networking controller) ADIC term for a storage networking appliance. The SNC enables high-performance, networked communications that support intelligence functionality within the Pathlight VX storage system. SNMP (Simple Network Management Protocol) The protocol governing network management and the monitoring of network devices and their functions. SPS (Standby Power Supply) The component of the Pathlight VX system that provides backup power to one of the DPE’s storage processors, allowing graceful shutdown in case of a power failure. Storage Processor (SP) The DPE or AX100SC component that controls access between the disk modules and the rest of the system. Switch fabric A set of point-to-point connections between nodes. One or more FC switches makes each connection. In Pathlight VX, the FC switch supports this particular physical topology. Target ID SCSI bus address. See also LUN. Trap An SNMP alert sent when predefined conditions are met. Ultrium A high capacity implementation of LTO, a type of media. Virtual library A system that virtualizes physical drives and libraries. The system makes disk storage appear as if it were a tape drive or physical library. The system also allows the virtual tape to become actual tape by integration with physical tape systems. WWN (World Wide Name) A unique number assigned by a recognized naming authority. The WWN is integral to Fibre Channel operations. Pathlight VX Site Preparation Guide 64 Glossary Index A ADIC assistance . . . . . . . . . . . . . . . . . . . . . . . . . .3 Advanced Features Archive . . . . . . . . . . . . . . . . . . . . . . . . . . . . 41 Early Tape Creation . . . . . . . . . . . . . . . . . . 41 Storage Policies . . . . . . . . . . . . . . . . . . . . . 41 aggregation device decision path . . . . . . . . . . . . . . . . . . . . . . . . 46 guidelines . . . . . . . . . . . . . . . . . . . . . . . . . . 49 preparation information . . . . . . . . . . . . . . . . 48 Archive . . . . . . . . . . . . . . . . . . . . . . . . . . . . . . . .41 audience, intended . . . . . . . . . . . . . . . . . . . . . . . .5 B book, organization . . . . . . . . . . . . . . . . . . . . . . . .5 browser Internet Explorer supported version . . . . . . 24 Netscape supported version . . . . . . . . . . . . 25 C checklist pre-installation . . . . . . . . . . . . . . . . . . . . . . . . 7 tools . . . . . . . . . . . . . . . . . . . . . . . . . . . . . . . 23 configuration information FC Host . . . . . . . . . . . . . . . . . . . . . . . . . . . . 32 FC port . . . . . . . . . . . . . . . . . . . . . . . . . . . . 31 physical media . . . . . . . . . . . . . . . . . . . . . . . 38 virtual library . . . . . . . . . . . . . . . . . . . . . . . . 29 virtual media . . . . . . . . . . . . . . . . . . . . . . . . 38 configuration requirements . . . . . . . . . . . . . . . . .28 D decision path aggregation device . . . . . . . . . . . . . . . . . . . 46 dimensions, rack (required) . . . . . . . . . . . . . . . .20 disabling . . . . . . . . . . . . . . . . . . . . . . . . . . . . . . .17 Pathlight VX Site Preparation Guide Test Unit Ready (TUR) requests . . . . . . . . . 17 drive information physical library . . . . . . . . . . . . . . . . . . . . . . . 50 E Early Tape Creation . . . . . . . . . . . . . . . . . . . . . . 41 environmental requirements, verifying . . . . . . . . 17 Event Notification feature, physical library . . . . . 52 external aggregation device, connectivity . . . . . 46 F FC Host configuration information . . . . . . . . . . . 32 FC port configuration information . . . . . . . . . . . . 31 G getting help . . . . . . . . . . . . . . . . . . . . . . . . . . . . . 3 glossary . . . . . . . . . . . . . . . . . . . . . . . . . . . . . . . 59 guidelines for aggregation device . . . . . . . . . . . 49 H how this book is organized . . . . . . . . . . . . . . . . . . 5 I I/O blade FC port configurations . . . . . . . . . . . . . . . . . 51 installation requirements . . . . . . . . . . . . . . . . . . 28 integration requirements . . . . . . . . . . . . . . . . . . 28 intended audience . . . . . . . . . . . . . . . . . . . . . . . . 5 intended use statement . . . . . . . . . . . . . . . . . . . . 1 Internet Explorer, supported version . . . . . . . . . 24 IP address physical library . . . . . . . . . . . . . . . . . . . . . . . 52 65 L license information physical library . . . . . . . . . . . . . . . . . . . . . . . 52 LUN mappings physical library . . . . . . . . . . . . . . . . . . . . 53, 55 M model number, product . . . . . . . . . . . . . . . . . . . . .3 mounting holes, rack (required) . . . . . . . . . . . . .20 N Netscape, supported version . . . . . . . . . . . . . . .25 network information physical library . . . . . . . . . . . . . . . . . . . . . . . 52 network requirements, verifying . . . . . . . . . . . . .24 P partition information physical library . . . . . . . . . . . . . . . . . . . . . . . 53 Pathlight VX Advanced Features . . . . . . . . . . . . . . . . . . . 41 connectivity to external aggregation device 46 connectivity to physical library . . . . . . . . . . . 50 remote management . . . . . . . . . . . . . . . . . . 52 virtual capacity . . . . . . . . . . . . . . . . . . . . . . . 28 Pathlight VX installation and configuration planning 27 physical library connectivity . . . . . . . . . . . . . . . . . . . . . . . . . 50 drive information . . . . . . . . . . . . . . . . . . . . . 50 Event Notification feature . . . . . . . . . . . . . . 52 I/O blade FC port configurations . . . . . . . . . 51 information table . . . . . . . . . . . . . . . . . . . . . 50 IP address . . . . . . . . . . . . . . . . . . . . . . . . . . 52 license information . . . . . . . . . . . . . . . . . . . 52 LUN mappings . . . . . . . . . . . . . . . . . . . . 53, 55 network information . . . . . . . . . . . . . . . . . . . 52 partition information . . . . . . . . . . . . . . . . . . . 53 remote management . . . . . . . . . . . . . . . . . . 52 SNC fibre port configuration . . . . . . . . . . . . 50 SNC SCSI channel parameters . . . . . . . . . . 51 SNMP settings . . . . . . . . . . . . . . . . . . . . . . . 52 physical media configuration . . . . . . . . . . . . . . .38 planning installation and configuration . . . . . . . .27 power requirements, verifying . . . . . . . . . . . . . .18 pre-installation checklist . . . . . . . . . . . . . . . . . . . .7 precautions . . . . . . . . . . . . . . . . . . . . . . . . . . . . . .2 product model number . . . . . . . . . . . . . . . . . . . . .3 R rack requirements, verifying . . . . . . . . . . . . . . . .19 rack, additional requirements . . . . . . . . . . . . . . .23 66 remote management Pathlight VX . . . . . . . . . . . . . . . . . . . . . . . . . physical library . . . . . . . . . . . . . . . . . . . . . . . requirements configuration . . . . . . . . . . . . . . . . . . . . . . . . installation . . . . . . . . . . . . . . . . . . . . . . . . . . integration . . . . . . . . . . . . . . . . . . . . . . . . . . network . . . . . . . . . . . . . . . . . . . . . . . . . . . . rack dimensions . . . . . . . . . . . . . . . . . . . . . . rack mounting holes . . . . . . . . . . . . . . . . . . . rack space . . . . . . . . . . . . . . . . . . . . . . . . . . requirements, rack additional . . . . . . . . . . . . . . 52 52 28 28 28 24 20 20 20 23 S safety intended use . . . . . . . . . . . . . . . . . . . . . . . . . 1 precautions . . . . . . . . . . . . . . . . . . . . . . . . . . 2 statements . . . . . . . . . . . . . . . . . . . . . . . . . . . 1 symbols and notes . . . . . . . . . . . . . . . . . . . . . 3 System, Safety, and Regulatory Information Guide . . . . . . . . . . . . . . . . . . . . . . . . . . . . 1 site requirements, verifying . . . . . . . . . . . . . . . . 17 SNC fibre port physical library . . . . . . . . . . . . . . . . . . . . . . . 50 SNC SCSI channel parameters . . . . . . . . . . . . 51 SNMP settings physical library . . . . . . . . . . . . . . . . . . . . . . . 52 space, rack (required) . . . . . . . . . . . . . . . . . . . . 20 statement intended use . . . . . . . . . . . . . . . . . . . . . . . . . 1 safety . . . . . . . . . . . . . . . . . . . . . . . . . . . . . . . 1 Storage Policies . . . . . . . . . . . . . . . . . . . . . . . . 41 symbols and notes, explained . . . . . . . . . . . . . . . 3 T tool requirements checklist . . . . . . . . . . . . . . . . 23 TUR Requests . . . . . . . . . . . . . . . . . . . . . . . . . 17 U urls www.adic.com/crc . . . . . . . . . . . . . . . . . . . 3, www.adic.com/ilink . . . . . . . . . . . . . . . . . . . . www.adic.com/onlinesr . . . . . . . . . . . . . . . . . www.adic.com/ProductUpdates . . . . . . . . . . . 4 4 3 4 V verifying environmental requirements . . . . . . . . . . . . power requirements . . . . . . . . . . . . . . . . . . . rack requirements . . . . . . . . . . . . . . . . . . . . site requirements . . . . . . . . . . . . . . . . . . . . . virtual capacity virtual drives (maximum) . . . . . . . . . . . . . . . 17 18 19 17 28 Index virtual libraries (maximum) . . . . . . . . . . . . . 28 virtual tapes (maximum) . . . . . . . . . . . . . . . 28 virtual library configuration . . . . . . . . . . . . . . . . .29 virtual media configuration . . . . . . . . . . . . . . . . .38 W Windows servers disabling TUR requests . . . . . . . . . . . . . . . . 17 www.adic.com/crc . . . . . . . . . . . . . . . . . . . . . . .3, 4 www.adic.com/ilink . . . . . . . . . . . . . . . . . . . . . . . .4 www.adic.com/onlinesr . . . . . . . . . . . . . . . . . . . . .3 www.adic.com/ProductUpdates . . . . . . . . . . . . . .4 www.adic.com/techsup . . . . . . . . . . . . . . . . . . . . .4 Pathlight VX Site Preparation Guide 67 68 Index