1
Owner's
Manual
Important!
Return
Card
your
within
Warranty
I 0 days. See
Re 1
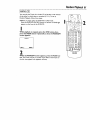
Once your PHILIPS purchase is registered, you're eligible to receive all the privileges of owning a
PHILIPS product. So complete and return the Warranty Registration Card enclosed with your purchase at once.And take advantage of these important benefits.
Warranty
Verification
Owner
Confirmation
Model
Registration
Registeringyour product within
Your completedWarranty
Returningyour Warranty
10days confirms your right to max-
Registration Card servesas
imum protection under the
verification of ownership in the
RegistrationCard right awayguarantees you'll receiveall the information
terms and conditions of your
event of product theft or loss.
PHILIPSwarranty.
and specialoffers which you qualify
for as the owner of your model.
Know these
PHILIPS
Congratulations
welcome
safetysymbols
on your
purchase,
and
to the "family!"
D_ar PHILIPS
product
owner:
Thank you for your confidence in PHILIPS.You've selected one of
the best-built, best-backed products available today.And we'll do
everything in our power to keep you happy with your purchase for
many years to come.
As a member of the PHILIPS"family;' you're entitled to protection
by one of the most comprehensive warranties and outstanding service networks in the industry.
What's more, your purchase guarantees you'll receive all the information and special offers for which you qualify, plus easy access to
accessories from our convenient home shopping network.
And most importantly you can count on our uncompromising
commitment to your total satisfaction.
All of this is our way of saying welcome-and thanks for investing in
a PHILIPS product.
Sincerely,
Robert Minkhorst
President and Chief Executive Officer
RS.
Remember, to get the most from your PHILIPS product, you must return your Warranty Registration
Card within 10 days. So please mail
it to us right now!
_,
This
of lightning"indicates"bolt
uninsulated
material
within your unit may cause an
electrical shock. For the safety
of everyone in your household,
please do not remove product
covering.
_The
"exclamation
point"
calls attention to features
for which you should read the
enclosed hterature closel'_ to
prevent operating and maintenance problems.
WARNING:
TO PREVENT
FIRE OR SHOCK HAZARD,
DO
NOT
EXPOSE THIS
EQUIPMENT TO RAIN OR
MOISTURE.
CAUTION:
To prevent electric shock, match wide blade of
plug to wide slot, fully insert.
ATTENTION:
Pour eviter les
choc _lectriques, introduire la
lame la plus large de la fiche
darts la borne correspondante
de la prise et pousser jusqu'au
fond.
For Customer
Use
Enter below the Serial No.
which is located on the rear of
the cabinet.Retain this information for future reference.
Model No.
Serial No.
SafetyandGeneral
Information
3
Safety Precautions
Warning: To prevent fire or shock hazard,do not exposethis equipment to rain or moisture.
Federal Communications Commission (FCC)Warning: Any unauthorizedchangesor modifications to
this equipmentvoid the user'sauthorityto operate it.
Department of Health and Human Services (DHHS) Certification: Complies with 21 Center for
Radiation (CFR) chapter I subchapterJ applicableat time of manufacture.
Laser Safety
This unit employs a laser.Only a qualified service person should remove the cover or attempt to service this
device,due to possible eye injury.
CAUTION: USEOF CONTROLS OR ADJUSTMENTSOR PERFORMANCE OF PROCEDURESOTHER
THAN THOSE SPECIFIEDHEREIN MAY RESULTIN HAZARDOUS RADIATION EXPOSURE.
CAUTION:VISIBLE AND INVISIBLELASERRADIATION WHEN OPEN AND INTERLOCK DEFEATED.DO
NOT STAREINTO BEAM.THE BEAM IS LOCATED INSIDE,NEARTHE DECK MECHANISM.
Special Information
for Canadian Users
This Class B digital apparatus complies with CanadianICES-003.
Cet appareil numerique de la classeB est conforme a la norme NMB-003 du Canada,
Radio/TV
Interference
This eq_ipmenthas been tested and found to complywith the limitsfor a Class B digital device,pursuant to
Part 15 of the FCC Rules.Theselimits are designedto provide reasonableprotection againstharmful interference in a residential installation.This
equipment generates,uses,and can radiate radio frequency energy and,if
not installedand used in accordancewith the instructions, may cause harmful interference to radio communications. However, there is no guaranteethat interference will not occur in a particular installation.If this equipment does cause harmful interference to radio or television reception, which can be determined by turning the
equipment off and on, the user is encouragedto try to correct the interference by one or more of the following measures:
I)
2)
Reorient
or relocate the receiving antenna,
Increase the separation between the equipment
3)
Connect
4)
Consult the dealer or an experiencedradio/TV technician for help.
the
equipment
into
an outlet
and the receiver.
on a circuit
different
from
that
to
which
the
receiver
is connected.
Copyright
Protection
Unauthorized copying,broadcasting,
publicperformanceand lendingof Discsare prohibited.
This product incorporatescopyrightprotection technology that is protected by method claimsof certain U.S.
patents and other intellectualproperty rights owned by Macrovision Corporation and other rights owners.
Use of this copyright protection technology must be authorized by Macrovision Corporation and is intended
for home and other limited viewing uses only unlessotherwise authorized by Macrovision Corporation, Reverse
engineering or disassemblyis prohibited.
Note to the Cable'lV
System Installer: This reminder is provided to call the Cable'lV system installer's
attention to Article 820-40 of the National Electrical Code, which provides guidelines for proper grounding - in
particular, specifyingthat the cable ground shallbe connected to the grounding system of the building,as close
to the point of cable entry as possible.
High Quality
This DVD/VCR is equipped with a High Quality (HQ) system and is compatible with existingVideo Home
System (VHS) equipment.
Declaration
of Conformity
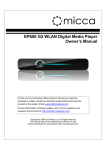
Model Number:
DV900VHS0 I
Trade Name:
Philips
ResponsibleParty: Philips Consumer Electronics
P.O.Box 14810
Knoxvine,TN 37914
(865) 521-4316
Manufacturedunder license from Dolby Laboratories."Dolby" and the double-D symbol are trademarks of Dolby
Laboratories.Confidential UnpublishedWorks. (© 1992-1997Dolby Laboratories,Inc. All rights reserved.)
DTS is a trademark of DigitalTheater SystemsInc.in the United Statesof America.
Copyright 2000 PhilipsConsumer Electronics.All rights reserved,
4 Tableof Contents
General
Information
Safety and General Information
Table of Contents
.................
Introduction
.....................
Additional
.......
Playable Discs ....................
Playable Video Cassette Tapes ........
3
4
5
6
7
Setting
Up Your DVD/VCR
Hookups Without
a Cable Box/Direct
Broadcast System ...............
8-9
Hookups With a Cable Box/Direct
Broadcast System .............
I 0- I I
Optional Hookups
.............
12-14
Remote Control
Setup ............
I5
Turning on Your DVD/VCR
.........
16
Automatic
Channel Setup ........
17-19
Setting the Clock .................
20
Daylight-Savings Time
.............
2I
Language Selection (VCR) ..........
22
On-Screen Status Displays (VCR)
. .23
Description
of Controls
DVD/VCR
Display - DVD Features
. .24
DVD/VCR
Display -VCR Features...25
Front Panel .....................
26
Rear Panel ......................
27
Remote Control
Buttons
........
28-31
Basic VCR Operations
Playing aVideo Cassette Tape .......
32
Recording on aVideo Cassette Tape . .33
VCR Recording
Recording One Channel/VVatching
Another .......................
34
One-Touch Recording .............
35
Timer Recording ..............
36-39
Rerecording (Tape Duplication) ......
40
Video Cassette Tape Playback
Repeat Play (Video Cassette Tapes) ...41
Real-Time Counter
Memory
........
42
Time Search ....................
43
Special Effects Playback ............
Automatic
Operation Features ......
44
45
MTS System
VCR
Features
..................
Hi-Fi Stereo Sound System .........
Blue Background
.................
Disc Playback
46-47
48
49
and Features
Playing a Disc
...................
Disc Menus .....................
50
5I
Pausing Playback .................
$2
Step by Step Playback/Slow Motion
...53
Fast Forward/Reverse
Search .......
54
Track Playback ...................
Title/Chapter
Playback .............
Specific Time Playback .............
Repeat Playback (Discs) ............
A-B Repeat Playback ..............
Programmed Playback .............
Random Playback .................
Audio Language/Sound Mode
.......
Subtitle Language .................
Camera Angles
..................
Status Display (Discs) .............
Parental Lock Levels ..............
Parental Lock Password ............
55
56
57
58
59
60
6I
62
63
64
65
66
67
DVD Player Setup and Features
Audio Settings ................
68-69
Language Settings ..............
Video Settings ...................
Other Menu Settings ..............
Information
You May Need
Care and Maintenance
.............
Helpful Hints
.................
Glossary .......................
Specifications ....................
Limited Warranty
................
Index ..........................
Accessories
.....................
70-72
73
74
75
76-79
80
8I
82
83
84
Introduction
5
• .e.
• eo..ee..oo..o....J....oe,,eeeo,eet.,ot,.,ot,.eoeoQleee
• • • ogeoee.,,_eetteeo
o • ooo,
• • ...•
• ....o.oo•..etile,o.
Welcome!
This DVD/VCR combines a DigitalVideo Disc (DVD) Playerand a Hi-FiVideo Cassette Recorder (VCR) into
one unit, allowing you to play DVDs,Audio Compact Discs (Audio CDs), and video cassette tapes from one
piece of equipment.The DVD Playerof this DVD/VCR wilt allow you to enjoy better picture quality,clearer
sound, and endless playbackfeatures availableon DVDs. Expandingtechnology allows you to add options to
your viewing - watch a director's cut of a movie, listen to the producer's comments, or playyour favorite scene
over and over again.Hear a movie in different languages,or listen only to the soundtrack.The possibilitiesare
limited only by your choices and the materials availableon the DVD.
When playingAudio CDs, determine the order in which you want to hear the songs,or play the Disc repeatedly - all while seeingthe status of the CD on your television.
We hope you enjoy this DVD/VCR and learn to use all of its features.Toget the most out of the DVD/VCR,
read this owner's manualcarefully.It will describe how you canaccessall the features listed below.
Features
• Automatic Channel Setup
Automatic Head Cleaner
Automatic Operation Features
Automatic Tracking Adjustment
Blue Background
Daylig_t-SavlngsTime
Hi-Fi Stereo Sound System
High Quality (HQ) System
MTS (Multi-Channel Television Sound) System
•
•
•
•
•
•
•
• Audio Language/SoundMode Choices*
• Automatic Detection of Disc Type
(Audio CD or DVD)
• DVD Menus in a Desired Language*
• On-Screen Display
• Parental Lock*
• Paused/Fast/Slow/Step-by-StepPlayback
•
•
•
•
•
When
referring
to this manual,
19 micron head
On-Screen Displays in Englishor Spanish
One-Touch Recording
Real-Time Counter
Repeat Play
S-VHS Quasi Play Back (SQPB)
Special Effects Playback:Forward and Reverse
Searching;Still; Slow Motion
• Time Search
• Timer Recording
Program Playback (Audio CD only)
Random Playback (Audio CD only)
Screen Saver
Multiple Camera Angles*
Subtitles in a Desired Language *
* If available on the Disc
remember...
Indicatesthat thefeature describedisavailable
on video cassettetapeswhen the DVD/VCR isinVCR mode.
[_
Indicatesthat the feature described is availableon some DigitalVideo Discswhen the DVD/VCR is in
DVD mode.
I AUDIO O_ indicates that the feature described is availableon some Audio Compact Discs when the
DVD/VCR is in DVD mode.
Disc Menus...
Someexplanations in this manualare intendedto describe the Disc menus.Thesemenusare set bythe movie
producers or bythe music industry,andthe menus will vary amongDiscs.Furthermore,not all Discs areguaranteed to havemenus.However. if the Disc hasa menu,you canaccessthe Disc menu by pressingthe DVD button, then pressing the MENU button on the remote control. (Make sure the DVD/VCR is in DVD mode. Press
the DVD/VCR OUTPUT button so that the red DVD light appearson the front of the DVD/VCR.)
DVD Menus...
Someinstructionsexplainhow to use the DVD player'smenu to set up features of the DVD player or the Disc.
You get to the DVD player menu by pressingthe SETUP button on the remote control when playbackis
stopped. Evenif a feature is set up in the DVD player'smenu, it may not be availableif the current Disc does not
include that feature.
Available
Disc Features...
Not all of the featuresdescribed in this manualmay be availableon everyDVD or Audio CD. If the
feature isnot availableon the Disc, you cannotusethe DVD/VCR to make these featuresavailable.
The "No feature"symbol will appearon theTV screenif you try to set up a feature that is not
availableon the current Disc or is not availableat the currenttime.
6 PlayableDiscs
oo ooeo
ooeo,,e,Q***t
i,oo
ooQel
• _et_
o**t
• *O,OIWlOQOO
•eoot
t.O,
• Iteo
IOeOOt
• OO**II
OOtOl
• • ooeott
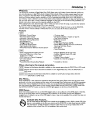
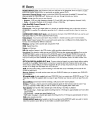
This DVD/VCR will play DigitalVideo Discs (DVDs) andAudio CDs. In order to play a
DVD or Audio CD on this DVD/VCR, make sure the Disc meets the requirements for
Region Codes and Color Systemsas described on this page.Also,the Discs should be
labelled with the following Iogos and should meet these standards.
Disc Type
Logo
Contents
Disc Size
12 cm
Digital
Video
Disc
Sound
and
Pictures
8 cm
Audio
CD
12cm
Sound
DIGrr&L
I
8crn
AUmO
! (singles)
Maximum
Playback
Disc
Time
Approx. 4 hours
(single-sided)
Approx. 8 hours
(double-sided)
Approx. 80 minutes
(single-sided)
Approx. 160 minutes
(double-sided)
74minutes
Segments
DVDs are
divided into Titles,
which are divided
into Chapters.
Titles and Chapters
are numbered.
Audio CDs are divided
into numbered Tracks,
20minutes
i.e.,
a track may be one song.
Region Codes
DVDs also must be labelled for ALL regions or for Region I in order to be playedon
this DVD/VCR.You can not play Discs that are labelled for other regions.
Look for the symbols below on your DVDs. If these region symbols do not appear on
your DVD, you cannot play the DVD in this DVD/VCR.
@@
The number insidethe globerefers to a region of the world. Region I represents the
United States,Canada,upper regions of North America, Bermuda,the U.S.Virgin
Islands,and small regions near Australia.
A Disc encoded in a specific region format can only be playedon DVD players with the
same region code. For example,if a Disc is labelled for Region2, you can not play the
DVD on this DVD/VCR.
Color Systems
Different color systems are availablethroughout the world.The most common color
systems are NTSC, which is used primarily in the United Statesand North America,
PAL,and SECAM.
This DVD/VCR usesthe NTSC color system.Therefore,the Discs that you ptaymust
be recorded in the NTSC system.Youcannot play Discs recorded in other formats.The
color system of the DVD may be listed on the DVD or on the Disc jacket.
Unacceptable
Discs
The following Discs cannot be played on this DVD/VCR.
• CD-ROM
• DVD-RAM
• Compact Disc-interactive (CD-I)
• Compact Disc-I_ecordable(CD-R)
• DigitaIVideo Disc-Video Recordable
(DVD-VR)
• DVD-ROM
• Photo CD
• Video CD
• Video Single Disc (VSD)
The following discs may be played, but only the audio will be available.There will be
no picture.
• Compact Disc-Graphic (CD-G)
• Compact Disc-Video (CD-V)
IBtOO*QO
• • I_t.,*°,o,_
•
Playable
VideoCassette
Tapes7
o,
• oto_
• _eQoo
_oQi
ooQo
OOQQ
• OeQOIOtQO
JOOtg
• • ttOOI
IIOttQI
OOtQOIg
_OOQOO0
OOOt,O
• ,_
• • ,0_
• _060
• _060
• • • _066°
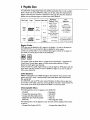
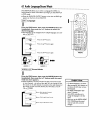
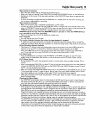
Playable Video Cassette Tapes
This DVD/VCR is equipped with a High Quality (HQ) systemand is
compatible with existingVideoHome System(VHS) equipment.
Philips Consumer Electronicsrecommends that you use only video
cassettetapes which are labeledwith the _
mark.The use of
other tapes may result in poor picture quality and excessivedeposits
on the video heads,which may not be covered by the warranty if
damageoccurs.The 19 micron head provides a better picture when
you view tapes recorded in slow speed (SLP).
Recording
Prevention
Video cassettetapes have record tabs to ensurethat recordings
are not accidentally erased.
I
To prevent
z
recording,
To allow recording,
DVD/VCR
break off the tab with a screwdriver.
cover the hole with cellophane tape.
maintenance
• Use only tapes with the _
mark.
• Remove any light adhesive stick-on notes from the video cassette tape before putting the tape in the DVD/VCR. Removable
labels can jam the DVD/VCR.
• Periodic maintenanceis required to maintain your DVD/VCR's
excellent performance.This DVD/VCR hasan Automatic Head
Cleaner. However, the video headswill require replacement eventually.Only an authorized service center should perform this setvice.
z
• • 000°IO
•
8 Hookups
Without
a CableBox/Direct
Broadcast
System
• • • • • • • • • •*
• • • • • • • • • • • ••
• • to
• • • •••
The basic antenna/cable
• • • • • • • • • • • • • • • • • ••
to DVD/VCR
toTV
• • • • • • • • • • • • • • o•
• • • • ••
• • • • ••
• • • • • ••
• • • • ••
• • • • • • • • • • • • • • • • •
is shown below.
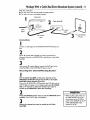
If you have a Cable Box or a Direct Broadcast System, please see pages 10-1 I. For better
sound and picture quality when using the DVD player, refer to the Optional Hookups on pages
12-14. After
you hook up the DVD/VCR,
go to page
16 to turn on the DVD/VCR.
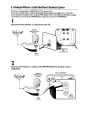
I
Disconnect
the antenna
or cable from yourTV.
Antenna
Indoor/Outdoor
I°°!
(300ohm)
IN
Jack
(on back of TV)
Cable
(75 ohm)
2
Connect the antenna
DVD/VCR.
or cable to the ANT-IN
Antenna
IndoorlOutdoor
(300 ohm)
Cable
(75 ohm)
(Antenna
In) Jack of your
Back of DVD/VCR
\
Hookups
Withouta CableBox/Direct
Broadcast
System
(cont'd)9
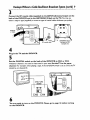
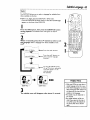
3
Connect
the RF coaxial cable (supplied)
to the ANT-IN
(Antenna
back of the DVD/VCR
and to the ANTENNA
IN Jack on the'IV.
either a snap-on type (supplied) or screw-on
In) Jack on the
(You may use
type of coaxial cable, whichever
you prefer.)
Antenna
or Cable
ANTENNA
RF
coaxial
cable
(on back
example
IN Jack
of TV)
only
4
Plug in theTV
and the
DVD/VCR.
5
Set the CH3/CH4
switch on the back of the DVD/VCR
to CH3 or CH4,
whichever channel is not used or least used in your area. Set theTV to the same
channel, For example, when playing a tape, if the CH3/CH4 switch is set to CH3, the TV
should be on channel 03.
CH3 / CH4
Switch
CH3
CH4
6
You are ready to turn
on the DVD/VCR.
on the
DVD/VCR.
Please
go to page
16 before
turning
I0 Hookups
Witha CableBox/Direct
Broadcast
System
• • •oe•
• •oool
,oge•
•o6••
•me•°
.°tom
eoo••
•ee•
• i°•o
° °9•
• ,e•
• • to•
• • •°tm
• oe••
• •*•°o
• w99oo
• • •••
• ° .to•
• ° t,•
• ° • _••J
• • • •el
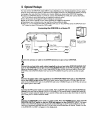
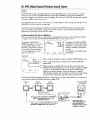
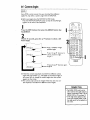
There are two ways to connect your Cable Box/DBS to the DVD/VCR.With this connection:
• You may view any channel.
• You must select channels at the Cable Box/DBS. Channels cannot be changed at the DVD/VCR.
• You may not view a channel other than the one you are recording.
• You may not program channels at the DVD/VCR.
• You can only program a timer recording for one channel at a time. Set the TV and the DVD/VCR to the Cable
Box/DBS output channel (channel 03 or 04); set the CH3/CH4 switch to the same channel. Set your Cable
Box/DBS to the channel you want to record.When you enter the channel you want to record in a timer
recording, select channel 03 or 04 (the Cable Box/DBS output channel). (This is step 5 on page 37.) Leave the
Cable Box/DBS on for a timer recording.
Cable Box/DBS
Cable
Signal
DVD/VCR
_"_O O O_
RF coaxial
_,._, O O O ,
cable
RF coaxial
-_
cable
_
Connections
I
Connect a Cable signal to the IN Jack on the Cable Box/DBS.
2
Use an RF coaxial cable (supplied) to connect the OUT Jack on the Cable
Box/DBS to the ANT-IN (Antenna In) Jack on the DVD/VCR.
3
Use a second RF coaxial cable to connect the ANT-OUT (Antenna Out) Jackon
the DVD/VCR to the TV's ANTENNA IN Jack.
Recording/Viewing
I
Any Channel
With the DVD/VCR on and in VCR position (the VCR light and the VCR/TV light
will appear on the display panel), use the CHANNEL Air
buttons to set
the DVD/VCR to the Cable Box/DBS output channel (channel 03 or
04). Set the CH3/CH4 switch to the same channel.
2
3
Set theTV
Select
to the same channel
the channel
to which
you want to view/record
you set the DVDIVCR.
at the Cable
BoxlDBS.
TV's
ANTENNA
Jack
IN
Hookups
Witha CableBox/Direct
Broadcast
System
(cont'd)II
• 06ttO6601*O60*OOIO601t601,O60,,O60*I66,110,,,t,OttOOOOOgOOgOOQOWOOOtOttO0*ItO
° tlglJ,,_et,16_Q,qg,,,O66t,_*
° me
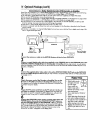
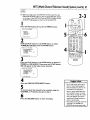
With this connection:
• You may watch one channel while recording another.
• You may not record scrambled channels.
I
DVD/VCR
Cable Box/DBS
_LL
Cable
Signal
_
__,
_T
RF coaxial
cable
r_L_
TV's ANTENNA
IN Jack
Connections
I
Connect a Cable signal to the DVD/VCR's ANT-IN (Antenna In)
Jack.
2
Use an RF coaxial cable (supplied) to connect the ANT-OUT
(Antenna Out) Jackon the DVD/VCR to the IN Jackon the Cable
Box/DBS.
3
Use a second RF coaxial cable to connect the OUT Jackon the
Cable Box/DBS to the ANTENNA IN Jack on the TM
Recording
One ChannellWatching
Another
I
Put the Cable Box/DBS on the same channel as the
DVD/VCR's CH3/CH4 switch. Set the TV to the Cable
Box/DBS output channel (03 or 04).
Then, with the DVD/VCR in VCR position (the VCR light and the
VCR/TV light will appear on the display panel),use the CHANNEL A/v buttons to select the channel you want to
record at the DVD/VCR. Start the recording.
2
Press the VCR/TV
button once to put the DVD/VCR
position, (The VCR/TV light will disappear.)
3
Select the channel you want to watch at the Cable
Box/DBS.
in TV
When you play a tape, make sure
the CableBoxlDBSis set to the
same channelas the CH3/CH4
switch on the DVD/VCR.Setthe TV
to the Cable Box/DBSoutput
channel (03 or 04).
12 OptionalHookups
•,
• J,o,,
,o,,.
Jr,
,o,
• o,i
• o9,,
• t66t
• • .,0
• • • oft
• ,,661,
or,,
• ,t6ot
• • *t6o
.oft
• ,t66°,
Jtt,t,
• otto,
,•Boo6o,ott
• tot_,,o,,
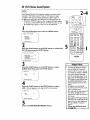
You may connect the DVD/VCR several different ways, depending on your existing equipment and your preferences for sound and picture quality.To determine which hookup is best for you, examine the options on the following pages, then see which best matches your situation. Before you hook up the DVD/VCR, remember:
• Connect the DVD/VCR directly to aT_. If you connect the DVD/VCR to aVCR, then connect the VCR to
the TV, the picture may be distorted by the copyright protection system.
• Turn off the power of all equipment before making any connections.
• Refer to the owner's manuals of your other equipment for additional information.
• Depending on your connection, you may need to purchase additional cables.
• When you use the DVD/VCR AUDIO anclVIDEO OUT jacks on the DVD/VCR, press the DVD/VCR OUTPUT button to selectVCR mode (or DVD mode).
Connecting
the DVD/VCR
to a Stereo TV
9
Otto,
Audio andVideo
IN Jackson TV
Video Cable
ANT-IN
Audio Cables
Jack
I
Connect
2
the antenna
or cable to the ANT-IN
(Antenna
In) jack of your DVD/VCR.
Connect the red and white audio cables (supplied) to the red and white DVD/VCRAUDIO
OUT
jacks on the DVD/VCR
and to the red and white AUDIO
IN jacks on the "IV, matching
the cable
colors to the jack colors. If the TV has a single AUDIO IN jack, use the white audio cable to connect the
DVD/VCR's white DVD/VCR AUDIO OUT jack to the TV's AUDIO IN jack.You will not use the red audio
cable.
3
Connect the yellow video cable (supplied) to the DVD/VCRVIDEO
OUT jack on the DVD/VCR
and to theVIDEO IN jack on theTV. Or, for better picture quality, connectan S-Video cable (not supplied) to the S-VIDEO OUT jack on the DVD/VCR and to the S-VIDEO IN jack on the TV.You will not use
the supplied yellow video cable.
4
Connect theTV's power cord to a power outlet. Turn on theTV and set it to the Audio/Video In
channel, which also may be referred to asA/V In or Auxiliary In.This channel usually is located near channel00.
See your'iV owner's manual for details.Or, if you used the S-Video cable at step 3, select the S-Video In channel at
your "i_ See yourTV owner's manual for details.
5
Connect the DVD/VCR's
power cord to a power outlet, Press the POWER button, then press the
DVD/VCR
OUTPUT
button so that the DVD light appears on the DVD/VCR.
"HELLO" will appear
briefly on the DVD/VCR's display panel.You should see the DVD logo on theTV screen briefly.If you do not,
check your connections and make sure the'iV is set to the correct Audio/Video In channel. If there is no disc
in the DVD/VCR,"no
DISC" will appear on the displaypanel.
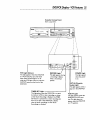
OptionalHookups
(cont'd)13
Connectin_g to a TV and a Stereo
TV has Component
Video In lacks
• Set DOLBY DIGITAL and DTS to OFF on the DVD/VCR. Detailsare on pages68-69. If you playa DVD when
the settings are wrong, the sound will be distorted or you may damagethe speakers.
I
DVD/VCR
COMPONENT
VIDEO IN
0'
_
Cb/B-Y
_
Cr,ql-Y
Back ofTV
(example only)
I
2
2
Back of Stereo
(example only)
Connect the antenna or cable to the ANT-IN (Antenna In) jack of your DVD/VCR.
Connect the red and white audio cables to the red and white DVD/VCRAUDIO
OUT Jacks on
the DVD/VCR and to the red and white AUDIO IN jacks on the Stereo, matching the cable colors
to the jack colors.
3
Connect an optional component video cable to the COMPONENTVIDEO
DVD/VCR and to the COMPONENTVIDEO
IN jacks on theTV.
OUT jacks on the
4
Plug in the Stereo's power cord.Turn on the Stereo and select the Stereo's Auxiliary IN station.
During Disc playback, you will adjust the volume at your Stereo. See your Stereo owner's manual for details,
5
Plug in theTV's power cord.Turn on the'iV and set it to the ComponentVideo In channel, which
usually is located near channel 00. DuringAudio CD playback,you may checkthe statusofAudio CDs on
yourTV screen.During DVD playback,
you will watch the programon the T_. See your"iV owners manualfor
details.
6
Connect the DVD/VCR's power cord to a power outlet. Press the POWER button, then press the
DVD/VCR OUTPUT button so that the DVD light appears on the DVD/VCR. "HELLO" will appear
brieflyon the DVDNCR'S displaypanel.Youshouldsee the DVD logoon the'IV screenbriefly.If you do not,
checkyour connectionsand make sure the'iV is set to the correct ComponentVideoIn channel.If there isno
discin the DVDNCR,"no DISC" will appear on the displaypanel.
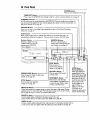
14 OptionalHookups
(cont'd)
• •oQ•
•toot
• ••,two•o•
•oeo•
• *eel
Connectine
•o,I
ioeeo
••oee•
• ito_tog
to a Dolbv Digital
iooeott.jo_,,
• • .e•••
Decoder,
• *..,••
o,_,
• Io,•l
*o_6.°.
• o°.,•°o•°
•,
DTS Decoder, or Amplifier
Some Discs are recorded in-a 5.1 channelE)olbyTPigitalSurround or DigitalTheater System (DT'S) Surround format.
These Discs will sound best if you connect the DVD/VCR to a Dolby Digital or DTS Decoder.
• You will need a coaxial digital audio cable or an audio optical cable (not supplied). SeeHelpful Hints below.
• If you use the OPTICAL jack, remove the protective cap.
• If you connect the DVD/VCR to a Dolby Digital Decoder, set DOLBY DIGITAL to ON. Details are on pages 68-69.
• If you connect the DVD/VCR to a DTS Decoder, set DTS to ON. Detailsare on pages 68-69.
• If the DVD/VCR is not connected to a Dolby Digital or DTS decoder, set DOLBY DIGITAL and DTS to OFF.
Incorrect settings may cause noise distortion and damage the speakers.
• Select the 5.1 channel Dolby Digital Surround sound in the Disc menu.
• Connect a subwoofer and the center, front, and surround speakers to the Decoder as described in the Decoder
owner's manual.
• If the Disc is recorded in 5.1 channel Dolby Digital Surround, you cannot dub the Disc in digital sound using a MiniDisc or Digital AudioTape Deck.
0
_l
o o_
DVD/VC
1[:] o,,
R
I
I
Back
ofTV 3
2
(example only)
Connect the antenna or cable to the ANT-IN
Back of Decoder
(example only)
(Antenna
In) jack of your DVD/VCR.
Connect a coaxial digital audio cable (not supplied) to the COAXIAL
jack on the DVD/VCR and to the
COAXIAL
DIGITAL AUDIO IN jack on the Decoder or Amplifier. (Or, you may connect an audio optical
cable (not supplied) to the OPTICAL jack on the DVD/VCR and to the OPTICAL DIGtTALAUDIO IN jack on the
Decoder or Amplifier.)
3
Connect the supplied yellow video cable to the yellow DVD/VCRVIDEO
OUT jack on the DVD/VCR
and to the VIDEO IN jack on the TV. (Or, you may connect a component video cable or a S-Videocable.Detai/s
are on pages 12-13.)
4
Plug in the power cord of the Decoder or Amplifier.Turn on the
Decoder or Amplifier and select its Auxiliary IN station. During
Disc playback,you will adjust the volume at the Decoder or Amplifier. See
its owner's manual for details.
5
Plug in the'rV's power cord.Turn on theTV and set it to the correctVideo
In channel. During Audio CD playback,you may check the
Disc status on your'iV screen. During DVD playback,you will watch the
program on theT_ See yourTV owner's manualfor details.
6
Connect the DVD/VCR's power cord to a power outlet. Press the
POWER button, then press the DVD/VCR OUTPUT
button so
that the DVD light appears on the DVD/VCR. "HELLO" will appear
briefly on the DVD/VCR'S displaypanel.Youshould seethe DVD logo on
the'iV screen briefly.If you do not, check your connections and make sure
the'IV is set to the correctVideo in channel. If there is no disc in the
DVD/VCR,"no DISC" will appear on the displaypanel.
Optical cable may be
damaged when bent
at acute angles.
Ensure cables are
coiled in loops with a
diameter of 6 inches or more
when storing them.
Use a cable which is 9.8 feet or
shorter.
Insert cable plugs firmly into the
jacks when making connections.
If a plug has minor scratches or is
dirty, clean it with a soft cloth
before inserting it into a jack.
Replace the protective cap on the
OPTICALjack when it is not in
use.
•
Remote
Control
Setup15
• ooooo
ooeQ,
o,eQo,,eoo
e,eo,,,t
et,
too,
• t oet.t
•or,
t 6et,ooo
• Io6o,,
I °°
• ° • • o••••
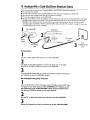
Putting_
Batteries
in the Remotelid on
Control
Remove the
battery compartment
the bottom of the
remote control by pressing the tab, then likingthe lid.
Joot,eooooooeoooooo_t••ol
o° ••_o•
o°
,oo
__
2
Place two AA batteries inside the battery compartment
with their + and - ends alignedas indicated.
3
Replace the battery compartment
Using
the Remote
lid.
Control
• Poirit the remote control at the DVD/VCR's remote sensor (see
page 26) when using the remote control to operate the
DVD/VCR.
• Do not put objects between the remote control and the
DVD/VCR.
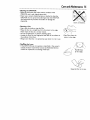
Recycling Guidelines/Battery
Safety
Your new product and its packagingcontain materials that can be
recycled and reused. Specializedcompaniescan recycle your product
to increasethe amount that needsto be properly disposed.
Your product usesbatteries that should not be thrown awaywhen
depleted but should be disposed of assmall chemical waste. Please
find out about the local regulations on disposal of your old product,
batteries, and packagingwhenever you replace existing equipment.
The remote control and its batteries are supplied.
Do nat mix alkaline and manganese batteries.
Do not mix old and new batteries.
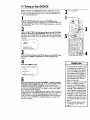
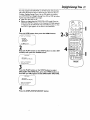
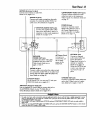
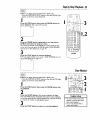
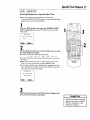
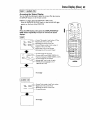
16 Turning
onYourDVD/VCR
Before turning on your DVD/VCR, make sure batteries are in the
remote control and the DVD/VCR and TV are connected correctly.
• You can not program channels if you are using a Cable Box or a
Direct Broadcast System.
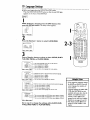
.
2
I
Turn on the T_.
Press the VCR button, then press the POWER button.
"HELLO" will appear briefly on the front of the DVD/VCR.TheVCR
light, theVCR/TV _ight,and the POWER light will appear on the front
of the DVD/VCR.
2
Turn on the TV. Set it to the same channel as the CH3/CH4
switch on the back of the DVD/VCR. The displayshown below
will appear. (If the display does not appear, check your hookups, then
follow the steps on page 17 to set up channelsand page 22 to select a
language.)
_
C3
-_ ENGLISH
_SPANOL
ocuoU
ON
SPEED
MAKE SELECTION OR
OCDO
ocuo
USH MENU TO CONTINUE
C300
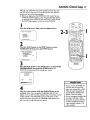
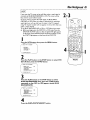
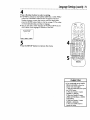
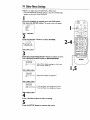
3
Within 60 seconds, press the PLAY button or the STOP
ton to select English or Spanish on-screen displays and
menus.
_
but-
4
Press the MENU
TO VCP,
THEN.
PUSH CH UP KEY
OR.
_CCONNECT
ANTENNA
Helpful
button.
OR CABLE 1
FOP, pLAy ONLY - PUSH STOP
5
Within 60 seconds, press the CHANNEL
A button to begin
automatic channel programming. AUTO CH PROGRAMMING
IN PROCESS PLEASE WAIT will appear on the'IV screen.The
DVD/VCR will memorize all availablechannels.When all channels are
memorized, CHANNELS ARE SET will appear on the screen briefly,
then TV programming will appear.
These channels will be availablewhen you want to watch TV while in
VCR mode.To put the DVD/VCR in VCR mode, press the DVD/VCR
OUTPUT button so that theVCR light appears.Then press the
VCR/TV button so that theVCR/TV light appears. Press theVCR button, then use the CHANNEL and Number buttons to select aTV
channel for viewing.
__E_S
TITLE
--
4
Hints
Toskip this feature and play a tape
immediately, insert a tape with its
record tab removed.Or, to skip step
3, press the MENU button.All onscreen displays will be in English.To
skip step 5, press the STOPbutton.
Channels will not be programmed,
and CHANNELS NOT SETwill
appear on the screen.
If you try to program channels when
there is no antenna or cable connected to the DVD/VCR.programming will appear to take place,but
eventually a NO TV SIGNALSmessage will appear. Connect an antenna or cable to the DVD/VCR'sANTIN (Antenna In) jack and press the
CHANNEL A button again. If channel programming does not resume,
you may need to follow the steps on
page 17.
You may need to repeat the steps
on this page if a power failure
OCcurs.
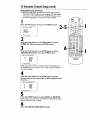
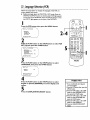
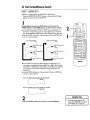
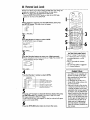
Although your DVD/VCR may automatically memorize the channels you receive when you turn it on for the first time, this function lets you set up the channels again.
• Before you begin,placethe DVD/VCR inVCR mode. Pressthe
DVD/VCR OUTPUT button so that the greenVCR light appears
on the front of the DVD/VCR. PresstheVCP,/TV button so that
theVCR/-rv lightappears on the front of the DVD/VCR.
I
Q
©
owvcA
OUTFIT
v_lv
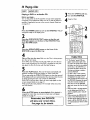
Press theVCR
button, then press the MENU button.
C_
MEMORY
CZ_ CZ_
DVD
>
VC_
-I
PROGRAM
VCR SET UP
TUNER
SET UP
SET CLOCK
O END PUSH EXIT
2
CD CD CD
Press the PLAY button or the STOP button to select
TUNER SET UP, then ,ress the F.FWD button.
SELECT a,v
oo.....
6 0
000
CHOOSE I_
AUTO PROGRAMMING
ADDIDELETE CH
CH MEMORY REVIEW
TV STEREO
2ND AUDIO
-I
ON
O END PUSH EXiT
3
PHILIPS
Press the PLAY button or the STOP button to select AUTO
PROGRAMMING, then press the F.FWD button. The
DVD/VCR will memorize all the channelsyou receive.
j
AUTO CH PROGRAMMING
IN PROCESS
PLEASE WAIT
START
IIIIIIIIII
FINISH
IIIIIIIIIII/
4
Wait for a few minutes while the DVD/VCR sets up the
channels. When this is complete, CHANNELS ARE SET will
appear on the screen.Then the programmingof the lowest channel
number placedin the DVD/VCR's memory will appearon the
screen. Now when you pressthe CHANNEL _/_ buttons,you
will scan only through channels you receive.
Helpful
H|n_
Youcan nat enter the TUNER SET
UP menu when you are in !3ne
Input made (channel 001 ar 002).
When you select channel 001 or
002,AV REARor AV FRONT will
appear on the screen briefly.
Youcan not program channels if you
are using a Cable Box or DBS.
If you have an antenna, channels 269 will be available. If you have a
cable conne_on, channels 1-125
will be available.
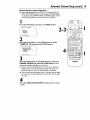
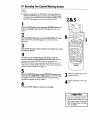
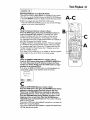
Adding/Deleting
Channels
• Before you begin,placethe DVD/VCR inVCR mode. Pressthe
DVD/VCR OUTPUT button so that the greenVCR light appears
on the front of the DVD/VCR. PresstheVCR/TV button so that
the VCR/TV light appearson the front of the DVDNCR.
f{_
I
r_MEnSET'_
(D
vc_Tv
O
c_lr_r
(2ZD C_
Press the VCR
button,
then press the MENU
button.
ME_
(2_D
_vD
_
I
PROGRAM
VCR SET UP
TUNEP, SET UP
SET CLOCK
SI!T'LECT
Av CHOOSE I1_
O END PUSH EXIT
2
C_ El CD 0
Press the PLAY button or the STOP button to select
TUI_ER SET UP, then press the F,FWD button.
3
SP_EO
6
CDC_3C3
J_JED CD
Press the PLAY button or the STOP button to select
ADD/DELETE CH, then press the F.FWD button.
0 0 '0"'0_'0
124
125
I
2
3
DELETED
DELETED
_-_ DELETED
ADOEO
ADDED
PHILIPS
SII_LECT
_- ADDJDELETE
P" 1
O END PUSH EXIT
J
NOT_ If you have an antenna, channel numbers 2-69 will appear on
the ADD/DELETECH menu.If you have a cable connection,channels I125 will be available.
4
Press the PLAY button or the STOP button until the
channel number you want to add or delete appears beside
the
arrow.
_-."To_SELECTEND201918_I67
A_PUSH._ADO/DELETEExITADDEDADDEDADDEDADDEDDELETED
ll1
5
Press the F.FWD button to select ADDED or DELETED.
Repeat steps4 and 5 until you haveadded or deleted all the channels you wanted to add or delete.
6
Press the DISPLAYISTATUS/EXIT
button.
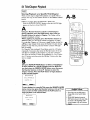
Automatic
Channel
Setup(cont'd)19
• • .o.o
• _Qo
• • to
Reviewing
•
• _oQo
• ooo
• • _ooo
• _tQo
Memorized
• _.o
• o._o
• • ttJ*
• Jottll
• • ooooo
• • • _oooo
• • ooooo.,
• _.oo
• i.°o
• Ioo...
o_ooom
• • • • _a°
Channels
Before you begin, place the DVD/VCR in VCR mode. Press the
DVD/VCR OUTPUT button so that the green VCR light appears
on the front of the DVD/VCR. Press theVCR/TV button so that
theVCR/TV light appears on the front of the DVD/VCR.
I
Press the VCR
button,
then press the MENU
button.
PROGRAM
_
I
VCR SET UP
TUNER SET UP
SIT
SET CLOCK
LECT _'v
CHOOSE
I1_
1
O END PUSH EXIT
2
Press the PLAY button
TUNER
SET UP, then
or the STOP
button
press the F.FWD
to select
button.
f
Sf
S LECT _,_ CHOOSE I_
AUTO PROGRAMMING
ADD/DELETE CH
CH MEMORY REVIEW
TV STEREO
2ND AUOIO
4
ON
I
O END PUSH EXIT
3
Press the PLAY button
or the STOP
button
to select CH
MEMORY REVIEW, then press the F,FWO button. A list of
memorized channels will appear on the screen.
• If all the memorized channels don't fit on the screen, press the
EF_/D button to see the remaining channels.Then press the
REW(ind) button to return to the first screen of channels.
• If you do not press any buttons within 10 seconds,you will either
go to the next screen of channels or you will return to the previous menu.
4
Press the DISPLAY/STATUS/EXIT
to exit.
button once or twice
PHILIPS
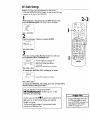
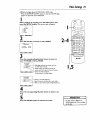
20 Setting
theClock
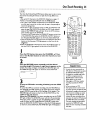
Follow the steps below to set the clock for the VCR. Make sure:
• The DVD/VCR is on and theVCR/TV light appears on the display panel.(If it does not, press the VCR/TV button once.)
• You make each entry within 60 seconds of the previous entry.
• Before you begin,placethe DVD/VCR inVCR mode. Pressthe
DVD/VCR OUTPUT button so that the greenVCR light appears
on the front of the DVD/VCR. PresstheVCR/TV button so that
theVCR/TV light appearson the front of the DVD/VCR.
4-5
2-3
I
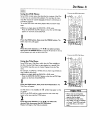
Press the VCR button, then press the MENU button.
2
Press the PLAY button or the STOP button to select SET
CLOCK, then press the F.FWD button.
_ poo
E] CZ)CZ30
3
C_ CZ3CZ)....
Press the PLAY button or the STOP button to select SET
CLOCK, then press the F.FWD button.
DATE - - / - - /
-
6
oo.....
6 0
_o
c_i:_ _,_
_
I
TIME - - :TO END PUSH EXiT
......
_
_0 00""Ot
I_
RE_URN
CD,
0'_
J
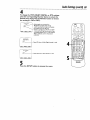
4
PHILIPS
Press two Number buttons for the hour(s) and two
Number buttons for the minute(s).Then press I forAM
or 2 for PM. For example, for 2:15 PM, press 02, 15, 2.
MONTH
/ - -/ -=
TO CORRECT
PUSH CLEAR
TO END PUSH EXIT
5
Press two Number buttons for the month, two Number
buttons for the day, and two Number buttons for the year.
For example, for July I, 2000, press 07, 0 I, 00.The day of the week
will appear automatically.
DATE 07101
/00
SAT
TO CORRECT PUSH CLEAR
TO
END
PUSH
EXIT
6
Press the DISPLAYISTATUS/EXIT
button.
Entera 0 beforea stngle-digit
number.
Entriesthat do notmatchthe
DVDIVCR's
clockor calendarwill
causea questionmark to appearon
the screen.
Tomakecorrec'dons,
pressthe CLEAR
buttonuntilthespaceforthe number
youwantto correctis flashing.Then
enterthe correctnumber.
Toseethe currenttimeon theTV
screen,
pressthe DISPLAY/STATUS/
EXITbutton.Detailsareon page23.
Powerfailuresthat last for morethan
oneminutecancauseyouto lose
yourclocksetting.
Daylight.Savings
Time21
Ilot
• oooeeBoQi
OQQO
OIIOOt0601
*.t0
* JttQ
• O01_
0006011660t
IOOQ_
0060
• 066O
• .trio
• .06°°°
• O..O_
• .,01
• ..61°
You may program the DVD/VCR so theVCR clock will automatically move forward one hour in April and turn back one hour in
October. Daylight-SavingsTime is set to ON when you receive
your DVD/VCR.Turn Daylight-SavingsTime ON or OFF by following the steps below. Before you begin:
• Make sure the clock is set.
• Before you begin,place the DVD/VCR in VCR mode, Pressthe
DVD/VCR OUTPUT button so that the greenVCR light appears
on the front of the DVD/VCR. Press theVCR/TV button so that
theVCR/TV light appearson the front of the DVD/VCR.
button,
then
press the MENU
• • ..O0
I
I
Press the VCR
1.0_,00.
button,
11
SIST
PROGRAM
VCR SET UP
TUNER SET UP
SET CLOCK
LECT Av CHOOSE _O EN_PUSH
1
EXIT
2
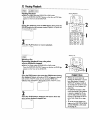
Press the PLAY button or the STOP button to select SET
CLOCK, then press the F.FWD button.
I
SET CLOCK
DAYUGHT SVGTIME [ON]
I
SELECT AvSETCLOCK
CHOOSE b
PHILIPS
1
O END PUSH EXIT
3
Press the PLAY button or the STOP button to select
DAYLIGHT SVG TIME.Then, press the E.FWD button so
that OFF (or ON) appears beside DAYLIGHT SVG TIME.
SET CLOCK
DAYLIGHT SVG TIME {ON]
_ST SELECT A_SETCLOCK
CHOOSE I _
1
O END PUSH EXIT
4
Press the DISPLAY/STATUSIEXIT
button.
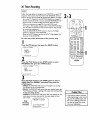
22 Language
Selection
(VCR)
Follow the steps below to change the languageof the VCR onscreen displaysand menus.
• Before you begin,place the DVD/VCR in VCR mode. Press the
DVD/VCR OUTPUT button so that the greenVCR light appears
on the front of the DVD/VCR. PresstheVCR/TV button so that
theVCR/TV light appearson the front of the DVD/VCR.
I
O
Dvovc_
Press theVCR
SIST
T_ERSET
O
button,
then press the MENU
button.
OVD
vcn
-I
14
PROGRAM
VCR SET UP
TUNER SET UP
SET CLOCK
LECT _,v CHOOSE I_
1
O END PUSH EXIT
2
Pre_s the PLAY
SET UP, then
button
press
the
or the STOP
F.FWD
button
to selectVCR
button.
m
REPEAT PLAY
ON SCREEN MODE
AUDIO OUT
LANGUAGE
BLUE BACKGROUND
STELEC T A"
CHOOSE
OFF
ID,
ON
_NTE_
_ET_
1
-I
O END PUSH EXIT
3
PHILIPS
Press the PLAY button or the STOP button
LANGUAGE,
then press the F.FWD button.
to select
_wJ
ESPANOL
_ISo
SELECT
_NGL_IsH
Av
MAKE SELECTION OR
ON
1
END PUSH EXIT
4
Press the PLAY button or the STOP button to select
English or Spanish (ESPAl_OL)on-screen
displays and
menns,
5
Press the DISPLAY/STATUS/EXIT
button.
Helpful
Hint
• If you accidentally select Spanish
and need English:
I. Pressthe VCR button, then press the
MENU button.
2. Pressthe PLAYbutton or the STOP
button to select PREPAREELVCR,
then press the EFWD button.
3. Pressthe PLAYbutton or the STOP
button to select LENGUAJE,then
press the EFWD button.
4. Pressthe PLAYbutton or the STOP
button to select ENGLISH.
5. Pressthe DISPLAY/STATUS/EXIT
button.
On-Screen
Status
Displays
(VCR)23
• • •o•••
• o••
• rio•
•1••
too•
• •••
• ••1
• OQQ • OOOOI
OOtOO
IOtOOg
• •tOOl
Jot•
• ••111•
A status display will appear when you press the
DISPLAY/STATUS/EXIT button or certain function buttons.The contents of the status display will vary.To choose the status display
mode, follow the steps below.
• Before you begin, place the DVD/VCR in VCR mode. Press the
DVD/VCR OUTPUT button so that the green VCR light appears
on the front of the DVD/VCR. Press theVCR/-rv button so that
theVCPdTV light appears on the front of the DVD/VCR.
If you select STATUS ON, then select COUNTER
ONLY
ON:
_ Whenever you press the STOP button or the PLAY button, the
status display will appear for five seconds.After five seconds, only
the counter will remain on the screen.You must press the DISPLAY/STATUS/EXIT button to remove it. Portions of the status
display also may appear when you press other function buttons.
If you select STATUS ON, then select COUNTER
ONLY
• • II1••
• tot
•,,Q•••
•IOtQ••tQ••,
Receiving and Recording Mode
Channel
Current
of tape
status
Time
I
I
f
I
(STOP
TI TV STEREO--
@ Whenever you press the STOP button or the PLAY button, the
status display will appear for five seconds. Portions of the status
P
display also may appear when you press other function buttons.
OFF:
_L
If youcselect STATUS OFF:
_ The status display will not appear when you press function buttons.You must press the DISPLAY/STATUS/EXIT button to see the Tape
status display.
Speed
Press the MENU button.
• •IOO•OOO,•
I
12:00AM
CHI0 -2ND AUD
1:23:45
HIFI
STEREO
Counter
and
Audio Out Mode
Memory
Counter
MTS
Broadcast
Available
2
Press the PLAY button or the STOP button to select VCR
SET UP, then press the F.FWD button.
3
Press the PLAY button or the STOP button to select ON
SCREEN MODE, then press the F.FWD button.
4
Press the PLAY button or the STOP button to select STATUS, then press the F.FWD button so that OFF (or ON)
appears beside STATUS.
f
Sf
S LECT Av
STATUS
COUNTER
CHOOSE ll_
ONLY
[OFF]
ION]
1
O END PUSH EXIT
5
Hempful
If you set STATUS to OFF, go to step 6. If you set STATUS
to ON, press the PLAY button or the STOP button to select
COUNTER ONLY, then press the F.FWD button so that
OFF (or ON) appears beside it.
6
Press the DISPLAYISTATUSIEXIT
button.
Youmay not accessa status display
when viewing a stJIIpicture, during
slow motJonplayback, or during forward or reverse searching.
The status display may not appear if
a weak channel is selected and
BLUE BACKGROUND is set to OFF.
Details are on page 49.
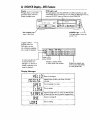
24 DVD/VCR
Display
- DVDFeatures
DVD Light (red)
This light appearswhen the DVD/VCR is in DVD mode.You can only
watch DVDs when the DVD light is on.To make the DVD light comeon,
press the OUTPUT button on the front of the DVD/VCR.
Display
Messages about current DVD
operations appear here. See
Display Messages below.
€--
Ill
pHIULIS
_--_ _
.......
!!
1
/
Disc loading tray /
Insert a Disc here.
POWER Light
\
This Light appearswhen the
power is on.
Lit w_hena DVD is -'-'--I
inserted.When the l
DVD light is on, the l
I
disc is loaded completely
andis
playback.Lit
when
ready
anfor
Audio
r
_
CD-___
°0_]_
__
_ill,....numberD'Sp!ays
(DVD)a
title _0
_
_D_(J
0
Qz_I
0
__ _D_J
10_=_
c0_ _
c_-_"0_]
c0_0
is inserted.When the
CD light is on, the disc is
loaded completely and is
ready for playback,
Display
_.
Displays a chapter (DVD)
or track (Audio CD) number
Displays the elapsedtime
of the current title (DVD)
or track (Audio CD)
Messages
!JCl ii-i
I I t8 I_ I_ I_1 Power isturning on.
I"I I--I
I-'1'_1 il IS'-|"I 0|---- |"I
U|
I_I
Lll
Appears after the disc tray closes if the tray
,sempty.
Tray is opening or is open.
C
Tray is closing.
LL!|"I C--*L-
I1_ I..
|_! _'! OO
t" !!..I!
il ':IE
| |"It!
T|
I_ I.,l I I 11
to
searchbriefly
for thewhen
next you
or previous
Appears
press thechapter/track.
SKIPbuttons
Power is turning off.
Disc is loading.
DVD/VCR
Display.VCRFeatures
25
Cassette Compartment
Insert a tape here.
PHILIPS
uluu
_
o II
.......
I
i
/
i
r_E,
d
VCR Light (Green)
This light appearswhen the DVDNCR
is inVCR mode.You can only watch
tapes when theVCR light is on.To
make theVCR light come on, press the
OUTPUT button on the front of the
DVD/VCR.
_IICOIIRD
LightIfi
_*_
This light appears during
a recording• It flashes
when a recording is
paused•
TIMER SET Light
This light glows when the DVD/VCR
POWER Light
This light appears
when the power
is on.
CST. IN (CassetteInside) Light
This light appearswhen a
tape is in the DVD/VCR.
is in stand-
by mode or off for a timer recording or during
a One-Touch Recording. It flashes if the TIMER
SET button is pressed for a timer recording, but
there is no tape in the DVD/VCR. It flashes
when all timer recordings or One-Touch
Recordings are finished.
VCR/TV
Light
This light appears when the
DVD/VCR is in VCR position.This light does not
appear when the DVD/VCR
is in "IV position.
26 FrontPanel
POWER
Button
Press to turn the power on and off.
TIMER SET Button
Press to put the DVD/VCR
CHANNEL
into standby mode for a timer
recording. Details are on page 38.
Buttons
InVCR mode, press to change channels at the DVD/VCR. Or, press to adjust the tracking of a
tape during normal playback or slow motion playback.Also, press to remove vertical jitter in a
Still picture. Details are on page 45.
RECORD
Button
Press once to start a recording. Press repeatedly to start a One-Touch
Details are on page 35.
Recording.
PLAY Button
Press to play a tape. Press to release Slow, Search, or Still mode and return to
tape playback. Details are on page 44. Press to select an item in theVCR menu.
Remote
Sensor
SEARCH
Buttons
Press for a fast forward or
reverse search during Disc playback. Details are on page 54.
Receives a signal from your
remlbte control so you can
operate your DVD/VCR
from a distance.
I
I
PHILIPS
0'Dn'LI_
u I Uu
nN
I
133.ir
,.C3.q_
m
J
OPENICLOSE
Button
Press to open or close the Disc tray.
Details are on page 50.
STOP Button
Press to stop Disc playback.
Details are on page 50.
PLAY Button
Press to start or
resume Disc playback.
Detailsare on page50.
OUTPUT Button Press to select DVD mode
orVCR mode.
STOP/EJECT Button
Pressonce to stop the tape.
When playbackis stopped, press
to eject the tape. Pressto select
an item in theVCR menu.
REW(ind)
Button
When tape playback is stopped, press to rewind the tape at high speed. During
playback, press to rewind the tape while the picture stays on the screen. Details
are on page 44. Press to return to a previousVCR menu.
F.FWD (Fast
Forward) Button
When tape playback is
stopped, press to fast
forward the tape at high
speed. During tape playback, press to fast forward the tape while the
picture stays on the
screen. Details are on
page 44. Press to
advance to the next
VCR menu or to
change the setting of an
item in theVCR menu.
AUDIO
In Jacks
Connect audio cables coming from the audio out jacks of a camcorder, anotherVCR, or an audio source here. Details are on page 40.
VIDEO
In Jack
Connect a video cable coming from the video out jack of a camcorder, another VCR, or
a video source (laser disc player, video disc player, etc.) here. Details are on page 40.
RearPanel27
ANT-IN (Antenna
In) Jack
Connect your antenna or cable here.
Details are on pages 8-14.
AUDIO
IN Jacks
Connect audio cables coming from the audio
out jacks of a camcorder, another VCR, or an
audio source here. Details are on page 40.
_DVD/VCRAUDIO
OUT Jacks
Connect the supplied audio cables
here and to the Audio In jacks of a
television or other audio equipment.
Details are on pages 12-14.
@
COAXIAL Jack
Connect an optional coaxial
digital audio cable here and to
the Coaxial Digital Audio In
jack of a decoder or amplifier.
Details are on page 14.
@
DVD/VCR
VIDEO
OUT Jack
Connect the yellow video cable
(supplied) here and to the TV's
Video In jack. Details are on
pages 12 and 14.
AC Power Cord
Connect to a
standard AC outlet to supply
power to the
DVD/VCR.
VIDEO IN Jack
Connect a cablecoming from the video out jack
of a camcorder, another VCR, or an audio-visual
source (laser disc player,video disc player,etc.)
here. Detailsare on page 40.
CH31CH4
COMPONENTVIDEO
OUT Jacks
Connect optional component video
cables here and to the component
Video In jacks of a television. Details are
on page 13.
Switch
Set to channel 3 or 4 to use your TV with your
DVD/VCR. Details are on pages 8-1 I.
OPTICAL Jack
Connect an optional
audio optical cable here
and to the Optical
Digital Audio In jack of a
decoder or amplifier.
Detailsare on page 14.
When the OPTICAL jack
is not in use, make sure
its protective cap is in
place.
S-VIDEO OUT Jack
Connect an optional S-Video cablehere
and to the S-Video In jack of a television. Detailsare on pages 12 and 14.
ANT-OUT (Antenna Out) Jack
Use the supplied RF coaxial cable to connectthis jack to
the ANTENNA IN Jack on your T_, Cable Box, or
Direct Broadcast System.Detailsare an pages8-1 I.
Helpful Hi,ts
• Youonly need one audio connection and one video connection, so you will not have a cable connected to every
jack. For example, if you are using the S-VIDEO OUT jack, you will not use the yellow VIDEO OUT jack or the
COMPONENTVIDEO OUT jacks.
• The S-VIDEO OUT jack, COAXIAL jack, OPTICALjack, and COMPONENTVIDEO OUT jacks are oniy useful in
DVD mode.
• When you use the DVD/VCR AUDIO and VIDEO OUT jacks, press the DVD/VCR OUTPUT button on the remote
control to select VCR mode or DVD mode.
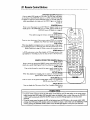
28 Remote
Control
Buttons
too°om
ooQ.
• 6°.
Joott
ooo°..
I.._o
oo66..
• ._.
• • oo°..
J_ol
• .°°.
• Jo_
•.
_°_o
• i°°.
• o o_t°°..
°_÷
• oo°°m
• • _,6_.
• • • _o_l_
• • • .o
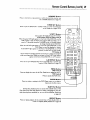
DVD/VCR
OUTPUT
Button
Press to select DVD mode orVCR mode.The DVD light will appear
on the front of the DVD/VCR when it is in DVD mode,TheVCR light
will appear on the front of the DVD/VCR when it is in VCR mode. For
video tape playback, also make sure theVCR/TV light is on. Details are
on page 32.
POWER Button
Press to turn the power on and off."HELLO" appears briefly on the
display panel as the DVD/VCR turns on."BYE" appears briefly as the
DVD/VCR turns off. Details are on page24.
DVD
Press before using the remote control for DVD features.
REW(ind)
Button--DVD mode •
Press to view the picture in fast reverse motion (DVD) or to reverse
playback of an Audio CD. Details are on page 54.
VCR mode •
When tape playbackis stopped, press to rewind the tape at high speed.
During playback, press to rewind the tape whiFe the picture stays on the
screen. Details are on page 44. Press to return to a previous menu.
STOP
In DVD mode, press to stop Disc playback. In VCR mode, press to stop
tape playback or recording, or press to select an item in the VCR menu.
SEARCH
MODE/TIME
DVD mode •
Pressto access or remove the SEARCH menu, which allows you to go
directly to a specific Title/Chapter/Track/Time. Details are on pages 55-57.
VCR mode •
Press to fast forward or rewind the tape a specific length of time.
Details are on page 43.
When Disc playback is stopped, press to access or remove the DVD
player's SETUP menu. Details are on pages 66-74,
Press to return to the previous DVD SETUP menu or to remove the
SETUP menu from theTV screen.
TITLE
Button
Press to display the Title menu of the Disc, if available. Details are on
page 5 I.
Helpful Hints
• To use the remote control to operate the DVD player and its features, press the DVD button on the remote control
before pressing other DVD buttons. DVD operation buttons are labelled in blue or white. Make sure the DVD/VCR is
in DVD mode by pressing the DVD/VCR OUTPUT button so that the DVD light appears on the front of the
DVD/VCR.
To use the remote control to operate the VCR and its.features, press the VCR button on the remote control before
pressing other VCR buttons.VCR operation buttons are labelled in orange or white. Make sure the DVD/VCR is in VCR
mode by pressing the OVD/VCR OUTPUT button so that the DVD light appears on the front of the DVD/VCR.
Remote
Control
Buttons
(cant'd)29
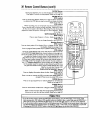
MEMORY
Button
Press to memorize a tape position at which the real-time counter was
set to 0:00:00. Details are an page 42.
TIMER SET Button
Press to put the DVD/VCR in standby mode so a timer recording can
occur, Detailsare on pages36-38.
VCR/TV
Button__
Use to select the signal that yourTV receives.
VCR Position (VCR or DVD mode) •
When the greenVCR light appears on the front of the DVD/VCR, use the
VCR to watch a tape, to watch aTV program while recording it, or to
watch aTV broadcast using the CHANNEL A/v or Number buttons
to change channels at the DVD/VCR.
When the red DVD light appears on the front of the DVD/VCR, use the
DVD Player to view Disc playback or menus.
If the VCR/TV light appears on the front of the DVD/VCR, it is inVCR
position (in eitherVCR or DVD mode).
TV Position •
Use to watchTV (changing channels at theTV) or to watch one program
while recording another. Details are on page 34. If theVCR/TV light doesn't
appear on the front of the DVD/VCR, it is in TV position.
A-B REPEAT Button
Press to set up A-B Repeat Play,which repeatedly plays a specific segment of a Disc. Details are on page 59.
MENU Button
DVD mode •
Press to display the menu of the Disc. Details are on pages five and 5 I.
VCR mode •
Press to access theVCR menu.
ENTER
Button
Press to select a setting in the DVD Player menu or to select a
feature in the Disc menu.
SUBTITLE Button
During disc playback,press to access the subtitle menu of the
Disc, then press the _/_ buttons to select a languagefor the subtitles (among those available) or to turn off the subtitles. Detailsare
on page 63.
REPEAT Button
Press to repeat playback of the current Disc or Track (Audio CD) or
a Title or Chapter (DVD). Details are on page 58.
30 Remote
Control
Buttons
(cant'd)
SLOW
Button
During tape playback, press to view the picture in slow motion.
Press again to resume normal playback. Details are on page 44.
PAUSE Button
DVD mode •
Press to pause Disc playback. Details are on page 52. Press repeatedly
to advance the DVD picture step by step (or one frame at a time).
Details are on page 53.
VCR mode •
While recording, press to temporarily stop the recording (pause).
Press a second time to resume normal recording. Details are on page
33. You can not pause a One-Touch Recording. Or, press during tape
playback to freeze the picture. Press again to resume playback. Details
are on page 44.
DVD mode •
Press to skip Chapters or Tracks. Details are on page 55.
VCR mode •
Press to change channels a_.the DVD/VCR.
DVD mode •
Press to directly select aTrack (Audio CD) or a Chapter orTitle (DVD)
for playback. Details are on pages 55-56.
Press to program Tracks (Audio CD) for playback.Details are on page 60.
VCR mode •
Use to set upVCR features (such asthe clock). Pressto select'iV channels
at the DVD/VCR. Cable Users: Enter channel numbers as a two-digit number for the quickest results. For example,to select channel 6, press 0,6. If you
only press the Number 6 button, channel 6 will be selected after a brief
delay.(There also may be a brief delaywhen you select channels I0, I I, and
12.)If you want to select channels 100and above,enter channel numbers as
a three-digit number For example, to select channel I 17,press number buttons I, I, 7.Antenna Users: Enter channel numbers as a two-digit number
for the quickest results. For example,to select channel 5,press 0,5. If you
only press the Number 5 button, channel 5 will be selected after a brief
DVD mode •
about the disc. Details are on page 65.
VCR mode •
Press to accessor remove theVCR's on-screenstatus display.Details are
on page 23. Press to exit on-screen VCR menus.
MODE Button
Press to set up programmed or random playbackfor an Audio CD.
Details are on pages 60-6 h
Press to display information
MENU
OO
TITLE
ENTER
IMPS
CLEAR Button
DVD mode •
Press to remove Track numbers from a Program. Details are on page 60.
VCR mode •
Press to erase incorrect data when programmingVCR functions.
Also, press to reset the real-time counter. Details are on page 42.
Helpful
Hints
Touse the remote control to operate the DVD player and its _atures, press the DVD button on the remote control
before pressingother DVD buttons. DVD opero'donbuttons are labelled in blue or white. Make sure the DVD/VCR is in
DVD mode by pressingthe DVD/VCR OUTPUT button so _at the DVD light appears on the front of the DVDNCR.
Touse the remote control to operate the VCR and its features, press the VCR button on the remote control before pressing other VCRbuttons.VCR operatJonbuttons are labelled in orange or white. Make sure the DVD/VCR is in VCRmode
by pressing the DVD/VCR OUTPUT button so that the DVD light appears on the front of the DVD/VCP,.
Remote
Control
Buttons
(cont'd)31
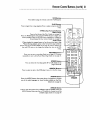
VCR
Press before using the remote control forVCR
Button
features.
PLAY Button
Pressto begin Disc or tape playback. Press to select an item in theVCR
menu.
F.FWD
(Fast Forward)
Button
DVO mode •
Press to fast forward the Disc. Details are on page 54.
Press the PAUSE button, then press the EFWD button to begin slow
motion playback. Press the EFWD button repeatedly to change the
forward speed of slow motion. Details are on page 53.
VCR mode •
When playback is stopped, press to fast forward the tape at high
_speed. During playback, press to fast forward the tape while the
picture stays on the screen. Details are on page 44. Press to advance to
the nextVCR menu or to change the setting of an item in theVCR
menu.
RECORD
Press once to start a recording. Details are on page 33. Or, press
repeatedly to start a One-Touch Recording. Details are on page 35.
SPEED Button-Press to select the recording speed (SP or SLP). Details are on
pages 38 and 80.
ARROW
Buttons--
Press to select an item in the DVD player menu or in the Disc menu.
AUDIO
Button
Press the AUDIO button,then press the A/v
buttonsto choose
one of the audio languagesor sound modes availableon the Disc.
Details are on page 62.
ANGLE
Button
Press to view the picture from a different angle (if available). Press the
ANGLE button, then press the A/v
buttons to choose one of the
available angles. Details are on page 64.
(330
i ENTER
C:)O
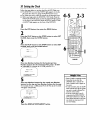
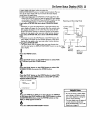
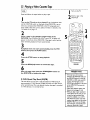
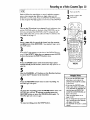
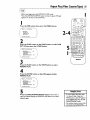
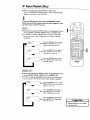
32 PlayingaVideoCassette
Tape
i
Turn on theTM
Read and follow the steps below to play a tape.
Insert a tape in the
DVD/VCR.
I
Turn on the'l-V
nel the CH3/CH4
and set it to channel 3 or 4, whichever chanswitch on the back of the DVD/VCR is set to.
Or, if you connected the DVD/VCR to theTV using audio and
video cables, select the correct audio and video in channel at the
TM Details are on page 12.
ovo
2
Insert
v¢_
O CZ -n
m
a tape in the cassette
compartment
of the
_/
DVD/VCR.
The POWER,VCR,VCR/TV
and CST IN lights will
appear on the front of the DVD/VCR. If the tape's record tab has
been removed, playback will start automatically.
REUnR_
3
If playback does not start automatically, press the VCR
button, then press the PLAY button.
4
5
HEr_u
Press the STOP
button
TITLE
to stop playback.
_O 00H_@_'O_
Press the REW(ind)
button
to rewind
the tape.
After the tape stops, press the STOP/EJECT button on
the DVD/VCR to remove the tape.
S-VHS
oo......
@0
Quasi
Play Back
(SQPB)
This unit allows you to view a tape recorded in S-VHSformat.A
tape recorded in S-VHS format will play the same as a tape recorded in normal format.This unit detects whether the tape is recorded
in S-VHSformat or in normal format.
PHILIPS
Helpful
Hints
If the tape you want to play is
alreadyin the DVDIVCR.make sure
the DVDIVCR power is on and the
DVD/VCRis in VCRmode andVCR
position.(TheVCRlight and the
VCR/TVlight will appear on the front
of the DVD/VCR.)Then press the
PLAYbutton.
Other tape playback options and
features are on pages 41-48.
When you play a tape recorded in
S-VHSformat on this unit, you can
not get the high resolution that
would be available on an S-VHS
VCR.Noise lines (black and white
streaks) may appear on the picture.
If REPEATPLAYis set to ON, playback will begin automatically, even
when the record tab is intacL
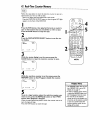
Recording
onaVideoCassette
Tape33
I
Readand follow the steps below to record a television program
onto a video cassette tape. Before you begin,make sure the
DVD/VCR is inVCR mode. Press the DVD/VCR OUTPUT button
Turn on the TV.
Insert a tape in the
DVD/VCR.
so that the greenVCR light appears on the front of the DVD/VCR.
I
Turn on theTV
nel the CH3/CH4
and set it to channel 3 or 4, whichever chanswitch on the back of the DVD/VCR is set to.
3
Or, if you connected the DVD/VCR to the TV using audio and
video cables, select the correct audio and video in channel at the
TV. Details are on page 12.
6
5
2
Insert a tape with its record tab intact into the cassette
coml_artment
of the DVD/VCR.
If tape playback begins, press
the STOP button.
3
If the VCR/TV light appears on the front of the DVD/VCR, go to
step 4. If the VCR/TV
light does not appear, press the VCR
button, then press the VCR/TV
button once.
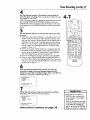
4
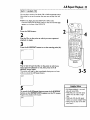
Press the SPEED button until the desired tape speed
appears briefly on the screen. (Detailsabout tape speedare on
page 38.)
PHILIPS
5
Use the CHANNEL
A/v
to select the "IV channel
buttons or the Number
to be recorded.
buttons
Helpful
6
Press the RECORD
button
RECORD light will appear.
once to start recording.
The
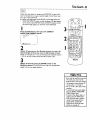
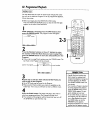
To pause the recording, press the PAUSE button once.The
RECORD light will flash.To resume recording, press the
RECORD button or press the PAUSE button again. The
RECORD light will come on again.
8
press the STOP
If you press the RECORD button
when there is not a tape in the
DVDIVCR,NO CASSETTEwill flash
on the screen.
7
To stop recording,
Hints
button.
If you press the RECORD button
while a tape without a record tab is
in the DVD/VCR,the DVD/VCR will
eject the tape and PROTECTED
CASSETTECANNOT RECORD will
flash on the screen.
Other recording optJonsare on
pages 34-40.
Youcan change the tape speed during a recording,but some distortion
will appear on the tape.
The DVD/VCR will record in a preset
volume.
34 Recording
OneChannel/Watching
Another
•
Beforeyou begin,place the DVD/VCR in VCR mode. Pressthe
DVD/VCR OUTPUT button so that the greenVCR light appears
on the front of the DVDNCR. PresstheVCR/TV button so that
theVCR/TV light appearson the front of the DVD/VCR.
I
Press the VCR button, then press the RECORD
button to
start a recording
of the currentTV
channel. Details are on
page 33.
2&5
©
2
Press theVCR/TV
tion. The VCR/TV
DVD/VCR.
button to put the DVD/VCR
inTV
light will disappear from the front of the
posi-
3
Use theTV remote control to select the channel you want
to watch at the TV.
4
To return to the channel being recorded, use theTV
remote control to select channel 03 or 04 at theTV (the
channel to which the CH3/CH4 switch on the back of the
DVD/VCR is set). Or, if you connected the DVD/VCR to the TV
using audio and video cables,select the correct audio and video in
channel at theTV, Detailsare on page 12.
5
j
Press theVCR/TV button on the DVD/VCR remote control to put the DVD/VCR in VCR position. The VCR/TV light
will appearon the front of the DVD/VCR.The channel being
recorded will appearon the TV screen.
6
Press the STOP
watch
TV. you want to
Select at
thethe
channel
Select channel 03 or 04 at the
button
to stop the recording.
Hel fulHint
• If you use a Cable Box or Direct
Broadcast System hookup, you may
not be able to watch one channel
while recording another. See pages
10-11 for details.
One-Touch
Recording
35
The One-Touch Recording (OTR) feature allows you to set an immediate timed recording 30 minutes to eight hours long. Before you
begin:
Set up theTV channelsat the DVD/VCR. Detailsare on page 17.
Select a recording speed (SP,SLP)with the SPEEDbutton.
Put a tape in the cassettecompartment of the DVD/VCR. Make
sure the tape's record tab is intact and the tape is long enough to
record the program(s).
÷ If the end of a tape is reached during an OTR, the DVD/VCR will
eject the tape.The DVD/VCR will switch to DVD mode immediately,and theTIMER SETlight will blink.To let the OTR continue,
insert another tape in the DVD/VCR.
To return to VCR mode, press the TIMER SET button on the front
of the DVD/VCR, then press the DVD/VCR OUTPUT button so
that the green VCR light appearson the front of the DVD/VCR.
Placethe DVD/VCR inVCR mode. Pressthe DVD/VCR OUTPUT
button so that the greenVCR light appearson the front of the
DVDp/VCR.
Placethe DVD/VCR inVCR position. Pressthe VCR/TV button so
that theVCR/TV light appears on the front of the DVD/VCR.
Q
v_:_ ix,
©
ovDw_
o_puT
",lE,,_O_y
•
V¢_
OVO
[D El
123153[23
oo.....
6 0
000
I
81
Press theVCR button, then press the CHANNEL A/v buttons or the Number buttons to select the channel you want
to record.
2
j
Press the RECORD button repeatedly until the desired
recording length (30 minutes to eight hours) appears on the
screen. Recording will begin immediately.TheRECORD light and
the TIMER SETlightwill appear on the front of the DVD/VCR.
TR (0:30)
PHILIPS
CHI2
)
3
To stop an OTR before recording is finished, press the STOP
button.
To cancel the OTR but continue recording, press the RECORD button repeatedly until REC appearsin the upper lee corner of the TV
screen.(STATUSmust be set to ON. Seepage 23 for details.) The
RECORD light will remain on the front of the DVD/VCR, but the
TIMER SETlight will disappea_
When the OTR finishes, if no timer recordings are set,the TIMER
SET light will blink.The DVD/VCR power will turn off automatically.
When the power is turned on again,the DVD/VCR will be in DVD
mode.To return to VCR mode, pressthe TIMER SETbutton, then
press the DVD/VCR OUTPUT button so that theVCR light appears
on the front of the DVD/VCR. (TheTIMER SETlight will disappear.)
Helpful Hints
Tocheck the time remaining for an
OTR after the OTRhas been seL press
the DISPLAY/STATUS/EXIT
burton.
• Tochangethe recordinglength while
an OTRis in progress,press the
RECORDbutton until the desired
length appears on the screen.
• If you begin an OTR when another
recordingis paused,the OTRwill
begin.
• Youcan not pause an OTR.
If the preset time for a timer recording comesup during an OTR,the OTR
has priority.A messagewill remind you
when the timer recordingwasscheduled to begin.Youmay let the OTR
continue,the timer recordingwill not
take place.Or, stop the OTRand press
the TIMER SETbutton immediately.
The timer recordingwill take place if
you press the TIMER SETbutton
before the timer recording'sscheduled
start time.
36 TimerRecording
Follow the steps below to program your DVD/VCR to record TV
programs while you're away from home.The DVD/VCR will turn
itself on, record, and turn itself off automatically. Before you begin:
Set up the TV channels at the DVD/VCR.Details are on page 17.
Set the clock. If the clock is not set, CLOCK MUST BESET will
appear on the TV screen briefly, followed by theVCR menu.
Follow the directions on page 20 to set theVCR's clock.
Put a tape in the cassette compartment of the DVD/VCR. Make
sure the tape's record tab is intact and the tape is long enough
to record the program(s).
Pressthe DVD/VCR OUTPUT button so that theVCR light
appears on the front of the DVD/VCR.
Press the VCR/TV button so that the VCR/TV light appears on
the front of the DVD/VCR.
Do each step within
60 seconds of the previous
©6©
step,
ff3CD_
I
-I
_
U
Press the VCR
button,
then
press the MENU
1:2D
12DlED .....
button.
ocu..... 0
CD (:D CD .....
PROGRAM
VCR SET UP
TUNER SET UP
SET CLOCK
0
E_R
c_:_D
END PUSH EXIT
2
PHILIPS
PROGRAM,
\TO
then
or the STOP
press the F.FWD
button
to select
button.
A'e CHOOSE I_"
DAILY
WEEKLY
PROGRAM
÷ ONCE
l
I
_O O O,iliO_lO_
Press the PLAY button
fSELECT
RE_AN
CD _
REVIEW
END PUSH EXIT
3
Press the PLAY
button
or the STOP
button
to select a
ONCE, DAILY, or WEEKLY
recording.Then,
press the
F.FWD button.
÷_ONCE: The DVD/VCR will record aTV program on any day
you choose, up to 12 months away.
® DAILY: The DVD/VCR will record the same channel every day
from Monday to Friday - starting at the same time and recording
for the same length of time.
WEEKLY:
The DVD/VCR will record the same channel on the
Helpful Hint
same day, at the same time, and for the same length of time
PP_OGKAM
Daily
Recording
(example)
12745678-
SELECT
PROGRAM
NUMBEP,
END PUSH EXIT
i
• If you need to make a correc_Jon
while programming a tJmer recording, press the CLEAR button until
the cursor is flashingon the item
you want to change.Then enter
the correct information.
TimerRecording
(cont'd)37
4
Use the Number buttons (I-8)
store the timer recording.There
slots will flash on the screen.
to select a slot in which to
are eight slots. Numbers for open
NOTE."If you enter a number for a slot that has already been used ta store a
timer recording,PREVIOUSLYSETPROGRAMwill appear on the screen
briefly.Information about the program in that slot will appear on the screen.
If this happens, press the DISPLAYISTATUS/EXITbutton, then select another
number.
©
v¢_
5
Use the Number
to record.
•
•
•
•
buttons to enter theTV
channel you want
Cable Users, enter channel numbers as a two-digit number for the
quickest results. For example, to select channel 6, press 0,6. If you
only press the Number 6 button, channel 6 will be selected after a
brief delay.There also may be a brief delaywhen you select channels
10,_l,and 12. If you want to select channels 100 and above, enter
channel numbers as a three-digit numbeE For example, to select
channel 117, press I, 1,7.
Antenna Users, enter channel numbers as a two-digit number for
the quickest results. For example, to select channel 5, press 0,5. If
you only press the Number 5 button, channel 5 will be selected
after a brief delay.You may only select channels 2-69.
If you are recording from line input, press (3_0to select AV REAR.
If you are usinga Cable Box/DBS, select the Cable Box/DBS output channel (03 or 04). Set the Cable Box/DBS to the channel you
want to record. Leave the Cable Box/DBS on for the timer recording.Details are on page I0.
C3 133(33
.....
C_ _
C23
_C_C9
0 0 'O"'O"H_O_
PHILIPS
6
Press two Number buttons for the hour you want the
recording to begin. Press two Number buttons for the
minute you want the recording to begin. Press I forAM
for PM, For example, for 9:30 PM, press 09, 30, 2.
PROGRAM
I
CHANNEL
TIME ON
10
- -
TO
CORRECT
END
PUSH
PUSH
or 2
- -
CLEAR
EXIT
7
Follow the instructions in step 6 to enter the recording's
stop time. (AM or PM will be set automatically.)
Helpful Hints
Entries that do not match the
DVD/VCR's clock or calendar will
PROGRAM
CHANNEL
I
10
cause a question mark to appear
TIME ON
TIME OFF
0930 PM
on the screen.
TO CORRECT PUSH CLEAR
END PUSH EXIT
Instructions
continue
on page 38.
If you are recording from line input,
connect the audio and video cables
to the AUDIO IN and VIDEO IN
jacks on the back of the DVD/VCR.
(Please see illustration on page 40.)
38 TimerRecording
(cont'd)
8
II
Press the Number I button to record in SP speed or the
Number 2 button to record in SLP speed. (See the chart
below.) You cannot use the SPEEDbutton at this time,
P_OGRAH
I
CHANNEL
TIME ON
10
O9¸3OPM
TIHE OFF
REC SPEED
1100 pf_
SLP
SP=I
O_E
SLP=2
TIHE PROGRAM
_O CORRECT PUSH CLEAR
END PUSH EXIT
9
Press two Number
buttons
for the month
8
and two
Number
buttons for the day you want to record the program. For example, for July I0, 2000, press 07. 10.The day of the
week and the year will appear automatically (you cannot program
the_C)VD/VCR to record more than one year in advance).
PROGRAM
CHANNEL
°_
I
10
TIME ON
O93O PM
TIME OFF
R_C SPEED
I I:00 Pt4
SLp
START DATE
07110/00
ETIME PROGRAMMON
TO CORRECT PUSH CLEAR
END PUSH EXIT
I
_'_
/
J
10
PHILIPS
Press the DISPLAY/STATUS/EXIT
button. PROGRAM WAS
COMPLETED/PLEASE PUSHTIMER-SET FOR TIMER RECORDING will appear on the screen briefly. (If PROGRAM NOT COMPLETED appears,try again from step I.)
II
Press the TIMER SET button. The TIMER SETlight will appear
on the front of the DVD/VCR.The DVD/VCR will be in standby
mode. If you turn on the DVD/VCR power, the DVD/VCR isin DVD
mode.You can use the DVD features.
If the timer recording will take place several hours or daysfrom now,
you may use the DVD/VCR until time for the recording. Pressthe
TIMER SETbutton to place the DVD/VCR in standby mode a few
minutes before the recording starts.
If you forget to place the DVD/VCR in standby mode, PLEASEPUSH
TIMER-SETFORTIMER RECORDING flasheson yourTV screen
two minutes before a timer recording starts. Pressthe CLEAR button to remove the message.Thenpress theTIMERSET button,
Tape Speeds
This chart shows the recording/playback time
for three types of video cassettes (T 160,T 120,
and T60).There are three playback speeds: SP,
LR and SLR When recording, you can change
the tape speed (SP or SLP) using the SPEED
button.You cannot record in LP speed.
TapeSpeed
SP (standard
LP (long
play)
play)
(pla)'back only)
SLP(super long play)
Press the TIMER
SET button to
place the
DVD/VCR
in
standby mode.
Insert a tape in
the DVD/VCR.
Leave the Cable
Box/DBS on
(if applicable).
Cassette type/PlaybackTime
TI60
TI20
T60
2 hrs.
40 mins.
2 hrs.
I hr,
5 hrs.
20 mins.
4 hrs.
2 hrs.
8 hrs.
6 hrs.
3 hrs.
TimerRecording
(cont'd)39
Checking
Before you or
begin,
CancellingTimer
place the DVD/VCR inVCR
Recordings
mode.
Press the DVD/VCR OUTPUT button so that theVCR light
appears on the front of the DVD/VCR.
2 4
m
/
I
-I
front of the DVD/VCR),
MENU button.
press the VCR
button,
then press the
2
Press the PLAY button
PROGRAM,
then
or the STOP
press the F.FWD
button
to select
C3 CD
€23 (53
El 0
button.
3
m
Press the PLAY button or the STOP button to select
PROGRAM REVIEW, then press the F.FWD button, The
timer recording informationfor the program in the lowest numbered slot will appear on the screen. If no timer recordings are
set, nothing will happen when you press the EFWD button.
4
Press the F.FWD button repeatedly
to review all programmed timer recordings. If you don't press the EFWD button within 10 seconds, the DVD/VCR witl automatically display
information about the next programmed timer recording.This will
continue until all timer recordings have been displayed.Then the
menu will disappear.
5
To cancel the timer recording displayed, press the CLEAR
button. Either the display wil! disappear or information about
other timer recordings will appear. If you do not press any other
buttons, the display will disappear after all timer recordings have
been displayed.
6
Repeat steps I-4 to make sure you have cleared the correct timer recording.
-I
Helpful
Hints
CLASHmay flash on the screenwhen
you ftnish settJnga timer recording.
This means that the timer recording
youjust programmed and another
timer recordingoverlap.The current
timer recordingwill not take place.You
may choose to cancel the overlapping
timer recording.
Tostop a started timer recording,press
the STOP/EJECT
button or the TIMER
SET button on the front of the
DVDIVCR.
If the power fails for more than one
minute, programmed timer recordings
will be lost.If this occurs,repeat the
steps on pages 16 and 20 before
resetting the timer recordings.
If the preset time for a timer recording comes up during an OTR,the OTR
has priority.A messagewill remind you
when the timer recordingwasscheduled to begin.Youmay let the OTR
contJnue;the timer recordingwill not
take place.Or, stop the OTRand press
the TIMER SETbutton immediately.
The timer recordingwill take place if
you press the TIMER SETbutton
before the timer recording'sscheduled
start time.
;ee pa_e 78 for more hints.
40 Rerecording
(TapeDuplication)
ot
°o ,ootooot6o
°.
otQoo,tooo,i
• • ° olo_ot_loo61
,.
oto_eo*66,
,.
o,o,eJoo
° ,Jeo_6t
,.ol
t_oe_o_,
o°1
JJoo
°°
o,
• Do oo o_o
• Qi
• • •,
The instructions on this page show you how to copy tapes.The illustration uses two DVD/VCRs. DifferentVCRs
may operate differently.To duplicate a tape, make the connections shown, then follow steps 1-7.
I.Audio cables from DVD/VCR AUDIO OUT Jacksof DVD/VCR
I toAUDIO IN Jacks of DVD/VCR 2
DVO/VCR
I
DVD/VCR
Playing_
unit
_,N_
r
_E]_
--_--_
Recording
_ ,_
ILTOOJI II
I I.T_,IIoII *'r'G _ O_L
oo.
L" =DI]:_
I
2.Video cable from DVD/VCRVIDEO
OUT Jack of DVD/VCR I toVIDEO
IN Jackof DVD/VCR 2
2
unit
I
3. RF coaxial cable from the ANT-OUT
(Antenna Out) jack of DVD/VCR 2 to
the TV's ANTENNA IN Jack
Make the connections shown above.
DVD/VCR I will play your tape. Put a prerecorded
the cassette compartment
of DVD/VCR
I.
tape into
3
Helpful Hints
DVD/VCR 2 will record your tape. Insert a blank tape in the cassette compartment
of DVD/VCR 2. The DVD/VCR must be in
VCR mode and VCR position. (The VCR light and the VCR mode and
VCR/TV light will appear on the front of the DVD/VCR.)
4
If you use the AUDIO and VIDEO In
Jacks on the front of DVD/VCR 2,
press Number buttons 0, 0, 2 at
step 5.AV FRONT will appear on
the TV screen.
Turn on theTV and set it to channel 03 or 04, whichever
channel the CH3/CH4 switch on DVD/VCR 2 is set to.
5
Point the remote control at DVD/VCR 2. Press the VCR
button, then press the Number buttons 0, 0, I or 0, 0, 2.
(SeeHelpful Hints at right.)
6
7
Press the SPEED
button
to select SP or SLP at DVD/VCR
If you use the AUDIO and VIDEO IN
Jacks on the back of DVD/VCR 2,
press Number buttons 0, 0, I at
step 5.AV REARwill appear on the
7_/ screen.
2.
Press theVCR PLAY button on DVD/VCR I and the
RECORD button on DVD/VCR 2 at the same time.
To stop recording, press the STOP/EJECTbutton on DVD/VCR I,
then press the STOP/EJECTbutton on DVD/VCR 2.
Unauthorized recording of copyrighted television programs, video tapes,
or other materials may infringe on
the rights of copyright owners and
violate copyright laws.
If a program has copyright protection, it may not record clearly.
Theseinstru_ons show you how to
copy tapes using two DVD/VCRs like
yours. Different VCRsmay operate
differently.
Youcannot record DVD material
onto a video cassette tape using a
single unit.
RepeatPlay(Video
Cassette
Tapes)41
°°
• ,t60olo6,1oolll
° • ,,
i,t,,o,,,,Q,,,oo,,oJto,,,ll,
°,
ittmtotoo,,,,oo,,,
Before you begin, place the DVD/VCR in VCR mode.
Press the DVD/VCR OUTPUT button so that the greenVCR
appears on the front of the DVD/VCR.
°,
gott,,o,o,,,olo,,llo,,
°o oDD ° too,,
iJ,t,,
II
I
light
I
Press theVCR
button, then press the MENU button.
PROG RAM
VCR SET UP
TUNER
SET LIp
SET CLOCK
O END
PUSH
EXIT
2
CZ3[D E3
Pres_ the PLAY
button
or the STOP
button
IZ3CDCD _0,_
to selectVCR
cJc_6
SPEED
SET UP, then
press
the
F.FWD
button.
0
Q
5
MgNU
REPEAT pLsky
ON SCREEN MODE
AUDIO
OUT
LANGUAGE
BLUE BACKGROUND
"_SELECT A. CHOOSE ll_
TO
END
OFF
PUSH
ON
1
I
--
EXIT
PHILIP$
3
Press the PLAY button or the STOP button to select
REPEAT PLAY.
4
Press the F.FWD button so that ON appears beside
REPEAT PLAY.
REPEAT PLAY
ON SCREEN MODE
AUDIO OUT
LANGUAGE
BLUE BACKGP, OUND
_ELECT A_ CHOOSE •
ON
ON
1
TO END PUSH EXIT
5
Press the DISPLAY/STATUS/EXIT
tape has finished playing,the DVD/VCR
playback again.
Helpful
button. Now, when a
will rewind it and start
Hints
• To cancel Repeat Play,follow steps
1-3 above.At step 4, press the
EFWD button so that OFF appears
beside REPEATPLAYPressthe DISPLAY/STATUS/EXITbutton.
• The real-time counter memory does
not function during Repeat Play.
42 Real-Time
Counter
Memory
Follow the steps below to reset the real-time counter to zero at a
tape location you want to refer to later.
Before you begin,place the DVD/VCR in VCR mode.
Press the DVD/VCR OUTPUT button so that the greenVCR light
appears on the front of the DVD/VCR.
I
Press theVCR
button, then play, fast forward, or rewind a
tape to the location that you would like to refer to later.
Press the STOP button to stop the tape.
Press the DISPLAYISTATUSIEXIT
button
I
to see the sta-
tus display.
E3 CDCE3
EREO
CHI0
o0o6A
_T
1:08PM
STOP
__
_S_P
I :23:45
HIFJ
3
While the status display is on the screen, press the
CLEAR button to reset the real-time
counter
to zero.
TV STEREO
Ip
86]
-3
PHILIPS
CHIO
STOP
1:08
0 O0 O0
PM
HIFI
4
While the real-time
counter is on the screen, press the
MEMORY button
so that M appears beside
the counter.
1:08 PM
CHI0
TV STEREO
Helpful Hints
P
M
0:00
:_
HIFI
5
To go to a tape location where the real-time
counter was
reset to zero, press the REW(ind)
button or the F.FWD
button when playback is stopped.
When the tape reaches the point at which the counter was set to
zero, the tape will stop.
Press the PLAY button to watch the tape.
The MEMORY button does not function if REPEATPLAYis set to ON.
Details are on page 41.
To erase a real-time counter memory, press the MEMORY button until
the M disappears from the screen.
Youmay onlyset the real-time
counter to zero at one location at a
time. If you set the real-time counter
to zero at a second location,the
previous real-time counter to zero
setting will be erased.
TimeSearch43
Follow the steps below to program the DVD/VCR to search forward or backward on a tape a specific length of time.There must
be a tape in the DVD/VCR.
• Before you begin,placethe DVD/VCR inVCR mode. Press the
DVD/VCR OUTPUT button so that the greenVCR light appears
on the front of the DVD/VCR. PresstheVCR/TV button so that
the VCR/TV light appearson the front of the DVD/VCR.
_ov0w
I
R
Tl_
m
Press the VCR button, then press the _EARCH
MODE/TIME SEARCH button.
O:O0
-
I
TIME SEARCH
N_R
1
CZ3m C_3_
SEARCH TIME
2
Within
10 seconds, use the Number buttons to enter the
desired length of time you want to skip forward or backward. For example, for I hour, 25 minutes, press Number buttons
I, 2, 5. Or, for five minutes, press Number buttons 0, O,5.
3
-c_
_3 c3 _3 0
I
..... 6 0
"CI CD CD
_0 0 0""0 _0_
PHILIPS
Within 10 seconds, press the F.FWD button or the
REW(ind) button. The DVD/VCR will skip over the specified
length of time, then begin playback.
If you want to search for more than
59 minutes, you must enter the
length of t_mein hours and minutes.
For example, to search forward 70
minutes, press I,I,0 at step 2.
Youcan not do a Time Search while
recording.
Toremove the _me Search display,
press the SEARCHMODE/TIME
SEARCHbu_on again.
Tocancel a Time Search that is in
progress,press the STOPbutton.
If the end of the tape is reached
during a Time Search,the Time
Search will be cancelled.The
DVD/VCR may rewind the tape.
Details are on page 45.
44 Special
Effects
Playback
Before trying the features on this page, make sure the DVD/VCR
is inVCR mode.
•
Before you begin, place the DVD/VCR in VCR mode. Press the
DVD/VCR OUTPUT button so that the green VCR light appears
on the front of the DVD/VCR. Press theVCR/TV button so that
theVCR/TV
Forward
light appears on the front of the DVD/VCR.
and Reverse
Searching
(SP/LP/SLP)
I
Q
©
ovovcn
nu_m,T
VCRTV
_1_
DV_
VCR
O_O
During tape playback, press and release the F.FWD button
or the REW(ind)
button. A fast forward or reverse picture
search will begin.
2
O3O3OO
To return
Super
to playback, press the PLAY button.
High
Speed
Searching
(LP/SLP)
.....
G 0
000
I
During tape playback, press the F.FWD button or the
REW(ind)
button, then press again. The DVD/VCR will now
search in super high speed.
2
PHILIPS
To return to normal
Viewing
a Still
playback, press the PLAY button.
Picture
I
During tape playback, press the PAUSE button. A still picture will appear on the screen.
2
To release the still picture and return
the PLAY button or press the PAUSE
to playback, press
button again.
Helpful
Hints
Slow and Still modes will automati-
Viewing
a Slow
Motion
Picture
I
During tape playback,
will play in slow motion.
press the SLOW
button.
The tape
2
To release Slow mode and return to normal playback,
press the PLAY button or press the SLOW button again.
cally switch to Stop mode after five
minutes to protect the DVD/VCR
and the tape from damage.
SP/LP/SLPmeans this feature will
work with tapes recorded in
Standard Play,Long Play,or Super
Long Play.
LP/SLPmeans this feature will
work with tapes recorded in Long
Play or Super Long Play.For details
about tape speed, see pages 38
and 80.
Automatic
OperationFeatures45
• • • ••••,lo,ooo*
• ••_eoo60,
o,•
t•
• •Jooooee6oto
•••
•oot6o_*
• Joog4e_o6
• ••Qe*tO,*IOOO_OI6
The following tape playbackfeatures are availableinVCR mode.
Automatic
Playback
When you put a tape inthe DVD/VCR, the power will come on
automatically.If the tape's record tab is missing,playbackwill begin.
If a timer recording is set,and theTIMER SETlight is flashing,the
power will not come on automatically when you insert a tape with
the record tab intact.
If a timer recording is set and theTIMER SET light is flashing,the
DVD/VCR will eject the tape if the record tab ismissing.
Automatic
Rewind, Eject
When a tape is played,fast forwarded,or recorded to its end,the
DVD/VCR will rewind the tape, stop, then eject the tape.
If the real-time counter memory is set, the DVD/VCR will only
rewind the tape to the point at which the counter is set to zero,
then stop.The DVD/VCR will not eject the tape automatically.If
REPF__T
PLAY is set to ON, the DVD/VCR will not eject the tape
automatically.
Tape Eject
A tape can be ejected with the DVD/VCR power on or off (but the
DVD/VCR must be plugged in).
If a timer recording is set,and theTIMER SETlightis on or flashing,
the tape cannot be ejected.To eject the tape, you must first press the
TIMER SETbutton to cancel the timer recording, then pressthe
STOP/EJECTbutton to remove the tape.To reset the timer recording,insert a tape, then press the TIMER SETbutton to put the
DVD/VCR in standby mode for the timer recording.
Automatic
Tracking Adjustment
The DVD/VCR adjuststracking automatically to give you the best
possible picture quality.With some recordings, however,you may get
a better picture usingthe manualtracking controls (seebelow).
Manual Tracking
To manuallyadjust the tracking during normal playbackand slow
motion playback,press the CHANNEL A/v buttons on the
DVD/VCR. (The CHANNEL A/v buttons on the remote control
will not adjust tracking.)
Trackingwill return to Automatic TrackingAdiustment when you
press the STOP button or insert a tape.
You cannot manually adjust the tracking of a Still picture. However,
you may press the CHANNEL _/_ buttons on the front of the
D'qD/VCR to remove vertical jitter in a Still picture.
Tracking
°.fo
Adjustment
_---_
Tracking
A o*
Adjustment
•••
,l•_0ot6,
• .at
• _•Ol
• • o•
,6
• •
46 MTS(Multi.Channel
Television
Sound)
System
Your DVD/VCR can play recordings broadcast in Hi-Fi (high fidelity) stereo, which produces a crisp, clear
sound from two sources. Your DVD/VCR also can play tapes recorded in a second audio (usually,that
means your program is recorded in a second language). Of course, your DVD/VCR will play tapes recorded
in monaural (single-source) sound as well.
Your DVD/VCR also will record in Hi-Fi stereo or in second audio, so when you play back that tape on the
DVD/VCR, it will be in stereo or second audio.
Read the directions on this page to familiarize yourself with your DVD/VCR's stereo and second audio
setups. Then follow the directions on page 47 to record in stereo or second audio and the directions on
page 48 to play back tapes recorded in Hi-Fi stereo.
Understanding
On-Screen
Displays
When you receive a signalfrom a channel you're watching, portions of the on-screen display shown below
will appear when you press the DISPLAY/STATUS/EXITbutton on the remote control.
The indication 2ND AUD or TV
STE'_EO that appears on this side of
the status display tells you if your
DVD/VCR is programmed to receive a
second audio or stereo broadcast (it
cannot be programmed to receive
both at the same time).
(_5TOP
- TV STEREO
12:cOOHA0_
STEREO
2ND AUD"
The indication 2ND AUD or STEREO
that appears on this sideof the status
displaytells you if the program you're
watchingis availablein secondaudio
or stereo.
SLP
1:23:45
HIFI
J
Thisindication is not availableduring
tape playback.
Specifically...
_SSTOP
12:00 AM
TV STEREO
CH 02
STEREO
AUD •
_2ND
_LP
1:23:45
jWhen
a program broadcast in stereo is available,STEREO appears here.
/When
a program broadcast in second audio is available,2ND AUD
f
appears here.
____.When a program is availableboth in stereo and second audio,both
STEREO and 2ND AUD appear here. Even though a program is available
in stereo or second audio, you still must program the DVD/VCR to
receive or record the program. Follow the directions on page 47.
NOTE:Althougha program may be broadcastin both stereo and secondaudio,
you cannot recordin both stereo and secondaudio at the same time.
HIEIj
To record and play back programs broadcast in stereo, even if you havea single-speaker_
the connections shown, then follow the steps on pages47-48.
Monitor
TV
Stereo
SpeakerTV
Single
SpeakerTV
Stereo Amplifier
or Receiver
Monaural Sound
ANT-OUT
I
(Antenna
Out)jack
J
IP' J : oo
to TV's
RF coaxial cable (supplied) from DVD/VCR's
ANTENNA
IN Jack
Video
cable
DVD/VCR
from
DVD/VCRVIDEO
to VIDEO
just use one of
OUT
IN Jack of rnonitorTV
_LILrT-__Jm _oo/
Jack of
_
Audio cables from
DVD/VCR AUDIO OUT
Jacks of DVD/VCR to
AUDIO IN Jacks of Stereo
Amplifier or Receiver
•
Before you begin,place the DVD/VCR inVCR mode. Pressthe
DVD/VCR OUTPUT button so that the greenVCR light appears
on the front of the DVD/VCR. PresstheVCP4TV button so that
theVCR/-I-V light appears on the front of the DVD/VCR.
I
Press the VCR button, then press the MENU button.
I
f
S//!
_LECT Av
CHOOS E ql_
-_ pROGRAM
VCR SET UP
TUNER SET UP
SET CLOCK
O END
PUSH
EXIT
2
Pres_ the PLAY button or the STOP button to select
TUNER SET UP, then press the F.FWD button.
--> AUTO PROGRAMMING
ADD/DELETE CH
CH MEMORY REVIEW
TV STEREO
ON
2ND AUDIO
fSELECT
_.TO
a,v
CHOOSE _
I
1
END PUSH EXIT
3
Press the PLAY button or the STOP button to select TV
STEREO or 2ND AUDIO. Then, press the F.FWD button.
ON will appear to the right of your selection.
AUTO PROGRAMMING
ADDIDELETE CH
CH MEMORY REVIEW
TM STEREO
_' 2ND AUDIO
fSELECT
_-v CHOOSE I_
_TO
ON
1
END PUSH EXIT
4
5
Press the DISPLAYISTATUSIEXIT
button.
To record, select the channel to be recorded using the
CHANNEL A/v buttons, then go to step 6.
6
Press the RECORD
button to start recording.
ui.u
Youcan only receive and record in
stereo or second audio programs
that are broadcast in stereo or second audio.You can only play in
stereo or second audio tapes that
were recorded in stereo or second
audio. Pleasesee page 46 to determine if the program you want to
watch/record is being broadcast in
stereo or second audio.
If you select second audio when second audio is not available, the
DVD/VCR will record normal audio.
48 Hi-FiStereo
Sound
System
Multi-Channel Television Sound system broadcasts are automatically
recorded in Hi-Fi stereo sound, To play in Hi-Fi stereo the tapes
recorded in Hi-Fi stereo, however, you'll need to follow steps t-5.
• Before you begin, place the DVD/VCR inVCR mode. Press the
DVD/VCR OUTPUT button so that the green VCR light appears
on the front of the DVD/VCR. Press theVCR/TV button so that
theVCR/TV
light appears on the front of the DVD/VCR.
I
Press the VCR
button,
then press the MENU
button.
C3 CDCZ3_
_ PROGRAM
VCR
SET
UP
TUNER SET UP
SET CLOCK
SII_LECT
..
CHOOSE •
ED Eg O] ....
!
O END PUSH EXiT
2
Press the PLAY button
SET UP, then
or the STOP
press the F.FWD
button
to selectVCR
_
button.
f
S_LECT
Av
CHOOSE
5
..... dJ 0
E_TE_
_ETURN
_CDi
_o_ ,_,,,,;o
_,,
•
REPEAT PLAY
ON SCREEN MODE
AUDIO OUT
LANGUAGE
BLUE BACKGROUND
OFF
ON
END PUSH EXIT
3
Helpful Hints
Press the PLAY
AUDIO
button
OUT, then
or the STOP
press the F.FWD
IT ;
_HIFI
MONO
button
to select
button.
ON
O END PUSH EXIT
4
Press the PLAY button
HIFI.
or the STOP
button
to select
ON will appear to the right of HIFI on the screen.
HIFI
ON
MONO
TO
ENO
PUSH
EXIT
5
Press the DISPLAYISTATUSIEXIT
button.
Normally, HIFI should be selected
from the AUDIO OUT menu for
playback with Hi-Fi sound. But,you
can change the selection to MONO
if you want monaural audio playo
back.To do this, follow steps I-3.At
step 4, press the PLAYbutton or the
STOP button to select MONO. Press
the DISPLAY/STATUS/EXITbutton.
HIFI will disappear from the status
display.
All programs are automatJcally
recorded in both Hi-Fi stereo sound
and in monaural sound.
The audio level of a tape recorded in
Hi-Fi stereo will differ from the
audio level of a tape not recorded in
Hi-Fi stereo.
If you play non-Hi-Fi tapes while the
DVD/VCR is set to HIFI, HIFI will disappear from the status display and
the tape will play in monaural
sound,
Please see additional notes
on page 79.
BlueBackground
49
If you want the TV screen to be solid blue when a weak signal is
received, set BLUE BACKGROUND to ON.The screen will be
blue and the sound will be muted.
Or, if you want to receive the weak signal,set BLUE BACKGROUND to OFF.When you select a channel that is receiving a
weak signal,you will see and hear the static in the TV programming.The channel number will not appear on the screen when you
select a weak channel.
To set BLUE BACKGROUND to ON or OFF,follow these steps.
• Before you begin,place the DVD/VCR inVCR mode. Pressthe
DVD/VCR OUTPUT button so that the greenVCR light appears
on the front of the DVD/VCR. PresstheVCR/TV button so that
theVCR/TV light appearson the front of the DVD/VCR.
Cb
button, then press the MENU button.
PROGRAM
VCR
4
SET UP
TUNER SET UP
SET CLOCK
E CT.- CHOOSE1
\TO
END PUSH EXIT
Press the PLAY button or the STOP button to selectVCR
SET UP, then press the F.FWD button.
REPEAT
pLAy
ON SCREEN MODE
AUDIO OUT
LANGUAGE
BLUE BACKGROUND
S_TTELECT
A.
CHOOSE I1_
OFF
ON
1
O END PUSH EXIT
3
Press the PLAY button or the STOP button to select
BLUE BACKGROUND.Then,
press the F.FWD button
repeatedly so that OFF (or ON) appears beside BLUE
BACKGROUND.
REPEAT PLaY
ON SCREEN MODE
AUDIO OUT
LANGUAGE
--_ BLUE BACKGROUND
OFF
ON
O END PUSH EXIT
4
Press the DISPLAYISTATUSIEXIT
button.
O
-I
I
Press theVCR
I IMI _ ,,q r
PHILIPS
50 Playinga Disc
Playing
a DVD
or an Audio
CD
Before you begin...
Turn on the power of the TV, amplifierand any other equipment
connected to the DVD/VCR. Make sure theTV and the stereo or
amplifier (if applicable) are set to the correct channel, Detailsare
on pages8-14.
I
Press the POWER button to turn on the DVD/VCR."HELLO"
will appear briefly on the display panel.
Press the DVD/VCR OUTPUT button so that the red
DVD light appears on the front of the DVD/VCR.Then,
prepssthe DVD button.
_
Press the OPEN/CLOSE
ton on the DVD/VCR.
A
Insert a Disc.
but-
I
5
C_N_L _
REdO_D
3
Press the OPEN/CLOSE button on the front of the
DVD/VCR to open the Disc tray.
4
Place a Disc into the tray. Make sure the Disc is sitting properly in the correct recess.
Some DVDs are recorded on both sides.Make sure the side you
want to play is facing up. Or, if the DVD is recorded on only one
side, place the Disc in the tray with the label facing up.
5
Press the PLAY button. The tray will close automatically, and
playbackwill beginat the first Chapter or Track of the Disc.
Or, you may press the OPEN/CLOSE button to close the tray, and
DVD playback will start automatically. (You also may close the tray
by gently pressing the Disc tray toward the DVD/VCR.)
If the DVD in the tray has a menu, the menu may appear on the
screen instead. Detailsare on page 51.
With some Audio CDs, playback will not begin unless you press
the PLAY button.
6
Press the STOP button to stop playback. If disc playback is
stopped for more than one minute,a screen saver will appear.
Detailsare on page 77.
Remember,
this DVDIVCR
will play only certain
Discs.
See page six for details.
c] ©Ni
Helpful
Hints
A "No Feature"symbol _ may
appear at the bottom right of the
TV screen.This symbol means either
the feature you tried is not available
on the Disc, or the DVD/VCR can
not accessthe feature at this time.
This does not indicate a problem
with the DVD/VCR.
If a Disc is dirty or has scratches,
the pictures may appear distorted
and playback may stop. In such
cases, remove the Disc and turn off
the DVD/VCR.Disconnect the power
cord, then reconnect it. Clean the
Disc, then turn on the DVD/VCR
again and reinsert the Disc for playback
When the DVD or CD light appears
on the display panel, the Disc is
loaded completely and is ready for
playback.
When you press the OPEN/CLOSE
button or the DVD PLAYbutton on
the front of the DVD/VCR when the
power is off, the DVD/VCR will turn
on automatically and will be in DVD
mode.
DiscMenus51
Using the DVD Menus
Some DVDs contain menus that describe the contents of the Disc
or allow you to customize Disc playback. For example,the menu
may offer choices for subtitle languages,director's commentary, or
soundtrack playback.
To use the DVD menu and select playbackfeatures, follow these
steps.
To access the DVD_ Man Menu...
I-
....
Ew
• Before you begin,place the DVD/VCR in DVD mode.
Pressthe DVD/VCR OUTPUT button so that the red DVD light
appears on the front of the DVD/VCR.
/,
F rwo
I
_ C_3C_30
_CDCD
m
cS cDc
C21 _ CD
I
:::
::
: _,_ •
CLEAR
Press the DVD button, then press the MENU button. The
DVD's main menu will appear.
2
-I
kO O 'O'NOH"O)
Press the arrow buttons (A/v/_1/1_
) to select an item,
then press the ENTER button. Continue this processto set up
all the features you wish to see on the Disc.
To access the DVD's Title Menu...
Using theTitle
Menu
Some DVDs havea Title Menu, which liststhe Titles availableon
the Disc. Use the Title Menu to start playbackat a specificTitle.
Some DVDs may allow you to choose Chapters from the Title
menu.
For example,
Title
5, follow
• Before
if a
DVD has 10Titles
and you want
you begin, place the DVD/VCR
in DVD
DVD/VCR OUTPUT button so
on the front of the DVD/VCR.
Press the
appears
to go directly
to
E3
C3 C_ 0
_53C_03
123153C53 ....
these steps.
that
mode.
the red
DVD
light
..... 0
(5
CDCDCD
I
Press the DVD button,
Title Menu will appear.
_Q
.....
then
press theTITLE
If a Title menu is not available,the _
TV screen.
button.
The
2-
-I
_O O _O"O""O
symbol may appear on the
NOTE: If the DVD only has a main menu, the main menu may
appear when you press the TITLE button.
2
Press the arrow buttons (A / v / _1 / I_ ) to select the
desired Title, then press the ENTER button.
Playback will begin at the Title you selected.
Helpful Hints
Menus may vary among Discs.
Refer to the informatJon accompanying the Disc for details.
Not all DVDs haveTitle menus.
Some DVDs may refer to Chapters
as "scenes."Some DVDs may refer
to the Title Menu as the "scene
index."
52 Pausing
Playback
IAUDIOCDI
Pausing
Playback
Pausing Playback...
• Before you begin, place the DVD/VCR in DVD mode.
Press the DVD/VCR OUTPUT button so that the red DVD light
appears on the front of the DVD/VCR.
I
Q
I-
During disc playback, press the DVD button, then press the
PAUSE button on the remote
control. Playback will pause and
the sound will be muted.
©
o¥o
vc_
\
RECO_
[23153153 .......
2
Press the PLAY
G
o0
CDCDCD
button
to resume
playback.
Memory On...
_'_
Memory On:
Resuming playback from the point
where playback stopped
• Before you begin, place the DVD/VCR in DVD mode.
Press the DVD/VCR OUTPUT button so that the red DVD light
appears on the front of the DVD/VCR.
O
ovD
TIr_E_F_
©
vÜ_
I
Press the DVD button, then press the STOP button during
disc playback, Playback will stop, and STOP will appear at the top
right corner of the TV screen. In a few seconds, MEMO ON
(Memory On) will appear in the top left corner of the "iV screen.
MEMO ON
2
Press the PLAY button. Playback will resume
point where playback stopped last.
from
the
Helpful Hints
Memory On can be erased by
pressing the STOP button a second
t_me while playback is stopped.
MEMO OFF will appear briefly at
the top left comer of the TV screen.
Memory On is not available with
Audio CDs.
The DVD/VCR will switch to VCR
mode automatically if disc playback
is paused or stopped for 30 minutes.This helps avoid the possible
burning of a still image into the TV
picture tube. Details are on page
77.
Tosee the on-screendisplay messages,such as PLAY,STOP,or PAUSE,
set OSD MESSAGEto ON. Details
are on page 74.
StepbyStepPlayback53
I
Press the DVD button, then press the PAUSE
pause playback. The sound will be muted.
button
to
I
PAUSE]
2
Press the PAUSE button repeatedly to see the picture
advaghceone frame (or step) at a time.
The sound will remain muted. PAUSEwill appear briefly on the
screen each time you press the PAUSEbutton. (OSD MESSAGE
must be set to ON. Detailsare on page 74.)
Press the PLAY button to resume playback.
PLAY will appear briefly on the screen. (OSD MESSAGE must be
set to ON. Details are on page 74.)
PLAY_
t,,,,eeet**,=,
°o
1
=o_ooe_eteee***=,
SlowMotion
°°
,=go,Jee,,_et**t
=,*,gwo,tleee**,,=
o otoleQ_,t,eeet_eoo**l**
°° tteooot****
• Before you begin, place the DVD/VCR in DVD mode.
Press the DVD/VCR OUTPUT button so that the red DVD light
appears on the front of the DVD/VCR.
I
Press the DVD button, then press the PAUSE button during playback.
Press the F.FWD button. Slow motion playback will begin.
Press the EFWD button repeatedly during slow motion playback
to vary the speed of slow motion playback.You may play the DVD
at I/16, 1/8, or I/2 the normal playback speed.
3
Press the PLAY
button
to return
to normal
playback.
Hel_)ful
Hints
The sound will be muted when
playback is paused and during
slow motion playback.
You can not play the DVD in
reverse slow motion.
° ,=
°
54 FastForward/Reverse
Search
,,oolll
ooo
IJ,_Q,otlo
o°
.oto,e_o4o,I
oo IJo,_eeo6ol,.ooo_eeoo6t,
,oo
ooeJo6
o,
,Q_*,eo,
° otoeoot_eo6,tge_o6o
• ooeJ_go_6
o •
[Aoo,o
col
• Before you begin, place the DVD/VCR in DVD mode.
Press the DVD/VCR OUTPUT button so that the red DVD light
appears on the front of the DVD/VCR.
I
During
F.FWD
playback, press the DVD button, then press the
button or the REW button on the remote control.
• On a DVD, pressing the EFWD or REW button repeatedly will
forward or reverse the picture at twice, eight times, or 32 times
the normal playback speed. Sound will be muted during searching.
• Use the EFWD button for a forward search. Press the REW button for a reverse search.
Press the REW button.
II /
I
Press the F.FWD button.
•1.qX2
C3 El CD _
_,X2
oc_c_ U
ess d
again
H
Press _
Press the FFWD
button
again
I
Press the REW
button
°/
i-_x32
Press tbe
F_FWD button
PHILIPS
• On an Audio CD, you may search forward or backward at 16
timesthe normal playbackspeed (_I4X 16 or I_I_X 16).Pressing
the EFWD or REW button repeatedly will not affect the speed of
the search.Sound will be intermittent during searchingon an
Audio CD.
• Use the EFWD button for a forward search.Pressthe REW button for a reverse search.
Press the REW button
during Audio
61
,jinX 1
J
CD playback.
]
Pressthe F.FWD button during Audio CD playback.
/
"x'°/
I
I
2
Press the PLAY button
to return
to normal
playback.
• Toseethe searchspeedon the
screen,O
SDMESSAGE
Helpful
Hintmustbe set ]
to ON. Detailsare on page 74.
TrackPlayback55
06tO000
060
I06
..o
t.eO...eBt
• ,.t6t
• • °°°..o
O.,Oe.*_O••_
°o.°
t_ee*tO
° • o°°°o
••,_*_OeO*6_••O
°o°.o°
I AUDUO
CDI
Starting
Playback at a Specific Track
There are three ways to begin playbackon an Audio CD at a specific
Track.You may usethe Number buttons, the SEARCH MODE button,
or the SKIP_
I_lpl buttons. For details,read the informationbelow.
• Before you begin, place the DVD/VCR in DVD mode.
Press the DVD/VCR OUTPUT button so that the red DVD light
appears on the front of the DVD/VCR.
A
Using the Number Buttons to Select aTtack
Press the DVD button, then press the Number buttons to
enter the desired Track number. The selectedTrack will be
located, and playbackwill start.You may select aTrack with the
Number buttons during playbackor when playbackis stopped.
For single-digitTracks,press asingle Number button. For example,to
playTrack three, press the Number 3 button.
ForTr_cks numbered I0 and above,press the +10 button (repeatedly, if necessary),then press the Number button of the second digit.
For example,to playTrack 12,press the +FO button, then press the
Number 2 button. For Track 22,press the +10 button twice, then
press the Number 2 button.
If you enter a Track number that is not availableon the Disc, playback
will not begin (or the currentTrack will continue to play)•
B
Using the SEARCH MODE Button to Select aTrack
Press the DVD button, then press the SEARCH MODE button once, then press the A/v buttons to select the Track
number you desire. Finally, press the PLAY button to begin
playback at the selected Track.
If you pressthe SEARCH MODE button once during playback,the
current Track number will be displayedinside the brackets.
TOTAL
TRACKS:
TRACK:
I
[
07
6 ]
SEARCH/TRACK
Start
_
Exit
C
Using the SKIP _ _
Buttons to Select a Track
Press the DVD button, then press the SKIP I1_ button during
playback to skip the current Track and move to the next
Track. Press the SKIP _
button repeatedly to skip subsequent Tracks.TheTrack numberwill appearbriefly on the "iV screen.
Press the SKIPI_
button during playback to return to the
beginning of the current Track. Press the SKIPI_
button
repeatedly to go to previousTracks.The Track number will appear
brieflyon theTV screen.
If you pressa SKIPbutton when playbackispaused,you must pressthe
PLAYbutton to resume playback
If you pressa SKIPbutton when playbackisstopped,the selectedTrack
will beginplayingautomatically.
_
_
m
Ot,Oi
°°
0_6
° _,
° QO •
56 Title/Chapter
Playback
Starting
Playback
at a Specific
Title/Chapter
There are twomay
ways
begin
DVD buttons
playback orat the
a specific
TitleMODE
or
Chapter.You
usetothe
Number
SEARCH
button.
A
mmg
• Before you begin, place the DVD/VCR in DVD mode.
Press the DVD/VCR OUTPUT button so that the red DVD light
appears on the front of the DVD/VCR.
Q
O
A
Using the Number
Buttons to Select aTitle/Chapter
During playback, press the DVD button, then press the
Number
buttons to select a Chapter. The Chapter will be
located and playback will start.
When playback is stopped, press the Number buttons
to
select aTitle.
The Title will be located and playback will begin.
For single-digit Chapters or Titles, press a single Number button. For
ex_'mple, to play Chapter three, press the Number 3 button during
playback.To play Title two, press the Number 2 button while playback is stopped.
For Chapters/Titles numbered 10 and above, press the + l0 button
(repeatedly, if necessary), then press the Number button of the second digit. For example, to play Chapter 12, press the + I0 button,
then press the Number 2 button during playback. ForTitle 22, press
the +10 button twice, then press the Number 2 button when playback is stopped.
B
PHILIPS
Using the SEARCH
MODE Button to Select aTitlelChapter
To start playback at a specific Chapter, press the DVD button, then press the SEARCH MODE button once, then press
the Number buttons or the Air
buttons to enter the
Chapter number. Press the PLAY button
t the selected Cha _ter.
to begin playback
SEARCH/CHAPTER
TOTAL
CHAPTERS:
CHAPTER[
Sla_
027
1_]
_
Exit
To start playback at a specificTitle, press the SEARCH MODE
button twice, then press the Number buttons or the A/v
buttons to enter theTitle
number. Press the PLAY button to
begin playback at the selected Title.
Helpful
Hints
• Some discsmay not allow you to
changeTides in the Search Made
screen.
TOTAL
T_TLES07
TITLE
I
(
SEARCH_TL
Start
_
5 ]
E
Exit
• During DVD playback, press the
SKIPbuttons to go to the next chapter, return to the beginning oft.he
current chapter, or go to a previous
chapte_
Specific
TimePlayback57
Starting
Playback
at a Specific
Disc Time
• Before you begin,place the DVDNCR in DVD mode.
Pressthe DVD/VCR OUTPUT button so that the red DVD light
appears on the front of the DVD/VCR.
I
Press the DVD button, then press the SEARCH
MODE
button repeatedly
(three times for DVDs or two times for
Audio CDs).
TOTAL
TIME:
TIME
I_b_
[
lh231_145s
h
m
s]
EARCHFIIME
tart
_
Exlq
2
Use the Number
buttons
to enter
the Disc time
you want playback to begin.
• Example: I hour, 23 minutes and 30 seconds
I •+10
_+10
'3
•+10
,+10
• To enter zero, press the Number
I_ button.
,+10
at which
_0
0 (zero) button or press the
• Make sure the time you enter is within the total time of the
Disc. If it is not, you will have to enter a different time.
• if you make a mistake, press the IP button repeatedly until you
reach the item you need to correct (hour, minute, or second),
then enter the correct information.
TOTAL
TIME: lh23m45s
TIME
I
PHILIPS
[! h05m30s]
SEARCHFrlME
Stari
_
Exit
3
Within 30 seconds, press the PLAY button. Playback will
start at the time that you specified.
Helpful
Hint
• Specific time playback is not available with some discs or if MEMORY OFF is activated for a DVD.
Details are on page 52.
58 RepeatPlayback
(Discs)
oo*#o,o
o°o
otJ
to6_o
• Qq Jotoeoo_oo6oo,,too_et6*_tloooo
• Before you begin, place the DVD/VCR
,_m
• oleeoo6
• oa,*,Q,,,,_eeo66,
°°
to_el
° ,o6
°°
• o° *e
.°
_o ° ,*
in DVD mode.
Press the DVD/VCR OUTPUT button so that the red DVD light
appears on the front of the DVD/VCR.
I
Press the DVD button, then press the REPEAT button
repeatedly
until the repeat mode you want appears in the
top left corner of the TV screen.
©
_
r'u_ _
C2D_
DVrl
• Repeatedly pressing the REPEAT button during playback lets you
choose REPEAT CHAPTER, REPEATTITLE, or REPEAT OFE
• If a Chapter is playing repeatedly, then you press the Number
buttons to select a new Chapter, the new Chapter will play
repeatedly.
REPEA:
II1_/[CI_APTER]
"_
/ R:P:AT
[TITLE]
_
|
n
]
_
_
•
Press the REPEATbutton to select
_'_
VC:_
°°o
0
C3 C33_
_°_
E3 E3 CS3
CHAPTER.The current
Chapter plays over and over.
REPEAT
Press the REPEATbutton againto
<[---select REPEATTITLE.The entire
Title plays over and over.
E_:C_
C_Z_9
_TU_
f REPEAT
]OFF]
tl
I AUDIO
RE_OqO
_O_
O
_U_O _
-I
R_TU_
C9
_ _
,0 00"O'O_j
_
Press the REPEATbutton againto
| _select
REPEATOFE Regular playback will resume.
PHILIPS
CD ]
• Repeatedly pressing the REPEATbutton during playback lets you
choose REPEATTRACK, REPEATALL and REPEATOFF.
• If a Track is playing repeatedly, then you press the Number buttons to select a new Track, the new Track will play repeatedly.
_I
|
r__Ep_
/ t_LI
| _
_
/
/ _
Pressthe REPEAT button to select
REPEATTRACK.The current Track
plays over and over.
Pressthe REPEAT button againto
select REPEATALL.The entire
Audio CD plays over and ove_
r REPEATIo_I
|
I
_
| _,_
I
Pressthe REPEAT button againto
select REPEATOFE Regular playback will resume.
I
Helpful Hint
" with
epeat
playback
some
discs. is not available
• •
A-BRepeatPlayback59
°°
[_
°
°°.°°°
°
°°.°°°1
°°.°°°°
°°°°°°..
°°
°°°
°°
.
IAUD'OCDI
You can play a section of an Audio CD or DVD repeatedly. Follow
these steps to set up the section that you want to play over and
over,
II
Press the DVD/VCR OUTPUT
button so that the red DVD light
• appears
Before you
begin,
place
the DVD/VCR.
DVD/VCR in DVD mode.
on the
front
of the
I1__°_/
,stheOVObutt
._,,.,. '
-4
¢_N_jEL_
Play the Disc to the point at which you want
playback to begin.
_E¢ORg
repeated
3
Press the A-B REPEAT button to set the starting point (A).
cc_8_
4
Play or fast forward the Disc to the point at which you
want repeated
playback to end, then press the A-B
REPEAT button again.
The section will begin to play immediately, playing over and over
until you cancel the A-B Repeat feature.
5
To cancel the A-B Repeat feature, press the A-B REPEAT
button so that REPEAT [OFF] appears on theTV screen.
Regular Disc playbackwill resume.
PHILIPS
J
Helpful Hints
• A-B Repeat playback is not available with some DVDs.
• With DVDs, the entire A-B repeat
section must be within a single
Title.
• With Audio CDs, the A-B repeat
section can contain multiple Tracks.
• Point B must be later on the Disc
than PointA.
60 Programmed
Playback
You may determine the order in which Tracks will play.The order
that you set is called the Program.To set up programmed playback,
follow these steps.
• Before you begin, place the DVD/VCR in DVD mode.
Press the DVD/VCR OUTPUT button so that the red DVD light
appears on the front of the DVD/VCR.
I
O
I-
While playback is stopped, press the DVD button, then
)ress the MODE button. The program screen will appear.
• I
O
DVD
w_n
CH_E _ •
_CO_D
pROGRAM
i 14 TOTAL
OhOOm_
CS3CE3C33
-@
U
123CZ)13B....
cu@Q
Press the Number
buttons
or the A/v
buttons
to enter
the number of the firstTrack
that you want to play.Then,
press the ENTER button to store the selected Track in the
Program.
• If you enter a wrong Track number, press the CLEAR button.The
last Track in the Program will be removed.
I
m
PHILIPS
J
T
position in program
[
l,
14
TOTAL
_.- o, ,2 _
"_
OhO7m46s
track number
PROGRAM
He_ful
3
Specific Track and random playback cannot be combined with
Repeat step 2 until you have selected all the Tracks you
wish to play in the Program.
• Up to 20Tracks may be stored in the Program.
• Make sure the Track numbers you enter are available on the
Audio CD. If it is not, you will have to enter a different track.
4
Press
which
• The
the
Hints
the PLAY button. The Tracks will play in the order in
you programmed them.The Program will play once.
contents of the program will be stored until you turn off
DVD/VCR or open the Disc tray.
programmed playback. During programmed playback, the MODE
and SEARCH MODE buttons will
not operate.
You may play a Program repeatedly. During programmed playback,
press the REPEATbutton so that
REPEAT[ON] appears.The program will play over and over.
To see which Tracks you stared in
the Program, press the STOP button to stop playback, then press
the MODE button so that the
PROGRAM screen appears.
Programmed playback can only be
started from the program screen.
Random
Playback61
You may play theTracks of an Audio CD in Random order instead
of the order in which they are recorded (I,2,3...).To set up
Random Playback,follow these steps.
• Before you begin, place the DVD/VCR in DVD mode.
Press the DVD/VCR OUTPUT button so that the red DVD light
appears on the front of the DVD/VCR.
I
While playback is stopped, press the DVD button, then
press the MODE button repeatedly so that the RANDOM
screen appears.
RANDOM
Start
2
While the RANDOM screen appears, press the PLAY button. The Tracks will play in random order.After all the Tracks on
the disc have played once, playbackwill stop.
PHILIPS
62 AudioLanguage/Sound
Mode
The DVD/VCR allows you to select a Languagefor DVDs or a
Sound Mode for Audio CDs. Before you begin, put the DVD/VCR
in DVD mode.
0
• Press the DVD/VCR OUTPUT button so that the red DVD light
appears on the front of the DVD/VCR.
0
ovo
[_
Language
I
Press the DVD button, then press the AUDIO
button during playback, then press the A/v
buttons to select the
desired language.
• The language can be changed only if multiple languages are available on the DVD.
[_uo_
_
Press the A/v
buttons.
Press the A/v
buttons
AUDIO I
CD]
E3 123123_
U
again.
1...
AUDIO
vcH
I
PHILIPS
-.
j
AUDIO 2
Sound
Mode
I
Press the DVD button, then press the AUDIO button during playback, then press the A/v buttons until the sound
mode you want appears.
• When producers record an Audio CD, they record the sound
on two channels - the left and the right.You can choose to hear
the sound on the left channel, the sound on the right channel, or
the sound on both channels (Stereo).You will select L-CH, RCH, or STEREO.
m_Ll
"--_
LAuolo _
.
I _'_
Both right
and left channels
_
j
are active
(stereo).
__J_-_
I
Only
_-_
Only
the right channe} is active
the left channel
is active
Helpful
Hints
If a desired language is not shown
after pressing the .AI_" buttons several times, the DVD does not have
that language.
The display will disappear after
about 15 seconds.
Some DVDs only allow you to
change the language in the Disc
menu.
When you use the DIGITALAUDIO
OUT COAXIAL jack, the sound
mode of audio CDs cannot be
changed.
SubtitleLanguage63
The DVD/VCR allows you to select a language for subtitles from
those available on the disc.
,,w_w,_
• Before you begin, place the DVD/VCR in DVD mode.
Press the DVD/VCR OUTPUT button so that the red DVD light
appears on the front of the DVD/VCR.
I
Press the DVD button, then press the SUBTITLE
button
during playback. The subtitle menu will appear on the TV
screen.
2
_PEE_
Within
15 seconds, press the A/v
buttons to select a subtitle language. Select a language from those available on the
OG
REPE_T
DVD_
_N_E_
FETU_
_OO
SETUF _E
SUBTITLE
_YB
AIr
_U_IC _TT_
L_LE
buttons.
PHILIPS
I
•
SUBTqTLE_F_J8
I
J_
Press the A/v
select another
Subtitle 2
buttons to
language.
J
e
_"'_I
_
J
_ll
To turn off subtit{es, press
SUBTITLE_)_/8
j
_
the _/v
buttons repeatedly
until OFF appears in the
subtitle menu.
No subtitles
Helpful
SUBTITLE I
SUBTITLE 2
3
The subtitle
menu
will disappear
after about
15 seconds.
Hints
Wch some DVDs, you may select a
subtitle language in the Disc menu.
If the desired language is not shown
after pressing the ,_,/'_" buttons several times, the Disc does not have
subtJtlesin that language.
The subtit/es may be delayed for a
few seconds.
• Your subtitle selection will be cancelled if you open the Disc tray or
turn off the power.The default setring of the DVD will be selected
again.
64 Camera
Angles
oo
• ° t,,,,t,o
o,
Jt,e,6o,
.°o
oo,,oolo
oo le_o_eoo
oo mJoQ_o•o
o°
•oo,ot66
• oe_o6o,
• JoQooe_ooo*•
° _tloeoooo_o
° eel,o6
o Qo•j,_o
Some DVDs contain scenes that were recorded from different
angles.You may select a camera angle with the DVD/VCR.
• Before you begin, place the DVD/VCR in DVD mode.
Press the DVD/VCR OUTPUT button so that the red DVD light
appears on the front of the DVD/VCR.
I
Press the DVD button, then press the ANGLE
ing playback.
button dur-
•
2
Within 15 seconds, press ttne A/v
ferent angle.
buttons to select a dif-
Angle I (default) of eight
possible angles
Press the A/v
buttons to
select another angle.
Angle 2
Press the A/v
I
buttons again.
• If the Disc contains sequences recorded from different camera
angles,the angle symbol _3 will appear at the bottom-right of
the screen.You can change the camera angle when the symbol
appears on the screen.
• The camera angle cannot be changed if the Disc does not contain sequences recorded from different camera angles.
Helpful
Hints
TheANGLE ICON must be set to
ON in order for the angle symbol to
appear as described in step 2.To set
ANGLE ICON to ON, see page 74.
If the angle status appears on the
screen (for example,ANGLE [ I]/8),
the angle symbol will not appear on
the screen.
StatusDisplay(Discs)65
Accessing
the Status Display
You can check the information about the current Disc by pressing
the DISPLAY button on the remote control.
• Before you begin, place the DVD/VCR in DVD mode.
Press the DVD/VCR OUTPUT button so that the red DVD light
appears on the front of the DVD/VCR.
I
Press the DVD button, then press the DISPLAY/STATUS/
EXIT button repeatedly to access or remove the status
displays.
TITLE
OI/O4
T,_E
0h2_14_
_
I
OhO_m_5 s
]
REMA,_
I
• Current Title number / total number of Titles
.
,
" Elapsedtime of the current T_tle
r
--'T---- • Remaining time of the current Title
_ApTER
T,_E
_EMAIN
" Current Chapter number / total number of
Chapters in the current Title
• Elapsed time of the current Chapter
• Remaining time of the current Chapter
i E_GLISH
OOLB
Y DIGITA
AUDIO
_U_T;_ D _ ....
_.
• Current language for the sound
" Current
audio format (DOLBY DIGITAL 5, I
L_
_
_.
_.
Channel is displayed as DOLBY DIGITAL 6 CH.)
Current language for the subtitles
Selected angle / total number of angles
VIRTUAL 3D setting (appears only if
VIRTUAL 3D is ON)
No display
I AUDIO
CD
_uc_
REMAIN
I
._
_o_z _
• Current Track number / total Track number
• Elapsed t me of the current Track
OhOIm_
_--.
PnoG_
I
_
Rema n ng t me of the current Track
• Current play mode
-41No display
PHILIPS
66 ParentalLockLevels
Parental Lock allows you to block viewing of DVDs that have ratings that
exceed your selections.To set the levels, follow the steps below.
• Before you begin, place the DVD/VCR in DVD mode.
Press the DVD/VCR OUTPUT button so that the red DVD light
appears on the front of the DVD/VCR.
I
Q
I-
©
DVD
V(_.
While playback is stopped, press the DVD button, then press
the SETUP button. The setup screen will appear.
I /
s
--_--
SETUP
I LAblGk/AGE
2 VIDEO
3 AUDIO
4 LOCK
5 OTHERS
2
Press the Number 4 button to select LOCK.
The SETUP/LOCK menu will appear.
5
_ETUp _OO_ _UOlC
2
L_
CHANGE
_,_LE
6
pNSSWORO
EVEL
[NONEI
3
RATING EXPLANATIONS
NC-17 - Under 17 not admitted
Press the Number buttons to enter your 4-digit password.
• When doing this for the first time, enter any 4 digits.That number will
be the password until you change it.
PASSWORD
I LEVEL
2 CHANGE
[ _
]
[NONE_
pASSWORD
SETUP/LOCK
R - Restricted; under 17 requires
accompanying parent or adult
guardian
PG 13 - Unsuitable for children
under 13
PG - Parental Guidance suggested
G - General Audience
1
4
Helpful
Press the Number
button to select LEVEL.
SETUP/LOCK
PARENTALLOCK
Parental
NONE
LEVEL8
[PLAY ALL]
LEVEL 7 [NC 17]
LEVEL6
[RI
LEVEL5
LEVEL 4 [PG131
LEVEL3
LEVEL2
LEVEL1
Lock _So_
---
All DVDS _11 play¸ regardless of _a_ng
DVDS _ate_ NC_I 7 o_ hdghe_ w_ll not play
_VOs rate_ R _ h_gh_ w,H not p_ay
---
DVD_ [ated PG13 or h_gher will nol _ay
DVDs _aled PG or h_Jher w_14not play
[PG]
[G}
DVDS ra_ed G or higher w_ll no_ploy Only
DVDS that a_e r_t _ated w,l_ pl_y
5
Press the _/_ buttons to select the level you desire, then press
the ENTER button. For example,if you want to play Discs rated
PG 13,you must select LEVEL 5 or higher.
The SETUPILOCK menu will reappear.The level you selected will appear
on the screen beside LEVEL.
6
Press the RETURN
button twice to remove the menu.
Hints
Some DVDs are not compatible with
Parental Lock.Make sure the DVD
plays accordingto the ParentalLock
settingsyou havemade.
• The DVD/VCR will not allowyou to
change LEVELsettingsuntil you enter
the correct password.
• When you try to play a Disc that has
a rating that exceedsthe levelyou set,
a messagewill appear on the screen,
indicating the Disc cannot be played.If
this happens,pressthe OPEN/CLOSE
button to remove the Disc,then select
a levelthat allowsplayback.Or select
NONE to turn off ParentalLock.Load
the Disc again and beginplayback as
usual.Some Discsmay allowyou to
simply enter your 4-digit password,
then begin playback automatically.
Follow the instructionsprovidedby the
Disc message.
ParentalLockPassword
67
You can change the password as often as you like.To do so, follow
these steps.
• Before you begin, place the DVD/VCR in DVD mode.
Press the DVD/VCR OUTPUT button so that the red DVD light
appears on the front of the DVDNCR.
35
I
'
While playback is stopped, press the DVD button, then
)ress the SETUP button, The setup screen will appear.
SETUP
1 LANGUAGE
2 VIDEO
3 AUDIO
4 LOCK
50THEAS
2
Press the Number
4 button
The SETUP/LOCK
PASSWOnO
1 LEVEL
2 CHANGE
[
--
to select
LOCK.
menu will appear.
I
[NONE]
PASSWORD
6
SETUP/LOCK
_l_er
_
Ba¢_
3
PHILIPS
Press the Number buttons to enter the 4-digit password.
• When doing this for the first time, enter any 4 digits.That number will be the password until you change it.
__]
PASSWORD
...
J
[ =_
1 LIEVEL
2 CHANGE
{NONE]
PASSWORD
SETUP/LOCK
Ether _
Bac_
Helpful
4
Press the Number 2 button to select CHANGE PASSWORD. The first space in the PASSWORD will start flashing.
5
6
Press the Number
Press the
RETURN
buttons
button
to enter
your new password.
twice to remove
the menu.
Hints
Wf_te dawn the password in case
you forget it.
To erase the old password, press the
POWER button to turn off•he
DVD/VCR.Then, press and hold the
DVD STOPbutton on the DVD/VCR
while pressing the POWER button
on th_ DVD/VCR to turn on the
power again.When "HELLO"
appears on the display panel, you
may release the DVD STOPbutton.
Follow the steps on this page to set
the password that you desire.
68 AudioSettings
• tolooo_01
,to,,oeetoQiooQe,o6,t
••
,°•
Io_*
,°•
t,e_*
,eol6
•=.
o,_q,
°•
tte*o
•••
,,ot6J
•,
Jo_,eelto_,lt61_et_o
• o,mee,Qo
• Before you begin, place the DVD/VCR in DVD mode.
Press the DVD/VCR OUTPUT button so that the red DVD light
appears on the front of the DVD/VCR.
I
While playback is stopped, press the DVD button, then
)ress the SETUP button. The setup screen will appear.
I
2
3
4
5
LANGUAGE
VIDEO
AUDIO
LOCK
OTHERS
SETUP
1
2
Press the Number
3 button
to select AUDIO.
SETUP/AUDIO
IGITAL OUT
_VOIRTUAL 3D
[OFF]
Press the corresponding
Number
item: DIGITAL
OUT orVIRTUAL
I
button
3D.
to select an
_.,° Setsthe samplerate for playingadisc
SETUP/AUDIO
PHILIPS
pCMDIGTALOU_48kHzj4
recorded wit'h high sound quality
2DOLB¥
Dre_TALIONI
q
• Selectwhen a Dolby Digitaldecoder
1
3o_s
_net_Oa
{o.i %
k_E_,
is connected.
* Selectwhen a DTS decoder is connected.
)
To change the DIGITAL
OUT
settings,
go to step 4.
VII=O_UAL30
I
IOFF
SETUP/AUDI
O
!
"SelectONto activatethe 3D effect.
2ON--
L__,J
To change theVIRTUAL
3D setting, press the corresponding
Number
button, then go to step 5.
This unit employs TruSurround system
(_)'Jrl_urrol_rlld
of SRS Labs, Inc. as the
VIRTUAL
3D technology.
Helpful Hint
TruSurround
and the(_)"
symbol are trademarks
SRS Labs, Inc. in the United States and selected
foreign countries.
TruSurround technology is incorporated
license from SRS Labs, Inc.
under
of
To enjoy Dolby Digital Surround or
D TS Surround sound, you must
have the DVD/VCR connected to a
Dolby Digital or DTS decoder.
Details are on page 14.
4
To change the PCM, DOLBY DIGITAL, or DTS settings,
press the corresponding Number button to select the
desired item, then press the Number button to choose
the setting (i.e. ON or OFF).
48kH_C_
a 06kHz
_
I
48 kHz/16 bit signals when playing
a DVD recorded with high sound quality
(48 kHz/20
bit/24 converted
bit, 96 kHz).
SETUP/AUO_O
_Audio
signalsare
to
"_
• Sound is reproduced at 96 kHz if a DVD
E_
/
is recorded with high sound quality. If you
are prayrng 48 kHz d scs or If 4:3 LETTER
BOX is selected, sound is reproduced
at 48 kHz.
OOLE_Y DIGITAL
OFF
[
/
2 o_ _
I
rJv_V_F_
C_3 C2_ C23
i Select ON when a Do by Digital decoder is used.
_ETtJP/AUDIO
i!
DTS
1 OFF
2ON_
SETUP/AUDI
• Select ON when a DTS decoder is used.
o
5
Press the SETUP
PHILIPS
button
to remove
the menu.
t
70 Language
Settings
Press the DVD/VCR OUTPUT button so that the red DVD light
appears on the front of the DVD/VCR.
I
While playback is stopped, press the DVD button, then
press the SETUP
I
2
3
4
5
I_
button,
C2D _D
LANGkJAGE
I
i AUDIO
[AUTO]
4
[ENGJ
pL_,YER
I button to select LANGUAGE.
U
[Z? C_ (53 ......
[AUTO]
3 r)ISC MENU
MENU
SETUp
LANGUAGE
V_
i
[O_IIGh
SUBTITLE
]_
_
DVO
WOEO
AUDIO
_OCK
OTHERS
SETUP
Press the Number
2
The setup screen appears.
eg
e5
---1 _ cD
]
3
Press a Number button to select an item:AUDIO,
TLE, DISC MENU, or PLAYER MENU.
I
_
L"O0 0_"0"0_
• The original anguage of each d sc will be selected.
Vonce usplayed back nn Enghsh.
• Voice is played back in Spanish.
j
[
O_HEn
_
_m_
_
L_0_,
n
PHILIPS
SETUP*LANGUaGE
_UDIO
_
_NGUSH_"
SPANIS_
_
4 FRENCH
OR G NAL
SUBTI-
)
• Voice is played back in French
• You can select other languages for audio playback.
SETUP/LANGUAGE
EN_USH
_
S_AN_SH
--
4 FRENCH
s _UTO_._
OTHE_
ISUeT_TLE_
, _•
|
_uToD_SC
MENU_
s_Nis_ --,
s OT_E_
4
__
a FRENCH
_NGUS_
L_n,r_._
Pt.A¥_R
2
SP_NIS_
" Subtntles are shown nn Englnsh.
• Subtitles are shown in Spanish.
• Subtitles are shown in French.
the automatically selected language.
You can select other anguages for subtitles.
•The disc menu is shown in the automatically
HeIpfu Uints
• If the original or automatic settings
for AUDlO and SUBTITLE are the
same language, the subtitles will
not be shown.
selected language
The disc menu appears in Spanish
dnse menu
appears in
English.
•• The
The disc
menu appears
in French
,_
• Language settings forAUDIO, SUBTITLE,and DISC MENU are not
available with some discs. Use the
AUDIO and SUBTITLE buttons
) " ou can select other languages for the disc menu.
MENU
_
,3 _.o_,_.--.
FaENCH_
"
display
and DVD Player
menus appear in
French.
rbe on-screen
ddisplay
spayandDVD
Eng"sh
and DVD Payer
Player _eousappear
menus appear iin. Spanish.
• The on-screen
• The on-screen
Go to step 4 to change the settings
within AUDIO,
TITLE, DISC MENU or PLAYER MENU.
SUB-
instead to select different languages for the audio and subtitles.
Details are on pages 62 and 63.
• Not all discs provide different languages for audio, subtitles, or disc
menus.
4
Press a Number button to select a setting.
• If OTHER is selected on the AUDIO, SUBTITLE or DISC MENU
screen,the COUNTRY CODE screen will appear.Press four
Number buttons to enter the country code you desire, then
press the ENTER button. Refer to the list on page 72.The codes
are listed alphabetically,according to language.
• You can only select other languagesfor AUDIO, SUBTITLE,and
DISC MENU if the languageis availableon the Disc.
SETUP/LANGUAG
COUNTRy
CODE
[
_[_Enqer
_
E
]
B_c_ Imi_E_
5
Press the SETUP
button
to remove
the menu.
Helpful
Hint
If you accidentally set the PLAYER
MENU LANGUAGE to French or
Spanish and need English:
I) Press the DVD button, then press
the SETUP button.
2) Pressthe Number I button
(IDIOMA or LANGUE).
3) Pressthe Number 4 button
(MENO EN PANTALLAor MENU
SUR ECRAN).
4) Pressthe Number I button
(INGLES or ANGLAIS).
5) Pressthe SETUP button to
remove
the menu.
72 Language
Settings
(cont'd)
Country
Code
_
A-B
Abkhazian
Afar
Afrikaans
Albanian
Amharic
Arabic
Armenian
Assamese
Aymara
Azerbaijani
Bangla
Bashkir
Basque
Bengali
Bhutani
Bih_ri
Bislama
Breton
Bulgarian
Burmese
Byelorussian
C-E
5759
4947
7254
4961
5464
4965
5047
6058
5160
5161
5166
F-H
Faroese
Fiji
Finnish
French (FRE)
Frisian
Gaelic (Scots)
Galician
Georgian
German (GER)
Greek
Greenlandic
Guarani
Gujarati
Hausa
Hebrew
Hindi
Hungarian
Country
Code
IoK
4748
4747
4752
6563
4759
4764
5471
4765
4771
4772
4860
4847
5167
4860
5072
4854
4855
4864
4853
5971
4851
Cambodian
Catalan
Chinese (CHI)
Corsican
Croatian
Czech
Danish
Dutch (DUT)
English (ENG)
Esperanto
Estonian
Country
5261
5256
5255
5264
_ 5271
5350
5358
5747
5051
5158
5758
5360
5367
5447
5569
5455
5467
S
5565
5560
5547
5551
5557
5347
5566
5647
5669
5760
5765
5757
6469
5771
6460
5761
5767
Icelandic
Indonesian
Interlingua
Interlingue
Inupiak
Irish
Italian (ITA)
Japanese(JPN)
Javanese
Kannada
Kashmiri
Kazakh
Kinyarwanda
Kirghiz
Kirundi
Korean (KOR)
Kurdish
L-N
Laothian
Latin
Latvian
Lettish
Lingala
Lithuanian
Macedonian
Malagasy
Malay
Malayalam
Maltese
Maori
Marathi
Moldavian
Mongolian
Nauru
Nepali
Norwegian
O-R
Occitan
Oriya
Oromo (Alan)
Panjabi
Pashto
Persian
Polish
Portugese
Pushto
Quechua
Rhaeto-Romance
Romanian
Russian
Code
5861
5847
5868
5868
5860
5866
5957
5953
5965
5958
5966
5955
5964
5961
5960
6047
605 J
6061
6149
6164
6159
6247
6265
5247
6258
6266
6265
6367
6459
646 I
6467
Samoan
Sangho
Sanskrit
Serbian
Serbo Croatian
Sesotho
Setswana
Shona
Sindhi
Singhalese
Siswat
SIovak
Slovenian
Somali
Spanish(SPA)
Sundanese
Swahili
Swedish
6559
6553
6457
6564
6554
6566
6660
6560
6550
6555
6565
6557
6558
6561
5165
6567
6569
6568
T
Tagalog
Tajik
Tamil
Tatar
Telugu
Thai
Tibetan
Tigrinya
Tonga
Tsonga
Turkish
Turkmen
Twi
6658
6653
6647
6666
6652
6654
486 I
6655
666 I
6665
6664
6657
6669
U°Z
Ukrainian
Urdu
Uzbek
Vietnamese
Volapuk
Welsh
Wolof
Xhosa
Yiddish
Yoruba
Zulu
6757
6764
6772
6855
696 t
497 I
696 I
7054
5655
7161
7267
VideoSettings
73
• Before you begin,place the DVD/VCR in DVD mode.
Pressthe DVD/VCR OUTPUT button so that the red DVD light
appearson the front of the DVD/VCR.
I
When playback is stopped, press the DVD button, then
)ress the SETUP button. The setup screen will appear.
SETUP
I
I
LANGUAGE
I
2 VIDEO
3 ALJDIO
4 LOCK
5 OTHERS
2
Press the Number
2 button
"C_ CS3Cg
to selectVIDEO.
0
SETUPNIDEO
1 TV MODE
[4:3L1_]
2 STILL
[AUTO]
MODE
Emer_
oo.....
C30(_ °0
tlc_z_ 5 _51
Back _EXl
3
PHILIPS
Press the corresponding Number button to select an
item:TV MODE or STILL MODE.
SE_:g'_EO1 • Full-height
I
143 PAN&SCAN_
|
2 43 LETTER
BOX_
!
3,.0w,oE_-_. Wide
scroe.
(fu,-w_dth)
pictures
are
j
I
"_
one
shown, with black bars at top and bottom.
" Select ifa wide screenTV
is connected to the DVD Player.
SETUPNIOEO
STILL MODE
1
_AUTO--.
2 FIELD
AUTO
I
3 FRAME_
•
-,
hie{ _l_a_k
are shown,with
or both sides trimmed.
L_E,,0,._k_E,,_
_E
pictures
_
is normally
selected.
Select if pictures are blurred in auto mode.
Select
to show Still pictures
in high resolution,
Exli_
4
Press the corresponding Number button to select a setting.
5
Press the SETUP
Helpful
button
to remove
the menu.
Hint
• You may select a different TV
MODE setting oniy if it is available
on the Disc.
74 OtherMenuSettings
***********l
.**
m*************l=
****
*******B
***°
*********
*o
=l******l
o**
,******l*l
* * oo*
****
° ****j**=***
• Before you begin,place the DVD/VCR in DVD mode.
Pressthe DVD/VCR OUTPUT button so that the red DVD light
appears on the front of the DVD/VCR.
I
When disc playback is stopped, press the DVD button,
then press the SETUP button. The setup screen will appear.
SETUP
1
2
3
4
5
LANGUAGE
VIDEO
AUDIO
LOCK
OTHERS
EnFe,
_
_E,,F
Press the Number 5 button to select OTHERS.
OSD MESSAGE
[ONI
2 ANGLE ICON
3 BACKGROUND
I_
[ONJ
[BLUE]
SETUPIOTHERS
Enle,_B_k
Im_pE
3
Press the corresponding Number button to select an item:
OSD MESSAGE,ANGLE
ICON, or BACKGROUND.
OSD MESSAGE
SETUP/OTHERS
/
1 ON
• Select ONto display messageson the screen,
such as PLAY, STOP, etc.
_II,L_J
ANGLEICON
SETUP/OTHERS
/
• Select ON to display the angle icon.
ON
2OFF
_Enler
q_i_
Ba_k _
Exil_
SETUPIOTHERS
BACKGROUND
i BLUE;O_HEN_
)
2 GRAY
_
_Enler
4
_
* Turns the Player menu background
to blue
• Turns the Player menu background to gray
e,_t
I_i_;J
E_il)
Press a Number button to select a setting.
Press the SETUP button to remove the menu.
PHILIPS
° **
° m**
•
CareandMaintenance
75
• o,
• ,,,
• oo,o
000
• • 0...
°°..
,o,,
• • ,,0
• ,00
• o0oo
• 0o°...o,,
•o
000
• o.°,
• • • 0,000
• 000,,,
• ,,,,
• ,i,
• ,,00
• o60Qtl
i oo60o*,Q.o_
Cleaning the DVD/VCR
• Wipe the front panel and other exterior surfaces of the
DVD/VCR with a soft, slightly damp cloth.
• Never use a solvent, thinner, benzene or alcohol to clean the
DVD/VCR. Do not spray insecticide liquid near the DVD/VCR.
Such chemicals may discolor the surface or damage the
DVD/VCR.
Don't
Cleaning a Disc
• Use a soft, dry cloth to wipe the Disc.
• Wipe the Disc in a straight line from the center to the edge.
Never wipe the Disc in a circular motion.
• Do not use detergent or abrasive cleaning agents.
• Handle the Discs so that fingerprints and dust do not adhere to
the surfaces of the Discs.
• Always store the Disc in its protective
use cleaners.
Wipe Discs from the
center to the edge.
case when it is not in use.
Checl_ing the Laser
• If the DVD/VCR does not operate as described in this owner's
manual,the laser may be dirty. Consult an Authorized Service
Center for inspection and cleaning of the laser.
Handle Discs
by the edges.
Keep the Disc in its case.
76 HelpfulHints
i°oo
• o°o
m o,..
o°°°.
°°t
• • ,,.
• .,.
• °°°
• °t,.
• ..,.
• o°tol
• .to.
• tttoo
• • ..,
0 • leo.o
• • o..Q
i • to
• o..
iioe..
• t.ooooo..
J•
,.
_Bo°
If you are havingproblems with your product, check this _ist of problems and possible solutions before
requesting service.You may be able to solve the problem yourselfi
If you need to call a customer service representative, please know the model number and serial number of
your product before you call.This information is displayed on the back of the product. Also, please take a
moment to identify the problem you are having,and be prepared to explain this to the representative. If
you believe the representative will need to help you with operations, pleasestay near the product. Our
representatives will be happy to assist you.
The DVD/VCR
has no power.
• Make sure the power cord is connected completely to an AC (alternating current) outlet.
• Press the POWER button to turn on the DVD/VCR."HELLO"
will appear briefly on the display panel as
the power is turning on.
The remote control will not operate the DVD/VCR.
• Aim the remote control directly at the DVD/VCR's remote sensor. Detailsare on page 26.
• Remove all obstacles between the remote control and the DVD/VCR.
• Inspect and/or replace the batteries in the remote control. Details are on page 15.
• Use the remote control within 23 feet of the DVD/VCR.
• Press the DVD button, then try the other DVD feature buttons. (Press the DVD/VCR OUTPUT button
_'o that the red DVD light appears on the front of the DVD/VCR.This means the DVD/VCR is in DVD
mode.)
• Press theVCR button, then try the otherVCR feature buttons. (Press the DVD/VCR OUTPUT button so
that the green VCR light appears on the front of the DVD/VCR.This means the DVD/VCR is in VCR
mode.)
• InVCR mode, make sure theVCR/TV light appears on the front of the DVD/VCR. If it does not, press the
VCR/TV button once.
No picture in DVD mode.
• Make sure the video cable is connected correctly.Youmay connect either the yellow video cable (supplied), an optional S-Video cable, or optional component video cables.Detailsare on pages 12-14.
• Make sure theTV is set to the correctVideo In channel (usually the AUX IN,A/V IN,Auxiliary In,
Component Video In or S-Video tn channel). Check your TV owner's manual for details.
• Insert a Disc that is playable on this DVD/VCR. Details are on page six.
Disc cannot be played.
• insert a playable Disc. Details are on page six.
• Place the Disc correctly in the recesses in the Disc tray. If the Disc is one-sided, place the Disc in the tray
with the labelfacing up. If the Disc is two-sided, make sure the side you want to play is facing up.
• Clean the Disc.
• Cancel the parental lock, enter the password, or changethe control level. Details are on pages66-67.
• Make sure the Disc is labelled for use in Region I or ALL regions. Details are on page six.
HelpfulHints(cont'd)77
• 1o1•
• 11•
• •o••
• o•
• too•
• o6o
• •.on
• •to
• OO•••
• ,OO•••
OOO,
,,°.
••to•
• O_tO,,,
,,•°••••
O_,,,,
• OO,,,
• .•••O,
I,_,°•
• O°_O°•,
No sound
• Connect the audio cablesfirmly.Make sure the cables are connectedto the AUDIO IN jackson theTV
or audio equipment. Detailsare on pages 12-/ q.
• Check the audio settings of the DVD/VCR. Details are on pages62 and 68-69.
• Turn on the power of the audio equipment and make sure it is set to the correct channel, usually
Auxiliary IN. Refer to the owner's manual of the audio equipment for details.
• Check the audio settings of the Disc. For example, you may have selected "sound•rack" playback on a
DVD. Only the music of the movie will play,not the characters' dialog; music might not be recorded
throughout the entire DVD.
Distorted picture
• Connect the DVD/VCR directly to the TV. Details are on pages8-14.
• There are some caseswhere the picture may be distorted slightly; this is not a malfunction of the
DVD/VCR.
The camera
angle cannot
be changed.
• The DVD might not contain segments recorded
available. Details are on page 64.
from different
camera angles. See if multiple angles are
The audio or subtitle language cannot be changed.
• The DVD does not contain audio or subtitles in the desired language.Not all DVDs contain audio or subtitles in multiple languages.See if other languagesare available.Details are on pages62-63.
"No feature" symbol appears on the screen, prohibiting an operation.
• That operation is currently prohibited by the DVD/VCR or is not availableon the Disc. Details are on page
_ve,
The DVD/VCR switches to VCR mode automatically.
• The DVD/VCR will switch toVCR mode automatically if disc playback is paused or stopped for more
than 30 minutes (and no buttons are pressed on the remote control or the DVD/VCR).
A screen saver appears on theTV screen,
• The DVD whale will appear on theTV screen if Disc playback is stopped for more than one minute (and
no buttons are pressed on the remote control or the DVD/VCR).The
DVD whale moves around on the
screen to prevent damage to your TV's picture tube.A prolonged still image, including TV station identification Iogos or video games, may damage the picture tube.
78 HelpfulHints(cont'd)
too
ooo,o
too,
.too
,too
ooQo
• otto
too,
• trot
ooeooo
• to°,,
ttQo
• toot
• • ot,o
• • ootoooo,
ttttoo
• toot
• ol°t,oo
• • oo°o
•,
• ootooooo
Power Failure
• Timer recordings, the clock setting, the languageselection, and channel setup may be lost if the power
fails for more than one minute. Follow the steps on pages 16 and 20.Then, see pages36-38 to reprogram your timer recordings.
A TV program cannot be recorded.
• Put the DVD/VCR inVCR mode. Press the DVD/VCR OUTPUT button so that the greenVCR light
appears on the front of the DVD/VCR.
• Check the connections between the DVD/VCR,TV, antenna/cable,and Cable Box/Direct Broadcast
System (if applicable).Details are on pages8-1 I.
• Make sure the tape has a record tab. Details are on page seven.
• Check theTV/VCR position. Detailsare on page 25.
• Check the CH3/CH4 switch. Detailsare on pages8-1 I. Or, if you connected the DVD/VCR to theTV
using audio and video cables,select the correct audio and video in channel at the TV. Detailsare on page
12.
The DVD/VCR will not perform a timer recording.
• Make sure the recording start and stop times are set correctly. Detailsare on pages36-39.
• Make sure a tape is in the DVD/VCR and the tape has a record tab. Detailsare on page seven.If,after programming a timer recording, you press the TIMER SETbutton without putting a tape in the DVD/VCR,
theTIMER SET light will blink.
• _ the record tab on a tape is missing,the DVD/VCR will eject the tape.The TIMER SET light will blink.
• Press theTIMER SET button to put the DVD/VCR in standby mode for the timer recording.TheTIMER
SET light should appear on the front of the DVD/VCR.
• Make sure the clock is set. Details are on page 20.
• The DVD/VCR may not perform or continue a timer recording if a power failure of more than one
minute occurs.
• If you have a Cable Box/Direct Broadcast System,timer recordings are programmed differently. Details are
on page 10.
• Finish programming a timer recording at least five minutes before the recording is set to begin.
• 12 p.m. is noon; 12 a.m. is midnight.
There is no picture or the picture is noisy or contains streaks during video cassette tape playback.
• Put the DVD/VCR inVCR mode. Press the DVD/VCR OUTPUT button so that the green VCR light
appears on the front of the DVD/VCR.
• Make sure the TV is on the same channel as the DVD/VCR's CH3/CH4 switch. Or, if you connected the
DVD/VCR to the TV using audio and video cables,select the correct audio and video in channel at the
TV. Detailsare on page 12.
• Make sure the DVD/VCR is inVCR position. Press theVCR/TV button so that theVCR/TV light appears
on the front of the DVD/VCR.
• Make sure channel 03 or 04 is properly adjusted at theT_
• Adjust the tracking. Details are on page 45.
• TVs placed too close to the DVD/VCR can cause interference during tape playback.Move the DVD/VCR
away from the TV.
The Number buttons won't work for channels above 69.
• Enter channel numbers as a two-digit number. If you want to select channels 100 and above,enter channel numbers as a three-digit number. Details are on page 30.
TV programs cannot be watched normally.
• Put the DVD/VCR in VCR mode, then put it in TV position. Press the DVD/VCR OUTPUT button so that
the green VCR light appears.Then, press the VCR/TV button so that the VCR/TV light disappearsfrom the
front of the DVD/VCR. Details are on page 29.)
• Check the connections between the DVD/VCR,TV, antenna/cable, and Cable Box/Direct Broadcast
System (if applicable). Details are on pages8-1 I.
HelpfulHints(cont'd)79
oQoo
Iotog
• OQQ,.tet,
OtOtO
OOOI
_00J
• 06O
• O Otog
JOOtO0
_toto
,060
• • 66,
• • ,,,,
• 00._
• ,°,
• o°°°,
O°°O
• O,_
• • O,°°O
• • I°_o°
•,,
• •
Tape cannot be inserted.
• Insert the tape, window side up, with the record tab facing you.
• Make sure a tape isn't already in the DVD/VCR by pressing the STOP/EJECTbutton on the DVD/VCR.
• Gently push on the center of the tape when putting it in the DVD/VCR. Never force the tape into the
DVD/VCR.
• If a timer recording is programmed and the DVD/VCR is in standby mode for the timer recording, you
can not insert a tape without a record tab.
Tape cannot be removed.
• Make sure the power plug is completely connected to a power outlet.
• You have set a timer recording. Press theTIMER SET button to temporarily cancel standby mode. Then,
press the STOP/EJECTbutton on the DVD/VCR to eject the tape. Be sure to insert a tape and press the
TIMER SET button to put the DVD/VCR in standby mode for the timer recording.
DVD/VCR ejects the tape when the RECORD button is pressed or when theTIMER SET button is pressed to set a timer recording.
• Make sure the tape has a record tab. Details are on page seven.
Poor reception
• You may need to tune yourTV again.
The motor (cylinder) rotates even when the tape playback is stopped.
• To enable the quick play mechanism,the cylinder will rotate for about five minutes.This is normal.The
quicle play mechanism allows the tape mechanism to switch from Stop mode to Play mode in one second.
Direct Broadcast System Hookups
• Watching one TV channel while recording another may not be possible if you havea DBS hookup.You
may have to set your TV to channel 03 or 04, then make your channel selections at the DBS.
• With many DBS hookups, if you use accessory audio and video cables to connect your DVD/VCR to
your TV, you will have to put your DVD/VCR in Line Input mode (channel 001 or 002).
Line Input mode
• If you accidentally enter Line Input mode (AV FRONT orAV REAR will appear on yourTV screen
briefly), press the CHANNEL A/v buttons or use the Number buttons to select another channel.
Hi-Fi Stereo Sound
• During playback, Hi-Fi audio may temporarily revert to normal audio when you adjust tracking. This is
normal.
• When connecting the DVD/VCR to a stereo T_, you will only get stereo sound if you use audio cables to
connect the DVD/VCR AUDIO OUT jacks on the DVD/VCR to the AUDIO IN jacks on your T_, and if
theTV is in Line (Auxiliary) Input mode.
• When you connect the DVD/VCR AUDIO OUT jacks on the DVD/VCR to the AUDIO IN jacks on your
TV, the stereo light on the TV might not glow. But, as long as the status display indicates you are receiving a stereo signal,you are receiving a stereo signal. This is normal, Details are on page 46.
• Only tapes recorded in Hi-Fi audio will play back in Hi-Fi audio. Tapes recorded in normal audio will play
back in monaural audio.
Cleaning the Video Heads
• Your DVD/VCR automatically cleans the video heads of theVCR each time you insert a tape. However,
the heads may become dirty. If so, use a commercially-available head cleaner or have an authorized servicer clean the video heads.Eventually,the heads may need to be replaced.
The playback picture is too dim, too bright, or fluctuates in brightness.
• Some programs may be broadcast with copyright protection technology in order to protect the rights of
copyright owners.This technology is used on programs that are recorded on video tapes or Digital Video
Discs (DVDs), as well as some programs broadcast by antenna/cable/satellite television channels.
Programs broadcast with copyright protection technology may not record clearly. Likewise, if you play a
tape that is a recording of a copyright protected program, the picture may not be clear.Tapesof copyright
protected programs may havea picture that is dark or dim, or the brightness of the picture may fluctuate.
Therefore, you should avoid recording or playing copies of copyright protected programs.
This DVD/VCR incorporates copyright protection technology that is protected by method claims of certain U.S.patents and other intellectual property rights owned by Macrovision Corporation and other
rights owners. Use of this copyright protection technology must be authorized by Macrovision
Corporation and is intended for home and other limited viewing uses only, unless otherwise authorized
by Macrovision Corporation. Reverse engineering or disassemblyis prohibited.
80 Glossary
060.
• OtOJ
JO•tl
• 060.O
.tO..Or.
• tOO
• .OIt_
• ..66.
• J.tl
• ..661
• OOQ_
0 • .66.
• OtO_
• ..t_
..6..
OOI
AUDIO
IN/OUT
Jacks: jacks located on the front and back of the DVD/VCR
audio from another source (IN) or to send audio to another system (OUT).
• 0..61.
• o.
OO_ •.
• .°°,,om
• • • •
which are used to receive
Automatic
Channel Setup: process in which the DVD/VCR memorizes all available TV channels.Then,
when you press the CHANNEL A/v
buttons, you only scan through channels you receive.
Bands: settings that allow you to tune channels.
• Antenna -VHF (very high frequency;channels 2-13) and UHF (ultra high frequency;channels
• Cable - all standard channels can be received without a Cable Box.
Cable
CD:
Box/DBS
Compact
Output
Channel:
14-69).
03 or 04.
Disc (audio)
Coaxial jack: Used to send digital audio to a decoder or amplifier, allowing you to adjust the volume at
the decoder or amplifier.This connection provides the 5.1 channel surround sound as heard in movie theaters.
COMPONENTVIDEO
OUT Jacks: jacks located on the back of the DVD/VCR
high-quality video to a TV with Component Video In jacks.
which are used to send
Dolbv Di__ital: A surround sound system that provides S.I channel sound as used in movie theaters.
DTS: Digital Theater Systems.This is a surround
formats were developed by different companies.
sound system, but it is different
from Dolby Digital.The
copying a video cassette tape using anotherVCR.
DVD:
DigitaIVideo
Disc.
Frame," a still picture.
high quality; a feature in theVCR
circuitry which provides enhanced picture detail.
Line I_
The channel to which you set your DVD/VCR
AUDIO and VIDEO In jacks on the front of the DVD/VCR,
AUDIO and VIDEO IN jacks on the back of the DVD/VCR,
Line Input mode, press the CHANNEL A/v
buttons or
nel
during video cassette tape dubbing. If you use the
select channel 002 (AV FRONT). If you use the
select 001 (AV REAR). If you accidentally enter
use the Number buttons to select another chan-
OPTICAL
DIGITAL
AUDIO
OUT lack: Converts electrical signals into optical signals before sending
the audio to the amplifier. Optical audio is not prone to external electrical influences and has less noise,
which reduces adverse effects on external equipment. Be sure to keep the protective cap on the jack when
the jack is not being used.This keeps dust out of the jack.
OTR: One-Touch Recording; a timed recording on the VCR that starts immediately and records for 30
minutes to eight hours.
Remote Control:
from a distance.
the small unit that came with your DVD/VCR; allows you to operate your DVD/VCR
RF coaxial cable: A cablesuppliedwith your DVD/VCR. Use it to connect your DVD/VCR to yourTV (or
Cable Box or DBS).The suppliedcable isa snap-ontype. However, you may use a screw-on type if you prefer.
Snecial
Effects: forward and reverse searching; a still picture; slow motion playback.
S-Video:
Produces a clearer picture by sending separate signalsfor the luminance and the color. If you
connect an optional S-Video cable, you will not need to use the supplied yellow video cable.
Tape Speeds: how fast the video cassette tape travels during a recording or playback.
• SP (standard play) - fastest tape speed (recording time for aTI20 tape is approximately two hours); best
picture quality.
• LP (long play) - average tape speed; playback only.
• SLP (super long play) - slowest tape speed (recording time for aTI20 tape is approximately six hours).
VCR: video cassette recorder.
VIDEO
IN/OUT
lacks: jacks located on the front and back of the DVD/VCR
video from another source (IN) or to send video to another system (OUT).
which are used to receive
Specifications
81
toot
• t.ot
• .o..6......6
• ol6
• .66.
• .6......I
....o
6oe6
• 6.6.6
• °°..
• 6o666
• 6.°°......66
Video Heads
Four heads - Hi-Fi
Antenna
VHF/UHF
- 75 ohm external antenna terminal
VHF Output
Signal
Channel 03 or 04 (switchable)
75 ohms unbalanced
Tuner Broadcast Channels
VHF 2-13, UHF 14-69
Cable TV Channels
1-125
Product Type
DigitaIVideo Disc Player & Video Cassette Recorder
Playable Discs
DVD-Video
Audio CD
Color
NTS_
System
Frequency Response
DVD (linear sound): 20 Hz to 22 kHz (sample rate: 48 kHz)
20 Hz to 44 kHz (sample rate: 96 kHz)
Audio CD: 20 Hz to 20 kHz
Signal-to-Noise
Ratio (S/N Ratio)
Audio CD: II0 dB EtAJ (Electronic Industries Association
of Japan)
Dynamic Range
DVD (linear sound): 95 dB
Audio CD: 94 dB (EIAJ)
Total Distortion
Factor
Audio CD: 0.007% (EIAJ)
Wow
and Flutter
Below the measurement
limitation (+0.001% W PEAK) (EIAJ)
Power Requirement
120VAC +/- 10%,60 Hz +/- 0.5%
Power Consumption
Power on: 37 W
Standby (power off): 4 W
Operating
Temperature
41°F (5°C) to 104°F (40°C)
Relative Humidity
30% to 80%
Dimensions
17-1/8" (W) x 4-1/16" (H) x 12-11/16"
(435mm x 103mm x 323mm)
(D)
Weight
I 1.0Ibs.(5.0kg.)
NOTE: Designs and specifications are subject to change without notice.
• 66.66
• 6666
• ...
• 6..6°1
• 6•
6....°
82 Limited
Warranty
**6*,.
**J
****
• 16*,*1*
_ ****
***1
• ***l
• 1***
• .66.
• **l
• ****_*.61
.*1.***.6**.
• ****
• .0°°..*°**
• 1*°.*
**°**.
,*****°***ml
DVD/VCR
90 Days FreeLaborlOneYearParts Exchange.This product must be carried in for repair.
WHO IS COVERED?
MAKE SURE YOU KEER..
You must have proof of purchase to receive
Pleasekeep your sales receipt or other document
warranty service.A sales receipt or other document
showing proof of purchase.Attach it to this owner's
showing that you purchased the product is considmanual and keep both nearby.Also keep the original
ered proof of purchase.
box and packing material in case you need to return
your product.
WHAT IS COVERED?
BEFORE REQUESTING SERVICE...
Warranty coverage begins the day you buy your
Pleasecheck your owner's manual before
product. For 90 days thereafter, all parts will be
repaired or replaced, and labor is free. From 90 days
requesting service.Adjustments of the controls
to one year from the day of purchase,all parts will be
discussed there may save you a service call.
repaired or replaced, but you pay for all labor
TO GET WARRANTY SERVICE IN U.S.A.,
charges.After one year from the day of purchase,you
PUERTO RICO OR U.S. VIRGIN ISLANDS...
payfor the replacement or repair of all parts, and
for all labor charges.
Take the product to a Philips factory service center
(see enclosed list) or authorized service center for
All parts, including repaired and replaced parts, are
repair.When the product has been repaired, you
covered only for the original warranty period.When
must pick up the unit at the center. Centers may
the warranty on the product expires, the warranty
keep defective parts.
on all replaced and repaired parts also expires.
(In U.S.A.,Puerto Rico and U.S.Virgin Islands,all
WHAT IS EXCLUDED?
implied warranties, including implied warranties of
Your warranty does not cover:
merchantability and fitness for a particular purpose,
• labor charges for installation or setup of the
are limited in duration to the duration of this
product, adjustment of customer controls on the
express warranty. Because some states do not allow
product, and installationor repair of antenna
limitations on how long an impliedwarranty may
systems outside of the product.
last,this limitation may not apply to you.)
• product repair and/or part replacement because
of misuse, accident, unauthorized repair or other
TO GET WARRANTY SERVICE IN CANADA...
cause not within the control of Philips Consumer
Pleasecontact Philips at:
Electronics.
1-800-661-6162 (French Speaking)
• reception problems caused by signal conditions
1-800-363-7278 (EnglishSpeaking)
or cable or antenna systems outside the unit.
• a product that requires modification or adapta(In Canada,this warranty isgivenin lieu of all other
tion to enable it to operate in any country other
warranties. No other warranties are expressed or
than the country for which it was designed, manimplied, including any implied warranties of merufactured, approved and/or authorized, or repair
chantability or fitness for a particular purpose.
of products damaged by these modifications.
Philips is not liable under any circumstances for any
• incidental or consequential damagesresulting
direct, indirect,special,incidental, or consequential
from the product. (Some states do not allow the
damages,howsoever incurred, even if notified of the
exclusion of incidental or consequential damages, possibility of such damages.)
so the above exclusion may not apply to you.This
includes,but is not limited to, prerecorded mateREMEMBER...
rial, whether copyrighted or not copyrighted.)
Please record below the model and serial numbers
• damagecaused by the use of non-VHS tapes or
found
on the product.Also, please fill out and mail
tapes that have not been tested and labeled for
your
warranty
registration card promptly. It will be
use in two, four, six, and eight hourVHS
easier for us to notify you if necessary.
recorders.
• a product that is used for commercial or instituMODEL#
tional purposes (including but not limited to
SERIAL#
rental purposes).
WHERE IS SERVICE AVAILABLE?
Warranty service is available in all countries where
the product is officially distributed by Philips
Consumer Electronics. In countries where PhiFips
Consumer Electronics does not distribute the product, the local Philips service organization will
attempt to provide service (although there may be a
delay if the appropriate spare parts and technical
manual(s) are not readily available).
Philips Service Solutions Group,
This warranty gives you specific legal rights.You may
have other rights which vary from state to state.
RO. Box 2976, Longview, Texas 75606,
(903) 242.4800
EL6473E001 / 8-00
Index83
ac power cord .................
27
accessories ....................
84
anglebutton ................
3 I, 64
ant-in (antennain) jack ...... 8-14,27
ant-out (antennaout) jack ...9- I I, 27
arrow buttons .................
3I
audiobutton ................
3 I, 62
audiocd .......................
6
audioin/out jacks .... 12-13,27, 40, 46
automatic
playback ....................
45
rewind, eject .................
45
a-b repeat ....................
59
a-b repeat button ............
29, 59
batteries ......................
bit rate ...................
b_uebackground ...............
I5
.68-69
49
camera angle ..................
64
cassette compartment ...........
25
ch3/ch4 switch ............
8-I I, 27
channel
adding ......................
18
deleting ....................
18
reviewing ...................
19
selection ....................
30
setup ....................
16-17
Air
buttons ..........
26, 30, 45
chapters ....................
6, 56
clear button .............
30, 42, 60
clock setting ...................
20
coaxial jack ..............
14,27, 80
component video out jacks .I 3, 27, 80
connections .................
8-14
contents, table of ................
4
controls
dvd/vcr .....................
remote ..................
copyright protection ..........
counter only mode .............
cs_ in light ....................
26
28-3 I
40, 79
23
25
daylight-savingstime .............
2I
display/status/exit
button ...23, 30, 65
displaypanel ................
24-25
duplication ....................
40
dvd button ....................
28
dvd video ......................
6
dvd/vcr output button ...........
28
enter button
..................
29
fast forward ................
44, 54
front panel ....................
26
f.fwd button ........
26, 3 I, 44, 53, 54
glossary ......................
80
head cleaner ..............
7, 79, 82
helpful hints ................
76-79
hi-fi stereo sound system ........
.48
hookups
amplifier with digital in jacks/
md deck/dat deck ............
14
dolby digital decoder/
dts decoder ................
dolby surround
compatible amplifier ..........
s-video .....................
stereo .....................
tv .......................
with cable box/dbs .........
with stereo tv ...............
without cable box/dbs ........
14
14
12
13
8-14
10-I I
12
8-9
language(dvd) ...............
70-72
languageselection (vcr) ..........
22
line input mode ...........
17,40, 80
longplay ...................
38, 80
Ip ........................
38, 80
memory button .............
menu button ..................
menus ......................
modebutton .............
number buttons
................
29,42
29
5,51
30,60-61
30
on-screenstatusdisplays(vcr) ..... 23
on-screen display(discs) .........
65
one-touchrecording ............
35
open/closebutton ...........
26, SO
optical jack ..............
14,27, 80
output button .................
26
parental lock ................
66-67
password .....................
67
pausebutton ..........
30, 44, 52-53
play button ...........
26, 3 I, 32, 50
playingdiscs ...................
50
playingtapes ...................
32
power
button ..................
26, 28
cord .......................
27
light .......................
25
program (audio cd) .............
60
random playback ...............
61
real-time counter ...............
42
rear panel .....................
27
record button .........
26, 3I, 33, 35
record light ...................
25
recording
basic .......................
33
one channel/
watching another .............
34
prevention ...................
7
timer ....................
36-39
remote
control
buttons ..................
28-3 I
sensor .....................
26
using .................
15,28, 30
repeat button ...............
29, 58
repeat play (tape) ...............
41
repeat playback(discs) ...........
58
rerecording ...................
40
resuming play ..................
52
return button ..................
28
reverse searching ............
44, 54
rew(ind) button ........
26, 28, 44, 54
rf coaxial cable .......
9- I I, 40, 46, 80
safetyprecautions ...............
3
screensaver ................
50, 77
search buttons .................
26
search mode/time search button
..................
28, 43, 55-57
searching...................
44, 54
second audio broadcast
receiving .................
46-47
recording ...............
.46-47
sensor (remote) ................
26
settings(dvd)
audio ....................
68-69
language .................
70-72
other ......................
74
video ......................
73
setup button .............
28, 66-74
skip/channelbuttons ..........
30,55
slow
button ..................
30,44
motion ..................
44, 53
sip ........................
38,80
sound mode ...................
62
sp ........................
38, 80
speed button ..................
3I
sqpb .........................
32
standard play ...............
38, 80
status display (vcr) ..............
23
stereo
broadcast
receiving ................
46-47
recording ...............
46-47
hookups ...................
46
stereo'lV hookups .............
12
still picture .................
44, 52
stop button ...................
28
stop/eject button ...............
26
subtitle button ..............
29, 63
super highspeed searching .......
44
super long play ..............
38, 80
s-video out jack .............
12,27
table of contents ................
4
tape
duplication ..................
40
eject ....................
26, 45
speed ...................
38, 80
timer recording
cancelling..................
39
checking...................
39
setting ..................
36-38
timer set button ..........
26, 29, 38
timer set light..................
25
title button .................
28, 5I
tides ....................
6, 5I, 56
tracking .....................
.45
tracks ......................
6, 55
tv hookups .................
.8-14
tv position ...............
25, 29, 34
vcr position ................
25, 29
vcr/tv button ..................
29
vcr/tv light ....................
25
video in/out jacks. .12, 14,26-27,40,46
warranty
....................
.82
The following items are supplied with your DVD/VCR; they
are provided to help you use or set up your DVD/VCR.
Remote Control 4835 218 37301
Audio and Video Cables
4835 321 17148
TwoAA Batteries 4835 138 17012
RF Coaxial Cable, 75 ohm
4835 323 27011
The following additional items are not provided with your
DVD/VCR, but they are designed for use with your new DVD/VCR.
To order these optional accessories, contact us at:
Philips Parts & Accessories Marketing Department
401 East Old Andrew Johnson Highway
RO. Box 555
Jefferson City, TN 37760
1-800-851-8885.
VHS Cassette Rewinder
Three Cassette Storage Cases (plastic)
FitsVHS and Beta cassettes
#H61117
#M6t 104
This
ow_r,s to manual
Remember
recycle! is made
of recydable
materials
'
Six High-Fade,VHS,T- 120 Cassettes
#HHGI206
OVttN0257S
Frim_-d k_ C],_ea
I HIC_UDIM2SIE001
* ** **