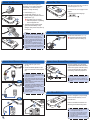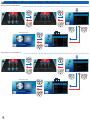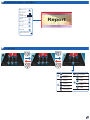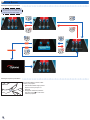
1
AL RS IVE UN Pico Pocket P ro ojector I/O Important Safety Instruction CLASS 1 LED PRODUCT Eye Safety Warnings Avoid staring/facing directly into the projector beam at all times. Keep your back to the beam as much as possible. A stick or laser pointer is recommended to avoid the need for the user to enter the beam. When projector is used in a classroom, adequately supervise students when they are asked to point out something on the screen. In order to minimize power, use room blinds to reduce ambient light levels. 1.Do not block any ventilation openings. To ensure reliable operation of the projector and to protect from over heating, it is recommended to install the projector in a location that does not block ventilation. As an example, do not place the projector on a crowded coffee table, sofa, bed, etc. Do not put the projector in an enclosure such as a book case or a cabinet that restricts air flow. 2.Do not use the projector near water or moisture. To reduce the risk of fire and/ or electric shock, do not expose the projector to rain or moisture. 3.Do not install near heat sources such as radiators, heaters, stoves or any other apparatus such as amplifiers that emits heat. 4.Do not use the projector in direct sunlight. 5.Do not use near any appliance generating a strong magnetic field. 6.Do not use the projector in areas susceptible to excessive dust and dirt. 7.Turn off the product before cleaning. 8.Turn off the product before removing the battery. 9.Disconnect the battery if the product is not being used for a long period of time. 10.Ensure that the ambient room temperature is within 5- 35°C. 11.Relative Humidity is 5 - 35°C, 80% (Max.), non-condensing. 12.Do not expose the battery to temperatures above +60°C (+140°F) 13.New or idle batteries can have shortterm reduced capacity. Fully charge the battery before initial use. 14.Do not put the battery into your mouth. 15.Do not let the battery contacts touch another metal object. 16.Do not drop, throw or try to bend your product. 17.May explode if disposed of in fire. 18.Clean only with dry cloth. Regulation & safety notices This appendix lists the general notices of your Projector. FCC notice This device has been tested and found to comply with the limits for a Class B digital device pursuant to Part 15 of the FCC rules. These limits are designed to provide reasonable protection against harmful interference in a residential installation. This device generates, uses, and can radiate radio frequency energy and, if not installed and used in accordance with the instructions, may cause harmful interference to radio communications. However, there is no guarantee that interference will not occur in a particular installation. If this device does cause harmful interference to radio or television reception, which can be determined by turning the device off and on, the user is encouraged to try to correct the interference by one or more of the following measures: • Reorient or relocate the receiving antenna. • Increase the separation between the device and receiver. • Connect the device into an outlet on a circuit different from that to which the receiver is connected. • Consult the dealer or an experienced radio/television technician for help. 2 Notice: Shielded cables All connections to other computing devices must be made using shielded cables to maintain compliance with FCC regulations. Caution Changes or modifications not expressly approved by the manufacturer could void the user’s authority, which is granted by the Federal Communications Commission, to operate this device. Operation conditions This device complies with Part 15 of the FCC Rules. Operation is subject to the following two conditions: 1. this device may not cause harmful interference, and 2. this device must accept any interference received, including interference that may cause undesired operation. Notice: Canadian users This Class B digital apparatus complies with Canadian ICES-003. Remarque à l’intention des utilisateurs canadiens Cet appareil numerique de la classe B est conforme a la norme NMB-003 du Canada. Declaration of Conformity for EU countries • EMC Directive 2004/108/EC (including amendments) • Low Voltage Directive 2006/95/EC • R & TTE Directive 1999/5/EC (if product has RF function) 19.Only use attachments/accessories specified by the manufacturer. 20.Do not use the unit if it has been physically damaged or abused. Physical damage/abuse would be (but not limited to): ▀■Unit has been dropped. ▀■Charger or plug has been damaged. ▀■Liquid has been spilled on to the projector. ▀■Projector has been exposed to rain or moisture. ▀■Something has fallen in the projector or something is loose inside. Do not attempt to service the unit yourself. Opening or removing covers may expose you to dangerous voltages or other hazards. Please contact your local reseller or service center before you send the unit for repair. 21.Do not let objects or liquids enter the projector. They may touch dangerous voltage points and short out parts that could result in fire or electric shock. 22.See projector enclosure for safety related markings. 23.The unit should only be repaired by appropriate service personnel. 24.Do not touch the projector for a long time while the projector is used. 25.CAUTION: Risk of Explosion if Battery is replaced by an Incorrect Type. 26.Dispose of Used Batteries According to the Instructions. Disposal of old Electrical & Electronic Equipment (Applicable throughout the European Union and other European countries with separate collection programs) This symbol found on your product or on its packaging, indicates that this product should not be treated as household waste when you wish to dispose of it. Instead, it should be handed over to an applicable collection point for the recycling of electrical and electronic equipment. By ensuring this product is disposed of correctly, you will help prevent potential negative consequences to the environment and human health, which could otherwise be caused by inappropriate disposal of this product. The recycling of materials will help to conserve natural resources. This symbol is only valid in the European Union. If you wish to discard this product, please contact your local authorities or dealer and ask for the correct method of disposal. Product Overview 1.Focus Dial 2.Speaker 3.Audio Out Connector 4. AV Input Connector 5.VGA Input Connector 6.Lens 7.Up Button ( ) 8.OK Button ( ) 9.Left Button ( ) 10.Cancel / ESC Button ( ) 11. Right Button ( ) 12. Down Button ( ) 13. Power / Home Button ( ) 14.Reset Button 15. Micro USB port 16. DC Input 17. Air vent 18. MicroSD card Slot 19. Screw Hole for Tripod Converter 20. Battery Cover 19 6 17 1 2 4 UNIVERSAL I/O 5 7 8 10 9 11 18 13 12 micro SD 3 <Note> Items 7~12 are also function buttons. Functions vary depending on the current mode. 15 14 DC IN RESET 16 20 Package Overview 1 2 Install the Battery 3 1. Remove the battery cover. (~) 2. Align the battery contacts with the contacts in the battery compartment. () 3.Completely insert the battery with the battery pull tab extending underneath. () 4. Slide the battery cover back into place with the battery pull tab inserted inside. (~) 4 1 2 RE SE T o SD micr DC IN 5 6 7 3 8 4 mic ro SD mi SD 9b cro 9c 5 T o SD micr DC IN 6 <Note> The standard accessories may vary in each region due to different applications. 7 RE T o SD micr DC IN <Note> The inclusive power plug head varies per region. SE Optional Accessory 9. iPod Connection Kit a. USB cable for iPod Connector b. iPod Cable c. iPod Connector SE Standard Accessory 1. Power adaptor with AC Plug 2. VGA Cable 3. USB Male Cable 4. Battery 5. AV Cable 6. Carrying Case 7. Warranty Card and Quick Guide 8. Extra Bezel RE 9a 3 Charge the Battery 1 IN N IV ER SA L I/O T SE RE 4 IN DC UN IV ER SA I/O DC U T SE RE SA L IN DC ER SA L I/O T SE RE 1 I/O T SE RE Connect Input Source - VGA IN DC UN IV ER SA L I/O T SE RE 1 Connect the VGA device. (~) Insert the universal connector with the arrow mark facing up. 2 Connect input source Data transfer 1. Connect the AV input source. (~) 2. Connect external speakers to the audio out connector of the projector. () IV IV ER Connect input source - Video in UN For first time use, the Language screen appears. 1. Highlight the desired language. ( ) 2. Select the item. ( ) IN N <Note> 1. For LED indicator information, see page 18. 2. After the projector is turned off, the battery may not start charging right away due to over temperature protection. The projector will automatically start charging once it cools off. 3. The battery has a lifespan and ages every time it is charged and discharged. It will gradually loose its charging capability as it ages. Replace the battery at the end of its lifespan. 3 L Press the Power button for 3 seconds to switch the projector on or off. 1. Insert the plug. () 2. Connect the charger. (~) 3. During charging, the LED indicator lights amber. () T he battery will not charge while the projector is operating. Turn the projector off. 4. The LED Charge Indicator lights green when the battery is fully charged. This process may take up to 2.5 hours. 2 DC U Switch On / Off When the LED indicator lights red, the battery is low. Replace the battery immediately or connect the power adapter to charge the battery. IN DC UN 1 IV ER onnect a laptop or PC using the C supplied Male USB Cable to transfer data to the Projector internal memory or the inserted microSD card. After connecting, switch the projector on. SA L I/O T SE RE 2 or IN DC 1 UN IV ER SA L I/O T SE RE <Note> 1. All other brand and product names are trademarks or registered trademarks of their respective companies. 2. The cables connecting the video output devices are not supplied, please contact the device vendor. 3. iPod nano/iPod touch/iPhone/iPod classic (version 5 and above) 4. Designed for iPod/iPhone/Mobile phone/ PMP with TV out functions. Using with devices with audio signal voltage > 0.3Vrms is not recommended. 5. The optional USB cable for iPod Connector is used to charge the iPod device using a computer. 2 Insert MicroSD Card 2 PK120 is designed to project image from the internal memory or via a microSD card. or 1 DC U iN N IV ER SA L <Note> The laptop/PC can only detect the input source when the projector is switched on. The projection will stop when this connection is made. I/O ET REs RE SE T 3 U DC IN N IV ER D SA C L I/O T IN o SD micr Insert a microSD card into the slot with the gold contacts facing down. SE RE 2 4 <Note> •• To remove the microSD card, push the card to eject it from the slot. •• Do not remove the microSD card while the projector is projecting image from the card. This can cause data loss or damage the card. •• Supports microSD card size up to 32GB. Use a Tripod Stand RSAL I/O UNIVE Adjust the Projected Image Screw a standard tripod into the screw hole on the projector. Projection Distance (A) <Note> The tripod is an optional accessory. Screen Size - Width (B) Screen Size - Height (C) Screen Diagonal (D) Meter inch (mm) (inch) (mm) (inch) (mm) (inch) 0.500 19.7 227 8.9 128 5.0 261 10.3 0.700 27.6 318 12.5 179 7.0 365 14.4 0.975 38.4 443 17.4 249 9.8 508 20.0 1.500 59.1 682 26.8 384 15.1 782 30.8 2.000 78.7 909 35.8 511 20.1 1043 41.1 2.500 98.4 1136 44.7 639 25.2 1304 51.3 3.215 126.6 1461 57.5 822 32.4 1677 66.0 B L I/O RSA IVE UN 1 Adjust the focus () until the image is clear. RE sE T How to Use the Menu D C o SD micr iN Home menu Enter Music menu Enter Video menu Enter Photo menu Select input source signal Enter Setup menu Browse documents with Office Viewer Button guide •• Press the corresponding button of the desired option. •• Press to go back a previous screen. •• Press to return to the Home menu. Or, press for 3 seconds to switch off the projector. Press for 3 seconds to switch off the projector <Note> A button guide appears on the lower left corner of most screens. The guide varies depending on the current mode. Press the corresponding button to select the option or operation. Items Video menu Music menu Photo menu Input source screen Office Viewer menu Setup menu 5 How to Play Videos - Source: Internal Memory / MicroSD Card Playing Videos from the MicroSD Card Video Playback mode Playing Videos from the Internal Memory Video Playback mode 6 How to Play Videos - Playback Mode Repeat Icons Adjust volume Repeat all Repeat one current video Pause/Play Repeat off Fast forward <Note> To change repeat settings, see Video Settings below. Rewind Return to Home menu Video Settings Repeat all Repeat one Repeat disabled Browser display small icon Browser display large icon Compatibility: Videos Compatible Video Format File Format AVI MOV MP4 3GP Video Format H.264 MJPEG H.263- Max Res. D1 30fps Profile File Format Video Format Max Res. Profile MPEG4 D1 30fps Baseline AVI 3GP MOV WMV Simple Profile AVI WMV Xvid D1 30fps Baseline File Format Video Format Max Res. Profile AVI MOV MJPEG 800x480 30fps Baseline FLV Sorenson Spark 800x600 30fps Baseline <Note> Video format does not support content with B-Frame function. 7 How to Play Music - Source: Internal Memory / MicroSD Card Playing Music from the MicroSD Card Music Playback mode Playing Music from the Internal Memory Music Playback mode 8 How to Play Music - Playback Mode Repeat / Shuffle Icons Adjust volume Pause/Play Repeat all Repeat one current video Repeat off Fast forward Rewind Return to Home menu Shuffle on Shuffle off <Note> To change repeat or shuffle settings, see Music Settings below. Music Settings Repeat all Repeat one Repeat disabled Shuffle on Shuffle off Compatibility: Music Compatible Audio Format File Format AAC MP3 PCM ADPCM WMA AMR APE Vorbis 9 How to View Photos - Source: Internal Memory / MicroSD Card Viewing Photos from the MicroSD Card Full screen mode Viewing Photos from the Internal Memory Full screen mode Compatibility: Photo Compatible Photo Format 10 File Format File Extension BMP JPG JPEG *.bmp, *.jpg *.jpeg <Note> PK120 supports the following photo resolution: •• Bitmap file up to 2M (megapixels) •• Jpeg file up to 7M (megapixels How to View Photos - Mode: Full Screen / Slideshow Full Screen Mode Play slideshow Rotate 90° clockwise Next photo Rotate 90° counter-clockwise Previous photo Return to Home menu Slideshow Mode In Slideshow mode, photos are played continuously at a specified interval time while playing music stored in the internal memory as background. <Note> Only music files stored in the internal memory can be played as background music. <Note> To change slideshow interval settings and enable/disable background music, see Slideshow Settings below. Slideshow mode Full screen mode Exit slideshow or Pause/Play slideshow Volume down Next photo Exit Slideshow Previous photo Return to Home menu Volume up Slideshow Settings Timer: 2-second interval Timer: 5-second interval Timer: 10-second interval Background music on Background music off 11 How to View Documents - Source: Internal Memory / MicroSD Card Viewing Documents from the MicroSD Card View mode Report Viewing Documents from the Internal Memory View mode Report Compatibility: Document PK120 uses Picsel File Viewer to open and view Microsoft® Word files and Adobe® PDF files. Compatible Document Format File Format File Extension Microsoft® Office Application (Word, Excel, Power Point) HTML Adobe® PDF .doc .docx .ppt .pptx .xls .xlsx .htm .html .pdf Supported Versions Version Microsoft® Word 95 Microsoft® Word 97 Microsoft® Word 2000 Microsoft® Word 2003 Microsoft® Word 2007 Adobe® PDF 1.0 ~ 1.4 12 Font / Language Support PK120 has limited font support. When a document with unsupported font is opened, Office Viewer automatically substitutes the unsupported font. This may cause the document layout to look different. If no font substitutions are available, the text are displayed as blanks. <Note> •• Office Viewer supports embedded fonts in Adobe®PDF documents but not in Microsoft® Word documents. •• Embedded fonts are used in priority over the PK120 system fonts. Font / Language Dutch English French German (Deutsch) Italian Japanese Korean Polish (Polski) Iberian Portuguese Spanish Swedish (Svenska) Traditional Chinese Simplified Chinese Russia Greek PK120 supports one default font for each language. How to View Documents - View Mode Zoom in 1x ~ 4x Pan up, down, left, right (in zoom mode) Page up Report Page down Move left Move right Return to Home menu Display Settings LED mode: Bright LED mode: Standard Gamma: Standard Gamma: Animation Gamma: Bright Gamma: Movie Gamma: Presentation Projection: Front Desktop Projection: Front Inverted Projection: Rear Desktop Projection: Rear Inverted 13 Select Menu Language Select your preferred menu language. Options are: English, French, Spanish, Portuguese (Brazilian), German, Italian, Russian, Polish, Dutch, Swedish, Greek, Traditional Chinese, Simplified Chinese, Korean, Japanese View Projector Information MicroSD card capacity Internal memory capacity Battery charging 14 Power adapter connected Upgrade Firmware Software updates can be obtained from the OPTOMA website (www.optoma.com). 1. On your computer, create a folder named "upgrade". 2. Download the latest firmware from www.optoma.com and save it in the "upgrade" folder. 2. Copy the "upgrade" folder to the root folder of the microSD card. 3. Insert the microSD card into the microSD card slot of the projector. 4. Follow the steps below. Yes No Upgrade may take a while to complete <Note> A "File not found" message appears if there is no update file in the microSD card. <Note> •• Do not touch any buttons or turn off the projector while upgrading is in progress. Otherwise, this may damage the projector. •• Do not remove the microSD card until the upgrade is complete. Reboot PK120 15 Reset the System Resetting the System by Reset Menu <Note> When the system is reset, all files stored in the internal memory will be deleted. Ensure all files are backed up before resetting. Yes No Reboot PK120 Resetting the System by Reset Button Use the Reset button to perform a hard reset on your projector. DC T O SE RE 16 IN 1. Push the Reset button using a pointed object such as a tip of a pen or a paper clip. 2. The projector resets the system and shuts down. Press for 3 seconds to reboot the projector. How to Use External Input Source: VGA / Composite AV Switching Input Source Once a video source device is connected to the projector and turned on, PK120 detects the video source. To manually switch the input source, do the following: or Switch again or Exit the input source and return to Home menu from any point Adjusting Input Source Settings <Note> Similar screen appears in Brightness setting and Sharpness setting. However, the button functions may differ, follow the button guide. Adjust volume Enter Setting mode or Contrast setting Brightness setting Sharpness setting Exit Setting mode Sharpness setting Brightness setting Return to previous screen Return to Home menu 17 Compatible Video / VGA Mode Timing Table Mode VGA Video In Resolution V-Sync (Hz) 640x480 60 800x600 60 1024x768 60 1280x768 60 480i / 480P 60 576i / 576P 50 720P 50 / 60 1080i 50 / 60 Troubleshooting If you experience a problem with your projector, please refer to the following information. If a problem persists, please contact your local retailer or service center. <Note> Video format does not support content with B-Frame function. Image Problems No image appears on-screen • Ensure the cables/charger/ battery are correctly and securely connected. • Ensure the pins of connectors are not crooked or broken. • Make sure the projector is LED Indicator switched on. Image is out of focus Description LED Color • Adjust the Focus Dial. No light In operation • Make sure the projection screen Amber Battery charging is between the required distance Charge complete Green 9.6 to 126.6 inches (0.245 to 3.215 Transferring data meters) from the projector. See Red Battery low page 5. Overheat; The projector Red (flashing) Image is too small or too large temperature exceeds 80°C. • Move the projector closer to or <Note> further from the screen. •• The LED flashes red when the projector Image is reversed temperature reaches 80°C. It is • Select “Setup --> Display --> recommended to switch off the projector Projection” from the OSD and set to allow it to cool down. the projection direction. •• When the projector temperature reaches Audio Problems No sound • During video or music playback, press the button. Appendix Copyright / Trademark Clause for Office / Document Viewer The End User may not: •• make copies of the Picsel Products or make them available for use by third parties. •• reverse engineer, disassemble, reverse translate, or in any way decode the Picsel Products or any copy or part of it in order to derive any source code. Save only as is permitted by any applicable law. Copyright © Optoma Company Limited. All rights reserved. Optoma reserves the right to make technical changes. Optoma assumes no liability for damages incurred directly or indirectly from errors, omissions, or discrepancies between the device and this documentation. 18 Battery Problems Battery capacity is low • R emove the battery and clean the connectors. • The battery is worn out and needs to be replaced. • The battery may not charge correctly after the projector is turned off due to the high temperature emitted by the projector. Let the projector cool for a while before connecting the charger. 85°C, the projector automatically shuts down due to the built-in temperature protection. This is not a malfunction. Let the projector cool down before switching it on again. Other brands or logos are trademarks or registered trademarks of their respective companies. This device is not intended for use in the direct field of view at visual display workplaces. Technical Specification PK120 Specifications Optical Specification (Panel) Manufacturer I/O Connectors Texas Instruments Video Compatibility Universal (24-pin) to VGA IN x 1 Type DLP® 0.2 nHD DMD Size 0.22 inches (diagonal) Display pixels 640 x 360 microSD card slot x 1 Projection image size 10” ~ 60” Audio output (Φ 3.5mm) x 1 Throw ratio 2.2 Horizontal scan rate 31.5 ~ 48.4 KHz Vertical scan rate 50 / 60 Hz Aspect ratio External memory 4:3, 16:9, Auto Analog RGB signal (PC) Video signal Audio signal (Share with A/V input jack) 2GB NAND Flash micro SD card (up to 32 GB) Luminance Uniformity (JBMA) Bright mode: 12lm STD mode: 8lm 50% (Minimum) 60% (Typical) Contrast Ratio 1200:1 (Typical) Projection Offset 100% Brightness Micro USB x 1 (for data transfer / charging) AV-IN •• Analog RGB 0.7 +/- 0.1 Vp-p, 75 ohm •• Separate TTL, H, V Sync NTSC / PAL Compsite video 1.0 +/- 0.1 Vp-p, 75 ohm 300mVrms, 22K ohm Audio input: 0 ~ 1 Vrms Video input: 0.5 ~ 1.8 Vp-p Output Signal Specification Micro USB X 1 Audio out Speaker NTSC M/J 3.58MHz, 4.43MHz PAL PAL B/D/G/HI/M/N, 4.43MHz SDTV 480i, 576i RGB 480i / 480P, 576i / 576P Computer Compatibility Input Signal Specification Parameters Internal memory Composite Video / Audio (Φ 2.5mm) x 1 Power Specifications NTSC (Device/Battery charge) Host support < 150mA 5V 3.5Ψmm jack Built-in stereo speaker 0.5W x 2 VESA standards, PC & Macintosh compatible Battery 3.7V, 1800mAh Power supply 5V, 2A, 110 ~ 240V Charging time 2.5 hours Battery operating temperature Charge: 0° ~ 45°C Discharge: -20° ~ 60°C Specifications are subject to change without prior notice. Physical Specifications Weight 145g (with battery) Dimensions (L x W x H) 117 x 60 x 21 mm Charging time 2.5 hours Operating time Video: 80 min (high brightness) Music: 4.5 hours Operating temperature 0° ~ 30°C (32°F ~ 86°F) Storage temperature -20° ~ 60°C Humidity 10 ~ 40% RH (without condensation) 0 ~ 1829 m (0 ~ 6000 feet) above sea level P/N 36.00040G011- B HDPY2001010 19