1
Norstar Voice Mail 4.0 FAX
Set Up and Operation Guide
Norstar is a trademark of Northern Telecom
© Copyright Northern Telecom 1998
1-800-4 NORTEL
www.nortel.com/norstar
Norstar is a trademark of Northern Telecom.
P0886629 Issue 1.0
Printed in Canada
COPYRIGHT NOTICE
This Nortel documentation is protected by copyright. It may not
be copied in any form or medium except pursuant to the Nortel
License to Copy Documentation ("License"). If a License has
been purchased, it will be enclosed with this copy of Nortel
documentation.
Contents
Chapter 1
How to use this guide 1
Introduction 1
How this guide is organized 1
Conventions 2
What appears on the display 2
Prerequisites 2
Other documents 3
Chapter 2
Learning about FAX 5
Introduction 5
How FAX works 5
Who can use FAX 5
About Fax Mail 6
Message Notification 6
About the Virtual fax line 6
About Fax-on-demand 7
Call methods 7
About Fax Answering 7
About Fax Overflow 8
Fax System Group message (Fax Broadcast) 8
About FAX with CCR 9
About Norstar Voice Mail reports 9
Chapter 3
Setting up and maintaining FAX 11
Introduction 11
Entering characters using the Norstar Dialpad 12
Setting the FAX System parameters 12
Changing the FAX System parameters 15
Adding a Fax Overflow Mailbox 16
Changing the Fax Overflow Mailbox parameters 18
Deleting a Fax Overflow Mailbox 19
Adding a Fax System Group List 20
Adding fax machine members to a Fax System Group List 21
Sending a Fax System Group message (Fax Broadcast) 22
P0886629 Issue 1.0
FAX Set Up and Operation Guide
ii Contents
Chapter 4
Setting up and maintaining Fax-on-demand mailboxes 25
Introduction 25
About Fax-on-demand Mailboxes 26
Adding a Fax-on-demand Mailbox 26
Changing the parameters of a Fax-on-demand Mailbox 28
Choosing a Fax-on-demand call method 29
Adding a Fax message from a fax machine telephone 31
Adding a Fax message from a disk 32
Recording a Fax-on-demand Mailbox Greeting 34
Deleting and viewing fax selection numbers in a Fax-on-demand
Mailbox 36
Including a Fax-on-demand Mailbox in CCR 36
Assigning a Home Fax Point 37
Adding a Fax Point 38
Changing a Fax Point 39
Deleting a Fax-on-demand Mailbox 40
Chapter 5
Troubleshooting FAX 41
Introduction 41
Problems and solutions 41
Error messages 44
Disabling and Re-enabling Norstar Voice Mail Channels 45
Chapter 6
Examples and Tips 47
Introduction 47
Examples of FAX set ups 47
FAX Tips 48
Appendix A: FAX Programming Record 51
Before you begin 51
Programming overview 51
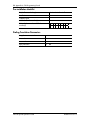
Pre-installation checklist 52
Dialing Translation Parameters 52
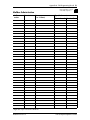
Mailbox Administration 53
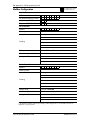
Mailbox Configuration 54
Fax System Group Lists 55
Appendix B: Dialing Translation 57
Introduction 57
How the Dialing Translation Table works 57
Telephone number Translation 58
Network Access 59
FAX Set Up and Operation Guide
P0886629 Issue 1.0
Contents iii
Dialing Translation Parameters 60
Setting the Dialing Translation Parameters 60
Dialing Translation Table Administration 62
Setting up a Dialing Translation Table 62
Reviewing the entries in the Dialing Translation Table 63
Finding an entry in the Dialing Translation Table 64
Changing an entry in the Dialing Translation Table 65
Deleting a Dialing Translation Table entry 66
Technician Created Dialing Translation Table 67
Creating the Dialing Translation Table file 67
Installing the Dialing Translation Table onto the Norstar Voice Mail
System 68
Creating a DOS system disk 68
Creating an Autoexec.bat file 69
Loading the files onto the DOS system disk 69
Loading the Dialing Translation Table file onto the Norstar Voice Mail
system 70
Appendix C: Technical content of a loadable .PCX file 73
Introduction 73
Glossary 75
Index 81
P0886629 Issue 1.0
FAX Set Up and Operation Guide
1
How to use this guide
Introduction
This guide is intended to lead a System Coordinator through the Norstar Voice Mail
FAX set up, and continue as an ongoing reference aid.
This chapter tells you what to expect as you read this guide, and how information
is presented.
How this guide is organized
The Norstar Voice Mail FAX Set Up and Operation Guide is organized according
to chapters that cover:
How to use this guide – provides a brief overview identifying the organization of
this guide and the conventions used for set up and operation tasks.
Learning about FAX – provides an overview of how FAX works and explains
common features.
Setting up and maintaining FAX – provides the necessary information to set up
and maintain FAX.
Setting up and maintaining Fax-on-demand mailboxes - provides the
information necessary to set up and maintain Fax-on-demand mailboxes.
Troubleshooting FAX – provides diagnostic and recovery procedures for
problems that might occur while setting up and operating FAX. This chapter also
provides a list of error messages that might appear when using FAX.
Examples and Tips - provides examples of the different fax features and tips for
using FAX.
Appendix A: FAX Programming Record - provides a programming record to
keep track of FAX set up information.
Appendix B: Dialing Translation - provides information on setting up the Dialing
Translation Table and setting the Dialing Translation Parameters.
Appendix C: Technical content of a loadable .PCX file - shows the required
content of the file header when loading a .PCX Fax message from a disk.
Glossary – Defines the terms used in this guide
Index – provides an alphabetical list of information topics contained in this guide
and the page number of where the information is located. If you cannot find a term,
try looking according to its task.
P0886629 Issue 1.0
FAX Set Up and Operation Guide
2 How to use this guide
Conventions
As you work with this guide, you will notice that conventions are used to represent
the words that appear on the Norstar two-line display telephone.
Display command line text
Any word or prompt that is part of the first line of the display appears in a different
text.
Example: Pswd:
When you see a word in a different text, it represents the action you must take to
proceed.
Display button options text
Words in the second line of the display appear in an underlined text.
Example: Press MBOX.
When you see an underlined word, you can press the button directly below the
option on the display.
Buttons
This guide uses dialpad button representations. Any button that appears in the text
or instruction steps indicates the dialpad button that selects an option.
Example: Press
£
.
When you see a dialpad button, it represents the button you must press to proceed.
Note: For more information about Norstar Voice Mail and using the Norstar
two-line display telephone, refer to the Norstar Voice Mail Set Up and
Operation Guide.
What appears on the display
The telephone displays shown throughout this guide use Norstar Voice Mail default
settings and sample names.
Example:
Set 221
OK
This display shows an example of the Norstar Voice Mail Directory Number (DN).
Prerequisites
Before you attempt to set up FAX, ensure you are familiar with how Norstar
two-line display telephones operate. Read your Norstar telephone user cards before
proceeding.
FAX Set Up and Operation Guide
P0886629 Issue 1.0
How to use this guide 3
You must also have a good working knowledge of Norstar Voice Mail and Custom
Call Routing. This guide assumes you know how to operate the different Norstar
Voice Mail Feature Codes, are aware of Norstar Voice Mail programming, and
know the Norstar Voice Mail terminology.
Other documents
For more information about FAX or Norstar Voice Mail, refer to the:
•
Norstar Voice Mail FAX Installation Guide
•
Norstar Voice Mail FAX User Guide
•
Norstar Voice Mail Programming Record
•
Norstar Voice Mail Set Up and Operation Guide
•
Norstar Voice Mail Reference Guide
•
Norstar Voice Mail User Guide
•
Norstar Voice Mail Software Installation Guide
P0886629 Issue 1.0
FAX Set Up and Operation Guide
2
Learning about FAX
Introduction
Norstar Voice Mail is a fully automated receptionist service that offers call routing
and message taking services. FAX works with Norstar Voice Mail to provide
incoming and outgoing fax capability. This chapter describes how FAX works and
explains:
•
How FAX works
•
Who can use FAX
•
About Fax Mail
•
Message Notification
•
About the Virtual fax line
•
About Fax-on-demand
•
About Fax Answering
•
About Fax Overflow
•
Fax System Group message (Fax Broadcast)
•
About FAX with CCR
•
About Norstar Voice Mail reports
How FAX works
FAX works with Norstar Voice Mail, offering a caller the capability of sending a
Fax message to a mailbox as easily as sending a voice message to a mailbox. A
caller can also access a mailbox to retrieve a Fax message.
Who can use FAX
FAX can be used by any outside caller or by mailbox owners in your company.
Away from the office, FAX can be used with any touchtone telephone. At your
office, FAX can be used from any Norstar or touchtone telephone connected to your
Norstar system. When using FAX from a Norstar or touchtone telephone, you must
first enter a Feature Code. No Feature Code is required when using Fax-on-demand.
Callers using a rotary dial telephone cannot access FAX.
P0886629 Issue 1.0
FAX Set Up and Operation Guide
6 Learning about FAX
About Fax Mail
A fax document in a mailbox (with or without a voice introduction) is called a Fax
message. Fax messages can be either voice introduced or non-voice introduced.
This means the caller can leave a Fax message in a mailbox with or without an
introductory message. The Fax message can later be retrieved by the mailbox owner
and printed on a fax machine.
An average Fax message, consisting of text only, uses 10 seconds of mailbox
message time per page. A Fax message that contains a graphic can use as much as
two minutes of mailbox message time per page. After a Fax message has been
printed or forwarded, it should be deleted from the mailbox.
Message Notification
Norstar Voice Mail will notify you when you have received a voice message or a
Fax message. When someone sends a Fax message to your mailbox, your telephone
display shows:
Message for you
MSG
This message indicates that you have received either a voice message or a Fax
message. When you open your mailbox, the telephone display will show you the
number of new and saved messages. A voice prompt will inform you of the number
of new and saved Fax messages.
About the Virtual fax line
A line can be assigned to a mailbox to act as a Virtual fax line for the mailbox. Any
Fax messages sent to the Virtual fax line bypass the greeting and Automated
Attendant, and receive a fax tone. The Fax message is immediately sent to your
mailbox. When “Message for you” appears on the display, the mailbox owner can
open their mailbox and access both voice and Fax messages. For more information
about accessing and printing Fax messages, refer to the Norstar Voice Mail FAX
User Guide.
The corresponding seven digit telephone number associated with the Virtual fax
line must be given to the mailbox owner. The mailbox owner can then advise people
of the fax number. For example, if line 20 was chosen as fax line, the corresponding
telephone number of 735-5822 would be given to the mailbox owner.
If the line being used for the Virtual fax line is either a Direct Inward Dial (DID) or
a Target Line, two callers can send a fax to the same fax line at the same time. The
resulting two Fax messages both end up in the mailbox. If a third caller attempts to
send a fax to the Virtual fax line and the line is busy, the resulting Fax message will
be delivered to the General Delivery mailbox. For more information on Fax
Overflow for a fax line, refer to Norstar Voice Mail Set Up and Operation Guide.
FAX Set Up and Operation Guide
P0886629 Issue 1.0
Learning about FAX 7
To add a fax line to an existing mailbox, refer to the Norstar Voice Mail Set Up and
Operation Guide.
About Fax-on-demand
The Fax-on-demand feature allows a caller to retrieve documents that are stored in
Norstar Voice Mail. These documents must be stored in special mailboxes called
Fax-on-demand Mailboxes.
A Fax-on-demand Mailbox contains a greeting and the documents you have stored.
Documents stored in a Fax-on-demand Mailbox can be printed on any fax machine.
Call methods
There are two call methods used with Fax-on-demand Mailboxes:
•
one-call
•
two-call
When a caller requests a fax from the Fax-on-demand Mailbox using the one-call
method, the document is transmitted during the original call. Therefore, a caller
must use the telephone at the fax machine to call the one-call Fax-on-demand
Mailbox. With this type of call method, the external caller pays for any long
distance toll charges incurred.
When a caller requests a fax from the Fax-on-demand Mailbox using the two-call
method, the document is transmitted during the second call. The first call can
originate from any touchtone telephone. The caller provides a telephone number
where the information is to be delivered. The document can be sent to any fax
machine. With this type of call method, the Fax-on-demand mailbox owner pays for
any toll charges incurred.
Note: In order for the Fax-on-demand two-call method to function properly, the
Dialing Translation Table must be created and all the Dialing Translation
Parameters must be set. Refer to "Appendix B: Dialing Translation" on
page 57.
About Fax Answering
Fax Answering allows a caller to use the autosend feature on their fax machine to
send faxes to the Norstar Voice Mail system. The Norstar Voice Mail Automated
Attendant recognizes the fax tone and automatically sends the Fax message to a
predefined fax machine for printing.
The fax machine extension can be set up with a Fax Overflow Mailbox for
improved performance. However, if the fax machine extension is not equipped with
a Fax Overflow Mailbox and the fax machine extension rings busy or does not
answer the incoming call, the fax call will be terminated.
P0886629 Issue 1.0
FAX Set Up and Operation Guide
8 Learning about FAX
About Fax Overflow
A Fax Overflow mailbox is a mailbox for your fax machine. If the fax machine
cannot answer an incoming fax call, Norstar Voice Mail answers the call and
temporarily stores the Fax messages in the Fax Overflow mailbox. Later, when the
fax machine is ready to print, Norstar Voice Mail will send the stored Fax messages
to the fax machine.
If Norstar Voice Mail cannot send the Fax messages on the first attempt, it will
attempt to send the documents several more times. The number of times Norstar
Voice Mail will attempt to send the Fax message is called the retry attempts. The
number of retry attempts can be any number between one and 99. Between each of
these retries, Norstar Voice Mail will wait a specified amount of time called the
retry interval. The retry interval can be from one to 60 minutes.
A Fax Overflow mailbox may be assigned to any Norstar port to which a fax
machine is connected.
Fax System Group message (Fax Broadcast)
A Fax System Group message can be sent whenever you want to notify a group, by
way of a fax, of a pending event or company notice that only pertains to that group.
A Fax System Group List is a collection of fax machines from other locations.
When you send a Fax message to a Fax System Group List, each fax machine in the
Fax System Group List receives the same Fax message. You should publish a list
of fax machines in each Fax System Group List. Each mailbox owner will then
know which fax machines will receive the Fax System Group message.
FAX Set Up and Operation Guide
P0886629 Issue 1.0
Learning about FAX 9
About FAX with CCR
Fax-on-demand can be used with Custom Call Routing (CCR) Trees. The
Fax-on-demand functionality can be added to the CCR Tree by assigning the
appropriate mailbox to a CCR Point.
You can assign a Personal mailbox to a Leave Message Point. Incoming callers can
then leave Fax messages in this Personal mailbox.
To use Fax-on-demand, add a Fax Point to the CCR Tree and then assign a Fax-ondemand Mailbox to that Point. An incoming caller can then retrieve documents
from this Point.
About Norstar Voice Mail reports
Norstar Voice Mail reports are available to view and verify Norstar Voice Mail set
up information. All dates will be shown with the four-digit year format,
yyyy/mm/dd. Four Norstar Voice Mail reports show FAX information:
•
Directory report: This report shows the mailbox owners listed in the Company
Directory. This report provides the mailbox owner’s name, mailbox number,
type of mailbox, extension, whether or not mailbox owners recorded their name
in the Company Directory, and if they have a greeting recorded for their
mailbox. Use this report to identify which mailboxes are assigned as
Fax-on-demand.
•
Group List report: This report shows the Group List number, the type of
Group List, and the Group List name. For Voice Group Lists, the mailbox
numbers included in the Group List, the mailbox owner’s name and the type of
mailbox are also shown. For Fax Group Lists, the name of each recipient, the
route type (line or pool), and the fax number are also shown. Use this report to
identify the Fax Group Lists.
•
Custom Call Routing Tree report: This report shows the CCR Tree number,
the current date, the last date changes were made, and the Tree status. The report
also shows the Points on the Tree, assignments made to the Points, and any
areas that need administering. Use this report to identify which points are
Fax-on-demand Mailboxes.
•
Fax-on-demand Usage report: This report lists all the Fax-on-demand
requests, shows the date and time that an item was requested, the delivery fax
number and the Caller ID of the caller. Use this report to identify which
mailboxes are assigned as Fax-on-demand.
You must have a printer connected to Norstar Voice Mail to produce reports. For
more information about Norstar Voice Mail reports, refer to the Norstar Voice Mail
Set Up and Operation Guide.
P0886629 Issue 1.0
FAX Set Up and Operation Guide
Setting up and maintaining FAX
3
Introduction
As System Coordinator you perform all the tasks necessary for setting up and
maintaining FAX. This chapter describes these tasks. Setting up and maintaining
FAX involves:
•
Entering characters using the Norstar Dialpad
•
Setting the FAX System parameters
•
Changing the FAX System parameters
•
Adding a Fax Overflow Mailbox
•
Changing the Fax Overflow Mailbox parameters
•
Deleting a Fax Overflow Mailbox
•
Adding a Fax System Group List
•
Adding fax machine members to a Fax System Group List
•
Sending a Fax System Group message (Fax Broadcast)
Before you begin administering FAX, you should complete the Norstar Voice Mail
FAX Programming Record. This will help you collect and organize all the
information you will need to administer FAX.
A Norstar Voice Mail FAX Programming Record is included in Appendix A of this
guide. Make a photocopy of this Norstar Voice Mail FAX Programming Record
before you enter any information.
Note: To administer FAX in your company, you require a Norstar two-line display
telephone. You cannot administer FAX from a Norstar single-line display
telephone.
P0886629 Issue 1.0
FAX Set Up and Operation Guide
12 Setting up and maintaining FAX
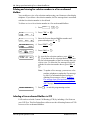
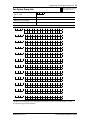
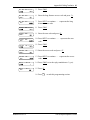
Entering characters using the Norstar Dialpad
You will enter characters on your Norstar dialpad to add the Fax Answering
extension name, the Fax-on-demand mailbox name, the Fax Overflow Mailbox
name, and a new member’s name to a Fax System Group List.
The first time a numeric key is pressed, the Norstar set displays the first assigned
letter. A second press of the same key changes the displayed letter to the second
letter, and so on, cycling around to the first letter. To accept the displayed letter, you
press either
or the next key. If you press a different key, the cursor is advanced
and the display shows the first character on the new key. Pressing BKSP erases the
most recently entered character, moving the cursor position to the left.
£
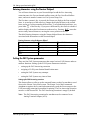
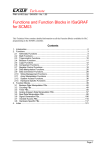
The table Entering characters using the Norstar dialpad shows the characters
associated with the numbers on the Norstar dialpad.
Entering characters using the Norstar dialpad
⁄
›
‡
•
££
1 - ’
GHI4ghi
PRS7prs
quit
enters a comma
¤
fi
°
‚
ABC2abc
J KL5jkl
TUV8tuv
Q Z zero q z
‹
fl
·
£
DEF3def
MNO6mno
WXY9wxy
accepts letter
Setting the FAX System parameters
There are four FAX System parameters that control various FAX features and user
mailbox functions. Setting up the FAX System Parameters includes:
•
setting up the FAX Answering extension
•
assigning a FAX System Station Identification name
•
setting the FAX System retry attempts
•
setting the FAX System retry interval time
Setting up the FAX Answering extension
This feature allows a caller to use the autosend feature on their fax machine to send
faxes to the Norstar Voice Mail system. The Norstar Voice Mail Automated
Attendant recognizes the fax tone and automatically sends the Fax messages to the
FAX Answering extension fax machine for printing. The Fax Answering extension
must be a valid Norstar DN. The FAX Answering extension is empty by default.
Note: The FAX Answering extension fax machine must be connected to an
Analog Terminal Adapter (ATA).
FAX Set Up and Operation Guide
P0886629 Issue 1.0
Setting up and maintaining FAX 13
Assigning a FAX System Station Identification name
The FAX System Station Identification name is a text name that can be up to 16
characters. The FAX System Station Identification name can be a company name,
a department, a location, number, or any other name. The name is transmitted to
external fax machines at the beginning of all Fax messages. The FAX System
Station Identification name will also be printed in the fax machine’s log files. The
FAX System Station Identification name is empty by default.
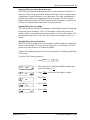
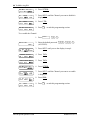
Setting the FAX System retry attempts
The FAX System retry attempts is the number of times that the System will attempt
to print faxes from mailboxes. Also, it is the number of times the System will
attempt to deliver faxes that have been forwarded to an external fax machine. The
retry attempts range from 1 to 99. The FAX System retry attempts is set to 3 by
default.
Setting the FAX System retry interval time
The FAX System retry interval time is the number of minutes that the system waits
between retry attempts. The retry intervals range from 1 to 60 minutes. The FAX
System retry interval time is 10 minutes by default.
All the FAX System parameters can be set in one Norstar Voice Mail programming
FAX session.
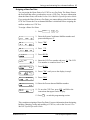
To set the FAX System parameters:
1. Press
Log:
QUIT
RETRY
Admin
MBOX
AA
ƒ·°‹
.
2. Enter the System Coordinator Mailbox number and
password and press OK.
3. Press OTHR until you see the display in step 4.
4. Press FAX.
Admin
NET
5. Press PARM.
Fax Admin
LOAD
6. Press CHNG.
Fax ext: none
NEXT
P0886629 Issue 1.0
FAX Set Up and Operation Guide
14 Setting up and maintaining FAX
Ext:
RETRY
QUIT
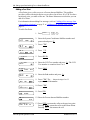
7. Enter the Fax Answering extension number. The Fax
Answering extension must be a valid Norstar DN.
The Fax Answering extension can be set up with a
Fax Overflow Mailbox for improved performance.
Refer to "Adding a Fax Overflow Mailbox" on
page 16.
Note: The call is disconnected if the Fax Answering
extension rings busy, does not answer the
incoming call, or is not equipped with a Fax
Overflow Mailbox.
Fax ext:
CHNG
Fax name:
Name:
RETRY
8. Press NEXT.
xxxx
none
NEXT
9. Press CHNG.
10. Enter the Fax Answering extension name and
press OK. To enter the Fax Answering extension
name, refer to "Entering characters using the Norstar
Dialpad" on page 12. The Fax Answering extension
name can be a maximum of 16 characters.
BKSP
11. Press NEXT.
xxxx
CHNG
12. Press CHNG.
Retries: 3
NEXT
Retries:
CHNG
13. Enter the number of retries and press OK.
OK
The default number of retries is 3. The number of
retries ranges from 01 to 99.
14. Press NEXT.
Retries: xx
CHNG
15. Press CHNG.
Interval: 10
OK
Interval:
RETRY
16. Enter the retry interval time and press OK.
The default retry interval time is 10 minutes. This is
a two-digit field. The retry interval time is a value
between 01 and 60 minutes.
Interval: 9
CHNG
FAX Set Up and Operation Guide
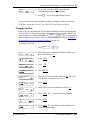
17. Press OK to accept the retry interval time.
P0886629 Issue 1.0
18. Press
Setting up and maintaining FAX 15
®
to end this programming session.
Each time a Fax message’s retry limit is reached, Norstar Voice Mail stops
attempting to send the message and a non-delivery alarm message is generated. The
messages that failed to be sent are shown in the non-delivery alarm message. The
alarms will continue until the problem has been solved. Most delivery alarms are
caused by fax machine problems such as a paper jam or the fax machine running
out of paper.
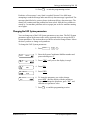
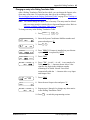
Changing the FAX System parameters
You can change any of the FAX System parameters at any time. The FAX System
parameters appear in the same order as they appeared when you set up the FAX
System parameters. This section shows you how to select the change feature. It does
not show you how to change each parameter.
To change the FAX System parameters:
1. Press
Log:
QUIT
RETRY
Admin
MBOX
AA
ƒ·°‹
.
2. Enter the System Coordinator Mailbox number and
password and press OK.
3. Press OTHR until you see the display in step 4.
4. Press FAX.
Admin
NET
Fax Admin
LOAD
5. Press PARM.
Fax Ext:
CHNG
6. To locate the parameter you wish to change,
press NEXT until the display with the parameter
appears. To change the parameter, press CHNG and
enter the new parameter value.
xxxx
7. Press
P0886629 Issue 1.0
®
to end this programming session.
FAX Set Up and Operation Guide
16 Setting up and maintaining FAX
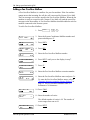
Adding a Fax Overflow Mailbox
A Fax Overflow Mailbox is a mailbox for your fax machine. If the fax machine
cannot answer the incoming fax call, the call is answered by Norstar Voice Mail.
The Fax messages received are stored in the Fax Overflow Mailbox. When the fax
machine is ready to accept fax calls, Norstar Voice Mail will send the stored Fax
messages to the fax machine. A Fax Overflow Mailbox should be added to each fax
machine connected to the Norstar system.
To add a Fax Overflow Mailbox:
1. Press
Log:
QUIT
ƒ·°‹
.
2. Enter the System Coordinator Mailbox number and
password and press OK.
RETRY
3. Press MBOX.
Admin
AA
OTHR
Mailbox Admin
DEL CHNG
4. Press ADD.
Mbox:
RETRY
5. Enter the Fax Overflow Mailbox number.
QUIT
Type: subscriber
OK
6. Press NEXT until you see the display in step 7.
Type: fax-overflo
NEXT
7. Press OK.
Ext:
RETRY
8. Enter the Fax Overflow Mailbox extension number.
Name:
RETRY
QUIT
9. Enter the Fax Overflow Mailbox name and press OK.
To enter the Fax Overflow Mailbox name, refer to
"Entering characters using the Norstar Dialpad" on
page 12. The Fax Overflow Mailbox name is a
maximum of 16 characters.
BKSP
10. Press CHNG.
Retries: 99
NEXT
Retries:
RETRY
11. Enter the number of retries.
OK
The default number of retries is 99. The number of
retries ranges from one to 99.
Retries: 99
CHNG
FAX Set Up and Operation Guide
12. Press NEXT.
P0886629 Issue 1.0
Setting up and maintaining FAX 17
13. Press CHNG.
Interval:1
OK
Interval:
RETRY
14. Enter the retry interval time and press OK.
The default retry interval time is 1 minute. This is a
two-digit field. The retry interval time is a value
between one and 60 minutes.
Interval:3
CHNG
15. Press OK.
Repeat these steps for each new Fax Overflow
Mailbox you want to add.
16. Press
®
to end this programming session.
When the retry limit is reached for a Fax message, the message is automatically sent
to the General Delivery Mailbox. The System Coordinator can then open the
General Delivery Mailbox and forward the Fax messages to a fax machine
connected to the Norstar system. The System Coordinator should check the General
Delivery mailbox on a regular basis.
Off-premise Message Notification can be set up to notify the System Coordinator
when a message has been received in the General Delivery Mailbox. For more
information about the General Delivery Mailbox, refer to the Norstar Voice Mail
Set Up and Operation Guide.
P0886629 Issue 1.0
FAX Set Up and Operation Guide
18 Setting up and maintaining FAX
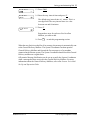
Changing the Fax Overflow Mailbox parameters
You can change any parameter assigned to a Fax Overflow Mailbox. This does not
include the mailbox number. If you need to change a mailbox number, you must
first delete the mailbox and then add the new Fax Overflow Mailbox. For
instructions about adding a mailbox, refer to "Adding a Fax Overflow Mailbox" on
page 16. For instructions about deleting a mailbox, refer to "Deleting a Fax
Overflow Mailbox" on page 19.
The Fax Overflow Mailbox parameters appear in the same order as they appear
when you add a Fax Overflow Mailbox. This section shows you how to select the
change feature. It does not show you how to change each parameter.
Changing the parameters of a Fax Overflow Mailbox involve:
•
locating the display with the parameter you want to change
•
pressing CHNG
•
entering the new parameter value
To change the parameters of a Fax Overflow Mailbox:
1. Press
Log:
QUIT
ƒ·°‹
.
2. Enter the System Coordinator Mailbox number and
password and press OK.
RETRY
3. Press MBOX.
Admin
AA
OTHR
4. Press CHNG.
Mailbox Admin
ADD
DEL
Mbox:
DIR
5. Enter the Fax Overflow Mailbox number.
QUIT
Ext: <x>
CHNG
6. To select a parameter, press NEXT until the display
shows the parameter you want to change. To change
the parameter, press CHNG and enter the new
parameter value.
7. Press
FAX Set Up and Operation Guide
®
to end this programming session.
P0886629 Issue 1.0
Setting up and maintaining FAX 19
Deleting a Fax Overflow Mailbox
You can delete a Fax Overflow Mailbox at any time. When you delete a Fax
Overflow Mailbox, an incoming fax transmission will meet a busy signal. Fax
messages that were in the Fax Overflow Mailbox before it was deleted are
automatically printed.
To delete a Fax Overflow Mailbox:
1. Press
Log:
QUIT
ƒ·°‹
.
2. Enter the System Coordinator Mailbox number and
password and press OK.
RETRY
3. Press MBOX.
Admin
AA
OTHR
Mailbox Admin
ADD
CHNG
4. Press DEL.
Mbox:
DIR
5. Enter the Fax Overflow Mailbox number that you
want to delete.
QUIT
6. Press DEL.
(mb name)
QUIT
7. Press
P0886629 Issue 1.0
®
to end this programming session.
FAX Set Up and Operation Guide
20 Setting up and maintaining FAX
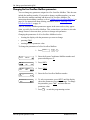
Adding a Fax System Group List
A Fax System Group List is used to send the same fax to all the members of a list.
This eliminates sending the same fax several times. The maximum combined
number of Voice and Fax Group Lists is 99.
To add a Fax System Group List:
1. Press
Log:
QUIT
Admin
MBOX
ƒ·°‹
.
2. Enter the System Coordinator Mailbox number and
password and press OK.
RETRY
3. Press OTHR.
AA
4. Press GLIST.
Admin
CCR
OTHR
Group List Admin
DEL
CHNG
5. Press ADD.
GList:901
VOICE
6. Press FAX. Norstar Voice Mail automatically assigns
a Fax System Group List number. Group List
number 901 is an example.
Record name:
RETRY
7. Pick up the handset and at the sound of the tone,
record the Group List name and press OK to end
your recording.
Note: This Group List name is played to anyone
who sends a Fax message to the fax machines
in this group.
Accept name?
RETRY PLAY
8. To listen to your recording, press PLAY. To record
the name again, press RETRY. Press OK to accept
the recording.
Name:
RETRY
9. Enter the Group List name and press OK. To enter
the Group List name, refer to "Entering characters
using the Norstar Dialpad" on page 12. The Group
List name is a maximum of 16 characters.
BKSP
Add first member
10. This display appears briefly and then changes to the
display in step 11.
Name:
RETRY
11. To add the Group List without adding members at
this time, press
.
BKSP
OK
FAX Set Up and Operation Guide
®
P0886629 Issue 1.0
Setting up and maintaining FAX 21
If you want to add fax members to the Group List, refer to "Adding fax machine
members to a Fax System Group List" on page 21. For more information about
Group Lists, refer to the Norstar Voice Mail Set Up and Operation Guide.
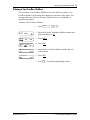
Adding fax machine members to a Fax System Group List
Members of a Fax System Group List are fax machines from other locations. These
fax machines do not have to be connected to your Norstar system. These fax
machines can be internal or external numbers.
Since not all the fax machine members of this List are connected to your Norstar
system, you must specify the telephone number of the fax machine and the line or
line pool to be used. A maximum of 125 fax machine members can be added to a
Fax System Group List.
To add a member to a Fax System Group List:
1. Press
Log:
QUIT
ƒ·°‹
.
2. Enter the System Coordinator Mailbox number and
password and press OK.
RETRY
3. Press OTHR.
Admin
MBOX
AA
4. Press GLIST.
Admin
CCR
OTHR
Group List Admin
ADD
DEL
5. Press CHNG.
GList:
RETRY
6. Enter the number of the Fax System Group List you
wish to add a member to.
QUIT
7. Press NEXT until the display shows.
GList Name
CHNG
GList Name is an example of a Group List name.
8. Press ADD.
GList members
VIEW
Name:
RETRY
BKSP
P0886629 Issue 1.0
9. Enter the new member’s name and press OK to
accept the member’s name. To enter the name of the
Fax System Group List, refer to "Entering characters
using the Norstar Dialpad" on page 12. The name of
the Fax System Group List is a maximum of 16
characters.
FAX Set Up and Operation Guide
22 Setting up and maintaining FAX
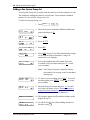
FINANCE
CHNG
10. Press NEXT.
FINANCE is an example of a Fax System Group List
name.
Fax dest: none
POOL
IC
11. Press LINE.
Note: Pressing POOL selects a line within a line
pool. Pressing IC selects an intercom line. If
you press IC you must enter an extension
number, accept the number and go to step 15.
Line:
RETRY
12. Enter the line, pool or intercom number and
press OK.
Note: If a Fax System Group List member is at a
location that requires long distance dialing,
the line or pool number selected must not
have any long distance dialing restrictions.
Accept:1
RETRY
13. Press OK to accept the new number.
Dest ph:
RETRY
14. Enter the destination telephone number and press OK
to end the new number.
7355822
ADD
15. In this example, 7355822 is the destination number.
To cancel the number and enter a new number, press
. To insert a pause, press
. The pause entered
is automatically four seconds long. To recognize dial
tone, press
. To enter more digits, press
. To
enter a star, press
. To enter a number sign, press
. Press OK to accept the new number.
•
› fl
fi
GList members
ADD
VIEW
‹
¤
16. Repeat steps 8 to 15 for each member you are adding
to this Fax System Group List.
17. Press
®
to end this programming session.
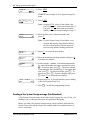
Sending a Fax System Group message (Fax Broadcast)
A Fax System Group message can be sent to notify a group, by way of a fax, of a
pending event or company notice that only pertains to that group.
Before you send a Fax System Group message, ensure you have added the Fax
System Group List, and the Group List contains all the fax machines that are to
receive a message.
FAX Set Up and Operation Guide
P0886629 Issue 1.0
Setting up and maintaining FAX 23
To send a Fax System Group message from your Norstar telephone:
1. Press
ƒ·°⁄
.
£
Pswd:
OTHR RETRY
2. Enter your password and press OK or
1 new
to retrieve your new Fax
3. Press PLAY or
message. The fax identification number and any
introductory voice content is played.
4 saved
REC ADMIN
¤
.
fl
Note: If you want to send a saved Fax message,
press
until you find the saved Fax
message you want to send. To use this feature
a Fax message must exist in your mailbox.
fi
⁄
¤
End of message
ERASE NEXT
4. Press COPY or
.
Copy fax
OTHR
5. Press MBOX or
.
Record intro?
YES
6. Press NO or
.
Note: Fax Group List recipients cannot hear voice
introductions.
Mbox:
DIR
7. Enter the Fax System Group List number.
QUIT
£
GList: <x>
OPTS
CC
8. Press SEND or
Msg delivered
9. This display appears briefly to acknowledge that the
message has been delivered.
Another copy?
YES
QUIT
10. To send this Fax message to another Group List,
. To end this session press QUIT
press YES or
or
.
•
®
11. Press
P0886629 Issue 1.0
.
⁄
to end this programming session.
FAX Set Up and Operation Guide
4
Setting up and maintaining
Fax-on-demand mailboxes
Introduction
As System Coordinator you perform all the tasks necessary for setting up and
maintaining Fax-on-demand mailboxes. This chapter describes:
•
About Fax-on-demand Mailboxes
•
Adding a Fax-on-demand Mailbox
•
Changing the parameters of a Fax-on-demand Mailbox
•
Choosing a Fax-on-demand call method
•
Adding a Fax message from a fax machine telephone
•
Adding a Fax message from a disk
•
Recording a Fax-on-demand Mailbox Greeting
•
Deleting and viewing fax selection numbers in a Fax-on-demand Mailbox
•
Including a Fax-on-demand Mailbox in CCR
•
Deleting a Fax-on-demand Mailbox
Before you begin administering FAX, you should complete "Appendix A: FAX
Programming Record" on page 51. This will help you collect and organize all the
information you will need to administer FAX. Make a photocopy of the
Appendix A: FAX Programming Record before you enter any information.
Note: To administer FAX in your company, you require a Norstar two-line display
telephone. You cannot administer FAX from a Norstar single-line display
telephone.
P0886629 Issue 1.0
FAX Set Up and Operation Guide
26 Setting up and maintaining Fax-on-demand mailboxes
About Fax-on-demand Mailboxes
A Fax-on-demand Mailbox allows external callers to retrieve Fax messages from
Norstar Voice Mail. To set up a Fax-on-demand mailbox you must:
•
add a Fax-on-demand mailbox
•
choose whether the call method is one-call or accept the default two-call method
•
add Fax messages from a fax machine telephone or a disk to the Fax-on-demand
mailbox
•
record a Fax-on-demand mailbox greeting which describes the documents
available and instructions on how callers can retrieve them
You cannot add or update a Fax message in a Fax-on-demand Mailbox by using
your Norstar two-line display telephone. For information about adding a Fax
message, refer to "Adding a Fax message from a fax machine telephone" on page 31
or "Adding a Fax message from a disk" on page 32.
You can include a Fax-on-demand mailbox in Custom Call Routing (CCR). CCR
allows mailbox owners to select options to direct their own calls. For more
information on CCR, refer to the Norstar Voice Mail Set Up and Operation Guide.
Adding a Fax-on-demand Mailbox
To add a Fax-on-demand Mailbox:
1. Press
Log:
QUIT
ƒ·°‹
.
2. Enter the System Coordinator Mailbox number and
password and press OK.
RETRY
3. Press MBOX.
Admin
AA
OTHR
Mailbox Admin
DEL CHNG
4. Press ADD.
Mbox:
RETRY
5. Enter the Fax-on-demand Mailbox number.
QUIT
Type: subscriber
OK
6. Press NEXT until you see the display in step 7.
Type: fax-on-dmnd
NEXT
7. Press OK.
FAX Set Up and Operation Guide
P0886629 Issue 1.0
Setting up and maintaining Fax-on-demand mailboxes 27
Service class:
RETRY
OK
8. Enter the Class of Service.
For information about Class of Service, refer to the
Norstar Voice Mail Set Up and Operation Guide.
Name:
RETRY
9. Enter the Fax-on-demand Mailbox name and
press OK.
BKSP
For information about how to enter the name, refer to
"Entering characters using the Norstar Dialpad" on
page 12. The Fax-on-demand Mailbox name is a
maximum of 16 characters.
Directory?
NO
10. Press YES or NO. This is a Directory Override.
Pressing YES means that the Fax-on-demand
Mailbox name plays in the Company Directory.
Outdial:
11. Press LINE.
none
POOL
Note: Press POOL for Norstar Voice Mail to select
a line within a line pool. Refer to the Norstar
Voice Mail Set Up and Operation Guide for
important information about preventing
unauthorized calls using the outdial feature.
Line:
RETRY
12. Enter the Line or Pool number and press OK.
Accept: <line>
RETRY
13. Press OK.
Retries: 3
14. Press CHNG.
NEXT
15. Enter the number of retries and press OK.
Retries:
RETRY
The default number of retries is three. The number of
retries ranges from one to 99.
16. Press NEXT.
Retries: 3
CHNG
17. Press CHNG.
Interval:10
OK
P0886629 Issue 1.0
FAX Set Up and Operation Guide
28 Setting up and maintaining Fax-on-demand mailboxes
Interval:
RETRY
18. Enter the retry interval time and press OK.
The default retry interval time is 10 minutes. This is
a two-digit field. The retry interval time is a value
between 01 and 60 minutes.
Interval:15
CHNG
19. Press OK.
Repeat steps 5 through 19 for each new Fax-ondemand Mailbox you want to add.
20. Press
®
to end this programming session.
Before you can use the Fax-on-demand Mailbox you must initialize it. For
information about initializing a mailbox, refer to the Norstar Voice Mail Set Up and
Operation Guide.
Changing the parameters of a Fax-on-demand Mailbox
You can change any Fax-on-demand Mailbox parameter, except the mailbox
number. If you want to change a mailbox number, you must first delete the mailbox
and then add the new Fax-on-demand Mailbox. Refer to "Deleting a Fax-ondemand Mailbox" on page 40 and "Adding a Fax-on-demand Mailbox" on page 26.
Changing the parameters of a Fax-on-demand Mailbox involves:
•
locating the display with the parameter you want to change
•
pressing CHNG
•
entering the new parameter value
The Fax-on-demand Mailbox parameters appear in the same order as they appear
when you add a Fax-on-demand Mailbox.
FAX Set Up and Operation Guide
P0886629 Issue 1.0
Setting up and maintaining Fax-on-demand mailboxes 29
To change a Fax-on-demand Mailbox parameter:
1. Press
Log:
QUIT
ƒ·°‹
.
2. Enter the System Coordinator Mailbox number and
password and press OK.
RETRY
3. Press MBOX.
Admin
AA
OTHR
Mailbox Admin
ADD
DEL
4. Press CHNG.
Mbox:
DIR
5. Enter the Fax-on-demand Mailbox number.
Password
RESET
QUIT
6. To select a parameter, press NEXT until the display
shows the parameter you want to change. To change
the parameter, press CHNG and enter the new
parameter value.
7. Press
®
to end this programming session.
Choosing a Fax-on-demand call method
For each Fax-on-demand Mailbox you must choose whether the call method is onecall or two-call. When you choose the one-call method:
•
the Fax message is transmitted during the original call
•
the caller must use a fax machine to retrieve a Fax message
•
the caller pays for any charges incurred
When you choose the two-call method:
•
the Dialing Translation Table must be created and the Dialing Translation
Parameters must be set
•
the caller provides a fax telephone number of where the information is to be
delivered
•
the Fax message is transmitted in the second call which is originated by Norstar
Voice Mail
Note: For information on creating the Dialing Translation Table and setting all the
Dialing Translation Parameters, refer to "Appendix B: Dialing Translation"
on page 57.
Each Fax-on-demand Mailbox is assigned a number of Fax messages a caller can
request. The maximum number of Fax messages that can be requested is eight.
P0886629 Issue 1.0
FAX Set Up and Operation Guide
30 Setting up and maintaining Fax-on-demand mailboxes
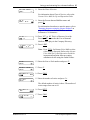
To choose a call method and the number of Fax messages:
1. Press
.
2. Press OTHR or
Pswd:
RETRY
Log:
QUIT
ƒ·°⁄
•
OK
.
£
3. Enter the Fax-on-demand Mailbox number and
.
password and press OK or
RETRY
°
FaxOnDemand
FAXES
4. Press ADMIN or
Mailbox admin
GREET PSWD QUIT
5. Press
Method: Two call
CHNG
NEXT
to choose the one-call method.
6. Press CHNG or
In this display, Two represents the current call
method. The two-call method is the default call
method. If the current call method is correct,
.
press NEXT or
Limit: 8
OK
fi
.
.
⁄
£
⁄
and enter the number of faxes a
7. Press CHNG or
caller can request. The default number of faxes a
caller can request is eight. The number of faxes
requested by a caller ranges from one to eight.
£
£
Limit:
RETRY
8. Press OK or
Limit: 7
CHNG
again to accept the number of
9. Press OK or
faxes a caller can request.
10. Press
FAX Set Up and Operation Guide
®
.
to end this programming session.
P0886629 Issue 1.0
Setting up and maintaining Fax-on-demand mailboxes 31
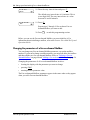
Adding a Fax message from a fax machine telephone
You must enter a selection identification number when you add a Fax message from
a fax machine telephone to a Fax-on-demand Mailbox. The selection identification
number is used by callers to select the document they want to retrieve.
Immediately after you add or update a Fax message in the Fax-on-demand Mailbox,
verify that the Fax message has been received and is ready for customer use. Access
the Fax-on-demand Mailbox and print the new or updated Fax messages.
To add a Fax message from a fax machine telephone to a Fax-on-demand Mailbox:
1. From a fax machine telephone, dial a telephone number that will be answered
by the Automated Attendant.
2. Once the Automated Attendant answers the call, press
••
.
3. Enter the Fax-on-demand Mailbox number and password.
4. Press
5. Press
6. Press
£
⁄
⁄
.
.
again to add a Fax message.
Note: To change or delete a Fax message, follow the voice prompts.
7. Enter the Fax-on-demand selection identification number.
Note: The Fax-on-demand selection identification number must be a unique
number with a maximum of eight digits and may not start with zero or
nine.
8. Press
£
.
9. Press the START/SEND key on your fax machine when prompted. The
Norstar Voice Mail session will end when the transmission is complete.
P0886629 Issue 1.0
FAX Set Up and Operation Guide
32 Setting up and maintaining Fax-on-demand mailboxes
Adding a Fax message from a disk
You can add or update a Fax message by loading the Fax message onto a 3.5" disk
and inserting the 3.5" disk into the floppy disk drive of your Norstar applications
server. This method will result in a cleaner outgoing fax and the process will be
noticeably faster than adding a Fax message from a fax machine telephone.
You will be prompted to enter the number of a Fax-on-demand Mailbox and the
selection identification number of the Fax message at the Norstar set. Then place
the disk into the disk drive of the Norstar applications server. If the Fax message is
a new document and not an updated version of a past document, you must confirm
its creation.
After you have added a Fax message to a Fax-on-demand Mailbox, you should
verify the existence of the Fax message by sending it to a fax machine. Ensure the
Fax message is complete and the page numbering matches the number of pages of
the selection. Check all selections in the Fax-on-demand Mailbox before
advertising the selections in your Fax-on-demand greeting.
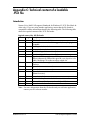
The disk must contain only one Fax message. The Fax message must be in one of
the file formats indicated by the appropriate file extension listed below:
Extension
Assumed Content
.TXT
ASCII file.
.PCX
PC Paintbrush format (black & white only). A .PCX image that is
18 X 22.92 inches will be reduced and print as 8.5 X 11 inches.
.TIF
Tag Image File Format Class F (TIFF-F). Only Class F File Formats are
supported.
Note: Norstar Voice Mail FAX supports black and white .PCX files created with
Paintbrush for Windows 3.1. If you are using another application, verify that
the file has been successfully added and the Fax message can be sent to a
fax machine. If the file cannot be sent to a fax machine successfully, refer
to "Appendix C: Technical content of a loadable .PCX file" on page 73, for
the required content of the .PCX file header.
FAX Set Up and Operation Guide
P0886629 Issue 1.0
Setting up and maintaining Fax-on-demand mailboxes 33
To add a Fax message from a disk:
1. Press
Log:
QUIT
ƒ·°‹
.
2. Enter the System Coordinator Mailbox number and
password and press OK.
RETRY
3. Press OTHR until you see the FAX option.
Admin
MBOX AA
4. Press FAX.
5. Press LOAD.
Fax Admin
PARM
Mbox:
DIR
QUIT
6. Enter the Fax-on-demand Mailbox number. A
Fax-on-demand Mailbox must already exist in order
to add the Fax message. If a Fax-on-demand Mailbox
does not exist, you must create one before adding the
Fax message. Refer to "Adding a Fax-on-demand
Mailbox" on page 26.
Select: x
RETRY
7. Enter the Fax-on-demand selection identification
number and press OK. The Fax-on-demand selection
identification number is a maximum of eight digits,
must be unique, and may not start with zero or nine.
Create:x
RETRY
8. The number that appears in this display (x) will be
the same number entered in step 7, if it is a new
selection identification number. Press OK.
Insert disk
QUIT
9. Insert the 3.5" disk into the floppy disk drive of your
Norstar applications server and press OK on the
Norstar set.
Checking disk ...
Checking file ...
Num of pages: 1
OK
10. Press CHNG.
Num of pages:
RETRY
11. Enter the number of pages in the Fax message and
press OK.
P0886629 Issue 1.0
FAX Set Up and Operation Guide
34 Setting up and maintaining Fax-on-demand mailboxes
Num of pages: X
CHNG
12. Press OK to accept the number of pages in the Fax
message.
Loading ...
13. The disk must contain only one Fax message file.
When the file has been successfully loaded, you will
see the display in step 14.
File Loaded
14. If the Fax message file is loaded successfully the
Norstar applications server beeps 3 times. If the Fax
message file is not loaded successfully the Norstar
applications server will beep twice. Even if the Fax
message file appears to have been loaded
successfully, you should test it by sending the Fax
message to the fax machine.
15. After the Fax message file has been successfully
loaded, the display returns to the Admin prompt. You
can then safely remove the disk from the floppy disk
drive of the Norstar applications server.
16. Press
®
to end this programming session.
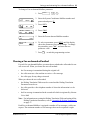
Recording a Fax-on-demand Mailbox Greeting
You must record a greeting for each Fax-on-demand Mailbox. This greeting is
played to callers who access the Fax-on-demand Mailbox. The maximum length of
this greeting is designated by the Class of Service.
Before you record the Fax-on-demand Mailbox Greeting, prepare a greeting for
each Fax-on-demand Mailbox. Your greeting should describe the documents
available and instructions on how callers can retrieve them. For example, you might
record your greeting for a one-call method Fax-on-demand Mailbox by saying:
“Hello. You have reached Paddy’s Dance Studio fax information Hotline. If you are
calling from a fax machine telephone, you can receive information on class
schedules and prices, registration forms and upcoming special events. To receive
class schedules and prices, press
. To receive registration forms, press
. To
receive information about upcoming special events, press
. After you have
entered the required numbers, press START on your fax machine.”
⁄
‹
¤
If you are using the Norstar Voice Mail bilingual capability, you should also record
the Fax-on-demand Mailbox Greeting in the alternate language.
For the two-call method Fax-on-demand Mailbox to function properly, the Dialing
Translation Table must be created and the Dialing Translation Parameters must be
set. Refer to "Appendix B: Dialing Translation" on page 57.
FAX Set Up and Operation Guide
P0886629 Issue 1.0
Setting up and maintaining Fax-on-demand mailboxes 35
An example of a two-call method Fax-on-demand Mailbox greeting is:
“Hello. You have reached Paddy’s Dance Studio fax information Hotline. You can
receive information on class schedules and prices, registration forms and
upcoming special events. To receive class schedules and prices, press
. To
receive registration forms, press
. To receive information about upcoming
special events, press
. Enter the telephone number of the fax machine you wish
to have the faxes sent to. If you are calling long distance remember to include the
area code.”
‹
¤
To record a greeting:
1. Press
ƒ·°⁄
•
.
2. Press OTHR or
Pswd:
RETRY OK
Log:
QUIT
⁄
RETRY
.
£
3. Enter the Fax-on-demand Mailbox number and
.
password and press OK or
°
¤
⁄
FaxOnDemand
FAXES
4. Press ADMIN or
.
Mailbox admin
PSWD QUIT
5. Press GREET or
.
Primary greeting
NEXT
6. Press REC or
Record greeting:
RETRY PLAY
7. At the tone, record the Primary Fax-on-demand
to end the
Mailbox Greeting and press OK or
recording.
Accept greeting?
RETRY PLAY
OK
8. To listen to your greeting before accepting it,
. To record your greeting again,
press PLAY or
. Press OK or
to accept
press RETRY or
your Primary Fax-on-demand Mailbox Greeting.
Primary Greeting
PLAY NEXT
9. To record an Alternate Fax-on-demand Mailbox
and follow the
Greeting, press NEXT or
instructions that appear on the display.
£
⁄¤
10. Press
P0886629 Issue 1.0
.
®
£
‹
to end this programming session.
FAX Set Up and Operation Guide
36 Setting up and maintaining Fax-on-demand mailboxes
Deleting and viewing fax selection numbers in a Fax-on-demand
Mailbox
You can delete or view a fax selection number using your Norstar two-line display
telephone. If you delete a fax selection number, the Fax message that is associated
with the fax selection number is also deleted.
To delete or view a fax selection number in a Fax-on-demand Mailbox:
1. Press
.
2. Press OTHR or
Pswd:
RETRY
Log:
QUIT
ƒ·°⁄
•
OK
£
3. Enter the Fax-on-demand Mailbox number and
.
password and press OK or
RETRY
⁄
¤
4. Press FAXES or
FaxOnDemand
ADMIN
<x> faxes
ADD
.
QUIT
Select: <x>
UPDATE DEL NEXT
5. Press CHNG or
.
.
£
6. To view the fax selection numbers, press NEXT or
. If you know the fax selection number, then enter
the fax selection number of the Fax message that you
wish to view. To delete the Fax message associated
with the fax selection number shown, press DEL or
.
‡
Note: To update a Fax message, you must use a fax
machine telephone or update the Fax message
by disk. For information about loading or
updating Fax messages, refer to "Adding a
Fax message from a fax machine telephone"
on page 31 or "Adding a Fax message from a
disk" on page 32.
Select deleted
7. Press
®
to end this programming session.
Including a Fax-on-demand Mailbox in CCR
FAX can be used with Custom Call Routing (CCR) by including a Fax Point on
your CCR Tree. This Fax Point allows callers to use the call routing features of CCR
to access a Fax-on-demand Mailbox.
FAX Set Up and Operation Guide
P0886629 Issue 1.0
Setting up and maintaining Fax-on-demand mailboxes 37
Assigning a Home Fax Point
You can assign the Home Point of a CCR Tree as a Fax Point. The Home Point is
the first Point that callers get when they access a CCR Tree. For more information
about the Home Point, refer to the Norstar Voice Mail Set Up and Operation Guide.
If you assign the Home Point as a Fax Point, you cannot add any other Points to this
CCR Tree. Ensure the Fax-on-demand Mailbox is initialized before assigning the
mailbox number to a CCR Tree.
To assign a Home Fax Point:
1. Press
Log:
QUIT
RETRY
Admin
MBOX
AA
ƒ·°‹
.
2. Enter the System Coordinator Mailbox number and
password and press OK.
3. Press OTHR.
4. Press CCR.
Admin
GLIST
OTHR
CCR Admin
5. Press ADMIN.
CCR tree:
RETRY
6. Enter the CCR Tree number and press OK. The CCR
Tree number is a number from 1 to 4.
New tree: <1>
QUIT
7. Press BUILD.
0
REC
Home/Menu
OK
8. Press OTHR until you see the display in step 9.
0
Home/FOD
OTHR
OK
9. Press CHNG.
10. Enter the Fax-on-demand Mailbox number.
Mbox:
QUIT
Path:
RETRY
OK
11. To save the CCR Tree, press END and follow the
instructions that appear on the display.
12. Press
®
to end this programming session.
This completes assigning a Home Fax Point. For more information about designing,
building, changing, saving and enabling a CCR Tree, refer to the Norstar Voice
Mail Set Up and Operation Guide.
P0886629 Issue 1.0
FAX Set Up and Operation Guide
38 Setting up and maintaining Fax-on-demand mailboxes
Adding a Fax Point
A Fax Point gives a caller access to a Fax-on-demand Mailbox. This mailbox
provides a caller with single-digit access to a fax or list of faxes. If a CCR Tree does
not already exist, you must create one. The Home Menu must exist before you can
add a Fax Point.
For information about adding Fax messages, refer to "Adding a Fax message from
a fax machine telephone" on page 31 or "Adding a Fax message from a disk" on
page 32.
To add a Fax Point:
1. Press
Log:
QUIT
RETRY
Admin
MBOX
AA
ƒ·°‹
.
2. Enter the System Coordinator Mailbox number and
password and press OK.
3. Press OTHR.
4. Press CCR.
Admin
GLIST
OTHR
CCR Admin
5. Press ADMIN.
CCR tree:
RETRY
6. Enter the CCR Tree number and press OK. The CCR
Tree number is a number from 1 to 4.
Tree: 1
PRINT
Path:
RETRY
<x>
MENU
7. Press CHNG.
QUIT
8. Enter the Path number and press OK.
END
9. Press OTHR. The x shown in steps 9 to 11
represents the Path number.
INFO
<x>
XFER LVMSG
10. Press OTHR.
<x>
11. Press FAX.
ERASE
12. Enter the Fax-on-demand Mailbox number.
Mbox:
QUIT
Destination?
PREV HOME DISC
FAX Set Up and Operation Guide
13. Press PREV to return the caller to the previous point.
Pressing HOME returns the caller to the Home Menu.
Pressing DISC disconnects the call.
P0886629 Issue 1.0
Setting up and maintaining Fax-on-demand mailboxes 39
Path:
RETRY
OK
14. To save the Tree, press END and follow the
instructions that appear on the display.
15. Press
®
to end this programming session.
For more information about designing, building, changing, saving or enabling a
CCR Tree, refer to the Norstar Voice Mail Set Up and Operation Guide.
Changing a Fax Point
From CCR, you can change the Fax-on-demand Mailbox number and destination
of a Fax Point. To change the greeting, call method or Fax messages available, you
. For information
must open the Fax-on-demand Mailbox via
about changing the parameters of Fax-on-demand Mailboxes, refer to "Changing
the parameters of a Fax-on-demand Mailbox" on page 28.
ƒ·°⁄
To change a Fax Point:
1. Press
Log:
QUIT
RETRY
Admin
MBOX
AA
ƒ·°‹
.
2. Enter the System Coordinator Mailbox number and
password and press OK.
3. Press OTHR.
4. Press CCR.
Admin
GLIST
OTHR
CCR Admin
5. Press ADMIN.
CCR tree:
RETRY
6. Enter the CCR Tree number and press OK. The CCR
Tree number is a number from 1 to 4.
Tree: 1
PRINT
8. Enter the Fax Point Path number and press OK.
Path:
RETRY
END
<x>
ERASE
Mbox:
CHNG
7. Press CHNG.
QUIT
Fax
OK
10. Press NEXT.
<xxx>
Dest: <type>
OK
P0886629 Issue 1.0
9. Press CHNG. The x represents the Path number.
11. Press CHNG. The type shown on this display is the
current destination type.
FAX Set Up and Operation Guide
40 Setting up and maintaining Fax-on-demand mailboxes
Destination?
PREV HOME DISC
12. Press PREV to return the caller to the previous point.
Pressing HOME returns the caller to the Home Menu.
Pressing DISC disconnects the call.
Dest: <type>
CHNG
13. Press OK.
Path:
RETRY
OK
14. To save the CCR Tree, press END and follow the
instructions that appear on the display. For more
information about designing, building, changing,
saving or enabling a CCR Tree, refer to the Norstar
Voice Mail Set Up and Operation Guide.
15. Press
®
to end this programming session.
Deleting a Fax-on-demand Mailbox
You can delete a Fax-on-demand Mailbox at any time. To delete a Fax-on-demand
Mailbox:
1. Press
Log:
QUIT
ƒ·°‹
.
2. Enter the System Coordinator Mailbox number and
password and press OK.
RETRY
3. Press MBOX.
Admin
AA
OTHR
Mailbox Admin
ADD
CHNG
4. Press DEL.
Mbox:
DIR
QUIT
5. Enter the Fax-on-demand Mailbox number that you
want to delete.
QUIT
6. Press DEL and the display returns to the
Mailbox Admin prompt shown in step 4.
(mb name)
7. Press
FAX Set Up and Operation Guide
®
to end this programming session.
P0886629 Issue 1.0
5
Troubleshooting FAX
Introduction
Troubleshooting FAX involves solving problems that are related to the FAX
options. For troubleshooting information about other aspects of Norstar Voice Mail,
refer to the Norstar Voice Mail Set Up and Operation Guide.
Problems and solutions
Callers cannot retrieve a fax from a Fax-on-demand Mailbox.
If a caller cannot retrieve a Fax message from a Fax-on-demand Mailbox, check the
following:
1. Verify that the mailbox is a Fax-on-demand Mailbox.
2. Verify that Fax messages have been added to this mailbox.
3. Make sure your greeting tells the user how to retrieve the Fax message. This
includes information about which call method is used.
4. If the two-call method is being used, verify that the Dialing Translation Table
has been created and the Dialing Translation Parameters are set.
Callers cannot leave a fax in a Personal Mailbox.
If a caller cannot leave a Fax message in a mailbox, check the following:
1. Make sure the mailbox greeting tells the caller to press
START/SEND on the fax machine.
°
before pressing
2. Ensure the greeting tells the caller that the call must be made from a fax
machine.
P0886629 Issue 1.0
FAX Set Up and Operation Guide
42 Troubleshooting FAX
A user cannot reply or send messages to other mailboxes.
If a user cannot reply or send messages to other mailboxes, the user’s mailbox may
be full. This means that too many voice and fax messages are being stored in the
mailbox and the user must delete old messages from the mailbox. If this problem
occurs too often, assign the mailbox a different class of service to give the user more
mailbox space.
Norstar Voice Mail mailboxes are equipped with the Never Full Mailbox Feature,
which allows external callers to leave voice and fax messages in your mailbox, even
if the mailbox is “full”. The message will be stored, but cannot be accessed until
you delete at least one saved message. The Never Full Mailbox Feature is only
available to external callers. Internal callers cannot leave messages if a mailbox is
full.
Faxes that are sent when the fax machine is busy are lost.
If Fax messages sent when the fax machine is busy are not being received, check
the following:
1. Verify that a default fax extension has been set up.
2. Verify that a Fax Overflow Mailbox has been added to Norstar Voice Mail.
3. Verify that the extension defined in the Fax Overflow Mailbox is the
extension number of the fax machine.
4. Make sure the fax machine is connected to the Norstar system through an
ATA.
A message indicates that faxes could not be sent to the fax machine.
If this occurs on a local fax machine, check the following:
1. Verify that the fax machine is ready to receive and is not jammed or out of
paper.
2. Verify that the fax machine is connected to the Norstar system through an
ATA.
3. Increase the number of retries assigned to the Fax Overflow Mailbox
associated with that machine.
Note: To change the number of retries, refer to "Changing the Fax Overflow
Mailbox parameters" on page 18.
If this occurs on a fax machine that is remote, check the following:
1. Verify that you entered the correct fax number.
2. Verify that there are no dialing restrictions applied to the users extension.
FAX Set Up and Operation Guide
P0886629 Issue 1.0
Troubleshooting FAX 43
A message indicates that faxes could not be sent from the Fax Overflow Mailbox.
The message left in the General Delivery Mailbox is shown below:
“The attached Fax message could not be printed to <fax machine extension>.”
This message indicates that the maximum number of retries has been reached by the
Fax Overflow Mailbox and the Fax message has still not been sent. If this occurs,
you should:
1. Verify that the fax machine is still operable.
2. Verify that the fax machine is connected to the Norstar system through an
ATA.
3. Increase the maximum number of retries set in the Fax Overflow Mailbox.
Fax messages are being left in the General Delivery Mailbox
When the Fax Overflow Mailbox retry limit is reached for a Fax message, the
message is automatically sent to the General Delivery Mailbox.
1. Verify that the fax machine is still operable.
2. Verify that the fax machine is connected to the Norstar system through an
ATA.
3. Open the General Delivery Mailbox and forward the Fax messages to another
fax machine connected to the Norstar system. Be sure to check the General
Delivery mailbox on a regular basis.
4. Off-premise Message Notification can be set up to notify you when a message
has been received in the General Delivery Mailbox. For more information
about Off-premise Message Notification and the General Delivery Mailbox,
refer to the Norstar Voice Mail Set Up and Operation Guide.
P0886629 Issue 1.0
FAX Set Up and Operation Guide
44 Troubleshooting FAX
Error messages
While you are programming Norstar Voice Mail, an error message may appear on
your Norstar telephone display. This section describes the Error Messages that are
related to FAX. The Error Messages shown here are presented in alphabetical order.
For a list of all Norstar Voice Mail Error Messages, refer to the Norstar Voice Mail
Set Up and Operation Guide.
Invalid ext
Appears when an incorrect extension is entered. Check the DN length or use the
Company Directory.
Invalid glist
Appears when a FAX Group List is used for a voice message or when a voice
Group List is used for a fax message.
Invalid mailbox
Appears when an incorrect mailbox number is entered.
Invalid number
Appears when entering an incorrect number for one of the FAX parameters. For the
correct range of values for a specific FAX parameter, refer to Chapters 3 and 4 of
this guide.
LOCKED
Appears when a Fax-on-Demand mailbox has been disabled because of excessive
incorrect password attempts.
Mbox needed
Appears when adding a Fax Point to a CCR Tree and a mailbox number has not
been specified when required.
Mbox not init
Appears when a message is sent to a mailbox that is not initialized.
Must be unique
The value you have entered as the fax selection number has already been assigned
to another Fax message. Fax numbers must be unique.
NONAMEREC
Appears when a mailbox is initialized but the spoken name is not recorded.
NOGREET
Appears when a Fax-on-demand mailbox is initialized but the Primary Greeting is
not recorded.
None to print
Appears when trying to print faxes when there are no faxes in the mailbox.
FAX Set Up and Operation Guide
P0886629 Issue 1.0
Troubleshooting FAX 45
Not available
When a FAX feature is attempted after the FAX hardware has been removed or
FAX has been disabled.
Not set up
When PRESET is selected before it has been set up.
Rec too long
Appears when a recorded message is too long. Message or greeting length for a
mailbox is determined by the Class of Service.
Speak up
Appears when recording a greeting or message and the minimum volume level of
Norstar Voice Mail is not met. Do not use Handsfree. When recording a greeting or
message, speak directly into the handset of your Norstar telephone.
UNINIT
Appears when the Fax-on-demand mailbox has not been initialized.
WARN Mbox uninit
Appears when a Fax-on-demand mailbox is not initialized.
WARN Mbox empty
Appears when the Fax-on-demand mailbox has no content.
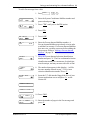
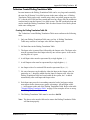
Disabling and Re-enabling Norstar Voice Mail Channels
In the course of diagnosing a system problem you may find it necessary to disable
a particular Norstar applications server Channel. After the problem has been solved,
you will need to re-enable the Norstar applications server Channel. If you attempt
to disable all the Channels, the system will reboot itself.
To disable a Channel:
1. Press
ƒ · ⁄ fi
¤¤¤‹‡‡¤
.
Password:
∫∫∫∫∫∫∫∫∫∫∫RETRY
2. Enter the default password
(ACCESS2).
ACCESS∫Server
BACK∫∫
∫ADMIN
3. Press NEXT until you see the display in step 4.
Channel Status
BACK∫∫NEXT∫∫
4. Press SHOW.
Chan Status Menu
QUIT∫∫ALL ∫∫
5. Press SHOW.
P0886629 Issue 1.0
FAX Set Up and Operation Guide
46 Troubleshooting FAX
01-08 > ccc**crr
QUIT NEXT
6. Press DETAIL.
1:
2225
QUIT
***
DSBL
7. Press NEXT until the Channel you want to disable is
displayed.
3:
2227
QUIT NEXT
***
3: Not in sync
QUIT NEXT ENBL
8. Press DSBL.
9. Press
To re-enable the Channel:
1. Press
®
to end this programming session.
ƒ · ⁄ fi
¤¤¤‹‡‡¤
.
Password:
∫∫∫∫∫∫∫∫∫∫∫RETRY
2. Enter the default password
(ACCESS2).
ACCESS∫Server
BACK∫∫
∫ADMIN
3. Press NEXT until you see the display in step 4.
Channel Status
BACK∫∫NEXT∫∫
4. Press SHOW.
Chan Status Menu
QUIT∫∫ALL ∫∫
5. Press SHOW.
01-08 >cc***crr
QUIT NEXT
6. Press DETAIL.
1:
2225
QUIT
7. Press NEXT until the Channel you want to re-enable
is displayed.
***
DSBL
3: Not in sync
QUIT NEXT
8. Press ENBL.
3:
2227
QUIT NEXT
9. Press
***
DSBL
FAX Set Up and Operation Guide
®
to end this programming session.
P0886629 Issue 1.0
6
Examples and Tips
Introduction
This chapter provides examples of different fax features and tips for using FAX.
Examples of FAX set ups
FAX can be set up to perform several different functions. How you choose to set up
FAX depends on your requirements for fax storage and retrieval.
The following examples describe how the different fax features are used by a small
fictitious company called Paddy’s Dance Studio. This company uses the Norstar
Voice Mail Fax functions to inform callers of upcoming events and allow students
to register by fax.
Example of a Fax-on-demand Mailbox set up
Paddy’s Dance Studio uses a Fax-on-demand Mailbox to inform students of
upcoming events. In this mailbox there are three Fax messages that are updated
every month. The first Fax message contains the schedule for regular and drop-in
classes. The second Fax message lists the current prices for each class. The final Fax
message contains a schedule for the upcoming special events such as musicals,
dance recitals and open houses. Each of the Fax messages is sent using the one-call
method. This means the caller pays for any charges incurred.
Since the Fax-on-demand Mailbox contains three different Fax messages, the
greeting for this mailbox must contain instructions that tell the caller how to get the
information they want. For example:
“Hello. You have reached Paddy’s Dance Studio’s fax information mailbox. If you
are calling from a fax machine telephone, you can receive information on class
schedules, prices, and upcoming special events. To retrieve class schedules,
press
. To get a detailed price list, press
. To get information about
upcoming special events, press
.”
⁄
‹
¤
Sample Fax Messaging set up
The registrar of Paddy’s Dance Studio uses a personal mailbox to receive
registration Fax messages from students. These Fax messages are sent to a mailbox
and not the fax machine because the registration forms contain personal
information, such as addresses and telephone numbers. The registration faxes are
collected in the mailbox and sent to the fax machine when the registrar is available
to pick them up.
P0886629 Issue 1.0
FAX Set Up and Operation Guide
48 Examples and Tips
The greeting on the registrar’s mailbox must contain information about how to send
the Fax message. For example:
‚
“Hello. You have reached Paddy’s Dance Studio’s registration desk. To speak to
the receptionist, press
. To leave a message for the registrar, leave your name,
telephone number and message after the tone.
If you are calling from a fax machine telephone, you can register for a class by fax.
On your registration fax form, remember to include your name, telephone number,
address and the name of the class you are registering for. Also remember that
payment is due before the start of the first class. To register now by fax, press
and then the START button on your fax machine.”
°
Sample Fax Overflow set up
Paddy’s Dance Studio has only one fax machine and it can get very busy. To
prevent losing any Fax messages due to a busy fax machine, a Fax Overflow
Mailbox was added to Norstar Voice Mail. This mailbox collects any incoming Fax
messages that come in while the fax machine is busy.
FAX Tips
Printing a fax from a Fax Overflow Mailbox to another fax machine
If a fax machine that is assigned to a Fax Overflow Mailbox is out of order for an
extended time, you can print the stored Fax messages on another fax machine
connected to the Norstar system. To print the Fax messages, change the extension
number of the Fax Overflow Mailbox to the extension of a working fax machine.
After the stored Fax messages are printed, change the extension number back to the
extension of the original fax machine so you do not miss incoming Fax messages.
For information about setting the extension number of a Fax Overflow Mailbox,
refer to "Changing the Fax Overflow Mailbox parameters" on page 18.
Adjusting the mailbox Class of Service
All personal mailboxes allow Fax messages, incoming Fax messages and incoming
voice messages to be stored in the same message space. The amount of space
available is determined by the mailbox Class of Service. If the user expects several
Fax messages, you may need to change the mailbox Class of Service to allow more
message space.
FAX Set Up and Operation Guide
P0886629 Issue 1.0
Examples and Tips 49
Setting up notification of a fax machine problem
When a Fax message is sent to the Fax Overflow Mailbox and the retry limit is
reached, the Fax message is automatically sent to the General Delivery Mailbox.
The System Coordinator can then open the General Delivery Mailbox and forward
the Fax messages to another fax machine connected to the Norstar system. The
System Coordinator should check the General Delivery mailbox on a regular basis.
Off-premise Message Notification can be set up to notify the System Coordinator
when a message has been received in the General Delivery Mailbox. For more
information about setting up Off-premise Message Notification and the General
Delivery Mailbox, refer to the Norstar Voice Mail Set Up and Operation Guide.
Transferring a fax caller to your mailbox
If a caller is phoning from a fax machine telephone and is attempting to leave a Fax
message in your mailbox, but you answer the call, you can transfer the caller to your
mailbox. When you answer the call, inform the caller you will transfer them to your
and enter your mailbox number. The caller
mailbox. Press
will hear your mailbox greeting and will be able to leave a Fax message. Inform the
caller to press
before pressing START on their fax machine.
ƒ · ° fl
°
ƒ · ° fl
If you answer your telephone and hear a Fax Calling Tone, you can transfer the call
and entering your mailbox
to your mailbox by pressing
number. The Fax message will be left in your mailbox.
P0886629 Issue 1.0
FAX Set Up and Operation Guide
Appendix A: FAX Programming Record
Before you begin
•
Make copies of the pages in this chapter you will need for recording more
program settings.
•
When a telephone is used for programming, a Norstar two-line telephone must
be used.
Programming overview
This overview provides a recommended approach to FAX programming. To use
this overview:
•
Start at the top and progress down through the programming options. Determine
which options require your attention.
•
You will be programming Fax Mail on an installed Norstar Voice Mail system.
Refer to the Norstar Voice Mail documentation for information on Norstar
Voice Mail system operation. Refer to the Norstar Voice Mail Programming
Record for specific information about what has already been programmed for
Norstar Voice Mail.
•
Refer to the page number to find where that option is in this Programming
Record. Space is provided for you to write the option or circle an option (if
provided). The defaults are shown in bold text.
•
Instructions for accessing each programmable option are provided in brackets
(“F” means “Feature”).
Note: To record the programming for the Dialing Translation Table, refer to
the Norstar Voice Mail Programming Record.
.
Description of programming
Title
Record a general description of your fax setup
Pre-installation
checklist
page 52
Record dialing translation parameters for your system
Dialing Translation
Parameters
page 52
Add Fax Mailboxes
(F983, then press MBOX and follow prompts)
Mailbox
Administration
page 53
Configure Fax Mailboxes
(F983, then press FAX and follow prompts)
Mailbox
Configuration
page 56
Define Fax System Group Lists
(F983, then press GLIST and follow prompts)
Fax System Group
Lists
page 55
P0886629 Issue 1.0
Page
FAX Set Up and Operation Guide
52 Appendix A: FAX Programming Record
Pre-installation checklist
DN/mailbox number length
1
2
3
4
5
6
7
Installer’s name
Installation date
Model of office fax machine(s)
DN or telephone number of office fax
machine(s)
Dialing Translation Parameters
Long distance access code
Area code
Access code
Reply translation
FAX Set Up and Operation Guide
Y
N
P0886629 Issue 1.0
Appendix A: FAX Programming Record 53
Copy page before using if
more sheets required.
Mailbox Administration
Mailbox
number
Extension*
Name
(1 to 16 letters)
Type (check ✔ one)
Fax-on-demand
Fax Overflow
* Applicable only for Fax Overflow Mailboxes
P0886629 Issue 1.0
FAX Set Up and Operation Guide
54 Appendix A: FAX Programming Record
Copy page before using if
more sheets required.
Mailbox Configuration
Fax Overflow
Mailbox
Fax machine extension number
Retry attempts (01-99)
Retry interval (01-60 min)
Fax-on-demand
Mailbox
Directory name
Primary:
Greeting
Alternate:
Delivery mode
One-call Two-call
Maximum number of faxes*
1
2
3
4
5
6
7
8
6
7
8
Description of fax contents
Fax-on-demand
Mailbox
Directory name
Primary:
Greeting
Alternate:
Delivery mode
One-call Two-call
Maximum number of faxes*
1
2
3
4
5
Description of fax contents
* The maximum number of faxes requested by a caller ranges from 1 to 8. A mailbox can store as
many faxes as space permits.
FAX Set Up and Operation Guide
P0886629 Issue 1.0
Appendix A: FAX Programming Record 55
Copy page before using if
more sheets required.
Fax System Group Lists
Group List number*
(901 to 999)
Type
FAX
Name (voice recording)
Name (max. 16 letters)
Line or Line Pool number and Telephone number of fax machine (1-30 digits)
*The Group List leading digit may be changed from the default of 9. This is done by the Installer or System
Coordinator during System initialization.
P0886629 Issue 1.0
FAX Set Up and Operation Guide
Appendix B: Dialing Translation
Introduction
This chapter describes how to set up the Dialing Translation Table and how to set
Dialing Translation Parameters. This chapter describes:
•
How the Dialing Translation Table works
•
Dialing Translation Parameters
•
Dialing Translation Table Administration
•
Technician Created Dialing Translation Table
•
Installing the Dialing Translation Table onto the Norstar Voice Mail System
There are several instances when Norstar Voice Mail generates an outbound call.
One instance is when a mailbox subscriber replies to a Caller ID (Calling Line
Identification-CLID) message. In this situation, Norstar Voice Mail generates a
telephone number to be dialed by the public switched telephone network.
Another instance is when the Fax-on-demand two-call method is used. In this
situation, a caller enters the telephone number of the fax machine where
information is to be delivered. In a second call, Norstar Voice Mail transmits the
document. However, the telephone number entered by the caller may contain errors.
For example, the caller may forget to add the area code or add a long distance access
code when it is unnecessary.
In both instances several changes must occur before the number can be dialed
successfully through the local telephone network. The Dialing Translation Table
and Dialing Parameters determine these changes for the user.
How the Dialing Translation Table works
A telephone number is entered by a caller or is derived from information attached
to an incoming Caller ID message. The number is then looked up in the Dialing
Translation Table. If the leading digit or digits match a Dialing Translation Table
Input value, the number is then substituted for the Output value. This change results
in a telephone number that can be dialed on the local network. The changing of the
number usually consists of dropping an area code or inserting an access code, based
on the dialing rules of the local network. For example, if a local number is prefixed
with the long distance code “1”, it is removed by the Dialing Translation Table.
The Dialing Translation process is immediate so calls will not take any longer to
dial. Not all telephone numbers need to be changed before dialing. The Dialing
Translation Table is created by the System Coordinator.
P0886629 Issue 1.0
FAX Set Up and Operation Guide
58 Appendix B: Dialing Translation
Telephone number Translation
The Dialing Translation Table changes Network DNs into numbers that can be
dialed on the local network. The Network DN form of a telephone number is the
normal form in which the number appears. For example, on a business card a
telephone number would read 403-555-5050. This number, in it’s Network DN
form, must be translated into a number that can be dialed on the local telephone
network. The Dialing Translation Table follows the rules required to make the call.
The Dialing Translation Table needs to define each possible case where some
degree of change is needed to allow the number to be dialed on the local network.
Every Dialing Translation Table entry consists of an Input column and an Output
column. The values in the Input column represent the leading digits of the Network
DN which, if matched, are replaced by the corresponding value in the Output
column. The “*” character shown after a value signifies any digits in the telephone
number remaining to be dialed. Norstar Voice Mail automatically adds the “*”
character after every Input and Output value.
Any given telephone number will either match a specific Input value or will not
match at all.
The following three tables are examples of Dialing Translation Tables and how they
function.
A sample Dialing Translation Table taken from a site located in metropolitan
Toronto, Ontario.
Sample Dialing Translation Table
INPUT
OUTPUT
Explanation
011*
011*
The Table will not attempt to translate international telephone
numbers.
416*
*
The Table removes the 416 area code and dials all calls as 7
digits.
905206*
90527*
etc.
(135 more
entries)
905206*
90527*
etc.
(135 more
entries)
These telephone exchanges can be dialed as local (no long
distance charges) 10 digit calls from the 416 area.
905*
1905*
All other 905 numbers not listed in the Input column above
are long distance numbers and must be dialed as 11 digit
long distance numbers.
*
1*
All numbers that do not begin with 011, 416 and 905 are
long distance, and will have a “1” added as a prefix.
FAX Set Up and Operation Guide
P0886629 Issue 1.0
Appendix B: Dialing Translation 59
A sample Dialing Translation Table taken from a site located in Mountainview,
California.
Sample Dialing Translation Table
INPUT
OUTPUT
Explanation
The Dialing Translation Table is empty. The local network in
Mountainview supports 10 digit national dialing with
recognized long distance charging.
In situations like the Mountainview example, there is no need
to build a Dialing Translation Table.
A sample Dialing Translation Table taken from a site in area code 206 near the
border with area code 360.
Sample Dialing Translation Table
INPUT
OUTPUT
Explanation
011*
011*
The Table will not attempt to translate international telephone
numbers.
20644*
206626*
etc.
(40 more
entries)
44*
626*
etc.
(40 more
entries)
Due to the site location, some calls can be dialed as local 7
digit numbers.
206*
1206*
All other 206 numbers require 11 digit long distance dialing.
360224*
360227*
360472*
360224*
360227*
360472*
These 360 numbers can be dialed as 10 digit local
numbers...
360*
1360*
... but all other 360 numbers are 11 digits long distance
numbers.
*
1*
All numbers that do not begin with 011, 206 and 360 are
long distance and will have a “1” added as a prefix.
Network Access
The Dialing Table Translation results in a number that can be dialed on the local
network. The final step is to add (prefix) digits to the beginning of the number to
reach the local network from your Norstar System. Systems that are behind a PBX
must have digits prefixed to the beginning of the telephone number. In North
America “9” is typically prefixed to the beginning of the telephone number.
Systems attached to the central office (CO) lines do not require digits to be prefixed.
P0886629 Issue 1.0
FAX Set Up and Operation Guide
60 Appendix B: Dialing Translation
Dialing Translation Parameters
The Dialing Translation process is controlled by four parameters. In order for the
Fax-on-demand two-call method to be functional, a value must be entered for the
long distance access code and the area code parameters. Also, the reply translation
parameter must be set to “Y” (yes) if you are using the Reply to Caller ID feature.
The Dialing Translation Parameters are explained below.
Long distance access code (Lg dst ac): This prefix will be removed from any
numbers if it is not needed to make the call. This in turn will make the creation of
the Dialing Translation Table much simpler. For North America, the long distance
access code should be set to “1”. The default for this parameter is: none. The field
for this parameter is a maximum of 2 digits.
Area code (Area cd): If a telephone number entered by a caller appears to be
missing an area code, this area code will be prefixed to the number. The area code
will be considered missing if the number is less than 10 digits. The default for this
parameter is: none. The field for this parameter is a maximum of 6 digits.
Access code (Access cd): This number is prefixed to all numbers, after Translation,
in order to access the local telephone network. The access code is required if
Norstar Voice Mail is installed behind a PBX or PABX. In North America, the
access code is usually “9”. If Norstar Voice Mail is attached directly to Central
Office (CO) lines, the Access Code should be set to “none”. The default for this
parameter is: none. The field for this parameter is a maximum of 2 digits.
Reply translation (Reply trans): When using the Reply to Caller ID feature, the
reply translation must be set to “Y”. The default for this parameter is: N.
Setting the Dialing Translation Parameters
When using the Fax-on-demand two-call method, you must set up the Dialing
Translation Parameters and Dialing Translation Table. Also, setting the Dialing
Translation Parameters makes the task of setting up a Dialing Translation Table less
complex.
To set the Dialing Translation Parameters:
1. Press
3. Press
AA
.
2. Enter the System Coordinator Mailbox number and
password and press OK.
Log:
QUIT RETRY
Admin
MBOX
ƒ·°‹
OTHR
Dialing
TABLE QUIT
FAX Set Up and Operation Guide
°°
.
4. Press PARM. If Centrex is installed on your Norstar
system, QUIT is replaced by NEXT.
P0886629 Issue 1.0
Appendix B: Dialing Translation 61
Lg dst ac: none
NEXT
5. Press CHNG.
Lg dst ac:
RETRY
6. Enter the long distance access code and press OK.
Lg dst ac: xx
CHNG
7. Press NEXT to continue. xx represents the long
distance access code.
Area code: none
NEXT
8. Press CHNG.
Area code:
RETRY
9. Enter the area code and press OK.
Area code: xxx
CHNG
10. Press NEXT to continue. xxx represents the area
code.
Access cd: none
NEXT
11. Press CHNG.
Access cd:
RETRY
12. Enter the access code and press OK.
Access cd:xx
CHNG
13. Press NEXT to continue. xx represents the access
code.
Reply trans:N
OK
14. Press CHNG to set the reply translation to Y (yes).
Reply trans:Y
CHNG
15. Press OK.
16. Press
P0886629 Issue 1.0
®
to end this programming session.
FAX Set Up and Operation Guide
62 Appendix B: Dialing Translation
Dialing Translation Table Administration
The System Coordinator is responsible for the creation and maintenance of the
Dialing Translation Table. When using the Fax-on-demand two-call method, you
must set up the Dialing Translation Table.
Setting up a Dialing Translation Table
To set up a Dialing Translation Table, you must enter an Input value and an Output
value for each entry. The Input value is the number that Norstar Voice Mail will
look up in the Dialing Translation Table. After the corresponding entry has been
matched, the Output value is substituted for the Input value. The resulting number
is ready to dial on the local network. Refer to the Dialing Translation Table
examples earlier in this chapter.
To set up a Dialing Translation Table:
1. Press
3. Press
AA
Dialing
PARM
Dial table
CHNG
.
2. Enter the System Coordinator Mailbox number and
password and press OK.
Log:
QUIT RETRY
Admin
MBOX
ƒ·°‹
OTHR
QUIT
°°
.
4. Press TABLE. If Centrex is installed on your Norstar
system, QUIT is replaced by NEXT.
5. Press ADD.
QUIT
In:
RETRY
6. Enter the Input value and press OK to accept the
Input value. The Input value can be a maximum of
14 digits.
Out:
RETRY
7. Enter the Output value and press OK to accept the
value. The Output value can be a maximum of 15
digits.
Dial table
CHNG
QUIT
8. You must repeat steps 5 through 7 to add each entry
to the Dialing Translation Table.
9. Press
FAX Set Up and Operation Guide
®
to end this programming session.
P0886629 Issue 1.0
Appendix B: Dialing Translation 63
Reviewing the entries in the Dialing Translation Table
You can review or check the entries in your Dialing Translation Table at anytime.
To review your Dialing Translation Table entries:
1. Press
3. Press
AA
OTHR
Dialing
PARM
QUIT
Dial table
ADD
QUIT
inval*
.
2. Enter the System Coordinator Mailbox number and
password and press OK.
Log:
QUIT RETRY
Admin
MBOX
ƒ·°‹
°°
.
4. Press TABLE. If Centrex is installed on your Norstar
system, QUIT is replaced by NEXT.
5. Press CHNG.
outval*
OTHR
6. Press NEXT to view the next entry in the Dialing
Translation Table.
Note: The display shows 16 characters. If the total
number of Input and Output values equals
more than 16 digits a VIEW> softkey will
appear on the left side of the display. After
you have pressed VIEW> to view the digits
furthest to the right, the softkey changes to
<VIEW. Press the <VIEW softkey to view the
digits on the left again. The inval*
outval* is an example of a Table entry.
The * character shown after a value
signifies any digits in the telephone number
remaining to be dialed. Norstar Voice Mail
automatically adds the * character after
every Input and Output value.
inval*
outval*
OTHR
7. Continue pressing NEXT to view all the entries in
the Dialing Translation Table.
8. Press
P0886629 Issue 1.0
®
to end this programming session.
FAX Set Up and Operation Guide
64 Appendix B: Dialing Translation
Finding an entry in the Dialing Translation Table
For convenience, the System Coordinator can locate a specific entry in the Dialing
Translation Table. The Input value must be entered in order to find the entry.
To find a specific entry in the Dialing Translation Table:
1. Press
3. Press
AA
Dialing
PARM
Dial table
ADD
.
2. Enter the System Coordinator Mailbox number and
password and press OK.
Log:
QUIT RETRY
Admin
MBOX
ƒ·°‹
OTHR
QUIT
°°
.
4. Press TABLE. If Centrex is installed on your Norstar
system, QUIT is replaced by NEXT.
5. Press CHNG.
QUIT
inval* outval*
NEXT
6. Press OTHR.
inval* outval* is an example of a Table entry.
inval* outval*
CHNG DEL
7. Press FIND.
In:
RETRY
8. Enter the Input value of the entry you wish to find
and press OK.
OK
inval* outval*
NEXT
9. Repeat steps 6 through 8 to find other entries in the
Dialing Translation Table.
Note: The inval* outval* is an example of a
Table entry. The * character shown after a
value signifies any digits in the telephone
number remaining to be dialed. Norstar Voice
Mail automatically adds the * character after
every Input and Output value.
10. Press
FAX Set Up and Operation Guide
®
to end this programming session.
P0886629 Issue 1.0
Appendix B: Dialing Translation 65
Changing an entry in the Dialing Translation Table
After a Dialing Translation Table has been built, you can change the Output value
of an entry at any time. To locate the entry that you wish to change, refer to
"Reviewing the entries in the Dialing Translation Table" on page 63 or "Finding an
entry in the Dialing Translation Table" on page 64.
Note: You cannot change the Input value of an entry. The entry must be deleted
and a new entry must be created with new Input and Output values. Refer to
"Deleting a Dialing Translation Table entry" on page 66.
To change an entry in the Dialing Translation Table:
1. Press
3. Press
AA
Dialing
PARM
Dial table
ADD
.
2. Enter the System Coordinator Mailbox number and
password and press OK.
Log:
QUIT RETRY
Admin
MBOX
ƒ·°‹
OTHR
QUIT
°°
.
4. Press TABLE. If Centrex is installed on your Norstar
system, QUIT is replaced by NEXT.
5. Press CHNG.
QUIT
inval* outval*
NEXT
6. Press OTHR. inval* outval* is an example of a
Table entry. The * character shown after a value
signifies any digits in the telephone number
remaining to be dialed. Norstar Voice Mail
automatically adds the * character after every Input
and Output value.
inval*
7. Press CHNG.
outval*
DEL FIND
Out:
RETRY
8. Enter the new Output value and press OK.
inval* outval*
NEXT OTHR
9. Repeat steps 6 through 8 to change any other entries
in the Dialing Translation Table.
10. Press
P0886629 Issue 1.0
®
to end this programming session.
FAX Set Up and Operation Guide
66 Appendix B: Dialing Translation
Deleting a Dialing Translation Table entry
The System Coordinator can delete an entry in the Dialing Translation Table at any
time. To locate the entry that you wish to delete, refer to "Reviewing the entries in
the Dialing Translation Table" on page 63 or "Finding an entry in the Dialing
Translation Table" on page 64.
To delete an entry in the Dialing Translation Table:
1. Press
3. Press
AA
Dialing
PARM
OTHR
QUIT
Dial table
ADD
.
2. Enter the System Coordinator Mailbox number and
password and press OK.
Log:
QUIT RETRY
Admin
MBOX
ƒ·°‹
°°
.
4. Press TABLE. If Centrex is installed on your Norstar
system, QUIT is replaced by NEXT.
5. Press CHNG.
QUIT
inval* outval*
NEXT
6. Press OTHR. The inval* outval* is an example
of a Table entry. The * character shown after a
value signifies any digits in the telephone number
remaining to be dialed. Norstar Voice Mail
automatically adds the * character after every Input
and Output value
inval*
CHNG
7. Press DEL.
outval*
FIND
Deleted
8. This transient display shows Deleted and then the
display changes to show the next entry in the table:
inval2* outval2*
NEXT
9. Repeat steps 6 through 8 for every entry you want to
delete.
The inval2* outval2* is an example of the next
Dialing Translation Table entry.
10. Press
FAX Set Up and Operation Guide
®
to end this programming session.
P0886629 Issue 1.0
Appendix B: Dialing Translation 67
Technician Created Dialing Translation Table
In some instances the Dialing Translation Table can be very large and essentially
the same for all Norstar Voice Mail systems in the same calling area. A Dialing
Translation Table can be easily created using a basic text editor program on your
PC. After the ASCII file has been created and saved to a floppy disk, the technician
can then load it onto the Norstar Voice Mail system. The disk can then be kept and
used to install the Dialing Translation Table on other Norstar Voice Mail systems
in the same calling area.
Creating the Dialing Translation Table file
The Technician Created Dialing Translation Table must conform to the following
rules:
1. Only one Dialing Translation Table entry per line. A Dialing Translation
Table entry consists of one Input value and one Output value.
2. No blank lines in the Dialing Translation Table.
3. The Input value is entered first, followed by the Output value. The Input value
must be separated from the Output value by one or more spaces. A tab can be
used in place of a space.
4. A null Input value must be represented by a single hyphen ( - ) .
5. A null Output value must be represented by a single hyphen ( - ) .
6. An Output value of a restricted DN must be represented by a ( # ) .
7. No extra characters can be added to either the Input or the Output value. In
particular, no * should be added after the Input or Output value. After the
Dialing Translation Table has been loaded on the system, the * is added
automatically after each Input and Output value.
8. Each Input entry must be in ascending numerical order, but longer strings
must appear before shorter more generic sub-strings. All null Input values
( - ) must appear at the end of the Dialing Translation Table. Refer to the table
"Sample Dialing Translation Table" on page 58 for examples of how to set up
the Dialing Translation Table.
9. The Dialing Translation Table must be saved as: dial.20.
Note: The above rules must be followed to ensure the Dialing Translation Table
will function properly.
P0886629 Issue 1.0
FAX Set Up and Operation Guide
68 Appendix B: Dialing Translation
An example of a Dialing Translation Table created using a basic text editor.
Technician Created Dialing Translation Table
INPUT
OUTPUT
Explanation
011
011
First entry in the Dialing Translation Table.
416
-
The Input value is 416 and the Output value is null.
905206
905206
90527
90527
These specific 905 telephone exchanges appear before the more
generic 905 entry.
905
1905
The generic 905 sub-string must appear after the longer more
specific 905 strings.
9011
#
9011 is a restricted DN.
-
1
The Input value is null and the Output value is 1.
Installing the Dialing Translation Table onto the Norstar Voice Mail System
There are four distinct steps for installing the Dialing Translation Table file onto the
Norstar Voice Mail system.
•
Create a DOS system disk.
•
Create an Autoexec.bat file.
•
Load the Dialing Translation Table file (dial.20) and the Autoexec.bat file onto
the DOS system disk.
•
Load the Dialing Translation Table file onto the Norstar Voice Mail system.
Creating a DOS system disk
A DOS system disk is a floppy disk that has system files copied onto it. This type
of disk is required to automatically load the dialing translation table file onto the
Norstar Voice Mail system.
To create a DOS system disk:
1. Insert a blank 3.5" disk into the floppy disk drive of a DOS compatible
computer.
2. Ensure the DOS prompt is on the computer screen.
3. Type Format a: /s and follow the instructions shown on the screen.
Note: The default name for the floppy disk drive is a:. However, on
computers with two disk drives, the 3.5" drive may be named b:. If the
drive is named b:, replace a: with b: in the above command. If you are
unsure of the name of the 3.5" floppy disk drive, check the user
manuals for your computer.
FAX Set Up and Operation Guide
P0886629 Issue 1.0
Appendix B: Dialing Translation 69
Creating an Autoexec.bat file
The Autoexec.bat file is a file that contains commands a computer automatically
executes when it starts up. In the following steps you are creating a Autoexec.bat
file that automatically loads the Dialing Translation Table file into the proper
location on the Norstar Voice Mail system.
To create the Autoexec.bat file:
1. Open the text editor program you used to create the Dialing Translation Table
file.
2. Create a new document.
3. Type copy a:\dial.20 c:\st\dial.20
Note: This is the only text that should appear in the file.
4. Save the file as autoexec.bat
Note: The file must be named exactly as shown above. Do not save this file into
the root directory (C:\) of your computer or you will destroy the existing
Autoexec.bat file.
Loading the files onto the DOS system disk
To load the files onto the DOS system disk:
1. Insert the DOS system disk that you created earlier into the floppy disk drive
of your computer.
2. Use the Change Directory command (CD) to move to the directory where the
Dialing Translation Table file is stored.
3. Type copy dial.20 a:\dial.20 to load the Dialing Translation
Table file onto the DOS system disk.
4. Use the Change Directory command (CD) to move to the directory where the
Autoexec.bat file you created is stored.
5. Type copy autoexec.bat a:\autoexec.bat to load the
autoexec.bat file onto the DOS system disk.
P0886629 Issue 1.0
FAX Set Up and Operation Guide
70 Appendix B: Dialing Translation
Loading the Dialing Translation Table file onto the Norstar Voice Mail system
To load the Dialing Translation Table file onto the Norstar Voice Mail system you
must shut down Norstar Voice Mail and then reboot the system using the DOS
system disk you created. A Norstar two-line telephone is required to perform the
following steps.
To load the Dialing Translation Table file:
1. Press
Password
RETRY
ƒ · ⁄ fi
¤¤¤‹‡‡¤
.
2. Enter the default password
(ACCESS2) and press OK.
ACCESS Server
BACK
ADMIN
3. Press NEXT.
System shutdwn
BACK NEXT
4. Press SHOW.
Shutdown type
QUIT NEXT
5. Press GRACE.
Shutdown Graceful
NO
6. Press YES.
Note: The Norstar Voice Mail system issues a
series of tones in descending pitch when the
shutdown is complete. Wait for the tones
before you unplug the NAM.
7. Unplug the AC power to the NAM.
8. Open the front cover of the NAM to access the
floppy disk drive.
9. Insert the DOS system disk you copied the Dialing
Translation Table file onto.
10. Plug in the NAM.
11. Wait until the light on the floppy disk drive goes out
and then unplug the NAM and remove the DOS
system disk.
12. Close the front cover of the NAM.
FAX Set Up and Operation Guide
P0886629 Issue 1.0
Appendix B: Dialing Translation 71
13. Plug in the NAM and wait until the self-diagnostics
are completed. This will take approximately 12
minutes.
14. After Norstar Voice Mail has been rebooted, verify
the Dialing Translation Table has been loaded by
printing the Dialing Translation Report.
For information about printing reports, refer to the Norstar Voice Mail Set Up and
Operation Guide.
P0886629 Issue 1.0
FAX Set Up and Operation Guide
Appendix C: Technical content of a loadable
.PCX file
Introduction
Norstar Voice Mail FAX supports Paintbrush for Windows 95 .PCX files (black &
white only). If you are using another application, ensure that the file format is
compatible with the information shown in the following table. The following table
shows the required content of the .PCX file header.
Required content of the .PCX file header
Offset
Length
Description
0
1
.PCX identification. Must be 0x0A.
1
1
Version information. A value of 2 is suggested, but anything higher is
acceptable.
2
1
Encoding method. Must be 1.
3
1
Bits per pixels. Must be 1.
4
2
X position of upper left corner. Usually 0.
6
2
Y position of upper left corner. Usually 0.
8
2
X position of the bottom right corner. 1728 is the maximum. The
difference between this field and the upper left corner X position is the
width of the bitmap. The number must be a multiple of 8.
10
2
Y position of the bottom right corner. 2200 is the recommended
maximum.
12
2
Ignored in fax transmission mode.
14
2
Ignored in fax transmission mode.
16
48
Ignored in fax transmission mode
(palette Information).
64
1
Reserved. Must be 0.
65
1
Number of color planes. Must be1 in fax transmission mode.
66
2
Horizontal line width in bytes, equal to: (Xright - Xleft)÷8
68
60
Reserved. Must be 0.
Note: For more information about the file header and your software application,
contact your PC software retailer.
P0886629 Issue 1.0
FAX Set Up and Operation Guide
Glossary
Administration
The tasks involved in setting up and maintaining the Norstar Voice Mail Mailboxes,
greetings, Custom Call Routing (CCR), and set up configuration.
Analog Terminal Adapter (ATA)
A Norstar product that allows for the connection of an analog device, such as a
single-line telephone or a facsimile machine, to a Norstar KSU.
Automated Attendant
The Norstar Voice Mail answering service that answers incoming calls with a
Company Greeting, plays a list of Norstar Voice Mail options to a caller, and
performs call routing functions in response to a caller's selections.
Call Method
The call method is a parameter defined for a Fax-on-demand Mailbox. This
parameter determines how a Fax message is sent to the caller. There are two call
methods: one-call and two-call. In the one-call method, the Fax message is sent to
the caller in the original call. In the two-call method, the Fax message is sent in a
second call that Norstar Voice Mail makes to a number specified by the caller.
Call Path
The route an incoming call takes along a CCR Tree. Each Call Path provides the
caller with options and access to Points.
Central Office
The telephone company facility where customer telephone lines are joined to
switching equipment for connecting local and long distance calls.
Class of Service
A predetermined number designation that specifies the Norstar Voice Mail options
for a mailbox.
Company Directory
An internal voice list that contains the names of users with initialized mailboxes
who have been designated to appear in the directory.
Configuration
The tasks involved in setting up the different parameters of Norstar Voice Mail. For
example, configuring the telephone lines answered by Norstar Voice Mail. Also,
see Administration.
P0886629 Issue 1.0
FAX Set Up and Operation Guide
76 Glossary
Conventions
The way certain information has been described. For example, using underlined text
to represent second-line display prompt information.
Custom Call Routing (CCR) Tree
Call Paths that allow users to select options to direct their own calls.
Default
The parameters that are preset within the Norstar Voice Mail module.
Destination
In CCR, a destination is where a call is transferred from an Information Message
Point, a Leave Message Point, or a Fax Point. There are three Destination Types:
Home Menu, Previous Menu and disconnecting the caller.
Dialing Translation
A Norstar Voice Mail feature that converts the digits to be dialed into acceptable
call routing information. Dialing Translation is required to use the two call method
with Fax-on-demand mailboxes.
Digital Fax Card (DFC)
The DFC is an expansion card that provides Fax capability to Norstar Voice Mail.
Digital Voice Card (DVC)
The DVC is an expansion card that converts speech into a form that can be stored
on and retrieved from the hard disk. The DVC also connects the Norstar KSU to
Norstar Voice Mail.
Display
A one or two-line screen on a Norstar telephone that shows Norstar Voice Mail
commands and options.
Display buttons
The three buttons that appear below a Norstar two-line display. When pressed, these
buttons select the specified Norstar Voice Mail option.
Display options
The choices available to a user that appear on the Norstar two-line display. Options
appearing on the display can be selected using the display or dialpad buttons.
Extensions
A two to seven-digit number that is used to reach a designated telephone on a
Norstar system.
Fax Mail
Fax Mail allows a caller to leave a Fax message in a Personal Mailbox. The Fax
messages can later be retrieved by the owner of the mailbox and printed on a fax
machine.
FAX Set Up and Operation Guide
P0886629 Issue 1.0
Glossary 77
Fax-on-demand Mailbox
A Fax-on-demand Mailbox is a Norstar Voice Mail mailbox that allows a caller to
retrieve Fax messages you have stored in Norstar Voice Mail.
Fax Overflow Mailbox
The Fax Overflow Mailbox is a Norstar Voice Mail mailbox for your fax machine.
If the fax machine cannot answer an incoming fax call, Norstar Voice Mail answers
the call and stores the Fax messages in the Fax Overflow Mailbox. Later, when the
fax machine is ready to print, Norstar Voice Mail will send the stored Fax messages
to the fax machine.
Fax Point
A point along a CCR Tree call Path where the caller can retrieve a Fax message
from a Fax-on-demand Mailbox.
Fax telephone
A fax machine that can also be used to make standard telephone calls.
Feature Code
A unique three-digit code that is used to access Norstar Voice Mail Features and
options.
General Delivery Mailbox
One of the two Special Mailboxes used to collect messages for individuals in a
company who have not been assigned Personal Mailboxes. The other Special
Mailbox is the System Coordinator Mailbox.
Greetings
Fax-on-demand Mailbox Greetings can be recorded in the Primary and Alternate
Languages. These greetings provide a list or description of faxes available from the
Fax-on-demand Mailbox.
Home Point
The Home Point is the first point a caller goes to on a CCR Tree.
Home Fax Point
In CCR, a Home Fax Point is a Home Point where the caller can retrieve Fax
messages from a Fax-on-demand Mailbox.
Initialize mailbox
Preparing a mailbox to receive messages, which includes changing a mailbox
default password and recording a Company Directory name.
Initializing Norstar Voice Mail
Preparing the Norstar Voice Mail settings during system installation. Settings
include mailbox number length, language preference, and intercom number length.
P0886629 Issue 1.0
FAX Set Up and Operation Guide
78 Glossary
Intercom number length
The number of digits in a Norstar extension and a Norstar Voice Mail Mailbox
number. The intercom number length ranges from two to seven digits.
Language
Norstar Voice Mail software is available in either English and French or English
and Spanish. When the Primary Language is English, the Alternate Language is
either French or Spanish.
Mailbox
A storage place for messages on the Norstar Voice Mail system.
Mailbox number length
The number of digits allowed in a mailbox number. The mailbox number length
ranges from two to seven digits.
Mailbox Overrides
The two Mailbox Overrides are optional parameters in addition to the Class of
Service values. The Mailbox Overrides are: Include in Company Directory and
Message Waiting Notification.
Non voice-introduced Fax message
A Fax message without an introductory message that is left in a mailbox.
Norstar Voice Mail FAX Programming Record
The Norstar document where selected FAX programming options are written down.
Off-premise Message Notification
A Norstar Voice Mail feature you can program to call you at any telephone number,
extension, or pager to let you know that there is a voice or Fax message for you.
Option
A Norstar Voice Mail choice that is given to a user through voice or display
prompts.
PBX
A PBX (Private Branch eXchange) is the electronic equipment which controls the
operation of a telephone system and provides many call control features.
Password
A four to eight digit number that is entered using the dialpad. A password is used
to open mailboxes or perform configuration tasks.
Path number
An identification number assigned to a Path on each CCR Tree. The number
represents the sequence of digits that callers enter to route themselves along the call
path.
FAX Set Up and Operation Guide
P0886629 Issue 1.0
Glossary 79
Point
An option along the call Path of a CCR Tree. A Point can be the Home Menu, a
Menu, an Information Message, Personal Mailbox, a Fax-on-demand Mailbox or an
extension.
Registering mailboxes
A System Coordinator task for the addition of mailboxes to Norstar Voice Mail
using the Administration Feature Code.
Reports
The Norstar Voice Mail Reports are used to view information such as Norstar Voice
Mail programming, amount of available message storage time and CCR
programming and administration.
Resetting passwords
A System Coordinator task that changes a mailbox password from its current setting
back to the Norstar Voice Mail default setting 0000 (four zeros).
Special Mailboxes
The two mailboxes used by the System Coordinator and designated Norstar Voice
Mail Operator. The two Special Mailboxes are: System Coordinator and General
Delivery.
System Coordinator
The person responsible for configuring, updating, and maintaining the Norstar
Voice Mail module.
System Coordinator Mailbox
One of the two Special Mailboxes. This mailbox is used by the System Coordinator
for sending Broadcast Messages and is also the System Coordinator’s Personal
Mailbox. The other Special Mailbox is the General Delivery Mailbox.
Tone dial telephone
A push button telephone that emits DTMF tones.
Voice introduced Fax message
A Fax message that is left in a mailbox with an introductory message.
Voice prompts
The prerecorded voice instructions that are played when accessing the different
Norstar Voice Mail Features and options. Voice prompts also enable a caller to
proceed along the call Path of a CCR Tree.
P0886629 Issue 1.0
FAX Set Up and Operation Guide
Index 81
Index
A
Answering, Fax 12
B
E
Error Messages 44
Extension, Fax Answering 12
Buttons, telephone 2
F
C
error messages 44
Fax Answering extension 12
Fax Point 38
FAX System Station Identification name 13
Fax-on-demand mailbox 26, 28
Set up tasks 11, 25
System parameters 12
System retry interval 13
System set up 11, 25
troubleshooting 41
who can use 5
with CCR 9, 36
Fax Broadcast 8, 22
Fax document, adding to Fax-on-demand
Mailbox 31
Fax Group List
adding 20
adding members 21
recording a name 20
Sending a Group Fax Message 22
Fax Lines 6
Fax Mail
about 6
message notification 6
Fax Message
Sending to group 8, 22
Fax Overflow
about 8
adding a 16
Deleting a Mailbox 19, 40
Fax Point 36
adding 38
changing 39
FAX prerequisites 2
Fax System Group List
Sending a Group Fax Message 8
Fax-on-demand
about 7
adding a 26
adding fax documents 31
assigning a document from disk 32
Call methods 29
call methods 7
Call methods 7
Fax-on-demand 29
CCR
adding a Fax Point 38
changing a Fax Point 39
Home Fax Point 37
setting up a Fax Point 36
with FAX 9
Channels
disabling 45
re-enabling 46
Conventions
display button 2
display line text 2
guide 2
telephone buttons 2
D
Dialing 62
Dialing Translation 57
Access code 60
Area code 60
Building a table 62
Long distance access code 60
Network DNs 58
Overview 57
parameters 60
Reply translation 60
sample table 59
table administration 62
table sample 58
Telephone numbers 58
Dialing Translation Table
Changing an entry 65
Checking the entries 63
Deleting an entry 66
Finding a Table entry 64
Installing onto the system 68
Network Access 59
Reviewing the entries 63
Disk, assigning documents 32
Display 2
P0886629 Issue 1.0
FAX
FAX Set Up and Operation Guide
82 Index
changing fax documents 34
deleting fax documents 34
Maximum number of documents 29
Parameters 28
recording a greeting 34
selection numbers 34
with CCR 36
File header, required content of 73
T
G
V
Greeting, Fax-on-demand 34
Group List
adding a Fax List 20
adding fax members 21
recording a name 20
Guide organization 1
Technician Created Dialing Translation Table
Creating a DOS system disk 68
Creating an Autoexec.bat file 69
Loading files 69
Telephone number Translation 58
Troubleshooting, 45
Troubleshooting FAX 41
Voice Channels
Re-enabling 46
H
Home Fax point 37
I
Interval, retry 13
M
Mailbox
adding Fax Overflow 16
adding Fax-on-demand 26
Fax-on-demand greeting 34
Message Notification 6
N
Network Access 59
Network DNs 58
Norstar Voice Mail reports 9
O
Organization, guide 1
Overflow, Fax 16
P
Point
adding Fax 38
changing Fax 39
home fax 37
Prerequisites, Fax 2
R
Retry interval 13
S
Setting System parameters 12
Setting the Dialing Translation Parameters 60
Symbols 2
System parameters 12
System Station name 13
FAX Set Up and Operation Guide
P0886629 Issue 1.0
83
Tell us what you think...
This is your document. Nortel wants it to work well for you.
Please take a few minutes to answer the questions on the other side of this page. Fax it
back to us at the number provided, or mail it to the address below.
Your comments will be used to make improvements.
Thank you. We appreciate your time and consideration.
Nortel Product Training and Documentation
Return mail address:
Documentation User Comments Survey
Nortel Product Training and Documentation
P.O. Box 833858
M/S H300
Richardson, TX 75083-3858
USA
FAX Set Up and Operation Guide
P0886629 Issue 1.0
84
Fax to:
Documentation User Comments Survey
Nortel Product Training and Documentation
1-972-684-8699
Please circle the most appropriate number on the scale for each question.
1.
Overall, are you satisfied with this document?
Yes
2.
3
2
1
No
7
6
5
4
3
2
1
No
7
6
5
4
3
2
1
No
7
6
5
4
3
2
1
No
Is the information in this document complete for its purpose?
Yes
6.
4
Is this document clearly written?
Yes
5.
5
Have you found the information in this document to be technically accurate?
Yes
4.
6
Is it easy to find information in this document?
Yes
3.
7
7
6
5
4
3
2
1
No
3
2
1
No
Does this document help you do your job?
Yes
7
6
5
4
Comments:
Optional:
Your name
___________________________________
Fax
___________________________________
Company
___________________________________
FAX Set Up and Operation Guide
P0886629 Issue 1.0