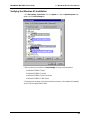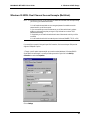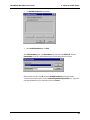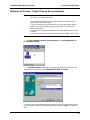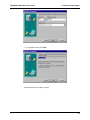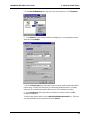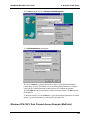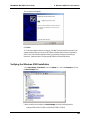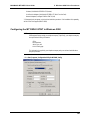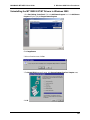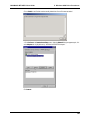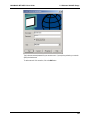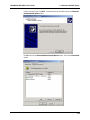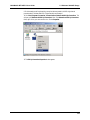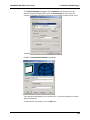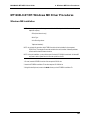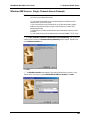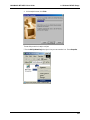
1
MultiMobile ZLX MT128ZLX-ST/NT ISDN PC-Card Modem User Guide MultiMobile MT128ZLX PC Card Modem User Guide P/N S0000154, Revision A Copyright © 2001 by Multi-Tech Systems, Inc. All rights reserved. This publication may not be reproduced, in whole or in part, without prior expressed written permission from Multi-Tech Systems, Inc. Multi-Tech Systems, Inc. makes no representation or warranties with respect to the contents hereof and specifically disclaims any implied warranties of merchantability or fitness for any particular purpose. Furthermore, Multi-Tech Systems, Inc. reserves the right to revise this publication and to make changes from time to time in the content hereof without obligation of Multi-Tech Systems, Inc., to notify any person or organization of such revisions or changes. Revision Date A 2/24/01 Description Supersedes Owner’s Manual P/N 82068901 Multi-Tech, MultiMobile and the Multi-Tech logo are trademarks of Multi-Tech Systems, Inc. Windows is a registered trademarks of Microsoft in the U.S. and other countries. Other trademarks and trade names mentioned in this publication belong to their respective owners. Multi-Tech Systems, Inc. 2205 Woodale Drive Mounds View, Minnesota 55112 (763) 785-3500 or (800) 328-9717 Fax (763) 785-9874 Technical Support (800) 972-2439 Internet Address: http://www.multitech.com Software User License Agreement The MultiMobile software is licensed by Multi-Tech Systems, Inc., to the original end-user purchaser of the product, hereafter referred to as “Licensee.” The License includes the distribution disc, other accompanying programs, and the documentation. The MultiMobile software, hereafter referred to as “Software,” consists of the computer program files included on the original distribution disc. Licensee agrees that by purchase and/or use of the Software, he hereby accepts and agrees to the terms of this License Agreement. In consideration of mutual covenants contained herein, and other good and valuable considerations, the receipt and sufficiency of which is acknowledged, Multi-Tech Systems, Inc. does hereby grant to the Licensee a nontransferable and non-exclusive license to use the Software and accompanying documentation on the following conditions and terms: The software is furnished to the Licensee for execution and use on a single computer system only and may be copied (with the inclusion of the Multi-Tech Systems, Inc. copyright notice) only for use on that computer system. The Licensee hereby agrees not to provide or otherwise make available any portion of this software in any form to any third party without the prior express written approval of Multi-Tech Systems, Inc. Licensee is hereby informed that this Software contains confidential proprietary and valuable trade secrets developed by or licensed to Multi-Tech Systems, Inc. and agrees that sole ownership shall remain with MultiTech Systems, Inc. The Software is copyrighted. Except as provided herein, the Software and documentation supplied under this agreement may not be copied, reproduced, published, licensed, sub-licensed, distributed, transferred, or made available in any form, in whole or in part, to others, without expressed written permission of Multi-Tech Systems, Inc. Copies of the Software may be made to replace worn or deteriorated copies for archival or backup procedures. Licensee agrees to implement sufficient security measures to protect Multi-Tech Systems, Inc. proprietary interests and not to allow the use, copying or transfer by any means, other than in accordance with this agreement. Licensee agrees that any breach of this agreement will be damaging to Multi-Tech Systems, Inc. Licensee agrees that all warranties, implied or otherwise, with regard to this Software, including all warranties of merchantability and fitness for any particular purpose are expressly waived, and no liability shall extend to any damages, including consequential damages, whether known to Multi-Tech Systems, Inc. It is hereby expressly agreed that Licensee’s remedy is limited to replacement or refund of the license fee, at the option of Multi-Tech Systems, Inc., for defective distribution media. There is no warranty for misused materials. This package contains a compact disc. Neither this software nor the accompanying documentation may be modified or translated without the written permission of Multi-Tech Systems, Inc. This agreement shall be governed by the laws of the State of Minnesota. The terms and conditions of this agreement shall prevail regardless of the terms of any other submitted by the Licensee. This agreement supersedes any proposal or prior agreement. Licensee further agrees that this License Agreement is the complete and exclusive statement of Agreement, oral, written, or any other communications between MultiTech Systems, Inc. and Licensee relating to the subject matter of this agreement. This agreement is not assignable without written permission of an authorized agent of Multi-Tech Systems, Inc. iii Contents 1 Introduction ...................................................................1 Product Description........................................................................................................................................... 2 About This Manual ............................................................................................................................................ 2 MT128ZLX-ST/NT & Computer Operating Systems................................................................................ 2 MT128ZLX-ST/NT & Application Program Interfaces ............................................................................ 3 Safety Warnings ................................................................................................................................................. 3 Technical Specifications .................................................................................................................................... 4 Features.............................................................................................................................................................. 5 2 Installation & Use in Windows 95 ................................6 MT128ZLX-ST/NT: Windows 95 Driver Procedures........................................................................................ 7 Windows 95 Installation ........................................................................................................................... 7 Verifying the Windows 95 Installation ................................................................................................... 18 Configuring the MT128ZLX in Windows 95........................................................................................... 19 Uninstalling MT128ZLX-ST/NT Drivers in Windows 95 ....................................................................... 20 MT128ZLX: Using APIs in Windows 95......................................................................................................... 23 About APIs............................................................................................................................................... 23 The NDIS API .................................................................................................................................. 23 The VCOMM API............................................................................................................................. 23 The CAPI API .................................................................................................................................. 24 Intro to API Single-Channel and MultiLink Examples........................................................................... 24 Windows 95 NDIS : Single Channel Access Example ............................................................................. 25 Windows 95 NDIS: Dual Channel Access Example (MultiLink)............................................................ 29 Windows 95 Vcomm: Single Channel Access Example......................................................................... 31 Windows 95 Vcomm: Dual Channel Access Example (MultiLink) ....................................................... 34 Windows 95 CAPI: Single Channel Access Example.............................................................................. 39 Windows 95 CAPI: Dual Channel Access Example (MultiLink) ............................................................ 43 3 Installation & Use in Windows 98 ..............................48 MT128ZLX-ST/NT: Windows 98 Driver Procedures...................................................................................... 49 Windows 98 Installation ......................................................................................................................... 49 Verifying the Windows 98 Installation ................................................................................................... 58 Configuring the MT128ZLX-ST/NT in Windows 98............................................................................... 59 Uninstalling MT128ZLX-ST/NT Drivers in Windows 98 ....................................................................... 61 MT128ZLX: Using APIs in Windows 98......................................................................................................... 64 About APIs............................................................................................................................................... 64 The NDIS API .................................................................................................................................. 64 The VCOMM API............................................................................................................................. 64 The CAPI API .................................................................................................................................. 65 Intro to API Single-Channel and MultiLink Examples........................................................................... 65 Windows 98 NDIS : Single Channel Access Example ............................................................................. 66 Windows 98 NDIS: Dual Channel Access Example (MultiLink)............................................................ 70 Windows 98 VCOMM: Single Channel Access Example........................................................................ 72 Windows 98 Vcomm: Dual Channel Access Example (MultiLink) ....................................................... 76 Windows 98 CAPI: Single Channel Access Example.............................................................................. 81 Windows 98 CAPI: Dual Channel Access Example (MultiLink) ............................................................ 85 iv 4 Installation & Use in Windows NT..............................90 MT128ZLX-ST/NT: Windows NT4 Driver Procedures................................................................................... 91 Windows NT4 Installation ...................................................................................................................... 91 Verifying the Windows NT4 Installation.............................................................................................. 102 Configuring the MT128ZLX in Windows NT4...................................................................................... 104 Uninstalling the MT128ZLX-ST/NT Drivers in Windows NT4............................................................ 106 MT128ZLX: Using APIs in Windows NT...................................................................................................... 110 About APIs............................................................................................................................................. 110 The NDIS API ................................................................................................................................ 110 The CAPI API ................................................................................................................................ 111 Intro to API Single-Channel and MultiLink Examples......................................................................... 111 Windows NT4 NDIS: Single Channel Access Example ........................................................................ 112 Windows NT4 NDIS: Dual Channel Access Example (MultiLink)...................................................... 117 Windows NT4 VCOMM: Single Channel Access (not supported) ........................................................... 120 Windows NT4 VCOMM: Dual Channel Access (not supported).............................................................. 120 Windows NT4 CAPI: Single Channel Access Example ........................................................................ 121 Windows NT4 CAPI: Dual Channel Access Example (MultiLink)....................................................... 127 5 Installation & Use in Windows 2000 ........................137 MT128ZLX-ST/NT: Windows 2000 Driver Procedures ................................................................................ 138 Windows 2000 Installation.................................................................................................................... 138 Verifying the Windows 2000 Installation ............................................................................................. 144 Configuring the MT128ZLX-ST/NT in Windows 2000......................................................................... 145 Uninstalling the MT128ZLX-ST/NT Drivers in Windows 2000 ........................................................... 147 MT128ZLX: Using APIs in Windows 2000 ................................................................................................... 151 About APIs............................................................................................................................................. 151 The NDIS API ................................................................................................................................ 151 The VCOMM API........................................................................................................................... 151 The CAPI API ................................................................................................................................ 152 Intro to API Single-Channel and MultiLink Examples......................................................................... 152 Windows 2000 NDIS: Single Channel Access Example ....................................................................... 153 Windows 2000 NDIS: Dual Channel Access Example (MultiLink) ..................................................... 159 Windows 2000 Vcomm: Single Channel Access Example ................................................................... 162 Windows 2000 Vcomm: Dual Channel Access Example (MultiLink).................................................. 167 Windows 2000 CAPI: Single Channel Access Example........................................................................ 168 Windows 2000 CAPI: Dual Channel Access Example (MultiLink) ...................................................... 174 6 Installation & Use in Windows ME ...........................181 MT128ZLX-ST/NT: Windows ME Driver Procedures .................................................................................. 182 Windows ME Installation...................................................................................................................... 182 Verifying the Windows ME Installation ............................................................................................... 193 Configuring the MT128ZLX-ST/NT in Windows ME........................................................................... 194 Uninstalling the MT128ZLX-ST/NT Drivers in Windows ME ............................................................. 195 MT128ZLX: Using APIs in Windows ME ..................................................................................................... 198 About APIs............................................................................................................................................. 198 The NDIS API ................................................................................................................................ 198 The VCOMM API........................................................................................................................... 198 The CAPI API ................................................................................................................................ 199 Intro to API Single-Channel and MultiLink Examples......................................................................... 199 Windows ME NDIS: Single Channel Access Example ......................................................................... 200 Windows ME NDIS: Dual Channel Access Example (MultiLink) ....................................................... 204 v Windows ME Vcomm: Single Channel Access Example ..................................................................... 206 Windows ME Vcomm: Dual Channel Access Example (MultiLink).................................................... 209 Windows ME CAPI: Single Channel Access Example.......................................................................... 212 Windows ME CAPI: Dual Channel Access Example (MultiLink) ........................................................ 217 7 Warranty, Service, & Tech Support..........................221 Limited Warranty .......................................................................................................................................... 222 Upgrades and Tech Support .......................................................................................................................... 222 Service ............................................................................................................................................................ 222 Appendix A .....................................................................223 Regulatory Agency Information ....................................223 FCC Regulatory Statements ........................................................................................................................... 224 Consumer Instructions ......................................................................................................................... 224 Product/Manufacturer Description ...................................................................................................... 225 FCC Part 15 Statement........................................................................................................................... 225 Canadian Limitations Notice......................................................................................................................... 225 EMC, Safety, and Terminal Directive Compliance........................................................................................ 226 Appendix B: Technical Specifications.........................227 Appendix C: Troubleshooting ......................................230 Problem/Cause/Solution Dialogue ................................................................................................................ 231 COM Port and IRQ Conflicts - General.......................................................................................................... 234 COM Port and IRQ Conflicts - Windows 95 .................................................................................................. 234 Appendix D: Using AT Commands ..............................235 Appendix E: ISDN Primer.............................................240 Introduction to ISDN..................................................................................................................................... 241 BRI ISDN........................................................................................................................................................ 241 PRI ISDN ........................................................................................................................................................ 241 Digital End-to-End......................................................................................................................................... 242 ISDN Configuration ....................................................................................................................................... 242 ISDN Terminal Adapters – Internal or External........................................................................................... 243 Interfaces for ISDN Devices: “U” or “S/T” ................................................................................................... 243 The Telco/Subscriber Responsibility Boundary ........................................................................................... 243 ISDN Wiring: Standards & Pitfalls ................................................................................................................ 244 ISDN Lines and Multitple Devices................................................................................................................. 244 ISDN Connections.......................................................................................................................................... 244 Appendix F: Glossary of ISDN-Related Terms .............245 vi Appendix G: Phone Jack Pin Assignments.................249 RJ45 pin-outs of U-Interface......................................................................................................... 250 RJ45 Pinouts of S/T Interface........................................................................................................ 250 vii 1 Introduction MultiMobile MT128ZLX User Guide 1 Introduction Product Description The MT128ZLX-ST/NT is a credit-card-size ISDN terminal adapter. It is plug-and-play compatible. The MT128ZLX-ST/NT is a Type II PCMCIA (PC-card) device with a thickness of 5 mm. It complies with the PCMCIA Standard Release 2.1 and JEIDA 4.2. The MT128ZLX-ST works with the “S/T” ISDN interface. The MT128ZLX-NT works with the “U” ISDN interface. Otherwise the MT128ZLX-ST and the MT128ZLXNT are functionally equivalent. The MT128ZLX is compatible with common ISDN telephony switch types, including NI-1, AT&T 5-ESS, Nortel DMS-100, ETSI, and Japan INS-64. It uses Basic-Rate-Interface (ISDN-BRI) service and operates at data speeds up to 128Kbps. The MT128ZLX supports most common communications protocols (including V.110, V.120, PPP, MLP, MLP+BOD, and HDLC Transparent). The MT128ZLX supports common Application Program Interfaces like NDIS, CAPI 2.0, and VCOMM (for Windows 95/98/2000/ME but not for Windows NT). About This Manual This User Guide explains how to install, configure, and operate your MT128ZLX-ST or MT128ZLX-NT terminal adapter in each of five operating systems. MT128ZLX-ST/NT & Computer Operating Systems Procedures for installing, verifying, configuring, and un-installing the MT128ZLX are quite different for each operating system. The use of Application Program Interfaces also differs significantly from one operating system to another. For this reason, this manual contains a separate chapter for each operating system. The operating systems are: Windows 95 Windows 2000 Windows 98 Windows ME (Millenium Edition) Windows NT Before you can install the MT128ZLX in your computer under any operating system, you will need to obtain information from your telephone company about your ISDN service. The information needed is that which is specific to the way ISDN is implemented with the specific telephony equipment that your telephone company uses in addition to specific information about your own individual ISDN account. You will need: SPIDs (North America only) Switch Type Voice Encoding scheme Telephone Number(s) 2 MultiMobile MT128ZLX User Guide 1 Introduction MT128ZLX-ST/NT & Application Program Interfaces The MT128ZLX-ST/NT operates in conjunction with three Application Program Interface software packages: NDIS, VCOMM, or CAPI. The full names of these programs are as follows: NDIS (Network Driver Interface Specification): VCOMM (Virtual Communications Driver): CAPI (Common ISDN Application Program Interface): Each API contains software components that interact with the operating system (OS) of the computer in which the MT128ZLX is installed. The “API Usage” section of each OS-specific chapter will present examples of how the MT128ZLX can be used with these APIs in that particular OS. (The CAPI-compliant program used in these examples is RVS-COM Lite.) Each API adds communications functionality to the system. Each of the three APIs adds a different set of features to the system, although the APIs have substantial functionality in common with each other. Safety Warnings Never install telephone wiring during a lightning storm. Never install telephone jacks in wet locations unless the jacks are specifically designed for wet locations. Never touch uninsulated telephone wires or terminals unless the telephone line has been disconnected at the network interface. Use caution when installing or modifying telephone lines. Avoid using a telephone (other than cordless type) during an electrical storm. There may be a remote risk of electrical shock from lightning. Do not use the telephone to report a gas leak in the vicinity of that leak. 3 MultiMobile MT128ZLX User Guide 1 Introduction Technical Specifications Model Number: Dimensions: MT128ZLX-ST or MT128ZLX-NT 54mm (W) x 85.6mm (L) x 5mm (H) Weight: 1.225 oz. (35 g) Power: +5V ±5%, @220mA Power Consumption: 0.86 W (concurrent mode) Cable/Connector: RJ-45 (telco end), 15-pin (to laptop PC) PC Card Interface: PCMCIA Type II Switch Compatibility: AT&T 5ESS, Nortel DMS-100, NI-1, ETSI Operating Systems: Windows 95 (OSR2), Windows 98, Win NT, Windows 2000, Windows ME Term. Adapter Specs: • Microsoft Plug-and-Play compatible • Multiple signaling protocol compatibility with these ISDN protocols and phone switches: NI-1, AT&T 5ESS, Nortel DMS-100, ETSI • B-Channel speed support: 56 kbps and 64 kbps • B-Channel protocols: V.120, X.75, Async-to-Sync PPP Conversion, Multi-Link PPP (RFC1317) with channel bundling at 112kbps or , and HDLC Raw Data. • Compatible with AT command set • Windows-based configuration utility included 4 MultiMobile MT128ZLX User Guide 1 Introduction Features • Compatible with most laptop computers • Compatible with Card and Socket Services • Easy to install and use • Card is hot swappable • Supports popular OSs (e.g., Windows 95/98/NT/2000/ME) • Windows-based configuration utility included •==Microsoft Plug and Play (PnP) Compatible •==Multiple signaling protocol compatibility with the following ISDN protocols and switches: NI-1, ETSI, AT&T 5ESS and Nortel DMS-100 •==B-Channel speed support: 56Kbps and 64Kbps •==B-Channel Protocol: V.120, X.75, Async-to-Sync PPP Conversion, Multi-Link PPP (RFC1317), and HDLC raw data, V.110 •==Three Application Program Interfaces (APIs) are supported: NDIS, CAPI, and VCOMM (VCOMM not supported for WinNT) •==AT command set compatible •==Windows-based configuration utility included. 5 2 Installation & Use in Windows 95 6 MultiMobile MT128ZLX User Guide 2: Windows 95 Driver Procedures MT128ZLX-ST/NT: Windows 95 Driver Procedures Windows 95 Installation NOTE: Before beginning the installation, you must obtain the following technical information from your telephone company: SPIDs (North America only) Switch Type Voice Encoding scheme Telephone Number(s) NOTE: As you begin this procedure, the MT128ZLX card should not be installed in the computer’s PCMCIA slot. The setup.exe file must be run before the card is installed. Otherwise problems will arise as Windows 95 detects the device. 1. For now, leave the MT128ZLX card out of the computer’s PCMCIA slot. 2. Insert the MT128ZLX Installation CD into the computer’s CD-ROM drive. 3. Using Windows Explorer, browse to the win9x directory on the MT128ZLX Installation CD. 4. Double-click on the Setup.exe file to launch the Configuration Utility Setup program. At the Welcome screen, click Next>. 7 MultiMobile MT128ZLX User Guide 2: Windows 95 Driver Procedures 5. At the Choose Destination Location screen, you can accept the default path or enter a different path at which to install the Configuration Utility files. Click Next>. 6. At the Select Program Folder screen, you can accept the default folder or select another folder into which the program icons will be added. Then click Next>. 8 MultiMobile MT128ZLX User Guide 2: Windows 95 Driver Procedures 7. The Start Copying Files screen allows you one last chance to go back and change information that you have provided in previous steps. When satisfied with your settings, click Next> to begin copying files. 8. Progress screens will appear while files are being copied to your hard disk. 9. When prompted to install the Accelerator Pack, click Yes. The Accelerator Pack updates the Dial-Up Networking software components to include ISDN functionality. 9 MultiMobile MT128ZLX User Guide 2: Windows 95 Driver Procedures 10. Click Yes to accept the license agreement. 11. You will be prompted to read the manufacturer’s documentation. Click OK. 10 MultiMobile MT128ZLX User Guide 2: Windows 95 Driver Procedures 12. At the Setup Complete screen, select Yes, I want to restart my computer now. Click Finish. 13. When the restart process is complete, a message will appear indicating that “ISDN PC Card does not exist,” meaning that the card is not in the computer’s PCMCIA slot. This is normal. After the drivers are installed, this message will appear upon restart anytime the MT128ZLX card is not installed in its slot. Click OK. 11 MultiMobile MT128ZLX User Guide 2: Windows 95 Driver Procedures 14. Insert the MT128ZLX into the computer’s PCMCIA slot. 15. Windows 95 will detect the MT128ZLX card. The New Hardware Found wizard will display a series of screens indicating that is has found new hardware and that it is installing the corresponding software. 12 MultiMobile MT128ZLX User Guide 2: Windows 95 Driver Procedures 16. Go to Start | Settings | Control Panel. Select the Network icon. Select the Configuration tab. Click Add. 17. At the Select Network Component Type screen, highlight Adapter and click Add. 13 MultiMobile MT128ZLX User Guide 2: Windows 95 Driver Procedures 18. At the Select Network Adapters screen, highlight “MultiTech” in the Manufacturers pane. In the right pane (the Network Adapters pane), the MT128ZLX ISDN Adapter appears in the list. Click OK. This installs the NDIS Application Program Interface and adds ISDN-LINE0 and ISDN-LINE1 to the list of devices in Dial-Up Networking. At the Network screen (under the Configuration tab), click OK. 14 MultiMobile MT128ZLX User Guide 2: Windows 95 Driver Procedures 19. The ISDN Configuration wizard begins. NOTE: The information entered in the Microsoft ISDN Configuration wizard does not affect the operation of the MT128ZLX. However, completing this wizard is necessary to update certain dial-up networking software components to add ISDN functionality to Windows 95. The MT128ZLX is configured for use with the Configuration Utility that was installed during driver installation. In the section “Configuring the MT128ZLX” (presented later in this chapter), you will supply setup information for using the Configuration Utility program with your particular computer. Click Next>. 15 MultiMobile MT128ZLX User Guide 2: Windows 95 Driver Procedures 20. Accept the default value for the “Switch Protocol.” Click Next>. 21. The next wizard screen requests Phone Number and SPID information. It is not necessary to enter this information here. You will be asked to supply this information later (in the Configuration Utility program). Leave the fields of this dialog box blank. Click Next>. 16 MultiMobile MT128ZLX User Guide 2: Windows 95 Driver Procedures 22. At the ‘completion’ screen, click Finish. 23. When prompted to restart your computer, click Yes. 24. Driver installation is now complete. However, before you can use your MT128ZLX in Windows 95, it must be configured with SPIDs (in the U.S. and Canada), telephone numbers, voice-encoding information, and switch-type information. (See the procedure “Configuring the MT128ZLX In Windows 95” below.) 17 MultiMobile MT128ZLX User Guide 2: Windows 95 Driver Procedures Verifying the Windows 95 Installation 1. Go to Start | Settings | Control Panel. Click on the System icon. When the System Properties screen appears, select the Device Manager tab. 2. After a successful driver installation, the Device Manager will contain the following entries: MultiMobile MT128ZLX-ST (ISDN) MultiMobile MT128ZLX-ST (modem) MultiMobile MT128ZLX-ST Multi-Function Card MultiMobile MT128ZLX-ST ISDN TA (Net) 3. If these entries do not appear, re-do the driver installation procedure. If the installation fails repeatedly, call MultiTech Tech Support (800-972-2439). 18 MultiMobile MT128ZLX User Guide 2: Windows 95 Driver Procedures Configuring the MT128ZLX in Windows 95 NOTE: In this procedure, you will be asked to enter detailed configuration information that relates to the ISDN equipment being used by your telephone company. Specifically, your telephone company must provide the following information: SPIDs, Phone Numbers, Switch Type, and Voice Encoding type. This information is supplied by your telephone company and you must have it available when doing this procedure. 1. Go to Start | Programs | Configuration Utility | Config. The Configuration Utility dialog box will appear. 2. Enter the information needed in each field of the dialog box. Switch Type: See listed options. Phone Numbers: B1 number and B2 number. SPID Needed only in the U.S. and Canada. B-Channel Speed 56 kbps or 64 kbps Voice Encoding: for Net3 or ETSI, use A-law voice encoding for other switches, use Mu-law voice encoding Click OK. 19 MultiMobile MT128ZLX User Guide 2: Windows 95 Driver Procedures Uninstalling MT128ZLX-ST/NT Drivers in Windows 95 1. Close the Status program. After the Configuration Utility has been installed, the Status program’s icon normally appears at the lower right corner of your screen. Click on this icon and close the Status program. 2. Go to Start | Settings | Control Panel. Click on the Add/Remove Programs icon. The Add/Remove Programs Properties dialog box will appear. At the Install/Uninstall tab, highlight Configuration Utility. Click on the Add/Remove button. 3. At the Confirm File Deletion screen, click Yes. 4. The Uninstall Shield program will appear. At the Remove Programs From Your Computer screen, click OK. 20 MultiMobile MT128ZLX User Guide 2: Windows 95 Driver Procedures Click on Details to see files that must be manually deleted later. Record file names as needed. Click OK at both of these screens to proceed. 21 MultiMobile MT128ZLX User Guide 2: Windows 95 Driver Procedures 5. A message screen appears recommending that you restart your computer. Click OK. Then restart your computer. 22 MultiMobile MT128ZLX User Guide 2: Windows 95 API Usage MT128ZLX: Using APIs in Windows 95 About APIs The MT128ZLX-ST/NT operates in conjunction with three Application Program Interface software packages: NDIS, VCOMM, or CAPI. This chapter presents examples of how the MT128ZLX can be used with these APIs. The CAPI-compliant program used in these examples is RVS-COM Lite. Each API contains software components that interact with the operating system of the computer in which the MT128ZLX is installed. Each API adds communications functionality to the system. Each of the three APIs adds a somewhat different set of features to the system, as summarized in the table below and described more fully in subsequent sections. API Full Name Functionality NDIS Network Driver Interface Specification dial-up networking (DUN)connection, network interface card (NIC) emulation VCOMM Virtual Communications Driver dial-up networking (DUN)connection, modem emulation CAPI Common ISDN Application Program Interface dial-up networking (DUN)connection, modem emulation, G3 and G4 FAX, V.110, V.120, X.75, HDLC, interface to ISDN features and services The NDIS API NDIS allows Network Interface Cards (NICs) to work with each other, with the operating system, and with higher order protocol drivers. NDIS is an interface that facilitates development of NIC drivers. NDIS program routines can implement the functions that NIC drivers must perform. These include interaction with protocol drivers, the handling of hardware interrupts, and interface with underlying NICs by dealing with registers, port I/O, and other functionality. NDIS allows drivers to be developed in high-level programming languages, such that their creation and implementation are platform-independent. The VCOMM API The communications device driver known as “VCOMM” provides protected-mode services. It allows makes ports and modems available to Windows-based software application programs. VCOMM also uses plug-and-play functionality to simplify the installation and configuration of communications devices. 23 MultiMobile MT128ZLX User Guide 2: Windows 95 API Usage The CAPI API Being a common interface, the ISDN CAPI (Common Application Program Interface), allows software programs to use all ISDN services. Computer programs have access to most services and features of ISDN when used with CAPI. This access is hardware-independent. CAPI makes call numbers available, as well as several kinds of service information: caller number, called number, call charges, ISDN service ID. CAPI also facilitates transmission of data, FAX, or voice, and multiple B-channels can also be used simultaneously on a single call. It is the capabilities of the ISDN adapter and the type of ISDN connection that determine which services and features are actually available. CAPI merely serves as a common interface. ISDN CAPI is a platformindependent standard which can be used in non-Windows operating systems like OS/2 and UNIX, as well as in Microsoft operating systems. CAPI 2.0 is the current form of CAPI. ISDN adapters with CAPI 2.0 can be used anywhere in Europe with the DSS1 Euro-ISDN connection. Intro to API Single-Channel and MultiLink Examples In the following procedures, you will use Application Program Interfaces (APIs) to set up and use dial-up networking with the MT128ZLX in conjunction with the particular operating system your computer is using. The APIs are installed as part of the MT128ZLX driver installation, which must be complete before these procedures can be done. Note that the procedures presented here are examples only. Your use of APIs will depend on the needs and limitations of your operating environment. 24 MultiMobile MT128ZLX User Guide 2: Windows 95 API Usage Windows 95 NDIS : Single Channel Access Example NOTE: To complete this procedure, you will need to know several technical details that can be provided by your ISP or by your network administrator. 1. You will need to know whether or not an encrypted password is needed to access the network to which you will be connected. 2. If you are connecting to a non-Windows server, you will also need to know in advance whether or not the server requires you to type in login information or to know TCP/IP addresses before dialing. 3. If applicable, you will need to know the domain name of the network to which you will be connected. 4. You will need to know the dial-out network protocol to be used (NetBEUI, TCP/IP, or IPX). 1. Go to Start | Programs | Accessories | Dial-Up Networking. At the Dial-Up Networking folder, select Make New Connection. 25 MultiMobile MT128ZLX User Guide 2: Windows 95 API Usage 2. The Make New Connection screen appears. Enter a descriptive name for the connection. In the “Select a Modem” drop-down box, highlight ISDN-Line0. Click Next>. 3. At the next screen, enter the area code and phone number of your ISP or the remote device you will be calling using this connection. Select the appropriate Country Code and click Next> to complete the setup. 26 MultiMobile MT128ZLX User Guide 2: Windows 95 API Usage 4. At the completion screen, click Finish. The new dialup connection is ready to configure. 27 MultiMobile MT128ZLX User Guide 2: Windows 95 API Usage 5. From the Dial-Up Networking folder, right-click on your new connection icon. Choose Properties. 6. On the General tab, type in the phone number for the adapter port. You may change the connection options by clicking Configure. 7. Click on the Server Types tab to configure logon options, encryption, log file information and network protocol options, including TCP/IP Settings for your remote server and DNS connections. If necessary, contact your ISP or network administrator to obtain the correct TCP/IP addressing information. 8. Use the Scripting tab to define scripts that will run when this connection is made. Click OK to complete the configuration. To use this new connection, double-click on the New Dial-Up Networking Connection icon. Type in the user name and password for your remote account and click Connect. 28 MultiMobile MT128ZLX User Guide 2: Windows 95 API Usage Windows 95 NDIS: Dual Channel Access Example (MultiLink) NOTE: To complete this procedure, you will need to know several technical details that can be provided by your ISP or by your network administrator. 1. You will need to know whether or not an encrypted password is needed to access the network to which you will be connected. 2. If you are connecting to a non-Windows server, you will also need to know in advance whether or not the server requires you to type in login information or to know TCP/IP addresses before dialing. 3. If applicable, you will need to know the domain name of the network to which you will be connected. 4. You will need to know the dial-out network protocol to be used (NetBEUI, TCP/IP, or IPX). If you would like to use multi-linking with your NDIS connection, first be sure that your ISDN provider supports a 128kbps MLP option. 1. To begin, you will need to create a new dial-up connection as described above (“Windows 95 NDIS : Single Channel Access Example”) or modify an existing connection. Right-click on the Dial-Up Connection icon and select Properties. Click on Settings. 29 MultiMobile MT128ZLX User Guide 2. The Set Additional Devices screen appears. 3. Select Use Additional Devices. Click Add. 2: Windows 95 API Usage At the Edit Extra Device screen, in the Device Name drop-down box, select ISDN-Line1. Enter the Phone Number of your ISP or the remote device that you will be calling with this connection. When complete, continue to click OK to leave the Set Additional Devices configuration screens. To use this new connection, double-click on the New Dial-Up Networking Connection icon. Type in the user name and password for your remote account and click Connect. 30 MultiMobile MT128ZLX User Guide 2: Windows 95 API Usage Windows 95 Vcomm: Single Channel Access Example NOTE: To complete this procedure, you will need to know several technical details that can be provided by your ISP or by your network administrator. 1. You will need to know whether or not an encrypted password is needed to access the network to which you will be connected. 2. If you are connecting to a non-Windows server, you will also need to know in advance whether or not the server requires you to type in login information or to know TCP/IP addresses before dialing. 3. If applicable, you will need to know the domain name of the network to which you will be connected. 4. You will need to know the dial-out network protocol to be used (NetBEUI, TCP/IP, or IPX). 1. Go to Start | Programs | Accessories | Dial-Up Networking. At the Dial-Up Networking folder, select Make New Connection. 2. The Make New Connection screen appears. Enter a descriptive name for the connection. In the “Select a Modem” drop-down box, highlight MultiMobile MT128ZLX-ST (modem). 3. At the next screen, enter the area code and phone number of your ISP or of the remote device you will be calling using this connection. Select the appropriate Country Code and click Next> to complete the setup. 31 MultiMobile MT128ZLX User Guide 4. 2: Windows 95 API Usage At the completion screen, click Finish. The new dialup connection is ready to configure. 32 MultiMobile MT128ZLX User Guide 2: Windows 95 API Usage 5. From the Dial-Up Networking folder, right-click on your new connection icon. Choose Properties. 6. On the General tab, type in the phone number for the adapter port. You may change the connection options by clicking Configure. 7. Click on the Server Types tab to configure logon options, encryption, log file information and network protocol options, including TCP/IP Settings for your remote server and DNS connections. If necessary, contact your ISP or network administrator to obtain the correct TCP/IP addressing information. 8. Use the Scripting tab to define scripts that will run when this connection is made. Click OK to complete the configuration. To use this new connection, double-click on the New Dial-Up Networking Connection icon. Type in the user name and password for your remote account and click Connect. 33 MultiMobile MT128ZLX User Guide 2: Windows 95 API Usage Windows 95 Vcomm: Dual Channel Access Example (MultiLink) NOTE: To complete this procedure, you will need to know several technical details that can be provided by your ISP or by your network administrator. 1. You will need to know whether or not an encrypted password is needed to access the network to which you will be connected. 2. If you are connecting to a non-Windows server, you will also need to know in advance whether or not the server requires you to type in login information or to know TCP/IP addresses before dialing. 3. If applicable, you will need to know the domain name of the network to which you will be connected. 4. You will need to know the dial-out network protocol to be used (NetBEUI, TCP/IP, or IPX). If you would like to use multi-linking with your VCOMM connection, first be sure that your ISDN provider supports a 128kbps MLP option. In order to use VCOMM multi-linking, you must install a second ISDN device in the Modems applet in the Control Panel. The first ISDN device was installed automatically during the initial driver installation. 1. Install the virtual modem for your MT128ZLX in Windows 95 by selecting Start | Settings | Control Panel | Modems | Add. The Install New Modems screen will appear. Select “Other” and click Next>. 34 MultiMobile MT128ZLX User Guide 2: Windows 95 API Usage 2. At the next screen, Windows 95 will prepare to detect your modem. Click on “Do not detect my modem; I will select it from a list.” Click Next>. 3. The next screen displays a list of modem manufacturers and modem models. In the Manufacturers pane, highlight “MultiTech.” In the Models pane, highlight “MultiMobile MT128ZLX-ST (modem).” Click Next>. 35 MultiMobile MT128ZLX User Guide 4. 2: Windows 95 API Usage The next screens allows you to select which COM port to use with the MT128ZLX. Select “ISDN 2nd COM.” Click Next>. 5. At the completion screen, click Finish. You should now see two ISDN devices in the Modems Properties window. Click Close to exit from the Modems Properties window. Then close the Control Panel window. 36 MultiMobile MT128ZLX User Guide 2: Windows 95 API Usage 6. For this example, we will use the existing connection that was created in the VCOMM single-channel procedure above (“Windows 95 Vcomm: Single Channel Access Example”). Go to Start | Programs | Accessories | Dial-Up Networking. This will open up the Dial-Up Networking folder. From the Dial-Up Networking folder, right-click on your new connection icon. Choose Properties. 7. The Connection menu screen appears. Click on Settings. 37 MultiMobile MT128ZLX User Guide 2: Windows 95 API Usage 8. The Set Additional Devices screen appears. 9. Select Use Additional Devices. Click Add. At the Edit Extra Device screen, in the Device Name drop-down box, select MultiMobile MT128ZLX-ST (modem) #2. Enter the Phone Number of your ISP or of the remote device that you will be calling with this connection. When complete, continue to click OK to leave the Set Additional Devices configuration screens. To use this new connection, double-click on the New Dial-Up Networking Connection icon. Type in the user name and password for your remote account and click Connect. 38 MultiMobile MT128ZLX User Guide 2: Windows 95 API Usage Windows 95 CAPI: Single Channel Access Example NOTE: To complete this procedure, you will need to know several technical details that can be provided by your ISP or by your network administrator. 1. You will need to know whether or not an encrypted password is needed to access the network to which you will be connected. 2. If you are connecting to a non-Windows server, you will also need to know in advance whether or not the server requires you to type in login information or to know TCP/IP addresses before dialing. 3. If applicable, you will need to know the domain name of the network to which you will be connected. 4. You will need to know the dial-out network protocol to be used (NetBEUI, TCP/IP, or IPX). To use the Common ISDN Application Interface (CAPI), you must install a CAPI-compliant telecommunications application, such as the RVS-COM Lite program, which will be used for this example. After installing RVS-COM Lite, several new virtual modems become available to configure. The following example uses the RVS ISDN V.120 modem. Before beginning, be sure that the RVS-COM Center is running (the icon will appear in the Windows 95 Task Bar). 1. Go to Start | Programs | Accessories | Dial-Up Networking. At the Dial-Up Networking folder, select Make New Connection. 39 MultiMobile MT128ZLX User Guide 2: Windows 95 API Usage 2. The Make New Connection screen appears. Enter a descriptive name for the connection. In the “Select a Modem” drop-down box, highlight RVS ISDN V.120. Click Next>. 3. At the next screen, enter the area code and phone number of your ISP or of the remote device you will be calling using this connection. Select the appropriate Country Code and click Next> to complete the setup. 40 MultiMobile MT128ZLX User Guide 4. 2: Windows 95 API Usage At the completion screen, click Finish. The new dialup connection is ready to configure. 5. From the Dial-Up Networking folder, right-click on your new connection icon. Choose Properties. 41 MultiMobile MT128ZLX User Guide 2: Windows 95 API Usage 6. On the General tab, type in the phone number for the adapter port. You can change the connection options by clicking Configure. 7. Click on the Server Types tab to configure logon options, encryption, log file information and network protocol options, including TCP/IP Settings for your remote server and DNS connections. If necessary, contact your ISP or network administrator to obtain the correct TCP/IP addressing information. 8. Use the Scripting tab to define scripts that will run when this connection is made. Click OK to complete the configuration. To use this new connection, double-click on the New Dial-Up Networking Connection icon. Type in the user name and password for your remote account and click Connect. 42 MultiMobile MT128ZLX User Guide 2: Windows 95 API Usage Windows 95 CAPI: Dual Channel Access Example (MultiLink) NOTE: To complete this procedure, you will need to know several technical details that can be provided by your ISP or by your network administrator. 1. You will need to know whether or not an encrypted password is needed to access the network to which you will be connected. 2. If you are connecting to a non-Windows server, you will also need to know in advance whether or not the server requires you to type in login information or to know TCP/IP addresses before dialing. 3. If applicable, you will need to know the domain name of the network to which you will be connected. 4. You will need to know the dial-out network protocol to be used (NetBEUI, TCP/IP, or IPX). If you would like to use multi-linking with your CAPI connection, first be sure that your ISDN provider supports a 128kbps MLP option. The ports you link must first be enabled through RVS-Com. In this example, the RVS ISDN V.120 modems are used. 1. To enable the ports in RVS-Com, open the RVS-Com Comm Center. 2. Click the Services tab. In the Virtual Com Ports section of the window, place a check mark in front of both ports. Associate each port with a unique COM port number (the two devices must use different COM ports). Click Apply, and then OK. Next you will need to identify the two modems to be linked or installed. 3. In the example, if two RVS ISDN V.120 modems do not exist, you will need to create a new definition for each of them. To create a new definition, go to Start | Settings | Control Panel | Modems | Add. The Install New Modems screen will appear. Select “Other” and click Next>. 43 MultiMobile MT128ZLX User Guide 2: Windows 95 API Usage 2. At the next screen, Windows 95 will prepare to detect your modem. Click on “Do not detect my modem; I will select it from a list.” Click Next>. 3. The next screen displays a list of modem manufacturers and modem models. In the Manufacturers pane, highlight “RVS Datentechnik.” In the Models pane, highlight “RVS ISDN V.120.” Click Next>. 44 MultiMobile MT128ZLX User Guide 2: Windows 95 API Usage 4. The next screens allows you to select which COM port to use with the “RVS ISDN V.120 modem.” Select “RVS Port (COM 4).” Click Next>. 5. At the completion screen, click Finish. You should now see two “RVS ISDN V.120” devices in the Modems Properties window. Click Close to exit from the Modems Properties window. Then close the Control Panel window. 45 MultiMobile MT128ZLX User Guide 2: Windows 95 API Usage 6. For this example, we will use the existing connection that was created in the CAPI single-channel procedure above (“Windows 95 CAPI: Single Channel Access Example”). Go to Start | Programs | Accessories | Dial-Up Networking. This will open up the Dial-Up Networking folder. From the Dial-Up Networking folder, right-click on your new connection icon. Choose Properties. 7. The Connection menu screen appears. Click on Settings. 8. The Set Additional Devices screen appears. 46 MultiMobile MT128ZLX User Guide 2: Windows 95 API Usage 9. Select Use Additional Devices. Click Add. At the Edit Extra Device screen, in the Device Name drop-down box, select RVS ISDN V.120 #2. Enter the Phone Number of your ISP or of the remote device that you will be calling with this connection. When complete, continue to click OK to leave the Set Additional Devices configuration screens. To use this new connection, double-click on the New Dial-Up Networking Connection icon. Type in the user name and password for your remote account and click Connect. 47 3 Installation & Use in Windows 98 48 MultiMobile MT128ZLX User Guide 3: Windows 98 Driver Procedures MT128ZLX-ST/NT: Windows 98 Driver Procedures Windows 98 Installation NOTE: Before beginning the installation, you must obtain the following technical information from your telephone company: SPIDs (North America only) Switch Type Voice Encoding scheme Telephone Number(s) NOTE: As you begin this procedure, the MT128ZLX card should not be installed in the computer’s PCMCIA slot. The setup.exe file must be run before the card is installed. Otherwise problems will arise as Windows 98 detects the device. NOTE: During the installation, you should have your Windows 98 CD-ROM close at hand. Windows 98 may need to add or update files which must be copied from the CD. 1. For now, leave the MT128ZLX card out of the computer’s PCMCIA slot. 2. Insert the MT128ZLX Installation CD into the computer’s CD-ROM drive. 3. Using Windows Explorer, browse to the win9x directory on the MT128ZLX Installation CD. 49 MultiMobile MT128ZLX User Guide 3: Windows 98 Driver Procedures 4. Double-click on the Setup.exe file to launch the Configuration Utility Setup program. At the Welcome screen, click Next. 5. At the Choose Destination Location screen, you can accept the default path or enter a different path at which to install the Configuration Utility files. Click Next>. 50 MultiMobile MT128ZLX User Guide 3: Windows 98 Driver Procedures 6. At the Select Program Folder screen, you can accept the default folder or select another folder into which the program icons will be added. Then click Next>. 7. The Start Copying Files screen allows you one last chance to go back and change information that you have provided in previous steps. When satisfied with your settings, click Next> to begin copying files. 8. Progress screens will appear while files are being copied to your hard disk. 51 MultiMobile MT128ZLX User Guide 3: Windows 98 Driver Procedures 9. The Configuration Utility screen appears, displaying the various applets of the Configuration Utility program. Close the Configuration Utility window. 10. At the Setup Complete, screen, select Yes, I want to restart my computer now. Click Finish. 52 MultiMobile MT128ZLX User Guide 3: Windows 98 Driver Procedures 11. When the restart process is complete, a message will appear indicating that “ISDN PC Card does not exist,” meaning that the card is not in the computer’s PCMCIA slot. This is normal. After the drivers are installed, this message will appear upon restart anytime the MT128ZLX card is not installed in its slot. Click OK. 12. Insert the MT128ZLX into the computer’s PCMCIA slot. 13. Windows 98 will detect the MT128ZLX card. The New Hardware Found wizard will display a series of screens indicating that is has found new hardware and that it is installing the corresponding software. 53 MultiMobile MT128ZLX User Guide 3: Windows 98 Driver Procedures 14. Go to Start | Settings | Control Panel. Select the Network icon. Select the Configuration tab. Click Add. 15. At the Select Network Component Type screen, highlight Adapter and click Add. 54 MultiMobile MT128ZLX User Guide 3: Windows 98 Driver Procedures 16. At the Select Network Adapters screen, highlight “MultiTech” in the Manufacturers pane. In the right pane (the Network Adapters pane), the MT128ZLX ISDN Adapter appears in the list. Click OK. This installs the NDIS Application Program Interface and adds ISDN-LINE0 and ISDN-LINE1 to the list of devices in Dial-Up Networking. At the Network screen (under the Configuration tab), click OK. 17. The ISDN Configuration wizard begins. NOTE: The information entered in the Microsoft ISDN Configuration wizard does not affect the operation of the MT128ZLX. However, completing this wizard is necessary to update certain dial-up networking software components to add ISDN functionality to Windows 98. The MT128ZLX is configured for use with the Configuration Utility that was installed during driver installation. In the section “Configuring the MT128ZLX” (presented later in this chapter), you will supply setup information for using the Configuration Utility program with your particular computer. Click Next>. 18. Accept the default value for the “Switch Protocol.” Click Next>. 55 MultiMobile MT128ZLX User Guide 3: Windows 98 Driver Procedures 19. The next wizard screen requests Phone Number and SPID information. It is not necessary to enter this information here. You will be asked to supply this information later (in the Configuration Utility program). Leave the fields of this dialog box blank. Click Next>. 56 MultiMobile MT128ZLX User Guide 3: Windows 98 Driver Procedures 20. At the ‘completion’ screen, click Finish. 21. In some cases, Windows 98 may require an additional software component which can be loaded from the Windows 98 CD-ROM. If this occurs, a notification screen will appear. Insert your Windows 98 CD into the CD-ROM drive and follow the Windows 98 messages to allow the required files to be copied. 22. When the ISDN Configuration wizard process is complete, you will be prompted to restart your computer. Click Yes. 23. Driver installation is now complete. However, before you can use your MT128ZLX in Windows 95, it must be configured with SPIDs (in the U.S. and Canada), telephone numbers, voice-encoding information, and switch-type information. (See the procedure “Configuring the MT128ZLX in Windows 98” below.) 57 MultiMobile MT128ZLX User Guide 3: Windows 98 Driver Procedures Verifying the Windows 98 Installation 1. Go to Start | Settings | Control Panel. Click on the System icon. When the System Properties screen appears, select the Device Manager tab. 2. After a successful driver installation, the Device Manager will contain the following entries: MultiMobile MT128ZLX-ST (ISDN) MultiMobile MT128ZLX-ST (modem) MultiMobile MT128ZLX-ST Multi-Function Card MultiMobile MT128ZLX-ST ISDN TA (Net) 3. If these entries do not appear, re-do the driver installation procedure. If the installation fails repeatedly, call MultiTech Tech Support (800-972-2439). 58 MultiMobile MT128ZLX User Guide 3: Windows 98 Driver Procedures Configuring the MT128ZLX-ST/NT in Windows 98 NOTE: In this procedure, you will be asked to enter detailed configuration information that relates to the ISDN equipment being used by your telephone company. Specifically, your telephone company must provide the following information: SPIDs, Phone Numbers, Switch Type, and Voice Encoding type. This information is supplied by your telephone company and you must have it available when doing this procedure. 1. Go to Start | Programs | Configuration Utility | Config. The Configuration Utility dialog box will appear. 2. Enter the information needed in each field of the dialog box. 59 MultiMobile MT128ZLX User Guide Switch Type: 3: Windows 98 Driver Procedures See listed options. Phone Numbers: B1 number and B2 number. SPID Needed only in the U.S. and Canada. B-Channel Speed 56 kbps or 64 kbps Voice Encoding: for Net3 or ETSI, use A-law voice encoding for other switches, use Mu-law voice encoding NOTE: It is essential for the proper operation of your device that this information is entered correctly. Please take a moment to verify that the information entered is correct. Click OK. 60 MultiMobile MT128ZLX User Guide 3: Windows 98 Driver Procedures Uninstalling MT128ZLX-ST/NT Drivers in Windows 98 1. Close the Status program. After the Configuration Utility has been installed, the Status program’s icon normally appears at the lower right corner of your screen. Click on this icon and close the Status program. NOTE: Failure to close the Status program at this point will result in an incomplete uninstallation process. 2. Go to Start | Settings | Control Panel. Click on the Add/Remove Programs icon. The Add/Remove Programs Properties dialog box will appear. At the Install/Uninstall tab, highlight Configuration Utility. Click on the Add/Remove button. 61 MultiMobile MT128ZLX User Guide 3: Windows 98 Driver Procedures 3. At the Confirm File Deletion screen, click Yes. 4. The Uninstall Shield program will appear. At the Remove Programs From Your Computer screen, click OK. 62 MultiMobile MT128ZLX User Guide 3: Windows 98 Driver Procedures If, for any reason, the Status screen was not closed earlier (step 1), the uninstall procedure will be incomplete and some program files will remain on the computer. If this happens, the Remove Programs From Your Computer screen will point out that files need to be removed manually. To identify the files that must be manually deleted later, click on the Details button. Record file names as needed. Click OK to proceed. 5. A message screen appears recommending that you restart your computer. Click OK. Then restart your computer. 63 MultiMobile MT128ZLX User Guide 3: Windows 98 API Usage MT128ZLX: Using APIs in Windows 98 About APIs The MT128ZLX-ST/NT operates in conjunction with three Application Program Interface software packages: NDIS, VCOMM, or CAPI. This chapter presents examples of how the MT128ZLX can be used with these APIs. The CAPI-compliant program used in these examples is RVS-COM Lite. Each API contains software components that interact with the operating system of the computer in which the MT128ZLX is installed. Each API adds communications functionality to the system. Each of the three APIs adds a somewhat different set of features to the system, as summarized in the table below and described more fully in subsequent sections. API Full Name Functionality NDIS Network Driver Interface Specification dial-up networking (DUN)connection, network interface card (NIC) emulation VCOMM Virtual Communications Driver dial-up networking (DUN)connection, modem emulation CAPI Common ISDN Application Program Interface dial-up networking (DUN)connection, modem emulation, G3 and G4 FAX, V.110, V.120, X.75, HDLC, interface to ISDN features and services The NDIS API NDIS allows Network Interface Cards (NICs) to work with each other, with the operating system, and with higher order protocol drivers. NDIS is an interface that facilitates development of NIC drivers. NDIS program routines can implement the functions that NIC drivers must perform. These include interaction with protocol drivers, the handling of hardware interrupts, and interface with underlying NICs by dealing with registers, port I/O, and other functionality. NDIS allows drivers to be developed in high-level programming languages, such that their creation and implementation are platform-independent. The VCOMM API The communications device driver known as “VCOMM” provides protected-mode services. It allows makes ports and modems available to Windows-based software application programs. VCOMM also uses plug-and-play functionality to simplify the installation and configuration of communications devices. 64 MultiMobile MT128ZLX User Guide 3: Windows 98 API Usage The CAPI API Being a common interface, the ISDN CAPI (Common Application Program Interface), allows software programs to use all ISDN services. Computer programs have access to most services and features of ISDN when used with CAPI. This access is hardware-independent. CAPI makes call numbers available, as well as several kinds of service information: caller number, called number, call charges, ISDN service ID. CAPI also facilitates transmission of data, FAX, or voice, and multiple B-channels can also be used simultaneously on a single call. It is the capabilities of the ISDN adapter and the type of ISDN connection that determine which services and features are actually available. CAPI merely serves as a common interface. ISDN CAPI is a platformindependent standard which can be used in non-Windows operating systems like OS/2 and UNIX, as well as in Microsoft operating systems. CAPI 2.0 is the current form of CAPI. ISDN adapters with CAPI 2.0 can be used anywhere in Europe with the DSS1 Euro-ISDN connection. Intro to API Single-Channel and MultiLink Examples In the following procedures, you will use Application Program Interfaces (APIs) to set up and use dial-up networking with the MT128ZLX in conjunction with the particular operating system your computer is using. The APIs are installed as part of the MT128ZLX driver installation, which must be complete before these procedures can be done. Note that the procedures presented here are examples only. Your use of APIs will depend on the needs and limitations of your operating environment. 65 MultiMobile MT128ZLX User Guide 3: Windows 98 API Usage Windows 98 NDIS : Single Channel Access Example NOTE: To complete this procedure, you will need to know several technical details that can be provided by your ISP or by your network administrator. 1. You will need to know whether or not an encrypted password is needed to access the network to which you will be connected. 2. If you are connecting to a non-Windows NT server, you will also need to know in advance whether or not the server requires you to type in login information or to know TCP/IP addresses before dialing. 3. If applicable, you will need to know the domain name of the network to which you will be connected. 4. You will need to know the dial-out network protocol to be used (NetBEUI, TCP/IP, or IPX). 1. Go to Start | Programs | Accessories | Communications | Dial-Up Networking. If this is your first communications connection, the Welcome to Dial-Up Networking screen will appear. Otherwise, click on the Make New Connection icon. Click Next>. 66 MultiMobile MT128ZLX User Guide 3: Windows 98 API Usage The Make New Connection screen appears. Enter a descriptive name for the connection. In the “Select a device” drop-down box, highlight ISDN-Line0. Click Next>. 3. At the next screen, enter the area code and phone number of your ISP or the remote device you will be calling using this connection. Select the appropriate Country or Region Code and click Next> to complete the setup. 67 MultiMobile MT128ZLX User Guide 3: Windows 98 API Usage 4. At the completion screen, click Finish. The new dialup connection is ready to configure. 5. From the Dial-Up Networking folder, right-click on your new connection icon. Choose Properties. 68 MultiMobile MT128ZLX User Guide 3: Windows 98 API Usage 6. On the General tab, type in the phone number for the adapter port. You may change the connection options by clicking Configure. 7. Click on the Server Types tab to configure logon options, encryption, log file information and network protocol options, including TCP/IP Settings for your remote server and DNS connections. If necessary, contact your ISP or network administrator to obtain the correct TCP/IP addressing information. 8. Use the Scripting tab to define scripts that will run when this connection is made. Click OK to complete the configuration. To use this new connection, double-click on the New Dial-Up Networking Connection icon. Type in the user name and password for your remote account and click Connect. 69 MultiMobile MT128ZLX User Guide 3: Windows 98 API Usage Windows 98 NDIS: Dual Channel Access Example (MultiLink) NOTE: To complete this procedure, you will need to know several technical details that can be provided by your ISP or by your network administrator. 1. You will need to know whether or not an encrypted password is needed to access the network to which you will be connected. 2. If you are connecting to a non-Windows server, you will also need to know in advance whether or not the server requires you to type in login information or to know TCP/IP addresses before dialing. 3. If applicable, you will need to know the domain name of the network to which you will be connected. 4. You will need to know the dial-out network protocol to be used (NetBEUI, TCP/IP, or IPX). If you would like to use multi-linking with your NDIS connection, first be sure that your ISDN provider supports a 128kbps MLP option. 1. To begin, you will need to create a new dial-up connection as described above (“Windows 98 NDIS : Single Channel Access Example”) or modify an existing connection. Right-click on the Dial-Up Connection icon and select Properties. 70 MultiMobile MT128ZLX User Guide 3: Windows 98 API Usage Click on the MultiLink tab. 2. Select Use Additional Devices. Click Add. At the Edit Extra Device screen, in the Device Name drop-down box, select ISDN-Line1. Enter the Phone Number of your ISP or of the remote device that you will be calling with this connection. When complete, continue to click OK to leave the Set Additional Devices configuration screens. To use this new connection, double-click on the New Dial-Up Networking Connection icon. Type in the user name and password for your remote account and click Connect. 71 MultiMobile MT128ZLX User Guide 3: Windows 98 API Usage Windows 98 VCOMM: Single Channel Access Example NOTE: To complete this procedure, you will need to know several technical details that can be provided by your ISP or by your network administrator. 1. You will need to know whether or not an encrypted password is needed to access the network to which you will be connected. 2. If you are connecting to a non-Windows server, you will also need to know in advance whether or not the server requires you to type in login information or to know TCP/IP addresses before dialing. 3. If applicable, you will need to know the domain name of the network to which you will be connected. 4. You will need to know the dial-out network protocol to be used (NetBEUI, TCP/IP, or IPX). 1. Go to Start | Programs | Accessories | Communications | Dial-Up Networking. If this is your first communications connection, the Welcome to Dial-Up Networking screen will appear. Otherwise, click on the Make New Connection icon. Click Next>. 72 MultiMobile MT128ZLX User Guide 3: Windows 98 API Usage 2. The Make New Connection screen appears. Enter a descriptive name for the connection. In the “Select a device” drop-down box, highlight MultiMobile MT128ZLX-ST (modem). Click Next>. 3. At the next screen, enter the area code and phone number of your ISP or of the remote device you will be calling using this connection. Select the appropriate Country Code and click Next> to complete the setup. Click Next>. 73 MultiMobile MT128ZLX User Guide 4. 3: Windows 98 API Usage At the completion screen, click Finish. The new dialup connection is ready to configure. 5. From the Dial-Up Networking folder, right-click on your new connection icon. Choose Properties. 74 MultiMobile MT128ZLX User Guide 3: Windows 98 API Usage 6. On the General tab, type in the phone number for the adapter port. You may change the connection options by clicking Configure. 7. Click on the Server Types tab to configure logon options, encryption, log file information and network protocol options, including TCP/IP Settings for your remote server and DNS connections. If necessary, contact your ISP or network administrator to obtain the correct TCP/IP addressing information. 8. Use the Scripting tab to define scripts that will run when this connection is made. Click OK to complete the configuration. To use this new connection, double-click on the New Dial-Up Networking Connection icon. Type in the user name and password for your remote account and click Connect. 75 MultiMobile MT128ZLX User Guide 3: Windows 98 API Usage Windows 98 Vcomm: Dual Channel Access Example (MultiLink) NOTE: To complete this procedure, you will need to know several technical details that can be provided by your ISP or by your network administrator. 1. You will need to know whether or not an encrypted password is needed to access the network to which you will be connected. 2. If you are connecting to a non-Windows server, you will also need to know in advance whether or not the server requires you to type in login information or to know TCP/IP addresses before dialing. 3. If applicable, you will need to know the domain name of the network to which you will be connected. 4. You will need to know the dial-out network protocol to be used (NetBEUI, TCP/IP, or IPX). If you would like to use multi-linking with your VCOMM connection, first be sure that your ISDN provider supports a 128kbps MLP option. In order to use VCOMM multi-linking, you must install a second ISDN device in the Modems applet in the Control Panel. The first ISDN device was installed automatically during the initial driver installation. 1. Install the virtual modem for your MT128ZLX in Windows 98 by selecting Start | Settings | Control Panel | Add. The Install New Modems screen will appear. Select “Other” and click Next>. 76 MultiMobile MT128ZLX User Guide 3: Windows 98 API Usage 2. At the next screen, Windows 98 will prepare to detect your modem. Click on “Do not detect my modem; I will select it from a list.” Click Next>. 3. The next screen displays a list of modem manufacturers and modem models. In the Manufacturers pane, highlight “MultiTech.” In the Models pane, highlight “MultiMobile MT128ZLX-ST (modem).” Click Next>. 77 MultiMobile MT128ZLX User Guide 4. 3: Windows 98 API Usage The next screens allows you to select which COM port to use with the MT128ZLX. nd Select “ISDN 2 COM.” Click Next>. 5. At the completion screen, click Finish. You should now see two ISDN devices in the Modems Properties window. Click Close to exit from the Modems Properties window. Then close the Control Panel window. 6. For this example, we will use the existing connection that was created in the VCOMM single-channel procedure above (“Windows 98 Vcomm: Single Channel Access Example”). 78 MultiMobile MT128ZLX User Guide 3: Windows 98 API Usage Go to Start | Programs | Accessories | Communications | Dial-Up Networking. This will open up the Dial-Up Networking folder. From the Dial-Up Networking folder, right-click on your new connection icon. Choose Properties. 7. The Connection menu screen appears. Click on the MultiLink tab. Select Use Additional Devices. Click Add. 79 MultiMobile MT128ZLX User Guide 3: Windows 98 API Usage 8. At the Edit Extra Device screen, in the Device Name drop-down box, select MultiMobile MT128ZLXST (modem) #2. Enter the Phone Number of your ISP or of the remote device that you will be calling with this connection. When complete, continue to click OK to leave the Set Additional Devices configuration screens. To use this new connection, double-click on the New Dial-Up Networking Connection icon. Type in the user name and password for your remote account and click Connect. 80 MultiMobile MT128ZLX User Guide 3: Windows 98 API Usage Windows 98 CAPI: Single Channel Access Example NOTE: To complete this procedure, you will need to know several technical details that can be provided by your ISP or by your network administrator. 1. You will need to know whether or not an encrypted password is needed to access the network to which you will be connected. 2. If you are connecting to a non-Windows server, you will also need to know in advance whether or not the server requires you to type in login information or to know TCP/IP addresses before dialing. 3. If applicable, you will need to know the domain name of the network to which you will be connected. 4. You will need to know the dial-out network protocol to be used (NetBEUI, TCP/IP, or IPX). To use the Common ISDN Application Interface (CAPI), you must install a CAPI-compliant telecommunications application, such as the RVS-COM Lite program, which will be used for this example. After installing RVS-COM Lite, several new virtual modems become available to configure. The following example uses the RVS ISDN V.120 modem. Before beginning, be sure that the RVS-COM Center is running (the icon will appear in the Windows 98 Task Bar). 1. Go to Start | Programs | Accessories | Communications | Dial-Up Networking. If this is your first communications connection, the Welcome to Dial-Up Networking screen will appear. Otherwise, click on the Make New Connection icon. Click Next>. 81 MultiMobile MT128ZLX User Guide 3: Windows 98 API Usage 2. The Make New Connection screen appears. Enter a descriptive name for the connection. In the “Select a device” drop-down box, highlight RVS ISDN V.120. Click Next>. 3. At the next screen, enter the area code and phone number of your ISP or of the remote device you will be calling using this connection. Select the appropriate Country Code and click Next> to complete the setup. 82 MultiMobile MT128ZLX User Guide 4. 3: Windows 98 API Usage At the completion screen, click Finish. The new dialup connection is ready to configure. 5. From the Dial-Up Networking folder, right-click on your new connection icon. Choose Properties. 83 MultiMobile MT128ZLX User Guide 3: Windows 98 API Usage 6. On the General tab, type in the phone number for the adapter port. You may change the connection options by clicking Configure. 7. Click on the Server Types tab to configure logon options, encryption, log file information and network protocol options, including TCP/IP Settings for your remote server and DNS connections. If necessary, contact your ISP or network administrator to obtain the correct TCP/IP addressing information. 8. Use the Scripting tab to define scripts that will run when this connection is made. Click OK to complete the configuration. To use this new connection, double-click on the New Dial-Up Networking Connection icon. Type in the user name and password for your remote account and click Connect. 84 MultiMobile MT128ZLX User Guide 3: Windows 98 API Usage Windows 98 CAPI: Dual Channel Access Example (MultiLink) NOTE: To complete this procedure, you will need to know several technical details that can be provided by your ISP or by your network administrator. 1. You will need to know whether or not an encrypted password is needed to access the network to which you will be connected. 2. If you are connecting to a non-Windows server, you will also need to know in advance whether or not the server requires you to type in login information or to know TCP/IP addresses before dialing. 3. If applicable, you will need to know the domain name of the network to which you will be connected. 4. You will need to know the dial-out network protocol to be used (NetBEUI, TCP/IP, or IPX). If you would like to use multi-linking with your CAPI connection, first be sure that your ISDN provider supports a 128kbps MLP option. The ports you link must first be enabled through RVS-Com. In this example, the RVS ISDN V.120 modems are used. 1. To enable the ports in RVS-Com, open the RVS-Com Comm Center. 2. Click the Services tab. In the Virtual Com Ports section of the window, place a check mark in front of both ports. Associate each port with a unique COM port number (the two devices must use different COM ports). Click Apply, and then OK. Next you will need to identify the two modems to be linked or installed. 3. In the example, if two RVS ISDN V.120 modems do not exist, you will need to create a new definition for each of them. To create a new definition, go to Start | Settings | Control Panel | Modems | Add. The Install New Modems screen will appear. Select “Other” and click Next>. 85 MultiMobile MT128ZLX User Guide 3: Windows 98 API Usage 4. At the next screen, Windows 98 will prepare to detect your modem. Click on “Do not detect my modem; I will select it from a list.” Click Next>. 5. The next screen displays a list of modem manufacturers and modem models. In the Manufacturers pane, highlight “RVS Datentechnik.” In the Models pane, highlight “RVS ISDN V.120.” Click Next>. 86 MultiMobile MT128ZLX User Guide 6. 3: Windows 98 API Usage The next screens allows you to select which COM port to use with the “RVS ISDN V.120 modem.” Select “RVS Port (COM 5).” Click Next>. 7. At the completion screen, click Finish. You should now see two “RVS ISDN V.120” devices in the Modems Properties window. Click Close to exit from the Modems Properties window. Then close the Control Panel window. 87 MultiMobile MT128ZLX User Guide 3: Windows 98 API Usage 8. For this example, we will use the existing connection that was created in the CAPI single-channel procedure above (“Windows 98 CAPI: Single Channel Access Example”). Go to Start | Programs | Accessories | Communications |Dial-Up Networking. This will open up the Dial-Up Networking folder. From the Dial-Up Networking folder, right-click on your new connection icon. Choose Properties. 9. The Connection menu screen appears. Click on the MultiLink tab. Select Use Additional Devices. Click Add. 88 MultiMobile MT128ZLX User Guide 3: Windows 98 API Usage 10. At the Edit Extra Device screen, in the Device Name drop-down box, select MultiMobile MT128ZLX-ST (modem) #2. Enter the Phone Number of your ISP or of the remote device that you will be calling with this connection. When complete, continue to click OK to leave the Set Additional Devices configuration screens. To use this new connection, double-click on the New Dial-Up Networking Connection icon. Type in the user name and password for your remote account and click Connect. 89 4 Installation & Use in Windows NT 90 MultiMobile MT128ZLX User Guide 4: Windows NT Driver Procedures MT128ZLX-ST/NT: Windows NT4 Driver Procedures Windows NT4 Installation Note: To install, configure, and remove devices in Windows NT, your logon permissions must include the ability to load and remove device drivers. 1. Insert the MT128ZLX card into the laptop PC. 2. Insert the MT128ZLX Installation CD into the computer’s CD-ROM drive. 3. In Windows Explorer, browse to the NT40 directory on the MT128ZLX Installation CD. 91 MultiMobile MT128ZLX User Guide 4: Windows NT Driver Procedures 4. Double-click on the Setup.exe file to launch the Configuration Utility Setup program. At the Welcome screen, click Next>. 5. At the Choose Destination Location screen, you can accept the default path or enter a different path at which to install the Configuration Utility files. Click Next>. 92 MultiMobile MT128ZLX User Guide 4: Windows NT Driver Procedures 6. At the Select Program Folder screen, you can accept the default folder or select another folder into which the program icons will be added. Then click Next>. 7. The Start Copying Files screen allows you one last chance to go back and change the information that you have provided in previous steps. When satisfied with your settings, click Next> to begin copying files. 93 MultiMobile MT128ZLX User Guide 4: Windows NT Driver Procedures 8. Progress screens will appear while files are being copied to your hard disk. When file copying is complete, a Configuration Utility window will also appear, displaying the three applets of the Configuration Utility program (HW Detect, Protocol Analyzer, and Status monitor). Close the Configuration Utility window. 9. At the Setup Complete, screen, select Yes, I want to restart my computer now. Click Finish. 94 MultiMobile MT128ZLX User Guide 4: Windows NT Driver Procedures 10. When the restart process is complete, the HW Detect window will appear. This screen presents the IRQ values and base-I/O addresses that are available in the computer. Available resources are marked with a green check. Resources already in use are marked with a red “X.” This is an informational screen only. Click OK. NOTE: The resource information presented on the HW Detect screen is also available at Start | Programs | Administrative Tools | Windows NT Diagnostics. Then select the Resources tab. Click on the IRQ button to see the IRQ resources already in use. Click on I/O Port to see the base-I/O addresses already in use. 95 MultiMobile MT128ZLX User Guide 4: Windows NT Driver Procedures 11. Go to Start | Settings | Control Panel | Network.. Select the Adapters tab. Click Add. 12. The Select Network Adapter screen appears. Click Have Disk. 96 MultiMobile MT128ZLX User Guide 4: Windows NT Driver Procedures 13. At the Insert Disk screen, enter D:\nt40, where “D” is the CD-ROM drive letter. Click OK. 14. The Select OEM Option screen appears. Click OK. 15. A progress screen will appear while files are being copied. 97 MultiMobile MT128ZLX User Guide 4: Windows NT Driver Procedures 16. The MultiMobile MT128ZLX Setup screen will appear. Enter the “Adapter Settings” (these are computer resource settings) and the “Line Settings” (these are ISDN settings) that are requested on the screen. Click OK. 17. A progress screen appears briefly. Then a Setup Message screen appears indicating that RAS must be configured. Click OK. 98 MultiMobile MT128ZLX User Guide 4: Windows NT Driver Procedures 18. At the Network screen, click on the Services tab. Highlight Remote Access Service. Click on Properties. 19. At the Remote Access Setup screen, select Add. 99 MultiMobile MT128ZLX User Guide 4: Windows NT Driver Procedures 20. The Add RAS Device screen appears. Highlight “ISDN1 – MT128STZLX” and click OK. 21. At the Remote Access Setup screen, select Add again. 22. The Add RAS Device screen appears again. Highlight “ISDN2 – MT128STZLX” and click OK. 100 MultiMobile MT128ZLX User Guide 4: Windows NT Driver Procedures 23. At the Remote Access Setup screen, click Continue. 24. At the Network screen, click Close. 101 MultiMobile MT128ZLX User Guide 4: Windows NT Driver Procedures 25. Progress screens appear while bindings are being stored. You will then be prompted to reboot your computer. Click Yes. 26. Installation is complete. Verifying the Windows NT4 Installation 1. When the restart process is complete, go to Start | Settings | Control Panel. Click on the PC Card applet. The MultiMobile MT128ZLX is listed with a question-mark icon. This is normal. Click OK. 102 MultiMobile MT128ZLX User Guide 4: Windows NT Driver Procedures 2. Go to Start | Programs | Administrative Tools | Windows NT Diagnostics. Select the Resources tab and the IRQ button. Verify that the ISDN-TA device is assigned to the IRQ that you selected earlier. 3. Under the Resources tab, click the I/O Port button. Verify that the ISDN-TA device is using the I/O address that you selected earlier. 103 MultiMobile MT128ZLX User Guide 4: Windows NT Driver Procedures 4. If for any reason the IRQ or I/O Port are not the same as the ones you specified earlier, go back and repeat the Windows NT procedure at step 11 and then re-check that the correct IRQ and I/O Port values have been assigned. If you still have problems with this, call MultiTech’s Tech Support group at 1-800972-2439. Configuring the MT128ZLX in Windows NT4 NOTE: In this procedure, you will be asked to enter detailed configuration information that relates to the ISDN equipment being used by your telephone company. Specifically, your telephone company must provide the following information: SPIDs, Phone Numbers, Switch Type, and Voice Encoding type (or “Analog Encoder”). This information is supplied by your telephone company and you must have it available when doing this procedure. 1. Go to Start | Settings | Control Panel | Network. At the Network screen, click on the Adapters tab. Highlight “MultiMobile MT128STZLX Adapter.” Click on Properties. 104 MultiMobile MT128ZLX User Guide 4: Windows NT Driver Procedures 2. The MultiMobile MT128STZLX Setup screen will appear. 3. Enter the information needed in each field of the Line Setting pane. Switch Type: See listed options. Phone Numbers: B1 number and B2 number SPID: Needed only in the U.S. and Canada. B-Channel Speed: 56kbps or 64 kbps Analog Encoder: For Net3 or ETSI, use A-law voice encoding. For other switches, use Mu-law voice encoding. Click OK. At the Network screen, click Close. When prompted to reboot, click Yes. 105 MultiMobile MT128ZLX User Guide 4: Windows NT Driver Procedures Uninstalling the MT128ZLX-ST/NT Drivers in Windows NT4 1. Go to Start | Settings | Control Panel. Click on the Network icon. At the Network dialog box, click on the Services tab. Highlight Remote Access Service. Click Properties. 2. The Remote Access Setup dialog box appears. Highlight “ISDN1” and click Remove. 106 MultiMobile MT128ZLX User Guide 4: Windows NT Driver Procedures At the confirmation screen, click Yes. 3. At the Remote Access Setup dialog box, highlight “ISDN2” and click Remove. At the confirmation screen, click Yes. 4. Click Continue at the Remote Access Setup screen. When the Network dialog box appears again, click on the Adapters tab. Highlight the entry “MultiMobile MT128STZLX Adapter.” Click Remove. 107 MultiMobile MT128ZLX User Guide 4: Windows NT Driver Procedures 5. When the confirmation screen appears, click Yes. 6. When the Network dialog box appears again, click Close. Transient progress screens will appear while bindings are being stored. 7. When prompted to restart your computer, click Yes. 8. When the restart process is complete, go to Start | Settings | Control Panel. Click on the Add/Remove Programs icon. Highlight Configuration Utility. Click on Add/Remove. 108 MultiMobile MT128ZLX User Guide 4: Windows NT Driver Procedures 10. At the Confirm File Deletion screen, click Yes. 11. The Uninstall Shield program will appear. At the Remove Programs From Your Computer screen, click OK. 12. When the Add/Remove Programs Properties screen appears, click OK. 13. The uninstall procedure is complete. 109 MultiMobile MT128ZLX User Guide 4: Windows NT API Usage MT128ZLX: Using APIs in Windows NT About APIs The MT128ZLX-ST/NT operates in conjunction with three Application Program Interface software packages: NDIS, VCOMM, or CAPI. However, VCOMM is not supported in Windows NT. This chapter presents examples of how the MT128ZLX can be used with NDIS and CAPI. The CAPI-compliant program used in these examples is RVS-COM Lite. Each API contains software components that interact with the operating system of the computer in which the MT128ZLX is installed. Each API adds communications functionality to the system. Each of API adds a somewhat different set of features to the system, as summarized in the table below and described more fully in subsequent sections. API Full Name Functionality NDIS Network Driver Interface Specification dial-up networking (DUN)connection, network interface card (NIC) emulation VCOMM Virtual Communications Driver not supported in Windows NT CAPI Common ISDN Application Program Interface dial-up networking (DUN)connection, modem emulation, G3 and G4 FAX, V.110, V.120, X.75, HDLC, interface to ISDN features and services The NDIS API NDIS allows Network Interface Cards (NICs) to work with each other, with the operating system, and with higher order protocol drivers. NDIS is an interface that facilitates development of NIC drivers. NDIS program routines can implement the functions that NIC drivers must perform. These include interaction with protocol drivers, the handling of hardware interrupts, and interface with underlying NICs by dealing with registers, port I/O, and other functionality. NDIS allows drivers to be developed in high-level programming languages, such that their creation and implementation are platform-independent. 110 MultiMobile MT128ZLX User Guide 4: Windows NT API Usage The CAPI API Being a common interface, the ISDN CAPI (Common Application Program Interface), allows software programs to use all ISDN services. Computer programs have access to most services and features of ISDN when used with CAPI. This access is hardware-independent. CAPI makes call numbers available, as well as several kinds of service information: caller number, called number, call charges, ISDN service ID. CAPI also facilitates transmission of data, FAX, or voice, and multiple B-channels can also be used simultaneously on a single call. It is the capabilities of the ISDN adapter and the type of ISDN connection that determine which services and features are actually available. CAPI merely serves as a common interface. ISDN CAPI is a platformindependent standard which can be used in non-Windows operating systems like OS/2 and UNIX, as well as in Microsoft operating systems. CAPI 2.0 is the current form of CAPI. ISDN adapters with CAPI 2.0 can be used anywhere in Europe with the DSS1 Euro-ISDN connection. Intro to API Single-Channel and MultiLink Examples In the following procedures, you will use Application Program Interfaces (APIs) to set up and use dial-up networking with the MT128ZLX in conjunction with the particular operating system your computer is using. The APIs are installed as part of the MT128ZLX driver installation, which must be complete before these procedures can be done. Note that the procedures presented here are examples only. Your use of APIs will depend on the needs and limitations of your operating environment. 111 MultiMobile MT128ZLX User Guide 4: Windows NT API Usage Windows NT4 NDIS: Single Channel Access Example NOTE: To install, configure, and remove devices in Windows NT, your logon permissions must include the ability to load and remove device drivers. NOTE: To complete this procedure, you will need to know several technical details that can be provided by your ISP or by your network administrator. 1. You will need to know whether or not an encrypted password is needed to access the network to which you will be connected. 2. If you are connecting to a non-Windows NT server, you will also need to know in advance whether or not the server requires you to type in login information or to know TCP/IP addresses before dialing. 3. If applicable, you will need to know the domain name of the network to which you will be connected. 4. You will need to know the dial-out network protocol to be used (NetBEUI, TCP/IP, or IPX). 5. You will need to know how to configure your port usage (dial-out calls only, receive calls only, dial-out and receive calls). 1. Go to Start | Programs | Accessories | Dial-Up Networking. If this is your first communications connection, the Dial-Up Networking screen will appear. 2. The Dial-Up Networking Wizard will be launched. Click New. 112 MultiMobile MT128ZLX User Guide 4: Windows NT API Usage 3. The New Phonebook Entry Wizard screen appears. Type in a descriptive name for the phonebook entry. Click Next>. 4. The Server screen appears. Click the check-boxes that apply. Click Next>. 113 MultiMobile MT128ZLX User Guide 4: Windows NT API Usage 5. The Modem or Adapter screen appears. For this example, select “MT128STZLX (ISDN1).” Click Next>. 6. The Phone Number screen appears. Enter the phone number of the dial-up server you are calling. Click Next>. 114 MultiMobile MT128ZLX User Guide 4: Windows NT API Usage 7. At the completion screen, click Finish. 8. The Dial-Up Networking screen re-appears. 115 MultiMobile MT128ZLX User Guide 4: Windows NT API Usage 9. Click More. Highlight and click on Edit Entry and Modem Properties. 10. The Edit Phonebook Entry screen appears. 11. Click on the Server tab to configure logon options, encryption, log file information and network protocol options, including TCP/IP Settings, for your remote server and DNS connections. If necessary, contact your ISP or network administrator to obtain the correct TCP/IP addressing information. 12. Use the Script tab to define scripts that will run when this connection is made. Click OK to complete the configuration. 116 MultiMobile MT128ZLX User Guide 4: Windows NT API Usage To use the new connection, click on the Dial button. Type in the user name and password for your remote account. If you are joining a domain, you must also specify the domain name. Windows NT4 NDIS: Dual Channel Access Example (MultiLink) NOTE: To install, configure, and remove devices in Windows NT, your logon permissions must include the ability to load and remove device drivers. NOTE: To complete this procedure, you will need to know several technical details that can be provided by your ISP or by your network administrator. 1. You will need to know whether or not an encrypted password is needed to access the network to which you will be connected. 2. If you are connecting to a non-Windows NT server, you will also need to know in advance whether or not the server requires you to type in login information or to know TCP/IP addresses before dialing. 3. If applicable, you will need to know the domain name of the network to which you will be connected. 4. You will need to know the dial-out network protocol to be used (NetBEUI, TCP/IP, or IPX). 5. You will need to know how to configure your port usage (dial-out calls only, receive calls only, dial-out and receive calls). If you would like to use multi-linking with your NDIS connection, first be sure that your ISDN provider supports a 128kbps MLP option. 1. To begin, you will need to create a new dial-up connection as described above (“Windows NT NDIS : Single Channel Access Example”) or modify an existing connection. Go to Start | Programs | Accessories | Dial-Up Networking. 117 MultiMobile MT128ZLX User Guide 4: Windows NT API Usage 2. Click More. Highlight and click on Edit Entry and Modem Properties. 3. The Edit Phonebook Entry screen appears. In the Dial using drop-down box, select “Multiple Lines.” 118 MultiMobile MT128ZLX User Guide 4: Windows NT API Usage 4. Click on the Configure button. The Multiple Line Configuration screen appears. For this example, highlight MT128STZLX (ISDN2) and click the check box. Click on the Phone Numbers button. 5. The Phone Numbers screen will appear. In the New phone number field, type in the phone number. (In this example, both ISDN lines use the same phone number. In some cases, a separate phone number is used for each ISDN connection.) Click Add. The new phone number will appear in the Phone numbers field. Click OK. At the Multiple Line Configuration screen, click OK. At the Edit Phonebook Entry screen, click OK. 119 MultiMobile MT128ZLX User Guide 4: Windows NT API Usage To use the new multi-link connection, click on the Dial button. Type in the user name and password for your remote account. If you are joining a domain, you must also specify the domain name. Windows NT4 VCOMM: Single Channel Access Not supported. Windows NT4 VCOMM: Dual Channel Access Not supported. 120 MultiMobile MT128ZLX User Guide 4: Windows NT API Usage Windows NT4 CAPI: Single Channel Access Example NOTE: To install, configure, and remove devices in Windows NT, your logon permissions must include the ability to load and remove device drivers. NOTE: To complete this procedure, you will need to know several technical details that can be provided by your ISP or by your network administrator: 1. You will need to know whether or not an encrypted password is needed to access the network to which you will be connected. 2. If you are connecting to a non-Windows NT server, you will also need to know in advance whether or not the server requires you to type in login information or to know TCP/IP addresses before dialing. 3. If applicable, you will need to know the domain name of the network to which you will be connected. 4. You will need to know the dial-out network protocol to be used (NetBEUI, TCP/IP, or IPX). 5. You will need to know how to configure your port usage (dial-out calls only, receive calls only, dial-out and receive calls). To use the Common ISDN Application Interface (CAPI), you must install a CAPI-compliant telecommunications application, such as the RVS-COM Lite program, which will be used for this example. After installing RVS-COM Lite, several new virtual modems become available to configure. The following example uses the RVS ISDN V.120 modem. Before beginning, be sure that the RVS-COM Center is running (the icon will appear in the Windows NT Task Bar). 1. Go to Start | Settings | Control Panel | Network. Select the Services tab. Highlight Remote Access Service. 2. Select Properties. The Remote Access Setup screen appears. Click Add. 121 MultiMobile MT128ZLX User Guide 4: Windows NT API Usage 3. The Add RAS Device screen appears. In the RAS-capable devices drop-down box, select “COM3-RVS ISDN V.120.” Click OK. 4. The Remote Access Setup screen re-appears. Click on the Configure button. The Configure Port Usage screen appears. Select the appropriate port usage. Click OK. 122 MultiMobile MT128ZLX User Guide 4: Windows NT API Usage 5. At the Remote Access Setup screen, click on the Network… button. Select the appropriate network protocol to be used. Click OK. 6. At the Remote Access Setup screen, click the Continue button. 7. At the Network screen, click Close. Transient screens will appear while bindings are being stored. You will be prompted to restart your computer. Click Yes. 8. Go to Start | Programs | Accessories | Dial-Up Networking. If this is your first communications connection, the Dial-Up Networking screen will appear. 9. The Dial-Up Networking Wizard will be launched. Click New. 123 MultiMobile MT128ZLX User Guide 4: Windows NT API Usage 10. The New Phonebook Entry Wizard screen appears. Type in a descriptive name for the phonebook entry. Click Next>. 11. The Server screen appears. Click the check-boxes that apply. Click Next>. 124 MultiMobile MT128ZLX User Guide 4: Windows NT API Usage 12. The Modem or Adapter screen appears. For this example, select “RVS ISDN V.120 (COM3).” Click Next>. 13. The Phone Number screen appears. Enter the phone number of the dial-up server you are calling. Click Next>. 125 MultiMobile MT128ZLX User Guide 4: Windows NT API Usage 14. At the completion screen, click Finish. 15. The Dial-Up Networking screen re-appears. 126 MultiMobile MT128ZLX User Guide 4: Windows NT API Usage 16. Click More. Highlight and click on Edit Entry and Modem Properties. 17. The Edit Phonebook Entry screen appears. 18. Click on the Server tab to configure logon options, encryption, log file information and network protocol options, including TCP/IP Settings, for your remote server and DNS connections. If necessary, contact your ISP or network administrator to obtain the correct TCP/IP addressing information. 19. Use the Script tab to define scripts that will run when this connection is made. Click OK to complete the configuration. To use the new connection, click on the Dial button. Type in the user name and password for your remote account. If you are joining a domain, you must also specify the domain name. Windows NT4 CAPI: Dual Channel Access Example (MultiLink) 127 MultiMobile MT128ZLX User Guide 4: Windows NT API Usage NOTE: To install, configure, and remove devices in Windows NT, your logon permissions must include the ability to load and remove device drivers. NOTE: To complete this procedure, you will need to know several technical details that can be provided by your ISP or by your network administrator. 1. You will need to know whether or not an encrypted password is needed to access the network to which you will be connected. 2. If you are connecting to a non-Windows NT server, you will also need to know in advance whether or not the server requires you to type in login information or to know TCP/IP addresses before dialing. 3. If applicable, you will need to know the domain name of the network to which you will be connected. 4. You will need to know the dial-out network protocol to be used (NetBEUI, TCP/IP, or IPX). 5. You will need to know how to configure your port usage (dial-out calls only, receive calls only, dial-out and receive calls). To use the Common ISDN Application Interface (CAPI), you must install a CAPI-compliant telecommunications application, such as the RVS-COM Lite program, which will be used for this example. After installing RVS-COM Lite, several new virtual modems become available to configure. The following example uses the RVS ISDN V.120 modem. Before beginning, be sure that the RVS-COM Center is running (the icon will appear in the Windows NT Task Bar). If you would like to use multi-linking with your CAPI connection, first be sure that your ISDN provider supports a 128kbps MLP option. The ports you link must first be enabled through RVS-Com. In this example, the RVS ISDN V.120 modems are used. 1. To enable the ports in RVS-Com, open the RVS-Com Comm Center. 2. Click the Services tab. In the Virtual Com Ports section of the window, place a check mark in front of both ports. Associate each port with a unique COM port number (the two devices must use different COM ports). Click Apply, and then OK. 128 MultiMobile MT128ZLX User Guide 4: Windows NT API Usage 3. Go to Start | Settings | Control Panel | Modems. Click Add. 4. The Install New Modems screen appears. Select “Don’t detect my modem; I will select it from a list.” Click Next>. 129 MultiMobile MT128ZLX User Guide 4: Windows NT API Usage 5. The next screen displays a list of modem manufacturers and modem models. In the Manufacturers pane, highlight “RVS Datentechnik.” In the Models pane, highlight “RVS ISDN V.120.” Click Next>. 6. The next screens allows you to select which COM port to use with the “RVS ISDN V.120 modem.” 130 MultiMobile MT128ZLX User Guide 4: Windows NT API Usage 7. At the completion screen, click Finish. The Modems Properties screen appears. Click Close. You will be prompted to configure your dial-up networking because the list of modems has changed. Click Yes. 8. The Remote Access Setup screen appears. Click Add. 131 MultiMobile MT128ZLX User Guide 4: Windows NT API Usage 9. The Add RAS Device screen appears. From the RAS-Capable Devices drop-down box, select “COM4 – RVS ISDN V.120 #2.” Click OK. 10. The Remote Access Setup screen re-appears. Click on the Configure button. The Configure Port Usage screen appears. Select the appropriate port usage. Click OK. 11. At the Remote Access Setup screen, click on the Network… button. Select the appropriate network protocol to be used. Click OK. 132 MultiMobile MT128ZLX User Guide 4: Windows NT API Usage 12. At the Remote Access Setup screen, click the Continue button. 13. Transient screens will appear while bindings are being stored. You will be prompted to restart your computer. Click Yes. 14. You will need to create a new dial-up connection as described above (“Windows NT CAPI : Single Channel Access Example”) or modify an existing connection. Go to Start | Programs | Accessories | DialUp Networking. 133 MultiMobile MT128ZLX User Guide 4: Windows NT API Usage 15. Click More. Highlight and click on Edit Entry and Modem Properties. 16. The Edit Phonebook Entry screen appears. In the Dial using drop-down box, select “Multiple Lines.” 134 MultiMobile MT128ZLX User Guide 4: Windows NT API Usage 17. Click on the Configure button. The Multiple Line Configuration screen appears. For this example, highlight RVS ISDN V.120 #2 (COM4) and click the check box. Click on the Phone Numbers button. 18. The Phone Numbers screen will appear. In the New phone number field, type in the phone number. (In this example, both ISDN lines use the same phone number. In some cases, a separate phone number is used for each ISDN connection.) Click Add. The new phone number will appear in the Phone numbers field. Click OK. 135 MultiMobile MT128ZLX User Guide 4: Windows NT API Usage At the Multiple Line Configuration screen, click OK. At the Edit Phonebook Entry screen, click OK. To use the new multi-link connection, click on the Dial button. Type in the user name and password for your remote account. If you are joining a domain, you must also specify the domain name. 136 5 Installation & Use in Windows 2000 137 MultiMobile MT128ZLX User Guide 5: Windows 2000 Driver Procedures MT128ZLX-ST/NT: Windows 2000 Driver Procedures Windows 2000 Installation NOTE: Before beginning the installation, you must obtain the following technical information from your telephone company: SPIDs (North America only) Switch Type Voice Encoding scheme Telephone Number(s) NOTE: To install, configure, and remove devices in Windows 2000, your logon permissions must include the ability to load and remove device drivers. NOTE: As you begin this procedure, the MT128ZLX card should not be installed in the computer’s PCMCIA slot. The setup.exe file must be run before the card is installed. Otherwise problems will arise as Windows 2000 detects the device. 1. For now, leave the MT128ZLX card out of the computer’s PCMCIA slot. 2. Insert the MT128ZLX Installation CD into the computer’s CD-ROM drive. 3. Using Windows Explorer, browse to the win2000 directory on the MT128ZLX Installation CD. 4. Double-click on the Setup.exe file to launch the Configuration Utility Setup program. At the Welcome screen, click Next>. 138 MultiMobile MT128ZLX User Guide 5: Windows 2000 Driver Procedures 5. At the Choose Destination Location screen, you can accept the default path or enter a different path at which to install the Configuration Utility files. Click Next>. 6. At the Select Program Folder screen, you can accept the default folder or select another folder into which the program icons will be added. Then click Next>. 139 MultiMobile MT128ZLX User Guide 5: Windows 2000 Driver Procedures 7. The Start Copying Files screen allows you one last chance to go back and change information that you have provided in previous steps. When satisfied with your settings, click Next> to begin copying files. 8. Progress screens will appear while files are being copied to your hard disk. When file copying is complete, a Configuration Utility window will also appear, displaying the various applets of the Configuration Utility program (HW Detect, Protocol Analyzer, and Status monitor, etc.). Close the Configuration Utility window. 140 MultiMobile MT128ZLX User Guide 5: Windows 2000 Driver Procedures 9. At the Setup Complete, screen, select Yes, I want to restart my computer now. Click Finish. 10. When the restart process is complete, the Line Status window will appear briefly. Now, insert the MT128ZLX card into the laptop PC. 11. Windows 2000 detects the MT128ZLX card and the Found New Hardware screen appears. 141 MultiMobile MT128ZLX User Guide 5: Windows 2000 Driver Procedures 12. The Digital Signature Not Found screen will appear. Click Yes. 13. The Found New Hardware screen appears again, followed by another Digital Signature Not Found screen. 142 MultiMobile MT128ZLX User Guide 5: Windows 2000 Driver Procedures 14. The ISDN Configuration wizard screen sequence (labeled ISDN – Intelligent PCMCIA ISDN TA (Net)) begins. NOTE: The information entered in the Microsoft ISDN Configuration wizard does not affect the operation of the MT128ZLX. However, completing this wizard is necessary to update certain dial-up networking software components to add ISDN functionality to Windows 2000. The MT128ZLX is configured for use with the Configuration Utility that was installed during driver installation. In the section “Configuring the MT128ZLX” (presented later in this chapter), you will supply setup information for using the Configuration Utility program with your particular computer. The info entered in this screen sequence will be superseded. Click Next>. 15. The next screen requests Phone Number and SPID information. Again, this info will be superseded. Leave the fields on this screen blank. Click Next>. 143 MultiMobile MT128ZLX User Guide 5: Windows 2000 Driver Procedures 16. A completion screen appears. Click Finish. 17. You will be prompted to restart your computer. Click Yes. The driver installation procedure is now complete. However, before you can use your MT128ZLX in Windows 2000, it must be configured with SPIDs (in the U.S. and Canada), telephone numbers, voice-encoding information, and switch-type information. (See the procedure “Configuring the MT128ZLX In Windows 2000” below.) Verifying the Windows 2000 Installation 1. Go to Start | Settings | Control Panel. Click on the System icon. Click on the Hardware tab. Click on the Device Manager button. 2. After a successful driver installation, the Device Manager will contain the following entries: Intelligent PCMCIA ISDN TA (ISDN) \ MultiMobile MT128ZLX-ST (ISDN) 144 MultiMobile MT128ZLX User Guide 5: Windows 2000 Driver Procedures Modems \ MultiMobile MT128ZLX-ST (Modem) Multifunction Adapters \ MultiMobile MT128ZLX-ST (Multi-Function Card) Network Adapters \ Intelligent PCMCIA ISDN TA (Net) 3. If these entries do not appear, re-do the driver installation procedure. If the installation fails repeatedly, call MultiTech Tech Support (800-972-2439). Configuring the MT128ZLX-ST/NT in Windows 2000 NOTE: In this procedure, you will be asked to enter detailed configuration information that relates to the ISDN equipment being used by your telephone company. Specifically, your telephone company must provide the following information: SPIDs, Phone Numbers, Switch Type, and Voice Encoding type. This information is supplied by your telephone company and you must have it available when doing this procedure. 1. Go to Start | Programs | Configuration Utility for Win2000 | Config. 145 MultiMobile MT128ZLX User Guide 5: Windows 2000 Driver Procedures 2. Enter the information needed in each field of the dialog box. Switch Type: See listed options. Phone Numbers: B1 number and B2 number. SPID Needed only in the U.S. and Canada. B-Channel Speed 56 kbps or 64 kbps Voice Encoding: for Net3 or ETSI, use A-law voice encoding for other switches, use Mu-law voice encoding Click OK. 146 MultiMobile MT128ZLX User Guide 5: Windows 2000 Driver Procedures Uninstalling the MT128ZLX-ST/NT Drivers in Windows 2000 1. Go to Start | Settings | Control Panel. Click on the Add/Remove Programs icon. At the Add/Remove Programs dialog box, highlight Change or Remove Programs. Click Change/Remove. 2. At the confirmation screen, click Yes. 3. The Uninstall Shield program will appear. At the Remove Programs From Your Computer screen, click OK. 147 MultiMobile MT128ZLX User Guide 5: Windows 2000 Driver Procedures Click on Details to see files that must be manually deleted later. Record file names as needed. 4. Click Continue at the Remote Access Setup screen. When the Network dialog box appears again, click on the Adapters tab. Highlight the entry “MultiMobile MT128STZLX Adapter.” Click Remove. 148 MultiMobile MT128ZLX User Guide 5: Windows 2000 Driver Procedures 5. When the confirmation screen appears, click Yes. 6. When the Network dialog box appears again, click Close. Transient progress screens will appear while bindings are being stored. 7. When prompted to restart your computer, click Yes. 8. When the restart process is complete, go to Start | Settings | Control Panel. Click on the Add/Remove Programs icon. Highlight Configuration Utility. Click on Add/Remove. 10. At the Confirm File Deletion screen, click Yes. 149 MultiMobile MT128ZLX User Guide 5: Windows 2000 Driver Procedures 11. The Uninstall Shield program will appear. At the Remove Programs From Your Computer screen, click OK. 12. When the Add/Remove Programs Properties screen appears, click OK. 13. The uninstall procedure is complete. 150 MultiMobile MT128ZLX User Guide 5: Windows 2000 API Usage MT128ZLX: Using APIs in Windows 2000 About APIs The MT128ZLX-ST/NT operates in conjunction with three Application Program Interface software packages: NDIS, VCOMM, or CAPI. This chapter presents examples of how the MT128ZLX can be used with these APIs. The CAPI-compliant program used in these examples is RVS-COM Lite. Each API contains software components that interact with the operating system of the computer in which the MT128ZLX is installed. Each API adds communications functionality to the system. Each of the three APIs adds a somewhat different set of features to the system, as summarized in the table below and described more fully in subsequent sections. API Full Name Functionality NDIS Network Driver Interface Specification dial-up networking (DUN)connection, network interface card (NIC) emulation VCOMM Virtual Communications Driver dial-up networking (DUN)connection, modem emulation CAPI Common ISDN Application Program Interface dial-up networking (DUN)connection, modem emulation, G3 and G4 FAX, V.110, V.120, X.75, HDLC, interface to ISDN features and services The NDIS API NDIS allows Network Interface Cards (NICs) to work with each other, with the operating system, and with higher order protocol drivers. NDIS is an interface that facilitates development of NIC drivers. NDIS program routines can implement the functions that NIC drivers must perform. These include interaction with protocol drivers, the handling of hardware interrupts, and interface with underlying NICs by dealing with registers, port I/O, and other functionality. NDIS allows drivers to be developed in high-level programming languages, such that their creation and implementation are platform-independent. The VCOMM API The communications device driver known as “VCOMM” provides protected-mode services. It allows makes ports and modems available to Windows-based software application programs. VCOMM also uses plug-and-play functionality to simplify the installation and configuration of communications devices. 151 MultiMobile MT128ZLX User Guide 5: Windows 2000 API Usage The CAPI API Being a common interface, the ISDN CAPI (Common Application Program Interface), allows software programs to use all ISDN services. Computer programs have access to most services and features of ISDN when used with CAPI. This access is hardware-independent. CAPI makes call numbers available, as well as several kinds of service information: caller number, called number, call charges, ISDN service ID. CAPI also facilitates transmission of data, FAX, or voice, and multiple B-channels can also be used simultaneously on a single call. It is the capabilities of the ISDN adapter and the type of ISDN connection that determine which services and features are actually available. CAPI merely serves as a common interface. ISDN CAPI is a platformindependent standard which can be used in non-Windows operating systems like OS/2 and UNIX, as well as in Microsoft operating systems. CAPI 2.0 is the current form of CAPI. ISDN adapters with CAPI 2.0 can be used anywhere in Europe with the DSS1 Euro-ISDN connection. Intro to API Single-Channel and MultiLink Examples In the following procedures, you will use Application Program Interfaces (APIs) to set up and use dial-up networking with the MT128ZLX in conjunction with the particular operating system your computer is using. The APIs are installed as part of the MT128ZLX driver installation, which must be complete before these procedures can be done. Note that the procedures presented here are examples only. Your use of APIs will depend on the needs and limitations of your operating environment. 152 MultiMobile MT128ZLX User Guide 5: Windows 2000 API Usage Windows 2000 NDIS: Single Channel Access Example NOTE: To install, configure, and remove devices in Windows 2000, your logon permissions must include the ability to load and remove device drivers. NOTE: To complete this procedure, you will need to know several technical details that can be provided by your ISP or by your network administrator. 1. You will need to know whether or not an encrypted password is needed to access the network to which you will be connected. 2. If you are connecting to a non-Windows 2000 server, you will also need to know in advance whether or not the server requires you to type in login information or to know TCP/IP addresses before dialing. 3. If applicable, you will need to know the domain name of the network to which you will be connected. 4. You will need to know the dial-out network protocol to be used (NetBEUI, TCP/IP, or IPX). 1. Go to Start | Programs | Accessories | Communications | Network and Dial-Up Connections. The Network Connection Wizard screen will appear. At this ‘welcome’ screen, click Next>. 153 MultiMobile MT128ZLX User Guide 5: Windows 2000 API Usage 2. At the Network Connection Type screen, choose the type of network connection you want to create, based on your network configuration and your networking needs. For this example, we will select “Dialup to private network.” Click Next>. 3. The Select a Device screen appears. At this screen, you specify the device to be used for this connection. In this example, we have chosen the “ISDN Channel-Intelligent PCMCIA ISDN TA (Net).” Click Next>. 154 MultiMobile MT128ZLX User Guide 5: Windows 2000 API Usage 4. The Phone Number to Dial screen appears. At this screen, you will type the phone number of the computer or network to which you are connecting. Click Next>. 155 MultiMobile MT128ZLX User Guide 5: Windows 2000 API Usage 5. The Connection Availability screen appears. At this screen, you can choose to make this connection available only to yourself or, alternatively, to all users. Click Next>. 6. The Completing the Network Connection Wizard screen appears. At this screen, you should type in a descriptive name for this connection. Click Finish. 156 MultiMobile MT128ZLX User Guide 5: Windows 2000 API Usage 7. The Connect Dial-Up Connection screen appears. To configure this connection, click the Properties button. 157 MultiMobile MT128ZLX User Guide 5: Windows 2000 API Usage From the Dial-Up Connection screen, do one or more of the following: - to configure dialing services, phone numbers, host address, country/region codes, or dialing rules, click the General tab; - to configure dialing and re-dialing options, multi-link configuration, domain name, or X.25 parameters, click the Options tab; - to configure identity, authentication, data encryption, or terminal window and scripting options, click the Security tab; - to configure the remote access server and protocols used for this connection, click the Networking tab. When configuration is complete, click OK to return to the Connect Dial-Up Connection screen. To use the new connection, click on the Dial button. Type in the user name and password for your remote account. If you are joining a domain, you must also specify the domain name. 158 MultiMobile MT128ZLX User Guide 5: Windows 2000 API Usage Windows 2000 NDIS: Dual Channel Access Example (MultiLink) If you would like to use multi-linking with your NDIS connection, first be sure that your ISDN provider supports a 128kbps MLP option. NOTE: To install, configure, and remove devices in Windows 2000, your logon permissions must include the ability to load and remove device drivers. NOTE: To complete this procedure, you will need to know several technical details that can be provided by your ISP or by your network administrator. 1. You will need to know whether or not an encrypted password is needed to access the network to which you will be connected. 2. If you are connecting to a non-Windows 2000 server, you will also need to know in advance whether or not the server requires you to type in login information or to know TCP/IP addresses before dialing. 3. If applicable, you will need to know the domain name of the network to which you will be connected. 4. You will need to know the dial-out network protocol to be used (NetBEUI, TCP/IP, or IPX). 1. To begin, you will need to create a new dial-up connection as described above (“Windows 2000 NDIS : Single Channel Access Example”) or modify an existing connection. Go to Start | Programs | Accessories | Communications | Network and Dial-Up Connections. 159 MultiMobile MT128ZLX User Guide 5: Windows 2000 API Usage 2. Double-click on the icon of the connection you want to configure. At the Connect Dial-Up Connection screen, click Properties. 3. The Dial-Up Connection screen appears. Select the General tab. Select the check-box for the additional “ISDN Channel-Intelligent PCMCIA ISDN TA (Net)” listed in the Connect Using field. Since the multi-link connection you are making requires two of these devices, be sure that both “ISDN ChannelIntelligent PCMCIA ISDN TA (Net)” entries are selected. Click OK. The Connect Dial-Up Connection screen appears. 160 MultiMobile MT128ZLX User Guide 5: Windows 2000 API Usage Type in the user name and password for your remote account. If you are joining a domain, you must also specify the domain name. To use the new multi-link connection, click on the Dial button. 161 MultiMobile MT128ZLX User Guide 5: Windows 2000 API Usage Windows 2000 Vcomm: Single Channel Access Example NOTE: To complete this procedure, you will need to know several technical details that can be provided by your ISP or by your network administrator. 1. You will need to know whether or not an encrypted password is needed to access the network to which you will be connected. 2. If you are connecting to a non-Windows NT server, you will also need to know in advance whether or not the server requires you to type in login information or to know TCP/IP addresses before dialing. 3. If applicable, you will need to know the domain name of the network to which you will be connected. 4. You will need to know the dial-out network protocol to be used (NetBEUI, TCP/IP, or IPX). 1. Go to Start | Programs | Accessories | Communications | Network and Dial-Up Connections. The Network Connection Wizard screen will appear. At this ‘welcome’ screen, click Next>. 162 MultiMobile MT128ZLX User Guide 5: Windows 2000 API Usage 2. At the Network Connection Type screen, choose the type of network connection you want to create, based on your network configuration and your networking needs. For this example, we will select “Dialup to private network.” Click Next>. 3. The Select a Device screen appears. At this screen, you specify the device to be used for this connection. In this example, we have chosen the “ISDN Channel-Intelligent PCMCIA ISDN TA (Net).” Click Next>. 163 MultiMobile MT128ZLX User Guide 5: Windows 2000 API Usage 4. The Phone Number to Dial screen appears. At this screen, you will type the phone number of the computer or network to which you are connecting. Click Next>. 5. The Connection Availability screen appears. At this screen, you can choose to make this connection available only to yourself or, alternatively, to all users. Click Next>. 164 MultiMobile MT128ZLX User Guide 5: Windows 2000 API Usage 6. The Completing the Network Connection Wizard screen appears. At this screen, you should type in a descriptive name for this connection. Click Finish. 7. The Connect Dial-Up Connection screen appears. 165 MultiMobile MT128ZLX User Guide 5: Windows 2000 API Usage To configure this connection, click the Properties button. 8. From the Dial-Up Connection screen, do one or more of the following: - to configure dialing services, phone numbers, host address, country/region codes, or dialing rules, click the General tab; - to configure dialing and re-dialing options, multi-link configuration, domain name, or X.25 parameters, click the Options tab; - to configure identity, authentication, data encryption, or terminal window and scripting options, click the Security tab; - to configure the remote access server and protocols used for this connection, click the Networking tab. 166 MultiMobile MT128ZLX User Guide 5: Windows 2000 API Usage When configuration is complete, click OK to return to the Connect Dial-Up Connection screen. To use the new connection, click on the Dial button. Type in the user name and password for your remote account. If you are joining a domain, you must also specify the domain name. Windows 2000 Vcomm: Dual Channel Access Example (MultiLink) NOT SUPPORTED. 167 MultiMobile MT128ZLX User Guide 5: Windows 2000 API Usage Windows 2000 CAPI: Single Channel Access Example NOTE: To install, configure, and remove devices in Windows 2000, your logon permissions must include the ability to load and remove device drivers. NOTE: To complete this procedure, you will need to know several technical details that can be provided by your ISP or by your network administrator. 1. You will need to know whether or not an encrypted password is needed to access the network to which you will be connected. 2. If you are connecting to a non-Windows 2000 server, you will also need to know in advance whether or not the server requires you to type in login information or to know TCP/IP addresses before dialing. 3. If applicable, you will need to know the domain name of the network to which you will be connected. 4. You will need to know the dial-out network protocol to be used (NetBEUI, TCP/IP, or IPX). To use the Common ISDN Application Interface (CAPI), you must install a CAPI-compliant telecommunications application, such as the RVS-COM Lite program, which will be used for this example. To use the Common ISDN Application Interface (CAPI), you must install a CAPI-compliant telecommunications application, such as the RVS-COM Lite program, which will be used for this example. After installing RVS-COM Lite, one modem, “RVS ISDN,” is installed automatically during the RVS-COM installation. We will use this single modem for this example. Additional modems of various types can be installed as needed. Before beginning, be sure that the RVS-COM Center is running (the icon will appear in the Windows 2000 Task Bar). 1. Go to Start | Programs | Accessories | Communications | Network and Dial-Up Connections. The Network Connection Wizard screen will appear. At this ‘welcome’ screen, click Next>. 168 MultiMobile MT128ZLX User Guide 5: Windows 2000 API Usage 2. At the Network Connection Type screen, choose the type of network connection you want to create, based on your network configuration and your networking needs. For this example, we will select “Dialup to private network.” Click Next>. 5. The Select a Device screen appears. At this screen, you specify the device to be used for this connection. In this example, we have chosen the “Modem-RVS ISDN (COM4).” Click Next>. 169 MultiMobile MT128ZLX User Guide 5: Windows 2000 API Usage 6. The Phone Number to Dial screen appears. At this screen, you will type the phone number of the computer or network to which you are connecting. Click Next>. 7. The Connection Availability screen appears. At this screen, you can choose to make this connection available only to yourself or, alternatively, to all users. Click Next>. 170 MultiMobile MT128ZLX User Guide 5: Windows 2000 API Usage 8. The Completing the Network Connection Wizard screen appears. At this screen, you should type in a descriptive name for this connection. Click Finish. 9. The Connect Dial-Up Connection screen appears. 171 MultiMobile MT128ZLX User Guide 5: Windows 2000 API Usage To configure this connection, click the Properties button. 10. From the Dial-Up Connection screen, do one or more of the following: - to configure dialing services, phone numbers, host address, country/region codes, or dialing rules, click the General tab; - to configure dialing and re-dialing options, multi-link configuration, domain name, or X.25 parameters, click the Options tab; - to configure identity, authentication, data encryption, or terminal window and scripting options, click the Security tab; - to configure the remote access server and protocols used for this connection, click the Networking tab. 172 MultiMobile MT128ZLX User Guide 5: Windows 2000 API Usage When configuration is complete, click OK to return to the Connect Dial-Up Connection screen. To use the new connection, click on the Dial button. Type in the user name and password for your remote account. If you are joining a domain, you must also specify the domain name. 173 MultiMobile MT128ZLX User Guide 5: Windows 2000 API Usage Windows 2000 CAPI: Dual Channel Access Example (MultiLink) NOTE: To install, configure, and remove devices in Windows 2000, your logon permissions must include the ability to load and remove device drivers. NOTE: To complete this procedure, you will need to know several technical details that can be provided by your ISP or by your network administrator. 1. You will need to know whether or not an encrypted password is needed to access the network to which you will be connected. 2. If you are connecting to a non-Windows 2000 server, you will also need to know in advance whether or not the server requires you to type in login information or to know TCP/IP addresses before dialing. 3. If applicable, you will need to know the domain name of the network to which you will be connected. 4. You will need to know the dial-out network protocol to be used (NetBEUI, TCP/IP, or IPX). To use the Common ISDN Application Interface (CAPI), you must install a CAPI-compliant telecommunications application, such as the RVS-COM Lite program, which will be used for this example. After installing RVS-COM Lite, one modem, “RVS ISDN,” is installed automatically during the RVS-COM installation. We will use this single modem for this example. Additional modems of various types can be installed as needed. Before beginning, be sure that the RVS-COM Center is running (the icon will appear in the Windows 2000 Task Bar). If you would like to use multi-linking with your CAPI connection, first be sure that your ISDN provider supports a 128kbps MLP option. The ports you link must first be enabled through RVS-Com Lite. 1. To enable the ports in RVS-Com, open the RVS-Com Comm Center. 2. Click the Services tab. In the Virtual Com Ports section of the window, place a check mark in front of both ports. Associate each port with a unique COM port number (the two devices must use different COM ports). Click Apply, and then OK. 174 MultiMobile MT128ZLX User Guide 5: Windows 2000 API Usage 3. Go to Start | Settings | Control Panel | Modems. The Phone and Modem Options screen appears. Select the Modems tab. Click on the Add button. 4. The Add/Remove Hardware Wizard screen appears. Select “Don’t detect my modem; I will select it from a list.” Click Next>. 175 MultiMobile MT128ZLX User Guide 5: Windows 2000 API Usage 5. The next screen displays a list of modem manufacturers and modem models. In the Manufacturers pane, highlight “RVS Datentechnik.” In the Models pane, highlight “RVS ISDN.” Click Next>. 6. The next screens allows you to select which COM port to use with the “RVS ISDN modem.” Select “COM 6.” Click Next>. 7. The Digital Signature Not Found screen appears. 176 MultiMobile MT128ZLX User Guide 5: Windows 2000 API Usage Click Yes to continue the installation. 177 MultiMobile MT128ZLX User Guide 5: Windows 2000 API Usage 8. At the completion screen, click Finish. You should now see two “RVS ISDN” devices in the Phone and Modem Properties Options window. Click OK to exit from the Phone and Modem Properties Options window. Then close the Control Panel window. 178 MultiMobile MT128ZLX User Guide 5: Windows 2000 API Usage 9. For this example, we will use the existing connection that was created in the CAPI single-channel procedure above (“Windows 2000 CAPI: Single Channel Access Example”). 10. Go to Start | Programs | Accessories | Communications | Network and Dial-Up Connections. This will open up the Network and Dial-Up Connections folder. At the Network and Dial-Up Connections folder, right-click on your new connection icon. Choose Properties. 11. The Dial-Up Connections Properties window appears. 179 MultiMobile MT128ZLX User Guide 5: Windows 2000 API Usage 12. The Dial-Up Connection screen appears. Select the General tab. Select the check-box for the additional “Modem-RVS ISDN #2 (COM6)” listed in the Connect Using field. Since the multi-link connection you are making requires two of these devices, be sure that both “Modem-RVS ISDN” entries are selected. Click OK. The Connect Dial-Up Connection screen appears. Type in the user name and password for your remote account. If you are joining a domain, you must also specify the domain name. To use the new multi-link connection, click on the Dial button. 180 6 Installation & Use in Windows ME 181 MultiMobile MT128ZLX User Guide 6: Windows ME Driver Procedures MT128ZLX-ST/NT: Windows ME Driver Procedures Windows ME Installation NOTE: Before beginning the installation, you must obtain the following technical information from your telephone company: SPIDs (North America only) Switch Type Voice Encoding scheme Telephone Number(s) NOTE: As you begin this procedure, the MT128ZLX card should not be installed in the computer’s PCMCIA slot. The setup.exe file must be run before the card is installed. Otherwise problems will arise as Windows ME detects the device. NOTE: During the installation, you should have your Windows ME CD-ROM close at hand. Windows ME may need to add or update files which must be copied from the CD. 1. For now, leave the MT128ZLX card out of the computer’s PCMCIA slot. 2. Insert the MT128ZLX Installation CD into the computer’s CD-ROM drive. 3. Using Windows Explorer, browse to the win9x directory on the MT128ZLX Installation CD. 182 MultiMobile MT128ZLX User Guide 6: Windows ME Driver Procedures 4. Double-click on the Setup.exe file to launch the Configuration Utility Setup program. At the Welcome screen, click Next. 5. At the Choose Destination Location screen, you can accept the default path or enter a different path at which to install the Configuration Utility files. Click Next>. 183 MultiMobile MT128ZLX User Guide 6: Windows ME Driver Procedures 6. At the Select Program Folder screen, you can accept the default folder or select another folder into which the program icons will be added. Then click Next>. 7. The Start Copying Files screen allows you one last chance to go back and change information that you have provided in previous steps. When satisfied with your settings, click Next> to begin copying files. 8. Progress screens will appear while files are being copied to your hard disk. 184 MultiMobile MT128ZLX User Guide 6: Windows ME Driver Procedures 9. The Configuration Utility screen appears, displaying the various applets of the Configuration Utility program. Close the Configuration Utility windows. 10. At the Setup Complete, screen, select Yes, I want to restart my computer now. Click Finish. 185 MultiMobile MT128ZLX User Guide 6: Windows ME Driver Procedures 11. When the restart process is complete, a message will appear indicating that “ISDN PC Card does not exist,” meaning that the card is not in the computer’s PCMCIA slot. This is normal. After the drivers are installed, this message will appear upon restart anytime the MT128ZLX card is not installed in its slot. Click OK. 12. Insert the MT128ZLX into the computer’s PCMCIA slot. 13. Windows ME will detect the MT128ZLX card. The New Hardware Found wizard will display a series of screens indicating that is has found new hardware and that it is installing the corresponding software. 14. Go to Start | Settings | Control Panel. Double-click the Add New Hardware icon. 186 MultiMobile MT128ZLX User Guide 6: Windows ME Driver Procedures The Add New Hardware Wizard begins with a warning to close all open applications. Click Next>. A plug-and-play screen appears. Click Next>. 187 MultiMobile MT128ZLX User Guide 6: Windows ME Driver Procedures 15. When prompted about the device list, select “No, the device isn’t in the list.” Click Next>. 16. When prompted about the hardware list, select “No, I want to select the hardware from a list.” Click Next>. 188 MultiMobile MT128ZLX User Guide 6: Windows ME Driver Procedures 17. In the “Hardware Types” list, select Network Adapters. Click Next>. 18. At the Select Device screen, highlight “MultiTech” in the Manufacturers pane; highlight “MultiMobile MT128ZLX-ST ISDN TA (Net)”in the Models pane. Click OK. 189 MultiMobile MT128ZLX User Guide 6: Windows ME Driver Procedures 19. At the completion screen, click Finish. Progress screens appear while files are being copied. 20. The ISDN Configuration wizard is launched. At the first screen, click Next>. NOTE: The information entered in the Microsoft ISDN Configuration Wizard is overridden by the information entered in the MT128ZLX configuration utility, which was installed during the driver installation. However, completing this wizard is necessary to update certain dial-up networking software components to add ISDN functionality to Windows ME. The MT128ZLX is configured for use with the Configuration Utility that was installed during driver installation. In the section “Configuring the MT128ZLX” (presented later in this chapter), you will supply setup information for using the Configuration Utility program with your particular computer. 190 MultiMobile MT128ZLX User Guide 6: Windows ME Driver Procedures 21. Accept the default value for the “Switch Protocol.” Click Next>. 22. The next wizard screen requests Phone Number and SPID information. It is not necessary to enter this information here. You will be asked to supply this information later (in the Configuration Utility program). Leave the fields of this dialog box blank. Click Next>. 21. In some cases, Windows ME may require an additional software component which can be loaded from the Windows ME CD-ROM. If this occurs, insert your Windows ME CD into the CD-ROM drive and follow the Windows ME messages to allow the required files to be copied. 191 MultiMobile MT128ZLX User Guide 6: Windows ME Driver Procedures 23. At the completion screen, click Finish. 24. When prompted to restart your computer, click Yes. 25. Driver installation is now complete. However, before you can use your MT128ZLX in Windows ME, it must be configured with these parameters: • • • • SPIDs (in the U.S. and Canada), telephone numbers, voice-encoding information, and switch-type information. (See the procedure “Configuring the MT128ZLX In Windows ME” below.) 192 MultiMobile MT128ZLX User Guide 6: Windows ME Driver Procedures Verifying the Windows ME Installation 1. Go to Start | Settings | Control Panel. Double-click the System icon. At the System Properties screen, select the Device Manager tab. 2. After a successful driver installation, the Device Manager will contain the following entries: ISDN Adapter \ MultiMobile MT128ZLX-ST (ISDN) Modem \ MultiMobile MT128ZLX-ST (modem) Multifunction Adapters \ MultiMobile MT128ZLX-ST Multi-Function Card Network Adapters \ MultiMobile MT128ZLX-ST ISDN TA (Net) 3. If these entries do not appear, un-install the Configuration Utility (see the the un-install section in this chapter). Then run the Setup.exe file again. If the installation fails repeatedly, call MultiTech Tech Support (800-972-2439). 193 MultiMobile MT128ZLX User Guide 6: Windows ME Driver Procedures Configuring the MT128ZLX-ST/NT in Windows ME NOTE: In this procedure, you will be asked to enter detailed configuration information that relates to the ISDN equipment being used by your telephone company. Specifically, your telephone company must provide the following information: SPIDs, Phone Numbers, Switch Type, and Voice Encoding type. This information is supplied by your telephone company and you must have it available when doing this procedure. 1. Go to Start | Programs | Configuration Utility | Config. The Configuration Utility dialog box will appear. 2. Enter the information needed in each field of the dialog box. Switch Type: Phone Numbers: SPID B-Channel Speed Voice Encoding: See listed options. B1 number and B2 number. Needed only in the U.S. and Canada. 56 kbps or 64 kbps for Net3 or ETSI, use A-law voice encoding for other switches, use Mu-law voice encoding Click OK. 194 MultiMobile MT128ZLX User Guide 6: Windows ME Driver Procedures Uninstalling the MT128ZLX-ST/NT Drivers in Windows ME 1. Close the Status program. After the Configuration Utility has been installed, the Status program’s icon normally appears at the lower right corner of your screen. Click on this icon and close the Status program. 2. Go to Start | Settings | Control Panel. Click on the Add/Remove Programs icon. The Add/Remove Programs Properties dialog box will appear. At the Install/Uninstall tab, highlight Configuration Utility. Click on the Add/Remove button. 3. At the Confirm File Deletion screen, click Yes. 195 MultiMobile MT128ZLX User Guide 6: Windows ME Driver Procedures 4. The Uninstall Shield program will appear. At the Remove Programs From Your Computer screen, click OK. Click on Details to see files that must be manually deleted later. Record file names as needed. Click OK at both of these screens to proceed. 196 MultiMobile MT128ZLX User Guide 6: Windows ME Driver Procedures 5. A message screen appears recommending that you restart your computer. Click OK. Then restart your computer. 197 MultiMobile MT128ZLX User Guide 6: Windows ME API Usage MT128ZLX: Using APIs in Windows ME About APIs The MT128ZLX-ST/NT operates in conjunction with three Application Program Interface software packages: NDIS, VCOMM, or CAPI. This chapter presents examples of how the MT128ZLX can be used with these APIs. The CAPI-compliant program used in these examples is RVS-COM Lite. Each API contains software components that interact with the operating system of the computer in which the MT128ZLX is installed. Each API adds communications functionality to the system. Each of the three APIs adds a somewhat different set of features to the system, as summarized in the table below and described more fully in subsequent sections. API Full Name Functionality NDIS Network Driver Interface Specification dial-up networking (DUN)connection, network interface card (NIC) emulation VCOMM Virtual Communications Driver dial-up networking (DUN)connection, modem emulation CAPI Common ISDN Application Program Interface dial-up networking (DUN)connection, modem emulation, G3 and G4 FAX, V.110, V.120, X.75, HDLC, interface to ISDN features and services The NDIS API NDIS allows Network Interface Cards (NICs) to work with each other, with the operating system, and with higher order protocol drivers. NDIS is an interface that facilitates development of NIC drivers. NDIS program routines can implement the functions that NIC drivers must perform. These include interaction with protocol drivers, the handling of hardware interrupts, and interface with underlying NICs by dealing with registers, port I/O, and other functionality. NDIS allows drivers to be developed in high-level programming languages, such that their creation and implementation are platform-independent. The VCOMM API The communications device driver known as “VCOMM” provides protected-mode services. It allows makes ports and modems available to Windows-based software application programs. VCOMM also uses plug-and-play functionality to simplify the installation and configuration of communications devices. 198 MultiMobile MT128ZLX User Guide 6: Windows ME API Usage The CAPI API Being a common interface, the ISDN CAPI (Common Application Program Interface), allows software programs to use all ISDN services. Computer programs have access to most services and features of ISDN when used with CAPI. This access is hardware-independent. CAPI makes call numbers available, as well as several kinds of service information: caller number, called number, call charges, ISDN service ID. CAPI also facilitates transmission of data, FAX, or voice, and multiple B-channels can also be used simultaneously on a single call. It is the capabilities of the ISDN adapter and the type of ISDN connection that determine which services and features are actually available. CAPI merely serves as a common interface. ISDN CAPI is a platformindependent standard which can be used in non-Windows operating systems like OS/2 and UNIX, as well as in Microsoft operating systems. CAPI 2.0 is the current form of CAPI. ISDN adapters with CAPI 2.0 can be used anywhere in Europe with the DSS1 Euro-ISDN connection. Intro to API Single-Channel and MultiLink Examples In the following procedures, you will use Application Program Interfaces (APIs) to set up and use dial-up networking with the MT128ZLX in conjunction with the particular operating system your computer is using. The APIs are installed as part of the MT128ZLX driver installation, which must be complete before these procedures can be done. Note that the procedures presented here are examples only. Your use of APIs will depend on the needs and limitations of your operating environment. 199 MultiMobile MT128ZLX User Guide 6: Windows ME API Usage Windows ME NDIS: Single Channel Access Example NOTE: To complete this procedure, you will need to know several technical details that can be provided by your ISP or by your network administrator. 1. You will need to know whether or not an encrypted password is needed to access the network to which you will be connected. 2. If you are connecting to a non-Windows server, you will also need to know in advance whether or not the server requires you to type in login information or to know TCP/IP addresses before dialing. 3. If applicable, you will need to know the domain name of the network to which you will be connected. 4. You will need to know the dial-out network protocol to be used (NetBEUI, TCP/IP, or IPX). 1. Go to Start | Programs | Accessories | Communications | Dial-Up Networking. If this is your first communications connection, the Welcome to Dial-Up Networking screen will appear. Otherwise, click on the Make New Connection icon. Click Next>. 200 MultiMobile MT128ZLX User Guide 6: Windows ME API Usage The Make New Connection screen appears. Enter a descriptive name for the connection. In the “Select a device” drop-down box, highlight ISDN-Line0. Click Next>. 3. At the next screen, enter the area code and phone number of your ISP or the remote device you will be calling using this connection. Select the appropriate Country or Region Code and click Next> to complete the setup. 201 MultiMobile MT128ZLX User Guide 6: Windows ME API Usage 4. At the completion screen, click Finish. The new dialup connection is ready to configure. 5. From the Dial-Up Networking folder, right-click on your new connection icon. Choose Properties. 202 MultiMobile MT128ZLX User Guide 6: Windows ME API Usage 6. On the General tab, type in the phone number for the adapter port. You may change the connection options by clicking Configure. 7. Click on the Networking tab to configure logon options, encryption, log file information and network protocol options, including TCP/IP Settings for your remote server and DNS connections. If necessary, contact your ISP or network administrator to obtain the correct TCP/IP addressing information. 8. Use the Scripting tab to define scripts that will run when this connection is made. Click OK to complete the configuration. To use this new connection, double-click on the New Dial-Up Networking Connection icon. Type in the user name and password for your remote account and click Connect. 203 MultiMobile MT128ZLX User Guide 6: Windows ME API Usage Windows ME NDIS: Dual Channel Access Example (MultiLink) NOTE: To complete this procedure, you will need to know several technical details that can be provided by your ISP or by your network administrator. 1. You will need to know whether or not an encrypted password is needed to access the network to which you will be connected. 2. If you are connecting to a non-Windows server, you will also need to know in advance whether or not the server requires you to type in login information or to know TCP/IP addresses before dialing. 3. If applicable, you will need to know the domain name of the network to which you will be connected. 4. You will need to know the dial-out network protocol to be used (NetBEUI, TCP/IP, or IPX). If you would like to use multi-linking with your NDIS connection, first be sure that your ISDN provider supports a 128kbps MLP option. 1. To begin, you will need to create a new dial-up connection as described above (“Windows ME NDIS : Single Channel Access Example”) or modify an existing connection. Right-click on the Dial-Up Connection icon and select Properties. Click on the MultiLink tab. 204 MultiMobile MT128ZLX User Guide 6: Windows ME API Usage 2. Select Use Additional Devices. Click Add. At the Edit Extra Device screen, in the Device Name drop-down box, select ISDN-Line1. Enter the Phone Number of your ISP or of the remote device that you will be calling with this connection. When complete, continue to click OK to leave the Set Additional Devices configuration screens. To use this new connection, double-click on the new Dial-Up Networking Connection icon. Type in the user name and password for your remote account and click Connect. 205 MultiMobile MT128ZLX User Guide 6: Windows ME API Usage Windows ME Vcomm: Single Channel Access Example NOTE: To complete this procedure, you will need to know several technical details that can be provided by your ISP or by your network administrator. 1. You will need to know whether or not an encrypted password is needed to access the network to which you will be connected. 2. If you are connecting to a non-Windows server, you will also need to know in advance whether or not the server requires you to type in login information or to know TCP/IP addresses before dialing. 3. If applicable, you will need to know the domain name of the network to which you will be connected. 4. You will need to know the dial-out network protocol to be used (NetBEUI, TCP/IP, or IPX). 1. Go to Start | Programs | Accessories | Communications | Dial-Up Networking. If this is your first communications connection, the Welcome to Dial-Up Networking screen will appear. Otherwise, click on the Make New Connection icon. Click Next>. 2. The Make New Connection screen appears. Enter a descriptive name for the connection. In the “Select a device” drop-down box, highlight MultiMobile MT128ZLX-ST (modem). Click Next>. 206 MultiMobile MT128ZLX User Guide 6: Windows ME API Usage 3. At the next screen, enter the area code and phone number of your ISP or of the remote device you will be calling using this connection. Select the appropriate Country or Region Code and click Next> to complete the setup. Click Next>. 4. At the completion screen, click Finish. The new dialup connection is ready to configure. 207 MultiMobile MT128ZLX User Guide 6: Windows ME API Usage 5. From the Dial-Up Networking folder, right-click on your new connection icon. Choose Properties. 6. On the General tab, type in the phone number for the adapter port. You may change the connection options by clicking Configure. 7. Click on the Networking tab to configure logon options, encryption, log file information and network protocol options, including TCP/IP Settings for your remote server and DNS connections. If necessary, contact your ISP or network administrator to obtain the correct TCP/IP addressing information. 8. Use the Scripting tab to define scripts that will run when this connection is made. Click OK to complete the configuration. To use this new connection, double-click on the New Dial-Up Networking Connection icon. Type in the user name and password for your remote account and click Connect. 208 MultiMobile MT128ZLX User Guide 6: Windows ME API Usage Windows ME Vcomm: Dual Channel Access Example (MultiLink) NOTE: To complete this procedure, you will need to know several technical details that can be provided by your ISP or by your network administrator. 1. You will need to know whether or not an encrypted password is needed to access the network to which you will be connected. 2. If you are connecting to a non-Windows server, you will also need to know in advance whether or not the server requires you to type in login information or to know TCP/IP addresses before dialing. 3. If applicable, you will need to know the domain name of the network to which you will be connected. 4. You will need to know the dial-out network protocol to be used (NetBEUI, TCP/IP, or IPX). If you would like to use multi-linking with your VCOMM connection, first be sure that your ISDN provider supports a 128kbps MLP option. In order to use VCOMM multi-linking, you must install a second ISDN device in the Modems applet in the Control Panel. The first ISDN device was installed automatically during the initial driver installation. 1. Install the virtual modem for your MT128ZLX in Windows ME by selecting Start | Settings | Control Panel | Add. Windows ME will prepare to detect your modem. The Install New Modems screen will appear. Click on “Do not detect my modem; I will select it from a list.” Click Next>. 3. The next screen displays a list of modem manufacturers and modem models. In the Manufacturers pane, highlight “MultiTech.” In the Models pane, highlight “MultiMobile MT128ZLX-ST (modem).” 209 MultiMobile MT128ZLX User Guide 6: Windows ME API Usage Click Next>. 4. The next screens allows you to select which COM port to use with the MT128ZLX. nd Select “ISDN 2 COM.” Click Next>. 210 MultiMobile MT128ZLX User Guide 6: Windows ME API Usage 5. At the completion screen, click Finish. You should now see two ISDN devices in the Modems Properties window. Click Close to exit from the Modems Properties window. Then close the Control Panel window. 6. For this example, we will use the existing connection that was created in the VCOMM single-channel procedure above (“Windows ME Vcomm: Single Channel Access Example”). Go to Start | Programs | Accessories | Communications | Dial-Up Networking. This will open up the Dial-Up Networking folder. From the Dial-Up Networking folder, right-click on your new connection icon. Choose Properties. 7. The Connection menu screen appears. Click on the MultiLink tab. 211 MultiMobile MT128ZLX User Guide 6: Windows ME API Usage Select Use Additional Devices. Click Add. 8. At the Edit Extra Device screen, in the Device Name drop-down box, select MultiMobile MT128ZLXST (modem) #2. Enter the Phone Number of your ISP or of the remote device that you will be calling with this connection. When complete, continue to click OK to leave the Set Additional Devices configuration screens. To use this new connection, double-click on the New Dial-Up Networking Connection icon. Type in the user name and password for your remote account and click Connect. Windows ME CAPI: Single Channel Access Example NOTE: To complete this procedure, you will need to know several technical details that can be provided by your ISP or by your network administrator. 212 MultiMobile MT128ZLX User Guide 6: Windows ME API Usage 1. You will need to know whether or not an encrypted password is needed to access the network to which you will be connected. 2. If you are connecting to a non-Windows server, you will also need to know in advance whether or not the server requires you to type in login information or to know TCP/IP addresses before dialing. 3. If applicable, you will need to know the domain name of the network to which you will be connected. 4. You will need to know the dial-out network protocol to be used (NetBEUI, TCP/IP, or IPX). To use the Common ISDN Application Interface (CAPI), you must install a CAPI-compliant telecommunications application, such as the RVS-COM Lite program, which will be used for this example. After installing RVS-COM Lite, several new virtual modems become available to configure. The following example uses the RVS ISDN V.120 modem. Before beginning, be sure that the RVS-COM Center is running (the icon will appear in the Windows ME Task Bar). 1. Go to Start | Programs | Accessories | Communications | Dial-Up Networking. If this is your first communications connection, the Welcome to Dial-Up Networking screen will appear. Otherwise, click on the Make New Connection icon. Click Next>. 213 MultiMobile MT128ZLX User Guide 6: Windows ME API Usage 2. The Make New Connection screen appears. Enter a descriptive name for the connection. In the “Select a device” drop-down box, highlight RVS ISDN V.120. Click Next>. 3. At the next screen, enter the area code and phone number of your ISP or of the remote device you will be calling using this connection. Select the appropriate Country Code and click Next> to complete the setup. 214 MultiMobile MT128ZLX User Guide 4. 6: Windows ME API Usage At the completion screen, click Finish. The new dialup connection is ready to configure. 5. From the Dial-Up Networking folder, right-click on your new connection icon. Choose Properties. 215 MultiMobile MT128ZLX User Guide 6: Windows ME API Usage 6. On the General tab, type in the phone number for the adapter port. You may change the connection options by clicking Configure. 7. Click on the Networking tab to configure logon options, encryption, log file information and network protocol options, including TCP/IP Settings for your remote server and DNS connections. If necessary, contact your ISP or network administrator to obtain the correct TCP/IP addressing information. 8. Use the Scripting tab to define scripts that will run when this connection is made. Click OK to complete the configuration. To use this new connection, double-click on the New Dial-Up Networking Connection icon. Type in the user name and password for your remote account and click Connect. 216 MultiMobile MT128ZLX User Guide 6: Windows ME API Usage Windows ME CAPI: Dual Channel Access Example (MultiLink) NOTE: To complete this procedure, you will need to know several technical details that can be provided by your ISP or by your network administrator. 1. You will need to know whether or not an encrypted password is needed to access the network to which you will be connected. 2. If you are connecting to a non-Windows server, you will also need to know in advance whether or not the server requires you to type in login information or to know TCP/IP addresses before dialing. 3. If applicable, you will need to know the domain name of the network to which you will be connected. 4. You will need to know the dial-out network protocol to be used (NetBEUI, TCP/IP, or IPX). If you would like to use multi-linking with your CAPI connection, first be sure that your ISDN provider supports a 128kbps MLP option. The ports you link must first be enabled through RVS-Com. In this example, the RVS ISDN V.120 modems are used. 1. To enable the ports in RVS-Com, open the RVS-Com Comm Center. 2. Click the Services tab. In the Virtual Com Ports section of the window, place a check mark in front of both ports. Associate each port with a unique COM port number (the two devices must use different COM ports). Click Apply, and then OK. Next you will need to identify the two modems to be linked or installed. 3. Install the virtual modem for your MT128ZLX in Windows ME by selecting Start | Settings | Control Panel | Add. Windows ME will prepare to detect your modem. The Install New Modems screen will appear. Click on “Do not detect my modem; I will select it from a list.” Click Next>. 217 MultiMobile MT128ZLX User Guide 6: Windows ME API Usage 5. The next screen displays a list of modem manufacturers and modem models. In the Manufacturers pane, highlight “RVS Datentechnik.” In the Models pane, highlight “RVS ISDN V.120.” Click Next>. 6. The next screens allows you to select which COM port to use with the “RVS ISDN V.120 modem.” Select “RVS Port (COM 4).” Click Next>. 218 MultiMobile MT128ZLX User Guide 6: Windows ME API Usage 7. At the completion screen, click Finish. You should now see two “RVS ISDN V.120” devices in the Modems Properties window. Click Close to exit from the Modems Properties window. Then close the Control Panel window. 8. For this example, we will use the existing connection that was created in the CAPI single-channel procedure above (“Windows ME CAPI: Single Channel Access Example”). Go to Start | Programs | Accessories | Communications |Dial-Up Networking. This will open up the Dial-Up Networking folder. From the Dial-Up Networking folder, right-click on your new connection icon. Choose Properties. 9. The Connection menu screen appears. Click on the MultiLink tab. 219 MultiMobile MT128ZLX User Guide 6: Windows ME API Usage Select Use Additional Devices. Click Add. 10. At the Edit Extra Device screen, in the Device Name drop-down box, select MultiMobile MT128ZLX-ST (modem) #2. Enter the Phone Number of your ISP or of the remote device that you will be calling with this connection. When complete, continue to click OK to leave the Set Additional Devices configuration screens. To use this new connection, double-click on the New Dial-Up Networking Connection icon. Type in the user name and password for your remote account and click Connect. 220 7 Warranty, Service, & Tech Support 221 MultiMobile MT128ZLX User Guide 7: Warranty, Service & Tech Support Limited Warranty Multi-Tech Systems, Inc. (MTS) warrants that its products will be free from defects in material or workmanship for a period of two years from the date of purchase, or if proof of purchase is not provided, two years from date of shipment. MTS MAKES NO OTHER WARRANTY, EXPRESSED OR IMPLIED, AND ALL IMPLIED WARRANTIES OF MERCHANTABILITY AND FITNESS FOR A PARTICULAR PURPOSE ARE HEREBY DISCLAIMED. This warranty does not apply to any products which have been damaged by lightning storms, water, or power surges or which have been neglected, altered, abused, used for a purpose other than the one for which they were manufactured, repaired by the customer or any party without MTS’s written authorization, or used in any manner inconsistent with MTS’s instructions. MTS’s entire obligation under this warranty shall be limited (at MTS’s option) to repair or replacement of any products which prove to be defective within the warranty period, or, at MTS’s option, issuance of a refund of the purchase price. Defective products must be returned by Customer to MTS’s factory transportation prepaid. MTS WILL NOT BE LIABLE FOR CONSEQUENTIAL DAMAGES AND UNDER NO CIRCUMSTANCES WILL ITS LIABILITY EXCEED THE PURCHASE PRICE FOR DEFECTIVE PRODUCTS. Upgrades and Tech Support You can access updated versions of firmware, drivers, and other software-related support for MultiMobile MT128ZLX products via the MultiTech web site and/or the MultiTech FTP site. www.multitech.com. Go to Support page and select the MultiMobile product family. Drivers, software, and firmware are available here. Follow links for manuals, replacements, our warranty, and access to our FTP site. ftp://ftp.multitech.com. Resources for MultiMobile products are grouped with ISDN devices. Service Multi-Tech has an excellent technical support staff available to help you get the most out of your MultiTech product. If you have any questions about the operation of this product, call Technical Support at (800) 972-2439. Before calling Technical Support, note the status of your equipment, including screen messages, diagnostic test results, problems with a specific application, etc. 222 Appendix A Regulatory Agency Information 223 MultiMobile MT128ZLX User Guide Appendix A: Regulatory Information FCC Regulatory Statements Consumer Instructions 1. This equipment complies with part 68 of the Federal Communications Commission Rules. On the outside surface of this equipment is a label that contains, among other information, the FCC registration number and ringer equivalence number (REN). If requested, this information must be provided to the telephone company. 2. As indicated below, the suitable jack (Universal Service Order Code connecting arrangement) for this equipment is shown. If applicable, the facility interface codes (FIC) and service order codes (SOC) are shown. 3. An FCC-compliant telephone and modular plug is provided with this equipment. This equipment is designed to be connected to the telephone network or premises wiring using a compatible modular jack which is Part 68 compliant. See installation instructions for details. 4. The ringer equivalence number (REN) is used to determine the quantity of devices not ringing in response to an incoming call. In most, but not all areas, the sum of the REN’s should not exceed five (5.0). To be certain of the number of devices tat may be connected to the line, as determined by the total REN’s, contact the telephone company to determine the maximum REN for the calling area. 5. If this equipment causes harm to the telephone network, the telephone company will notify you in advance that temporary discontinuance of service may be required. But if advance notice is not practical, the telephone company will notify the customer as soon as possible. Also, you will be advised of your right to file a complaint with the FCC if you believe it is necessary. 6. The telephone company may make changes in its facilities, equipment, operations, or procedures that could affect the operation of the equipment. If this happens, the telephone company will provide advance notice in order for you to make necessary modifications in order to maintain uninterrupted service. 7. If trouble is experienced with this equipment (the model of which is indicated below) please contact Multi-Tech Systems, Inc. at the address shown below for details of how to have repairs made. If the equipment is causing harm to the network, the telephone company may request you to remove the equipment from the network until the problem is resolved. 8. No repairs are to be made by you. Repairs are to be made only by Multi-Tech Systems or its licensees. Unauthorized repairs void registration and warranty. 9. This equipment cannot be used on public coin service provided by the telephone company. Connection to Party Line Service is subject to state tariffs. (Contact the state public utility commission, public service commission or corporation commission for information.) 10. If so required, this equipment is hearing-aid compatible. 11. The telephone Consumer Protection Act of 1991 makes it unlawful for any person to use a computer or other electronic device, including fax machines, to send any message unless such message clearly contains in a margin at the top or bottom of each page or on the first page of the transmission, the date and time is sent and an identification of the business or other entity, or individual sending the message and the telephone number of the sending machine or such business, other entity, or individual. In order to program this information into your fax machine please refer to the installation instructions. 224 MultiMobile MT128ZLX User Guide Appendix A: Regulatory Information Product/Manufacturer Description Manufacturer: Multi-Tech Systems, Inc. Trade Name: MultiMobile Model Number: MT128NTZLX FCC Registration #: N/A Modular Jack (USOC): RJ45 Service Center in USA: Multi-Tech Systems, Inc. 2205 Woodale Drive Mounds View, MN 55112 Phone: (763) 785-3500 Fax: (763) 785-987 FCC Part 15 Statement NOTE: This equipment has been tested and found to be comply with the limits for a Class B digital device, pursuant to Part 15 of the FCC rules. These limits are designed to provide reasonable protection against harmful interference when the equipment is operated in a residential installation. This equipment generates, uses and can radiate radio frequency energy, and if not installed and used in accordance with the instruction manual, may cause harmful interference to radio communications. However there is no guarantee that interference will not occur in a particular installation. If this equipment does cause harmful interference to radio or television reception, which can be determined by turning the equipment off and on, the user is encouraged to try to correct the interference by one or more of the following measures: • Reorient or relocate the receiving antenna. • Increase the separation between the equipment and receiver. • Connect the equipment into an outlet on a circuit different from that to which the receiver is connected. • Consult the dealer or an experienced radio/TV technician for help. This device complies with Part 15 of the FCC rules. Operation is subject to the following two conditions: (1) This device may not cause harmful interference. (2) This device must accept any interference that may cause undesired operation. Warning: Changes or modifications to this unit not expressly approved by the party responsible for compliance could void the user’s authority to operate the equipment. Canadian Limitations Notice Notice: The ringer equivalence number (REN) assigned to each terminal device provides an indication of the maximum number of terminals allowed to be connected to a telephone interface. The termination of a interface may consist of any combination of devices subject only to the requirement that the sum of the ringer equivalence numbers of all the devices does not exceed 5. 225 MultiMobile MT128ZLX User Guide Appendix A: Regulatory Information Notice: The Industry Canada label identifies certificated equipment. This certification means that the equipment meets certain telecommunications network protective, operational and safety requirements. The Industry Canada does not guarantee the equipment will operate to the user’s satisfaction. Before installing this equipment, users should ensure that it is permissible to be connected to the facilities of the local telecommunications company. The equipment must also be installed using an acceptable method of connection. The customer should be aware that compliance with the above conditions may not prevent degradation of service in some situations. Repairs to certified equipment should be made by an authorized Canadian maintenance facility designated by the supplier. Any repairs or alterations made by the user to this equipment, or equipment malfunctions, may give the telecommunications company cause to request the user to disconnect the equipment. Users should ensure for their own protection that the electrical ground connections of the power utility, telephone lines and internal metallic water pipe system, if present, are connected together. This precaution may be particularly important in rural areas. Caution: Users should not attempt to make such connections themselves, but should contact the appropriate electric inspection authority, or electrician, as appropriate. EMC, Safety, and Terminal Directive Compliance The CE mark is affixed to this Multi-Tech product to confirm compliance with the following European Community Directives: Council Directive 89/336/EEC of 3 May 1989 on the approximation of the laws of Member States relating to electromagnetic compatibility; and Council Directive 73/23/EEC of 19 February 1973 on the harmonization of the laws of Member States relating to electrical equipment designed for use within certain voltage limits; and Council Directive 91/263/EEC of 29 April 1991 on the approximation of the laws of the Member States concerning telecommunications terminal equipment, including the mutual recognition of their conformity. each amended by Council Directive 93/68/EEC of 22 July 1993 on the harmonization of CE marking requirements. 226 Appendix B Technical Specifications 227 MultiMobile MT128ZLX User Guide Appendix B: Technical Specifications Technical Specifications Tradename : *MultiMobileTM Model Numbers: *MT128NTZLX for U-interface, *MT128STZLX for S/T-interface ISDN Interface & Standard: * 2B+D Basic Rate Access * U-interface: 2B1Q, complies with ANSI T1.601 * S/T-interface: complies with ITU-T I.430 ISDN Line Rate: * 64 Kbps on 1 B-Channel * 128 Kbps aggregate on 2 B-Channels * 16 K bps on D-Channel for signalling DTE Data Rate: * Asynchronous, up to 460.8 Kbps ISDN Protocol: * ITU-T Q.921/Q.931 and ETSI NET3 ISDN Network & Switch Compatibility: * National ISDN-1 (NI1) * AT&T 5ESS Custom * Northern Telecom DMS-100 Custom * DSS1 (Euro-ISDN) * INS-Net (Japan) B-Channel Protocol: * V.120 * X.75 * Async-to-Sync PPP Conversion * Multi-Link PPP (RFC1317), and HDLC raw data Application Interface: * ISDN AT Command Set * WINISDN * NDIS 228 MultiMobile MT128ZLX User Guide Operating System Support: Appendix B: Technical Specifications * Windows 95 * Windows 98 * Windows NT * Windows 2000 * Windows ME General Features: * Menu-Driven Configuration Utility * Microsoft (PnP) Plug and Play * Hot-Swap and Insertion * RJ-45 Line Interface Dimensions: * 54mm (W) x 85.6mm (L) x 5mm (H), PCMCIA Type II Warranty: *5 Years 229 Appendix C Troubleshooting 230 MultiMobile MT128ZLX User Guide Appendix C: Troubleshooting Troubleshooting Problem/Cause/Solution Dialogue This chapter provides general and specific problem solving steps. Below is a number of examples of Problems (P:), Causes (C:), & Solutions (S:). If your MultiMobile is not working properly, look up the problem and solution here; if unsuccessful, call Tech Support (see Chapter 7). At the end of this chapter we present some specific steps for resolving IRQ and COM port conflicts. P: When running Applications Programs (APs), system reports “Open port fail”. S: Windows 95 suddenly shows “Open port fail” because the MultiMobile is in use by other APs. Terminate the other APs and try again. S: Enter the Run! ISDN configuration utility, check the currently active API shown at the bottom of the Utility Manager’s main screen, and make sure the AP uses the consistent API with the current active mode. If not, select the appropriate API for the AP. S: If VCOMM API is used, check if the AP’s COM port setting is consistent with the COM port setting in Windows 95’s System properties. S: If none of the above solutions resolve the prob-lem, uninstall the MultiMobile and install it once again. P: No Response to AT Commands C: The COMx port for which the TA is set may be conflicting with another card. S: Change the COMx port of MultiMobile to a different unused port. It might be best to set it to COM3 or COM4. Even if you are not using a serial port which is set to the same COMx port as the MultiMobile, it can still interfere. Be sure to update your software COMx port setting as well. C: The Interrupt that the MultiMobile is using may be the same Interrupt another card is using. S: Change the IRQ settings to a different, unused, IRQ. Even if you are not using a serial port which is set to the same IRQ as the MultiMobile, it can still interfere with the TA. S: Type AT&F and press <Enter>, then type AT again, the MultiMobile should respond with an OK message. Otherwise, uninstall the MultiMobile, and reinstall it. P: The TA Does Not Execute the Command Line C: Make sure you type ‘AT’ at the beginning of command line (and press Enter at the end). 231 MultiMobile MT128ZLX User Guide Appendix C: Troubleshooting C: Make sure the TA is not in Data Mode. Type +++ if necessary. C: Make sure your software is set to the same COMx port as your MultiMobile. P: The TA Does Not Give a Response After an Executed AT Command C: The echo and/or responses may be turned off by the ATE0Q1 commands. Enable the AT&V1 to check Result Codes. S: Use ATE1Q0<cr> to change them back. C: Make sure the MultiMobile is in Command Mode and not Data Mode when you type the AT command. P: The Software Does Not Control the TA Properly or Cannot Detect the TA S: Make sure the software properly configured. Check the initialization string and dial string. C: Some TSRs (programs that stay in memory after they are loaded) may conflict with the communications software. S: Try starting your computer without loading any TSRs. P: The Characters on the Screen Are Doubled C: S: C: S: Both the TA and the software have the echo feature turned on. Since only one needs an echo, turn the software echo feature off. The remote TA is echoing your typed characters. Type ATE1<cr>. Then turn off the software echo feature. P: No Text Appears on the Screen When in Command Mode S: If you can’t see the characters you are typing, then type ATE1 then press Enter. P: Communications Software Dials, but Fails C: C: C: S: Make sure the software dialing prefix is ATDT. Make sure the software and TA are set to the same COMx port. The TA may not have hung up the phone line since the last call. Change to Command mode and type ATH then press Enter. P: In NDIS mode (Microsoft ISDN Accelerator Pack has been installed already), when your laptop is powered on, Microsoft ISDN Accelerator Pack reports “Network adapter fail”. S: If all VCOMM, WinISDN, and NDIS are installed at the very beginning, only oneAPI is activated when the laptop is power on. And the other two APIs are disabled. If NDIS is not set as power up active API, Microsoft ISDN Accelerator will report “Network adapter fail”. Enter Run! ISDN configuration utility, check the current active API shown at the bottom of the Utility Manager’s main screen, and make sure the NDIS is set as the currently active mode. If not, change the currently active API to NDIS mode, then reboot the laptop. 232 MultiMobile MT128ZLX User Guide Appendix C: Troubleshooting P: How can one know if the ISDN phone line is attached properly to the ISDN network connection cable so that you can originate/answer ISDN calls? S: When the U-interface network connection cable is used, the LED indicator on the connection cable has following meanings: LED always OFF: ISDN phone line is not attached, check the ISDN phone line connection between MultiMobile and ISDN switch. LED flashes very quickly: U-interface is in connection mode. LED flashes once per second: U-interface connection successful, S/T-interface is in connection mode. LED always ON: ISDN link established, you can make/answer ISDN calls now. In VCOMM mode, you can use the ATH5 command to check if the ISDN link between MultiMobile and ISDN switch is ready to make/answer calls. The following responses report the MultiMobile’s status: Line Lost: ISDN phone line is not connected (check the connection between MultiMobile and ISDN network connection cable, check the connection between ISDN network connection cable and ISDN switch, check the ISDN switch type setting). SPID Fail: Both SPID numbers are not correctly configured. 1 SPID Ready: One of the SPID numbers is incorrect. 2 SPID Ready: The MultiMobile is ready to operate. P: It seems that the throughput of the MultiMobile is not as fast as expected. S: Sometimes the resident anti-virus program and the laptop’s BIOS settings, like “Auto-detect PNP Function”, affects the MultiMobile’s I/O operation, and might lower the ISDN TA’s file transfer throughput. Disable them (keep the system as simple as possible) and try again. P: I can run Application Program (API) successfully, and the MultiMobile responds OK when entering AT, but I cannot Originate/Answer ISDN calls. Why? S: (1) Check if ISDN phone line is connected properly. (2) Check if the ISDN switch type is selected correctly. (3) Check if the SPID numbers are correct. (4) Issue the ATH5 command (in VCOMM mode) to check the MultiMobile function. P: How can one make sure the MultiMobile’s hardware functions properly? S: Use AT&K command (in VCOMM mode) to verify the MultiMobile hardware function. The response to the AT&K command is “ISDN Hardware is OK” or “ISDN Hardware is ‘BAD’.” S: Connect the ISDN phone line between ISDN switch and MultiMobile, and use the ATH5 command (in VCOMM mode) to verify the ISDN PC Card function. All the following messages show the MultiMobile hardware is without problems: SPID Fail 1 SPID Ready 233 MultiMobile MT128ZLX User Guide Appendix C: Troubleshooting 2 SPID Ready P: When plugging-in the MultiMobile, the PCMCIA alert message is not heard. S: Enter Control Panel >> System >> Device Manager in Windows 95 to check whether the MultiMobile and the drivers are installed prop erly. If not, uninstall the MultiMobile, and reinstall it. With VCOMM, NDIS and WinISDN APIs installed, the correct settings should be:Intelligent TA IM128 (ISDN) COM Port and IRQ Conflicts - General If you have isolated the problem with IRQs or COM ports, refer to the following sections for resolving IRQ and COM port conflicts in Windows 95. When installing a card in an IBM PC compatible computer, it is important to choose settings for the PC Card which does not conflict with any other cards in the computer. Choose an Interrupt (IRQ) and a COMx: port for your terminal adapter card, that does not interfere with any other devices in your computer. Select the Port and Interrupt you want to use, and remember to update your communications software to the same settings. The following is a list of some settings other cards in your computer may already be using. COM Port and IRQ Conflicts - Windows 95 In Windows 95, right-click on My Computer, select Properties from the menu, click on the Device Manager tab, double-click on Ports, then double-click on the Communications Port your TA is connected to. In the port’s Properties sheet, click on the Resources tab to see the port’s Input/Output range and Interrupt Request. If another device is using the same address range or IRQ, it will appear in the Conflicting Device List. Uncheck “Use Automatic Settings” to change the port’s settings so they do not conflict with the other device, or select the port the conflicting device is on and change it instead. If you need to open your computer to change switches or jumpers on the conflicting device, refer to the device’s documentation. 234 Appendix D Using AT Commands 235 MultiMobile MT128ZLX User Guide Appendix D: Using AT Commands AT Command Summary Usually, your data comm software controls the MultiMobile for you. However, you may also want to use the AT commands. These commands give you complete control over your MultiMobile. You need to be careful when using these commands, because they can cause your software to loose its ability to control the MultiMobile. If you do find that an AT command has caused a problem, turn the computer off, and then back on. That will reset AT commands to the factory default settings. You can also type AT&F to go back to the factory default setting. To use an AT command, you must first: 1. Run your communication software. 2. Configure the software for the appropriate COM port and IRQ settings, if necessary. 3. Enter Terminal mode (aka “Command mode”, “Local mode”, or “Direct mode”). This is the mode in which most data comm software packages start up. You can then type the desired AT command, and press the Enter key. For example, type: ATH0<Enter> to hang up the MultiMobile connection, or AT&V<Enter> Display current configuration Most of the AT commands can be entered in “strings” (i.e., on the same command line) without spaces between the individual commands. For example: AT&VH0<Enter> As shown above, it is not necessary to put spaces between the commands. So, there are no spaces between AT, &V, and H0. The MultiMobile usually returns a response (or “Result Code”) at the next line if it understands the command. The response is usually OK or ERROR unless the AT command provides other (extended) messages. 236 MultiMobile MT128ZLX User Guide Command Options ATA Appendix D: Using AT Commands Function & Description Go off-hook (answer the incoming call immediately) ATD <number> Dial out the ISDN phone number ATDT <number> Dial out the ISDN phone number ATDSn Dial out the pre-stored phone number (n=0, 1, 2,…). See AT&Zn=<ISDN_phone_number> command for phone number storage. ATDL Re-dial the last ISDN phone number ATEn n=0 Echo in command mode is disabled n=1 Echo in command mode is enabled ATH Hang up the ISDN link ATH4 Restart ISDN layer 2 link. Issue this command when SPID numbers are changed. ATH5 View ISDN TA status Responses: Line Lost: ISDN phone line is not properly attached. SPID Fail: Both SPID numbers are incorrect 1 SPID Ready: One of the SPIDs incorrect 2 SPID Ready: ISDN TA OK ATO Return to connection (on-line) mode. Command Options Function & Description n=00 n=01 n=02 n=05 ISDN D-channel protocol and switches selection AT&T 5ESS Custom Northern Telecom DMS-100 Custom ETSI Europe ISDN U.S. National ISDN-1 (NI-1), factory default AT!C0=n AT!C6=n Example: AT!C2=n Set Service Profile ID 0 (SPID 0), where ” n” is the SPID number up to 20 characters. ISDN phone number: 5551000 SPID 0: 0555100001 Set Service Profile ID 1 (SPID 1), where ” n” is the SPID number up to 20 characters. Example: AT!N0=n ISDN phone number: 5553000 SPID 1: 0555300001 Set ISDN Directory Number 0 (DN 0), where “n” is the ISDN phone number. Example: AT!N1=n DN 0: 5551000 => n=5551000 Set ISDN Directory Number 1 (DN 1), where “n” is the ISDN phone number. Example: DN 1: 5553000 => n=5553000 237 MultiMobile MT128ZLX User Guide Command Options Function & Description AT!Q=n n=0 n=4 Set B-channel speed to 64 K Set B-channel speed to 56 K n=05 n=09 B-channel protocol selection V.120 Async to Sync PPP conversion AT!Z=n Appendix D: Using AT Commands AT&F Load factory default profile to active RAM. AT&J0 Use two different ISDN phone numbers for making multi-link PPP calls. AT&J1 Use single ISDN phone number for Multi-Link PPP connections. AT&K Verifies TA hardware function; entering AT&K invokes hardware is “OK” or “BAD”. The “!” command modifier is used to change certain fundamental configuration parameters which are infrequently changed – typically, only once at installation. Using these “!” commands during normal operation with the telephone line connected to the Terminal Adapter (TA), can cause unpredictable results. It is best to issue the “!” command when the TA is not connected to the ISDN network to avoid confusion between the TA and ISDN network. The recommended procedure for using the “!” commands is as follows: (1) Disconnect the ISDN phone line from the TA. (2) Issue the “!” commands to set the correct value for the “!” command related parameters. (3) Issue the AT&Wn command to store the parameters changed during step (2) in the user profile. (4) Reconnect the ISDN phone line. (5) Reset or reboot the ISDN sub-system with the updated configuration parameters. 238 MultiMobile MT128ZLX User Guide Command Options AT&L0 AT&L1 AT&L2 AT&L3 AT&L4 AT&L5 AT&L6 AT&L7 AT&L8 AT&L9 Set Single-Link mode for Async to Sync PPP Conversion. Set Multi-Link mode for Async to Sync PPP Conversion. Copy user profile 0 to profile E, and set it as power-up profile. Copy user profile 1 to profile E, and set it as power-up profile. Copy user profile 2 to profile E, and set it as power-up profile. Options AT&P3 AT&P4 AT&P5 AT&P6 AT&P7 AT&P8 AT&W0 AT&W1 AT&W2 AT&W3 AT&W4 AT&W5 AT&W6 AT&W7 AT&W8 AT&W9 Command AT&Z0 AT&V AT&Zn=x Function & Description Load user profile 0 to active RAM. Load user profile 1 to active RAM. Load user profile 2 to active RAM. Load user profile 3 to active RAM. Load user profile 4 to active RAM. Load user profile 5 to active RAM. Load user profile 6 to active RAM. Load user profile 7 to active RAM. Load user profile 8 to active RAM. Load user profile 9 to active RAM. AT&N0=0 AT&N0=1 AT&P0 AT&P1 AT&P2 Command Appendix D: Using AT Commands Function & Description Copy user profile 3 to profile E, and set it as power-up profile. Copy user profile 4 to profile E, and set it as power-up profile. Copy user profile 5 to profile E, and set it as power-up profile. Copy user profile 6 to profile E, and set it as power-up profile. Copy user profile 7 to profile E, and set it as power-up profile. Copy user profile 8 to profile E, and set as it power-up profile. Save current active settings in RAM to user profile 0. Save current active settings in RAM to user profile 1. Save current active settings in RAM to user profile 2. Save current active settings in RAM to user profile 3. Save current active settings in RAM to user profile 4. Save current active settings in RAM to user profile 5. Save current active settings in RAM to user profile 6. Save current active settings in RAM to user profile 7. Save current active settings in RAM to user profile 8. Save current active settings in RAM to user profile E. Options n x Function & Description Set the Secondary Dial Number for Async to Sync Multi-link PPP Mode. Display current configuration Store phone number n as x index number 0, 1, 2…. saved phone number 239 Appendix E: ISDN Primer 240 MultiMobile MT128ZLX User Guide Appendix E: ISDN Primer Introduction to ISDN Integrated Services Digital Network (ISDN) is a digital telephony service that offers high-speed data communications over the existing twisted-pair copper telephone wiring commonly found in residential and commercial phone service. Two distinct types of ISDN service are available around the world: : Basic Rate Interface (BRI) and Primary Rate Interface (PRI). In ISDN, the signalling bitstream is timedivision-multiplexed, which means that multiple data “channels” are interspersed with each other in the same physical signalling stream. This allows multiple data connections to occur simultaneously on the same conductor. BRI ISDN BRI consists of two bearer channels (B-channels) plus one administrative data channel (D-channel). In BRI, the telephone signalling path is divided into three digital channels: two B-channels, used for data transmission at 56 kbps or 64 kbps (depending on telco services), and one D-channel, used to carry control signals and customer call data, at 16 kbps. With a total of 144 kbps of data bandwidth, BRI is well suited to individual users. (Note that the “k” used in data transmission speeds means literally 1000, not 1024, as in computer memory descriptions. That is, 1 kbps equals 1000 bits per second, not 1024.) Note that every B-channel is capable of carrying its own data telephone call. The B-channels are typically used for sending voice or circuit switched data or packet switched data and can function independently of each other or bonded together to achieve 128 kilobits-per-second of bandwidth. With ISDN you can mix connections. You can have a voice call on B-channel while receiving packet or switched data packets on the second B-channel. The administrative telephony tasks of D-channels include the setting up and tearing down of calls, as well as monitoring. D-channels also contain ANI information(Automatic Number Identification), which is the number of the phone that is making an incoming call. PRI ISDN PRI has two subtypes, US orNorth American PRI and Euro PRI. US PRI consists of 23 B-channels (64 kbps each) plus one D-channel (also 16 kbps). Euro PRI has 30 or 31 B-channels (64 kbps each) plus one Dchannel (also 64 kbps). Again, B-channels carry message data and D-channels carry control signals and customer call data (sometimes called “administrative” data). With a total of 1544 kbps of data bandwidth, US PRI service is carried on a T1 line and is well suited for subscribers who require greater data transmission capacity. US PRI ISDN is described as 23B + D. The US ISDN-PRI (23B+D) is comprised of the following components: twenty three 64 kilobits-per-second B-channels and 1 16 kilobit-per-second D-channel over a T-1 line for a total bandwidth of 1.544 megabitsper-second (Mbps) European ISDN-PRI Service (described as 30B+D), with its 30 or 31 B-channels and one D-channel, can be carried on either a T1 or E1 line and, again, is suited to customer with high data throughput requirements. In Euro ISDN, D-channels as well as B-channels are 64 kbps and one D-channel can be used to control one or more E1 or T1 lines. (The remainder of this discussion will focus on BRI ISDN.) 241 MultiMobile MT128ZLX User Guide Appendix E: ISDN Primer Digital End-to-End Telephony signals within central offices, between central offices, and on long-distance lines are all digital. The link from the central office to the subscriber (the subscriber drop) is really the only non-digital part of the telephony signal stream. ISDN digitizes subscriber drops, making the signal digital end-to-end. The availability of ISDN varies greatly from country to country and region to region. It became available on the East and West Coasts of the United States earlier than in the Midwest. It is widely available in Europe. To offer ISDN, the telco must have special equipment in its central office switching systems. Also, the distance of ISDN transmissions is limited. To access BRI service, it is necessary to subscribe to an ISDN phone line. Generally, the subscriber must be 18000 feet (about 3.4 miles or 5.5 km) or less from the telco central office to qualify for BRI service. (ISDN signal extension devices are available but expensive.) ISDN Configuration ISDN service must be configured at both the telco end and at the subscriber end. There are many features and options of ISDN service that the telco must set up in keeping with its particular implementation of ISDN. This configuration process at the telco’s central office is called “provisioning.” Configuration at the subscriber end involves four pieces of information: • Switch type • Telephone numbers (or “directory numbers”) • Service Profile Identifiers (SPIDs) • Voice Encoding Type (A-law or Mu-law) Switch Type. Only a comparatively small number of telephony switching systems are available in the world. “Switch type” refers to the brand and model of switch in use by the telco. Outside of the U.S., there is generally only one switch type in most nations. Unfortunately, different phone switch manufacturers have implemented ISDN somewhat differently, thus requiring ISDN subscriber devices to have software components compatible with all of these various switch-specific ISDN implementations. Telephone Numbers. During ISDN configuration, the subscriber must know the phone numbers (or “directory numbers”) that the service will use. It can work one of two ways. There can be one phone number for both B-channels, or there can be a separate phone number for each B-channel. This is dependent on your telco’s implementation of ISDN. Having two phone numbers adds the convenience of being able to make voice phone calls while maintaining your computer ISDN connection. SPIDs. Service Profile Ids (SPIDs) are used only in the U.S. and Canada. The SPID consists of the ten-digit phone number of the ISDN line, plus a prefix and a suffix, which can identify features on the line. The information in the SPID is used before call setup. If SPIDs are supplied incorrectly, the ISDN line will not be able to complete incoming or outgoing calls. Voice Encoding Type. A-law and Mu-law are separate standards for PCM (Pulse Code Modulation) encoding and companding (the sampling scheme applied to digitize analog voice signals). The Mu-law scheme is used in the U. S., Canada, Japan, and other locations influenced by U.S. telephony standards. The A-law scheme is used in Europe and in most of the rest of the world. This setting is vital. If set wrong, the ISDN service will not work at all. 242 MultiMobile MT128ZLX User Guide Appendix E: ISDN Primer ISDN Terminal Adapters – Internal or External. Although ISDN terminal adapters are sometimes called “ISDN modems,” this term is a misnomer. In fact, with ISDN, the signal stream is always digital, no modulation or demodulation are required (as implied by the term “modem”). Both internal and external ISDN terminal adapters are available. Internal adapters are inserted into an ISA or PCI slot in the computer’s motherboard. External adapters are connected through a port connector on the computer. External adapters can be attached or removed without opening the computer. When ISDN terminal adapters are connected through a port, a data bottleneck may be introduced to the system. This is because the ISDN connection has a data speed of 128 kbps, whereas the serial ports on most computers are limited to 115 kbps (although 230 kbps is now available on some models). The external terminal adapter can also slow down computer performance because it uses significant CPU resources when connected. External ISDN terminal adapters are best used on computers with a Pentium processor, or better, and a CPU processing speed of at least 200 MHz. Some important functionality resides in ISDN terminal adapters themselves, for example, Point-to-Point protocol, multi-linking (where two B-channels are “bonded” or used together to double data throughput speed). It is up to the subscriber to be sure that correct and up-to-date drivers are used to implement these ISDN features. Drivers generally evolve over time. Bugs appear and are remedied, and new features are introduced. Interfaces for ISDN Devices: “U” or “S/T” The “U” interface uses a single-pair of telephone wires, whereas the “S/T” interface uses two pairs. In the U.S., telcos provide customers with the U interface. It carries data over the single-pair wiring in fullduplex mode, but is limited in its connections: the U interface accommodates only one ISDN device, namely a “Network Termination 1” device, or NT-1. In practice, many ISDN devices (including terminal adapters, ISDN-ready phones, and ISDN fax machines), have NT-1 devices built into them. If the NT-1 device is a separate unit, it generally must be powered from a wall outlet (instead of drawing power from the telephony system). The purpose of the NT-1 is really to convert the single-pair signal into a dual-pair signal, which is the S/T interface. The U interface is generally easy to install. The S/T interface is commonly available in Europe and elsewhere in the world. The S/T interface is a bus arrangement to which as many as seven ISDN devices can be connected. The dual-pair wiring of the S/T interface allows for separate physical paths for “transmit” data and “receive” data. The Telco/Subscriber Responsibility Boundary The “demarc”, or demarcation point between equipment for which the telco is responsible versus equipment for which the ISDN subscriber is responsible lies at the wall of the subscriber’s building. The subscriber is responsible for everything from the wall jack inward, whereas the telco is responsible for everything outside the wall jack. This means subscribers must pay for maintenance of equipment inside the demarc. In most cases, the telco will install and maintain equipment within the demarc for a specified fee. The wall jack from which the subscriber accesses the ISDN service must be connected directly to the ISDN service as it exists on the telco side of the demarc. This is called the subscriber drop or “home run.” 243 MultiMobile MT128ZLX User Guide Appendix E: ISDN Primer ISDN Wiring: Standards & Pitfalls The ISDN service on the telco side of the demarc must be conveyed to the wall jack from which the subscriber will be accessing the ISDN service. However, some telephone wiring in both residential and commercial buildings are unsuited to ISDN use. For example, some surplus wires may already be use for analog lines, to power the lights on phones with illuminated dialing buttons. Telephone wires in a “daisychain” configuration are also inappropriate for ISDN use. For these reasons, the subscriber should check with the telco to be sure the wiring proposed for ISDN use will actually work properly. There are two types of connector jacks that are commonly used for ISDN physical connections: • RJ11 — This is the standard four-wire analog phone jack. ISDN wiring from the subscriber’s wall box to the NT-1 device is generally done with RJ11 jacks. • RJ45 — This is an eight-wire jack that is somewhat wider than the RJ11. The physical connection between the NT-1 device and the ISDN adapter typically is outfitted with RJ45 jacks. ISDN Lines and Multitple Devices A single ISDN line can have up to eight devices connected to it. The list of devices that you may attach to an ISDN line include bridges, routers, Group 4 ISDN fax machines, ISDN telephones and analog telephone devices. Because ISDN is capable of routing incoming calls between the two B-channels, up to two devices may be used simultaneously. By using a network bridge or router, a single ISDN line can be shared on a LAN in order that all computers on the LAN can make use of it. As previously mentioned, multiple ISDN devices can be connected to a single ISDN line. For example you could have an internal ISDN TA installed in your computer and Group 4 fax machine both connected to the same ISDN line. This would allow you to surf the internet and accept incoming voice calls and faxes at the same time. For this configuration to work, an NT-1 that supports multiple S/T interface connections would be required and each device would have to be connected to the NT-1. Each device would also be required to have it’s own SPID in order that the calls could be routed to the correct device. Also, some NT-1s or ISDN devices are capable of converting between an analog signal and ISDN and can support the use of traditional analog devices such as telephones, modems, Group 3 fax machines, and answering machines. ISDN Connections As with most digital services, ISDN is sensitive to outside interference and has certain restrictions. For instance, such factors as the distance from the telephone company’s central office and the grade of cable used can affect the signal quality. For ISDN lines,the maximum distance from the central office is 18,000 feet and normally uses twisted pair cabling for its transmission media. For small sites, ISDN-Basic Rate Interface (ISDN-BRI) would be most appropriate while for medium to large sites ISDN-Primary Rate makes more sense. 244 Appendix F: Glossary of ISDN-Related Terms 245 MultiMobile MT128ZLX User Guide Appendix F: ISDN Glossary ISDN Glossary 2B+D a Basic Rate Interface ISDN line consisting of two B channels and one D channel A-Law Voice encoding scheme used in Europe and widely throughout the world outside of Japan and North America. AT@T “5ESS” Central office telephone switching system equipment manufactured by AT&T B-Channel One 64 kilobit-per-second digital data channel of an ISDN line Bandwidth Allocation Control Protocol A set of rules that govern bandwidth over PPP dynamic multilink connections Basic Rate Interface (BRI) An ISDN service that provides for 3 digital channels: 2 B-channels and 1 D-channel Bridge A device used to connect and forward information betweenn two or more network segments. Also known as a data link relay or a level 2 relay. A bridge is simpler and less expensive than a router, but the information that it can carry is limited. Central Office (CO) The local telephone facility that provides telephone service in your area CENTREX A virtual PBX for a set of extensions provided by the central office. Customer Access line charge (CALC) Also known as End User Common Line Charge (EUCL) or Subscriber Line Charge (SLC). This is a federal tariff charged for installing your ISDN line. The amount Of this tariff will vary from state to state or province to province. Demarc Or “Demarcation point” is the point where the telephone companies wiring stops and your wiring begins. In other words the telephone company is responsible for wiring before the Demarc and your responsibility is anything after that point. D-channel One of the three channels that make up a BRI line. The D-channel is rated for 16 kilobits-per-second and is used to carry signaling information and low speed packet data. DMS Another ISDN switch type, this switch type is manufactured by Northern Telcom (now Nortel). EWSD Another ISDN switch type, this switch type is manufactured by Siemens Stromberg-Carlson 246 MultiMobile MT128ZLX User Guide Appendix F: ISDN Glossary Exchange The local telephone facility that provides telephone service in your area. Inside Wiring Wiring work that would be needed on your side of the Demarc for your ISDN line and which would thus be the responsibility of the ISDN subscriber. The telephone company will typically do this work for you for an additional charge. ISDN Integrated Services Digital Network: A digital telephone network used to carry voice, data, images, and video at high speeds. Can use existing copper phone line. ISDN Ordering Code The telephone company uses this predefined number to determine how to provision your ISDN line based on your ISDN hardware requirements. Line Extension A method used to provide ISDN service beyond the normal distance limit between the central office and your site. Line or Loop Qualification A test the phone company runs to measure the line quality and distance to your location from the central office to determine if your line meets the requirements for ISDN service. Mu-Law Voice encoding scheme used in Canada, the U.S., Japan, and in other locations influenced by North American telephony standards. Multi-Link PPP Allows you to “bond” or combine two or more B channels to form a single, faster PPP connection. This configuration will allow you to realize the full 128 kilobit/second bandtwidth available from your ISDN service. NI-1 (National ISDN-1) The “Standard” ISDN phone line specification. Intended to be used as a standard to which manufacturers must conform. NT-1 (Network Terminiation-1) A device that connects your ISDN hardware to an ISDN U-interface and an ISDN S/T-interface. PBX Private Branch Exchange. A PBX is a telephone switch that provides switching for an office or campus. Point-to-Point Protocol (PPP) A transport protocol that allows a computer to use TCP/IP to connect to other computers over a standard telephone line. POTS Plain Old Telephone Service. An analog telephone line. Primary Rate Interface An ISDN service that offers 23 B channels at 64 kbps and one D channel at 64 kbps (23B+D). In Europe PRI consists of 30 B channels at 64 kbps and two D channels (30B+D) Provisioning A telephone company term for configuring your ISDN line with various features, such as caller ID, call bumping, call waiting, etc… 247 MultiMobile MT128ZLX User Guide Appendix F: ISDN Glossary Router A device used to connect and forward information between two or more network segments. A router is like a bridge except with more capabilities. A router will determine the best route for a packet to take to get from point to point. RJ-11 A common telephone jack. It is a six conductor modular jack that is wired with 4 wires. RJ-45 An 8-pin modular jack that is a little larger than an RJ-11 jack and is used in networks and ISDN connections. Service Profile Indentifier (SPID) A set of numbers assigned to your ISDN line. They are provided to the ISDN subscriber by the phone company. SPIDS are a unique identifier for each ISDN line. S/T-interface The part of the ISDN line that connects to the phone or computer Switch Type The brand or manufacturer of the equipment/software that the telephone company uses to provide ISDN service to you. There are just a few switch types in existence and generally only one switch type is used per country except in the United States. Twisted Pair A telephone company term for telephone wiring. The name comes from the fact that each pair of wires in the cable are twisted to reduce attenuation (or crosstalk) in the wiring. Voice Encoding The method of transforming the analog voice signal picked up by a telephone handset into a digital signal in Pulse Code Modulation form based on sampling. A-Law and Mu-Law are the two types of voice encoding used for ISDN. U-Interface A 2-wire ISDN circuit that connects the ISDN line to the central office. The U-type interface is more common than the S/T interface. 248 Appendix G Phone Jack Pin Assignments 249 MultiMobile MT128ZLX Appendix G: Pin Assignments RJ45 pin-outs of U-Interface Pin 1 Not Connected Pin 2 Not Connected Pin 3 Not Connected Pin 4 Signal Pin 5 Signal Pin 6 Not Connected Pin 7 Not Connected Pin 8 Not Connected RJ45 Pinouts of S/T Interface Pin 1 Not Connected Pin 2 Not Connected Pin 3 Transmit Signal (T1) Pin 4 Receive Signal (R1) Pin 5 Receive Signal (R2) Pin 6 Transmit Signal (T2) Pin 7 Not Connected Pin 8 Not Connected The Intelligent ISDN TA PC Card comes with either a U-interface or S/T-interface network connection cable. The U-interface connection cable is for direct ISDN line connection, which does not need any extra ISDN NT1 device. The S/T-interface connection cable is for connecting to NT1. Both U- and S/T-interface use RJ45 phone jacks, but with different pin assignments. The bundled RJ45 phone cord can be used for both U- or S/Tinterface connections. 250