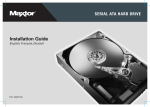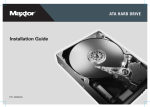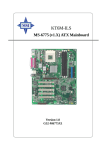
1
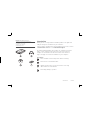
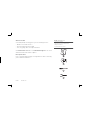
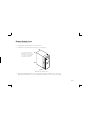
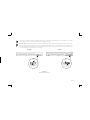
One gigabyte, or GB, equals one billion bytes when referring to hard drive capacity. One terabyte, or TB, equals 1,000 gigabytes when referring to hard drive capacity. Accessible capacity may
vary depending on operating environment and formatting. Quantitative usage examples for various applications are for illustrative purposes and are based on the following assumptions: each
hour of DVD-quality video is 2.1GB, each digital photo is 1MB, and each MP3 is 4 minutes long. Actual quantities will vary based on various factors, including file size, file format, features and
application software. Specifications subject to change without notice.
© 2006 Seagate, Seagate Technology. MaxBlast, Maxtor, and the Maxtor Stylized logo are registered trademarks of Seagate Technology LLC. Mac, the Mac logo, are trademarks of Apple
Computer, Inc., registered in the U.S. and other countries. Microsoft, Windows and the Windows logo are either registered trademarks or trademarks of Microsoft Corporation in the United
States and/or other countries. Other trademarks are the property of their respective holders. Actual product may vary from photo shown.
Seagate Technology, 920 Disc Drive, Scotts Valley, CA 95066 U.S.A.
Installation Guide
MAXTOR SATAII/300 INTERNAL HARD DRIVE
ACK SIDE
PN: 20300101
Contents
Warranty Registration Information . . . . . . . . . . . . . . . . . . . . . . . . . . . . . . 1
Introduction . . . . . . . . . . . . . . . . . . . . . . . . . . . . . . . . . . . . . . . . . . . . . . . . . . 2
Precautions . . . . . . . . . . . . . . . . . . . . . . . . . . . . . . . . . . . . . . . . . . . . . . . . 2
Included in this Kit. . . . . . . . . . . . . . . . . . . . . . . . . . . . . . . . . . . . . . . . . . . 2
Required Tools . . . . . . . . . . . . . . . . . . . . . . . . . . . . . . . . . . . . . . . . . . . . . 3
About Serial ATA . . . . . . . . . . . . . . . . . . . . . . . . . . . . . . . . . . . . . . . . . . . . 3
Back Up Your Data . . . . . . . . . . . . . . . . . . . . . . . . . . . . . . . . . . . . . . . . . . 3
Remove System Cover . . . . . . . . . . . . . . . . . . . . . . . . . . . . . . . . . . . . . . . . . 4
Mount the Hard Drive . . . . . . . . . . . . . . . . . . . . . . . . . . . . . . . . . . . . . . . . . . 5
Attach Serial ATA and Power Cables . . . . . . . . . . . . . . . . . . . . . . . . . . . . . 7
Check BIOS Message . . . . . . . . . . . . . . . . . . . . . . . . . . . . . . . . . . . . . . . . . . 9
Format the Hard Drive . . . . . . . . . . . . . . . . . . . . . . . . . . . . . . . . . . . . . . . . 10
Set the Boot Sequence . . . . . . . . . . . . . . . . . . . . . . . . . . . . . . . . . . . . . . . . . . . . . . 15
Getting Help . . . . . . . . . . . . . . . . . . . . . . . . . . . . . . . . . . . . . . . . . . . . . . . . . . 16
Warranty Registration Information
Before installing the hard drive, please write down the serial number and the model number information. If you
ever need to contact Maxtor Support, you must provide this information about your hard drive prior to
assistance.
Several hard drive models are illustrated below to help you identify where these numbers are located. Use the
drawing that looks like your hard drive, then locate the model and serial numbers from your hard drive and
write these numbers in the space provided.
Serial
Number
Model
Number
DiamondMax XX
XXXXXXX
S/N: XXXXXXXX
XXX GB* SATA
XXXXXXXXXX
P/N: XXXXXX-XXX
+5V x.xx A
+12V x.xx A
Firmware: X.XXX
Product of Singapore
Date Code: XXXXX Site Code: XX
Caution. Product warranty is void if any seal
or label is removed, or if the drive experiences
shock in excess of 350 Gs.
Serial
Number
MIC
XXX-XXXXX(X)
For technical support and regional contact
information, please visit www.maxtor.com
Installation Summary
For easy installation use MaxBlast software, available at www.maxtor.com.
Serial
Number
Model
Number
Model
Number
1. Attach the cables. The data interface and power cables are keyed.
2. Mount the drive using two screws per side. Do not over tighten the screws.
3. Serial ATA controllers or systems may have custom device drivers. See your
controller or system documentation for specific installation instructions.
4. Prepare the drive for use with your Operating System. See your OS instructions
for details. Be careful to select the correct drive. Always backup critical data
before making changes. Windows®XP or 2000 prepares the drive during
installation. Windows®ME or 98 uses FDISK and Format commands.
SATA
SATA Jumper
Power Data
Power
Data
Block
Limit to 1.5 Gb/s Operation
3 Gb/s Operation
3.5 Series 7200. xx
Manufactured by Seagate Technology International
Product of xxxxxx, xxxxxx
*One Gbyte equals one billion bytes when referring to hard drive capacity.
Accessible capacity may vary depending on operating environment and formatting.
R
E106814
Model Number ___________________ Serial Number (S/N)___________________________
PAGE 1
Warranty Registration Information
N176
D33027
FIGURE 1 INCLUDED IN THIS KIT
1. Maxtor Serial ATA (SATA) Hard Drive
2. SATA Interface Cable
3. Driver CD or Diskette
4. Mounting Screws
Introduction
Thank you for selecting a Maxtor hard drive product. This guide will
lead you through the installation of your new drive.
If you encounter any difficulties with installation, please visit us online
at www.maxtor.com and click on Worldwide Support.
The Maxtor SATA Hard Drive Kit includes the components shown in
Figure 1. Your computer may need some or all of these parts to
complete the installation. You will also need the tools shown in
Figure 2 on page 3 to install the hard drive in your computer.
Precautions
Drive should be at room temperature before installing.
Max•Blast ™
Do not touch circuit board on drive.
Unplug system from electrical outlet before connecting
cables to drive or motherboard.
Do not drop, bump, or jar drive.
Introduction
PAGE 2
About Serial ATA
Serial ATA (SATA) technology offers you the following benefits:
– World’s fastest ATA interface
– Ideal for high-performance RAID
– Thin, easy-plug cables for improved airflow
FIGURE 2 REQUIRED TOOLS
1. System User Manual
2. Operating System CD and Boot Disk
3. Philips Screwdriver
4. Small Needle-Nose Pliers
System Man
ual
Visit www.maxtor.com and click on Worldwide Support for the latest
SATA information and software updates.
Back Up Your Data
Protect your data by backing up existing hard drives before installing
your new Maxtor hard drive.
PAGE 3
Introduction
Remove System Cover
1.
Turn your computer off.
2.
Unplug your system from the electrical outlet.
3.
Remove the cover from your system case. See Figure 3.
Refer to your system user
manual for instructions on
removing the cover, or obtain
the services of a qualified
installation technician.
FIGURE 3
REMOVING THE SYSTEM COVER
4.
Attach a grounding strap or touch a metal portion of your computer case. This will
ground you to minimize the risk of exposing the hard drive to electrostatic discharge.
PAGE 4
Mount the Hard Drive
Before mounting the hard drive in your system, determine whether you are installing the hard drive in a 3.5-inch
or 5.25-inch device bay. If you are unable to locate an available device bay, consult your system manual or
system manufacturer.
3.5-inch Device Bay Installation
Many systems have an available 3.5-inch bay located adjacent to the floppy drive.
– Mount the hard drive in the 3.5-inch bay using the screws provided. See Figure 4.
Some systems may not have
enough room to plug in the
cables after the hard drive is
mounted. You may need to
attach the SATA and power
supply cables first.
Mounting
Screws
FIGURE 4
TYPICAL 3.5-INCH DEVICE BAY INSTALLATION
PAGE 5
5.25-inch Device Bay Installation
When installing the hard drive in a 5.25-inch bay (such as where CD-ROM drives are typically installed), you first
need to attach mounting brackets (not included) to the hard drive. Mounting brackets are available from your
local computer hardware store.
1.
Attach the mounting brackets to the hard drive using the screws included with this kit. See Figure 5 for
details.
FIGURE 5
MOUNTING THE BRACKETS ON THE HARD DRIVE
2.
Mount the hard drive in the 5.25-inch bay using the screws provided with the mounting brackets.
Position the hard drive as close to the bottom of the device bay as possible with the label facing up.
PAGE 6
Attach Serial ATA and Power Cables
1.
Locate an available Serial ATA (SATA) port on your motherboard or on a SATA PCI card and plug in
one end of the SATA interface cable.
2.
Locate the SATA port on the rear of the hard drive and plug in the SATA interface cable as shown.
3.
Connect the 15 pin SATA power connector.
Power
Connector
POWER
SATA
SATA Interface
Connector
FIGURE 6
ATTACHING THE CABLES TO THE HARD DRIVE
PAGE 7
If you have an existing installation of Windows 2000 or XP, you must install a Windows driver for the SATA interface before
connecting the drive. See “Format the Hard Drive” on page 10 for details.
Important Note: Motherboards and host controllers equipped with VIA, VT8237, VT8237R, VT6420, VT6421L, SIS760, and
SIS964 do not support SATA 300 transfer speeds. For Maxtor SATA 300 drives to function properly on the VIA chipsets, the
Force 150 jumper must be used. For more information about your system chipset, please refer to the motherboard or host
controller manufacturer’s documentation or web site.
M Type
S Type
NC
no connect
NC
no connect
Force 150
transfer speeds
Force 150
transfer speeds
FIGURE 7
HARD DRIVE JUMPER PINS
PAGE 8
Check BIOS Message
If you have a motherboard with built-in SATA ports, power on your system and look for an on-screen BIOS
message that refers to the SATA interface or controller. (See Figure 8.) This message indicates that the SATA
interface on your motherboard is enabled. If you do not see this message, consult the documentation supplied
with your motherboard or system to enable SATA support in the system BIOS.
If you are using a SATA PCI card, there is no need to enter BIOS Setup to enable SATA support. The card will
automatically enable SATA support after the system BIOS has loaded.
FIGURE 8
TYPICAL SATA BIOS MESSAGE
PAGE 9
Format the Hard Drive
This chapter describes how to partition and format your new drive using the MaxBlast installation software on a
Windows system. Maxtor recommends using MaxBlast on 98 and ME systems, rather than FDISK, to partition
and format the drive.
If you have not previously installed a SATA drive in your system, you must install a Windows driver for your SATA
PCI card or SATA-enabled motherboard or system so that Windows can recognize your new drive. For maximum
compatibility, Maxtor recommends downloading and installing the latest SATA driver from the website of the
SATA card/motherboard/system manufacturer. The latest SATA drivers for Maxtor-branded SATA cards can be
downloaded from the Worldwide Support section at www.maxtor.com.
Choose from one of the following installation scenarios:
A. Existing Windows 98 or Me system
B. Existing Windows 2000 or XP system – new drive as “storage only”
C. Existing Windows 2000 or XP system – new drive as “boot drive”
D. New Windows 98 or Me system or replacing a failed 98 or Me boot drive
E. New Windows 2000 or XP system or replacing a failed 2000 or XP boot drive
Special notes for installation scenarios C and D:
The DOS version of MaxBlast does not currently support USB mouse or keyboard input unless supported by your system BIOS. If
you have a USB keyboard and/or mouse, you may need to connect a PS/2 mouse or keyboard to your system temporarily to
navigate through the program. MaxBlast for DOS can be operated from the keyboard using the Tab, Enter/Return, and arrow keys.
To boot from the MaxBlast CD, you may need to change the boot sequence or boot order settings in your system BIOS to “Floppy
CDROM IDE-0” or “A, CDROM, C.” Depending on your BIOS type (AMI, Award, Phoenix), the boot sequence settings may be located
on the main setup screen or under the BIOS FEATURES SETUP or ADVANCED CMOS SETUP menus.
PAGE 10
If your system cannot boot from a CD, you can create a bootable MaxBlast diskette by inserting the MaxBlast CD into a system
running Windows and choosing Create MaxBlast Installation Diskette from the menu. If you have dual optical (CD/DVD) drives, try
booting from the other optical drive.
A. Existing Windows 98 or Me System
1. Boot the system into Windows.
2.
The Add New Hardware Wizard will appear informing you that it has found a new PCI mass storage
controller. Follow the SATA card/motherboard/system manufacturer's instructions for installing the driver
for the SATA controller.
3.
From the Windows desktop, insert the MaxBlast CD and install MaxBlast for Windows.
4.
Follow the on-screen prompts to step through the installation process. Choose whether to install the drive as
additional storage or as the new boot drive.
5.
Depending on your selection, do one of the following:
a. Additional storage install: After the drive has been set up as additional storage, double-click the My
Computer icon. A new drive letter and icon should appear. The new drive is ready to use.
b. Boot drive install: When MaxBlast has finished copying data to your new drive, eject any CDs or floppies and
perform a normal shutdown. Continue to “Set the Boot Sequence (New boot drive only)” on page 15.
B. Existing Windows 2000 or XP System – New drive as “storage only”
The driver for the SATA interface must be installed prior to connecting the hard drive. If you are using a SATA card, you should
physically install it at this time, but do not connect the drive.
PAGE 11
1.
Boot the system into Windows.
2.
Follow the SATA card/motherboard/system manufacturer's instructions for installing the SATA driver.
3.
Shut down your system, connect the hard drive, and boot into Windows to format the drive.
4.
From the Windows desktop, select: Start / Settings / Control Panel / Administrative Tools / Computer
Management / Disk Management.
5.
Initialize the drive as a basic disk. When finished initializing, format the drive using the NTFS file format.
C. Existing Windows 2000 or XP System – New drive as “boot drive”
The driver for the SATA interface must be installed prior to connecting the hard drive. If you are using a SATA card, you should
physically install it at this time, but do not connect the drive.
1.
Boot the system into Windows.
2.
Follow the SATA card/motherboard/system manufacturer's instructions for installing the SATA driver.
3.
Shut down your system, connect the hard drive, and boot into Windows.
4.
From the Windows desktop, insert the MaxBlast CD and install MaxBlast for Windows.
5.
Follow the on-screen prompts to step through the installation process.
6.
Select the boot drive install option: When MaxBlast has finished copying data to your new drive, eject any CDs
or floppies and perform a normal shutdown. Proceed to “Set the Boot Sequence (New boot drive only)” on
page 15.
PAGE 12
D. New Windows 98 or Me System or Replacing a Failed 98 or Me Boot Drive
1. Boot your system from the MaxBlast CD.
2.
When MaxBlast asks if you would like to prepare the drive for use in your system, click Yes and follow
the on-screen prompts to format and partition your drive.
3.
When finished partitioning and formatting the hard drive, eject all CDs or floppy disks and restart the system.
4.
Boot your system from your Windows system boot floppy.
5.
When prompted to start the computer with CD-ROM support, select this option so that Windows will load the
CD-ROM driver. After the system boot floppy finishes loading, you should see the A:\prompt. Above the
prompt, you should also see a line saying Drive X = Driver MSCD001 unit 0 where X is the drive letter
assigned to the CD-ROM drive. Depending on how many devices are connected to the ATA/IDE cables, the
assigned CD-ROM drive letter could be E, F, G, etc.
6.
Note the CD-ROM drive letter, and insert your Windows CD in the CD-ROM drive.
7.
At the A:\ prompt, type X: (where X is the CD-ROM drive letter) and press Enter.
8.
At the X:\ prompt, type SETUP and press Enter. Follow the on-screen instructions to install Windows.
9.
The Windows installer will detect the SATA interface as a PCI mass storage controller near the end of
the installation process. You will need to provide the drivers for the SATA card at this time.
10. Complete the Windows installation process, then continue to “Set the Boot Sequence (New boot drive only)”
on page 15.
PAGE 13
E. New Windows 2000 or XP System or Replacing a Failed 2000 or XP Boot Drive
Before you begin. The SATA host driver for motherboards with embedded SATA controllers, or non Maxtor branded SATA hosts, are
typically contained on an installation CD that is included with the motherboard or add-in controller. The SATA host drivers must
first be extracted to a floppy disk before installing the operating system. Drivers for Maxtor-branded SATA cards can be
downloaded from the Worldwide Support section at www.maxtor.com or extracted to floppy from the bootable MaxBlast CD. Boot
your system from the MaxBlast CD.
1.
Boot your system from your Windows installation CD. If you have trouble booting to the Windows XP CD, see
Maxtor Knowledge Base Article #855 at www.maxtor.com.
2.
When prompted by the Windows installer to install a third-party SCSI or RAID driver, press the F6 key
then S when prompted, to specify additional devices.
3.
Insert the SATA driver floppy and press Enter.
4.
Follow the on-screen prompts to finish installing Windows, then continue to “Set the Boot Sequence (New
boot drive only)” on page 15.
PAGE 14
Set the Boot Sequence (New boot drive only)
The final step is to configure your system BIOS to use your SATA drive as the system boot drive. Your system has
a built-in BIOS Setup utility that allows you to change this setting.
1.
Power on the system and look for an on-screen message indicating which function key to press to enter
Setup. (See Figure 9.) The function keys used for entering Setup vary between manufacturers. The most
common Setup function keys are F1, F2, and DEL.
Refer to your system manual for specific information about your system BIOS.
On some newer systems, the function key message for entering Setup disappears before you get a chance to read the screen. Also,
some monitors are slow to display text when powering up the system, so you may need to restart your computer to read the
message. To make it easier to read the function key message, press the Pause/Break key after the memory count to pause the
boot process. The Pause/Break key is usually located in the upper right corner of your keyboard (see Figure 8). Press the Enter key
to resume system boot.
2.
Immediately after the function key message appears, press the indicated key to enter
Setup. Within the Setup utility, navigation is limited to keyboard commands.
Keyboard instructions are usually located somewhere on the Setup screen.
3.
Configure the Boot Sequence or Boot Order setting so that the SATA drive or
interface is detected first. This will enable the SATA drive to be used as the
boot drive.
On some newer systems, you may be able to set the boot order of individual SATA drives
in BIOS Setup.
4.
Save the settings, exit Setup, and reboot your system.
PAGE 15
FIGURE 9
PAUSE/BREAK KEY
ON A KEYBOARD
Getting Help
Before contacting Maxtor Support, use the Hard Disk Information feature in MaxBlast to view the model number
and serial number of your drive. These numbers can be used to get help from Maxtor Support,
register your drive, and look up information on the Maxtor website.
Please visit www.maxtor.com to obtain comprehensive support information, such as:
– Warranty Services
Drive Returns (RMA), Warranty Status, Limited Warranty Statement
– Product Support
Installation Tutorial, Specifications, Jumper Settings, Installation Guides, Product Manuals
– Software Downloads
Installation Software, Utilities, Diagnostics
– Knowledge Base
Troubleshooting information, FAQs, resolved problem database
– Product Index
Current and Legacy Maxtor product's listing
Click on Support to access the Knowledge Base, download software updates, register your drive, and get
assistance via e-mail.
PAGE 16
One gigabyte, or GB, equals one billion bytes when referring to hard drive capacity. One terabyte, or TB, equals 1,000 gigabytes when referring to hard drive capacity. Accessible capacity may
vary depending on operating environment and formatting. Quantitative usage examples for various applications are for illustrative purposes and are based on the following assumptions: each
hour of DVD-quality video is 2.1GB, each digital photo is 1MB, and each MP3 is 4 minutes long. Actual quantities will vary based on various factors, including file size, file format, features and
application software. Specifications subject to change without notice.
© 2006 Seagate, Seagate Technology. MaxBlast, Maxtor, and the Maxtor Stylized logo are registered trademarks of Seagate Technology LLC. Mac, the Mac logo, are trademarks of Apple
Computer, Inc., registered in the U.S. and other countries. Microsoft, Windows and the Windows logo are either registered trademarks or trademarks of Microsoft Corporation in the United
States and/or other countries. Other trademarks are the property of their respective holders. Actual product may vary from photo shown.
Seagate Technology, 920 Disc Drive, Scotts Valley, CA 95066 U.S.A.
Installation Guide
MAXTOR SATAII/300 INTERNAL HARD DRIVE
ACK SIDE
PN: 20300101