1
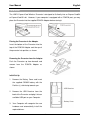
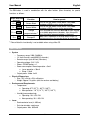
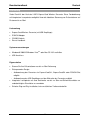
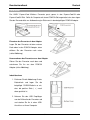
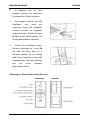
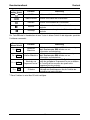
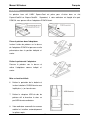
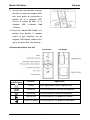
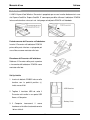
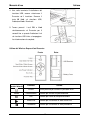
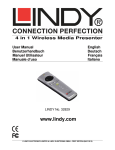
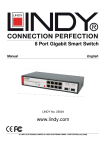
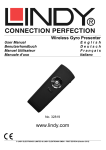
ExpressCard Wireless
Presenter
User Manual
Benutzerhandbuch
Manuel Utilisateur
Manuale d’uso
English
Deutsch
Français
Italiano
LINDY No. 51550
www.lindy.com
© LINDY ELECTRONICS LIMITED & LINDY-ELEKTRONIK GMBH - FIRST EDITION (JUNE 2008)
IMPORTANT HEALTH AND SAFETY INFORMATION
WARNING! RISK OF INJURY!
Laser beam can cause permanent damage to eyes. Do not look into the laser beam or shine
the laser beam into your eyes, other peoples’ eyes, or animals’ eyes.
Keep this device away from Children. This is a working tool, not a toy or entertainment
device. It should only be used by adults.
WICHTIGER SICHERHEITSHINWEIS!
ACHTUNG! VERLETZUNGSGEFAHR!
Laserstrahlen können Ihre Augen dauerhaft schädigen. Schauen Sie nicht direkt in den
Laserstrahl und richten Sie den Laserstrahl generell nicht auf die Augen von Menschen oder
Tieren!
Bewahren Sie dieses Gerät außerhalb der Reichweite von Kindern auf. Es ist nicht zum
Spielen bestimmt und sollte nur von Erwachsenen verwendet werden.
INFORMATION IMPORTANTE
ATTENTION! RISQUE DE BLESSURE!
Un faisceau laser peut causer des dommages permanents aux yeux. Ne regardez pas le
faisceau laser ou ne le pointez pas vers les yeux.
Gardez cet appareil loin des enfants. Ceci est un outil de travail, pas un jouet. Il ne doit être
utilisé que par des adultes
INFORMAZIONI IMPORTANTI SICUREZZA E SALUTE
ATTENZIONE! PERICOLO!
Laser può provocare danni permanenti agli occhi. Non guardare il raggio laser e non
lasciare che questo possa essere guardato da persone o animali.
Tenere questo dispositivo lontano dalla portata dei bambini. Questo oggetto non è un
giocattolo adatto per bambini, deve essere maneggiato da soli adulti.
-2-
User Manual
English
Introduction
Thank you for purchasing the LINDY ExpressCard Wireless Presenter. This 2-in-1 remote
control and laser pointer allows you to wirelessly control your presentations at distances of up to
20m!
Package Contents
ExpressCard Wireless Presenter (with USB receiver)
PCMCIA Adapter
CR2032 Battery
This Manual
System Requirements
Windows® 2000/XP/Windows VistaTM or Mac OS 10.2 or above
An available USB Port
Features
Control your presentations from up to 20m away
Convenient, space saving design:
▫ Can be stored in ExpressCard/34, ExpressCard/54 or PCMCIA slots when not in use
▫ The USB receiver can be inserted into the back of the presenter for storage
Built in laser pointer, with 30m range and safety switch, to aid your presentation
Simple plug and play installation, no additional drivers required
-3-
User Manual
English
Installation
The LINDY ExpressCard Wireless Presenter is designed to fit directly into an ExpressCard/34
or ExpressCard/54 slot. However, if your computer is equipped with a PCMCIA port, you may
place the Presenter into the supplied PCMCIA Adapter before storing it.
Placing the Presenter in the Adapter
Insert the bottom of the Presenter into the
top of the PCMCIA Adapter and then push
the presenter into position, as shown.
Removing the Presenter from the Adapter
Push the Presenter up from beneath and
remove from the PCMCIA Adapter as
shown.
Initial Set Up
1. Remove the Battery Cover and insert
the supplied CR2032 battery with the
Positive (+) side facing towards you.
2. Remove the USB Receiver from the
back of the Presenter and plug it into an
available USB port on your Computer.
3. Your Computer will recognise the new
hardware and automatically install the
required drivers.
-4-
User Manual
English
4. Once your Computer has finished
installing the USB Receiver, you will
need
to
pair
the
Presenter
and
Receiver. Press the ID Link button on
the USB Receiver. The Link indicator
will light up.
5. Press and hold FN and Link buttons on
the Presenter simultaneously for 3
seconds until the Link indicator on the
USB receiver blinks, to indicate that the
paring is complete.
Operating the Wireless ExpressCard Presenter
Front View
Button with
white character
Function
Rear View
How to operate
LASER
Press and hold to use the laser beam
Slides
Press to start a slide show
ESC
Press to exit a slide show
Next
Press to go to the next slide
Previous
Press to go to the previous slide
-5-
User Manual
English
The FN button is used in combination with the other buttons (blue character) for special
functions as follows:
Button with blue
character
Fn + Black
Fn + White
Fn + Alt+Tab
Fn + Link
Function
How to operate
Press to turn the whole screen black. Press Next,
Previous or ESC to return to the presentation
Press to turn the whole screen white. Press Next,
Screen White
Previous or ESC to return to the presentation
Press and hold Fn, then click Alt+Tab to cycle through
Change
the available programmes/windows, then release Fn
program/window *
when the chosen program/window is displayed
Note: ONLY implement ID change when serious RF
Change ID
interference causes the remote control to malfunction
Screen Black
* Please Note this functionality is not available when using a Mac OS.
Specification
System
▫ Frequency range: 2400~2483MHz
▫ (16 multi channels and 65535 ID channels)
▫ Remote range: Up to 66 feet (20 metres)
▫ Operating voltage: 2.6V~3.3V
▫ Power: CR2032 battery x 1
▫ Power consumption: Normal operation < 5mA
Laser operation < 30mA
Sleep < 10uA
▫ Output power: Under 1mW
Physical Dimensions
▫ Size: 75(l) x 34(w) x 5(h) millimetres
▫ Weight: Approx. 14 grams (with the receiver and battery)
Environmental Requirements
▫ Temperature
Operating: 0oC (32 oF) - 60 oC (140 oF)
Non-operation: -10 oC (14 oF) - 65 oC (149 oF)
▫ Humidity(non-condensing):
Operating: 10%~85% RH
Non-operating: 10%~95% RH
Laser
▫ Semiconductor laser(λ= 650 nm)
▫ Emission duration: continuous
▫ Output power: Max. 0.95mW
-6-
Benutzerhandbuch
Deutsch
Einführung
Vielen Dank für den Kauf des LINDY ExpressCard Wireless Presenter. Diese Fernbedienung
mit integriertem Laserpointer ermöglicht Ihnen die kabellose Steuerung von Präsentationen auf
Distanzen bis zu 20m!
Lieferumfang
ExpressCard Wireless Presenter (mit USB Empfänger)
PCMCIA Adapter
CR2032 Batterie
Dieses Handbuch
Systemvoraussetzungen
Windows® 2000/XP/Windows VistaTM oder Mac OS 10.2 und höher
USB Anschluss
Eigenschaften
Steuern Sie Ihre Präsentationen aus bis zu 20m Entfernung
Platzsparendes Design:
▫ Aufbewahrung des Presenters im ExpressCard/34-, ExpressCard/54- oder PCMCIA-Slot
möglich
▫ Aufbewahrung des USB Empfängers auf der Rückseite des Presenters möglich
Integrierter Laserpointer mit einer Reichweite von bis zu 30m und Sicherheitsschalter um
unbeabsichtigtes Einschalten zu vermeiden
Einfache Plug und Play-Installation, keine zusätzlichen Treiber erforderlich
-7-
Benutzerhandbuch
Deutsch
Installation
Der LINDY ExpressCard Wireless Presenter passt genau in den ExpressCard/34 oder
ExpressCard/54 Slot. Sollte Ihr Computer mit einem PCMCIA-Slot augestattet sein, dann legen
Sie den Presenter bitte zur Aufbewahrung im Slot zuerst in den beigefügten PCMCIA Adapter.
Einsetzen des Presenters in den Adapter
Legen Sie den Presenter mit dem unteren
Ende oben in den PCMCIA Adapter, dann
drücken Sie den Presenter nach unten
(siehe Abbildung).
Herausnehmen des Presenters aus dem Adapter
Ziehen Sie den Presenter nach oben und
entnehmen Sie ihn aus dem PCMCIA
Adapter (siehe Abbildung).
Inbetriebnahme
1. Entfernen Sie die Abdeckung für das
Batteriefach
und
legen
Sie
die
beigefügte CR2032-Batterie so ein,
dass die positive Seite ( + ) nach
oben gerichtet ist.
2. Nehmen Sie den USB Empfänger
von der Rückseite des Presenters ab
und stecken Sie ihn in einen USBAnschluss an Ihrem Computer.
-8-
Benutzerhandbuch
3.
Ihr
Computer
Deutsch
wird
die
neue
Hardware erkennen und automatisch
die erforderlichen Treiber installieren.
4.
Nach erfolgter Installation des USB
Empfängers
muss
durch
das
sogenannte Pairing eine Verbindung
zwischen Presenter und Empfänger
hergestellt werden. Drücken Sie dazu
ID Link auf dem USB Empfänger. Die
Anzeige Link wird dann aufleuchten.
5.
Drücken Sie anschließend auf dem
Presenter gleichzeitig die Tasten FN
und Link und halten diese für 3
Sekunden gedrückt bis die Anzeige
Link für die Verbindung auf dem USB
Empfänger blinkt. Damit wird angezeigt
dass
das
Pairing
erfolgreich
abgeschlossen wurde.
Bedienung des Wireless ExpressCard Presenter
Vorderseite
-9-
Rückseite
Benutzerhandbuch
Tasten mit
weißer Schrift
Deutsch
Funktion
LASER
Slides/Diashow
Beenden
Nächste
Vorherige
Bedienung
Drücken und Halten zur Verwendung des Lasers
Drücken zum Starten der Präsentation
Drücken zum Beenden der Präsentation
Drücken um zur nächsten Präsentationsfolie zu
wechseln
Drücken um zur vorhergehenden Präsentationsfolie zu
wechseln
Die Taste FN wird in Kombination mit den Tasten in blauer Schrift für die folgenden speziellen
Funktionen verwendet:
Tasten mit
blauer Schrift
Fn + Black
Fn + White
Fn + Alt+Tab
Fn + Link
Funktion
Bedienung
Drücken um einen schwarzen Bildschirm anzuzeigen.
Next, Previous oder ESC drücken um zur
Präsentation zurückzukehren
Drücken um einen weißen Bildschirm anzuzeigen.
Weißer Bildschirm Next, Previous oder ESC drücken um zur
Präsentation zurückzukehren
Fn gedrückt halten, dann auf Alt+Tab klicken um so
Wechseln von
durch die verfügbaren Programme/Fenster zu blättern;
Programm/Fenster * die Taste Fn loslassen wenn das gewünschte
Programm/Fenster erscheint
Achtung: Ändern Sie die ID nur bei ernsthaften
ID ändern
Störungen der Radiofrequenz, die die Funktion der
Fernbedienung beeinträchtigen
Schwarzer
Bildschirm
* Diese Funktion ist unter Mac OS nicht verfügbar.
- 10 -
Benutzerhandbuch
Deutsch
Technische Spezifikationen
System
▫ Frequenzbereich: 2400~2483MHz (16 multi channels, 65535 ID channels)
▫ Reichweite: bis zu 20m
▫ Betriebsspannung: 2.6V~3.3V
▫ Stromversorgung: 1 x CR2032-Batterie
▫ Stromverbrauch: < 5mA
Laserbetrieb < 30mA
Ruhemodus < 10uA
▫ Sendeleistung: weniger als 1mW
Abmessungen
▫ 75(Länge) x 34(Breite) x 5(Höhe)mm
▫ Gewicht: ca. 14g (mit Empfänger und Batterie)
Umgebungsanforderungen
▫ Temperatur
Im Betrieb: 0oC (32 oF) - 60 oC (140 oF)
Außer Betrieb: -10 oC (14 oF) - 65 oC (149 oF)
▫ Relative Feuchte (ohne Kondensation):
Im Betrieb: 10%~85%
Außer Betrieb: 10%~95%
Laser
▫ Halbleiterlaser(λ= 650 nm)
▫ Emissionsdauer: kontinuierlich
▫ Ausgangsleistung des Lasers: max. 0.95mW
- 11 -
Manuel Utilisateur
Français
Installation
Le pointeur laser wifi LINDY ExpressCard est prévu pour s’insérer dans un slot
ExpressCard/34 ou ExpressCard/54.
Cependant, si votre ordinateur est équipé d’un port
PCMCIA, vous pouvez utiliser l’adaptateur PCMCIA fourni.
Placer le pointeur dans l’adaptateur
Insérez l’arrière du pointeur sur le dessus
de l’adaptateur PCMCIA et poussez ensuite
présentateur dans la position indiquée cicontre.
Retirer le pointeur de l’adaptateur
Poussez le pointeur vers le dessus et
retirez l’adaptateur comme indiqué cicontre.
Mise en fonction initiale
6. Retirez la protection de la batterie et
insérez la batterie CR2032 fournie avec
le pôle plus (+) en face de vous.
7. Retirez le récepteur USB du dos du
pointeur wifi et branchez le dans un
port USB de votre ordinateur.
8. Votre ordinateur reconnaîtra le nouveau
matériel et installera automatiquement
les pilotes requis.
- 12 -
Manuel Utilisateur
Français
9. Une fois que votre ordinateur a terminé
d’installer les pilotes du récepteur USB,
vous aurez besoin de synchroniser le
pointeur wifi et le récepteur USB.
Pressez le bouton ID Link sur le
récepteur
USB.
L’indicateur
Link
s’allumera.
10. Pressez les boutons FN et Link sur le
pointeur laser pendant 3 secondes
jusqu’à ce que l’indicateur Link du
récepteur USB clignote, indiquant ainsi
que la synchronisation a été effectuée.
Utilisation du pointeur laser wifi
Vue de face
Bouton avec
caractère blanc
Fonction
LASER
Vue de dos
Signification
Restez appuyer pour utiliser le pointeur laser
Défilement
Pressez pour démarrer le défilement/diaporama
ESC/Echap
Pressez pour quitter le défilement/diaporama
Next/Suivant
Pressez pour passer à la diapositive suivante
Previous/Précédent Pressez pour passer à la diapositive précédente
- 13 -
Manuel Utilisateur
Français
Le fonction FN est utilisé en combinaison avec les autres boutons (caractères bleus) pour
obtenir des fonctions avancées:
Bouton avec
caractère bleu
Fn + Black
Fn + White
Fn + Alt+Tab
Fn + Link
Fonction
Signification
Pressez pour passer l’écran total en noir. Pressez
Ecran noir
Next, Previous ou ESC pour retourner dans la
présentation
Pressez pour passer l’écran total en noir. Pressez
Ecran blanc
Next, Previous ou ESC pour retourner dans la
présentation
Changer
Pressez Fn, et cliquez Alt+Tab pour faire défiler les
programmes/fenêtres programmes/fenêtres ouverts, puis pressez Fn quand
le programme/fenêtre choisi est affiché
*
Note: ne changez d’ID UNIQUEMENT si des
Changer ID
interférences radio causent un mauvais
fonctionnement
* Attention: cette fonctionnalité n’est pas disponible sous Mac OS.
Spécification
Système
▫ Bande de fréquence: 2400~2483MHz
▫ (16 canaux différents et 65535 identifiants ID)
▫ Portée: jusqu’à 20 mètres)
▫ Tension de fonctionnement: 2.6V~3.3V
▫ Alimentation: 1 batterie CR2032
▫ Consommation: en utilisation normale < 5mA
En utilisant le laser < 30mA
En veille < 10uA
▫ Puissance de sortie: inférieure à 1mW
Dimensions
▫ Taille: 75(l) x 34(L) x 5(h) millimètres
▫ Poids: environ 14 grammes (avec le récepteur et la batterie)
Environment requis
▫ Température
En cas d’utilisation: 0oC (32 oF) - 60 oC (140 oF)
En cas de non utilisation: -10 oC (14 oF) - 65 oC (149 oF)
▫ Humidité (non condensée):
En cas d’utilisation: 10%~85%
En cas de non utilisation: 10%~95%
Laser
▫ Laser semiconducteur (λ= 650 nm)
▫ Durée de l’émission: continue
▫ Puissance d’émissionmaxi: 0.95mW
- 14 -
Manuale d’uso
Italiano
Grazie per aver scelto il LINDY ExpressCard Wireless Presenter. Questo dispositivo include in
un unico prodotto un telecomando e un puntatore laser e permette di gestire presentazioni da
una distanza massima di 20m!
Contenuto della confezione
ExpressCard Wireless Presenter (con ricevitore USB)
Adattatore PCMCIA
Batteria CR2032
Questo manuale
Requisiti del Sistema
Windows® 2000/XP/Windows VistaTM, Mac OS 10.2 o superiori
Porta USB
Caratteristiche
Controllo delle presentazioni Wireless da 20m di distanza
Design pratico e compatto:
▫ Può essere riposto in uno slot ExpressCard/34, ExpressCard/54 o PCMCIA quando non è
in uso
▫ Il ricevitore USB può essere inserito nel retro del presenter
Puntatore laser integrato con 30m di portata
Installazione plug and play facile e veloce, nessun driver addizionale richiesto
- 15 -
Manuale d’uso
Italiano
Installazione
Il LINDY ExpressCard Wireless Presenter è progettato per essere inserito direttamente in uno
slot ExpressCard/34 o ExpressCard/54. E’ comunque possibile utilizzare l’adattatore PCMCIA
incluso nella fornitura nel caso in cui si disponga solo di porte PCMCIA sul Notebook.
Posizionamento del Presenter nell’adattatore
Inserire il Presenter nell’adattatore PCMCIA
prima dalla parte inferiore e spingendo poi
verso il basso come mostrato nella foto.
Rimozione del Presenter dall’adattatore
Sollevare il Presenter dalla parte superiore
e rimuoverlo dall’adattatore PCMCIA come
mostrato nella foto.
Set Up iniziale
1. Inserire le batterie CR2032 incluse nella
fornitura con la polarità positiva (+)
rivolta verso di Voi.
2. Togliere il ricevitore USB da sotto il
Presenter ed inserirlo in una porta USB
libera sul Computer.
3. Il
Computer
riconoscerà
il
nuovo
hardware ed installerà automaticamente
i driver richiesti.
- 16 -
Manuale d’uso
Italiano
4. Una volta terminata l’installazione del
ricevitore USB, occorre sintonizzare il
Presenter ed il ricevitore. Premere il
tasto
ID
Link
sul
ricevitore
USB,
l’indicatore Link si illuminerà.
5. Tenere premuti i tasti FN e Link
simultaneamente sul Presenter per 3
secondi fino a quando l’indicatore Link
sul ricevitore USB inizia a lampeggiare.
La sintonizzazione è completa.
Utilizzo del Wireless ExpressCard Presenter
Fronte
Tasti con
caratteri bianchi
Funzione
LASER
Presentazione
ESC
Retro
Utilizzo
Tenere premuto per utilizzare il puntatore laser
Premere per avviare una presentazione
Premere per uscire da una presentazione
Successivo
Premere per visualizzare la slide successiva
Precedente
Premere per visualizzare la slide precedente
- 17 -
Manuale d’uso
Italiano
Il tasto FN è utilizzato in combinazione con gli stessi tasti ma con caratteri blu per le seguenti
funzioni speciali:
Tasti con
caratteri blu
Fn + Black
Fn + White
Fn + Alt+Tab
Fn + Link
Funzione
Utilizzo
Premere per ottenere la schermata nera. Premere
Next, Previous o ESC per tornare alla presentazione.
Premere per ottenere la schermata bianca. Premere
Schermata bianca
Next, Previous o ESC per tornare alla presentazione.
Cambio programma Tenere premuto Fn, quindi cliccare Alt+Tab per
scorrere tra i programmi/finestre aperti, rilasciare Fn
o finestra *
quando compare il programma/finestra desiderato.
N.B.: utilizzare questa funzione SOLO quando si
Cambio ID
riscontrano seri problemi di ricezione o interferenze.
Schermata nera
* Questa funzione non è supportata da Computer con Mac OS.
Specifiche
Sistema
▫ Frequenza: 2400~2483MHz
▫ 16 multi channel e 65535 ID
▫ Portata massima: fino a 66 piedi (20 metri)
▫ Voltaggio: 2.6V~3.3V
▫ Alimentazione: una batteria CR2032
▫ Consumo standard < 5mA
Laser < 30mA
Sleep < 10uA
▫ Potenza in uscita: sotto 1mW
Dimensioni e peso
▫ 75 x 34 x 5 millimetri
▫ Peso: 14 grammi circa (ricevitore e batteria)
Parametri operativi
▫ Temperatura
Operativa: 0oC (32 oF) - 60 oC (140 oF)
Non-operativa: -10 oC (14 oF) - 65 oC (149 oF)
▫ Umidità (non condensata):
Operativa: 10%~85% RH
Non-operatia: 10%~95% RH
Laser
▫ Semiconduttore laser(λ= 650 nm)
▫ Emissione continua
▫ Potenza in uscita: Max. 0.95mW
- 18 -
Radio Frequency Energy, Certifications
Shielded cables must be used with this equipment to maintain compliance with radio frequency
energy emission regulations and ensure a suitably high level of immunity to electromagnetic
disturbances.
FCC Warning
This equipment has been tested and found to comply with the limits for a Class B digital device,
pursuant to part 15 of the FCC Rules. These limits are designed to provide reasonable
protection against harmful interference in a residential installation.
This equipment generates, uses, and can radiate radio frequency energy and, if not installed
and used in accordance with the instructions, may cause harmful interference to radio
communications. However, there is no guarantee that interference will not occur in a particular
installation. If this equipment does cause harmful interference to radio or television reception,
which can be determined by turning the equipment off and on, the user is encouraged to try to
correct the interference by one or more of the following measures:
Reorient or relocate the receiving antenna
Increase the separation between the equipment and receiver
Connect the equipment into an outlet on a circuit different from that to which the receiver is
connected
Consult the dealer or an experienced technician for help
You are cautioned that changes or modification not expressly approved by the party responsible
for compliance could void your authority to operate the equipment.
This device complies with part 15 of the FCC Rules.
Operation is subject to the following two conditions:
1. This device may not cause harmful interference, and
2. This device must accept any interference received, including interference that may cause
undesired operation.
CE Certification
This equipment complies with the requirements relating to electromagnetic compatibility, EN
55024 and EN55022 class A for ITE, EN61000-3-2/-3 the essential protection requirement of
Council Directive 89/336/EEC on the approximation of the laws of the Member States relating to
electromagnetic compatibility.
Recycling Information
WEEE (Waste of Electrical and Electronic Equipment),
Recycling of Electronic Products
United Kingdom
In 2006 the European Union introduced regulations (WEEE) for the collection and recycling of
all waste electrical and electronic equipment. It is no longer allowable to simply throw away
electrical and electronic equipment. Instead, these products must enter the recycling process.
Each individual EU member state has implemented the WEEE regulations into national law in
slightly different ways. Please follow your national law when you want to dispose of any
electrical or electronic products. More details can be obtained from your national WEEE
recycling agency.
Germany / Deutschland
Die Europäische Union hat mit der WEEE Direktive umfassende Regelungen für die
Verschrottung und das Recycling von Elektro- und Elektronikprodukten geschaffen. Diese
wurden von der Bundesregierung im Elektro- und Elektronikgerätegesetz – ElektroG in
deutsches Recht umgesetzt. Dieses Gesetz verbietet vom 24.März 2006 an das Entsorgen von
entsprechenden, auch alten, Elektro- und Elektronikgeräten über die Hausmülltonne! Diese
Geräte müssen den lokalen Sammelsystemen bzw. örtlichen Sammelstellen zugeführt werden!
Dort werden sie kostenlos entgegen genommen. Die Kosten für den weiteren Recyclingprozess
übernimmt die Gesamtheit der Gerätehersteller.
France
En 2006, l'union Européenne a introduit la nouvelle réglementation (DEEE) pour le recyclage
de tout équipement électrique et électronique.
Chaque Etat membre de l’ Union Européenne a mis en application la nouvelle réglementation
DEEE de manières légèrement différentes. Veuillez suivre le décret d’application
correspondant à l’élimination des déchets électriques ou électroniques de votre pays.
Italy
Nel 2006 l’unione europea ha introdotto regolamentazioni (WEEE) per la raccolta e il riciclo di
apparecchi elettrici ed elettronici. Non è più consentito semplicemente gettare queste
apparecchiature, devono essere riciclate. Ogni stato membro dell’ EU ha tramutato le direttive
WEEE in leggi statali in varie misure. Fare riferimento alle leggi del proprio Stato quando si
dispone di un apparecchio elettrico o elettronico.
Per ulteriori dettagli fare riferimento alla direttiva WEEE sul riciclaggio del proprio Stato.
LINDY No. 51550
1st Edition, June 2008
www.lindy.com