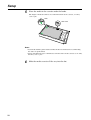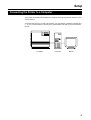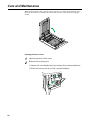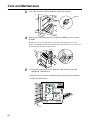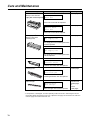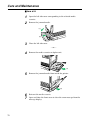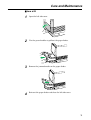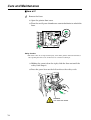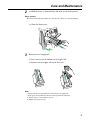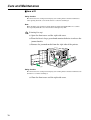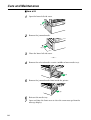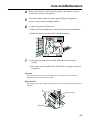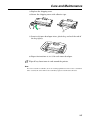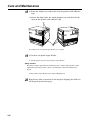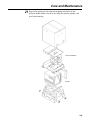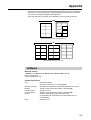
1
Thank you for purchasing the Kyocera FS-5900C Colour Laser Printer.
Notice
NO LIABILITY IS ASSUMED FOR ANY DAMAGE CAUSED BY IMPROPER INSTALLATION.
The information in this manual is subject to change without notification. Additional pages may be inserted in future
editions. The user is asked to excuse any technical inaccuracies or typographical errors in the present edition.
SOFTWARE USED WITH THIS PRINTER MUST SUPPORT THE PRINTER’S NATIVE MODE OR ONE OF ITS
EMULATION MODES. The printer is factory set to emulate the PCL 5C. The emulation mode can be changed by
following the procedures described in Using the Printer.
No responsibility is assumed if accidents occur while the user is following the instructions in this manual. No
responsibility is assumed for defects in the printer’s firmware (contents of its read-only memory).
This manual, any copyrightable subject matter sold or provided with or in connection with the sale of the printer,
are protected by copyright. All rights are reserved. Copying or other reproduction of all or part of this manual, any
copyrightable subject matter without the prior written consent of the copyright holder is prohibited. Any copies
made of all or part of this manual, any copyrightable subject must contain the same copyright notice as the material
from which the copying is done.
© Copyright 1999 by Kyocera Corporation and KYUSHU MATSUSHITA ELETRIC CO., LTD. All rights reserved.
(Revision 1.1. April 1999)
Regarding Tradenames
KPDL is a trademark of Kyocera Corporation.
HP Colour LaserJet 5 is a product of Hewlett-Packard Company. Hewlett-Packard, PCL, and PJL are registered
trademarks of Hewlett-Packard Company. Centronics is a trade name of Centronics Data Computer Corp. Microsoft
and Windows are registered trademarks of Microsoft Corporation in the United States and/or other countries.
Pentium is a registered trademark of Intel Corporation. PostScript is a registered trademark of Adobe Systems
Incorporated. Apple and Macintosh are trademarks of Apple Computer, Inc. registered in the U.S. and other
countries. Adobe and Acrobat are trademarks of Adobe Systems Incorporated which may be registered in certain
jurisdictions. All other trademarks are the property of their respective owners.
Typeface Trademark Acknowledgement
All resident fonts in this printer are licensed from Bitstream Inc., Cambridge, Massachusetts, U.S.A.
Dutch801, Swiss742, Incised901, ZapfCalligraphic801, ZapfHumanist601, OriginalGaramond, and Chianti are
trademarks of Bitstream Inc.
Century Schoolbook, Stymie, and Cooper-Black are trademarks of Kingsley-ATF Type Corporation.
ITC AvantGarde, ITC Benguiat, ITC Bookman, ITC Souvenir, ITC ZapfChancery, and ITC ZapfDingbats are
registered trademarks of International Type-face Corporation.
Revue is a trademark of Esselte Pendaflex Corporation in the U.S., Letraset Canada Ltd. in Canada, and Esselte
Letraset Ltd. elsewhere.
Bitstream Sublicense Agreement
FONTWARE/TrueDoc developed by BITSTREAM INC. is provided as part of this Printer by KYOCERA
CORPORATION under license. KYOCERA, as a Licensee of BITSTREAM, grants you, the Sublicensee, nonexclusive right to use FONTWARE/TrueDoc installed in this Printer, if you agree to and at all times comply with the
following items:
1. Ownership
As the Sublicensee, you own the Printer in which FONTWARE/TrueDoc is originally installed, but BITSTREAM
retains title to and ownership in the software program of FONTWARE/TrueDoc. The Sublicense is not a sale of the
original software program of FONTWARE/TrueDoc or any portion or copy of it.
i
2. Copy Restrictions
FONTWARE/TrueDoc is copyrighted. Unauthorized copying of FONTWARE/TrueDoc even if modified, merged, or
included with other software, is expressly forbidden. You may be held legally responsible for any copyright infringement.
3. Unauthorized Use
FONTWARE/TrueDoc may not be removed, disclosed and transferred to any third party for any length of time
without the prior written consent of KYOCERA or BITSTREAM. Also, you may not modify, adapt, translate, reverse
engineer, decompile, or create derivative works based on FONTWARE/TrueDoc.
4. Term
This agreement should remain in full force and effect forever thereby allowing the Sublicensee to use the
FONTWARE/TrueDoc forever unless the Sublicensee violates the terms of paragraphs 2. or 3. above. In the event of
such violation, this agreement will terminate automatically without notice from KYOCERA. Upon termination, you
should destroy FONTWARE/TrueDoc and all copies of them, in part and in whole, including modified copies, if any.
Important note on the interface connectors
Be sure to turn off printer power before connecting or disconnecting an interface cable* to the printer. For protection
against static discharge which may be applied to the printer’s internal electronics through the interface connector(s),
keep any interface connector which is not in use capped using the protective cap supplied.
*
A shielded interface cable must be used.
Ozone concentration
The printer generates ozone gas (O3) which may concentrate in the place of installation and cause an unpleasant
smell. To minimize concentration of ozone gas to less than 0.1 ppm, we recommend you not to install the printer in a
confined area where ventilation is blocked.
ii
IMPORTANT SAFEGUARDS
1. Read all of these instructions and save these instructions for later use.
2. Unplug this product from the wall outlet before cleaning.
3. Do not use this product near water.
4. Do not place this product on an unstable cart, stand, or table. The product may fall, causing serious damage to
the product.
5. Slots and openings in the cabinet and the back are provided for ventilation to ensure reliable operation of the
product and to protect it from overheating, these openings must not be blocked or covered. The openings should
never be blocked by placing the product on a bed, sofa, rug, or other similar surface. This product should never be
placed near or over a radiator or heat register. This product should not be placed in a built-in installation unless
proper ventilation is provided.
6. This product is equipped with a 3-wire grounding type plug, a plug having a third (grounding) pin. This plug will
only fit into a grounding-type power outlet. This is a safety feature. If you are unable to insert the plug into the
outlet, contact your electrician to replace your obsolete outlet. Do not defeat the purpose of the grounding-type
plug.
7. Do not allow anything to rest on the power cord. Do not locate this product where persons will walk on the cord.
8. If an extension cord is used with this product, make sure that the total of the ampere ratings on the products
plugged into the extension cord do not exceed the extension cord ampere rating.
9. Never push objects of any kind into this product through cabinet slots as they may touch dangerous voltage
points or short out parts that could result in a risk of fire or electric shock. Never spill liquid of any kind on the
product.
10. Except as explained elsewhere in User’s Manual, do not attempt to service this product yourself. Removing
covers may expose you to dangerous voltage points or other risks. Refer all servicing in those compartments to
service personnel.
11. Unplug this product from the wall outlet and refer servicing to qualified service personnel under the following
conditions:
A – When the power cord or plug is damaged or frayed.
B – If liquid has been spilled into the product.
C – If the product has been exposed to rain or water.
D – If the product does not operate normally when the operating instructions are followed. Adjust only those
controls that are covered by the operating instructions since improper adjustment of other controls may result in
damage and will often require extensive work by a qualified technician to restore the product to normal
operation.
E – If the product has been dropped or the cabinet has been damaged.
iii
CE Marking Directive
according to Council Directive 89/336/EEC and 73/23/EEC
Manufacturer’s name:
Manufacturer’s address:
Kyocera Corporation, Printer Division
2-14-9 Tamagawadai, Setagaya Ward, Tokyo 158-8610, Japan
declares that the product
Product name:
Model number:
Colour Laser Printer
FS-5900C (as tested with enhancement optional units: PF-81, DU-81 and HD-2C)
conforms to the following product specifications.
EN 55 022:1994 (Class B)
EN 61 000-3-2:1995
EN 61 000-3-3:1995
EN 50 082-1:1997
EN 60 950:1992+A1+A2+A3+A4
EN 60 825-1:1994
The manufacturer and its merchandising companies retain the following technical documentation in anticipation of
the inspection that may be conducted by the authorities concerned.
User’s instruction that conforms to the applicable specifications
Technical drawings
Descriptions of the procedures that guarantee the conformity
Other technical information
KYOCERA ELECTRONICS EUROPE GmbH
Mollsfeld 12
40670 Meerbusch, Germany
Phone: +49 21 59 918 0
Fax:
+49 21 59 918 100
ISO 7779
Maschinenlärminformationsverordnung 3. GSGV, 18.01.1991: Der höchste Schalldruckpegel beträgt 53 dB(A) oder
weniger gemäß ISO 7779.
iv
Declaration of Conformity (Australia)
Manufacturer’s name:
Manufacturer’s address:
Kyocera Corporation, Printer Division
2-14-9 Tamagawadai, Setagaya Ward, Tokyo 158-8610, Japan
declares that the product
Product name:
Model number:
Colour Laser Printer
FS-5900C (tested with PF-81, DU-81 and the HD-2C)
Conforms to the following product specifications.
AS/NZS 3548: 1995 (EN 55 022:1994 Class B)
IEC60950
(EN 60 950:1992+A1+A2+A3+A4)
IEC60825
(EN 60 825-1:1994)
Description of device:
The model FS-5900C utilizes plain paper, laser, dry toner etc. The printer can be equipped with several
enhancement optional unit[s] such as the harddisk unit HD-2C.
The manufacturer and its merchandising companies retain the following technical documentation in anticipation of
the inspection that may be conducted by the authorities concerned.
User’s instruction that conforms to the applicable specifications
Technical drawings
Descriptions of the procedures that guarantee the conformity
Other technical information
KYOCERA ELECTRONICS AUSTRALIA PTY., LTD
Unit 6 112 Talavera Road North Ryde, NSW 2113, Australia
Phone: +61-2-9888-9999
Fax:
+61-2-9888-9588
Disclaimer
We shall have no liability or responsibility to customers or any other person or entity with respect to any liability,
loss or damage caused or alleged to be caused directly or indirectly by equipment sold or furnished by us, including
but not limited to, any interruption of service, loss of business or anticipatory profits, or consequential damages
resulting from the use or operation of the equipment or software.
v
ENERGY STARSM
As an ENERGY STAR Partner, Kyocera Corporation has determined that this product
meets the ENERGY STAR guidelines for energy efficiency.
The basic objective of the ENERGY STAR Program is to reduce environmental
pollution by encouraging the manufacture and sale of equipment that uses energy
more efficiently.
This printer is equipped with a sleep timer function that conforms with the standards of the ENERGY STAR
Program. This function makes it possible to reduce the amount of electrical power consumed by the printer. For
maximum power savings, turn off the printer’s power supply when not using the printer for extended periods of
time.
Initial settings of the sleep timer function and power saved using the sleep timer function (Values in
brackets are ENERGY STAR program guide lines.):
vi
Initial sleep mode setting
Power consumption during
sleep mode
60 minutes (60 minutes)
45 W (45 W)
Contents
Chapter 1
Before You
Start
Cautions........................................................................................... 1
Features ........................................................................................... 3
System Requirements .................................................................... 4
PC ...................................................................................................................... 4
Interface ............................................................................................................. 4
Minimum Space Requirements ...................................................... 5
Power Source .................................................................................. 5
Unpacking ........................................................................................ 6
Part Names ...................................................................................... 7
Control Panel Overview .................................................................. 8
Setting Up the Printer ................................................................... 12
Chapter 2
Preparing the Imaging Unit .............................................................................. 12
Setting Up the Output Tray .............................................................................. 13
Installing the Toner Developers ....................................................................... 14
Setup
Loading Media ............................................................................... 16
Loading Paper or Transparencies in the Media Cassette ............................... 16
Loading Media in the Multi-purpose Tray ........................................................ 19
Connecting the Printer to a Computer ........................................ 23
Using a Parallel Interface Cable ...................................................................... 24
Connecting the Serial Interface ....................................................................... 25
Installing the Hard Disk Option ........................................................................ 25
Power On ....................................................................................... 25
Printing a Status Page From the Printer Control Panel ............. 26
Installing the Driver Software ...................................................... 27
Installing the Printer Driver for Windows 3.1 ................................................... 27
Installing the Printer Driver for Windows 95/
Windows 98 ..................................................................................................... 28
Setting the Colour Density ........................................................... 30
Mode Selection.............................................................................. 34
Chapter 3
Using the
Printer
Navigating through the menus ......................................................................... 37
Outline for Menus ............................................................................................ 38
Other menus (Others) ...................................................................................... 47
RAM DISK ........................................................................................................ 51
Virtual Mail Box (VMB) ..................................................................................... 52
Memory Cards ................................................................................................. 57
Setting the Sleep Timer ................................................................................... 62
Resource Protection ........................................................................................ 62
vii
Contents
Chapter 4
Care and
Maintenance
Cleaning ......................................................................................... 64
User Replaceable Components ................................................... 69
Clearing a Jam .............................................................................. 71
Troubleshooting ............................................................................ 85
Error Messages ............................................................................. 93
Printer Panel Message .................................................................................... 93
Repacking .................................................................................... 101
Specifications.............................................................................. 110
Appendix
viii
Printer ............................................................................................................ 110
Media ............................................................................................................. 111
Margins and Print Area .................................................................................. 112
Software ......................................................................................................... 115
Bi-directional Parallel Interface ...................................................................... 116
For Your Safety
General
Warning
To prevent fire or shock hazard, do not expose this product to rain or any type of moisture.
Caution
Do not open covers and do not attempt to repair the unit yourself. Refer servicing to qualified personnel.
Power Source
Warning
• The power source voltage of this unit is listed on the nameplate. Only plug the unit into an outlet with
the proper voltage.
• When you operate this equipment, the outlet should be near the equipment and accessible.
• To ensure safe operation the AC cord supplied must be inserted into standard three-prong AC outlet
which is effectively grounded (earthed) through the normal wiring.
• The fact that the equipment operates satisfactorily does not imply that the power point is grounded
(earthed) and that the installation is completely safe. For your safety, if in any doubt about the
effective grounding (earthing) of the power point, consult a qualified electrician.
• If the plug cannot be inserted into the AC outlet, contact a licensed electrician to replace the outlet
with a properly grounded (earthed) one. Do not defeat the purpose of the grounding (earthing) plug
(e.g. using a conversion plug).
Laser Safety
Caution
This printer utilizes a laser. Use of controls or adjustments or performance of procedures other than
those specified herein may result in hazardous radiation exposure.
Ozone Release
Warning
Make sure that the printer is installed in a well ventilated room so as not to increase density of ozone in
the air. Since ozone is heavier than air, it is recommended that air at floor level be ventilated.
ix
For Your Safety
Moving the Unit
The printer weighs approximately 51 kg (112 lbs.). It must be handled by two people. Turn the power off and remove
the power cord when handling the unit.
x
For Your Safety
Caution Labels
(220-240 VAC equipment)
CLASS 1 LASER PRODUCT
KLASSE 1 LASER PRODUKT
CLASSE 1 LASER PRODUIT
CLASE 1 LÁSER PRODUCTO
Laser diode properties
Laser output
: 5 mW max
Wavelength
: 780 nm
Emission duration : Continuous
CAUTION:
HOT SURFACE INSIDE
CAUTION:
HOT SURFACE
INSIDE
ATTENTION:
SURFACE
CHAUDE
CI-INTERIEUR
CAUTION:HOT SURFACE BELOW
ATTENTION:SURFACE CHAUDE CI-DESSOUS
VORSICHT:HEIßE OBERFLÄCHE DARUNTER
ATENCION:SUPERFICIE CALIENTE ABAJO
VORSICHT:
HEISSE FLÄCHE
INTERN
ATENCION:
SUPERFICIE
CALIENTE
EN EL INTERNO
xi
For Your Safety
FOR USERS IN THE UK
IMPORTANT:
FOR YOUR SAFETY PLEASE READ THE FOLLOWING TEXT CAREFULLY
This printer is supplied with a moulded three pin mains plug each for your safety and convenience. A 13
amp fuse is fitted in this plug. Should the fuse need to be replaced please ensure that the replacement
fuse has a rating of 13 amps and that it is approved by ASTA or BSI to BS 1362.
Check for the ASTA mark ASA or the BSI mark
on the body of the fuse.
If the plug contains a removable fuse cover you must ensure that it is refitted when the fuse is replaced.
If you lose the fuse cover the plug must not be used until a replacement cover is obtained.
A replacement fuse cover can be purchased from your local dealer.
IF THE FITTED MOULDED PLUG IS UNSUITABLE FOR THE SOCKET OUTLET IN YOUR HOME
THEN THE FUSE SHOULD BE REMOVED AND THE PLUG CUT OFF AND DISPOSED OF SAFELY.
THERE IS A DANGER OF SEVERE ELECTRICAL SHOCK IF THE CUT OFF PLUG IS INSERTED
INTO ANY 13 AMP SOCKET.
If a new plug is to be fitted please observe the wiring code as shown below.
If in any doubt please consult a qualified electrician.
WARNING: THIS APPLIANCE MUST BE EARTHED.
IMPORTANT: The wires in this mains lead are coloured in accordance with the following code.
Green-and-Yellow: Earth
Blue: Neutral
Brown: Live
As the colours of the wire in the mains lead of this appliance may not correspond with the coloured
markings identifying the terminals in your plug, proceed as follows.
The wire which is coloured GREEN-AND-YELLOW must be connected to the terminal in the plug which
is marked with the letter E or by the Earth symbol
YELLOW.
, or coloured GREEN or GREEN-AND-
The wire which is coloured BLUE must be connected to the terminal in the plug which is marked with
the letter N or coloured BLACK.
The wire which is coloured BROWN must be connected to the terminal in the plug which is marked with
the letter L or coloured RED.
How to replace the fuse: Open the fuse compartment with a screwdriver and replace the fuse.
SCREWDRIVER
FUSE COVER
L
FUSE
xii
N
Before You Start
Cautions
To avoid machine malfunction, do not use the equipment under the following conditions:
• Direct exposure to sunlight
• Extremely high or low temperature [temperature range: 10˚C to 32.5˚C
(50˚F to 90.5˚F)]
• Extremely high or low humidity (humidity range: 20% to 80% RH)
• Condensation due to rapid change of temperature
• Unstable or unlevel surfaces
• Directly in front of air
conditioning vents
• Areas of poor ventilation
• Areas of high dust or chemical
fume concentration (solvent etc.)
• Liquids near the equipment
Genuine or Original
• Too much media which exceeds
the limit mark on the guide of
the tray.
• Front/right/left covers opened
while the printer is operating. It
may cause a media jam.
• We strongly recommend to use
only the original Kyocera toner
developer. Use of Kyocera toner
developer assures the intended
long term reliability of the printer.
1
Before You Start
■ CD-ROM
To prevent the CD-ROM from accidental damages:
• Do not touch or write on the
surface of the disc.
• Do not leave the disc out of the
protective case.
• Do not place heavy objects on the
disc.
• To clean the disc, hold the disc
by its edges and wipe it from the
centre to the edges with a dry,
soft cloth.
• Do not leave the disc in direct
sunlight or near heat sources.
■ Static Electricity Damage
To prevent static electricity damage to any of the following components, touch a grounded metal surface, such as the
printer’s bare metal frame prior to touching the component.
• The interface connectors: Parallel and optional network card
• Electrical components, connectors inside the printer and any components on the optional boards (RAM expansion
board, network interface board, etc.)
• The connector pins on the optional paper feeder for the printer
■ Interface Cable
Always use a shielded interface cable. Use of an unshielded cable can result in radio interference with data.
■ Waste Disposal Method
Waste material may be dumped or incinerated under conditions which meet the applicable environmental
regulations.
2
Before You Start
Features
The FS-5900C Colour Laser Printer provides fast, high-quality colour printing on plain
paper, plus the ease of operation and high performance you expect from a laser printer.
Some of its features include:
■ High quality
Resolution
Maximum 1200 dpi*
(*KPDL emulation only)
■ High speed
For printing of multiple copies on various sizes of paper
Full-colour mode: Maximum 4 ppm (pages per minute)
Monochrome mode: Maximum 16 ppm
■ Easy operation
Printer driver
Easily prints full-colour documents.
3
Before You Start
System Requirements
PC
To operate the FS-5900C effectively, refer to the following:
CPU:
More than Pentium
(133 MHz or faster CPU is recommended.)
Operating System: Windows 3.1*1 / Windows 95*2 / Windows 98*3 Windows NT*4
RAM:
16 MB or more (More than 32 MB is recommended.)
Free disk space:
100 MB or more
Virtual memory:
16 MB or more (More than 32 MB is recommended.)
Display:
Video card that can display more than 256 colours.
(32,000 colour recommended.)
Drive:
CD-ROM drive
*1
*2
*3
*4
Microsoft® Windows®
Microsoft® Windows®
Microsoft® Windows®
Microsoft® Windows®
operating system Version 3.1 (hereafter Windows 3.1)
95 operating system (hereafter Windows 95)
98 operating system (hereafter Windows 98)
NT 3.51/4.0 operating system (hereafter Windows NT)
Interface
■ Parallel interface requirement
Based on the IEEE1284 standard (An ECP compatible parallel port is recommended for Windows 95. To turn on the ECP
mode, use the computer’s BIOS setup. Refer to the computer’s manual for details.)
Interface
■ Network interface requirements
Manufacturer
Ethernet
Token Ring
Model
Applicable country
HBM
HB-7SNMP
Available in UK and France
DPI
EcoLAN 2000E
Available in USA and Japan
SEH
IC59-ETHER-KYO2
Other countries
SEH
IC69-Token-KYO2
All countries
HBM
HB-8
Available in UK and France
See your nearest dealer of the manufacturer for availability.
4
Before You Start
Minimum Space Requirements
45 cm (17.7”)
Multi-Purpose Tray
Opening Space
Rear
35 cm (13.8”)
Controller Board
Opening Space
Right
Left
60 cm (23.6”)
Front cover opening space
50 cm (19.7”)
Media tray Opening
Space
Power Source
• The voltage level of the power source must not vary more than ±10% from the voltage
level marked on the nameplate (located on the back of the unit).
• Do not use an extension cord.
• Do not use a line conditioner, transient suppressor or surge protector as it may cause a
machine error.
5
Before You Start
Unpacking
Make sure that all of the items shown below were provided and have not been damaged.
Report damage or shortages to the reseller from which the unit was purchased.
Note:
Save the original carton and packing materials for future shipping and transporting of
the unit. They have been specifically designed to protect the equipment during
shipment.
1. Printer (Colour imaging unit, Fuser kit, Paper cassette and Output tray are
included.)
2. Toner developers (black, cyan, magenta, and yellow)
3. Power cord
4. CD-ROM (Manuals, drivers, utilities)
5. Colour Calibration Reference card
6
1
2
4
5
3
Before You Start
Part Names
■ Front side view
Operation panel
Main Charger
Right side cover
Output tray
Media cassette
( ☞ P. 16)
Fuser Kit
( ☞ P. 74)
Front cover
Imaging unit
( ☞ P. 12)
■ Rear side view
Network interface card slot
Serial interface connector
( ☞ P. 25)
Multi-purpose (MP) tray
( ☞ P. 19)
Power switch
( ☞ P. 25)
Left side cover ( ☞ P. 19)
Media thickness switch*
( ☞ P. 19)
AC inlet
( ☞ P. 24)
Parallel interface
connector
( ☞ P. 24)
*Accessible by opening
the left side cover
Harddisk access indicator
Memory card connector
( ☞ P. 57)
7
Before You Start
Control Panel Overview
Ready
PAR 600 A4 001
Message Display
The message display displays the printer’s operational mode. Messages which are
displayed and their meanings are given in the table below.
Message
8
Meaning
Self test
The printer is self-testing after power-up and is not ready to
print.
Please wait
The printer is warming up and is not ready to print.
Ready
The printer is ready to print.
Processing
The printer is processing print data or in the middle of printing.
Waiting
The last page remains unprinted. The printer waits awhile and
eventually generates a form feed allowing the last page to be
printed. (The length of time depends on the form feed timeout
setting.) The printing will begin immediately when the Form
Feed key is pressed. If a memory card is being used this can indicate the printer is waiting for data to be written (☞ P. 57).
FormFeed TimeOut
An automatic form feed has been generated.
Before You Start
Interface Indicator
The interface indicator indicates the interface over which data is currently being received
or was last received. The current interface is indicated by one of the following messages:
Display
Description
PAR
Parallel interface
SER
Serial interface
OPT
Optional interface (if a network interface card is installed)
Note:
The display will blink while the printer is receiving data and continue blinking until
the interface is released, even after data transmission is finished.
Resolution Indicator
This shows the current printing resolution in either 1200 or 600 dpi (dots-per-inch).
Paper Size Indicator
This indicator indicates the paper size of the cassette currently selected. The following
abbreviations are used to indicate the paper sizes:
Indicator
Paper Size
A4
ISO A4 (21 × 29.7 cm)
EX *
Executive (7-1/4 × 10-1/2 inches)
B5 *
JIS B5 (18.2 × 25.7 cm)
LT
Letter (8-1/2 × 11 inches)
LG
Legal (8-1/2 × 14 inches)
b5 *
ISO B5 (17.6 × 25.0 cm)
* These paper sizes can only be used in the multi-purpose (MP) tray.
Copy Indicator
This indicator indicates the number of copies to print from 001 to 999. This number is
reduced as printing proceeds.
9
Before You Start
Symbolic Indicator
This printer icon includes the indicators which show the following information regarding
the printer’s paper and toner status.
Name
Description
Face-down indicator
Indicates when printed pages are delivered to the output tray
in the face-down stack (correct order). The pages are delivered
in the reverse order when this indicator is not lit. If flashing, it
indicates that paper is jammed on the output tray.
Toner indicator
Indicates the status of toner supply in either colour of cyan,
magenta, yellow, or black. The toner supply is normal when
this indicator is off. If flashing, the toner supply is dwindling.
If this is lit, it indicates that the printer is out of toner and not
operative until the appropriate toner cartridge is replaced (☞
P. 69).
Cassette feed
indicator
Indicates paper is being fed from the media cassette.
When flashing, it indicates that there is no media in the
cassette or that media is jammed in the media cassette.
Multi-purpose feed
indicator
Indicates when media is fed from the multi-purpose feed tray.
If this is flashing, it indicates that there is no media in the tray
or that media is jammed on the multi-purpose tray.
Duplex Indicator
Indicates when media is being fed from the duplex unit. It
flashes when there is no media in the duplex unit, or when the
media is jammed in the duplex unit.
ON LINE indicator
When lit, it indicates that the printer is on-line (The printer
prints received data). When this is off, the printer is offline
(The printer stores but does not print received data).
ON LINE
DATA indicator
Flashes when data is arriving at the printer’s interface. When
lit continuously, it indicates that data is being processed for
printing (or that data is being written to the memory card).
DATA
ATTENTION indicator
ATTENTION
10
Flashes when the printer needs maintenance
(☞ P. 69). When lit continuously, it indicates that the printer
cannot print due to an error.
Before You Start
Control Keys
Key
Function
ON LINE
This key toggles the printer on-line and off-line.
CANCEL
This key cancels the data processed in the printer during printing. When the printer is in a mode selection sequence (See
MODE key below), pressing this key abandons mode selection
in course.
STACK/+
• This key selects whether to output media face-down (printed
side down) or face-up (printed side up).
• During a mode selection sequence, this key is used to select
menus and change setting values.
FEED/-
• This key selects the paper feed cassette or multi-purpose tray
as the paper source. It can also select an optional feeder if
one is installed.
• Select the alternative paper source when Use alternative?
is displayed.
• During a mode selection sequence, this key is used to select
menus and change setting values.
CONTINUE/
• In normal operating mode, this key forcibly cancels errors
and resumes printing when printing is halted due to errors
such as memory overflow.
• This key functions as the
key during a mode selection
sequence: It moves the selection upward in the menu hierarchy or moves the cursor left.
EXIT/MODE
This key is used to start and end a mode selection sequence.
(☞ P. 34)
FORM FEED/
• In normal operating mode, this key is used to forcibly formfeed when a print timeout occurs.
• This key functions as the
key during a mode selection
sequence: It moves the selection downward in the menu hierarchy or moves the cursor right.
ENTER/STATUS
• During a mode selection sequence, this key confirms the setting made in the mode selection.
• This key determines the paper source while Use alternative?
is being displayed.(☞ P. 94)
• In normal operating mode, this key prints a status page.
Notes
• Menus set using these keys are enabled only for the interface currently indicated on
the message display.
• Settings made from the control panel may be automatically switched to different
settings by application software being used.
11
Setup
Setting Up the Printer
Preparing the Imaging Unit
12
1
Open the front cover.
2
Turn the upper green lever clockwise until it stops and the arrows
are aligned. (This tightens the internal belts, ensuring the unit is
ready for printing.)
3
Close the front cover.
Setup
Setting Up the Output Tray
1
Remove the adhesive tape that holds the output tray against the
printer.
2
Lower the tray to the operating position.
13
Setup
Installing the Toner Developers
Note:
The toner developers that are shipped with the printer are starter developers. They
are installed in exactly the same manner as the optional developers; the only
difference is that the starter developers have less toner. (The page life expectancy is
5000 pages for colour and 6000 pages for black, both based on a 5% image area.)
1
Remove the packaging from the toner developer.
2
Remove the shipping cover from the developer.
Caution:
To avoid possible toner spillage, do not tilt developer.
Note:
Save all packing material for shipping purpose.
3
14
Open the right side cover.
Setup
4
Insert the toner developer in the appropriately labelled slot.
From top to bottom, the order of the colour toner developers is BLACK, CYAN,
MAGENTA, YELLOW.
Caution:
Excessive exposure to light will damage the imaging unit; do not leave the right side
door open for more than 1 minute. Close the right side door after replacing each
individual toner developer unit.
5
Repeat steps 1 to 4 for each toner developer.
When you have installed all the toner developers, go to step 6.
6
Close the right side cover.
15
Setup
Loading Media
Loading Paper or Transparencies in the Media
Cassette
The printer is shipped with a media cassette (either Letter paper or A4 paper) installed.
The printer can also use five different trays as options:
Cassette
Size
A4 Paper
210 mm × 297 mm
A4 Transparency
210 mm × 297 mm
Letter Paper
8.5" × 11"
Letter Transparency
8.5" × 11"
Legal Paper
8.5" × 14"
Notes:
• Make sure that you load the correct media. Each tray is designed and labelled for
only paper or transparency. If you load the incorrect media type in a tray, it may
cause a jam.
• If you have the Paper Feeder PF-81/PF-81D installed:
– If you wish to use the automatic cassette-switching feature (for example, when
doing a large print job), make sure that all cassettes in the printer are the same
media type (paper only) and size.
– The transparency cassette should only be inserted in the upper or middle cassette
slots.
Note:
The printer does not automatically switch cassettes if the media type of the cassette is
Transparency.
1
16
Pull the media cassette out of the printer.
Setup
2
Remove the base plate stopper from inside the media cassette; refer
to the instruction sheet attached to the cassette.
(1)
Base plate stopper
(4)
(3)
(2)
(5)
3
Push down on the metal plate until it clicks, locking it in place.
4
Fan the media (paper/transparencies), then tap it on a level surface
to avoid media jams or skewed printing.
Notes:
• To optimize your printer’s performance, always use clean, unused media.
• Be careful not to leave fingerprints on the media, which can result in a smudged
print.
• Reusing media that has been fed through the printer once (for example, after jams)
can reduce the life of the consumables and paper path components.
• Recommended transparency types are 3M CG3700 and 3M CG3710. If the print
quality is poor, print on the other side.
17
Setup
5
Place the media in the cassette under the hooks.
The height of media should not exceed the limit mark on the cassette, or it may
cause a jam.
Hook
Limit mark
Notes:
• Load media with the print side down. Most media has instructions recommending
the side to be printed first.
• Do not mix different types or thicknesses of media in the media cassette at one time;
this may cause a jam.
6
18
Slide the media cassette all the way into the slot.
Setup
Loading Media in the Multi-purpose Tray
The multi-purpose (MP) tray serves as an additional tray for loading any type of media
that ranges in size from 91 mm × 254 mm to 216 mm × 356 mm (3.6≤ × 10≤ to 8.5≤ × 14≤
inches). Use it to load a single sheet or a stack of media, depending on the media’s type
and thickness.
Use the multi-purpose tray to accomplish the following:
Print on standard and special media
• Standard media
Plain paper [75 to 165 g/m2 (20 to 44 lbs.)]
• Special media
Label, transparency, card stock, coated paper, or the reverse side of printed paper
(The print quality may not be stable. Use the media tray for best reliability.)
Setting media thickness switch
Because the printer accommodates various media weights from the multi-purpose tray,
media thickness can be manually selected for the most reliable paper-picking. Follow
these steps:
1
Open the left side cover ( (1) ). The green media thickness switch is
located on the paper feeder and has three settings:
(1)
Thin
Thick
Middle
2
Move the switch to the desired setting.
Switch setting
3
Media
2
Thin (Default)
Laser paper 75 to 90 g/m (20 to 24 lbs.)
Middle
Laser paper 91 to 123 g/m2 (25 to 32 lbs.)
Transparency, Label, Coated paper
Thick
Laser paper 124 to 165 g/m2 (33 to 44 lbs.)
Close the left side cover.
Selecting a multi-purpose tray mode
The multi-purpose tray has two different ways of feeding media: Cassette, and First
modes. For details on selecting a mode, refer to page 46.
19
Setup
■ Loading Paper
Notes:
• Reusing media that has been fed through the printer (for example, after jams) can
reduce the life of the consumables and paper path components.
• When printing legal size using the multi-purpose tray, backside marking may occur.
If this occurs, use the legal cassette.
For detailed information on media, refer to pages 111 and 114.
1
Set the media thickness switch ( ☞ P. 19).
2
(1) Open the Multi-purpose tray.
(2) Extend the media support by sliding it outward.
(1)
(2)
20
3
Separate the media guides to the approximate width of the media.
4
Fan the media, and then tap it on a level surface to avoid media
jams or skewed printing.
Setup
5
Insert the media with the printing side up into the multi-purpose
tray.
The height of media should not exceed the limit mark on the left guide, or it may
cause a media jam.
6
Adjust the media guides to the media size.
7
Use the printer driver to select the multi-purpose tray.
8
Open the printer driver’s Paper tab, then pull down the Paper
Source menu and select your media type.
Note:
If you use the MP tray and print on the second side of the thick paper, select Card
Stock in the Paper Source menu, instead of Second Side.*
* Means the other side of a preprinted sheet.
21
Setup
■ Loading Label
For detailed information on labels, refer to page 114.
1
Set the media thickness switch ( ☞ P. 19).
2
Adjust the media guides to the width of the label sheets.
3
Load label stock into the multi-purpose tray, positioning the sheets
so that the top edge feeds into the printer first and the printable
side is facing up.
The height of the labels should not exceed the limit mark on the paper guide.
4
22
Open the printer driver’s Paper tab, then pull down the Paper Source
menu and select Label.
Setup
Connecting the Printer to a Computer
The printer can directly be connected to a computer through the parallel interface or the
serial interface.
To connect the printer in a local area network, you must obtain a network interface card
(☞ P. 4). For further details, consult your Kyocera dealer from which you purchased the
printer.
FS-5900C
Computer
Monitor
23
Setup
Using a Parallel Interface Cable
If you do not have a parallel interface cable, you will need to purchase one from your local
computer store or dealer (☞ P. 116 for Parallel Interface specifications).
1
Make sure the computer, printer and the other connected peripheral
devices are turned off.
2
Connect the parallel interface cable to the computer’s parallel
interface connector and the printer’s parallel interface connector
(marked as Parallel).
Computer’s parallel
interface connector
Parallel interface
cable
Notes:
• The actual connector on the computer may vary depending on the manufacturer of
the computer. Consult the computer’s documentation.
• If the cable is connected to the PC via a printer buffer or selector, the printer may
not print.
3
Connect the power cord to the printer’s AC inlet and to an AC outlet.
Power cord
24
Setup
Connecting the Serial Interface
To connect the printer to a computer using the serial interface, use the XSER connector
at the rear panel of the printer. The serial connector is of a round, 8-pin DIN type and
you will need a cable adaptor (SA-80) if you connect a DSub type serial connector.
Barcode Reader (BC-1)
With the hard disk option (see below) installed, you can take the advantage of the
Kyocera MPS (Multiple Print System). The barcode reader then allows you to recursively
print the jobs cached in the hard disk by reading the barcode printed on the printed job.
For more information, refer to the user’s manual supplied with the barcode reader.
Installing the Hard Disk Option
The printer can be optionally installed with a hard disk kit HD-2C. Once the hard disk is
installed, the printer can temporarily or permanently cache the print jobs in the hard
disk so that you can print multiple collated copies quickly or take the advantage of the
barcode reader system. (See the preceding section.)
Installing the hard disk option requires removal of the main controller board and
mounting the hard disk on it and therefore requires a qualified technician. See your
dealer from which the printer is purchased for installing the hard disk.
Power On
1
Turn ON the printer, then the computer. The printer’s power switch
is located at the bottom rear of the printer.
Back side
2
(1) All the indicators on the printer lights briefly and Self test is
displayed on the printer message display.
(2) After approximately 5 minutes, the ON LINE indicator is
illuminated and Ready is displayed on the printer message
display.
The printer is ready for printing.
Note:
When you power on your system for the first time, if “New Hardware Found” is
displayed on the computer screen, refer to page 28.
25
Setup
Printing a Status Page From the Printer Control Panel
The status page provides general information on printer settings and configuration.
Make sure the printer is ready and paper is loaded. Use the following procedure to print
a test page.
While the message display indicates Ready, press the STATUS key.
The printer will start printing a status page.
(Example)
The printer can also print a different status page for service purposes. To print a service
status page, see page 36, then 50.
26
Setup
Installing the Driver Software
The driver software installation will create the printer driver for Windows 3.1 or
Windows 95/98.
See the Help file provided with the driver for how to use the printer with the driver
software.
Installing the Printer Driver for Windows 3.1
1
Start Windows 3.1.
2
Quit all applications.
3
Insert the supplied CD-ROM into your computer’s CD-ROM drive.
4
Double click on the Control Panel.
5
Double click on Printers.
6
Click on Add >>.
7
A screen for “List of Printers:” will appear. From the choices, click on
Install Unlisted or Updated Printer.
8
Click on Install....
9
The install driver menu will appear. Type in your CD-ROM drive
name followed by the directory path depending on the language you
use:
\(language)\Pcl\3x\Enhanced
For example, if you are in U.K. and your CD-ROM drive is D:, type
D:\English\Pcl\3x\Enhanced.
Note:
To install the KPDL printer driver, select “\Kpdl” in place of “\Pcl” in each line above.
10
Select Kyocera FS-5900C Enhanced from the printers displayed and
click on OK. Once the driver has been installed, close the Control
Panel by clicking on Close.
27
Setup
Installing the Printer Driver for Windows 95/
Windows 98
■ Using Plug and Play
1
Turn on the printer.
2
Turn on the computer and start Windows 95/Windows 98.
The New Hardware Found window is displayed for a few seconds, then the Update
Device Driver Wizard window is displayed.
3
Click Next >.
4
Click Finish.
The Insert Disk window is displayed.
5
Insert the supplied CD-ROM into your CD-ROM drive.
When the Kyocera Digital Library screen starts, click EXIT.
6
Click OK.
The Copying Files window is displayed.
7
In the Copy File from field, type in your CD-ROM drive name
followed by the directory path depending on the language you use:
\(language)\Pcl\9x\Enhanced
For example, if you are in U.K. and your CD-ROM drive is D:, type
D:\English\Pcl\9x\Enhanced.
8
Click OK.
9
Click on Kyocera FS-5900C Enhanced.
10 Click Next >.
11 Follow the instructions on the screen to complete the installation.
After installation, restart your system.
Note:
The Plug and Play installation procedure varies depending on the version of Windows
95/Windows 98. Refer to Help in Windows 95/Windows 98.
28
Setup
■ Using Add Printer
1
2
3
Start Windows 95/Windows 98.
Quit all applications.
Click Start, move the pointer to Settings, then click Printers.
The Printers window is displayed.
4
Double click the Add Printer icon.
The Printer Wizard screen starts.
5
6
7
8
Click Next >.
Select Local printer or Network printer and then click Next>.
Click Have Disk....
Install the supplied CD-ROM into your computer’s CD-ROM drive.
When the Kyocera Digital Library screen starts, click EXIT.
9
In the Copy File from field, type in your CD-ROM drive name
followed by the directory path depending on the language you use:
\(language)\Pcl\9x\Enhanced
For example, if you are in U.K. and your CD-ROM drive is D:, type
D:\English\Pcl\9x\Enhanced.
10 Click OK.
11 Click on Kyocera FS-5900C Enhanced.
12 Click Next >.
13 Follow the instructions on the screen to complete the installation.
After installation, restart your system.
Note:
After installing the printer driver, it will take several minutes for the printer to
register and display in Printers Folder.
29
Setup
Setting the Colour Density
The printer panel provides an interface to adjust the density of the toner applied to the
media. This makes it possible to offset changes in density that may result due to varying
environmental conditions or aging of the toner or imaging unit.
(2)
(3)
(4), (5)
(1)
Perform the following steps to adjust the colour density:
Begin by printing a Colour Calibration Page. To print a Colour
Calibration Page, proceed as follows:
1
(1) Press the MODE key on the printer panel.
(2) Press the + key repeatedly until the message display indicates
Colour Calibration.
Colour
Calibration
(3) Press the
>
key.
(4) Press the + key until the message display shows >Print
Calibration Page.
>Print Calibration Page
(5) Press the ENTER key. A question mark (?) will appear.
(6) Press the ENTER key again.
A Colour Calibration Page will be printed.
30
Setup
The current density setting for each colour is indicated by four stripes of cyan, magenta,
yellow, and black (from left to right). On the Colour Calibration Page as shown in the
following example.
The factory default setting for each colour density is 10.
Colour Calibration Page (Example):
31
Setup
2
Compare the current colour density settings on the Colour
Calibration Page with the colour density samples on the Colour
Calibration Reference to see if they match.
Place the Colour Calibration Page on at least 2 sheets of clean white paper in a
well-lighted area.
10
10
10
10
Colour Calibration
Page
Colour Calibration
Reference
If they match, you do not need to adjust the colour density. If they do not match, go to
step 3.
3
Press the + key until the message display shows >Cyan. The current
density setting for cyan is indicated (the default is 10).
(1) Press the ENTER key.
>Cyan
10
(2) Press the + or - key to darken or lighten the cyan colour.
For example:
• If you wish to make the density setting darker:
– Press the + button (up to 20).
• If you wish to make the density setting lighter:
– Press the - button (to 00).
(3) Press the ENTER key.
32
Setup
4
Press the + or - key until >Print Calibration Page is indicated.
5
Press the ENTER key twice to reprint the Colour Calibration Page.
• Repeat step 3 above, if necessary.
6
Repeat steps 3 through 5 for each colour (MAGENTA, YELLOW,
BLACK).
• To skip a colour, press the + button.
• To return to a previous colour, press the - button.
7
When the Colour Calibration Page and the Calibration Reference
match in all four colours, press the MODE key to finalise the
calibration procedure.
Notes:
• The colour density setting affects the average life of toner.
• Save the Colour Calibration Reference for future calibrations.
33
Using the Printer
Mode Selection
This section explains the menu levels and options which can be set using the MODE key. The MODE key can be used
to display all of the menus in the following table.
Ready
PAR
600 A4 001
MODE
Interface
Parallel
These items will not show unless the
printer is installed with the applicable
option unit/kit.
Press the MODE key.
>Parallel I/F
Nibble (high)
>
High Speed
Serial
Normal
Option
Auto
>Baud rate
9600
Number of copies
001
Emulation
PCL 5C
Emulation
KPDL
>
(*1)
>Code set
ISO-6 ASCII
>
>Data bits
8
>Stop bits
1
>
KPDL (AUTO)
(*2)
>Parity
None
>Print KPDL errs
Off
On
>Protocol
DTR (pos.)&XON
Font
Bitmap
>
>
>Bitmap font
00001
>Barcode mode
On
Scalable
>AudreyTwo-Regular
SWC
>Size
012.00 point (s)
Page orientation
Portrait
(*3)
10.00 cpi
>Read data
>
>List of partitions
HARD DISK
>
>Read data
RAM DISK mode
>
(*4)
>RAM DISK size
>Read data
>Write data
>Delete data
>Print VMB data Tray:
>List of Partitions
>List of VMB
Continued on next page
34
*1: Depending on the emulation selected, the following
code sets are available.
>Pitch
Landscape
Opt. ROM
Off
PCL 5C
Bitmap and
Scalable Fonts
Scalable Fonts
Only
ISO-6 ASCII
ISO-11 Sweden
ISO-15 Italian
ISO-17 Spain
ISO-21 Germany
ISO-60 Norway
ISO-69 France
HP Roman-8
ECMA-94 Latin 1
US Legal
IBM PC-8
IBM PC-8 (D/N)
IBM PC-850
ISO-4 U.K.
Ventura math
Ventura int'l
Ventura US
PS math
PS text
Math8
Pi font
MS publishing
Windows
Desktop
ISO Latin 2
ISO Latin 5
Windows Latin 1
Windows Latin 2
Windows Latin 5
PC-852 Latin 2
PC-Turkish
Macintosh
ISO Latin 9
Using the Printer
Continued from previous page
MEMORY CARD
>
>Read fonts
>Read data
>Write data
>Delete data
>Format
>List of Partitions
Paper handling
>
>MP tray mode
>MP tray size
>MP tray type
>Duplex mode
>Auto cassette
>Override A4/LT
>Colour mode
Colour
Quick Colour
Monochrome
Colour
Matching
>
>RGB Simulation
>Vivid mode
>Black
10
>Yellow
10
>Magenta
10
>Cyan
10
Colour
Calibration
Life counters
>
>Print Calibration Page
>
>Total print
1234567
>TransferRoller
>
1234567
>Imaging unit
1234567
>Fuser KIT
1234567
>>Reset Transfer
roller ?
>Oil supply roll
1234567
>Main Charger
1234567
>Fuser cleaning
>
Pad
1234567
>>Reset Fuser
cleaning pad
Continued on next page
35
Using the Printer
Continued from previous page
Others
>
>MSG language
English
>Form Feed
Time out
(*5)
030sec.
(*6)
>Sleep timer
060 min
>Print HEX-DUMP
>List of
resident Fonts
>Printer Reset
>LF action
LF only
CR and LF
Ignore LF
>CR action
CR only
CR and LF
Ignore CR
*2: The printer can be set to print error data during KPDL
emulation. If this is set to On, error data will be printed
if trouble occurs during printing. This is set to Off
before leaving the factory.
>Ecoprint mode
Off
*3: The >Size menu is not available for the Courier and
LetterGothic fonts. Use the >Pitch menu to scale
these fixed fonts.
>Resolution
*4: The RAM DISK mode menu is not displayed when an
optional hard disk unit is installed.
>Resource prot.
Off
*5: Any value from 0 to 495 [seconds] in 5-second
increments. (The printer does not time out with the
value set to 0.)
*6: Any value from 0 to 120 [minutes] in 5-minute
increments.
*7: For service purpose only.
On
Permanent
Perm / Temp
(*7)
>>Print
Test page 2
>Buzzer
Off
>>Print
Test Page 1
On
>>TransferRoller
? Type X
>Service
36
>
>>Print
Status Page
Using the Printer
Navigating through the menus
The menus are in the hierarchy as shown in the diagram above. Use the + and - keys to
move between menus in the same level (“vertically” in the table). The + key shows the
and
next menu, while the - key shows the previous one. Change levels by using the
keys. The
key moves to lower levels (sub-menus), while the
key moves to higher
levels.
(2), (4), (6)
(3)
(5), (7)
(1), (8)
To change a specific item, for example, the sleep mode timeout time, proceed as follows:
1
Press the MODE key.
The message display will show one of the first level menus (Level 1 in the table on
pages 34 to 36) depending on the previous selection.
2
Press + until Others > is shown on the display.
3
Press
.
The message display will show one of the second level menus (Level 2 in the table
on pages 34 to 36) belonging to the Others menu above depending on the previous
selection.
4
Press + until Sleep timer is shown on the display.
5
To change the timeout value, press ENTER.
If you want to abandon setting, press CANCEL, then press MODE.
6
Press + repeatedly to increase the timeout time; press - repeatedly
to decrease the timeout time until the desired timeout time (in
minutes) is displayed.
7
Press ENTER to confirm the new setting.
You can abandon the new setting by pressing CANCEL, then MODE.
8
To quit the mode selection sequence, press EXIT.
37
Using the Printer
Outline for Menus
■ Interface menu
The Interface menu selects one of the three printer interfaces (Option is available only if
an option network interface card is installed) on which subsequent mode menu settings
become effective. The Parallel and Serial options have the second level menus as
described below.
Level 1
Interface
Level 2
> >Parallel I/F
Range
Auto
Normal
High speed
Nibble (high)
Level 3
>Serial
>Option*
Range
>Baud rate
1200, 2400, 4800, 9600 (Default),
19200, 38400, 57600, 115200
>Data bits
7 or 8 (Default)
>Stop bits
1 (Default) or 2
>Parity
None (Default), Odd, Even, Ignore
>Protocol
DTR (pos.) & XON (Default), DTR
(positive), DTR (negative),
XON/XOFF, ETX/ACK
>Barcode mode*1
Off (Default) and On
2
*1Available only when the optional harddisk is installed in the printer.
*2Displayed only when network board or other option board installed.
Parallel Interface Mode
The parallel interface mode of this printer supports a bi-directional/high-speed mode.
Display
Description
Nibble (high)
The parallel interface is in high-speed/bi-directional mode in compliace with the IEEE1284 standard (Default).
Auto
The printer automatically changes its communication mode to the
one the host computer is using.
Normal
The parallel interface is configured according to standard specifications. Use this setting when conventional timing must be used.
High speed
The parallel interface is in high-speed mode.
After setting the interface, be sure to reset the printer or turn the power off at least once.
The new setting will be enabled thereafter.
38
Using the Printer
■ Number of copies
The Number of copies menu sets the number of copies to be printed.
Level 1
Range
Number of copies
001 (Default) to 999
■ Emulation
The Emulation menu switches the printer emulation. KPDL is the Kyocera’s
implementation of the Adobe’s PostScript language. KPDL (AUTO) automatically
switches the printer emulation.
Level 1
Range
Emulation
PCL 5C
KPDL
KPDL (AUTO)
Notes:
• For details about the emulation menu, see the table marked “*1 ” on page 34.
• The printer can be set to print error data during KPDL emulation. If this is set to
On, error data will be printed if trouble occurs during printing. This is set to Off
before leaving the factory.
■ Font
The Font menu selects the printer font. The fonts available vary depending on the
emulation.
Level 1
Font
Range
Options
Description
Bitmap
Fontnumber
See Font Number on list of resident
fonts that can be printed by referring
to List of Resident Fonts (☞ P. 48).
Scalable
Fontname
See the tables on pages 41 to 42.
Size
004.00 to 999.75 (points)
Pitch
00.44 to 99.99 (cpi)
Note:
The >Size menu is not available for the Courier and LetterGothic fonts. Use the
>Pitch menu to scale these fixed fonts.
For example, to select the 10-point Dutch801-RomanSWM:
1
2
3
4
Press MODE.
Press the + key repeatedly until the message display shows Font >.
If the Font > menu shows Scalable, proceed to step 4. If it shows
Bitmap, press ENTER (The question mark appears blinking), press
+ (Bitmap changes to Scalable), then press ENTER (The question
mark disappears).
Press the
key. The current scalable font is indicated.
39
Using the Printer
40
5
6
Press ENTER.
7
Press ENTER to confirm the font selection. Press CANCEL to
abandon the selection.
8
Press MODE. This finalizes the mode menu.
Press the + key repeatedly until the font name of Dutch801RomanSWM is displayed.
Using the Printer
Resident Scalable Fonts
41
Using the Printer
KPDL Fonts
42
Using the Printer
■ Page orientation
The Page orientation menu switches between portrait and landscape page
orientations.
Level 1
Page orientation
Range
Portrait (Default)
Landscape
■ Option ROM
The Option ROM menu reads data in the option ROM and prints a list of them as
partitions. This menu is available only when the option ROM is installed internally with
the printer.
Level 1
Opt. ROM
Range
Read data
List of partitions
■ Harddisk
The HARD DISK menu reads, writes, and deletes data on the option harddisk. It also
allows formatting the disk and printing a list of the contents. This menu is available only
when the harddisk option is installed in the printer (See Installing the Harddisk Option
[☞ P.25]).
Level 1
HARD DISK
Level 2
Read data
Write data
Delete data
Print VMB data Tray:
List of partitions
List of VMB
■ RAM DISK mode
The RAM DISK mode menu configures an arbitrary amount of memory as a RAM disk
for use with virtual mail boxes ( ☞ P.52) and reading or writing data.
Level 1
RAM DISK mode
Level 2
RAM DISK size
Read data
Write data
Delete data
Print VMB data Tray:
List of Partitions
List of VMB
43
Using the Printer
■ Memory card
The MEMORY CARD menu reads, writes, and deletes data on the memory card. It also allows
formatting the memory card and printing a list of the contents. This menu is available only
when a memory card is inserted into the memory card slot at the back of the printer (☞ P.
57). For instructions on using these submenus, refer to page 57.
Level 1
MEMORY CARD
Level 2
>
Read fonts
Read macro
Read data
Write data
Delete data
List of Partitions
■ Colour mode
This setting controls whether the page is printed in Colour (four-colour), Quick Colour
(three-colour), on in Monochrome (black and white gray scale).
Level 1
Colour mode
Range
Monochrome
Colour (Default)
Quick Colour
■ Colour matching
The Colour matching menu provides three colour matching functions to accurately
represent the original colour by giving different rendering intents.
Level 1
Colour matching
Options
RGB Simulation
Vivid mode
For details on each colour matching function, see the table below:
Colour matching mode
44
Description
RGB Simulation
Printing is done using colours most closely approximate
the monitor colours. Select the type of monitor being
used. (If your monitor is not listed, set Custom values
as appropriate for your monitor. See the monitor
documentation for appropriate values.)
Vivid mode
Adjusts the brightness of colours.
Using the Printer
■ Colour calibration
This menu provides an interface to adjust the density of the toner applied to the media.
For details on how to calibrate toner density, see Setting the Colour Density (☞P. 30).
Level 1
Level 2
Colour Calibration
Range
Print Calibration page
Cyan
00 to 20
Magenta
00 to 20
Yellow
00 to 20
Black
00 to 20
■ Life counters
The Life counter menu displays the printer’s page count and the supply consumption
status. This helps you know how soon you will need to replace the supplies listed below.1 The
Reset transfer roller and Reset cleaning pad options should be used after replacing
the transfer roller. Selecting this option resets the transfer roller counter to ‘0000000.’
Level 1
Level 2
Life counters Total print
Range
Level 3
0000000 to 9999999
pages
TransferRoller
0000000 to 9999999
pages
Imaging unit
0000000 to 9999999
images
Fuser KIT
0000000 to 9999999
pages
Reset transfer
roller
Oil supply roll 0000000 to 9999999
pages
1
Main Charger
0000000 to 9999999
pages
Fuser Cleaning
Pad
0000000 to 9999999
pages
Reset Fuser
Cleaninig Pad
When a supply item is replaced with a new one, the printer automatically resets the page counter
for that item to ‘0000000.’
45
Using the Printer
■ Paper handling mode
The Paper handling mode allows the MP tray to be configured in the same manner as
with the media cassette.
Level 1
Paper handling
Level 2
MP tray mode
Options
Cassette
First (Default)
MP tray size
B5
ISO B5
A4
Executive
Letter
Legal
MP tray type
Plain (Default)
Transparency
Labels
Cardstock
Coated
2nd side
Duplex mode
none (Default)
Short edge bind
Long edge bind
Auto cassette
None (Default)
Size select
1 & 2*
1 & 3*
2 & 3
1 & 2 & 3*
Override A4/LT
On
Off (Default)
* Not selectable if the duplex unit is installed.
MP tray mode
First mode
The printer automatically feeds any paper placed on the multi-purpose tray even if
another paper source is currently selected. After the paper in the multi-purpose tray is
printed, paper will be fed from the paper source originally set. This is the factory set
default. This mode is useful when printing on a special kind of paper followed by a
normal sheet in the media cassette.
46
Using the Printer
Cassette mode
Approximately 100 sheets of paper can be continuously fed.
Note:
In First mode, printing is carried out using custom size paper feed timing regardless
of the MP tray size setting.
MP tray type
When cassette is selected as the MP tray mode, the paper source is automatically selected
according to the print data. Set MP tray size and MP tray type to match the type of paper
to be loaded into the MP tray. If received print data does not match the type of paper
loaded in the paper source, the printer displays an error message (☞P.93) and printing is
interrupted.
When this occurs, printing can be resumed by loading the type of paper indicated by the
error message into the MP tray and pressing the CONTINUE key.
Auto cassette mode
The Auto cassette mode is available only when the printer is installed with the
optional paper feeder. This menu selects one of the automatic paper cassette switching
modes for normal paper. The numbers below refer the media cassettes of the printer and
the option paper feeder: 1 for the upper cassette; 2 for the middle cassette; and 3 for the
lower cassette. The Size select automatically searches all media cassettes for the
paper size commanded by the document.
Note:
The printer does not switch cassettes automatically if the media is transparency.
Override A4/LT
This sets whether to enable or disable the difference between A4 size and letter size.
Under the default setting of Off, the paper size of the paper source is matched to the
paper size given for the data, and if these differ a corresponding error message is
displayed. When this is set to On, printing is performed even if the actual paper size
differs from the paper size given for the data.
Other menus (Others)
The following settings are available by selecting Others at the end of the main menu. To
key, then the + (or -) key.
enter one of these menus, press the
■ Message language
The MSG language menu selects the language of the messages on the message display.2
Level 1
Others
2
Level 2
MSG language
Range
English, French, German, Italian,
Danish, Spanish, Swedish, Japanese
Messages in different languages can be added by installing a ROM inside the printer electronics or
inserting a PC card in the printer’s PC card slot. For more information, see your printer dealer.
47
Using the Printer
■ Formfeed timeout time
The Formfeed timeout time menu adjusts the time-out time for the occurrence of the
printer’s formfeed action. Absence of data for this period of time causes a formfeed.
Level 1
Others
Level 2
Range
Form feed time out
000 to 495 (seconds)
Note:
Any value from 0 to 495 [seconds] in 5-second increments. (The printer does not time
out with the value set to 0.)
■ Sleep timer
The Sleep timer menu adjusts the period of time after which the printer’s sleep
function is activated. During “sleeping,” all indicators and the ventilating fans will go off,
conserving electricity, until an operation is made from the control panel or print data is
received.
Level 1
Others
Level 2
Sleep timer
Range
000 to 120 (minutes)
Note:
Any value from 0 to 120 [minutes] in 5-minute increments.
■ Print HEX-DUMP
The Print HEX-DUMP menu prints formatted hexadecimal data codes for debugging
programs and files.
Level 1
Others
Level 2
Print HEX-DUMP
Range
(To print in debugging mode, press ENTER
twice.)
■ List of resident fonts
The List of resident fonts menu prints a list of all resident fonts in the printer on
several pages.
Level 1
Others
48
Level 2
List of resident fonts
Range
(To print a list of resident fonts,
press ENTER twice.)
Using the Printer
■ Printer Reset
The Printer Reset menu brings all temporary printer settings back to their default
values. Note that resetting the printer also removes all temporarily downloaded
resources such as fonts and macros from its memory.
Level 1
Others
Level 2
Printer Reset
Range
(To reset the printer, press ENTER twice.)
■ LF action
The LF action menu selects the line feed action from the following options.
Level 1
Others
Level 2
LF action
Range
LF only, CR and LF, Ignore LF
■ CR action
The CR action menu selects the carriage return action from the following options.
Level 1
Others
Level 2
CR action
Range
CR only, CR and LF, Ignore CR
■ Ecoprint mode
The Ecoprint mode menu switches Ecoprint on or off. The Ecoprint enables you to
reduce the amount of toner consumed on the page, saving your printing cost.
Level 1
Others
Level 2
Ecoprint mode
Range
On, Off
■ Resolution
The Resolution menu sets the resolution of the printer.
Level 1
Others
Level 2
Resolution
Range
600 dpi 1200 dpi*
Note:
* The 1200 dpi setting can be selected only when using KPDL emulation.
With emulation modes other than KPDL, 600 dpi is selected automatically.
49
Using the Printer
■ Resource protection
The Resource protection menu enables the resource protection function in the
following options. The resource protection function preserves PCL resources in memory
so that they are intact even when you change the emulation from KPDL (or KPDL
[AUTO]) back to PCL 5C.
Level 1
Others
Level 2
Resource prot.
Range
Off, Permanent, Perm/Temp
■ Audio alarm
The Buzzer menu turns on the audio alarm which sounds according to the printer error.
Level 1
Others
Level 2
Buzzer
Range
Off, On
■ Service
The Service menu prints a special status page and colour test pages to diagnose
problems. The Print Test Page 1 prints a CMYK test page; and the Print Test Page 2
prints four pages, each printed in cyan, magenta, yellow, or black.
Level 1
Others
Level 2
Service
Note:
For service purpose only.
50
Level 3
Print Status Page,
Transfer Roller,
Print Test Page 1,
Print Test Page 2
Using the Printer
RAM DISK
A RAM DISK can be set up as a virtual media device by setting a given amount of the
total printer memory as the RAM DISK. This can then be used for reading and writing
data just as with a memory card or as a virtual mail box function (see page 52 to 56).
Note however that data written to the RAM DISK is lost if the printer is reset or its
power turned off. RAM DISK settings can be made from the printer’s control panel.
Notes:
• The RAM DISK is set from the printer’s user memory. The printer’s printing speed
may therefore drop or insufficient memory errors result depending on the value of
the RAM DISK setting.
• RAM DISK functions cannot be used if an optional hard disk unit is installed.
■ Setting the RAM DISK Size
1
2
3
Press the MODE key.
4
5
Press the
6
7
Once the desired RAM DISK size is displayed, press the ENTER key.
Press the + or - key and select RAM DISK mode >.
The default setting is Off. Pressing the ENTER key will cause a ? to
flash. Press the + or - keys to display On and then press the ENTER
key.
key to display >RAM DISK size.
Press the ENTER key again, and change the RAM DISK size using
the + or - key. It is not possible to make a setting that exceeds total
printer memory. The default value for the RAM DISK is the total
printer memory minus 32 MB. This parameter may be set anywhere
from 01 to 80 depending on the available printer memory. Press the
EXIT key if you want to cancel the setting.
Press the EXIT key. Then turn the printer’s power off and on again.
The setting will be activated after restart.
51
Using the Printer
■ RAM DISK Operations
The following operations are available with the RAM DISK.
• Read Data
• Write Data
• Delete Data
• Print a List of Data Names
• Print Accumulated VMB Data
• Print VMB List
Except for printing accumulated VMB data and printing a VMB list, procedures for all
operations are the same as for a memory card. Please see the memory card item for the
given procedure.
Virtual Mail Box (VMB)
The Virtual Mail Box (VMB) function is a mail box function for the printer which does not
require a physical mail box to be attached to the printer. The virtual mail box function
can be used when RAM DISK mode is On or when an optional hard disk unit is installed
on the printer. (The RAM DISK cannot be used when the optional hard disk is installed.)
This manual describes how to use the virtual mail box with a RAM DISK.
With a virtual mail box, unlike a physical mailbox, data sent from the computer is stored
in the RAM DISK as rasterized data. This stored data accumulates in a numbered virtual
output tray. When it is time to actually print the data, it is printed by specifying the
virtual output tray number where the data is stored using the printer’s control panel or
an optional barcode reader (BC-1).
Note:
If all the data in a virtual output tray is printed, all data in that tray will be deleted.
If printing is halted by pressing the CANCEL key during printing, data in that tray
will not be deleted. Data is not deleted unless all data in the virtual output tray is
printed.
• Locked mailbox
Allowing a password to be set for the virtual output tray, this feature makes the
printout of confidential documents easy.
• Multilevel mailbox
Supporting up to 255 virtual output trays, mail boxes can be allocated at the
individual level rather than by the user’s job title or group.
• Large capacity mailbox
There is no limit on the size per virtual output tray. Since the only limit is on the
total size of all trays, all of the RAM DISK can be used.
52
Using the Printer
■ Outputting to a VMB
When sending data to a virtual output tray set within the RAM DISK, make this setting
from the printer driver. With this setting, data can be sent by specifying the desired
virtual output tray number. It is also possible to assign a name to a virtual output tray
and send data by specifying that name. (For details on this setting, please refer to the
help documentation for the printer driver.)
When data is sent by specifying a virtual output tray, printing to paper is not performed
at the time data is sent. Sent data accumulates in the virtual output trays of the RAM
DISK. For details on printing accumulated data, please see the next item.
■ Print Accumulated VMB Data
This function prints VMB data accumulated in a virtual output tray.
1
Select RAM DISK mode on the printer’s Mode Select Menu and
display >Print VMB data Tray. The VMB tray number will appear in
the location marked by #’s below, while the VMB tray name will
appear in the location marked by %’s.
>Print VMB data
Tray###:%%%%%%%
2
Pressing the ENTER key will cause a ? to flash.
>Print VMB data
Tray###?%%%%%%%
3
Each time the + or - keys are pressed, the VMB data display will
change. Press the CANCEL key if you want to halt printing. The ?
display will disappear.
4
Display the VMB data you want to print. Pressing the ENTER key
will cause Processing to be displayed and the data will be printed.
53
Using the Printer
■ Print Accumulated VMB Data with a Password
This function prints VMB data protected by a password which has accumulated in a
virtual output tray.
1
Display >Print VMB data Tray. The VMB tray number will appear
in the location marked by #’s below, while the VMB tray name will
appear in the location marked by %’s.
>Print VMB data
Tray###:%%%%%%%
2
Pressing the ENTER key will cause a ? to flash.
>Print VMB data
Tray###?%%%%%%%
3
Each time the + or - keys are pressed, the VMB data display will
change. Press the CANCEL key if you want to halt printing. The ?
display will disappear.
4
If a password is set for the VMB data you want to print, the message
display will change to >User ID? 00001 and the printer will standby
to accept a password. The cursor will blink in the one’s place of the
displayed number. Enter the correct password. Use the
and
keys to change places and the + or - keys to change the displayed
number. Passwords from 00001 to 65535 can be entered.
5
Press the ENTER key once the correct password is entered.
Processing will be displayed and the data will be printed. If the
password was incorrect, an error message “RAM DISK error 86” will
be displayed. (See page 97) Pressing the CONTINUE key will return
the printer to Ready status.
Note that the password entered here is reset (returns to 00001) when this mode is exited.
54
Using the Printer
■ Print VMB Accumulated Data List
This feature prints a list of VMB data accumulated in the RAM DISK.
1
Display >List of VMB.
>List of VMB
2
Pressing the ENTER key will cause a ? to display.
>List of VMB ?
Press the CANCEL key if you want to halt printing. The ? display
will disappear.
3
Pressing the ENTER key will cause Processing to be displayed and
the VMB data list to be printed.
An actual VMB list printout will differ slightly from sample given above.
Information regarding virtual output trays which are set will be displayed in the virtual
mail box list. A - mark is shown with the bin number for virtual output trays which
contain data. If a password is set for a virtual output tray, there is no barcode shown for
that virtual output tray. Also, “FULL!!” will be shown for virtual output trays for which
there was an error when data was sent to them. A VMB ERROR LOG will be printed
when data from such a virtual output tray is printed.
55
Using the Printer
■ Operations for Using a Barcode Reader
If an optional barcode reader (BC-1) is connected to the printer, it is possible to print data
within a virtual output tray using the barcode in the list. Select the barcode for “Output
(1)” in the upper right using the barcode reader and then select the barcode for the
virtual output tray you want to print. If you want to delete the data in a tray, select
“Delete (2)” also in the upper right and then select the barcode for the virtual output tray
you want to delete. Note that all data in the tray will be deleted.
For detailed operating procedures for the barcode reader, please read the instructions
included with the barcode reader.
56
Using the Printer
Memory Cards
This printer is equipped with a memory card slot. If a JEIDA Ver. 4.2 memory card is
used, it is possible to read, write and delete data, and format the memory card.
Note:
Only 32 MB or less, flash or S-RAM type memory cards, conforming to JEIDA Ver.
4.2, can be written or formatted by this printer.
Font cards can be read from the control panel or read automatically upon power-on or
printer reset when a font card is inserted in the printer.
■ Inserting a Memory Card
Carefully insert the memory card as far as it will go with the top (label) side facing as
shown below.
Memory Card Slot
Top Side of
Memory Card
Notes:
Follow the precautions below when handling memory cards:
• Memory cards are sensitive to static electricity. Before handling a memory card,
be sure to eliminate any static electricity which may have built up on your body
or clothing by touching a metallic object.
• Use flash memory cards or S-RAM memory cards conforming to JEIDA Ver. 4.2
which are approved by Kyocera.
• Be sure that its power is off when inserting or removing a memory card.
• Do not insert memory cards into the slot with undue force.
• Do not bend memory cards.
• Do not drop memory cards or subject them to shock.
• Do not splash water or other liquids on memory cards.
• Do not place memory cards near fires or heat sources.
• Do not subject memory cards to direct sunlight.
Store memory cards in their protective case when not using them.
57
Using the Printer
■ Reading Data from a Memory Card
The operation described here is performed while the message display reads Ready.
1
2
Insert the memory card into the memory card slot (☞ P. 57).
Bring up the menu >Read font on the message display.
For details on using the mode selection menu, see pages 37 and 44.
3
Press the ENTER key. The question mark (?) will appear and a data
name will appear after it.
Press the CANCEL key to abandon reading data.
4
5
Press the + key to scroll through data names on the memory card.
Press the ENTER key again. This will cause Processing to appear
in the message display and the selected data will be read.
6
After the data have been read, the message display will return to
Ready.
■ Writing Data (Partitions) to a Memory Card
Up to 127 partitions can be written on a single memory card. Data written on the card
are automatically assigned names, which can be checked by printing out a partition list.
Check that the memory card is not write-protected.
1
2
3
Bring up the menu >Write data on the message display.
Press the ENTER key. ? will appear.
Pressing the ENTER key again will cause Processing to appear in
the message display followed by Waiting.
Press the CANCEL key to cancel writing data.
4
Send data from the computer to the printer.
[Example]
Sending the file TEST.PRN to the printer from the computer (DOS mode).
COPY TEST.PRN LPT1
The message display will change to Processing when data is received and will
change back to Waiting when reception is finished.
Note:
A printable file should be stored on the memory card.
58
Using the Printer
5
Check that the message display has changed to Waiting and press
the FORM FEED key.
The printer will automatically print the data just written (example below). This
printout can be used to check the name (partition name) under which data was
written and confirm that it was written properly.
Slot number: Slot name for the memory card (only A is supported)
Data type: Data type (only 2 is supported)
Partition name: Name of the partition (data) written
Write data length: Size of the partition data written (in units of bytes)
After printing is finished, the message display will return to Ready.
■ Deleting Data from a Memory Card
It is possible to delete data on a memory card one at a time. Check that the memory card
is not write-protected.
1
Bring up the menu >Delete data on the message display. This
display only appears if the memory card contains data.
2
Press the ENTER key. The question mark (?) will appear and a data
name will appear after it.
The ? will flash, and a data name will appear.
3
>Delete data
? (data name)
You can scroll through data names on the memory card one by one
by pressing the + key.
Press the CANCEL key to cancel this operation.
4
Press ENTER key while the data you wish to delete is shown. The
message display will change to Processing. Use this to check that
the specified partition has been deleted properly.
59
Using the Printer
■ Formatting a Memory Card
It is necessary to first format a new memory card before it can be used by the printer.
Formatted memory cards can then be written with data.
Note:
• Note that if you format a memory card which already has data written on it, that
data will be lost entirely.
• Check that the memory card is not write-protected.
1
Bring up the menu >Format on the message display.
2
Press the ENTER key. ? will appear.
3
Pressing the ENTER key again will cause Processing to appear in
the message display and the memory card will be formatted.
The printer will print memory card formatting information after initialization is
finished. Use this to check that the memory card has been formatted properly.
After this information is printed, the message display will return to Ready.
■ Printing a List of Data Names (Partitions)
This operation prints the contents (data names, data size, etc.) of the memory card
inserted in the memory card slot.
1
Bring up the menu >List of Partitions on the message display.
2
Press the ENTER key. ? will appear.
Press the CANCEL key to cancel printing.
3
Press the ENTER key again. This will cause printing to start.
After this information is printed, the message display will return to Ready.
60
Using the Printer
■ Memory Card Error Codes
Error codes 11, 13, 17, and 18 apply only to flash memory cards.
Error code
Meaning
MEMORYCARD err 01
Press CONTINUE
• You attempted to write more than 32 MB of data to a
memory card. Or, the capacity of the memory card
installed in the printer is more than 32 MB.
• A data name not existing on the memory card is
specified. Check the data names on the memory card.
MEMORYCARD err 02
Press CONTINUE
• This memory card cannot be used by this printer.
MEMORYCARD err 03
Press CONTINUE
The memory card is not a JEIDA card. Only JEIDA
Ver. 4.2 memory cards can be used by this printer.
MEMORYCARD err 04
Press CONTINUE
The card is an S-RAM or flash card which cannot be
used by this printer.
MEMORYCARD err 05
Press CONTINUE
There is no battery in the memory card. Replace the
battery in the memory card with a new one.
MEMORYCARD err 06
Press CONTINUE
The memory card is write-protected. Cancel the writeprotection of the memory card.
MEMORYCARD err 07
Press CONTINUE
The memory card requires formatting. Format the
memory card from the control panel (☞ P. 61).
MEMORYCARD err 09
Press CONTINUE
The capacity of the memory card is insufficient. This
error code appears when an attempt is made to write
more data on the memory card than available memory.
To halt the writing of data, first stop data transmissions from the computer, and then press the printer’s
CANCEL key.
Press the FORM FEED key if the message Waiting
will appear in the message display. The message display will return to Ready.
MEMORYCARD err 11
Press CONTINUE
The memory card is full of data. The number of data
which can be written on the memory card is limited to
127. Pressing the CANCEL key will restore the message Ready in the message display.
MEMORYCARD err 13
Press CONTINUE
This is a logical error. Try substituting another flash
memory card.
MEMORYCARD err 17
Press CONTINUE
The flash memory card cannot be written due to
insufficient printer memory. Either delete unnecessary
macros and/or fonts stored in the printer, or expand the
printer’s available memory.
MEMORYCARD err 18
Press CONTINUE
This is a write error. Try substituting another flash
memory card.
61
Using the Printer
Setting the Sleep Timer
The sleep timer can be set anywhere from 0 to 120 minutes in 5-minute increments.
Setting the sleep timer to 0 turns it off. The sleep timer is set at the factory to 60 minutes.
To set the sleep timer:
1
Press the MODE key on the printer panel.
2
Press the + key repeatedly until the message display indicates
Others>.
3
Press the
4
Press the + key repeatedly until the message display indicates
>Sleep timer.
key.
The current sleep timer (in minutes) is indicated.
5
Press the ENTER key. The underline cursor flashes.
6
Press the + or - key to change the timer setting. You can use the
key to quickly change the timer setting.
7
Press the ENTER key to finalize the setting.
8
Press the MODE key to exit the mode selection menu.
Once the set time arrives, the printer will display Sleeping and all indicators will go
out. This minimizes the amount of energy used.
Resource Protection
When you switch from the PCL 5C emulation to KPDL, all downloaded fonts and macros
are lost. Resource protection preserves these PCL resources in memory so that they are
intact when you change the emulation back to PCL 5C.
By using the printer’s >Resource prot.menu, you can select from two resource
protection modes:
62
or
Using the Printer
Permanent
In this mode, the printer stores fonts, macros, symbol sets, etc. in memory that were
downloaded as permanent PCL resources. All temporary resources are lost when the
emulation mode is changed from PCL 5C to KPDL or vice versa.
Permanent and temporary
In this mode, the printer stores both permanent and temporary resources when the
emulation mode is changed from PCL 5C to another or vice versa.
To select the resource protection mode:
1
Press the MODE key on the printer panel.
2
Press the + key repeatedly until the message display indicates
Others>.
3
Press the
4
Press the + key repeatedly until the message display indicates
>Resource prot.
key.
The current resource protection mode is indicated — Permanent or Perm/Temp.
>Resource prot.
Permanent
>Resource prot.
Perm / Temp
5
Press the ENTER key. The question mark (?) will appear blinking.
6
Press the + key to change from Permanent to Perm/Temp, or vice
versa.
7
Press the ENTER key to finalize the setting.
8
Press the MODE key to exit the mode selection menu.
63
Care and Maintenance
Cleaning
Periodic cleaning of the printer is recommended. The frequency of cleaning is dependent
upon the environment in which the printer is used. You should clean the printer:
•␣ At least once a month.
•␣ When the printer experiences frequent media jams.
•␣ When print quality has deteriorated.
■ External
1
Turn the power OFF.
2
Clean all the covers with a soft cloth. Use any mild commercial
cleaner.
Caution:
Do not use benzine, thinner, aerosol cleaners, or any abrasive powder.
■ Internal
When using isopropyl alcohol with a lint-free cloth, make sure that the alcohol is at least
90% pure, obtainable from your local pharmacy. (Do not use rubbing alcohol; it can
damage the printer.)
Cleaning the paper-pick rollers
64
1
Slide the media tray out (you do not have to remove it) to allow
access to the paper-pick rollers.
2
Open the left side cover.
3
Use the green handles to pull out the paper feeder.
Care and Maintenance
4
Gently rotate the paper-pick rollers 180° (the paper-pick rollers are
D-shaped) and wipe them with a lint-free cloth that has been
moistened with isopropyl alcohol.
5
Reinsert the paper feeder ( (1) ) and close the left side cover ( (2) ).
(1)
6
(2)
Slide the media tray back into place.
Cleaning the optional feeder and the duplex unit
If you have an optional paper feeder installed, you may also need to clean the rollers for
the middle and lower media trays, which are accessed through the lower left side cover.
65
Care and Maintenance
When using the duplex unit, it may become necessary to clean the rollers inside the unit.
Open the internal cover, and wipe the rollers with a lint-free cloth steeped in isopropyl
alcohol.
Cleaning the home sensor
1
2
Open the printer’s front cover.
Remove the imaging unit:
(1) Loosen the two thumbscrews by turning them counterclockwise.
(2) Turn the lower green lever 180° counterclockwise.
(1)
(1)
66
(2)
Care and Maintenance
(3) Grasping the front green handle, slide the imaging unit out until
it catches.
(4) Lift up the left green handle. Pull the imaging unit out of the
printer and cover it to protect it from light exposure.
Green surface
(4)
(3)
Black belt
Important:
Do not touch the green surface (the right side) or the black belt (the underside).
Finger prints may affect the print quality.
Safety Caution:
The imaging unit weighs approximately 6.5 kg (14.3 lbs.). Always use the handles
when lifting it.
Cautions:
• Do not expose the imaging unit to artificial light for more than 45 seconds; or you
may damage the unit. Never expose it to direct sunlight.
• Do not leave the printer’s front cover open for an extended period of time (for
example, several hours).
67
Care and Maintenance
3
Use a dry, lint-free cloth to wipe the slot of the sensor.
Sensor
Slot
4
Reinsert the imaging unit into the printer, holding it by its green
handles.
Match the arrow on the right side of the imaging unit with the arrow on the
printer, and slightly push the imaging unit into the printer. Then release the left
handle and push the unit in until it stops.
5
(1) Turn the lower green lever clockwise 180° to insert the unit
completely and to lock it.
(2) Tighten the two green thumbscrews by turning them clockwise.
(3) Close the front cover.
(2)
(2)
(1)
(3)
68
Care and Maintenance
User Replaceable Components
When the printer panel indicates that a supply needs to be replaced, make sure that you
have replacement supplies on hand. The printer may continue to print until the supply is
completely used up; then it stops until you replace the indicated supply.
Toner Developers
Printer panel message
Toner Developers
Toner low
TD-81x (Colour)
Average life*1
Black*2
11,600 pages
C, M, Y*2
9,600 pages
Change the colour toner developer soon.
Replace Toner
TD-81K (Black)
Black*2
12,000 pages
C, M, Y*2
10,000 pages
Change the black toner developer now.
Imaging Unit
Warning IU-81
Imaging unit
Change the Imaging unit soon.
Replace IU-81
Imaging unit
Change the Imaging unit now.
Monochrome
57,000 pages
or
Colour
14,250 pages
Monochrome
60,000 pages
or
Colour
15,000 pages
*1
These figures are based on an average of 5% coverage of the printable area and standard density
for any one colour. The frequency of replacement will vary depending on the complexity of the
prints and the percentage of coverage and print density.
*2
The starter developers that are shipped with the printer have an average life of approximately
6,000 pages (Black), 5,000 pages (C, M, Y), based on an average of 5% coverage.
Note:
If you print with high density when Toner low is displayed, you may get faded
printout before Replace Toner is displayed.
69
Care and Maintenance
Main Charger
Printer panel message
*
Fuser unit
(with pre-installed Oil
Supply Roll and Cleaning Pad)
Average life
57,000 pages
Warning FK-81
Fuser KIT
Fuser unit must soon be replaced.
60,000 pages
Replace FK-81
Fuser KIT
Fuser unit must now be replaced.
Oil Supply Roll*
(with pre-installed
Cleaning Pad)
14,500 pages
Warning OS-81
Oil supply roll
Oil Supply Roll and Cleaning Pad must
soon be replaced.
15,000 pages
Replace OS-81
Oil supply roll
Oil Supply Roll and Cleaning Pad must
now be replaced.
Transfer unit
80,000 pages
Warning TR-81
Transfer roller
Transfer unit must soon be replaced.
Cleaning Pad
15,000 pages
Warning CP-81
Fuser clean pad
Cleaning Pad must soon be replaced.
Main Charger
Warning MC-81
Main Charger
Main Charger must soon be replaced.
*
70
Monochrome
30,000 pages
or
Colour
7,500 pages
Transparencies, coated paper, and other specialty media will result in shortening the life of a
consumable. When replacing the fuser unit, replace the oil supply roll as well. Do not insert the
used oil supply roll into the new fuser unit.
Care and Maintenance
Clearing a Jam
■ Clearing a media jam
Make sure that you follow these guidelines to avoid frequent media jams:
• Always use high-quality plain paper and transparencies. Refer to pages 111 and on.
• Make sure that you load specialty media only in the multi-purpose tray and that you
set the media thickness switch to the correct setting for the media used.
If a media jam occurs, the printer panel reports “Paper Jam.” It is followed by one of the
letters A through H that correspond to the various sensors throughout the paper path.
The following illustration shows the locations of the sensors that report media jams
(A through H).
Printer
(FS-5900C)
( ☞ P. 78)
Jam D
( ☞ P. 74)
Jam F
( ☞ P. 81)
Jam B
Jam C
( ☞ P. 80)
Jam E
( ☞ P. 73)
output tray
MP tray
Jam G
( ☞ P. 82)
Jam A
Media cassette or
Duplex Unit (Option)
( ☞ P. 72)
Jam H
( ☞ P. 84)
Paper Feeder
(option)
Notes:
• Sometimes the page on which the paper jam occurred will not be re-printed
depending on the location of the paper jam.
• Note that your hands may become dirty from unfused toner when removing paper
jams.
Frequent occurrence of paper jams may indicate you are using a paper specification
which does not suit the printer. If this appears to be the case, please change to a
different type of paper.
If you have tried changing paper types and paper jams still occur frequently, there
may be a problem with the printer. In this case, please contact your Kyocera dealer.
71
Care and Maintenance
■ Jam at A
1
Open the left side cover corresponding to the selected media
cassette.
2
Remove the jammed media.
(1)
(2)
3
Close the left side cover.
— OR —
4
Remove the media cassette or duplex unit.
(4)
5
Remove the jammed media from inside the printer.
(5)
6
7
72
Reinsert the media cassette.
Open and close the front cover to clear the error message from the
message display.
Care and Maintenance
■ Jam at B
1
Open the left side cover.
2
Use the green handles to pull out the paper feeder.
3
Remove the jammed media on the paper feeder.
4
Reinsert the paper feeder and close the left side cover.
73
Care and Maintenance
■ Jam at C
1
Remove the fuser:
(1) Open the printer front cover.
(2) Turn the small green thumbscrew counterclockwise to unlock the
fuser.
(2)
(1)
Safety Caution:
• The fuser is hot. To avoid personal injury, turn off the printer and wait 10 minutes
(after opening the front cover) for the fuser to cool before touching it.
(3) Holding the green tab on the right, slide the fuser out until the
safety catch stops it.
(4) Press the green lever on the left to release the safety catch.
(4)
(3)
CAUTION:
HOT SURFACE INSIDE
74
Care and Maintenance
2
(1) Hold the fuser as shown below, and slide it out of the printer.
Safety Caution:
The fuser unit weighs approximately 3.1 kg (6.8 lbs.). Take care when handling it.
(2) Close the front cover.
(2)
3
(1)
Remove the oil supply roll:
(1) Press out on tabs to unlock the oil supply roll.
(2) Remove the oil supply roll out of the fuser.
(1)
(1)
(2)
Note:
• Do not turn the green handle before removing the oil supply roll.
• If the paper is not jammed in the fuser unit, perform the following.
(1) Repeat steps 1 to 4 of Jam B on page 73.
(2) Skip step 4 and go to step 5.
75
Care and Maintenance
4
(1) Turn the fuser’s large green knob clockwise.
(2) Remove the jammed media.
(1)
(2)
5
(1) Replace the oil supply roll into the fuser.
(2) Press down firmly on the oil supply roll to snap both sides into
place.
(2)
(2)
(1)
Caution:
If the oil supply roll is not installed correctly, print quality will be diminished.
6
(1) Open the front cover.
(2) Slide the fuser back into the printer.
(2)
(1)
76
Care and Maintenance
7
(1) Turn the small green thumbscrew clockwise to lock the fuser.
(2) Close the front cover.
(1)
(2)
77
Care and Maintenance
■ Jam at D
Safety Caution:
The fuser is hot. To avoid personal injury, turn off the printer and wait 10 minutes
(after opening the front cover) for the fuser to cool before touching it.
Note:
First check the exit opening for media that has jammed and folded like an accordion.
It is especially difficult to see if the media is transparency film.
1A (Printing face up)
(1) Open the front cover and the right side cover.
(2) Turn the fuser’s large green knob counterclockwise to release the
jammed media.
(3) Remove the jammed media from the right side of the printer.
(3)
(2)
(1)
Safety Caution:
The fuser is hot. To avoid personal injury, turn off the printer and wait 10 minutes for
the fuser to cool before touching it.
(4) Close the front cover and the right side cover.
78
Care and Maintenance
1B (Printing face down)
(1) Open the front cover.
(2) Pull open the access door (above the plastic output tray). See if
the media is visible.
(2)
(1)
(3) Turn the large green knob on the fuser counterclockwise.
(4) Remove the media from inside the access door.
(4)
(3)
Caution:
If the fuser knob will not turn, do not force it, or you may damage the fuser. Instead,
follow these steps:
a) Unlock the fuser by turning the small green thumbscrew counterclockwise.
b) Pull the fuser out. The media will probably tear.
c) Remove the oil supply roll.
d) Turn the fuser’s large green knob to release the jammed media.
e) Remove the jammed media from the fuser and the printer.
Safety Caution:
Be careful not to let go of the access door while it is opened.
(5) Close the front cover.
79
Care and Maintenance
■ Jam at E
1
Remove the jammed media from the output tray.
— OR —
Pull open the access door (above the plastic output tray) and remove
the media.
Safety Caution:
Be careful not to let go of the access door while it is opened.
— OR —
Open the cover on the right side, and remove the media.
2
80
Open and close the front cover to clear the error message from the
message display.
Care and Maintenance
■ Jam at F
1
Remove the jammed media from the multi-purpose tray.
2
Open and close the front cover to clear the error message from the
message display.
81
Care and Maintenance
■ Jam at G
1
(1) Pull open the access door (above the plastic output tray), and look
for any paper.
(2) Remove the media from inside the access door.
(2)
(1)
Safety Caution:
Be careful not to let go of the access door while it is opened.
— OR —
(3) Remove the duplex unit.
(3)
82
Care and Maintenance
(4) Remove the jammed media from the duplex unit.
2
Open and close the front cover to clear the error message from the
message display.
83
Care and Maintenance
■ Jam at H
1
Open the lower left side cover.
(1)
2
Remove the jammed media.
(2)
3
Close the lower left side cover.
— OR —
4
Remove the selected media cassette (middle or lower media tray).
(4)
5
Remove the jammed media from inside the printer.
(5)
6
7
84
Reinsert the media tray.
Open and close the front cover to clear the error message from the
message display.
Care and Maintenance
Troubleshooting
Trouble
Possible Cause
Corrective Action
A single colour is not
The toner is almost depleted.
uniform or many vertical
streaks (both light and
dark) of slightly different density and nonuniform colour.
Replace the colour toner
developer.
Half tone area has areas
of weak colour.
Try fresh paper, or another
type of paper.
Paper doesn’t match the
environmental conditions, or
it has too much moisture.
Store media in the original,
dust-free package in the
same environmental conditions as the printer.
A single colour appears
faded.
The colour density is set
incorrectly in the printer
panel.
Check the density setting by
printing the Colour Calibration Page in the Colour
Calibration menu from the
printer panel. Compare the
settings with the colour
density samples on the Colour
Calibration Reference and, if
necessary, adjust the density
from the printer panel. Refer
to Setting the Colour Density
on page 31.
The toner is almost depleted.
Replace the colour toner
developer soon (depending on
the complexity of your prints,
you can continue to print up
to 100 more pages).
85
Care and Maintenance
Trouble
86
Possible Cause
Corrective Action
A single colour has a
sharp, dark or light
vertical streak.
The toner developer is almost Replace the colour toner
depleted and is not properly
developer.
applying toner.
Small white spots
appear on OHP transparency.
OHP transparency has dust
on its surface.
Remove dust or stain from
OHP transparency.
A single colour shows a
light, repeating horizontal line.
The roller in the toner
developer has a slight
impression after a long
period of storage.
Run 20-30 prints. The
impression will disappear
with continued time and use.
Prints are missing fineline detail.
The imaging unit has
reached its useful life.
Replace the imaging unit.
Dark colour spots and
dark or light streaks
appear in all colours.
The imaging unit has
reached its useful life.
Replace the imaging unit.
Care and Maintenance
Trouble
Straight, thin light
vertical line in colours.
Possible Cause
The photosensitive belt
inside the imaging unit is
scratched.
Corrective Action
Replace the imaging unit.
Each colour “bleeds” into The imaging unit’s internal
the colour band.
waste toner box is full.
Replace the imaging unit.
A single white spot
appears in approximately the same vertical
place on the page.
The imaging unit is damaged.
Replace the imaging unit.
Large light spot(s)
appear randomly.
Fingerprint(s) on the underside belt or photosensitive
belt (inside) of the imaging
unit.
Print several pages until the
spots fade.
87
Care and Maintenance
Trouble
One or more dark
vertical lines appear on
the print in all colours.
A piece of the printed
image is missing and
reappears out of place,
approximately 129 mm
(5”) down the page.
88
Possible Cause
Corrective Action
The imaging unit is
scratched.
Replace the imaging unit;
make sure that the old
imaging unit is not exposed
to light for more than 45
seconds.
If a new imaging unit does
not correct the problem:
• Put the old imaging unit
back into the printer.
• Repack the new imaging
unit.
The fuser is damaged.
Replace the fuser.
The fuser’s internal roller is
not being consistently oiled.
or
The fuser’s internal roller is
contaminated with toner
particles
Print 5-10 pages of blank
pages to clean the roller.
If you still see the problem:
Replace the oil supply roll.
If you still see the problem:
Replace the fuser.
The surface of the
The fuser is near its useful
printed image appears to life.
have vertical scratches
(visible by holding the
print at an angle and
observing the “shine” of
the image).
At first, the scratches
appear only on the
printed image; eventually, dark vertical scratches appear on the unprinted portion of the page.
Replace the fuser (depending
on your quality needs, you
can continue to print until
the dark vertical lines
appear).
Media frequently wraps
around the fuser.
The oil supply roll has
reached its useful life.
Replace the oil supply roll.
Light vertical streaks
appear in all colours.
The main charge grid is
dirty.
Replace the imaging unit.
Care and Maintenance
Trouble
Dark and wavy vertical
streaks appear in all
colours.
Possible Cause
The main charge grid is
dirty.
The entire page prints in Bad electrical contact for the
black, including the
main charge grid.
borders.
The main charge grid is
broken.
Corrective Action
Replace the imaging unit.
Reinsert the imaging unit to
correct the contact for the
main charge grid.
Replace the imaging unit.
Toner spots appear on
the back of the media.
The transfer unit is worn out. Replace the transfer unit.
The page prints in black
in the image area only.
(The borders are clear.)
Either the image processor
Turn the printer off and back
board or engine control board on again. If the problem
is not functioning properly.
persists, call for service on
your printer.
89
Care and Maintenance
Trouble
Possible Cause
Corrective Action
The page is completely
blank.
The problem could be with
one of the following:
• Engine control board.
• Developer voltage.
• Laser scanning unit mirror.
Turn the printer off and back
on again. If the problem
persists, call for service on
your printer.
“Call service person ...”
is displayed on the
message display.
An error occurred that is not
user-correctable.
Turn the printer off and back
on again. If the error persists, call for service.
■ If you can’t make a print
Trouble
Possible Cause
The printer does not
operate.
Make sure that you plugged in the printer and turned it on.
The printer does not
print.
If the communication link between your computer and the
printer is working but the printer ejects a blank page when
printing from your application or through Windows, make
sure that the appropriate driver is installed and that you
have selected the printer correctly.
Trouble
The printer does not
print correctly.
Make sure that you connected the interface cable(s) properly.
Possible Cause
Corrective Action
The computer is not properly
communicating with the
printer.
Follow the procedure below
and disable the bi-directional
interface.
Under Windows 95/98:
1. Click Start, select Settings, then click Printers.
2. Double click the Kyocera
FS-5900C icon.
3. Click the Printer menu,
then click Properties.
4. Click the Details tab and
Spool settings... .
5. Click Disable bi-directional support for this
printer, then click OK.
90
Care and Maintenance
■ Media problems
Trouble
Frequent paper-picking
errors
Possible Cause
Fan the paper or transparencies before installing them in
their respective cassettes; this is especially important for
transparencies because they tend to stick together.
Make sure that you have loaded paper in the paper tray and
transparencies in the transparency cassette.
Make sure that the media is installed under the hooks at the
front of the media cassette.
If printing on transparencies and your printer has an option
Paper Feeder, make sure that the transparency cassette is
installed in the upper or middle tray slot.
Clean the paper-pick rollers (☞P. 64).
Frequent media jams
Make sure that you use a high-quality laser paper:
60-105 g/m2 (16-28 lbs.) paper in the media cassettes and
75-165 g/m2 (20-44 lbs.) paper in the multi-purpose tray.
If you are using media that is 105 g/m2 (28 lbs.), check if the
Face Down media output setting is selected in the driver. If
it is, change the setting to Face Up.
Use only recommended transparencies (☞P. 114). We
cannot guarantee the results of using other transparencies.
Make sure that the media is installed under the hooks at the
front of the media cassette.
Do not overfill the media cassette, as indicated by the red
line on the right side of the cassette.
Clean the paper-pick rollers (☞P. 64).
Make sure that the media thickness switch is set correctly
for the installed media (☞P. 19).
■ Problems with image size and position
Trouble
Possible Cause
Off-set images
Check your application for correct image sizing.
Cut-off images
Check your application for image sizing.
Make sure that the correct size media is in the media cassette.
91
Care and Maintenance
■ Print quality problems
Trouble
Corrective Action
Prints have dull, faded
colours.
Print the Colour Calibration Page from the Colour Calibration menu in the printer panel. Check the density settings
for each colour and compare them to the examples on the
Colour Calibration Reference card. Refer to Setting the
Colour Density on page 30 for instructions on comparing and
setting colour density.
Make sure that the imaging unit stays covered until immediately before installing it in the printer. Exposure to light can
damage the imaging unit and will produce light streaks or
faded prints.
Make sure that the toner developers are installed correctly.
Make sure that you use a high-quality laser paper:
60-105 g/m2 (16-28 lbs.) paper in the media cassettes and
75-165 g/m2 (20-44 lbs.) paper in the multi-purpose tray.
Image is very faded or
pieces of the image are
missing; toner on the
page is loose.
When using the multi-purpose tray, make sure that you
have selected the correct media type in the driver or in the
MODE menu of the operation panel.
Streaks or spots
Most spots are caused by fingerprints or dust introduced
into the printer while installing the imaging unit or loading
media.
Make sure that the surface where you unpack the imaging
unit, paper, and transparencies is free of dust. Keep supplies
in a covered area or a closed box.
Make sure that the imaging unit stays covered until immediately before installing it in the printer. Exposure to light for
more than 45 seconds can damage the imaging unit.
Do not touch the right side or underside of the imaging unit;
fingerprints affect print quality.
Make sure that the paper or transparency film is clean.
Make sure that you handle the media on the outside edges to
avoid fingerprints.
To get rid of fingerprint spots, print a few prints.
92
The back of the printed
page appears dirty.
Toner particles have contaminated the transfer roller. This
can happen if the printed image is larger than the media (for
example, when printing on envelopes). Run 10-20 prints to
clean the transfer roller.
The print quality of a
transparency is poor.
There is a defect on the coated surface of the transparency.
Print on the other side.
Care and Maintenance
Error Messages
Printer Panel Message
Error Message
1
Possible Cause
Corrective Action
Add paper (paper source)
(paper size)(media type)
The paper source is out of
paper.
Add paper to the paper cassette or multi-purpose tray.
Not only the paper source, but
also the paper size and media
type set for the paper source in
question are displayed.
Battery error
MEMORY CARD
The memory card’s
battery is run out or not
installed.
Insert a new battery in the
memory card. (See the memory
card manufacturer’s instruction.)
Call service
person##:#######
A failure requiring the
attention of service
personnel has occurred.
Note the corresponding error
code (## followed by the colon)
and the total printed pages1
(####### preceded by the
colon). Turn printer power off
and call for service.
Cassette 1
not loaded
The printer’s media
cassette is not loaded in
the printer, or not closed
fully in position.
Insert the media tray, or close it
securely. (Cassette 1 is shown
as Cassette when no option
paper feeder is installed.)
Cassette 2
not loaded
The paper feeder’s top
media cassette is not
loaded in the paper
feeder, or not closed fully
in position.
Insert the top media tray, or
close it securely. (This message is shown only when the
printer is installed with an
option paper feeder.)
Cassette 3
not loaded
The paper feeder’s bottom
media cassette is not
loaded in the paper
feeder, or not closed fully
in position.
Insert the bottom media tray,
or close it securely. (This
message is shown only when
the printer is installed with an
option paper feeder.)
Duplex unit
not loaded
The Duplex unit is not
installed in the printer.
Install the Duplex unit in the
printer.
Format error
(Media)
The hard disk or memory
card is not formatted.
Format the media (For a
memory card, ☞P. 60).
Front/Right
cover Open
The front or right side
cover is open.
Check both covers and close
them tightly.
HARDDISK error##
Press CONTINUE
The printer has encountered an error during
access to the optional
hard disk.
Note the error code (##)
preceded by the HARDDISK
error message. Then, press
CONTINUE to clear the error
situation. Refer to section
Hard disk Error Codes
(☞P. 99).
The total printed pages is not shown when the error code is F0 (Communication error).
93
Care and Maintenance
Error Message
Possible Cause
Corrective Action
I/F occupied
The front control panel
operation you attempted
is not possible because
that interface is receiving
data.
Wait until the data transfer is
completed on that interface.
Imaging unit
not locked
The imaging unit is not
locked properly because
its lever is not lifted.
Lift the imaging unit lever
fully up.
Insert the same
MEMORY CARD
A different memory card
was inserted following the
MEMORY CARD err/
Insert again message.
Reinsert the same memory
card as was removed previously into the printer’s memory
card slot.
KPDL Error ##
Press CONTINUE
The printer encountered
an error during processing data in KPDL mode.
Note the error code of ## and
press CONTINUE to clear the
error situation. See section
KPDL Error Codes (☞P. 100)
for information.
Left cover Open
The left side cover is open. Close it tightly.
Load (paper source)
The paper size or type
(paper size)(media type) does not match the
printing area.
94
One of MP tray, Cassette 1
to 3, will be displayed in
place of "paper source". Load
the paper displayed on the
message display and press the
CONTINUE key to print.
Or, pressing the FEED key
without pressing the CONTINUE key, will cause Use alternative? to be displayed,
and a different paper source
can be selected to supply
paper. The paper source
changes each time the FEED
key is pressed. And press the
MODE key to display Paper
handling>. Press the
key
and you can change the paper
source setting using the + or key to select. Load paper
appropriate for the paper
source and press the EXIT key
to print.
Care and Maintenance
Error Message
Possible Cause
Load cassette #
The paper size does not
(paper size) (media type) match.
Corrective Action
The size of paper panel in the
cassette is different to the size
specified by the application
software or by PRESCRIBE 2e
command. Put paper of the
specified size into the cassette.
(# represents the cassette
number)
If the CONTINUE key is
pressed, printing will be
resumed. However, if more
than one sheet is to be printed,
the same message will again
be displayed from the second
sheet onward.
You can abandon printing by
pressing the CANCEL key.
MEMORYCARD err##
Press CONTINUE
The printer has encountered an error during
access to the memory
card.
Look at the error code of ##
preceded by MEMORYCARD
err. Then, press CONTINUE to
clear the error situation. Refer
to section Memory card errors
(☞ P. 61).
MEMORY CARD err
Insert again
The memory card was
removed during the
memory card operation.
Re-insert the same memory
card into the printer’s memory
card slot. The printer will
continue with the memory
card operation.
Memory overflow
Press CONTINUE
The print data from the
computer is larger than
the printer can fit in its
memory.
Press CONTINUE to print the
data. Install additional memory .
Missing FK-81
Fuser KIT
The fuser kit is not
installed in the printer.
Install the fuser kit.
Missing IU-81
Imaging unit
The imaging unit is not
installed in the printer.
Install the imaging unit
(☞ P. 68).
Missing MC-81
Main Charger
The Main Charger unit is
Install the Main Charger unit
not installed in the printer. in the imaging unit.
Missing OS-81
Oil supply roll
The oil supply roller is not Install the oil supply roller
installed in the printer.
(☞ P. 76).
Missing Toner
TD-81C (Cyan)
The cyan toner developer
is not installed in the
printer.
Install the cyan toner developer (☞ P. 14).
Missing Toner
TD-81K (Black)
The black toner developer
is not installed in the
printer.
Install the black toner developer (☞ P. 14).
Missing Toner
TD-81M (Magenta)
The magenta toner
developer is not installed
in the printer.
Install the magenta toner
developer (☞ P. 14).
95
Care and Maintenance
Error Message
96
Possible Cause
Corrective Action
Missing Toner
TD-81Y (Yellow)
The yellow toner developer is not installed in the
printer.
Install the yellow toner
developer (☞ P. 14).
Missing paper
feed unit
The paper feeder unit is
not installed in the
printer.
Install the paper feeder unit.
Option feeder
Left cover Open
The paper feeder’s left
side cover is open.
Close it tightly.
Opt. ROM error
Press CONTINUE
The printer has encountered an error while
accessing data in the
option EPROM (on the
printer main board).
Press CONTINUE to print the
data processed so far. Replace
the option EPROM.
Option interface
Error
##
The printer has detected
an error on the option
interface.
Note the error code of ## and
consult your Kyocera dealer.
Output tray
paper full
The output tray has
become full.
Remove paper from the output
tray.
PJL OPMSG/STMSG
The printer encountered
an error during processing PJL commands.
Press CONTINUE to print the
page processed so far.
Paper jam
(Location)
Paper has become
jammed.
Remove jammed paper according to section Removing Paper
Jam (☞ P. 71).
Print overrun
Press CONTINUE
The printer has received
print data that is too
complex to finish processing in time with the
operation of the printer
mechanism.
Press CONTINUE to print the
data. Install additional
memory .
Processing
PAR FIT A4
Compressed data is
printed due to insufficient
memory when FIT flashes
in the resolution indicator. The quality of printed
data is reduced when this
occurs. Fit will continue
flashing even after
printing is finished. The
resolution indicator will
automatically return to
the previous resolution
when any key is pressed,
when a timeout occurs, or
when subsequent data is
received.
Increase the printer memory
to avoid this error.
Care and Maintenance
Error Message
RAM DISK error ##
Press CONTINUE
Possible Cause
Corrective Action
Check the error code
displayed in the place of
## and refer to the
corresponding description
at right.
01: Abnormal format. Try
turning the power off and on
again.
02: RAM DISK mode is OFF.
Turn RAM DISK mode On.
03: Cannot write to the disk
system because it is write
protected. Remove the write
protection.
04: No disk space. Clean up
files.
05: Specified file not on disk.
06: No memory for use by disk
system. Expand printer
memory.
10: Cannot format disk because host data is spooled
there. Format the disk after
Ready is displayed.
85: VMB: Alias error (Alias
setting failure or no virtual bin
corresponds to the alias.)
Make the setting again.
86: VMB: Password error (No
password specification, mistaken password, or password
setting failure.)
Check the password.
87: VMB: Although an attempt
was made to use a virtual bin
job stack, the stack size
reached the maximum limit.
Output the job or raise the
maximum limit.
88: VMB: There was a job or
page which could not be read
out during virtual bin job
output (the job is destroyed).
89: VMB: No job in the virtual
bin specified for output or that
virtual bin is not being used.
Check the bin.
97: MPS: A non-volatile job
has reached the maximum
limit and no more data can be
saved. Clean up the job or
raise the maximum limit.
98: MPS: There was a page
which could not be read out
within a job (the job is destroyed).
97
Care and Maintenance
Error Message
Possible Cause
98
Corrective Action
99: MPS: No job in the virtual
bin specified for output or that
page is missing.
RAM DISK error ##
Press CONTINUE
Read font ?
Failed
A font could not be read
due to insufficient memory.
A download font could not be
loaded into printer memory
due to insufficient available
printer memory. Either
remove unnecessary download
fonts or expand printer memory.
Read macro ?
Failed
A macro could not be
read due to insufficient
memory.
A download macro could not be
loaded into printer memory
due to insufficient available
printer memory. Either remove
unnecessary download macro
or expand printer memory.
Replace FK-81
Fuser KIT
The fuser is worn out.
Replace the fuser kit now.
Replace IU-81
Imaging unit
The imaging unit is worn
out.
Replace the imaging unit now.
Replace OS-81
Oil supply roll
The oil supply roller is
worn out.
Replace the oil supply roller
now.
Replace Toner
TD-81C (Cyan)
The cyan toner developer
is empty.
Replace the cyan toner developer now.
Replace Toner
TD-81K (Black)
The black toner developer
is empty.
Replace the black toner
developer now.
Replace Toner
TD-81M (Magenta)
The magenta toner
developer is empty.
Replace the magenta toner
developer now
Replace Toner
TD-81Y (Yellow)
The yellow toner developer is empty.
Replace the yellow toner
developer now.
Reset Fuser cln.
pad Press ENTER
The printer is waiting for
your input confirming that
you have replaced the
Cleaning Pad and resetting its counter (☞ P. 45).
Press ENTER and the printer
resets the transfer unit
counter to 0000000.
If you have not replaced the
Cleaning Pad, press EXIT, to
prevent the counter from being
reset.
Reset Trans.Roll
Press ENTER
The printer is waiting for
your input confirming that
you have replaced the
transfer roller and resetting its counter (☞ P. 45).
Press ENTER and the printer
resets the transfer unit
counter to 0000000.
If you have not replaced the
transfer roller, press EXIT, to
prevent the counter from being
reset.
Set paper
Press CONTINUE
The multi-purpose tray is
empty.
Add a sheet of paper to the
multi-purpose tray, and press
CONTINUE key.
Care and Maintenance
Error Message
Possible Cause
Corrective Action
Toner low
TD-81C (Cyan)
The cyan toner developer
is almost empty.
Replace the cyan toner developer as soon as possible.
Toner low
TD-81K (Black)
The black toner developer
is almost empty.
Replace the black toner
developer as soon as possible.
Toner low
TD-81M (Magenta)
The magenta toner
Replace the magenta toner
developer is almost empty. developer as soon as possible.
Toner low
TD-81Y (Yellow)
The yellow toner developer is almost empty.
Replace the yellow toner
developer as soon as possible.
Virtual Mail Box
full
The virtual mail box area
is full.
Print out accumulated VMB
data. If the VMB function is
being implemented by RAM
DISK, increase the RAM DISK
size.
Warning CP-81
Fuser clean pad
The Cleaning Pad is
wearing out.
Replace the Cleaning Pad as
soon as possible.
Warning MC-81
Main Charger
The Main charger is
wearing out.
Replace the Main charger as
soon as possible.
Warning FK-81
Fuser KIT
The fuser kit is wearing
out.
Replace the fuser kit as soon
as possible.
Warning IU-81
Imaging unit
The imaging unit is
wearing out.
Replace the imaging unit as
soon as possible.
Warning OS-81
Oil supply roll
The oil supply roll is
wearing out.
Replace the oil supply roll as
soon as possible.
Warning TR-81
Transfer roller
The transfer roller is
wearing out.
Replace the transfer roller as
soon as possible.
Warning battery
MEMORY CARD
The memory card’s
battery is running out.
Change the memory card
battery as soon as possible.
(See the memory card manufacturer’s instruction.)
Warning
Low memory
The printer’s internal
memory is insufficient to
complete the printing.
Press CONTINUE key to print
the page processed so far.
Remove any unnecessary fonts
or macros in the printer or
install additional memory.
99
Care and Maintenance
■ Hard Disk Error Codes
Error Message
HARDDISK error##
Press CONTINUE
Remedy
Check the error code (digits) shown at the ## position, and
refer to the following.
01: Format error.
The hard disk has malfunctioned. Turn on the printer
again.
02: No hard disk installed.
Check whether the hard disk has been correctly installed.
04: Insufficient capacity on hard disk, or the number of
stored files has exceeded 10,000.
Free disk space before attempting the operation again.
Reduce the number of files on the hard disk.
05: The specified file does not exist.
Check whether a file with the specified name exists on
the hard disk.
06: The memory available for use by the file system is
insufficient.
■ KPDL Error Codes
Code
100
Error
Meaning
00
—
Cannot initiate KPDL
01
dictfull
Dictionary full; no new entries can be added
02
dictstackoverflow
Too many begins
03
dictstackunderflow
Too many ends
04
execstackoverflow
Execution stack nesting depth exceeded 250
05
handle
Name of error-reporting procedure
06
interrupt
Control-C was received
07
invalidaccess
Attempted violation of access attribute
08
invalidexit
Exit not enclosed in any loop
09
invalidfile
Invalid access string for file operator
10
invalidfont
Invalid font name or invalid font dictionary format
11
invalidrestore
Restore would destroy composite object created after save
12
ioerror
Input/output error
13
limitcheck
Path too complex, more than 6 files open, etc.
14
nocurrentpoint
No current point is defined
15
rangecheck
Operand out of allowed range
16
stackoverflow
Operand stack overflow
17
stackunderflow
Operand stack underflow
18
syntaxerror
Syntax error in program
19
timeout
Time limit exceeded
20
typecheck
Wrong type of operand
21
undefined
Name not found in dictionary
22
undefinedfilename
File cannot be found
23
undefinedresult
Overflow, underflow, or meaningless result
Care and Maintenance
Code
Error
Meaning
24
unmatchedmark
Expected mark not found on stack
25
unregister
Internal error
26
vmerror
Virtual memory is exhausted, or illegal access was
attempted
27
badpassword
Bad password
28
invalidnumber
Invalid number
29
nomemory
Memory unavailable
30
configurationerror
Setpagedevice request cannot be satisfied
31
invalidcontext
Improper use of context operation
32
invalidid
Invalid identifier for external object
33
undefinedresource
Resource instance not found
98
fatal
Fatal error (User memory exhausted)
Repacking
It is highly recommended that you keep the original carton and all packing materials.
Should you need to transport or ship your printer, please follow these instructions.
Safety Caution:
The printer weights about 51 kg (112.4 lbs.). It must be handled by two people.
Notes:
• Should you need to send your printer for service, consult your reseller first or
Kyocera.
• Please use the original carton and all of the original packing materials.
• If you do not have the packing for the imaging unit and the transfer unit: contact
Kyocera for packaging.
• Improper repacking of the printer may result in a service charge to remove spilled
toner.
• Since the printer uses dry toner, extreme care must be taken when handling. The
printer should be handled in the upright (vertical) position.
Material required:
• Original cartons and packing materials
• Newspaper or drop cloth
• Shipping tape and scissors
101
Care and Maintenance
1
Turn off the printer; remove the power cord and all interface cables.
2
Remove the media cassette from the printer; remove the media from
the cassette(s).
3
Press down on a media cassette’s metal plate. Place the base plate
stopper into the media cassette.
(2)
(1)
(3)
Base plate stopper
102
Care and Maintenance
4
Reinsert the media cassette into the printer; use adhesive tape to
secure the cassette to the printer.
5
If you have other media cassettes, repack them for shipping or
storage in their original shipping boxes.
6
(1) Open the printer’s front cover.
(2) Loosen the two thumbscrews by turning them counterclockwise.
(3) Turn the lower green lever 180° counterclockwise.
(2)
(3)
(2)
(1)
7
(1) Grasping the front green handle, slide the unit out until it
catches.
(2) Lift up the green handle on the left. Pull the imaging unit out of
the printer.
Important:
Do not touch the green surface (the right side) or the black belt (the under side).
Finger prints may affect the print quality.
Safety Caution:
The imaging unit weighs approximately 6.5 kg (14 lbs.). Always use the handles when
lifting it.
Green surface
(2)
Black belt
(1)
103
Care and Maintenance
8
Wrap the imaging unit with a protective black plastic sheet.
Caution:
Do not expose the imaging unit to light for more than 45 seconds to avoid damage.
9
On the imaging unit, turn the upper lever 90° counterclockwise; this
is necessary to protect the imaging unit during shipment.
10
Insert the imaging unit into the packaging carton.
11
(1) Open the left side cover.
(2) Using the green handles, slide the paper feeder out.
(2)
(1)
104
Care and Maintenance
12
(1) Push in on green tabs to unlock the cover.
(2) Raise the cover until it catches in the open position.
(1)
(2)
13
(1) Rotate the transfer unit’s green handles up.
(2) Lift out the transfer unit.
(2)
(1)
14
Place the transfer unit on newspaper or drop cloth. Rotate the
handles down and wrap the transfer unit with a piece of paper and
adhesive tape.
Note:
Do not touch or bump the roller. It can damage the roller.
105
Care and Maintenance
15
Install the plastic cover and insert the transfer unit into a plastic
bag and seal the end tightly. Install the transfer unit into the
packaging.
Note:
Use the plastic cover that is originally fitted with a new TR-81 transfer unit.
Plastic cover
Plastic bag
16
Packing the toner developers:
(1) Open the right side cover.
(2) Remove the toner developer.
(2)
(1)
Caution:
To avoid possible toner spillage, do not tilt the toner developer.
106
Care and Maintenance
(3) Replace the shipping cover.
(4) Secure the shipping cover with adhesive tape.
(3)
(4)
(5) Insert each toner developer into a plastic bag and seal the end of
the bag tightly.
(6) Repeat instructions (2) to (5) for each toner developer.
17
Wipe off any loose toner in and around the printer.
Note:
If a toner vacuum is available, use it for cleaning spilled toner. Do not use a standard
office vacuum; the toner will not be retained by typical vacuum dust collectors.
107
Care and Maintenance
18
(1) Raise the output tray and secure it to the printer with adhesive
tape.
(2) Secure the front cover, the multi-purpose tray and the left side
cover to the printer with adhesive tape.
(1)
(2)
If you don’t have an option Paper Feeder, go to step 20.
19
If you have an option Paper Feeder:
(1) Lift the printer up and away from the Paper Feeder.
Safety Caution:
The printer weighs approximately 46.6 kg (103 lbs.) and the Paper Feeder weighs
approximately 14.4 kg (32 lbs.). Observe standard precautions for lifting heavy
objects.
(2) Repack the Paper Feeder in its original shipping box.
20
108
Repack any other accessories in the original shipping box. Refer to
the diagram on the next page.
Care and Maintenance
21
Repack the printer in the original shipping box. Refer to the
diagram below. Make sure that you keep the printer upright and
level when moving.
Toner developers
Printer
109
Appendix
Specifications
Printer
Power source
Refer to the nameplate on the rear of the unit.
Temperature
Operating:
10°C to 32.5°C (50°F to 90.5°F)
Recommended Operating: 16°C to 27°C (60°F to 81°F)
Storage:
0°C to 40°C (32°F to 104°F)
Humidity
Operating:
15% to 80% RH
Recommended Operating: 36% to 63% RH
Storage:
10% to 80% RH
Warm-up time
Less than 330 seconds (22°C/50%)
Power consumption
Max. 920 W
During sleeping less than 45 W
Mass (Weight) less than standard unit with all consumables
(without optional Paper Feeder)
51Kg (112 lbs)
Dimensions of standard unit (Without Paper Feeder)
Height:
Depth:
Width:
462 mm (18.2")
493 mm (19.4")
510 mm (20.1") [784 mm (30.9") with the output tray]
Noise level
53 dB(A) [Printing mode]
47 dB(A) [Standby mode]
Printing method
Semiconductor Laser
Paper output
Up to 500 sheets [75 g/m2 (20 lbs.)]
Resolution
600 × 600 dpi
1200 × 1200 dpi (KPDL)
Main Memory
Standard 48 MB, expandable up to 112 MB (SIMM slots × 3)
110
Appendix
Maximum printing speed
The print speeds listed in the following table represent the time the printer produces
multiple prints on various media and resolution (Continuous throughput rate).
Continuous Print Speed (ppm)
Labels, Coated
Transparency
Card stock
2nd side*
Plain Paper
A4/Letter
Media Type
Legal
Colour Mono Colour Mono Colour Mono Colour Mono
Simplex
Duplex
600 × 600 dpi
4
16
2
8
2
8
2
8
1200 × 1200 dpi
2
8
1
4
2
8
-
-
600 × 600 dpi
2
4
1
2
-
-
-
-
1200 × 1200 dpi
1
2
0.5
1
-
-
-
-
The figures in Colour above depend on using the four colour mode (See Colour mode on
page 44.).
Interface
Standard:
Option:
Bi-directional Parallel, serial (8-pin DIN)
Slot for the network interface card
Altitude
Operating:
Storage:
0 to 2,500 m (8,000 ft.)
0 to 4,000 m (13,125 ft.)
Media
■ Media Sizes
Medium
Paper
Transparency
Size
Dimensions
Letter
8.5" × 11"
A4
210 mm × 297 mm
JIS B5
182 mm × 257 mm
ISO B5
176 mm × 250 mm
Legal
8.5" × 14"
Executive
7-1/4 × 10-1/2
Letter
8.5" × 11"
A4
210 mm × 297 mm
Note:
Please store your paper according to the recommendations of the manufacturer.
111
Appendix
Margins and Print Area
When the image is printed on the media, the image (print area) is a bit smaller than the
media size. You may need to adjust the page margins in the application software to match
the print area.
The following table and illustrations show the page sizes, the largest print areas, and the
margins for the media sizes in KPDL emulation.
Media
Paper size
Edge limits (A) (dot)
Printable area (B) (dot)
cm/inch
Points
Horizontal
Vertical
A4
21.0 × 29.7 cm
595 × 842
112
120
4736 × 6784
B5
18.2 × 25.7 cm
516 × 729
174
97
3950 × 5875
ISO B5
17.6 × 25.0 cm
499 × 708
99
102
3958 × 5700
Legal
8.5 × 14 inches
612 × 1008
86
136
4928 × 8128
Letter
8.5 × 11 inches
612 × 792
86
132
4928 × 6336
522 × 756
100
100
4150 × 6100
Executive 7.25 × 10.5
inches
(600 dpi)
B
Horizontal
edge limit
Printable area
A
Vertical edge limit
112
Direction of paper
feeding
Appendix
■ Paper Weight
The printer is designed to work well with most types of paper. However, differences in
paper may have significant effects on the quality of the print or the reliability of paper
handling.
It is strongly recommended that you always test paper before purchasing it to make sure
it provides desirable performance.
Media cassette*
Duplex Unit
Multi-purpose
tray
One-sided printing
Two-sided printing
One-sided printing
Monochrome
60 to 105 g/m2 (16 to 28 lbs.)
Colour
75 to 105 g/m2 (20 to 28 lbs.)
Monochrome
75 to 90 g/m2 (20 to 24 lbs.)
Colour
75 to 90 g/m2 (20 to 24 lbs.)
Monochrome
75 to 165 g/m2 (20 to 44 lbs.)
Colour
75 to 165 g/m2 (20 to 44 lbs.)
• Recommended paper (for optimum performance):
LETTER/LEGAL:
Hammermill LASERPRINT 90 g/m2 (24 lbs.)
A4:
NEUSIEDLER COLOR COPY 90 g/m2
* We do not recommend the use of 105 g/m2 (28 lbs.) paper in areas of high or low humidity and
temperature since paper feed problems may be experienced.
■ Types of Paper to Avoid
• Extremely smooth or shiny paper or paper that is highly textured
• Letterhead imprinted with low temperature or thermography. These materials may
transfer onto the fusing roller and cause damage. Any pre-printed paper should use
inks compatible with 200°C (392°F) for 0.1 second.
• Damaged or wrinkled paper, or paper with irregularities such as tabs, staples, etc.
• Multipart forms or carbonless paper
• Paper with a 25% or more cotton and/or fibre content
• Ink jet paper (It may transfer onto the fuser roller and cause damage.)
113
Appendix
■ Transparencies and Labels
You may also print on transparencies and labels that are made for the printer. The
following work satisfactorily.
OHP transparency 3M CG3700, 3M CG3710
Labels
AVERY 5163, AVERY 5164, AVERY 5165
Avery L7163, Avery L7165, Avery L7166, Avery L7167
Avery L7168, Avery L7169
Using OHP Film
When printing on OHP film it is extremely important that the correct side of the film be
facing up when in is loaded into the printer. Failure to load the film correctly may result
in jams or damage to the printer.
Note:
No precaution is necessary when using 3M CG3700 film, as this film can be printed on
either side and fed in any direction.
• When loading OHP film into the multi-purpose tray
Direction of paper feed
3M CG3710
Generic OHP Film
When using OHP film that has an adhesive paper strip (3M CG3710), make sure that the
paper strip is on the leading edge and that the paper strip is facing DOWN.
When using OHP film that has a notched corner, make sure that the notched corner is on
the trailing edge and that the notched corner is on the left.
• When loading OHP film into the cassette
Direction of paper feed
3M CG3710
Generic OHP Film
When using OHP film that has an adhesive paper strip (3M CG3710), make sure that the
paper strip is on the leading edge and that the paper strip is facing UP.
When using OHP film that has a notched corner, make sure that the notched corner is on
the trailing edge and that the notched corner is on the right.
114
Appendix
• Re-using transparencies that have been fed through the printer once (for example,
after jams or if the transparency is ejected without being printed) can reduce the
life of the consumables and paper path components.
• With any label stock, the labels must completely cover the backing material.
YES
Labels cover the entire backing material
NO
The backing material is exposed.
Software
Windows Version
• Windows 3.1, Windows 95, Windows98, Windows NT 3.51/4.0
KPDL Printer Driver
Colour Management: ICM
System Requirement
CPU:
Operating System:
Memory:
Free disk space:
Virtual memory:
Display:
Drive:
More than Pentium
(133 MHz or faster CPU is recommended.)
Windows 3.1, Windows 95, Windows98,Windows NT 3.51/4.0
16 MB or more (More than 32 MB is recommended.)
100 MB or more
16 MB or more (More than 32 MB is recommended.)
Video card that display more than 256 colours.
(A video card that can display more than 32,000 colours is
recommended.)
CD-ROM drive
115
Appendix
Bi-directional Parallel Interface
The bi-directional parallel interface is based on the IEEE1284 standard.
If your computer has a bi-directional parallel port, the printer driver and printer can take
advantage of faster data transfer.
Specifications
Connector Type
IEEE1284 type connector
Cable
Use a shielded cable 2 m (6.6 ft.) or less in length.
Pin configuration
Return
Signal Pin side pin
Signal
Return
Signal Pin side pin
Signal
1
19
nStrobe
11
29
Busy
2
20
Data 1
12
30
PError
3
21
Data 2
13
31
Select
4
22
Data 3
14
32
nAutoFd
5
23
Data 4
18
-
+5V(Peripheral)
6
24
Data 5
31
-
nInit
7
25
Data 6
32
-
nFault
8
26
Data 7
35
-
+5V(Host)
9
27
Data 8
36
-
nSelection
10
28
nAck
Parallel Interface connector (printer side)
18
1
36
19
Notes:
• “Return” denotes the return side wire of a twisted pair cable and is connected to
signal ground.
• Be sure to use only a shielded cable. The printer will not operate properly if any of
the pins are not connected.
116
Index
A
AC inlet ..................................................................... 7, 24
ATTENTION indicator ............................................ 8, 10
Audio alarm .................................................................. 50
Auto cassette mode ...................................................... 47
FORM FEED/> key .................................................. 8, 11
Formfeed timeout time ................................................ 48
Front cover .............................................. 7, 12, 74, 76, 77
Fuser .............................................................. 7, 70, 74-77
H
C
Calibration Page ...................................................... 30-33
CANCEL key ............................................................ 8, 11
Cassette feed indicator ............................................ 8, 10
Caution Labels .............................................................. xi
Cautions ................................................................ ix, xi, 1
CD-ROM ........................................................... 2, 6, 27-29
Cleaning pad ................................................................. 70
Cleaning the duplex unit ............................................. 65
Cleaning the optional feeder ....................................... 65
Cleaning the printer .................................................... 64
Cleaning the sensor ..................................................... 66
Clearing a jam .............................................................. 71
Colour calibration ........................................................ 45
Colour calibration card ................................................ 32
Colour calibration page ................................................ 32
Colour Density .............................................................. 30
Colour matching ........................................................... 44
Colour mode .................................................................. 44
Connecting
Printer to computer ................................................ 23
CONTINUE/< key .................................................... 8, 11
Control panel .................................................................. 8
Copy Indicator ................................................................ 9
CR action ....................................................................... 49
Hard Disk Error Codes .............................................. 100
Hard disk option ........................................................... 25
Harddisk ....................................................................... 43
I
Imaging unit ............................................ 7, 12, 66-68, 69
Installing the driver software ..................................... 27
Installing the toner developers ................................... 14
Interface .................................................................... 4, 38
Bi-directional Parallel Interface .......................... 116
Cable ........................................................... 24-25, 116
Connector ........................................................... 24-25
Interface Indicator ......................................................... 9
J
Jam at A ............................................................ 72, 81, 84
Jam at B ........................................................................ 73
Jam at C ................................................................... 74-77
Jam at D ....................................................... 78-79, 82-83
Jam at E ........................................................................ 80
Jam at F ........................................................................ 81
Jam at G ........................................................................ 82
Jam at H ....................................................................... 84
Jam clearing ................................................................. 71
D
K
DATA indicator ......................................................... 8, 10
Declaration of Conformity (U.S.A.) .............................. iv
Duplex indicator ........................................................... 10
KPDL Error Codes ..................................................... 100
Kyocera Digital Library CD-ROM ......................... 27-29
L
E
Emulation ..................................................................... 39
ENERGY STAR ............................................................. vi
ENTER/STATUS key ............................................... 8, 11
Error Messages ............................................................. 93
Printer Panel ........................................................... 93
EXIT/MODE key ...................................................... 8, 11
F
Face-down indicator ..................................................... 10
Features .......................................................................... 3
FEED/- key ............................................................... 8, 11
Font ............................................................................... 39
Font manager ............................................................... 39
FOR USERS IN U.K. ................................................... xii
For your safety ............................................................... ix
Left side cover ..................................................... 7, 19, 72
LF action ....................................................................... 49
Life counters ................................................................. 45
Limit mark .............................................................. 18, 21
List of resident fonts .................................................... 48
Loading labels .............................................................. 22
Loading media in the multi-purpose tray .................. 19
Loading paper .......................................................... 20-21
Loading paper or transparencies in the Media Casse 16
M
Main charger ................................................................ 70
Margins and print area ................................................ 19
Media cassette ............................................. 16-18, 72, 84
Media problems ............................................................ 91
Media sizes ................................................................. 111
117
Index
Memory Card ................................................................ 57
Memory card ........................................................... 43, 44
Memory Card Error Codes .......................................... 61
Menus ................................................................ 37, 38, 47
Message Display ............................................................. 8
Message language ........................................................ 47
Minimum space requirements ...................................... 5
Mode selection .............................................................. 34
Moving the unit .............................................................. x
MP tray mode ............................................................... 46
Multi-purpose (MP) tray .......................................... 7, 19
Multi-purpose feed indicator ................................... 8, 10
Problems with image size and position ...................... 91
R
RAM DISK .................................................................... 51
RAM DISK mode .......................................................... 43
Repacking ................................................................... 101
Resolution ..................................................................... 49
Resolution Indicator ....................................................... 9
Resource Protection ..................................................... 62
Resource protection ...................................................... 50
Right side cover .................................................. 7, 14, 78
N
S
Number of copies .......................................................... 39
Serial interface ............................................................. 25
Service ........................................................................... 50
Setting media thickness .............................................. 19
Setting the colour density ............................................ 30
Setting the Sleep Timer ............................................... 62
Setting up the Multi-purpose (MP) tray .................... 20
Sleep timer .................................................................... 48
Software specifications .............................................. 115
Specifications .............................................................. 110
Interface ................................................................ 116
Media ............................................................. 111, 115
Printer ................................................................... 110
STACK indicator ............................................................ 8
STACK/+ key ............................................................ 8, 11
Static electricity damage ............................................... 2
Status Page ................................................................... 26
System
Connecting .............................................................. 23
Requirements ............................................................ 4
O
Oil supply roll ................................................... 70, 75, 76
ON LINE indicator ......................................................... 8
ON LINE key ............................................................ 8, 11
Option ROM .................................................................. 43
Output tray ....................................................... 13, 79, 80
P
Page orientation ........................................................... 43
Paper
Feeder .......................................................... 64, 65, 73
Loading .................................................................... 20
trays ......................................................................... 16
Paper handling mode ................................................... 46
Paper Size Indicator ....................................................... 9
Paper Weight .............................................................. 113
Paper-pick ............................................................... 64, 65
Parallel interface ........................................................ 116
Parallel interface cable ................................................ 24
Parallel interface connector ......................................... 24
Part names ...................................................................... 7
Control panel overview ............................................ 8
Front side view ......................................................... 7
PC 4
Plug and Play ............................................................... 28
Power cord ..................................................................... 24
Power On ....................................................................... 25
Power source ................................................................... 5
Power switch ................................................................... 7
Preparing the imaging unit ......................................... 12
Print HEX-DUMP ........................................................ 48
Print quality problems ................................................. 92
Printer driver ............................................................... 27
Printer driver for Windows 3.1 ............................. 27, 28
Printer driver for Windows 95/Windows 98 ............... 28
Printer panel message ................................................. 93
Printer Reset ................................................................ 49
Printing a status page ................................................. 26
118
T
Thickness
Media ....................................................................... 19
Switch ...................................................................... 19
Toner developers .......................................................... 69
Toner indicator ......................................................... 8, 10
Trademarks ..................................................................... i
Transfer unit ................................................................ 70
Transparencies and labels ......................................... 114
Transparency ........................................................ 16, 114
Troubleshooting ............................................................ 85
Two-sided printing ..................................................... 113
Types of paper to avoid .............................................. 113
U
Unpacking ....................................................................... 6
Upper green lever ......................................................... 12
User replaceable components ...................................... 69
Index
V
Virtual Mail Box (VMB) ............................................... 52
W
Warnings ........................................................................ ix
Windows 3.1 ................................................ 4, 27, 28, 115
Windows 95 ............................................................. 4, 115
119