1
2
Copyright information
Warranty
Safety information
© Copyright Hewlett-Packard Company
2000
The information contained in this
document is subject to change without
notice.
WARNING!
Electrical shock hazard
All rights reserved. Reproduction,
adaptation, or translation without prior
written permission is prohibited, except
as allowed under copyright laws.
Publication number
C7707-90006
First Edition, April 1, 2000
Trademark credits
Adobe, the Adobe logo, Acrobat, the
Acrobat logo, Adobe Circulate, and the
Adobe Circulate logo are trademarks of
Adobe Systems Incorporated.
CompuServe is a U.S. trademark o
CompuServe,Inc.Microsoft, Windows
and Windows NT are U.S. registered
trademarks of Microsoft Corporation.
Pentium is a U.S. registered product of
Intel Corporation.
LDAP code (libldap client library and
liblber encoding/decoding library) used
courtesy of University of Michigan at
Ann Arbor. Copyright 1992-1999
Regents of the University of Michigan.
All rights reserved.
All other products mentioned herein
may be trademarks of their respective
companies
Hewlett-Packard makes no warranty of
any kind with respect to this
information. HEWLETT-PACKARD
SPECIFICALLY DISCLAIMS THE IMPLIED
WARRANTY OF MERCHANTABILITY
AND FITNESS FOR APARTICULAR
PURPOSE.
Hewlett-Packard shall not be liable for
any direct, indirect, incidental,
consequential, or other damage alleged
in connection with the furnishing or use
of this information.
NOTICE TO U.S. GOVERNMENT
USERS: RESTRICTED RIGHTS
COMMERCIAL COMPUTER SOFTWARE:
“Use, duplication, or disclosure by the
Government is subject to restrictions as
set forth in subparagraph (c) (1) (ii) of
the Rights in Technical Data Clause at
DFARS 52.227-7013.”
Material scanned by this product may
be protected by governmental laws and
other regulations, such as copyright
laws. The customer is solely responsible
for complying with all such laws and
regulations.
To avoid electrical shock, use only
supplied power cords and connect only
to properly grounded (3-hole) wall
outlets.
3
!
"
#
$
%
&
"
''
(')
* ')
'
+! '
,-
.,.* /" '
'
0
!
'
'
( ,
)1
( , )'
( ))
+!
)2
* 3%/0
)2
" )
( )
(
4'
(!
4'
4'
!!
4)
5%
44
/%67 44
8
42
+ 4
,
4
4
0
4
"!
4
8
4$
(!
!%%4&
(
!% 21
9:3( 2'
(
2)
3
!% 22
-
!%
;
% 2
-
!%
,
%2
-
2$
-
% 2$
(!
! !;(2$
<
!
2&
9
!
1
9
!
1
8
!
'
(
!
)
" )
0 4
" %% +%!
!
=
%!
( +%!
%)
%!
)
*,
4
*,>)111 8
* * &
#
'
4
"%
2
( =
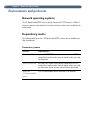
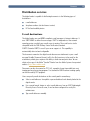
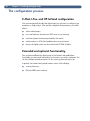
The HP Digital Sender 8100C can be directly connected to TCP/IP networks. It converts
black-and-white and color documents, drawings, and photographs into electronic format
and distributes them directly to several types of destinations
●
e-mail addresses
●
fax numbers
●
HPJetSend-enabled printers
The unit includes a flatbed scanner and an automatic document feeder (ADF) that can
accept up to 25 pages.
Registered users can create their own address books of e-mail addresses and combine
e-mail addresses into personal distribution lists. Users can also add fax numbers to public
phone books. The destinations and distribution lists can then be selected at the digital
sender control panel.
The administrator has the ability to create public e-mail destinations and distribution lists
and make them available to all users.
The HP Digital Sender 8100C supports LDAP (Lightweight Directory Access Protocol),
which allows you to find and use e-mail addresses located on directory servers located
elsewhere on a network (such as the Internet) over aTCP/IP connection. See the HP
digital sender website for a list of global e-mail address books:
http://www.digitalsender.hp.com
Installing the digital sender is simply a matter of making a few connections and
configuring a few network and e-mail parameters. The digital sender operates as a
stand-alone unit and does not require network privileges to administer.
The HPJetDirect print server (network interface card) that comes installed in the digital
sender handles all protocol support for TCP/IP and SMTP automatically.
5
6
(!',0%!
The HP Digital Sender 8100C must be directly connectedto TCP/IP network. A 10Base-T
ethernet connection is provided by the network interface card that comes installed in the
digital sender.
The following table shows the HPDigital Sender 8100C services that are available and
their dependencies
Dependency matrix
Service
Dependencies
Send to e-mail
An e-mail SMTP-MIME server directly connected to aTCP/IP
network that can be reached from the digital sender (not a dialup connection).
Send to Internet fax
An e-mail SMTP-MIME server directly connected to aTCP/IP
network that can be reached from the digital sender (not a dialup connection), and an account with an Internet fax provider.
Send to an
HPJetSend-enabled
printer
A HPJetSend-enabled printer connected to the network.
For maximum scanning speeds, see “Equipment specifications” on pag e71.
The HP Digital Sender 8100C supports multiple paper sizes:
●
Letter: 215.9 by 279 mm (8.5 by 11 inche s
●
A4: 210 by 297 mm (8.3 by 11.7 inche s
●
Legal (from the ADF only): 215.9 by 355.6 mm (8.5 by 14 inch e s
Paper weight: 60 to 105 g/m2 (16 to 28lb . )
Up to 25 sheets of letter, A4, or legal paper can be stacked in the ADF (maximum height
of 3 mm, or 0.1 inches).
ADF paper sizes
Item
Width
Length
Maximum paper size
215.9 mm (8.5 inches)
355.6 mm (14 inches)
Minimum paper siz
148.5 mm (5.9 inches)
210 mm (8.3 inches)
7
8
(!',0%!
The digital sender offers a choice of sending qualities at the control panel. You can
choose the most suitable quality for each type ofjob.
Sending qualities and destinations
Sending quality
Type of document
Destinations
B/W Document
The original contains text that must be clearly E-mail
transmitted.
Fax
-OrHPJetSend printer
The original is black and white.
Color Document
The original has a mix of text and images.
E-mail
-OrHPJetSend printer
The original has a mix of color and black-andwhite areas.
Color-B/W Phot
The original is a photograph.
E-mail
-OrHPJetSend printer
The colors or shades of gray in an image must
be transmitted clearly.
The digital sender is capable of distributing documents to the following types of
destinations:
●
e-mail addresses
●
fax phone numbers (via fax Internet service)
●
HPJetSend-enabled printers
The digital sender can send MIME-compliant e-mail messages to Internet addresses. It
uses SMTP-MIME to deliver these messages. SMTP is independent of the network
operating system on which your e-mail server is running. The e-mail service is also
compatible with the DSN (Delivery Status Notification) standard.
ESMTP (Extended SMTP) is used if your server supports it. This capability is
automatically detected and configurable.
The document scanned at the digital sender becomes an attachment to your e-mail
message. Portable Document Format (.pdf) is the file format most often used for the
attachments, which gives recipients the ability to both view and print them. You can
obtain a free copy of the Adobe ® Acrobat® Reader from the Adobe Systems Incorporated
website (http://www.adobe.com).
Documents can also be scanned as TIFF (.tif), a graphics format importable into most
imaging and word processing programs. Text scanned in B/W Document sending quality
can also be read by OCR programs.
Users can specify e-mail destinations at the control panel in several ways:
●
Select e-mail addresses from public or personal address books already loaded in the
digital sender.
●
Use a special search feature to select e-mail addresses from an LDAP (Lightweight
Directory Access Protocol) server, if one has been configured for use by the
administrator
●
Type e-mail addresses manually.
9
10
(!',0%!
Users can send faxes directly from the digital sender. They have the ability to select
destinations from a fax numbers book already loaded in the digital sender, or type the
at the control panel. The same document can be sent to multiple fax numbers.
Sending faxes with the digital sender requires an account with a supported Internet fax
provider. Visit the HP digital sender website (http://www.digitalsender.hp.com) for a list
of the Internet fax providers that are currently supported.
You can enable send to printer by setting up one or more HPJetSend-enabled printers on
the network for use with the digital sender. The printers you designate must be
HPJetSend-enabled, connected to the network, and have a valid TCP/IP address. See the
HPJetSend website (http://www.jetsend.com) for a list of HPJetSend-enabled printers.
The HP Digital Sender 8100C operates as a stand-alone unit on the network. You
administer each digital sender independently of any other device on the network under a
password that applies only to that digital sender.
The digital sender accepts three types of users
●
registered users
Individuals who have created their own user profile on the digital sender. Only
registered users have personal e-mail address books and lists that are accessible at
the digital sender.
●
guest users
Individuals who are not registered users and who do not have user profiles. Guest
users can use the digital sender and all public address books. However, they cannot
see or use personal address books. The administrator can disable guest user access.
●
administrator for the digital sender
The individual (referred to as the “administrator” in this guide) who performs
administrator activities for the digital sender. Because the digital sender is a standalone unit on the network, these activities can be performed independently of any
other network activity. Network administrator privileges for the digital sender do
not require network privileges. Activities include such things as establishing the
level of security for the digital sender and maintaining the public address books. The
administrator has access to all personal address books.
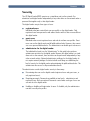
The administrator controls digital sender security in these ways:
●
Determining who can use the digital sender (registered users and guest users, or
only registered users).
●
Requiring passwords. Passwords are available at two levels: administrator and
registered users. Both are optional. Passwords control what each type of user can
see and do at the digital sender.
●
Enabling or disabling self-registration for users. If disabled, only the administrator
can add or modify user profiles.
11
12
(!',0%!
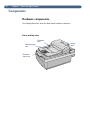
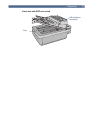
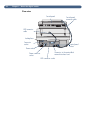
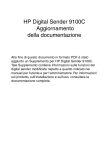
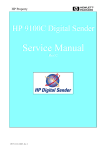
The following illustrations show the digital sender hardware components.
!" Document
lever
Document input
1
tray
Document
output tray
Control
panel
(
!""# ADFunit(raisesto
reveal glass)
Glass
13
14
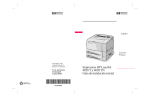
(!',0%!
$!"
Control panel
Control panel
connector cable
ADF connector
cable
Locking lever
Connector
socket
Control panel
socket
Power switch
Power connector
socket
Connector to the preinstalled
network interface card
ADF connector socket
See the Welcome Poster for installation and initial setup of the H PDigital Sender8100C.
This Administrator’s Guide provides much more detail on configuring the digital sender.
15
16
(!),
!
!
"# $
"
%
After you have physically installed the digital sender, you only need to configure a few
parameters to begin using it. After you have configured these parameters, you will be
able to:
●
send e-mail messages
●
use e-mail addresses located on an LDAP server of your choosing
●
send faxes (requires information provided by i-fax vendor)
●
send documents to HPJetSend-enabled printers on your network
●
discover the digital sender over the network with HP Web JetAdmin
Once you have established the digital sender on the network and enabled basic
functionality, you can extend functionality for the services you wish to implement. You
can also configure optional parameters for the services you have already set up.
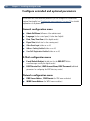
In general, the extended and optional features consist of the following:
●
security preferences
●
DNS and WINS name resolution
+! &
#
The easiest method for assigning an IP address to the digital sender is by entering it
directly at the control panel. You can also assign an IP address using a DHCP or BOOTP
server. You might be more familiar with assigning IP addresses to network devices from a
DHCP or BOOTP server. In this scenario, you prepare the device attached to the network,
make an entry for it on the DHCP or BOOTP server, and then turn the device on. The
HPJetDirect print server (network interface card) inside the HP Digital Sender 8100C
picks up its IP information from the DHCP or BOOTP server.
Note
You can let the digital sender time out to a default IP address. In fact, this happens
automatically if you do not manually assign an IP address at the control panel within the
timeout period of 2 minutes.
The default IP address is not a valid address. You must change the address to one of your
own assignment. You can use the control panel to do this at any time.
Before you start configuring th e HPDigital Sender 8100C for the first time, take a few
minutes to prepare so that you can complete the steps without interruption. Use the
checklist on the following page.
17
(!),
!
18
Configuration Checklist
Decisions needed for installation
❑
Register the digital sender.
❑
Method you want to use to assign IP address to the digital sender: manually at
the control panel, or from a DHCP or BOOTP server.
Information needed for e-mail configuration
❑
❑
❑
❑
❑
❑
IP address for the digital sender ________________________________
IP subnet mask________________________________
IP gateway________________________________
E-mail server address________________________________
E-mail default from (e-mail address)________________________________
If you choose to enable the LDAP directory service (optional)
LDAP server address ________________________________
LDAP search root________________________________
Additional information needed for I-Fax configuration
❑
Fax provider domain
(supplied by Internet fax provider)_________________________________
❑
❑
Fax billing address (e-mail address)________________________________
❑
File format (PDF or TIFF--determined by Internet fax provider)________________________________
Prefix or Postage to use before fax number
(supplied by Internet fax provider)________________________________
Additional information needed for HP JetSend configuration
❑
HPJetSend-enabled printer addresses ________________________________
________________________________
Decisions and information needed for extended functionality
❑
Do you want to enable DNS or WINS name resolution?
IP address of the DNS server ________________________________
IP address of the DNS server domain________________________________
IP address of the WINS server________________________________
❑
Do you want to set up registered users at this time?
For each user you will need: user name and user e-mail address.
❑
❑
Do you want to enable guest usage?
Do you want to allow user self-registration?
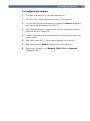
+! 1
If you have not already done so, turn the digital sender on.
2
Press SETUP (ALT+F4) from the main menu to go to the setup menu.
3
Press SETTINGS (F2) and use the arrow keys to highlight the General configuration
menu from the list which appears. Press OK (F1).
4
In the configuration menu, use the arrow keys to scroll to a parameter you want to
modify and then press CHANGE (F3).
5
Configure the parameters by selecting a value from a list using the arrow keys or by
typing in a value.
6
When finished, press OK (F1). Choose another parameter from the menu.
7
When finished with the General configuration menu, press SAVE (F1).
8
Repeat steps 3 through 7 for the Network, E-Mail, I-Fax, and Advanced
configuration menus.
19
20
(!),
!
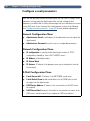
' After you have physically installed the digital sender, you only need to configure a few
parameters to begin using the digital sender. After you have configured these
parameters, you will be able to send e-mail messages and use e-mail addresses located
on an LDAP server of your choosing. The e-mail parameters consist of the following
(see “Configuration menu parameters” on pag e26 for more detailed explanations):
●
Administrator E-mail (e-mail address of the administrator used to register the
digital sender)
●
Administrator Password (to restrict access to configurable parameters.)
!
●
IP configuration (to specify how the digital sender receives its TCP/IP
configuration—manually or from a DHCP orBOOTP server)
●
IP Address (of the digital sender)
●
IP Subnet Mask
●
IP Gatewa (IP address of the gateway server used to send packets from the
local network)
●
E-mail Server Add . (IP address of the SMTP-MIME e-mail server)
●
E-mail Default From (default e-mail address for the FROM field of e-mail
messages from the digital sender)
●
LDAP Server Address (IP address of the server that hosts the LDAP server—
not required)
●
LDAP Search Root (basepoint from which to start searches for names on the
LDAP server—may be required if you configure an LDAP server address)
+! '# After you have configured the digital sender to send e-mail, you only need to configure
a few additional parameters to begin sending faxes. Information for the i-fax
parameters are issued by your Internet fax provider. (See “Configuration menu
parameters” on pag e26 for more detailed explanations):
"
●
Fax Provider Domain (an Internet address)
●
Fax # Prefix (not required by all Internet fax providers)
●
Fax Postage (not required by all Internet fax providers)
●
Fax Account E-mail (to receive billing information from the Internet fax
provider)
●
Fax File Format (determined by the provider)
21
22
(!),
!
'
Listed below are some additional parameters you can configure for extended and
optional functionality (see “Configuration menu parameters” on page 26 for detailed
explanations of all parameters )
●
Admin Full Name (full name of the administrator)
●
Language (for the control panel, if other than English)
●
Date, Time, Time Zone (of the digital sender)
●
Paper Size (default size for the scanning area)
●
Allow Guest Login (either on or off)
●
Address Caching Enabled (either on or off)
●
User Self-Registration Enabled (either on or off)
●
E-mail Default Subject (default text for the SUBJECT field in
e-mail messages sent by the digital sender)
●
LDAP Service Port, LDAP Account Name, LDAP Password (additional
parameters for configuring the LDAP directory service)
!
●
DNS Server Addres , DNS Domain (for DNS name resolution)
●
WINS Server Address (for WINS name resolution)
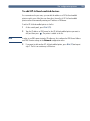
+! #
As a convenience for your users, you can add the addresses of HPJetSend-enabled
printers used in your office.Users can then select from a list of HP JetSend-enabled
printers rather than manually entering an IP address or DNSname.
To add a HP JetSend-enabled printer to the list:
Note
1
At the control panel, press PRINT (F3).
2
Type the IP address or DNS name for the HPJetSend-enabled printer you want to
add, and then press . The printer is added to the list.
In order to use DNS names instead of IP addresses, first configure the DNS Server Address
and DNS Domain settings in the Network configuration menu.
3
If you want to add another HP JetSend-enabled printer, press NEW (F1)and repeat
step 2. The list can contain up to 64 devices.
23
24
(!),
!
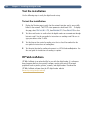
(
Use the following steps to verify the digital sender setup.
$
1
Display the Revision page to verify that the network interface card is successfully
linked to the network. TheTCP/IP status parameter should read READ . To display
the page, select STATUS (ALT+F3), then REVISION (F1). Press BACK (F4) to close
2
Test the e-mail service to confirm that the digital sender can communicate through
Internet e-mail. See the user guide for instructions on sending e-mail. Be sure to
type your address in the To field.
3
Test the Internet fax service by sending a test fax to a local fax number.See the
user guide for instructions on sending faxes.
4
Test the print function by sending a document to a HPJetSend-enabledprinter. See
the user guide for instructions on sending to a printer.
)%&
HP Web JetAdmin is an optional utility for use with the digital sender. It is a browserbased program that lets you remotely configure, monitor, and control HP network
peripherals such as printers, plotters, scanners, and digital senders. Download the
HP Web JetAdmin software from the HP digital sender website
(www.hp.com/go/webjetadmin/).
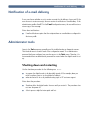
" Procedures in this chapter explain how to perform administrator activities at the control
panel.
Access to administrator-specific activities is blocked by the administrator password. It is
recommended that administrator create a password during the setup of t he HPDigital
Sender 8100C.
25
26
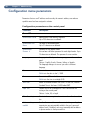
(!4,0
Parameters that use an IP address can show only the numeric address, even when a
symbolic name has been assigned to a device.
Configuration parameters on the control panel
Parameter
Description
General Menu
Administrator E-mail
Administrator e-mail address (required).
Up to 255 characters are allowed.
Administrator Full
Name
Full name of the administrator.
Up to 31 characters are allowed.
Administrator
Passwor d
Password for this digital sender.
You can have a different password for each digital sender. Up to
15 characters are allowed. The password is case-sensitive.
Langua g
Language in which keys and messages appear at the control
panel.
Choices: English, French, German, Italian, or Spanish.
The language changes as soon as you select a different
language.
Date
Current date.
CLEAR sets the date to Jan 1, 1980.
Time
Current time (24-hour clock).
CLEAR sets the time to midnight (0:0).
Time Zone
Based on Greenwich Mean Time (GMT). In the USA, Eastern
Standard Time is five hours (-5:00) behind GMT.
Paper Size
Default size for the scanning area. Users can override this
setting at the control panel.
Choices: Letter, A4, or Legal.
Allow Guest Logi
Permission for non-registered users to send e-mail and send ifax.
Address caching
enabled
E-mail addresses and fax numbers entered during sending of a
transmission are automatically added to the user’s personal
address book. If disabled, users must manually add an address
or phone number to their personal lists.
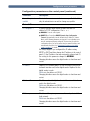
( Configuration parameters on the control panel (continued)
Parameter
Description
User self-registration
enabled
Permission for users to create their own user profile. If disabled,
only the administrator can add or change user profiles.
Network Menu
IP Configurati o
To specify how the digital sender network interface car
obtains itsTCP/IP configuration. Choi c e s
●
●
MANUAL. From the control panel.
BOOTP (Boot Protocol) or DHCP (Dynamic Host Configuration
Protocol). Automatically from the network (the IP Address, IP Subnet
Mask, and IP Gateway parameters are ignored). A corresponding server
must be running and properly configured. The next time you open the
configuration menu, you see the values that the network interface card
automatically discovered. See “Assigning an IP address to the digital
sender” on page 17 for details.
Two things happen if you configured the IP address using
BOOTP or DHCP and later change the IP address at the control
panel: (1) the IP address that was assigned is released and (2)
the setting for this parameter changes to MANUAL.
Changing this value causes the digital sender to shut down and
restart.
IP Address
UniqueTCP/IP network address of the HPJetDirect print server
(network interface card) in the digital sender. Required for the
digital sender to work.
CLEAR sets the address to 0.0.0.0.
Changing this value causes the digital sender to shut down and
restart.
IP Subnet Ma s
The filter used to identify the subnet of the network interface
card in the digital sender.
CLEAR sets the address to 0.0.0.0.
Changing this value causes the digital sender to shut down and
restart.
IP Gateway
IP address of the gateway server used to send packets off the
local network.
CLEAR sets the address to 0.0.0.0.
Changing this value causes the digital sender to shut down and
restart.
27
28
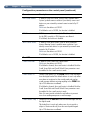
(!4,0
Configuration parameters on the control panel (continued)
Parameter
Description
DNS Server Address
IP address of the DNS server. Used for DNS (Domain Name
System) symbolic name resolution if you identify servers and
devices on your network by network name instead of by IP
address.
CLEAR sets the address to 0.0.0.0.
If left blank or set to 0.0.0.0, the function is disabled.
DNS Domain
If DNS name resolution is used, the IP address of the domain
for the DNS server.Up to 256 characters are allowed.
If left blank, the function is disabled.
WINS Server Addres
IP address of the WINS server. Used for WINS (Windows
Internet Naming Service) symbolic name resolution if you
identify servers and devices on your network by network name
instead of by IP address.
CLEAR sets the address to 0.0.0.0.
If left blank or set to 0.0.0.0, the function is disabled.
E-mail Menu
E-mail Server Addr.
IP address of the e-mail SMTP-MIME server.
CLEAR sets the address to 0.0.0.0.
If left blank or cleared, the e-mail service is disabled. Both the
E-mail Server Addr. and E-mail Default From parameters must
be enabled for the e-mail service to work.
E-mail Default Fro
Default e-mail address for the FROM field in e-mail messages
from the digital sender.This default address is used only when
users have not registered at the control panel and send an
e-mail message without entering anything in the FROM field.
Up to 255 characters are allowed.
If left blank or cleared, the e-mail service is disabled. Both the
E-mail Server Addr. and E-mail Default From parameters must
be enabled for the e-mail service to work.
Note: You must provide a default e-mail address to prevent
users from sending anonymous e-mail messages.
E-mail Default Subje c Default text for the SUBJECT field in e-mail messages sent by
the digital sender.
This default text is used only when users do not provide a
subject of their own directly from the control panel keypad.
Up to 128 characters are allowed.
( Configuration parameters on the control panel (continued)
Parameter
Description
E-mail Qualit
Default image quality used for documents sent by e-mail.
Choices: B/W Document, Color Document, Color-B/W Photo.
E-mail File Form a
Default format for documents sent by e-mail.
Choices: PDF or TIFF
Auto BCC Function
Enable
Registered user who activates the copy self option in the user
profile receives a copy of any e-mail message the user sends
from the digital sender.
LDAP Server Addres
IP address of the server that hosts the LDAP (Lightweight
Directory Access Protocol) directory for e-mail address
searches.
CLEAR sets the address to 0.0.0.0.
If left blank or cleared, the function is disabled.
LDAP Search Root
Basepoint (root) from which to start searches for names on the
LDAP directory server. Directories are often represented in a
hierarchical way using a tree. The basepoint might be a country,
an organization, or other type of group. Not all servers require
this information.
Up to 512 characters are allowed.
See the digital sender website for examples
(http://www.digitalsender.hp.com).
LDAP Service Port
TCP/IP port number on which the LDAP directory server is
listening. The default port is 389.
LDAP Account Name
Account name used when the LDAP server requires an
authenticated login. Up to 512 characters are allowed.
LDAP Password
Password associated with the LDAP Account Name.
I-fax menu
Fax Provider Domain
Internet address for the Internet fax account. Issued by the
Internet fax provider.
Fax # Prefix
Number placed before the fax number
Fax Postage
Security feature required by some Internet fax providers.
Fax Account E-m a i
E-mail address associated with the Internet fax account. Used
by the fax provider for billing purposes.
Fax File Format
Format for documents sent by Internet fax.
Choices: PDF or TIFF
29
30
(!4,0
Configuration parameters on the control panel (continued)
Parameter
Description
Advanced Menu
E-mail File Selecti o
Permission for users and guests to select PDF or TIFF format
for their messages.
Max User Mail Siz e
Restriction on e-mail message sizes allowed to be sent by users
and guests. Can be set to No Limit.
E-mail Langu a g
Language used in the e-mail cover message.
Choices: English, French, German, Italian, Spanish.
Mail Ping Frequency
Interval (in minutes) at which the digital sender verifies its
connection to the e-mail server. If the connection is lost, an
error message appears.
ESMTP Function
Enable
Extended e-mail functions.
(
'
Unless a password is used, anyone can perform sensitive administrator activities.
Therefore, the administrator is encouraged to create a password during the setup of the
HP Digital Sender 8100C.
Note
The administrator password is case-sensitive.
$
1
Make sure the digital sender is idle.
2
At the control panel, press SETUP (ALT+F4). Then press SETTINGS (F2).
3
Select the General configuration menu. If an administrator password is already
required, the HP Digital Sender 8100C Administrator’s Password dialog
box appears. Type the password and press OK (F1).
4
When the configuration menu appears, select Administrator Password and
then press CHANGE (F3).
5
Type the old administrator password and press ENTER.
6
Type the new password and press ENTER.
7
Type the new password again and press CONFIRM (F1).
8
Press SAVE (F1) to save the password and exit the menu.
If you forget the administrator password, and cannot access any of the passwordprotected areas, call H PTechnical Support (see pag e66).
31
32
(!4,0
The administrator determines who can use the digital sender: either registered users
(only those with a user profile) or both registered users and guest users.
$
$
Note
1
Make sure the digital sender is idle.
2
At the control panel, press SETUP (ALT+F4). Then press SETTINGS (F2).
3
Select the General configuration menu. If an administrator password is required,
the HP Digital Sender 8100C Administrator’s Password dialog box
appears.Type the password and press OK (F1).
4
Use the Allow guest login field to indicate your preference. On accepts guest
login, Off prohibits guests from using the digital sender.
5
Use the User self-registration enabled field to indicate your preference. On
allows users to register themselves, Off allows only the administrator to register
users.
6
Press SAVE (F1).
For more information on registered users, see “Creating and maintaining user profiles” on
page 42.
5%
Use these tools to learn the status of the digital sender and its jobs:
●
job(s) state
●
Revision page
●
Tasks page
%*+
The job state screen shows the status of the last five jobs processed by the digital
sender, with the latest job listed first. To view the Job(s) state screen press STATUS
(ALT+F3). Each job has the following information associated with it:
●
time processed
●
type of job (e-mail, fax, or print)
●
user (name of user profile which sent the job)
●
status (see below)
Job status
Status
Description
Processing
Pages still being scanned by the digital sender.
Sendin
The digital sender is attempting to locate the job’s destination.
Sent
The job has successfully been delivered to its destination.
NW Error
Network error. The job has failed to be delivered. This message will appear if
the destination HPJetSend-enabled printer is busy or out of paper, or the
sending process times out.
PP Error
Post processing error. An error occurred when the digital sender was converting
the page(s) to PDF or TIFF. Try re-scanning and re-sending the message.
33
34
(!4,0
,
The Revision page displays useful information about the digital sender (see the table on
the next page). Use it for the following reasons:
●
verify configuration settings
●
verify the operating status of the network interface card
●
learn the MAC address of the digital sender
●
learn firmware version numbers
The Revision page is in English only (even if you configure the control panel for a
different language).
%$&#
1
At the control panel, press STATUS (ALT+F3).
2
Press REVISION (F1).
5%
Revision page parameters
Parameter
Descriptions
Box Version
Product version
FW Ver.
Version of firmware installed in the digital sender.
FW Date
Release date of the firmware installed in the digital sender.
HPJetDirect Prd. #
Product number of the network interface card:
●
HPJ3113A
Ethernet (10Base-T) networks
HPJetDirect FW Rev.
Version of firmware installed on the network interface card (G.xx.xx).
MAC Address
Unique LAN hardware address assigned to the network interface card at the
time of manufacture (for example, 0060B072525E).
IP Address
UniqueTCP/IP address of the network interface card. This is assigned by the
administrator
Subnet Mas
If subnets are used, the filter used to identify the subnet of the HPJetDirect
print server (network interface card). This is assigned by the administrator.
TCP/IP statu
Status of the connection to the network:
●
●
●
INITIALIZING
The network interface card is searching for a valid IP address. After 2 minutes, a default IP
address is automatically assigned.
READY
The network interface card has been assigned an IP address and is actively connected to the
network.
ERROR
A network or network interface card error has been detected.
Gateway Addr.
IP address of the default gateway server used to communicate with nodes on
other subnets or networks.
Received pkts
Total number of packets received without error.
Bad packets
Total number of packets received with errors.
Framing err .
Total number of packets received that contained a CRC (cyclic redundancy
check) or framing (alignment) error.
Transm. pkts
Total number of packets transmitted without error on the network.
Collisio n
Total number of packets that were not transmitted due to successive collisions.
Late collision
Total number of packets that were not transmitted due to late collisions
(collisions after the 64th byte of a packet).
35
36
(!4,0
Revision page parameters (continued)
Parameter
Descriptions
Log Server Addr.
IP address of the host computer that receives syslog messages from the
HPJetDirect print server.
HPJetDirect Cfg.
Indicates how the digital sender has received its TCP/IP configuration:
●
●
DHCP
Automatically from a DHCP server
MANUAL
Manually from entries made at the control panel.
HPJetDirect Timeou
Timeout value in seconds that an idle data connection is allowed to remain
open.Valid values are 0 to 3600. A value of 0 disables the timeout mechanism.
The default is 90 seconds.
HPJetDirect ID
HP manufacturing identification code assigned to the network interface card.
Boot BlockVer .
Version of the digital sender startup (boot) program. This information is used
only by HP manufacturing and HP customer support.
Multi-BootVer .
Version of the digital sender multi-boot program. This information is used only
by HP manufacturing and HP customer support.
Engine FW Ver.
Version of firmware used by the digital sender scanner engine. This information
is used only by HP manufacturing and HP customer support.
Running Imag e
The firmware image currently running. Either 1 or 2.
(
The Tasks page lists the services running on the digital sender at that moment. Each task
is assigned a Status, Error Number (Errno), and State (St). Tasks cannot be modified or
deleted and are diagnostic tools that may be referred to by HPTechnical Support staff.
%$
!
1
At the control panel, press STATUS (ALT+F3).
2
Press TASKS (F2).
,
A user can choose whether or not to receive a receipt for the delivery of an e-mail. If the
user chooses to receive a receipt, the user receives a notification of e-mail delivery. If the
administrator enables AutoBCC in the E-mail configuration menu, the user will receive a
return copy of the message.
Notes about notifications:
●
E-mail notifications require that the recipients have an e-mail address configured in
their user profile.
Items in the Tools menu are generally used for troubleshooting or diagnostic reasons.
This identical menu is found in each of the configuration menus. If no administrator
password has been configured, any user has access to the Tools menu. Therefore, it is
recommended that an administrator password be created when the digital sender is set
up.
Use the shutdown procedure for the following reas o n s
●
●
to prepare the digital sender to be physically turned off (for example, when you
need to replace a part or to close down for holidays)
when instructed to do so by troubleshooting steps or HP customer support
Notes about the procedure:
●
Shutdown locks the digital sender from use until you restart it. The procedure does
not turn the power off.
●
Jobs in process might be interrupted and lost.
37
38
(!4,0
$ Note
1
Make sure the digital sender is idle.
2
At the control panel, press SETUP (ALT+F4). Then press SETTINGS (F2).
3
Select any of the configuration menus. If an administrator password is required, the
HP Digital Sender 8100C Administrator’s Password dialog box appears.
Type the password and press OK (F1).
4
When the configuration menu appears, press TOOLS (F2).
5
Select Shutdown and press OK (F1).
A shutdown key sequence exists that will shut down the digital sender if it becomes
unresponsive and therefore will not navigate to the Shutdown option. The code is:
SHIFT+ALT+ .
,
Use this procedure for the following reasons:
●
when you want to completely reconfigure the digital sender and all address books
●
when instructed to do so by troubleshooting steps or HPcustomer support
Resetting the digital sender to factory defaults is a combination of resetting address
books and resetting network parameters. It does the following:
●
erases the administrator password
●
locks the digital sender from use until the reset is complete
●
erases the configuration for TCP/IP, DNS/WINS, security, e-mail, fax, and LDAP
settings
●
erases the contents of all public and personal address books, distribution lists, and
phone books.
Notes about the procedure:
●
CAUTION
After you reset the digital sender to the factory defaults, neither you nor any users
can use the digital sender again until you have reconfigured it, starting with the
steps under “Configure e-mail parameters” on pag e20.
This action cannot be undone.
0
%
1
Make sure the digital sender is idle.
2
At the control panel, press SETUP (ALT+F4). Then press SETTINGS (F2).
3
Select any of the configuration menus. If an administrator password is required, the
HP Digital Sender 8100C Administrator’s Password dialog box appears.
Type the password and press OK (F1).
4
When the configuration menu appears, press TOOLS (F2).
5
Select Factory defaults and press OK (F1).
6
Press OK (F1) to confirm that you want to reset to factory defaults.
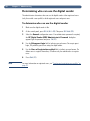
'
At any time, you can check the database of address books to correct problems and
inconsistencies in the information.
Perform the database check for the following reasons:
●
when the digital sender seems to be performing slowly for no apparent reason
●
when the digital sender was inadvertently turned off during a sensitive operation
(such as saving configuration changes)
●
when you detect inconsistencies between address books and distribution lists
●
when instructed to do so by troubleshooting steps or by HPcustomer support
Notes about the procedure:
Note
●
The procedure causes the digital sender to shut down and then restart.
●
The procedure can take as long as 25 minutes, based on the amount of information
in address books.
If the check fails, turn the digital sender off and back on, and then try again. If the problem
persists, the address book database is beyond recovery. Clear the address book database
(see pag e40).
39
40
(!4,0
$!
!
1
Make sure the digital sender is idle.
2
At the control panel, press SETUP (ALT+F4).
3
Select any configuration menu. If an administrator password is required, the
HP Digital Sender 8100C Administrator’s Password dialog box appears.
Type the password and press OK (F1).
4
When the configuration menu appears, press TOOLS (F2).
5
Select Check Address Books and press OK (F1).
6
Confirm that you want to perform the check. The digital sender shuts down and
then checks the address book database as it restarts.
'
You may want to clear the address book data base if:
CAUTION
●
You are changing the digital sender’s user base(e.g. moving the digital sender to a
different department)
●
The address book has become corrupt and checking the address books (see
page 39) has not corrected the problem
Clearing the address book data base will erase all user profiles, e-mail addresses, e-mail
lists, fax numbers, and fax lists.
$
!
1
At the control panel, press SETUP (ALT+F4).
2
Select any configuration menu. If an administrator password is required, the
HP Digital Sender 8100C Administrator’s Password dialog box appears.
Type the password and press OK (F1).
3
When the configuration menu appears, press TOOLS (F2).
4
Select Clear data bas .
5
The confirmation dialog box appears. Press OK to clear the data base. Press CANCEL
to exit.
6
The data base is cleared and the digital sender re-starts.
0
-.)'
If e-mail or i-fax documents sent by the digital sender appear too light or too dark, the
problem may be solved by adjusting the contrast. Use this feature much the same way
you would use a similar function on a phot ocopier:decreasing the contrast lightens the
scan of the image, increasing the contrast darkens it.
$$
Note
1
At the control panel, press SETUP (ALT+F4). Then press SETTINGS (F2).
2
Select any of the configuration menus. If an administrator password is required, the
HP Digital Sender 8100C Administrator’s Password dialog box appears.
Type the password and press OK (F1).
3
When the configuration menu appears, press TOOLS (F2).
4
Select B/W Contrast and press OK (F1).
5
By default, the digital sender is set to Automatic. Press ENTER, then use
to switch to Manual. Press ENTER.
6
Use or to move to the contrast bar. Move the marker to the left to lighten
the contrast, move the marker to the right to darken the contrast.
7
Press SAVE (F1).
and
In general, the B/W Contrast setting should be kept on Automatic unless a contrast
adjustment is necessary to improve readability.
41
42
(!4,0
This section contains information about user profiles that pertains to the administrator.
See the user guide for details on other uses.
The administrator determines who can create and modify user profiles in these ways:
●
If Allow user self-registration in the General configuration menu is on, users can
create and modify their own profile. The administrator can see and modify any user
profile, including user passwords.
●
If Allow user self-registration in the General configuration menu is off, only the
administrator can create and modify user profiles, including user passwords.
●
The administrator can also enable or disable guest usage of the digital sender
(General configuration menu). If disabled, anyone wishing to use the digital sender
would be required to have a user profile.
Note
1
At the control panel, press SETUP (ALT+F4). Then press USERS (F1).
2
If an administrator password is required, the HP Digital Sender 8100C
Administrator’s Password dialog box appears. Type the password and press OK
(F1).
3
Type a name in the Users field and press ADD (F1).
You may want to use a naming convention for all user names, such as last name_first
name or first name_last name.
4
Type the user’s e-mail address, password, and password confirmation, pressing
ENTER after each field.
5
Press OPTIONS (F2) and select YES (F1) or NO (F4) for each option in the user profile.
6
Press OK (F1). The user profile can now be used to send e-mail, send faxes, and
print.
(
$
1
At the control panel, press SETUP (ALT+F4). Then press USERS (F1).
2
If an administrator password is required, the HP Digital Sender 8100C
Administrator’s Password dialog box appears. Type the password and press OK
(F1).
3
Select a name in the list of users by using the arrow keys or type the profile name
in the Users field and press MODIFY (F3).
4
Modify the name, e-mail address, password, and password confirmation, pressing
ENTER after each field.
5
Press OPTIONS (F2) and select YES (F1) or NO (F4) for each option in the user profile.
6
Press OK (F1).
CAUTION
1
At the control panel, press SETUP (ALT+F4). Then press USERS (F1).
2
If an administrator password is required, the HP Digital Sender 8100C
Administrator’s Password dialog box appears. Type the password and press OK
(F1).
3
Highlight a name in the list of users or type the profile name in the Users field and
press DELETE (F3).
4
Press OK (F1) to delete the user profile. Press CANCEL (F4) to return to the Users
screen without deleting the profile.
Deleting a user profile also deletes that user’s address book.
43
44
(!4,0
!"!
This section contains information about address books that pertains to the administrator.
The administrator maintains these categories in the LISTS option of the SETUP (ALT+F4)
menu:
●
Public E-mail Lists
Contains predefined groups of e-mail addresses available to anyuser. Only the
administrator can change information in this address book.
●
Public E-mail Addresses
Contains e-mail addresses available to any user. Only the administrator can change
information in this address book.
●
User’s E-mail Lists
Contains a registered user’s predefined groups of e-mail addresses. The user can
change information in this address book through the LISTS option of the main menu.
●
User’s E-mail Addresses
Contains e-mail addresses available to the registered user. The user can change
information in this address book through the LISTS option of the main menu.
●
Fax Lists
Contains predefined groups of fax numbers available to any registered user. The
user can change information in this address book through the LISTS option of the
main menu.
●
Fax Numbers
Contains fax numbers available to any registered user. The user can change
information in this address book through the LISTS option of the main menu.
3
!%
!
/
Only the administrator can change information in the Public Lists address book.
$'
!
1
Press SETUP (ALT+F4), then LISTS (F3).
2
Select Public E-mail Lists.
3
If an administrator password is required, the HP Digital Sender 8100C
Administrator’s Password dialog box appears. Type the password and press OK
(F1).
4
Type the name for the distribution list.
5
Press ENTER.
6
Press OK (F1) to add the new list.
7
Type an address to add to the list and press ENTER.
8
Edit the information for the address and click SAVE (F1).
9
Repeat steps 7 and 8 for each address to add to the list.
$'
!
1
Press SETUP (ALT+F4), then LISTS (F3).
2
Select Public E-mail Lists.
3
If an administrator password is required, the HP Digital Sender 8100C
Administrator’s Password dialog box appears. Type the password and press OK
(F1).
4
Type a list name or choose the distribution list name from the list.
5
Press DELETE (F3).
6
Press OK (F1) to confirm.
45
46
(!4,0
1
Press SETUP (ALT+F4), then LISTS (F3).
2
Select Public E-mail Lists.
3
If an administrator password is required, the HP Digital Sender 8100C
Administrator’s Password dialog box appears. Type the password and press OK
(F1).
4
Select the distribution list you want to edit.
5
Press OK to modify the list.
6
Type an address to add to the list and press ENTER.
7
Edit the information for the address and click SAVE (F1).
8
Repeat steps 6 and 7 for each address to add to the list.
1
Press SETUP (ALT+F4), then LISTS (F3).
2
Select Public E-mail Lists.
3
If an administrator password is required, the HP Digital Sender 8100C
Administrator’s Password dialog box appears. Type the password and press OK
(F1).
4
Select the distribution list you want to edit.
5
Press OK (F1) to modify the list.
6
Select the addresses.
7
Press DELETE (F3).
8
Press OK (F1) to confirm the deletion.
3
!%
!
Only the administrator can change information in the Public E-mail address book.
$
!
1
Press SETUP (ALT+F4), then LISTS (F3).
2
Select Public E-mail Addresse .
3
If an administrator password is required, the HP Digital Sender 8100C
Administrator’s Password dialog box appears. Type the password and press OK
(F1).
4
Add an address by doing one of the following:
●
Type a name for this entry in the Name field and press ADD (F1).
●
If the digital sender is set to work with an LDAP server, begin typing the first
letters of an entry and press SEARCH (F2). Use the and keys to select an
entry and press OK (F1).
5
Change the name and e-mail information for this entry as necessary. Use TAB to
move between fields.
6
Press SAVE (F1).
7
Repeat steps 4 through 6 for each address you want to add.
8
When finished, click SAVE (F1).
$
!
CAUTION
1
Press SETUP (ALT+F4), then LISTS (F3).
2
Select Public E-mail Addresse .
3
If an administrator password is required, the HP Digital Sender 8100C
Administrator’s Password dialog box appears. Type the password and press OK.
4
Type a display name or choose the address from the list using the arrow keys.
5
Press DELETE (F3).
6
Press OK (F1) to confirm.
Deleting an address from the public e-mail address book also deletes that address from
all public and personal distribution lists.
47
48
(!4,0
!
To add, modify, or delete the addresses and lists for a particular registered user, follow
the procedures in “Maintaining the Public E-mail address book” on pag e47 and
“Maintaining the Public Lists address book” on pag e45 with the following provisions:
●
Select User’s E-mail Lists or User’s E-mail Addresses from LISTS.
●
Between steps 3 and 4, enter the user name.
!
Users and the administrator have access to fax lists and numbers. To add, modify, or
delete fax lists and numbers, follow the procedures in the user guide with the following
provisions:
●
Press SETUP (ALT+F4), then LISTS (F3) to access the fax lists and fax numbers.
●
The digital sender will not ask for a user name.
#$
Use this procedure to change the contrast of the display on the control panel. You might
want to do this, for example, to adjust for lighting conditions in youroffice.
$
#
You can change the contrast level at any time. The digital sender does not need to beidle.
At the control panel, press the following while at the main menu or during login:
SHIFT+ALT+
SHIFT+ALT+
(decreases)
(increases)
<
!
%"
If you register with the digital sender website (http://www.digitalsender.hp.com), you
will be notified by e-mail when a firmware upgrade is available for the digital sender.
Notes about the procedure:
●
When you upgrade the digital sender firmware, you replace the existing firmware
image with one or more new files.
●
The digital sender is locked from use until the upgrade has finished.
●
This procedure causes the digital sender to shut down and restart.
●
The upgrade interrupts any job in progress.
●
If the digital sender detects a problem with the new firmware version, it
automatically reverts to the old version.
●
The upgrade takes from 1 to 5 minutes.
$
1
Download the firmware upgrade file from the digital sender website (http://
www.digitalsender.hp.co ) to a computer which shares the network with the
digital sender.
2
Follow the instructions on the website for upgrading the firmware image.
At the end of the procedure, you are notified of the upgrade’s success or failure.
49
50
(!4,0
&!
The Backup and Restore utilities save and recover the configuration of all personal and
public address books, and the configuration of the digital sender. These utilities are
stored in the \Utility folder on the product CD and must be installed on a computer on
the same network as the digital sender.
$(!&
Note
1
On the product CD, browse to the Utilities folder.
2
Review the Readme.txt file
3
Run Install.bat. The utilities are installed to C: \HP9100C\Utilities.
Backup and Restore are command line programs which can be run from a .bat or .cmdfile.
-
Use this procedure:
●
After configuring the digital sender, creating users, and configuring public and
personal address books
●
Periodically to ensure recoverability of the digital sender to a desired state
●
Before performing firmware upgrades
Backup saves the configuration of the digital sender to a .tgz file on your hard drive.
!$
1
Make sure the computer you are using has the Backup and Restore utilities
installed.
2
At a command line, run Backup using the following syntax:
backup.exe/dir:Backup Directory/d:Digital Sender
/p:Administrator Password/l/tr
Note
Example: backup.exe /dir:c:\data /d:xxx.xxx.xxx.xxx /p:password /l /tr
9
!
,
Use this procedure:
Note
●
After initializing the address books
●
After performing a Restore to factory defaults
●
When instructed to do so by HP Customer Support
This procedure will erase any changes made to the address books and configurations since
a backup image was created.
$
1
Make sure the computer you are using has the Backup and Restore utilities
installed.
2
At a command line, run Restore using the following syntax:
restore.exe/f:Restore File/d:Digital Sender
/p:Administrator Password/l/tr
Note
Example: restore.exe /f:c:\data\data.tgz /d:xxx.xxx.xxx.xxx /p:password /l /tr
Backup and Restore code
Source
Description
/dir
Directory must be in a volume supporting long file names.
/d
Digital sender network name or IP address.
/p
Digital sender administrator password.
/l
Log results in log file (backup.log or restore.log).
/tr
Log low level activity in trace file (backup.trc or restore.trc).
/f
Restore file, generated by previous backup.
51
52
(!4,0
When to clean:
●
as necessary
●
when vertical streaks appear on electronic forms of sent documents
$
Clean the glass surface gently using a soft cloth. Do not press hard on the glass surface
(you could break the glass). You may dampen the cloth with water, isopropyl alcohol, or
window cleaner, if necessary.
CAUTION
Do not use other cleaning fluids. They may damage the digital sender. Never spray cleaning
fluid directly on the digital sender glass.
(
!
&$
When to clean:
1
●
if paper documents in good condition begin to mis-feed
●
when vertical streaks appear on electronic forms of sent documents
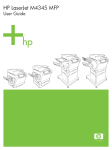
$)*"
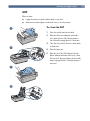
1
Raise the control panel access hatch.
2
Wipe the rollers and separation pad with a
soft, clean, lint-free cloth. You may dampen
the cloth with isopropyl alcohol, if necessary
3
Close the access hatch. Be sure it snaps down
on both sides.
4
Raise the input tray.
5
Wipe the top of the ADF window (the clear
plastic window) and rollers with a soft, clean,
lint-free cloth. You may dampen the cloth with
water, isopropyl alcohol, or window cleaner, if
necessary.
2
4
5
53
(!4,0
54
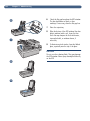
6
1
6
Check the flat gray bar above the ADF window.
The bar should have no black or other
markings. If necessary, clean the flat gray bar.
7
Raise the output tray.
8
Wipe the bottom of the ADF window (the clear
plastic window) with a soft, clean, lint-free
cloth. You may dampen the cloth with water,
isopropyl alcohol, or window cleaner, if
necessary.
9
To eliminate vertical streaks, clean the flatbed
glass, especially near the top of the glass.
7
CAUTION
Do not use other cleaning fluids. They may damage
the ADF window. Never spray cleaning fluid directly
on the ADF.
8
9
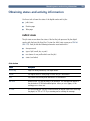
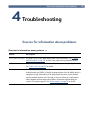
" %%
Sources for information about problem s
Source
Description
Control panel messages Messages on the control panel display when there are problems. See “Control
panel messages” on pag e56 for a list of messages and recommended actions.
Job(s) state
This screen reveals the status of the last five jobs processed by the digital sender.
See “Job(s) state” on pag e33 for details.
Revision pag
The Revision page that you can display at the control panel is an important
troubleshooting tool. Ability to display the page indicates that the digital sender is
operating correctly. Information on the page reveals the status of your network
and the network interface card. The page is also your reference for information
about firmware versions and product numbers (sometimes needed when you
contact H Pcustomer support). See “Revision page” on page 34 for details.
55
56
(!2,+%!
0
Use the table in the user guide to solve common problems encountered while using the
digital sender. Contact HP customer support (see pag e67) if the actions suggested there
do not resolve the problem.
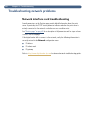
'
The following table lists the messages the control panel might display which may require
the administrator’s attention. The table also lists the cause of the message, and
recommended actions. See the user guide for other control panel messages.
Note
The messages are listed in alphabetical order. Messages that report normal status are not
included.
Control panel messages
Message
Description
Actions
AB Error codes .
An internal problem in
accessing address books has
occurred.
●
The default “From” e-mail
address is not set. Cannot
send e-mail messages if
“From” field is not provided
either at control panel or in
registered user profile.
A default FROM e-mail
address is missing from the
configuration.
●
The DNS configuration is
inconsistent. Please chec k
There is a problem with the
DNS (Domain Name System)
configuration.
●
●
●
●
●
●
Turn the digital sender off and then back on.
Perform a database check (see “Checking the
address book database” on pag e39).
If the problem persists, note the error codes and
contact H Pcustomer support.
Use the E-mail configuration menu to configure the
default FROM e-mail address.
If the problem persists, contact HP customer
support.
Using the Network configuration menu, make sure
that you have correctly configured a DNS server and
default domain.
Try reentering the information in the configuration
menu.
If the problem persists, contact HP customer
support.
+%!
!
Control panel messages (continued
Message
Description
Actions
The e-mail configuration is
inconsistent. Please chec k
There is a problem with the
e-mail configuration.
●
●
●
●
Using the E-mail configuration menu, make sure
that you have correctly configured the e-mail server
address and e-mail default FROM address.
Try reentering the information in the Network
configuration menu.
Turn the digital sender off and then back on.
If the problem persists, contact HP customer
support.
The e-mail function isn’t
There is a problem with the
configured. Please contact the e-mail configuration.
administrator or refer to the
documentation
●
See “Configure e-mail parameters” on page20.
E-mail server not available.
Contact the administrator.
●
Turn the digital sender off and then on again.
Make sure all cabling is securely connected.
Make sure the e-mail server is running and can be
reached from the portion of the network on which
the digital sender is installed.
Make sure the network interface card is
communicating with the network. To do this, verify
that theTCP/IP status parameter on the Revision
page reads READ , and then try to reach the
digital sender using a network command such as
ping.
You selected the e-mail
function, but the e-mail server
is turned off or cannot be
reached.
●
●
●
Errors were found when
checking the address book.
Initialize address b o o k
An internal check of the
address book database found
significant problems.
●
Reset address books by answering “Yes” to the
control panel question. Wait for the reset to
complete and then restore a backup copy of the
address book.
The I-fax configuration is
inconsistent. Please chec k
There is a problem with the Ifax configuration.
●
Using the I-fax configuration menu, make sure that
you have correctly configured the I-fax domain, fax
account e-mail address, fax prefix and/or fax
postage.
Try reentering the information in the Network
configuration menu.
Turn the digital sender off and then back on.
If the problem persists, contact HP customer
support.
●
●
●
The i-fax function isn’t
There is a problem with the iconfigured. Please contact the fax configuration.
administrator or refer to the
documentation.
●
See “Configure I-fax parameters” on p age21.
57
58
(!2,+%!
Control panel messages (continued
Message
Description
Actions
Internal error. codes
Digital Sender halted .
Internal problem.
●
See the internal error table starting on page 61.
Invalid credentials. Check
The account name and
account name and passw ord. password that have been
configured for authenticating
LDAP searches are invalid.
●
Use the E-mail configuration menu at the control
panel to change the account name and password.
Invalid password. Press any
key to retry.
●
Press any key and then retype the password. The
password is case-sensitive, so make sure you type
the right combination of uppercase and lowercase
letters.
If the problem persists see “Erasing administrator
password” on pag e31.
The digital sender did not
recognize the password you
entered.
●
JetDirect not responding.
The firmware version of the
Please check the card or the HPJetDirect print server
firmware version.
(interface card) installed in
the digital sender is not
compatible with the product.
●
Contact HP customer support.
The LDAP configuration is
inconsistent. Please check.
●
Using the E-mail configuration menu, make sure
that you have correctly configured the LDAP server
Try reentering the information in the E-mail
configuration menu.
Turn the digital sender off and then back on.
If the problem persists, contact HP customer
support.
There is a problem with the
LDAP configuration.
●
●
●
LDAP protocol error.
The LDAP search could not
complete because of a
problem with a network
connection or LDAP server.
●
●
●
●
Turn the digital sender off and then back on.
Check that the other functions of the digital sender
are working.
Make sure the LDAP server is functioning properly
If the problem persists, contact HP customer
support.
+%!
!
Control panel messages (continued
Message
Description
The LDAP server is currently There is a problem with either
unreachable. Contact the
the LDAP server or the
administrator
network.
Actions
●
●
●
●
●
●
●
●
Network error code .
Try again later.
Check that all cabling is securely connected.
Using the Network and E-mail configuration
menus, make sure you have correctly configured all
TCP/IP addresses, the LDAP server name, and
(optionally) the LDAP port number.
If you use symbolic names, make sure you have
correctly configured a DNS or WINS server in the
Network configuration menu.
Check that the network is working correctly using a
network command such as ping.
Check with the LDAP server administrator to mak
sure the LDAP server is running.
Check that the network is properly configured.
If the problem persists, contact HP customer
support.
There is a problem with the
network interface card.
●
There is no entry in the LDAP
directory that matches your
search string and search
criteria.
●
Check the accuracy of your search string and search
criteria.
Object not found. Check your Either the search root or the
configuratio n
name/password combination
for authenticating searches in
the LDAP server is incorrect.
●
Use the E-mail configuration menu at the control
panel to correct the search root or name/password
combination.
Partial results. Check your
configuratio n
The search root for searches
in the LDAP server is
incorrect.
●
Use the E-mail configuration menu at the control
panel to correct the search root.
Passwords do not match.
Press any key to retry.
During the procedure to
change password, the
confirming password that was
entered did not match the
first password.
●
Try again.
No matches found .
●
Turn the digital sender off and then back on.
Check the TCP/IP status parameter on the Revision
page. If it displays READ , try reaching the digital
sender using a network command such as ping. If it
displays ERROR, note the codes and contact
HP customer support.
59
60
(!2,+%!
Control panel messages (continued
Message
Description
Actions
Search error.
An unexpected proble
occurred in the LDAP search
(for example,memory
shortage, or problem with the
network link or LDAP server).
●
The digital sender did not
recognize the password you
typed.
●
Sorry, you have typed an
incorrect password. Please
retype your passwor d.
●
●
●
Try the search again.
Turn the digital sender off and then back on.
If the problem persists, contact HP customer
support.
Press any key to clear the message, and then retype
the password. Passwords are case-sensitive, so make
sure you enter the correct combination of lowercase
and uppercase letters.
Check the user profile for the password.
This operation can require
You are being asked to
several minutes. Do you really confirm that you want to
want to proceed?
check the address book
database.
●
Press OK to continue with the database check or
press CANCEL to cancel. If you continue, the digital
sender shuts down and restarts.
This user is not registered.
Please add th e m
The user needs a user profile.
●
See “Creating and maintaining user profiles” on
pa ge42.
This will clear the
configuration and all the
destinations. Do you really
want to proceed?
You are being asked to
confirm that you want to
reset the digital sender to the
factory defaults.
●
Press OK to continue with the reset or press CANCEL
to cancel.
This will clear your changes. You are being asked to
Do you really want to
confirm that you want to
proceed?
discard all changes that you
have made in the
configuration menu.
●
Press OK to discard your changes; this takes you out
of the configuration menu. Press CANCEL to return to
the configuration menu, where you can use SAVE to
save the changes before exiting.
The user name you typed was The digital sender did not
not found. Contact the
recognize the user name you
administrator
entered.
●
Make sure the name is correct and try again.
The WINS configuration is
inconsistent. Please chec k
There is a problem with the
WINS (Windows Internet
Naming Service)
configuration.
●
Try reentering the information in the Network
configuration menu.
If the problem persists, contact HP customer
support.
The account name used to
authenticate searches with
LDAP server has insufficient
rights to access the
information.
●
You do not have sufficient
access rights.
●
Use the E-mail configuration menu at the control
panel to change the account name and password.
+%!
!
Control panel messages (continued
Message
Description
Actions
You need to become a
Allow user self-registration in
registered user to use this
the General configuration
digital sender. Please contact menu is disabled.
your admin.
●
●
The administrator must add the user. See “Creating
and maintaining user profiles” on page 4 2.
Enable Allow user self-registration.
Internal error message descriptions and ac t i o n
Code
Description
Actions
NOTE
Every internal error message has a code associated with it. Use the code to locate the
description and action.
5,xxxxx
Internal software or hardwar
problem
●
●
●
●
7,xxxxx
Internal failure.
●
●
●
10,0
Failure initializing address books.
●
●
●
●
●
Turn the digital sender off and then back on.
Verify control panel access hatch is snapped into place.
Verify all cables are seated securely.
If the problem persists, note the code and contact H Pcustomer
support.
Turn the digital sender off and then back on.
Reconfigure all network parameters.
If the problem persists, note the code and contact HP customer
support.
Turn the digital sender off and then back on.
Check the address book database (see “Checking the address
book database” on page 39).
Clear the address book.
Reset the digital sender to factory defaults (see “Resetting to
factory defaults” on page 3 8).
NOTE: This also erases the administrator password, all TCP/IP
configuration, and all public and personal address books.
If the problem persists, note the code and contact HP customer
support.
61
62
(!2,+%!
"!
Several parameters on the Revision page provide helpful information about the print
server. In particular, the TCP/IP status parameter indicates whether the print server is
actively connected to the network or whether an error condition exists.
See “Revision page” on pag e34 for a description of all parameters and for steps on how
to access the Revisionpage.
If the digital sender fails to connect to the network, verify the following information is
correctly entered in the Network configuration menu.
●
IP address
●
IP subnet mask
●
IP gateway
Refer to http://www.digitalsender.hp.com for advanced network troubleshooting guides.
*,
'"(!"
HP PRODUCT
HP Digital Sender 8100C
DURATION OF WARRANTY
One year
1
HP warrants HP hardware, accessories, and supplies against defects in materials
and workmanship for the period specified above. If HP receives notice of such
defects during the warranty period, HP will, at its option, either repair or replace
products which prove to be defective. Replacement parts may be either new or likenew.
2
HP warrants that HP software will not fail to execute its programming instructions,
for the period specified above, due to defects in material and workmanship when
properly installed and used. If HP receives notice of such defects during the
warranty period, HP will replace software media which does not execute its
programming instructions due to such defects.
3
HP does not warrant that the operation of HP products will be uninterrupted or
error free. If HP is unable, within a reasonable time, to repair or replace any product
to a condition as warranted, customer will be entitled to a refund of the purchase
price upon prompt return of the product.
4
HP products may contain remanufactured parts equivalent to new in performance
or may have been subject to incidental use.
5
The warranty period begins on the date of the delivery or on the date of installation
if installed by HP. If customer schedules or delays HP installation more than 30 days
after delivery,warranty begins on the 31st day from delivery.
63
64
(!,3
6
Note
Warranty does not apply to defects resulting from improper or inadequate
maintenance or calibration, software, interfacing, parts or supplies not supplied by
HP, unauthorized modification or misuse, operation outside of the published
environmental specifications for the product, or improper site preparation or
maintenance.
Operation of the digital sender beyond the limit of its nominal duty cycle (scanning greater
than the equivalent of 3300 pages per month) shall be deemed digital sender abuse and
all repairs thereafter are to be billed on a time-and-materials basis.
7
TO THE EXTENT ALLOWED BY LOCAL LAW, THE ABOVE WARRANTIES ARE
EXCLUSIVE AND NO OTHER WARRANTY,WHETHER WRITTEN OR ORAL, IS
EXPRESSED OR IMPLIED AND HP SPECIFICALLY DISCLAIMS THE IMPLIED
WARRANTIES OF MERCHANTABILITY, SATISFACTORY QUALITY, AND FITNESS FOR
A PARTICULAR PURPOSE.
8
HP will be liable for damage to tangible property per incident up to the greater of
$300,000 or the actual amount paid for the product that is the subject of the claim,
and for damages for bodily injury or death, to the extent that all such damages are
determined by a court of competent jurisdiction to have been directly caused by a
defective HP product.
9
TO THE EXTENT ALLOWED BY LOCAL LAW, THE REMEDIES IN THIS WARRANTY
STATEMENT ARE THE CUSTOMER’S SOLE AND EXCLUSIVE REMEDIES. EXCEPT AS
INDICATED ABOVE, IN NO EVENT WILL HP BE LIABLE FOR LOSS OF DATAOR FOR
DIRECT, SPECIAL, INCIDENTAL, CONSEQUENTIAL (INCLUDING LOST PROFIT OR
DATA), OROTHER DAMAGE, WHETHER BASED IN CONTRACT, TORT, OR
OTHERWISE.
10 FOR CONSUMER TRANSACTIONS IN AUSTRALIA AND NEW ZEALAND; THE
WARRANTY TERMS CONTAINED IN THIS STATEMENT, EXCEPTTO THE EXTENT
LAWFULLY PERMITTED, DO NOT EXCLUDE, RESTRICT OR MODIFY AND ARE IN
ADDITION TO THE MANDATORY STATUTORY RIGHTS APPLICABLETO THE SALE OF
THIS PRODUCT TO YOU.
*,>)111
'"(!)*+++"
Subject to all of the terms and limitations of the HP Limited Warranty Statement
provided with this HP Product, HP warrants that this HP product will be able to
accurately process date data (including, but not limited to, calculating, comparing, and
sequencing) from, into, and between the 20th and 21st centuries, and the year 1999 and
2000, including leap year calculations, when used in accordance with the Product
documentation provided by HP (including any instructions for installing patches or
upgrades), provided that all other products(e.g., hardware, software, firmware) used in
combination with such HP product(s) properly exchange date data. The duration of the
Year 2000 warranty extends through January 31, 2001.
65
66
(!,3
,
You can obtain replacement parts for your HPDigital Sender8100C by contacting your
sales representative or your Hewlett-Packard dealer.
Replacement parts and accessories
Item
Part or
product number
Documentation CD-ROM (full set)
C7707-60009
Welcome Poster
C7707-90004
Welcome Poster (Eastern Europe)
C7707-90015
ADF window
C5195-16511
Bumper foot
C4557-40118
Control panel clip
C7707-40005
* '( ""
You can call HP for support using the table below. For all other support information, such
as obtaining printer drivers or help using an online server, see “HP support” on
page 69. If you need a replacement part or information not listed in one of these two
tables, see the administrator guide .
Customer Support and Product Repair Assistance for the U.S. and Cana d
(See the administrator guide for additional product repair information.)
Call (1) (208) 323-2551 in the U.S. Monday through Friday from 6 am to 6 pm (Mountain Time) free of charge for 90 days. The 90day period begins with the first support call, and it must be within the one-year hardware warranty period. However, your standard
long-distance phone charges still apply. Have your product nearby and your serial number ready when calling.
After your free telephone-support period has expired, fee-based telephone assistance is available to answer your product questions.
Call (1) (900) 555-1500 ($2.50*per minute, U.S. only) or call 1-800-999-1148 ($25* per call, Visa or MasterCard, U.S. and Canad a)
Monday through Friday from 7 am to 6 pm and Saturday from 9 am to 3 pm (Mountain Time). Charges begin only when you connect
with a support technician. *Prices subject to change.
European Customer Support Center Language
and In-Country Options Availab l
Open Monday through Friday 8:30–18:00 CET (unless otherwise noted)
HP provides a free telephone support service for 90 days, beginning with the first support call, but it must be within the one- ear
warranty period. By calling a telephone number listed below, you will be connected to a responsive team waiting to help you. If you
require support after your 90-day free phone support has expired, you can receive support for a fee through the same telephone
number.The fee is charged on a per-incident basis. When callingHP, have the following information ready: product name and seri al
number,date of purchase,and description of the problem.
English
Czech
Danish
Dutch
Finnish
French
German
Greek
Ireland: +353 (0)1 662 5525
U.K.: +44 (171) 512-5202
International: +44 (0)171 512 52 02
+42 (0)2 6130 7310
(08:00-18:00 Monday-Thursday;
08:00-16:30 Friday)
(45) 3929-4099
Belgium: +32 (0)2 626 8806
Netherlands: +31 (0)20 606 8751
+358 (0)203 47 288
Belgium:+32 (0)2 626 8807
France: +33 (0)1 43 62 34 34
Germany: +49 (0)180 52 58 143
(24PF/min)
Austria: +43 (0)7114201080
+30 (0)1 68964 11
(09:00-17:00 CET)
Hebrew
Hungarian
Italian
Norwegian
Polish
Portuguese
Russian
Spanish
Swedish
Switzerland
Turkey
+972 (0)9 9524848 (09:00-18:00
CET Sunday-Thursday)
+36 (0)1 3821111
Italy: +39 02 264 10350
+47 22 11 6299
+351 (0)1 3176333
Portugal: +7 095 797 3520
(09:00-18:00 CET)
+27 86 000 1030
(08:00-17:00 CET)
Spain: +46 (0)8 619 2170
+41 (0)8488011 11
+90 212 224 59 25
+44 (0)171 512 52 02
67
68
(!,3
All other countries worldwide: Use the telephone number below for your country to obtain support during th
warranty period. If you require support after your warranty has expired, additional product repair services, or if your country is not
listed below, see the administrator guide.
(541) 778 8380
Argentina
+61 3 8877-8000
Australia
(011) 829 6612
Brazil
(1) (905) 206-4663
Canada
+86 (0)10 6564 5959
China
800 360 999
Chile
+85 (2) 2802 4098
Hong Kong
+91 11 682-6035
India
+91 11 682-6069
+62 (21) 350 3408
Indonesia
+82 (2) 3270 0700
Korea (Seoul)
080 999-0700
Korea (outside Seoul)
Japan
Malaysia
Mexico
Middle East/Africa
New Zealand
Philippines
Singapore
South Africa
Taiwan
Thailand
Venezuela
Viet Nam
+81 3 3335-8333
+60 (3) 295 2566
01 800 472 6684
(41) (22) 780-7111
+64 (9) 356 6640
+63 (2) 867 3551
+65 272 5300
+34 902 321 123
+886 (2) 2717 0055
+66 (2) 661 4000
800 47 888
+84 (0) 8 823 4530
* '( Online services: for 24-hour access to World Wide Web URL - Firmware upgrades, printer drivers, updated HP printer
information over your modem, we suggest
these services:
software, plus product and support information may be obtained from the following
URLs:
for HP Digital Sender 8100C
http://www.digitalsender.hp.com
in the U.S.
http://www.hp.com
in Europe
http://www2.hp.com
Printer drivers may be obtained from the following sites:
in Japan
ftp://www.jpn.hp.com/drivers
in Korea
http://www.hp.co.kr
in Taiwan
http://www.hp.com.tw
or the local driver website
http://www.dds.com.tw
America Online - America Online/Bertelsmann is available in the U.S., France,
Germany, and U.K. - Printer drivers, updated HP printer software, and support
documentation to help answer your questions about HP products are available. Use
Keyword HP to start your tour or call 1-800-827-6364 preferre dcustomer #1118 to
subscribe. In Europe, call the appropriate number below
Austria
022 58 58 485
France
+353 1 704 90 00
Germany
0180 531 31 64 (24PF/min)
Switzerland
0848 80 10 11
United Kingdom
0800 279 1234
Obtaining software utilities and
electronic Information:
See “HP customer support options worldwide” on page67.
HP direct ordering for
accessories or supplies:
Call 1-800-538-8787 (U.S.) or 1-800-387-3154 (Canada).
HP Support Assistant CD-ROM:
This support tool offers a comprehensive online information system designed to
provide technical and product information on HP products. To subscribe to this
quarterly service call 1-800-457-1762 in the U.S. or Canada;
+31 555 384279 in Europe (0800 960 274 in the U.K.);
(65) 740-4477 in the Asia/Pacific region; and 1-801-431-1587 in Latin America.
HP Service Information:
To locate HP-Authorized Dealers, call 1-800-243-9816 (U.S.) or 1-800-387-3867
(Canada).
HP Service Agreements:
Call 1-800-835-4747 (U.S.) or 1-800-268-1221 (Canada).
Extended Service: 1-800-446-0522.
Locating HP Resellers
Hewlett-Packard appliances, peripherals, personal computers, supplies, and accessories
are available at HPauthorized resellers worldwide. To find the one nearest to you,
contact:
United States:
1-877-DSENDER (373-6337)
Canada:
1-800-387-3867
Europe:
http://www.hp.com and select Assistance and Other Countries
69
70
(!,3
#
-
Feature
Description
Product t y p
●
Flatbed and sheetfed
Scanning elemen
●
Charged-coupled device
Light sourc
●
Cold Cathode Fluorescent Lamp (CCFL)
Interface
●
Ethernet 10BaseT
Optical resolution
●
600 dpi (dots per inch)
Maximum scanning speed
●
B/W sending quality: 4 pages per minute
Color sending quality: 3 pages per minute
Photo sending quality: 3.5 pages per minute
●
●
Image processing
●
●
●
●
Black-and-white documents
Color documents
Color and black-and-white documents
High-resolution color and black-and-white photographs
(print only)
Compression
●
Software: HP Smart Compression ImagingTechnology
utilizing CCIP, G4, and optimized JPEG compression
AC line voltage
●
100 to 240 Vac, 50 to 60 Hz
Power consumption
●
30 W idle
38 W operating
●
Noise pressure level
●
56 dB when operating the flatbed
68 dB when operating the ADF
Weigh
●
10.9 kg (24.0 lb)
Duty cycle
●
3,300 pages per month
●
71
72
(!0,"
Feature
Description
Control panel display
●
●
Keypad
●
●
●
●
●
●
Scan engin
●
●
●
●
Automatic document feeder
(ADF)
●
●
●
●
●
240-by-64 pixels graphic LCD
Blue dots on silver-gray background
40-key alphabetic keypad
12-key numeric keypad
Help key
Simplex/duplex key for single-sided or double-sided
scanning
Green “go” button and red “stop” button
4 context-sensitive function keys
Full-color and grayscale ADF (automatic document feeder)
and flatbed scans
Image calibration
Color and tonal adjustment
Data scaling and enhancement
25-page capacity
High feeding accuracy and reliability
Variety of paper sizes and weights
Correct order output
Automatic start and stop at any speed
Temperature
Operating
10 to 35° C (50 to 95° F)
Storage
-40 to 60° C (-40 to 140° F)
Humidity
CAUTION
Operating
10 to 80% noncondensing(10 to 35° C)
Storage
0 to 90%
The operating environment should be stable, with no abrupt changes in temperature or
humidity, or your digital sender might be damaged. If you move the digital sender from a
cold to a warm environment, wait about two hours before using it.
73
74
(!0,"
Operating capabilities
Description
Maximum
Multiple selections at control panel (combination of each
individual e-mail address and each distributi o n l i s t
128
Destinations for an e-mail message (combination of all individual
e-mail addresses and all addresses in selected distributio n l i s t s
1,024
Destinations for a fax transmissi o
1,024
Characters in a telephone numbe
80
Memory capabilities
Description
Maximum
Users
4,096
Public e-mail addresse
200,000
Fax numbers
2,048
Size of public e-mail distribution l i s t
512
Number of public e-mail distribution li s t
512
Size of fax distribution li s
512
Number of fax distribution lists
512
Public HPJetSend-enabled printers
Size of personal e-mail addres s
64
b o o
Number of personal distribution lis t
256
100
Length of user’s name
31
Length of display name
31
Length of user’s password
15
Length of distribution list name
31
Length of fax number
79
Length of e-mail address
255
( $
EU Declaration of Conformity
According to ISO/IEC Guide 22 and EN 45014
Manufacturer’s Name:
Hewlett-Packard Company
Manufacturer’s Address:
Greeley Hardcopy Division
700 71st Avenue
Greeley, Colorado 80634
USA
Declares that the product
Product Name:
Model Numbers:
Product Options:
HP Digital Sender 8100C
C7707 (may contain suffix)
C7707
Conforms to the following specifications:
SAFETY
IEC 950:1991+A1:1992+A2:1993+A3:1995+A4:1996
EN 60950:1992 +A1:1992+A2:1993+A3:1995+A4:1997+A11:1997
EN 60825-1:1994 Class 1
EMC
CISPR 22:1993+A1+A2, Class B/ EN 55022:1994+A1+A2, Class B
IEC 1000-3-2:1995 / EN 61000-3-2:1995
IEC 1000-3-3:1994 / EN 61000-3-3:1995
EN 50082-1:1992
IEC 801-2:1991 / prEN 55024-2:1992
± 4 KV CD; ± 8 KV AD
IEC 801-3:1984 / prEN 55024-3:1991
3 V/m
IEC 801-4:1988 / prEN 55024-4:1992
± 1.0 KV power lines
Supplementary information:
The product herewith complies with the requirements of the Low Voltage Directive 73/23/EEC and
the EMC Directive 89/336/EEC and carries the CE-marking accordingly.
LEDs in this product are Class 1 in accordance to EN60825-1.
Greeley, Colorado, USA, December 1999
__________________________________
Jodi Schilling - Quality Manager
European Contact: Your local Hewlett-Packard Sales and Service Office or Hewlett-Packard GmbH, Department
ZQ/Standards Europe, Herrenberger Straße 130, D-71034 Böblingen (Fax: +49-7031-14-3143)
75
76
(!0,"
FCC Declaration of Conformity
Manufacturer’s Name:
Hewlett-Packard Company
Manufacturer’s Address:
Greeley Hardcopy Division
700 71st Avenue
Greeley, Colorado 80634
USA
Contact Person:
Telephone:
Product Name:
Model Numbers:
Product Options:
GHC Regulatory Manager
970-350-5600
HP Digital Sender 8100C
C7707 (may contain suffix)
C7707
This equipment has been tested and found to comply with the limits for a Class B digital device, pursuant
to Part 15 of the FCC rules. Operation is subject to the following two conditions: (1) This device may not
cause harmful interference, and (2) This device must accept any interference received, including
interference that may cause undesired operation. These limits are designed to provide reasonable
protection against harmful interference in a residential installation. This equipment generates, uses, and
can radiate radio frequency energy, and, if not installed and used in accordance with the instruction manual,
may cause harmful interference to radio communications. However, there is no guarantee that interference
will not occur in a particular installation. If this equipment does cause harmful interference to radio or
television reception, which can be determined by turning the equipment off and on, the user is encouraged
to try to correct the interference by one or more of the following measures:
●
●
●
●
Reorient or relocate the receiving antenna.
Increase separation between equipment and receiver.
Connect equipment into an outlet on a circuit different from that to which the receiver is located.
Consult your dealer or an experienced radio/TV technician.
Any changes or modifications to the digital sender that are not expressly approved by Hewlett-Packard
could void the user’s authority to operate this equipment. Only use the cables, connectors, power cords
and accessories supplied with this equipment or expressly approved by Hewlett-Packard.
Test report on file:
Date:
C7707-1
December, 1999
=
.
Geräuschemission
LpS <70 dB
am Arbeitsplatz
normaler Betrieb
nach DIN 45635 T. 19
Die Daten sind die Ergebnisse von Typprüf u n g e n
77
78
(!0,"
79
Symbols
.tif format files 9
/d code 51
/dir code 51
/f code 51
/l code 51
/p code 51
/tr code 51
Numerics
2000 warranty 65
A
A4-sized paper 7
AB Error message 56
AC line voltage 71
access rights,insufficient 60
accessories and supplies
ordering 66
warranty 63
accounts,invalid credentials 58
acoustic emissions 71
Acrobat Reader,website 9
activity information 33
adding
addresses to distribution list 46
addresses to public e-mail book 47
HP JetSend devices 23
lists to address book 45
user profiles 42
address books
adding lists 45
adding to public e-mail 47
checking 39
clearing database 40, 44
control panel error messages 56
deleting lists from 45
descriptions 44
error messages 56
errors 57
failure to initialize 61
internal errors 61
maintaining 45
Address Caching Enabled setting 26
addresses
adding to distribution list 46
deleting from distribution list 46
ADF (automatic document feeder)
cable 14
cleaning 53
connector socket 14
illustration 13
maximum pages 7
paper sizes supported 7
specifications 72
adjusting
contrast for scanning 41
contrast of display 48
administrator
activities 25
changing password for 31
description 11
erasing password for 31
tools 37
Administrator E-mail parameter 26
Administrator Full Name parameter 26
administrator guide,part numbers 66
Administrator Password parameter 26
Adobe Acrobat Reader,website 9
agreements,service 69
Allow Guest Login parameter 26
America Online support service 69
AOL support service 69
assigning IP address
default timeout 17
manually 27
authorized dealers 69
Auto BCC Function Enabled parameter 29
automatic document feeder (ADF). See ADF (automatic document
feeder)
B
B/W contrast,changing 41
B/W Document,sending quality 8
backing up
address books 50
codes 51
device configuration 50
80
backup utility 50
Bad packets parameter 35
Boot Block Ver. parameter 36
BOOTP,using to assign IP address 17
Box Version # parameter 35
C
capacity of ADF 7
cards,connector to network interface 14
changing
administrator password 31
contrast 41
user profiles 42
characters,maximum number of 74
checking the address book database 39
checklist for configuration 17
cleaning
ADF 53
device 52
scanner glass 52
clearing,address book database 40
codes
for backing up and restoring 51
internal messages 61
Collisions parameter 35
Color Document,sending quality 8
color,sending 8
Color-B/W Photo sending quality 8
components
hardware 12
software 24
compression features 71
configuration
checklist 17
extended and optional 16
minimum 16
parameters in configuration menu 26
preparing for 17
resetting to factory defaults 38
using the control panel 22
configuration menu,parameters 26
configuring
e-mail 16
e-mail parameters at control panel 20
extended parameters 22
HP JetSend devices 23
I-fax 16
I-fax parameters at control panel 21
optional parameters 22
conformity, declaration of 75
connector socket 14
connectors
control panel cable 14
control panel socket 14
illustration 14
power socket 14
print server 14
consumption, power 71
contrast
changing 41
changing display 48
control panel
assigning IP address from 17
changing contrast 48
configuring device 22
configuring e-mail parameters 20
configuring I-fax parameters 21
connector cable 14
illustration 12
maximum number of selections 74
messages 56
socket connector 14
specifications 72
controlling access to device 32
convenience copying
description 10
maximum number of printers 74
copies,e-mail messages 37
copying,convenience 10
creating,user profiles 42
customer support options worldwide 67
cycle, duty 71
D
database of address books
checking 39
clearing 40
errors 57
date
firmware 35
setting for digital sender 26
Date parameter 26
dealers, authorized 69
declaration of conformity 75
decreasing,contrast 41
defaults
FROM field in e-mail messages 28
image quality for e-mail messages 29
IP address timeout 17
resetting to factory 38
SUBJECT field in e-mail messages 28
defects
product 63
software 64
deleting
addresses from public e-mail address book 47
lists from address book 45
delivery,notification of e-mail 37
description,security 11
destinations
fax 10
from digital sender 9
DHCP,using to assign IP address 17
diagnostics,administrator tools 37
displaying,revision page 34
distribution lists
adding addresses 46
deleting addresses 46
maintaining 45
maximum number of destinations 74
distribution services 9
DNS (Domain Name System)
configuration problem 56
support 9
DNS Domain parameter 28
DNS Server Address parameter 28
document input tray 12
document lever 12
document output tray 12
documentation,part numbers 66
documents,sending color 8
dots per inch (dpi), resolution 71
dpi (dots per inch), resolution 71
drivers, printer 69
duty cycle 71
E
e-mail
address book description 44
configuration 16
configuring parameters at control panel 20
copies of messages 37
dependencies 6
invalid credentials 58
maximum number of destinations 74
not configured 57
notification of delivery 37
e-mail addresses
adding to public e-mail address book 47
deleting from public e-mail address book 47
maximum number 74
E-mail Default From parameter 28
E-mail Default Subject parameter 28
E-mail File Format parameter 29
E-mail File Selection parameter 30
E-mail Language parameter 30
E-mail Quality parameter 29
E-mail Server Addr. parameter 28
e-mail server unavailable 57
e-mail service
configuration problem 57
description 9
Engine FW Ver. parameter 36
environmental specifications 73
equipment
components 12
specifications 71
erasing,administrator password 31
Error status 35
errors,in address book 57
ESMTP Function Enabled parameter 30
ESMTP support 9
Ethernet interface 71
extended configuration 16
extended parameters,configuring 22
Extended SMTP support 9
F
factory defaults, resetting to 38
Fax # Prefix setting 29
Fax Account E-mail parameter 29
Fax File Format parameter 29
Fax numbers,maximum number of addresses 74
Fax Postage parameter 29
Fax Provider Domain parameter 29
fax service,description 10
fax,dependencies 6
faxing,maximum number destinations 74
features,compression 71
file formats
for e-mail 29
I-fax 29
firmware
print server version 35
scanner engine 36
upgrading device 49
version 35
Framing err. parameter 35
FROM field in e-mail messages 28
FW Date parameter 35
FW Ver parameter 35
81
82
G
G4 compression 71
Gateway Addr. status 35
gateway server,default 35
German noise declaration 77
glass
cleaning scanner 52
scanner 13
guest login 32
guest users,description 11
H
hardware
components 12
internal problems 61
repair assistance 67
specifications 71
warranty 63
HP authorized dealers 69
HP JetDirect Cfg. parameter 36
HP JetDirect FW Rev. parameter 35
HP JetDirect ID parameter 36
HP JetDirect Prd. # parameter 35
HP JetDirect printer servers
connector to card 14
firmware version installed 35
ID 36
not responding 58
product number installed 35
timeout 36
troubleshooting 62
HP JetDirect Timeout parameter 36
HP JetSend,configuring devices 23
HP Smart Compression Imaging Technology 71
HP Support Assistant compact disc 69
HP Web JetAdmin 24
humidity, specifications 73
image,compression 71
inconsistent
DNS configuration 56
e-mail configuration 57
incorrect passwords 60
increasing,contrast 41
initializing address books,failure to 61
Initializing TCP/IP status 35
installation,testing 24
installing,digital sender 15
insufficient access rights 60
interface cards,troubleshooting 62
interface type 71
internal errors 58
internal failure 61
internal problems 61
Internet fax. See I-fax
invalid credentials 58
invalid passwords 58
IP address
assigning manually 27
default timeout 17
on self-test page 35
IP Address parameter 27, 35
IP Configuration parameter 27
IP Gateway parameter 27
IP Subnet Mask parameter 27
J
Jet Direct. See HP JetDirect printer server
JetSend. See HP JetSend
job queue,status 33
Job State screen 33
jobs
description of status 33
finding status 33
JPEG compression 71
I
K
ID, HP JetDirect printer server 36
I-fax
configuration problem 57
configuring 16
configuring at control panel 21
dependencies 6
fax file format 29
not configured 57
support 10
image processing options 71
image quality,default for e-mail messages 29
keypad,specifications 72
L
LAN hardware address 35
LAN interface 71
Language parameter 26
language support options 67
languages,manuals in other 66
Late collisions parameter 35
LCD,changing contrast level 48
LDAP (Lightweight Directory Access Protocol)
configuration problem 58
protocol error 58
server unavailable 59
support 5
LDAP Account Name parameter 29
LDAP Password parameter 29
LDAP Search Root parameter 29
LDAP Server Address parameter 29
LDAP Service Port parameter 29
Legal-sized paper 7
Letter-sized paper 7
levers
document 12
locking 14
light source for scanning 71
line voltage 71
locking lever 14
Log Server Addr. parameter 36
N
network
collisions 35
connector to interface card 14
error codes 59
errors on job state screen 33
framing errors 35
operating systems supported 6
packets 35
problems connecting to 62
server type 6
supported protocols 6
troubleshooting interface card 62
no matches found message 59
noise
German declaration 77
levels 71
notification,e-mail delivery 37
numbers, product and part 66
NW Error status 33
M
MAC address parameter 35
Mail Ping Frequency parameter 30
maintaining
device 52
user profiles 42
manuals
in other languages 66
part numbers 66
Max User Mail Size parameter 30
maximum paper size,in ADF 7
media. See index entry for specific type of media
memory,capabilities 74
messages
control panel 56
internal error 61
network error 59
MIME support 9
minimum
configuration 16
paper size in ADF 7
modes,sending 8
modifying,user profiles 42
Multi-Boot Ver. parameter 36
O
object not found message 59
online support services 69
operating
humidity specification 73
temperature 73
operating systems,supported networks 6
optical resolution 71
optional configuration 16
optional parameters,configuring 22
overview,digital sender 5
P
packets, network 35
pages
capacity of ADF 7
displaying Revision 34
displaying Tasks 36
Revision 55
pages per minute,scanning speed 71
paper
maximum in ADF 7
sizes supported 7
specifications 7
weights supported 7
Paper Size parameter 26
83
84
parameters
configuration menu 26
configuring e-mail at control panel 20
configuring extended and optional 22
configuring I-fax 21
part numbers 66
partial results message 59
parts,of product 12
passwords
changing administrator 31
description 11
do not match 59
erasing administrator 31
incorrect 60
invalid 58
LDAP (control panel) 29
performance
paper handling 7
scanning speed 71
permissions,using device 32
Personal E-Mail address books
description 44
maximum destinations in a list 74
maximum number of addresses 74
maximum number of lists 74
photographs, sending 8
post-processing error status 33
power connector socket 14
power switch 14
power,consumption 71
PP Error status 33
ppm,scanning speed 71
print server,connector to card 14
printers
drivers 69
maximum number for convenience copying 74
sending to 10
printing,dependencies 6
Processing status 33
product version 35
profiles,creating and maintaining user 42
programs,installed for digital sender 24
protocols
dependency on 6
supported 6
used for e-mail 9
Public E-Mail address book
adding addresses 47
deleting addresses 47
description 44
maintaining 47
maximum number of addresses 74
maximum number of lists 74
public lists
adding lists 45
deleting lists from 45
maintaining 45
Public Printers address book,maximum number of printers 74
Q
quality
B/W Document 8
Color Document 8
Color-B/W Photo 8
quality modes 8
queue,jobs in 33
R
Reader,website 9
Ready status 35
receipts,e-mail delivery 37
Received pkts parameter 35
registered users
deleting 43
description 11
repair and replacement 63
repair assistance 67
replacement and repair 63
replacement parts 66
resetting,factory defaults 38
resolution,optical 71
restarting the digital sender 37
restore utility 50
restoring
address books 50
codes 51
device configuration 50
Revision page
displaying 34
troubleshooting with 55
Running Image # parameter 36
S
scanner
specifications 72
type of 71
scanner glass
cleaning 52
illustration 13
scanning
changing contrast 41
setting size of area 26
speed 71
scanning element 71
search error message 60
security
controlling access 32
description 11
sending modes 8
Sending status 33
sending,to e-mail 9
Sent status 33
servers
dependencies on 6
e-mail unavailable 57
LDAP unavailable 59
log 36
service agreements 69
service and support
language options 67
options worldwide 67
settings
Color Document 8
Color-B/W Photo 8
time on digital sender 26
setup,digital sender 15
shutting down the digital sender 37
sizes
setting for scanning area 26
supported paper 7
Smart Compression Imaging Technology 71
SMTP protocol,sending to e-mail 9
sockets
connectors 14
control panel cable 14
power connector 14
software
components 24
compression 71
internal problems 61
utilities 69
warranty 63
specifications
environmental 73
equipment 71
keypad 72
paper handling 7
speed,scanning 71
starting the digital sender 37
status
device 33
job 33
stopping the digital sender 37
storage
humidity specification 73
temperature 73
SUBJECT field in e-mail messages 28
subnet mask
for IP address 27
on self-test page 35
parameter 35
supplies and accessories
ordering 66
warranty 63
support agreements 69
support and service
language options 67
options worldwide 67
Support Assistant compact disc 69
supported
.tif files 9
fax services 10
paper sizes 7
switches,power 14
T
Tasks page,displaying 36
TCP/IP
configuration 36
dependency on 6
status parameter 35
telephone numbers, maximum number of characters 74
temperature
operating 73
storage 73
testing,installation 24
Time parameter 26
timeout
default IP address 17
HP JetDirect printer server 36
Token Ring interface 71
85
86
tools
for administrator 37
troubleshooting 51, 55
Transm. pkts. parameter 35
transmission packets 35
trays
document input 12
document output 12
troubleshooting
administrator tools 37
cleaning device 52
DNS configuration 56
e-mail configuration 57
errors in address books 57
HP JetDirect printer servers 62
I-fax configuration 57
information on 55
internal errors 58, 61
LDAP configuration 58
network errors 59
network interface card 62
repair assistance 67
Revision page 55
sources for information 51
testing installation 24
tools 55
WINS configuration 60
types of users 11
U
upgrading,device firmware 49
user guide,part numbers 66
User Self-registration Enabled setting 27
user’s e-mail addresses
description 44
user’s e-mail lists,description 44
users
creating and maintaining profiles 42
deleting profiles 43
maximum number 74
name not found 60
not registered 60
types 11
utilities, software 69
V
versions
boot block 36
firmware 35
multi-boot program 36
print server firmware 35
product 35
scanner firmware 36
voltage, AC line 71
W
warranty
hardware 63
software 63
year 2000 65
watts consumed 71
Web JetAdmin. See HP Web JetAdmin
websites
Adobe Systems Incorporated 9
firmware upgrade 49
weight
digital sender 71
paper 7
WINS (Windows Internet Naming Service),configuration problem
60
WINS Server Address parameter 28
World Wide Web support service 69
worldwide, support options 67
WWW support service 69
Y
Y2K warranty 65
year 2000 warranty 65