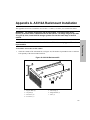
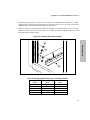
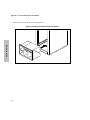
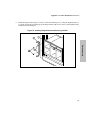
1
HP A3311A/12A/12AZ High Availability Storage Systems Installation/Service Manual HP Part No. A3311-90006 Printed in USA December 1999 Notice Copyright © 1999 Hewlett-Packard Company The information contained in this document is subject to change without notice. Hewlett-Packard Company makes no warranty of any kind with regard to this material, including, but not limited to, the implied warranties of merchantability and fitness for a particular purpose. Hewlett-Packard shall not be liable for errors contained herein or for incidental or consequential damages in connection with the furnishing, performance, or use of this material. This document contains proprietary information, which is protected by copyright. All rights are reserved. No part of this document may be photocopied, reproduced, or translated to another language without the prior consent of Hewlett-Packard. Typographical Conventions NOTE! Notes contain important information. CAUTION! Caution messages indicate procedures which, if not observed, could result in damage to your equipment or loss of your data. WARNING! Warning messages indicate procedures or practices which, if not observed, could result in personal injury. About this Manual This manual describes the installation, operation, and service of the HP A3311A deskside, A3312A field rackmount, and A3312AZ factory rackmount storage systems. Trademark Credits TORX hardware is used in this product. TORX hardware requires the use of special drivers. In this manual, any reference to TORX hardware will be accompanied by the required driver size (for example, “T-15”). TORX is a product of the Camcar Division of Textron, Inc. ii Table of Contents CHAPTER 1. PRODUCT INFORMATION ..................................................................................... 1 PRODUCT OVERVIEW ................................................................................................................................. 1 Key Features ........................................................................................................................................ 2 High Availability.................................................................................................................................. 2 SCSI Buses ........................................................................................................................................... 2 Modular Design ................................................................................................................................... 2 Fibre Channel (FC) SCSI Multiplexer (MUX) Connection .................................................................... 2 Base Product Configuration ................................................................................................................. 3 STORAGE SYSTEM MODULES ..................................................................................................................... 4 MODULE ICONS ......................................................................................................................................... 6 CHAPTER 2. INSTALLATION & CONFIGURATION .................................................................. 7 INSTALLATION OVERVIEW ......................................................................................................................... 8 APPLYING BAY LABELS ............................................................................................................................. 9 INSTALLING ADDITIONAL MODULES......................................................................................................... 10 Installing a Fan Module ..................................................................................................................... 12 Installing a Power Module.................................................................................................................. 12 Installing a Disk Module .................................................................................................................... 13 Installing a DDS Tape Module ........................................................................................................... 15 SETTING SCSI ID SWITCHES ................................................................................................................... 16 CONNECTING SCSI CABLES AND TERMINATORS ....................................................................................... 19 Applying SCSI Cable Labels............................................................................................................... 23 CONNECTING POWER CORDS ................................................................................................................... 24 POWERING-ON THE STORAGE SYSTEM ..................................................................................................... 25 Power-On Sequence ........................................................................................................................... 25 Powering-Off the Storage System........................................................................................................ 26 CONFIGURING THE HOST SYSTEM............................................................................................................. 27 Documentation References ................................................................................................................. 27 CHAPTER 3. DDS TAPE MODULE............................................................................................... 29 DDS TAPE MODULE FRONT PANEL .......................................................................................................... 29 Self-Test ............................................................................................................................................. 29 Status Lights....................................................................................................................................... 30 LOADING A DDS TAPE CARTRIDGE .......................................................................................................... 31 UNLOADING A DDS TAPE CARTRIDGE...................................................................................................... 32 Forcing DDS Tape Cartridge Ejection ............................................................................................... 32 WRITE-PROTECTING A DDS TAPE CARTRIDGE ......................................................................................... 33 iii CONTROLLING DATA COMPRESSION .........................................................................................................34 CARE OF DDS TAPE CARTRIDGES .............................................................................................................34 Handling DDS Tape Cartridges ..........................................................................................................34 Storing DDS Tape Cartridges .............................................................................................................35 BACKUP ROUTINES ...................................................................................................................................35 Model 1: Daily Backup .......................................................................................................................35 Model 2: Weekly Rotation with Daily Backup .....................................................................................35 Model 3: Monthly and Weekly Rotation with Daily Backup.................................................................36 CLEANING TAPE HEADS............................................................................................................................37 ORDERING DDS TAPE CARTRIDGES ..........................................................................................................38 DDS/MRS Logos .................................................................................................................................38 CHAPTER 4. TROUBLESHOOTING & DIAGNOSTICS.............................................................41 TROUBLESHOOTING OVERVIEW ................................................................................................................41 MODULE STATUS LIGHTS .........................................................................................................................42 TROUBLESHOOTING PROCEDURES .............................................................................................................45 SCSI Bus Troubleshooting Procedure..................................................................................................45 Fan Module Troubleshooting Procedure .............................................................................................47 Power Module Troubleshooting Procedures ........................................................................................47 DDS Tape Module Troubleshooting Procedure ...................................................................................49 Disk Module Troubleshooting Procedure ............................................................................................49 MODULE REPLACEMENT PROCEDURES ......................................................................................................50 Fan Module Replacement Procedure ..................................................................................................50 Power Module Replacement Procedure...............................................................................................52 DDS Tape Module Replacement Procedure.........................................................................................53 Disk Module Replacement Procedures ................................................................................................54 SE Disk Module Replacement Procedure (HP 3000 Series 900) ..........................................................56 SE Disk Module Replacement Procedure (HP 9000 Series 700, C-Series, J-Series).............................56 SE Disk Module Replacement Procedure (HP 9000 Series 800) ..........................................................56 DF Disk Module Replacement Requirements.......................................................................................58 DF Disk Module Replacement/Recovery Procedure (HP 3000 Series 900) ..........................................60 DF Disk Module Replacement Procedure (HP 9000 Series 700, C-Series, J-Series)............................60 DF Disk Module Replacement Procedure (HP 9000 Series 800, No Strict Mirroring) .........................61 DF Disk Module Replacement/Recovery Procedure for Attached Physical Volumes (HP 9000 Series 800 with Strict Mirroring) ...................................................................................................................63 DF Disk Module Replacement/Recovery Procedure for Unattached Physical Volumes (HP 9000 Series 800 with Strict Mirroring) ...................................................................................................................68 DF Disk Module - Is the Volume Group or Physical Volume Group Active? (HP 9000 Series 800 with Strict Mirroring) .................................................................................................................................70 DF Disk Module - Is the Physical Volume Attached? (HP 9000 Series 800 with Strict Mirroring) .......71 DIAGNOSTIC INFORMATION ......................................................................................................................71 Self-Test Diagnostics...........................................................................................................................71 iv Online Diagnostics............................................................................................................................. 72 Disk Module Request Sense Information............................................................................................. 72 DDS Tape Module Request Sense Information.................................................................................... 80 CHAPTER 5. SERVICE................................................................................................................... 91 TOOLS REQUIRED .................................................................................................................................... 91 DOOR ASSEMBLY .................................................................................................................................... 92 Deskside Door.................................................................................................................................... 92 Rackmount Door ................................................................................................................................ 95 DESKSIDE SIDE PANEL ............................................................................................................................. 97 DESKSIDE PEDESTAL BASE ....................................................................................................................... 98 BACKPLANE ASSEMBLY ........................................................................................................................... 99 Deskside Backplane Assembly ............................................................................................................ 99 Rackmount Backplane Assembly........................................................................................................100 SCSI Bus Reset Switch.......................................................................................................................101 POWER BUTTON AND PUSH ROD..............................................................................................................104 TOP COVER ............................................................................................................................................105 AC POWER ADAPTER .............................................................................................................................106 Deskside AC Power Adapter..............................................................................................................106 Rackmount AC Power Adapter ..........................................................................................................107 MODULE CAM LEVER .............................................................................................................................108 ENCLOSURE REPLACEABLE PARTS ...........................................................................................................110 APPENDIX A. A3312A RACKMOUNT INSTALLATION ..............................................................121 APPENDIX B. PRODUCT SPECIFICATIONS.................................................................................133 APPENDIX C. REGULATORY STATEMENTS..............................................................................137 INDEX .................................................................................................................................................141 v vi Product Information Chapter 1. Product Information This chapter includes a product overview, base product information, and product features for rackmount and deskside storage systems. Product Overview The HP A3311A deskside, HP A3312A field rackmount, and HP A3312AZ factory rackmount high availability storage systems are scaleable mass storage systems optimized for high availability (see Figure 1). They are designed for use on the HP 9000 Series 700 and 800 with HP-UX, and the HP 3000 Series 900 with MPE-iX, Version 5.0/Express 3. These storage systems support single-ended (SE) disk modules, fast/wide differential (DF) disk modules and single-ended digital data storage (DDS) tape modules. Both single-ended and differential storage modules can reside within the same storage system on independent buses. The HP A3312A can be installed into a 1.1-meter, 1.6-meter, or 2.0-meter EIA cabinet. Figure 1. Storage Systems, Front View A3311A Deskside 1 - Power Switch Cover 2 - Security Lock (A3311A Only) A3312A/12AZ Rackmount 3 - P1 Power Module Status Light 4 - P2 Power Module Status Light 1 Product Information Product Overview Product Information Key Features The key features of the storage systems are: • • • • • Dual wide SCSI bus, either single-ended or fast/wide differential Two redundant fan modules (shipped standard) Two redundant power modules (one shipped, one optional) Up to eight 1-inch-high, or four 1.6-inch-high slots Optimized for high availability High Availability The storage systems are optimized for high availability with the following features: • • • • • • Dual SCSI bus Hot pluggable, front-accessible modules Redundant fan and power modules Can mirror disks in the same storage system Can be integrated with mirrored disks in an HP-UX environment with MC/LockManager and ServiceGuard Can be integrated with diagnostic tools to allow remote monitoring and troubleshooting. SCSI Buses The storage system contains two separate wide SCSI buses. One bus is connected to the slots in bay A and the other bus is connected to the slots in bay B. Each bus can be used independently, or can be connected together via an external SCSI cable to form one common bus. In a common bus configuration, four 1-inch disk modules can be installed in each bay for a maximum of eight devices per bus, or two 1.6-inch disk modules or DDS tape modules can be installed in each bay for a maximum of four devices per bus. Modular Design Each storage system contains the following modular components: fans, power supplies, disk drives, and DDS tape drives. Each component is housed in a plastic module. Each storage system contains two slots for fan modules, two slots for power modules, and eight 1-inch-high slots for disk modules or DDS tape modules. Each module is easily removed by pulling out a locking lever, is installed or removed from the front of the storage system, and can be used in any of the three storage system enclosures. Fibre Channel (FC) SCSI Multiplexer (MUX) Connection Fibre channel host connection is available through a Fibre Channel (FC) SCSI Multiplexer (MUX). Configurations of the FC are detailed in the HP 9000 Enterprise Servers Configuration Guide. For 2 information regarding the Fibre Channel technology, refer to the Fibre Channel SCSI Multiplexer Service and User Manual, part number A3308-90005. NOTE! The term hot pluggable refers to modules that can be replaced while the host and storage system are operating, without disrupting their operation. Not all modules are hot pluggable, and some modules require the use of command line utilities before the module is removed, and after the module is replaced. The storage systems do not support installation of additional disk modules or DDS tape modules while the host and storage system are operating. Fan Modules The storage system is shipped with two fan modules, which provide redundant cooling. If one fan fails, the remaining fan will provide enough cooling capacity for the storage system. Fan modules are hot pluggable. Failed fan modules should be replaced as soon as possible. Power Modules The storage system is shipped with one power module. Two power modules provide redundant power for the storage system. If one power module fails, the storage system continues operating on one power module. If two power modules are used, both share the load. Power modules are hot pluggable. Disk Modules The storage system can contain any combination of 1-inch-high and 1.6-inch-high disk modules. A 1-inch disk module occupies one slot in the storage system, and a 1.6-inch disk module occupies two slots. The disk modules are available with either a single-ended (SE) or fast/wide differential (DF) SCSI interface. The disk module is enclosed in a plastic module, so SCSI address (ID) jumpers are not accessible. SCSI ID switches on the rear of the storage system are used to set the disk module SCSI ID. DDS Tape Module A 1.6-inch-high, single-ended DDS tape module can also be installed into the storage system. The DDS tape module occupies two slots. The DDS tape module is enclosed in a plastic module, so tape module jumpers and SCSI address (ID) jumpers are not accessible. SCSI ID switches on the rear of the storage system are used to set the DDS tape module SCSI ID. Base Product Configuration The storage system base product configuration includes the following: • • • • • • one storage system (A3311A/12A/12AZ) two security keys (deskside only - located inside storage system door) door lock (A3311A only) bumper feet (A3311A only - located inside storage system door) two fan modules one power module and power cord 3 Product Information Product Information Product Overview Product Information Storage System Modules Product Information • • SCSI bus label kit HP A3311A/12A/12AZ High Availability Storage Systems Installation/Service Manual Storage System Modules The following modules are supported in the storage systems (see Figure 2): • • • • • fan module power module 1-inch disk module 1.6-inch disk module DDS tape module Figure 2. Storage System Modules Fan Module 4 Power Module Product Information Product Information Storage System Modules 1-Inch Disk Module 1.6-Inch Disk Module DDS Tape Module 5 Product Information Module Icons Product Information Module Icons Icons are used to identify the disk, fan, and power modules. They are located in the upper left corner of the module (see Figure 3). Figure 3. Module Icons Fan Module Blue icon on black background Power Module Red icon on black background Disk Module, 4.0-Gigabyte, Single-Ended (SE) Yellow icon on black background Yellow color bar on bottom Disk Module, 4.0-Gigabyte, Differential (DF) Purple icon on black background Purple color bar on bottom 6 Chapter 2. Installation & Configuration CAUTION! The A3312A storage system should only be installed by an HP service representative. See “Installing the A3312A into an EIA Cabinet”. • • • • • • • installing the storage system installing additional storage modules setting SCSI ID switches connecting SCSI cabling applying SCSI bus labels connecting power cords powering-on the storage system The term hot pluggable, refers to storage modules that can be replaced while the host is operating. Not all modules are hot pluggable, and some modules require the use of command line utilities before the module is removed, and after the module is replaced. Table 1 shows the HP systems that support hot pluggable modules. You cannot install additional disk modules or DDS tape modules while the host and storage system are operating. When installing a new storage system, you must shut down the host before you connect power to and power-on the storage system. Table 1. HP System Support of Hot Pluggable Modules* Module Type HP 3000 Series 900 MPE-iX, Version 5 with Express 3 HP 9000 Series 700, C-Series and J-Series HP 9000 Series 800 with Strict Mirroring Fan Yes Yes Yes Power Yes Yes Yes DDS Tape No No No SE Disk No No No DF Disk Yes No Yes *Yes = Hot Pluggable; No = Not Hot Pluggable 7 Installation This chapter tells how to install and configure the deskside and rackmount storage systems. It includes information on: Installation & Configuration Installation Overview Installation Overview CAUTION! Shut down the host before connecting and powering-on the storage system. 1. Place the storage system close to an ac power outlet. Leave some space behind the storage system, so you can set SCSI IDs and attach SCSI cables. 2. A3311A Only: Open the door by grasping the security lock tab and pulling the door toward you. Remove the keys and bumper feet behind the door and install the bumper feet under the storage system. A3312A Only: Install the A3312A storage system into an EIA cabinet (see Appendix A). Installation 3. Re-seat all factory-installed storage modules. 4. Apply SCSI bus labels to the storage system bays. 5. Install additional storage modules into the storage system. 6. Set the SCSI ID switches for the storage modules. 7. Shut down and power-off the host. 8. Connect the SCSI cables and terminators. 9. Apply SCSI bus labels to the SCSI cables. 10. Power-on your computer, then power-on the storage system. If your boot device is located in the storage system, you may need to reboot your computer. 11. Perform an ioscan to see if the host will recognize any newly installed disk or tape modules. 8 Installation & Configuration Applying Bay Labels Applying Bay Labels A SCSI bus label kit is included with the storage system, which enables you to identify the type of SCSI bus associated with each bay (A or B). Apply the bay labels on the front and rear of the storage system. Figure 4 shows how to differentiate bay A for single-ended devices and bay B for differential devices. This is just an example of one configuration for the storage system. Your storage system may have two singleended buses, two differential buses, or a different bus for each bay. Installation Figure 4. Applying Bay Labels 9 Installation & Configuration Installing Additional Modules Installing Additional Modules CAUTION! Do not touch the rear connector on a module. The module is susceptible to electrostatic discharge (ESD) and damage to components may occur. CAUTION! Do not install a single-ended (SE) module into a differential (DF) bus or a DF module into an SE bus. The SCSI bus will hang and damage to the host bus adapter (HBA) may occur. NOTE! You should install storage modules in the order from bottom to top and from left to right. Installation The storage system is shipped with two fan modules and one power module. An additional power module, disk modules, and DDS tape modules can be installed. Figure 5 shows the storage systems with their 1inch slot reference designators. 1-inch disk modules can use any of the 1-inch slots in bay A (A1 through A4) and bay B (B1 through B4). 1.6-inch disk modules and DDS tape modules use two 1-inch slots. 1inch and 1.6-inch modules can be installed in a storage system in any combination of slots in bay A and bay B. 10 Installation & Configuration Installing Additional Modules F1, F2: Installation Figure 5. Storage Module Slots Fan module slots (numbers not embossed on storage system). A3, A4, B3, B4: Upper 1-inch module slots. Disk modules use delayed spin-up in order of SCSI ID. 1-inch disk modules use SCSI ID switches A3, A4, B3, B4. A1, A2, B1, B2: Lower 1-inch module slots. Valid boot device slots. Disk modules spin-up simultaneously. 1-inch disk modules use SCSI ID switches A1, A2, B1, B2. P1, P2: Power module slots (numbers not embossed on storage system). . 11 Installation & Configuration Installing Additional Modules Installing a Fan Module NOTE! The storage system is shipped with two fan modules. See Chapter 4 for information on replacing a fan module. Installing a Power Module The storage system is shipped with one power module. To install a second power module for redundancy: 1. Pull out the module lever (see Figure 6). CAUTION! Pull the module lever all the way out, or the module will jam in the slot. Installation 2. Install the power module into slot P2. 3. Push in the module lever until it clicks to lock the module in place. Figure 6. Installing a Power Module 12 Installation & Configuration Installing Additional Modules Installing a Disk Module CAUTION! The disk modules located in slots A1, A2, B1, and B2 will power-on first, so a boot device should only be installed in one of those slots. NOTE! Replacement of a disk module is not the same as installing additional capacity in an operating storage system! To add capacity, follow the steps below. To replace a disk module, see Chapter 4. 1. Shut down the host and power-off the storage system. 2. Read and remove the module “Attention” label (see Figure 7). Installation To install a disk module: Figure 7. Removing the Attention Label 3. Pull out the module lever (see Figure 8). CAUTION! Pull the module lever all the way out, or the module will jam in the slot. 4. Install the disk module into the storage system. 5. Push in the module lever until it clicks to lock the module in place. 13 Installation & Configuration Installing Additional Modules Figure 8. Installing a Disk Module Installation 14 Installation & Configuration Installing Additional Modules Installing a DDS Tape Module To install DDS tape module: 1. Shut down the host and power-off the storage system. 2. Read and remove the module “Attention” label (see Figure 7). 3. Pull out the module lever (See Figure 9). 4. Install the DDS tape module in a single-ended (SE) slot. 5. Push in the module lever until it clicks to lock the module in place. Installation CAUTION! Pull the module lever all the way out, or the module will jam in the slot. Figure 9. Installing a DDS Tape Module 15 Installation & Configuration Setting SCSI ID Switches Setting SCSI ID Switches CAUTION! Do not set SCSI ID switches A3, A4, B3, or B4 to ID 0. If their IDs are set to 0, an over-current condition will occur during the power-on sequence and the power module will shut down. CAUTION! All storage modules and host bus adapters (HBAs) must have unique SCSI IDs. If two or more devices have the same SCSI ID on the SCSI bus, the host will not recognize those devices. Installation NOTE! SCSI ID 7 is normally reserved for the host bus adapter (HBA). SCSI IDs 8 through 15 are used only by fast/wide differential (DF) modules. To set SCSI ID switches for the disk and tape modules: 1. Perform an ioscan (HP-UX) or sysgen (MPE-iX) to determine which SCSI IDs are already in use. 2. Locate the SCSI ID switch for the device (see Figure 10, items 3 through 6 and 9 through 12). 3. Set the SCSI ID switch to an ID number not in use by another device (see Figure 11 and Figure 12): 16 • When setting SCSI IDs for 1-inch modules, use the SCSI ID switch that corresponds to the slot number occupied by the module. For example, if a disk module occupies slot A4, use SCSI ID switch A4. • When setting SCSI IDs for 1.6-inch modules, use the SCSI ID switch that corresponds to the lowest slot occupied by the module. For example, if a DDS tape module occupies slots A1 and A2, use SCSI ID switch A1. Installation & Configuration Setting SCSI ID Switches 1 - Bus A Upper SCSI Connector (68-pin) 2 - Bus A Lower SCSI Connector (68-pin) 3 - SCSI ID Switch A1 4 - SCSI ID Switch A2 5 - SCSI ID Switch A3 6 - SCSI ID Switch A4 7 - Bus B Upper SCSI Connector (68-pin) 8 - Bus B Lower SCSI Connector (68-pin) Installation Figure 10. Storage Systems, Rear View 9 - SCSI ID Switch B1 10 - SCSI ID Switch B2 11 - SCSI ID Switch B3 12 - SCSI ID Switch B4 13 - P1 AC Power Connector 14 - P2 AC Power Connector 15 - SCSI Bus Reset Switch (Factory Set Only) CAUTION! Changing default factory settings on the SCSI bus reset switch may cause operating system conflicts for the host. Therefore, the SCSI bus reset switch is covered with a label that states "Factory Set Only". 17 Installation & Configuration Setting SCSI ID Switches Figure 11. SCSI ID Switch Labels Installation 8421 = SCSI ID bits (LSB=1) 1 = ON (Slide switch up to enable bit) 0 = OFF (Slide switch down to disable bit) Figure 12. SCSI ID Switch Settings 18 Installation & Configuration Connecting SCSI Cables and Terminators Connecting SCSI Cables and Terminators CAUTION! Before connecting SCSI cabling, shut down the host, power-off the host, then power-off the storage system. CAUTION! If your host has an HP 28696A adapter, you must have current firmware, or the differential (DF) disk modules will not be hot pluggable. Contact your HP service representative to get the current version. Installation NOTE! To optimize SCSI bus performance: • The cable between bus A and bus B must be 0.9 meters in length minimum. • The cable between two A33xxAx storage systems must be 2.5 meters in length minimum. The storage system contains two separate internal SCSI buses: bus A and bus B (see Figure 10). These buses are isolated, so two different SCSI interfaces can be supported in the same storage system. Bus A supports four devices in bay A (slots A1 through A4). Bus B supports four devices in bay B (slots B1 through B4). When a single bus is required, a 0.9-meter SCSI cable can be used to connect bus A and bus B, forming one bus that supports eight devices. A SCSI bus consists of the following components. All of these components must be of the same type, single-ended (SE) or fast/wide differential (DF): • • • • a host bus adapter (HBA) card devices on the bus SCSI cabling a SCSI terminator (SF or DF) Table 2 shows the SCSI bus requirements for the storage system. 19 Installation & Configuration Connecting SCSI Cables and Terminators Table 2. SCSI Bus Requirements Interface Type1 SCSI Cabling Total Length2 Number of Devices3 SCSI Terminator4 SE 6m HBA + 7 SE (Active) DF 25 m HBA + 15 DF (Passive) Notes: Installation 1. SE = single-ended narrow; DF = fast/wide differential. 2. The total length of SCSI cabling is equal to the equivalent internal cable length (0.9 meter per internal bus, or 1.0 meter per storage system) plus the external cable length. To connect internal buses A and B, a bus interconnect cable is required. 3. Depending on the type of interface used, you may not be able to fully load the storage system with 1inch storage modules. For example, on a single-ended bus, you must leave one slot empty, since only seven devices are supported in addition to the HBA. If two storage systems are connected on a differential bus, eight slots can be filled in the first storage system and seven more slots can be filled in the second storage system. 4. Each end of the SCSI bus must be terminated. The HBA card is one end of the bus. It includes its own termination and also provides termination power. The other end of the bus is one of the SCSI connectors on the rear panel of the storage system. Depending on the configuration, a 68-pin high density SCSI terminator must be connected to one or both of these connectors. Refer to your host system documentation for exact terminator specifications. Connect SCSI cables (see Figure 13 through Figure 15) and SCSI terminators (see Figure 16) to the storage system in one of the following configurations: • Single Bus: Bus B is connected to one host bus adapter (HBA), bus B and bus A are interconnected, and bus A is terminated with a SCSI terminator (see Figure 13). Two storage systems can be connected together on a common SCSI bus (see Figure 14). • Split Bus: Bus A and bus B are connected to two separate HBAs, each terminated with a SCSI terminator (see Figure 15). Both buses can have the same SCSI interface or can have different SCSI interfaces. 20 Installation & Configuration Connecting SCSI Cables and Terminators 1 - HBA to Bus B (1 m) 2 - Bus B to Bus A (0.9 m) Installation Figure 13. One Storage System on a Single Bus 3 - Bus A Terminator Figure 14. Two Storage Systems on a Single Bus 1 - HBA to Bus B1 (1 m) 2 - Bus B1 to Bus A1 (0.9 m) 3 - Bus A1 to Bus B2 (1 m) 4 - Bus B2 to Bus A2 (0.9 m) 5 - Bus A2 Terminator 21 Installation & Configuration Connecting SCSI Cables and Terminators Figure 15. One Storage System on Split Buses Installation 1 - HBA1 to Bus B (1 m) 2 - Bus B Terminator 3 - HBA2 to Bus A (1 m) 4 - Bus A Terminator Figure 16. SCSI Terminators SE Terminator 22 DF Terminator Installation & Configuration Connecting SCSI Cables and Terminators Applying SCSI Cable Labels Apply the SCSI cable labels included in the SCSI bus label kit (see Figure 17). Installation Figure 17. Applying SCSI Cable Labels 23 Installation & Configuration Connecting Power Cords Connecting Power Cords WARNING! The storage system power cords are used as main disconnect devices. To ensure that the power cords can be disconnected quickly, locate the storage system near an easily accessible power outlet. WARNING! To avoid a fire hazard, the ac branch service must be properly currentprotected by either a fuse or a circuit breaker. Use only UL/CSA approved power cord, SVT type, rated for suitable voltage and current. These power cords have two conductors and a ground. Failure to use the proper power cord may result in a shock or fire hazard. Installation NOTE! A fully loaded storage system can run on one power module. If the storage system has two power modules for redundancy, we recommend that you plug the power cord for each power module into a separate uninterruptable power supply (UPS). This will allow the storage system to continue operating if one of the ac power sources fails. To connect power cords: Connect power cords to the P1 and P2 ac power connectors on the rear of the storage system (see Figure 10). In a redundant power module configuration, if one power module fails, the other power module will provide power for the entire storage system. 24 Installation & Configuration Powering-On the Storage System Powering-On the Storage System CAUTION! The storage system should be powered-on first to allow access to all filesets during the boot process. The disk modules in the four upper slots have delayed spin-up, so if the boot process starts before all the disks are online, some of the filesets may not be mounted. CAUTION! Do not operate the storage system if it has been exposed to temperature extremes. Damage to the disk and tape modules may occur if the storage system does not stabilize at room temperature for two hours before operation. 1. Lift the storage system power switch cover if the front door is closed. 2. Press in the storage system power switch to the power-on position. 3. A3312A/12AZ Only: Press the cabinet power switch to the power-on position (see Figure 58). 4. The storage system will perform the power-on sequence (see “Power-On Sequence”). Installation To power-on the storage system: Power-On Sequence 1. The four lower storage modules power-on and begin simultaneous self-tests for approximately 20 seconds. 2. The four upper storage modules power-on and begin self-tests in the order of their SCSI IDs. The disk module status lights are green. 3. When the self-tests have completed, the disk module status lights and DDS tape module status lights will be off. 25 Installation & Configuration Powering-On the Storage System Powering-Off the Storage System WARNING! When the power switch is in the standby position, the dc power output circuits within the power modules are off, but the ac power input circuits are still active. To power-off the storage system: 1. Lift the power switch cover. 2. A3312A/12AZ Only: Press the cabinet power switch to the power-off “0” position (see Figure 58). 3. Press the storage system power switch then release the switch to the out (standby) position Installation 26 Installation & Configuration Configuring the Host System Configuring the Host System CAUTION! The computer system should be powered-on, then the storage system should be powered-on to allow access to all filesets during the boot process. The disk modules in the four upper slots have delayed spin-up, so if the boot process starts before all the disks are online, some of the filesets may not be mounted Power-on your computer, then power-on the storage system. If your boot device is located in the storage system, you may need to reboot your computer. Refer to your system administration manual or owner's guide for information on how to power-on and configure the storage system (see “Documentation References”). 2. Follow these tips on utility commands needed to configure different systems: Installation 1. HP 3000 Series 900 Systems Perform one of the following procedures: • Run SYSGEN to configure the logical device and device type, then reboot the system. • Run ioconfg to configure logical devices. In this case, no reboot is necessary. HP 9000 Series 700 Systems To install the drivers, regen the operating system kernel. This activates the device drivers and the card drivers. Then reboot the system. HP 9000 Series 800 Systems To install the drivers, regen the operating system kernel. This activates the device drivers and the card drivers. Then reboot the system. Documentation References HP-UX Manuals Reference manuals for Logical Volume Management (LVM): • How HP-UX Works: Concepts for the System Administrator, part number B2355-90029. • System Administration Tasks • Solving HP-UX Problems 27 Installation & Configuration Configuring the Host System Reference manuals for System Administration Management Tool (SAM): • How HP-UX Works: Concepts for the System Administrator • System Administration Tasks • Solving HP-UX Problems Reference manuals for peripherals: • Installing Peripherals, HP 9000 Series 800 Computers, part number B3108-90004. • Configure HP-UX for Peripherals for 10.01, part number B2355-90053. MPE-iX Manuals Reference manuals for the HP 3000 Series 900 Computer: Installation • Performing System Manager Tasks, part number 32650-90040 • Configuring Systems for Tapes, Printers and other Serial Devices, part number 32022-61000 • System Start-up, Configuration, and Shutdown Reference Manual, part number 32650-90042 • Mirrored Disk/iX User's Guide, part number 30394-90003 28 Chapter 3. DDS Tape Module This chapter describes how to operate the digital data storage (DDS) tape module in the storage system. DDS Tape Module Front Panel Figure 18 shows the front panel of the DDS tape module. 1 - Cartridge Slot 2 - Tape Light 3 - Clean Light 4 - Cartridge Unload Button Self-Test When the storage system is powered-on, the DDS tape module performs a diagnostic self-test. During the self-test, the tape light flashes green. When the tape light goes off, the DDS tape module is ready to accept a DDS tape cartridge. If the clean light changes to steady amber, the self-test has failed and you should contact your HP service representative. 29 DDS Tape Module Figure 18. DDS Tape Module Front Panel DDS Tape Module DDS Tape Module Front Panel Status Lights Table 3 lists the status light indications and actions for the tape light and clean light. Tape Light The tape light monitors the following tape parameters: • • • • tape loading or unloading tape loaded or unloaded self-test in progress read/write activity Clean Light The DDS tape module monitors the number of errors occurring during read and write operations. If the number of errors exceeds the error limit, the clean light flashes amber. This condition can be caused by a hard read or write error, dirty tape heads, or the tape nearing the end of its useful life. If the clean light flashes amber: DDS Tape Module 1. Clean the tape heads. 2. Repeat the last operation and see if the clean light flashes again. 3. If the clean light flashes again, copy the data from the old tape onto a new tape then discard the old tape. The clean light is cleared after you load a cleaning cartridge, or when the DDS tape module is power cycled. 4. If the clean light flashes after cleaning the tape heads, you should service the DDS tape module. Table 3. DDS Tape Module Status Light Indications 30 Tape Light Clean Light Indication/Recommended Action Off Off No power or passed self-test. Flashing Green (1 flash/second) Off Tape loading or unloading, or self-test in progress. Flashing Green (2 flashes/second) Off Tape loaded and read/write activity. Green Off Tape loaded. Ready. Amber or Green Flashing Amber (1 flash/second) Amber or Green Amber Tape heads are dirty. Copy the data to a new tape, discard the old tape, and clean the tape heads. Drive fault. Replace the DDS tape module. DDS Tape Module Loading a DDS Tape Cartridge Loading a DDS Tape Cartridge CAUTION! Only cartridges labeled "DDS" should be used in the DDS tape module. Do not use cartridges labeled "DAT". They will jam in the tape mechanism and damage to the mechanism will not be covered by the warranty. Also, only apply one label to a DDS tape cartridge to avoid jamming the tape mechanism. NOTE! Do not try to force the DDS tape cartridge into the cartridge slot. If it does not load properly, the cartridge will be ejected after 10 seconds. You can then load the DDS tape cartridge again. To load a DDS tape cartridge (see Figure 19): 1. Insert the DDS tape cartridge squarely into the cartridge slot in the direction of the embossed arrow on top of the cartridge. 2. Gently push the DDS tape cartridge into the cartridge slot until the autoloading mechanism takes the cartridge. The load sequence takes about 20 seconds. During the load sequence, the tape light flashes green. When the load sequence has completed, the tape light will turn steady green. DDS Tape Module Figure 19. Loading a DDS Tape Cartridge 31 DDS Tape Module Unloading a DDS Tape Cartridge Unloading a DDS Tape Cartridge To unload a DDS tape cartridge: Press the cartridge unload button. This starts the unload sequence which winds the tape to the beginning, unthreads the tape, and ejects the cartridge. The unload sequence takes about 25 seconds for a writeenabled DDS tape cartridge and 10 seconds for a write-protected DDS tape cartridge. During the unload sequence, the tape light flashes green. Forcing DDS Tape Cartridge Ejection CAUTION! You may lose data if you force the ejection of a DDS tape cartridge. Also, the tape may not be formatted during a forced ejection because the end-of-data (EOD) area may not have been written on the tape. If you press the cartridge unload button when the DDS tape module is busy, it may take some time to respond because it will finish the operation it is performing first. This ensures that the operation is terminated in a controlled manner and no data is lost. However, you may need to unload a DDS tape cartridge immediately, even if you risk losing data. To force DDS tape cartridge ejection, perform one of the following: DDS Tape Module • • Press the cartridge unload button three times within a five-minute period. Hold the cartridge unload button down for at least five seconds. Following either of these actions, a 35-second delay occurs, starting from the first time the cartridge unload button is pressed. Then, the tape is unthreaded, the cartridge is ejected, and the DDS tape module is reset as though the power had been cycled. 32 DDS Tape Module Write-Protecting a DDS Tape Cartridge Write-Protecting a DDS Tape Cartridge CAUTION! The tape log on a DDS tape cartridge contains a history of tape usage. If the DDS tape cartridge is write protected, the tape log will not be updated during its use and cannot indicate when the cartridge is nearing the end of its useful life. To write-protect the data on a DDS tape cartridge (see Figure 20): Slide the write-protect tab to the left side. To write-enable data on a DDS tape cartridge (see Figure 20): Slide the write-protect tab to the right side. DDS Tape Module Figure 20. Write-Protecting a DDS Tape Cartridge Write-Protect Write-Enable 33 DDS Tape Module Controlling Data Compression Controlling Data Compression The DDS tape module is shipped with the following default data compression parameters: • • Data compression is enabled at power-on. Host control of data compression is enabled after power-on. After the DDS tape module is powered-on, the host can control data compression via device files on HPUX and MPE operating systems. Care of DDS Tape Cartridges Handling DDS Tape Cartridges The following precautions will ensure the data integrity and long life of DDS tape cartridges: DDS Tape Module • Always store the cartridge in its protective case. Do not drop it or handle it roughly. • Always keep the cartridge in a clean environment. Do not expose it to dirt, moisture, or high humidity. • Operate the cartridge at temperatures between +5° and +45° C (4l° to -104° F). After moving it from one temperature extreme to another, allow it to stabilize for at least two hours before using. • Do not place the cartridge in direct sunlight or in places where magnetic fields are present (under telephones or near transformers). • Do not place a label outside the recessed area on the cartridge. Doing so may cause interference with the tape loading mechanism. Write on the label before adhering the label to the cartridge. Always remove the old labels before adhering new ones. • Do not touch the tape, or attempt to clean the tape path or tape guides inside the cartridge. • Rewind the tape fully before removing the cartridge for storage. • Do not use excessive force when inserting or removing the cartridge from the module. • Use only data grade DDS tape cartridges, marked DDS-3, DDS-2, or DDS-1. Always label the cartridge and record the number of uses. Discard the cartridge after 100 uses. • Do not use a cartridge beyond its useful life. 34 DDS Tape Module Backup Routines Storing DDS Tape Cartridges DDS tape cartridges can be stored for a period of 10 years without loss of data. You should give each DDS tape cartridge in storage a full pass in the tape module at least once a year to prevent the tape media from sticking to itself. Store cartridges in a cool, dry environment. Backup Routines Your backup routine depends on how frequently the data changes, how extensive the changes are, and how valuable the data is. It is essential that you follow a routine, so data backup is regular and troublefree. The following three models present routines which are commonly used. In each model, a "set" of DDS tape cartridges is the smallest number of cartridges that will hold a full or partial backup. Keep a record of the number of times each set is used, so a set can be replaced when its recommended write life (100 insertions) is reached. The replaced set can still be kept for read-only use, but should not be used for writing. Model 1: Daily Backup Number of cartridges needed: 1 set for full backup Model 2: Weekly Rotation with Daily Backup Number of cartridges needed: 2 sets for full backup 4 sets for partial backup In this model, you perform a full backup every Friday, and a partial backup on Monday, Tuesday, Wednesday, and Thursday. Partial backups are made only on those files that have changed since the previous backup. Two sets of cartridges, A and B, are used in rotation for the weekly full backups. On the first Friday, you make a full image copy of your disks on set A. On the second Friday, use set B for a full backup. On the third Friday, use set A again. This way, there are always two generations of full backup in existence. Store the sets off-site, preferably in a fire-proof safe. Four sets of cartridges are used for the daily backups, one set for each day. Because only changed files are saved, these backups are very quick. 35 DDS Tape Module This is the simplest backup model. All of your data is backed up onto a single set of cartridges at the end of each work day. If data is lost, it is simply restored from the previous day's backup. It is the least secure backup model because if the cartridge is lost, destroyed, or damaged, the data is lost forever. DDS Tape Module Backup Routines Model 3: Monthly and Weekly Rotation with Daily Backup Number of cartridges needed: 6 sets for full backup 4 sets for partial backup The backup model which offers optimum data protection uses six full backup sets (three monthly and three weekly), and four sets for daily partial backups. This model is recommended if you compile large quantities of data where loss would be disastrous. It also provides the best method of securing data from software viruses. The four sets of cartridges for daily partial backup are labeled Monday, Tuesday, Wednesday, and Thursday, as in model 2. Three sets of cartridges are used in rotation for a weekly full backup on Fridays. Two of these sets are stored off-site. After a full backup is made on Friday, the set of cartridges is taken off-site and exchanged for the oldest backup set in storage. Next Friday, the backup is made using this oldest set of cartridges. In this way, at any moment, three generations of a full weekly backup exist; the two most recent are off-site, and the oldest is on-site ready for the next backup. The final three sets of cartridges are used for a full backup on the first working day of each month, again in rotation. This is in addition to the usual backup that would be made that day, so the normal routine is maintained. As with the weekly cartridges, the monthly sets should be stored off-site. DDS Tape Module 36 DDS Tape Module Cleaning Tape Heads Cleaning Tape Heads CAUTION! Only use the HP 92283K Cleaning Cartridge to clean the tape heads. Do not use cotton swabs or other tools to clean the heads. Table 4 shows the proper intervals for cleaning the tape heads in the DDS tape module. You should also clean the tape heads if the clean light flashes. Once your backup routine has been established, you should know how many DDS tape cartridges are used each day. Using Table 4, you can estimate how often the heads will need cleaning and build the cleaning operation into the backup routine. Table 4. Cleaning Intervals for Tape Heads Number of Cartridges Used/Day: Cleaning Interval: 1 2 3 4+ 8 weeks 4 weeks 3 weeks weekly To clean the tape heads: 1. Slide the cleaning cartridge into the cartridge slot. The cartridge is automatically loaded and the heads are cleaned. At the end of the cleaning cycle, the cleaning cartridge is automatically ejected. Note the date on the cartridge label so you know how many times it has been used. 2. After the cleaning cartridge is ejected, write the date on the cartridge label This record tells you how many times the cleaning cartridge has been used. Discard the cleaning cartridge after it has been used 50 times. 37 DDS Tape Module NOTE! The cleaning cycle takes about 30 seconds. If the cleaning cartridge ejects in less than 20 seconds and the media caution light is still lit, no cleaning has occurred. Replace the cleaning cartridge and repeat the process. DDS Tape Module Ordering DDS Tape Cartridges Ordering DDS Tape Cartridges CAUTION! To ensure data integrity, use only Hewlett-Packard DDS tape cartridges. Only cartridges with the DDS logo meet the quality standards required for reliable data storage. DDS tape cartridges have more stringent reliability standards than DAT cassettes, which are only tested for audio use. DDS/MRS Logos To identify computer-grade DDS tape media, look for the DDS logos (see Figure 21). The Media Recognition System (MRS) enables the DDS tape module to identify DDS-grade tape media. DDS/MRS tape cartridges have four stripes after the DDS logo and a line underneath the logo that states “Media Recognition System”. Figure 21. DDS/MRS Logos DDS-1 Logo DDS-1/MRS Logo DDS Tape Module DDS-2/MRS Logo DDS-3/MRS Logo 38 DDS Tape Module Ordering DDS Tape Cartridges Table 5 lists the DDS tape cartridges you can order from Hewlett-Packard. Any of the DDS tape cartridges listed may be used. However, the DDS-3/MRS data cartridges are recommended for use in the DDS-3 tape module. Table 5. DDS Tape Cartridges and Accessories HP Part No. Capacity* Description C1517A 12 GB Box of 5 DDS-3/MRS data cartridges (125 m) 92300A 4 GB Box of 5 DDS-2/MRS data cartridges (120 m) 92283B 2 GB Box of 5 DDS-1/MRS data cartridges (90 m) 92283A 1.3 GB Box of 5 DDS-1/MRS data cartridges (60 m) 92283K N/A Box of 2 cleaning cartridges 92283L N/A Lockable storage box (holds 12 DDS tape cartridges) DDS Tape Module *Capacity is for 1:1 data compression; N/A = Not Applicable. 39 DDS Tape Module Ordering DDS Tape Cartridges DDS Tape Module 40 Chapter 4. Troubleshooting & Diagnostics This chapter includes procedures for troubleshooting and replacing fan modules, power modules, disk modules and DDS tape modules. Troubleshooting Overview The following troubleshooting steps are recommended to identify and resolve storage system failures: Gather failure information by checking: • host system error logs • host system error messages • module status lights (see “Module Status Lights” in this chapter) 2. Check host/device communication on the SCSI bus. 3. Check device operation with no host connection (see “Self-Test Diagnostics” in this chapter). 4. Troubleshoot the suspect device (see “Troubleshooting Procedures” in this chapter). 5. Replace the suspect device (see “Module Replacement Procedures” in this chapter).. 6. Check storage system operation with host connection. 7. Contact your HP service representative. 41 Troubleshooting 1. Troubleshooting & Diagnostics Module Status Lights Module Status Lights Each module within the storage system has at least one status light on its front panel (see Figure 22). The DDS tape module has two status lights (see Figure 23). Status lights show the results of power-on selftests and indicate the functional status of the device within the module. Table 6 through Table 9 list the status light indications and recommended actions for the modules. Figure 22. Module Status Lights and Power Switch 1 - Power Module Status Light 2 - Disk Module Status Light Troubleshooting 42 3 - Fan Module Status Light 4 - Power Switch Troubleshooting & Diagnostics Module Status Lights Table 6. Fan Module Status Light Indications Status Light Off Indication Recommended Action No power or fan not operating. Green Normal operation. None required. Amber Fan failure. Fan speed is too slow or the fan has stopped blowing air. Replace the fan module. Table 7. Power Module Status Light Indications Status Light Off Indication No power or power module not operating. Recommended Action Check to see if power cords are plugged in. Check to see if storage system power switch is turned on. Green Normal operation. None required. Amber Both fans are missing or failed, overcurrent condition, or power supply failure. See “Power Module Troubleshooting Procedures” in this chapter. Table 8. Disk Module Status Light Indicators Status Light Indication Recommended Action Off No power, disk module failed, or selftest passed. Check storage system power. If power is present and self-test passed, no action is required. If the disk module failed, replace the disk module. Flashing Green Disk module is reading or writing data. Normal operation. None required. Green 1 2 Drive fault or self-test is running. If there is a drive fault, replace the disk module. If self-test is running, no action is required. 1. A solid green status light at any time other than during a self-test indicates a disk module fault. Replace the disk module. 2. Termination problems can prevent successful completion of a self-test. Verify there are no termination problems on the SCSI bus. See “SCSI Bus Troubleshooting Procedures”. 43 Troubleshooting Notes: Troubleshooting & Diagnostics Module Status Lights Figure 23. DDS Tape Module Front Panel 1 - Cartridge Slot 2 - Tape Light 3 - Clean Light 4 - Cartridge Unload Button Table 9. DDS Tape Module Status Light Indications Troubleshooting 44 Tape Light Clean Light Indication/ Recommended Action Off Off No power, tape module failed, or self-test passed. Check storage system power. If power is present and self-test passed, no action is required. If the tape module failed, replace the tape module. Flashing Green (1 flash/second) Off Tape loading or unloading or tape self-test is running. No action required. Flashing Green (2 flashes/second) Off Tape loaded and read/write activity. No action required. Green Off Tape loaded. Tape module ready. Amber or Green Flashing Amber (1 flash/second) Amber or Green Amber Tape heads are dirty. Copy the data to a new tape, discard the old tape, and clean the tape heads. See Chapter 3 for detailed cleaning instructions. Drive fault. Replace the tape module. Troubleshooting & Diagnostics Troubleshooting Procedures Troubleshooting Procedures This section contains troubleshooting procedures for the storage systems. SCSI Bus Troubleshooting Procedure If the host cannot access any of the devices connected to the SCSI bus, check the following: 1. Check SCSI cables for loose connections and bent pins. 2. Check SCSI terminator connections. A differential terminator on a single-ended bus or a single-ended terminator on a differential bus will cause the bus to hang. If a terminator is missing, storage system modules may not pass power-on self-test. 3. Check the SCSI ID switches for conflicting SCSI ID numbers. 4. Check the host bus adapter to see if it includes on-board termination and termination power, or if they must be supplied externally. 5. Reseat all storage modules. 45 Troubleshooting If there is a SCSI bus problem with a disk module, see Table 10. Troubleshooting & Diagnostics Troubleshooting Procedures Table 10. Disk Module/SCSI Bus Troubleshooting Condition Recommended Action* Disk module not recognized by host or fails power-on self-test. Check for SCSI bus termination. Check for correct terminator type. Check for bent pins on terminators or SCSI cables. Check for SCSI ID conflicts. Ensure that a SCSI cable does not exceed 6 meters on a single-ended bus or 25 meters on a wide differential bus. Ensure that a DF disk module has not been connected to an SE host bus adapter, or that an SE disk module has not been connected to a DF host bus adapter. Disk module not recognized by host during operation Check for a green status light on the disk module. If it is a DF disk module, perform the hot plug procedure under “DF Disk Module Replacement/Recovery Procedure (HP 3000 Series 900)” prior to replacing it. If it is an SE disk module, shut down the operating system prior to replacing it. Check the power supplies (see “Power Module Troubleshooting Procedures”). Wide differential SCSI bus hangs immediately after a disk module is replaced. Ensure that an SE disk module is not installed in a wide differential slot, or that a WD disk module is not installed in a single-ended slot. A DF disk module on a single-ended bus is usually transparent to the host. A new DF disk module is not recognized by the host. I/O subsystem errors are logged after a system boot. Ensure that the DF disk module is not installed in a single-ended slot. A DF disk module on a single-ended bus is usually transparent to the host. The SE disk modules on the single-ended bus will operate normally. *SE = single-ended narrow; DF = fast/wide differential Troubleshooting 46 Troubleshooting & Diagnostics Troubleshooting Procedures Fan Module Troubleshooting Procedure CAUTION! To maintain proper cooling within the storage system, a failed fan module must remain in the fan slot until a replacement fan module is installed. A missing fan module will cause the storage system to overheat and power off. NOTE! The storage system is designed to operate with two fan modules, regardless of the number of storage modules installed. If a fan module fails (see Table 6), check the following: 1. An amber status light indicates the fan speed is too slow, or the fan has stopped blowing air. 2. If both fan modules fail, the power modules will automatically power off in 3 to 7 seconds to avoid overheating. A SCSI bus reset will occur at this time. Power Module Troubleshooting Procedures CAUTION! The following conditions will cause a power module to power off in 3 to 7 seconds: (1) two failed fan modules, (2) a power supply internal fan failure or other internal component failure, or (3) an over-current condition caused by a faulty storage system module, a device in one of the four upper slots set to SCSI ID 0, or using an unsupported device with a high current rating. 47 Troubleshooting Each power module contains a power supply with an internal fan for cooling. Two power modules (redundant configuration) use active current sharing to share the power load equally. If one power module fails or is removed, or if one of the ac power cords is accidentally removed, the other power module takes over the entire power load without interruption. Troubleshooting & Diagnostics Troubleshooting Procedures One Power Module/One Fault Troubleshooting Procedure CAUTION! There should be no bus activity when these steps are performed. The storage system should be offline. NOTE! Power cycle the storage system after performing each step in this procedure. If the storage system contains one power module and a power supply fault occurs when installing storage modules, perform the following steps: 1. If any storage module in the four upper slots is set to the same SCSI ID number as a storage module in the four lower slots, change the SCSI ID to a unique number. 2. Remove all storage modules. 3. Install the storage modules one at a time until a power supply fault occurs. 4. Remove all storage modules except the last one installed. 5. If a power supply fault occurs again, replace the storage module. 6. If a power supply fault occurs after replacing the storage module, replace the power module. Two Power Modules/One Fault Troubleshooting Procedure CAUTION! There should be no bus activity when these steps are performed. The storage system should be offline. If the storage system contains two power modules and one power supply fault occurs when installing storage modules, perform the following steps: 1. Check the power cord for the faulty power module. 2. Remove and re-install the faulty power module. 3. Replace the faulty power module. Troubleshooting 48 Troubleshooting & Diagnostics Troubleshooting Procedures Two Power Modules/Two Faults Troubleshooting Procedure CAUTION! There should be no bus activity when these steps are performed. The storage system should be offline. If the storage system contains two power modules and two fan modules and two power supply faults occur, follow these steps: 1. Cycle storage system power. 2. After power-on, the power module status lights will be amber. • If both fan module status lights do not turn green before they turn off, replace both fan modules. • If at least one fan status light turns green after power-on, either a power module has failed or an over-current condition exists. Follow the steps under "One Power Module/One Fault”. DDS Tape Module Troubleshooting Procedure If a DDS tape module failure occurs, see Table 9. Disk Module Troubleshooting Procedure 1. A solid green status light at any time other than during a self-test indicates a drive fault. A flashing or pulsing green status light indicates read/write activity. 2. Termination problems can prevent successful completion of a drive module self-test. Verify there are no termination problems on the SCSI bus (see "SCSI Bus Troubleshooting Procedure"). 3. Solve the problem using the appropriate procedure. If the disk module needs to be replaced, see Figure 29. DF Disk Module Replacement Decision Flowchart”. 49 Troubleshooting If a disk module failure occurs, check the following: Troubleshooting & Diagnostics Module Replacement Procedures Module Replacement Procedures The following procedures describe how to replace the storage system modules. NOTE! The term hot pluggable, refers to modules that can be replaced while the host and storage system are operating. Not all modules are hot pluggable, and some modules require the use of command line utilities before removal and after replacement. See Table 1 in Chapter 2 for HP system support of hot pluggable modules. Fan Module Replacement Procedure WARNING! You can only replace one fan module at a time. Do not remove a failed fan module from the storage system until the replacement fan module is ready to be installed. Both fan modules must be installed for proper air flow and cooling. NOTE! You can replace a fan module while the host and the storage system are operating. To replace a fan module: 1. Remove the fan module from the storage system (see Figure 24). 2. Install a new fan module into the storage system (see Figure 25). Figure 24. Removing a Fan Module Troubleshooting 50 Troubleshooting & Diagnostics Module Replacement Procedures 51 Troubleshooting Figure 25. Installing a Fan Module Troubleshooting & Diagnostics Module Replacement Procedures Power Module Replacement Procedure CAUTION! The power module is hot pluggable only if a second power module is present and operating. If you remove the only power module in the storage system, the storage system and all modules will lose power. NOTE! If there are two power modules in the storage system, each will share the power load. If one power module fails or is removed, or if one of the ac power cords is removed, the other power module will take over the entire power load without interruption. NOTE! You can replace a power module while the host and the storage system are operating. To replace a power module: 1. Remove the power module from the storage system (see Figure 26). 2. Install the new power module into the storage system (see Figure 6 in Chapter 2). Figure 26. Removing a Power Module Troubleshooting 52 Troubleshooting & Diagnostics Module Replacement Procedures DDS Tape Module Replacement Procedure CAUTION! DDS tape modules cannot be replaced while the host is running. You must shut down the host and power-off the storage system before you replace a tape module. To replace a DDS tape module: 1. Shut down the host and power-off the storage system. 2. Remove the DDS tape module from the storage system (see Figure 27). 3. Install the new DDS tape module into the storage system (see Figure 9 in Chapter 2). 4. Perform host recovery procedures. 53 Troubleshooting Figure 27. Removing a DDS Tape Module Troubleshooting & Diagnostics Module Replacement Procedures Disk Module Replacement Procedures CAUTION! Not all disk modules are hot pluggable. See Table 11 and the appropriate replacement procedure in this chapter for information on replacing a disk module. NOTE! Replacement of a disk module is not the same as installing additional capacity to an operating storage system. To add capacity, see "Installing Additional Disk Modules". Table 11. Host Support of Hot Pluggable Disk Modules Disk Module HP 3000 Series 900 HP 9000 Series 700, C-Series, J-Series HP 9000 Series 800 Version 9.04, 10.01* Single-Ended (SE) No No No F/W Differential (DF) Yes No Yes *The storage system does not support version 10.0 for HP-UX systems. To replace a disk module: 1. 2. 3. Troubleshooting 54 Determine the proper disk module replacement procedure to use, based on: • the type of disk module being replaced (SE or DF) • the type of host system and its configuration If the disk module is single-ended (SE), follow the steps in one of the following procedures: • SE Disk Module Replacement Procedure (HP 3000 Series 900) • SE Disk Module Replacement Procedure (HP 9000 Series 700, C-Series, J-Series) • SE Disk Module Replacement Procedure (HP 9000 Series 800) If the disk module is differential (DF), see Figure 29 then follow the steps in one of the following procedures: • DF Disk Module Replacement/Recovery Procedure (HP 3000 Series 900) • DF Disk Module Replacement Procedure (HP 9000 Series 700, C-Series, J-Series) • DF Disk Module Replacement Procedure (HP 9000 Series 800, No Strict Mirroring) • DF Disk Module Replacement/Recovery Procedure for Attached Physical Volumes (HP 9000 Series 800 with Strict Mirroring) Troubleshooting & Diagnostics Module Replacement Procedures DF Disk Module Replacement/Recovery Procedure for Unattached Physical Volumes (HP 9000 Series 800 with Strict Mirroring) 4. Remove the disk module (see Figure 28). 5. Install a new disk module into the storage system (see Figure 8 in Chapter 2). Figure 28. Removing a Disk Module 55 Troubleshooting • Troubleshooting & Diagnostics Module Replacement Procedures SE Disk Module Replacement Procedure (HP 3000 Series 900) CAUTION! The new disk module must be of the same capacity and model as the module being replaced. 1. Shut down the host then power-off the storage system. 2. Remove the disk module from the storage system. 3. Install a new disk module with the same model and capacity as the failed disk module. 4. Power-on your computer, then power-on the storage system. If your boot device p the storage system, you may need to reboot your computer SE Disk Module Replacement Procedure (HP 9000 Series 700, C-Series, J-Series) 1. Shut down the host then power-off the storage system. 2. Remove the disk module from the storage system. 3. Install a new disk module with the same model and capacity as the failed disk module. 4. Power-on the storage system and reboot the host. 5. Perform an ioscan to ensure that the host recognizes the new disk module. SE Disk Module Replacement Procedure (HP 9000 Series 800) 1. Shut down the host. The storage system can remain operating while you replace the disk module. 2. Remove the disk module from the storage system. 3. Install a new disk module. 4. Power-on the storage system and reboot the host. 5. Perform an ioscan to ensure that the host recognizes the new disk module. Troubleshooting 56 Troubleshooting & Diagnostics Module Replacement Procedures Figure 29. DF Disk Module Replacement Decision Flowchart DF Disk Drive Replacement You cannot hot plug the module. 2 No Does DF meet requirements? 1 Yes Yes Replacing DF Drive on HP-UX? System is MPE-iX Yes DF disk drive is hot puggable. 3 Is volume group active? 4 No System HP 9000 Series 800 with Strict Mirroring? No Use "HP 9000, Series 700: DF Replacement Procedure" for Series 700 or Series 800 with no Mirroring. Yes Is physical volume attached? 5 No Yes Follow instructions for attached physical volumes. 6 Follow instructions for unattached physical volumes. 7 57 Troubleshooting No Troubleshooting & Diagnostics Module Replacement Procedures Figure 29 Footnotes: 1. See “DF Disk Module Replacement Requirements” in this chapter. 2. Contact your HP service representative for software assistance. 3. See “DF Disk Module Replacement/Recovery Procedure (HP 3000 Series 900)”. 4. If you don't know, see “DF Disk Module - Is the Volume Group or Physical Volume Group Active? (HP 9000 Series 800 with Strict Mirroring)”. 5. If you don't know, see “DF Disk Module - Is the Physical Volume Attached? (HP 9000 Series 800 with Strict Mirroring)”. 6. See “DF Disk Module Replacement/Recovery Procedure for Attached Physical Volumes (HP 9000 Series 800 with Strict Mirroring)”. 7. See “DF Disk Module Replacement/Recovery Procedure for Unattached Physical Volumes (HP 9000 Series 800 with Strict Mirroring)”. DF Disk Module Replacement Requirements To replace a disk module while the host is operating, all of the following conditions must be met: • All patches must be loaded by an HP service representative or customer engineer (CE). • All of the extents of the replaced disk that are in use must belong to mirrored logical volumes that were created with the strict (-s) option. • You must have a current volume group configuration backup file. In version 10.x, the backup is created by default each time an LVM command changes the LVM configuration. The default backup file path name is: /etc/lvmconf/base_vg_name.conf. In version 9.x, the backup is a manual process. • The replacement disk module must be of the same or greater capacity as the module being replaced. NOTE! HP uses different manufacturers for disk modules having the same product number. The manual hot plug procedure will not update the disk module internal information to that of the replaced disk. A replacement disk module must have the same capacity and block size as the defective disk module because it has the same product number. The only string that can be different is the one specifying the vendor name. This will not affect the behavior of the LVM. If you want to update the manufacturer's name, the disk's volume group must be deactivated and reactivated. If the conditions listed above cannot be met, contact your HP service representative for help. Troubleshooting 58 Troubleshooting & Diagnostics Module Replacement Procedures If the conditions above are met, you can replace the DF disk module while the host is operating. To know which replacement and recovery procedure to use, you must: 1. 2. Determine if the volume group is active. See “DF Disk Module - Is the Volume Group or Physical Volume Group Active? (HP 9000 Series 800 with Strict Mirroring)”. • If the volume group is active, determine if the physical volume is attached. See “DF Disk Module - Is the Physical Volume Attached? (HP 9000 Series 800 with Strict Mirroring)”. • If the volume group is not active, follow the procedure under “DF Disk Module Replacement/Recovery Procedure for Unattached Physical Volumes (HP 9000 Series 800 with Strict Mirroring)”. Determine if the physical volume (replaced disk module) is attached. • If the physical volume (replaced disk module) is attached, follow the procedure under “DF Disk Module Replacement/Recovery Procedure for Attached Physical Volumes (HP 9000 Series 800 with Strict Mirroring)”. • If the physical volume is not attached, follow the procedure under “DF Disk Module Replacement/Recovery Procedure for Unattached Physical Volumes (HP 9000 Series 800 with Strict Mirroring)”. Example of a Disk Module Failure Use the example in Table 12 of a disk module failure to see the types of messages the host may display while using LVM utility commands. The DF replacement/recovery procedures base their example messages on the hardware addresses or device files shown below. Volume group /dev/vg00 contains three discs, with the logical volume configuration shown below: Table 12. Example Volume Group with Three Disks 1vol 3 1vol 4 1vol 2 1vol 4 1vol 5 1vol 3 1vol 5 Hardware Address: Device File (/dev/dsk/): 52.6.0 c2t6d0 52.5.0 c1t5d0 52.4.0 c2t4d0 NOTE! In HP-UX 9.04, the device file /dev/dsk/ naming convention is cXdXsX. (Versions 10.01 are different.) 59 Troubleshooting 1vol 1 Troubleshooting & Diagnostics Module Replacement Procedures DF Disk Module Replacement/Recovery Procedure (HP 3000 Series 900) Hot pluggable disk modules are only supported on the HP 3000, Series 900 MPE-iX Version 5.0 with Express 3. If the host does not meet this specification, follow the steps in “HP 3000, Series 900: SE Disk Module Replacement Procedure”. Before you replace the disk module, ensure that the host meets the following criteria. If you are unsure, see Table 11. If the host or replacement disk module do not meet the following requirements, contact your HP service representative. You can replace the disk module while the host and the storage system are operating. NOTE! The new disk module must have the same product ID as the disk module being replaced. This will ensure that the new disk module has the same capacity. 1. If the host acknowledged the disabled logical drive, the host may display the following message: /ACKNOWLEDGE MIRRORED PARTNER DISABLED FOR LDEV #3 (Y/N)? This is only an advisory message. Replying to it only stops the message from repeating. 2. Remove the disk module from the storage system. 3. Install a new disk module with the same model and capacity as the failed disk module. 4. Run VOLUTIL, the mirrored volume utility program: REPLACEMIRRVOL sname:vname ldev 5. The system will automatically recognize and start the repair of the mirrored pair of disks. DF Disk Module Replacement Procedure (HP 9000 Series 700, C-Series, J-Series) 1. Shut down the host then power-off the storage system. 2. Remove the disk module from the storage system. 3. Install a new disk module. 4. Power-on the storage system and reboot the host. 5. Perform an ioscan to ensure that the host recognizes the new disk module. Troubleshooting 60 Troubleshooting & Diagnostics Module Replacement Procedures 1. Shut down the host. The storage system can remain operating while you replace the disk module. 2. Remove the disk module from the storage system. 3. Install a new disk module. 4. Reboot the host. 5. Perform an ioscan to ensure that the host recognizes the replaced disk module. 61 Troubleshooting DF Disk Module Replacement Procedure (HP 9000 Series 800, No Strict Mirroring) Troubleshooting & Diagnostics Module Replacement Procedures Figure 30. DF Disk Module Replacement/Recovery Flowchart for Attached Physical Volumes Flowchart B To replace DF attached physical Step 1 # lvreduce -m <one less than num_mirrors> -A n <LVname><physical volume path> Host fail? Yes lvdisplay No Step 2 Replace faulty disk drive. Perform ioscan. Step 3 # vgcfgrestore -n Yes Host fail? Repeat Step 3 No Step 4 vgchange -a y <volume group name> Step 5 Disk mirror of root? Yes (see MC/ServiceGuard note in Step 4) # mkboot # lvlnboot -A No Troubleshooting Step 6 # lvextend -m <one greater than num_mirrors><LV name><physical volume path> or # lvextend -m <one greater than num_mirrors> /path 62 Troubleshooting & Diagnostics Module Replacement Procedures DF Disk Module Replacement/Recovery Procedure for Attached Physical Volumes (HP 9000 Series 800 with Strict Mirroring) Before you begin, review the requirements under “DF Disk Module Replacement Requirements” and ensure they are met. Use the following commands to reduce any logical volumes that have mirror copies on the faulty disk module so they no longer mirror onto that disk module. If the host fails during a process, the recovery process is listed at the end of each step. NOTE! This procedure will use the lvreduce command to remove mirrors whose extents are on the defective disk. Once the disk has been replaced, use the lvextend command to recreate the mirrors' extents on the new disk. NOTE! Mirrors which span several disks may not have their extents placed on the disks as they were before. For cases where the original mirror layout needs to be preserved, the operator should consider deactivating the volume group with the vgchange command and following the steps in "DF Disk Module Replacement/Recovery Procedure for Unattached Physical Volumes (HP 9000 Series 800 with Strict Mirroring)". Step 1 The -A n option is effective only in HP-UX release 10.01 and later and is not required for HP-UX release 9.04. For one-way mirroring: # lvreduce -m <one less than num_mirror> -A n <LV name> <physical volume path> or, for two-way mirroring: # lvreduce -m <one less than num_mirror> -A n <LV name> <physical volume path> If you follow the example under “Example of a Disk Module Failure”, the host will display: # lvreduce -m <one less than num_mirror> -A n /dev/vg00/lvol4 /dev/dsk/c2t4d0 63 Troubleshooting # lvreduce -m <one less than num_mirror> -A n /dev/vg00/lvol5 /dev/dsk/c2t4d0 Troubleshooting & Diagnostics Module Replacement Procedures If the host fails during Step 1 If the host failed during an lvreduce command, you should execute an lvdisplay command to determine if the command succeeded. If the command did not succeed, the command should be executed again. You should perform any other lvreduce commands that had not been executed before the system failure, then proceed. NOTE! An important side effect of the lvreduce commands is that the LVM configuration backup file used by the vgcfgrestore command in step 1 is updated. If this hot plug procedure is being performed now on another host system and there was no need to execute any lvreduce commands, then the configuration file has not been updated. However, the LVM configuration is correct on the physical volumes, so the configuration file can be updated with the vgcfbackup command. Step 2 a. Replace the disk module if you have not done so already. b. Perform an ioscan on the new disk module to ensure that it is accessible and also, as a double check, that it is a proper replacement. If you follow the example under “Example of a Disk Module Failure”, the host will display: # ioscan /dev/dsk/c2t4d0 HP uses different manufacturers for disks having the same product number. The manual hot plug procedure will not update the disk module’s internal information to that of the replaced disk. Replacement disks must have the same capacity and block size as the defective disk because they have the same product number. The only field that could be incorrect is the string specifying the vendor's name. This will not affect the behavior of the LVM. If you want to update the manufacturer's name, the disk's volume group must be deactivated and reactivated. Step 3 Use the following commands to restore the LVM configuration/headers to the replaced disk modules from your backup of the LVM configuration: # vgcfgrestore -n <volume group name> <physical volume path> Troubleshooting For example, the host will display: # vgcfgrestore -n /dev/vg00 /dev/rdsk/c2t4d0 If the host fails during Step 3 Repeat step 3 to ensure all the configuration data is written to the new disk. 64 Troubleshooting & Module Replacement NOTE! An important side effect of the commands is that the LVM configuration backup file used by the command in step 3 is updated. If this hot plug procedure is being performed now on another host system and there was no need to execute lvreduce commands, then the configuration file has not been updated. However, the LVM vgcfgbackup command. Step 4 he replaced disk module to the active volume group with the vgchange # vgchange a y <volume group name> # vgchange a y /dev/vg00 Note for MC/ServiceGuard If the disk array is used in an MC/ServiceGuard cluster volume vgchange – /dev/vgcluster VG Status from the vgdisplay: Command VG Status Available Availble, exclusive Available, shared, server –a y vgchange – Not sure what to do with SLVM Not sure what to do with SLVM *available may Step 5 6. If the disk is the mirror of a root disk: a. mkboot command on the replaced disk. If you use the example from “Example of a Disk Module Failure”, the host will display: # mkboot /dev/rdsk/c2t4d0 # lv1nboot -link the replaced disk into the Boot Data Reserved Area of all -R R 5 mkboot and -R commands are repeatable with no harm. 65 Troubleshooting Run the Troubleshooting & Diagnostics Module Replacement Procedures Step 6 Use the lvextend command to transfer the mirrors back on to the replaced disk. This will take some time because it copies all of the data from the original copy of the data to the mirrored extents. The logical volumes are still accessible to users’ applications during this command for two-way mirroring: # lvextend -m <one greater than num_mirror> <LV name> physical volume path or for three-way mirroring: # lvextend -m <one greater than num_mirrors> <LV name> physical volume path If you follow the example under “Example of a Disk Module Failure”, the host will display: # lvextend -m <one greater than num_mirrors> /dev/vg00/lvol4 /dev/dsk/c2t4d0 # lvextend -m <one greater than num_mirrors> /dev/vg00/lvol5 /dev/dsk/c2t4d0 At this point, your system should be fully functioning. If the host fails during Step 6 Execute an lvdisplay command to determine if the command was successfully executed. If the command did not successfully execute, re-issue the command. You should perform any other lvextend commands that had not been executed before the system failure. Troubleshooting 66 Troubleshooting & Module Replacement Replacement Flowchart for Unattached Physical Volumes (see MC/ServiceGuard note in Step 4) Flowchart C To replace DF on Unattached Physical Volume Step 1 Replace faulty disk drive. Perform ioscan. Step 2 # vgcfgrestore -n <volume group name> <character device file> Yes Host fail? (see MC/ServiceGuard note in Step 3) Step 3No # vgchange -a y <volume group name> Step 4 Disk mirror of root? Yes # mkboot # lvlnboot -R Yes No Host fail? No Step 5 # vgsync <volume group Yes Host fail? No Perform ioscan. 67 Troubleshooting Figure 31 Troubleshooting & Diagnostics Module Replacement Procedures DF Disk Module Replacement/Recovery Procedure for Unattached Physical Volumes (HP 9000 Series 800 with Strict Mirroring) Before you begin, review and ensure the requirements described in the “DF Disk Module Replacement Requirements” are met. Use this procedure if the volume group is not active or if the physical volume is unattached. Step 1 a. Replace the disk module if you have not done so already. b. Perform ioscan on the replaced disk module to ensure that it is accessible and to check that it is a proper replacement. If you follow the example under “Example of a Disk Module Failure”, the host will display: # ioscan /dev/dsk/c2t4d0 Step 2 Restore the LVM configuration/headers to the replaced disk from your backup of the LVM configuration: # vgcfgrestore -n <volume group name> character device file For example, the host will display: # vgcfgrestore -n /dev/vg00 /dev/rdsk/c2t4d0 If the host fails during Step 2 If the host fails during this step, repeat this step to ensure all of the configuration data is written to the new disk. Step 3 Attach the new disk module to the active volume group with the vgchange command: # vgchange -a y <volume group name> For example, the host will display: # vgchange -a y /dev/vg00 Note for MC/ServiceGuard - If the disk array is used in an MC/ServiceGuard cluster volume Troubleshooting group, the appropriate activation mode should be used. For example, vgchange –a e /dev/vgcluster The appropriate activation mode can be determined by the value of the VG Status from the vgdisplay: VG Status* Command Available vgchange –a y Availble, exclusive vgchange –a e Available, shared, server Not sure what to do with SLVM Available, shared, client Not sure what to do with SLVM *available may have a state specified after it (e.g. available/state) 68 & Diagnostics Replacement Procedures Step 4 If the disk is not the mirror of a root disk, skip this step. Run the mkboot command. For the above exampl # mkboot /dev/rdsk/c2t4d0 b. lvlnboot - command to reArea of all the Physical Volumes in the Volume Group: -R If the host fails during Step 4 when the host failed. The mkboot lvlnboot - commands are repeatable with no harm. Step 5 -synchronize the mirrors of the replaced disk module. This will take some time because it copies all the d extents. The logical volumes are still accessible to users' applications during this command: # vgsync <VG name> # vgsync /dev/vg00 If the host fails during Step 5 -issue the command. Troubleshooting & Diagnostics Module Replacement Procedures DF Disk Module - Is the Volume Group or Physical Volume Group Active? (HP 9000 Series 800 with Strict Mirroring) Use this procedure to determine if the volume group and physical volume group is active: 1. At the host console type: # vgdisplay <VG name> If you followed the example under “Example of a Disk Module Failure”, the host will display: # vgdisplay /dev/vg00 If the volume group is not active, the host will display: # vgdisplay: volume group not active # vgdisplay: cannot display volume group <VG name> 2. If the disk was defective when vgchange was executed, the following messages will be displayed: VGDISPLAY:WARNING: COULDN'T QUERY PHYSICAL VOLUME “/DEV/DSK/c2t4d0” THE SPECIFIED PATH DOES NOT CORRESPOND TO PHYSICAL VOLUME ATTACHED TO THE VOLUME GROUP VGDISPLAY: WARNING: COULDN'T QUERY ALL OF THE PHYSICAL VOLUMES Troubleshooting 70 • If the message above displays, the physical volume is not active. Refer to “DF Disk Module Replacement/Recovery Procedure for Unattached Physical Volumes (HP 9000 Series 800 with Strict Mirroring)”. • If the message above does not display, the physical volume is active. Refer to “DF Disk Module -: Is the Physical Volume Attached? (HP 9000 Series 800 with Strict Mirroring)”. & Diagnostics Information - Is the Physical Volume Attached? (HP 9000 Series 800 with Strict Use this procedure to det The example messages shown here are based on “Example of a Disk Module Failure”. Use the command to activate the volume group if you have not done so already. The phy VGCHANGE: WARNING: COULDN'T ATTACH TO THE VOLUME GROUP PHYSICAL VOLUME "/DEV/DSK/c2t4d0" IS NOT CONFIGURED INTO THE KERNEL. • for Unattached Physical Volumes (HP 9000, Series 800 with Strict Mirroring)”. If the physical volume is attached, continue to “DF Disk Procedure for Attached Physical Volumes (HP 9000, Series 800 with Strict Mirroring)”. The following diagnostic tools are available for isolating storage system hardware failures: • • nal device selfOnline system- Self Test Diagnostics 71 Troubleshooting -test diagnostic firmware. The self test executes automatically at power-test can also be initiated externally, -level diagnostic utilities. This enables the operator to execute a self test, without powerhe selfaddition, any selfSense command. Whenever a selfautomatically returned to the host (see “Request Sense Information” on the following page). Troubleshooting & Diagnostics Diagnostic Information Online Diagnostics Most HP systems include online diagnostic utilities for use with SCSI mass storage devices. The following online diagnostics may be available on your system. Refer to your system documentation for information on using online diagnostics. • Sherlock Online Diagnostics for SCSI: Used to diagnose all devices. • SCSIDSK2: Used to diagnose disk devices. • SCSIDDS: Used to diagnose DDS tape devices. Disk Module Request Sense Information This section describes the data returned for a disk module when a Request Sense command is invoked. Table 13. Disk Module Request Sense Data Format Bit Byte 7 0 Valid 6 5 2 1 Segment Number FM EOM ILI 0 Sense Key 3-6 Information Bytes (MSB=3; LSB=6) 7 Additional Sense Length 8-11 Command-Specific Information 12 Additional Sense Code 13 Additional Sense Code Qualifier 14 FRU Code 15 Troubleshooting 72 3 Error Code 1 2 4 SKSV Sense Key Specific 16-17 Sense Key Specific 18-n Product Unique Sense Data 0 Troubleshooting & Diagnostic Information Table 13 Returned Sense Data Fields: Valid: one if byte -6 are valid, zero if not valid. Error Code: 70h is a current error; Error Code 71h is a deferred error. Segment Number: Always zeros. File Mark: Always zero for a disk drive. EOM: End Of Medium indicator. Always zero for a disk drive. Incorrect Length Indicator: of the data on the medium. Indicates the general error category. These are listed in Table 14. The code in byte 12 provides additional explanation o Information Bytes: associated with the Sense Key. Unless otherwise specified, the Information Bytes contain the address of the current Additional Length: additional bytes. If the Allocation Length of the Command Descriptor Block is too small to transfer all of the Additional Sense Code and Additional Sense Code Qualifier: Sense Key is valid. Error code definitions are in Table 15. If the condition is not reportable by the disk drive, the 0000)”. Defined for Field Maintenance personnel only. SKSV (Sense Key Specific Valid) bits and Sense Key Specific bytes: The Additional Sense Code field may contain commandspecific data that further defines the nature of the CHECK CONDITION status. -specific data, or vendor The Sense Key Specific field is defined by this specification when the value of the SKSV bit is one. The definition of this field is determined by the value of the Sense Key field. This field is reserved for sense keys not described in . If the Sense Key field is set to ILLEGAL REQUEST (5h) and the SKSV bit is set to 1, the Sense Key Specific field is defined as shown in Table 11. These fields point to illegal parameters in command descriptor blocks tor in the DATA OUT phase. Troubleshooting & Diagnostics Diagnostic Information Table 14. Disk Module Field Pointer Bytes Bit Byte 7 6 5 15 SKSV C/D Rsvd 4 3 Rsvd BPV 2 1 0 Bit Pointer Field Pointer (MSB=16; LSB=17) 16-17 A command data C/D bit of one indicates that the illegal parameter is in the command descriptor block. A C/D bit of zero indicates that the illegal parameter is in the data parameters sent by the initiator during the DATA OUT phase. A BPV (Bit Pointer Valid) bit of zero indicates that the value in the bit pointer field is not valid. A BPV bit of one indicates that the Bit Pointer field specifies the bit of the byte designated by the field pointer that is in error. When a multiple-bit fields in error, the Bit Pointer field will point to the most significant bit of the field. The Field Pointer field indicates the byte of the command descriptor block or of the parameter data that was in error. Bytes are numbered starting from zero, as shown in the tables describing the commands and parameters. When a multiple-byte field is in error, the pointer will point to the most significant byte of the field. If a sense key is RECOVERED ERROR (1h), HARDWARE ERROR (4h), or MEDIUM ERROR (3h), and if the SKSV bit is one, the Sense Key Specific field is defined as shown in Table 12. These fields identify the actual number of retries used in attempting to recover from the error condition. Table 15. Disk Module Actual Retry Count Bytes Bit Byte 7 15 SKSV 16-17 6 5 4 3 2 1 0 Reserved Actual Retry Count (MSB=16; LSB=17) The Actual Retry Count field returns implementation-specific information on the actual number of retries used in attempting to recover an error or exception condition. Not all drives implement reporting actual retry counts in bytes 15, 16, and 17. See specific drive Product Manual Volume 1. If the Sense Key is NOT READY and the SKSV bit is one, the Sense Key Specific field will be defined as shown in Table 13. These fields are only defined for the FORMAT UNIT command with the Immed bit set to one. Troubleshooting 74 T & Diagnostics Information 16. Disk Module Format Progress Indication Bytes Bit Byte 7 15 SKSV 6 16-17 5 4 3 2 1 0 Reserved Progress Indication (MSB=16; LSB=17) The Progress Indication field is a percent complete indication in which the returned value is the numerator that has 655326 (10000h) as its denominator. The progress indication will be based upon the total format operation including any certification or initialization operations. Support of format progress indication is provided in each drive Product Manual Volume 1. Product Unique Sense Data: Not used. Table 14 lists the Sense Keys in the Extended Sense Data Format used by the drive. 75 Troubleshooting Table 15 lists the Extended Sense Additional Sense codes and Additional Sense Qualifier codes. & Diagnostics Information 17. Disk Module Sense Keys Code 1h drive. This would be the case for a successful command or when the ILI bit is one. RECOVERED ER recovery action performed by the disk drive. When multiple recovered errors occur, the last la 3h 4h may be required to correct this condition. MEDIUM ERROR. Indicates the command terminated with a nonrecovere probably caused by a flaw in the medium or an error in the recorded data. HARDWARE ERROR. Indicates the disk drive detected a nonrecoverable hardware failure rface parity error, additional parameters supplied as data for some commands (Format Unit, Mode Select, etc.). If k drive detects an invalid parameter in the command descriptor block, it will terminate 6h 7h 9h Bh Ch Dh Eh Troubleshooting 76 additional parameters supplied as data, the disk drive may have already a This Sense Key may also indicate that an invalid IDENTIFY message was received. UNIT ATTENTION. Indicates the disk drive may have been reset or power cycled. DATA PROTECT. Indicates that a command that reads or writs to the mediu on a block that is protected from this operation. The read or write operation is not performed. FIRMWARE ERROR. Vendor specific Sense Key. ABORTED COMMAND. Indicates the disk drive aborted the command. The initiator may be ecover by trying the command again. EQUAL. Indicates a SEARCH DATA command has satisfied an equal comparison. VOLUME OVERFLOW. Indicates a buffered peripheral device has reached the end of t been written to the medium. MISCOMPARE. Indicates that the source data did not match the data read form the medium. Troubleshooting & Diagnostics Diagnostic Information Table 18. Disk Module Additional Sense Code/Qualifier Codes 00 00h 01 00h 02 00h 03 00h 04 00h 04 01h 04 02h 04 03h 04 04h 08 00h 08 01h 08 02h 09 00h 09 04h 0A 00h 0C 00h 0C 01h 0C 02h 10 00h 11 00h 11 01h 11 02h 11 04h 12 00h 12 01h 12 02h 14 00h 14 01h 15 00h 15 01h 15 02h 16 00h 17 00h 17 01h Description No Additional Sense information No index/sector signal No seek complete Peripheral device write fault LUN not ready; cause not reportable LUN not ready; becoming ready LUN not ready; initializing command required LUN not ready; manual intervention required LUN not ready; format in progress LUN communication failure LUN communication time-out LUN communication parity error Track following error Head select fault Error log overflow Write error Write error recovered with auto-reallocation Write error; auto-reallocation failed ID CRC or ECC error Unrecovered read error Read retries exhausted Error too long to correct Unrecovered read error; auto reallocation failed Address mark not found for ID field Recovered data without ECC using previous sector ID Recovered data with ECC using previous sector ID Sector not found Record not found Random positioning error Mechanical positioning error Positioning error detected by read of medium Data synchronization mark error Recovered data with no error correction applied Recovered data using retries 77 Troubleshooting Byte 12-13 & Diagnostics Information Troubleshooting 78 Byte -13 Description 17 02 17 03 17 05 17 06 18 00 18 01 18 02 19 00 19 01 19 02 19 03 1A 00 1B 00 1C 00 1C 01 1C 02 1D 00 20 00 21 00 24 00 25 00 26 00 26 01 26 02 26 03 26 98 26 99 27 00 28 00 29 00 29 01 2A 00 2A 01 2A 02 2F 00 Recovered data using positive offset Recovered data using negative offset Recovered data using previous sector ID Recovered data without ECC; data auto-reallocated Recovered data with ECC Recovered data with ECC and retries applied Recovered data with ECC and/or retries; data auto-reallocated Defect list error Defect list not available Defect list error in primary list Defect list error in grown list Parameter list length error Synchronous data transfer error Defect list not found Primary defect list not found Grown defect list not found Miscompare during verify operation Invalid command operation code Logical block address out of range Invalid field in CDB LUN not supported Invalid field in parameter list Parameter not supported Parameter value invalid Invalid field parameter; threshold parameter Invalid field parameter; checksum Invalid field parameter; firmware tag Write-protected Not ready-to-ready transition; medium may have changed Power-on, Reset, or bus device reset occurred Power-on Reset occurred Parameters changed Mode parameters changed Log parameters changed Tagged commands cleared by another initiator Byte -13 Description 31 00 31 01 32 00 37 00 3D 00 3E 00 3F 00 3F 01 3F 02 40 01 42 00 43 00 44 00 45 00 47 00 48 00 49 00 4C 00 4E 00 5B 00 5B 01 5B 02 5B 03 5C 00 5C 01 5C 02 65 00 80 00 Medium format corrupted Format failed No defect spare location available Parameter rounded Invalid bits in identify message LUN has not yet self-configured Target operating conditions have changed Microcode changed Changed operating definition DRAM parity error Power-on or self-test failure Message error Internal target failure Select/reselection failure SCSI parity error Initiator detected error message received Invalid message error LUN failed self-configuration Overlapped commands attempted Log exception Threshold condition met Log counter at maximum Log list codes exhausted RPL status change Spindles synchronized Spindles not synchronized Voltage fault General firmware error qualifier 79 Troubleshooting & Diagnostics Infor & Diagnostics Information This section describes the data returned for a DDS tape module when a Request Sense command is 19 Bit Byte 7 0 Valid 6 5 2 EOM ILI Rsvd (0) Information Bytes (MSB=3; LSB=6) 7 Additional Sense Length (0Eh) - 1 Segment Number Mark 36 8 11 Troubleshooting 80 3 Error Code (70h or 71h) 1 2 4 Command Specif Sense Key 0 Troubleshooting & Diagnostics Diagnostic Information Table 19 Returned Sense Data Fields: Valid: 1 indicates that the information bytes contain valid information as defined in the SCSI specification. Error Code: 70h indicates that the error is current, that is, it is associate CONDITION status has been reported. 71h indicates that the error is . A deferred error occurs when there is in a CONDITION status was reported is therefore unlikely to be the cause of the deferred error. It simply gives the drive ECK CONDITION status for an error that already exists. Segment Number: (Default value is 1)The Mark bit is set to 1 when the logical position is at a filemark or setmark. See the Sense Code and Qualifier fields will indicate which sort of mark it is. MODE SELECT Device Configuration Parameters page is set. EOM: lue is 1) The EOM bit indicates the tape is a BOP or EOP/M. Three different Sense keys may be • region preceding EOP with an additional sense code of encounters BOP, or after commands such as LOAD and REWIND. EOP/M is reported when a WRITE or partition ( and VERIFY can cause this bit to be set. Sense Key: The Information Bytes field is on following the failure of either a READ, WRITE, WRITE FILEMARKS, or SPACE command. The field can take a nd that failed for the 0Eh specifies the number of additional sense bytes to follow and is always set to 0Eh. Command Specific Information Bytes: ntity is These two bytes provide additional information about the cause of the position when the REQUEST SENSE is unsolicited. See “Additional oller PCA failure 2: Drive mechanism failure 3: Change mechanism or external power supply 81 Troubleshooting This will be set to a value to indicate a specific part that has failed. It may be one of the following Troubleshooting & Diagnostics Diagnostic Information SKSV: 0 indicates the Sense Key Specific Bytes (bytes 15 through 17) are invalid. The C/D, BPV, and Bit Pointer fields will be zero. The top byte of the Field Pointer will be zero, and the bottom byte will contain a product-specific error code. 1 indicates the Sense Key Specific Bytes are valid. This will only happen when the bytes assume the role of Field Pointer Bytes as defined by ANSI. This occurs when an Illegal Field check detects an error in a command descriptor block or a Parameter List check detects an error in a command parameter list. C/D: Command Data is only valid if the SKSV flag is set. 0 indicates the Field Pointer information applies to the parameter list for the command. 1 indicates the Field Pointer information applies to command descriptor block. BPV: 0 indicates the Bit Pointer field is invalid. 1 indicates the Bit Pointer field is valid. If the SKSV bit is set then the BPV bit must be set also. Bit Pointer: Identifies the bit position of the field in error, whether it is a command descriptor or a command parameter list field. Only valid when the SKSV flag is set. Field Pointer/Drive Error Code: If SKSV is set, this field identifies in which byte of the command descriptor or parameter list an error was detected. Note that the drive scans from byte 0 bit 7 of a command or parameter list through to byte n bit 0. The field and bit pointers are set to point to the most significant bit of the field that is in error. If SKSV is not set, the top byte of this field will be zero. The bottom byte contains the drive error code associated with the failure of the previous command, or zero in the case of no failure and no appropriate error code. CLN: 0 indicates the drive is OK. 1 indicates the drive requires cleaning. Table 20. DDS Tape Module Sense Keys Code 0h 1h 2h 3h 4h 5h 6h 7h 8h Bh Troubleshooting Dh 82 Description NO SENSE. There is no real problem. the sense information is probably indicating some condition such as encountering a filemark. RECOVERED ERROR. An error has occurred from which the drive has recovered. NOT READY. The drive is not in a state to be able to execute the request. MEDIUM ERROR. The command failed, possibly because of a problem with the tape or an error in the recorded data. HARDWARE ERROR. The command failed, possibly because of a problem with the drive hardware. The FRU in the sense data should indicate which part of the hardware is faulty. ILLEGAL REQUEST. The last command sent to the drive or the data associated with the command violated conditions imposed by the drive on its acceptance. UNIT ATTENTION. Indicates some condition of which the host needs to be made aware. DATA PROTECT. A write command was attempted on a write-protected block. BLANK CHECK. The drive encountered a blank tape or EOD while reading. ABORTED COMMAND. The drive has stopped trying to act on a command, usually through some problem on the SCSI bus. VOLUME OVERFLOW. Physical EOT reached, unable to fit remaining information on a tape. Troubleshooting & Diagnostics Diagnostic Information Table 21. DDS Tape Module Additional Sense Codes 00 00h 00 01h 00 02h 00 03h 00 04h 00 05h 04 00h 04 01h 04 02h 09 00h 0C 00h 11 00h 14 03h 15 01h 17 00h 17 01h 18 00h 1A 00h 20 00h 24 00h 25 00h 26 00h 27 00h 28 00h 29 00h 2A 01h 30 00h 30 01h 30 02h 30 03h 31 00h 33 00h 37 00h 3A 00h Description No additional sense information Filemark detected EOP/M detected Setmark detected BOP/M detected EOD detected LUN not ready, cause not reportable LUN becoming ready LUN not ready, initializing command required Track following error Write error Unrecovered read error EOD not found Mechanical positioning error Recovered data with no error correction applied Recovered data with retries Recovered data with error correction applied Parameter list length error Invalid command operation code Invalid field in command descriptor block LUN not supported Invalid field in parameter list Write-protected Not ready-to-ready transition Power-on, reset, or bus device reset occurred Mode parameters changed Incompatible medium Cannot read media, unknown format Cannot read media, incompatible format Cleaning cartridge installed Medium format corrupted Tape length error Parameter rounded Medium not present 83 Troubleshooting Code Troubleshooting & Diagnostics Diagnostic Information Code 3B 00h 3D 00h 3E 00h 3F 01h 40 XXh 43 00h 44 00h 45 00h 47 00h 48 00h 49 00h 4A 00h 4B 00h 4E 00h 50 00h 51 00h 52 00h 53 00h 53 02h 5D 00h 5D FFh 70 nnh 82 83h Troubleshooting 84 Description Sequential positioning error Invalid bits in Identify message LUN has not yet self-configured Microcode download Diagnostic failure on component XX Message error Internal target failure Select or reselect failure SCSI parity error Initiator detected error message received Invalid message error Command phase error Data phase error Overlapped commands attempted Write append error Erase failure Cartridge fault Media load or eject failed. Medium removal prevented Failure prediction threshold exceeded Failure prediction threshold exceeded (false) Decompression exception short algorithm ID of nnh Bad microcode detected Troubleshooting & Diagnostics Diagnostic Information Table 22. DDS Tape Module Drive Error Codes 06h 07h 08h 09h 0Dh 15h 16h 17h 18h 19h 1Ah 1Bh 1Ch 1Dh 1Eh 1Fh 20h 21h 22h 23h 24h 25h 26h 27h 28h 29h 2Ah 2Bh Description Capstan motor stalled. During calibration, servo failed to converge to a value within the correct range. Drum is stationary when it should be rotating. Drum phase lock lost during a write. The drive failed to maintain drum phase relative to tape, so tracks are starting too early or too late. During a mode movement, 20s elapsed without reaching target position, or 6.4s elapsed without any change in rotary encoder state. Servo did not see first command. Drum failed to stop rotating. Reels stuck while drive in process of threading tape. Supply reel stuck during capstan or reel-driven tape motion. Servo ROM checksum failure. Too many reel FG pulses detected from supply reel during capstan or reel-driven tape motion. Take-up reel stuck during capstan or reel-driven tape motion. Too many reel FG pulses detected from take-up reel during capstan or reel-driven tape motion. Attempt to execute download routine failed because download version does not correspond to version of servo firmware. Communication protocol error indicates servo is “busy” when it should not be. Servo cannot respond because it is hung. Filemark encountered during a read, write, or spacing operation. Setmark encountered during a read, write, or spacing operation. Record of unexpected length was read. Format error in the group just read. MEDIUM ERROR. Buffer firmware does not know the logical tape position. MEDIUM ERROR. Parity error on reading data from the buffer. HARDWARE ERROR. Mismatch in number of bytes transferred to and from SCSI, due to firmware or hardware failure. HARDWARE ERROR. Illegal machine state detected. HARDWARE ERROR. Illegal buffer command received. HARDWARE ERROR. Illegal parameters sent with a valid buffer command. HARDWARE ERROR. Space or Locate failed; position specified is in middle of a compressed entity. Write Setmarks failed because it would cause the number of setmarks in the current partition to exceed 65535. No error is logged to EEPROM. ILLEGAL REQUEST. 85 Troubleshooting Code Troubleshooting & Diagnostics Diagnostic Information Code 40h 41h 42h 47h 48h 49h 4Ah 4Bh 4Ch 4Dh 4Eh 4Fh 52h 53h 54h 80h 81h 82h 83h 84h 85h 86h Troubleshooting 87h 88h 89h 86 Description Drive found data compressed using an algorithm other than DCLZ. MEDIUM ERROR. DC read transfer shorter than indicated in its header. MEDIUM ERROR. Parity error while processing compressed data. HARDWARE ERROR. Invalid DC command sequence received. HARDWARE ERROR. Decompression error reported when no decompression should occur. HARDWARE ERROR. Decompression error reported while DC ASIC waited for input. HARDWARE ERROR. Decompression error reported while DC ASIC waited for output. HARDWARE ERROR. Decompression error reported when DC ASIC status is active. HARDWARE ERROR. Decompression error reported when DC ASIC status register indicates a Reset is being performed. HARDWARE ERROR. Decompression error reported when DC ASIC status register indicates bad word length. HARDWARE ERROR. Decompression error reported when DC ASIC status register indicates unknown code word. HARDWARE ERROR. Decompression error reported when DC ASIC status register indicates parity error. HARDWARE ERROR. DC task detected entity with algorithm ID of zero (not an access point), but dictionary status was invalid (not 8 bytes). MEDIUM ERROR. Entity header invalid. MEDIUM ERROR. Defect in DC task firmware. Drive will only respond to a Log Sense to allow access to Trace logs. HARDWARE ERROR. Unexpected command received during a Write. HARDWARE ERROR. Failure to get a write command. Write command afoul; possible firmware defect. HARDWARE ERROR. Reported problems during a Write; possible firmware defect. HARDWARE ERROR. RAW retry limit exceeded for a group. MEDIUM ERROR. RAW retry limit exceeded while writing a frame. MEDIUM ERROR. No communication message sent by servo processor over internal bus within the time-out period. HARDWARE ERROR. Bad Read command received. HARDWARE ERROR. Failure to get a Read command. Read command queue afoul; possible firmware defect. HARDWARE ERROR. Code Description 8Bh Hardware parity error detected when reading from DRAMs. HARDWARE ERROR. C3 row calculation failed. Streamfail occurred during error mapping; drive cannot cope. Too many frames with bad sub-data. MEDIUM ERROR. Too many guessed logical frame Ids. Tape position may be lost. MEDIUM ERROR. Group being read was found to be incomplete. MEDIUM ERROR. Bad positive-azimuth track found when reading 22-frame group. MEDIUM ERROR. Bad negative-azimuth track found when reading 22-frame group. MEDIUM ERROR. Conflict between tracks found when reading 22-frame group. MEDIUM ERROR. Time-out exceeded during hardware CS ECC syndrome check while reading HARDWARE ERROR. Mismatch with a checksum stored in a positive-azimuth track during C3 error correction while reading. MEDIUM ERROR. Mismatch with a checksum stored in a negative-azimuth track during C3 error correction while reading. MEDIUM ERROR. C3 error correction failed during a Read. MEDIUM ERROR. C3 ECC shows no error, yet a frame is considered to contain invalid data. MEDIUM ERROR. C3 error-correction calculations failed. MEDIUM ERROR. C3 error-correction failure. MEDIUM ERROR. Firmware failed to perform all processing during a “message window” time period. HARDWARE ERROR. Mismatch between checksum calculated while reading, and that stored in a positive track. MEDIUM ERROR. Mismatch between checksum calculated while reading, and that stored in a negative track. MEDIUM ERROR. Too many bad sub-data areas to allow checksum cross-checks. MEDIUM ERROR. Buffer controller ASIC test failed. HARDWARE ERROR. Communication test between servo processor and main 68000 processor failed. HARDWARE ERROR. Illegal parameters specified for AFC search. ILLEGAL REQUEST. Time-out waiting for BOM or EOM flag. HARDWARE ERROR. Unexpected BOM or EOM encountered. HARDWARE ERROR. Failure in data loopback test between buffer controller and DAT formatting ASIC. Flags or data were not set correctly. HARDWARE ERROR. 8Ch 8Dh 8Eh 8Fh 90h 91h 92h 93h 94h 95h 96h 97h 98h 99h 9Ah 9Bh 9Ch 9Dh 9Eh A0h A2h A3h A4h A5h A8h 87 Troubleshooting Troubleshooting & Diagnostics Diagnostic Information Troubleshooting & Diagnostics Diagnostic Information Code Description A9h Failure in data loopback test between buffer controller and DAT formatting ASIC. Data header was not set correctly. HARDWARE ERROR. Failure in data loopback test between buffer controller and DAT formatting ASIC. Checksum register was not as expected. HARDWARE ERROR. Drum motor took too long to reach speed. HARDWARE ERROR. Capstan motor took too long to reach speed. HARDWARE ERROR. Supply-reel motor took too long to reach speed. HARDWARE ERROR. Take-up reel motor took too long to reach speed. HARDWARE ERROR. Status report from servo processor to main processor not valid. HARDWARE ERROR. Illegal diagnostic requested. ABORTED COMMAND. Illegal loopcount value specified. ABORTED COMMAND. Diagnostic needs a tape; no tape detected. ABORTED COMMAND. Tape in drive; can only perform diagnostic when no tape present. ABORTED COMMAND. Diagnostic not supported by drive. ABORTED COMMAND. Reel failed to turn during reel-motor calibration. Reel failed to stop during reel-motor calibration. Failure to change state within time-out period. HARDWARE ERROR. Drive failed to achieve ATF lock during Drum PG autocalibration. Having achieved ATF lock during Drum PG autocalibration, drive could not find a delay that would cause it to unlock again. Results of drum autocalibration unacceptable; tolerance window not the right size. Servo firmware revision incompatible with controller firmware revision. Group found which does not comply with DDS format. MEDIUM ERROR. DOS format violation in EOD frames. Reference or system area DDS format violation. No sub-data available for the group. MEDIUM ERROR. EOD found when trying to find correct position to append data. MEDIUM ERROR. Unreadable sub-data encountered when track-following. MEDIUM ERROR. Tape position possibly beyond EOD. MEDIUM ERROR. Drive action did not occur within time-out period. HARDWARE ERROR. EOM and BOM reported simultaneously. MEDIUM ERROR. Tape speed wrong while writing. HARDWARE ERROR. EOD encountered; not necessarily an error condition. BLANK CHECK reported, with Additional Sense of 0005h (EOD detected). BOM encountered; not necessarily an error condition. Drive reached EOM. MEDIUM ERROR. AAh ABh ACh ADh AEh B1h B3h B4h B5h B6h B7h B8h B9h BAh BBh BCh Troubleshooting BDh BEh C0h C1h C2h C3h C4h C5h C6h C7h C8h C9h CAh CBh CCh 88 Code Description CDh Target position missed; position controller went past desired position without achieving objective. MEDIUM ERROR. Failure to achieve ATF locking within time-out period. MEDIUM ERROR. Failure to reach the target point on tape. MEDIUM ERROR. Unexpected physical BOM encountered. Failure to position. HARDWARE ERROR. Servo command time-out. HARDWARE ERROR. Drum took too long to reach speed. HARDWARE ERROR. Failure to process one servo event before servo processor sent next event. HARDWARE ERROR. Too long between successive servo message events. HARDWARE ERROR. Unexpected position counter. Calculated supply-reel diameter is suspect. HARDWARE ERROR. Tape not available for use. HARDWARE ERROR. Tape is threaded; command received which requires no tape to be threaded. HARDWARE ERROR. No cartridge in drive; cartridge is expected. HARDWARE ERROR. Cartridge present; no cartridge expected. HARDWARE ERROR. Time-out when finding Absolute Frame Count of append point. MEDIUM ERROR. Initialization error. HARDWARE ERROR. Buffer controller detected underflow. HARDWARE ERROR. Buffer controller detected overflow. HARDWARE ERROR. Buffer controller detected parity error. HARDWARE ERROR. Overflow in servo message to main 68000 processor. HARDWARE ERROR. System log on tape is unreadable. MEDIUM ERROR. Tape either blank or completely unreadable. BLANK CHECK. Tape not in valid DDS format. MEDIUM ERROR, with Additional Sense of 3002h (cannot read media, incompatible format). Parity error in reading track checksums out of buffer RAM. HARDWARE ERROR. Failure in position controller’s internal state machine. HARDWARE ERROR. Unable to find target position on tape. MEDIUM ERROR. Failed to measure tracking calculation; not enough samples to calibrate timetracking properly. Device command rejected because a previous command failed. HARDWARE ERROR. Invalid command sequence. HARDWARE ERROR. Invalid tape length. Unsupported tape inserted. MEDIUM ERROR. CEh CFh D0h D1h D2h D3h D4h D5h D6h D7h D8h D9h DAh DBh DCh DDh DEh DFh E0h E1h E2h E3h E4h E5h E6h E7h EEh F0h F1h F2h F3h 89 Troubleshooting Troubleshooting & Diagnostics Diagnostic Information Troubleshooting & Diagnostics Diagnostic Information Code F4h F5h F6h F7h F8h F9h Troubleshooting 90 Description Cleaning sequence occurred. Only logged in EEPROM for firmware earlier than version V10. Invalid command opcode received from buffer. HARDWARE ERROR. Invalid device parameter received. HARDWARE ERROR. Defect in device firmware. HARDWARE ERROR. Invalid tape format. HARDWARE ERROR. No tape present; tape expected. HARDWARE ERROR. Service Chapter 5. Service This chapter provides instructions for replacing storage system assemblies and parts. This chapter also includes exploded views of deskside and rackmount storage systems, and part numbers for replaceable parts. WARNING! The procedures in this chapter should only be performed by a qualified service representative. If you are not a qualified service representative, performing these procedures may result in personal injury or loss of data. CAUTION! Check with system administrator before powering down the system. Tools Required • • • • • • • • • T10 Torx driver T15 Torx driver T25 Torx driver Large flat-bladed screwdriver Small flat-bladed screwdriver (< 4 inches long, 0.25 inch wide) 3/8-inch nut driver deep socket nut driver needle-nose pliers 91 Service Door Assembly Door Assembly Service Deskside Door To replace the deskside door (Figure 32): 1. Unlock the security lock. 2. Open the door to 90 degrees from the closed position. 3. Move the hinged side toward the left and rear. 4. Remove the door by lifting it up and out toward the front. 5. Replace the door by lowering the hinges onto the enclosure hinge bracket. NOTE! The replacement door includes a switch cover, security lock, two light pipes, and a latch. Keys are not included with the replacement door. Figure 32. Replacing the Deskside Door 92 Service Door Assembly Deskside Security Lock and Latch 1. Using a 3/8 inch nut driver, remove the #10 nut (1a), lock washer (1b), and pawl (1c). 2. Use a 19 mm deep socket to remove the M12 nut (1d). 3. Remove the lock washer (1e). 4. Remove the latch (2) and security lock (1). 5. Install the security lock parts in reverse order, ensuring the key slot is pointing up and the pawl is positioned to allow the lock to turn outward to lock. Service To replace the deskside security lock and latch (Figure 33): Figure 33. Replacing the Deskside Security Lock 1 - Security Lock 1a - #10 Nut 1b - #10 Lock Washer 1c - Pawl 1d - M12 Nut 1e - M12 Lock Washer 2 - Door Latch Deskside Switch Cover To replace the deskside switch cover: 1. Press the switch cover outward from behind the door. 2. Snap the switch cover in place from the front of the door. 93 Service Door Assembly Rackmount Door Service To replace the rackmount door (Figure 34): 1. Open the door to a position 90 degrees from the closed position. 2. Center the top hinge pin in the door’s top hinge pin slot. 3. Push the top of the door top outward, so the hinge pin exits through the hinge pin slot. 4. Pull the door up and free it from the bottom hinge pin. 5. Replace the door by lowering the door’s bottom hinge pin hole onto the bottom hinge pin. 6. Push the top hinge pin slot into the top hinge pin until it snaps into place. Figure 34. Replacing the Rackmount Door 94 Service Door Assembly Rackmount Switch Cover 1. Press the switch cover outward from behind the door. 2. Snap the switch cover in place from the front of the door. Service To replace the rackmount switch cover: Rackmount Door Handle To replace the rackmount door handle: 1. Squeeze the securing tab at the top of the handle. 2. Press the handle outward from behind the door. 3. Replace the door handle by snapping it in place. Rackmount Door Snap To replace the rackmount door snap: 1. Align the door snap with the alignment pins on the right mounting flange. 2. Secure the door snap with a T15 screw. 95 Service Deskside Side Panel Deskside Side Panel Service To replace a deskside side panel (Figure 35): 1. Remove the modules from the two lower bay slots. 2. Locate the removal access hole inside the panel. 3. Holding the outside of the side panel and pressing slightly upward, insert a small screwdriver into the removal access hole in the direction of the arrow, pressing the panel outward. 4. Move the side panel upward to release it from the hook slots at the top and bottom of the enclosure. 5. Replace the side panel by positioning the hooks into the slots and pushing the panel downward. Figure 35. Locating the Side Panel Removal Access Hole 96 Service Deskside Pedestal Base CAUTION! Before removing the pedestal bases, disconnect cables to prevent stressing the cables and connectors. To remove a deskside pedestal base (Figure 45): 1. Lay the enclosure on its top. 2. Push the pedestal base (12) toward the center to unlatch it, then lift the outer edge. 3. To replace a pedestal base, insert the inner tabs then snap the outside edge in place. 97 Service Deskside Pedestal Base Service Backplane Assembly Backplane Assembly Service Deskside Backplane Assembly CAUTION! The following procedures require that you turn off the storage enclosure and make it inaccessible. Check with the system administrator before proceeding. To replace the deskside backplane assembly (Figure 45): 1. Disconnect the ac power cords and SCSI interface cables. 2. Remove all modules from the bays. 3. Remove two captive screws (17) from the rear panel (5). 4. Tilt the top of the rear panel outward and remove it. 5. Remove nine M4/T15 screws (14) from the backplane assembly (13). 6. Remove the four outer M3 nuts (15) from the ac power adapters. 7. Remove the backplane assembly. 8. Reassemble the backplane assembly in reverse order. Ensure that the flat washers (16) are still on the ac power adapter studs, before replacing the backplane assembly. Align the power switch push rod (19) with the power switch on the backplane assembly and check for proper operation. 98 Service Backplane Assembly CAUTION! The following procedures require that you turn off the storage enclosure and make it inaccessible. Check with the system administrator before proceeding. To replace the rackmount backplane assembly (Figure 46): 1. Disconnect the AC Power cords and SCSI interface cables. 2. Remove all modules from the bays. 3. Remove eight standoffs (23) from four SCSI connectors with a flat-bladed screwdriver. 4. Remove eleven M4/T15 screws (14). 5. Remove the backplane assembly (24). 6. Reassemble the backplane assembly in reverse order, ensuring that it is seated properly. Align the power switch push rod (19) with the power switch on the backplane assembly and check for proper operation. 99 Service Rackmount Backplane Assembly Service Backplane Assembly SCSI Bus Reset Switch Service CAUTION! Changing the default factory settings on the SCSI bus reset switch may cause operating system conflicts for the host computer. The switch is covered with a label that states “Factory Set Only”. NOTE! A SCSI reset is a high priority interrupt. The SCSI bus reset option is used when the host controller or software requires a SCSI reset to be sent as notification of device removal or power shutdown. The default setting for the SCSI bus reset switch is all switch segments enabled. The switch is enabled when the host controller or software requires a SCSI reset to be sent as notification of disk removal or power shutdown. The SCSI bus reset switch is visible on the rackmount rear panel (see Figure 36, item 1). To locate the switch on the deskside rear panel, remove the two T15 screws (see Figure 37, item 2), then remove the rear panel (see Figure 37, item 3) to expose the switch (see Figure 37, item 1). Figure 38 shows the switch segments on the SCSI bus reset switch and Table 23 shows the switch functions. NOTE! Even when bus A and bus B are connected to form one bus, the SCSI bus reset switches function independently. 100 Service Backplane Assembly Service Figure 36. Rackmount SCSI Bus Reset Switch 1 - Rackmount SCSI Bus Reset Switch Figure 37. Deskside SCSI Bus Reset Switch 1 - Deskside Rear Panel 2 - T15 Screws (2) 3 - Deskside SCSI Bus Reset Switch 101 Service Backplane Assembly Figure 38. SCSI Bus Reset Switch Default Settings Service Table 23. SCSI Bus Reset Switch Functions Switch 1: Bus B Power Detect Switch 2: Bus B Module Detect Switch 3: Bus A Power Detect Switch 4: Bus A Module Detect Switch Enabled (Up, Default): SCSI bus B is reset if one of these events occurs: • The power switch is cycled. • Both power cords are unplugged. • The input voltage limits are exceeded on both power supplies. • Both power supplies shut down. SCSI bus B is reset if a storage module is inserted or removed. SCSI bus A is reset if one of these events occurs: • The power switch is cycled. • Both power cords are unplugged. • The input voltage limits are exceeded on both power supplies. • Both power supplies shut down. SCSI bus A is reset if a storage module is inserted or removed. Switch Disabled (Down): SCSI bus B is not reset if one of the above events occurs. SCSI bus B is not reset if a storage module is inserted or removed. SCSI bus A is not reset if one of the above events occurs. SCSI bus A is not reset if a storage module is inserted or removed. 102 Service Power Button and Push Rod Service Power Button and Push Rod To replace the power button and push rod in either storage system (Figure 45 or Figure 46): 1. Remove the backplane assembly. 2. Pull out the power button (21) with pliers and remove it. 3. Remove the spring (20). 4. Slide the push rod (19) out of the rear of the chassis. 5. Reassemble the parts in the reverse order, holding the push rod while snapping the button onto the rod. NOTE! (1) The rear of the push rod is angled upward to fit the switch on the backplane assembly. (2) The spring fits between the enclosure and the power button. (3) The vertical mark on the button should point upward. 6. Check for proper operation. 103 Service Top Cover Top Cover Service To replace the top cover on either storage system (Figure 39): 1. Turn off the storage system and disconnect power and SCSI cables. 2. Remove one of the following parts: • Deskside: the rear cover (see Figure 45, item 2). • Rackmount: the backplane assembly (see Figure 46, item 24). 3. Insert a flat-bladed screwdriver into the slot shown in Figure 39. Twist the screwdriver to open the latch and lift the rear of the top cover. The other latches should then release. 4. Hold the released side of the top cover up and repeat step 3 to release the other side. 5. Pull the top cover up and toward the rear to remove it. 6. To replace the top cover, push the front edge of the top cover onto the enclosure, then push the top cover downward until all latches are secured. 7. Replace the rear cover (deskside) or backplane assembly (rackmount), SCSI cables and power cords. 8. Check for proper operation. Figure 39. Replacing the Top Cover 104 Service AC Power Adapter Service AC Power Adapter Deskside AC Power Adapter To replace the deskside ac power adapter (Figure 40): 1. Remove the power module and the rear cover. 2. Remove the two M3/T10 nuts (1) from the backplane tabs. 3. Remove the backplane assembly. 4. Remove the two flat washers (item 2) and the two nuts (item 3). 5. Remove the ac power adapter (item 4). 6. Replace in reverse order, ensuring the flat washers are in front of the backplane tabs. Figure 40. Replacing the Deskside AC Power Adapter 1 - M3/T10 Nut (2) 2 - Flat Washer (2) 3 - M3/T10 Nut (2) 4 - AC Power Adapter 105 Service AC Power Adapter Rackmount AC Power Adapter Service To replace the rackmount ac power adapter (Figure 41): 1. Remove the power module. 2. Remove two T10 screws (item 1) 3. Remove two star washers (item 3). 4. Remove the ac power adapter (item 2). 5. Replace the ac power adapter in reverse order, ensuring the lock washers are located between the ac power adapter and the rear of the chassis. NOTE! Put the screws and washers on the power adapter, then fasten the entire assembly at once. Figure 41. Replacing the Rackmount AC Power Adapter 1 - M3/T10 Screw (2) 2 - AC Power Adapter 106 3 - Star Washer (2) Service Module Cam Lever Service Module Cam Lever To replace the module cam lever: 1. Squeeze the pivot tabs with pliers (see Figure 42) and lift the cam lever off of the pivot. 2. Position the locking bracket (Figure 43, item 2) over the track notch (Figure 43, item 3) and lift it out of the track. 3. To replace the cam lever, insert the locking bracket into the notch, then snap the cam lever onto the pivot (Figure 44). Figure 42. Removing Module Cam Lever from Pivot 107 Service Module Cam Lever Figure 43. Removing Module Cam Lever from Track Service Figure 44. Replacing Module Cam Lever 108 Service Enclosure Replaceable Parts Service Enclosure Replaceable Parts Figure 45. Deskside Enclosure Replaceable Parts 109 Service Enclosure Replaceable Parts Figure 46. Rackmount Enclosure Replaceable Parts Service 110 Service Enclosure Replaceable Parts Service Figure 47. Rackmount Kit Replaceable Parts Figure 48. Module Replaceable Parts 111 Service Enclosure Replaceable Parts Table 24. A3311A Enclosure Parts List Service 112 Figure No. Item No. HP Part No. Description Qty. 45 1 Not Available A3311A Deskside Enclosure 1 45 2 C3573-40053 Top Cover 1 45 3 C3573-40066 Right Panel 1 45 4 C3573-40065 Left Panel 1 45 5 Not Available Rear Panel 1 45 6 A3311-00007 Door Assembly, incl. items 7, 8, 10, and 11 1 45 7 C3595-40050 Front Door Latch 1 45 8 5181-7789 Security Lock 1 45 9 5181-7790 Security Key, set of 2 1 45 10 C3595-40031 Power Switch Cover 1 45 11 Not Available Front Door Light Pipe 1 45 12 C3573-40070 Pedestal Base 2 45 13 A3311-69002 Backplane Assembly 1 45 14 0515-2270 Screw, backplane, T15, M4 x 16mm 9 45 15 0535-0028 Nut, backplane, T10, M3 x 5.5mm, with captive ext. washer 8 45 16 3050-1131 Washer, M3, external 4 45 17 5181-7791 Screw, rear panel, T15, M4 x 10mm 2 45 18 5181-7779 AC Power Adapter 2 45 19 C3595-40009 Power Push Rod 1 45 20 Not Available Compression Spring 1 45 21 C3595-40010 Power Push Button 1 N/A N/A C3573-60068 Shipping Package, A3311A 1 Service Enclosure Replaceable Parts Figure No. Item No. HP Part No. Description 46 22 Not Available A3312A Field Rackmount Enclosure 1 46 22 Not Available A3312AZ Factory Rackmount Enclosure 1 46 2 C3573-40053 Top Cover 1 46 18 5181-7779 AC Power Adapter 2 46 19 C3595-40009 Power Push Rod 1 46 20 Not Available Compression Spring 1 46 21 C3595-40010 Power Push Button 1 46 23 5181-7796 Standoff 8 46 24 A3312-69002 Backplane Assembly 1 46 14 0515-2270 Screw, backplane, T15, M4 x 16mm 11 46 25-29 Not Available Not Available — 47 30 A3312-00004 Front Door Assembly (Parch. White), incl. items 10 and 31 1 47 30 A3312-00104 Front Door Assembly (Qtz. Gray), incl. items 10 and 31 1 47 31 C2786-40003 Door Handle 1 47 10 C3595-40031 Power Switch Cover 1 47 32 C3573-00057 Hinge Bracket 1 47 33 C2786-00002 Rail 2 47 34 0515-1357 Screw, latch, T15, M4 x 10mm 1 47 35 C2786-40002 Door Snap 1 47 36 0515-2992 Screw, rail, T25, 6-32 x 0.625 8 47 37 0590-2318 Nut, captive, rail, 6-32 8 N/A N/A C3573-60040 Shipping Package, A3312A 1 Service Table 25. A3312A/12AZ Enclosure Parts List Qty. 113 Service Enclosure Replaceable Parts Table 26. Enclosure Accessories Parts List Service Figure No. Item No. HP Part No. Description Qty. N/A N/A A1658-62016 SCSI Terminator, single-ended narrow, active (1) (A3328A) N/A N/A A1658-62024 SCSI Terminator, wide differential, passive (1) N/A N/A 8120-1351 *Power Cord, UK, BS 1363/A (1) N/A N/A 8120-1369 *Power Cord, Austral., AS 3112 (1) N/A N/A 8120-1689 Power Cord, Cont. Europe, GMBH/CEE7 (1) N/A N/A 8120-1751 Power Cord, N. Am., NEMA (1) N/A N/A 8120-3996 *Power Cord, N. Am., NEMA 6-15P (1) N/A N/A 8120-2104 Power Cord, Switz., SEVTYP12 (1) N/A N/A 8120-2956 Power Cord, Denmark, MDPP/CEE (1) N/A N/A 8120-4211 *Power Cord, S. Africa, IEC 83-B1 (1) N/A N/A 8120-4753 *Power Cord, Japan, JIS C 8303 (1) (C2905A) *Female connectors are type IEC 320-1 C13 114 Service Enclosure Replaceable Parts Table 27. Exchange Parts List Description* A3517-69003 2 GB SE LP 7200 Disk Module A3318-69003 2 GB DF LP 7200 Disk Module A3322-69001 4 GB SE DDS2 HH Tape Module A3646-69002 4.3 GB DF LP 7200 Disk Module A3647-69002 4.3 GB DF LP 7200 Disk Module A3319-69001 4.3 GB SE HH Disk Module A3320-69002 4.3 DF DF HH Disk Module A5238-69001 9.1 GB DF LP 7200 Disk Module A5285-69001 9.1 GB DF LP 7200 Disk Module A3649-69002 9.1 GB DF HH 7200 Disk Module A5286-69001 18.2 GB DF LP 7200 Disk Module A5239-69001 18.2 GB DF HH 7200 Disk Module A3640-69001 12 GB SE HH DDS-3 Tape Module A3538-69002 Power Module N/A C3595-40007** Service Exchange Part Number Fan Module Module Cam Handle*** A3311-69001 Deskside Backplane A3312-69001 Rackmount Backplane *SE=Single-Ended Wide; DF=Wide Differential; HH=Half-Height (1.6”); LP=Low Profile (1”); 7200=7200 rpm spindle speed **HP Part No. ***Figure 48, item 38 115 Service Enclosure Replaceable Parts Service Table 28. Cables HP Product Number Equiv Option Description A1658-62018 A1658-62018 A1658-62020 A1658-62021 A1658-62022 A3639-63011 A3639-63012 A3639-63013 A3639-63014 5183-2651 001 801 802 803 804 806 807 808 809 811 0.9 meter 68PHD-68PHD M/M 0.9 meter 68PHD-68PHD M/M 2.5 meter 68PHD-68PHD M/M 5 meter 68PHD-68PHD M/M 10 meter 68PHD-68PHD M/M 1 meter 68PHD-68PHD LP/LP 2.5 meter 68PHD-68PHD LP/LP 5 meter 68PHD-68PHD LP/LP 10 meter 68PHD-68PHD LP/LP 1 meter VHDCI-68PHD 5183-2653 812 2.5 meter VHDCI-68PHD 5183-2654 813 5 meter VHDCI-68PHD 5183-2655 814 10 meter VHDCI-68PHD A3639-63015 A3639-63016 841 842 A3639-63017 A3639-63018 843 844 A3639-63019 B25 A3639-63020 B26 A3639-63021 A3639-63022 B27 B28 5063-1214 5063-1269 821 822 2 meter V VHDCI-VHDCI/68PHD 2 meter V VHDCI-VHDCI (ILT) / 68PHD 2 meter V 68PHD-VHDCI / 68PHD 2 meter V 68PHD-VHDCI (ILT) / 6PHD 4 meter V VHDCI-VHDCI / 68PHD 4 meter VHDCI-VHDCI (ILT) / 68PHD 4 meter 68PHD-VHDCI / 68PHD 4 meter 68PHD-VHDCI (ILT) / 68PHD 1 meter 50PLD-68PHD M/M 2 meter 50PLD-68PHD M/M 116 Special App Notes Single Bus N/A4800A/FWD N/A4800A/FWD N/A4800A/FWD N/A4800A/FWD N/A5149A,A5150A,A5159A/SE*, FWD,LVD** N/A5149A,A5150A,A5159A/SE*, FWD,LVD** N/A5149A,A5150A,A5159A/SE*, FWD,LVD** N/A5149A,A5150A,A5159A/SE*, FWD,LVD** N(HA)/A5159A-A5159/FWD N(HA)/A5159A-A5159/FWD N(HA)/A5159A-Legacy/FWD N(HA)/A5159A-Legacy/FWD N(HA)/A5159A-A5159/FWD N(HA)/A5159A-A5159/FWD N(HA)/A5159A-Legacy/FWD N(HA)/A5159A-Legacy/FWD Service Enclosure Replaceable Parts Table 28. Cables Equiv Option 5063-5323 5181-7705 C2962A 5181-7707 5181-8686 A4801-63002 823 825 826 827 840 851 A4801-63012 A4801-63010 A4801-63004 871 873 875 Description Special App Notes Service HP Product Number 1 meter 50PLD-68PHD F/M 1 meter 50PLD-68PHD M/M 1.5 meter 50PHD-68PHD M/M 2 meter 50PHD-68PHD M/M 2 meter 68PHD M/M 10 meter 68PHD-68PHD (ILT) M/M 2/5 meter V 68PHD (ILT) M 2/3 meter V 68PHD (ILT) M 5 meter 68PHD (ILT) – 68PHD M/M * Except 10 meter cable ** 40 MHz speeds only Description 68PHD = 68 Pin High Density 50PLD = 50 Pin Low Density LP/LP = Low Profile to Low Profile M/M = Male to Male F/M = Female to Male VHDCI = Very High Density Cable Interconnect (Standard) ILT = Inline Terminator Special Application Notes: Servers N = N-Class N (HA) = N-Class in High Availability Configuration V = V-Class HBAs A4800A = single port FWD A5149A = single port SE or LVD, auto negotiating A5150A = dual port SE or LVD, auto negotiating A5159A = dual port FWD Interfaces SE = Single-Ended FWD = Fast / Wide Differential LVD = Low Voltage Differential 117 Service Enclosure Replaceable Parts Table 29 Supported Cabinets Service HP Product Number 118 Description A1833A 1.1 meter EIA cabinet for MPE systems (Legacy Cabinets) A1834A 1.6 meter EIA cabinet for MPE systems (Legacy Cabinets) A1896A 1.1 meter EIA cabinet for HP-UX systems (Legacy Cabinets ) A1897A 1.6 meter EIA cabinet for HP-UX systems (Legacy Cabinets) A4901A 1.6 meter EIA cabinet for HP-UX systems (A4900 Series Cabinets) A4902A 1.96 meter EIA cabinet for HP-UX systems (A4900 Series Cabinets) A5135A 1.6 meter EIA cabinet for MPE systems (A4900 Series Cabinets) A5136A 1.96 meter EIA cabinet for MPE systems (A4900 Series Cabinets) Appendix A. A3312A Rackmount Installation This appendix shows how to install the A3312A into a 1.1-meter, 1.6-meter, or 2.0-meter EIA cabinet. CAUTION! The A3312A should be installed into an EIA cabinet only by your HP service representative. To install the A3312A into an EIA cabinet: 1. Check the contents of the rackmount kit (see Figure 49). The number in parenthesis next to each item is the quantity of the item included in the kit. Figure 49. A3312A Rackmount Kit 1 - Support Rails (2) 2 - Clip Nut (8) 3 - T25 Screw (8) 4 - T15 Screw (1) 5 - Door Snap (1) 6 - Hinge Bracket (1) 7 - Door (1) 119 Rackmounting WARNING! The A3312A weighs 41kg (90 lb) fully loaded. To avoid personal injury, remove all modules before installation into the EIA cabinet. The empty weight is less than 15 kg (27 lb). Also, install A3312A storage systems first into the lower bays of the EIA cabinet. Appendix A. A3312A Rackmount Installation 2. Remove the front and rear shipping panels, (Figure 50, item 1), eight T25 screws (2), and eight clip nuts (3) from the cabinet. Figure 50. Removing Shipping Panels Rackmounting 120 Appendix A. A3312A Rackmount Installation 3. Install one clip nut (Figure 51, item 1) on each of the four rail standards on hole number 6, counting from the bottom of the cabinet. Secure the rails (2) with four T25 screws (3). See Table 30 for the rail standard holes to use when installing multiple storage systems. 4. Install two clip nuts on the right and left front ear standards: one clip nut (Figure 51, item 4) on hole number 8 and one clip nut (5) on hole number 17. See Table 30 for the ear standard holes to use when installing multiple storage systems. Rackmounting Figure 51. Installing Clip Nuts and Rails Table 30. Storage System Spacing in a 1.6-m EIA Cabinet Storage System Number 5 4 3 2 1 Rail Standard Holes 62 48 34 20 6 Ear Standard Holes 64, 73 50, 59 36, 45 22, 31 8, 17 121 Appendix A. A3312A Rackmount Installation 5. Slide the A3312A into the EIA cabinet (Figure 52). Figure 52. Sliding the A3312A into EIA Cabinet Rackmounting 122 Appendix A. A3312A Rackmount Installation Install the hinge bracket (Figure 53, item 2) on the left mounting ear (1) using the alignment pins (3) as a guide. Secure the left mounting ear and hinge bracket with two T25 screws (4) through the hinge bracket and left mounting ear. Figure 53. Installing Hinge Bracket and Securing Left Ear Rackmounting 6. 123 Appendix A. A3312A Rackmount Installation 7. Install two T25 screws (Figure 54, item 2) through the right mounting ear (1). 8. Install the door snap (Figure 54, item 4) on the right mounting ear, using the alignment holes (3) as a guide. Secure the door snap with one T15 screw (5). Figure 54. Securing Right Ear and Installing Door Snap Rackmounting 124 Appendix A. A3312A Rackmount Installation Install the door (Figure 55, item 1). Drop the lower corner mounting hole onto the lower hinge bracket pin (2) then swing the upper corner mounting slot into the upper hinge bracket pin (3). Gently press on the front upper left corner of the door and snap the upper corner into the hinge bracket pin. Figure 55. Installing the Door Rackmounting 9. 125 Appendix A. A3312A Rackmount Installation 10. Repeat steps 1 through 9 to install additional A3312A storage systems. 11. Install one filler panel in the bottom EIA slot and one in the top EIA slot (Figure 56). Figure 56. Installing EIA Filler Panels Rackmounting 126 Appendix A. A3312A Rackmount Installation 12. Complete the steps under “Installation Overview” in Chapter 2. 13. Connect the storage system power cords to the EIA cabinet power distribution units (PDUs) (see Figure 57). CAUTION! To avoid exceeding the current rating of the PDU, the maximum number of storage systems that can be connected to one PDU is seven (with one power module each) or eight (with two power modules each). Rackmounting NOTE! If the storage system contains two power modules, you can connect each power module into a separate PDU for greater redundancy. Figure 57. Connecting Power Cords to PDUs 127 Appendix A. A3312A Rackmount Installation 14. To power-on the EIA cabinet, press the cabinet power switch (Figure 58, item 1) to the power-on “1” position. The cabinet power light (2) should be green. Figure 58. Powering-On the EIA Cabinet Rackmounting 128 Rackmounting Appendix A. A3312A Rackmount Installation 129 Appendix B. Product Specifications This appendix contains storage system enclosure and module specifications. Table 31. Enclosure Specifications 14 kg (31 lb) 25 kg (55 lb) 18 kg (40 lb) 30 kg (66 lb) 16 kg (35 lb) 28 kg (62 lb) 22 kg (49 lb) 34 kg (75 lb) Dimensions: Deskside Enclosure: Rackmount Enclosure: Deskside Packaging: Rackmount Packaging: 415 mm H x 310 mm W x 320 mm D (16.34 in x 12.2 in x 12.6 in) 263 mm H x 425 mm W x 265 mm D (10.35 in x 16.73 in x 10.43 in) 673 mm H x 406 mm W x 432 mm D (26.5 in x 15.98 in x 17.01 in) 584 mm H x 508 mm W x 610 mm D (23 in x 20 in x 24.02 in) Line Input Requirements: Input Power3: Nominal Voltages: Inclusive Voltage Range: Nominal Frequencies: Inclusive Frequency Range: Fast Rise: Surge Transient: Ringing Wave: Brownout: Brownout Recovery: Transparent Line Surge: Recoverable Line Surge: Line Voltage Sag: Line Dropout: 400 W (120 Vac @ 3.3 A; 230 Vac @ 1.7 A) 100/120/127 Vac, 8 A max; 200/230 Vac, 4 A max 88-140 Vac; 180-269 Vac 60 Hz (120 Vac), 50 Hz (230 Vac) 47.5 to 66 Hz 1 kV, 1 µsec duration, 1 pulse/cycle for 10 min 1 kV, 50 µsec duration, 1 pulse/cycle every 10 sec 3 kV, 100 kHz 88/180 to 0 Vac over 30 min 0 to 88/180 Vac over 30 min 293 Vac for 500 msec 298 Vac for 500 msec 80.5 Vac for 500 msec ≤ 20 msec Specifications Weight: Deskside Net, Min. Config.1: Deskside Net, Max. Config.2: Deskside Shipping, Min. Config. 1: Deskside Shipping, Max. Config. 2: Rackmount Net, Min. Config. 1: Rackmount Net, Max. Config. 2: Rackmount Shipping, Min. Config. 1: Rackmount Shipping, Max. Config. 2: Notes: 1. Minimum Configuration is 2 fan modules, 1 power module, no disk modules 2. Maximum Configuration is 2 fan modules, 2 power modules, eight 1-inch disk modules 3. Worst case during spin-up; Maximum Configuration 131 Appendix B. Product Specifications Electromagnetic: Radiated: Conducted: Magnetic: Electrostatic Discharge: Magnetic Interference, Nonop: Magnetic Interference, Operating: Magnetic Susceptibility: Radiated Susceptibility: Conducted Susceptibility: ESD, Operating: ESD, Nonop: 5 V/m, 14 kHz to 1000 Mhz 3 Vrms, 30 kHz to 50 kHz; 1 Vrms, 50 kHz to 400 MHz 47.5 Hz to 198 Hz @ 4 Gauss external field 1-10 kV operating; 1-25 kV nonoperating < 5.25 mGauss @ 4.6 m; < 2 mGauss @ 0.7 ft < 5 mGauss p-p @ product surface 47.5 Hz to 198 Hz @ 4 Gauss external field 3 V/m external field, 14 kHz to 1000 MHz 3 Vrms, 30 kHz to 50 kHz; 1 Vrms, 50 kHz to 400 MHz 0 to 15 kV, air discharge 15 kV to 25 kV, air discharge Heat Dissipation: Min. Config.1: Max. Config.2: Airflow Space: 66 W (225 Btu/hr; 57 kcals/hr) 177 W (603 Btu/hr; 152 kcals/hr) 102 mm (4.02 in) min. front and rear Temperature: Operating (Disk/DDS Tape): Operating Gradient (Disk): Operating Gradient (DDS Tape): Nonop (Disk/DDS Tape): Nonop (DDS Tape Media): Nonop Gradient (Disk/DDS Tape): 5° to 40° C (41° to 104° F) 20° C/hr (68° F/hr) max 10° C/hr (50° F/hr) max -40° to 65° C (-40° to 149° F) -40° to 45° C (-40° to 113° F) 20° C/hr (68° F/hr) max Specifications Humidity: Maximum Wetbulb Temperature: Operating Gradient: Operating (Disk Module): Operating (DDS Tape Module w/Media): Nonop (Disk Module): Nonop (DDS Tape Module w/Media): 26° C (79° F) 10% RH/hr 8 to 80% RH (noncondensing) 20 to 80% RH (noncondensing) 5 to 90% RH (noncondensing) 20 to 80% RH (noncondensing) Altitude: Operating: Nonop: 0 to 3,048 m (0 to 10,000 ft.) 3,048 to 4,572 m (10,000 to 15,000 ft.) Shock: Operating3: 0.635 cm (0.25 in) tilt drop Notes: 1. Minimum Configuration is 2 fan modules, 1 power module, no disk modules 2. Maximum Configuration is 2 fan modules, 2 power modules, eight 1-inch disk modules 3. No damage; no data loss 132 Appendix B. Product Specifications Vibration: Operating Random: Nonop Random: Nonop Swept Sine: Acoustic Emissions: ≈ 0.21 g rms from 5 to 500 Hz (PSD of 0.0001 g2/Hz from 5 to 350 Hz, 0 dB/octave, -6 dB/octave from 350 to 500 Hz; PSD of 0.00005 g2/Hz at 500 Hz ≈ 2.09 g rms from 5 to 500 Hz (PSD of 0.015 g2/Hz from 5 to 100 Hz, 0 dB/octave, -6 dB/octave from 100 to 370 Hz; PSD of 0.008 g2/Hz from 137 to 350 Hz, 0 dB/octave, -6 dB/octave from 359 to 500 Hz; PSD of 0.0039 g2/Hz at 500 Hz, 0 dB/octave 0.5 g (0-p) from 5 to 500 Hz < 5.9 bels Table 32. Module Specifications 0.45 kg (0.99 lb) 39.5 mm H x 120 mm W x 240 mm D (1.56 in x 4.72 in x 9.45 in) Radial blower Power Module: Weight: Dimensions: Type: 2.7 kg (5.95 lb) 100 mm H x 120 mm W x 230 mm D (3.94 in 4.72 in x 9.06 in) N+1, active power factor correcting/current sharing, with int. axial fan 1-Inch Disk Module: Weight: Dimensions: Type: 1.1 kg (2.43 lb) 36.5 mm H x 120 mm W x 240 mm D (1.44 in x 4.72 in x 9.45 in) 2 GB, 4.3 GB SE/WD or 9.1 GB WD, SCSI-2, 7200 rpm 1.6-Inch Disk Module: Weight: Dimensions: Type: 1.6 kg (3.53 lb) 74 mm H x 120 mm W x 240 mm D (2.91 in x 4.72 in x 9.45 in) 18.2 GB WD, SCSI-2, 7200 rpm 1.6-Inch DDS Tape Module: Weight: Dimensions: Type: 1.6 kg (3.53 lb) 74 mm H x 120 mm W x 240 mm D (2.91 in x 4.72 in x 9.45 in) 4 GB (DDS-2, 1:1 DC) or 12 GB (DDS-3, 1:1 DC), SEN, SCSI-2 Specifications Fan Module: Weight: Dimensions: Type: 133 Appendix B. Product Specifications Specifications 134 Appendix C. Regulatory Statements This appendix contains the product regulatory and safety statements and the declaration of conformity. FCC Statement (USA Only) The Federal Communications Commission (in 47 CFR 15.105) has specified that the following notice be brought to the attention of the users of this product. This equipment has been tested and found to comply with the limits for a Class A digital device, pursuant to Part 15 of the FCC Rules. These limits are designed to provide reasonable protection against harmful interference when the equipment is operated in a commercial environment. This equipment generates, uses, and can radiate radio frequency energy and, if not installed and used in accordance with the instruction manual, may cause harmful interference to radio communications. Operation of this equipment in a residential area is likely to cause harmful interference in which case the user will be required to correct the interference at his own expense. The end user of this product should be aware that any changes or modifications made to this equipment without the approval of Hewlett-Packard could result in the product not meeting the Class A limits, in which case the FCC could void the user's authority to operate the equipment. IEC Statement (Worldwide) This is a Class A product. In a domestic environment this product may cause radio interference in which case the user may be required to take adequate measures. VCCI Statement (Japan Only) 135 Regulatory Statements This equipment is in the Class A category information technology equipment based on the rules of Voluntary Control Council For Interference by Information Technology Equipment (VCCI). When used in a residential area, radio interference may be caused. In this case, user may be required to take appropriate corrective actions. Appendix C. Regulatory Statements Class A Warning Statement (For Taiwan Only) Spécification ATI Classe A (France seulement) DECLARATION D'INSTALLATION ET DE MISE EN EXPLOITATION d'un matériel de traitement de l'information (ATI), classé A en fonction des niveaux de perturbations radioélectriques émis, définis dans la norme européenne EN 55022 concernant la Compatibilité Electromagnétique. Cher Client, Conformément à la Réglementation Française en vigueur l'installation ou le transfert d'installation, et l'exploitation de cet appareil de classe A, doivent faire l'objet d'une déclaration (en deux exemplaires) simultanément auprès des services suivants: • Comité de Coordination des Télécommunications 20, avenue de Ségur - 75700 PARIS • Préfecture du département du lieu d'exploitation Le formulaire à utiliser est disponible auprès des préfectures. La déclaration doit être faite dans les 30 jours suivant la mise en exploitation. Le non respect de cette obligation peut être sanctionné par les peines prévues au code des Postes et Télécommunications et celles indiquées dans la loi du 31 mai 1993 susvisée. Arrêté du 27 Mars 1993, publié au J.O. du 28 Mars - ATI Product Noise Declaration (Germany Only) Acoustic Noise Emissions LpA: 58 dB At bystander position per ISO 7779. All data are the results from type tests of the product configuration having the highest acoustic emissions: 8 disk modules. All other configurations have lower emission levels. Refer to the environmental specification section of the manual for details. Regulatory Statements Geräuschemission LpA: 58 dB Am fiktiven Arbeitsplatz nach DIN 45635 T. 19. Die Daten sind die Ergebnisse von Typprüfungen an Gerätekonfigurationen mit den höchsten Geräuschemissionen: 8 Plattenlaufwerke. Alle andere Konfigurationen haben geringere Geräuschpegel. Für weitere Angaben siehe unter Umgebungsbedingungen. 136 Appendix C. Regulatory Statements EMC Compliance • • • • FCC Class A Canadian EMC Class A VCCI Registered Class 1 Meets EMC Directive 89/336/EFC CISPR-22: 1993/EN 55022 (1994) Class A EN 50082-1: 1992 IEC 10003-2: 1995/EN61000-3-2 (1995) 137 Regulatory Statements Safety Certification • IEC 950: 1991+A1+A2+A3 • EN 60950: 1992+A1+A2+A3 • IEC 825-1: 1993/EN 60825-1: 1994 Class 1 (Laser/LED) • CSA C22.2 No. 950-95 • UL 1950 3rd Edition Appendix C. Regulatory Statements Regulatory Statements 138 A A3311A parts list, 112 A3311A, front view, 1 A3312A front view, 1 installing into EIA cabinet, 120 parts list, 113 A3312AZ front view, 1 parts list, 113 ac power adapter replacing deskside, 105 replacing rackmount, 106 B backplane assembly, replacing deskside, 98 backplane PCA, replacing rackmount, 99 backup routines, DDS tape cartridge, 35 boot device, 11 C cleaning tape heads, 37 configuration base product, 3 SCSI bus, 21 storage system, 11 connecting power cords, 24 connecting SCSI cables, 19 connecting SCSI terminators, 19 D data compression, DDS tape module, 34 DDS tape cartridge backup routines, 35 care of, 34 data loss, 32 ejecting, 32 forcing ejection, 32 handling, 34 loading, 31 ordering, 38, 39 storing, 35 tape log, 33 unloading, 32 write-enabling, 33 write-protecting, 33 DDS tape module cartridge slot, 29, 44 cartridge unload button, 29, 44 clean light, 29, 30, 44 cleaning tape heads, 37 data compression, 34 error codes, 80 front panel, 29, 44 installing, 15 replacing, 53 self-test, 29 status lights, 30, 44 tape light, 29, 30, 44 troubleshooting, 49 delayed spin-up, 11 deskside base product configuration, 3 exploded view, 109 module slots, 11 diagnostics, 71 online, 72 self-test, 71 disk module configuration, 11 error codes, 72 installing, 13 replacing, 54 self-test, 25 status light, 42 troubleshooting, 49 door handle, replacing rackmount, 95 door snap, replacing rackmount, 95 139 Regulatory Statements Index Index door, replacing deskside, 92 door, replacing rackmount, 94 L loading, DDS tape cartridge, 31 Index E EIA cabinet installing A3312A into, 120 power switch, 128 switching off power, 128 switching on power, 128 enclosure accessories parts list, 114 error codes DDS tape module, 80 disk module, 72 exploded view deskside, 109 rackmount, 110 rackmount kit, 111 F fan module installing, 12 replacing, 50 status light, 42, 43 troubleshooting, 47 fibre channel, 2 HBA, 16, 19 host bus adapter, 16, 19 hot pluggable, 3 hot swappable, 3 I 140 module fibre channel, 2 MUX, 2 replaceable parts, 111 module cam lever, replacing, 107, 108 modules, 4 exchange part numbers, 115 icons, 6 installing into storage system, 10 parts list, 115 replacement part numbers, 115 O online diagnostics, 72 over-current condition, 16 P H installing DDS tape module, 15 disk module, 13 fan module, 12 power module, 12 M parts list A3311A, 112 A3312A, 113 A3312AZ, 113 enclosure accessories, 114 modules, 115 pedestal base, replacing deskside, 97 power switching off EIA cabinet, 128 switching off storage system, 26 switching on EIA cabinet, 128 switching on storage system, 25 power button and push rod, replacing, 103 power cords, connecting, 24 power module installing, 12 replacing, 52 status light, 42 troubleshooting, 47 power module, status light, 43 power supply, shutdown, 16 Index power switch EIA cabinet, 128 storage system, 42 power-on sequence, 25 S rackmount base product configuration, 3 exploded view, 110 kit contents, 119 module slots, 11 SCSI bus reset switch, 17 rackmount kit exploded view, 111 redundant fans, 3 power supplies, 3, 24 replaceable parts deskside, 109 module, 111 rackmount, 110 rackmount kit, 111 replacement DDS tape module, 53 disk module, 54 fan module, 50 power module, 52 replacing ac power adapter, deskside, 105 ac power adapter, rackmount, 106 backplane assembly, deskside, 98 backplane PCA, rackmount:, 99 door handle, rackmount, 95 door snap, rackmount, 95 door, deskside, 92 door, rackmount, 94 module cam lever, 107, 108 pedestal base, deskside, 97 power button and push rod, 103 security lock and latch, deskside, 93 side panel, 96 switch cover, deskside, 93 switch cover, rackmount, 95 top cover, 104 Index R SCSI bus configurations, 21 connecting, 19 troubleshooting, 45 SCSI bus reset switch default settings, 100, 102 deskside, 101 factory set only, 17, 100 functions, 102 rackmount, 17, 101 SCSI cables, connecting, 19 SCSI ID switches, setting, 16, 18 SCSI terminators, connecting, 19 security lock and latch, replacing on deskside, 93 self-test DDS tape module, 29 disk module, 25 storage system, 25 self-test diagnostics, 71 service tools, 91 setting SCSI ID switches, 16 shutdown, 16 side panel replacing, 96 status light disk module, 42 fan module, 42, 43 power module, 42, 43 status lights DDS tape module, 30, 44 storage life, DDS tape cartridge, 35 storage modules, 4 storage system configuration, 11 modules, 4 power switch, 42 switching off power, 26 switching on power, 25 Supported, 118 switch cover, replacing deskside, 93 switch cover, replacing rackmount, 95 141 Index T Index tape log, 33 tools, service, 91 top cover, replacing, 104 troubleshooting DDS tape module, 49 disk module, 49 fan module, 47 power module, 47 SCSI bus, 45 142 U uninterruptable power supply, 24 unloading, DDS tape cartridge, 32 UPS, 24 W write-enabling, DDS tape cartridge, 33 write-protecting, DDS tape cartridge, 33 Index Index - 143