1
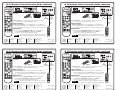
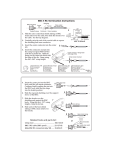
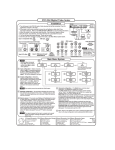
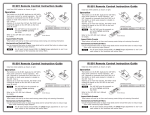
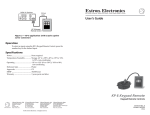
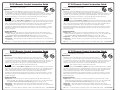
IR 701 Remote Control Instruction Guide
Install two AAA batteries as shown at right.
Operation
The buttons on the IR 701 duplicate the System 7SC‘s front panel controls for
normal operation. See the other side of this card for details. The switcher responds
to commands from the IR 701 as if that button or knob were pressed or rotated on the switcher. From
a distance of no more than 30 feet, the IR 701 sends infrared (IR) signals to the System 7SC via the
switcher’s front panel IR port or the IR port of an optional SCP 200 or SCP 250 control pad.
Setup operations cannot be performed from the IR 701.
The three Display buttons (Power, Mute, and Mode) will not function until IR and/or RS-232 commands
have been stored in their memories. Each Display button can also have a Room command associated
with it. Each Room button and each input selection button can also have an IR command and/or an
RS-232 command associated with it. Refer to the System 7SC User’s Manual for details.
Commands are transmitted from the switcher’s RS-232 projector control port, IR Emitter, or optional
IR Broadcaster when the corresponding button is pressed on the IR 701, the SCP control pad, or the
switcher’s front panel.
Commands are transmitted from the switcher’s RS-232 projector control port, IR Emitter, or optional
IR Broadcaster when the corresponding button is pressed on the IR 701, the SCP control pad, or the
switcher’s front panel.
Control functions
Display Power — After the System 7SC switcher is programmed (set up) with learned or downloaded commands, press this button to toggle the projector’s power on or off. The switcher’s LCD
shows DISPLAY POWER EXECUTING COMMAND during projector power up or down.
Display Mute — After setup, this button functions as the display’s video mute on/off switch.
Display Mode — After the switcher is set up, this button activates any RS-232 or IR command stored
in its memory.
Vol + and - — Press these buttons to adjust the volume of the variable audio output. (See other side.)
IR 701 Remote Control Instruction Guide
Install two AAA batteries as shown at right.
Operation
The buttons on the IR 701 duplicate the System 7SC‘s front panel controls for
normal operation. See the other side of this card for details. The switcher responds
to commands from the IR 701 as if that button or knob were pressed or rotated on the switcher. From
a distance of no more than 30 feet, the IR 701 sends infrared (IR) signals to the System 7SC via the
switcher’s front panel IR port or the IR port of an optional SCP 200 or SCP 250 control pad.
Setup operations cannot be performed from the IR 701.
The three Display buttons (Power, Mute, and Mode) will not function until IR and/or RS-232 commands
have been stored in their memories. Each Display button can also have a Room command associated
with it. Each Room button and each input selection button can also have an IR command and/or an
RS-232 command associated with it. Refer to the System 7SC User’s Manual for details.
Commands are transmitted from the switcher’s RS-232 projector control port, IR Emitter, or optional
IR Broadcaster when the corresponding button is pressed on the IR 701, the SCP control pad, or the
switcher’s front panel.
Commands are transmitted from the switcher’s RS-232 projector control port, IR Emitter, or optional
IR Broadcaster when the corresponding button is pressed on the IR 701, the SCP control pad, or the
switcher’s front panel.
Control functions
Display Power — After the System 7SC switcher is programmed (set up) with learned or downloaded commands, press this button to toggle the projector’s power on or off. The switcher’s LCD
shows DISPLAY POWER EXECUTING COMMAND during projector power up or down.
Display Mute — After setup, this button functions as the display’s video mute on/off switch.
Display Mode — After the switcher is set up, this button activates any RS-232 or IR command stored
in its memory.
Vol + and - — Press these buttons to adjust the volume of the variable audio output. (See other side.)
IR 701 Remote Control Instruction Guide, continued
IR 701 Remote Control Instruction Guide, continued
CONTROL
DISP
PWR
DISP
MUTE
MODE
CONTROL
ROOM
1
ROOM
2
COLOR TINT
BRIGHT CONT
DETAIL
ADJUST
DISP
PWR
DISP
MUTE
MODE
ROOM
1
ROOM
2
1
2
3
4
5
COLOR TINT
BRIGHT CONT
DETAIL
ADJUST
VOLUME
MENU
Control Functions
Display
Power
Audio
Display
Mute
1
2
3
4
5
6
7
DISPLAY
INPUT 7
VIDEO
VIDEO
S-VIDEO
S-VIDEO
AUDIO
COMPUTER
Mute
LL
Volume
Mode
VOLUME
BRIGHT CONT
NEXT
IR
RX LEARN
MENU
ADJUST
Control Functions
VOLUME
TX
RX
RR
DETAIL
MENU
DISPLAY
DISPLAY
MUTE
6
7
S-VIDEO
S-VIDEO
IR
RX LEARN
TX
RX
AUDIO
MAX/
MODE
DISPLAY
AUDIO
COMPUTER
Mute
Volume
Mode
SYSTEM 7SC
IR
MIN
VOLUME
DISPLAY
POWER
ol
ntr
lay
er
Disp
Pow
Fun
e
Aud
io
n
ctio 3
4
8
MODE
lay
8
30 feet
max.
Display
Power
Display
Mute
Mute
Mode
Volume
Input Selection
2
3
4
5
6
8
9
0
7
SHIFT
Image Adjustments
CONT
IR 701
System Remote
Room 2
SHIFT
Image Adjustments
TINT
BRIGHT
DETAIL
IR 701
System Remote
IR 701
68-543-01, Rev. B
03 02
Printed in the USA.
Input selection buttons — Press the button(s) for the number of
the desired input, then press the Enter button to select that input.
The corresponding button lights on the System 7SC’s front panel.
www.extron.com
The + and - centering (H-Shift, V-Shift) and picture adjustment
controls (Color, Tint, Brightness, Contrast, and Detail)
increment or decrement the adjustment settings.
While Executive Mode is active, adjustments cannot be
made; adjustment controls are locked in Executive Mode.
Extron Electronics, USA
Extron Electronics, Europe
Extron Electronics, Asia
Extron Electronics, Japan
1230 South Lewis Street
Anaheim, CA 92805
USA
714.491.1500
Fax 714.491.1517
Beeldschermweg 6C
3821 AH Amersfoort
The Netherlands
+31.33.453.4040
Fax +31.33.453.4050
135 Joo Seng Road, #04-01
PM Industrial Building
Singapore 368363
+65.6383.4400
Fax +65.6383.4664
Daisan DMJ Building 6F
3-9-1 Kudan Minami
Chiyoda-ku, Tokyo 102-0074 Japan
+81.3.3511.7655
Fax +81.3.3511.7656
Audio
Display
Mute
1
2
3
ROOM
2
COLOR TINT
BRIGHT CONT
4
5
6
7
DETAIL
ADJUST
S-VIDEO
S-VIDEO
AUDIO
LL
Mode
COMPUTER
RR
DETAIL
IR
RX LEARN
TX
RX
DISP
PWR
DISP
MUTE
MODE
ROOM
1
ROOM
2
1
2
3
4
5
COLOR TINT
BRIGHT CONT
MENU
ADJUST
Control Functions
VOLUME
System 7SC
Front Panel
MENU
DISPLAY
MUTE
Audio
Display
Mute
6
7
DETAIL
S-VIDEO
S-VIDEO
IR
RX LEARN
TX
RX
AUDIO
MAX/
MODE
Volume
Mode
SYSTEM 7SC
IR
MIN
VOLUME
AUDIO
RR
System 7SC
Front Panel
ADJUST
IR
RX LEARN
TX
RX
AUDIO
SYSTEM 7SC
ol
ntr
lay
er
Disp
Pow
Co
Fun
ns
lay
DispMut
ctio
e
9
0
2
Sele
n
ctio 3
6
4
7
4
5
6
7
8
ments
Room 2
SHIFT
Mute
Mode
Volume
5
6
9
0
7
8
CONT
IR 701
System Remote
SHIFT
TINT
DETAIL
ENTER
Room 2
CONT
Image Adjustments
BRIGHT
DETAIL
IR 701
System Remote
IR 701
68-543-01, Rev. B
03 02
Printed in the USA.
System
7SC
40
40
www.extron.com
30 feet
max.
Input selection
Input selection buttons — Press the button(s) for the number of
the desired input, then press the Enter button to select that input.
The corresponding button lights on the System 7SC’s front panel.
Control Functions
Display
Power
Audio
Display
Mute
Mute
Mode
Volume
BRIGHT
4
Room 1
COLOR
Image Adjustments
Audio
Display
Mute
Input Selection
2
3
mo
Control Functions
Display
Power
SCP 250
SCP 250
Room 1, Room 2 — These toggle the switcher’s relay contacts to
control items such as lights and display screens.
COLOR
1
IR 701
Remote
ENTER
Room 1
30 feet
max.
701 te
Re
40
7
IR
Daisan DMJ Building 6F
3-9-1 Kudan Minami
Chiyoda-ku, Tokyo 102-0074 Japan
+81.3.3511.7655
Fax +81.3.3511.7656
ut
Extron Electronics, Japan
3
ENTER
Adjust
T
IL
The + and - centering (H-Shift, V-Shift) and picture adjustment
controls (Color, Tint, Brightness, Contrast, and Detail)
increment or decrement the adjustment settings.
While Executive Mode is active, adjustments cannot be
made; adjustment controls are locked in Executive Mode.
135 Joo Seng Road, #04-01
PM Industrial Building
Singapore 368363
+65.6383.4400
Fax +65.6383.4664
2
Image
BRIGH
DETA
TINT
Extron Electronics, Asia
1
R
Adjustments
Beeldschermweg 6C
3821 AH Amersfoort
The Netherlands
+31.33.453.4040
Fax +31.33.453.4050
ROOM
2
SHIFT
COLO
Input selection buttons — Press the button(s) for the number of
the desired input, then press the Enter button to select that input.
The corresponding button lights on the System 7SC’s front panel.
Extron Electronics, Europe
ROOM
1
TINT
Input selection
1230 South Lewis Street
Anaheim, CA 92805
USA
714.491.1500
Fax 714.491.1517
io
8
CONT
40
Extron Electronics, USA
Aud
6
tem
www.extron.com
5
Inp
System
7SC
Sys
mo
701 te
Re
IR
tem
IR 701
System Remote
IR 701
NEXT
MAX/
MODE
2
SCP 250
SCP 250
BRIGHT
DETAIL
MUTE
m
Sys
CONT
4
Roo
2
IR 701
Remote
ENTER
Image Adjustments
DETAIL
e
1
m
TINT
BRIGHT
IR 701
System Remote
Volum
m
8
Roo
ments
T
Input Selection
2
3
0
7
Roo
6
9
4
1
5
5
n
ctio 3
7
m
4
Mute
1
io
6
0
Roo
3
Room 1, Room 2 — These toggle the switcher’s relay contacts to
control items such as lights and display screens.
COLOR
Image Adjustments
TINT
CONT
IR
Aud
Sele
9
2
ENTER
Adjust
SHIFT
SHIFT
COLOR
VOLUME
e
2
ut
5
1
Image
BRIGH
IL
Room 2
8
Room 2
MIN
lay
0
ROOM
2
R
DETA
MENU
DISPLAY
ns
DispMut
9
ROOM
1
SHIFT
COLO
1
e
TINT
CONT
Room 1
4
ENTER
VOLUME
SYSTEM 7SC
POWER
ctio
8
7
0
COMPUTER
Fun
6
9
7
Room 1
DISPLAY
ol
ntr
lay
er
Disp
Pow
5
DETAIL
IR
RX LEARN
TX
RX
Mode
Volum
Inp
4
6
68-543-01, Rev. B
03 02
Printed in the USA.
BRIGHT CONT
COMPUTER
Co
Mute
1
Input Selection
2
3
5
ADJUST
NEXT
DISPLAY
INPUT 7
VIDEO
VIDEO
Mute
NEXT
COMPUTER
POWER
Display
Power
LL
SYSTEM 7SC
DISPLAY
Mode
1
Volume
VOLUME
BRIGHT CONT
NEXT
DISPLAY
INPUT 7
VIDEO
VIDEO
Mute
Volume
Mute
Mode
Input Selection
2
3
CONTROL
ROOM
1
MENU
Control Functions
Audio
Display
Mute
1
IR 701 Remote Control Instruction Guide, continued
VOLUME
Display
Power
Control Functions
Display
Power
Adjustments
DETAIL
ENTER
CONT
30 feet
max.
BRIGHT
Room 1
COLOR
40
Input selection
Room 2
Audio
1
40
Room 1, Room 2 — These toggle the switcher’s relay contacts to
control items such as lights and display screens.
COLOR
Control Functions
SCP 250
System
7SC
ENTER
CONTROL
DISP
MUTE
7
0
IR 701 Remote Control Instruction Guide, continued
DISP
PWR
6
Daisan DMJ Building 6F
3-9-1 Kudan Minami
Chiyoda-ku, Tokyo 102-0074 Japan
+81.3.3511.7655
Fax +81.3.3511.7656
Sele
135 Joo Seng Road, #04-01
PM Industrial Building
Singapore 368363
+65.6383.4400
Fax +65.6383.4664
2
Beeldschermweg 6C
3821 AH Amersfoort
The Netherlands
+31.33.453.4040
Fax +31.33.453.4050
ut
1230 South Lewis Street
Anaheim, CA 92805
USA
714.491.1500
Fax 714.491.1517
Inp
mo
Extron Electronics, Japan
7
SCP 250
IR 701
Remote
701 te
Re
www.extron.com
Extron Electronics, Asia
ments
IR
9
7
Room 1
The + and - centering (H-Shift, V-Shift) and picture adjustment
controls (Color, Tint, Brightness, Contrast, and Detail)
increment or decrement the adjustment settings.
While Executive Mode is active, adjustments cannot be
made; adjustment controls are locked in Executive Mode.
Extron Electronics, Europe
tem
Sys
40
Input selection buttons — Press the button(s) for the number of
the desired input, then press the Enter button to select that input.
The corresponding button lights on the System 7SC’s front panel.
Extron Electronics, USA
6
Adjust
T
IL
Adjustments
IR 701
System Remote
5
Image
BRIGH
DETA
6
TINT
DETAIL
4
R
5
BRIGHT
CONT
3
2
TINT
2
m
Image Adjustments
Roo
mo
701 te
Re
IR
tem
Sys
COLOR
1
SHIFT
COLO
Input selection
SHIFT
ROOM
2
TINT
CONT
Room 1, Room 2 — These toggle the switcher’s relay contacts to
control items such as lights and display screens.
Room 2
4
ROOM
1
ENTER
40
ENTER
Room 1
e
1
2
0
SCP 250
1
Volum
m
8
m
9
SCP 250
IR 701
Remote
System
7SC
0
7
Roo
6
9
4
5
5
n
ctio 3
4
Mute
1
io
Roo
ments
ns
DispMut
ctio
Aud
3
Adjust
T
IL
SYSTEM 7SC
Co
e
2
Image
BRIGH
DETA
TX
RX
AUDIO
MAX/
MODE
IR
lay
7
1
1
R
8
MUTE
VOLUME
ns
DispMut
6
m
ROOM
2
SHIFT
COLO
7
IR
RX LEARN
MIN
ctio
Sele
0
Roo
ROOM
1
TINT
CONT
6
NEXT
DISPLAY
Fun
2
ut
e
ENTER
5
MENU
COMPUTER
Mode
Input Selection
2
3
Volum
Inp
9
4
ADJUST
VOLUME
SYSTEM 7SC
System 7SC
Front Panel
ol
ntr
lay
er
Disp
Pow
Mute
1
5
1
DETAIL
IR
RX LEARN
TX
RX
RR
Co
Mode
Input Selection
2
3
BRIGHT CONT
NEXT
INPUT 7
VIDEO
VIDEO
NEXT
COMPUTER
POWER
Audio
Display
Mute
LL
SYSTEM 7SC
System 7SC
Front Panel
Display
Power
Adjustments
The + and - centering (H-Shift, V-Shift) and picture adjustment
controls (Color, Tint, Brightness, Contrast, and Detail)
increment or decrement the adjustment settings.
While Executive Mode is active, adjustments cannot be
made; adjustment controls are locked in Executive Mode.
Extron Electronics, USA
Extron Electronics, Europe
Extron Electronics, Asia
Extron Electronics, Japan
1230 South Lewis Street
Anaheim, CA 92805
USA
714.491.1500
Fax 714.491.1517
Beeldschermweg 6C
3821 AH Amersfoort
The Netherlands
+31.33.453.4040
Fax +31.33.453.4050
135 Joo Seng Road, #04-01
PM Industrial Building
Singapore 368363
+65.6383.4400
Fax +65.6383.4664
Daisan DMJ Building 6F
3-9-1 Kudan Minami
Chiyoda-ku, Tokyo 102-0074 Japan
+81.3.3511.7655
Fax +81.3.3511.7656
1
Input Selection
2
3
5
6
9
0
4
7
8
ENTER
Room 1
Room 2
SHIFT
COLOR
TINT
CONT
Image Adjustments
BRIGHT
DETAIL
IR 701
System Remote
IR 701
68-543-01, Rev. B
03 02
Printed in the USA.