1
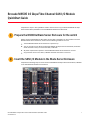
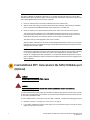
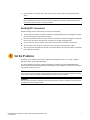
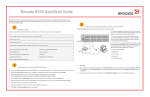
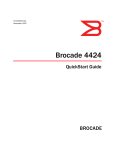
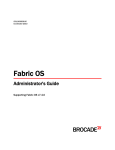
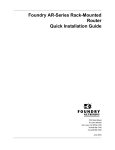
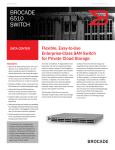
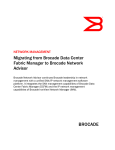
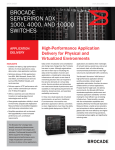
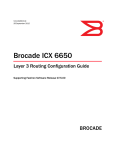
53-1002577-01 15 November 2012 Brocade M6505 16 Gbps Fibre Channel SAN I/O Module QuickStart Guide ® Copyright © 2012 Brocade Communications Systems, Inc. All Rights Reserved. Brocade, Brocade Assurance, the B-wing symbol, BigIron, DCX, Fabric OS, FastIron, MLX, NetIron, SAN Health, ServerIron, TurboIron, VCS, and VDX are registered trademarks, and AnyIO, Brocade One, CloudPlex, Effortless Networking, ICX, NET Health, OpenScript, and The Effortless Network are trademarks of Brocade Communications Systems, Inc., in the United States and/or in other countries. Other brands, products, or service names mentioned may be trademarks of their respective owners. Notice: This document is for informational purposes only and does not set forth any warranty, expressed or implied, concerning any equipment, equipment feature, or service offered or to be offered by Brocade. Brocade reserves the right to make changes to this document at any time, without notice, and assumes no responsibility for its use. This informational document describes features that may not be currently available. Contact a Brocade sales office for information on feature and product availability. Export of technical data contained in this document may require an export license from the United States government. The authors and Brocade Communications Systems, Inc. shall have no liability or responsibility to any person or entity with respect to any loss, cost, liability, or damages arising from the information contained in this book or the computer programs that accompany it. The product described by this document may contain “open source” software covered by the GNU General Public License or other open source license agreements. To find out which open source software is included in Brocade products, view the licensing terms applicable to the open source software, and obtain a copy of the programming source code, please visit http://www.brocade.com/support/oscd. Brocade M6505 16 Gbps Fibre Channel SAN I/O Module QuickStart Guide Complete the steps in this QuickStart Guide to install and set up your Brocade M6505 16 Gbps Fibre Channel SAN I/O Module in the Dell M1000e Blade Server Enclosure. 1 Prepare the M1000e Blade Server Enclosure for the switch Before the Brocade M6505 16 Gbps Fibre Channel SAN I/O Module can be inserted in the Dell M1000e Blade Server Enclosure, make sure the following conditions are met: • The Dell M1000e Blade Server Enclosure is powered up. • The I/O module bay into which the Brocade M6505 16 Gbps Fibre Channel SAN I/O Module will be inserted is ready to receive the SAN I/O Module. • All power requirements specific to the Dell M1000e Blade Server Enclosure are met. • Any protective cover on the SAN I/O Module backside connector is removed. 2 Insert the SAN I/O Module in the Blade Server Enclosure Complete the following steps to insert the Brocade M6505 16 Gbps Fibre Channel SAN I/O Module in the Dell M1000e Blade Server Enclosure. B1 C1 C2 B2 Brocade M6505 16 Gbps Fibre Channel SAN I/O Module QuickStart Guide 53-1002577-01 1 NOTE The SAN I/O Module is designed to work only in I/O module bays B1/B2 and C1/C2 of the Dell M1000e Blade Server Enclosure. Make sure to comply with installation requirements stated in the Dell PowerEdge M1000e Enclosure Owner’s Manual. 1. Press the release latch on the SAN I/O Module to free the release lever. 2. With the front side facing you and the release lever fully extended, slide the SAN I/O Module into the appropriate Dell M1000e Blade Server Enclosure I/O module bay. 3. Press the release lever upward until the release latch clicks and locks the lever in place. This locks the SAN I/O Module in the Dell M1000e Blade Server Enclosure I/O module bay. Locking the SAN I/O Module in the I/O module bay provides power (if the power is on in the Blade Server Enclosure) and activates (powers on) the switch and switch LEDs. The switch then runs self-diagnostic tests (such as POST). When the SAN I/O Module is inserted in the Dell M1000e Blade Server Enclosure, the physical Ethernet connection is established through the Dell M1000e Blade Server Enclosure Chassis Management Controller (CMC). NOTE Once inserted, the SAN I/O Module can be accessed remotely. Ensure that the SAN I/O Module is not being modified from any other connection until configuration is complete. Refer to Chapter 3, “Configuring the SAN I/O Module,” in the Brocade M6505 16 Gbps Fibre Channel SAN I/O Module Hardware Reference Manual for additional information about configuring the SAN I/O Module. 3 Insert additional SFP+ transceivers in the SAN I/O Module port (Optional) DANGER All fiber-optic interfaces use Class 1 lasers. DANGER Laser radiation. Do not view directly with optical instruments. Class 1 laser products. Your Brocade M6505 16 Gbps Fibre Channel SAN I/O Module ships from the factory with a certain number of pre-installed SFP+ transceivers. The number of pre-installed transceivers will vary based on your SAN I/O Module model. To insert additional SFP+ transceivers into your SAN I/O Module, complete the following procedure. 1. Review the section, “Handling SFP+ transceivers” on page 3. 2. If your SAN I/O Module ships with insert plugs in the unused external ports, remove the insert plugs from the ports to be used. 2 Brocade M6505 16 Gbps Fibre Channel SAN I/O Module QuickStart Guide 53-1002577-01 3. Insert the SFP+ transceiver into a port until it is firmly seated and the latching mechanism clicks. NOTE SFP+ Transceivers are keyed to ensure correct orientation. If an SFP+ transceiver does not install easily, ensure that it is correctly oriented. Handling SFP+ transceivers Before installing an SFP+ transceiver, be aware of the following: • The housing on the SFP+ transceiver includes an integral guide key that is designed to prevent you from inserting the transceiver incorrectly. • Use minimal pressure when you insert an SFP+ transceiver in the port. Forcing the transceiver into the port can cause damage to the transceiver or the SAN I/O Module port. • You can insert or remove an SFP+ transceiver while the SAN I/O Module is powered on. • You must first insert the SFP+ transceiver in the port before connecting the cables. • You must remove the cable from the SFP+ transceiver before you remove the SFP+ transceiver from the SAN I/O Module. 4 Set the IP address By default, the IP address for the SAN I/O Module is configured as 10.77.77.77 with a default Ethernet subnet mask of 255.255.255.0. It is recommended that you set the SAN I/O Module IP address using the Dell M1000e Blade Server Enclosure Chassis Management Controller (CMC). From the CMC, you can set the IP address using either the GUI or the CLI. NOTE If you want to set the IP address using the SAN I/O Module, refer to the Brocade M6505 16 Gbps Fibre Channel SAN I/O Module Hardware Reference Manual for instructions. ATTENTION Do not connect the SAN I/O Module to the internal network until the IP address is correctly set for your Ethernet network requirements. Brocade M6505 16 Gbps Fibre Channel SAN I/O Module QuickStart Guide 53-1002577-01 3 Using the CMC GUI to set the IP address To modify the SAN I/O Module IP address using the CMC GUI, perform the following steps: 1. Select I/O Module Overview from the left navigation panel. 2. Click the Setup tab. 3. Enter the new information in the IP Address, Subnet Mask, and Gateway fields as appropriate, then click Apply. 4. To enable DHCP, select DHCP Enabled, then click Apply. Refer to the Dell PowerEdge M1000e Enclosure Owner’s Manual that comes with your Dell M1000e Blade Server Enclosure for more information. Using the CMC CLI to set the IP address To modify the SAN I/O Module IP address through the Chassis Management Controller (CMC) CLI, perform the following steps: 1. Establish a Telnet session to the CMC CLI. 2. At the command prompt, enter connect switch-x where x is the bay in which the SAN I/O Module is installed. For example, switch-x can be one of the following values: • • • • Switch-3 for SAN I/O Module installed in bay B1. Switch-4 for SAN I/O Module installed in bay B2. Switch-5 for SAN I/O Module installed in bay C1. Switch-6 for SAN I/O Module installed in bay C2. 3. Log in to the default administrative account using the following default settings: Login: admin Password: password 4 Brocade M6505 16 Gbps Fibre Channel SAN I/O Module QuickStart Guide 53-1002577-01 4. Enter the ipAddrSet command to change the IP address of the selected SAN I/O Module. switch:admin> ipaddrset 5. Follow on-screen instructions and supply the correct information, as shown in the following example: switch:admin> ipaddrset Ethernet IP Address [10.77.77.77]:10.32.53.47 Ethernet Subnetmask [255.255.255.0]:255.255.240.0 Fibre Channel IP Addresss [none]: Fibre Channel Subnetmask [none]: Gateway IP Address [0.0.0.0]:10.32.48.1 DHCP [Off]: IP address is being changed...Done. 6. Enter ipAddrShow to verify the IP address was correctly set. switch:admin> ipaddrshow Ethernet IP Address: 10.32.53.47 Ethernet Subnetmask: 255.255.240.0 Fibre Channel IP Addresss: none Fibre Channel Subnetmask: none Gateway IP Address 10.32.48.1 DHCP: Off Refer to the Dell PowerEdge M1000e Enclosure Owner’s Manual that comes with your Blade Server Enclosure for information on using the CMC connect command. 5 Connect the cable to the SFP+ transceiver After modifying the IP address of the Brocade M6505 16 Gbps Fibre Channel SAN I/O Module, it is recommended that you cable all external ports to fabric connections before bringing the SAN I/O Module online. Begin by cabling the ports from the top (ports 17 and 18) and working down as needed (ports 19, 20, 21, 22, 23, and 0). At a minimum, for all licensed variants of the SAN I/O Module, ports 17 and 18 are pre-licensed at the factory as part of Dynamic Ports On Demand (DPOD). NOTE: To avoid damage to the fiber-optic cables, follow these guidelines: • Do not route the cable along a folding cable-management arm. • When you attach the cable to a device on slide rails, leave enough slack in the cable so that it does not bend to a radius of less than 38 mm (1.5 in.) when the device is extended, or becomes pinched when the device is retracted. • Tie wraps are not recommended for optical cables because they are easily overtightened. CAUTION A 50-micron cable should not be bent to a radius less than 2 inches under full tensile load and 1.2 inches with no tensile load. Brocade M6505 16 Gbps Fibre Channel SAN I/O Module QuickStart Guide 53-1002577-01 5 6 Establish an Ethernet connection Once you have successfully set the appropriate IP address of the SAN I/O Module, you can establish an Ethernet connection through the Dell M1000e Blade Server Enclosure Chassis Management Controller (CMC) to a remote management workstation for any additional configuration. The management workstation must be on the same Ethernet subnet as the CMC. NOTE Ensure that the SAN I/O Module is not being modified from any other connection until configuration is complete. Once an Ethernet connection is established, you can configure the SAN I/O Module by way of Telnet/SSH using the switch CLI, or by launching Web Tools. 7 Enable Native Fabric mode (Optional) The SAN I/O Module ships from the factory in Access Gateway (AG) mode. For direct connectivity to storage arrays, or native connectivity to an existing Brocade SAN, you will need to disable AG mode. When you disable AG mode, the module automatically reboots in Native Fabric mode. Once the switch reboots in Native Fabric mode, it will not join the SAN automatically. Refer to the section “Rejoin the SAN I/O Module to a fabric” on page 7 for instructions on how to join the switch to your SAN fabric. You can determine if the SAN I/O Module is running Native Fabric mode by entering the switchShow command to display the current switch configuration. If the SAN I/O Module is running in Native Fabric mode, the switch mode should display “Native.” As an alternative, you can enter the ag --modeShow command, which displays the current AG operating mode of the SAN I/O Module as either enabled or disabled. NOTE Disabling Access Gateway mode is disruptive because the switch is disabled and rebooted. Always back up the current configuration before enabling or disabling Access Gateway mode. Enabling Access Gateway mode clears the security and zone databases. Disabling Access Gateway mode clears the F_Port to N_Port mapping. Disable Access Gateway mode To disable AG mode on the SAN I/O Module, perform the following procedure. 1. Before disabling a switch in AG mode, save the current configuration file using the configUpload command in case you need this configuration again. 2. Enter the switchDisable command. switch:admin> switchdisable This command disables all user ports on a switch. All Fibre Channel ports are taken offline. If the switch is part of a fabric, the remaining switches reconfigure. You must disable the switch before making configuration changes. 6 Brocade M6505 16 Gbps Fibre Channel SAN I/O Module QuickStart Guide 53-1002577-01 3. Enter the ag --modeDisable command. switch:admin> ag --modedisable The console will display the message, “Access Gateway mode was disabled successfully. Switch is being rebooted.” 4. Wait for the switch to come up in “Native” mode. 5. Log in to the switch and verify that the switch is set to Native Fabric mode using the switchShow command. switch:admin> switchshow The switch mode should display “Native.” As an alternative, you can use the ag --modeShow command. The console will display the message, “Access Gateway mode is NOT enabled.” Refer to the Brocade Access Gateway Administrator’s Guide for information on re-enabling AG mode. Rejoin the SAN I/O Module to a fabric When a switch reboots after AG mode is disabled, the Default zone is set to no access. Therefore, the switch does not immediately join the fabric to which it is connected. Use one of the following methods to rejoin a switch to the fabric: • If you saved a Fabric OS configuration before enabling AG mode, download the configuration using the configDownload command. • If you want to rejoin the switch to the fabric using the fabric configuration, use the following procedure. To rejoin the Fabric OS switch to a fabric, perform the following steps: 1. Connect to the switch and log in using an account assigned to the admin role. 2. Enter the switchDisable command to disable the switch. switch:admin> switchdisable 3. Enter the defZone --allAccess command to allow the switch to merge with the fabric. switch:admin> defzone --allaccess 4. Enter the cfgSave command to commit the default zone changes. switch:admin> cfgsave 5. Enter the switchEnable command to enable the switch and allow it to merge with the fabric. switch:admin> switchenable The switch automatically rejoins the fabric. Brocade M6505 16 Gbps Fibre Channel SAN I/O Module QuickStart Guide 53-1002577-01 7 8 Brocade M6505 16 Gbps Fibre Channel SAN I/O Module QuickStart Guide 53-1002577-01