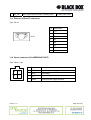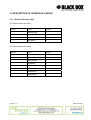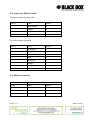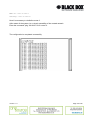
1
MDS920C-10BT
RACK-CARD
MDS921AE-10BT
STANDALONE
MDS922AE-10BT
MINI-RACK
Ethernet Router / Bridge
User Manual
Version
1.0
Revision
11 February 2003
© Copyright ©2002 by BLACK BOX Network Services AG. The contents of this publication may
not be reproduced in any part or as a whole, transcribed, stored in a retrieval system, translated
into any language, or transmitted in any form or by any means, electronic, mechanical, magnetic,
optical, chemical, photocopying, manual, or otherwise, without the prior written permission of
BLACK BOX Network Services AG. All rights reserved.
VERSION CONTROL.......................................................................................................... 5
1
INTRODUCTION........................................................................................................ 6
3
SPECIFICATIONS ................................FEHLER! TEXTMARKE NICHT DEFINIERT.
4
TECHNOLOGIES....................................................................................................... 9
4.1
xDSL technology, background .......................................................................... 9
4.2
4.1.1
Asymmetric DSL (ADSL) technology .................................................. 9
4.1.2
ISDN DSL technology ....................................................................... 10
4.1.3
High bit rate DSL (HDSL) technology................................................ 11
4.1.4
EXTRAns technology ........................................................................ 13
4.1.5
Multispeed DSL (MDSL) technology ................................................. 14
4.1.6
Multispeed DSL (MSDSL) technology............................................... 15
4.1.7
G.shdsl technology............................................................................ 16
Local area network integration. Access to Internet ......................................... 17
4.2.1
4.2.2
4.2.3
4.2.4
5
TCP/IP stack structure ...................................................................... 17
Address assignment in IP networks .................................................. 19
Bridging of local networks ................................................................. 21
Routing of networks........................................................................... 25
DESCRIPTION OF THE DEVICE ............................................................................ 31
5.2
5.1.1
Background ....................................................................................... 31
Operation mode .............................................................................................. 33
5.3
5.2.1
G.shdsl line interface......................................................................... 33
5.2.2
Ethernet 10BaseT interface............................................................... 34
5.2.3
ATM interface .................................................................................... 34
Description of LEDs ........................................................................................ 35
6
MECHANIC DESIGN ............................................................................................... 36
7
EQUIPMENT INSTALLATION................................................................................. 41
8
PROGRAMMING GUIDE......................................................................................... 43
8.1
Introduction ..................................................................................................... 43
8.2
Main menu of the bridge mode ....................................................................... 47
8.2.1
8.2.2
Version: 1.0
Help command .................................................................................. 47
Home command ................................................................................ 47
Page. 2 of 95
8.3
8.2.3
Default command .............................................................................. 48
8.2.4
Lan command.................................................................................... 48
8.2.5
List command .................................................................................... 49
8.2.6
Manage command............................................................................. 50
8.2.7
Mode command................................................................................. 52
8.2.8
Ping command .................................................................................. 53
8.2.9
Quick command ................................................................................ 53
8.2.10 R1483 command ............................................................................... 54
8.2.11 Restart command .............................................................................. 57
8.2.12 Save command ................................................................................. 57
8.2.13 Shdsl command................................................................................. 58
8.2.14 Show command................................................................................. 62
8.2.15 Ver command .................................................................................... 62
Main menu of the router mode ........................................................................ 62
8.3.1
8.3.2
8.3.3
8.3.4
8.3.5
8.3.6
8.3.7
8.3.8
8.3.9
8.3.10
8.3.11
8.3.12
8.3.13
8.3.14
8.3.15
8.3.16
8.3.17
8.3.18
8.3.19
9
FIRMWARE LOADING ............................................................................................ 79
9.1
10
Default command .............................................................................. 62
Dnsrelay command ........................................................................... 62
8.3.3 Ipoa command.......................................................................... 64
Lan command.................................................................................... 66
List command .................................................................................... 68
Manage command............................................................................. 68
Mode command................................................................................. 68
Pat command .................................................................................... 68
Ping command .................................................................................. 70
Pppoa command ............................................................................... 70
Pppoe command ............................................................................... 73
R1483 command ............................................................................... 74
Quick command ................................................................................ 76
Restart command .............................................................................. 77
Rtable command ............................................................................... 77
Save command ................................................................................. 78
Shdsl command................................................................................. 78
Show command................................................................................. 78
Ver command .................................................................................... 78
Firmware loading guide................................................................................... 79
TECHNICAL SPECIFICATIONS ............................................................................. 80
10.1 Interfaces ........................................................................................................ 80
10.1.1
10.1.2
Version: 1.0
Monitor interface................................................................................ 80
Network management interface ........................................................ 80
Page. 3 of 95
10.1.3 SHDSL interface................................................................................ 80
10.1.4 Network interface .............................................................................. 81
10.2 Power supply................................................................................................... 81
10.2.1 Protection against dangerous affects ................................................ 82
10.2.2 Surge safety ...................................................................................... 82
10.3 10.3 Climatic conditions .................................................................................. 82
10.4 10.4 Guarantee ............................................................................................... 83
10.5 10.5 Physical dimensions................................................................................ 83
11
CONNECTORS’ DESCRIPTION ............................................................................. 84
11.1 SHDSL connector ........................................................................................... 84
11.2 Monitor connector ........................................................................................... 84
11.3 Ethernet (10BaseT) connector ........................................................................ 85
11.4 Power connector (For MDS922AE-10BT)....................................................... 85
12
DESCRIPTION OF INTERFACE CABLES ............................................................. 86
12.1 «Direct» Ethernet cable................................................................................... 86
12.2 Cross-over Ethernet cable .............................................................................. 87
12.3 Monitor connector ........................................................................................... 87
13
DELIVERY SET ....................................................................................................... 88
14
GLOSSARY ............................................................................................................. 89
15
EXAMPLE OF NETWORK CONFIGURATION ....................................................... 92
15.1 Router 1 .......................................................................................................... 92
15.2 Router 2 .......................................................................................................... 94
Version: 1.0
Page. 4 of 95
VERSION CONTROL
version
Date
Major changes to previous version
0.1
30. Jul. 2001
First version
0.2
9. Sept. 2001
Pre-official version
Chapter 4.2 is changed
Small changes throughout the text
1.0
Version: 1.0
11. Feb. 2003
Layout, Small changes throughout the text
Page. 5 of 95
1 INTRODUCTION
MDS921AE-10BT, MDS920C-10BT and MDS922AE-10BT network and line termination units are
a part of the Black Box PAM family (hereafter family) constructed for the organization of highspeed communication channels over one pair copper lines (DSL).
This family of units represents G.shdsl modems that have 64 – 2312-kbit/s speed of data transfer.
The modern type of TC-PAM encoding has the best characteristics of long-distance data
transmission and electromagnetic compatibility while working over one pair subscriber lines. TCPAM can be deciphered as Trellis Coded Pulse Amplitude Modulation. The essence of this
encoding method consists of an increase of layer numbers (encoding states) from 4 (as in 2B1Q)
to 16 and use of a special error-correction mechanism.
This family of modems with different network interfaces (G.703, Nx64 (V.35/V.36/X.21) and
Ethernet 10Base-T) can be used as transfer systems between multiplexers, routers and crossconnection devices in different networks, for example:
1. for the organization of E1 (2048 Kbit/s) channels between Public automatic branch
exchange (PABX), Digital Loop Carrier systems, TDM multiplexing and terminal stations
of mobile networks as well as their connection to SDH networks;
2. for the organization of high-speed communication channels (data links) in data transfer
networks and connection of Internet-providers’ access nodes;
3. for the connection of remote working stations (computers) and small Ethernet branches to
the office computer network and for integration of IP and IPX network segments, for
providing Internet access, etc.
The Ethernet 10BaseT interface allows an operator to provide services for the interconnection of
territorially distributed local networks, to provide high-speed access to Internet and to use
MDS921AE-10BT, MDS920C-10BT and MDS922AE-10BT devices in applications that require
high speed data transmission.
The use of ATM technology makes it possible to connect MDS921AE-10BT, MDS920C-10BT and
MDS922AE-10BT units to DSLAM devices of different manufacturers.
The units of this family, subdivided into network termination (NTU) and line termination units
(LTU), can be installed at the customer (user) premises and at the operator (provider) nodes,
respectively. NTU–NTU connections (for instance for the connection of two local networks) or
LTU–LTU connections (for the connection of large nodes) can be used to organize “point-topoint” connection.
It is possible to power units locally with 48 VDC (telephone station batteries) and with 220 VAC.
This family of devices has three mechanic designs:
1. Sub-Rack (MDS920C-10BT) is a unit to be mounted in 19’’ chassis (MDS920AE-RMDC)
2. Mini-Rack (MDS922AE-10BT) is a unit of 1U height (44.5 mm) to be mounted in 19’’ rack
cabinet;
3. Stand Alone (MDS921AE-10BT) is a compact unit to be mounted on the tabletop/desktop
or another horizontal surface.
Version: 1.0
Page. 6 of 95
The units have all the possibilities for monitoring and management. Different management
protocols that are used in the firmware of the family allow one to implement:
1. local management using a computer, which supports the VT 100 type emulation of the
terminal;
2. remote monitoring and configuring over Telnet protocol;
3. remote monitoring and configuring over HTTP protocol;
4. support of the CMU SNMP-agent for remote monitoring and configuring while working as
a part of sophisticated networks under Simple Network Management Protocol (SNMP).
The use of Flash-memory chips as read only memory (ROM) facilitates the loading of new
firmware versions.
Version: 1.0
Page. 7 of 95
3 SPECIFICATION
• High-speed symmetric data transfer over a 135-ohm physical twisted copper pair according to
G.shdsl ITU G.991.2;
• TC-PAM line encoding;
• line speed from 72 Kbit/s to 2320 Kbit/s;
• automatic and manual line speed adjusting;
• Ethernet 10Base T interface;
• bridge and router function;
• built-in 4-port HUB on;
• AAL5 for ATM over SHDSL;
• function of traffic priorities;
• DNS support;
• built-in DHCP server;
• NAT support;
• static and dynamic routing, RIP;
• built-in function of diagnostics and self-testing;
• low power consumption;
• console port for local management;
• TELNET and HTTP management;
• built-in SNMP agent;
• possibility of remote firmware loading through TFTP protocol;
• different types of mechanic design.
Version: 1.0
Page. 8 of 95
4 TECHNOLOGIES
4.1
xDSL technology, background
xDSL technology appeared due to the growing user’s demand to high-speed digital stream
transfer over telephone copper pairs. Operators had to organize the interconnection of backbone
stations of cellular networks, Digital Loop Carrier systems, interstation connection and to provide
high-speed Internet access at minimal expenses. In these circumstances, it was reasonable to
use the existing telephone cables. The new technology acquired the name – xDSL (Digital
Subscriber Line).
“x” key
x is a variable in the DSL technology, where every word has its own meaning. Thus the term
“Digital” means, that not an analogue but digital signal, that was processed by one of line
encoding methods, is transmitted over pairs. In fact, the term xDSL points at this or that line code
the distance of data transfer and maximal connection speed depend on it. However, some
technologies, for example ADSL, can use one of the two line codes: either Discrete Multi-Tone
(DMT) or Carrierless Amplitude/Phase (CAP).
The term “Subscriber Line” is referred to physical copper pairs of telephone cable, or in simple
words, to “direct wires”. The term DSL was originally referred to the ISDN technology, but later
was borrowed by the developers of xDSL technologies.
4.1.1 Asymmetric DSL (ADSL) technology
The most popular DSL technology, ADSL, was developed in Bellcore laboratory in late 1980s.
Standards Institutes assigned the use of carrier set modulation, which acquired the name DMT,
to ADSL, while another leading method received the name of Rate-Adaptive DSL (RADSL).
ADSL transmits downstream to the end user and upstream to the net. The ADSL technology
does not use 25–30-kHz frequencies, used for a subscriber’s access to public switched telephone
network (PSTN). This provides simultaneous subscriber’s access to data transfer networks and
PSTN over the same copper pair. The original ADSL implies the presence of splitters both on
LTU and NTU. However, ADSL without splitters found its use and acquired the name of ADSL
Lite or G.lite. Later, it was standardized by ITU-T. This standard supports downstream speeds up
to 1.5 Mbit/s and upstream speeds up to 512 Kbit/s.
4.1.1.1 ADSL in brief
Standard
• G.lite G.992.1 (G.DMT)
• T1 413-1998
• Interoperability between equipment of different manufacturers
Version: 1.0
Page. 9 of 95
Transmission rate
• Downstream
• up to 6–8 Mbit/s
• up to 1.5 Mbit/s for G.lite
• Upstream
• up to 640 Kbit/s
• up to 512 Kbit/s for G.lite
Line code
• DMT
• CAP
Number of pairs
• one pair
Usage
• public network operators (PNO) and Internet service providers
Restrictions
• Asymmetry
4.1.2 ISDN DSL technology
The IDSL technology is based on the ISDN technology, but without switching. IDSL uses 2B1Q
line encoding and has two B and one D channel capacity, which allows transmitting data bidirectional at 144 Kbit/s. The necessity to transmit simultaneously voice and data served as a
powerful spur to the further development of IDSL. Thus, the channel capacity is divided between
voice unit and digital interface. NTU-128 Voice is an example of a device implementing this
mode,
Version: 1.0
Page. 10 of 95
4.1.2.1 IDSL in brief
Standard
• T1.601
• interoperability between equipment of different manufacturers at the U interface layer
Transmission rate
• up to 144 Kbit/s
• up to 64 Kbit/s + voice channel in NTU-128 Voice
Line code
• 2B1Q
Transmission medium
• one pair
• possibility of the regenerator’s installation
Usage
• PNOs and providers of Internet services
• commercial operators
• integration of LANs
Restrictions
• low speed
• impossibility of transmission rate adjusting
4.1.3 High bit rate DSL (HDSL) technology
The HDSL technology allows transmitting synchronous digital data at 1.54- or 2.048-Mbit/s speed
over two copper pairs. This standard was accepted by European Telecommunication Standards
Institute. 2B1Q or CAP 64 are used as line codes. The data transmission rate over each pair is
1168 Kbit/s, the decrease of linear rate is not provided. The 2B1Q encoding HDSL technology
allows to connect up to 3 remotely powered regenerators.
Version: 1.0
Page. 11 of 95
4.1.3.1 HDSL in brief
Standard
• ETSI TS 101 135
• interoperability between equipment of different manufacturers is not provided
Transmission rate
• 1168 Kbit/s over each pair (2 Mbps over two pairs)
Line code
• 2B1Q
• CAP 64
Transmission medium
• two pairs
• possibility of the regenerator’s installation (up to 3)
Usage
• PNOs
• long-haul E1 transmission
• organization of trunk lines between PABX
• increase of capacity of subscribers’ lines with the help of Digital Loop Carrier systems
• high-speed access to SDH networks
Restrictions
• two pairs are used for stream transmission
• impossibility to regulate transmission rates
• increased influence on analog systems with frequency division multiplexing/demultiplexing
Version: 1.0
Page. 12 of 95
4.1.4 EXTRAns technology
xDSL solutions are widely used for the organization of interstation trunk lines, creation of routes
for multiplexers and routers. But the wide spread of analog systems with frequency division
multiplexing/demultiplexing of the K-60, K-24, K-12 types makes it difficult to use standard xDSL
solutions over backbone (trunk lines) and zone cables of the different types with the wire
diameter of 0.9–1.2, if one of the analog systems works over cables. To digitalize local and zone
lines, NTC NATEKS engineered the EXTRAns technology based on asymmetric adaptive
multimode CAP modulation with a regulated level. This technology allows transmitting
synchronous digital stream with a changeable line speed from 144 to 2064 Kbit/s over two copper
pairs. The technology stipulates the installation of up to 6 remotely powered regenerators. The
number of regenerators can be doubled if they are remotely powered from two-manned repeater
station, where power source is available.
4.1.4.1 EXTRAns in brief
Standard
• Patent № 2001104235/20(004956) of the Federal Institute of Industrial Property
• interoperability with the equipment of other manufacturers is not provided
Transmission rate
• 144–2064 Kbit/s
Line code
• CAP-EXTRAns
Transmission medium
• two pairs
• possibility of the regenerator’s installation (up to 6)
Usage
• PNOs, Competitive Local Exchange Carriers (CLECs)
• creation of long-haul digital routes with many regenerating segments
• organization of trunk lines between PABX
• increase of capacity of subscribers’ lines with the help of Digital Loop Carrier systems
Version: 1.0
Page. 13 of 95
• high-speed access to SDH networks
Restrictions
• two pairs are used for full stream transmission
4.1.5 Multispeed DSL (MDSL) technology
The term SDSL was used for several years on the market. It was referred to all solutions meant
for the synchronous digital stream transmission over one pair. This technology supports the
possibility of line speed regulation over long-haul distances. The technology is implemented in
MDSL and MSDSL, the latter one having a different line code. The MDSL technology uses 2B1Q
line code. The transmission rate varies from 144 to 2320 Kbit/s. Regenerators are not used here.
4.1.5.1 MDSL in brief
Standard
• ETSI TS 101 135
• interoperability between equipment of different manufacturers at the level of DSL chips
Transmission rate
• 144–2320 Kbit/s
Line code
• 2B1Q
Transmission medium
• one pair
• impossibility of the regenerator’s installation
Usage
• Internet service providers
• access to Internet
• integration of LANs
Version: 1.0
Page. 14 of 95
Restrictions
• the shortest distance of data transfer over one wire compared to other technologies
4.1.6 Multispeed DSL (MSDSL) technology
The MSDSL technology is a further development of the MDSL technology. It allows to run over
longer distances because of using a more progressive line code – CAP. In addition, it is possible
to install a CAP-splitter, which allows using the copper pair for both data transfer and telephoning
connection. The technology supports the installation of a line regenerator. However, the spectral
characteristics of the CAP code interfere with other xDSL systems, running over the neighboring
pairs in the same cable. The ADSL technology is exposed to the greatest influence.
4.1.6.1 MSDSL, in brief
Standard
• ETSI TS 101 135
• interoperability between equipment of different manufacturers is not provided
Transmission rate
• 144–2064 Kbit/s
Straight-line code
• CAP8…CAP128
4.1.6.2 Transmission medium
• one pair
• one regenerator
Usage
• PNOs, Internet service providers
• access to Internet
• integration of LANs
Version: 1.0
Page. 15 of 95
• creation of trunk lines between PABX
• increase of capacity of subscribers’ lines with the help of Digital Loop Carrier systems
• high-speed access to SDH networks
Restrictions
• absence of compatibility with the equipment of other manufacturers
• interference with other xDSL services
4.1.7 G.shdsl technology
The G.shdsl technology was engineered as a universal technology of synchronous digital data
transmission. It became an international standard for symmetric systems. The technology
supports the transmission over one and two pairs. Special stress, while developing the
technology, was laid to provide spectral compatibility with other technologies such as ADSL,
IDSL, MDSL, MSDSL.
4.1.7.1 G.shdsl, in brief
Standard
• ITU-T G.991.2
• compatibility with the equipment of other manufacturers
Transmission rate
• 192–2360 Kbit/s
Line code
• TC-PAM
Transmission medium
• one or two pairs
• possible installation of up to three regenerators
Usage
• PNOs, Internet service providers
Version: 1.0
Page. 16 of 95
• access to Internet
• integration of LANs
• creation of trunk lines between PABX
• increase of subscribers’ lines with the help of Digital Loop Carrier systems
• high-speed access to SDH networks
4.2
Local area network integration. Access to Internet
Local area networks facilitate documentation-processing, access to data in modern companies
but the Ethernet technology does not allow to transfer data at long distances and create Wide
Area Networks (WANs). xDSL can be used for the solution of this problem.
4.2.1
TCP/IP stack structure
TCP/IP became widely practiced with the development of the Internet all over the world. It was
engineered earlier than the OSI model, and that is why differs greatly.
Fig.1 shows the TCP/IP structure.
TCP/IP protocols are composed of 4 layers:
Layer IV
The lowest layer (Layer IV) corresponds to the physical and data link layers of the OSI reference
model. This layer in TCP/IP is not regulated, but it supports all the popular physical and data link
layer standards: for LANs, this is Ethernet, for WANs, these are Point-to-Point Protocols, SLIP,
Frame Relay. However, when a new LAN and WAN technology appears, it is usually included
into TCP/IP stack because of a specially engineered request for comments (RFC), which
determines the encapsulation method of IP packets into its frames. Thus, for the encapsulation of
IP protocols into ATM cells, there was engineered a special RFC 1483 method. This method is
used in Black Box PAM modems as well.
Version: 1.0
Page. 17 of 95
Fig.1 Correspondence of TCP/IP layers with the OSI model layers
Layer III
The next layer (Layer III) is a layer of internetwork interconnection, which enables packet
transmission using different transmission media, LANs, WANs, xDSL, etc.
The Internet Protocol is used as the primary protocol of this layer (session layer in terms of the
OSI model).
All protocols, connected with data collecting and updating of routing tables, such as Routing
Internet Protocol (RIP) refer to this layer. This protocol is used in Black Box PAM modems.
Layer II
Layer II is sometimes called basic. The Transmission Control Protocol (TCP) and User Datagram
Protocol (UDP) function at this level. TCP provides reliable packet transmission using virtual
links. UDP, as well as IP, enables datagram application packet transmission. It functions as a
connecting link between network protocols and numerous application processes.
Layer I
Layer I is called the application layer. It contains a great number of application layer protocols
and services. Such widely used protocols as File Transfer Protocol (FTP), Telnet terminal
emulation protocol, Simple Network-Management Protocol (SNMP) (used in the e-mail), WWW
protocols and many others belong to this layer.
Version: 1.0
Page. 18 of 95
4.2.2 Address assignment in IP networks
Any IP-network device is characterized by the addresses of three groups:
Physical address. It is a hexadecimal MAC address of the network adapter or port. The MAC
address is unique and is 6-byte long: the first 3 bytes are the manufacturer’s identifier and the
other 3 bytes are uniquely assigned by the manufacturer itself. For example, 18-B7-34-39-AA-FC.
Network address (IP address). It is assigned during the configuring of network devices by the
administrator and does not depend on the physical address. The address has a decimal
representation and its length is 4 bytes. It consists of two parts: network number and node
number. Depending on the class of the network, different quantity of bytes is assigned to the
network number..
IP address classes
The network address consists of two logical parts: network and node number. The values of the
first address bits mean what part of the address refers to the network number and what to the
node number:
• Class A networks. The network number takes one byte, the other three show the node number
in the network. Class A networks can only have numbers in the 1.0.0.0–126.0.0.0 range.
Networks with number are not used, and number 127 is reserved. The node count must be more
than 126 but less than 224. The first bit of the network address of Class A must start with 0.
• Class B networks. The network and node numbers take two bytes each. Class B networks can
have numbers in the 128.0.0.0–191.255.0.0 range. The node count must be more than 28 but
less than 216. The network address of Class B must have the first two bits equal to 10.
• Class C networks. The network number takes three bytes. Class C networks can have numbers
in the 192.0.1.0–223.255.225.0 range. The node count must no be more than 28. The network
address of Class C must have the first three bits equal to 110.
• Class D networks. The networks of this class have a special multicast address. Class D
networks can have numbers in the 224.0.0.0–239.255.225.225 range. All nodes that have this
address will receive a packet with an address that belongs to Class D network. The network
address of Class D must begin with a sequence of 1110.
• Class E networks. The networks of this class are not used and they are reserved for future
(experimental) usage. Class E networks can have numbers in the 240.0.1.0–247.255.225.225
range. The network address of Class E must begin with a sequence of 11110.
Version: 1.0
Page. 19 of 95
4 bytes
1
2
3
4
Class А
0
Network №
Node №
Class B
1 0
Network №
Node №
Class C
1 1 0
Network №
Node №
Class D
1 1 1 0
Multicast address
Class E
1 1 1 1 0
Reserved
Masks
Network mask is a number, consisting of four bytes. It is a decimal number divided by dots, and it
is used together with the IP address. A mask usually contains decimal numbers – 255. The use of
masks allows providing users with narrow address ranges compared to networks of different
classes. The least dedicated range without masks is Class C network, i.e. 256 addresses. Using
masks, the entry 192.168.1.253 mask 255.255.255.252 defines the address 192.168.1.253 in the
subnet of four-address range: from 192.168.1.252 to 192.168.1.255.
4.2.2.1 Automatic assignment of IP addresses
The administrator can assign IP addresses to network devices either manually or automatically. If
there are many devices in the network, the address assignment is a long and painstaking
process. Dynamic Host Configuration Protocol (DHCP) was developed to facilitate this process.
The primary task of DHCP is dynamic IP address assignment. However, besides dynamic, DHCP
can support simpler means of manual and automatic statistic address assignment.
The administrator takes active part during the manual procedure of address assignment. He
presents information about correspondence of IP addresses to MAC addresses or other
customer’s identifiers to DHCP server.
During the automatic-static address assignment, the DHCP server assigns a free IP address from
the IP address range without reference to the administrator. The administrator gives the
boundaries of the address range during the DHCP-server configuration. In this case, the IP
address remains the same all the time.
During the dynamic address assignment, the DHCP server assigns an address to the customer
for a limited period of time. It means that later other computers can reuse the IP address.
Version: 1.0
Page. 20 of 95
The dynamic address assignment allows one to create IP networks in which the number of nodes
exceeds the number of the IP addresses administrator has.
4.2.3 Bridging of local networks
Bridges are the simplest devices for logical network structuring. They divide the transmission
network medium into segments (logical segments), forwarding data from one segment to another,
if such a transmission is necessary, i.e. if the destination address belongs to another subnet.
Bridges are data communication devices that operate at the data link layer of the OSI reference
model. They use addresses of computers and other devices. Bridges control data flow, handles
transmission errors, provides physical (as opposed to logical) addressing and manage access to
the physical medium. Bridges provide these functions by using various link-layer protocols that
dictate specific flow control, error handling, and addressing and medium-access algorithms.
The primary advantage of bridging is the upper-layer protocol transparency. Because bridges
operate at the data link layer, they are not required to examine upper layer information. It means
that that they can rapidly forward traffic representing any network layer protocol.
By dividing large networks into self-contained units, bridges provide a range of additional
advantages. First, because only a certain percent of traffic is forwarded, bridges diminish traffic
passing through devices of all connected segments. Second, bridges act as a firewall for some
potentially damaging network errors. Third, bridges allow communication between a larger
number of devices than any single LAN connected to the bridge would support. Fourth, bridges
extend the effective LAN length, permitting the attachment of distant stations.
Types of bridges
Bridges can be either local or remote. Local bridges provide a direct connection of subnet
segments in the same area. Remote bridges connect subnet segments in different areas, usually
over telecommunication lines. The MDS92xxx-10BT, device belongs to remote bridges.
Remote bridging represents several unique internetworking challenges. One of them is the
difference between LAN and WAN speeds. Vastly different LAN and WAN speeds sometimes
prevent users from running delay-sensitive network applications over the WAN.
Remote bridges cannot increase WAN speeds, but they can compensate for the speed
discrepancies by using buffering capacities. If a LAN device capable of a 10-Mbit/s transmission
rate intends to communicate with another remote LAN device, the local bridge must regulate the
10-Mbit/s information flows in order not to overwhelm the 2-Mbit/s serial link. It is done by storing
the incoming data in buffers and transmitting it over a serial link. This can be achieved only for
short bursts of data that do not overwhelm the bridge’s buffering capacity.
The MDS92xxx-10BT device implements “transparent bridge” and “spanning tree” algorithms.
The “transparent bridge” is called so because its presence and operation is transparent to all
network hosts.
A bridge builds its own address table while passively monitoring the traffic. At this stage it
extracts the information about source addresses of data frames. The source address shows that
it belongs to a certain node of this or that network segment. Fig. 2 shows the creation of an
Version: 1.0
Page. 21 of 95
address table of a simple network consisting of two segments.
Fig.2 Simple network
MAC address
Port
1
2
3
Port 1
4
Port 2
Segment 1
Segment 2
Bridge
1
1
2
1
3
2
4
2
Each port work as an end node of the network segment. Originally, the bridge does not know
what nodes with what MAC addresses are connected to each of its port. That is why it sends any
received frame to all ports excluding the port from which the frame was received. Simultaneously
the bridge studies the source address of the frame and fills its table: what port (of a MAC
address) belongs to this or that segment.
Later, the bridge uses its table to forward the traffic. When one of the bridge interfaces receives
the information unit, the bridge seeks for the destination address in its internal table. If the table
contains an association between the destination address and any of the ports of this bridge,
excluding the one the information unit was received on, then the unit is forwarded from the
indicated port. If such an association is not established, the information is flooded to all ports,
except the inbound port. Broadcast and multicast-address messages are also flooded as in the
previous case.
Transparent bridges isolate in-segment traffic, thus reducing the traffic clearly seen in each
individual segment. This improves the response time of the network, seen by the user. The extent
of the traffic shortening and response-time improvement depends on the volume of intersegment
traffic relative to total traffic as well as the volume of the broadcast and multicast traffic.
One of the drawbacks that interfere with the “transparent bridge” algorithm is the presence of
network “loops”. It is shown in Fig.3:
Version: 1.0
Page. 22 of 95
Fig.3 Network with loops
Suppose that host A sends an information unit to host B. Both bridges receive this information
unit and conclude that host A belongs to network 2. Unfortunately, after host B receives two
copies of the information unit from host A, both bridges again receive the same information unit
onto their interfaces with network 1, because all hosts receive all messages of broadcast LANs.
In some cases bridges change their internal tables to indicate that host A is on network 1. When
host B rep[lies to the information unit of host A, both bridges will receive and then ignore these
replies, since their tables will indicate that this destination address (host A) is on the same
network segment as the information unit source.
Another disadvantage is cloning (proliferation) of broadcast messages in networks with loops.
Assume that the initial information unit of host A is a broadcast. Both bridges will forward this
information unit endlessly, using the available network bandwidth and blocking the transmission
of other packets on both segments.
To solve the above-described problems there was engineered the spanning tree algorithm (STA).
It preserves the benefits of loops, eliminating their drawbacks. The algorithm was published in the
IEEE 802.1d specification.
The STA designates a loop-free subset of the network's topology by placing those bridge ports
that, if active, would create loops into a standby (blocking) mode. Blocking bridge ports can be
activated in the event of primary link failure, providing a new path through the internetwork. Figs 4
and 5 illustrate how the STA eliminates loops.
Version: 1.0
Page. 23 of 95
Fig. 4 Network before running STA
The STA calls for each bridge to be assigned a unique identifier. Typically, this identifier is one of
the bridge's Media Access Control (MAC) addresses plus a priority. Each port in every bridge is
also assigned a unique (within that bridge) identifier (typically, its own MAC address). Finally,
each bridge port is associated with a path cost. The path cost represents the cost of transmitting
a unit onto a LAN through that port. In Fig. 4, path costs are noted on the lines emanating from
each bridge. Path costs are usually defaulted, but can be assigned manually by network
administrators.
The first step in spanning-tree calculation is the selection of the root bridge, which is the bridge
with the lowest value bridge identifier. In Fig. 4, the root bridge is Bridge 1. Next, the root port on
all other bridges is determined. A bridge root port is the port through which the root bridge can be
reached with the least aggregate path cost. This value (i.e. the least aggregate path cost to the
root) is called the root path cost.
Finally, designated bridges and their designated ports are determined. A designated bridge is the
bridge on each LAN that provides the minimum root path cost. A LAN's designated bridge is the
only bridge allowed to forward information units to and from the LAN for which it is the designated
bridge. A LAN's designated port is the port that connects it to the designated bridge.
In some cases, two or more bridges can have the same root path cost. For example, in Fig. 4,
both Bridges 4 and 5 can reach Bridge 1 (the root bridge) with a path cost of 10. In this case, the
bridge identifiers are used again, this time to determine the designated bridges. The priority is
given to LAN V of Bridge 4 over LAN V port of Bridge 5.
Using this process, all but one of the bridges directly connected to each LAN are eliminated,
thereby removing all loops between two LANs. The STA also eliminates loops involving more
than two LANs, while still preserving connectivity. Fig. 5 “Network after running STA” shows the
results of implementing the STA to the network shown in Fig. 4. Comparison of these two figures
illustrates that the STA placed Bridge 3 and Bridge 5 ports to LAN V into the standby mode.
Version: 1.0
Page. 24 of 95
Fig. 5: Network after running STA
The spanning-tree calculation occurs when the bridge is powered up and whenever a topology
change is detected. The calculation requires communication between the spanning-tree bridges,
which is implemented through configuration messages. Configuration messages contain
information identifying the bridge that is assumed to be the root (root identifier) and the distance
from the sending bridge to the root bridge (root path cost) and also the bridge and port identifier
of the sending bridge and the age of information contained in the configuration message.
Bridges exchange configuration messages at regular intervals (typically 1–4 s). If a bridge fails
(causing a topology change), neighboring bridges will soon detect the lack of configuration
messages and initiate a spanning-tree recalculation.
The MDS92xxx-10BT device implements both transparent bridge and spanning tree algorithms.
4.2.4 Routing of networks
The word “routing” means forwarding information through an internetwork from source to
destination. At least one node must be passed when transmitting data. Routing is often
contrasted with bridging. The main difference between bridging and routing consists in the fact
that bridging occurs at the data link layer of the OSI reference model, while routing occurs at the
network layer. It means that routing and bridging use different information while moving it from
source to destination. It results in different way of implementing their tasks.
4.2.4.1 Routing components
Routing consists of two basic activities: determination of optimal routing paths between source
and destination and data transmission through network. The latter is called switching.
Version: 1.0
Page. 25 of 95
Optimal path determination
The determination of the optimal path is based on different standards of measurement, for
example, path length, and metric. Routing algorithms calculate path indexes to determine the
optimal path to destination.
To facilitate the process of path determination, routing algorithms initialize and maintain routing
tables, which contain the routing information. This information changes depending on the routing
algorithm used.
Routing algorithms fill in routing tables with different information. “Destination/next hop”
combinations tell a router that a destination can be reached through the shortest path by sending
a packet to a particular router representing the “next hop” on the way to the final destination.
When the router receives an incoming packet, it checks the destination address and makes an
attempt to associate this address with a next hop. An example of a routing table is shown below.
Destination address
Next hop
27
Router A
57
Router B
17
Router C
24
Router A
52
Router A
16
Router B
26
Router A
Routing table also contain other information. “Metrics” represent information about the desirability
of a path or a route. Routers compare metrics to determine the optimal routes. Metrics differ
depending on the routing algorithms being used. A variety of common metrics will be described
below in this chapter.
Routers communicate with each other (and maintain their routing tables) by transmitting various
messages. One of these messages is the “routing update”. The routing update usually includes
all or a part of a routing table. By analyzing routing update information from all routers, any router
can build a detailed picture of network topology. Another example of a message exchange
between routers is a “link-state advertisement”. Link state advertisements inform other routers
about sender’s link-states. Link information also can be used to build a full picture of network
topology. After the network topology is determined, routers can determine optimal paths to
destinations.
Version: 1.0
Page. 26 of 95
Switching
Switching algorithms are relatively simple and are basically the same for most routing protocols.
In most cases, a host determines the necessity of sending a packet to another host. Having
received a router's address, the source host sends a packet addressed specially to a router's
physical (MAC layer) address, however, the packet contains (network-layer) protocol address of
the destination host.
After checking the packet's destination protocol address, the router determines whether the
destination address is in the routing table. If the router did not find the address in the routing
table, it typically drops the packet. If the router knows where to forward the packet, it changes the
destination physical address to that of the next hop and transmits the packet.
During the packet transmission through an internetwork, its physical address changes, however,
the address of the network-layer protocol remains unchanged. Fig. 6 illustrates this process.
Fig. 6 Change of packet addresses
Version: 1.0
Page. 27 of 95
4.2.4.2 Routing algorithms, RIP
The rate of information processing and its trustworthiness depend on the routing algorithm. But
more complicated and high-speed algorithms imply high requirements to the router’s capacity.
Static routing algorithms are the simplest ones. The network administrator establishes routing
tables, and they do not change until the network administrator changes them. Algorithms of static
routers are simple to design and they work well in simple networks with low traffic.
Dynamic routing algorithms are more complicated ones. They adjust in real time to network
changes. They do this by analyzing incoming routing update messages. If the router receives a
message about a network change, it makes updates it’s routing table and sends out this
information to all the nodes.
The Routing Information Protocol (RIP), implemented in MDS92xxx-10BT modems is a dynamic
routing protocol.
RIP routing tables contain information about packet destination, next hop, and hop counts
(metrics). The routing table can also contain other information such as timers.
Destination
Next hop
Distance
Timers
Flags
Network A
Router 1
3
t1, t2, t3
x,y
Network B
Router 2
5
t1, t2, t3
x,y
Network C
Router 1
2
t1, t2, t3
x,y
RIP supports only optimal routes to destinations. If new information provides a better route, this
information updates the old one. Changes in the network topology can cause changes in the
routes, resulting, for example, in creation of better routes to a definite destination. If the network
topology changes, these changes are reflected in updating messages. For example, when a
router finds a failure of one of the links or another router, it recalculates its own routes and sends
out routing updates. Each router that receives routing update messages, includes changes to its
tables and sends them out.
4.2.4.3 Internet Access through LANs, NAT
The Network Address Translation technology allows one to solve to main problems the Internet
faces now. This is a restriction of the address space of IP and routing scaling.
If necessary to get an Internet access, when the number of network nodes connected to the
Internet provider is bigger that the number of IP addresses, NAT allows private IP networks,
using unregistered addresses, to get an access to Internet resources. NAT functions are
configured on a border router, dividing Intranet and Internet networks.
If necessary to change internal address system, instead of a complete change of all the
addresses (and this is quite a pain-taking process), NAT allows translating them according to the
new address plan.
Version: 1.0
Page. 28 of 95
If there is a necessity to divide traffic on the basis of TCP ports, NAT makes it possible to map
local addresses with one external address using TCP load distribution function.
NAT functioning
The NAT technology defines, as it is stated in the RFC 1631 standard, the ways of IP address
translation, used in one network into another network addresses.
There exist three basic principles of address translation: static, dynamic and masquerading.
Static Network Address Translation
With the help of this concept, NAT can organize translation between the same class networks.
(For example, when each of two networks contain one address (mask – 255.255.255.255). This
strategy is the simplest, because the translation can be described by a couple of simple logical
transformations.
Let us cite an example of address translation from two Class C networks – 194.24.90 and
195.60.3. While passing through NAT to the sender’s address field, the packet, addressed from
the host 194.24.90.13 will contain a change in the IP header from 194.24.90.13 to 195.60.3.13.
Dynamic Address Translation
Dynamic translation is necessary when the number of addresses (internal and external) being
translated is different, however, dynamic translation is sometimes used when static translation
does not work. The number of intercommunicating hosts will be limited, in any case, by the
number of free (available) addresses on the NAT interface.
Dynamic NAT is more complicated, because it requires to keep track of intercommunicating hosts
and possibly even of connections, in case when the information (content) must be modified at
Layer 4 (TCP, for example).
For example it is necessary to translate dynamically all IP addresses in Class B network 138.201
into addresses of Class C network 190.200.112. Then, each new connection receives an address
from Class C network if there are available addresses there.
This technology, in contrast with static translation, introduces a new notion – NAT table. It is a
rendition table of internal addresses and NAT-interface addresses (hereinafter, NAT addresses)
Masquerading (NAPT, PAT)
The Port Address Translation is another case of dynamic translation. Here, we have only one
external address behind which, internal addresses “are hidden” – there can be as many internal
addresses as possible. In contrast to the original dynamic translation, PAT does not mean that
there can be only one connection at a time. To multiplex the number of connections, TCP port
information is used by this masquerading. Thus, only the number of ports available limits number
of simultaneous connections.
Version: 1.0
Page. 29 of 95
Let us illustrate PAT functioning:
There is an internal network 191.167.0 and a router with a MAC address 193.200.150.5. A host
from the internal network with an address 191.167.0.10 and TCP source port 1243 addresses
web-server 205.131.1.1. While passing through the NAT interface, the outcoming packet will
have the following changes: in the IP header, the source address is changed and the source port
in the TCP header is changed from 1243 into, for example, 62300. The following change is then
recorded in the Nat table:
Internal IP
Port local
NAT port
191.167.0.10
1243
61300
Thus, when the web-server’s reply is received, the Nat table will be updated and the packet
addressed to port 61300, will be corrected: the internal address will be then in the IP header, and
in the TCP header – port 1243, now acting as a destination port.
Incoming connections are impossible with masquerading, since even when a host has an entry in
the masquerading table of the NAT device this entry is only valid for the connection being active.
Version: 1.0
Page. 30 of 95
5 DESCRIPTION OF THE DEVICE
5.1.1 Background
MDS92xxx-10BT is a device of Digital Subscriber Line (DSL) system used for data transmission
over symmetrical physical copper lines. The TC-PAM line encoding technology (G.shdsl
standard), which was accepted by ITU as the only world standard of high-speed symmetrical data
transmission over one pair, is used to transmit data over a twisted pair. The device consists of the
following:
• CPU with a firmware;
• memory unit;
• signal processor;
• power supply unit (DC/DC converter);
• Ethernet 10BaseT network interface;
• management interface;
• line interface.
Fig. 15 shows a structural schematic of the device.
Version: 1.0
Page. 31 of 95
Common Bus
To
DSL
line
CPU
RS-232
RAM
DSP
AFT
Ethernet
ROM
Ethernet
10
BaseT
+5 V
12 V
DC/DC
+3,3 V
RS232
Monitor
Fig. 15 Structural schematic of MDS92xxx-10BT
The CPU enables control of all devices’ functioning units in accordance with the firmware and the
parameters configured. The CPU supports the Ethernet and RS-232 interfaces.
The memory unit keeps the control micro program, temporary values and buffers Ethernet
packets.
The setup of the parameters, mode switching and system control are enabled though the
management interface with the help of VT-100-type terminal or over Telnet and HTTP protocols
through Ethernet. The firmware loading can be implemented through the Ethernet interface as
well.
The signal processor enables translation of data flow before it is transmitted over a line. The
signal processor also enables:
• structure generation of the SHDSL cycle (word synchronization, bits, etc.) and its filling with
data:
• synchronization flattening between the internal bus of the device and transmission on the line
(i.e. management of the stuffing algorithm).
The signal processor also controls the process of communication on lines and digital processing
Version: 1.0
Page. 32 of 95
of the incoming signal.
The line interface includes a scheme with integrated into it Digital-to-Analog and Analog-to-Digital
Converters, input and output amplifiers with a programmed amplification and analog filters that
are used to convert digital data into a signal and visa versa.
The device is powered from an in-built 3.3-V or 5-V AC-DC/DC adapter. The input voltage of the
secondary power supply source is 38…72.0 V or 200+/-10% VAC.
The network interface unit converts the data signal layers of the device, connected to network
interface and data preprocessing in accordance with the configured operation mode of the
network interface before the data is transmitted onto the chip.
5.2
Operation mode
This part contains the description of different operation modes of the device.
The operation mode can be changed locally from the control computer connected to the device
management interface or remotely over Telnet/HTTP protocols.
5.2.1 G.shdsl line interface
“Master/Slave” mode
To start up a link between two devices, one system must be configured as master and the other
as slave. Moreover, the link start-up is controlled by the COE (Central Office Equipment) unit. It is
impossible to start up a link in the COE-COE or CPE-CPE configuration. The devices are
delivered in the CPE (Customer Premises Equipment) mode (default setting).
Connection at a fixed speed (Fixed Mode)
The devices can communicate at a fixed speed. The line speed adaptation to the line parameters
will not take place, i.e. the communication will be at a fixed speed even if the line allows higher
speeds.
COE is configured for fixed speeds, while CPE is configured for adaptive mode.
Connection with an automatic speed regulation (Adaptive mode)
To simplify the setup, the devices can automatically adjust the line rate, they adapt to the line
quality. The lack of lost packets during the test time is the criterion of the optimal line rate
adjustment.
The adaptive mode is set on both COE and CPE devices.
Version: 1.0
Page. 33 of 95
5.2.2 Ethernet 10BaseT interface
The Ethernet interface functions depend on the device operation modes.
Bridge mode
The bridge mode is used to connect LANs. The algorithm of the Ethernet traffic encapsulation
into ATM is used in accordance with RFC 1483. The MDS92xxx-10BT device implements both
the transparent bridge or spanning tree algorithms. These algorithms are described in detail in
“Bridging of local networks”.
Route mode
If the bridge functions are not enough, the MDS92xxx-10BT device can work as a router. The
Ethernet traffic is encapsulated in accordance with RFC 1438, RFC 2364, RFC 2516.
The MDS92xxx-10BT device implements static and dynamic routing algorithms. These algorithms
are described in detail in “Routing of local networks”.
Note! At the point-to-point connection, both devices must be configured either as bridge
or as router.
5.2.3 ATM interface
From side of the G.shdsl line interface, the MDS92xxx-10BT device acts as a SHDSL modem
that uses ATM protocol to transmit data. This allows attaching it to DSLAM equipment of different
manufacturers.
In the present version of the firmware, ATM implements the following:
• multiprotocol encapsulation of heterogeneous LAN traffic into ATM cells. AAL5 according to
RFC 1483;
• support of IP protocols over ATM and PPP over ATM;
• in the router mode there is established one PVC for the bridge (RFC 1483 standard), eight
PVCs for IP over ATM, one PVC for PPP over ATM;
• support of QoS elements: UBR, CBR, VBR-nrt;
• ATM UNI interfaces (versions 3.0, 3.1, 4.0)
Version: 1.0
Page. 34 of 95
5.3
Description of LEDs
The following LEDs are used to display normal operation condition and alarm condition.
LED
Status
Off
On
Blinking
Alarm
Normal operation
Failure or start of
the device
Low quality of line
BER > 15 %
Synch
DSL line is not
connected
Synchronization is
set up
Synchronization is in
process
Link
The Ethernet
network is off
The Ethernet
network is on
Packet exchange
between shdsl and
Ethernet
Act
–
–
Ethernet packet is
received
Pwr
Power is off
Power is on
–
1, 2, 3, 4
The hub port is
not active
The hub port is
active
Ethernet packet is
received
Col
–
–
Collision in the
Ethernet interface
Version: 1.0
Page. 35 of 95
6 MECHANIC DESIGN
The Black Box devices have three mechanic designs:
1. Sub-Rack is a unit to be mounted in 19’’ chassis (MDS920AE-RMDC);
2. Mini-Rack is a unit of 1U height (44.5 mm) to be mounted in 19’’ rack or a cabinet;
3. Stand Alone is a compact unit to be mounted on the tabletop/desktop or another horizontal
surface.
Sub-Rack
From the constructive point of view, MDS92xxx-10BT, NG consists of two printed circuit boards
(PCBs) and a front panel.
Fig. 16 shows the front panel.
The front panel has the following sockets and LEDs:
LED
Description
Alarm
Alarm LED
Sync
xDSL line status LED
Link
User’s Ethernet interface status LED
Act
Transmission status LED over user interface
xDSL
RJ11 socket to connect DSL lines
10BaseT
four RJ45 sockets to connect Ethernet network
1, 2, 3, 4
Hub port activation LED
Col
Collision LED in Ethernet interface
Version: 1.0
Page. 36 of 95
Fig. 16 MDS920C-10BT, NG, front panel
Version: 1.0
Page. 37 of 95
Mini-Rack
From the constructive point of view, MDS922AE-10BT represents a case made of stainless steel
and containing the basic elements of the device.
Fig. 17 shows the front panel.
The front panel has the following sockets and LEDs:
LED
Description
Alarm
Alarm LED
Sync
xDSL line status LED
Link
User’s Ethernet interface status LED
Act
Transmission status LED over user interface
Pwr
Power supply LED
XDSL
RJ11 socket to link DSL lines
10BaseT
four RJ45 sockets to link Ethernet network
1, 2, 3, 4
Hub port activation LED
Col
Collision LED in Ethernet interface
-48VDС
-48 Volt DС power input socket
Monitor
DB9F socket to connect management terminal
~220VAC
~220 Volt AC power input socket
┴
Grounding bolt
Version: 1.0
Page. 38 of 95
Fig. 17 MDS922AE-10BT, front panel
Version: 1.0
Page. 39 of 95
Stand Alone
From the constructive point of view, MDS921AE-10BT represents a case made of shockproof
polystyrene to withstand harsh environmental conditions and containing the basic elements of the
device. The power supply unit represents an external power supply unit in the form of a plug.
The panels have the following sockets and LEDs:
LED
Description
Alarm
Alarm LED
Sync
xDSL line status LED
Link
User’s Ethernet interface status LED
Act
Transmission status LED over user interface
Pwr
Power supply LED
xDSL
RJ11 socket to link DSL lines
10BaseT
four RJ45 sockets to link Ethernet network
1, 2, 3, 4
Hub port activation LED
Col
Collision LED in Ethernet interface
DС/IN
External power adapter entrance socket
Monitor
DB9F socket to connect management terminal
┴
Grounding bolt
Fig. 18 MDS921AE-10BT rear panels
Version: 1.0
Page. 40 of 95
7 EQUIPMENT INSTALLATION
The installation and connection of the Black Box PAM devices is implemented in the following
order:
• before the installation, make sure that the set is complete;
• mount the device in 19” shelf (for the devices of the Sub-Rack type), in 19” rack or cabinet (for
the devices of the Mini-Rack type), or on horizontal surface (for the devices of the Stand Alone
type);
Note! The metal cases in which devices of Mini-Rack type and cards of Sub-Rack type are
mounted must be properly grounded (the grounding resistance is no more than 10 Ohm).
The devices of Mini-Rack and Stand Alone type must be grounded through the grounding
bolt. It is strictly prohibited to use the device until it is properly grounded.
• Connect xDSL cable to xDSL line port with the help of RJ11 connector;
• Plug in the free end of xDSL cable to the cable box or intermediate cross;
Note! The xDSL cable grounding must be connected to the line cable shield to reduce
noise interference of the system.
• Connect the Data terminal equipment and the network interface socket with the appropriate
cable;
• Connect Monitor socket on the device and the computer serial port with the help of RS232 9-pin
cable;
Note! The controlling computer must be grounded through the same grounding circuit as
the Black Box device.
Version: 1.0
Page. 41 of 95
• Switch the device on. The initialization takes of about 20 seconds. When the time lapses the
device is ready for configuring from the control computer.
Note! The device must be disconnected from power during the installation.
DSL and computer connectors are described in Chapter 11.
Version: 1.0
Page. 42 of 95
8 PROGRAMMING GUIDE
8.1
Introduction
The equipment has built-in management and self-testing functions. The devices can be
connected through the RS232 interface to the terminal or computer with a possibility of the
terminal emulation for controlling and configuring.
Note! The device, primarily configured through the RS232 interface, can be remotely
controlled over the Telnet or HTTP protocols.
Management of devices of Sub-Rack type
The device rear panel contains the TTL management bus, organized according to the
“point/multipoint” scheme. The TTL-RS232 layer translator is on the rear panel of the device. The
socket for the connection to the terminal is on the rear panel as well. If ACU and CMU are
installed in subrack, the management socket is on the front panel.
To connect the terminal, it is necessary to use RS232 cable. While attaching the cable to the
computer COM-port, make sure the port is not occupied by the other device drivers (for example,
mouse).
The terminal must be configured in the following way:
• Transmission rate: 9600 Kbit/s;
• Transmission format: 8-N-1;
• Flow management: XON/XOFF;
• Terminal type: VT100.
At any one time only one device in the card can be logically connected to the management
interface. The device is chosen in accordance with the slot number, in which it is mounted. To
choose the necessary device, type <%SN↵>, where SN is the slot number.
Example: to select the modem, mounted in slot 3, type:
%03↵.
The unit in the card displays %SN after the ECHO command is entered, where SN is the slot
number.
After typing “ECHO”, the operator will receive a response from LTU devices, as it is shown below:
Version: 1.0
Page. 43 of 95
ECHO↵
%01 %02 %08 %10 %11 %12
Management of devices of Mini-Rack and Stand Alone type
The management terminal is connected to the MONITOR socket (DB9 type), which is on the front
(for devices of the Mini-Rack type) or rear (for the devices of the Stand Alone type) panels. The
requirements to the terminal configuration are similar to those of Sub-Rack devices. After the
power is on, the computer displays information about the device firmware loading.
Command structure
The device is configured and controlled by using command line interface, called command menu.
To facilitate the process, the commands are divided into hierarchical groups, called levels. The
command of the first level can have subcommands. All subcommands are on the second level.
Besides, there are special commands that do not form part of hierarchical groups.
Commands may have one or several parameters. When one enters such commands it is
necessary to use a space character (SP) to divide command names and each of the parameters.
To facilitate the process of the command recognition, the monitor displays this or that prompt. For
the main menu (commands of level 1) the following invitation is displayed >, for the submenu
(commands of level 2) the following prompt is displayed >submenu name>. For example,
>shdsl>. Prompts indicate that the device is ready to accept programs.
Fig.19 shows the command menu structure of the bridge mode.
Fig. 20 shows the command menu structure of the router mode.
The following rules are used to describe commands:
• the first level commands and special commands are numbered by three figures;
• the second level commands are numbered by four figures;
• parameters in angular brackets < > are obligatory to enter;
• parameters in direct brackets [ ] are not obligatory to enter;
• in real commands brackets are not entered, they are used for description!
• after the command is typed, press <enter>;
• symbol “vertical line” | between parameters requires to type one of the listed parameters.
Note! If a password is used as access permission, the time of the command input is
limited and makes 10 minutes. After the time lapses, the password must be entered again.
Version: 1.0
Page. 44 of 95
Fig. 19 Command tree of bridge mode
Version: 1.0
Page. 45 of 95
Fig. 20 Command tree of router mode
Version: 1.0
Page. 46 of 95
8.2
Main menu of the bridge mode
After the power is switched on, the terminal screen displays the booting process:
NBfs2
Helium Family PP flash boot 6.1.0.25 (22 October 1999)
(c) Copyright BLACK BOX 1999
SDRAM size = 0x800000, type = 0x2
NPn
Booting...
System start...
>>
The symbol >> means that the system is ready to accept commands.
Security password from an unauthorized access
The system implements a security from an unauthorized access. When the security from an
unauthorized access is activated the system demands to enter the password:
password: *****
>>
The factory setting assumes no password protection. If, nevertheless, after installation the
modem asks for a password (it might happen for example if somebody used or tested the device
before) please contact nearest Black Box service center or technical support team.
8.2.1 Help command
The help command displays prompts with a list of available programs. One can receive detailed
prompts about each command.
>> help
…
…
>>
Command format: help [command]
Parameter:
Command:
8.2.2
Any command available in the menu.
Home command
The home command returns the command line one level up.
> shdsl> home
>>
Version: 1.0
Page. 47 of 95
Command format: home
Parameter: no
8.2.3 Default command
The default command sets the default settings.
>> default
The data set to default successfully.
>>
Command format: default
Parameter: none
8.2.4 Lan command
The Lan command puts the system in the Ethernet submenu.
>> lan
> lan>
Parameter:
Setip:
Show
See 8.2.4.1
See 8.2.4.2
8.2.4.1 Setip command
The setip command sets the device IP address. This address is used for remote management of
the device over Telnet or HTTP protocols.
> lan> setip> 10.0.1.205 255.0.0.0
> lan>
Command format: setip <etherip[/<masknum>]> [subnet mask]
Parameter:
Etherip:
Masknum:
Subnet mask
IP address of the device
Network mask number
Subnet mask
8.2.4.2 Show command
The show command displays the IP configuration of the device.
> lan> show
Ethernet ip: 10.0.1.205
Subnet mask: 255.0.0.0
Version: 1.0
Page. 48 of 95
Command format: show
Parameter: none
Definitions:
Ethernet ip:
Subnet mask:
IP address of the device
Subnet mask
8.2.5 List command
The list command displays the VC condition.
>> list
Port ethernet1
0: edd
TxPkts:
0/0
RxPkts:
Port shdsl
0: oamloop TxPkts: 0/0
RxPkts:
0/0
xVPI/VCI:
0/0
1: oamloop TxPkts: 0/0 RxPkts:
0/0
xVPI/VCI:
0/0
2: oamloop TxPkts: 0/0 RxPkts:
0/0
xVPI/VCI:
0/3
3: oamloop TxPkts: 0/0 RxPkts:
0/0
xVPI/VCI:
0/4
4: bridge TxPkts: 0/0 RxPkts: 0/0
xVPI/VCI:
8/35
>>
0/0
TxVPI/VCI:
0/0
R
TxVPI/VCI:
0/0
R
TxVPI/VCI:
0/0
R
TxVPI/VCI:
0/0
R
TxVPI/VCI:
8/35
R
Command format: list
Definitions:
Ethernet
port
0
TxPkts
RxPkts
SHDSL port
4
TxPkts
RxPkts
TxVPI/VCI
RxVPI/VCI
Version: 1.0
Status of port № 1
Transmitted packets counter
Received packets counter (right/error)
Status of port № 1
Transmitted packets counter
Received packets counter (right/error)
Number of transmitted VC
Number of receiving VC
Page. 49 of 95
8.2.6 Manage command
The manage command puts the system into the management submenu of the access to the
device.
>> manage
> manage>
Command format: manage [setpass]
Parameter:
Setpass:
See 8.2.6.1
8.2.6.1 Setpass command
The setpass command enables and disables the access password to the system.
Password setting
> manage> setpass
Password disabled
New Password:****
Confirm password again:****
Password has been changed
Saving configuration...
Configuration saved.
> manage>
Command format: setpass
Parameter: none.
Definitions:
Password disabled:
New Password:
Confirm password
again:
Password has been
changed:
Saving
configuration…:
Version: 1.0
The password is disabled. Information
line.
Enter a new password.
Confirm the password again.
The password has been changed.
Information line.
The new configuration is saved
automatically after the dialogue is
finished.
Page. 50 of 95
Password change
> manage> setpass
Old Password:****
New Password(press ENTER to disable):******
Confirm password again:******
Password has been changed
Saving configuration...
Configuration saved.
> manage>
Command format: setpass
Parameter: none.
Definitions:
Old Password:
New Password (press
Enter to disable):
Confirm password
again:
Password has been
changed:
Saving
configuration…:
Enter the old password.
Enter the new password.
Confirm the password again.
The password has been changed.
Information line.
The new configuration is saved
automatically after the dialogue is
finished.
Password disablement
manage> setpass
Old Password:******
New Password(press ENTER to disable):
Are you sure to disable password(y/n)?y
Password has been changed
Saving configuration...
Configuration saved.
> manage>
Command format: setpass
Parameter: none.
Definitions:
Old Password:
Enter the old password
New Password (press Press “Enter” to disable the password.
Enter to disable):
Version: 1.0
Page. 51 of 95
Are you sure to
disable password
(y/n):
Password has been
changed:
Saving
configuration…:
Confirm the desire to disable the
password by pressing “y”.
The password has been changed.
Information line.
The new configuration is saved
automatically after the dialogue is
finished.
Note! The maximal password length should be no more than 20 symbols. The password
should be of Latin letters and figures. The symbol uppercase differs.
8.2.7 Mode command
The mode command selects the device operation mode: bridge or router.
Bridge mode setting
>> mode
Please select bridge or router:(b/r,b)b
Current mode is bridge
>>
Command format: mode
Parameter: none.
Definitions:
Please select
bridge or router:
Current mode is
bridge:
Select the operation mode:
bridge/router
The current mode is bridge:
Router mode setting
>> mode
Please select bridge or router:(b/r,b)r
Current mode is router
>>
Command format: mode
Parameter: none.
Version: 1.0
Page. 52 of 95
Definitions:
Please select
bridge or router:
Current mode is
router:
Select the operation mode:
bridge/router
The current mode is bridge:
Note! The mode command changes the list of available commands in the main menu.
8.2.8 Ping command
The ping command enables testing and allows checking the network efficiency.
>>
>>
>>
>>
>>
>>
>>
>>
ping 10.0.1.55
Press 'ESC' to break
ip: ping – reply received from 10.0.1.55
ip: ping – reply received from 10.0.1.55
ip: ping – no reply received
ping 299.999
Invalid IP
Command format: ping <ipaddress>
Parameter:
Ipaddress:
The IP address of the destination
device
Definitions:
ip: ping – reply
received from
xxx.xxx.xxx.xxx:
ip: ping – no reply
received:
Invalid IP:
The packet reached the destination
successfully.
The packet did not reach the
destination.
The invalid IP address of the
destination device.
Note! The ping command can be stopped by pressing “Esc”.
8.2.9 Quick command
The quick command allows configuring the modem’s parameters.
>> quick
Version: 1.0
Page. 53 of 95
0 PVC existed, 8 PVCs available.
VPI(0-4095): 8
VCI(1-65535): 35
Packet Filter ( Any/Ip/Pppoe ): a
Add another PVC ? (y/n): n
Enable Spanning tree? (y/n) : n
Configuration
MODE: Bridge
FUNCTION: R1483
Spanning Tree: Disable
# VPI
VCI
Package filter
1: 8
35
ANY
Preserve the configuration (y/n) : y
Configuration will have no effect until after save and restart.
>>
Comand format: quick
Parameter: none.
Definitions:
0 PVC existed, 8 PVCs
available:
VPI(0-4095):
VCI(1-65535):
Packet Filter
(Any/Ip/Pppoe ):
Add another PVC ?
(y/n):
Enable Spanning tree?
(y/n) :
Information line shows the number of
existing or available PVC.
Enter the VPI decimal number.
Enter the VCI decimal number.
Defines the type of packet filtration.
All (a), Ip (i) or PPP (p).
Continue or end the quick program.
To enable/disable the spanning tree
algorithm.
Preserve the
configuration (y/n) : To save/disable the configuration.
Note! The changes will be activated after the configuration is saved.
8.2.10 R1483 command
The r1483 command puts the system into the submenu of RFC1483 encapsulation settings.
>> r1483
> r1483>
Version: 1.0
Page. 54 of 95
Parameter:
Delpvc:
Pfilter:
Setpvc:
Setqos:
Setspan:
Show:
8.2.10.1
See
See
See
See
See
See
8.2.10.1
8.2.10.2
8.2.10.3
8.2.10.4
8.2.10.5
8.2.10.6
Delpvc command
The delpvc allows to delete one or all PVCs.
> r1483> delpvc all
> r1483>
Command format: delpvc <all>|[<vpi>/]<vci>
Parameter:
All:
VPI/VCI:
8.2.10.2
Deletes all PVCs.
Deletes a PVC with a VPI/VCI number.
Pfilter command
The pfilter command sets the packet filter for the mentioned PVC.
> r1483> pfilter 8/35 ip
> r1483>
Command format: pfilter [<vpi>/]<vci> <any|ip|pppoe|igmp|none>
Parameter:
VPI/VCI:
Any:
Ip:
Pppoe:
Igmp:
None:
Sets
This
This
This
This
This
PVC
PVC
PVC
PVC
PVC
PVC
with the VPI/VCI number.
passes any packet.
passes only IP packet.
passes only PPPoE packet.
passes only IGMP packet.
does not pass packets.
Note! The pfilter command changes the PVC parameters, first configured by the quick
command (see 8.2.9) or setpvc command (see 8.2.10.3). If the mentioned PVC is not
found, the system displays an error message.
8.2.10.3
Setpvc command
The setpvc command activates PVC with a mentioned address.
Version: 1.0
Page. 55 of 95
> r1483> setpvc 8/35 llc
> r1483>
Command format: setpvc [<vpi>/]<vci> [llc/vcmux]
parameter:
VPI/VCI:
LLC/VCMUX:
8.2.10.4
Sets PVC with the VPI/VCI number.
Shows the encapsulation type according to
RFC1483.
Setqos command
The setqos command sets the priority for the active PVC.
> r1483> setqos 8/35 ubr
> r1483>
Command format: setqos [<vpi>/]<vci> <ubr|cbr|vbr(nrt)>
Parameter:
VPI/VCI:
UBR:
CBR:
VBR:
VBRNRT:
Sets
Sets
Sets
Sets
Sets
PVC
the
the
the
the
with the VPI/VCI number.
UBR priority.
CBR priority.
VBR priority.
VBR-NRT priority.
Note! The setqos command changes the PVC parameters, first configured by the quick
command (see 8.2.9) or setpvc command (see 8.2.10.3). If the mentioned PVC is not
found, the system displays an error message.
8.2.10.5
Setspan command
The setspan command enables and disables the spanning tree mode for all PVCs.
> r1483> setspan disable
> r1483>
Command format: setspan <Enable>|<Disable>
Parameter:
Enable:
UBR:
Version: 1.0
To enable the spanning tree mode for
all PVCs.
To disable the spanning tree mode for
all PVCs.
Page. 56 of 95
8.2.10.6
6 Show command
The show command displays the configuration of all the active PVCs.
> r1483> show
FUNCTION
VPI/VCI
Rfc1483
8/35
> r1483>
CLASS
ubr
LLC/VCMUX
LLC
Spanning
Disable
Pkt Filter
IP
Command formate: show
Parameter: none.
Definitions:
Function:
VPI/VCI:
CLASS:
LLC/VCMUX:
Spanning:
Pkt Filter:
Defines the used protocol.
PVC number.
Priority.
Encapsulation type according to RFC1483.
Spanning tree mode (enabled/disabled).
The used packet filter.
8.2.11 Restart command
The restart command reboots the system.
>> restart
NBfs2
Helium Family PP flash boot 6.1.0.25 (22 October 1999)
(c) Copyright BLACK BOX 1999
SDRAM size = 0x800000, type = 0x2
NPnNo
Booting...
System start...
>>
Command format: restart
Parameter: none.
8.2.12 Save command
The save command preserves all the changes.
>> save
Saving configuration...
Configuration saved.
Updating flash filing system ...
NBfs2
Version: 1.0
Page. 57 of 95
Helium Family PP flash boot 6.1.0.25 (22 October 1999)
(c) Copyright BLACK BOX 1999
SDRAM size = 0x800000, type = 0x2
NPnNo
Booting...
System start...
>>
Command format: save
Parameter: none.
Note! The save command restarts the system.
8.2.13 Shdsl command
The shdsl command puts the system into the submenu of the shdsl line.
>> shdsl
> shdsl>
Command format: shdsl [default | enable | terminal <Coe>|<CPe> | annex <a|b> | fix <Rate> |
adapt <maxrate> <minrate> | status]
Parameter:
Default:
Enable:
Terminal:
Annex:
Fix
Adapt:
Status
8.2.13.1
See
See
See
See
See
See
See
8.2.13.1
8.2.13.2
8.2.13.3
8.2.13.4
8.2.13.5
8.2.13.6
8.2.13.7
Default command
The default command sets the shdsl default settings.
> shdsl> default
> shdsl>
Command format: default
Parameter: none.
Version: 1.0
Page. 58 of 95
8.2.13.2
Enable command
The enable command activates the last settings of shdsl without them being saved and restarted.
> shdsl> enable
> shdsl>
Command format: enable
Parameter: none.
8.2.13.3
Terminal command
The terminal command sets the device as the master or slave.
> shdsl> terminal coe
> shdsl>
Command format: terminal <Coe>|<CPe>
Parameter:
Coe:
Cpe:
The device is configured as master.
The device is configured as slave.
Note! When the two modems are connected according to the point-to-point algorithm, one
of the devices must be configured as the master, and the other as the slave.
8.2.13.4
Annex command
The annex command sets the line code type in accordance with ITU-T (G.shdsl).
> shdsl> annex b
> shdsl>
Command format: annex <a|b>
Parameter:
а:
b:
Version: 1.0
Sets the mode most suitable for the USA
and Canada.
Sets the mode most suitable for Europe.
Page. 59 of 95
8.2.13.5
Fix command
The fix command sets the manual mode of line rate adjustment.
> shdsl> fix 768
> shdsl>
Command format: fix <rate>
Parameter:
rate:
Displays the rate at which the connection
will be established. Rate is calculated
according
to
the
following
expression
n*64+i*8+8, where n is efficient capacity (1≤
n <36), and i is a header (i=0 | 1). Rate can
take the following values: 2320, 2312, 2256,
2248, 2192, 2184, 2128, 2120, 2064, 2056,
2000, 1992, 1936, 1928, 1872, 1864, 1808,
1800, 1744, 1736, 1680, 1672, 1616, 1608,
1552, 1544, 1488, 1480, 1424, 1416, 1360,
1352, 1296, 1288, 1232, 1224, 1168, 1160,
1104, 1096, 1040, 1032, 976, 968, 912, 904,
848, 840, 784, 776, 720, 712, 656, 648, 592,
584, 528, 520, 464, 456, 400, 392, 336, 328,
272, 264, 208, 200, 144, 136, 80, 72
Note! The fixed mode must be enabled on the master device.
8.2.13.6
Adapt command
The adapt command sets the automatic mode of line rate adjustment.
> shdsl> adapt 2320 72
> shdsl>
Command format: adapt <maxrate> <minrate>
Parameter:
Maxrate:
Minrate:
Version: 1.0
Displays the maximal rate of the connection.
Displays the minimal rate of the connection.
Page. 60 of 95
Note! The adaptive mode must be configured on the slave device. If the manual mode is
configured on the master device, the line rate will be set according to the fix parameter of
the master device. If the automatic mode is configured on the master device, the line rate
will depend on the DSL line quality.
8.2.13.7
Status command
The status command displays the actual SHDSL connection status.
> shdsl> status
Config :
terminal
Rate Mode
Line Rate Range
Status :
F/W Version
:
Line Code
:
SHDSL Standard:
Last Failed
:
Start Progress:
Attenuation
:
Line Quality :
Avg Quality
:
Receiver Gain :
XMIT Power
:
Framer Status :
Current Rate :
Line Status
:
> shdsl>
– coe
– adaptive
– MAX:2320
MIN:72
R1.2
PAM(SHDSL)
ANNEX B
No failure
PRE ACTIVATION
-NaNdB
InfinitydB
InfinitydB
-InfinitydB
0.0dBm
Unknown(0x88)
0
Handshake
Command format: status
Definitions:
Config:
Terminal:
Rate Mode:
Line Rate Range:
Status:
Version: 1.0
The device configuration
The device type (Coe/CPe).
Line rate mode (Manual/Automatic).
Line range rate in the automatic mode.
shdsl status.
Page. 61 of 95
8.2.14 Show command
The show command displays the modem IP address and active PVC settings.
>> show
Ethernet ip: 192.168.1.1
Subnet mask: 255.255.255.0
FUNCTION
VPI/VCI
CLASS
Rfc1483
8/35
ubr
>>
LLC/VCMUX
LLC
Spanning
Disable
Pkt Filter
ANY
Command format: show
Definitions:
Ethernet ip:
Subnet mask:
Function:
VPI/VCI:
CLASS:
LLC/VCMUX:
Spanning:
Pkt Filter:
The device IP address.
Subnet mask.
Indicates the used protocol.
PVC number.
Priority.
Encapsulation type according to RFC1483.
Spanning tree (enabled/disabled).
The used packet filter.
8.2.15 Ver command
The ver command displays the firmware version.
>> ver
Version : 1.523102rB-XA0(1.523102rB-XA0-H02.1302-FR12-230B 15/Jun/2001
11:30)
>>
Command format: ver
8.3
Main menu of the router mode
8.3.1 Default command
See 8.2.1
8.3.2 Dnsrelay command
The dnsrelay command puts the system into the submenu of dns parameters.
>> dnsrelay
> dnsrelay>
Version: 1.0
Page. 62 of 95
Command formate: dnsrelay [setdnsip <dnsip> [<retry times>] | show]
Parameter:
Setdnsip:
Show:
See 8.3.2.1
See 8.3.2.2
8.3.2.1 Setdnsip command
The setdnsip command sets the DNS-server address.
> dnsrelay> setdnsip 10.0.0.50 3
Command format: dnsrelay [setdnsip <dnsip> [<retry times>]
Parameter:
Dnsip:
Retry
times:
IP address of the DNS server
The number of retry connections with the server
8.3.2.2 Show command
The show command displays the DNS current settings and server connection status.
> dnsrelay> show
DNS server ip: 0.0.0.0
Retry times: 3
DNS relay status
DNS server address discovery incomplete.
> dnsrelay>
Command format: show
Parameter:
None
Version: 1.0
Page. 63 of 95
8.3.3 Ipoa command
The ipoa command puts the system into the menu of connection settings of IP over ATM.
>> ipoa
> ipoa>
Command format: ipoa [delwanip | setqos | setrip | show]
Parameter:
Delwanip:
Setqos:
Setrip:
Show:
See
See
See
See
8.3.3.1
8.3.3.2
8.3.3.3
8.3.3.3
8.3.3.1 Delwanip command
The delwanip command serves to delete all or selected PVC.
> ipoa> delwanip all
Command format: delwanip <all>|[<vpi>/]<vci>
Parameter:
All:
VPI/VCI:
Deletes all PVCs.
Deletes the selected PVC with the VPI/VCI number.
8.3.3.2 Setqos command
The setqos command sets the priority for the active PVC.
> r1483> setqos 8/35 ubr
> r1483>
Command format: setqos [<vpi>/]<vci> <ubr|cbr|vbr(nrt)>
Parameter:
VPI/VCI:
UBR:
CBR:
VBR:
VBRNRT:
Version: 1.0
Sets
Sets
Sets
Sets
Sets
PVC
the
the
the
the
with the VPI/VCI number.
UBR priority.
CBR priority.
VBR priority.
VBR-NRT priority.
Page. 64 of 95
Note! The setqos command changes the PVC parameters, first configured by the quick
command (see 8.2.9) or the setwanip command (see 8.3.3.4). If the mentioned PVC is not
found, the system displays an error message.
8.3.3.3 Setrip command
The setrip command sets the RIP type for the used PVC.
> ipoa> setrip 8/35 1
> ipoa>
Command format: setrip [<vpi>/]<vci> <1|2|1&2|0>
Parameter:
VPI/VCI:
1:
2:
1&2:
0:
Sets PVC with the VPI/VCI number.
Sets RIP1.
Sets RIP2.
Sets RIP1 и 2.
RIP is not used
Note! The setrip command changes the PVC parameters, first configured by the quick
command (see 8.2.9) or the setwanip command (see 8.3.3.4). If the mentioned PVC is not
found, the system displays an error message.
8.3.3.4 Setwanip command
The setwanip command sets the IP address of the SHDSL (WAN) interface and the gateway of
the selected PVC.
> ipoa> setwanip 8/35 216.71.89.12 216.71.89.3
> ipoa>
Command format: setwanip [<vpi>/]<vci> <wanip[/<masknum>]> <gatewayip>
Parameter:
VPI/VCI:
Wanip:
Musknum:
Gatewayip:
Version: 1.0
Sets
Sets
Sets
Sets
PVC
the
the
the
with the VPI/VCI number.
IP address of the device WAN interface.
mask number.
gateway IP address.
Page. 65 of 95
8.3.3.5 Show command
The show command displays the IP configuration over ATM.
> ipoa> show
IPoA setting:
FUNCTION VPI/VCI
IPoA
8/35
CLASS Wan IP/MaskNum
ubr
216.71.89.12/24
GatewayIP
216.71.89.3
RIP
0
Command format: show
Definitions:
VPI/VCI:
Wanip/MaskNum:
GatewayIP:
RIP:
Defines the used PVC with the VPI/VCI
number.
IP address/subnet mask
Gateway IP address.
The used RIP
8.3.4 Lan command
The lan command puts the system into the menu of local Ethernet interface parameter settings.
>> lan
> lan>
Command format: lan [dhcpserver | setdhcp | setip | show]
Parameter:
Dhcpserver:
Setdhcp:
Setip:
Show:
See
See
See
See
8.3.4.1
8.3.4.2
8.3.4.3
8.3.4.4
8.3.4.1 Dhcpserver command
The dhcpserver command sets the operation mode of the in-built DHCP server.
DHCP Mode: Server.
Version: 1.0
Page. 66 of 95
> lan>
Command format: dhcpserver <range1 startIP> <range1 endIP> [<range2 startIP>
<range2 endIP>] [<max-lease-time>]
dhcpserver dns <dns ip1> [<dns ip2>]
Parameter:
Range1 startIP:
Range1 endIP:
Range2 startIP:
Range2 endIP:
Max-lease-time:
Dns ip1:
Dns ip2:
The starting IP address of the first range.
The end IP address of the first range.
The starting IP address of the second range.
The end IP address of the second range.
Lease time of the address.
IP address of the first DNS.
IP address of the second DNS.
8.3.4.2 Setdhcp command
The setdhcp command activates or deactivates the DHCP server.
> lan> setdhcp disable
DHCP is set to disable.
> lan>
Command format: setdhcp [server|disable]
Parameter:
Server:
Disable:
DHCP server is active.
DHCP server is not active.
8.3.4.3 Setip command
See 8.2.4.1
8.3.4.4 Show command
The show command displays the configuration of the built-in DHCP server and the Ethernetinterface address.
lan> show
Ethernet ip: 198.24.67.20
Subnet mask: 255.255.255.0
DHCP current setting : disable.
DHCP ineffective setting : disable.
Version: 1.0
Page. 67 of 95
> lan>
Command format: setdhcp [server|disable]
Parameter:
Ethernet ip:
Subnet mask:
DHCP current
setting :
DHCP ineffective
setting :
Ethernet interface IP address.
Ethernet interface subnet mask.
DHCP server current settings.
DHCP server settings (server/disable).
8.3.5 List command
See 8.2.5
8.3.6 Manage command
See 8.2.6
8.3.7 Mode command
See 8.2.7
8.3.8 Pat command
The pat command puts the system into the menu of NAT address translations settings.
>> pat
> pat>
Command format: pat [addpatin | delpatin | setpat | show]
Parameter:
addpatin:
delpatin:
setpat:
Show:
See
See
See
See
8.3.8.1
8.3.8.2
8.3.8.3
8.3.8.4
8.3.8.1 Addpatin command
The addpatin command is used to translate private IP addresses into real in order to provide
access to LAN resources from WAN.
> pat> addpatin pppoa 434 udp 192.168.2.134
> pat>
Version: 1.0
Page. 68 of 95
Command format: addpatin <pppoa|pppoe|wanip> <port>/<udp|tcp> <serverip>
Parameter:
Wanip:
Port
Real IP address
The server port number, to which the
access is allowed
Packet transmission protocols
The local server address
Udp|tcp
Serverip
8.3.8.2 Delpatin command
The delpatin command deletes the addpatin command.
> pat> delpatin all
> pat>
Command format: delpatin <all>|<number>
Parameter:
all:
Number:
Deletes all the connections.
The virtual connection number, displayed by
the show command.
8.3.8.3 Setpat command
The setpat command enables and disables real IP address translation in LANs. The access list
function will be added later.
> pat> setpat pppoa enable
> pat>
Command format: setpat <pppoa|pppoe|wanip> <e>nable|<d>isable
Parameter:
Wanip:
<e>nable|<d>isable
Real IP address.
Enables/disables the PAT function.
8.3.8.4 Show command
The show command displays the PAT configuration.
> pat> show
PAT enabled interface:
Interface
IP address
IPoA
210.62.2.195
PPPoA
???.???.???.???
PAT incoming table
Version: 1.0
Page. 69 of 95
No. i/f name|WanIP Port/Protocol
Server IP
1
pppoa
434/udp
192.62.2.134
2
210.62.2.195
232/tcp
192.62.2.166
> pat>
Command format: show
Definitions:
Interface:
IP address:
No.
i/f name|WanIP
Port/Protocol:
Server IP
The used interface.
Interface IP address.
The table serial number.
The interface name | WAN address.
Port and transmission protocol.
The server IP address.
8.3.9 Ping command
See 8.2.8
8.3.10 Pppoa command
The pppoa command puts the system into the menu of PPP over ATM settings.
>> pppoa
> pppoa>
Command format: pppoa [adduser [<vpi>/]<vci> <userid> [<chap|pap>] | chpass | deluser | echo
<interval time> | setllc <e>nable|<d>isable | setqos <ubr|cbr> | setrip <1|2|1&2|0> | show]
Parameter:
Adduser:
Chpass:
Deluser:
Echo
Setllc:
Setqos:
Setrip:
Show:
Version: 1.0
See
See
See
See
See
See
See
See
8.3.10.1
8.3.10.2
8.3.10.3
8.3.10.4
8.3.10.5
8.3.10.6
8.3.10.7
8.3.10.8
Page. 70 of 95
8.3.10.1
Adduser command
The adduser command activates VC, assigning the VPI/VCI addresses and sets the user’s name
and the password for PPP over ATM connections.
> pppoa> adduser 8/35 Access chap
New Password:*******
Confirm password again:*******
User account added successfully.
> pppoa>
Command format: adduser [<vpi>/]<vci> <userid> [<chap|pap>]
Parameter:
VPI/VCI:
Userid:
Chap/pap:
8.3.10.2
Defines the used PVC with the VPI/VCI number.
User’s name.
Access check protocol.
Chpass command
The chpass command changes the password on PPP over ATM connections. The password can
contain no more that 20 letters or figures. The uppercase and lowercase differ.
> pppoa> chpass
Old Password:*******
New Password:****
Confirm password again:****
Password has been changed
> pppoa>
Command format: chpass
Parameter:
None
8.3.10.3
Deluser command
The deluser command deletes the current PPP over ATM connection.
> pppoa> deluser
> pppoa>
Command format: deluser
Parameter:
None
Version: 1.0
Page. 71 of 95
8.3.10.4
Echo command
The echo command enables and disables the LCP response (the process of the control
connection). LCP is used to confirm the established PPP connection, the interval time between
the LCP responses can be changed.
> pppoa> echo 120
> pppoa>
Command format: echo <interval time>
Parameter:
Interval
time
8.3.10.5
Intervals between LCP responses. The interval
lies in the range from 0 to 65535 seconds. The
default setting is 60 s. If the parameter is
0, the function is disabled.
Setllc command
The setllc command enables and disables the logical connection control.
> pppoa> setllc enable
> pppoa>
Command format: setllc <e>nable|<d>isable
Parameter:
<e>nable|
<d>isable
8.3.10.6
The function of logical connection control
(enabled/disabled).
Setqos command
The setqos command sets the priority for the active connection of PPP over ATM.
> pppoa> setqos ubr
> pppoa>
Command format: setqos <ubr|cbr>
Parameter:
UBR:
CBR:
Version: 1.0
Sets the UBR priority.
Sets the CBR priority.
Page. 72 of 95
8.3.10.7
Setrip command
The setrip command sets the RIP type for the active connection of PPP over ATM.
> pppoa> setrip 1
> pppoa>
Command format: setrip <1|2|1&2|0>
Parameter:
1:
2:
1&2:
0:
8.3.10.8
Sets RIP1.
Sets RIP2.
Sets RIP1 и 2.
RIP is not used.
Show command
The show command displays the configuration of the current PPP over ATM connection.
> pppoa> show
PPPoA setting:
Function VPI/VCI
PPPoA
8/35
LLC=Enable
> pppoa>
CLASS RIP UserID/Authentication
cbr
1
Access/CHAP
Echo is disabled
Command format: show
Parameter:
None
8.3.11 Pppoe command
The pppoe command puts the system into the menu of PPP over Ethernet settings.
The menu description will be given in the next version.
Version: 1.0
Page. 73 of 95
8.3.12 R1483 command
The r1484 command puts the system into the menu of RFC1483 encapsulation settings.
>> r1483
> r1483>
Command format: r1483 [delwanip <all>|[<vpi>/]<vci> | setqos [<vpi>/]<vci> <ubr|cbr|vbr(nrt)> |
setrip [<vpi>/]<vci> <1|2|1&2|0> | setwanip setwanip [<vpi>/]<vci> <wanip[/<masknum>]>
[llc/vcmux] | show]
Parameter:
Delwanip:
Setqos:
Setrip:
Setwanip:
Show:
8.3.12.1
See
See
See
See
See
8.3.12.1
8.3.12.2
8.3.12.3
8.3.12.4
8.3.12.5.
Delwanip command
The delwanip command serves to delete all or selected PVC.
> r1483> delwanip all
> r1483>
Command format: delwanip <all>|[<vpi>/]<vci>
Parameter:
All:
VPI/VCI:
8.3.12.2
Deletes all PVC.
Deletes the selected PVC with the
VPI/VCI number.
Setqos command
The setqos command sets the priority for the active PVC.
> r1483> setqos 8/35 ubr
> r1483>
Command format: setqos [<vpi>/]<vci> <ubr|cbr|vbr(nrt)>
Version: 1.0
Page. 74 of 95
Parameter:
VPI/VCI:
UBR:
CBR:
VBR:
VBRNRT:
8.3.12.3
Sets
Sets
Sets
Sets
Sets
PVC
the
the
the
the
with the VPI/VCI number.
UBR priority.
CBR priority.
VBR priority.
VBR-NRT priority.
Setrip command
The setrip command sets the RIP type for the used PVC.
> pppoa> setrip 1
> pppoa>
Command format: setrip <1|2|1&2|0>
Parameter:
VPI/VCI
1:
2:
1&2:
0:
8.3.12.4
Sets PVC with the VPI/VCI number
Sets RIP1.
Sets RIP2.
Sets RIP1 и 2.
RIP is not used.
8.3.12.4 Setwanip command
The setwanip command sets the IP address of the SHDSL (WAN) interface for the selected PVC.
> r1483> setwanip 8/35 216.71.89.12
> r1483>
Command format: setwanip [<vpi>/]<vci> <wanip[/<masknum>]> [llc/vcmux]
Parameter:
VPI/VCI:
Wanip:
Musknum:
Llc/vcmux:
Version: 1.0
Sets PVC with the VPI/VCI number.
Sets the IP address of the device WAN
interface.
Sets the mask number.
Sets the encapsulation type according
to RFC1483.
Page. 75 of 95
8.3.12.5
Show command
The show command displays the r1483 configuration.
> r1483> show
RFC1483 setting:
FUNCTION VPI/VCI
Rfc1483
8/35
> r1483>
CLASS
ubr
LLC/VCMUX
LLC
Wan IP/MaskNum
216.71.89.12/24
RIP
1
Command format: show
Definitions:
VPI/VCI:
Wanip/MaskNum:
Class:
RIP:
Defines the used PVC with the VPI/VCI
number.
IP address/subnet mask.
Connection priority.
The used RIP
8.3.13 Quick command
The quick command allows to set quickly the connection with the help of prompts.
>> quick
R1483(r)/ IPoA(i)/ PPPoA(p): i
0 PVC existed, 5 PVCs available.
Ethernet IP (192.168.1.1) : 198.24.67.20
Subnet mask (255.255.255.0) : 255.255.255.0
VPI(0-4095): 8
VCI(1-65535): 35
WAN IP : 216.71.89.12
Gateway : 216.71.89.3
Setup Configuration
FUNCTION: IPOA
Ethernet IP: 198.24.67.20
Subnet Mask: 255.255.255.0
# VPI
VCI
WAN IP
Gateway IP
1: 8
35
216.71.89.12
216.71.89.3
Preserve the configuration (y/n) : y
Continue quick (y/n) : n
Configuration will have no effect until after save and restart.
>>
Command format: quick
Version: 1.0
Page. 76 of 95
8.3.14 Restart command
See 8.2.11
8.3.15 Rtable command
The rtable puts the system into the menu of routing table settings.
>> rtable
> rtable>
Command format: rtable [addiproute | deliproute | show]
Parameter:
Addiproute:
Deliproute:
Deletes all the connections.
The virtual connection number,
displayed by the show command.
Show
8.3.15.1
Addiproute
The addiproute command adds a new route in the routing table.
> rtable> addiproute 198.24.67.0 216.71.89.3
> rtable>
Command format: addiproute <destip[/<masknum>]> [<submask>] <gatewayip>
Parameter:
Destip[/<masknum:
Submask:
Gatewayip
8.3.15.2
Address / destination network mask.
Subnet.
Gateway IP address.
Deliproute
The deliproute command deletes a route in the routing table.
> rtable> deliproute all
> rtable>
Command format: deliproute <all>|<number>
Version: 1.0
Page. 77 of 95
Parameter:
all:
number:
8.3.15.3
Deletes all routes from the table.
Deletes the route with the number
displayed by the show command.
Show command
The show command displays the routing table.
> rtable> show
Routing Table:
No. Destination IP SubMask
1 0.0.0.0
0.0.0.0
2 198.24.67.0
255.255.255.0
effective routing table:
Routing table is empty
> rtable>
Gateway IP
216.71.89.3
216.71.89.3
Command format: show
Parameter:
No:
Destination IP:
SubMask
Gateway IP
The routing number.
Destination address.
Subnet mask
Gateway IP address
8.3.16 Save command
See 8.2.12
8.3.17 Shdsl command
See 8.2.13
8.3.18 Show command
See 8.2.14
8.3.19 Ver command
See 8.2.15
Version: 1.0
Page. 78 of 95
9 FIRMWARE LOADING
The device hardware allows to implement new possibilities and functions by updating its
firmware. To facilitate the firmware update, there exists a command file. The upgrade is
implemented over TFTP.
It is recommended to update the firmware in the manufacturer or provider’s (supplier) service
center. One should take into account the following items, while loading the firmware:
• The firmware updating is the most responsible operation in the process of the device
exploitation. The staff mistakes and the device malfunctioning while updating it, can lead to
unexpected results.
• The firmware loading should not be done if it is not necessary. One should not install new
firmware, if the possibilities it has, are not used while running the device.
• The power supply must be stable during the firmware loading. If there occurs a failure of power
supply and the device starts malfunctioning it is necessary to contact the service center.
• It is expressly recommended to use the same firmware version in all inter connected devices in
order to provide their reliable operation.
• New firmware versions are available on the manufacturer’s web site or in the provider’s center.
9.1
Firmware loading guide
To update the device firmware it is necessary:
• Extract the file from the archive;
• Set the password;
• Open the tftplock.key file with the help of a text editor and add your password in it;
• With the help of the ping command, make sure that the system responds;
• In DOS enter xupgrade<the device IP address>, for example, xupgrade 192.168.1.1;
• The new firmware version starts operating after the restart of the system.
Note! It is recommended to follow the default command (see 8.2.1) and to save the
configuration before installing a new firmware version.
Version: 1.0
Page. 79 of 95
10 TECHNICAL SPECIFICATIONS
10.1 Interfaces
10.1.1 Monitor interface
Parameter
Description
Interface
ITU-T V.24/V.28 (RS232)
Transmission mode
Asynchronous
Interface type
DCE
Terminal emulation mode
VT100
Transmission format
8-N-1
Flow management
XON/XOFF
Transmission rate
2400…57600 bit/s
10.1.2 Network management interface
Parameter
Description
Interface
Ethernet ISO/IEC 8802-3
Supported protocols
Telnet, SNMP MIB II, ILMI, TFTP, HTTP
10.1.3 SHDSL interface
Parameter
Description
Transmission standard
ITU-T G.991.2 (G.shdsl)
Cable
Symmetrical wire cables
Number of pairs
1
Transmission rate
72 – 2320 kbit/sw
Line code
TC-PAM
Version: 1.0
Page. 80 of 95
For transmission rate, Kbit/s:
200
264
392
520
776
1032
1544
2056
Frequency transmission range, kHz
0…67
0…88
0…131
0…173
0…258
0…344
0…515
0…685
10.1.4 Network interface
Parameter
Description
Transmission rate
10 Mbit/s
Transmission medium
UTP 10BASE-T
Standard
Ethernet ISO/IEC 8802-3
Bridge
IEEE-802.1d
Encapsulation
RFC1483, RFC2364, RFC2516
Routing
RIP1, RIP2, static routing
Protocols
NAT, PPP, PAP/CHAP, DHCP
10.2 Power supply
Parameter
Description
Input direct current voltage range
38…72 Volt
(12 Volt for MDS921AE-10BT)
Input alternating current voltage
range
220 Volt +/- 10%, 40..60 Hz
Power consumption
≤ 10 Watt
Version: 1.0
Page. 81 of 95
10.2.1 Protection against dangerous affects
The protection of the equipment against dangerous interfering affects meets the requirements of
ITU-U K20/K.21
10.2.2 Surge safety
Parameter
Description
Note
The resistance between the
ground terminal and isolated parts
of the device
≤ 0,1 Ohm
Insulation resistance of the device
electrical circuit
≥ 20 MOhm (normal climatic
conditions)
≥ 5 MOhm (high temperature)
≥ 1 MOhm (high humidity)
Test voltage for ungrounded
electrical circuit relative to the
case of the device
500 V (amplitude, normal
climatic conditions)
300 V (amplitude, high
humidity)
Test voltage of isolation of
electrical circuit, galvanically
disconnected with the ground
500 V (amplitude, normal
climatic conditions)
300 V (amplitude, high
humidity)
Test voltage of 50 Hz accepted by > 2000 Vrms relative to
the line interface
ungrounded device elements
> 1500 Vrms relative to
grounded device elements
Without
discharge
within 1
minute
Within 2 s
10.3 10.3 Climatic conditions
The units are engineered to operate in the following climatic conditions:
• air temperature -5… +45°C;
• relative air humidity 95% at 25°C.
The equipment preserves all its characteristics at 450 Torr (60 KPa)
The storage conditions: -50…+50°C.
The equipment can withstand all means of transport (including airplanes), i.e. it withstands the
90-Torr (12 KPa) atmospheric pressure at -50°C.
Version: 1.0
Page. 82 of 95
10.4 10.4 Guarantee
The Mean Time Between Failure is not less than 3x10⁴ hours.
The operating lifetime is no less than 20 years.
10.5 10.5 Physical dimensions
Stand Alone (dimensions, weight)
220 mm х 170 mm х 40 mm, 0.5 kg
Mini-Rack (dimensions, weight)
483 mm х 230 mm х 43.5 mm, 3 kg
Sub-Rack (dimensions, weight)
233 mm х 220 mm х 30 mm, 1 kg
Version: 1.0
Page. 83 of 95
11 CONNECTORS’ DESCRIPTION
11.1 SHDSL connector
Type: RJ-11, 4 pin
Pin Signal
Description
1
NC
–
2
LA,a
SHDSL pair, tip
3
LA,b
SHDSL pair, ring
4
NC
–
11.2 Monitor connector
Type: Sub-D9, female
1
6
DB9
9
5
female
Pin Signal
Description
1
NC
–
2
TXD
Transmit data
3
RXD
Receive data
4
ALACOM
Common contact of Alarm Relay
5
SGND
Signal ground
6
DA_NC
Urgent-Alarm contact, normally closed
For Mini-Rack units
7
DA_NO
Urgent-Alarm contact, normally open
For Mini-Rack units
8
ND_NC
Non Urgent-Alarm contact, normally closed For Mini-Rack units
Version: 1.0
Note
For Mini-Rack units
Page. 84 of 95
9
ND_NO
Non Urgent-Alarm contact, normally open
For Mini-Rack units
11.3 Ethernet (10BaseT) connector
Type: RJ-45
1 ............ 8
RJ45
Pin
Description
1
Tx+
2
Tx-
3
Rx+
4
NC
5
NC
6
Rx-
7
NC
8
NC
11.4 Power connector (For MDS922AE-10BT)
Type: Molex, 4 pin
4
2
Version: 1.0
3
1
Pin Signal
Description
1
-PWR
negative power supply terminal
2
PROT
Grounding
3
NC
–
4
+PWR
positive power supply terminal
Page. 85 of 95
12 DESCRIPTION OF INTERFACE CABLES
12.1 «Direct» Ethernet cable
The cable contains two pairs:
Side А
Color
Side B
1
white/orange
1
2
orange/white
2
3
white/blue
3
6
blue/white
6
The cable contains four pairs:
Side А
Color
Side B
1
white/green
1
2
green/white
2
3
white/orange
3
4
blue/white
4
5
white/blue
5
6
orange/white
6
7
white/brown.
7
8
brown/white
8
Version: 1.0
Page. 86 of 95
12.2 Cross-over Ethernet cable
The cable contains only two pairs:
Side А
Color
Side B
1
white/orange
3
2
orange
6
3
white/blue
1
6
blue
2
The cable contains four pairs:
Side А
Color
Side B
1
white/green
3
2
green
6
3
white/orange
1
4
blue
7
5
white/blue
8
6
orange
2
7
white/brown
4
8
brown
5
12.3 Monitor connector
Device
Computer
DB9M
DB9F
DB25F
2
2
3
3
3
2
5
5
7
Version: 1.0
Page. 87 of 95
13 DELIVERY SET
(see the technical passport)
Typically the delivery set includes:
•
SHDSL modem
•
AC power adapter (for Stand Alone versions only)
•
AC power cable (for MiniRack versions only)
•
Ethernet cable
•
User Manual (in some cases can be made available on a disk or web site)
Version: 1.0
Page. 88 of 95
14 GLOSSARY
DSL (digital subscriber line)
Digital technology that provides high-speed data transmission over physical wiring (twisted pair),
used to connect telephones.
E1
Digital data rate of 2048 Kbit/s structured according to ITU-T G.704.
G.703
ITU-T standard regulating electrical and mechanical specifications for connections.
G.704
ITU-T standard regulating synchronous structures for the first and second hierarchical layers.
G.826
ITU-T standard regulating errors and norms for digital lines.
Hub
Local network concentrator (repeater) that serves to connect computers and other
internetworking equipment to it.
IEEE (Institute of Electrical and Electronics Engineers)
Professional organization whose activities include the development of communications and
network standards. In particular, the institute elaborated a group of standards (802) for LANs.
ANSI and ISO are members of IEEE.
IEEE 802.1d
IEEE specification for bridges connecting LANs. It describes an algorithm that prevents bridging
loops by creating a spanning tree.
Internet
Global internetwork, connecting tens of thousands of national backbone networks and local
networks worldwide. Internet uses a set of IP.
IP (Internet Protocol)
Internet network layer protocol. It describes packet routing and device addressing, the standard is
used to transmit data units and IP datagrams over networks. IP does not organize connections
and guarantee delivery, but provides packet transmission.
ISO (International Organization for Standardization)
International organization that is responsible for the development of a wide range of standards,
including those relevant to networking. ISO developed the OSI reference model, defining
standards intercommunication.
ITU (International Telecommunication Union)
Version: 1.0
Page. 89 of 95
International body that develops worldwide standards for telecommunications technologies.
LAN (local-area network)
LANs connect workstations, servers, terminals, printers and other devices in a single building or
other geographically limited area. LANs use special operating systems to transmit data at high
speeds. Several LANs form wide area networks (WAN).
LTU
Line termination unit.
MSDL (Multispeed DSL)
Special method of DSL structure, allowing to adapt the information exchange speed and
bandwidth frequency of the line signal depending on the line quality and length.
NTU
Network termination unit.
PVC
Private virtual circuit.
POTS (Plain old telephone service)
International term for analog telephone lines.
RJ11
Four- or six-pin connector, used for telephone connections and fax machines and other types of
network analog connections.
RJ45
Eight-pin connector used in LANs and data transmission systems.
RS232
EIA standard for 25-pin (simpler version – 9-pin) interface used to connect computers or
terminals with communication equipment (modem, fax, etc.).
SDSL (Symmetric Digital Subscriber Line)
Symmetrical DSL provides high-speed (0.1…2048 Mbit/s and more) bi-directional transmission
over one twisted pair. The transmission rates in both directions are equal.
SNMP (Simple Network Management Protocol)
Network administration protocol, which is widely used nowadays. The network management is
included in the TCP/IP stack.
Splitter
Devices representing a combination of filters and allowing transmitting analog telephone signals
together with digital data.
Version: 1.0
Page. 90 of 95
TDM
Time Division Multiplexing
SDH
Synchronous Digital Hierarchy
VPI
Virtual Path Identificator
VСI
Virtual Channel Identificator
Version: 1.0
Page. 91 of 95
15 EXAMPLE OF NETWORK CONFIGURATION
Consider the following example of router configuration in MDS92xxx-10BT modems.
Fig. 13 shows the network structure.
Network 198.24.67.0/24
Workstation
Network 194.27.54.0/24
IBM Compatible
Workstation
WAN
Hub
216.71.89.12
Router1
198.24.67.20/24
Workstation
Hub
216.71.89.3
Router2
194.27.54.10/24
Fig.13 network
With the help of the mode command select the routing mode for the modem. The following
message notifies you that the current mode now is router. Then we should configure each of the
routers.
15.1 Router 1
Type “quick” and press “enter”.
Version: 1.0
Page. 92 of 95
When the following message “R1483(r)/IpoA/PPPoA(p)” appear, type “IpoA” and press “enter”.
Enter the IP address, which will belong to the router. In our case, it is 198.24.67.20 with mask
255.255.255.0.
The system requires to enter VPI and VCI. Type 8 and then press “enter” after it, type 35, and
press “enter”.
On request “WANIP” it is necessary to enter the interface IP address through which the
connection with another router occurs. In our case, it is 216.71.89.12.
Then the router requires to enter the gateway address to which all packets that belong to
unknown networks will be sent (198.24.67.0).
In this case, router 2 will be this gateway.
Version: 1.0
Page. 93 of 95
Enter 216.71.89.3.
Note! IP addresses of WAN interfaces must be in the address field of one network.
In our case this is network 216.71.89.0 with mask 255.255.255.0.
After it, on request to add next PVC, type “n” and press “enter”. Then save the configuration, and
restart the modem.
15.2 Router 2
The configuration of router 2 will differ only when we enter the IP address of the router, wan
interface and gateway.
On request of the router to enter:
Ethernet IP:
Subnet mask (0.0.0.0):
it is necessary to enter:
Ethernet IP: 198.27.54.10
Subnet mask (0.0.0.0): 255.255.255.0
On request of the router to enter:
WAN IP:
Gateway:
it is necessary to enter:
Version: 1.0
Page. 94 of 95
WAN IP: 216.71.89.3
Gateway: 216.71.89.12
Now it is necessary to reinitialize router 2.
After restart of the system, let us check operability of the created network.
Enter the command “ping 198.24.67.20 on router 2.
The configuration is completed successfully.
Version: 1.0
Page. 95 of 95