1
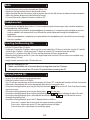
®
VISION BEYOND SOUND ®
INSTRUCTION MANUAL
MCB10
MP3 CD BOOMBOX WITH AM/FM RADIO
Photo is for reference only.
Printed In China
Table Of Contents
Caution ................................................................................................................... 02
Location Of Controls ......................................................................................... 03
Specifications ....................................................................................................... 04
Power Supply ....................................................................................................... 04
Basic Operations
Radio.............................................................................................................. 05
Headphone Jack ....................................................................................... 05
Inserting And Removing Of CDs ......................................................... 05
Playing Standard CDs ............................................................................. 05
How To Play MP3 Discs .......................................................................... 06
How To Program The CD Player .......................................................... 06
Troubleshooting ................................................................................................. 06
01
C A U T IO N
R IS K OF E L E C TR IC S HOC K
DO NOT OP E N
The lightning flash
and arrow head
within the triangle is a
warning sign alerting
you of "dangerous
voltage" inside the
product.
WARNING: To reduce the
risk of electric shock, do not
remove cover (or back). No
user-serviceable parts inside.
Refer servicing to qualified
service personnel.
The exclamation
point within the
triangle is a warning
sign alerting you of
important instructions
accompanying the
product.
WARNING:
TO REDUCE THE RISK OF FIRE OR ELECTRIC SHOCK, DO NOT
EXPOSE THIS APPLIANCE TO DRIPPING OR SPLASHING LIQUIDS.
CAUTION
DO NOT EXPOSE TO DRIPPING OR SPLASHING LIQUIDS!
CAUTION: GROUNDING OR POLARIZATION. THE PRECAUTIONS
SHOULD BE TAKEN SO THAT THE WIDER BLADE OF THE AC PLUG
MUST MATCH THE SLOT IN RECEPTACLE "WALL SOCKET".
C A UT IO N: I NV IS IB L E L A S E R R A DIATI O N W HE N O P E N A ND
IN T E R L O C K S DE F E AT E D. AV O ID E X P O S UR E TO B E A M.
V O R S IC HT: U NS IC HT B A R E L A S E R S T R A HL UNG T R IT T A US ,
W E NN DE C K E L G E ÖF F NE T UND W E NN S IC HE R HE IT S V E R R IE G E L UNG
ÜB E R B R ÜC K T IS T. N IC HT DE M S T R A HL A US S E T ZE NI.
VA R NIN G : O S Y NL IG L A S E R S T R ÁL NIN G NÄR DE NNA D E L ÄR ÖP P NA D O C H
S P ÄR R ÄR UR K O P P L A ND. S T R ÁL E N ÄR FAR L IG .
A DVA R S E L : US Y NL IG L A S E R S T R ÁL IN G V E D ÁB NIN G . N ÁR
S IK K E R HE DS A F B RY DE R E E R UDE A F F UNK T IO N. U NDG Á UDS /E T T E L S E F O R
S T R ÁL IN G .
AT T NE NZIO NE : R A DIO NS L A S E R IN V IS ID IL E . N O N G UA R DA R E
DIR E T TA ME NT E NE L L A S O R G E NT E DE L L A S E R .
A C HT UNG : L A S E R L IN S E NIC HT B E R ÜHR E N UNS IC HT B A R E R L A S E R S T R A HL .
AV IS O : A L E NT E NUNC A D E V E S E R TO C A DA .
02
C L A S S 1 L A S E R P R O DU C T
K L A S S E 1 L A S E R P R O DU K T
L A S E R DE C L A S S E
L A S E R DI P R IMA C L A S S E
K LAS S E 1 LAS E R
L A S E R P R IME R A C L A S E
LAS E R CLAS S E 1
K L A S S E 1 L A S E R P R O DU K T
Locations Of Controls
3
2
4
1
14
5
10
15
9
11
8
12
7
13
6
6
01.
02.
03.
04.
05.
06.
07.
08.
09.
Handle
Headphone Jack
Telescopic Antenna (FM)
CD Door
CD Door Opening Recess
Speakers (Left And Right)
Skip +10 / Folder Button
CD Repeat / Program Button
CD Stop Button
10.
11.
12.
13.
14.
15.
16.
17.
03
16
CD Display
CD Play And Pause Button
CD Skip Forward Button
CD Skip Back Button
Radio Dial Scale Window
Radio Tuning Control
Function Switch (AM / FM / OFF / CD(MP3))
Volume Control Knob
17
Specifications
Power supply: ............................................................................................ AC 110/220V ~ 50/60Hz
DC 9V (6 x C-Cell / UM-2/ LR14 Size)
Batteries not included
Power consumption: ............................................................................... 15W
Output power per channel: .................................................................. 1W
Frequency: .................................................................................................. AM 530 - 1710 KHz
FM 88 - 108 MHz
Do not set the MCB10 near or around objects that contain water or other liquids. Exposure to
liquids could cause the unit to short-circuit and possibly cause a fire hazard.
Power Supply
Battery operation:
Open the battery compartment door and insert all 6 c-size batteries. Please observe the correct battery
polarities otherwise the MCB10 will not work.
110V
220V
Important:
To avoid damage to the MCB10, remove the batteries (if inserted) when not using DC voltage. Leaving
the batteries placed in the unit during AC voltage operation could result in battery leakage.
AC operation (built-in transformer):
Make sure the voltage of the MCB10 matches the local household voltage. Insert plug of the AC-cord into
a wall outlet with AC-power.
When not in use, make sure the Function switch is turned
to the Off position to conserve power.
04
Radio
- Set the Function switch to the desired band (AM or FM).
- Rotate the Tuning Knob to tune-in the desired station.
- Adjust the Antenna (for FM stations) and re-position the unit for AM stations to obtain the best reception.
- Adjust the Volume Knob to the desired level of sound.
- To turn off the radio, slide the Function switch to OFF.
Headphone Jack
This unit comes equipped with a built-in 3.5mm headphone jack which accepts most standard earphones
and headphones (not included).
- When the plug of a standard stereo headphone (or earphone) is inserted into the headphone jack, the
built-in speakers will automatically shut off and the sound redirected through the headphones /
earphones.
- When the headphones / earphones are removed from the headphone jack, sound will resume through
the unit’s speakers.
Inserting And Removing CDs
- Lift the CD Door of the CD player.
- To place a CD into the CD player, make sure the center hole of the CD lines up with the circular CD spindle
inside of the CD player. Gently press the CD down to lock the CD into place onto the spindle.
- Once the CD is in place, close the CD Door and the playback will start automatically.
- When finished listening to the CD, press the Stop button and wait until CD has come to a complete stop
before lifting CD Door.
- Gently release and remove the CD from the unit.
To prevent damaging of CDs:
- Make sure the lable side is face up before inserting them into the CD player.
- Be careful not to scratch the CD on the CD spindle when removing the CD.
Playing Standard CDs
- Insert a CD as described in the above directions.
- Slide the Function switch to CD(MP3).
- The CD will spin momentarily and then the display will show “CD” and the total number of tracks on the disc.
- Afterwards, the playback will start automatically from the first song of the disc.
- At anytime during playback, pressing the Play/Pause button
will Pause the CD. Press Play/Pause button
again to resume.
- At anytime during playback, pressing the Stop button
will stop play.
- At anytime during playback, pressing the Next/Back buttons
allows selecting of other CD tracks.
- At anytime during playback, press and hold the Next/Back buttons
to fast forward or reverse
through the playing track.
- At anytime during playback, press the CD Repeat button as follows:
Press once - repeats the current track, the repeat indicator will blink.
Press twice - repeats the entire CD, the repeat indicator will light.
Press third or press stop button to cancel the repeat.
05
How To Play MP3 CDs
- Insert a MP3 CD just as a normal CD (described on page 05) .
- Slide the Function switch to CD(MP3).
- The disc will spin and perform a full check of the entire disc.
- Once the check is complete, the first song (track) will start to play and the display will show “MP3”.
- At anytime during playback, press the Next/Back button to skip forward or backward one
track at a time.
- MP3 discs often have “Folders” (sub-directories) which contain groups of songs. To skip to a different
folder, press the Skip+10 / Folder button. (If the disc has more than 1 folder.)
How To Program The CD Player
- The CD player can be programmed to play up to 20 consecutive tracks in any given order as desired.
- Always press the Stop button before beginning any progamming.
- Press the Program button, the display will show P and an “P01” will flash, to indicate that the set is
now in “Memory Programming Mode”.
- Press the Next/Back button to select the desired tracks (songs).
- When you scan to the numbered track you would like to program, simply press the Program button to
store that particular track into the Program Memory.
- Repeat the previous step to program all of the desired tracks (up to 20 total tracks) to be programmed.
- After the maximum 20 tracks have been programmed, (or less).
- Press Play to start the progress of the programmed tracks (songs).
- To clear the memory (cancel the programmed songs), simply press the Stop button or turn OFF the
unit entirely.
Troubleshooting
Problems
Radio
Noise or sound distorted on
radio broadcasts
AM or FM, no sound
Possible reasons
Resolvents
- Station not tuned properly for AM or FM. - Retune the AM or FM broadcast
station.
- FM: Telescopic antenna is not properly
- Extend wire antenna.
adjusted.
- AM: Unit is not positioned correctly.
- Rotate unit for best reception.
- Tuner is not selected.
- Slide the Function switch to
select the radio.
- Increase volume.
- Volume at minimum.
Compact Disc Player
- There is not a CD in unit.
CD will not play
- CD Function is not selected.
- CD is placed with label side down.
- CD is scratched/damaged.
- CD is wrong format.
06
- Insert a CD and press play.
- Press FUNCTION button to select
CD.
- Flip the CD over where label side
is facing up.
- Discard disc and use another.
- Make sure the CD is burned in an
MP3 file format.
Troubleshooting (Continued)
General
AC power doesn't work
DC power doesn't work
No Sound
- AC power cord is not connected.
- Batteries are not inserted.
- Battery placement is wrong.
- Batteries are no good.
- Connect AC power cord.
- Insert batteries.
- Check the polarities of the batteries
- Replace batteries.
- The unit is not turned on.
- Headphones inserted.
- The volume of the unit is turned all the
way down.
- Turn on the unit.
- Remove headphones.
- Turn up the volume to desired.
listening level.
07
®
VISION BEYOND SOUND ®
Auvi Electronics N.A. & Auvi Electronics L.A.
Retail Divisions of Auvi Technologies
5988 Mid Rivers Mall Drive
St. Charles, MO 63304
www.auviworld.com
For customer service inquiries in the U.S. and Canada, please email [email protected].
For customer service inquiries in Latin and South America, please email [email protected].
© 2006 Auvi Technologies, LLC. All Rights Reserved. Auvi Electronics N.A., LLC and Auvi Electronics L.A., LLC are separate subsidiaries of Auvi
Technologies, LLC. All the mentioned trademarks or trade names are the property of their respective owners. Specifications of product
features are subject to change without notice, which might alter the functionality described within this instruction manual.