Transcript
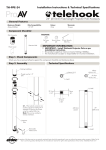
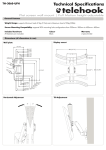
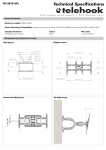
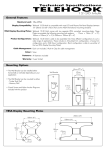
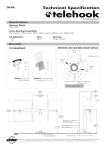
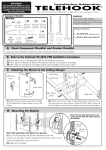
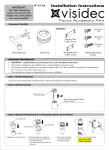
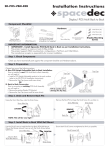
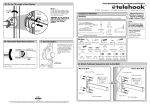
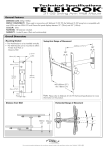
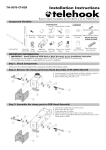
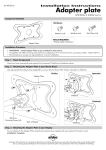
TH-PFK
Installation Instructions
Pro AV Projector Ceiling Mount with 3” Pole
Component Checklist
Security
Allen Key
HARDWARE
Security Set Standard Set
Screw (x2) Screw (x2)
Mount
M6 Washer (x4) Coach Bolt (x4)
3” Pole
Tools Required:
• Power Drill
• 4.5mm(0.18”) Drill Bit
• 10mm (3/8”) Socket Wrench Shifter
• Phillips Head Screw Driver
TH-PF
Pro AV Projector Mount
Cover
IMPORTANT INFORMATION:
! IMPORTANT - Install Telehook Ceiling Mount as per installation instruction.
! This product supports a maximum load of 25kg (55lbs.).
! The manufacturer accepts no responsibility for incorrect installation.
Step 1. Check Components
Check you have received all parts against the component checklist and hardware above.
Step 2. Ceiling Mount
Timber Stud
Ø4.5mm x 65mm
deep Drilled Hole
Mount
Masonry
Holes to Suit Anchors
NYLON ANCHORS
NOT SUPPLIED
Mount
M6 Washer
M6 Washer
Coach Bolt
Coach Bolt
TIP: Use Mount as a drilling template.
IMPORTANT! Any structural elements must be capable of
supporting the combined weight of all the equipment and devices
being mounted. If in doubt, consult a structural engineer.
Step 3.
Step 4.
Clip on Cover
Secure pole by inserting
standard or security set
screws using supplied
Allen key
2
Step 5.
Side panels can be
snapped off to provide
cable route
2
1
Screw in 3” Pole
To complete installation please jump to Step 5 of the TH-PF installation manual
No portion of this document or any artwork contained herein should be reproduced in any way without the express written consent of Atdec Pty Ltd.
Due to continuing product development, the manufacturer reserves the right to alter specifications without notice. Published 21.03.13 ©