1
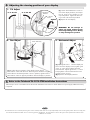
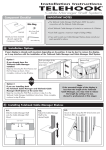
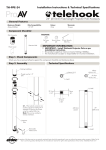
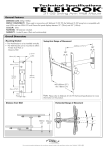
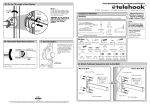
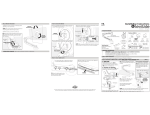
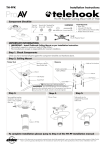
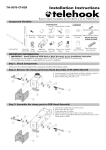
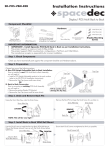
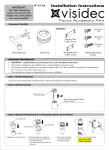
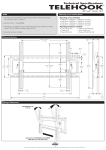
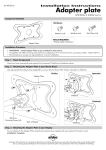
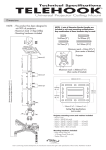
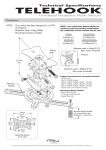
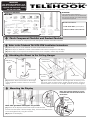
IMPORTANT
This Addendum MUST be used
with the Installation Instructions
supplied with Telehook Ceiling
Tilt (TH-3070-CTW)
Installation Addendum
TELEHOOK
TH-3070-CTW Back to Back Conversion Kit
Component Checklist
WARNING
Bits Box
M8 x 55mm
Screw
M8 x16mm
M6 x 12mm
Mounting
Grub Screw (x3) Screws (x6)
6mm Allen Key
5mm Allen Key
M8 Small
Washer
Multi
(x2)
Washer (x6)
A
Failure to follow these installation
instructions and those in the TH-3070-CTW
may result in personal injury and/or damage
to Audio/Visual quipment
M6 x16mm M5 x16mm
Mounting
Mounting
Screws (x6) Screws (x6)
Product check list:
3mm Allen Key
M4 x16mm
Mounting
Screws (x6)
Wall Mount
Bracket (Left)
Wall Mount
Bracket (Right)
1 x TH-3070-CTW
1 x Back-to-Back conversion kit
Wall Mount
Horizontal Bar
M8 x45mm
Locking Screws (x2)
Slider (x2)
(separate product)
Collar Front
Check Component Checklist and Product Checklist
Ensure you have received all components in both Component Checklist and Product Checklist
B Refer to the Telehook TH-3070-CTW Installation Instructions
(1) Follow steps A, B, C on the Telehook TH-3070-CTW Installation Instructions.
(2) Follow step D on Telehook TH-3070-CTW Installation Instructions and repeat for 2nd display.
(3) Follow steps E,F and repeat for 2nd display bracket. Once complete, continue step C below.
C
Attaching the Mount to the Ceiling Hanger
Swivel Insert
M8x10mm
Screw
Collar Front
Swivel Insert
M8 x 30mm
Screws
(1) Attach the three Swivel Inserts to the hanger
at the height that has been chosen to mount the
display.
D
TM
Collar Front
(2) Attach the two front collars to the Hanger Pole so that they sit on
the swivel inserts as shown above. Tighten the M8 x 30mm screws so
that the collars are secure on the hanger, however do not over tighten.
Mounting the Display
Note: The brackets should rest on the
horizontal bar with the slider between
the bracket.
M8 Small
Washer
Note: This operation will require two persons
(1) Lift one of the displays with brackets attached and hook the
brackets over the sliders. Hold the display firmly, insert the two M8 x 45mm
screws and tighten firmly using the Hex Tool.
(2) Repeat for 2nd Display
M8x45mm
Screw
Hex Tool
E
Adjusting the viewing position of your display
1. Tilt Adjust
-5° to 25° Tilt
M8 Small
Washer
-5° to 25° Tilt
M8 x 45mm
Screw
Tighten
Loosen
Hex Tool
2. Pan Adjust
6mm Allen Key
(1) Loosen both M8x45mm screws on
one of the display brackets, and adjust
the tilt angle of the display to the
required position. Tighten the two locking screws with Hex Tool provided.
(2) Repeat for 2nd Display
WARNING: Do not attempt to
adjust tilt angle without firstly
loosening locking screws. Doing
so may damage the product.
3. Horizontal Adjust
2
Tighten
3
-5° to 5°
1
360° Rotation
(1) To adjust the pan position of the display, loosen all four
M8 x 30mm screws with the 6mm Allen Key, then rotate the Hanger
Pole Collar to the desired position. Once in position, tighten all four
M8 x 30mm screws as tight as possible to lock the display in position.
Horizontal Bar
(1) Adjust grub screw 1 until the display sits
level. Once the display is level, tighten grub
screw 2 until it firmly tightens onto the
horizontal bar. Tighten grub screw 3 until it
firmly tightens onto the horizontal bar and
prevents it from moving.
(2) Repeat for 2nd Display Bracket
F Refer to the Telehook TH-3070-CTW Installation Instructions
Follow steps K and L in the Telehook TH-3070-CTW Installation Instructions to attach adhesive vinyl and apply additional security
if required.
TFT Manufacturers are constantly releasing new monitor models, Atdec does not accept responsibility if the mounting hole pattern does not comply with
the international VESA standards. Due to continuing product development, the manufacturer reserves the right to alter specifications without notice.
Published: 12.12.08 ©