1
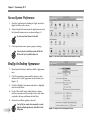
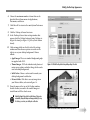
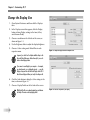
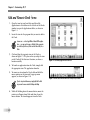
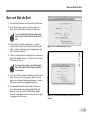
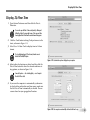
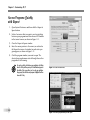
➟
Chapter
TE
RI
A
pple is rightfully proud of the user interface design incorporated into
the Macintosh OS X family of operating systems. The interface is easy
to use, and it’s also easy to customize so that your Mac looks and behaves
the way you want.
AL
Customizing OS X
MA
This chapter shows you how to customize various parts of the OS X interface, including
Desktop: You can change the color scheme of your desktop or use
a picture as your background.
➟
Display: You can also change the size of the desktop display, use
a custom screen saver, and adjust the way the clock appears.
➟
Dock: The OS X Dock normally resides at the bottom of the screen
and gives quick access to your most commonly used programs. You
can move the Dock, add or remove items, and change the way the
Dock appears.
➟
Keyboard and Accessibility: Mac OS X can accommodate most
accessibility needs, and common keyboard shortcuts can be
changed, too.
➟
➟
Exposé: Switch quickly between programs with this OS X tool.
PY
RI
GH
TE
D
➟
CO
Spaces: If you’re tired of constantly re-arranging your desktop,
create and easily move between multiple virtual workspaces using
Leopard’s new Spaces feature.
Get ready to . . .
1
➟ Access System Preferences ..........................6
➟ Modify the Desktop Appearance ..................6
➟ Change the Display Size ..............................8
➟ Customize Keyboard Shortcuts......................9
➟ Add and Remove Dock Items......................10
➟ Move and Hide the Dock............................11
➟ Make OS X Accessible ................................12
➟ Activate a Screen Saver..............................14
➟ Display 24-Hour Time ................................15
➟ Access Programs Quickly with Exposé ........16
➟ Set up Spaces ............................................17
➟ Switch between Spaces ..............................18
Chapter 1: Customizing OS X
Access System Preferences
1. Open the Apple menu by clicking the Apple icon in the
upper-left corner of the screen.
2. Choose System Preferences from the Apple menu to reveal
the System Preferences screen, as shown in Figure 1-1.
You can also open System Preferences from the Dock.
3. Click a preference icon to open a group of settings.
To return to the main System Preferences window, click the Show
All button at the top of any individual settings screen.
Figure 1-1: Start with the System Preferences window to change OS X settings.
Modify the Desktop Appearance
1. Open System Preferences and then click the Appearance
icon.
2. Click the Appearance menu and then choose a color
scheme for the overall appearance of the interface (see
Figure 1-2).
3. Click the Highlight Color menu and choose a highlight
color for selected text.
4. Use the Place Scroll Arrows radio buttons to choose
whether you want scroll arrows right next to each other
or placed at the top and bottom of scroll bars.
5. Select other scroll bar options as desired.
➟
6
If you find that your computer freezes momentarily or responds
slowly when scrolling through documents, deselect the Use Smooth
Scrolling option.
Figure 1-2: Change the color and other appearance settings.
Modify the Desktop Appearance
6. Choose the maximum number of items that are dis-
played in Recent Items menus for Applications,
Documents, and Servers.
7. Click Show All to return to the main System Preferences
screen.
8. Click the Desktop & Screen Saver icon.
9. In the Desktop & Screen Saver settings window that
appears, click the Desktop button to bring Desktop settings to the front (see Figure 1-3), if they aren’t shown
already.
10. Click an image folder on the left side of the settings
window and then choose a picture or swatch on the
right to use as your desktop background. Choices
include
• Apple Images: These are standard background graphics supplied with OS X.
• Themed images: OS X also includes stock photos of
nature scenes, plants, and other things, which can be
used as desktop backgrounds.
Figure 1-3: Click the Desktop button to bring desktop settings to the front.
• Solid Colors: Choose a color swatch to make your
desktop background a solid color.
• Pictures Folder: Click this to use any image from
your Pictures folder, as shown in Figure 1-4.
11. Using the menu at the top of the Desktop window,
choose whether you want to tile smaller images or
stretch them to fill the whole screen.
Enable the Change Picture check box at the bottom of the screen to
automatically change the background image periodically. By using
this feature, you can turn your desktop into a slide show.
Figure 1-4: You can use almost any picture as your desktop background.
➟
7
Chapter 1: Customizing OS X
Change the Display Size
1. Open System Preferences and then click the Displays
icon.
2. In the Displays screen that appears, click the Display
button to bring Display settings to the front, if they
aren’t shown already.
3. Choose a resolution on the left side of the screen, as
shown in Figure 1-5.
4. Use the Brightness slider to adjust the display brightness.
5. Choose a Colors setting and a Refresh Rate in each
respective menu.
Figure 1-5: Change the display resolution and brightness here.
In general, you should use the highest available settings in the
Colors and Refresh Rate menus. Reduce them only if you see distortion or other display problems.
If you connect a second display to your computer — for example,
an external monitor or a multimedia projector — open the
Displays settings and then click the Detect Displays button. OS X
detects the new display and allows you to adjust its settings as well.
6. Click the Color button to bring the Color settings to the
front, as shown in Figure 1-6.
7. Choose a Display Profile on the left side of the screen.
Which Display Profile you use depends primarily on your hardware.
See Chapter 4 for more on choosing display profiles.
➟
8
Figure 1-6: Choose a color profile for your display.
Customize Keyboard Shortcuts
Customize Keyboard Shortcuts
1. Quit any open applications by using Ô+Q.
2. Open System Preferences and then click the Keyboard &
Mouse icon to open the Keyboard & Mouse settings, as
shown in Figure 1-7.
3. Click the Keyboard Shortcuts button to bring Keyboard
Shortcut settings to the front, as shown in Figure 1-8.
4. Scroll down the list of available commands to find the
one you want to customize.
5. Double-click the shortcut you want to change. Make
sure you double-click the actual shortcut listed in the
Shortcut column, not the command listed in the
Description column.
6. Press the new keyboard shortcut that you want to use
Figure 1-7: Adjust basic keyboard settings here.
for the command.
If the shortcut you want to use is assigned already to a different
command, a yellow warning triangle appears next to the duplicated
shortcuts. If you see the yellow warning triangles, at least one
shortcut must be changed.
7. To disable a keyboard shortcut, remove the check mark
next to it in the On column.
8. Close the Keyboard & Mouse preferences window to
save your changes.
If you’re unhappy with the keyboard shortcuts you’ve customized
or if you’re using a pre-owned computer that was customized by
someone else, open the Keyboard Shortcuts settings and click the
Restore Defaults button. This restores all keyboard shortcuts back to
their factory defaults.
Figure 1-8: Keyboard shortcuts are customized easily.
➟
9
Chapter 1: Customizing OS X
Add and Remove Dock Items
1. Open the icon for your hard drive and then click
Applications in the sidebar on the left side of the Finder
window to open the Applications folder, as shown in
Figure 1-9.
2. Locate the icon for the program that you want to add to
the Dock.
In some cases — such as Apple iWork or Microsoft Office applications — you may need to open a subfolder to find a program’s
icon. Look closely at the icon; if the icon looks like a folder, it is a
folder.
3. Click and drag the program’s icon to the Dock, as
shown in Figure 1-9. The place where you drop the icon
on the Dock will be that icon’s location, so choose a
location carefully.
Figure 1-9: Click and drag application icons to the Dock.
4. To launch an application from the Dock, simply click
the appropriate icon. The application launches.
5. To remove an item from the Dock, click-and-hold the
mouse pointer on the item until a pop-up menu
appears, as shown in Figure 1-10.
If you’re using a two-button mouse, simply right-click the Dock
icon you want to remove instead of clicking-and-holding.
6. While still holding down the mouse button, move the
pointer over Remove from Dock and then release the
mouse button. The item disappears from the Dock.
➟
10
Figure 1-10: Items can be removed from the Dock as easily as they are added.
Move and Hide the Dock
Move and Hide the Dock
1. Open System Preferences and then click the Dock icon.
2. In the Dock settings screen, as shown in Figure 1-11,
move the Dock Size slider to change the Dock size.
You can also change the Dock size at any time by clicking and dragging up or down on the thin vertical line near the right side of the
Dock.
3. If you want to use Dock magnification — useful if
you have the Dock size set to small and it holds many
icons — place a check mark next to Magnification and
adjust the slider as desired.
Figure 1-11: You can customize many aspects of the Dock.
4. Choose a Dock position by clicking the Left, Bottom, or
Right radio buttons. Figure 1-12 shows the Dock on the
left side of the screen.
If you have a widescreen monitor, you may find that putting the
Dock on the left or right side of the screen makes more efficient use
of screen real estate.
5. If you don’t like the bouncy feedback provided by Dock
icons when you launch a program, remove the check
mark next to Animate Opening Applications. An arrow
still shows you when the program is launching.
6. To automatically hide the Dock when it isn’t in use,
place a check mark next to Automatically Hide and
Show the Dock. To reveal the hidden Dock, simply
move the mouse pointer to the bottom (or left or right,
as appropriate) of the screen.
Figure 1-12: If you have a widescreen monitor, you may want to move your Dock
to the side.
➟
11
Chapter 1: Customizing OS X
Make OS X Accessible
1. Open System Preferences and then click the Universal
Access icon.
2. To adjust settings for visual impairments, click the
Seeing tab to reveal the Seeing settings, as shown in
Figure 1-13.
3. To enable VoiceOver — a basic screen reader program
built-in to OS X — select the On radio button below
VoiceOver.
If you aren’t happy with how VoiceOver sounds, click the Open
VoiceOver Utility button. There you can change the voice, pitch,
speed, and other characteristics of VoiceOver.
4. To enable screen zooming, select the On radio button
below Zoom. Press Option+Ô+= to zoom in on an area
of the screen, and press Option+Ô+- to zoom back out.
Figure 1-13: Use these settings if you need help seeing your Mac.
5. Use the settings below Display to change the appearance
and use of color onscreen.
6. Click the Hearing button to reveal audio options, as
shown in Figure 1-14.
7. If you can’t hear alert sounds from the computer, place
a check mark next to Flash the Screen When an Alert
Sound Occurs.
Click the Flash Screen button to test the screen flash.
➟
12
Figure 1-14: If you can’t hear audio alerts, you can enable a screen flash
instead.
Make OS X Accessible
8. Click the Keyboard button to adjust keyboard options,
as shown in Figure 1-15.
9. To enable Sticky Keys, select the On radio button next to
Sticky Keys. Sticky Keys allows you to use modifier keys,
such as Shift, Function, Control, Option, and Ô, without simultaneously pressing multiple keys.
If you need Sticky Keys only occasionally, place a check mark next
to Press the Shift Key Five Times to Turn Sticky Keys On or Off. This
option gives you an easy way to quickly enable or disable Sticky
Keys.
10. To create a delay between when a key is first pressed and
when it’s accepted by the computer, click On next to
Slow Keys. Use the Acceptance Delay slider to change
the length of the delay.
11. Click Mouse & Trackpad to open pointer device settings,
as shown in Figure 1-16.
Figure 1-15: Change the way your keyboard behaves here.
12. If you wish to use a numeric keypad in place of a
mouse, click On next to Mouse Keys.
If your keyboard doesn’t include a dedicated keypad — this is usually the case with laptops — you can purchase a USB (Universal
Series Bus) keypad at most computer and office supply stores.
13. Use the Initial Delay and Maximum Speed sliders to
fine-tune the behavior of Mouse Keys.
14. If the mouse cursor is too small, use the Cursor Size
slider to change the size of the cursor. The Cursor Size
slider works with Mouse Keys as well as a conventional
mouse or trackpad.
If you’re giving a presentation with your Mac and a digital projector,
you may want to increase the size of the mouse cursor so that the
cursor can be used as an onscreen pointer during the presentation.
Figure 1-16: Your pointing device can be customized, too.
➟
13
Chapter 1: Customizing OS X
Activate a Screen Saver
1. Open System Preferences and then click the Desktop &
Screen Saver icon.
2. Click the Screen Saver button to reveal screen saver set-
tings, as shown in Figure 1-17.
3. Scroll through the list of screen savers and click a screen
saver to preview it in the window to the right.
To create a screen saver with photos from your iPhoto library,
choose Library in the Screen Savers list. Alternatively, scroll down
the Screen Savers list and click Choose Folder and then browse to a
folder containing pictures you want to use.
4. Use the Start Screen Saver slider to change when the
screen saver appears. If you choose 15, for example, the
screen saver appears only after the computer is inactive
for 15 minutes.
Figure 1-17: OS X comes with some neat built-in screen savers.
5. To configure a hot corner for activating your screen
saver, click the Hot Corners button.
6. Decide which corner you want as the hot corner and
then choose Start Screen Saver in that corner’s menu, as
shown in Figure 1-18.
7. Click OK to close the hot corner options. To test the hot
corner, move the mouse pointer all the way to the corner you selected. The screen saver begins.
If you don’t want to use a screen saver, move the Start Screen Saver
slider to Never.
➟
14
Figure 1-18: Hot corners can be used to quickly activate a screen saver.
Display 24-Hour Time
Display 24-Hour Time
1. Open System Preferences and then click the Date &
Time icon.
You can also open the Date & Time control panel by clicking-andholding the clock in the upper-right corner of the screen and then
choosing Open Date & Time from the contextual menu that appears.
2. Click the Clock button to bring Clock preferences to the
front, as shown in Figure 1-19.
3. Select Use a 24-Hour Clock to display time in 24-hour
format.
If you’re displaying time in 24-hour format, it makes sense to
deselect the Show AM/PM option.
Figure 1-19: Customize the way time is displayed on your computer.
4. Adjust other clock options as desired and then click the
Date & Time button to show the calendar and time setting options, as shown in Figure 1-20.
Some clock options — such as Analog display — aren’t compatible with a 24-hour clock.
5. If you want the computer to automatically synchronize
its clock with an online date and time source, make sure
that Set Date & Time Automatically is checked. Choose
a source based on your geographical location.
➟
Figure 1-20: Your computer can automatically check and set the time for you.
15
Chapter 1: Customizing OS X
Access Programs Quickly
with Exposé
1. Open System Preferences and then click the Exposé &
Spaces button.
2. Select a hot corner that you want to use for switching
between open programs and then choose All Windows
in that corner’s menu, as shown in Figure 1-21.
3. Close the Exposé & Spaces window.
4. Move the mouse pointer to the corner you selected as
the Exposé hot corner. A window for each active program appears, as shown in Figure 1-22.
5. Click the program window you want to open. The
selected program becomes active although those other
programs are still running.
You can also quickly switch between open applications by holding
down the Ô key and then pressing Tab. A small window appears in
the middle of the screen with an icon for each open application.
Keep pressing Tab until the desired program is highlighted and then
release the Ô key.
➟
16
Figure 1-21: Select a hot corner here.
Figure 1-22: Click the program window you want to open.
Set up Spaces
Set up Spaces
1. Open System Preferences and then click the Exposé &
Spaces icon.
2. Click the Spaces button to open Spaces options, as
shown in Figure 1-23.
3. Place a check mark next to Enable Spaces.
To switch between Spaces more easily, place a check mark next to
Show Spaces in Menu Bar. A Spaces number appears in the menu
bar. Click the Space number and then select a new space from the
menu that appears to jump to that space.
4. To add spaces, click the plus sign next to either Column
or Row. In Figure 1-23, one row has been added.
5. If you want to use only a certain program in a certain
space — for example, you may set up a separate space
just for the DVD player — click the plus sign under
Application Bindings.
Figure 1-23: Enable and configure different spaces for your desktop.
6. In the Finder window that appears, as shown in Figure
1-24, select an application and then click Add.
7. In the Application Bindings column of the Spaces win-
dow, click the Space number and choose a space to
which the application should be assigned.
You can create bindings for any application, but they’re most effective for multimedia applications that might compete with each
other, such as iTunes and the DVD Player. If iTunes is in Space 3,
audio from iTunes goes away when you switch to the DVD Player in
Space 4 and vice versa.
Figure 1-24: Applications can be assigned to specific spaces.
➟
17
Chapter 1: Customizing OS X
Switch between Spaces
1. To switch between spaces, use one of the following
techniques:
• Press F8 to activate spaces, as shown in Figure 1-25,
and then click the space that you want to open.
You can change the Spaces hot key by opening the Spaces preferences window and selecting a different function key from the To
Activate Spaces menu. F8 is the default hot key for spaces.
• Click the Spaces number in the menu bar (if shown)
and then select a Space number from the menu that
appears.
• Launch a program that has a dependency to a specific
space. The previous section shows you how to set up
dependencies.
Figure 1-25: Press F8 to activate spaces and then click a space to open it.
2. To move an application window from one space to
another, activate Spaces and then click and drag a window to a new space, as shown in Figure 1-26.
➟
18
Figure 1-26: You can click and drag application windows between Spaces.