1
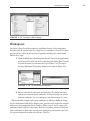
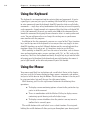
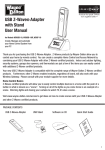
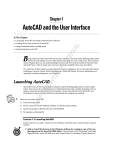
Chapter 1 AL Getting to Know AutoCAD Opening either AutoCAD or AutoCAD LT for the very first time can be RI GH TE D MA TE RI an intimidating experience. Faced with such an expansive collection of tools, settings, and more, where is one to start? To help you answer that question, this chapter will break down the many components of the user interface into manageable segments and introduce you to basic operations such as opening drawings. Even if you’ve used earlier versions of AutoCAD, you’ll still want to review this chapter to become acquainted with some of the changes from recent years. Although the 2011 release does have some subtle user interface improvements, the interfaces are almost identical in AutoCAD and AutoCAD LT. Generally speaking, both platforms offer the same 2D drafting experience. (The biggest difference is that AutoCAD LT has no 3D capability. AutoCAD offers many powerful tools for modeling in 3D that are not found in AutoCAD LT. These tools are the topic of Chapter 16, “Creating 3D Geometry,” and Chapter 17, “Rendering and Materials.”) With so little separating the two platforms, for most purposes in this book I’ll refer to both interchangeably as AutoCAD unless otherwise specified. PY Opening a new drawing Becoming familiar with the AutoCAD and AutoCAD LT Application CO windows Modifying the display Displaying and arranging AutoCAD tools 2 Chapter 1 • Getting to Know AutoCAD Starting AutoCAD If you installed AutoCAD using the default settings for the location of the program files, start the program by choosing Start ➢ Programs ➢ Autodesk ➢ AutoCAD 2011 ➢ AutoCAD 2011 or by choosing Start ➢ Programs ➢ Autodesk ➢ AutoCAD LT 2011 ➢ AutoCAD LT 2011, depending on your program. (This command path might vary depending on the Windows operating system and scheme you are using.) You can also find and double-click the AutoCAD 2011 icon or the AutoCAD LT 2011 icon on your desktop. N O T E You can also use AutoCAD-based products such as AutoCAD Architecture or AutoCAD Civil 3D to learn the topics covered in this book. To use one of these vertical products, choose Start ➢ Programs ➢ Autodesk ➢ AutoCAD Product Name 2011 ➢ AutoCAD Product Name as AutoCAD 2011. The Welcome Screen The Welcome Screen, shown in Figure 1.1, opens when you first start AutoCAD and leads to several video tutorials and demonstrations. Within it you’ll find links to a number of videos introducing you to AutoCAD. These videos go beyond what’s found in the New Features Workshop by providing a more comprehensive look at the entire feature, not just what may have changed from previous releases. The dialog itself features videos for the most popular topics and contains links to many more resources, including additional tutorial videos. The following links are found in the lower-left corner of the Welcome Screen: New Features Workshop: Links to the already mentioned New Features Workshop, where you can learn about improvements that were made throughout the last several releases. Learning Path: This link is truly a launch pad to all things AutoCAD, allowing you access to additional tutorials, tips, tricks, and even links to groups and blogs. More Videos: Expands on the videos featured inside the Welcome Screen itself, and provides access to many more videos to help you get started with AutoCAD. Online Help: An online version of the same help file that installs with the software Although the internal help file defaults to a local copy of the online help file if no internet connection is available, this link does not and requires an internet connection to use.. Starting AutoCAD F i g u r e 1 . 1 The Welcome Screen featuring videos and links to help you get started with AutoCAD After exploring the Welcome Screen, you may prefer to disable it from automatically loading each time you start the software. This can be done by deselecting the check box labeled Show This Dialog At Startup in the lower-left corner of the Welcome Screen. Even after choosing this option, you can still access the Welcome Screen through the Help button on the right end of the AutoCAD title bar. Exploring the New Features Workshop Among the options found on the Welcome Screen when AutoCAD first opens is a What’s New link (see Figure 1.1 earlier). This link leads you to the New Features Workshop (Figure 1.2), where you can quickly learn how AutoCAD 2011 has improved over the last several releases and which tools you can use to augment any skills you already have. In addition to the Welcome Screen, you can also find the New Features Workshop through the Help button on the right end of the AutoCAD title bar. The New Features Workshop is split in two; an index of topics (new features) is listed along the left side of the interface, which is complemented by a pane displaying information about a selected topic on the right (see Figure 1.2). The drop-down list in the upper-left corner provides access to the New Features Workshops for other Autodesk products installed on your system. 3 4 Chapter 1 • Getting to Know AutoCAD F i g u r e 1 . 2 The New Features Workshop dialog box The Customer Involvement Program AutoCAD 2011 is among a large number of Autodesk products that provide the opportunity to participate in a customer involvement program (CIP). The CIP is designed to collect nonpersonal information about your Autodesk products and computer system to help the product programmers and developers design software that best meets your needs. If you haven’t yet agreed or declined to participate, the Customer Involvement Program dialog box (Figure 1.3) might prompt you to join when you first start AutoCAD. Participation is strictly voluntary and, if you choose to participate, AutoCAD will periodically send a small file to Autodesk containing information such as your software name and version, the commands you use, and your system configuration information. An Internet connection is required, and you must ensure that your firewall settings don’t prevent the information from being transmitted. Exploring the AutoCAD User Interface Once you dismiss all of the initial dialog boxes, AutoCAD opens to display its default user interface, or UI as it’s sometimes called. Collectively known as the graphics window, the user interface can be broken down into numerous parts. Starting AutoCAD 5 F i g u r e 1 . 3 The Customer Involvement Program dialog box Many of these parts remain unchanged regardless of how the software is configured, whereas other elements may not always be viewable. We’ll discuss how AutoCAD chooses to configure the user interface shortly. At this point, however, your graphics window should look similar to Figure 1.4. Standard AutoCAD Workspaces O AutoCAD provides the following standard workspaces: AutoCAD and AutoCAD LT offer numerous dialog boxes with various combinations of buttons and text boxes. You’ll learn many of their functions as you progress throughout the book. 2D Drafting & Annotation Utilizing the Ribbon, this workspace (shown in Figure 1.4) is considered the default workspace. Unless otherwise specified, this is also the workspace used throughout this book. AutoCAD Classic Mimics the menu-based interface utilized prior to AutoCAD 2009. 3D Basics Provides the core tools needed to get started with 3D modeling inside AutoCAD. (For AutoCAD users only. 3D features are not included in AutoCAD LT.) 3D Modeling Provides the complete set of 3D modeling tools found inside AutoCAD, including materials via the Materials Browser. (For AutoCAD users only. 3D features are not included in AutoCAD LT.) Initial Setup Workspace You may have one or more Initial Setup Workspaces if you have completed the steps inside the Initial Setup dialog box one or more times. 6 Chapter 1 • Getting to Know AutoCAD Application Menu Quick Access Toolbar Ribbon Tabs Ribbon Panel Ribbon View Cube Navigation Bar Cursor UCS Icon Command Prompt InfoCenter Command Window Coordinate Readout Status Bar F i g u r e 1 . 4 The AutoCAD Application window using the 2D Drafting & Annotation workspace Switching the Current Workspace Whether you choose to develop your own custom workspace or just use one that comes with the software, you may switch your current workspace at any time. As you become more comfortable with the software, you’ll likely choose to build a workspace that better matches the way you use AutoCAD. You’ll be using the 2D Drafting & Annotation workspace for the first 15 chapters in this book. In the final two chapters, you’ll switch to the 3D Modeling (Figure 1.5) workspace. For now, however, you need to get your AutoCAD user interface to look like Figure 1.4. N O T E T he illustrations in this book show the drawing area of the AutoCAD user interface with a white background; however, the default and preferred method is to use a dark gray or black background to reduce eyestrain. The color choice in the book is simply for readability. Starting AutoCAD View Cube Cursor UCS Icon Materials Browser Palette F i g u r e 1 . 5 The AutoCAD Application window using the 3D Modeling workspace If your screen looks like Figure 1.5 or isn’t at all like Figure 1.4, you need to make a few changes: 1. Click the Workspace drop-down from the Quick Access toolbar, and choose 2D Drafting & Annotation, as shown in Figure 1.6. Alternatively, command-line users can enter: WSCURRENT↵ 2d drafting & annotation↵. F i g u r e 1 . 6 Selecting the 2D Drafting & Annotation workspace 2. The 2D Drafting & Annotation workspace may display the tool palettes on the screen. If the palettes are displayed, you need to turn them off for now by clicking the X in the upper-right corner. Your workspace 7 Chapter 1 • Getting to Know AutoCAD 8 might have different palettes displayed than those shown in Figure 1.7. If other palettes are still visible, click the X in the upper-right or upperleft corner of each palette to close them. F i g u r e 1 . 7 The tool palettes 3. The large area in the middle of the screen is called the drawing area. It might need to be adjusted. On the Ribbon, select the View tab ➢ Visual Styles panel ➢ Visual Styles drop-down list, and select the 2D Wireframe option (see Figure 1.8). F i g u r e 1 . 8 Selecting the 2D Wireframe visual style AutoCAD LT users can skip step 3 and move on to step 4. 4. If you’re not still on the View tab, click the View tab ➢ Views panel ➢ Top, as shown in Figure 1.9. This procedure ensures that your view is perpendicular to the drawing area. It should be as though you were looking straight down at a piece of paper on a drawing table. Introducing the AutoC AD Application Window If the drawing area looks like a sheet of graph paper, it means the grid, a drawing aid that you’ll look at later, is turned on. F i g u r e 1 . 9 Selecting the Top option from the Views Ribbon panel 5. Move the cursor to the left side of the status bar at the bottom of the screen, and click the Grid Display button so it’s in the Off (unpushed with a gray, not blue background) position and the gridlines disappear. Place your cursor over any button in the status bar to reveal its name in a tooltip. Your screen should now look similar to Figure 1.4. Introducing the AutoCAD Application Window At the top of the Application window (see Figure 1.10) the Ribbon and the Quick Access toolbar sit to the left, and the InfoCenter and a number of related tools sit on the right. The title bar is analogous to the title bar in any Windows program. It contains the program name (AutoCAD or AutoCAD LT) and the title of the current drawing with its path, provided a drawing other than the default Drawing#.dwg is open. Below the title bar is the Ribbon, where you’ll find most of the AutoCAD commands and tools needed to complete any drawing task. You’ll explore the Ribbon in much more detail shortly; however, its basic concept is that related tasks are found under the different tabs, which are further segmented into panels containing similar tools. 9 Chapter 1 • Getting to Know AutoCAD 10 Application Menu Button Quick Access Toolbar Communincation Center Program and Drawing Title Subscription Center Favorites Help Button InfoCenter Ribbon The title bar and menu bar at the top of the AutoCAD LT screen are identical to those in AutoCAD except that AutoCAD LT appears in the title bar rather than AutoCAD. F i g u r e 1 . 1 0 The Ribbon, Quick Access toolbar, and InfoCenter To the far right of the title bar is the InfoCenter containing the Search, Subscription Center, Communication Center, Favorites, and Help buttons. You can enter a question in the field to the left of the Search button to access information from a number of locations including the standard AutoCAD help system quickly through the drop-down panel. With the Communication Center, you can choose to have information, such as software updates, product support, or websites such as blogs using Really Simple Syndication (RSS) feeds, sent directly to your system. With the Favorites tool, you can define a list of help or informational topics that can be quickly accessed whenever you need them. The Help button is a direct link to the AutoCAD help system (also accessible by pressing the F1 key). The blank middle section of the screen is called the drawing area. Notice the movable crosshair cursor (see Figure 1.11). The crosshairs on your cursor might extend completely across the screen. Later in this chapter, you’ll see how to modify the length of the crosshairs as well as make a few other changes. F i g u r e 1 . 1 1 The crosshair cursor placed near the UCS icon Introducing the AutoC AD Application Window 11 Notice the little box at the intersection of the two crosshair lines. This is one of several forms of the AutoCAD cursor, known in this form as the Aperture. When you move the cursor off the drawing area, it changes to the standard Windows pointing arrow. As you begin using commands, it will take on other forms, depending on which step of a command you’re performing. The icon composed of two lines, labeled X and Y, in the lower-left corner of the drawing area is the UCS icon (UCS stands for user coordinate system). It indicates the positive direction for the x- and y-axes. Below the drawing area is the command window, shown in Figure 1.12. U n d e r s ta n d W h e r e A u t o C AD I s S e a r c h i n g It’s reasonable to assume a search query would return the same results regardless of where in the software the search was performed. However, that is not the case. A search using the InfoCenter will generally yield more results than a search of the AutoCAD help file. The InfoCenter is able to search numerous locations simultaneously. By default the InfoCenter will search the help file as well as some predetermined web locations. You can view and customize the full list of where the InfoCenter searches by clicking the down arrow next to the binocular icon and selecting Search Settings. F i g u r e 1 . 1 2 The command window Most commands can be launched in a few different ways (the command line, Ribbon tools, and so on). Regardless of which method you choose, the command window is where you will tell the program what to do and where the program tells you what’s happening. It’s an important feature, and you’ll need to learn how it works in detail. By default, three lines of text are visible. You’ll learn how to adjust the number of visible lines later in this chapter during the “Working in the Command Window” section. When the Dynamic Input feature is active, much of the command window information is displayed alongside the cursor as well. The number of InfoCenter icons may vary based on the way AutoCAD was installed, especially in the case of network deployments. 12 Chapter 1 • Getting to Know AutoCAD Below the command window is the status bar (see Figure 1.13). F i g u r e 1 . 1 3 The left side of the status bar (top) and the right side of the status bar (bottom) On the left end of the status bar, you’ll see a coordinate readout window. In the middle are 14 buttons (LT has only 11) that activate various drawing modes. It’s important to learn about the coordinate system and most of these drawing aids (Snap Mode, Grid Display, Ortho Mode, Object Snap, and so on) early as you learn to draw in AutoCAD. They will help you create neat and accurate drawings. You’ll have the chance to explore each of the following drawing modes/aides throughout this book; as a preview, however, following is a complete list with a brief description of each: Infer Constraints When this is enabled, AutoCAD will automatically apply constraints between objects as you create or modify them. Snap Mode Restricts movement of the cursor inside the drawing area to specified intervals. Grid Display Mimics a piece of graph paper by displaying a series of nonplotting horizontal and vertical lines displayed in the drawing’s background. Ortho Mode Restricts movement of the cursor to 90° intervals; 0°, 90°, and 270° by default. Polar Tracking Frequently used in conjunction with Object Snap Tracking, Polar Tracking is an advanced drawing tool that guides cursor movement to specified increments along a polar angle. Its use will be introduced in Chapter 5, “Developing Drawing Strategies: Part 2.” Object Snap Aids you in drawing objects based with geometric reference points such as endpoint, midpoint, intersection, and so on. Mastering the use of object snaps is critical in the creation of accurate drawings. 3D Object Snap Similar to the standard object snaps, with more sophisticated tools for working and interacting with 3D faces and edges. Object Snap Tracking An advanced drafting method introduced in Chapter 5, this allows you to draw objects with specific geometric relationships to other objects within your drawing. Introducing the AutoC AD Application Window Dynamic UCS UCS stands for User Coordinate System, and Dynamic UCS is used in 3D drawings. Dynamic Input When enabled, displays much of the command interface near the cursor (in addition to the command line itself). Show/Hide Lineweight Toggles the display of lineweights (discussed in Chapter 14, “Using Layouts to Set Up a Print”) in the drawing area. Show/Hide Transparency Many objects, including layers, can be assigned a transparency value. When this toggle is on, these objects’ transparency settings will take effect. Quick Properties Based on the type of object/objects you have selected, Quick Properties provides a contextual version of the full Properties palette near the selected object/objects. When nothing is selected, the Quick Properties will disappear from the drawing area. Selection Cycling Provides contextual list of selected overlapping objects, making it easier to select the object/objects you intended to select. Te x t - B a s e d B u t t o n s o r I c o n s ? Sometimes the status bar icons can be a little cryptic. If you prefer, AutoCAD can display those buttons as text instead of icons. Just right-click on any of the icons, and deselect Use Icons. At the right side of the status bar are tools for navigating in the drawing area and controlling the display, tools for controlling the appearance of annotation objects in AutoCAD, and tools to control access to other drawings or features within the current drawing. The padlock icon controls which types of toolbars and windows are locked in their current positions on the screen. Leave it in the unlocked mode for now. To conclude this quick introduction to the various parts of the Application window, you need to understand a couple of items that might be visible on your 13 14 Chapter 1 • Getting to Know AutoCAD screen. You might have scroll bars below and to the right of the drawing area; although they can be useful, they can also take up precious space in the drawing area. They won’t be of any use while working your way through this book, so you can remove them for now. These features can be removed temporarily from the OPTIONS command. The following steps will show you how: 1. To access the OPTIONS command graphically, click the Application Menu button in the upper-left corner of the AutoCAD window, and then click the Options button at the bottom of the menu (see Figure 1.14). The OPTIONS command is also accessible from the command line by entering OPTIONS↵. F i g u r e 1 . 1 4 Click the Options button in the Application menu. The Options dialog box (shown in Figure 1.15) opens. It has ten tabs (LT has only eight) across the top that act like tabs on file folders. 2. Click the Display tab, which is shown in Figure 1.16. Focus on the Window Elements section. If scroll bars are visible on the lower and right edges of the drawing area, the Display Scroll Bars In Drawing Window check box will be selected. 3. Click the check box to turn off the scroll bars. Also be sure the check box for Display Screen Menu is not selected. Don’t click the OK button yet. Introducing the AutoC AD Application Window 15 F i g u r e 1 . 1 5 The Options dialog box F i g u r e 1 . 1 6 The Options dialog box opened at the Display tab Another display setting that you might want to change at this point controls the color of the cursor and the drawing area background. If you want to change the colors, follow these steps: 1. In the Window Elements area of the Display tab, click the Colors button to open the Drawing Window Colors dialog box (see Figure 1.17). AutoCAD LT doesn’t have the screen menu, so the option to turn it off isn’t on LT’s Display tab. Chapter 1 • Getting to Know AutoCAD 16 In the upper-left corner of the dialog box, in the Context list box, 2D Model Space should be selected. If it’s not, select it. N O T E T he screen-captured images in this book are taken from AutoCAD sessions using the Dark color scheme. You can set the Color Scheme at the top of the Window Elements area and choose either Light or Dark. Alternatively you can click the Restore Classic Colors button to set the background to black, along with the other display contexts. 2. Move to the Color drop-down list, which is in the upper-right corner. If your drawing area background is currently white, a square followed by the word White is displayed. Open the Color drop-down list and select Black (or the background color you want). The drawing area will become that color, and the cursor color will change to white, as shown in the Preview window in Figure 1.17. F i g u r e 1 . 1 7 The Drawing Window Colors dialog box 3. Click the Apply & Close button to close the Drawing Window Colors dialog box. The background and cursor colors will change. 4. If you want to change the length of the lines of your crosshair cursor, go to the lower-right corner of the Display tab (the middle of the right Working in the Command Window side for LT), and move the slider to change the Crosshair Size setting. The crosshair length changes as a percentage of the drawing area. 5. Click OK to apply any remaining changes, and close the Options dialog box. T I P I f you choose a color other than black as the drawing area background color, the color of the crosshair cursor remains the same as it was. To change the crosshair color, go to the Interface Element list box in the Drawing Window Colors dialog box and select Crosshairs. Then select a color from the Color drop-down list. Working in the Command Window Just below the drawing area is the command window. This window is separate from the drawing area and behaves like a Windows window — that is, you can drag it to a different place on the screen and resize it, although you probably shouldn’t do this at first. If you currently have fewer than three lines of text in the window, you should increase the window’s vertical size. To do so, move the cursor to the horizontal boundary between the drawing area and the command window until it changes to an up-and-down arrow broken by two parallel horizontal lines. Hold down the left mouse button, drag the cursor up by approximately the same amount that one or two lines of text would take up, and then release the mouse button (see Figure 1.18). You should see more lines of text, but you might have to try this a few times to display exactly four lines. A horizontal line will separate the top two lines of text from the bottom line of text. When you close the program, AutoCAD will save the new settings. The next time you start AutoCAD, the command window will display four lines of text. The command window is where you give information to AutoCAD and where AutoCAD prompts you for the next step in executing a command. It’s a good practice to keep an eye on the command window as you work on your drawing. Many errors can occur when you don’t check it frequently. If the Dynamic Input button on the status bar is in the On position, some of the information in the command window will appear in the drawing area next to the cursor. You’ll learn about this feature when you start drawing. 17 18 Chapter 1 • Getting to Know AutoCAD F i g u r e 1 . 1 8 Resizing the command window Before you begin to draw in the next chapter, take a close look at the Ribbon, Application menu, toolbars, and keyboard controls. N O T E You can start AutoCAD commands in a number of ways: from the Ribbon, the Application menu, the command window, and the menus that appear when you right-click. When you get used to drawing with AutoCAD, you’ll learn some shortcuts that start commands quickly, and you’ll find the way that best suits you. Using the Ribbon Perhaps one of the most prominent elements of the AutoCAD interface is the Ribbon (Figure 1.19). While the Ribbon can be positioned in a number of different ways, its default position extends across the top of the AutoCAD window. Depending on the size of your AutoCAD window (or current screen resolution), the Ribbon may look a little different on your computer. That’s because the Ribbon self-adjusts according to the size of the AutoCAD window itself. To see the Ribbon in its fully expanded state, you need to be sure to have a screen resolution wider than 1280 pixels. When the width is too narrow to display each panel fully, the panels will begin to collapse first by replacing the panels with a single button bearing the name of the panel. The Ribbon itself can be divided into three parts: tools, panels, and tabs. Ribbon Tools The individual icons and various drop-down lists found on the Ribbon are known as Ribbon tools. Clicking on any of these tools will launch the command associated with it. Using the Ribbon Ribbon Tabs Large Tool Icon (Button) Panel Collapsed Ribbon Panel F i g u r e 1 . 1 9 The Ribbon fully displaying all panels (top) and with partially and completely collapsed panels (bottom) Ribbon Panels Similar tools are grouped together into a series of Ribbon panels. For instance the Move, Erase, and Rotate tools modify objects. Consequently, each of these tools is found on the Modify Ribbon panel. Ribbon Tabs Ribbon tabs offer the highest level of organization; they group Ribbon panels by task. For instance, commands related to plotting (printing) are found on the Output tab, whereas commands related to entering text can be found on the Annotate tab. 19 20 Chapter 1 • Getting to Know AutoCAD Displaying the Ribbon Tools The Ribbon’s default location is at the top of the screen, but it can be moved or docked almost anywhere on your screen. Individual panels have a number of display options built into them as well. In the following exercises, you will have the chance to explore many of these display options. Collapsing, Moving, and Hiding the Ribbon Available drawing area is always at a premium, and you can regain some of it by collapsing the Ribbon. When you click the Minimize button to the right of the Ribbon tabs once, the panels are collapsed vertically, showing only an icon for each Ribbon panel. Clicking it a second time collapses the Ribbon further so only the tab and panel names display. Clicking it a third time collapses the Ribbon so only the tabs show. When the Ribbon is in either of these states, you can expand any panel or tab by clicking its visible panel or tab name. Clicking the Minimize button a fourth time returns the Ribbon to its default state. Rather than cycling through each display option, you can use the small Down icon to the right of the Minimize Ribbon button to quickly switch between states. A list of available display states (Figure 1.20) will appear after clicking the Down icon. Select the desired visibility to switch directly to it, as opposed to cycling through the other options. F i g u r e 1 . 2 0 List of available Ribbon display states The Ribbon’s default location is at the top of the screen, but it can be undocked, or floating over the drawing area; or it can be moved to a second monitor, or docked on either side of the drawing area. To undock the Ribbon, right-click to the right of the tab names and choose Undock from the pop-up menu, as shown in Figure 1.21. The Ribbon detaches from the top of the drawing area and floats on the screen, as shown in Figure 1.22. To dock it, click the title bar on the side of the floating Ribbon and drag it to the side or the top of the drawing area. Experiment with detaching the Ribbon, but when you are finished, dock it back at the top so that you can follow the graphics in this book more easily. Using the Ribbon F i g u r e 1 . 2 1 Undocking the Ribbon If you don’t want the Ribbon at all, you can turn it off by right-clicking to the right of the Ribbon tabs and choosing Close. To turn it on, enter RIBBON↵. You’ll use the Ribbon throughout this book, so be sure to keep it on for now. F i g u r e 1 . 2 2 The Ribbon undocked from the top of the drawing area Using the Ribbon Tools Each panel contains tools from a related family of functions. For example, all the common tools for editing objects in the drawing area are consolidated in the Modify panel. When more tools are available than will fit on the panel, an arrow is displayed on the panel’s title bar. Clicking the title bar expands the panel and 21 22 Chapter 1 • Getting to Know AutoCAD exposes the additional tools. Follow these steps to learn how the Ribbon tools work and how they display information. 1. Click the Home tab on the Ribbon to expose the Home tab’s panels (see the top of Figure 1.19 shown earlier). 2. Move your cursor over the Modify panel, and pause the cursor over the Bring To Front tool button. This exposes the button’s tooltip, as shown at the top of Figure 1.23. Displaying the name of the tool, the tooltip also provides a brief description of its function, the command-line equivalent of clicking the tool, and instructions to press the F1 key to open the AutoCAD Help file to the current tool’s Help page. F i g u r e 1 . 2 3 The tooltip for the Bring To Front command (top) and the extended tooltip (bottom) 3. After a few seconds of hovering over the Bring To Front button, the tooltip expands to display the extended tooltip (see the bottom of Figure 1.23) with a more complete description. 4. Pause the cursor over the Copy button in the Modify panel. This time, after a few seconds, the tooltip is replaced with a cue card, as shown in Figure 1.24, instead of an extended tooltip. Cue cards show the step-by-step implementation of the tool. Using the Ribbon 5. Click the Modify panel’s title bar to expand the panel and expose all of the Modify tools. 6. Often, you may find yourself returning to the same tool on an expanded Ribbon panel. When that happens, you can pin the panel open by clicking the pushpin-shaped button in the bottom-left corner. When the panel is pinned open, it remains open even when the cursor is not hovering over it (see Figure 1.25). 7. Click the button again to unpin the panel, and then move the cursor off the panel to collapse it. Regardless of whether a panel is pinned or unpinned, it will automatically collapse if you change Ribbon tabs. F i g u r e 1 . 2 4 The cue card for the Copy tool F i g u r e 1 . 2 5 The Modify panel pinned to stay open Customizing the Ribbon Nearly every portion of the Ribbon can be customized to your liking. From modifying an existing Ribbon panel to building your own custom tabs and panels, to displaying only the buttons you want — it’s all possible! There are several 23 24 Chapter 1 • Getting to Know AutoCAD ways to customize the Ribbon, and the overall user interface. One of the easiest ways to custom tailor the user interface to the way you plan to use AutoCAD is with the Initial Setup Dialog box. The Initial Setup Dialog Box To access the Initial Setup dialog box, select the Application Menu button (the big A icon in the upper-left corner of the screen), and then select Options. This opens the Options dialog box, where you can select the User Preferences tab and then click the Initial Setup button. Finally the Initial Setup dialog box (Figure 1.26) will appear prompting you to select an industry that most closely describes your work. After progressing through the Initial Setup Dialog, the software will custom tailor itself to better match the way people in your industry use AutoCAD. For instance, if you were to select Architecture, AutoCAD would customize your Ribbon panels and tool palettes, and it might also make changes to settings such as the default drawing template path. F i g u r e 1 . 2 6 The first Initial Setup dialog box Because so many configurations are possible when using this tool, click the Skip button if you open the Initial Setup dialog box. Staying with a generic setup will help ensure AutoCAD will both look and perform as shown in this book. Choosing the Skip button will open the Initial Setup - Changes Not Saved dialog shown in Figure 1.27 where you can Return to Initial Setup or Discard Using the Application Menu 25 changes and close Initial Setup. To ensure AutoCAD looks and performs as shown in this book, choose Discard changes and close Initial Setup. Using the Initial Setup Dialog box is just one way to customize the look and feel of AutoCAD. More advanced features such as the Customize User Interface (CUI command) allow you to customize nearly every element of the user interface. You can even design your own buttons for commands that aren’t already represented by buttons on the toolbars. These activities are for more advanced users, however, and aren't covered in this book. There are numerous resources available online from blogs, such as your author’s www.TheCADGeek.com. George Omura’s book Mastering AutoCAD 2011 and AutoCAD LT 2011 (Wiley, 2010) provides a comprehensive look into customizing the Ribbon and more. F i g u r e 1 . 2 7 The second Initial Setup dialog box Using the Application Menu The Application menu contains the tools for opening, saving, and printing (plotting) your drawings, similar to the options found under the File drop-down menu in AutoCAD and many other programs. When the Application menu is open, the menus for these tools project from the upper-left corner of the AutoCAD window and cover the drawing area and any open dialog boxes. 1. Click the Application Menu button to open the Application menu. 2. The left pane of the Application menu displays the different commands. Clicking or hovering over a command displays a menu of its options in the right pane, as shown in Figure 1.28. A bar with an up or down arrow at the top or bottom of the right pane indicates that additional tools are available. You can display these tools by placing your cursor over either bar. Be careful not to double-click the Application menu, as this will make AutoCAD close. 26 Chapter 1 • Getting to Know AutoCAD F i g u r e 1 . 2 8 The Application menu showing the Print options Opening a Drawing with the Application Menu The Application menu offers a quick method for opening drawings. You can even see a thumbnail preview of the drawings and arrange drawings that you frequently edit so that they are easily accessible. Here’s how: 1. To open a new AutoCAD file from the Application menu, select New ➢ Drawing, as shown in Figure 1.29. This opens the Select Template dialog box, where you select a template on which to base the new drawing. Opening a file with a template is covered in Chapter 2, “Learning Basic Commands to Get Started.” F i g u r e 1 . 2 9 Opening a new drawing from the Application menu 2. To open an existing file from the Application menu, select Open ➢ Drawing, as shown in Figure 1.30. Using the Application Menu F i g u r e 1 . 3 0 Opening an existing drawing from the Application menu This opens the Select File dialog box, where you can navigate to the desired drawing file and select it. 3. To open a file that you’ve worked on recently, click the Recent Documents button at the top of the Application menu’s left pane. This displays the most recent files opened in AutoCAD in the right pane, as shown in Figure 1.31. F i g u r e 1 . 3 1 Displaying the recent documents in the Application menu 4. Hover over a filename in the right pane to display a thumbnail preview of the drawing and additional information, including the drawing location and AutoCAD drawing format (see Figure 1.32). 27 28 Chapter 1 • Getting to Know AutoCAD F i g u r e 1 . 3 2 Displaying a thumbnail of the selected file O pen i ng N e w Fi les You can open new or existing files using the QNew or Open button in the Quick Access toolbar. Existing drawings can also be opened by dragging them from a Windows Explorer window to the AutoCAD title bar. G e t t i ng t h e M ost o u t o f t h e R ec en t D ocum en ts L i st The Application menu offers many time-saving tips. Here are two of the best ways to use the Recent Documents list: Frequently Used Drawings: For drawings you access on a regular basis, and would like to remain on the Recent Documents list, click the pushpin that displays next to its name. This will “pin” that drawing to the Recent Documents list until you unpin it. Maximize the Number of Recent Documents: Out of the box the Recent Document list only displays the last nine drawings you’ve opened. This number can be increased to fifty by opening the OPTIONS command, selecting the Open and Save tab, and changing the Number Of Recently-Used Files setting under the Application Menu heading. Using the Application Menu N O T E AutoCAD 2011 uses the AutoCAD 2010 drawing (DWG) file for- mat. This means that the files created in AutoCAD 2011 are compatible only with AutoCAD 2010 and AutoCAD 2011. You can share drawings with releases earlier than AutoCAD 2010 by performing a simple conversion. To convert a 2010 format drawing to a prior version, open the Application menu and then click Save As ➢ AutoCAD Drawing and choose the version you want from the Files Of Type drop-down list at the bottom of the Save Drawing As dialog box. Switching between Open Drawings As in many programs, you can have multiple drawing files open in the same session of AutoCAD. Each drawing is stacked behind the drawings in front of it. There are several ways to switch between the open files, including using the Application menu, as shown next. 1. Start or open two or more AutoCAD files. 2. Open the Application menu, and then click the Open Documents option at the top of the left pane. The open drawings are displayed in the right pane, as shown in Figure 1.33. 3. Click on any drawing to bring it to the front of the AutoCAD window. 29 30 Chapter 1 • Getting to Know AutoCAD F i g u r e 1 . 3 3 Displaying the open drawings in the Application menu 4. You can change the way AutoCAD displays the list of open drawings by clicking the icon near the top of the right pane and choosing one of four sizes of icons or thumbnail images to represent the open drawings. 5. Another option for switching between open drawings is to click the Quick View Drawings button in the status bar. This displays thumbnails for the open drawings, and you can click any thumbnail to make its drawing active. Hovering over a thumbnail displays that drawing’s layouts (see Figure 1.34). Layouts are designated views of the drawing with scaled viewports looking into the drawing model. Viewports are covered in Chapter 14. F i g u r e 1 . 3 4 Displaying the open drawings with the Quick View Drawings tool Using the Drop-Down Menus If you prefer to use drop-down menus, they’re still available in AutoCAD 2011, although they are turned off by default in the 2D Drafting & Annotation, 3D Basics, and 3D Modeling workspaces. You can display them by switching to the AutoCAD Using the Drop-Down Menus Classic workspace, clicking the down arrow at the right end of the Quick Access toolbar, and choosing Show Menu Bar (see Figure 1.35), or by entering MENUBAR↵ 1↵. This book will focus on the use of the Ribbon; the menus are covered here so that you’ll be familiar with them if you use them in the future. F i g u r e 1 . 3 5 Turning on the menu bar The left end of the menu bar, just below the title bar (see Figure 1.36), consists of an icon and 13 (11 if you don’t have the Express Tools installed or are using LT) menus. Click any of these to display a drop-down menu. The icon and the File and Edit menus are included with all Windows-compliant applications, although they are somewhat customized to work with AutoCAD. The drop-down menu associated with the icon contains commands to control the appearance and position of the drawing area. F i g u r e 1 . 3 6 The AutoCAD user interface showing the menu bar Commands in the File menu are for opening and saving new and existing drawing files, printing, exporting files to another application, choosing basic utility options, and exiting the application. The Edit menu contains the UNDO and REDO commands, the Cut and Paste tools, and options for creating links between AutoCAD files and other files. The Help menu works like most Windows Help menus and contains a couple of AutoCAD-specific entries as well, including some online resources and a link to the New Features Workshop. The other eight (or ten) menus contain the most frequently used AutoCAD commands. You’ll find that if you master the logic of how the commands are organized 31 32 Chapter 1 • Getting to Know AutoCAD by menu, you can quickly find the command you want. Here are short descriptions of the other AutoCAD drop-down menus: View Contains tools for controlling the display of your drawing file. Insert Contains commands for placing drawings and images or parts of them inside other drawings. Format Contains commands for setting up the general parameters for a new drawing or changing the entities in a current drawing. Tools Contains special tools for use while you’re working on the current drawing, such as those used for finding the length of a line or for running a special macro. Draw Contains commands for creating new objects (such as lines or circles) on the screen. Dimension Contains commands for dimensioning and annotating a drawing. Modify Contains commands for changing existing objects in the drawing. Parametric Contains commands for constraining objects or dimensions to specific values or parameters. Window Contains commands for displaying currently open drawing windows and lists currently open drawing files. Express Contains a library of productivity tools that cover a wide range of AutoCAD functions. Express Tools are widely used but aren’t officially supported by Autodesk. They are a part of the default program installation but may be omitted in a custom installation. AutoCAD LT users do not have the option to install Express Tools. You can turn off the menu bar by clicking the down arrow on the right end of the Quick Access toolbar and choosing Hide Menu Bar, or by entering MENUBAR↵ 0↵. Using the Toolbars The AutoCAD toolbars have essentially been replaced by the Ribbon or other features, so we’ll only touch on them briefly here. Toolbars, like the Ribbon panels, are collections of tools grouped by similar tasks. Like the Ribbon itself, any toolbar can be displayed or hidden without affecting the others, and they can all be docked to a side or the top of the drawing area or float freely. To display a toolbar, first display the menu bar; then choose Tools ➢ Toolbars, click a toolbar category, and click the toolbar that you want to open (see Figure 1.37). Take a few minutes to explore the available toolbars, and then close them and hide the display of the menu bar. You’ll touch on a few of the toolbars throughout the course of this book, but most of the tools used will be accessed from the Ribbon. U s i n g t h e To o l b a r s F i g u r e 1 . 3 7 Selecting a toolbar to display Workspaces You haven’t been directed to make any significant changes to the workspace, but when you do, you can save this setup as a new workspace. Using this feature, you can always return to your preferred layout by activating the saved layout. Follow these steps: 1. Click the Workspace Switching drop down list next to the Application menu, or on the right side of the status bar, and choose Save Current As from the menu, as shown on the left in Figure 1.38. This opens the Save Workspace dialog box, shown on the right in Figure 1.38. F i g u r e 1 . 3 8 The Save Workspace dialog box 2. Enter a name for the workspace and click Save. The dialog box closes, and you are returned to your workspace. Until you change it or select a different workspace, the new workspace setup will remain as it is now. When you make changes to the new workspace by adding a toolbar or changing the background color of the drawing area, you can easily update the current workspace to accommodate those changes. Follow steps 1 and 2, naming the workspace again with the same name. You’ll get a warning window telling you that a workspace by that name already exists and asking you whether you want the new arrangement to replace the old one. Click Yes. 33 34 Chapter 1 • Getting to Know AutoCAD Using the Keyboard The keyboard is an important tool for entering data and commands. If you’re a good typist, you can gain speed in working with AutoCAD by learning how to enter commands from the keyboard. AutoCAD provides what are called alias commands — single keys or key combinations that start any of several frequently used commands. A good example of a command alias that ships with AutoCAD is the LINE command. Of course you could enter LINE at the command line to launch the command, but typing the one-character alias L is much quicker and easier. You can add more aliases or change the existing ones as you become more familiar with the program. In addition to the alias commands, you can use several of the F keys (function keys) on the top row of the keyboard as two-way or three-way toggles to turn AutoCAD functions on and off. Although buttons on the screen duplicate these functions (Snap, Grid, and so on), it’s sometimes faster to use the F keys. While working in AutoCAD, you’ll need to enter a lot of data, such as dimensions and construction notes; answer questions with “Yes” or “No”; and use the arrow keys. You’ll use the keyboard constantly. It might help to get into the habit of keeping your left hand on the keyboard and your right hand on the mouse if you’re right-handed, or the other way around if you’re left-handed. Using the Mouse Your mouse most likely has two buttons and a scroll wheel. So far in this chapter, you have used the left mouse button to choose menus, commands, and options, and you’ve held it down to drag the Ribbon. The left mouse button is the one you’ll be using most often, but you’ll also use the right mouse button. While drawing, you’ll use the right mouse button for the following three operations: To display a menu containing options relevant to the particular step you’re in at the moment To use in combination with the Shift or Ctrl key to display a menu containing special drawing aids called object snaps To display a menu of toolbars when the pointer is on any icon of a toolbar that is currently open The middle button with scroll wheel serves a dual function. Pressing-andholding the middle button will allow you to pan throughout your drawing until A r e Yo u E x p e r i e n c e d ? you release the middle button. The second function of the middle scroll wheel is to zoom in/out within your drawing. When scrolling toward the screen, you will zoom into your drawing. Conversely, when scrolling away from the screen, you will zoom out from your drawing. AutoCAD makes extensive use of toolbars and the right-click menu feature. This makes your mouse an important input tool. The keyboard is necessary for inputting numeric data and text, and it has hot keys and aliases that can speed up your work; however, the mouse is the primary tool for selecting options and controlling toolbars. The next chapter will familiarize you with a few basic commands that will enable you to draw a small diagram. If you want to take a break and close AutoCAD, choose Application Menu ➢ Exit AutoCAD (lower-right corner), and choose not to save the drawing. Are You Experienced? Now you can… EErecognize the elements of the AutoCAD Application window EEunderstand how the command window works and why it’s important EEstart commands from the Ribbon EEstart commands from the command line EEuse the Application menu EEdisplay the drop-down menus EEopen and control the positioning of toolbars EEsave a workspace of your screen setup in AutoCAD 35