1
Instructions for use
WASHING MACHINE
Contents
FR
GB
English,1
Français,13
NL
Nederlands,25
GB
Installation, 2-3
Unpacking and levelling
Connecting the electricity and water supplies
Technical details
GB
Description of the machine, 4-5
AR
PT
, 37
Português,49
Self-cleaning detergent dispenser drawer
Control panel
Load balancing system
Running a wash cycle, 6
Wash programmes, 7
Detergents and laundry, 8
Preparing the laundry
Washing recommendations
SIXL 146
Precautions and advice, 9
General safety
Disposal
Saving energy and respecting the environment
Drip-tray system
Care and maintenance, 10
Cutting off the water or electricity supply
Cleaning the machine
Cleaning the detergent dispenser drawer
Caring for the door and drum of your appliance
Cleaning the pump
Checking the water inlet hose
Troubleshooting, 11
Service, 12
1
Installation
GB
This instruction manual should be kept in a safe
place for future reference. If the appliance is sold,
transferred or moved, make sure that the instruction
manual remains with the machine so that the new
owner is able to familiarise himself/herself with its
operation and features.
Levelling the machine correctly will provide it with
stability, help to avoid vibrations and excessive noise
and prevent it from shifting while it is operating. If it is
placed on carpet or a rug, adjust the feet in such a
way as to allow a sufficient ventilation space
underneath the machine.
Read these instructions carefully: they contain vital
information relating to the safe installation and
operation of the appliance.
Connecting the electricity and water
supplies
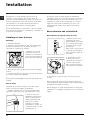
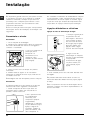
Unpacking and levelling
Connecting the water inlet hose
Unpacking
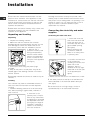
1. Unpack the washing machine.
2. Make sure that the machine has not been
damaged during the transportation process. If it has
been damaged, contact the retailer and do not
proceed any further with the installation process.
3. Remove the 4
protective screws (used
during transportation)
and the rubber washer
with the corresponding
spacer, located on the
rear part of the appliance
(see figure).
4. Close off the holes using the plastic plugs
provided.
5. Keep all the parts in a safe place: they will be
needed again if the washing machine is moved to
another location.
Packaging materials should not be used as toys for
children.
Levelling
Your machine may make a considerable amount of
noise if the two front feet have not been adjusted
correctly.
1. Install the washing machine on a flat and sturdy
floor, without placing it against walls, cabinets or
other furniture.
2. If the floor is not
perfectly level, compensate for any unevenness
by tightening or loosening
the adjustable front feet
(see figure); the angle of
inclination, measured in
relation to the worktop,
must not exceed 2°.
2
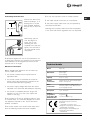
A
1. Insert seal A into the
end of the inlet hose and
screw the latter onto a
cold water tap with a 3/4
gas threaded opening
(see figure).
Before performing the
connection, allow the
water to run freely until it
is perfectly clear.
2. Connect the inlet hose
to the machine by
screwing it onto the cold
water inlet of the
appliance, which is
situated on the top righthand side of the rear part
of the appliance(see
figure).
3. Make sure that the hose is not folded over or bent.
The water pressure at the tap must fall within the
values indicated in the Technical details table (see
next page).
If the inlet hose is not long enough, contact a
specialised shop or an authorised technician.
Do not use extension cords or multiple sockets.
Connecting the drain hose
65 - 100 cm
Connect the drain hose,
without bending it, to a
draining duct or a wall
drain situated between
65 and 100 cm from the
floor;
GB
The cable should not be bent or compressed.
GB
The power supply cable must only be replaced by
authorised technicians.
Warning! The company shall not be held responsible
in the event that these regulations are not respected.
alternatively, place it
over the edge of a
basin, sink or tub,
fastening the duct
supplied to the tap (see
figure). The free end of
the hose should not be
underwater.
We advise against the use of hose extensions; if it
is absolutely necessary, the extension must have the
same diameter as the original hose and must not
exceed 150 cm in length.
Electrical connections
Before plugging the appliance into the electricity
socket, make sure that:
the socket is earthed and complies with all
applicable laws;
the socket is able to withstand the maximum
power load of the appliance as indicated in the
Technical data table (see opposite);
the power supply voltage falls within the values
indicated in the Technical data table(see opposite);
the socket is compatible with the plug of the
appliance. If this is not the case, replace the
socket or the plug.
The machine must not be installed outdoors, even
in covered areas. It is extremely dangerous to leave
the appliance exposed to rain, storms and other
weather conditions.
The mains socket must remain within easy reach
after the washing machine has been installed.
Technical details
Model
SIXL 146
Dimensions
59.5 cm wide
85 cm high
53.5 cm deep
Capacity
from 1 to 6 kg
Electric
connections
please refer to the technical data plate
fixed to the machine
Water
connections
maximum pressure 1 MPa (10 bar)
minimum pressure 0.05 MPa (0.5 bar)
drum capacity 52 litres
Spin speed
up to 1400 rpm
Control
programmes
according to EN
60456 directive
programme
;
run with a load of 6 kg.
This appliance is compliant with the
following European Community
Directives:
- 73/23/CEE of 19/02/73 (Low
Voltage) and subsequent amendments
- 89/336/CEE of 03/05/89
(Electromagnetic Compatibility) and
subsequent amendments
- 2002/96/CE
3
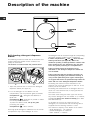
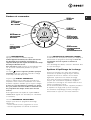
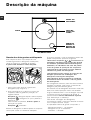
Description of the machine
GB
CONTROL
PANEL
PORTHOLE
DOOR
HANDLE
PORTHOLE
DOOR
ACCESS
PANEL FOR
THE DRAIN
PUMP
ADJUSTABLE FEET
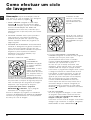
Self-cleaning detergent dispenser
drawer
This washing machine is fitted with an innovative selfcleaning detergent drawer which enhances the
quality of each wash.
The drawer is located inside the porthole door.
We recommend that the maximum levels
indicated on the detergent dispenser drawer are
not exceeded.
STOP
ST
OP
MAX
MAX
A
B
1. Open the porthole door to access the detergent
dispenser drawer (see figure A).
2. Pour the detergent or the additive into the
compartments, over the protective grilles, as follows:
: detergent and additives in
Compartment
liquid form.
: detergent in powder or tablet
Compartment
form and powder addititves.
To place the tablets inside, lift up the grille
protecting the drawer.
: fabric softener.
Compartment
Pouring liquid detergent or additives into the central
compartment may cause leakages to occur.
4
The detergent level can be seen through the corresponding
transparent windows provided on the compartment.
Inside compartments
and
, there are also
floating indicators (see figure B) . When the
maximum quantity of detergent/fabric softener has
been measured out, the indicators rise until they
touch the grilles protecting the compartments.
We recommend that the dosage instructions on
the detergent packaging are followed carefully. If
using certain particularly thick types of detergent,
we suggest that these are placed directly inside the
drum and not in the detergent dispenser drawer.
Exceeding the maximum levels indicated on the
machine may cause the detergent to leak out of the
bottom part of the drawer.
Exceeding the stated amount of detergent does not
result in a more effective was; it simply pollutes the
environment more.
The water used during the wash cycle will remove
any excess detergent from the drawer. It is, however,
possible to remove the drawer manually (see Care
and Maintenance).
To facilitate the process of measuring out the
detergents, we recommend that the dosing device
supplied with the washing machine is used.
The maximum capacity of the drawer is as follows:
- liquid detergents: 1 1/2 measures
- powder detergents: 2 measures
- fabric softener: 1 measure
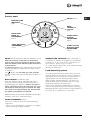
Control panel
GB
ON/OFF button
WASHING TIME
INDICATOR
lights
GB
DOOR
LOCKED red
indicator
light
START DAILY
WASH 30
PROGRAMME
button
START WHITE
COTTON
PROGRAMME
button
START DELICATES
PROGRAMME
button
ON/OFF button: press this to switch the machine on or off.
When the machine is switched on, the buttons
used to start various programmes begin to flash,
while the washing time indicator lights illuminate in
a fixed manner.
To cancel the cycle, press and hold the on/off button
for approximately 2 seconds while the wash cycle is
in progress.
indicator light will flash for a few seconds
The
and the machine will automatically drain the water in
the tub.
DOOR LOCKED red indicator light:
when the indicator light is illuminated the door is
locked to prevent it being opened accidentally; to
avoid damaging the appliance, wait for the light to
switch off before opening the door after the cycle
has ended or when the cycle is paused. The light
will remain lit for approximately two minutes after
the washing programme has finished.
START COLOUR
MIX EASY-IRON
PROGRAMME
button
WASHING TIME INDICATOR lights: these light up
in sequence to indicate the progress of the washing
programme. At the end of the programme all
the indicator lights begin to flash.
For further details, please refer to the chapter entitled
Running a wash cycle.
Load balancing system
To avoid excessive vibrations before every spin, the
machine distributes the load in a uniform manner by
rotating the drum continuously at a speed which is
slightly greater than the washing rotation speed.
When, despite repeated attempts, the load is not
perfectly distributed, the machine spins at a lower
speed than stated for the wash cycle.
If the load is excessively unbalanced, the machine
performs the distribution process instead of spinning.
Balancing attempts may increase the total duration of
the cycle, up to a maximum of 10 minutes.
Rapid flashing of the DOOR LOCKED indicator light
indicates a fault (see Troubleshooting).
START PROGRAMME buttons:
press one of these to start the selected washing
programme.
- button lit in a fixed manner: programme in progress.
- buttons flashing: awaiting selection.
5
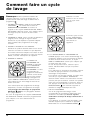
Running a wash cycle
GB
Note:
Once the appliance has been installed, and
before you use it for the first time, run a wash cycle
with detergent and no laundry, using the
programme.
1. SWITCH ON THE MACHINE by pressing the ON/
OFF
button. The icons for the START
PROGRAMME buttons begin to flash and the
WASHING TIME INDICATOR lights light up in a
fixed manner, to indicate that the washing machine
is ready to receive instructions.
2. LOAD THE LAUNDRY. Open the door using the
handle. Load the laundry, making sure you do not
exceed the maximum load value indicated in the
table of programmes on the following page.
3. MEASURE OUT THE DETERGENT AND
ADDITIVES.
Pour the detergents into the drawer located inside
the porthole door, taking care not to exceed the
maximum levels indicated on the surface of the
drawer and by the floating indicators. For further
details, please refer to the chapter entitled
Description of the machine.
4. CLOSE THE DOOR.
5. START THE
WASHING
PROGRAMME by
pressing the
corresponding START
PROGRAMME
BUTTON. The icon
corresponding to the
selected programme
illuminates in a fixed
manner, and all the wash time indicator lights
switch off. The DOOR LOCKED indicator light
illuminates in a fixed manner, to signal the
activation of the door safety device.
For a description of the wash programmes
available, please refer to the chapter entitled
Wash programmes.
The procedure used to start the DELICATES
programme is different; see paragraph "Delicates
30°" on the following page.
During the programme the WASH TIME
INDICATOR lights illuminate in sequence, indicating
how much of the programme has already been
completed.
6
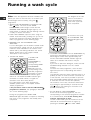
The diagram at the side
refers to a situation in
which approximately
50% of the cycle has
been completed.
At the end of the cycle,
all the WASHING TIME
INDICATOR lights begin
to flash.
6. The WASH PROGRAMME can be SUSPENDED by
pressing the illuminated start programme button
which begins to flash. After approximately two
minutes the DOOR LOCKED indicator light will
switch off to indicate that the door may be
opened.
If you wish to add more detergent, make sure that
the MAX floating indicator is not in a raised
position.
To restart the wash programme, close the door
again and press the corresponding start button
once more.
To guarantee maximum safety, whenever there is a
quantity of water in the drum which could leak out
of the machine, it will not be possible to open the
door (the DOOR LOCKED indicator light will remain
lit even after the two minutes have passed).
The machine, in this case, should be switched off
by pressing for approximately 2 seconds the ON/
button, then waiting for the water to be
OFF
drained automatically.
7. AT THE END OF THE PROGRAMME
At the end of the wash programme, the icon
corresponding to the selected programme remains
lit in a fixed manner, while all the washing time
indicator lights begin to flash.
To start a new wash cycle the machine must be
switched off and switched back on again, by
button TWO TIMES.
pressing the ON/OFF
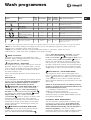
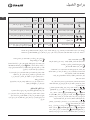
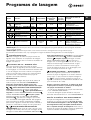
Wash programmes
B u tto n
F abr ics
M ax .
lo ad
(kg )
Te m pe rature
S p in
speed
(rp m )
C y cle
du ratio n
(m inu te s)
6
6 0°C
14 00
14 5
W as h cycle, rin s e cycles , in termediate
an d fin al s pin cycles
4,5
40 °C
10 0 0
10 5
W as h cycle, rin s e cycles an d delicate
s pin cycle
1,5
3 0°C
6 00
50
W as h cycle, rin s e cycles an d delicate
s pin cycle
1,5
3 0°C
no*
50
W as h cycle, rin s e cycles an d drain age
3
3 0°/co ld
w ater**
8 00
30
W as h cycle (on ly if th e " R apid w ash "
pro gramm e activated), rin se cycles ,
delicate spin cycle
GB
Was h cy cle d e scrip tio n
W H ITE C OTT ON
D u rable w h ite co tton
GB
C OL O R M IX 4 0 ° / E AS Y IR O N
Colou red cotto n
an d s yn th etics
D E L IC AT E S
+
+
W ool (fin al delicate spin
cycle)
Silk an d cu rtain s (w ith ou t
final spin cycle)
D AILY WAS H / C OL D WATE R R IN S E
Cotton an d syn th etics
The duration of the programmes indicated in the table are for guidance purposes only, and are calculated based on an average load quantity.
*Note:
for information relating to excluding the spin cycle in the delicates programme, please refer to the
Delicates 30° paragraph further down the page.
**Note: for information relating to rinsing hand-washed clothes in cold water, please refer to the
Daily wash 30 / Cold water rinse paragraph further down the page.
WHITE COTTON 60°
Designed for the washing of all durable white cotton
garments. Higher washing temperatures offer improved
washing results in Class A appliances.
COLOUR MIX 40° / EASY-IRON
This programme can be used to wash all your coloured
garments, whether cotton or synthetic fabric. The spin
cycle is carefully controlled during the entire wash cycle,
so as to reduce the formation of creases in the fabric
and make it easier to iron.
Cotton and synthetic garments can be washed at the
same time.
DELICATES 30°
A cycle designed for the washing of all woollen, silk and
delicate garments. As these garments have different
features, this programme requires an activation
process which is different from the others:
+
DELICATES CYCLE WITH FINAL SPIN (for
woollen garments): press the START DELICATES
button. After approximately 3
PROGRAMME
seconds, the START DELICATES PROGRAMME
and START DAILY WASH PROGRAMME
buttons
begin to flash. Press the START DELICATES
button to perform the wash, which
PROGRAMME
ends with a delicate spin cycle. This programme
includes drum movements which have been carefully
researched to remove excess water from the fabric,
thereby reducing friction and helping to protect your
woollen garments.
+ DELICATES CYCLE WITH SPIN PHASE
EXCLUDED (for silk and viscose garments and for
curtains; not to be used for washing wool):
press the START DELICATES PROGRAMME
button. After approximately 3 seconds, the START
and START DAILY
DELICATES PROGRAMME
buttons begin to flash. Press
WASH PROGRAMME
button to
the START DAILY WASH PROGRAMME
perform the wash without the final spin cycle. At the
end of the cycle, the machine will automatically drain
the water contained in the drum. We recommend that
the garments are removed from the washing machine
straight away, in order to limit the formation of creases.
DAILY WASH 30 / COLD WATER RINSE
This programme can be used to wash lightly soiled
cotton or synthetic fabrics, or garments with the "wash
instruction on the label, in just 30 minutes. It
at 30°"
is also possibile to rinse cotton or synthetic garments
which have been washed by hand (this does not include
wool or silk).
Thanks to its special sensors, the washing machine
is able to recognise when the garments placed in the
drum have detergent on them.
- if no detergent is detected on the clothes, the DAILY
WASH 30' cycle will be performed;
- if detergent is detected (cloths which have been
washed by hand), the COLD WATER RINSE cycle will
be performed automatically.
AUTOMATIC RINSE MANAGEMENT
The rinse function is monitored and controlled in every
programme by special sensors. If the garments are
very soapy at the end of the wash, the rinse cycle
will be extended automatically until the detergent is
removed completely. In this case the wash
programme duration may be slightly increased in relation
to the information given in the table of programmes.
7
Detergents and laundry
GB
Preparing the laundry
Divide the laundry according to:
- the type of fabric/the symbol on the label;
- the colours: separate coloured garments from
whites.
Empty all garment pockets and check the
buttons.
Do not exceed the load values indicated for the
Wash programmes.
How much does your laundry weigh?
1
1
1
1
1
1
1
sheet 400-500 g
pillow case 150-200 g
tablecloth 400-500 g
bathrobe 900-1.200 g
towel 150-250 g
pair of jeans 400-500 g
shirt 150-200 g
Washing recommendations
Bed and bathroom laundry (sheets, towels,
bathrobes, etc.): use the WHITE COTTON
programme which guarantees the most efficient
wash in Class A appliances. The intensive spin
cycle eliminates all excess water efficiently.
Coloured synthetic and cotton garments, with
instruction on the care label: use
wash at 30°
programme. The low
the DAILY WASH 30
washing temperature protects the coloured fabrics.
We recommend the use of liquid detergent.
White cotton garments (shirts, T-shirts,
tablecloths, etc.): use the WHITE COTTON 60°
programme. If there are any stubborn stains, they
should be pre-treated with solid soap before the
wash cycle is started.
Woollen garments (jumpers, scarves, etc.): use
the DELICATES 30° programme with final spin
+ . The movement of the drum during the
wash and the delicate spin cycle reduces fabric
matting. We recommend the use of detergents
specifically designed for woollen garments. We
recommend that the maximum load level is not
exceeded.
Coloured cotton garments (shirts, T-shirts,
underwear, etc.): use the COLOUR MIX 40°
programme, which maximises the performance of
the wash without damaging the colours. The spin
cycle phase, thanks to the incorporated EASY
IRON function, reduces the formation of creases
at the end of the wash, making the fabric easier
to iron. We recommend the use of liquid
detergent.
White or coloured synthetic garments (shirts,
T-shirts, underwear, etc.): use the COLOUR MIX
programme. We recommend that white
40°
and coloured garments are not washed in the
same wash cycle, to prevent any colour leakage
from seeping into the white clothing. We
recommend the use of liquid detergent.
8
Silk garments (shirts, underwear, etc.): use the
DELICATES 30° programme with the spin excluded
+ . Try not to leave the laundry in the drum for
too long after the wash cycle has finished, to
prevent excessive creasing.
Curtains: use the DELICATES 30° programme
+ . We recommend
with the spin excluded
they are folded and placed inside a pillowcase or a
mesh bag. Wash them separately, making sure
the maximum load level is not exceeded.
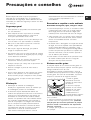
Precautions and advice
This machine was designed and constructed in
accordance with international safety regulations. The
following information is provided for safety reasons
and must therefore be read carefully.
General safety
This appliance was designed for domestic use only.
The machine must only be used by adults, in
accordance with the instructions given in this manual.
symbol on the product reminds you of your
obligation, that when you dispose of the appliance
it must be separately collected.
Consumers should contact their local authority or
retailer for information concerning the correct
disposal of their old appliance.
Saving energy and respecting the
environment
Saving detergents, water, energy and time
Do not touch the machine when barefoot or with
wet or damp hands or feet.
To avoid wasting resources, the washing machine
should be used with a full load. One full load instead of
two half loads saves up to 50% of the energy used.
Do not pull on the power supply cable when
unplugging the appliance from the electricity
socket. Hold the plug and pull.
Treating stains with a stain remover, or leaving
them to soak before they are washed, reduces the
need to wash the garments at high temperatures.
Do not touch the drained water as it may reach
extremely high temperatures.
Never force the porthole door. this could damage
the safety lock mechanism designed to prevent
accidental opening.
If the appliance breaks down, do not under any
circumstances access the internal mechanisms in
an attempt to repair it yourself.
Always keep children well away from the appliance
while it is operating.
The door can become quite hot during the wash cycle.
If the appliance has to be moved, work in a group
of two or three people and handle it with the
utmost care. Never try to do this alone, because
the appliance is very heavy.
Before loading laundry into the washing machine,
make sure the drum is empty.
Disposal
Disposing of the packaging materials: observe local
regulations so that the packaging may be re-used.
The European Directive 2002/96/EC on Waste
Electrical and Electronic Equipment, requires that
old household electrical appliances must not be
disposed of in the normal unsorted municipal
waste stream. Old appliances must be collected
separately in order to optimise the recovery and
recycling of the materials they contain and reduce
the impact on human health and the
environment. The crossed out "wheeled bin"
Use the correct quantity of detergent, in
accordance with the water hardness, how soiled
the garments are and the amount of laundry you
have, in order to avoid wastage and to protect the
environment: although they are biodegradable,
detergents still contain ingredients which alter the
balance of nature. Avoid using fabric softener
wherever possible.
If you use your washing machine between late
afternoon and the early hours of the morning, you will
help to reduce the peak load of the electricity board.
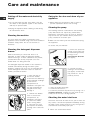
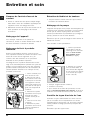
Drip-tray system
The machine is fitted with a drip-tray system on the
inside of the door, which catches any residual drips of
water at the end of the cycle.
We recommend that the dampness level of the
sponge inside the drip-tray compartment is checked
regularly. If necessary, it may be cleaned or replaced
as follows:
1. Remove the
compartment by applying
a light pressure to the
lower part.
2. Remove the sponge
1
inside it, rinse it under
running water and wring it
2
out thoroughly. It may
also be replaced with one
of the spare sponges
provided.
3. Place the sponge back inside the compartment.
4. Replace the compartment in the door, making
sure the springs on the door are correctly
inserted into the corresponding slots on the
compartment.
5. Make sure that the compartment is slotted back
into position correctly.
9
GB
GB
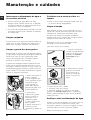
Care and maintenance
GB
Cutting off the water and electricity
supply
Caring for the door and drum of your
appliance
Turn off the water tap after every wash. This will
limit wear on the hydraulic system in the machine
and help to prevent leaks.
Always leave the porthole door ajar in order to
prevent unpleasant odours from forming.
Unplug the appliance when cleaning it and during
all maintenance work.
Cleaning the machine
The outer parts and rubber components of the
appliance can be cleaned using a soft cloth soaked in
lukewarm soapy water. Do not use solvents or
abrasives.
Cleaning the detergent dispenser
drawer
We recommend you check that there is no
detergent or water inside the detergent drawer
before removing it. If these substances are present,
proceed with care as they may leak out of the
drawer while it is being removed.
The detergent dispenser drawer in this machine is
cleaned automatically during the wash cycles.
However, residues may form very occasionally after
certain detergents have been used. To clean the
drawer, proceed as follows:
1. Open the door to
access the drawer.
2. Remove the drawer by
pulling upwards, holding it
by the central
compartment as
indicated in the figure. Do
not grip the drawer by
the grille as this may
damage it.
3. Unhook the drawer
cover to access the
compartment, as
indicated in the figure.
4. Clean the drawer
under running water.
5. Re-hook the cover
and replace the drawer,
pushing until it clicks into
place.
10
Cleaning the pump
The washing machine is fitted with a self-cleaning
pump which does not require any maintenance.
Sometimes, small items (such as coins or buttons)
may fall into the pre-chamber which protects the
pump, situated in its bottom part.
Make sure the wash cycle has finished and unplug
the appliance.
To access the pre-chamber:
1. remove the protective
casing on the lower part
of the washing machine,
turning it in an
anticlockwise direction
(see figure);
2. unscrew the lid by
rotating it anti-clockwise
(see figure): a little water
may trickle out. This is
perfectly normal;
3. clean the inside thoroughly;
4. screw the lid back on;
5. screw the protective cap back on by turning it in a
clockwise direction, making sure the arrow on the
inside part of the cap is facing upwards.
Checking the water inlet hose
Check the inlet hose at least once a year. If there are
any cracks, it should be replaced immediately: during
the wash cycles, water pressure is very strong and a
cracked hose could easily split open.
Never use second-hand hoses.
Troubleshooting
Your washing machine could occasionally fail to work. Before contacting the Technical Assistance Centre
(see Service), make sure that the problem is not easily solved using the following list.
GB
Problem:
Possible causes / Solutions:
GB
The washing machine does not
switch on.
The appliance is not plugged into the socket fully, or is not making
contact.
There is no power in the house.
The wash cycle wont start.
The washing machine door is not closed properly.
The ON/OFF button has not been pressed.
The START PROGRAMME buttons have not been pressed (they
are still flashing).
The water tap has not been opened.
The washing machine does not fill
with water (the door locked LED
flashes rapidly).
The machine continuously fills
with water and drains.
The drain hose is not fitted at a height between 65 and 100 cm
from the floor ( see Installation).
The free end of the hose is under water (see Installation).
The wall drainage system is not fitted with a breather pipe.
The water inlet hose is not connected to the tap.
The hose is bent.
The water tap has not been opened.
There is no water supply in the house.
The pressure is too low.
The START PROGRAMME buttons have not been pressed (they
are still flashing).
If the problem persists even after these checks, shut off the water
tap, switch the appliance off and contact the Technical Assistance
Service. If the dwelling is on one of the upper floors of a building,
there may be problems relating to water drainage, causing the
washing machine to fill with water and drain continuously. Special
anti-draining valves are available in shops and help to avoid this
inconvenience.
The washing machine does not
drain or spin.
The drain hose is bent (see Installation).
The drainage duct is clogged.
The machine vibrates a lot during
the spin cycle.
The protective screws (used during transportation) were not
removed when the appliance was installed. Remove the screws
(see Installation).
The machine is not level (see Installation).
The machine is trapped between cabinets and walls (see
Installation).
The washing machine leaks.
The water inlet hose is not screwed on properly (see Installation).
The detergent dispenser is blocked (to clean it, see Care and
maintenance).
The drain hose is not fixed in place properly (see Installation).
The drip-tray system is full. Clean the sponge or replace it (see
"Precautions and advice").
The DOOR LOCKED indicator light
flashes rapidly.
Switch off the machine and unplug it, wait for approximately 1
minute and then switch it back on again. The wash cycle will have
to be started again from the beginning. If the problem persists,
contact the Technical Assistance Service.
Too much foam.
The detergent is not suitable for machine washing (it should bear
the description for washing machines or hand and machine
wash, or similar instructions).
Too much detergent was used.
11
Service
Before calling for Assistance:
Check whether you can solve the problem alone (see Troubleshooting);
Restart the programme to check whether the problem has been solved;
If it has not, contact the Authorised Technical Assistance Service.
GB
If the machine has been installed or used incorrectly, you may be charged for the maintenance callout
service.
Always request the assistance of authorised technicians.
Have the following information to hand:
the type of problem;
the appliance model (Mod.);
the serial number (S/N).
The above information can be found on the data plate located on the appliance itself.
12
Mode demploi
LAVE-LINGE
Sommaire
F
Français
F
Installation, 14-15
Déballage et mise à niveau
Raccordements eau et électricité
Caractéristiques techniques
Description de lappareil, 16-17
Tiroir à produits lessiviels autonettoyant
Bandeau de commandes
Système déquilibrage de la charge
Comment faire un cycle de lavage, 18
Programmes de lavage, 19
Produits lessiviels et linge, 20
SIXL 146
Triage du linge
Conseils de lavage
Précautions et conseils, 21
Sécurité générale
Mise au rebut
Economies et respect de lenvironnement
Dispositif récolte-gouttes
Entretien et soin, 22
Coupure de larrivée deau et du courant
Nettoyage de lappareil
Nettoyage du tiroir à produits lessiviels.
Entretien du Hublot et du tambour
Nettoyage de la pompe
Contrôle du tuyau darrivée de leau
Anomalies et remèdes, 23
Assistance, 24
13
Installation
F
Conserver ce mode demploi pour pouvoir le
consulter à tout moment. En cas de vente, de
cession ou de déménagement, veiller à ce quil suive
toujours lappareil pour que son nouveau propriétaire
soit informé sur son mode de fonctionnement et
puisse profiter des conseils correspondants.
Lire attentivement les instructions : elles fournissent
des conseils importants sur linstallation, lutilisation et
la sécurité de lappareil.
Déballage et mise à niveau
Une bonne mise à niveau garantit la stabilité de
lappareil et évite quil y ait des vibrations, du bruit et
des déplacements en cours de fonctionnement. Si
lappareil est posé sur de la moquette ou un tapis,
régler les petits pieds de manière à ce quil y ait
suffisamment despace pour assurer une bonne
ventilation.
Raccordements eau et électricité
Raccordement du tuyau darrivée de leau
Déballage
1. Déballer lappareil.
2. Contrôler que lappareil na pas été endommagé
pendant le transport. Sil est abîmé, ne pas le
raccorder et contacter le vendeur.
3. Enlever les 4 vis de
protection servant au
transport, le caoutchouc
et la cale, placés dans la
partie arrière (voir figure).
4. Boucher les trous à laide des bouchons plastique
fournis.
5. Conserver toutes ces pièces: il faudra les remonter
en cas de transport de lappareil.
Les pièces demballage ne sont pas des jouets pour
enfants.
Mise à niveau
Lappareil peut savérer bruyant si ses deux pieds
avant nont pas été réglés correctement.
1. Installer lappareil sur un sol plat et rigide, sans
lappuyer contre des murs, des meubles ou autre.
2. Si le sol nest pas
parfaitement horizontal,
visser ou dévisser les
petits pieds avant (voir
figure); pour niveler
lappareil; son angle
dinclinaison, mesuré sur
le plan de travail, ne doit
pas dépasser 2°.
14
A
1. Monter le joint A sur
lextrémité du tuyau
dalimentation et le visser
à un robinet deau froide
à embout fileté 3/4 gaz
(voir figure).
Faire couler leau jusquà
ce quelle soit limpide et
sans impuretés avant de
raccorder.
2. Raccorder le tuyau
darrivée de leau à
lappareil en le vissant à
la prise deau prévue,
dans la partie arrière en
haut à droite (voir figure).
3. Attention à ce que le tuyau ne soit pas plié ou
écrasé.
La pression de leau doit être comprise entre les
valeurs indiquées dans le tableau des Caractéristiques
techniques (voir page ci-contre).
Si la longueur du tuyau dalimentation ne suffit pas,
sadresser à un magasin spécialisé ou à un technicien
agréé.
Raccordement du tuyau de vidange
65 - 100 cm
Raccorder le tuyau
dévacuation, sans le plier,
à un conduit dévacuation
ou à une évacuation
murale placés à une
distance du sol comprise
entre 65 et 100 cm;
Nutiliser ni rallonges ni prises multiples.
F
Le câble ne doit être ni plié ni trop écrasé.
Le câble dalimentation ne doit être remplacé que
par des techniciens agréés.
Attention! Nous déclinons toute responsabilité en cas
de non-respect des normes énumérées ci-dessus.
ou bien laccrocher à un
évier ou à une baignoire,
dans ce cas, fixer le
support en plastique
fourni avec lappareil au
robinet (voir figure).
Lextrémité libre du tuyau
dévacuation ne doit pas
être plongée dans leau.
Lutilisation dun tuyau de rallonge est absolument
déconseillée mais si on ne peut faire autrement, il faut
absolument quil ait le même diamètre que le tuyau
original et sa longueur ne doit pas dépasser 150 cm.
Caractéristiques techniques
Branchement électrique
Modèle
SIXL 146
Avant de brancher la fiche dans la prise de courant,
contrôler que:
Dimensions
largeur 59,5 cm
hauteur 85 cm
profondeur 53,5 cm
la prise est bien reliée à la terre et est conforme
aux normes;
Capacité
de 1 à 6 kg
Raccordements
électriques
voir la plaque signalétique appliquée
sur la machine
Raccordements
hydrauliques
pression maximale 1 MPa (10 bar)
pression minimale 0,05 MPa (0,5 bar)
capacité du tambour 52 litres
Vitesse
d'essorage
jusqu'à 1400 tours minute
Programmes de
contrôle selon la
norme EN 60456
programme
;
effectué avec une charge de 6 kg.
la prise est bien apte à supporter la puissance
maximale de lappareil indiquée dans le tableau des
Caractéristiques techniques (voir ci-contre);
la tension dalimentation est bien comprise entre
les valeurs figurant dans le tableau des
Caractéristiques techniques (voir ci-contre);
la prise est bien compatible avec la fiche de
lappareil. Autrement, remplacer la prise ou la fiche.
Cet appareil ne doit pas être installé à lextérieur,
même à labri, car il est très dangereux de le laisser
exposé à la pluie et aux orages.
Après installation de lappareil, la prise de courant
doit être facilement accessible.
Cet appareil est conforme aux
Directives Communautaires suivantes:
- 73/23/CEE du 19/02/73 (Basse
Tension) et modifications suivantes
- 89/336/CEE du 03/05/89
(Compatibilité électromagnétique) et
modifications suivantes
- 2002/96/CE
15
Description de lappareil
F
TABLEAU DE
BORD
POIGNEE
HUBLOT
HUBLOT
PORTILLON
DACCES A
LA POMPE
DE VIDAGE
PIEDS REGLABLES
Tiroir à produits lessiviels autonettoyant
Ce lave-linge est équipé dun tout nouveau tiroir à
produits lessiviels autonettoyant qui permet
daméliorer la qualité du lavage.
Le tiroir se trouve à lintérieur du hublot.
Nous recommandons de ne jamais dépasser les
niveaux maximums indiqués sur le tiroir à produits
lessiviels.
STOP
ST
OP
MAX
MAX
A
B
1. Ouvrir le hublot pour accéder au tiroir à produits
lessiviels (voir figure A).
2. Introduire la lessive ou ladditif de lavage à
lintérieur des bacs, à travers les grilles de protection,
comme suit:
: lessive liquide et additifs liquides.
Bac
Bac
: lessive en poudre ou en pastilles et
additifs en poudre.
Pour introduire les pastilles, soulever la grille de
protection du tiroir.
: assouplissant.
Bac
Lintroduction de produits lessiviels ou dadditifs
liquides dans le bac du milieu peut causer un
déversement non souhaité.
16
Possibilité de contrôle du niveau de lessive à travers
les fenêtres transparentes du tiroir.
Les bacs
et
disposent en outre de flotteurs
indicateurs (voir figure B). Les flotteurs se soulèvent
jusquà effleurer les grilles de protection des bacs
quand la quantité maximum de lessive/assouplissant
pouvant être introduite est atteinte.
Nous recommandons de toujours se conformer
aux instructions de dosage fournies par le fabricant
de lessive. Nous conseillons dintroduire les
lessives particulièrement denses directement dans
le tambour sans utiliser le tiroir à produits
lessiviels.
Le dépassement des niveaux maximums indiqués sur
lappareil peut causer un débordement de lessive par
le bas du tiroir.
Un excès de lessive ne lave pas mieux mais pollue
davantage lenvironnement.
Leau utilisée pendant le cycle de lavage procède à
lélimination de tout excédent de lessive dans le tiroir.
Il est toutefois possible de sortir le tiroir (voir
Entretien et soin).
Pour bien doser les produits lessiviels, nous conseillons
dutiliser le doseur fourni avec le lave-linge.
La capacité maximum du tiroir est de:
- lessives liquides: 1 dose 1/2
- lessives en poudre: 2 doses
- assouplissant: 1 dose
Bandeau de commandes
Voyants
INDICATION
DU TEMPS
DE LAVAGE
Touche
F
MARCHE/
ARRET
Voyant rouge
HUBLOT
VERROUILLE
Touche
DEMARRAGE
PROGRAMME
EXPRESS
Touche
DEMARRAGE
PROGRAMME
DÉLICAT
Touche MARCHE/ARRET:
appuyer pour allumer ou éteindre lappareil.
Quand lappareil est allumé, les icônes des touches
de démarrage du programme commencent à
clignoter tandis que les voyants dindication du temps
de lavage sallument au fixe.
Pour annuler le cycle, appuyer 2 secondes de suite
sur la touche marche/arrêt pendant le cycle de
lavage.
se met à clignoter pendant quelques
Le voyant
secondes tandis que lappareil procède au vidage
automatique de leau de la cuve.
Voyant rouge HUBLOT VERROUILLE:
allumé, il indique que le hublot est verrouillé pour
empêcher toute ouverture accidentelle. Pour éviter
dabîmer lappareil, attendre que le voyant séteigne,
à la fin du cycle de lavage ou pendant une pause
du cycle, avant douvrir le hublot. Lattente à la fin
du programme de lavage est de deux minutes
environ.
Touche
DEMARRAGE
PROGRAMME
COTON BLANC
Touche
DEMARRAGE
PROGRAMME MIX
COULEUR
REPASSAGE FACILE
Voyants INDICATION DU TEMPS DE LAVAGE:
ils sallument les uns après les autres pour indiquer le
déroulement du programme de lavage. A la fin du
programme tous les voyants se mettent à
clignoter.
Pour davantage de détails, consulter Comment faire
un cycle de lavage.
Système déquilibrage de la charge
Avant tout essorage, pour éviter des vibrations
excessives et répartir le linge de façon uniforme,
lappareil fait tourner le tambour à une vitesse
légèrement supérieure à la vitesse de lavage.
Si au bout de plusieurs tentatives, la charge nest
toujours pas correctement équilibrée, lappareil
procède à un essorage à une vitesse inférieure à la
vitesse normalement prévue.
En cas de déséquilibre excessif, lappareil procède à
la répartition du linge plutôt quà son essorage.
Les tentatives déquilibrage peuvent prolonger la
durée totale du cycle de 10 minutes maximum.
Un clignotement très rapide du voyant HUBLOT
VERROUILLE signale une anomalie (voir Anomalies
et remèdes).
Touches DEMARRAGE PROGRAMME:
appuyer pour lancer le programme de lavage
sélectionné.
- touche allumée en fixe: programme en cours.
- touches clignotantes: en attente de sélection.
17
Comment faire un cycle
de lavage
F
Remarque:
Avant la première utilisation de
lappareil, effectuer un cycle de lavage avec un
produit lessiviel mais sans linge et sélectionner le
.
programme
1. ALLUMER LAPPAREIL à laide de la touche MARCHE/ARRET . Les icônes des touches de
DEMARRAGE PROGRAMME se mettent à
clignoter et les voyants dINDICATION DU TEMPS
DE LAVAGE sallument au fixe, pour indiquer que le
lave-linge est prêt à recevoir les instructions
voulues.
2. CHARGER LE LINGE. Ouvrir le hublot à laide de la
poignée prévue. Charger le linge en faisant
attention à ne pas dépasser la quantité indiquée
dans le tableau des programmes de la page
suivante.
Le dessin ci-contre
montre un cas où environ
50% du cycle a été
effectué.
A la fin du cycle, tous les
voyants dINDICATION
DU TEMPS DE LAVAGE
sont allumés et
clignotent.
3. DOSER LA LESSIVE ET LES ADDITIFS
Distribuer les produits lessiviels dans le tiroir situé à
lintérieur du hublot en veillant à ne pas dépasser
les niveaux maximums indiqués à la surface du tiroir
et sur les flotteurs indicateurs. Pour de plus amples
détails, consulter Description de lappareil.
4. FERMER LE HUBLOT.
5. LANCER LE
PROGRAMME DE
LAVAGE en appuyant
sur la TOUCHE DE
DEMARRAGE DU
PROGRAMME. Licône
correspondant au
programme sélectionné
sallume au fixe tandis
que tous les voyants
dindication du temps de lavage séteignent. Le
voyant HUBLOT VERROUILLE sallume au fixe
pour indiquer que le verrouillage de sécurité du
hublot est activé.
Pour la description des programmes de lavage
disponibles, consulter Programmes de lavage.
La procédure de démarrage du programme
diffère, voir paragraphe Délicats
DELICATS
30° page suivante.
Au cours du programme, les voyants dINDICATION
DU TEMPS DE LAVAGE sallument progressivement
pour indiquer où en est le déroulement du
programme.
18
6. Pour INTERROMPRE LE PROGRAMME DE
LAVAGE appuyer sur la touche de démarrage du
programme éclairée qui se met aussitôt à clignoter.
Au bout de deux minutes environ, le voyant
HUBLOT VERROUILLE séteint pour indiquer que
le hublot peut être ouvert.
En cas de rajout de lessive, sassurer que le
flotteur indicateur MAX nest pas en position
soulevée.
Pour redémarrer le programme de lavage, refermer
le hublot et appuyer à nouveau sur la touche de
démarrage correspondante.
Pour assurer une sécurité optimale, le hublot reste
verrouillé (le voyant HUBLOT VERROUILLE
demeure allumé même au bout des deux minutes
prévues) tant que le tambour contient une quantité
deau qui pourrait déborder à louverture. Dans ce
cas, appuyer 2 secondes de suite sur la touche
pour éteindre lappareil et
MARCHE/ARRET
attendre le vidage automatique de leau.
7. FIN DU PROGRAMME
A la fin du programme de lavage, licône
correspondant au programme sélectionné reste
éclairée au fixe tandis que tous les voyants
dindication du temps de lavage commencent à
clignoter.
Pour démarrer un nouveau cycle de lavage, il faut
éteindre lappareil puis le rallumer en appuyant
DEUX FOIS sur la touche MARCHE/ARRET .
Programmes de lavage
Touche
Textiles
Charge
maxi
(Kg)
Température
Essorage
(tours
minute)
Durée du
cycle
(minutes)
6
60°C
1400
145
Lavage, rinçages, essorages
intermédiaires et essorage final
40°C
1000
105
Lavage, rinçages et essorage
délicat
30°C
600
50
Lavage, rinçages et essorage
délicat
30°C
non*
50
Lavage, rinçages, vidange
30°/eau
froide**
800
30
Lavage (uniquement si le
programme "Rapide" est activé),
rinçages, essorage délicat
F
Description du cycle de
lavage
COTON BLANC
Coton blanc résistant
MIX COULEUR 40° / REPASSAGE FACILE
Coton et synthétiques
4,5
couleurs
DÉLICAT
Laine (essorage final
+
1,5
délicat)
Soie
et
rideaux
(sans
+
1,5
essorage final)
EXPRESS / RINÇAGE À FROID
Coton et synthétiques
3
Les durées des programmes indiquées dans le tableau sont purement indicatives, elles sont calculées pour une charge moyenne.
*Remarque:
pour savoir comment exclure lessorage du programme délicats, consulter le paragraphe Délicat
30° plus bas dans la page.
**Remarque: pour savoir comment effectuer un rinçage à leau froide de linge lavé à la main, consulter le
paragraphe Express / Rinçage à froid plus bas dans la page.
COTON BLANC 60°
Dédié au lavage de tout le linge blanc en coton plus
résistant. La température de lavage plus élevée permet
dobtenir dexcellents résultats de lavage en classe A.
MIX COULEUR 40°/ REPASSAGE FACILE
Ce programme permet de laver tous les articles de
couleur, quils soient synthétiques ou coton. Lessorage
est minutieusement contrôlé pendant tout le cycle de
lavage pour froisser le moins possible les tissus et
simplifier ainsi leur repassage.
Possibilité de laver simultanément coton et synthétiques.
DÉLICAT 30°
Cycle réservé au lavage des articles en laine, en soie et
de tous les articles plus délicats. Compte tenu des
différentes caractéristiques de ces articles, ce
programme doit être activé de façon différente:
+
CYCLE DELICATS AVEC ESSORAGE FINAL
(pour articles en laine): appuyer sur la touche
. Au bout de
DEMARRAGE PROGRAMME DELICATS
3 secondes environ, les touches DEMARRAGE
PROGRAMME DELICATS
et DEMARRAGE
se mettent à clignoter.
PROGRAMME EXPRESS
Appuyer à nouveau sur la touche DEMARRAGE
pour effectuer le lavage qui
PROGRAMME DELICATS
se termine par une phase dessorage délicat. Ce
programme prévoit des mouvements du tambour dûment
étudiés pour éliminer leau en excès imprégnant les tissus,
réduire le frottement et protéger ainsi les articles en laine.
+
CYCLE DELICATS AVEC SUPPRESSION
DESSORAGE (spécial articles en soie, viscose et rideaux, à
ne pas utiliser pour le lavage de la laine):
appuyer sur la touche DEMARRAGE PROGRAMME
. Au bout de 3 secondes environ, les touches
DELICATS
DEMARRAGE PROGRAMME DELICATS
et
se mettent à
DEMARRAGE PROGRAMME EXPRESS
clignoter. Appuyer sur la touche DEMARRAGE
pour effectuer un lavage sans
PROGRAMME EXPRESS
essorage final. En fin de cycle, lappareil vidange
automatiquement leau contenue dans le tambour. Nous
conseillons de sortir aussitôt le linge de lappareil pour éviter
quil se froisse excessivement.
EXPRESS / RINÇAGE À FROID
Ce programme permet de laver en 30 minutes à peine coton
et synthétiques peu sales ou qui portent létiquette lavage à
. Il permet aussi de rincer coton et synthétiques
30°
précédemment lavés à la main (sauf laine et soie).
Grâce à des capteurs spéciaux, le lave-linge est en
mesure de détecter la présence de produit lessiviel
sur le linge introduit dans le tambour:
- si aucun produit lessiviel nest détecté sur le linge, il
effectuera le cycle de lavage EXPRESS;
- sil détecte la présence de produit lessiviel (articles
lavés à la main) il effectuera automatiquement le cycle
RINÇAGE À FROID.
GESTION AUTOMATIQUE DES RINCAGES
La fonction de rinçage est contrôlée, pour chaque programme,
par des capteurs spéciaux. En cas darticles excessivement
imprégnés de lessive en fin de lavage, la phase de rinçage
sera automatiquement prolongée jusquà lélimination
totale du produit lessiviel. Dans ce cas, la durée du
programme de lavage peut se prolonger légèrement par
rapport à la durée indiquée dans le tableau des programmes.
19
Produits lessiviels et linge
F
Triage du linge
Triez correctement votre linge daprès:
- le type de textile / le symbole sur létiquette.
- les couleurs: séparer le linge coloré du blanc.
Vider les poches et contrôler les boutons.
Ne pas dépasser les quantités de charge
maximales indiquées par les Programmes de
lavage.
Combien pèse le linge ?
1 drap 400-500 g
1 taie doreiller 150-200 g
1 nappe 400-500 g
1 peignoir 900-1.200 g
1 serviette éponge 150-250 g
1 jean 400-500 g
1chemise 150-200 g
Conseils de lavage
Linge de lit et de toilette (draps, serviettes,
peignoirs etc): utiliser le programme COTON
qui garantit les meilleures
BLANC 60°
performances de lavage en classe A. Lessorage
intensif permet déliminer efficacement leau en
excès.
Articles en coton blanc (chemises, tee-shirts,
nappes etc.): utiliser le programme COTON
BLANC 60°. Traiter les taches tenaces au savon
solide avant de procéder au lavage.
Articles en coton couleurs (chemises, tee-shirts
,
etc.): utiliser le programme MIX COULEUR 40°
qui permet doptimiser les performances de lavage
sans abîmer les couleurs. La fonction de
REPASSAGE FACILE, incorporée dans la phase
dessorage, réduit la formation de faux plis et
simplifie lopération de repassage. Nous
recommandons dutiliser de la lessive liquide.
Articles en textiles synthétiques, blanc ou
couleurs (chemises, tee-shirts etc.): utiliser le
. Nous
programme MIX COULEUR 40°
recommandons de ne pas laver simultanément
blanc et couleurs au cours dun même cycle de
lavage car les couleurs risquent de déteindre sur
le blanc. Nous recommandons dutiliser de la
lessive liquide.
20
Articles coton ou textiles synthétiques couleurs
: utiliser le
portant létiquette lavage à 30°
. Le respect des couleurs
programme EXPRESS
est assuré par la basse température de lavage.
Nous recommandons dutiliser de la lessive liquide.
Articles en laine (pulls, écharpes etc.): utiliser le
programme DÉLICAT 30° avec essorage final
+ . Les mouvements imprimés au tambour
pendant le lavage et la phase dessorage délicat
réduisent les risques de feutrage des tissus. Nous
conseillons dutiliser des lessives spéciales laine.
Nous recommandons de ne pas dépasser la
charge maximale autorisée.
Articles en soie (chemises etc.): utiliser le
programme DÉLICAT 30° avec suppression
+ . Veiller à ne pas laisser le linge
dessorage
séjourner trop longtemps dans le tambour en fin
de lavage pour éviter une formation excessive de
faux plis.
Rideaux: utiliser le programme DÉLICAT 30° avec
+ . Nous
suppression dessorage
recommandons de bien les plier et de les glisser
dans une taie doreiller ou dans un sac genre filet.
Les laver à part en veillant à ne pas dépasser la
charge maximale autorisée.
Précautions et conseils
Cet appareil a été conçu et fabriqué conformément
aux normes internationales de sécurité. Ces
consignes sont fournies pour des raisons de sécurité,
il faut les lire attentivement.
Sécurité générale
Cet appareil est conçu pour un usage domestique.
Cet appareil ne doit être utilisé que par des adultes
qui devront se conformer aux instructions du mode
demploi.
Ne jamais toucher lappareil si lon est pieds nus et
si les mains sont mouillées ou humides.
Ne jamais tirer sur le câble pour débrancher la fiche
de la prise de courant.
Ne pas toucher à leau de vidange, elle peut
atteindre des températures très élevées.
Ne pas forcer pour ouvrir le hublot: le verrouillage
de sécurité qui protège contre les ouvertures
accidentelles pourrait sendommager.
En cas de panne, éviter à tout prix daccéder aux
mécanismes internes pour tenter une réparation.
Veiller à ce que les enfants ne sapprochent pas de
lappareil pendant son fonctionnement.
Pendant le lavage, le hublot a tendance à se
réchauffer.
Deux ou trois personnes sont nécessaires pour la
déplacer en faisant très attention. Ne jamais
déplacer lappareil tout seul car il est très lourd.
Avant dintroduire le linge, sassurer que le tambour
est bien vide.
Mise au rebut
Mise au rebut du matériel demballage:
se conformer aux réglementations locales de
manière à ce que les emballages puissent être
recyclés.
La directive européenne 2002/96/CE sur les
déchets déquipements électriques et électroniques
prévoit que les électroménagers ne peuvent pas
être traités comme des déchets solides urbains
ordinaires. Les appareils usagés doivent faire lobjet
dune collecte séparée pour optimiser le taux de
récupération et de recyclage des matériaux qui les
composent et empêcher tout danger pour la santé
et pour lenvironnement. Le symbole de la poubelle
barrée est appliqué sur tous les produits pour
rappeler quils font lobjet dune collecte sélective.
Pour tout autre renseignement sur la collecte des
électroménagers usés, prière de sadresser au
service public préposé ou au vendeur.
F
Economies et respect de lenvironnement
Économie de produit lessiviel, deau, dénergie
et de temps
Pour ne pas gaspiller de ressources, utiliser
lappareil à sa charge maximale. Mieux vaut une
pleine charge que deux demies pour faire jusquà
50% déconomie délectricité.
Pour éviter de laver à de hautes températures,
traiter les taches avec un produit détachant ou les
mettre tremper avant de les laver.
Bien doser la quantité de produit lessiviel en
fonction de la dureté de leau, du degré de
salissure et de la quantité de linge à laver évite les
gaspillages et protège lenvironnement: bien que
biodégradables, les produits lessiviels contiennent
des éléments qui altèrent léquilibre de la nature.
Eviter le plus possible lutilisation dassouplissant.
Effectuer les lavages tard dans laprès-midi et
jusquaux premières heures du matin permet de
réduire la charge dabsorption des opérateurs
énergétiques.
Dispositif récolte-gouttes
Lappareil est équipé dun dispositif récolte gouttes
situé à lintérieur de la porte pour capturer toute
goutte deau résiduelle en fin de lavage.
Nous conseillons de contrôler périodiquement le
niveau dhumidité de léponge placée dans le tiroir
récolte gouttes. En cas de besoin, elle peut être lavée
ou remplacée comme suit:
1. appuyer légèrement
dans le bas du tiroir pour
le faire sortir.
2. enlever léponge qui se
trouve à lintérieur, la
1
rincer et la tordre
soigneusement. Elle peut
2
être remplacée par une
des éponges de rechange
fournies avec lappareil.
3. remettre léponge à lintérieur du tiroir.
4. remettre le tiroir à sa place et sassurer que les
ressorts présents sur la porte aillent bien se loger
dans les emplacements prévus sur le tiroir.
5. attention à ce que le tiroir rentre bien dans son
logement.
21
Entretien et soin
F
Coupure de larrivée deau et du
courant
Fermer le robinet de leau après chaque lavage.
Cela réduit lusure de linstallation hydraulique de
lappareil et évite tout danger de fuites.
Débrancher la fiche de la prise de courant lors de
toute opération de nettoyage et de travaux
dentretien.
Nettoyage de lappareil
Pour nettoyer lextérieur et les parties en
caoutchouc, utiliser un chiffon imbibé deau tiède et
de savon. Nutiliser ni solvants ni abrasifs.
Nettoyage du tiroir à produits
lessiviels
Nous recommandons de bien sassurer que le
tiroir à produits lessiviels ne contient ni lessive ni eau
avant de le sortir de son logement. Sil y en
contient, faire bien attention car ils pourraient
déborder du tiroir pendant lopération.
Le lavage du tiroir à produits lessiviels de ce lavelinge a lieu automatiquement pendant les cycles de
lavage. Il peut toutefois arriver, bien que rarement,
que des résidus se déposent lors de lutilisation de
certains produits lessiviels. Pour nettoyer le tiroir,
procéder comme suit:
1. Ouvrir le hublot pour
avoir accès au tiroir.
2. Saisir le tiroir par le
bac central et tirer vers
le haut pour le sortir de
son logement comme
illustré par la figure. Ne
pas saisir le tiroir par la
grille, elle risquerait de
sabîmer.
3. Décrocher la partie
supérieure du tiroir pour
accéder aux bacs
comme illustré par la
figure.
4. Laver le tiroir à leau
courante.
5. Remettre la partie
supérieure du tiroir à sa
place et introduire le
tiroir dans son logement jusquau déclic.
22
Entretien du Hublot et du tambour
Toujours laisser le hublot entrouvert pour éviter la
formation de mauvaise odeurs.
Nettoyage de la pompe
Lappareil est équipé dune pompe autonettoyante qui
nexige aucune opération dentretien. Il peut toutefois
arriver que de menus objets (pièces de monnaie,
boutons) tombent dans la préchambre qui protège la
pompe, placée en bas de cette dernière.
Sassurer que le cycle de lavage est bien terminé et
débrancher la fiche.
Pour accéder à cette préchambre:
1. retirer la protection
située dans le bas du
lave-linge en la tournant
dans le sens inverse
des aiguilles dune
montre (voir figue);
2. dévisser le couvercle
en le tournant dans le
sens inverse des aiguilles
dune montre (voir figure):
il est normal quun peu
deau sécoule;
3. nettoyer soigneusement lintérieur;
4. revisser le couvercle;
5. pour revisser le bouchon de protection, tourner
dans le sens des aiguilles dune montre, la flèche à
lintérieur du bouchon doit être tournée vers le haut.
Contrôle du tuyau darrivée de leau
Contrôler le tuyau dalimentation au moins une fois
par an. Procéder à son remplacement en cas de
craquèlements et de fissures: car les fortes pressions
subies pendant le lavage pourraient provoquer des
cassures.
Nutiliser que des tuyaux neufs.
Anomalies et remèdes
Il peut arriver que lappareil ne fonctionne pas bien. Avant dappeler le Service de dépannage (voir Assistance),
contrôler sil ne sagit pas par hasard dun problème facile à résoudre à laide de la liste suivante.
F
Anomalies:
Causes / Solutions possibles:
Lappareil ne sallume pas.
La fiche nest pas branchée dans la prise de courant ou mal branchée.
Il y a une panne de courant.
Le cycle de lavage ne démarre
pas.
Le hublot nest pas bien fermé.
La touche MARCHE/ARRET na pas été enfoncée.
Les touches DEMARRAGE PROGRAMME nont pas été enfoncées
(elles continuent à clignoter).
Le robinet de leau nest pas ouvert.
Il ny a pas darrivée deau
(le voyant HUBLOT VERROUILLE
clignote rapidement).
Lappareil prend leau et vidange
continuellement.
Le tuyau de vidange nest pas installé à une distance du sol comprise
entre 65 et 100 cm (voir Installation).
Lextrémité du tuyau de vidange est plongée dans leau (voir Installation).
Lévacuation murale na pas dévent.
Le tuyau darrivée de leau nest pas raccordé au robinet.
Le tuyau est plié.
Le robinet de leau nest pas ouvert.
Il y a une coupure deau.
La pression nest pas suffisante.
Les touches DEMARRAGE PROGRAMME nont pas été enfoncées
(elles continuent à clignoter).
Si après ces vérifications, le problème persiste, fermer le robinet de leau,
éteindre lappareil et appeler le service Assistance. Si lappartement est situé en
étage dans un immeuble, il peut y avoir des phénomènes de siphonnement qui
font que le lave-linge prend et évacue leau continuellement. Pour supprimer cet
inconvénient, on trouve dans le commerce des valves spéciales antisiphonnement.
Lappareil ne vidange pas ou
nessore pas.
Le tuyau dévacuation est plié (voir Installation).
La conduite dévacuation est bouchée.
Lappareil vibre beaucoup
pendant lessorage.
Les vis de protection servant au transport nont pas été enlevées lors
de linstallation de lappareil. Enlever les vis (voir Installation).
Lappareil nest pas posé à plat (voir Installation).
Lappareil est coincé entre des meubles et le mur (voir Installation).
Lappareil fuit.
Le voyant HUBLOT VERROUILLE
clignote très rapidement.
Eteindre lappareil et débrancher la fiche de la prise de courant, attendre 1
minute environ avant de rallumer. Il va falloir reprendre le cycle du début.
Si lanomalie persiste, appeler le service dassistance.
Il y a un excès de mousse.
Le produit de lavage utilisé nest pas une lessive spéciale machine (il
faut quil y ait linscription pour lave-linge, main et machine, ou
autre semblable).
La quantité utilisée est excessive.
Le tuyau darrivée de leau nest pas bien vissé (voir Installation).
Le tiroir à produits lessiviels est bouché (pour le nettoyer voir Entretien et soin).
Le tuyau de vidange nest pas bien fixé (voir Installation).
Le dispositif récolte gouttes est plein. Laver léponge ou la remplacer
(voir Précautions et Conseils).
23
Assistance
Avant dappeler le service après-vente :
Vérifier si on ne peut pas résoudre lanomalie par ses propres moyens (voir Anomalies et Remèdes);
Remettre le programme en marche pour contrôler si linconvénient a disparu;
Si ce nest pas le cas, contacter un Service dassistance technique agréé.
F
En cas dinstallation erronée ou dutilisation incorrecte, lintervention est à la charge de lutilisateur.
Ne jamais sadresser à des techniciens non agréés.
Communiquer:
le type de panne;
le modèle de lappareil (Mod.);
son numéro de série (S/N);
Ces renseignements se trouvent sur la plaque signalétique de lappareil.
24
Gebruiksaanwijzing
WASAUTOMAAT
Inhoud
NL
Nederlands
NL
Installatie, 26-27
Uitpakken en waterpas zetten
Hydraulische en elektrische aansluitingen
Technische gegevens
Beschrijving van de wasautomaat, 28-29
Zelfreinigend wasmiddelbakje
Bedieningspaneel
Balanceersysteem van de lading
Het uitvoeren van een wascyclus, 30
Wasprogrammas, 31
Wasmiddelen en wasgoed, 32
SIXL 146
Voorbereiden van het wasgoed
Wastips
Voorzorgsmaatregelen en advies, 33
Algemene veiligheid
Afvalverwijdering
Energiebesparing en bescherming van het milieu
Druppelopvangsysteem
Onderhoud en verzorging, 34
Afsluiten van water en stroom
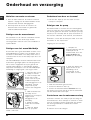
Reinigen van de wasautomaat
Reinigen van het wasmiddelbakje
Onderhoud van deur en trommel
Reinigen van de pomp
Controleren van de wateraanvoerslang
Storingen en oplossingen, 35
Service, 36
25
Installatie
NL
Het is belangrijk deze handleiding te bewaren voor
latere raadpleging. In het geval u het apparaat
verkoopt of u verhuist, dient u de gebruiksaanwijzing
bij het apparaat te bewaren zodat de nieuwe
gebruiker de functies en betreffende raadgevingen
kan doornemen.
Lees de instructies aandachtig door: u vindt er
belangrijke informatie betreffende installatie, gebruik
en veiligheid.
Uitpakken en waterpas zetten
Een correcte nivellering geeft de machine stabiliteit en
voorkomt trillingen, lawaai en het zich verplaatsen van
de automaat tijdens de werking. In het geval van
plaatsing op vloerbedekking of tapijt regelt u de
stelvoetjes zodanig dat onder de wasautomaat
genoeg plaats is voor ventilatie.
Hydraulische en elektrische
aansluitingen
Aansluiting van de watertoevoerbuis
Uitpakken
1. Het apparaat uitpakken.
2. Controleer of de wasautomaat geen schade heeft
geleden gedurende het vervoer. Indien dit wel het
geval is moet hij niet worden aangesloten en moet u
contact opnemen met de handelaar.
3. Verwijder de 4
schroeven die het
apparaat beschermen
tijdens het vervoer en de
rubberen ring met
bijbehorende
afstandsleider die zich
aan de achterkant
bevinden (zie afbeelding).
4. Sluit de openingen af met de bijgeleverde plastic
doppen.
5. Bewaar alle onderdelen: mocht de wasautomaat
ooit weer moeten worden vervoerd, dan moeten deze
onderdelen weer worden aangebracht.
A
1. Plaats de pakking A op
het uiteinde van de
waterbuis en schroef
deze op een
koudwaterkraan met een
mondstuk met
schroefdraad van 3/4 gas
(zie afbeelding).
Voordat u hem aansluit
moet u het water laten
lopen totdat het helder is.
2. Verbind de
watertoevoerbuis aan de
wasautomaat door hem
op de betreffende
watertoevoer te
schroeven, rechtsboven
aan de achterkant (zie
afbeelding).
Het verpakkingsmateriaal is geen speelgoed voor
kinderen.
3. Let erop dat er geen knellingen of kronkels in de
buis zijn.
Waterpas zetten
De waterdruk van de kraan moet zich binnen de
waarden van de tabel Technische Gegevens bevinden
(zie bladzijde hiernaast).
De wasautomaat kan veel lawaai maken als de twee
voorste stelvoetjes niet juist zijn afgesteld.
1. Installeer de wasautomaat op een rechte en
stevige vloer en laat hem niet tegen een muur,
meubel of dergelijke steunen.
2. Als de vloer niet volledig
horizontaal is kunt u de
onregelmatigheid opheffen
door de stelvoetjes aan de
voorkant losser of vaster
te schroeven (zie
afbeelding); de
inclinatiehoek, gemeten
ten opzichte van het
werkvlak, mag de 2° niet
overschrijden.
26
Als de toevoerbuis niet lang genoeg is moet u zich
wenden tot een gespecialiseerde winkel of een
bevoegde installateur.
Aansluiting van de afvoerbuis
65 - 100 cm
Steek de afvoerslang
zonder hem te knikken in
een afvoerpijp dat een
hoogte moet hebben van
65 tot 100 cm vanaf de
grond gerekend;
Gebruik geen verlengsnoeren of dubbelstekkers.
NL
Het snoer mag niet gebogen of samengedrukt
worden.
De voedingskabel mag alleen door een bevoegde
installateur worden vervangen.
Belangrijk! De fabrikant kan niet aansprakelijk worden
gesteld wanneer deze normen niet worden nageleefd.
of hang hem aan de
rand van een wasbak of
badkuip, en bind de
bijgeleverde steun aan
de kraan (zie afbeelding).
Het uiteinde van de
afvoerslang mag niet
onder water hangen.
Gebruik nooit verlengstukken voor de buis; indien dit
niet te vermijden is moet het verlengstuk dezelfde
doorsnede hebben als de oorspronkelijke buis en mag
hij niet langer zijn dan 150 cm.
Technische gegevens
Elektrische aansluiting
Model
SIXL 146
Voordat u de stekker in het stopcontact steekt moet
u zich ervan verzekeren dat:
Afmetingen
breedte cm 59,5
hoogte cm 85
diepte cm 53,5
het stopcontact geaard is en voldoet aan de
geldende normen;
Vermogen
van 1 tot 6 kg
Elektrische
aansluitingen
zie het typeplaatje met de technische
eigenschappen dat op het apparaat
is bevestigd
Aansluiting
waterleiding
max. druk 1 MPa (10 bar)
min. druk 0,05 MPa (0,5 bar)
Inhoud trommel 52 liters
Snelheid
centrifuge
tot 1400 toeren per minuut
Controle-programma's volgens de
norm EN 60456
programma
;
uitgevoerd met 6 kg lading.
het stopcontact het maximum vermogen van de
wasautomaat kan dragen, zoals aangegeven in de
tabel Technische Gegevens (zie hiernaast);
de spanning zich bevindt tussen de waarden die
zijn aangegeven in de tabel Technische Gegevens
(zie hiernaast);
de contactdoos geschikt is voor de stekker van de
automaat. Indien dit niet zo is moet de stekker of
het stopcontact vervangen worden.
De wasautomaat mag niet buitenshuis worden
geïnstalleerd, ook niet op een beschutte plaats,
aangezien het gevaarlijk is hem aan regen en onweer
bloot te stellen.
Als de wasautomaat is geïnstalleerd moet het
stopcontact gemakkelijk te bereiken zijn.
Deze apparatuur voldoet aan de
volgende EEC voorschriften:
-73/23/EEC van 19/02/73
(Laagspanning) en successievelijke
modificaties
-89/336/EEC van 03/05/89
(Elektromagnetische compatiabiliteit)
en successievelijke modificaties
- 2002/96/CE
27
Beschrijving van de wasautomaat
NL
BEDIENINGSPANEEL
HANDVAT DEUR
WASAUTOMAAT
DEUR
WASAUTOMAAT
TOEGANGSLUIK
AFVOERPOMP
STELVOETJES
Zelfreinigend wasmiddelbakje
Deze wasautomaat is voorzien van een revolutionair
zelfreinigend wasmiddelbakje dat in staat is de
waskwaliteit te verbeteren.
Het bakje bevindt zich aan de binnenkant van de deur.
STOP
ST
OP
MAX
MAX
A
B
1. Open de deur om toegang te krijgen tot het
wasmiddelbakje (zie afbeelding A).
2. Giet of strooi het wasmiddel of wasversterker in de
bakjes, over de beschermingsroosters, zoals hierna
aangegeven:
: vloeibaar wasmiddel en vloeibare
Bakje
wasversterkers.
: waspoeder of tabletten en
Bakje
wasversterkers in poedervorm.
Om de tabletten in te voeren, tilt u het
beschermrooster van het bakje op.
: wasverzachter.
Bakje
Het gieten van wasmiddelen of vloeibare
wasversterkers in het middelste bakje kan een
ongewild leeglopen ervan veroorzaken.
28
U kunt het wasmiddelniveau aflezen vanaf de speciale
doorzichtige venstertjes die zich op het bakje bevinden.
In de bakjes
en
bevinden zich bovendien
vlottertjes die de hoeveelheid wasmiddel aangeven
(zie afbeelding B). Als u de maximale hoeveelheid
wasmiddel/wasverzachter invoert zullen de
vlottertjes stijgen totdat ze de beschermroosters
van de bakjes bereiken.
Zorg ervoor nooit de maximum niveaus te
overschrijden die op het wasmiddelbakje staan
aangegeven.
We raden u aan altijd de doseringsinstructies op
te volgen die u op de verpakking van het
wasmiddel zelf terugvindt. Bepaalde bijzonder
dikke vloeibare wasmiddelen kunnen beter direct in
een wasbol in de trommel worden geplaatst dan in
het wasmiddelbakje.
Als de wasautomaat meer wordt geladen dan
maximaal wordt aangegeven kan het wasmiddel aan
de onderzijde van het bakje leeglopen.
Het gebruik van een te grote hoeveelheid wasmiddel
zorgt er niet voor dat het wasgoed schoner wordt,
maar echter wel dat het milieu meer wordt vervuild.
Het water dat wordt gebruikt tijdens de wascyclus
zorgt ervoor dat eventueel overbodig wasmiddel uit
het wasbakje wordt verwijderd. Het is mogelijk het
wasmiddelbakje handmatig te verwijderen (zie
Onderhoud en verzorging).
Om het wasmiddel makkelijker te doseren raden wij u
aan het speciale doseerbakje te gebruiken dat bij de
wasautomaat wordt geleverd.
De maximum inhoud van het bakje komt overeen met:
- vloeibaar wasmiddel: 1 1/2 maatbeker
- waspoeder: 2 maatbekers
- wasverzachter: 1 maatbeker
Bedieningspaneel
Knop
NL
AAN/UIT
Controlelampjes
WASDUUR
Rood controlelampje
DEUR
GEBLOKKEERD
Knop
START PROGRAMMA
SNELLE WAS 30'
Knop
START
PROGRAMMA
FIJNE WAS
Knop AAN/UIT:
druk op deze knop en om de wasautomaat aan- of uit te
zetten.
Als de automaat aanstaat gaan de symbolen op de
knoppen van start programma knipperen, terwijl de
controlelampjes van de wasduur blijven branden.
Om de cyclus te annuleren houdt u de aan/uit knop
tijdens de wascyclus circa 2 seconden lang ingedrukt.
zal enkele seconden
Het controlelampje
knipperen terwijl de wasautomaat automatisch het
overtollige water afvoert.
Rood controlelampje DEUR GEBLOKKEERD:
als het controlelampje aan is betekent het dat de
deur is geblokkeerd om te verhinderen dat hij per
ongeluk open gaat. Om beschadigingen te
voorkomen moet u aan het einde van de wascyclus
of tijdens de pauze wachten tot het controlelampje
gaat knipperen voor u de deur opendoet. De
wachttijd aan het einde van het wasprogramma is
ongeveer 2 minuten.
Als het controlelampje DEUR GEBLOKKEERD snel
knippert geeft dit een storing aan (zie Storingen en
oplossingen).
Knop
START
PROGRAMMA WIT
KATOEN
Knop
START PROGRAMMA
GEKLEURD
ANTI KREUK
Controlelampjes WASDUUR:
deze lampjes gaan een voor een aan om aan te
geven in welke fase het programma zich bevindt.
Aan het einde van het programma zullen alle
controlelampjes gaan knipperen.
Voor verdere details zie Het uitvoeren van een
wascyclus.
Balanceersysteem van de lading
Om overmatige trillingen te vermijden verdeelt de
automaat de lading vóór het centrifugeren op een
gelijkmatige manier. Dit gebeurt door de trommel
voortdurend te laten draaien op een snelheid die iets
hoger ligt dan de wassnelheid.
Als, na herhaaldelijke pogingen, de lading nog steeds
niet goed is gebalanceerd, zal de wasautomaat de
centrifuge op een lagere snelheid uitvoeren dan die
was voorzien.
Als de lading zeer uit balans is zal de wasautomaat
een verdeling uitvoeren in plaats van een centrifuge.
De herhaaldelijke balanceerpogingen kunnen de totale
duur van de cyclus verlengen tot aan maximaal 10
minuten.
Knoppen START PROGRAMMA:
druk hierop om het geselecteerde wasprogramma te
starten.
- licht op knop brandt vast: programma bezig.
- licht op knop knippert: wacht op selectie.
29
Het uitvoeren van een wascyclus
NL
N.B.:
Na de installatie en voor u de wasautomaat in
gebruik neemt, dient u een wascyclus uit te voeren
met wasmiddel maar zonder wasgoed, op het
.
programma
1. SCHAKEL DE WASAUTOMAAT IN door op de knop
te drukken. De symbolen op de
AAN/UIT
knoppen START PROGRAMMA beginnen te
knipperen en de controlelampjes van de
WASDUUR blijven vast branden om aan te geven
dat de wasautomaat klaar is om instructies te
ontvangen.
2. HET WASGOED INLADEN. Open de deur met
behulp van het speciale handvat. Laad het
wasgoed in en zorg ervoor nooit de
laadhoeveelheid te overschrijden die wordt
aangegeven in de programmatabel op de volgende
bladzijde.
De tekening hiernaast
geeft een situatie weer
waarin circa 50% van de
cyclus is uitgevoerd.
Aan het einde van de
cyclus zullen alle
controlelampjes van de
WASDUUR knipperend
branden.
3. WASMIDDEL EN WASVERSTERKERS DOSEREN
Doseer wasmiddelen in het bakje in de deur. Zorg
ervoor de maximale niveaus niet te overschrijden.
Deze staan aangegeven aan de voorkant van het
bakje en op de speciale vlottertjes. Voor verdere
datails, zie Beschrijving van de wasautomaat.
4. SLUIT DE DEUR.
5. START HET
WASPROGRAMMA
door op de betreffende
KNOP START
WASPROGRAMMA te
drukken. Het symbool
dat betrekking heeft op
het geselecteerde
programma blijft vast
branden, terwijl alle
andere controlelampjes met betrekking tot de
wasduur uitgaan. Het controlelampje DEUR
GEBLOKKEERD blijft vast branden om aan te
geven dat de veiligheidsblokkering van het deurtje
is ingeschakeld.
Voor een beschrijving van de beschikbare
wasprogrammas, zie Wasprogrammas.
De procedure om het programma FIJNE WAS
te starten is anders. Zie hoofdstuk Fijne was
30° op de volgende pagina.
Tijdens het programma zullen de controlelampjes
WASDUUR een voor een aan gaan, om aan te geven
welk deel van het programma al is voltooid.
30
6. Het is mogelijk het WASPROGRAMMA TE
ONDERBREKEN door op de verlichte startknop
van het programma te drukken deze zal dan
knipperen. Na circa twee minuten zal het
controlelampje DEUR GEBLOKKEERD uitgaan om
aan te geven dat het mogelijk is de deur te
openen.
Als u wasmiddel wilt toevoegen moet u oppassen
dat het vlottertje MAX niet reeds in de hoogste
stand staat.
Om het programma voort te zetten doet u de deur
weer dicht en drukt u nogmaals op de betreffende
startknop.
Om de maximale veiligheid te garanderen, zal het
niet mogelijk zijn het deurtje te openen indien er
teveel water in de trommel aanwezig is (het
controlelampje DEUR GEBLOKKEERD zal ook na
twee minuten aan blijven). Het is in dit geval
noodzakelijk de wasautomaat uit te zetten door
te
circa 2 seconden op de knop AAN/UIT
drukken en te wachten tot het water automatisch
wordt afgevoerd.
7. EINDE VAN HET PROGRAMMA
Aan het einde van het wasprogramma zal het
symbool met betrekking tot het geselecteerde
programma branden, terwijl alle controlelampjes
van de wasduur beginnen te knipperen.
Om een nieuwe wascyclus te starten dient u de
wasautomaat uit te schakelen en daarna weer in
te schakelen, door TWEE MAAL op de knop AAN/
te drukken.
UIT
Wasprogrammas
Knop
Materiaal
Max.
Lading
(kg)
Temperatuur
Centrifuge
(toeren per
minuut)
Duur van
de cyclus
(minuten)
6
60°C
1400
145
Wassen, spoelen, centrifuge
halverwege en op het einde
4,5
40°C
1000
105
Wassen, spoelen en lichte
centrifuge
1,5
30°C
600
50
1,5
30°C
geen
centrifuge*
50
3
30°/koud water**
800
30
NL
Beschrijving van de
wascyclus
WIT KATOEN
Wit katoen
GEKLEURD 40° / ANTI KREUK
Bont katoen en synthetisch
FIJNE WAS
Wol (langzame centrifuge
op het einde)
Zijde en gordijnen (zonder
+
centrifuge op het einde)
SNELLE WAS 30’ / SPOELEN
+
Katoen en synthetisch
Wassen, spoelen en lichte
centrifuge
Wassen, spoelen en water
afvoeren
Wassen (alleen als het
programma "Snelle was" actief
is), spoelen en lichte centrifuge
De duur van de programmas zoals aangegeven in de tabel zijn slechts geschat en gaan uit van een gemiddelde hoeveelheid wasgoed.
*N.B.:
voor informatie over het uitsluiten van de centrifuge bij fijne was, zie de paragraaf Fijne was 30°
onderaan de bladzijde.
**N.B.: voor informatie hoe wasgoed dat met de hand is gewassen te kunnen spoelen met koud water, zie de
paragraaf Snelle was 30'/Spoelen onderaan de bladzijde.
WIT KATOEN 60°
Geschikt voor het wassen van wit katoenen wasgoed.
De hogere wastemperatuur zorgt ervoor dat u betere
wasresultaten kunt bereiken in de klasse A.
GEKLEURD 40° / ANTI KREUK
Met dit programma kunt u al uw bonte was wassen,
zowel van katoen als synthetisch. De centrifuge wordt
nauwkeurig gecontroleerd tijdens de gehele wascyclus,
zodat er minder kreukels op de stof worden gevormd en
de kleding makkelijker kan worden gestreken.
Het is mogelijk tegelijkertijd katoenen en synthetisch
wasgoed te wassen.
FIJNE WAS 30°
Cyclus voor het wassen van wol, zijde en alle andere
fijne was. Gezien de verschillende eigenschappen van
dit wasgoed vereist dit programma een
verschillende activering:
+
CYCLUS FIJNE WAS MET CENTRIFUGE
AAN HET EINDE (voor wollen wasgoed): druk op de
. Na circa 3
knop START PROGRAMMA FIJNE WAS
seconden zullen de knoppen START PROGRAMMA
en START PROGRAMMA SNELLE WAS
FIJNE WAS
beginnen te knipperen. Druk nogmaals op de knop
om de wascyclus
START PROGRAMMA FIJNE WAS
uit te voeren die eindigt met een langzame centrifuge.
Tijdens dit programma beweegt de trommel op een
speciaal ontwikkelde manier, die ervoor zorgt dat het
overtollige water uit de stoffen wordt verwijderd, waardoor
wollen kledingstukken beter worden beschermd.
+
CYCLUS FIJNE WAS MET UITSLUITING VAN
DE CENTRIFUGE (voor kledingstukken van zijde, viscose
en voor het wassen van gordijnen en vitrage; niet te
gebruiken voor het wassen van wol): druk op de knop
. Na circa 3
START PROGRAMMA FIJNE WAS
seconden zullen de knoppen START PROGRAMMA FIJNE
en START PROGRAMMA SNELLE WAS
WAS
beginnen te knipperen. Druk op de knop START SNELLE
voor een wascyclus zonder de centrifuge aan het
WAS
einde. Aan het einde van de cyclus zal de wasautomaat
automatisch het water dat aanwezig is in de trommel
afvoeren. We raden u aan gelijk het wasgoed uit de
automaat te halen om een onnodig kreuken te vermijden.
SNELLE WAS 30' / SPOELEN
Met dit programma kunt u in slechts 30 minuten u niet
zo vuile katoenen of synthetisch kleding wassen, of
wasgoed waar op het etiket staat wassen op 30°
U kunt bovendien katoenen of synthetisch wasgoed dat
van te voren op de hand is gewassen uitspoelen (wol en
zijde uitgezonderd).
Dankzij speciale sensoren is de wasautomaat in
staat de aanwezigheid van wasmiddel waar te nemen
op het wasgoed dat in de trommel wordt geplaatst:
- als er geen wasmiddel op het wasgoed aanwezig is,
zal de cyclus SNELLE WAS 30' worden uitgevoerd;
- als er wel wasmiddel aanwezig is (kleding die met de
hand is gewassen), zal automatisch de cyclus
SPOELEN worden uitgevoerd.
AUTOMATISCH BEHEER VAN HET SPOELEN
De spoelfunctie wordt in elk programma door speciale
sensoren geregeld. In het geval het wasgoed aan het
einde van de wasfase nog vol zeep zit, zal de
spoelfase automatisch worden verlengd tot aan de
volledige verwijdering van het wasmiddel. In dit geval
zal de duur van de wascyclus iets langer zijn dan
aangegeven in de programmatabel.
31
Wasmiddelen en wasgoed
NL
Voorbereiden van het wasgoed
Hoeveel weegt het wasgoed?
Verdeel het wasgoed volgens:
- het soort stof / het symbool op het etiket.
- de kleuren: scheid de bonte was van de witte was.
Leeg de zakken en controleer de knopen.
Overschrijd nooit de waarden van maximale lading
die zijn aangegeven in de Wasprogrammas.
1
1
1
1
1
1
1
laken 400-500 g.
sloop 150-200 g.
tafelkleed 400-500 g.
badjas 900-1200 g.
handdoek 150-250 g.
spijkerbroek 400-500 g.
overhemd 150-200 g.
Wastips
Handdoeken en beddengoed (lakens,
handdoeken, badjassen, etc.): gebruik het
dat de beste
programma WIT KATOEN 60°
wasprestaties garandeert in klasse A. De intensieve
centrifuge zorgt ervoor dat het overtollige water
goed wordt verwijderd.
Bonte katoenen of synthetisch wasgoed, met op
:
het etiket de aanwijzing wassen op 30°
. De
gebruik het programma SNELLE WAS 30
lage wastemperatuur zorgt ervoor dat de kleuren
goed worden behouden. We raden u aan een
vloeibaar wasmiddel te gebruiken.
Witte katoenen kledingstukken (overhemden,
t-shirts, tafellakens, etc.): gebruik het
programma WIT KATOEN 60°. Het is raadzaam
hardnekkige vlekken voor te wassen met een
stuk zeep voor u het kledingstuk in de
wasautomaat doet.
Wollen kleding (truien, sjaals, etc.): gebruik het
programma FIJNE WAS 30° met centrifuge op het
+ . Het bewegen van de trommel
einde
tijdens het wassen en de langzame centrifuge
behoeden het vervilten van de stoffen. Gebruik
wasmiddel dat speciaal voor wol is bedoeld.
Overschrijd nooit het maximale laadniveau.
Bonte katoenen kledingstukken (overhemden,
t-shirts, linnengoed, etc.): gebruik het programma
dat de beste wasprestaties
GEKLEURD 40°
levert zonder de kleuren te beschadigen. De
centrifugefase vermindert, dankzij de functie ANTI
KREUK, de vorming van kreukels aan het einde van
de wascyclus, waardoor strijken gemakkelijker
wordt. We raden u aan een vloeibaar wasmiddel te
gebruiken.
Witte of bonte synthetische kledingstukken
(overhemden, t-shirts, linnengoed, etc.): gebruik
. We raden u
het programma GEKLEURD 40°
aan nooit witte en bonte was tegelijk te wassen,
om te voorkomen dat de bonte was afgeeft op de
witte was. We raden u aan een vloeibaar
wasmiddel te gebruiken.
32
Zijden kleding (blouses, linnengoed, etc.):
gebruik het programma FIJNE WAS 30° met
+ . Zorg ervoor
uitsluiting van de centrifuge
het gewassen goed nooit te lang in de trommel te
laten om te voorkomen dat het kreukt.
Gordijnen: gebruik het programma FIJNE WAS
+ . Vouw
30° met uitsluiting van de centrifuge
de gordijnen en doe ze in een kussensloop of
wasnet. Was ze alleen en zorg ervoor nooit het
maximale laadniveau te overschrijden.
Voorzorgsmaatregelen
en advies
Deze wasautomaat is ontworpen en uitgevoerd
volgens de internationale veiligheidsnormen. Deze
aanwijzingen zijn voor uw eigen veiligheid en moeten
aandachtig worden doorgenomen.
Algemene veiligheid
Dit apparaat is uitsluitend ontworpen voor
huishoudelijk niet-professioneel gebruik.
De wasautomaat mag alleen door volwassenen
worden gebruikt en volgens de instructies in deze
handleiding.
Raak de machine niet aan als u blootsvoets bent of
met natte of vochtige handen of voeten.
Trek de stekker nooit uit het stopcontact door aan
het snoer te trekken, maar altijd door de stekker
zelf beet te pakken.
Raak het afvoerwater niet aan aangezien het
behoorlijk warm kan zijn.
Forceer de deur nooit: het veiligheidsmechanisme
dat een ongewild openen van de deur voorkomt,
kan beschadigd worden.
Probeer in geval van storingen nooit zelf de interne
mechanismen van de wasautomaat te repareren.
Zorg ervoor dat kleine kinderen niet te dicht bij de
machine komen als deze in werking is.
De deur kan tijdens het wassen zeer heet worden.
Als de machine verplaatst moet worden, doe dit
dan met twee of drie personen tegelijk en met
grote voorzichtigheid. Doe dit nooit alleen want het
apparaat is erg zwaar.
Voordat u het wasgoed in de automaat laadt, moet
u controleren of hij leeg is.
Afvalverwijdering
Het wegdoen van het verpakkingsmateriaal:
houdt u aan de plaatselijke normen zodat het
materiaal hergebruikt kan worden.
De Europese richtlijn 2002/96/EG, betreffende
afgedankte elektrische en elektronische
apparatuur, voorziet dat huishoudelijke apparatuur
niet met het normale afval mag worden
meegegeven. De afgedankte apparatuur moet
apart worden opgehaald om het wedergebruik van
materialen waarvan het is gemaakt te
optimaliseren en om potentiële schade aan de
gezondheid en het milieu te voorkomen. Het
symbool van de afvalemmer met een kruis staat op
elk product, om aan te geven dat het apart moet
worden weggegooid.
Voor verdere informatie betreffende het correcte
verwijderen van huishoudelijke apparatuur kunnen
de gebruikers zich wenden tot de gemeentelijke
reinigingsdienst of de verkoper.
Energiebesparing en bescherming
van het milieu
Bezuinigen op wasmiddel, water, energie en tijd
Teneinde geen energiebronnen te verkwisten moet
de wasautomaat altijd met een maximale lading
worden gebruikt. U spaart 50% energie met een
volle lading i.p.v. twee half volle ladingen.
Door vlekken met een ontvlekkingsmiddel te
behandelen of van te voren in te weken kunt u op
lagere temperaturen wassen.
Doseer het wasmiddel op basis van de hardheid
van het water, de vuilheidsgraad en de hoeveelheid
wasgoed. Zo vermijdt u onnodig energieverbruik en
beschermt u het milieu: ook al zijn wasmiddelen
biologisch afbreekbaar, toch bevatten ze
elementen die het evenwicht in de natuur
verstoren. Probeer bovendien zoveel mogelijk
wasverzachters vermijden.
Door gedurende de late middag tot aan de vroege
morgen te wassen werkt u mee aan het beperken
van de belasting van elektrische centrales.
Druppelopvangsysteem
De wasautomaat is voorzien van een
druppelopvangsysteem aan de binnenkant van het
deurtje om eventuele overgebleven druppels aan het
einde van de cyclus op te vangen.
We raden u aan regelmatig de vochtigheidsgraad van
het sponsje in het bakje van het
druppelopvangsysteem te controleren. Indien
noodzakelijk is het mogelijk het sponsje te reinigen of
te vervangen, zoals volgt:
1. trek het bakje naar
voren door er licht aan de
onderkant tegen te
drukken.
2. verwijder het sponsje,
1
spoel het onder stromend
water en knijp het goed
2
uit. Het is bovendien
mogelijk het sponsje te
vervangen met een van
de bijgeleverde reservesponsjes.
3. doe het sponsje weer op zijn plaats in het bakje.
4. doe het bakje weer op zijn plaats in de deur. Zorg
ervoor dat de veren van de deur weer goed op
hun plaats in het bakje worden gestoken.
5. controleer of het wasmiddelbakje goed op zijn
plaats zit.
33
NL
Onderhoud en verzorging
NL
Afsluiten van water en stroom
Onderhoud van deur en trommel
Sluit na iedere wasbeurt de kraan af. Hiermee
beperkt u slijtage van de waterinstallatie van de
wasautomaat alsmede lekkagegevaar.
Laat de deur altijd op een kier staan om nare
luchtjes te vermijden.
Sluit altijd eerst de stroom af voordat u de
wasautomaat schoonmaakt en gedurende
onderhoudswerkzaamheden.
Reinigen van de wasautomaat
De buitenkant en de rubberen onderdelen kunnen
met een spons en een lauw sopje worden
schoongemaakt. Gebruik nooit schuurmiddelen of
oplosmiddelen.
Reinigen van het wasmiddelbakje
Controleer dat er geen wasmiddel of water in het
wasmiddelbakje zit voordat u het verwijdert. Als er
wel water of wasmiddel in het bakje zitten moet u
controleren dat ze niet uit het bakje lopen als u het
verwijdert.
Het wasmiddelbakje van deze wasautomaat wordt
automatisch gereinigd tijdens het wasprogramma.
Het is echter mogelijk dat er bij het gebruik van
speciale wasmiddelen, in uitzonderlijke gevallen,
zeepresten achterblijven. Om het wasmiddelbakje
handmatig te reinigen gaat u als volgt te werk:
1. Open de deur om bij
het bakje te komen.
2. Trek het bakje naar
boven toe en naar
buiten. Pak het bij het
middelste bakje beet
zoals aangegeven in de
afbeelding. Pak het
bakje nooit bij het
rooster beet aangezien
u het zou kunnen beschadigen.
3. Haal het deksel van
het bakje los om
toegang tot het bakje te
krijgen, zoals
aangegeven in de
afbeelding.
4. Reinig het bakje
onder het stromende
water.
5. Haak het deksel
weer vast en doe en bakje weer op zijn plaats
totdat u klik hoort.
34
Reinigen van de pomp
De wasautomaat is voorzien van een zelfreinigende
pomp en hoeft dus niet te worden onderhouden. Het
kan echter gebeuren dat kleine voorwerpen (muntjes,
knopen) in het voorvakje dat de pomp beschermt en
zich aan de onderkant ervan bevindt, terechtkomen.
Verzeker u ervan dat de wascyclus klaar is en haal
de stekker uit het stopcontact.
Toegang tot het voorvakje:
1. verwijder het
beschermelement aan de
onderzijde van de
wasautomaat, door het
tegen de klok in te
draaien (zie afbeelding);
2. draai het deksel eraf,
tegen de klok in (zie
afbeelding): het is
normaal dat er een
beetje water uit komt;
3. maak de binnenkant goed schoon;
4. schroef het deksel er weer op;
5. schroef het beschermdeksel rechtsom weer op
zijn plaats. Zorg ervoor dat de pijl aan de binnenkant
van het deksel naar boven wijst.
Controleren van de wateraanvoerslang
Controleer minstens een maal per jaar de slang van
de watertoevoer. Als er barstjes of scheuren in zitten
moet hij vervangen worden: gedurende het wassen
kan de hoge waterdruk onverwachts breuken
veroorzaken.
Gebruik nooit oude slangen.
Storingen en oplossingen
Het kan gebeuren dat het apparaat niet werkt. Voor u contact opneemt met de Servicedienst (zie Service) moet
u controleren of het niet een storing betreft die u zelf makkelijk kunt verhelpen met behulp van de volgende lijst.
Storingen:
Mogelijke oorzaken / Oplossing:
De wasautomaat gaat niet aan.
De stekker zit niet in het stopcontact of niet ver genoeg om contact te
maken.
Het hele huis zit zonder stroom.
De wascyclus start niet.
De
De
De
De
De wasautomaat heeft geen
watertoevoer (Het controlelampje
DEUR GEBLOKKEERD knippert
snel).
De watertoevoerbuis is niet aangesloten op de kraan.
De buis is gebogen.
De waterkraan is niet open.
Het hele huis zit zonder water.
Er is onvoldoende druk.
De knoppen START PROGRAMMA zijn niet ingedrukt (ze knipperen nog).
De wasautomaat blijft water
aan- en afvoeren.
De afvoerbuis is niet op 65 tot 100 cm afstand van de grond af
geïnstalleerd (zie Installatie).
Het uiteinde van de afvoerbuis ligt onder water (zie Installatie).
De afvoer in de muur heeft geen ontluchting.
deur zit niet goed dicht.
AAN/UIT knop is niet ingedrukt.
knoppen START PROGRAMMA zijn niet ingedrukt (ze knipperen nog).
waterkraan is niet open.
Als na deze controle het probleem nog niet is opgelost, doet u de
waterkraan dicht, de wasautomaat uit en belt u de Servicedienst. Als u op
een van de hoogste verdiepingen van een flatgebouw woont, kan zich een
hevelingsprobleem voordoen, waarbij de wasautomaat voortdurend water
aan- en afvoert. Om deze storing te verhelpen zijn er in de handel speciale
beluchters te koop.
De wasautomaat voert het water
niet af of centrifugeert niet.
De afvoerslang is geknikt (zie Installatie).
De afvoerbuis is verstopt.
De machine trilt erg tijdens het
centrifugeren.
De transportbeveiligingsschroeven zijn niet verwijderd tijdens het
installeren. Verwijder de schroeven (zie Installatie).
De wasautomaat staat niet goed recht (zie Installatie).
De wasautomaat staat te krap tussen meubels en muur (zie Installatie).
De wasautomaat lekt.
De buis van de watertoevoer is niet goed aangeschroefd (zie Installatie).
Het wasmiddelbakje is verstopt (voor reiniging zie Onderhoud en
verzorging).
De afvoerbuis is niet goed aangesloten (zie Installatie).
Het druppelopvangsysteem is vol. Reinig of vervang het sponsje (zie
Voorzorgsmaatregelen en advies)
Het controlelampje DEUR
GEBLOKKEERD knippert zeer
snel.
Doe de wasautomaat uit en haal de stekker uit het stopcontact. Wacht
circa 1 minuut en doe hem weer aan. Het is noodzakelijk de wascyclus
opnieuw te starten.
Als de storing aanhoudt, dient u de Servicedienst in te schakelen.
Er ontstaat teveel schuim.
Het wasmiddel is niet bedoeld voor wasautomaten (er moet voor
wasautomaat, handwas en machinewas, of iets dergelijks op staan).
U heeft teveel wasmiddel gebruikt.
35
NL
Service
Voordat u de Servicedienst inschakelt:
Controleer eerst of u het probleem zelf kunt oplossen (zie Storingen en oplossingen);
Start het programma opnieuw om te controleren of de storing is verholpen;
Als dit niet het geval is, kunt u contact opnemen met de erkende Servicedienst.
NL
In het geval de wasautomaat verkeerd is geïnstalleerd of u hem niet correct heeft gebruikt zal u
gevraagd worden de reparatiekosten te betalen.
Wendt u nooit tot een niet erkende installateur.
Vermeld:
het type storing;
het model van de machine (Mod.);
het serienummer (S/N);
Deze laatste gegevens vindt u op het typeplaatsje op het apparaat.
36
تعليمات االستخدام
ماكينة غسيل
المحتويات
AR
عربي1 ،
AR
التركيب38-39 ،
GB
إفراغ المحتويات وتحديد االرتفاع
وصل إمدادات الكهرباء والماء
البيانات التقنية
وصف الماكينة40-41 ،
درج وعاء مواد التنظيف للتنظيف الذاتي
لوحة التحكم
نظام موازنة الحمل
تشغيل دورة غسيل42 ،
برامج الغسيل43 ،
مواد التنظيف والغسيل44 ،
تحضير الغسيل
توصيات للغسيل
SIXL 146
وسائل حذر ونصائح45 ،
الوقاية العامة
التخلص
توفير الطاقة واحترام البيئة
نظام صينية التنقيط
العناية والصيانة16 ,
قطع إمداد الماء أو الكهرباء
تنظيف الماكينة
تنظيف درج وعاء مواد التنظيف
العناية بباب وبرميل الجهاز لديك
المضخة
ّ
تنظيف
فحص خرطوم إدخال الماء
استكشاف المشاكل وحلها11 ،
الخدمة18 ،
37
التركيب
AR
! يجب االحتفاظ بدليل التعليمات هذا في مكان آمن لمراجعته في المستقبل.
إذا تم بيع الجهاز ،إرساله أو نقله ،تأكد من أن دليل التعليمات قد أرفق
بالماكينة بحيث يتمكن مالكوها الجدد من التعرف على عملها وخصائصها.
وصل إمدادات الكهرباء والماء
وصل خرطوم إدخال الماء
! اقرأ هذه التعليمات بعناية :إنها تحتوي على معلومات هامة فيما يتعلق
بالتركيب اآلمن وتشغيل الجهاز.
إفراغ المحتويات وتحديد المستوى
A
إفراغ المحتويات
Aفي طرف فوهة
.1أدخل الحلقة
الخرطوم وثبت األخيرة بحنفية الماء
البارد مزودة بفتحة 3/4لولبية
(انظر الرسم).
قبل إنجاز التوصيل ،أتح للماء أن
يتدفق بحرية حتى يصبح نظيفا
تماما.
.1أخرج ماكينة الغسيل.
.2تأكد من أنه لم يلحق ضرر بالماكينة خالل عملية الشحن .إذا لحق بها
بالموزع وال تنفذ أية عملية تركيب إضافية.
ّ
ضرر ،اتصل
.3أزل البراغي األربعة الواقية
(المستخدمة خالل الشحن) ومطاط
الماكينة مع حافظ المسافة المالئم
الموجود في الجهة الخلفية من
الجهاز (انظر الرسم).
.4أغلق الفتحات باستخدام األغطية البالستيكية المزودة.
.5أبق كل األجزاء في مكان آمن :سوف تحتاجها مرة أخرى في حال تم نقل
ماكينة الغسيل إلى موقع آخر.
! يجب عدم استخدام مواد التعبئة كألعاب لألوالد.
معوج.
ّ
ملتف أو
.3تأكد من أن الخرطوم غير ّ
! على ضغط الماء في الحنفية أن يكون في نطاق القيم المشار إليها في جدول
البيانات التقنية (انظر الصفحة التالية).
!إذا لم يكن خرطوم اإلدخال طويال بما فيه الكفاية ،اتصل بمتجر متخصص
أو بفني معتمد.
تحديد المستوى
يمكن للماكنة لديك أن تحدث كمية كبيرة من الضجيج إذا لم يتم معايرة الرجلين
الأماميتين بشكل صحيح.
.1قم بتركيب ماكينة الغسيل على أرضية مستوية ومتينة ،من دون وضعها
مقابل الجدران ،الخزائن أو األثاث اآلخر.
.2إذا لم تكن األرضية مستوية
تماما ،قم بتعويض أي تفاوت بواسطة
شد أو فك أرجل المعايرة األمامية
(انظر الرسم)؛ على قياس زاوية
االنحناء مقارنة بمسطح العمل ،أال
يتعدى 2درجة مئوية.
تحديد مستوى الماكينة بشكل صحيح
سيمنحها الثبات ،سيساعد على
تحاشي االرتجاجات والضجيج الزائد
وسيمنعها من االنحراف أثناء العمل .إذا تم وضعها في خزانة أو على بساط،
قم بمعايرة األرجل بنفس الطريقة لتوفير فسحة تهوئة كافية تحت الماكينة.
.2قم بتوصيل فتحة المدخل
بالماكينة ،عن طريق تثبيتها لولبيا
داخل مدخل الماء البارد في الجهاز،
الموجود في الجهة اليمنى العليا
في الجزء الخلفي من الجهاز(انظر
الرسم).
وصل خرطوم تصريف الماء
65 - 100cm
! يجب فحص الكبل بانتظام وتبديله من قبل فنّي مؤهل فقط.
وصل خرطوم تصريف الماء،
من دون ثنيه ،بأنبوب تصريف
أو بتصريف جداري على ارتفاع
يتراوح بين 65وحتى 100سم
عن األرض؛
أو قم بتثبيته على طرف الحوض،
البالوعة أو المغسلة ،مع تثبيت
األنبوب المزوّد بالحنفية .على
الطرف الحر من الخرطوم أال
يكون تحت الماء.
! نحن ال ننصح باستخدام إطاالت الخرطوم؛ إذا كان ذلك ضروريا جدا،
فعلى اإلطاالت أن تكون بنفس القطر مثل الخرطوم األصلي ويجب أال يتعدى
طولها 150سم.
التوصيالت الكهربائية
قبل توصيل الجهاز بتزويد الطاقة ،تأكد من أن:
مؤرض ويذعن لكل القوانين الواجب تطبيقها؛
• المقبس ّ
• المقبس قادر على تحمل عبء الطاقة القصوى ،كما هو مبين في جدول
البيانات التقنية (انظر الجهة المقابلة)؛
تحذير :لن تتحمل الشركة أية مسؤولية في حال لم يتم احترام هذه التعليمات.
! يجب عدم تركيب الماكينة خارج المنزل ،حتى وإن كان ذلك في مناطق
مغطاة .من الخطر جدا إبقاء الجهاز عرضة للشتاء ،العواصف وأحوال
الطقس األخرى.
! على مقبس شبكة الكهرباء الرئيسية أن يبقى سهل الوصول بعد تركيب
ماكينة الغسيل.
! ال تستخدم كبالت اإلطالة أو المقابس المتعددة.
! على الكبل أال يكون معوجا أو مضغوطا.
GB
البيانات التقنية
الطراز
SIXL 1
المقاييس
59.5سم عرض
85سم ارتفاع
53.5سم عمق
من 1وحتى 6كغم
التوصيالت
الكهربائية
توصالت الماء
الرجاء راجع الصقة البيانات التقنية
الملصقة على الماكينة
الحد األقصى من الضغط 01( MPa 1
بار)
الحد األدنى من الضغط MPa 0.05
( 5.0بار)
سعة البرميل 52لتر
حتى 1400دورة في الدقيقة
السعة
• فولطية تزويد الطاقة تتراوح بين القيم المشار إليها في جدول البيانات
التقنية (أنظر الجهة المقابلة)؛
• أن المقبس متوافق مع قابس الجهاز .إذا لم يكن األمر كذلك ،قم بتبديل
المقبس أو القابس.
AR
سرعة العصر
البرنامج
التحكمبالبرامج
تماشيا مع توجيهات يتم التشغيل مع حمل من 6كغم
EN 60456
يذعن هذا الجهاز لإلرشادات الجماهيرية
التالية:
EEC/73/23من تاريخ ( 19/02/73جهد
منخفض) والتعديالت الالحقة؛
EEC/336/89من تاريخ ( 03/05/89تطابقالمغناطيسية الكهربائية) والتعديالت الالحقة؛
.CE/2002/96 -
وصف الماكينة
AR
لوحة
التحكم
باب الفتحة
مقبض باب الفتحة
لوحة الوصول إلى
مضخة التصريف
أرجل قابلة للمعايرة
درج وعاء مواد التنظيف للتنظيف الذاتي
يمكن مشاهدة مستوى مواد التنظيف عبر النوافذ الشفافة الملائمة الموزودة بالحجرات.
ماكنة الغسيل هذه مزودة بدرج إبداعي لمواد التنظيف المعدة للتنظيف الذاتي،
حيث يزيد من جودة كل دورة غسيل.
الدرج موجود داخل باب الفتحة.
هناك أيضا مؤشرات عائمة (انظر الرسم . )B
و
! داخل الحجرات
المطرية للغسيل ،ستطفو
ّ
إذا تم قياس الحد األقصى من مواد التنظيف/المواد
المؤشرات حتى تالمس شبكات حماية الحجرات.
! نحن نوصي بعدم اجتياز مستويات الحد األقصى في درج وعاء مواد
التنظيف.
STOP
ST
OP
MAX
! نحن نوصي باتباع تعليمات الكميات الموجودة على عبوة مواد التنظيف
بحذر .إذا تم استخدام مواد تنظيف معينة ،لزجة جزئيا ،نحن نقترح بوضعها
داخل البرميل مباشرة وليس داخل درج وعاء مواد التنظيف.
MAX
اجتياز مستويات الحد األقصى المشار إليها على الماكينة ،يمكن أن يسبب
تسرب مواد التنظيف من الجهة السفلية في الدرج.
A
B
.1افتح باب الفتحة للوصول إلى درج وعاء مواد التنظيف (انظر الرسم .)A
.2اسكب مواد التنظيف أو اإلضافات داخل الحجرات ،فوق شبكات الحماية،
كما يلي:
:مواد التنظيف واإلضافات السائلة.
حجرة
:مواد التنظيف على شكل مسحوق أو أقراص واإلضافات
حجرة
على شكل مسحوق.
إلدخال األقراص ،ارفع الشبكة التي تحمي الدرج.
المطرية للغسيل.
ّ
:المواد
حجرة
! يمكن لسكب مواد التنظيف أو اإلضافات السائلة داخل الحجرة الوسطى أن
التسرب.
ّ
يسبب
اجتياز الكمية المحددة من مواد التنظيف لن يكون أكثر فاعلية مما هو عليه؛
إنه سيزيد من تلويث البيئة.
الماء المستخدم خالل دورة الغسل سيقوم بإزالة أي مواد تنظيف زائدة
من الدرج .على أية حال ،من الممكن إزالة الدرج يدويا ("انظر العناية
والصيانة").
لتسهيل عملية قياس مواد التنظيف ،نحن نوصي باستخدام أداة قياس الكمية
المزودة بماكينة الغسيل.
الحد األقصى من سعة الدرج هي كما يلي:
مواد التنظيف السائلة 1/2 - 1 :كمية مواد التنظيف على شكل مسحوق :كميتانمطريات الغسيل :وحدة واحدة
ّ -
لوحة التحكم
AR
زر تشغيل/توقيف
GB
مؤشر وقت الغسيل
ضوء المؤشر األحمر
باب مقفل
زر بدء برنامج الغسيل
السريع 30درجة
زر بدء برنامج القطنيات
البيضاء
زر بدء البرنامج الناعم
زر بدء برنامج الملون
المختلط سهل الكي
تشغيل/توقيف :Fاضغط هذا الزر لتشغيل الماكينة أو إيقاف تشغيلها.
عندما يتم تشغيل الماكينة ،تبدأ أزرار البرامج المختلفة بالوميض ،بينما
تضيء أضواء المؤشر بشكل ثابت أثناء الغسل.
إللغاء الدورة ،اضغط ضغطا متواصال على زر تشغيل/توقيف لحوالي
ثانيتين بينما تكون دورة الغسل قيد اإلنجاز.
سيومض ضوء المؤشر لبضع ثوان وستقوم الماكينة بتصريف الماء
أوتوماتيكيا إلى الحوض.
المؤشر األحمر باب مقفل:
عندما يضيء ضوء المؤشر ،يكون الباب مقفال لتحاشي فتحه عن طريق
الخطأ ،لمنع إتالف الجهاز ،انتظر حتى ينطفئ الضوء قبل فتح الباب بعد
انتهاء الدورة أو عند توقيف الدورة بشكل مؤقت .يسبقى الضوء مشتعال
لحوالي دقيقتين بعد انتهاء برنامج الغسيل.
نظام موازنة الحمل
لتحاشي االرتجاج الزائد قبل كل دورة عصر ،تقوم الماكنية بتوزيع الحمل
موحد بواسطة إدارة البرميل باستمرار بسرعة تزيد بعض الشيء عن
بشكل ّ
سرعة دوران عملية الغسيل.
عندما ،رغم المحاوالت المتكررة ،ال يتم توزيع الحمل بشكل موحد ،تقوم
الماكينة بالعصر بسرعة أبطأ عما هو محدد لدورة الغسيل.
إذا لم يكن باإلمكان موازنة الحمل بشكل كبير ،تنجز الماكينة عملية التوزيع
بدل العصر.
من شأن محاوالت الموازنة أن تزيد من مدة الدورة ،حتى 10دقائق بحد
أقصى.
! الوميض السريع لضوء مؤشر باب مقفل يشير إلى خلل (انظر "استكشاف
المشاكل وحلها").
أزرار بدء البرامج:
اضغط أحدها لبدء برنامج الغسيل المختار.
الزر مضيء بشكل دائم :البرنامج قيد اإلنجاز.أزرار تومض:
مؤشر وقت الغسيل مضيء :هذا يضيء بالتتالي ليشير إلى عمل برنامج
الغسيل .عند انتهاء البرنامج ،تبدأ كل المؤشرات بالوميض.
لمزيد من التفاصيل ،راجع الفصل بعنوان "تشغيل دورة غسيل".
تشغيل دورة عسل
AR
مالحظة :بعد االنتهاء من تركيب الجهاز ،وقبل استخدامه في المرة األولى،
قم بتشغيل دورة غسيل مستخدما مواد التنظيف من دون غسيل ،باستخدام
البرنامج.
الرسم المجاور يخص الوضع الذي
يكون فيه قد تم قطع 50%من
دورة الغسيل.
.1شغل الماكينة بالضغط على زر تشغيل/توقيف .ستبدأ رموز أزرار
بدء البرامج بالوميض وستضيئ أضواء مؤشر وقت الغسيل بشكل دائم،
لتشير إلى أن ماكينة الغسيل قد أصبحت جاهزة لتلقي المعلومات.
.2قم بتحميل الغسيل افتح الباب باستخدام المقبض .أدخل الغسيل ،وتأكد
من أنك ال تتعدى الحد األقصى من قيمة الحمل المشار إليها في جدول
البرامج في الصفحة التالية.
.3قم بقياس مواد التنظيف واإلضافات.
عند انتهاء البرنامج ،تبدأ كل
مؤشرات وقت الغسيل بالوميض.
اسكب مواد التنظيف داخل الدرج الموجود داخل باب الفتحة ،واحذر من
تعدي حد المستويات األقصى المشار إليها على واجهة الدرج والمؤشرات
العائمة .لمزيد من التفاصيل ،يرجى مراجعة الفصل بعنوان "وصف
الماكينة".
.4أغلق الباب.
.5ابدأ برنامج الغسيل بواسطة
الضغط على زر بدء البرامج
المالئم .سيومض الرمز المالئم
لبرنامج الغسيل بشكل دائم،
وسنطفئ كل أضواء مؤشر مدة
الغسيل .سيضيء مؤشر باب
مقفل بشكل دائم لإلشارة بأن
عمل باب الجهاز آمن.
لشرح عن برامج الغسيل المتوفرة ،يرجى مراجعة الفصل بعنوان "برامج
الغسيل".
! عملية تشغيل برنامج الغسيل الناعم
"30°في الصفحة التالية.
.6يمكن إبطال برنامج الغسيل بواسطة ضغط زر بدء البرنامج المضيء
الذي سيبدأ بالوميض .بعد حوال دقيقتين سينطفئ مؤشر باب مقفل ليشير
إلى أنه قد أصبح باإلمكان فتح الباب.
إذا كنت ترغب في إضافة المزيد من مواد التنظيف ،تأكد من أن مؤشرات
الحد األقصى العائمة غير موجودة في أعلى حد لها.
إلعادة تشغيل برنامج الغسيل ،أغلق الباب مرة أخرى واضغط زر البدء
الملائم مرة أخرى.
لضمان الحد األقصى من األمان ،في حال كانت هناك كمية من الماء
داخل البرميل الي من الممكن أن تتسرب إلى خارج الماكينة ،لن يكون
باإلمكان فتح الباب (سيبقى ضوء مؤشر باب مقفل مضاء حتى إلى ما بعد
مرور دقيقتين).
يجب في هذه الحال إيقاف تشغيل الماكينة بالضغط على زر تشغيل/
توقيف لمدة دقيقتين تقريبا ثم االنظار إلى أن يتم تصريف الماء
أوتوماتيكيا.
مختلفة؛ انظر الفقرة "الغسيل الناعم
خالل البرنامج ،سيومض مؤشر وقت الغسيل بالتتالي ،ليشير إلى المدة
التي قطعها البرنامج حتى اآلن.
.7عند انتهاء البرنامج
عند انتهاء برنامج الغسيل ،سيبقى رمز البرنامج المختار مضاء بشكل
ثابت ،بينما تبدأ كل أضواء مؤشر مدة الغسيل بالوميض.
لبدء دورة غسيل جديدة ،يجب إيقاف ماكينة الغسيل وإعادة تشغيلها مرة
أخرى بالضغط على زر تشغيل/توقيف مرتين.
برامج الغسيل
األقمشة
الزر
التحميل
األقصى
(كغم)
درجة الحرارة
سرعة
العصر
(د.د)
مدة
الدورة
(دقائق)
60درجة
1400
145
وصف دورة الغسيل
AR
GB
قطنيات بيضاء
6
قطنيات بيضاء متينة
دورة غسيل ،دورات نقع ،دورات عصر
متوسطة ونهائية.
ملون مختلط كي سهل
قطنيات ملونة وأقمشة صناعية
4.5
1000
40درجة
105
دورة غسيل ،دورات نقع ودورة عصر ناعم
أقمشة ناعمة
+
+
صوف (عصر ناعم نهائي)
1.5
30درجة
600
50
دورة غسيل ،دورات نقع ودورة عصر ناعم
حرير وستائر (من دون دورة
عصر نهائية)
1.5
30درجة
ال*
50
دورة غسيل ،دورات نقع وتصريف
800
30
دورة غسيل (فقط إذا كان برنامج “غسيل سريع”
مشغل) ،دورات نقع ،دورة عصر ناعم
غعسير سريع /نقع فقط
قطنيات وأقمشة صناعية
3
30درجة /ماء
بارد**
أوقات البرامج المشار إليها في الجدول هي بهدف التوجيه فقط ،ويتم حسابها وفق معدل كمية الحمل.
*مالحظة :حول معلومات متعلقة باستبعاد مرحلة العصر في برامج الغسيل الناعمة ،الرجاء راجع فقرة "الغسيل الناعم °30في اسفل الصفحة.
**مالحظة :حول معلومات متعلقة شطف الثياب المغسولة يدويا بالماء البارد ،يرجى مراجعة فقرة "سريع /30°شطف فقط" في اسفل الصفحة.
نحن نوصي بإخراج األلبسة من ماكينة الغسيل فورا ،لتحاشي تجعدها
المالبس القطنية البيضاء 60°
مصمم لغسيل كل المالبس القطنية البيضاء .درجات حرارة الغسيل المرتفعة
تعطي نتائج غسيل أفضل في األجهزة من الفئة .A
مالبس ملونة مختلطة 40°سهلة الكي
يمكن استخدام هذا البرنامج لغسيل كل مالبسك الملونة ،سواء أكانت قطنية أو
أقمشة صناعية .يتم التحكم بدورة الدوران بشكل حذر خالل دورة الغسيل بكاملها،
وكذلك تقليل تجعّد األقمشة وجعل كيّها أسهل.
يمكن غسيل المالبس القطنية واألنسجة االصطناعية في نفس الوقت.
الغسيل الناعم 30°
مصمم لغسيل كل المالبس الصوفية الحريرية والمالبس الناعمة .لكون هذه
المالبس لها خصائص مختلفة ،فإن هذا البرنامج يحتاج إلى عملية تشغيل تختلف
عن البرامجاألخرى:
+
دورة للغسيل الناعم مع عصر نهائي (لأللبسة الصوفية) :اضغط زر
بدء البرنامج الناعم
الناعم
بعد حوالي 3ثوان ،ستبدأ األزرار زر بدء البرنامج
و زر بدء برنامج الغسيل السريع
البرنامج الناعم
بالوميض .اضغط زر بدء
إلنجاز الغسيل ،الذي ينتهي بدورة عصر ناعمة .يشتمل هذا
البرنامج على حركة برميل تم بحثها علميا بحذر إلزالة الماء الزائد من األنسجة،
وبهذه الطريقة تقليل االحتكاك والمساعدة على حماية ألبستك الصوفية.
+
دورة للغسيل الناعم من دون مرحلة عصر (أللبسة الحرير والفيسكوز
غسيل سريع /’30نقع فقط
يمكن استخدام هذا البرنامج للقطن المتسخ بعض الشيء أو لألنسجة الصناعية
المبين في الالصقة خالل 30دقيقة
أو األلبسة بواسطة "غسيل بـ :30°
فقط ..من الممكن أيضا نقع األلبسة القطنية أو األنسجة الصناعية التي كان قد
تم غسلها يدويا (ال تشمل الصوف أو الحرير).
بفضل مستشعراتها الخاصة ،فإن ماكينة الغسيل قادرة على التعرف فيما إذا
كانت األلبسة التي تم إدخالها في البرميل تحتوي على مواد تنظيف.
إذا لم يتم التعرف على مواد تنظيف على المالبس ،سيتم إنجاز دورةالغسيل السريع .’30
إذا تم التعرف على وجود مواد تنظيف (مالبس كان قد تم غسلها يدويا)سيتم إنجاز دورة النقع فقط أوتوماتيكيا.
إدارة النقع األوتوماتيكي
تتم مراقبة وظيفة النقع والتحكم بها في كل برنامج بواسطة مستشعرات
خاصة .إذا كانت المالبس صابونية جدا في نهاية كل غسلة ،سيتم إنجاز دورة
النقع أوتوماتيكيا حتى تتم إزالة مواد التنظيف كليا .في هذه الحال ،يمكن
لمدة برنامج الغسيل أن تزيد بعض الشيء وفقا للمعلومات المزودة في جدول
البرامج.
والستائر؛ ليس لالستخدام لغسيل الصوف):
اضغط زر بدء البرنامج الناعم
البرنامج الناعم
.بعد حوالي 3ثوان ،ستبدأ األزرار زر بدء
ور زر بدء برنامج الغسيل السريع
زر بدء برنامج الغسيل السريع
بالوميض .اضغط
إلنجاز الغسيل ،من دون دورة عصر ناعمة.
في نهاية الدورة ،ستقوم الماكينة بتصريف الماء الموجود في البرميل أوتوماتيكيا
مواد التنظيف والغسيل
AR
تحضير الغسيل
كم يزن الغسيل لديك؟
قسم الغسيل حسب ما يلي:
• ّ
نوع القماش /الرمز على الالصقة؛ األلوان :افصل بين المالبس الملونة والبيضاء.• قم بإفراغ جيوب كافة المالبس وافحص األزرار.
• ال تتعدى قيم الحمل المشار إليها في "برامج الغسيل".
شرشف واحد 400-500غم
غطاء وسادة واحد 150-200غم
مفرش طاولة واحد 400-500غم
برنس حمام واحد 900-1200غم
منشفة واحدة 150-250غم
بنطلون جينس 400-500غم
قميس واحد 150-250غم
توصيات للغسيل
األسرة والحمام (الشراشف ،المناشف ،برنس الحمام وما شابه):
ّ
غسيل
الذي يضمن أفضل غسيل في
استخدم برنامج القطنيات البيضاء
األجهزة من الصنف .Aدورة العصر المكثف تبعد الماء الزائد بشكل
فعال.
ملابس الأنسجة الصناعية والملابس القطنية بواسطة"غسيل 30درجة"
التعليمات على الصقة العناية :استخدم برنامج غسيل سريع 30
درجة حرارة الغسيل المنخفضة تحمي األنسجة الملونة.
درجة
نحن نوصي باستخدام مواد التنظيف السائلة.
المالبس القطنية (القمصان ،البلوزات ،مفارش الطاوالت وما شابه):
استخدم برنامج القطنيات البيضاء .60°إذا كانت هناك أية بقع
مستعصية ،فيجب معالجتها أوال بواسطة صابون صلب ،قبل بدء دورة
الغسيل.
المالبس الصوفية (المريالت ،المناديل وما شابه) :استخدم برنامج غسيل
. +تحرك البرميل خالل
ناعم 30درجة مع دورة عصر نهائية
الغسيل ودورة العصر الناعم يقلالن تلبّد األقمشة .نحن نوصي باستخدام
مواد التنظيف المصنعة خصيصا للمالبس الصوفية.
المالبس القطنية الملوّنة (القمصان ،البلوزات ،المالبس الداخلية وما
ملون مختلط 40درجة ،الذي ينفذ الحد
شابه) :استخدم برنامج
األقصى من األداء من دون إتالف األلوان .بفضل وظيفة الكي السهل
المدمجة ،فإن مرحلة دورة العصر تقلل حدوث التجعدات في نهاية
الغسيل ،وتجعل األنسجة سهلة الكي .نحن نوصي باستخدام مواد
التنظيف السائلة.
المالبس الحريرية (القمصان ،المالبس الداخلية وما شابه) :استخدم
. +حاول
برنامج غسيل ناعم 30درجة مع دورة عصر نهائية
عدم ترك الغسيل داخل البرميل لفترة طويلة بعد انتهاء دورة الغسيل،
لتحاشي التجعد الزائد.
المالبس البيضاء أو الملونة (القمصان،
البلوزات ،المالبس الداخلية وما شابه) :استخدم برنامج ملون مختلط
.نحن نوصي بعدم غسل المالبس البيضاء والملونة في
40درجة
نفس دورة الغسيل ،لتحاشي تسرب أية ألوان إلى المالبس البيضاء .نحن
نوصي باستخدام مواد التنظيف السائلة.
الستائر :استخدم برنامج غسيل ناعم 30درجة مع دورة عصر نهائية
. +نحن نوصي بطيّها ووضعها داخل غطاء وسادة أو كيس
شبكي.
وسائل حذر ونصائح
! تم تصميم هذا الجهاز وتصنيعه طبقا لمواصفات األمان العالمية .يتم تزويد
التحذيرات التالية ألسباب وقائية ويجب قراءتها بعناية.
الوقاية العامة
• تم تصميم هذا الجهاز لالستخدام المنزلي فقط.
• يجب استخدام الماكينة من قبل البالغين فقط ،بموجب التعليمات المزودة في هذا
الدليل.
• ال تالمس الماكينة وأنت حافي القدمين أو بيدين ورجلين مبللتين أو
رطبتين.t
• ال تقم بسحب كبل تزويد الطاقة عند فصل الجهاز عن مقبس شبكة الطاقة
الكهربائية .امسك القابس واسحبه.
• ال تالمس ماء الصرف ،حيث يمكن أن يكون بدرجة حرارة عالية جدا.
• ال تدفع باب الفتحة بقوة أبدا .يمكن لذلك أن يتلف ميكانيكية قفل األمان
المصمم لمنع فتحه عن طريق الخطأ.
• إذا تعطل الجهاز ،ال تحاول بأي حال من األحوال ،الوصول إلى األجهزة
الداخلية في محاولة لتصليحها بنفسك.
• أبق األطفال بعيدين عن الجهاز دائما أثناء عمله.
توفيرالطاقة واحترام البيئة
توفير مواد التنظيف ،الماء ،الطاقة والوقت
GB
• لتحاشي تبذير الموارد ،يجب استخدام ماكينة الغسيل بسعتها القصوى.
السعة الكاملة الواحدة بدل نصفي السعة توفر حتى 50%من الطاقة
المستخدمة.
• معالجة البقع بواسطة مزيل البقع أو تركها لتنقع قبل غسلها ،تقلل الحاجة
إلى غسل األلبسة بدرجة حرارة مرتفعة.
• استخدم الكمية الصحيحة من مواد التنظيف ،بالمالءمة مع قسوة الماء،
مدى اتساخ المالبس وكمية الغسيل التي لديك ،بهدف تحاشي التبذير
ولحماية الجهاز والبيئة :حتى ولو كانت قابلة لالستنفاذ الحيوي ،فإن مواد
التنظيف تحتوي على مكونات يمكن أن تغير التوازن الطبيعي .تحاشى
مطري الغسيل قدر اإلمكان.
استخدام ّ
• إذا قمت باستخدام ماكينة الغسيل أبتداء من ساعات ما بعد الظهر
المتأخرة ،وحتى ساعات الصباح الباكر ،فأن ستساعد على تقليل القمة
القصوى من الضغط على اللوحة الكهربائية.
نظام صينية التنقيط
الماكينة مزودة بنظام صينية التنقيط داخل الباب ،حيث يقوم بالتقاط أية قطرات
من الماء في نهاية دورة الغسيل.
نحن نوصي بفحص مستوى تبلل اإلسفنجة الموجودة داخل حجرة صينية التنقيط
بشكل منتظم .إذا اقتضت الضرورة ،يمكن تنظيفها أو تبديلها كما يلي:
.1أزل الحجرة بالضغط الطفيف
على الجزء السفلي.
• يمكن للباب أن يصبح ساخنا بعض الشيء خالل دورة الغسيل.
• إذا كانت هناك حاجة لنقل الجهاز ،نفذ العمل بمجموعة من شخصين أو
ثالثة أشخاص وتعاملوا معه بمنتهى الحذر .ال تحاول أبدا القيام بذلك
لوحدك ،ألن الجهاز ثقيل جدا.
• قبل إدخال الغسيل إلى ماكينة العسيل ،تأكد من أن البرميل فارغ.
AR
2
التخلص
• التخلص من مواد التعبئة :تقيّد بالقوانين المحلية حيث يمكن لمواد التعبئة
أن يعاد تصنيعها.
• التوجيهات األوروبية 2002/96/ECفيما يتعلق بنفايات األجهزة
الكهربائية واإللكترونية تتطلب عدم التخلص من األجهزة الكهربائية
المنزلية القديمة عن طريق خدمات القمامة البلدية العادية .يجب جمع
األجهزة القديمة على انفراد بهدف جعل استرداد وإعادة تدوير المواد التي
تحتوي عليها بشكل أمثل وتقليل التأثير على صحة الناس وعلى البيئة.
رمز "سلة القمامة الدائرية" المشطوبة على المنتج يذكرك بالتزامك بأنه
عند تخلصك من الجهاز يجب تجميعه على حدة.
على الزبائن االتصال بسلطاتهم المحلية أو بالتاجر للحصول على
معلومات حول التخلص الصحيح من أجهزتهم القديمة.
.2أزل اإلسفنجة الموجودة بداخلها ،اغسلها برفق تحت ماء متدفق
واعصرها تماما .من الممكن أيضا تبديلها بواحدة من اإلسفنجات
االحتياطية المزودة.
.3أعد اإلسفنجة إلى داخل الحجرة.
4قم أعد الحجرة إلى داخل الباب ،وتأكد من أن الرفاصات على الباب قد تم
إدخالها بشكل صحيح داخل الشقوق المالئمة على الحجرة.
.5تأكد من أن الحجرة قد أعيدت إلى مكانها بالوضع الصحيح.
العناية والصيانة
AR
العناية بباب وبرميل الجهاز لديك
قطع إمداد الماء والكهرباء
• أترك باب الفتحة مفتوحا دائما لتحاشي تكوّن الروائح الكريهة.
• أقفل حنفية الماء بعد كل غسلة .هذا سيحدد تلف النظام الهيدروليكي في
الماكينة ويساعد على منع التسربات.
• افصل الماكينة عن الكهرباء عن تنظيفها أو أثناء أي عمل صيانة.
تنظيف الماكينة
يمكن تنظيف األجزاء الخارجية والقطع المطاطية في الماكينة باستخدام خرقة
نظيفة مبللة بالماء الفاتر والصابون .ال تستخدم المواد المذيبة أو الكاشطة.
المضخة
ّ
تنظيف
ماكينة الغسيل مزودة بمضخة للتنظيف الذاتي ،حيث ال تحتاج إلى أية عناية في
أي وقت .في بعض األحيان ،يمكن للقطع الصغيرة (مثل القطع النقدية أو
األزرار) أن تسقط داخل الحجرة األولية التي تحمي المضخة ،والموجودة في
جزئها األسفل.
! تأكد من انتهاء دورة الغسيل وافصل الجهاز عن الكهرباء.
للوصول إلى الحجرة األولية:
تنظيف درج وعاء مواد التنظيف
.1أزل الغطاء الواقي في الجهة
السفلى من ماكينة الغسيل ،بواسطة
إدارته بعكس اتجاه عقارب الساعة
(أنظر الرسم)؛
! نحن نوصي بفحص وجود مواد التنظيف والماء داخل درج مواد التنظيف
قبل إزالته .في حال وجدت هذه المواد ،اعتني بها ألنها من الممكن أن
تتسرب عندما تتم إزالة الدرج.
يتم تنظيف درج حجرة مواد التنظيف في هذه الماكينة أوتوماتيكيا خالل
دورات الغسيل .على أية حال ،يمكن للبقايا أن تتكون أحيانا بعد استخدام مواد
تنظيف معينة .لتنظيف الدرج ،قم بما يلي:
.2فك الغطاء بواسطة إدارته
بعكس عقارب الساعة (أنظر
الرسم) :يمكن للقليل من الماء
أن يخرج إلى الخارج .هذا أمر
طبيعي؛
.1افتح الباب بهدف الوصول إلى
الدرج.
.2أزل الدرج بواسطة سحبه باتجاه
األعلى ،باإلمساك به من الحجرة
الوسطى كما هو مبين في الرسم .ال
تمسك بالدرج بواسطة الشبكة ألنه
من الممكن لذلك أن يتلفها.
.3نظيف الجزء الداخلي تماما؛
.3فك غطاء الدرج للوصول
إلى الحجرة ،كما هو مبين في الرسم.
.4نظف الدرج تحت ماء متدفق.
.4أعد تركيب الغطاء في مكانه؛
.5ركب غطاء الحماية بواسطة إدارته باتجاه عقارب الساعة ،وتأكد من أن
السهم الموجود في الجهة الداخلية من الغطاء يتجه إلى األعلى.
فحص خرطوم إدخال الماء
.5أعد تثبيت الغطاء وأعد الدرج إلى مكانه ،عن طريق دفعه حتى يعلق في
مكانه.
افحص فوهة الخرطوم مرة في السنة على األقل .إذا كانت هناك أية شقوق،
يجب تبديلها فورا .خالل
دورات الغسيل ،يكون ضغط الماء قويا جدا ويمكن للفوهة المتشققة أن تتشقق
لتنفتح بسهولة.
! ال تستخدم الخراطيم المستعملة أبدا.
16
استكشاف المشاكل وحلها
ل في العمل فجأة .قبل االتصال بمركز المساعدة التقنية (أنظر "الخدمة") تأكد من أن المشكلة ال يمكن حلها بسهولة باستخدام الجدول التالي.
المشكلة:
األسباب المحتملة /الحلول:
ال يمكن تشغيل ماكينة الغسيل.
• الجهاز غير موصل بالمقبس الكهربائي بشكل كامل ،أو أنه ال يحدث تماس.
• يوجد انقطاع كهرباء في البيت.
دورة الغسيل ال تبدأ.
•
•
•
•
ماكينة الغسيل ال تمتلئ بالماء (مؤشر إقفال الباب يومض
بسرعة).
• خرطوم دخول الماء غير متصل بالحنفية.
• الخرطوم ملتوي.
• لم يتم فتح حنفية الماء.
• يوجد انقطاع في تزويد الماء في البيت.
• الضغط منخفض أكثر مما يجب.
• أزرار بدء البرامج لم يتم ضغطها (ما زالت تومض).
ماكينة الغسيل تمتلئ بالماء وتفرغ منه بشكل متكرر.
• خرطوم التصريف غير مركب على ارتفاع يتراوح بين 65وحتى 100سم عن األرض( "انظر
التعليمات").
• الطرف الحر من الخرطوم تحت الماء (أنظر "التركيب").
• نظام التصريف الجداري غير مزود بأنبوب تنفس.
AR
GB
باب ماكينة الغسيل غير مقفل بشكل صحيح.
لم يتم الضغط على زر تشغيل/توقيف.
أزرار بدء البرامج لم يتم ضغطها (ما زالت تومض).
لم يتم فتح حنفية الماء.
إذا بقيت المشكلة حتى بعد هذه الفحوص ،أقفل حنفية الماء ،أوقف تشغيل الجهاز واتصل بمركز
المساعدة التقنية .إذا كان المسكن في أحد الطوابق العلوية من المبنى ،فمن الممكن أن تكون هناك مشاكل
متعلقة بتصريب الماء ،تسبب لماكنة الغسيل االمتالء بالماء وإفراغه بشكل متكرر .هناك صمامات
خاصة متوفرة في الحوانيت لمنع التصريف ،وهي تساعد على تحاشي هذه المشكلة.
ماكينة الغسيل ال تصرف الماء أو ال تعصر.
• خرطوم التصريف ملتوي (أنظر "التركيب").
• أنبوب التصريف مسدود.
الماكينة تهتز كثيرا خالل دورة العصر.
• براغي الحماية (المستخدمة خالل عملية الشحن) لم تتم إزالتها عند عملية التركيب .أزل البراغي
(أنظر "التركيب").
• الماكينة غير مستوية (أنظر "التركيب").
• الماكينة عالقة بين خزانات وجدران (أنظر "التركيب").
مدخل خرطوم الماء غير مثبت بشكل صحيح (أنظر "التركيب").
حجرة مواد التنظيف مسدودة (لتنظيفها ،أنظر "العناية والصيانة").
خرطوم التصريف غير مثبت في مكانه بشكل صحيح (أنظر "التركيب").
نظام صينية التنقيط ممتلئ .نظف اإلسفنجة أو بدلها (أنظر "وسائل حذر ونصائح").
يوجد تسرف في ماكينة الغسيل.
•
•
•
•
مصباح مؤشر إقفال الباب يومض بسرعة.
• قم بإيقاف تشغيل الماكينة وافصلها عن الكهرباء ،انتظر حوالي دقيقة واحدة ثم أعد تشغيلها مرة
أخرى .يجب بدء دورة الغسيل مرة أخرى من البداية.
الكثير من الرغوة.
• مواد التنظيف غير مالئمة لماكينة الغسيل (يجب أن تطابق الوصف “لماكينات الغسيل” أو “للغسيل
اليدوي وماكينات الغسيل” ،أو التعليمات المشابهة).
• تم استخدام كمية مواد تنظيف أكثر مما يجب.
11
الخدمة
قبل استدعاء المساعدة:
AR
• افحص فيما إذا كان بإمكانك حل المشكلة بنفسك (أنظر "استكشاف المشاكل وحلها")؛
• أعد تشغيل البرنامج للفحص فيما إذا تم حل المشكلة؛
• إذا لم يحدث ذلك ،اتصل بخدمة مساعدة تقنية معتمدة.
! إذا تم تركيب الماكينة أو استخدامها بشكل غير صحيح ،يمكن تحميلك مصاريف استدعاء خدمة الصيانة.
! اطلب دائما مساعدة فنّي مؤهل.
الرجاء خذ بعين االعتبار المعلومات التالية:
• نوع المشكلة؛
• طراز الجهاز ().Mod؛
• الرقم التسلسلي (.)S/N
يمكن العثور على المعلومتين األخيرتين على لوحة البيانات الموجودة على الجهاز نفسه.
18
Instruções para a utilização
MÁQUINA DE LAVAR ROUPA
Sumário
PT
Português
PT
Instalação, 50-51
Desembalar e nivelar
Ligações hidráulicas e eléctricas
Dados técnicos
Descrição da máquina, 52-53
Gaveta dos detergentes autolimpante
Painel de comandos
Sistema de balanceamento da carga
Como efectuar um ciclo de lavagem, 54
Programas de lavagem, 55
Detergentes e roupa, 56
SIXL 146
Preparar a roupa
Conselhos de lavagem
Precauções e conselhos, 57
Segurança geral
Eliminação
Economizar e respeitar o meio ambiente
Sistema recolhe gotas
Manutenção e cuidados, 58
Interromper a alimentação de água
e de corrente eléctrica
Limpar a máquina
Limpar a gaveta dos detergentes
Cuidados com a porta de vidro e o tambor
Limpar a bomba
Verificar o tubo de alimentação de água
Anomalias e soluções, 59
Assistência, 60
49
Instalação
PT
É importante guardar este livro para poder consultálo a qualquer momento. Se a máquina for vendida,
cedida ou transferida, certifique-se que este livro
permaneça com a máquina para informar o novo
proprietário acerca do seu funcionamento e das
respectivas advertências.
Leia com atenção estas instruções: há importantes
informações acerca da instalação, da utilização e da
segurança.
Um cuidadoso nivelamento dá estabilidade à máquina
e evita vibrações, ruídos e deslocamentos durante o
funcionamento. Se houver tapete ou alcatifa, regule
os pés em modo que embaixo da máquina de lavar
roupa deixe um espaço suficiente para ventilação.
Ligações hidráulicas e eléctricas
Ligação do tubo de alimentação da água
Desembalar e nivelar
Desembalar
1. Tire a máquina da embalagem.
2. Verifique se a máquina sofreu danos no transporte.
Se estiver danificada não efectue a sua ligação e
contacte o revendedor.
3. Tire os 4 parafusos de
protecção para o
transporte e a
borrachinha com o
respectivo calço,
situados na parte traseira
(veja a figura).
4. Tampe os furos com as tampas em plástico
fornecidas.
5. Guarde todas as peças: se for necessário
transportar a máquina de lavar roupa, terão de ser
montadas outra vez.
Embalagens não são brinquedos para as crianças!
Nivelamento
A máquina poderá ser muito ruidosa se os dois pés
anteriores não forem regulados correctamente.
1. Instale a máquina de lavar roupa sobre um
pavimento plano e rígido, sem encostá-la em
paredes, móveis nem outro.
2. Se o pavimento não
for perfeitamente
horizontal, para
compensar qualquer
irregularidade,
desatarraxe ou atarraxe
os pés dianteiros (veja a
figura); o ângulo de
inclinação, medido no
plano de trabalho, não
deve ultrapassar 2°.
50
A
1. Coloque a guarnição A
na ponta do tubo de
alimentação e atarraxe-o
numa torneira de água
fria com bocal de rosca
de 3/4 gás (veja a figura).
Antes de realizar esta
ligação, deixe a água
escorrer até estar límpida.
2. Ligue o tubo de
alimentação na máquina
de lavar roupa atarraxado
no apropriado
fornecimento da água,
na parte traseira, em
cima à direita (veja a
figura).
3. Tome cuidado para o tubo não estar dobrado nem
esmagado.
A pressão hídrica da torneira deve ser entre os
valores da tabela dos Dados técnicos (veja a página
ao lado).
Se o comprimento do tubo de alimentação não for
suficiente, contacte uma oficina especializada ou um
técnico autorizado.
Ligação do tubo de descarga
65 - 100 cm
Ligue o tubo de
descarga, sem dobrá-lo,
a uma conduta de
descarga ou a uma
descarga na parede
situada entre 65 e 100
cm de altura do chão;
Não empregue extensões nem fichas múltiplas.
PT
O cabo não deve ser dobrado nem apertado.
O cabo de alimentação deve ser substituído
somente por técnicos autorizados.
Atenção! O fabricante declina toda a responsabilidade
se estas regras não forem respeitadas.
ou coloque na beira de
um lavabo ou de uma
banheira, prenda na
torneira a guia fornecida
(veja a figura). A ponta
solta do tubo de
descarga não deve
permanecer imersa na
água.
É desaconselhado empregar tubos de extensão;
mas se for indispensável, a extensão deve ter o
mesmo diâmetro do tubo original e não medir mais de
150 cm de comprimento.
Dados técnicos
Ligação eléctrica
Modelo
SIXL 146
Antes de ligar a ficha na tomada eléctrica, certifiquese que:
Medidas
largura 59,5 cm.
altura 85 cm.
profundidade 53,5 cm.
a tomada tenha uma ligação à terra e esteja nos
termos da legislação;
Capacidade
de 1 a 6 kg.
Ligações
eléctricas
veja a placa das características
técnicas colocada na máquina
Ligações hídricas
pressão máxima 1 MPa (10 bars)
pressão mínima 0,05 MPa (0,5 bar)
capacidade do tambor 52 litros
Velocidade da
centrifugação
até 1400 rotações por minuto
Programas de
controlo segundo
a norma EN 60456
programa
;
realizado com carga de 6 kg.
a tomada tenha a capacidade para suportar a
carga máxima de potência da máquina, indicada
na tabela dos Dados técnicos (veja ao lado);
a tensão de alimentação esteja entre os valores
indicados na tabela dos Dados técnicos (veja ao
lado);
a tomada seja compatível com a ficha da máquina.
Se não for, substitua a tomada ou a ficha.
Esta máquina de lavar roupa não deve ser instalada
a céu aberto, nem mesmo abrigada, porque é muito
perigoso deixá-la exposta à chuva e às tempestades.
Depois de ter instalado a máquina de lavar roupa, o
acesso à tomada eléctrica deve ser fácil.
Esta aparelhagem está em
conformidade com as seguintes
Directivas Comunitárias:
- 73/23/CEE de 19/02/73 (Baixa
Tensão) e posteriores modificações
- 89/336/CEE dl 03/05/89
(Compatibilidade Electromagnética) e
posteriores modificações.
- 2002/96/CE
51
Descrição da máquina
PT
PAINEL DE
COMANDOS
PEGA DA
PORTA DE
VIDRO
PORTA
PORTA DE
ACESSO À
BOMBA DE
DESCARGA
PÉS REGULÁVEIS
Gaveta dos detergentes autolimpante
Esta máquina de lavar roupa dispõe de uma
inovadora gaveta dos detergentes autolimpante,
capaz de melhorar a qualidade da lavagem.
A gaveta está situada no interior da porta.
Recomenda-se não superar os níveis máximos
indicados na gaveta dos detergentes.
STOP
ST
OP
MAX
MAX
A
B
1. Abra a porta para alcançar a gaveta dos
detergentes (veja a figura A).
2. Deite o detergente ou o aditivo no interior dos
recipientes, sobre as grades de protecção, da
seguinte maneira:
: detergente líquido e aditivos líquidos.
Recipiente
Recipiente
: detergente em pó ou pastilhas e
aditivos em pó.
Para introduzir as pastilhas, levante a grade de
protecção na gaveta.
: amaciador.
Recipiente
Deitar os detergentes ou aditivos líquidos no recipiente
central pode causar um vazamento indesejado.
52
É possível visualizar o nível do detergente através das
janelas transparentes presentes na gaveta.
e
encontram-se os
Dentro dos recipientes
flutuadores indicadores (veja a figura B). Quando
for deitada a quantidade máxima de detergente/
amaciador, os indicadores irão subir até passar
rentes às grades de protecção dos recipientes.
Recomenda-se seguir sempre as instruções de
dosagem presentes nas embalagens dos
detergentes. Para alguns detergentes
particularmente densos sugerimos a introdução
directamente dentro do tambor e não na gaveta
dos detergentes.
Um carregamento excessivo, além dos limites máximos
indicados na máquina, pode causar um derrame de
detergente pela parte baixa da gaveta.
Um excessivo uso de detergentes não lava em modo mais
eficaz, mas contribui para poluir mais o meio ambiente.
A água utilizada durante o ciclo de lavagem removerá
o eventual excesso de detergente da gaveta. É
possível também remover manualmente a gaveta
(veja Manutenção e cuidados).
Para facilitar a dosagem dos detergentes,
recomenda-se utilizar o específico doseador fornecido
com a máquina de lavar roupas.
A capacidade máxima da gaveta corresponde a:
- detergentes líquidos: 1 1/2 doseador
- detergente em pó: 2 doseadores
- amaciador: 1 doseador
Painel de comandos
Botão
PT
LIGA/DESLIGA
Indicadores luminosos
INDICAÇÃO
DO TEMPO
DE LAVAGEM
Indicador
luminoso vermelho
PORTA
BLOQUEADA
Botão
INÍCIO
PROGRAMA
LAVAGEM
QUOTIDIANA
Botão
INÍCIO
PROGRAMA
DELICADOS
Botão LIGA/DESLIGA:
carregar para ligar ou desligar a máquina.
Com a máquina ligada, os ícones dos botões de
início do programa começam a piscar e os
indicadores do tempo de lavagem permanecem
acesos.
Para anular o ciclo, mantenha pressionado o botão
liga/desliga por pelo menos 2 segundos durante o
ciclo de lavagem.
irá piscar por alguns
O indicador luminoso
segundos enquanto a máquina efectua o
escoamento automático da água presente no tambor.
Indicador luminoso vermelho PORTA BLOQUEADA:
o indicador luminoso aceso indica que a porta está
trancada para impedir aberturas acidentais; para
evitar danos é necessário, após o fim do ciclo ou com
o ciclo em pausa, aguardar que o indicador
luminoso se desligue antes de abrir a porta. O
tempo de espera após o fim do programa de
lavagem é de aproximadamente dois minutos.
Se o indicador luminoso PORTA BLOQUEADA piscar
rapidamente, indicará uma anomalia (veja Anomalias
e soluções).
Botão
INÍCIO
PROGRAMA
ALGODÃO
BRANCOS
Botão
INÍCIO PROGRAMA
COLORIDOS MIX
ENGOMAR FÁCIL
Indicadores luminosos INDICAÇÃO DO TEMPO DE
LAVAGEM:
acendem-se progressivamente para indicar a
realização do programa de lavagem. No fim do
programa, todos os indicadores luminosos
começam a piscar.
Para maiores detalhes, veja Como efectuar um ciclo
de lavagem.
Sistema de balanceamento da carga
Antes de cada centrifugação, para evitar vibrações
excessivas da máquina e para distribuir a carga em
modo uniforme, o tambor efectua algumas rotações a
uma velocidade levemente superior àquela de
lavagem.
Se apesar das repetidas tentativas a carga ainda não
estiver perfeitamente distribuída, a máquina efectuará
a centrifugação com uma velocidade inferior àquela
prevista.
No caso de um excessivo desequilíbrio, a máquina de
lavar roupa efectuará a distribuição ao invés da
centrifugação.
As eventuais tentativas de balanceamento podem
prolongar a duração total do ciclo até um máximo de
10 minutos.
Botões INÍCIO PROGRAMA:
carregar para iniciar o programa de lavagem
seleccionado.
- botão aceso fixo: programa em curso.
- botões intermitentes: aguardando a selecção.
53
Como efectuar um ciclo
de lavagem
PT
Observação:
Depois da instalação, antes de
usar, efectue um ciclo de lavagem com detergente
.
mas sem roupa, defina o programa
1. LIGAR A MÁQUINA carregando no botão LIGA/
DESLIGA . Os ícones dos botões de INÍCIO
PROGRAMA começam a piscar e os indicadores
luminosos de INDICAÇÃO DO TEMPO DE
LAVAGEM ficam acesos fixos, indicando que a
máquina de lavar roupa está pronta para receber
instruções.
2. COLOCAR A ROUPA. Abra a porta puxando a
pega. Coloque a roupa dentro da máquina
prestando atenção para não superar a carga
máxima indicada na tabela dos programas na
página seguinte.
3. DOSAGEM DO DETERGENTE E DOS ADITIVOS
Introduza os detergentes ná gaveta colocada no
interior da porta prestando atenção para não
superar os níveis máximos indicados na superfície
da gaveta e pelos específicos flutuadores
indicadores. Para maiores detalhes, veja
Descrição da máquina.
4. FECHAR A PORTA DE VIDRO.
5. INICIAR O
PROGRAMA DE
LAVAGEM carregando
no respectivo BOTÃO
DE INÍCIO
PROGRAMA. O ícone
relativo ao programa
seleccionado fica aceso
fixo, enquanto todos os
indicadores luminosos
de indicação do tempo de lavagem desligam-se. O
indicador luminoso PORTA BLOQUEADA fica aceso
fixo para indicar o bloqueio de segurança da porta.
Para uma descrição dos programas de lavagem
disponíveis, veja Programas de lavagem.
O processo para iniciar o programa
é diferente, veja o parágrafo
DELICADOS
Delicados 30° na página seguinte.
Durante a realização do programa, os indicadores
luminosos de INDICAÇÃO DO TEMPO DE LAVAGEM
iluminam-se progressivamente em correspondência
do avanço do ciclo de lavagem.
54
O desenho ao lado
refere-se a uma situação
na qual foi efectuado
aproximadamente 50%
do ciclo.
No fim do ciclo, todos os
indicadores luminosos de
INDICAÇÃO DO TEMPO
DE LAVAGEM começam
a piscar.
6. É possível SUSPENDER O PROGRAMA DE
LAVAGEM carregando no botão de início programa
iluminado que começa a piscar. Após
aproximadamente dois minutos o indicador
luminoso PORTA BLOQUEADA irá desligar-se,
indicando que é possível abrir a porta.
No caso em que se deseje acrescentar mais
detergente, prestar atenção para o que flutuador
indicador MAX não esteja em posição elevada.
Para reiniciar o programa de lavagem feche a porta
e carregue novamente no relativo botão de início.
Para garantir a máxima segurança, no caso em
que dentro do tambor haja uma quantidade de
água tal que possa vazar para fora da máquina,
não será possível abrir a porta (o indicador
luminoso PORTA BLOQUEADA ficará aceso
mesmo depois dos dois minutos). Nesse caso é
necessário desligar a máquina carregando por
aproximadamente 2 segundos no botão LIGA/
e aguardar o escoamento automático
DESLIGA
da água.
7. FIM DO PROGRAMA
No fim do programa de lavagem, o ícone relativo
ao programa seleccionado continua aceso fixo,
enquanto todos os indicadores do tempo de
lavagem começam a piscar.
Para iniciar um novo ciclo de lavagem é necessário
desligar e ligar novamente a máquina, carregando
DUAS VEZES no botão LIGA/DESLIGA .
Programas de lavagem
Botão
Tecidos
Carga
max.
(Kg)
Temperatura
Centrifugação
(rotações por
minuto)
Duração
do ciclo
(minutos)
6
60°C
1400
145
Lavagem, enxaguamentos,
centrifugações
intermediárias e final
40°C
1000
105
Lavagem, enxaguamentos
e centrifugação delicada
30°C
600
50
30°C
não*
50
PT
Descrição do ciclo de
lavagem
ALGODÃO BRANCOS
Algodão branco
resistente
COLORIDOS MIX 40 ° / ENGOMAR FÁCIL
Algodão e sintéticos
4,5
coloridos
DELICADOS
Lã (centrifugação final
+
1,5
delicada)
Seda e cortinas (sem
+
1,5
centrifugação final)
LAVAGEM QUOTIDIANA / ENXAGUAMENTO
Algodão e sintéticos
3
30º/água
fria**
800
30
Lavagem, enxaguamentos
e centrifugação delicada
Lavagem, enxaguaduras,
descarga
Lavagem (somente se
activo o programa
“Rápido”), enxaguamentos,
centrifugação delicada.
As durações dos programas mencionadas na tabela são meramente indicativas e foram calculadas considerando uma quantidade média de carga.
*Observação: para informações sobre como excluir a centrifugação do programa delicados, veja o parágrafo Delicados
30º no fundo da página.
**Observação: para informações sobre como efectuar somente o enxaguamento com água fria de peças
precedentemente lavadas à mão, veja o parágrafo Lavagem Quotidiana / Enxaguamento no fundo da página.
ALGODÃO BRANCOS 60°
Dedicado à lavagem de todas as peças brancas de
algodão mais resistentes. A temperatura de lavagem
mais elevada consente obter os melhores resultados de
lavagem na classe A.
COLORIDOS MIX 40° / ENGOMAR FÁCIL
Com este programa pode lavar todas as peças
coloridas, tanto de algodão quanto de tecidos sintéticos.
A centrifugação é controlada atentamente durante todo
o ciclo de lavagem, de forma a reduzir a formação de
rugas nos tecidos para passar a ferro mais facilmente.
É possível lavar contemporaneamente peças de
algodão e de tecidos sintéticos.
DELICADOS 30°
Ciclo dedicado à lavagem das peças de lã, seda e de
todas as peças mais delicadas. Consideradas as
diferentes características destas peças, este
programa requer uma activação diferente dos outros:
+
CICLO DELICADOS COM CENTRIFUGAÇÃO
FINAL (para peças de lã): carregue no botão INÍCIO
. Após aproximadamente 3
PROGRAMA DELICADOS
segundos os botões INÍCIO PROGRAMA DELICADOS
e INÍCIO PROGRAMA RÁPIDO
começam a piscar.
Carregue novamente no botão INÍCIO PROGRAMA
para efectuar a lavagem, que termina
DELICADOS
com uma fase de centrifugação delicada. Este programa
prevê movimentos do tambor especialmente estudados
para remover a água em excesso dos tecidos, reduzindo o
contacto e contribuindo a proteger as suas roupas de lã.
+
CICLO DELICADOS COM EXCLUSÃO DA
CENTRIFUGAÇÃO (para peças de seda, viscosa e para
a lavagem de cortinas; não usar para a lavagem da lã):
.
carregue no botão INÍCIO PROGRAMA DELICADOS
Após aproximadamente 3 segundos os botões INÍCIO
e INÍCIO PROGRAMA
PROGRAMA DELICADOS
começam a piscar. Carregue no botão
RÁPIDO
para efectuar a
INÍCIO PROGRAMA RÁPIDO
lavagem sem a centrifugação final. No fim do ciclo, a
máquina irá descarregar automaticamente a água
presente no tambor. Aconselhamos retirar logo as
roupas da máquina de lavar no fim da lavagem para
evitar a formação excessiva de rugas.
LAVAGEM QUOTIDIANA / ENXAGUAMENTO
Com este programa é possível lavar em apenas 30
minutos as peças de algodão ou os tecidos sintéticos
pouco sujos, ou que possuam a etiqueta lavagem a
. É possível também enxaguar as peças de
30º
algodão ou sintéticas precedentemente lavadas à mão
(com exclusão de lã e seda).
Graças a sensores específicos, a máquina de lavar
roupas pode reconhecer a presença de detergente
nas peças introduzidas no tambor:
- se não houver detergente nas roupas será efectuado
o ciclo LAVAGEM QUOTIDIANA ;
- se houver detergente (roupas lavadas à mão) será
efectuado automaticamente um ciclo ENXAGUAMENTO.
GESTÃO AUTOMÁTICA DOS ENXAGUAMENTOS
A função de enxaguamento é controlada, em cada
programa, por sensores específicos. No caso de peças
com excesso de detergente no fim da lavagem, a fase
de enxaguamento será prolongada automaticamente
até a completa remoção do detergente. Nesse caso, a
duração do programa de lavagem poderá ser ligeiramente
superior ao indicado na tabela dos programas.
55
Detergentes e roupa
PT
Preparar a roupa
Divida a roupa em função:
- do tipo de tecido / do símbolo na etiqueta.
- as cores: separe as peças coloridas das brancas.
Esvazie as algibeiras e verifique se há botões
soltos.
Não ultrapasse os valores de carga máximos
indicados nos Programas de lavagem.
Quanto pesa a roupa?
1
1
1
1
1
1
1
lençol 400 - 500 g.
fronha 150 - 200 g.
toalha de mesa 400 - 500 g.
roupão 900 - 1.200 g.
toalha de rosto 150 - 250 g.
jeans 400 - 500 g.
camisa 150 - 200 g.
Conselhos de lavagem
Roupa de cama e de banho (lençóis, toalhas de
banho, roupões, etc.): utilize o programa
que garante as
ALGODÃO BRANCOS 60º
melhores prestações de lavagem na classe A. A
centrifugação intensiva consente eliminar de modo
eficaz a água em excesso.
Peças de algodão ou de tecidos sintéticos
:
coloridos, com a etiqueta lavagem a 30º
. A
utilize o programa LAVAGEM QUOTIDIANA
baixa temperatura de lavagem consente a máxima
tutela das cores. Aconselhamos a utilização de
detergente líquido.
Peças de algodão brancas (camisas, blusas,
toalhas, etc.): utilize o programa ALGODÃO
BRANCOS 60°. No caso de manchas resistentes,
é melhor pré-tratar com sabão sólido antes de
efectuar o ciclo de lavagem.
Peças de lã (blusões, cachecóis, etc.): utilize o
programa DELICADOS 30° com centrifugação final
+
. A movimentação do tambor durante a
lavagem e a fase de centrifugação delicada
reduzem o endurecimento dos tecidos. É
recomendado o emprego de detergentes
específicos para roupas de lã. Recomenda-se não
superar o nível máximo de carga.
Peças de algodão coloridas (camisas, blusas,
roupas interiores, etc.): utilize o programa
, que consente
COLORIDOS MIX 40°
maximizar as prestações de lavagem sem
danificar as cores. A fase de centrifugação,
graças à função ENGOMAR FÁCIL incorporada,
reduz a formação de rugas no fim da lavagem,
tornando a roupa mais fácil de passar.
Aconselhamos a utilização de detergente líquido.
Peças de tecidos sintéticos, brancos ou coloridos
(camisas, blusas, roupas de baixo, etc.): utilize o
. Recomenda-se
programa COLORIDOS MIX 40°
não lavar contemporaneamente peças brancas e
coloridas no mesmo ciclo de lavagem, para evitar que
eventuais perdas de cor possam depositar-se sobre
as peças brancas, manchando-as. Aconselhamos a
utilização de detergente líquido.
56
Peças de seda (camisas, roupa de baixo, etc.):
utilize o programa DELICADOS 30° com exclusão
+
. Procure não deixar por
da centrifugação
muito tempo a roupa dentro do tambor após o fim
da lavagem, para evitar a excessiva formação de
dobras.
Cortinas: utilize o programa DELICADOS 30° com
+
. Recomendaexclusão da centrifugação
se dobrá-las bem e colocá-las dentro de uma
fronha ou de um saquinho de rede. Lave-as
sozinhas prestando atenção para não superar o
nível máximo de carga.
Precauções e conselhos
Esta máquina de lavar roupa foi projectada e
fabricada em conformidade com os regulamentos
internacionais de segurança. Estas advertências são
fornecidas por razões de segurança e devem ser lidas
com atenção.
Segurança geral
Este aparelho foi projectado exclusivamente para
um uso doméstico.
Esta máquina de lavar roupa deve ser utilizada
somente por pessoas adultas e conforme as
instruções apresentadas neste livrete.
Não toque na máquina com os pés descalços nem
com as mãos ou os pés molhados ou húmidos.
Não puxe o cabo eléctrico para tirar a ficha da
tomada, pegue mesmo na ficha.
Não toque a água de descarga, que poderá
chegar a temperaturas altas.
Em nenhum caso force a porta para abri-la: poderá
danificar o mecanismo de segurança que a protege
contra aberturas acidentais.
Se houver avarias, em nenhum caso mexa nos
mecanismos internos para tentar reparar.
Verifique sempre que criança não se aproximem da
máquina a funcionar.
Durante a lavagem a porta de vidro tende a
aquecer-se.
Se for preciso deslocá-la, são precisas pelo menos
duas ou três pessoas, com a máxima atenção.
Nunca sozinho porque a máquina é muito pesada.
Antes de colocar a roupa controle que o tambor
esteja vazio.
Eliminação
Eliminação do material de embalagem:
obedeça os regulamentos locais, de maneira que
as embalagens possam ser reutilizadas.
A directiva Europeia 2002/96/CE relativa aos
resíduos de equipamentos eléctricos e electrónicos
prevê que os electrodomésticos não devem ser
eliminados no normal fluxo dos resíduos sólidos
urbanos. Os aparelhos não mais utilizados devem
ser recolhidos separadamente para optimizar a
taxa de recuperação e reciclagem dos materiais
que os compõem e impedir potenciais danos à
saúde e ao meio ambiente. O símbolo da lixeira
cancelada está indicado em todos os produtos
para lembrar o dever de colecta selectiva.
Para maiores informações sobre o correcto
desmantelamento dos electrodomésticos contactar
o serviço público especializado ou os
revendedores.
Economizar e respeitar o meio ambiente
Economizar detergente, água, energia e tempo
Para não desperdiçar recursos, é necessário utilizar
a máquina de lavar roupa com a carga máxima.
Uma carga plena em vez de duas cargas pela
metade permite economizar até 50% de energia.
Trate manchas com um produto contra manchas
ou deixe de molho antes de lavar, desta maneira
diminui a necessidade de lavar com altas
temperaturas.
Se dosear bem o detergente em função da dureza
da água, do nível de sujidade e da quantidade de
roupa, evitará desperdícios e protegerá o meio
ambiente: mesmos os detergentes biodegradáveis
contêm componentes que alteram o equilíbrio da
natureza. Além disto, evite ao máximo possível o
uso de aditivos para amaciar.
Lavar desde o fim da tarde até as primeiras horas
da manhã colabora para diminuir a carga de
absorção das empresas eléctricas.
Sistema recolhe gotas
A máquina dispõe de um sistema recolhe gotas na
parte interna da porta para capturar eventuais gotas
de água residuais no fim do ciclo.
Aconselhamos verificar periodicamente o nível de
humidade da esponja presente no interior da gaveta
recolhe gotas. Em caso de necessidade, é possível
limpá-la ou substituí-la da seguinte maneira:
1. extrair a gaveta,
exercitando uma leve
pressão na parte inferior
da mesma.
2. remover a esponja
1
presente no seu interior,
enxaguá-la com água
2
corrente e torcê-la
cuidadosamente. É
possível também substituíla com uma das esponjas de reposição fornecidas
com o produto.
3. colocar novamente a esponja dentro da gaveta.
4. montar outra vez a gaveta na porta, prestando
atenção para que as molas presentes na própria
porta se insiram correctamente nas específicas
posições na gaveta.
5. verifique que a gaveta volte correctamente para a
sua posição.
57
PT
Manutenção e cuidados
PT
Interromper a alimentação de água e
de corrente eléctrica
Cuidados com a porta de vidro e o
tambor
Feche a torneira da água depois de cada
lavagem. Desta maneira diminuiu-se o desgaste
do sistema hidráulico da máquina de lavar roupa
e elimina-se o risco de vazamento.
Deixe a porta sempre entreaberta para evitar que
se formem odores desagradáveis.
Tire a ficha da tomada eléctrica quando for limpar
a máquina de lavar roupa e durante os trabalhos
de manutenção.
Limpar a máquina
A parte externa e as peças em borracha podem ser
limpas com um pano molhado com água morna e
sabão. Não empregue solventes nem abrasivos.
Limpar a gaveta dos detergentes
Recomenda-se verificar que não haja detergentes
ou água dentro da gaveta dos detergentes antes de
extraí-la. No caso em que a gaveta não esteja
vazia, preste atenção pois o conteúdo poderia
derramar-se durante a sua remoção.
A gaveta dos detergentes desta máquina de lavar
roupa é limpa automaticamente durante os ciclos
de lavagem. Todavia é possível em raros casos que,
utilizando detergentes especiais, possam formar-se
alguns resíduos. Para limpar manualmente a gaveta
efectue as seguintes operações:
1. Abra a porta para ter
acesso à gaveta.
2. Puxe a gaveta para
cima, segurando-a pelo
recipiente central,
como indicado na
figura. Não segure a
gaveta pela grade, pois
poderia danificá-la.
3. Desmonte a
cobertura da gaveta
para ter acesso ao
recipiente, como
indicado na figura.
4. Lave a gaveta com
água corrente.
5. Monte novamente a
cobertura e insira
novamente a gaveta na
sua posição até ouvir o clique.
58
Limpar a bomba
Esta máquina de lavar roupa é equipada com uma
bomba com limpeza automática que não precisa de
operações de manutenção. Entretanto pode
acontecer que pequenos objectos (moedinhas,
botões) caiam na pré-câmara que protege a bomba,
situada na parte inferior da mesma.
Certifique-se que o ciclo de lavagem tenha
terminado e tire a ficha da tomada.
Para obter acesso à pré-câmara:
1. remova a protecção
situada na parte baixa da
máquina de lavar roupa,
girando-a no sentido
anti-horário (veja a
figura);
2. desenrosque a tampa
girando-a no sentido
anti-horário (veja a
figura). é normal que
perca um pouco de
água;
3. limpe o interior com cuidado;
4. enrosque outra vez a tampa;
5. enrosque novamente a tampa de protecção
girando-a no sentido horário tendo o cuidado de
deixar a flecha indicada na parte interna da tampa
virada para cima.
Verificar o tubo de alimentação de água
Verifique o tubo de alimentação pelo menos uma vez
por ano. Se houver rachaduras ou fendas, será
necessário substitui-lo: durante as lavagens as fortes
pressões podem provocar repentinas quebras.
Nunca utilize tubos já usados.
Anomalias e soluções
Pode acontecer que a máquina não funcione. Antes de telefonar para a Assistência Técnica (veja Assistência),
verifique se não se trata de um problema fácil de resolver com ajuda da seguinte lista.
PT
Anomalias:
Possíveis causas / Solução:
A máquina de lavar roupa não
liga.
A ficha não está colocada na tomada eléctrica, ou não o suficiente para
haver contacto.
Em casa não há corrente.
O ciclo de lavagem não inicia.
A porta de vidro não está bem fechada.
O botão LIGA/DESLIGA não foi pressionado.
Os botões INÍCIO PROGRAMA não foram pressionados (ainda estão piscando).
A torneira da água não está aberta.
A máquina não carrega água
(O indicador luminoso PORTA
BLOQUEADA pisca rapidamente).
O tubo de alimentação de água não está ligado na torneira.
O tubo está dobrado.
A torneira da água não está aberta.
Está a faltar água em casa.
Não há suficiente pressão.
Os botões INÍCIO PROGRAMA não foram pressionados (ainda estão piscando).
A máquina carrega e descarrega
água continuamente.
O tubo de descarga não está instalado entre 65 e 100 cm de altura do
chão (veja Instalação).
A ponta do tubo de descarga está imersa na água (veja Instalação).
Da descarga na parede não foi sangrado o ar.
Se depois destas verificações o problema não for resolvido, feche a torneira da
água, desligue a máquina de lavar roupa e chame a Assistência técnica. Se
residir nos últimos andares de um edifício, é possível que aconteçam
fenómenos de sifão por causa dos quais a máquina de lavar roupa carrega e
descarrega água continuamente. Para eliminar este inconveniente, há a
disposição no comércio apropriadas válvulas contra o efeito sifão.
A máquina não descarrega ou não O tubo de descarga está dobrado (veja Instalação).
realiza centrifugação.
A conduta de descarga está entupida.
A máquina de lavar roupa vibra
muito durante a centrifugação.
Os parafusos de protecção para o transporte não foram removidos no
momento da instalação. Remova os parafusos (veja Instalação).
A máquina não está nivelada (veja Instalação).
A máquina está apertada entre móveis e parede (veja Instalação).
A máquina está a perder água.
O tubo de alimentação da água não está bem enroscado (veja Instalação).
O gaveta dos detergentes está entupida (para limpá-la veja Manutenção
e cuidados).
O tubo de descarga não está bem fixado (veja Instalação).
O sistema recolhe gotas está cheio. Limpe a esponja ou substitua-a (veja
Precauções e Conselhos).
O indicador luminoso PORTA
BLOQUEADA pisca muito
rapidamente.
Desligue a máquina e tire a ficha da tomada, aguarde aproximadamente 1
minuto e volte a ligá-la. Será necessário iniciar novamente o ciclo.
Se a anomalia persistir, contacte a Assistência Técnica.
Está a formar-se demasiada
espuma.
O detergente não é específico para máquina de lavar roupa (deve haver a
escrita para máquina de lavar, à mão e para máquina de lavar ou similares).
A dose foi excessiva.
59
Assistência
195061889.01
02/2007 - Xerox Business Services
Antes de contactar a Assistência Técnica:
Verifique se consegue resolver a anomalia sozinho (veja Anomalias e soluções);
Reinicie o programa para verificar se o inconveniente foi resolvido;
Em caso negativo, contacte a Assistência Técnica autorizada;
PT
No caso de uma errada instalação ou de um uso não correcto, o pagamento do técnico poderia ficar
por conta do cliente.
Nunca recorra a técnicos não autorizados.
Comunique:
o tipo de anomalia;
o modelo da máquina (Mod.);
o número de série (S/N);
Estas informações encontram-se na placa de identificação colocada no aparelho.
60