1
Tape Help Package
Page 1 of 93
Tape Help Package
Tape Help Package
May 20, 2008
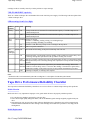
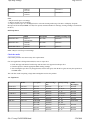
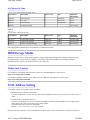
Description of the Tape Help Package contents
The Tape Help Package is a collection of System p tape drive information that is available elsewhere but is not
always easy to find or understand. This package attempts to collect the information in one area under one topic for
easier reference.
Table of Contents
Tape Help Package
z
z
z
May 20, 2008
Description of the Tape Help Package contents
Information Regarding Tape Drive Environment and Use
{ Media Grades
{ Tape Handling and Storage
{ Environmental Issues
{ Tape Drive Cleaning
{ SCSI Hardware Issues
{ Microcode Updates
System p customers
{ Summary
Tape Drive LED/LCD Information
{ 1/4" Tape Drives
150mb, 525mb, and 1.2GB 1/4" tape drives
4GB SLR5 1/4" tape drive
1/4" QIC-5010 13GB, 30GB SLR60, 50GB SLR100 tape drives:
{ 4mm Tape Drives
2GB, 4GB and 12GB 4mm tape drive:
20GB and 36GB 4mm tape drive:
80GB DAT160 tape drive(FC 5619):
24/48GB 4mm DDS2 Internal Autoloader:
7332-005 and 7332-110 4mm Autoloader:
7332-220 4mm Autoloader:
{ VXA Tape Drives
VXA-2 80GB, VXA-320 160GB Tape Drive
7212-312 VXA-2 Autoloader LCD
{ LTO Tape Drives
LTO2 200GB Half High Tape Drive(FC 1997, 5755)
LTO4 800GB Half High SAS Tape Drive(FC 5747)
{ 8mm Tape Drives
file://C:\temp\TAPEWHDR.html
5/20/2008
Tape Help Package
Page 2 of 93
2.3GB 8mm tape drive:
5GB, 7GB, 20GB and 60GB 8mm tape drives:
8mm 20GB drive ONLY
20GB and 60GB 8mm tape drive LCD messages:
DLT Tape Drives
7205-311 35GB DLT tape drive:
Left side LEDs(6)
Right side LEDs(4)
7205-440 40GB DLT tape drive:
Left side LEDs(5)
Right side LEDs(4)
7205-550 160GB DLT tape drive:
LEDs meanings from Left to Right
{
z
z
z
z
z
Tape Drive Performance/Reliability Checklist
Media Selection
Media Replacement
Media Storage
Cleaning Cartridge Selection/Usage
Environment
Troubleshooting
Tape Drive Error Information
Tape Drive Problem Determination
{ Problem Determination Steps
Cleaning the tape drive
Check the media
Microcode Level
AIX Error Log
Read Previously Written Data Cartridge
Verify mksysb table of contents
Reset the tape drive
SCSI Address
Check Connections
Check SCSI Termination
AIX Diagnostics
AIX Diagnostic Media
Slow Backup or Restore on Some Tape Drives
Placing a Service Call
{ Tape Drive Self Test
200GB LTO2 Tape Drive Internal Self Test(IST)
800GB LTO4 Tape Drive Self Test(IST)
VXA-2 and VXA-320 Tape Drive Self Test(IST)
Help Desk Guidelines
Tape Drive Interchange Information
{ rmt settings
rmt Density settings
rmt retension/rewind settings
{ Formats and Densities
{ 1/4" QIC-150(7207-001)
{ 1/4" QIC-525(7207-011)
{ 1/4" QIC-1000(7207-012)
{ 1/4" QIC-4GB SLR5(7207-122)
{ 1/4" QIC-5010 MLR1(7207-315)
{ 1/4" 30GB SLR60(7207-330)
{ 1/4" 50GB SLR100(7212-102)
{ 4mm Tape Interchange Information
file://C:\temp\TAPEWHDR.html
5/20/2008
Tape Help Package
{
{
{
{
z
z
z
Page 3 of 93
VXA Tape Interchange Format
VXA Tape Capacity
LTO Tape Interchange Format
LTO Tape Capacity
8mm Tape Interchange Information
8mm Tape drives
DLT Tape Interchange Information
IBM 7205-311 35GB
IBM 7205-440 40GB
IBM 7205-550 160GB
Tape Drive Cleaning Frequency
{ 1/4" Tape Drive Cleaning Frequency
{ 4mm Tape Drive Cleaning Frequency
{ VXA Cleaning Frequency
{ LTO Cleaning Frequency
{ 8mm Tape Drives Cleaning Frequency
{ DLT Tape Drive Cleaning Frequency
AIX Diagnostic SCSD Tape Drive Service Aid
SCSD Tape Drive Service Aid functions:
Supported Devices:
Using the program:
AIX Diagnostics Menu mode
Command mode
Sample Utape Usage:
Tape Part Numbers
{ 1/4" Part Numbers
QIC-150
QIC-525
QIC-1000
DC9250
SLR5
MLR1
SLR60
SLR100
{ 4mm Part Numbers
DDS|||| (DDS1)
DDS2
DDS3
DDS4
DAT72
DAT160
4mm Autoloader Magazine
{ VXA Part Numbers
VXA-2
VXA-320
{ LTO Part Numbers
LTO2 Ultrium 2
LTO4 Ultrium 4
{ 8mm Part Numbers
2.3GB, 5GB, and 7GB 8mm
20GB and 60GB 8mm
60GB 8mm
8mm Library Magazine.
{ DLT Part Numbers
DLT7000 and DLT8000
S-DLT
file://C:\temp\TAPEWHDR.html
5/20/2008
Tape Help Package
z
IBM Storage Media
{ Media Sales Contacts
z
SCSI Address Setting
z
Tape Drive Performance
z
Device Driver/Robotics Driver(ATAPE)
z
Tape Drive Microcode Download
z
z
Page 4 of 93
Drive Microcode Download with AIX 5.1 Diagnostics
{ AIX 5.1 Diagnostics
{ Microcode Packaging
{ Using Older Microcode Packages
{ Using AIX diagnostics
Using the AIX Diagnostics menu
Using the AIX Diagnostics via command line input.
{ Sample Dsdata file
SCSD Tape/Optical Ucode Download Utility
{ Genucode: SCSI microcode download utility for SCSD devices
Information about using Genucode
Microcode installation instructions:
{ Genucode Return Codes
Information Regarding Tape Drive Environment and Use
IBM's goal is to provide you with a product that you can configure and use reliably. Tape drives require specific
maintenance and environmental conditions to operate well over time. Using high quality, data grade media, handling and
storing this media properly, operating the tape drive in a clean environment and keeping the tape drive properly cleaned can
help you to avoid problems with your IBM tape drive.
Media Grades
IBM sells media designed to be used for data storage.
IBM supports the tape that we sell. If IBM service personnel analysis indicates a problem with non-IBM media it may be
necessary for the customer to replace the media.
Tape Handling and Storage
Most tape is supplied in a sealed cartridge. It is provided this way so that the tape will remain in a clean environment.
Opening the cartridge allows dirt and airborne particles to enter and then become a source of contamination. The cartridge
should only be opened by the tape drive and not an operator. The tape also is held under proper tension inside the cartridge.
If the cartridge is dropped, this tension will be relaxed. Inserting a dropped cartridge into a tape drive can cause incorrect
loading and result in a jam. This will ruin the tape and can cause physical damage if the cartridge is not removed properly.
When the tapes are stored, they must be replaced in their protective containers and stored on their end. The storage area
must be clean, dry, normal room temperature and away from any magnetic fields.
file://C:\temp\TAPEWHDR.html
5/20/2008
Tape Help Package
Page 5 of 93
Environmental Issues
Tape drives are designed to operate in a clean environment. Problem factors are dirt, dust, fibers and airborne particles.
Airborne particles are the most difficult to address. When a tape is installed in the tape drive, the clearance between the
heads and the tape is measured in microns. Particles can damage the tape or the head if they come in contact with either.
Customers are responsible to provide a clean operating environment for the tape drive and system.
Tape Drive Cleaning
No matter how clean the environment, debris may build up on the heads of any tape drive. Every time tape motion occurs,
some of the media surface comes off on the heads. Over time, this builds up and causes errors in reading and writing.
Customers are responsible to clean the tape drive in accordance with the cleaning information provided with the tape drive.
We only recommend that you use IBM cleaning cartridges for IBM tape drives.
Cleaning cartridges can be used a limited number of times. Once a cleaning cartridge has been used to its maximum number
of times, the cartridge is considered expired. When cartridges expire, they must be replaced. Never reuse an expired cleaning
cartridge. Doing so allows previously removed dirt to be reintroduced to the tape drive. When you have cleaned the tape
drive, mark the usage on the cartridge in order to best determine when your IBM cleaning cartridge has expired.
SCSI Hardware Issues
SCSI bus cables and terminators may affect tape drive performance. IBM cables and terminators are designed specifically to
keep the SCSI bus as free of noise as possible. Use of non-IBM cables or terminators may adversely affect the SCSI bus
performance. If IBM service personnel analysis indicates a problem with non-IBM cables, it may be necessary for the
customer to replace them with the appropriate IBM cables.
Microcode Updates
IBM constantly works to provide the best possible tape drive products. To make certain that the drives work their very best,
IBM occasionally releases changed microcode for the tape drives. When a microcode change is developed, IBM makes it
available to you through the service organization or by electronic delivery.
System p customers
Microcode changes are available from the following IBM Web site:
http://www14.software.ibm.com/webapp/set2/firmware/gjsn
Summary
Your tape drive must be installed in the cleanest possible environment. Additionally, IBM tape drives require high quality,
data grade tapes and cleaning on a regular basis. Media must also be stored and handled properly. Improper use, storage or
handling of tape drives or media may void your IBM warranty or service agreement
If a tape drive stops functioning due to a component failure during the tape drive warranty or maintenance time, IBM will
replace the tape drive unit. IBM will replace any defective tape drive under the terms and conditions of the IBM warranty or
service agreement. It is our objective to work with you to identify the cause of any tape drive problems and provide a
solution.
file://C:\temp\TAPEWHDR.html
5/20/2008
Tape Help Package
Page 6 of 93
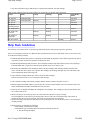
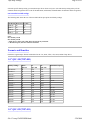
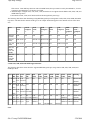
Tape Drive LED/LCD Information
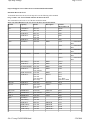
1/4" Tape Drives
150mb, 525mb, and 1.2GB 1/4" tape drives
The meaning of the LED is:
Color
Meaning
Off
One of the following conditions:
The Power-On Self Test(POST) has completed successfully, and the drive is not busy running a system
command.
z A tape is loaded and the drive is not busy running a system command.
z The drive is powered off
GREEN One of the following conditions:
z
POST is running
A tape is loaded and the drive is busy running a system command.
RED
The tape drive has detected an internal fault that requires corrective action. Internally mounted tape drives may
(AMBER require the system to be shutdown, powered off then powered on to clear the internal fault in the drive. If the
in 1.2GB condition cannot be cleared using this method, refer to your service guide or system diag- nostics for further
only)
assistance.
The AIX diagnostic command:
diag -c -d rmtx <-where x is the tape drive # will issue a reset to the tape drive if AIX is able to communicate
with the drive.
z
z
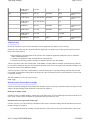
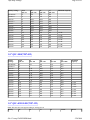
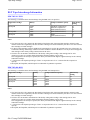
4GB SLR5 1/4" tape drive
The meaning of the LED is:
Color Meaning
Off
One of the following conditions:
The Power-On Self Test(POST) has completed successfully, and the drive is not busy running a system
command.
z A tape is loaded and the drive is not busy running a system command.
z The drive is powered off
GREEN One of the following conditions:
z
POST is running
A tape is loaded and the drive is busy running a system command.
AMBER One of the following conditions:
z
z
z
z
The tape drive has detected an internal fault that requires corrective action. Internally mounted tape drives
may require the system to be shutdown, powered off then powered on to clear the internal fault in the
drive. If the condition cannot be cleared using this method, refer to your service guide or system diagnostics for further assistance.
The AIX diagnostic command:
diag -c -d rmtx <-where x is the tape drive # will issue a reset to the tape drive if AIX is able to
communicate with the drive.
The LED will flash when the cleaning cartridge
has expired. Replace the cleaning cartridge
file://C:\temp\TAPEWHDR.html
5/20/2008
Tape Help Package
z
z
Page 7 of 93
The LED will flash when the cleaning cartridge when a tape runs off the end of the cartridge or breaks.
Replace the data cartridge
The tape drive has detected an internal fault that requires corrective action. Power OFF then ON the tape
drive to clear the internal fault in the drive.
If the condition cannot be cleared using this method, refer to your service guide or system diagnostics for
further assistance.
The AIX diagnostic command:
diag -c -d rmtx <-where x is the tape drive # will issue a reset to the tape drive if AIX is able to
communicate with the drive.
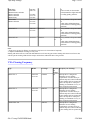
1/4" QIC-5010 13GB, 30GB SLR60, 50GB SLR100 tape drives:
LED's description are from left to right. The meaning of the LED's are:
Green
Green
Amber
Meaning
Ready(tape Reading or Disturbance
loaded)
Writing
On*
On*
On*
The Power-On Self Test(POST) is running
Flashing
Off
Off
The Power-On Self Test(POST) is running with the Diagnostic tape inserted.
Off
Off
Off
One of the following conditions:
The power is Off
The POST has completed successfully, but no tape cartridge has been inserted.
A tape cartridge has been inserted and the drive is ready to receive commands from
the system.
One of the following conditions:
z
z
On
Off
**
On
Flashing
**
A tape cartridge has been inserted and the tape drive is busy running a device
command.
z The tape drive is performing a tape load/unload operation,
The "tape path needs cleaning"(refer to the tape drive cleaning instructions).
The tape drive is in a cleaning operation. Note: Once the tape drive recognizes that a
cleaning cartridge has been inserted the tape drive will turn On the "tape path needs
cleaning" LED even if it was Off previously. The "tape path needs cleaning" LED
will stay On until a successful cleaning operation has been done.
If cleaning is attempted with a used up cleaning cartridge NO cleaning will be done
and the "tape path needs cleaning" LED will be left On even if it was Off prior to
attempting to clean the drive.
To turn Off the "tape drive needs cleaning" LED a cleaning cartridge that has NOT
reached the end of its useful life must be used to clean the drive.
The tape drive has detected an internal fault that requires corrective action. Reset the
drive by pressing the blue Eject button. If this does not clear the condition, power the
drive off then back on. Internally mounted tape drives may require the system to be
shutdown, powered off then powered on to clear the internal fault in the drive. If the
condition cannot be cleared using this method, refer to your service guide or system
diagnostics for further assistance.
The AIX diagnostic command:
diag -c -d rmtx <-where x is the tape drive# will issue a reset to the tape drive if AIX
is able to communicate with the drive.
z
***
Off
***
Flashing
On
On
Off
Off
Flashing
Note: Where:
* is On for approximately 2 seconds at POST
** is On or Off
*** is On, Off, or Flashing
file://C:\temp\TAPEWHDR.html
5/20/2008
Tape Help Package
Page 8 of 93
4mm Tape Drives
2GB, 4GB and 12GB 4mm tape drive:
LED's description are from left to right. The meaning of the LEDs are:
Green
Green
Amber
Meaning
Ready(tape Reading or Disturbance
loaded)
Writing
*
*
On
One of the following conditions:
The tape path needs cleaning(refer to the tape drive cleaning instructions).
A cleaning cartridge has been inserted and the cleaning cartridge has exceeded
the maximum number of cleanings for the cleaning cartridge.
The Power-On Self Test(POST) is running
The Power-On Self Test(POST) is running or the Diagnostic tape is running
One of the following conditions:
z
z
On
Flashing
Off
On
Off
Off
On
Off
Off
On
Off
Off
On
Flashing
Off
The power is Off
The POST has completed successfully, but no tape cartridge has been inserted.
A tape cartridge has been inserted and the drive is ready to receive commands from
the system.
One of the following conditions:
Flashing
A tape cartridge has been inserted and the tape drive is busy running a device
command.
z The tape drive is performing a tape load/unload operation,
z The tape drive is in a cleaning operation.
One of the following conditions:
z
z
z
*
*
z
z
z
z
The drive is unable to write to the tape cartridge
A Diagnostic cartridge has been inserted and the Diagnostic cartridge has
exceeded the maximum number of usage allowed(50).
The tape drive has detected an internal fault that requires corrective action.
Reset the drive by pressing the blue Eject button. If this does not clear the
condition, power the drive off then back on. Internally mounted tape drives
may require the system to be shutdown, powered off then powered on to clear
the internal fault in the drive. If the condition cannot be cleared using this
method, refer to your service guide or system diagnostics for further
assistance.
The AIX diagnostic command:
diag -c -d rmtx <-where x is the tape drive#
will issue a reset to the tape drive if AIX is able to communicate with the
drive.
A manual microcode download was attempted and failed. Power the drive off
and then back on to clear this condition.
Note: Where
* is On, Off, or Flashing
20GB and 36GB 4mm tape drive:
LED's description are from left to right. The meaning of the LEDs are:
Green
Green
Amber
Meaning
Ready(tape Reading or Disturbance
loaded)
Writing
file://C:\temp\TAPEWHDR.html
5/20/2008
Tape Help Package
*
*
Page 9 of 93
On
One of the following conditions:
Off
Off
The tape path needs cleaning(refer to the tape drive cleaning instructions).
A cleaning cartridge has been inserted and the cleaning cartridge has exceeded
the maximum number of cleanings for the cleaning cartridge.
The Power-On Self Test(POST) is running
One of the following conditions:
z
z
Flashing
Off
Off
Off
The power is Off
The POST has completed successfully, but no tape cartridge has been inserted.
A tape cartridge has been inserted and the drive is ready to receive commands from
the system.
One of the following conditions:
z
z
On
Off
**
On
Flashing
Off
z
z
A tape cartridge has been inserted and the tape drive is busy running a device
command.
The tape drive is performing a tape load/unload operation,
The tape drive is in a cleaning operation.
One of the following conditions:
z
*
*
Flashing
z
z
The tape drive has detected an internal fault that requires corrective action.
Reset the drive by pressing the blue Eject button. If this does not clear the
condition, power the drive off then back on.
If the condition cannot be cleared using this method, refer to your service
guide or system diagnostics for further assistance.
The AIX diagnostic command:
diag -c -d rmtx <-where x is the tape drive#
will issue a reset to the tape drive if AIX is able to communicate with the
drive.
A manual microcode download was attempted and failed. Power the drive off
and then back on to clear this condition.
Note: Where
* is On, Off, or Flashing
80GB DAT160 tape drive(FC 5619):
LED's description are from left to right. The meaning of the LEDs are:
Activity
Power on LED test(2.0 Seconds)
Power on self-test (POST) activity
POST Failed
POST Passed
Data Cartridge Loading
Data Cartridge Loaded, no activity
Data Cartridge Loaded, activity
file://C:\temp\TAPEWHDR.html
Amber
Cleaning
Required
On
Off
Off
On(1) or
Off
On(1) or
Off
On(1) or
Off
Amber
Media
Fault
On
Off
Off
Off
Amber
Drive
Fault
On
Off
Flashing
Off
Green
Ready/Activity
Off
Off
Flashing
On
Flashing
Off
Off
On(2) or Flashing On
Off
(3) or
Off
On(1) or On(2) or Flashing Flashing
5/20/2008
Tape Help Package
Page 10 of 93
Off
Data Cartridge Unloading
Data Cartridge Ejected
Cleaning Cartidge Loaded, Activity
Cleaning Succeeded, Cleaning Cartridge Ejected
Cleaning Failed, Cleaning Cartridge Ejected
Unrecoverable Drive Failure(4)
Unrecoverable Media Failure(4)
Firmware Download: Download and reprogram
Firmware Download: Possible Unload (See Data Cartridge Unloading)
Firmware Download: Reset in 1 second.
Firmware Download: Self Test (See Power on Self-Test Activity, and then
see either POST Passed or POST Failed.)
Firmware Download: Reprogram Failure
SCSI diagnostic test in progress (See Data Cartidge Loaded, Activity)
SCSI diagnostic test passed (See Data Cartidge Loaded, No Activity)
Scsi diagnostics test failed, tape ejected (After Data Cartridge Ejects, see
Data Cartridge Ejected.
Tape Diagnostics in Progress (See Data Cartrtridge Loaded and then:)
Tape Diagnostics in Passed, Tape Ejected (After Data Cartidge ejects, see
Data Cartridge Ejected.
Tape Diagnostics in Failed, Tape Ejected (After Data Cartidge ejects, see
Data Cartridge Ejected.
Off
(3) or
Off
On(1) or On(2) or Flashing
Off
Off
(3) or
Off
On(1) or On(2) or Flashing
Off
Off
(3) or
Off
On
Off
Flashing
(3) or
Off
Off
Off
Flashing
(3) or
Off
On(1)
On
Flashing
(3) or
Off
On(1)
On
Flashing
On(1)
On
Off
Flashing
Off
Flashing
Off
Off
Flashing Off
Off
Flashing
Flashing, On,
or Off
Flashing
On
On
On
On
Off
Off
Flashing Off
On
On
On
Flashing
Flashing Off
Off
Off
Off
Off
Flashing
Flashing
On
On
Flashing
On
Note:
1. A solid amber Cleaning LED indicates that the drive needs cleaning. The drive will continue to function but needs
cleaning as soon as possible. Do not ignore the indicator by cycling the power to turn it off.
2. The media has reached the end of its useful life and should be replaced. Any data should be copied to a new cartridge
as soon as possible.
3. Flashing in this state indicates a problem with write/read performance.
4. An unrecoverable drive failure is an error condition that results in the drive not being able to function unless initiator,
operator, or service intervention is applied.
An unrecoverable drive failure is usually the result of a hardware error condition.
One of the following actions is needed to clear the flashing fault LED:
{ Hard SCSI reset
{ Cartridge emergency eject
{ Power cycle
{ Retry firmware download
An unrecoverable media failure is usually the result of a defective cartridge, media, or cartridge state, and will require
the drive to eject the cartridge (if possible) to clear the On LED.
file://C:\temp\TAPEWHDR.html
5/20/2008
Tape Help Package
Page 11 of 93
* is On, Off, or Flashing
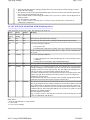
24/48GB 4mm DDS2 Internal Autoloader:
LCD description information for the 24/48GB 4mm DDS2 Internal Autoloader.
Feature Code
6153
6137
Description
Horizontal mount
Vertical
mount
The following table lists some of the error messages you might encounter. Also provide are descriptions of the messages and
suggested courses of action. These messages appear on the LCD. Messages longer than 10 characters scroll across the LCD.
Table 1. DDS2 Internal Autoloader
Message
Meaning
At BOT
A SPACE command encountered Beginning of
Data(BOD) unexpectedly.
At EOD
A Read or Space command encountered End of
Data(EOD) area unexpectedly.
Tape has DC Data
A Read command has encountered compressed
data on the tape, and the drive is not currently
set up to decompress data.
SCSI Error
A SCSI command error has been detected.
Partition1 Too large
Tape Full
Bad Media
Cannot Write NonMRS Tape
Clean Me
Close Door
Eject Fail
Error x
Force Eject
FW DataErr
A command to format the tape has failed
because the requested size for partition 1 is too
large.
A Read, Space, Write, or Write Filemarks
command encountered End of Partition(EOP)
unexpectedly.
A Read or Space command has failed because
the tape is not in DDS format.
Recommended Action
Retry the backup/restore operation.
Retry the backup/restore operation.
Make sure the configuration switches are set
correctly.
Check the SCSI bus connection and then retry
the backup/restore operation.
Retry the backup operation using a 120 meter
tape.
Retry backup operation with a longer or new
tape.
Replace tape with a Media Recognition
Supported(MRS) Data Grade DDS1, or DDS2
tape. Then retry the operation.
A Write, Write Filemark or Erase command has Replace the tape with DDS-Certified tape, then
been attempted on a non-MRS tape.
retry operation.
A high error rate has been detected while
Insert a cleaning cartridge to clean the tape
reading or writing.
heads, then retry the operation.
The front panel door is open. Any autoloader
Close the door.
motion will be delayed until the door is closed.
An Eject command has failed.
Press the Eject button for 5 seconds(Forced
Eject) to recover the cartridge and magazine.
Try turning the power off and then back on.
Check that labels are correctly affixed to the
magazine and cartridge.
The mechanism has jammed.
Press the Eject button for 5 seconds(Forced
Eject) to recover the cartridge and magazine.
Try turning the power off and then back on.
Check that labels are correctly affixed to the
magazine and cartridge. If the problem persists,
call for service.
A forced ejection is in operation.
Wait for the 35-second pause to elapse.
The Autoloader has failed to upgrade the drive Obtain a good copy of the firmware upgrade.
firmware because the new firmware is
unreliable.
file://C:\temp\TAPEWHDR.html
5/20/2008
Tape Help Package
FW Read Fail
FW Tape Write
Protected
Illegal FW
Illegal HW
Load Fail
No EODmark
Read Fail
Try again
Tape Position Lost
Tape Stuck
UpgradeErr
Worn Media.
Write Fail
Write Protected Tape
Drive Comms Error
FRU 1 Dead
FRU 2 Dead
Page 12 of 93
A firmware upgrade failed because of an error
in reading data from the tape.
A firmware upgrade failed because the tape is
write-protected.
The Autoloader has failed to upgrade the drive
firmware because the new firmware is
incompatible with the hardware.
The Autoloader has failed to upgrade the drive
firmware because the new firmware is
incompatible with the hardware.
A Load command has failed, or a Load
Partitions or Change Partitions command has
failed to read the System area of the tape.
A Read command has encountered blank tape:
that is, no DDS-format End of Data(EOD)
pattern has been recognized.
A Read command has failed.
The cartridge in the drive is faulty, possibly
because the tape has snapped, or the cartridge
has an invalid pattern of identification holes.
A Write, Read, Space, or Rewind command has
failed. The tape is on the far side of the bad
data.
The cartridge is stuck in the drive.
The Autoloader has failed to download an
upgrade of the firmware via SCSI.
A high error rate was detected while writing.
The tape probably is nearing the end of its
useful life.
A Write, Write Filemark, or Erase command has
failed.
A Write, Write Filemark or Erase command was
attempted on a write-protected tape.
The drive is not communicating with the
changer mechanism.
The controller board for the drive has failed its
self-test.
The drive mechanism has failed the self-test.
Clean the tape heads, then retry operation.
Change the write-protect switch on the tape and
retry the operation.
Obtain a correct version of the firmware
upgrade, then retry operation
Obtain a correct version of the firmware
upgrade, then retry operation
Retry the operation with another tape.
Clean the tape heads, then retry the operation.
Retry the operation with a new cartridge.
Clean the tape heads, then retry backup/restore
operation.
Try forcing an ejection.
Check the SCSI bus connection, then retry the
operation.
Clean the tape heads and/or replace the cartridge
with a new one. then retry the operation.
Clean the tape heads/or use a new cartridge.
Then retry the backup operation.
Change the write-protect switch on the tape and
retry the operation.
Call for Service.
Call for Service.
Call for Service.
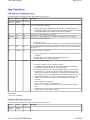
7332-005 and 7332-110 4mm Autoloader:
LED's description are from left to right. The meaning of the 4 LEDs and the 2 buttons are:
Table 2. Top Row
Green LED - Ready Amber LED (Tape Loaded)
Disturbance
Meaning
Table 3. Bottom Row
Green LED - Read- Green LED - Write
Write activity
protected
file://C:\temp\TAPEWHDR.html
Blue Button - Open/Close, used to eject the current loaded tape
cartridge and remove the magazine.
Ivory Button - Step, used to manually select any tape cartridge in the
magazine.
5/20/2008
Tape Help Package
Ready
On/Off
Page 13 of 93
Read/Write Disturbance Write
Protected
*
On
On/Off
Meaning
One of the following:
Tape Path needs cleaning.
A cleaning cartridge has been inserted and the cleaning
cartridge has exceeded the maximum number of cleanings for
the cleaning cartridge.
The Power-On Self Test(POST) is running or the Diagnostic test
tape is running.
One of the following conditions:
z
z
Flashing
Off
Off
Off
Off
Off
Off
Off
Power is Off
The Post has completed successfully, but no tape cartridge
has been inserted.
A data cartridge has been loaded and the 7332-005 is ready to
receive commands from the system
A data cartridge has been loaded and is in motion. Or a cleaning
operation is taking place.
Autoloader has detected a fault:
z
z
On
Off
Off
On/Off
On
Flashing
Off
On/Off
Off
Off
Flashing
Off
z
z
z
Tape cartridge failure
Diagnostic cartridge has exceeded its 50 usages.
Tape drive internal fault
Note: Where
* is Off, or Flashing
Table 4. 8-digit alphanumeric LED display information:
Displayed
Meaning
______
Data gauge, Alternatively displayed with READ or WRITE to show the position of the tape in the
tape cartridge.
0 TAPE
Alternatively displayed with CHK MAG to indicate 0 tapes in the magazine.
n TAPE
Displayed 2 seconds after magazine is mounted and scanned.
CHK MAG
The tape cartridge is not correctly inserted in the magazine.
CLEAN
A cleaning cycle, tape cartridge loaded manually.
CLEAN n
A cleaning cycle, tape cartridge loaded from magazine.
CLOSING
The drawer is closing.
DISMOUNT
The magazine is ready to be dismounted.
END MAG
The end of the magazine has been reached in sequential mode.
EJECT
Ejecting a manually loaded tape cartridge.
EJECT n
Ejecting a tape cartridge to slot n.
EJECTING
Ejecting a magazine to the dismount position
ERASE
Erasing a manually loaded tape cartridge.
ERASE n
Erasing a tape cartridge from slot n.
ERROR n
Indicates a loader mechanism error.
LOAD
Loading a manually loaded tape cartridge
LOAD n
Loading a tape cartridge from slot n.
OPENING
The drawer is opening.
file://C:\temp\TAPEWHDR.html
5/20/2008
Tape Help Package
OPERATOR
READ
READ n
READY
READY n
REWIND
REWIND n
SCANNING
SEARCH
SEARCH n
SEL n
SEL SLOT
SLOT n
WRITE
WRITE n
Page 14 of 93
No Magazine, operation action is required.
The autoloader is reading a manually loaded tape cartridge
The autoloader is reading tape cartridge from slot n.
The autoloader is ready with a manually loaded tape cartridge.
The autoloader is ready with a tape cartridge from slot n.
Rewind operation on a manually loaded tape cartridge.
Rewind operation on a tape cartridge from slot n.
The magazine is being scanned
Search operation on a manually loaded tape cartridge.
Search operation on a tape cartridge from slot n.
Indicates which slot is being selected by the pushbutton.
Display when a magazine is present but the autoloader does not have a tape cartridge.
Alternative displayed with CHK MAG to indicate a slot with incorrectly inserted tape cartridge.
The autoloader is writing a manually loaded tape cartridge
The autoloader is writing tape cartridge from slot n.
Note: n represents a digit from 1 to 12.
7332-005 Autoloader Error Codes
The following error codes can appear on the 8-digit LED display of the 7332-005 Tape Cartridge Autoloader.
Table 5. Autoloader Error Codes
Error Description
Code
10
Magazine Failure
11
Magazine Failure
20
Magazine Failed to Eject
30
Magazine Position Failure
31
Magazine Position Failure
40
Cartridge Insertion Failure
41
Cartridge Insertion Failure
42
Cartridge Insertion Failure
50
Cartridge Ejection Failure
51
Cartridge Ejection Failure
52
Cartridge Ejection Failure
60
Drawer Closing Failure
61
Drawer Opening Failure
file://C:\temp\TAPEWHDR.html
Cause
Recommended Action
Stuck tape cartridge or tape cartridge
improperly inserted.
Stuck tape cartridge or tape cartridge
improperly inserted.
Stuck tape cartridge or tape cartridge
improperly inserted.
Stuck tape cartridge or tape cartridge
improperly inserted.
Stuck tape cartridge or tape cartridge
improperly inserted.
Cartridge or autoloader failure trying
to load cartridge.
Cartridge or autoloader failure trying
to load cartridge.
Cartridge or autoloader failure trying
to load cartridge.
Cartridge or autoloader failure trying
to eject cartridge.
Cartridge or autoloader failure trying
to eject cartridge.
Cartridge or autoloader failure trying
to eject cartridge.
Interference with magazine drawer
closing properly.
Interference with magazine drawer
Clean magazine rollers
Clean magazine rollers
Clean magazine rollers
Clean magazine rollers
Clean magazine rollers
Clean tape cartridge insertion rollers
Clean tape cartridge insertion rollers
Clean tape cartridge insertion rollers
Clean tape cartridge insertion rollers
Clean tape cartridge insertion rollers
Clean tape cartridge insertion rollers
Clear obstruction.
Clear obstruction.
5/20/2008
Tape Help Package
Page 15 of 93
70
Magazine Position Unknown
B2
Magazine Scanning Failure
B3
Magazine Position Failure
F0
Power-on Failure
opening properly.
Position of magazine changed due to
shock or vibration.
Stuck tape cartridge or tape cartridge
improperly inserted.
Stuck tape cartridge or tape cartridge
improperly inserted.
Cartridge stuck or magazine locked
up when powering on the autoloader.
Recycle power to the autoloader.
Replace drive due to faulty sensor.
Clean the magazine rollers.
Clean the magazine rollers.
Recycle power to the autoloader.
7332-220 4mm Autoloader:
The informational area of the autoloader contains 2 information areas, LEDs and a multifunctional LCD.
LED's description are from top to bottom:
Green Green - Amber Meaning
Ready
Tape
Disturbance
(Magazine and
Loaded) Tape
Activity
*
*
On
One of the following conditions:
Flashing
Off
Off
Off
Off
Off
The tape path needs cleaning(refer to the tape drive cleaning instructions).
A cleaning cartridge has been inserted and the cleaning cartridge has exceeded
the maximum number of cleanings for the cleaning cartridge.
The Power-On Self Test(POST) is running
OR
A magazine is being installed, checked or ejected.
One of the following conditions:
Off
*
Flashing Off
The power is Off
The POST has completed successfully, but no tape cartridge has been inserted.
A magazine has been installed.
One of the following conditions:
z
z
z
z
On
On
A tape cartridge has been inserted and the tape drive is busy running a device
command.
z The tape drive is performing a tape load/unload operation,
z The tape drive is in a cleaning operation.
A tape cartridge has been inserted and the drive is ready to receive commands from the
system.
One of the following conditions:
z
On
On
*
*
*
Flashing
z
z
The tape drive has detected an internal fault that requires corrective action. Reset
the drive by pressing the blue Eject button. If this does not clear the condition,
power the drive off then back on.
If the condition cannot be cleared using this method, refer to your service guide
or system diagnostics for further assistance.
The AIX diagnostic command:
diag -c -d rmtx <-where x is the tape drive#
will issue a reset to the tape drive if AIX is able to communicate with the drive.
A manual microcode download was attempted and failed. Power the drive off
and then back on to clear this condition.
Note: Where
file://C:\temp\TAPEWHDR.html
5/20/2008
Tape Help Package
Page 16 of 93
* is On, Off, or Flashing
LCD Meaning:
The Liquid Crystal Display(LCD) has five(5) display regions that provide information about the autoloader:
z
z
z
z
z
The 10-character dot matrix display provides information on the autoloader operating status and potential error
conditions.
The 7-segment display shows the number of current cartridge loaded in the drive, or the cartridge selected whey you
press the Select button repeatedly.
DC (Data Compression) and WP (Write-Protected) in the center of the LCD indicate when data compression is being
used for writing, and if the cartridge is write-protected.
The six(6) numbered boxes on the right of the LCD are individually lit to show which magazine slot contain a
cartridge.
The "Odometer" lines appear at the bottom of the LCD. These lines show how much tape has been used. The more
lines shown, the more tape has been used.
LCD Message Categories
There are three(3) LCD message categories:
z
S - Status Information
z
I - Informational Message
z
E - Error information
Each message in the following chart is categorized by these three(3) categories in the Type section of the chart.
The OAR section of the chart indicates the state of the Operator Attention LED(AMBER LED):
z
z
On
Flashing
LCD 4 Digit Codes
Table 6. LCD Messages
LCD
Numeric Type OAR Meaning
Message Code
At BOT 1019
E
F
A SPACE command encountered at the Beginning of Data(BOD) unexpectedly. The
tape is now positioned at BOD.
At EOT 1018
E
F
A READ or SPACE command encountered at the End of Data(EOD) unexpectedly. The
tape is now positioned at EOD.
Bad
8014
E
F
A READ or SPACE command has failed because the tape is not in DDS format.
Media
Action: Unload the tape and us a DDS2, DDS3, or DDS4 tape.
Cannot
8021
E
F
A WRITE, WRITE FILEMARK or ERASE command has been attempted on a nonWrite
DDS tape.
Non-MRS
Tape
Action: Unload the tape and us a DDS2, DDS3, or DDS4 tape.
Clean
8009
E
O
Cleaning Failed, possibly due to an expired cleaning tape.
Fail:
Check
Action: Use a new Cleaning Cartridge.
Cleaning
Tape
Clean Me 2001
E
O
The 7332 requires cleaning.
file://C:\temp\TAPEWHDR.html
5/20/2008
Tape Help Package
Page 17 of 93
Action: Use a Cleaning Cartridge to clean the drive.
Cleaning 1008
Close
2006
Door
Drive
8002
Comms
Error
Eject Fail 8004
Eject Mag 2010
Erase
1015
Error X
8000
S
E
F
A Cleaning Cartridge has been inserted into the drive and cleaning is being done.
The front panel door is open. Any Autoloader motion will be delayed.
E
F
Action: Close the front panel door.
The drive has stopped communicating with the changer mechanism.
E
F
I
S
E
F
An eject command has failed, either after you pressed the Eject button or after a host
command.
Action: Use a new cartridge, or try forcing an eject. To force an eject hold the eject
button for 5 seconds. For a detail of the forced eject refer to "Emergency Ejection" in
the 7332-220 Setup and operator guide.
This is displayed when you press the Eject button.
The drive is erasing data from the tape.
The mechanism has jammed.
Error: No
tape in
slot 1
Error:
Unable to
boot from
tape
Forced
Eject
Format
FW
Check
FW Data
Err
4003
I
Action: Press the Eject button to attempt to recover the cartridge. If this fails, power the
drive OFF then ON again.
The autoloader requires a cartridge is slot 1.
4001
I
The tape drive cannot boot from Autoloader control tape.
1023
I
A forced ejection is in progress.
1014
3002
S
S
A SCSI command to generate a tape is being processed.
Firmware upgrade data is being checked for compatibility.
8024
E
FW
Program
FW Tape
FW
Upgrade
FW Read
Fail
3003
S
Action: Obtain a good copy of the firmware upgrade.
The drive is being upgraded with the new firmware.
3005
3001
S
S
The cartridge loaded in the drive mechanism is a firmware upgrade tape.
Firmware upgrade data is being read either through a tape or the SCSI bus.
8025
E
FW Tape 8027
Write
Protected
E
FW Write 8026
Fail
E
Insert
Mag
S
2002
F
The autoloader has failed to upgrade the drive firmware, because the new firmware is
corrupt.
F
A firmware upgrade failed because of an error in reading data from the tape.
F
Action: Try again
A firmware upgrade failed because the tape is write protected.
F
Action: Change the write protect tab on the tape and try again
A firmware upgrade failed because of an error in writing a modified upgrade count to
the tape.
Action: Try again
The autoloader is waiting for you to insert a magazine.
file://C:\temp\TAPEWHDR.html
5/20/2008
Tape Help Package
Language
Page 18 of 93
I
Available languages will be displayed
Load Fail: 8003
Try New
Tape
E
F
Action: The text on the 8mm Tape Drive LCD is available in several languages. To
change the language:
Press and hold the unload button after you turn the power on to the 8mm Tape Drive or,
if your system unit is already running, press and hold the unload button for
approximately 15 seconds until the LCD displays "RESET".
Release the unload button for approximately one second.
Then press and hold the unload button again.
After the LCD cycles through all the reset messages it cycles through the available
languages. When the desired language displays, release the unload button.
The "Language" prompt appears after the "SCSI ID" message, followed by a list of the
languages in a slow scrolling sequence. When the desired language appears on the
display, release the unload button. The drive RESETS again, even if it is the same
language, and begins with the new/same language.
English
Francais
Deutsch
Espanol
Italiano
Portugues
A load command has failed to read the System area of the tape.
Load Fail: 8007
Press
Eject
E
F
Action: Use a new cartridge.
A load command has failed, or a load or change partitions command has failed to read
the System area of the tape.
Load
Lock
Load
Tape
Loading
1021
I
Action: Press the eject button.
Manual loading is locked. Prevent Media Removal is in operation. displayed.
2009
I
This is displayed when you press the Load Tape Button.
1003
S
Locate
Mag
Check
Mag Eject
Mag
Loaded
Media
Removal
Prevented
1016
1002
S
S
Either a cartridge is being moved from the magazine and placed into the drive
mechanism, or the drive is loading a cartridge.
The drive is moving the tape to point specified by the host.
The autoloader is examining the magazine to find which slots are occupied.
1001
1006
S
S
The autoloader is ejecting the magazine.
A magazine is present in the autoloader and the magazine check has been carried out.
8005
E
New
FW!!!!
No EOD
Mark
Press
Eject
Read Fail
Rewind
SCSI
3004
S
8016
E
2007
I
8012
1013
8020
E
S
E
F
An eject command has been attempted when Media Removal Prevention is in force.
Action: Try again when the Media Removal Prevention has been removed. This can be
achieved by the host sending a SCSI Allow Medium Removal command, or by resetting
the autoloader, or cycling the power OFF then ON again.
The firmware upgrade process has been successfully completed.
F
The drive is trying to read what appears to be a blank tape (one with no DDS-Format
EOD pattern). This is probably a result of a power failure while writing the tape.
Press the Eject Button.
F
A READ has failed. The host should reposition and try again.
The drive is rewinding the tape.
A SCSI command error has been detected.
R
file://C:\temp\TAPEWHDR.html
5/20/2008
Tape Help Package
Page 19 of 93
Error
Search << 1012
Action: Check the SCSI interface connection and try again.
The drive is searching for a record, filemark, setmark, or Beginning of Data(BOD)
toward the beginning of the tape.
The drive is searching for a record, filemark, setmark, or End of Data(EOD) toward the
end of the tape.
Tape selection is locked. SCSI Prevent Medium Removal is in operation.
S
Search >> 1011
S
Select
Lock
Select
Tape
Self Test
Semi
Loaded
Stray
Tape:
Insert
Empty
Mag
Tape
Fault
1022
I
2008
I
0000
1007
S
S
This is displayed when you press the Select button, and for a short time after the button
is released.
The autoloader is preforming its power-on self-test.
A cartridge is in the drive but not loaded.
2003
I
There is a cartridge in the autoloader but there is no magazine present to put it into.
Action: Insert an empty magazine to retrieve the cartridge.
8006
E
F
Tape Full 1024
E
F
Tape has
DC data
E
F
Tape
Position
Lost
Tape
Stuck
8019
Action: Use a new cartridge and insure it is a DDS2, DDS3, or DDS4 cartridge.
A READ, SPACE, WRITE, or WRITE Filemark command encountered End Of Tape
(EOT) unexpectedly. When reading this may mean the required data is on the next
cartridge.
A READ command has encountered compressed data on the tape, and the drive is not
currently configured to decompress data. The host may have disabled data compression.
8013
E
F
Action: Check that the host has not disabled data compression.
A WRITE, READ, SPACE, or REWIND command has failed to complete. The Tape is
positioned on the far side of the bad data.
8008
E
F
The cartridge is stuck in the drive.
Unable to 4002
boot
Cleaning
tape
Unloading 1004
I
Upgrade
Err
E
Worn
Media
The cartridge in the drive is faulty, possibly because the tape has snapped, or the
cartridge has an invalid pattern of identification holes.
8022
8015
Write x.y 1010
Action: Try forcing an eject. To force an eject hold the eject button for 5 seconds. For a
detail of the forced eject refer to "Emergency Ejection" in the 7332-220 Setup and
operator guide.
The system cannot boot from a cleaning tape.
S
E
S
F
O
Either the drive is unloading a cartridge, or a cartridge is being ejected from the drive
and replaced in the magazine.
The autoloader has failed to download an upgrade of the firmware via SCSI.
Action: Check the SCSI connection and try again.
A high error rate has been detected while writing, suggesting that the tape is nearing the
end of its useful life.
Action: Copy any data you wish to keep from the cartridge onto a new cartridge and
discard the old cartridge.
The drive is writing data to the tape. x.y:1 is the cumulative compression ration since
power-on, or since the compression ration was last cleared. For example, Write 2.1
means a compression ratio of 2.1:1. The compression ration is on displayed after about 1
megabyte of data has been written since power-on.
file://C:\temp\TAPEWHDR.html
5/20/2008
Tape Help Package
Page 20 of 93
Write
8018
Protected
Tape
E
F
Write Fail 8010
E
F
Action: Remove the cartridge and change it to WRITE enabled.
Protected Tape. A WRITE, WRITE Filemark, or ERASE command has failed
F
Action: Use a new cartridge.
The drive could not write to the tape, which may be worn or damaged.
F
Action: Insert a cleaning cartridge to clean the tape drive heads. Ensure the cleaning
cartridge has not been used up, or use a new cleaning cartridge. Replace the media or
mark the tape as possibly bad.
The firmware is not compatible. The drive has not been programmed.
Write
Fail:
Clean or
use new
tape
8003
Wrong
FW
8023
E
E
Protected Tape. A WRITE, WRITE Filemark, or ERASE command has been attempted
on a write-protected tape.
LCD 2 Digit Codes
This chart is a supplement to the 7332-220 Service Guide. Often these two digit codes will indicate that a drive needs to be
replace. However some times the cause for these errors is simple to correct and should be attempted instead of replacing the
tape drive.
Possible causes for the 2 digit codes are:
z
Screws used to secure the tape drive to the drive mounting bracket are too long. These screws can be a maximum of
4mm long, longer screws will interfere with the internal operation of the autoloader.
Note: The screws used to secure the 7332-220 cover and other parts of the drive are 6mm long.
z
Cartridges that are damaged may not operate properly and may impede the operation of the autoloader.
z
Improperly mounted or secured labels on cartridges may impede the operation of the autoloader.
z
Loose or damaged SCSI cable inside the 7332-220.
In general:
z
Remove any cartridge from the drive. If the cartridge will not eject, recycle power to the tape drive.
z
Remove the magazine.
z
Recycle power to the tape drive.
z
Try a different cartridge.
z
Check cables, terminators, system connections, etc.
z
Check for other causes for interference to the magazine.
Definitions
The following is a description of the R, X, Y, and Z motions:
z
z
R-motion:
The rotational movement of the carousel inside the autoloader.
X-motion:
The movement of the picker arm in an autoloader when moving the cartridges in and out of the magazine.
file://C:\temp\TAPEWHDR.html
5/20/2008
Tape Help Package
z
z
Y-motion:
The movement up and down of the platform in an autoloader when carrying cartridges between the magazine and the
drive.
Z-motion:
The motion of the magazine transport in an autoloader when it takes a magazine that the user has inserted and conveys
it to the carousel. The same motion in reverse is used to eject the magazine.
Table 7. LCD 2 Digit Error Display
Code Description
61
Z-motor jammed while loading or ejecting the
magazine
62
63
64
65
66
Page 21 of 93
LCD
8
While pulling in
9
10
11
12
13
Z-motor has not responded within the time-out period. 16
17
18
19
20
21
A magazine load was attempted, but no magazine was 24
in the autoloader. This should never occur and is
likely a firmware error.
25
The R-motor is jammed, failing to rotate the carousel. 32
33
34
35
36
37
38
The R-motor has not responded within the time-out
40
period
42
43
44
45
46
The Y-motor has not responded within the time-out
48
period on upward motion
49
50
51
52
53
file://C:\temp\TAPEWHDR.html
While reversing load
While pushing out
While starting to unload
While unloading
Diagnostic
Completing load
Loading a magazine
Pulling the magazine in
Starting the unload
Unloading the magazine
Diagnostic
Magazine not loaded
Magazine reinserted
Leaving the home position
Moving away from the home position
Turning to the away position
Leaving the away position
Moving away from the away position
Turning to the home position
Recovering position
Leaving the home position
Unexpected home R-switch
Turning to the away position
Unexpected away R-switch
Turning to the home position
Recovering position
At power-on
Going up to the home position
Going up
Going up to the slot
Going up with the cartridge
Going up to the slot with the cartridge
5/20/2008
Tape Help Package
67
The Y-motor is jammed on upward motion
68
The Y-motor is jammed on downward motion
69
The X-motor is jammed with the picker arm forward
or backward
6A
The X-motor has not responded within the time-out
period
Page 22 of 93
54
55
56
57
58
59
60
61
62
63
64
65
66
67
68
69
70
71
72
Leaving the door open
Closing the door
At power-on
Going up to the home position
Going up
Going up to the slot
Going up with the cartridge
Going up to the slot with the cartridge
Leaving the door open
Closing the door
Going down to the home position
going down
Going down to the slot
Going down with a cartridge
Going down to the slot with a cartridge
Going below the home position
Going down to the door
Opening the door
Looking for a slot
73
74
75
76
77
78
Moving in with a cartridge
Moving in with a cartridge, the picker arm is open
Moving in without a cartridge
Moving in without a cartridge, the picker arm is open
Moving out without a cartridge
Moving out without a cartridge, the picker arm is
closed
Moving out with the cartridge
Looking for a slot
79
80
81
82
83
84
85
86
6B
6C
There is no cartridge on the platform when one was
expected
87
88
89
90
91
92
93
There is a cartridge on the platform when there should 96
not be one
file://C:\temp\TAPEWHDR.html
Moving in with a cartridge
Moving in with a cartridge, the picker arm is open
Moving in without a cartridge
Moving in without a cartridge, the picker arm is open
Moving out without a cartridge
Moving out without a cartridge, the picker arm is
closed
Moving out with the cartridge
In the home position
With the door open
At completion
Unexpectedly
No cartridge in the magazine
Already on the platform at the start of the load
In the home position
5/20/2008
Tape Help Package
6D
6E
6F
The door is open after a magazine has been inserted,
or after an attempt to lock it
The X-motor is jammed
71
The X-motor has not responded within the time-out
period
73
74
97
98
99
100
101
104
105
106
107
A cartridge in the picker fingers has become loose
112
113
114
115
116
117
The tape has not been loaded in the drive successfully, 120
even though the changer mechanism has apparently
delivered it successfully.
121
70
72
Page 23 of 93
The diagnostic to test sensor status detected that the
sensor is inactive. This is not necessarily a fault.
The Y-motor has not responded within the time-out
period on downward motion
A cartridge has been accidentally pushed into the
drive. The cartridge was then either physically loaded,
or ejected and returned to the magazine.
128
129
130
131
132
136
137
138
139
140
144
With the door open
At completion
Unexpectedly
Cartridge is still in the picker arm
Already on the platform at the start of the load
After a load
When the door is locked
Door did not close
Lock broken
During X-motion
During upward Y-motion
During Y-motion up to the slot
During downward Y-motion
During Y-motion down to the slot
During unload
Premature ejection. The drive accepted the tape, but
then had a problem, such as a snapped tape or
misload.
The drive failed to induct the cartridge, probably
because of a changer mechanism problem
Approaching the door without a cartridge
Approaching the door with a cartridge
Leaving the cartridge
Looking for no slot
Pushing the cartridge
Approaching the door without a cartridge
Approaching the door with a cartridge
Looking for no slot
Pushing the cartridge
Retrying initialization
152 Going down to the home position
153
154
155
156
157
158
159
160
Going down
Going down to the slot
Going down with a cartridge
Going down to the slot with a cartridge
Going down below the home position
Going down to the door
Opening the door
Cartridge pushed into drive
161 Unload pushed into drive
file://C:\temp\TAPEWHDR.html
5/20/2008
Tape Help Package
75
76
77
78
79
7A
7B
7C
7D
7E
7F
Page 24 of 93
A cartridge has been inserted into the drive but has not 168
been successfully loaded or ejected.
169
The door has failed to open
176
An unsupported or unrecognizable medium changer- 184
type command has been sent to the autoloader.
Alternatively, the parameters for the command are
inadequate, or out of range. This code indicates a
firmware defect.
A command has been received that expects a
192
magazine in the autoloader, and there is none.
A command requesting the autoloader to insert a tape 200
in the drive has been received, and there is already a
tape in the drive.
The current magazine location already has a cartridge 208
in it.
The host has sent a LOG SENSE or LOG SELECT
216
command with an invalid page code.
The host has issued a command with an invalid
200
magazine slot(that is not in the range of 1-6).
The current magazine slot is empty, when it was
232
expected to contain a cartridge
A diagnostic has been sent, but the autoloader is not in 240
diagnostic mode.
Communications between the drive and the front
248
panel display have been aborted. This is an internal
error code.
Cartridge pushed into drive
Stuck in the drive after an unload
This is a possible host application error.
This is a possible host application error.
This is a possible host application error.
This is a possible host application error.
This is a possible host application error.
This is a possible host application error.
This is a possible host application error.
VXA Tape Drives
VXA-2 80GB, VXA-320 160GB Tape Drive
LED's description are from left to right. The meaning of the LED's are:
Table 8. LED Information
Green
Green
Amber
On
On
On
Power
Activity
Cleaning
On
(Tape/SCSI Required
Indicator bus)
Indicator
Indicator
On
On
On
Flashing Off
Off
Off
Off
Off
Off
Off
On
On
Off
On or Off
On
Flashing
On or Off
On
Off
On
On
Flashing
On
Off
Flashing
On or Off
Amber
Description of what the LED(s) are indicating.
Flashing/On
Fault/Over
Temperature
Indicator
On
Off
Off
Off
Off
Off
Off
Off
Off
file://C:\temp\TAPEWHDR.html
Power On test in operation, On for 2 seconds
Power On Self Test(POST) in operation
Cartridge not loaded or drive not powered on
Cartridge not loaded and Drive Cleaning is Required
Cartridge loaded and no tape motion or SCSI bus activity
Cartridge loaded and tape motion or SCSI bus activity
Cartridge loaded and Drive Cleaning is Required
Cartridge loaded and tape motion and Drive Cleaning is required
Cartridge loading or unloading
5/20/2008
Tape Help Package
Page 25 of 93
Off
Flashing
On or Off Off
On
Off
On or Off Flashing
Flashing
Flashing
Slow
Flashing
Off
Flashing
Slow
Flashing
On or Off Off
On or Off Off
On or Off Off
Off
Off
On or Off On
Cartridge loading or unloading and Drive Cleaning is required
Unrecovered drive failure or microcode download failure.
Hold eject button in for 10 seconds to cause the drive to reset to clear
the fault indication. If this does not clear the fault indication the drive
must be powered Off then back On to clear the fault indication.
Microcode is being Downloaded and Verified in the tape drive.
Microcode is being Updated in the tape drive.
Slow flashing of Power On and Activity LED's indicates "Format
Recovery".
If the tape drive was powered off after or during a write operation prior
to a rewind completing for the tape drive the next time the tape drive is
powered the tape drive must due a "Format Recovery".
This can take from a few minutes to several hours depending on how
far out on the data cartridge the last write was done.
To eliminate the need for the tape drive to do a "Format Recovery",
rewind the tape prior to any powering off or reset of the tape drive.
The tape drive has exceeded its designed maximum internal operating
temperature of 47 Degrees Centigrade. The tape will be ejected, if
present. The Over Temperature/Fault LED will stay ON until the
internal drive temperature goes below the preset maximum
temperature.
Note: AIX will see the over temperature condition as if the tape drive
went from ready to not ready. No error will be logged in the AIX error
log.
7212-312 VXA-2 Autoloader LCD
Table 9. LCD Information
Informational Message
Autoloader is Busy
Bootblock
Cartridg.Invalid
Description
Action Required
The autoloader is executing a command Wait until the autoloader has finished
issued from the application
its current operation, then retry the
requested operation
An error has occurred during a
z Verify that you loaded the correct
firmware upload to the autoloader.
code. Do no load firmware from
one model of autoloader into
another.
z Reset the autoloader and reload
the firmware.
z If the error persists, contact your
service provider
An attempt was made to load an
incompatible cartridge into the tape
drive or a spent cleaning cartridge and
the cartridge was ejected.
z
z
Command Failed Check Ship Lock
file://C:\temp\TAPEWHDR.html
Remove the cartridge from the
autoloader and replace it with one
that is compatible with the tape
drive.
If you were attempting to import
a cleaning cartridge, insert a
cartridge with cleaning cycles
remaining on it.
The cartridge loader could not move
Make sure that the shipping key that
because it may be locked in place by the was in the slot in the top cover of the
5/20/2008
Tape Help Package
Command Failed Drive is Full
Command Rejected Carousel Full
Command Reject Empty Carousel
Configuration Locked by Host
Device Not Ready
Drive CMD Error
Page 26 of 93
shipping key.
A command was issued from the
operator panel to load a cartridge into
the tape drive when the drive already
contained a cartridge.
A command was issued from the
operator panel to load a cartridge into
the autoloader when all of the cartridge
cells were already full.
A command was issued from the
operator panel to either load a cartridge
into the tape drive or remove a cartridge
from the autoloader when there were no
cartridges in the cartridge carousel.
The application is currently controlling
the autoloader(a SCSI command is
active) or the Remote Management
utility is controlling the autoloader.
The autoloader is not ready to perform
the requested operation because it is
performing diagnostics or it power-on
self-test has not completed.
The tape drive received an invalid
command
autoloader has been removed.
Wait until the current cartridge is
uploaded by the application, or use the
operator panel to unload it from the tape
drive.
Export a cartridge from the autoloader
to make room for a new cartridge.
Wait until the cartridge is ejected from
the tape drive, or use the operator panel
to import cartridges into the autoloader.
Wait for the command from the
application to complete
Wait until the autoloader has finished,
then retry the operation.
z
z
z
Drive Load Fail
The cartridge could not be loaded into
the tape drive because of a mechanical
problem or because of a broken tape.
z
z
Drive Timeout
The tape drive took too long to load or
unload a tape, or the tape drive is not
responding.
z
z
z
Drv Unload Fail
The cartridge could not be unloaded
from the tape drive because of a
mechanical problem.
z
z
z
H/W Inoperable
file://C:\temp\TAPEWHDR.html
An operation could not be completed
because of a mechanical problem.
z
If possible, use thee operator
panel to unload any cartridge that
is in the tape drive.
Power the autoloader off and
back on to reset the tape drive.
If the error persists, contact your
service provider.
Export the tape from the
autoloader and verify the tape is
in good condition, then retry the
operation.
If the error persists, contact your
service provider.
If possible, use the operator panel
to unload any cartridge that is in
the tape drive.
Power the autoloader off and
back on to reset the tape drive.
If the error persist, contact your
service provider.
Power the autoloader off and
back on to reset the tape drive.
Retry the unload operation once.
If the error persist, contact your
service provider.
Reset the autoloader and retry the
operation.
5/20/2008
Tape Help Package
Page 27 of 93
z
Hardware Error
An operation could not be completed
because of a mechanical problem.
z
z
In Enet Mode
In a Security Mode Choice Rejected
Over Temperature
POST Failed
Sequential Mode
Servo Error
Servo Jammed
The autoloader is executing a command
issued from the Remote Management
utility with a command is issued from
the operator panel.
Autoloader security has been set from
the application
The tape drive's temperature limit has
been exceeded, and the cartridge has
been ejected from the drive.
Disable autoloader security from the
application and retry the operation.
z Wait until the autoloader has
cooled, then unload the cartridge
to a cell and re-load it into the
tape drive.
z Check the room temperature. The
ambient temperature must be no
more than 40 Degrees C(104
Degrees F).
z Provide additional air flow
around the autoloader to improve
cooling.
The autoloader encountered an error
Reset the autoloader.
during its power-on self-test.
An application tried to issue commands Set the autoloader to Random mode.
to the autoloader while it was set to
Sequential mode.
The autoloader carousel has
z Reset the autoloader, and retry
experienced a problem
the operation.
z If the error persists, contact your
service provider.
The autoloader carousel has
experienced a problem.
z
The autoloader carousel has
experienced a problem.
z
z
System Error
The autoloader has experienced a fatal
error.
z
z
file://C:\temp\TAPEWHDR.html
Reset the autoloader and retry the
operation.
If the error persist, contact your
service provider.
Wait until the autoloader has finished
its current operation, then retry the
operation.
z
Servo Timeout
If the error persist, contact your
service provider.
Reset the autoloader, and retry
the operation.
If the error persists, contact your
service provider.
Reset the autoloader, and retry
the operation.
If the error persists, contact your
service provider.
Reset the autoloader, and retry
the operation.
If the error persists, contact your
service provider.
5/20/2008
Tape Help Package
Page 28 of 93
System Timeout
An autoloader operation took too long.
z
z
Tape Alert Halt
The Autoloader has experienced a Tape
Alert event. For example:
z
z
A tape drive component has
exceeded it expected operational
lifetime.
z Tape Alert asynchronous
notification.
z Tape Alert asynchronous
notification test.
A tape was inserted through the
cartridge access port in the wrong
orientation.
z
Tape incorrectly inserted, RETRY
Wait for Command To Complete
Reset the autoloader, and retry
the operation.
If the error persists, contact your
service provider.
Reset the autoloader, and retry
the operation.
If the error persists, contact your
service provider.
Position the cartridge with the hug
down and the side with the barcode
label and write-protect switch towards
the door and re-insert it. Do not insert
cartridges with the label and writeprotect switch towards you. The arrow
on the cartridge must face toward the
outside.
The autoloader is executing a command Wait until the autoloader has finished
issued from the application or the
its current operation, then retry the
Remote Management utility when a
operation.
command is issued from the operator
panel.
LTO Tape Drives
LTO2 200GB Half High Tape Drive(FC 1997, 5755)
LED's description are from left to right. The meaning of the LED's are:
Table 10. LED Information
Green
Green
Ready
Activity
On for 2
On for 2
seconds
seconds
Flashing
Off
Off
Off
Off
Off
On
Off
On
Flashing
On
Off
On
Flashing
Off
Off
Flashing
Flashing
Amber
Cleaning(1)
On for 2
seconds
Off
On or Off
On
On/Off
On or Off
On
On
Amber
Fault
On for 2
seconds
Off
Off
Off
Off
Off
Off
Off
On or Off
On
Off
Off
file://C:\temp\TAPEWHDR.html
Description of what the LED(s) are indicating.
Power On test in operation, On for 2 seconds
Power On Self Test(POST) in operation
Cartridge not loaded or drive not powered on
Cartridge not loaded and Drive Cleaning is Required
Cartridge loaded and no tape motion or SCSI bus activity
Cartridge loaded and tape motion
Cartridge loaded and Drive Cleaning is Required
Cartridge loaded and tape motion and Drive Cleaning is
required
Cartridge loading or unloading
Cartridge loading or unloading and Drive Cleaning is
5/20/2008
Tape Help Package
Page 29 of 93
Off
On or Off
Flashing
Off
Off
Off
On(4)
On or Off
On or Off
Off
Flashing(3)
Off
Flashing
Off
Off
Flashing
Flashing
Off
Off
Off or
Flashing
Off
Flashing
On or Off
On or Off
On or Off
On or Off
Off
Flashing(3)
On
Off
required
Cleaning cartridge loaded, Cleaning failed
Unrecovered drive failure.
Firmware is being Downloaded and Verified in the tape
drive.
Firmware is being updated in the tape drive.
Firmware download failure(4).
Internal Drive Temperature over limit(6).
Diagnostic test in-progress.
Flashing
Flashing
Off
Off
Media failure(7)
Incorrect media inserted in the drive(8).
Off
Off
Note:
(1) A solid Amber Clean LED indicates that the drive needs cleaning. In most cases the drive will continue to function, but
it should be cleaned as soon as possible.
(2) If the cleaning function completes and the solid Amber Clean LED remains lit, the cleaning function was not successful.
The cleaning cartridge may be depleted. Obtain a new LTO cleaning cartridge and use it to perform the cleaning function
again.
(3) The Fault LED will flash to indicate an unrecoverable error. An unrecoverable error is an error condition that results in
the drive not being able to function unless initiator, operator, or service intervention is applied. An unrecoverable drive
failure is usually the result of a hardware error condition. One of the following actions will be needed to clear the flashing
Fault LED:
z
z
z
z
Hard SCSI Reset
Cartridge Eject
Power Cycle
Retry Microcode Download
(4) The firmware download failed and the drive is not functional. The boot code is in control and the firmware download
should be tried again.
(5) The fault LED will be "ON" to indicate to indicate an over temp condition(internal temperature greater then a preset
allowable limit). The LED will remain on until the drive temperature drops below a preset limit and one of the following
conditions is met:
z
z
A data or cleaning cartridge is inserted.
A POR cycle occurs.
(6) The tape drive has exceeded its designed maximum internal operating temperature. The tape will be ejected, if present.
The Over Temperature/Fault LED will stay ON until the internal drive temperature goes below the preset maximum
temperature.
AIX will see the over temperature condition as if the tape drive went from ready to not ready. No error will be logged in the
AIX error log.
(7)While using drive diagnostics(via System Diagnostics or via the drive self test diagnostics), a flashing Clean LED
indicates that a media-related problem has occurred(such as a hard write error or excessive soft errors).
(8)While using drive diagnostics(via System Diagnostics or via the drive self test diagnostics) with media, the Activity and
Clean LED's will flash at the same time. The corrective action is to verify that your tape cartridge is not write-protected or
damaged, and that the media type is compatible with your tape drive.
LTO4 800GB Half High SAS Tape Drive(FC 5747)
LED's description are from left to right. The meaning of the LED's and Single Character Display(SCD) are:
Table 11. LED/SCD Information
file://C:\temp\TAPEWHDR.html
5/20/2008
Tape Help Package
Operation
Power-On
Self-Test in
progress.
After PowerOn Self-Test
and the drive
resets(2).
No Cartridge
is Loaded.
Cartridge is
Loading or
Unloading
Cartridge is
Loaded, No
Activity
Data Cartridge
is Loaded,
Activity
Cleaning is
Required
Cleaning in
Progress
Cleaning
Cartridge
Loaded,
Cleaning
Failed
Maximum
Operating
Temperature
Exceeded(5).
Input Voltage
Failure
Drive
Firmware
Failure
Drive
Firmware or
Hardware
Failure
Unrecoverable
Drive Failure
Drive or
Media Failure
(7)
Media Error
SAS Interface
Failure.
Recoverable
Drive Error(8)
Page 30 of 93
Green
Ready
Amber
Fault
Single
Character
Display
(SCD)
Off
Off or On(3)
Segments
flashing(1)
Wait 30 to 60 seconds.
3 seconds On
(2)
3 seconds On
(2)
3 seconds On
(2)
Wait 30 to 60 seconds.
Off
Off or On(3)
Off or C (3)
Wait 30 to 60 seconds.
Flashing(1)
Off or On(3)
Off or C (3)
Wait 30 to 60 seconds.
On
Off or On(3)
Off or C (3)
Wait 30 to 60 seconds.
Flashing(1)
Off or On(3)
Off or C (3)
Wait 30 to 60 seconds.
On or Off
On(3)
C (3)
Clean drive as soon as possible
Flashing
Off
C (3)
Wait for Cleaning to complete.
Off
On
6 or 7(4)
Replace Cleaning Cartridge, which may be expired.
Off
On
1
Reduce Drive Temperature.
Off
On
2
Check Input Power Connectors.
Off
Flashing(1)
3
Update to Latest Level of Firmware.
Off
Flashing(1)
4
Clean Drive, Replace Cartridge, or both, if needed, Retry
Operation.
Off
Flashing(1)
5
Off
On
6
Clean Drive, Replace Cartridge, or both, if needed, Retry
Operation.
Clean Drive, Replace Cartridge, or both, if needed, Retry
Operation.
Off
Off
On
Flashing(1)
7(4)
8
Replace Cartridge, Possible Expired Cleaning Cartridge.
Check SAS Cable and Connector.
Off
On
A
Clean the Drive and Retry the Operation.
file://C:\temp\TAPEWHDR.html
Response
5/20/2008
Tape Help Package
Incorrect
Media
Firmware
Update is in
Progress.
Incorrect
Firmware
Update Tape
Used.
Firmware
Update Failed
(9)
Write
Operation was
Attempted and
Media is Write
Protected.
Drive is in
Service Mode
Drive Self Test
is in Process
Page 31 of 93
Off
On
J
Insert Correct Media Type.
Both LED's
Flashing
Together
Off
Both LED's
Flashing
Together
On
Off
Wait for Firmware Update to Complete.
F(4)
Replace Firmware Update Tape
Off
Flashing(1)
H
Retry Firmware Update Operation
Off
On
I(4)
Use Media that is not Write Protected.
Flashing
Rapidly(1)
Flashing(1)
On
On(10)
On
The Number 1 Wait for the test to complete.
is flashing
Note:
1. When used in this table, Flashing refers to a 1 Hz flash rate(1 flash per second), and Flashing Rapidly refers to a 4
Hz flash rate(4 flashes per second).
2. Immediately following a Power-On Self-Test sequence or a drive reset, both LED's, all segments of the singlecharacter display, and the SCD dot will be on solid for approximately 3 seconds.
3. When a drive need cleaning, the Fault LED will be on solid and a C will show on the single character display. In most
cases the drive will continue to function, but it should be cleaned as soon as possible. Do not ignore the indicator by
cycling the power to turn the LED off.
4. Error code on single-character display is cleared when cartridge is removed from drive.
5. The Fault LED will be on solid to indicate an over-temperature condition. If a tape is present it will be ejected. This
LED will remain on until the drive temperature drops below a lower secondary-temperature limit and one of the
following two conditions is also met:
{ A data or cleaning cartridge is inserted.
{ The drive is powered off and on.
6. A drive dump will be stored before the drive is powered off. The SCD light serves as a dump indicator. When this
light is lit, a dump file is stored in the drive and can be retrieved.
7. Failure cannot be isolated to either a faulty drive or faulty media.
8. Error condition will be cleared when the drive is powered off. The drive is not disabled. >li. The firmware update
failed and the drive is not functional. The drive boot code is in control and you should retry the firmware download.
9. When the drive is in maintenance mode, the Fault LED will be on solid and the single character display will indicate
the current maintenance mode state.
8mm Tape Drives
2.3GB 8mm tape drive:
LED's description are from left to right. Meaning of the LEDs:
Amber Green - Meaning
Read/Write Ready
or
(Tape
Disturbance Loaded)
file://C:\temp\TAPEWHDR.html
5/20/2008
Tape Help Package
Off
Off
Page 32 of 93
One of the following conditions:
The power is Off
The Power On SelfTest(POST) has completed successfully, but no tape cartridge has been
inserted.
On
Drive has tape loaded and is ready.
On
Drive is performing a Power-on Self Test (POST). (All LED's will remain ON if the drive is
powered on and the system to which the drive is connected is powered off or the SCSI cables and
terminator are connected to the drive but not to a system.)
On
Drive is writing or reading.
Off or The tape drive has detected an internal fault that requires corrective action. Reset the drive by
Flashing pressing the blue Eject button. If this does not clear the condition, power the drive off then back
on. Internally mounted tape drives may require the system to be shutdown, powered off then
powered on to clear the internal fault in the drive. If the condition cannot be cleared using this
method, refer to your service guide or system diagnostics for further assistance.
The AIX diagnostic command:
diag -c -d rmtx <-where x is the tape drive #
will issue a reset to the tape drive if AIX is able to communicate with the drive it will issue a reset
to the tape drive.
z
z
Off
On
Flashing
On
5GB, 7GB, 20GB and 60GB 8mm tape drives:
LED's description are from left to right. Meaning of the LEDs:
Amber Green Green - Meaning
Disturbance Ready
Tape
(Magazine and
Loaded) Tape
Activity
On
*
*
One of the following conditions:
The tape path needs cleaning(refer to the tape drive cleaning instructions).
A cleaning cartridge has been inserted and the cleaning cartridge has exceeded
the maximum number of cleanings for the cleaning cartridge.
The Power-On Self Test(POST) is running (All LED's will remain ON if the drive is
powered on and the system to which the drive is connected is powered off or the SCSI
cables and terminator are connected to the drive but not to a system.)
One of the following conditions:
z
z
On
On
On
Off/On
Off
Off
The power is Off
The POST has completed successfully, but no tape cartridge has been inserted.
Off
A tape cartridge has been inserted and the tape drive is ready to receive commands
from the system.
Flashing A tape cartridge has been inserted and the tape drive is busy running a device
operation.
Flashing A tape cartridge has been inserted and the tape drive is performing a tape load/unload
operation.
*
The tape drive has detected an internal fault that requires corrective action. Reset the
drive by pressing the blue Eject button. If this does not clear the condition, power the
drive off then back on. Internally mounted tape drives may require the system to be
shutdown, powered off then powered on to clear the internal fault in the drive. If the
condition cannot be cleared using this method, refer to your service guide or system
diagnostics for further assistance.
The AIX diagnostic command:
diag -c -d rmtx <-where x is the tape drive #
will issue a reset to the tape drive if AIX is able to communicate with the drive.
z
z
Off/On
On
Off/On
On
Off/On
Off
Flashing
*
file://C:\temp\TAPEWHDR.html
5/20/2008
Tape Help Package
Page 33 of 93
Note: Where
* is On, Off, or Flashing
8mm 20GB drive ONLY
Meaning of the LEDs
The next 2 LED settings apply only to the 20GB 8mm drive.
LED's description are from left to right:
Amber Green Green - Meaning
Disturbance Ready
Tape
(Magazine and
Loaded) Tape
Activity
Flashing
Flashing Flashing When all 3 LEDs are flashing same as 3 LEDs ON (All LED's can Flash if the drive is
powered on and the system to which the drive is connected is powered off or the SCSI
cables and terminator are connected to the drive but not to a system.).
Flashing
*
*
The tape drive has detected an internal fault that can either indicate an error, as above,
or the system is powered off and the tape drive is powered on and connected to the
SCSI cable and terminator, same as 3 LEDs ON condition. The LCD will be showing
the last 3 errors
Note: Where
* is On, Off, or Flashing
20GB and 60GB 8mm tape drive LCD messages:
The 16-digit alphanumeric LCD display information:
Display
Meaning
RESET
During the PowerUp Sequence the RESET Message comes up
RESETTING
First to indicate that the drive is going thru the boot sequence. Then after about 5 seconds, the following
messages appear in sequence for 3-4 seconds each. These messages indicate the
MODEL: IBM- MODEL
xxGB
SUBMODEL:
SUBMODEL: EEimage in the drive
xxxxxxx
SN: xxxxxxxxxx SN: drive serial number
CODE: aaaaaaa CODE: microcode level in the drive
LAST CLEAN: LAST CLEAN: hours since last cleaning
xxxhr
COMPRESSION: COMPRESSION: indicates whether data compression mode is ON or OFF
ON
SINGLE ENDED Single Ended interface.
DIFFERENTIAL Differential interface.
LV
Low Voltage Differential(LVD) interface. (LVD drives will show as Single Ended on Single Ended
DIFFERENTIAL SCSI bus)
WIDE
WIDE interface only
SCSI ID: xx
SCSI ID: number 0-15
While the drive is completing the reset the LEDs show that the drive is in the RESET(Power up or
Reset) mode . The drive usually completes the reset before all messages complete.
Note: To cause the drive to reset press and hold the eject button until *** RESET is displayed.
Releasing the eject button will allow the reset to proceed.
LANGUAGE
Available languages will be displayed
file://C:\temp\TAPEWHDR.html
5/20/2008
Tape Help Package
CLEAN SOON
READY-NOTAPE
LOADING
READY-TAPE
M2 READYTAPE
ILLEGAL TAPE
EJECT **
Page 34 of 93
Action: The text on the 8mm Tape Drive LCD is available in several languages. To change the
language:
Press and hold the unload button after you turn the power on to the 8mm Tape Drive or, if your system
unit is already running, press and hold the unload button for approximately 15 seconds until the 3 LEDs
are illuminated.
Release the unload button for approximately one second, the drive will then display the words "***
RESETTING".
Then press and hold the unload button again.
After the LCD cycles through all the reset messages it cycles through the available languages. When the
desired language displays, release the unload button.
The "Language" prompt appears after the "SCSI ID" message, followed by a list of the languages in a
slow scrolling sequence. When the desired language appears on the display, release the unload button.
The drive RESETS again, even if it is the same language, and begins with the new/same language.
English
Francais
Deutsch
Espanol
Italiano
Portugues
If the drive cleaning criteria has been reached, the MUST CLEAN CLEAN SOON message displays,
with the ICON flashing, CLEANING... during the time that the drive is normally idle, DEPLETED
When READY is typically displayed. The Disturbance, AMBER CLEAN LED, is also ON. When the
drive has recognized that a clean is in process the word CLEANING... will be displayed during the
cleaning process. If the Cleaning Cartridge is at the end of it length, the cartridge is ejected and the
DEPLETED message is displayed until a new cleaning cartridge is used or a data tape is installed.
When a tape motion command is given, that new message is displayed even though the AMBER
CLEAN LED is still on. Then, until the drive is properly cleaned, at each idle opportunity, CLEAN
SOON is displayed.
Note: MUST CLEAN - (20GB drive only) The MUST CLEAN message is displayed when the tape is
switched from MP to AME and the drive cannot be used to write to the AME tape without cleaning the
tape drive. Any AME TAPE WILL BE EJECTED until the tape drive is cleaned. After reading an MP
tape, the 20GB drive MUST BE CLEANED before being able to use AME tapes, refer to the MUST
CLEAN message. After reading MP tapes insert an AME tape and wait for the AME tape to be ejected
and the MUST CLEAN message to be displayed before doing this cleaning. This is necessary because
there is a special cleaning cycle the tape drive will do when changing from MP to AME media.
Cleaning tapes supported by the 2.3GB, 5GB and 7GB 8mm tape drive are NOT supported in this
drive, if these cleaning cartridges are inserted the "ILLEGAL TAPE" message will be displayed, and
the tape ejected.
This message appears at the end of the RESET sequence if no tape is loaded.
This message appears when tape is loading. The ICON will flash during this time.
This message appears at the end of Loading Tape.
(M2)This message appears at the end of Loading Tape.
If a customer inserts an ILLEGAL TAPE, like a cloth cleaning tape, then the tape will be ejected and
the ILLEGAL TAPE message will be displayed until a suitable tape is loaded.
Note: ILLEGAL TAPE - Only tapes labeled AME can be written by these drives. Tapes labeled 15m,
54m, 112m, or 160m are Metal Particle(MP) and cannot be written.
The 20GB drive can read MP tapes, the 60GB drive cannot read MP tapes and it will eject MP tapes.
After reading an MP tape, the 20GB drive MUST BE CLEAN ED before being able to use AME tapes,
refer to the MUST CLEAN message. After reading MP tapes insert an AME tape and wait for the AME
tape to be ejected and the MUST CLEAN message to be displayed before doing this cleaning. This is
necessary because there is a special cleaning cycle the tape drive will do when changing from MP to
AME media.
Cleaning tapes supported by the 2.3GB, 5GB and 7GB 8mm tape drive are NOT supported in this
drive, if these cleaning cartridges are inserted the "ILLEGAL TAPE" message will be displayed, and
the tape ejected.
This message will be displayed, with the ICON flashing whenever the eject button is pressed and the
file://C:\temp\TAPEWHDR.html
5/20/2008
Tape Help Package
Page 35 of 93
eventual result is to eject the tape. For example, this message will appear even thought the tape drive is
continuing to flush the buffer during a READ or a Write, because the eventual result is to rewind and
eject the tape. This will give instant acknowledgement to the operator that the button press was received
by the drive. The ICON will change to < < (same as Rewind) when the rewind phase is in process.
EJECT PREVNT This message will be displayed if the system has issued a "prevent media removal" command and the
drive unload button is pressed. The tape will rewind and unload into the tape cartridge, but the cartridge
will not eject from the drive.
READ + **
The + sign appears whenever the drive is in compression mode. The boxes show the amount of tape
used as a percent of the total tape length. The empty area is shown as equal sign so that the line is
complete. There are up to 6 solid squares to follow the message as shown in the following 5 messages.
WRITE + **
The + sign appears whenever the drive is in compression mode.
PROTECTED
If a write is attempted on a Write Protected tape, the PROTECTED message is displayed.
ILLEGAL WRT The ILLEGAL WRT message is displayed if write is attempted to a for which writing is not supported
on this tape drive. This message remains until another tape is inserted that is the correct type or another
legal command is issued such as a READ, REWIND, or the eject button is pushed.
Note: ILLEGAL WRT - Only tapes labeled AME can be written by these drives. Tapes labeled 15m,
54m, 112m, or 160m are Metal Particle(MP) and cannot be written.
SEARCH **
Used for high speed searching to indicate the position on the cartridge. The display bar will increase or
decrease for forward or backward searches.
REWIND **
Self explanatory. Display bar reduces in size as rewind occurs.
ERASE **
Self explanatory. This occurs very quickly for a short erase.
WORN TAPE
This message is displayed when the tape in the drive is beyond the end of its useful life(20,000 passes
of the tape drive head over any spot on the tape). This counter is an internal counter that is not
accessible to the user.
This counter was implemented starting in microcode level 40HA in the 20GB drive and first shipment
of 60GB drive.
To avoid the possibility of data loss, copy the data you need from this tape to a new tape as soon as
possible.
OVER TEMP
The tape drive detected an internal temperature of 47 degrees C or greater. If a data cartridge is in the
tape drive when this condition occurs, the tape drive will complete the current tape operation, and then
rewind and eject the data cartridge. After the tape drive temperature returns to a normal operating
temperature of 42 degrees C or less, the OVER TEMP message continues to display until one of the
following occurs:
Front-panel reset(press and hold the Unload button.
Power cycle(tape drive power is turned off and then on)
z Tape load(load a tape in the tape drive)
If a code load tape is inserted and the tape is recognized as such, or a code load is in process via the
SCSI or Monitor port, then the LOADING CODE.. message is displayed. At the completion of the code
load, if there was a failure, CODE LOAD FAIL and RETRY CODE LOAD messages scroll.
Otherwise, if the code load was successful, the drive will automatically RESET and come READY
again.
z
z
LOADING
CODE..
CODE LOAD
FAIL
RETRY CODE
LOAD
DIAG-LOAD
TAPE
DIAG-TESTING
DIAG-PASSED
DIAG-FAILED
DIAG-WRT
xx.x%
DIAG-READ
xx.x%
DIAG-ECC
xx.x%
ERR 1: xx yy zz
ERR 2: xx yy zz
If a SCSI Send Diagnostic command is received, or a Diagnostic tape is used, then this series of
messages appears. DIAG-LOAD TAPE is used if the command is via SCSI and no tape is present.
DIAG-TESTING appears during this test.
If the test passes OK, then the DIAG-PASSED appears for 15 seconds. If there is a failure, then DIAGFAILED appears and the 3 statistics messages appear for 2 seconds each in a rotating loop. Pressing the
Eject button to remove the tape will clear this display. Otherwise this message will continue to display
DIAG-FAIL(plus the 3 statistics messages) until the drive is RESET.
Failing error codes displayed when the drive is first powered on or during tape drive operation.
Where xx is the fault symptom code.
file://C:\temp\TAPEWHDR.html
5/20/2008
Tape Help Package
ERR 3: xx yy zz
Page 36 of 93
Where yy is the primary error code.
Where zz is the secondary error code.
Whenever errors are displayed it will be helpful in problem determination if they are written down and
provided to support.
Note:
* Indicates that there is an ICON accompanying this message. To see what the ICON looks like you will have to look at a
drive or the Operator Guide or the Service guide.
** Progress symbols
DLT Tape Drives
7205-311 35GB DLT tape drive:
There are 10 LEDs on the tape drive and another LED on the 7205-311 power supply. The following is the description of
the 10 LEDs on the tape drive:
Left side LEDs(6)
Label or
Symbol*
2.6
6.0
10.0/15.0
20.0
35.0
Compression*
Color State Meaning
Green
Green
Green
Green
Green
Green
ON
ON
ON
ON
ON
ON
Tape is recorded in 2.6GB format
Tape is recorded in 6.0GB format
Tape is recorded in 10.0/15.0GB format
Tape is recorded in 20.0GB format
Tape is recorded in 35.0GB format
Compression mode is enabled. Compression can be done in 10, 15, 20, and 35GB Density
only.
Note:
In a read operation, the indicators will reflect the density and compression status of the pre-written tape.
* On the drive this is an international symbol the wording here is a description of what that symbol means.
Right side LEDs(4)
Label or Color State
Symbol*
Write
Green ON
Protected*
OFF
Tape In
Green ON
Use*
Flashing
Use
Amber ON
Cleaning
Cartridge*
ON
Meaning
Tape is write-protected.
Tape is write-enabled.
Tape is loaded, ready for use.
Tape is moving.
Drive head needs cleaning, or the previous data tape was worn out.
Remains ON after you unload the cleaning cartridge. If this condition occurs the likely cause
is cleaning cartridge has expired(been used up) and the cleaning was not done.
file://C:\temp\TAPEWHDR.html
5/20/2008
Tape Help Package
Operate
Handle*
Page 37 of 93
OFF
If the Use Cleaning Cartridge LED comes ON and Remains ON after you unload the cleaning
then ON cartridge the likely cause is cleaning cartridge has expired(been used up) and the cleaning was
not done.
OFF
If after cleaning the LED turns on again when you reload the data cartridge. When n this
then ON condition occurs the likely cause is a worn out data cartridge. Clean the drive again and try
another data cartridge. If the problem persists, do the problem determination procedures.
OFF
Cleaning is complete, or cleaning is not required.
Green ON
It is OK to operate the cartridge Insert/Release handle.
OFF
Do not operate the cartridge Insert/Release handle.
Note: Not all errors(Flashing LEDs) are drive failures. Media can cause these failures. Before replacing the drive clean the
drive and try new media.
LEDs
All Left LEDs
or
All Right LEDs
All Left LEDs
and
All Right LEDs
All Left LEDs
All Right LEDs**
Right top 3 LEDs
and
Right Bottom LED**
All Right LEDs
State
ON
Meaning
Power On Self Test(POST) has started.
Flashing Error was detected during POST.
Flashing Servo controller error was detected.
Flashing Drive controller error was detected.
On
Drive controller error was detected.
Flashing Drive Microcode download failure
in
Sequence
Note:
* On the drive this is an international symbol the wording here is a description of what that symbol means.
** Likely caused by a detached leader on the drive, have the drive leader replaced by service personnel and check all tape
cartridges as this is normally caused by a leader problem on a tape cartridge.
7205-440 40GB DLT tape drive:
There are 9 LEDs on the tape drive and another LED on the 7205-440 power supply. The following is the description of the
9 LEDs on the tape drive:
Left side LEDs(5)
Label or
Symbol*
10.0/15.0
20.0
35.0
40.0
Compression*
Color State Meaning
Green
Green
Green
Green
Green
ON
ON
ON
ON
ON
Tape is recorded in 10.0/15.0GB format
Tape is recorded in 20.0GB format
Tape is recorded in 35.0GB format
Tape is recorded in 40.0GB format
Compression mode is enabled.
Note:
file://C:\temp\TAPEWHDR.html
5/20/2008
Tape Help Package
Page 38 of 93
In a read operation, the indicators will reflect the density and compression status of the pre-written tape.
* On the drive this is an international symbol the wording here is a description of what that symbol means.
Right side LEDs(4)
Label or Color State
Symbol*
Write
Green ON
Protected*
OFF
Tape In
Green ON
Use*
Flashing
Use
Amber ON
Cleaning
cartridge*
ON
Operate
Handle*
Meaning
Tape is write-protected.
Tape is write-enabled.
Tape is loaded, ready for use.
Tape is moving.
Drive head needs cleaning, or the previous data tape was worn out.
Remains ON after you unload the cleaning cartridge. If this condition occurs the likely cause
is cleaning cartridge has expired(been used up) and the cleaning was not done.
OFF
If the Use Cleaning Cartridge LED comes ON and Remains ON after you unload the cleaning
then ON cartridge the likely cause is cleaning cartridge has expired(been used up) and the cleaning was
not done.
OFF
If after cleaning the LED turns on again when you reload the data cartridge. When n this
then ON condition occurs the likely cause is a worn out data cartridge. Clean the drive again and try
another data cartridge. If the problem persists, do the problem determination procedures.
OFF
Cleaning is complete, or cleaning is not required.
Green ON
It is OK to operate the cartridge Insert/Release handle.
OFF
Do not operate the cartridge Insert/Release handle.
Note: Not all errors(Flashing LEDs) are drive failures. Media can cause these failures. Before replacing the drive clean the
drive and try new media.
LEDs
All Left LEDs
or
All Right LEDs
All Left LEDs
and
All Right LEDs
All Left LEDs
All Right LEDs**
Right top 3 LEDs
and
Right Bottom LED**
All Right LEDs
State
ON
Meaning
Power On Self Test(POST) has started.
Flashing Error was detected during POST.
Flashing Servo controller error was detected.
Flashing Drive controller error was detected.
On
Drive controller error was detected.
Flashing Drive Microcode download failure
in
Sequence
Note:
* On the drive this is an international symbol the wording here is a description of what that symbol means.
** Likely caused by a detached leader on the drive, have the drive leader replaced by service personnel and check all tape
file://C:\temp\TAPEWHDR.html
5/20/2008
Tape Help Package
Page 39 of 93
cartridges as this is normally caused by a leader problem on a tape cartridge.
7205-550 160GB DLT tape drive:
There are 3 LEDs on the tape drive and another LED on the 7205-550 power supply. The following is the description of the
3 LEDs on the tape drive:
LEDs meanings from Left to Right
Label or Color State
Symbol*
Density
Green ON
OFF
Drive
Status
Meaning
The tape in the drive is formatted for a maximum data capacity of 220GB compressed or
110GB uncompressed.
The tape in the drive is formatted for a maximum data capacity of 320GB compressed or
160GB uncompressed.
Green Flashing The tape is moving.
The drive is calibrating, reading, writing, or rewinding the tape.
The tape is loading, unloading, or rewinding.
On
The drive is idle, there may or may not be a cartridge in the tape drive.
Off
There is no power to the drive.
Use
Amber ON
Cleaning
Cartridge*
ON
Drive head needs cleaning, or the previous data tape was worn out.
Remains ON after you unload the cleaning cartridge. If this condition occurs the likely cause
is cleaning cartridge has expired(been used up) and the cleaning was not done.
OFF
If the Use Cleaning Cartridge LED comes ON and Remains ON after you unload the cleaning
then ON cartridge the likely cause is cleaning cartridge has expired(been used up) and the cleaning was
not done.
OFF
If after cleaning the LED turns on again when you reload the data cartridge. When n this
then ON condition occurs the likely cause is a worn out data cartridge. Clean the drive again and try
another data cartridge. If the problem persists, do the problem determination procedures.
OFF
Cleaning is complete, or cleaning is not required.
Note:
* On the drive this is an international symbol the wording here is a description of what that symbol means.
Tape Drive Performance/Reliability Checklist
The Tape Drive Performance/Reliability Checklist is an overview of how to evaluate and prevent tape drive problems.
Media Selection
Media selection is very important as improper or low grade media will not work properly with the tape drive.
z
z
z
Use only the tape cartridges supported by your tape drive.
These must be high quality data grade media, such as the IBM data grade cartridge originally supplied with your
drive.
Don't attempt to write on previously written software distribution tapes. Often these tapes will not support being
rewritten without modifications to the cartridge. If the cartridges are modified it is possible to cause tape jams or
misalignment.
Media Replacement
file://C:\temp\TAPEWHDR.html
5/20/2008
Tape Help Package
Page 40 of 93
Cartridges which are used regularly (e.g. daily/weekly backup tapes) should be discarded after about a hundred uses.
Cartridges which are in use when media-related errors are reported by your backup application, or are physically dropped, or
are exposed to extremely harsh environments should be discarded.
Media Storage
Proper media handling and storage is important to reduce the chance of damage to the media.
z
z
z
Protect your cartridges from particulate contamination when they're not in use. Put each cartridge in its protective case
or place the cartridge in a dust-tight container designed for tape cartridge storage.
Keep your cartridges in an area where the temperature and humidity are comfortable for you and are relatively
constant.
Orient cartridges in storage so that their cases are on an edge (vs flat). If cartridges are moved between areas whose
temperature or humidity differ greatly, let the cartridge adapt for several hours prior to use.
Cleaning Cartridge Selection/Usage
Proper cleaning is important to reduce errors and rereads/rewrites.
z
z
z
z
z
z
z
Use only the cleaning cartridges supported by your tape drive. These must be high quality cartridges, such as the IBM
cleaning cartridge originally supplied with your drive.
Refer to the "Media Selection" for proper cleaning cartridge part numbers and their minimum recommended usage.
Cleaning Cartridges often are specifically designed for specific drive usage, use only the cleaning cartridge specified
for the drive being used.
The need to clean a tape drive is often indicated by an message on the tape drives display or by a cleaning indicator,
such as an Amber LED on the drive being on solid(not flashing).
Clean the tape drive after any media related error is encountered.
Mark the cleaning cartridge usage counter every time the cartridge is used.
If a cleaning cartridge is used to clean the drive and the cleaning LED is on after the cleaning cartridge is use,it is very
likely that the cleaning cartridge has been completely used up(expired) and that it did not clean the tape drive. Use a
brand new IBM cleaning cartridge to clean the drive again. If this cleaning cartridge turns off the cleaning required
indication, discard the previously used cartridge as it is expired(used up).
Environment
Locate your tape drive at table top level or higher and away from sources of particulate contamination such as outside
doorways, high foot traffic areas, printers, and copiers. Maintain comfortable temperature and humidity (ideally 30-40%
Relative Humidity) when the tape drive is in use. Note that this may require a timing adjustment of nighttime setbacks.
Minimize the amount of time cartridges spend in the drive when not in actual use.
Troubleshooting
If a backup failure occurs, try cleaning the drive and retrying the operation with a new cartridge. Verify that this checklist's
recommendations are being followed by the system's operators. Look for trends, process changes, and/or environmental
changes. Avoid mechanical loading problems by placing labels only in the designated cartridge spine and top locations and
assuring that they are not peeling off or more than two layers thick. Contact your IBM CE if problems persist.
Note: The TAPE DRIVE PERFORMANCE/RELIABILITY CHECKLIST is based on the copyrighted "8MM
PERFORMANCE/RELIABILITY CHECKLIST" by the Exabyte Corporation and is distributed free of charge with Exabyte
Corporation permission.
Tape Drive Error Information
With the introduction of Serial Attached SCSI(SAS) adapters there are new labels for TAPE_ERR's. The equivalent of
TAPE_ERR1 will be SC_TAPE_ERR1 when the device is a SAS Tape Drive.
Details AIX Error Log entries(errpt -a) for tape entries:
file://C:\temp\TAPEWHDR.html
5/20/2008
Tape Help Package
Page 41 of 93
Label
Identifier
Likely Cause of Error Log Entry
TAPE_ERR1
SC_TAPE_ERR1
TAPE_ERR2
SC_TAPE_ERR2
TAPE_ERR3
SC_TAPE_ERR3
4865FA9B
68C66836
476B351D
E1D8D4A4
E64EC259
AD70D2DA
Media (hard error)*
Effect on User Diagnostic
Application
Calls out
I/O Error
Media
H/W(but media can cause H/W errors)*
I/O Error
Media (soft error)**
TAPE_ERR4
SC_TAPE_ERR4
TAPE_ERR5
SC_TAPE_ERR5
TAPE_ERR6
SC_TAPE_ERR6
5537AC5F
07A33B6A
FFE2F73A
03C88393
B617E928
5AE89094
Unknown(Requires further analysis)
No effect(Not
Seen by
Application)
I/O Error
Unknown(Requires further analysis)
I/O Error
Ignores
Dirty Drive (Cleaning LED ON)***
No effect(Not
Seen by
Application)
Ignores
Drive/Dirty
drive/Media
Ignores
Ignores
Note:
z
z
z
z
z
z
z
* 4mm tape drives will flash the Amber LED
** 4mm tape drives will put the Amber LED on solid
*** 8mm 5GB, & 7GB put the Amber LED on solid after 30 hours of tape motion without the drive being cleaned.
8mm 20GB put the Amber LED on solid after 70 hours of tape motion with AME media and 20 hours with MP
media.
8mm 2.3GB, 5GB, 7GB, & 20GB tape drives will log a TAPE_ERR3 when: Rewrite % is equal to or greater than 2%
with at least 100mb of data written,
or
Reread % is equal to or greater than 1% with at least 20mb of data read.
The 20GB drive MUST BE CLEANED after using 15m, 54m, 112m, or 160m length media before any subsequent
write operation will be allowed.
TAPE_ERR3 and TAPE_ERR6 are "soft errors" that are posted to the AIX error log. In other words, neither error
terminated the tape operation. They are informational errors that may cause AIX to send an informational message to
the user.
TAPE_ERR4 errors are often found to be caused by noise on the SCSI bus. Noise on the SCSI bus can be caused by
one or more of the following:
{ Loose SCSI Cables (reseat and tighten all SCSI connections).
{ Bent pins in the SCSI connection (check all SCSI connections for bent pins).
{ Device is not supported on the SCSI adapter/system(insure device is supported by the SCSI adapter/system).
{ Improper, missing or multiple SCSI bus termination(check SCSI bus termination).
{ SCSI cables(insure the proper IBM SCSI cables are used).
{ SCSI cables exceed the supported length for the bus(check the IBM information on SCSI bus length).
{ Other SCSI devices on the bus(it may be necessary to remove the other SCSI devices one at a time to determine
device causing the problem).
Tape Drive Problem Determination
Details the steps that should be taken to resolve problems.
Tape drives are very expensive and often are not the reason a tape cannot be read or written. Often the problem is caused by
one or more of the following:
z
z
Not cleaning the tape drive, using cleaning cartridges that are used up, use of cleaning cartridges that are not
supported, not following the recommended cleaning frequency, or cleaning instructions.
Not cleaning the tape drive after an I/O error prior to retrying the failing operation.
file://C:\temp\TAPEWHDR.html
5/20/2008
Tape Help Package
z
z
z
z
z
z
z
z
z
z
z
Page 42 of 93
Poor Quality media, or worn out media being used. Clean the drive and retest the operation with a new IBM data
cartridge recommended for the drive.
Misunderstanding of the meaning of the LED's on the tape drive.
Environment not suitable for tape drive operation.
PTF's level of the system does not support the tape drive.
Bad blocksize, attempts to read at one blocksize and the tape is written at another. Or the blocksize, attempting to
write at is preceded by a 0 (ZERO), 0512 is not the same as 512. The zero is recognized by the system as Octal and
some applications do not support Octal values.
Device buffering turned off causing the drive to write every block of data as it is received. Normal operation is to
buffer the data allowing the drive to stream the data to the tape as a continuous operation.
Writing a tape with one command then attempting to read the tape with a non compatible command, such as: writing
the tape with a "tar" command and attempting to read the tape with a "restore" command.
Improper SCSI bus termination.
Conflict of tape drives SCSI address with another device on the bus.
Electrical problems with the electrical power going to the system and the tape drive. This could be no electrical
ground, poor electrical ground, measurable voltage on the ground or neutral, etc..
This is not for the user to check, a trained professional should check this.
Other device causing "noise" on the bus.
Problem Determination Steps
When experiencing problems with IBM tape drives, 1/4", 4mm, VXA, LTO, 8mm, or DLT tape drives you should do the
following before placing a service call:
Cleaning the tape drive
It is very important to follow the recommended cleaning information provided with the tape drive. If the tape drive is not
cleaned properly even new media may not perform properly.
Do not over clean the tape drive as over cleaning can damage the tape drive, follow the cleaning information
provided with the drive.
If the recommended cleaning schedule or non IBM cleaning cartridges have been used it may be necessary to clean the tape
drive more than once to get the drive fully cleaned.
Clean the tape drive using the IBM Cleaning Cartridge:
1/4" Tape Drives
150mb drive
520mb drive
1.2GB drive
4GB drive
13GB drive
30GB drive
50GB drive
Model
7207-001
7207-011
7207-012
Description
QIC-150
QIC-525
QIC-1000
7207-122
7207-315
7207-330
7212-102
7212-102
SLR5-4GBSL
QIC-5010-DC
SLR60
Cleaning Cartridge P/N
16G8572*
16G8572*
16G8572*
35L0844**
35L0844*
35L0844*
35L0844*
SLR100
35L0844*
Note:
* May be used for up to 50 cleanings
** Supported with a minimum microcode level of I09.23 or I09:23
file://C:\temp\TAPEWHDR.html
5/20/2008
Tape Help Package
Page 43 of 93
4mm Tape Drives
4mm 2GB DDS|||| drive
4mm Internal Autoloader
4mm 4GB DDS2 drive
Model
7206-001
7206-005
7332-005
4mm 12GB DDS3 drive
7206-110
7332-110
4mm 20GB DDS4 drive
7206-220
7332-220
7212-102
4mm 36GB DAT72 drive 7206-336
7212-102 and 103
7214-1U2(SAS drive only)
4mm 80GB DAT160 drive 7214-1U2
Description
DDS1(DDS||||)
DDS2
DDS2
Cleaning Cartridge P/N
21F8763*
21F8763*
21F8763*
DDS3
21F8763*
DDS4
21F8763*
DAT72
21F8763*
DAT160
23R5638
Note: * May be used for up to 50 cleanings
VXA Tape Drives
VXA-2 80GB drive
VXA-2 80GB drive
VXA-320 160GB drive
Model
7206-VX2
7212-102
7212-312
7206-VX2
7212-102
7212-312
VXA-320
Description
VXA-2
Cleaning Cartridge P/N
19P4880*
VXA-2
24R2138**
VXA-320
24R2138**
Note: * May be used for up to 20 cleanings(Gray Accent Color)
** May be used for up to 80 cleanings(Teal(Green) Accent Color)
LTO Tape Drives
200GB LTO-2 drive
Model
7212-102
800GB LTO-4 drive
7214-1U2
Description
IBM Universal Cleaning
Cartridge
IBM Universal Cleaning
Cartridge
Cleaning Cartridge P/N
35L2086*
35L2086*
Note: * May be used for up to 50 cleanings.
8mm Tape Drives
2.3GB drive
5GB drive
7GB drive
Model
7208-001
7208-011
7331-205
file://C:\temp\TAPEWHDR.html
Description
Cleaning Cartridge P/N
16G8467*
16G8467**
16G8467**
5/20/2008
Tape Help Package
20GB drive
60GB drive
Page 44 of 93
7208-341
7331-305
7208-345
7334-410
35L1409***
35L1409***
Note:
* May be used for up to 12 cleanings
** May be used for up to 22 cleanings
*** May be used for up to 18+ cleanings(The drive varies the cleaning media usage. The drive will display "Expired"
Message and Clean LED(AMBER on solid) if an expired, maximum number of cleanings, cleaning cartridge is inserted into
the drive.)
DLT Tape Drives
35GB DLT drive
40GB DLT drive
160GB SDLT drive
Model
7205-311
7337-305/306
7205-440
7337-360
Description
DLT7000
Cleaning Cartridge P/N
59H3092*
DLT8000
59H3092*
7205-550
SDLT320
19P4357*
Note: * May be used for up to 20 cleanings
Check the media
Often media problems cause unnecessary drive replacements.
If an user application is failing with media(I/O) errors to a tape drive:
z
z
z
Check what type and brand of media being used and insure it is supported on the tape drive.
Clean the tape drive with the appropriate IBM cleaning cartridge.
After cleaning the tape drive retry the application, and if it fails again, clean the drive again, and retry the operation on
new IBM media.
This will often result in replacing a single data cartridge that resolves the problem.
1/4" Tape Drives
Model
Description
150mb drive
520mb drive
7207-001
7207-011
1.2GB drive
7207-012
4GB drive
7207-122
QIC-150
QIC-525
QIC-150
QIC-1000
QIC-525
QIC-150
SLR5-4GB
QIC-2GB
QIC-1000
QIC-525
QIC-150
file://C:\temp\TAPEWHDR.html
Data Cartridge
P/N
21F8578
21F8697
21F8578
21F8730
21F8697
21F8578
59H3660
16G8436
21F8730
21F8697
21F8578
Density Setting
15, 16
15, 16, 17
15, 16
21 (ONLY)
15, 16, 17
15, 16
38, 166
34, 162
21 (ONLY)
15, 16, 17
15, 16
Media
Description
DC6150
DC6525
DC6150
DC9120
DC6525
DC6150
SLR5-4GB
DC9120
DC6525
DC6150
5/20/2008
Tape Help Package
13GB drive
30GB drive
50GB drive
Page 45 of 93
7207-315
7207-330
7212-102
7212-102
MLR1-16GB
QIC-5010
QIC-5010(2GB)
QIC-2GB
QIC-1000
QIC-525
QIC-150
SLR60 37.5GB
59H4175*
16G8574**
35L0589**
16G8436
21F8730
21F8697
21F8578
24R0146
33 (ONLY)
33 (ONLY)
33 (ONLY)
34 (ONLY)
21 (ONLY)
15, 16, 17
15, 16
52
MLR1-16GB
DC5010 MLR1
DC5010 MLR1
SLR60-30GB
SLR100-5GB
MLR3-25GB
MLR1-16GB
MLR1-13GB
MLR1-2GB
SLR5-4GB
SLR5-4GBSL
DC9250
DC9250XL
DC9200
DC9200SL
SLR100 50GB
SLR100 37.5GB
SLR60-30GB
SLR100-5GB
MLR3-25GB
MLR1-16GB
MLR1-13GB
MLR1-2GB
SLR5-4GB
SLR5-4GBSL
DC9250
DC9250XL
DC9200
DC9200SL
19P4209
35L0661
59H4128
59H4175
16G8574
35L0589
59H3660
52
52
48
33
33
33
SLR60
35L0968
24R0146
19P4209
35L0661
59H4128
59H4175
16G8574
35L0589
59H3660
52
52
52
52
48
33
33
33
DC9120
DC6525
DC6150
SLR60
MLR1-16GB
MLR1-16GB
MLR1-2GB
Read Only
Read Only
Read Only
Read Only
Read Only
Read Only
SLR60
SLR60
SLR60
MLR1-16GB
MLR1-16GB
MLR1-2GB
Read Only
Read Only
Read Only
Read Only
Read Only
Read Only
Note:
* Drive must have a microcode level of 0345 or higher to use this tape.
** Withdrawn(obsolete)
4mm Tape Drives
Note: Do not change the default density settings in AIX for the 4mm tape drive as the 4mm tape drives do automatic
media sensing and write and read the correct format for each tape. Changing the default density settings may cause
unpredictable results.
Model
file://C:\temp\TAPEWHDR.html
Description
Data Cartridge P/N
5/20/2008
Tape Help Package
4mm 2GB drive
4mm 4GB drive
4mm 12GB drive
4mm 20GB drive*
4mm 36GB drive**
4mm 80GB drive***
Page 46 of 93
7206-001
7206-005
7332-005
7206-110
7332-110
7206-220
7332-220
7212-102
7206-336
7212-102
7212-102 and 103
7214-1U2
DDS1(DDS||||)
DDS2
21F8754
8191151
DDS1(DDS||||)
DDS3
21F8754
59H3465
DDS2
DDS1(DDS||||)
DDS4
8191151
21F8754
59H4456
DDS3
DDS2
DDS1(DDS||||) is not
supported
59H3465
8191151
DAT72
18P7912
DDS4
DDS3
DDS2 is not supported
DDS1(DDS||||) is not
supported
59H4456
59H3465
DAT160
23R5635
DAT72
DDS4
DDS3 is not supported
DDS2 is not supported
DDS1(DDS||||) is not
supported
18P7912
59H4456
59H3465
Note:
* Tapes that are not DDS4, or DDS3, or DDS2 are not supported and will eject when inserted into the 20GB 4mm DDS4
tape drive or DDS4 Autoloader.
** Tapes that are not DAT72, or DDS4, or DDS3 are not supported and will eject when inserted into the 36GB 4mm
DAT72 tape drive.
***Tapes that are not DAT160, or DAT72, or DDS4 are not supported and will eject when inserted into the 80GB 4mm
DAT160 tape drive.
VXA Tape Drives
The Smit density setting for VXA-320 format/capacity is "130".
The Smit density setting for VXA-2 format/capacity is "129".
The Smit density setting for VXA-1 format/capacity is "128".
file://C:\temp\TAPEWHDR.html
5/20/2008
Tape Help Package
Model
VXA-2 80GB drive 7206-VX2
7212-102
7212-312
VXA-320 160GB
Drive
Page 47 of 93
Description
Density Setting
V6
Data Cartridge
P/N
19P4878
V10
N/A
129, 128
V17
19P4877
129, 128
V23
19P4876
129, 128
X6
24R2134
129, 128
X10
24R2136
129, 128
X23
24R2137
129, 128
V23
19P4876
130, 129, 128
X6
24R2134
130, 129, 128
X10
24R2136
130, 129, 128
X23
24R2137
130, 129, 128
129, 128
Media
Description
20GB
Blue accent
40GB
Orange accent
59GB
Red accent
80GB
Purple accent
20GB
Teal(Green)
accent
40GB
Teal(Green)
accent
80GB
Teal(Green)
accent
160GB
Purple accent
40GB
Teal(Green)
accent
80GB
Teal(Green)
accent
160GB
Teal(Green)
accent
The VXA-2 tape drive supports "X" media. To use "X6", or "X10" media you must have a minimum microcode level in
the VXA-2 tape drive(including the drive in the autoloader) of "2105".
The "X23" and "X Cleaning" cartridge will work with all levels of the VXA-2 microcode.
The VXA-2 Tape drive can write VXA-1 format of data to the 'X' media but 'X' media is not supported in the VXA-1 tape
drive. 'X' media will be ejected by the VXA-1 tape drive.
The VXA-320 tape drive supports only 'X' media and the 'V23' media, all other media is ejected.
LTO Tape Drives
The Smit density setting for LTO4 format/capacity is "70".
The Smit density setting for LTO3 format/capacity is "68".
The Smit density setting for LTO2 format/capacity is "66".
The Smit density setting for LTO1 format/capacity is "64".
Model
LTO2 200GB drive 7212-102
LTO4 800GB drive 7214-1U2
68
file://C:\temp\TAPEWHDR.html
Description
LTO2
LTO1
LTO4
LTO3
Data Cartridge
P/N
08L9870
08L9120
95P4436
24R1922
Density Setting
66, 64
64
70
Media
Description
200GB
100GB
800GB
400GB
5/20/2008
Tape Help Package
Page 48 of 93
LTO2 Read only
08L9870
200GB
8mm Tape drives
2.3GB, 5GB, 7GB and 20GB Drive/Media Capacity
Each 8mm tape drive only supports specific media, the following data will give you information that can be used to make an
informed decision on what media to use:
z
z
z
z
z
z
z
z
8mm media of 15m, 54m, 112m, or 160m length are Metal Particle(MP) media.
8mm media of 22m, 45m, 75m, 125m, 150m, 170m or 225m length are Advanced Metal Evaporated(AME) media.
Use the AME media on 20GB and 60GB drives ONLY. MP media can only be read on the 20GB drives.
8mm drives with 2.3GB or 5.0GB capacity Read/Write 15m, 54m, or 112m length "MP" media only.
8mm drives with 7.0GB capacity Read/Write 15m, 54m, 112m, or 160m length "MP" media only.
8mm drives with 20.0GB capacity can only Read 15m, 54m, 112m, or 160m length "MP" media.
8mm drives with 20.0GB capacity can Read/Write ONLY on 22m, or 170m length "AME" media.
If the 22m or 170m AME tape has been written in 60GB format, the tape cannot be read by the 20GB drive, it can be
rewritten by the 20GB drive as if the tape were blank.
AME data tapes of lengths: 45m, 75m, 125m, 150m, and 225m are not supported on the IBM 2.3GB, 5GB, 7GB, and
20GB 8mm tape drives
8mm media of 22m, 160m, and 170m should bear the Recognition System Logo.
The following chart shows data interchange using IBM data grade tapes among 8mm 2.3GB, 5GB, 7GB, 20GB, and 60GB
tape drives. The chart list the external model types as an example but the data applies to the internal versions of the drives
also.
Drive
2.3GB
NonC
**
2.3GB
Compress
**
5GB
NonC
**
5GB
Compress
**
7GB
NonC
**
7GB
Compress
**
N/S
20GB
NonC Compress
**
N/S
60GB
NonC Compress
**
N/S
7208-001
(2.3GB)
7208-011
(5GB)
7331-205
(7GB)
R/W
N/S
N/S
N/S
N/S
R/W D=20* R
R/W D=21* R/W D=140 N/S
N/S
N/S
N/S
R/W D=20* R
R/W D=21* R/W D=140 N/S
R/W D=140 N/S
N/S
7208-341
(20GB)
7331-305
(20GB)
7208-345
(60GB)
7334-410
(60GB)
R#
N/S
R#
R#
R#
R#
R/W
N/S
N/S
N/S
N/S
N/S
N/S
N/S
R
R/W
2.3GB, 5GB, 7GB, 20GB and 60GB supported media
The following chart shows chart shows the supported IBM data grade tapes usage 8mm 2.3GB, 5GB, 7GB, 20GB, and
60GB tape drives.
Drive 15m 54m 112m
160m
MP MP MP
MP
2.3GB R/W R/W R/W
N/S
N/A 21F8575
file://C:\temp\TAPEWHDR.html
22m
AME
N/S
45m
AME
N/S
75m
AME
N/S
125m
AME
N/S
150m
AME
N/S
170m
AME
N/S
225m
AME
N/S
Cleaning
30hr/Monthly
5/20/2008
Tape Help Package
5GB
7GB
N/A
R/W R/W
N/A
N/A
R/W R/W
N/A
N/A
20GB R#
N/A
60GB N/S
Eject
R#
N/A
N/S
Eject
Page 49 of 93
R/W
N/S
21F8575
N/S
N/S
N/S
N/S
N/S
N/S
N/S
R/W
R/W
N/S
21F8575 87G1603
N/S
N/S
N/S
N/S
N/S
N/S
R#
21F8575
N/S
Eject
R#
87G1603
N/S
Eject
R/W
N/S
N/S
N/S
N/S
59H2671
R/W*** R/W*** R/W*** R/W*** R/W***
59H2671
N/A
35L1044 N/A
09L5323
R/W
N/S
59H2678
R/W*** R/W
59H2678 18P6484
16G8467
Amber LED
16G8467
Amber LED
16G8467
Amber LED
35L1409
Amber LED
35L1409
Note:
z
z
z
z
z
z
z
z
z
z
z
z
Compress - Compression Capable
NonC - Non Compression Capable
R/W - This drive can both Read and Write this media.
R - This drive can ONLY Read from this media. The drive cannot write on this media.
N/S - Not Supported.
N/A - No IBM media Available.
D= - Density setting
Eject- The drive will eject this media.
# This media is Metal Particle(MP) the 20GB drive MUST BE CLEANED after reading this media prior using
Advanced Metal Evaporated(AME) media. When you are ready to use AME media insert the AME media and
let the drive eject the AME media. The drive then is to be cleaned. Cleaning the drive prior to inserting the
AME will still require the drive to be cleaned again as the drive will eject the AME media and display the
MUST CLEAN message.
* Use the Density setting to write this format/capacity with this drive.
** Data interchange between the 2.3GB, 5GB, and 7GB tape drives is ONLY capable on the 15m, 54m or 112m
Data Cartridges, not on the 160m.
*** The 60GB drive can Read tapes written by the 20GB drive but cannot write tapes that can be Read by the
20GB drive. Tapes written by the 60GB drive can only be read on a 60GB drive.
20GB and 60GB tape drive interchange
The following chart shows data interchange using the IBM 8mm data grade tape between the 8mm 20GB and 60GB tape
drives. The chart lists the external model type as the example but the data applies to the internal versions of the 20GB drive
also.
z
z
z
z
z
z
z
z
z
z
z
z
Metal Particle(MP) media is not supported in the 60GB tape drive and is ejected. MP media is normally 15m,
54m, 112m, 160m lengths.
MP media can only be read on the 20GB drives.
Advanced Metal Evaporated(AME) media is available in 22m, 45m, 75m, 125m, 150m, 170m, or 225m lengths.
AME "SmartClean" data cartridges contain a build in cleaning capability. Cartridges of 75m, 150m, and 225m
are "SmartClean" Cartridges.
AME media of 22m, or 170m length are the only AME media supported in the 20GB drive.
Format is a term used to describe the way a tape is written.
The 20GB 8mm tape drive ONLY writes/reads a "Mammoth" format.
The 60GB 8mm tape drive ONLY writes "Mammoth2(M2)" format.
The 60GB 8mm tape drive READS "Mammoth" or "Mammoth2(M2)" format.
It is not possible to write data on a 60GB drive and read the data on the 20GB drive.
If the 22m or 170m AME tape has been written by a 60GB 8mm drive the tape cannot be read by the 20GB
drive. The 20GB drive will treat this tape as if the tape were a blank tape.
There is no need to use density settings for writing or reading tapes on either the 20GB or the 60GB drives as
the drives do automatic media and tape format recognition.
file://C:\temp\TAPEWHDR.html
5/20/2008
Tape Help Package
Drive
7208-341(20GB)
7331-305(20GB)
7208-345(60GB)
7334-410(60GB)
20GB
R/W*
R/W*
R**
R**
Page 50 of 93
60GB
N/S
N/S
R/W**
R/W**
Note:
z
z
z
z
z
R/W - This drive can both Read and Write this media.
R - This drive can ONLY Read from this media. The 60GB drive cannot write a format that can be read by the
20GB 8mm drive.
N/S - Not Supported
* Media must be 22m or 170m AME ONLY.
** The 60GB drive can read Mammoth or M2 format but can only write M2 format.
DLT Tape Drives
The following chart shows the various DLT media and their IBM Part number and the associated density setting:
Model
Type of
Non
Compressed
Data Cartridge Density Setting
Cartridge
Compressed
Capacity
P/N
Capacity
35GB drive
7205-311
DLTtapeIII
2.6GB
2.6GB
N/A
23
7337-305
Compression
not supported
6GB
6GB
N/A
24
Compression
not supported
10GB
20GB
N/A
25
DLTtapeIIIxt
15GB
30GB
59H3411
25
DLTIV
20GB
40GB
59H3040
26
35GB
70GB
59H3040
27
40GB drive
7205-440
7337-360
DLTtapeIII
2.6GB
N/A
23
N/A
24
10GB
15GB
20GB
35GB
40GB
2.6GB
Compression
not supported
6GB
Compression
not supported
20GB
30GB
40GB
70GB
80GB
N/A
59H3411
59H3040
59H3040
59H3040
25
25
26
27
65
110GB
160GB
220GB
320GB
35L1119
35L1119
72
73
6GB
DLTtapeIIIxt
DLTIV
160GB drive
7205-550
SDLT320
Note: DLTtapeIV, DLTtapeIIIxt, and DLTtapeIII are the trademarks of Quantum Corp.
Microcode Level
The Tape Drives Microcode level is important in that there have been many fixes for problems incorporated in the new
levels of microcode. The level of microcode in the drive is field upgradeable without changing the tape drive. User
installable microcode is available from the WEB at:
file://C:\temp\TAPEWHDR.html
5/20/2008
Tape Help Package
Page 51 of 93
http://techsupport.services.ibm.com/server/mdownload/download.html
Determine Microcode Level
To determine the microcode level in the tape drive use the following AIX command:
lscfg -vl rmt0 <- the Z1 or FW field will show the microcode level
The current microcode levels are as of the date on this document.
Please check the IBM microcode web site for the most current information.
Format
Capacity
Model
Description
1/4"
4mm
1.2GB Drive
4GB Drive
13GB Drive
30GB Drive
50GB Drive
7207-012
7207-122
7207-315
7207-330
7212-102
7212-102
4GB Drive
7206-005
Current
Microcode Level
I07:24
0940
0345
0620
0620
DDS2
4Co0
5ALL
6640
4GB Autoloader
7332-005
DDS2
4Co0
5ALG
4GB Library
12GB Drive
12 GB Autoloader
20GB Drive
20GB Autoloader
36GB Drive
7336-205
7206-110
7332-110
7206-220
7212-102/103
7332-220
7206-336
7212-102
7214-1U2(SAS
drive only)
7214-1U2
DDS2
DDS3
DDS3
DDS4
5ALG
758B
758B
C209
DDS4
DAT72
DAT160
H211
V315
B013
3.5" - B013
SAS Drive: BS08
WS11
VXA-2
2142
VXA-320
3221
LTO2
LTO4
0410
82F5
Mammoth
Mammoth
Mammoth 2
Mammoth 2
807A
807A
41eA
41eA
07wR
07wR
DAT160
80GB Drive
VXA-2
80GB Drive
VXA-320
160GB Drive
7206-VX2
7212-102/103
7212-312
VXA-320
LTO-2
LTO-4
200GB Drive
800GB Drive
7212-102/103
7214-1U2
8mm
5GB Drive
7GB Library
20GB Drive
20GB Library
60GB Drive
60GB Library
7208-011
7331-205
7208-341
7331-305
7208-345
7334-410
file://C:\temp\TAPEWHDR.html
<--- Generation 1
drive
<--- Generation 2
drive
<--- Generation 3
drive
<--- Generation 1
drive
<--- Generation 2
drive
5/20/2008
Tape Help Package
DLT
Page 52 of 93
60GB Library
Controller
7334-410
35GB Drive
7205-311
DLT7000
296B
35GB Library
7337-305 and 306
DLT7000
296B
35GB Library
Controller
40GBDrive
7337-305 and 306
7205-311
DLT8000
0255
40GB Library
7337-360
DLT8000
0255
40GB Library
Controller
160GB Drive
7337-360
7205-550
2.2
(Also known as
V107)
(Also known as
V107)
1.63
(Also known as
V85)
(Also known as
V85)
2.67.0001
SDLT
3A3A
(Also known as
V58)
AIX Error Log
Review the AIX Error Log for all errors around the time the application was unable to process the tape.
If there is no error in the AIX error log around the time application was unable to process the tape the following would be
likely causes of the problem:
z
z
z
Data cartridge was not appropriate for the operation. For example the application attempted to write to 5GB 8mm
media in 20GB 8mm drive.
A backup was attempted to a data cartridge that was write protected.
The amount of data being written to the tape exceeded the capacity of the data cartridge.
AIX error log entries of the form: TAPE_ERR1, TAPE_ERR2, or TAPE_ERR3 are normally media related errors that can
be corrected by cleaning the tape drive and retrying the operation. If the error occurs again on the same data cartridge, clean
the tape drive and use a new IBM data cartridge.
AIX error log entries of the form: TAPE_ERR6 are caused by the tape drive requesting cleaning. Either the tape drive has
exceeded the recommended cleaning interval or the tape drive has exceeded the tape drives internal limit for soft errors and
is requesting cleaning.
The AIX command to review the AIX error log is:
errpt -a | pg
Read Previously Written Data Cartridge
If there are problems reading previously written data cartridges it may be necessary to determine if there was data previously
written to the data cartridge and at what block size the data was written at.
Read tape on another system
If another system is available attempt to read the tape on the other system. If it can read the tape then check the blocksize set
in the "good" system to insure it matches the system where the tape could not be read.
Determine block size of previously written tape
It will be necessary to do a dd of the tape to determine if there is data on the data cartridge and also determine the blocksize
the data cartridge was written at.
z
To determine the blocksize currently set for the tape drive on the system use the AIX command "lsattr". Write down
file://C:\temp\TAPEWHDR.html
5/20/2008
Tape Help Package
z
z
z
z
z
Page 53 of 93
this blocksize:
lsattr -El rmt0
Set the tape drives blocksize to 0 (if not already at 0):
chdev -a block_size=0 -l rmt0
Determine the blocksize the tape was written at:
dd if=/dev/rmt0 bs=128k count=1 | wc -c
Use the chdev command to set the blocksize for the tape.
Process the tape.
Set the tape drives blocksize back to the previous setting you wrote down previously.
Verify mksysb table of contents
There may be times when you want to verify the table of contents of a AIX "mksysb" tape without actually restoring the
data. The following AIX command will display the table of contents of the mksysb tape:
restore -s4 -Tvqf /dev/rmt0.1
Note:
z
z
You must use the no rewind setting(.1) for this command to work.
The blocksize set for the tape drive must match the blocksize the tape was written at. If you cannot determine the
blocksize the data on the tape was written at, using a blocksize of "0" will enable the tape drive to read the tape but
will take a very long time.
Reset the tape drive
There may be times when you want to reset a tape drive to clear an error condition(including stuck tape) without powering
off the tape drive. It is possible on most IBM 1/4", 4mm, 8mm, DLT, LTO and VXA tape drives to reset the tape drive by
pressing and holding the eject button depressed for 15-30 seconds(drive power must be ON).
Another way to reset the tape drive is to sign on the system with root authorization and issue the AIX command:
diag -c -d
SCSI Address
Determine that there is no conflict of SCSI addresses between the tape drive and any other SCSI device.
lsdev -Cs scsi
Check Connections
For externally attached tape drives check all external SCSI connections. Check all connectors to be sure there are no bent or
damaged pins in the connector. Insure all connections are secure, screws or clips are tightly attached.
Check SCSI Termination
For externally attached tape drives check to insure the proper IBM terminator is in use. Check the P/N. Insure the
terminators are securely attached.
AIX Diagnostics
To test the tape drive run the tape drive diagnostics using the IBM test tape or diagnostic tape. To run the AIX diagnostics it
is necessary to have root access. From the command line enter the AIX command:
diag
AIX Diagnostic Media
1/4" Tape Drives
Capacity
Model
file://C:\temp\TAPEWHDR.html
Description
Test Tape Part Number
5/20/2008
Tape Help Package
150mb drive
520mb drive
1.2GB drive
4GB drive
13GB drive
30GB drive
50GB drive
Page 54 of 93
7207-001
7207-011
7207-012
7207-122
7207-315
7207-330
7212-102
7212-102
QIC-150
QIC-525
QIC-1000
SLR5-4GBSL
QIC-5010-DC
SLR100
92X7510
21F8586
21F8734
59H3661
87G1626
35L0967
SLR100
35L0967
Note: Diagnostics will fail if the wrong tape is used in the 1/4" drive.
4mm Tape Drives
Capacity
Model
Description
2GB drive
4GB drive
7206-001
7206-005
7332-005
DDS1(DDS||||)
DDS2
12GB drive
7206-110
7332-110
Internal Autoloader
7206-220
7332-220
7212-102
7206-336
7212-102
7214-1U2(SAS drive only)
7212-1U2
DDS3
Diagnostic Tape Part
Number
21F8762*
8191146(No longer available)
*
or
IBM DDS2 Data Cartridge
P/N 8191151
Test Tape P/N
59H3466
DDS1(DDS||||)
DDS4
73H3467
59H4457
DDS4
59H4457
DAT160
23R5636
4GB
20GB drive
36GB DAT72 drive
80GB DAT160drive
Note: * Usage is counted and there is a maximum of 50 uses(tape insertions).
VXA Tape Drives
Capacity
VXA-2 80GB drive
VXA-320 160GB drive
Model
7206-VX2
7212-102
7212-312
VXA-320
Description
VXA-2
Test Tape Part Number
24R2135
19P4879
VXA-320
24R2135
Model
7212-102
7214-1U2
Description
LTO2
LTO4
Test Tape Part Number
24R0395
45E1129
LTO Tape Drives
Capacity
200GB drive
800GB drive
file://C:\temp\TAPEWHDR.html
5/20/2008
Tape Help Package
Page 55 of 93
8mm Tape Drives
Capacity
2.3GB drive
5GB drive
7GB drive
Model
7208-001
7208-011
7331-205
Description
Test Tape Part Number
21F8577
21F8577
21F8577
20GB drive
7208-341
7331-305
7208-345
7334-410
Mammoth
59H2677
Mammoth 2
59H2677
Model
7205-311
7337-305/306
7205-440
7337-360
Description
DLT7000
Test Tape Part Number
59H3039
DLT8000
59H3039
7205-550
SDLT320
35L1120
60GB
DLT Tape Drives
Capacity
35GB
40GB
160GB
Slow Backup or Restore on Some Tape Drives
Some drives are sensitive to the delivery of data to the tape drive. Some applications take the blocksize and block the
data block into larger blocks for transfer to the tape drive. Some applications call this the blocksize, or the buffer size
or blocking factor. Whatever it is called you need to understand that this tape drives performance(data rate)is
greatly effected when the system sends small blocks of data to the tape drive.
Try setting the tape drive block size to a large blocking factor. You may also increase the block size to decrease the
amount of small blocks transferred to and from the tape drive.
You should test your application to see at what blocking factor and blocksize you get the fastest backup and restore
with your particular system, tape drive, and application combination.
The minimum recommended blocking is 32k. Some AIX commands already use 32k or larger blocks when writing,
some do not.
Increasing the blocking factor to 256k may speed up the backup or restore.
The following are a few of the AIX commands and blocking information:
backup
<- will either use 32k or 51.2k as default depending if backup
by name or not.
N/S customer change required.
tar
<- default is 10k
tar needs the customer to use at minimum
-N64
mksysb
<- uses backup on AIX 4.1
N/S customer change required.
dd
needs the customer to use at minimum bs=32k
cpio needs the customer to use at minimum
-C64
Users should insure the blocksize they select is supported by the users application.
Placing a Service Call
Only after all this is done, and the problem persists, should the tape drive service call be placed. When placing a service call
have the following information available:
z
z
z
The type of tape drive you are placing the service call on, 5GB 8mm, or 20GB 4mm, etc..
The machine type, model, and serial number of the IBM machine where the tape drive is installed. If the tape drive is
externally mounted this will be the information from the external enclosure housing the tape drive.
The type of problem being reported.
file://C:\temp\TAPEWHDR.html
5/20/2008
Tape Help Package
z
z
Page 56 of 93
If there were AIX error log entries, what the error log entries were, such as: TAPE_ERR1, TAPE_ERR6, etc..
Be prepared to assist the support person to do further problem isolation and problem determination, including:
{ You have system access.
{ Have the tape drive test tape or diagnostic tape available.
{ Have the IBM cleaning tape available.
{ Have the failed data cartridges available.
{ Have a new IBM data cartridge available.
Tape Drive Self Test
Some tape drives have the ability to both test themselves and to test a data cartridge. This test is done entirely in the drive
with the status being reported by the drive LED's and or display on the tape drive.
200GB LTO2 Tape Drive Internal Self Test(IST)
The following procedure is designed to quickly perform a complete set of diagnostic internal self tests on the half-high
LTO-2 tape drive, without impacting server operation. This 5 = minute test can also be used to verify the status of individual
LTO tape cartridges.
Enter Diagnostic Mode:
1. Verify that a tape cartridge is not loaded in the drive. To unload a cartridge, press the eject button on the front of the
drive.
2. Press and hold the eject button for 7 seconds, until the green Ready LED starts flashing rapidly, then release the
button.
The Ready LED will continue flashing, indicating that the drive is waiting for a cartridge to be inserted.
Running the Self-Test:
3. Start the self-test by inserting IBM Test Tape P/N 24R0395 into the drive. If an IBM Test Tape is not available, you
can substitute a scratch (blank) LTO Ultrium-2 data cartridge.
Note:
!Important!
Use a blank cartridge that does not contain customer data. During this self-test, the cartridge will be rewritten with a
test pattern and any customer data will be destroyed.
Overall test duration is about 5 = minutes.
a. A cartridge must be loaded within 15 seconds -- otherwise, the drive will automatically revert back to normal
operation. If necessary, return to step 1 to re-enter diagnostic mode.
b. Use a cartridge that is not write-protected. If a write-protected cartridge is inserted while the drive is in
diagnostic mode, the cartridge will be ejected -- see step 9 below.
c. Self-testing can only be performed using a write-compatible (either Ultrium-1 or Ultrium-2) cartridge type, and
with a cartridge that is not damaged -- see step 9 below.
d. If a cleaning cartridge is inserted while the drive is in diagnostic mode, cleaning will occur and the drive will
then return to normal operating mode. To re-enter diagnostic mode, return to step 1.
4. At any time, self-testing can be stopped by pressing the eject button. After a current test operation is completed, the
cartridge will be ejected and the drive will return to normal operation.
5. While self-testing is in progress, the Ready LED will continue to flash. The following 4 test steps are performed: The
initialization sequence has an approximate duration of 20 seconds. The Activity LED indicates tape movement. The
hardware test has an approximate duration of 2 minutes. During that time, a static test is performed on the drive s
electrical components, and proper operation of the cartridge load/unload mechanism is verified. The write/read test
has an approximate duration of 3 minutes. The Activity LED indicates tape movement.
Interpreting the Results:
6. Test Passed: When self-testing has completed successfully and no problems were detected, the cartridge is unloaded
file://C:\temp\TAPEWHDR.html
5/20/2008
Tape Help Package
Page 57 of 93
from the drive and all LEDs are off. Proper functioning of both the drive and the tape cartridge has been verified.
a. If the IST passes, then the tape drive has no hardware fault and no further drive tests are required.
b. Direct the customer to troubleshoot the SCSI bus, OS 1 software configuration to determine the cause of failure
c. Any other LED status requires that the IST is repeated with a different compatible data cartridge that is not
write-protected.
Note:
When the yellow Clean LED remains on, it indicates that self-testing has completed successfully -- but cleaning
is required. Clean the drive by inserting an IBM Cleaning Cartridge (P/N 35L2086). The drive is no longer in
diagnostic mode, and has been returned to normal operation.
7. Drive Failure: When a drive problem is detected, the cartridge will remain loaded inside the drive and the yellow Fault
LED ( ! ) will flash.
8. Media Failure: When a media problem is detected, the cartridge will remain loaded inside the drive, and the yellow
Clean LED will flash. Repeat self-test using another tape cartridge, and replace any defective media.
9. Incorrect cartridge: When the drive has determined that an incorrect tape cartridge was inserted, the cartridge is
unloaded and both the Activity and Clean LEDs will flash. Self-testing cannot be performed if the inserted cartridge is
one of the following:
{ Write-protected
{ Damaged
{ Media type that is not write-compatible with the drive
Press the eject button, to end self-test and return the drive to normal operating mode. Then return to step 1 and run the
self-test using a suitable cartridge.
10. Return to Normal Operation: Following a self-test failure, the tape cartridge will remain loaded inside drive, and the
drive will remain in diagnostic mode. Press the eject button to unload tape cartridge and return drive to normal
operation.
800GB LTO4 Tape Drive Self Test(IST)
This procedure is designed to allow you to quickly perform a complete set of diagnostic tests on your half-high LTO-4 tape
drive, without impacting server operation.
This 4-minute test can also be used to verify good performance of individual LTO tape cartridges.
Enter Diagnostic Mode:
1. Verify that a tape cartridge is not loaded in drive. To unload a cartridge, press the eject button on the front of the
drive.
2. Press and hold the eject button for 7 seconds (until all LEDs become active), then release the button.
3. The Ready LED will continue flashing, the Fault LED ( ! ) will remain on, and "1" will be flashing -- indicating that
the drive is in diagnostic mode and waiting for a cartridge to be inserted. Running the Self-Test:
4. Start the self-test by inserting a scratch (blank) LTO Ultrium-4 data cartridge. If an Ultrium-4 data cartridge is not
available, an Ultrium-3 cartridge can be substituted.
Note: !Important!
Use a blank cartridge that does not contain customer data. During this self-test, the cartridge will be rewritten with a
test pattern and any customer data will be destroyed.
Overall test duration is about 4 minutes.
Note:
a. A cartridge must be loaded within 15 seconds -- otherwise, the drive will automatically revert back to normal
operation. If necessary, return to step 2 to reenter diagnostic mode.
b. Use a cartridge that is not write-protected. If a write-protected cartridge is inserted while the drive is in
diagnostic mode, the cartridge will be ejected -- see step 9 below.
c. Self-testing can only be performed using a write-compatible (either Ultrium-4 or Ultrium-3) cartridge type, and
with a cartridge that is not damaged
-- see step 9 below.
d. If a cleaning cartridge is inserted while the drive is in diagnostic mode, it will be ejected.
5. While self-testing is in progress, LEDs will remain active and the following test steps are performed:
file://C:\temp\TAPEWHDR.html
5/20/2008
Tape Help Package
{
{
Page 58 of 93
The hardware test runs for about 1 minute. During that time, proper operation of the cartridge load/unload
mechanism is verified, and a static test is performed on the drive's electrical components.
The write/read test runs for about 3 minutes.
Interpreting the Test Results:
6. Test Passed:
When self-testing has completed successfully and no problems were detected, the cartridge is unloaded from the drive
and all LEDs are off. Proper function of both the drive and tape cartridge have been verified.
Note: When the yellow Fault LED ( ! ) remains on and ›C› is displayed, it indicates that self-testing has completed
successfully -- but cleaning is required. Clean the drive by inserting an IBM Cleaning Cartridge (P/N 35L2086). The
drive is no longer in diagnostic mode, and has been returned to normal operation.
7. Drive Failure:
When a drive problem is detected, the cartridge will remain loaded inside the drive and the yellow Fault LED ( ! ) will
flash and "5" is displayed. Replace the tape drive.
8. Media Failure:
When a media problem is detected, the cartridge will remain loaded inside the drive, the yellow Fault LED ( ! ) will
remain on, and "7" is displayed. Repeat self-test using another tape cartridge, and replace the defective media.
9. Incorrect Cartridge:
When the drive has determined that an incorrect tape cartridge was inserted, the cartridge is unloaded, the Fault LED
( ! ) will remain on, and "P", "7" or "J" is displayed. Self-testing cannot be performed if the inserted of the following:
{ Write-protected (as indicated by "P")
{ Damaged (indicated by "7")
{ Media type that is not write-compatible with the drive (indicated by "J")
Press the eject button to end self-test and return the drive to normal operating mode. Then return to step 1 and run the
self-test using a suitable cartridge. Return to Normal Operation:
10. Following a self-test failure, the tape cartridge will remain loaded inside drive, and the drive will remain in diagnostic
mode. Press the eject button to unload tape cartridge and return drive to normal operation.
VXA-2 and VXA-320 Tape Drive Self Test(IST)
Performing the IBM VXA-2 and VXA-320 Internal Self Test (IST) The IBM VXA-2 & VXA-320 Internal Self Test (IST)
Prerequisites
z
z
z
z
VXA-2 Tape Drive: Firmware code v2123 or higher
VXA-320 Tape Drive: Firmware code v3209 or higher
One VXA Cleaning cartridge
One unused, brand new VXA X23 data cartridge
IST Procedure
z
z
z
Clean the tape drive
Press the blue eject button for 7 seconds
When the Ready LED blinks rapidly, insert a new X23 data cartridge
The tape drive performs the IST which can take up to 15 minutes
After successful completion the media may or may not be ejected
IST Status and results
The chart below indicates the tape drive s LED status.
z
z
Fields left blank indicate that the according LED is off
If the IST passes: i.e. all LEDs are turned off and the tape is ejected - then the tape drive has no hardware fault and no
further drive tests are required
Direct the customer to troubleshoot the SCSI bus, OS & software configuration to determine the cause of failure
file://C:\temp\TAPEWHDR.html
5/20/2008
Tape Help Package
z
Page 59 of 93
Any other LED status requires that the IST is repeated with a different X23 data cartridge
Note: If a tape which has been previously written to is used for the test, the data will be destroyed.
Action
Ready
Activity
Cleaning
Fault
IST initiated
IST running
IST passed
IST passed
(cleaning needed)
IST media failure
IST media write
protected
IST media not
compatible
IST drive failure
Flashing Rapidly
Flashing Rapidly
On
Tape(Media)
Status
Unloaded
Loaded
Unloaded
Unloaded
Flashing
Flashing
Flashing
Loaded
Unloaded
Flashing
Flashing
Unloaded
Flashing
Flashing
Loaded
Help Desk Guidelines
The following is an outline of how a customer help desk should operate with regard to tape drive operations:
The key to resolving the problems is to determine what is different between success and failure at one site or between sites.
To do this the following will help:
z
z
z
z
z
z
z
z
z
z
Establish and publish backup practices. This helps all understand the importance of the data being backed up, what is
expected to be done, and who is responsible for doing each item.
Establish and publish help desk procedures. This is helpful to both the help desk and the customer sites. This helps
both understand what is expected of each other plus identify what is to be done by each.
Media must be standardized, sites should get media, both data cartridges and cleaning cartridges from the same
source. Provide the sites a simple way to get the data cartridges and cleaning cartridges they need. This reduces the
risk of unsupported media from being used.
Label each data cartridge with the day of the week(on the data cartridge).
Each site should always have a new sealed spare data cartridge.
Label each data cartridge and cleaning cartridge with the date the customer first put it in service.
Manuals shipped from IBM with the system or tape drive need to be kept with the system for Customer and CE use.
Online documentation should be bookmarked for easy reference.
Each tape drive is shipped from IBM with a Diagnostic/Test cartridge. This cartridge needs to be kept with the drive
for Customer and CE use.
Monitor cleaning to insure the tape drives are cleaned when the tape drive requests cleaning.
The AIX Diagnostic, Task Selection, SCSD Tape Drive Service Aids can be used both locally and remotely to
monitor the tape drives need for cleaning. This can be used for the most new tape drives.
Determine cleaning cartridge status and discard used up cartridges. Each site should always have a new sealed spare
cleaning cartridge.
Monitor backups to determine the following:
{ Insure backup completed successfully
{ Determine the type of backup failure and track the following for that site:
Was the backup attempted?
file://C:\temp\TAPEWHDR.html
5/20/2008
Tape Help Package
z
Page 60 of 93
Did the backup put an error in the AIX error log.
TAPE_ERR1 is likely a media failure.
Did terminate the backup.
TAPE_ERR2 is normally a drive failure, but can be caused by a media failure.
Did terminate the backup.
TAPE_ERR3 is likely media starting to fail.
Did NOT terminate the backup.
TAPE_ERR4 Unknown cause requires further analysis. Often the cause of this error is found to be
poor termination of the devices or excessive media errors.
Did terminate the backup.
TAPE_ERR5 Unknown cause requires further analysis.
Did terminate the backup.
TAPE_ERR6 Tape drives log this error when the drive exceeds the preset limit of tape motion
hours since the drive was last cleaned or when the drive exceeds an internally set recovered error
limit. Some drives also log this error when there is an unrecovered media error.
Did NOT terminate the backup.
Log the day of the week, and track this to determine if one tape is failing or are all failing. This will
identify media or drive problems.
Cleaning a tape drive will not normally damage most tape drives when the approved cleaning cartridge is used. On
every backup failure where backup was attempted and failed, the tape drive should be cleaned with the approved
cleaning cartridge.
Note: On some drives over cleaning may damage the drive, review the drive information on cleaning, on those drives
follow the drive recommendation.
z
z
z
z
Prior to placing a service call attempt a simple backup to another tape cartridge to help determine the cause of the
failure. Often replacing a single data cartridge will resolve the problem.
When a service call is required, allow time and access for the CE to do problem determination and problem
correction. This includes allowing the CE time and access to run diagnostics prior to and after parts replacement. It is
desirable to allow the CE authorization to run concurrent diagnostics, a special id may be required for this as it
requires root authorization. This will allow the CE to do problem determination without having to take the system
down for dedicated CE diagnostics.
Sites that are dusty should keep the system at least 24" off the floor to reduce the exposure to dirt and contamination.
Sites that show persistent media and drive failures that are following established cleaning and media procedures
should be considered for filter enclosures.
Tape Drive Interchange Information
rmt settings
rmt Density settings
Density Settings are the internal control information for the tape drive that tell the drive what format(density) to write a data
cartridge at. This is important for both interchanging data with another tape drive or to insure the tape is written to its
maximum capacity.
A combination of methods is used to control the tape drive. One combination is to use the AIX program "smit" to set the
tape drive density and then use the rmt0.x option to choose which density the tape drive will use.
To use the AIX program "smit" enter the following on the AIX command line:
smit tape
Choose change/show device characteristics.
file://C:\temp\TAPEWHDR.html
5/20/2008
Tape Help Package
Page 61 of 93
Select the specific density setting you want(Some tape drives do not need you to select the density setting as they will do
automatic media recognition. Drives such as the DDS 4mm, 20GB 8mm, and 60GB 8mm do automatic media recognition.).
rmt retension/rewind settings
The following table shows the use of the rmt with both its tape options and density settings:
rmt D1/D2
rmt0.0/4
rmt0.1/5
rmt0.2/6
rmt0.3/7
Retension*
no
no
yes
yes
rewind**
yes
no
yes
no
Note:
D1 = density 1 used
D2 = density 2 used
* Used on 1/4" drives only, other drives do not do any retension.
** Rewind on open, does not control on insertion.
Formats and Densities
Details the supported tape formats and densities for the 1/4", 4mm, VXA, LTO, 8mm, and DLT tape drives.
1/4" QIC-150(7207-001)
Density Settings
DC300XLP
DC600A *
DC6150
DC6250 *
DC6037
DC6320
DC6525 *
DC6080
DC9100
DC9120
DC9135
DC9164
DC9200
DC9210
DC9250
None
QIC-24
R
R
R
R
R
R
R
R
N/S
N/S
N/S
N/S
N/S
N/S
N/S
15
QIC-120
N/S
R/W
R/W
R/W
R/W
R/W
R/W
R/W
N/S
N/S
N/S
N/S
N/S
N/S
N/S
16
QIC-150
N/S
N/S
R/W
R/W
R/W
R/W
R/W
R/W
N/S
N/S
N/S
N/S
N/S
N/S
N/S
Maximum Capacity
150mb
1.0 GB
1.2 GB
1.35GB
1.6 GB
2.0 GB
2.1 GB
2.5 GB
1/4" QIC-525(7207-011)
file://C:\temp\TAPEWHDR.html
5/20/2008
Tape Help Package
Density Settings
DC300XLP
DC600A *
DC6150
DC6250 *
DC6037
DC6320
DC6525 *
DC6080
DC9100
DC9120
DC9135
DC9164
DC9200
DC9210
DC9250
Page 62 of 93
None
QIC-24
R
R
R
R
R
R
R
R
N/S
N/S
N/S
N/S
N/S
N/S
N/S
15
QIC-120
N/S
R
R/W
R/W
R/W
R/W
R/W
R/W
N/S
N/S
N/S
N/S
N/S
N/S
N/S
16
QIC-150
N/S
N/S
R/W
R/W
R/W
R/W
R/W
R/W
N/S
N/S
N/S
N/S
N/S
N/S
N/S
17
QIC-525
N/S
N/S
N/S
N/S
N/S
R/W
R/W
R/W
N/S
N/S
N/S
N/S
N/S
N/S
N/S
Maximum Capacity
1.0 GB
1.2 GB
1.35GB
1.6 GB
2.0 GB
2.1 GB
2.5 GB
1/4" QIC-1000(7207-012)
Density
Settings
DC300XLP
DC600A *
DC6150
DC6250 *
DC6037
DC6320
DC6525 *
DC6080
DC9100
DC9120
DC9135
DC9164
DC9200
DC9210
DC9250
None
QIC-24
R
R
R
R
R
R
R
R
N/S
N/S
N/S
N/S
N/S
N/S
N/S
15
QIC-120
N/S
R
R/W
R/W
R/W
R/W
R/W
R/W
N/S
N/S
N/S
N/S
N/S
N/S
N/S
16
QIC-150
N/S
N/S
R/W
R/W
R/W
R/W
R/W
R/W
N/S
N/S
N/S
N/S
N/S
N/S
N/S
17
QIC-525
N/S
N/S
N/S
N/S
N/S
R/W
R/W
R/W
N/S
N/S
N/S
N/S
N/S
N/S
N/S
21
QIC-1000
N/S
N/S
N/S
N/S
N/S
N/S
N/S
N/S
R/W
R/W
N/S
N/S
N/S
N/S
N/S
Maximum
Capacity
21
34-162
38-166
1.0 GB
1.2 GB
1.35GB
1.6 GB
2.0 GB
2.1 GB
2.5 GB
1/4" QIC-4GB SLR5(7207-122)
Note: This drive does not support reading or writing QIC-24
Density
15
16
17
file://C:\temp\TAPEWHDR.html
5/20/2008
Tape Help Package
Page 63 of 93
Settings
QIC-120
QIC-150
QIC-525
QIC-1000
QIC-2GB
DC300XLP
DC600A *
DC6150
DC6250 *
DC6037
DC6320
DC6525 *
DC6080
DC9100
DC9120
DC9120SL
DC9120XL
9200
DC9200
DC9200SL
9210
DC9250XL
SLR5-4GB
SLR5-4GBSL
DC5010(MLR1)
MLR1-16GB
MLR1-25GB
N/S
R
R/W
R/W
R/W
R/W
R/W
R/W
N/S
N/S
N/S
N/S
N/S
N/S
N/S
N/S
N/S
N/S
N/S
N/S
N/S
N/S
N/S
N/S
R/W
R/W
R/W
R/W
R/W
R/W
N/S
N/S
N/S
N/S
N/S
N/S
N/S
N/S
N/S
N/S
N/S
N/S
N/S
N/S
N/S
N/S
N/S
N/S
N/S
R/W
R/W
R/W
N/S
N/S
N/S
N/S
N/S
N/S
N/S
N/S
N/S
N/S
N/S
N/S
N/S
N/S
N/S
N/S
N/S
N/S
N/S
N/S
N/S
N/S
R/W
R/W
R/W
R/W
N/S
N/S
N/S
N/S
N/S
N/S
N/S
N/S
N/S
N/S
N/S
N/S
N/S
N/S
N/S
N/S
N/S
N/S
N/S
N/S
N/S
N/S
R/W-R/W
R/W-R/W
R/W-R/W
N/S
R/W-R/W
N/S
N/S
N/S
N/S
N/S
QIC-4GB
SLR5-4GB
N/S
N/S
N/S
N/S
N/S
N/S
N/S
N/S
N/S
N/S
N/S
N/S
N/S
N/S
N/S
N/S
N/S
R/W-R/W
R/W-R/W
N/S
N/S
N/S
1/4" QIC-5010 MLR1(7207-315)
Note: This drive does not support reading or writing QIC-24
Density
15
16
17
Settings
QIC-120
QIC-150
QIC-525
DC300XLP
DC600A *
DC6150
DC6250 *
DC6037
DC6320
DC6525 *
DC6080
DC9100
DC9120
DC9120SL
DC9120XL
9200
N/S
R
R/W
R/W
R/W
R/W
R/W
R/W
N/S
N/S
N/S
N/S
N/S
N/S
N/S
R/W
R/W
R/W
R/W
R/W
R/W
N/S
N/S
N/S
N/S
N/S
file://C:\temp\TAPEWHDR.html
N/S
N/S
N/S
N/S
N/S
R/W
R/W
R/W
N/S
N/S
N/S
N/S
N/S
21
QIC-1000
34-162
QIC-2GB
38-166
QIC-4GB
SLR5-4GB
N/S
N/S
N/S
N/S
N/S
N/S
N/S
N/S
R/W
R/W
R/W
R/W
N/S
N/S
N/S
N/S
N/S
N/S
N/S
N/S
N/S
N/S
N/S
N/S
N/S
R/W-R/W
N/S
N/S
N/S
N/S
N/S
N/S
N/S
N/S
N/S
N/S
N/S
N/S
N/S
33
QIC5010
MLR1
N/S
N/S
N/S
N/S
N/S
N/S
N/S
N/S
N/S
N/S
N/S
N/S
N/S
5/20/2008
Tape Help Package
DC9200
DC9200SL
9210
DC9250XL
SLR5-4GB
SLR5-4GBSL
DC5010
(MLR1)
MLR1-16GB
MLR1-25GB
Page 64 of 93
N/S
N/S
N/S
N/S
N/S
N/S
N/S
N/S
N/S
N/S
N/S
N/S
N/S
N/S
N/S
N/S
N/S
N/S
N/S
N/S
N/S
N/S
N/S
N/S
N/S
N/S
N/S
N/S
R/W-R/W
R/W-R/W
N/S
R/W-R/W
N/S
N/S
N/S
N/S
N/S
N/S
N/S
N/S
N/S
N/S
N/S
N/S
N/S
N/S
N/S
N/S
R/W
N/S
N/S
N/S
N/S
N/S
N/S
N/S
N/S
N/S
N/S
N/S
N/S
R/W
N/S
Note:
z
z
z
z
z
z
R/W - This drive can both Read and Write this media.
R - This drive can ONLY Read from this media. The drive cannot write on this media.
N/S - Not Supported
- Non Compression - Compression Default for 4GB is compression 166. Compression is set only by density setting on
4GB. Not Set with Smit Compression setting.
* These tapes are not recommended for use on this model 7207 due to incompatibility of the media characteristics and
the design of this R/W head of this 7207.
** These tapes are supported with microcode level 0345 or higher only
1/4" 30GB SLR60(7207-330)
Density Settings 34-162
QIC-2GB
DC9200
DC9200SL
DC9250XL
SLR5-4GB
SLR5-4GBSL
MLR1(2GB)
DC5010(MLR1)
MLR1-16GB
MLR3-25GB
SLR100-50GB
SLR60-30GB
R
R
R
N/S
N/S
N/S
N/S
N/S
N/S
N/S
N/S
38-166
QIC-4GB
SLR5-4GB
N/S
N/S
N/S
R
R
N/S
N/S
N/S
N/S
N/S
N/S
33
QIC-5010
MLR1
N/S
N/S
N/S
N/S
N/S
R/W
R/W
R/W
N/S
N/S
N/S
48
QIC-5210
MLR3
N/S
N/S
N/S
N/S
N/S
N/S
N/S
N/S
R/W
N/S
N/S
52
SLR60
N/S
N/S
N/S
N/S
N/S
N/S
N/S
N/S
N/S
R/W
R/W
Note:
z
z
z
R/W - This drive can both Read and Write this media.
R - This drive can ONLY Read from this media. The drive cannot write on this media.
N/S - Not Supported
1/4" 50GB SLR100(7212-102)
file://C:\temp\TAPEWHDR.html
5/20/2008
Tape Help Package
Density Settings 34-162
QIC-2GB
DC9200
DC9200SL
DC9250XL
SLR5-4GB
SLR5-4GBSL
MLR1(2GB)
DC5010(MLR1)
MLR1-16GB
MLR3-25GB
SLR100-50GB
SLR60-30GB
R
R
R
N/S
N/S
N/S
N/S
N/S
N/S
N/S
N/S
Page 65 of 93
38-166
QIC-4GB
SLR5-4GB
N/S
N/S
N/S
R
R
N/S
N/S
N/S
N/S
N/S
N/S
33
QIC-5010
MLR1
N/S
N/S
N/S
N/S
N/S
R/W
R/W
R/W
N/S
N/S
N/S
48
QIC-5210
MLR3
N/S
N/S
N/S
N/S
N/S
N/S
N/S
N/S
R/W
N/S
N/S
52
SLR60
N/S
N/S
N/S
N/S
N/S
N/S
N/S
N/S
N/S
R/W
R/W
Note:
z
z
z
R/W - This drive can both Read and Write this media.
R - This drive can ONLY Read from this media. The drive cannot write on this media.
N/S - Not Supported
4mm Tape Interchange Information
The following is a chart that shows the interchange using the IBM 4mm data grade tape among the IBM 4mm tape drives.
The chart lists the external model type as the example but the data applies to the internal versions, external autoloader, and
library versions of the drive also.
Tape Drive
Non
2GB
4GB
12GB
20GB
36GB
80GB
DDS
DDS1 DDS2 DDS3 DDS4 DAT72 DAT160
Media DDS||||
7206-001(2GB)
R
R/W
N/S
N/S
N/S
N/S
N/S
DDS1(DDS||||)
7206-005(4GB)
R
R/W
R/W
N/S
N/S
N/S
N/S
DDS2
7206-110(12GB) R
R/W
R/W
R/W
N/S
N/S
N/S
DDS3
7206-220(20GB) Eject
Eject
R/W
R/W
R/W
N/S
N/S
DDS4
7206-336(36GB) Eject
Eject
Eject
R/W
R/W
R/W
N/S
DAT72
(80GB)
Eject
Eject
Eject
Eject
R/W
R/W
R/W
DAT160
Notes:
z
R/W - This drive can both Read and Write this media.
R - This drive can ONLY Read from this media. The drive cannot write on this media.
N/S - Not Supported
Eject - This media is Not Supported and will be ejected.
z
There is no need to use density settings for writing or reading tapes as the drives do automatic media and tape
z
z
z
file://C:\temp\TAPEWHDR.html
5/20/2008
Tape Help Package
z
z
z
z
z
z
Page 66 of 93
format recognition.
The IBM 2GB 4mm DDS1 tape dives will write/read media with a DDS |||| identification Only.
The IBM 4GB 4mm DDS2 tape dives will write/read media with a DDS ||||, or DDS2 identification Only.
The IBM 12GB 4mm DDS3 tape dives will write/read media with a DDS ||||, or DDS2, or DDS3 identification
Only.
The IBM 20GB 4mm DDS4 tape drives will write/read media with a DDS2, or DDS3, or DDS4 identification
Only, all other media will be ejected.
The IBM 36GB 4mm DAT72 tape drives will write/read media with a DDS3, or DDS4, or DAT72 identification
Only, all other media will be ejected.
Media that does not have a DDS ||||, or DDS2, or DDS3 identification are read ONLY on the IBM 2GB, 4GB,
and 12GB 4mm tape dives.
VXA Tape Interchange Format
The following chart shows data interchange between VXA-1, VXA-2 VXA-320 tape drives.
Drive and Format
V6(62m)
V10(124m) V17(170m) V23(230m) X6(62m)
X10(124m) X23(230m)
VXA-1(Non IBM)
VXA1 Format
R/W D=128 R/W D=128 R/W D=128 N/S *
N/S *
N/S *
N/S *
7206-VX2, 7212-102,
7212-312, VXA-2
VXA-1 Format
VXA-2 Format
R/W D=128 R/W D=128 R/W D=128 R/W D=128 R/W D=128 R/W D=128 R/W D=128
R/W D=129 R/W D=129 R/W D=129 R/W D=129 R/W D=129 R/W D=129 R/W D=129
VXA-320
VXA-1 Format
VXA-2 Format
VXA-320 Format
N/S **
N/S **
N/S **
R/W D=128 R/W D=128 R/W D=128 R/W D=128
R/W D=129 R/W D=129 R/W D=129 R/W D=129
R/W D=130 R/W D=130 R/W D=130 R/W D=130
Note:
* V23 and all "X" Data cartridges are ejected from the VXA-1 drive.
** The VXA-320 tape drive supports only 'X' media and the 'V23' media, all other media is ejected.
D = is the smit density setting for this format.
'X' Media requires a microcode level V2105 or higher in the VXA-2 tape drive except when using 'X23' and 'X'
Cleaner.
VXA Tape Capacity
The following chart shows native(non compressed) capacity for the VXA media by tape drive.
Drive and Format
V6(62m) V10(124m) V17(170m) V23(230m) X6(62m) X10(124m) X23(230m)
7206-VX2, 7212-102,
7212-312, VXA-2
VXA-1 Format
10GB
20GB
30GB
40GB
10GB
20GB
40GB
7206-VX2, 7212-102,
7212-312, VXA-2
VXA-2 Format
20GB
file://C:\temp\TAPEWHDR.html
40GB
59GB
80GB
20GB
40GB
80GB
5/20/2008
Tape Help Package
VXA-320
VXA-320 Format
Page 67 of 93
N/S
N/S
N/S
160GB
40GB
80GB
160GB
Note:
V23 and all 'X' Data cartridges are ejected from the VXA-1 drive.
'X' Media requires a microcode level V2105 or higher in the VXA-2 tape drive except when using 'X23' and 'X'
Cleaner.
The VXA-320 tape drive supports only 'X' media and the 'V23' media, all other media is ejected.
LTO Tape Interchange Format
The following chart shows data interchange using LTO tape drives.
LTO1(610m) LTO2(610m) LTO3
Drive
Media
Media
Media
LTO1
R/W D=64
N/S
N/S
LTO2
R/W D=64
R/W D=66
N/S
LTO3
R
R/W D=66
R/W D=68
LTO4
N/S
R
R/W D=68
LTO4
Media
N/S
N/S
N/S
R/W D=70
LTO Tape Capacity
The following chart shows native(non compressed) capacity for the LTO media by tape drive.
LTO1(610m) LTO2(610m) LTO3
LTO4
Drive
Media
Media
Media
Media
LTO1
100GB
N/S
N/S
N/S
LTO2
100GB
200GB
N/S
N/S
LTO3
R(only) 100GB 200GB
400GB
N/S
LTO4
N/S
R(only) 200GB 400GB
800GB
8mm Tape Interchange Information
8mm Tape drives
2.3GB, 5GB, 7GB and 20GB Drive/Media Capacity
Each 8mm tape drive only supports specific media, the following data will give you information that can be used to make an
informed decision on what media to use:
z
z
z
z
z
z
8mm media of 15m, 54m, 112m, or 160m length are Metal Particle(MP) media.
8mm media of 22m, 45m, 75m, 125m, 150m, 170m or 225m length are Advanced Metal Evaporated(AME) media.
Use the AME media on 20GB and 60GB drives ONLY. MP media can only be read on the 20GB drives.
8mm drives with 2.3GB or 5.0GB capacity Read/Write 15m, 54m, or 112m length "MP" media only.
8mm drives with 7.0GB capacity Read/Write 15m, 54m, 112m, or 160m length "MP" media only.
8mm drives with 20.0GB capacity can only Read 15m, 54m, 112m, or 160m length "MP" media.
8mm drives with 20.0GB capacity can Read/Write ONLY on 22m, or 170m length "AME" media.
file://C:\temp\TAPEWHDR.html
5/20/2008
Tape Help Package
z
z
Page 68 of 93
If the 22m or 170m AME tape has been written in 60GB format, the tape cannot be read by the 20GB drive, it can be
rewritten by the 20GB drive as if the tape were blank.
AME data tapes of lengths: 45m, 75m, 125m, 150m, and 225m are not supported on the IBM 2.3GB, 5GB, 7GB, and
20GB 8mm tape drives
8mm media of 22m, 160m, and 170m should bear the Recognition System Logo.
The following chart shows data interchange using IBM data grade tapes among 8mm 2.3GB, 5GB, 7GB, 20GB, and 60GB
tape drives. The chart list the external model types as an example but the data applies to the internal versions of the drives
also.
Drive
2.3GB
NonC
**
2.3GB
Compress
**
5GB
NonC
**
5GB
Compress
**
7GB
NonC
**
7GB
Compress
**
N/S
20GB
NonC Compress
**
N/S
60GB
NonC Compress
**
N/S
7208-001
(2.3GB)
7208-011
(5GB)
7331-205
(7GB)
R/W
N/S
N/S
N/S
N/S
R/W D=20* R
R/W D=21* R/W D=140 N/S
N/S
N/S
N/S
R/W D=20* R
R/W D=21* R/W D=140 N/S
R/W D=140 N/S
N/S
7208-341
(20GB)
7331-305
(20GB)
7208-345
(60GB)
7334-410
(60GB)
R#
N/S
R#
R#
R#
R#
R/W
N/S
N/S
N/S
N/S
N/S
N/S
N/S
R
R/W
2.3GB, 5GB, 7GB, 20GB and 60GB supported media
The following chart shows chart shows the supported IBM data grade tapes usage 8mm 2.3GB, 5GB, 7GB, 20GB, and
60GB tape drives.
Drive 15m 54m 112m
MP MP MP
2.3GB R/W R/W R/W
N/A 21F8575
N/A
5GB R/W R/W R/W
N/A 21F8575
N/A
7GB R/W R/W R/W
N/A 21F8575
N/A
160m
MP
N/S
20GB R#
N/A
60GB N/S
Eject
R#
87G1603
N/S
Eject
R#
N/A
N/S
Eject
R#
21F8575
N/S
Eject
N/S
22m
AME
N/S
45m
AME
N/S
75m
AME
N/S
125m
AME
N/S
150m
AME
N/S
170m
AME
N/S
225m
AME
N/S
N/S
N/S
N/S
N/S
N/S
N/S
N/S
R/W
N/S
87G1603
N/S
N/S
N/S
N/S
N/S
N/S
R/W
N/S
N/S
N/S
N/S
59H2671
R/W*** R/W*** R/W*** R/W*** R/W***
59H2671
N/A
35L1044 N/A
09L5323
R/W
N/S
59H2678
R/W*** R/W
59H2678 18P6484
Cleaning
30hr/Monthly
16G8467
Amber LED
16G8467
Amber LED
16G8467
Amber LED
35L1409
Amber LED
35L1409
Note:
file://C:\temp\TAPEWHDR.html
5/20/2008
Tape Help Package
z
z
z
z
z
z
z
z
z
z
z
z
Page 69 of 93
Compress - Compression Capable
NonC - Non Compression Capable
R/W - This drive can both Read and Write this media.
R - This drive can ONLY Read from this media. The drive cannot write on this media.
N/S - Not Supported.
N/A - No IBM media Available.
D= - Density setting
Eject- The drive will eject this media.
# This media is Metal Particle(MP) the 20GB drive MUST BE CLEANED after reading this media prior using
Advanced Metal Evaporated(AME) media. When you are ready to use AME media insert the AME media and
let the drive eject the AME media. The drive then is to be cleaned. Cleaning the drive prior to inserting the
AME will still require the drive to be cleaned again as the drive will eject the AME media and display the
MUST CLEAN message.
* Use the Density setting to write this format/capacity with this drive.
** Data interchange between the 2.3GB, 5GB, and 7GB tape drives is ONLY capable on the 15m, 54m or 112m
Data Cartridges, not on the 160m.
*** The 60GB drive can Read tapes written by the 20GB drive but cannot write tapes that can be Read by the
20GB drive. Tapes written by the 60GB drive can only be read on a 60GB drive.
20GB and 60GB tape drive interchange
The following chart shows data interchange using the IBM 8mm data grade tape between the 8mm 20GB and 60GB tape
drives. The chart lists the external model type as the example but the data applies to the internal versions of the 20GB drive
also.
z
z
z
z
z
z
z
z
z
z
z
z
Metal Particle(MP) media is not supported in the 60GB tape drive and is ejected. MP media is normally 15m,
54m, 112m, 160m lengths.
MP media can only be read on the 20GB drives.
Advanced Metal Evaporated(AME) media is available in 22m, 45m, 75m, 125m, 150m, 170m, or 225m lengths.
AME "SmartClean" data cartridges contain a build in cleaning capability. Cartridges of 75m, 150m, and 225m
are "SmartClean" Cartridges.
AME media of 22m, or 170m length are the only AME media supported in the 20GB drive.
Format is a term used to describe the way a tape is written.
The 20GB 8mm tape drive ONLY writes/reads a "Mammoth" format.
The 60GB 8mm tape drive ONLY writes "Mammoth2(M2)" format.
The 60GB 8mm tape drive READS "Mammoth" or "Mammoth2(M2)" format.
It is not possible to write data on a 60GB drive and read the data on the 20GB drive.
If the 22m or 170m AME tape has been written by a 60GB 8mm drive the tape cannot be read by the 20GB
drive. The 20GB drive will treat this tape as if the tape were a blank tape.
There is no need to use density settings for writing or reading tapes on either the 20GB or the 60GB drives as
the drives do automatic media and tape format recognition.
Drive
7208-341(20GB)
7331-305(20GB)
7208-345(60GB)
7334-410(60GB)
20GB
R/W*
R/W*
R**
R**
60GB
N/S
N/S
R/W**
R/W**
Note:
z
z
z
z
z
R/W - This drive can both Read and Write this media.
R - This drive can ONLY Read from this media. The 60GB drive cannot write a format that can be read by the
20GB 8mm drive.
N/S - Not Supported
* Media must be 22m or 170m AME ONLY.
** The 60GB drive can read Mammoth or M2 format but can only write M2 format.
file://C:\temp\TAPEWHDR.html
5/20/2008
Tape Help Package
Page 70 of 93
DLT Tape Interchange Information
IBM 7205-311 35GB
The following is a chart that shows the interchange using the IBM 7205-311 tape drive.
Supported Cartridge
Density
Compressed Data Capacity
DLTtapeIII
DLTtapeIIIxt
DLTtapeIV
2.6GB
6GB
10GB
15GB
20GB
35GB
2.6GB (No Compression)
6GB (No Compression)
20GB (Default for drive)
30GB (Default for drive)
40GB
70GB (Default for drive)
Smit Density
Setting
23
24
25
25
26
27
Notes:
z
z
z
z
z
The 7205 Tape drive only supports the data densities listed in the table. Supported data cartridges written in other
densities will not be recognized by the drive and these cartridges will not be readable by this drive. The 7205 will treat
these cartridges as blank cartridges.
If a DLT IV data cartridge written in 40GB mode is attempted to be read on the 35GB drive the tape will appear to be
a blank data cartridge. Interchange of data between the 35GB drive and the 40GB drive can only be done on supported
data cartridges with a density setting common between the drives.
The drive does an automatic determination of the density setting when reading a data cartridge, but for write
operations you must set a writing density that matches the data cartridge you are using.
If an unsupported write density is requested, the density will default to the highest supported density for the currently
loaded data cartridge.
* Compression will depend upon the type of data. A compression ratio of 2:1 is assumed for this compression
capacity.
DLTtapeIII, DLTtapeIIIxt, and DLTtapeIV are trademarks of Quantum Corporation.
IBM 7205-440 40GB
The following is a chart that shows the interchange using the IBM 7205-440 tape drive.
Supported Cartridge
Density
Compressed Data Capacity
DLTtapeIII
DLTtapeIIIxt
DLTtapeIV
10GB
15GB
20GB
35GB
40GB
20GB
30GB
40GB
70GB
80GB
Smit Density
Setting
25
25
26
27
65
Notes:
z
z
z
z
The 7205 Tape drive only supports the data densities listed in the table. Supported data cartridges written in other
densities will not be recognized by the drive and these cartridges will not be readable by this drive. The 7205 will treat
these cartridges as blank cartridges.
The drive does an automatic determination of the density setting when reading a data cartridge, but for write
operations you must set a writing density that matches the data cartridge you are using.
If an unsupported write density is requested, the density will default to the highest supported density for the currently
loaded data cartridge.
* Compression will depend upon the type of data. A compression ratio of 2:1 is assumed for this compression
capacity.
DLTtapeIII, DLTtapeIIIxt, and DLTtapeIV are trademarks of Quantum Corporation.
file://C:\temp\TAPEWHDR.html
5/20/2008
Tape Help Package
Page 71 of 93
IBM 7205-550 160GB
The following is a chart that shows the interchange using the IBM 7205-550 tape drive.
Supported Cartridge
Density Format
Density
Compressed Data Capacity Smit Density
Setting
SDLT
SDLT220
110GB
220GB
72
SDLT
SDLT320
160GB
320GB
73
Notes:
z
z
z
z
The 7205 Model 550 has full backward read-only compatibility with the currently available IBM 7205 Model 440
(DLT8000) tape drives.
The 7205 Model 550 is read-only compatible with older 7205 Model 311 (DLT7000), 7205 Model 305 & 306
(DLT4000), and DLT3000 tape drive formats (DLT Tape IV).
The 7205 Model 550 is also read and write compatible with the SDLT220 tape format (SDLT Tape 1) at the native
transfer rate of the SDLT220 tape drive (11 MB/sec).
Non-SDLT drives will eject a cartridge written in SDLT320 format.
Tape Drive Cleaning Frequency
Details the recommended tape cleaning frequencies* and proper cleaning cartridge to use for the 1/4", 4mm, VXA, LTO,
8mm, and DLT tape drives.
Other information you should be aware of:
z
z
z
Clean the tape drive at the recommended times and with the recommended IBM cleaning cartridge. Over cleaning
may cause premature head wear out, do not over clean the tape drive.
Whenever a tape drive reports an I/O error the drive should be cleaned prior to retrying the tape operation.
The 4mm, 8mm, and VXA cleaning cartridges move the cleaning media from the supply spool to the take up spool in
the cartridge during the cleaning operation. When cleaning is complete the area of the cleaning media used in cleaning
is wound onto the take up spool, unlike data cartridges that rewind all the media back onto the supply spool.
To determine if a 4mm, 8mm, or VXA cleaning cartridges is used up users should not only check the number of
remaining cleanings as marked on the cartridge but also observe the remaining media on the supply spool.
To do this:
The user should hold the cleaning cartridge as if they were going to insert the cleaning cartridge into the drive. If all,
or most, of the media is on the right hand, take up spool, and very little media is still on the supply spool, the cleaning
cartridge is used up and will not clean the tape drive.
z
z
If a 4mm, LTO, 8mm, or VXA cleaning cartridge has been used its maximum number of cleanings and the cartridge is
inserted into the tape drive the cleaning LED will not go off if it was previously on and if the cleaning LED was off
prior to the cleaning cartridges insertion the cleaning LED will be turned on to signify the cleaning was not done and
the cleaning cartridge has exceeded its maximum number of uses.
There are times when it will be necessary to use the recommended cleaning process several times in a row to clean the
drive:
{ Tape drives that have not been cleaned according to the recommended schedule.
{ Tape drives where unsupported media or cleaning cartridges were used.
{ Tape drives reporting repeated I/O errors.
{ Tape drives operating in dirty/dust environments.
If repeated cleanings and new media do not eliminate the I/O errors it may be necessary to replace the tape drive.
file://C:\temp\TAPEWHDR.html
5/20/2008
Tape Help Package
Page 72 of 93
1/4" Tape Drive Cleaning Frequency
Type
Model
Cartridge
150mb
7207-001
16G8572**
525mb
7207-011
16G8572**
1.2GB
7207-012
16G8572**
35L0844****
4GB
13GB
7207-122
7207-315
35L0844***
35L0844***
Number of Frequency for Cleaning*
Usages
50
After 2 hours of tape movement on a new
tape or every 20 hours of tape movement on a
used tape.
50
After 2 hours of tape movement on a new
tape or every 8 hours of tape movement on a
used tape.
50
After 2 hours of tape movement on a new
tape or every 8 hours of tape movement on a
used tape when used in QIC-1000 mode, or
every 12 hours of tape movement on a used
tape when used in QIC-120/150/525 mode.
50
Every 8 hours of tape movement.
50
Every 8 hours of tape movement or when
Amber LED(Disturbance LED) indicates
either:
8 hours of tape motion (Changed from
50 hours to improve reliability with
microcode level 0345)
z Hard Read or Write Error
Every 50 hours of tape movement or when
Amber LED(Disturbance LED) indicates
either:
z
30GB
7207-330
35L0844
50
50 hours of tape motion
Hard Read or Write Error
Every 50 hours of tape movement or when
Amber LED(Disturbance LED) indicates
either:
z
z
50GB
7212-102
35L0844
50
z
z
50 hours of tape motion
Hard Read or Write Error
Note:
* If tape errors or tape job failures occur the drive may have to be cleaned more frequently.
** Replaced 21F8570, was Isopropyl Alcohol
*** Replaced 59H4366 which replaced 46G2674
****Supported with a minimum microcode level of I09.23 or I09:23
4mm Tape Drive Cleaning Frequency
Type
Model
Cartridge
2GB DDS1
7206-001
21F8763**
file://C:\temp\TAPEWHDR.html
Number Frequency for Cleaning*
of
Usages
50
Every 30 hours of tape movement
5/20/2008
Tape Help Package
Page 73 of 93
4GB DDS2
12GB DDS3
DDS2 Internal Autoloader
DDS2 Autoloader
DDS3 Autoloader
DDS2 Library
20GB DDS4
DDS4 Autoloader
7206-005
7206-110
36GB DAT72
7206-336
7212-102
21F8763**
80GB DAT160
7214-1U2
23R5638
7332-005
7332-110
7336-205
7206-220
7212-102
7332-220
or
Once a month, or when Amber
LED (Disturbance light) indicates
recording quality problems.
21F8763**
50
Every 50 hours of tape movement
or
when Amber LED(Disturbance
LED) indicates recording quality
problems.
50
Every 50 hours of tape movement
or
when Amber LED(Disturbance
LED) indicates recording quality
problems.
Minimum Every 50 hours of tape movement
25
or
when Amber LED(Disturbance
LED) indicates recording quality
problems.
Note:
* If tape errors or tape job failures occur the drive may have to be cleaned more frequently.
** Replaced 59H3090(20 Cleanings) in early 1999
Starting with microcode level 5AL0 the 4GB 4mm drives will not only put ON the cleaning LED based on soft errors but
will also put the cleaning LED ON after 30 tape motion hours without the drive being cleaned.
VXA Cleaning Frequency
Type
Model
Cartridge
80GB VXA-2
7206-VX2
7212-102
19P4880
80GB VXA-2
7206-VX2
7212-102
24R2138
160GB VXA-320
file://C:\temp\TAPEWHDR.html
24R2138
Number Frequency for Cleaning*
of
Usages
20
This tape drive is designed to
determine its own cleaning
requirements. It is unnecessary to
clean the tape drive unless indicated
by the cleaning LED or repeated I/O
errors. The tape drive will request
cleaning at a maximum of every 75
hours of tape head movement.
80
This tape drive is designed to
determine its own cleaning
requirements. It is unnecessary to
clean the tape drive unless indicated
by the cleaning LED or repeated I/O
errors. The tape drive will request
cleaning at a maximum of every 75
hours of tape head movement.
80
This tape drive is designed to
determine its own cleaning
requirements. It is unnecessary to
clean the tape drive unless indicated
by the cleaning LED or repeated I/O
5/20/2008
Tape Help Package
Page 74 of 93
errors. The tape drive will request
cleaning at a maximum of every 75
hours of tape head movement.
LTO Cleaning Frequency
Type
Model
Cartridge
200GB LTO2
7212-102
35L2086
800GB LTO4
7214-1U2
35L2086
Number Frequency for Cleaning*
of
Usages
50
This tape drive is designed to
determine its own cleaning
requirements. It is unnecessary to
clean the tape drive unless indicated
by the cleaning LED or repeated I/O
errors. The tape drive will request
cleaning at a maximum of every 100
hours of tape head movement.
50
This tape drive is designed to
determine its own cleaning
requirements. It is unnecessary to
clean the tape drive unless indicated
by the cleaning indication(a "C" in
the Single Character Display(SCD))
or repeated I/O errors. The tape drive
will request cleaning at a maximum
of approximatly every 100 hours of
tape head movement.
8mm Tape Drives Cleaning Frequency
Type
Model
Cartridge
2.3GB
7208-001
16G8467**
5GB
7208-011
16G8467**
7GB
7331-205
16G8467**
20GB
7208-341
7331-305
35L1409***
file://C:\temp\TAPEWHDR.html
Number Frequency for Cleaning*
of
Usages
12
Every 30 hours of tape movement
or
once a month, approximately 30GB
of data transfer.
22
Every 30 hours of tape movement
or
Once a month, or when Amber LED
(Disturbance LED) indicates 30
hours of tape movement.
22
Every 30 hours of tape movement
or
Once a month, or when Amber LED
(Disturbance LED) indicates 30
hours of tape movement.
18+
Every 72 hours of tape movement
when using AME media(10 hours
with MP media)
5/20/2008
Tape Help Package
60GB
Page 75 of 93
7208-345
7334-410
35L1409***
18+
or
Once a month, or when Amber LED
(Disturbance LED) indicates 72 or
10 hours of tape movement or when
the Amber LED indicates recording
quality problems or when the LCD
says "MUST CLEAN" or when the
LCD says "CLEAN SOON".
When using "SmartClean" Data
cartridges it will seldom be
necessary to manually clean the
drive.
However: If non "SmartClean"
cartridges are used and the Amber
LED indicates the need for the drive
to be cleaned it will be necessary to
clean the drive with this cleaning
cartridge.
60GB 8mm tape drive Notes:
If SmartClean Data Cartridges are
NOT used it will be necessary to
manually clean the tape drive with
the cleaning cartridge when the tape
drive Amber LED (Disturbance
LED) indicates the drive needs
cleaning due to time of tape
movement or recording quality
problems. The LCD will say
"CLEAN SOON".
The maximum time between
cleanings will be 30 tape motion
hours.
Extended use of AME media that is
not SmartClean media is not
recommended as the 60GB 8mm
tape drive is optimized for the use of
SmartClean media.
Even with the exclusive use of
"SmartClean" cartridges the drive
may request cleaning. If the drive
requests cleaning, clean with this
cleaning cartridge.
Note:
* If tape errors or tape job failures occur the drive may have to be cleaned more frequently.
** Replaced 21F8593
*** ONLY USE on the 20GB and 60GB 8mm drives.
DLT Tape Drive Cleaning Frequency
Type
file://C:\temp\TAPEWHDR.html
Model
Cartridge
Number Frequency for Cleaning*
of
Usages
5/20/2008
Tape Help Package
Page 76 of 93
35GB
40GB
7205-311
7205-440
59H3092
20
This tape drive is designed to
determine its own cleaning
requirements. It is unnecessary to
clean the tape drive unless indicated
by the cleaning LED or repeated I/O
errors.
160GB
7205-550
19P4357
20
This tape drive is designed to
determine its own cleaning
requirements. It is unnecessary to
clean the tape drive unless indicated
by the cleaning LED or repeated I/O
errors.
AIX Diagnostic SCSD Tape Drive Service Aid
Provides the ability to display and monitor tape drive information for tape drives that are supported on AIX by the Self
Configuring SCSI device driver.
SCSD Tape Drive Service Aid functions:
z
z
z
Display time since drive was last cleaned
Capture internal drive trace information into a binary file(Dump).
Capture internal Log Sense information into a binary file(Log).
Supported Devices:
The following Self Configuring SCSI Drives(SCSD) are supported:
7205-311
7205-440
7205-550
7206-110
7206-220
7206-336
7214-1u2
7206-VX2
7206-VX3
7207-122
7207-315
7207-330
7208-341
7208-345
7212-102
7214-1U2
7331-305
IBM
IBM
IBM
IBM
IBM
IBM
IBM
IBM
IBM
IBM
IBM
IBM
IBM
IBM
IBM
IBM
IBM
35GB Digital Linear tape drive
40GB Digital Linear tape drive
160GB Digital Linear tape drive
4mm
12GB DDS3
tape drive
4mm
20GB DDS4
tape drive
4mm
36GB DAT72
tape drive
4mm
80GB DAT160 tape drive
VXA
80GB VXA-2
tape drive
VXA 160GB VXA-320 tape drive
1/4"
4GB tape drive
1/4" 13GB tape drive
1/4" 30GB tape drive
8mm
20GB tape drive
8mm
60GB tape drive
LTO 200GB LTO-2 tape drive
LTO 800GB LTO-4 tape drive
8mm tape library
Using the program:
While signed on as root utape can be run as a standalone program or under AIX Diagnostics.
Note: When the program puts out a file for later use it puts the file into the /tmp or /etc/lpp/diagnostics/data directory.
The binary Trace file is named:
/tmp/TRACE.rmt0
or newer levels of AIX use a different directory
/etc/lpp/diagnostics/data/TRACE.rmt0
The ASCII Log Sense file is named:
/tmp/LOGSENSE.rmt0
or newer levels of AIX use a different directory
/etc/lpp/diagnostics/data/LOGSENSE.rmt0
file://C:\temp\TAPEWHDR.html
5/20/2008
Tape Help Package
Page 77 of 93
When doing a Trace to diskette and the TRACE file is greater than 1mb the AIX diagnostic program will put the file on two
(2) or more diskettes. The file names will be TRACE1.DAT, TRACE2.DAT, etc. vs the name of the file when put directly
to disk(TRACE.rmt0) To use the two diskettes it will be necessary to concatenate the two files together into a third file.
To restore the diskette(s) repeat the following AIX command once for each diskette you created.
restore -q
If your Trace created two diskettes do the following command to concatenate the two files into a third file:
cat TRACE1.DAT TRACE2.DAT > TRACE.DAT
AIX Diagnostics Menu mode
z
z
z
z
z
z
z
Run AIX diagnostics by entering the AIX command:
diag
Select Task Selection(Diagnostics, Advanced Diagnostics, Service Aids
Select SCSD Tape Drive Service Aid.
Select the drive
Commit the selection
Select the option you desire.
Exit diagnostics.
Command mode
z
It may be necessary on some systems to change the language the system is using to run the tool in the command
mode. Try the TRACE commands first and only if they fail change the language to "C".
To do this do the following AIX command:
export LANG=C
Change to the diagnostic program directory by using the following AIX command:
cd /usr/lpp/diagnostics/bin
For a list of the command structure do the following AIX command:
./utape ?
Usage: utape -h | -d <device> -n|-t|-lceName>
utape -c -v -d <device> -n | -l | -t -f <filename> |-D
where:
z
z
z
z
z
z
z
z
z
-c --- command line.
-v --- verbose mode.
-h --- usage statement.
-d --- device name.
-n --- time since last cleaned.
-t --- trace table.
-l --- logsense data.
-f --- write to file.
-D --- write to Unix diskette.
Sample Utape Usage:
To display the time since the tape drive was last cleaned
There are 2 ways to display the time since last cleaned.
z
z
Verbose Mode
cd /usr/lpp/diagnostics/bin
./utape -vcnd rmt0
The command output is in tape motion hours(time the tape was moving)
Usage time since the drive was last cleaned: 4.13 hours.
Device rmt0 does NOT need cleaning at this time.
Non Verbose mode:
cd /usr/lpp/diagnostics/bin
./utape -cnd rmt0
The command output is in tape motion hours(time the tape was moving) since the drive was last cleaned:
file://C:\temp\TAPEWHDR.html
5/20/2008
Tape Help Package
Page 78 of 93
4.134564
To capture a tape drive trace(dump) file to disk(File)
Note:
When capturing a TRACE file it is best to capture a
trace after an error and without resetting or
power cycling the drive or the system. Resetting
or power cycle will loose some TRACE data from the
drive.
This TRACE file is a binary file, when uploading
this file for transmission to support be sure
to upload the file in binary.
cd /usr/lpp/diagnostics/bin
./utape -ctfd rmt0
The output will be to the /tmp directory:
/tmp/TRACE.rmt0
or newer levels of AIX use a different directory
/etc/lpp/diagnostics/data/TRACE.rmt0
To capture a tape drive Log Sense information to disk(File)
cd /usr/lpp/diagnostics/bin
./utape -clfd rmt0
The output will be to the /tmp directory:
/tmp/LOGSENSE.rmt0
or newer levels of AIX use a different directory
/etc/lpp/diagnostics/data/LOGSENSE.rmt0
Tape Part Numbers
Details the recommended IBM tape part numbers for the 1/4", 4mm, VXA, LTO, 8mm, and DLT tape drives.
IBM Media offer customer a one-stop shopping for all their quality media and accessories requirements across the
removable media storage. Through our business channels, we will be the best of breed in terms of product quality, spectrum
and services. The IBM products are designed, developed as a qualified complement to IBM hardware.
1/4" Part Numbers
QIC-150
Part Number
Description
Where Used
Type
21F8578
92X7510
16G8572*
Data Cartridge
Test Cartridge
Cleaning Cartridge (Petrofin)
7207-001
7207-001
7207-001
QIC-150
QIC-150
file://C:\temp\TAPEWHDR.html
Additional
Information
50 cleanings
5/20/2008
Tape Help Package
Page 79 of 93
QIC-525
Part Number
Description
Where Used
Type
21F8697
21F8586
16G8572*
Data Cartridge
Test Cartridge
Cleaning Cartridge (Petrofin)
7207-011
7207-011
7207-011
DC6525 QIC-525
QIC-525
Part Number
Description
Where Used
Type
21F8730
21F8734
16G8572*
35L0844****
Data Cartridge
Test Cartridge
Cleaning Cartridge (Petrofin)
Cleaning Cartridge(Dry Process)
7207-012
7207-012
7207-012
DC9120 QIC-1000
QIC-1000
Part Number
Description
Where Used
Type
16G8436
59H3316
16G8438
Data Cartridge(1200')
Data Cartridge
Test Cartridge
Additional
Information
50 cleanings
QIC-1000
Additional
Information
50 cleanings
DC9250
Additional
Information
DC9250 QIC-2GB
DC9200 QIC-2GB 950'
DC9250SL QIC155'
2GB
SLR5
Part Number
Description
Where Used
Type
59H3660
59H3661
35L0844**
Data Cartridge
Test Cartridge
Cleaning Cartridge
7207-122
SLR5-4GB
7207-122
SLR5-4GBSL
7207-122, 315, 330,
SLR100, Only
Part Number
Description
Where Used
Type
59H4175***
16G8574
Data Cartridge
Data Cartridge
7207-315
7207-315
MLR1-16GB
MLR1-13GB
DC5010
35L0589
87G1626
35L0844**
Data Cartridge
Test Cartridge
Cleaning Cartridge
7207-315
7207-315
MLR1 QIC-5010
7207-122, 315, 330,
Additional
Information
1500'
155'
50 cleanings
MLR1
file://C:\temp\TAPEWHDR.html
Additional
Information
1500'
QIC-5010 1200'
No longer Sold
(obsolete)
MLR1-2GB 200'
155'
50 cleanings
5/20/2008
Tape Help Package
Page 80 of 93
SLR100, Only
SLR60
Part Number
Description
Where Used
Type
24R0146
Data Cartridge
SLR60 37.5GB
19P4209
Data Cartridge
SLR60 30GB
900'
35L0661
Data Cartridge
SLR100 5GB
155'
35L0967
Test Cartridge
SLR100 5GB
155'
35L0844**
Cleaning Cartridge
7207-330
7212-102 F/C 1107
7207-330
7212-102 F/C 1107
7207-330
7212-102 F/C 1107
7207-330
7212-102 F/C 1107
7207-122, 315, 330,
SLR100, Only
Additional
Information
1200'
50 cleanings
SLR100
Part Number
Description
Where Used
Type
35L0968
24R0146
19P4209
35L0661
35L0967
35L0844**
Data Cartridge
Data Cartridge
Data Cartridge
Data Cartridge
Test Cartridge
Cleaning Cartridge
7212-102 F/C 1108
7212-102 F/C 1108
7212-102 F/C 1108
7212-102 F/C 1108
7212-102 F/C 1108
7207-122, 315, 330,
SLR100, Only
SLR100 50GB
SLR60 37.5GB
SLR60 30GB
SLR100 5GB
SLR100 5GB
Additional
Information
1500'
1200'
900'
155'
155'
50 cleanings
Note:
* This cartridge replaced 21F8570 old process used Isopropyl Alcohol, New P/N is Petrofin
** This cartridge replaced 59H4366 which had previously replaced 46G2674
*** These tapes are only supported with a microcode level of 0345 or higher.
**** These tapes are only supported with a microcode level of I09.23 or I09:23
4mm Part Numbers
DDS|||| (DDS1)
Part Number
Description
Where Used
Type
21F8754
Data Cartridge
7206-001
DDS1(DDS||||)
21F8762
21F8763*
Diagnostic Cartridge
Cleaning Cartridge
7206-001
Additional
Information
2GB
90m
50 cleanings
DDS2
file://C:\temp\TAPEWHDR.html
5/20/2008
Tape Help Package
Page 81 of 93
Part Number
Description
Where Used
Type
8191151***
Data Cartridge
DDS2
8191146
Diagnostic Cartridge
7206-005
7332-005
7206-005
7332-005
73H3467**
Test Cartridge
21F8763*
Cleaning Cartridge
Additional
Information
4GB
120m
DDS1(DDS||||)
Internal
Autoloader Use
Only
50 cleanings
Additional
Information
12GB
125m
DDS3
Part Number
Description
Where Used
Type
59H3465
Data Cartridge
DDS3
59H3466
Test Cartridge
7206-110
7332-110
7206-110
7332-110
21F8763*
Cleaning Cartridge
DDS3
50 cleanings
DDS4
Part Number
Description
Where Used
Type
59H4456
Data Cartridge
DDS4
59H4457
Test Cartridge
7206-220
7212-102
7332-220
7206-220
7212-102
7332-220
21F8763*
Cleaning Cartridge
DDS4
Additional
Information
20GB
150m
11.5m
50 cleanings
DAT72
Part Number
Description
Where Used
Type
18P7912
Data Cartridge
DAT72
59H4457
Test Cartridge
7206-336
7212-102
7206-336
7212-102
21F8763
Cleaning Cartridge
DDS4
Additional
Information
36GB
170m
11.5m
50 cleanings
DAT160
Part Number
Description
file://C:\temp\TAPEWHDR.html
Where Used
Type
Additional
Information
5/20/2008
Tape Help Package
23R5635
23R5636
23R5638
Data Cartridge
Test Cartridge
Cleaning Cartridge
Page 82 of 93
7214-1U2
7214-1U2
DAT160
DAT160
80GB
80GB
25 cleanings
minimum
Type
Additional
Information
Additional
Information
230m 80GB
Purple accent
color
170m 59GB
Red accent color
Note:
* This cartridge replaced 59H3090
** Not a stocked item use DDS|||| Cartridge P/N 21F8754
*** This cartridge replaces 8191160 withdrawn July 97, was a 5 pack
4mm Autoloader Magazine
Part Number
Description
Where Used
35L1200
35L1200
87G4885
87G4886
4mm 6 Cartridge Autoloader Magazine
4mm 6 Cartridge Autoloader Magazine
4mm 4 Cartridge Autoloader Magazine
4mm 12 Cartridge Autoloader
Magazine
4mm 14 Cartridge Library Magazine
Internal Autoloader
7332-220
7332-005, 110
7332-005, not 110
44H3590
7336-205
VXA Part Numbers
VXA-2
Part Number
Description
Where Used
Type
19P4876
Data Cartridge
V23
19P4877
Data Cartridge
19P4878
Data Cartridge
19P4879
Test Cartridge
19P4880
Cleaning Cartridge
24R2138
X Cleaning Cartridge
24R2137
Data Cartridge
24R2136
Data Cartridge
7206-VX2
7212-102
7212-312
7206-VX2
7212-102
7212-312
7206-VX2
7212-102
7212-312
7206-VX2
7212-102
7212-312
7206-VX2
7212-102
7212-312
7206-VX2
7212-102
7212-312
7206-VX2
7212-102
7212-312
7206-VX2
file://C:\temp\TAPEWHDR.html
V17
V6
62m 20GB
Blue accent color
V6
62m 20GB
Blue accent color
VXA
20 usage
Gray accent color
VXA
80 usage
Teal(Green)
accent color
230m 80GB
Teal(Green)
accent color
124m 40GB
X23
X10
5/20/2008
Tape Help Package
24R2134
Data Cartridge
24R2135
Test Cartridge
Page 83 of 93
7212-102
7212-312
7206-VX2
7212-102
7212-312
7206-VX2
7212-102
7212-312
X6
X6
Teal(Green)
accent color
62m 20GB
Teal(Green)
accent color
62m 20GB
Teal(Green)
accent color
VXA-2 Media Support
The VXA-2 tape drive supports "X" media. To use "X6", or "X10" media you must have a minimum microcode level in
the VXA-2 tape drive(including the drive in the autoloader) of "2105". The "X23" and "X Cleaning" cartridge will work
with all levels of the VXA-2 microcode.
The AIX command lscfg -vl rmt0 can be used to view the tape drive information. The Device Specific.(Z1) field is the
Microcode Level:
Device Specific.(Z1)........2105 <- Microcode Level
VXA-320
Part Number
Description
Where Used
Type
19P4876
Data Cartridge
V23
24R2138
X Cleaning Cartridge
VXA
24R2137
Data Cartridge
X23
24R2136
Data Cartridge
X10
24R2134
Data Cartridge
X6
24R2135
Test Cartridge
X6
Additional
Information
230m 160GB
Purple accent
color
80 usage
Teal(Green)
accent color
230m 160GB
Teal(Green)
accent color
124m 80GB
Teal(Green)
accent color
62m 40GB
Teal(Green)
accent color
62m 40GB Teal
(Green) accent
color
VXA-320 Media Support
The VXA-320 tape drive supports only 'X' media and the 'V23' media, all other media is ejected.
LTO Part Numbers
LTO2 Ultrium 2
Part Number
Description
file://C:\temp\TAPEWHDR.html
Where Used
Type
Additional
5/20/2008
Tape Help Package
Page 84 of 93
Ultrium 2(LTO2)
200GB
Ultrium 1(LTO1)
100GB
Ultrium 2(LTO2)
200GB
IBM Universal
Cleaning Cartirdge
Information
2000 ft (610
meters)
2000 ft (610
meters)
2000 ft (610
meters)
50 Cleanings
08L9870
Data Cartridge
7212-102
08L9120
Data Cartridge
7212-102
24R0395
Test Cartridge
7212-102
35L2086
Cleaning Cartirdge
7212-102
Part Number
Description
Where Used
Type
95P4436
Data Cartridge
7214-1U2
24R1922
Data Cartridge
95P4450
WORM Data Cartridge
96P1203
WORM Data Cartridge
45E1129
Test Cartridge
7214-1U2
35L2086
Cleaning Cartirdge
7212-102
Ultrium 4(LTO4)
800GB
Ultrium 3(LTO3)
400GB
Ultrium 4(LTO4)
800GB
Ultrium 3(LTO3)
400GB
Ultrium 4(LTO4)
800GB
IBM Universal
50 Cleanings
Cleaning Cartirdge
LTO4 Ultrium 4
Additional
Information
8mm Part Numbers
Drives with 2.3GB, or 5GB capacity can read/write 15m, 54m, 112m length media only.
Drives with 7GB capacity can read/write 15m, 54m, 112m, and the 160m length media only.
Drives with 20GB capacity are read only on 15m, 54m, 112m, 160m lengths (MP-Metal Particle), but can read/write on 22m
or 170m lengths (AME-Advanced Metal Evaporated).
After reading "MP" media on the 20GB 8mm tape drive it is necessary to clean the 20GB 8mm tape drive prior to using
"AME" media.
2.3GB, 5GB, and 7GB 8mm
For use on 2.3GB, 5GB, and 7GB 8mm drives.
Part Number
Description
21F8575
Data Cartridge
21F8595
87G1603
Data Cartridge
Data Cartridge
21F8577
Test Cartridge
file://C:\temp\TAPEWHDR.html
Where Used
2.3GB, 5GB, and
7GB drives
Use only on 7331205 and AS/400XL
2.3GB, 5GB, and
Type
Additional
Information
112m
112m
160m
112m
5/20/2008
Tape Help Package
Page 85 of 93
7GB drives
16G8467*
Cleaning Cartridge
12 cleanings
2.3GB
22 cleanings
5.0GB
22 cleanings
7.0GB
20GB and 60GB 8mm
For use on 20GB and 60GB 8mm drives only
Part Number
Description
59H2678
Data Cartridge
59H2671
Data Cartridge
59H2677
Test Cartridge
35L1409***
Cleaning Cartridge
Where Used
Type
Additional
Information
170m AME Media
20GB
22m AME Media
2.5GB
22m AME Media
2.5GB
18+ cleanings
Where Used
Type
Additional
Information
225m
AME/SmartClean
60GB
150m
AME/SmartClean
40GB
75m
AME/SmartClean
20GB
60GB 8mm
For use on 60GB 8mm drives only
Part Number
Description
18P6484****
Data Cartridge
09L5323
Data Cartridge
35L1044
Data Cartridge
Note:
* Requires 6S0 microcode or higher on the 5GB tape drive for this cartridge to work. The 2.3GB tape drive requires NO
changes for cartridge to work. Replaces 21F8577
** Replaced 59F3907(replaced 21F8577 with 16G8467)
*** Replaced 59H2898 4/2000
****Replaced 09L5321 8/2002
SmartClean is the Trademark of Exabyte Corporation.
8mm Library Magazine.
Part Number
Description
Where Used
86G9310
8mm Library Magazine 10 Cartridge
7331-205/305
Type
Additional
Information
DLT Part Numbers
file://C:\temp\TAPEWHDR.html
5/20/2008
Tape Help Package
Page 86 of 93
DLT7000 and DLT8000
For Use on the DLT7000 and DLT8000 Drives
Part Number
Description
59H3040
59H3039
59H3411
59H3092
Where Used
Data Cartridge
Test Tape
Data Cartridge
Cleaning Cartridge
Type
DLTtapeIV
DLTtapeIV
DLTtapeIIIxt
Additional
Information
549m
549m
549m
20 Cleanings
S-DLT
For use on the S-DLT Drives Only
Part Number
Description
35L1119
35L1120
19P4357
S-DLT Data Cartridge
S-DLT Test Cartridge
S-DLT Cleaning Cartridge
Where Used
Type
7205-550
7205-550
7205-550
S-DLT
S-DLT
S-DLT
Additional
Information
160 GB, 549m
160 GB, 549m
20 Cleanings
Note: DLTtapeIIIxt and DLTtapeIV are trademarks of Quantum Corporation.
IBM Storage Media
IBM offers a wide range of storage media products to support applications ranging from PC desktop to enterprise-wide
mainframe libraries. Count on our tape cartridges, optical disks, CD-R, DVD, diskettes, and cleaning cartridges to
dependably archive, organize, share and/or back up your system files.
Media Sales Contacts
For Canada, the United States and Puerto Rico, please call 1-888-IBM-MEDIA or on the web at:
http://www.storage.ibm.com/media/
For all other geographic locations, please contact your local IBM sales representative or on the web at:
http://www.storage.ibm.com/media/
SCSI Address Setting
SCSI address settings is important as the SCSI address:
z
z
Identifies the device to the bus and system.
Care must be taken not to set two devices to the same SCSI address as this will cause errors that are often not easy to
detect.
Sets the priority of the device on the bus.
Tape drives are normally slow devices compared to harddisks and the tape drives should be set to a high priority to
insure the tape drive gets access to the bus in a timely manner.
The SCSI bus priority on a pSeries or RS/6000:
Highest 7 6 5 4 3 2 1 0 15 14 13 12 11 10 9 8 Lowest
Most SCSI devices will need to be powered OFF then ON again for the device to recognize the new address if the device
file://C:\temp\TAPEWHDR.html
5/20/2008
Tape Help Package
Page 87 of 93
address was changed with the device powered ON.
In general the SCSI adapter will be set at SCSI address of 7, but this is not always the case, so it is best to determine the
SCSI address of the SCSI adapter.
To determine the SCSI adapters in the system do the following AIX command:
lsdev -C | grep scsi
The output will be:
scsi0 Available 00-04 SCSI I/O Controller
To be sure of the SCSI adapter address do the following AIX command for the adapter you are going to attach to:
lsattr -El scsi0 | grep id
The output will be:
id 7 Adapter card SCSI ID
Note: High Availability(HA) systems often use 5 and 6 as the SCSI adapter address. Some systems restrict the SCSI
address, refer to your system manuals to determine any system restrictions.
To be sure of the addresses of other devices are already using on the SCSI bus do the AIX command:
lsdev -Cs scsi
Valid SCSI addresses for Narrow devices(8 bit) are 0 thru 7, with 7 usually reserved for the SCSI adapter.
Valid SCSI addresses for Wide devices(16 bit) are 0 thru 15 with 7 usually reserved for the SCSI adapter. When a Wide
device is attached to a narrow bus the available addresses are the same as if the device was a narrow device.
Note: On systems that use the Common Hardware Reference Platform(CHRP), the SCSI address 15 may be used for CHRP
address. The backplanes use this address on CHRP boxes to ID backplane FRU locations codes in CHRP Error logs. The ID
15 is hard wired into the I-35 backplane. Any devices tagged with a SCSI address of 15 and attached to the SCSI interface
used by the backplanes are going to have a conflict of address, so if in doubt don't use the SCSI address of 15. Some systems
use more than 1 CHRP and use more than 1 SCSI address on the same SCSI adapter.. Currently the F50, H50, S70, and SP2
equivalents use CHRP.
The lsdev -Cs scsi command will show the following(adapter ID will vary):
ses0 10-68-00-15,0 SCSI-Enclosure Services Device
There may be multiple SCSI adapters in the system an each may have a SCSI-Enclosure Services Device at address 15.
Tape Drive Performance
The following information applies to most AIX tools(tar, cpio, backup, restore, dd, etc..) used to write or read data from
tape, backup and restore are used as generic names only.
Customers backing up the same size data or restoring data can find that the amount of time it takes to backup/restore data
may vary from backup to backup or restore to restore. Most tape drives work best when the tape drive can keep the tape
moving at a constant speed(streaming). The more the tape drive is able to keep the tape streaming the shorter the
backup/restore time will be. The ability of the tape drive to keep the tape streaming is effected by many factors.
These factors include:
z
z
z
z
z
Tape drive rated performance.
System performance, fast vs slower system. .
System activity can often effect the time it takes to do a backup/restore. Backup/restore are best done during periods
of low system activity to reduce the impact on other system operations and on the backup/restore operation. Make
sure the backup is not done with other system activity that could effect the ability of the system to deliver the data to
the tape drive. Such as other devices on the SCSI bus with high activity, or other system activity.
SCSI bus Activity on either the SCSI bus with the disks or the SCSI bus with the tape drives. High activity on either
SCSI bus may effect the ability of the system to keep the tape drive streaming.
Some tape drives, when used on an AIX system, may provide the best performance when written to in the fixed block
mode. If your application writes tapes in variable blocked mode, you may find that by changing your application to
write in fixed block mode your backup or restore may take less time. It is recommended that if you are currently using
variable blocked mode you try changing your backup to a fixed block mode and compare the backup and restore time
file://C:\temp\TAPEWHDR.html
5/20/2008
Tape Help Package
z
z
z
z
z
z
z
z
z
z
z
z
Page 88 of 93
to the time it took in variable mode.
AIX commands used. Depending on the AIX command used system backup/restore time may vary. Some tape drives
are sensitive to the delivery of data to the tape drive. Some applications take the blocksize and block the data block
into larger blocks for transfer to the tape drive. Some applications call this the blocksize, or the buffer size or blocking
factor. Whatever it is called you need to understand that some tape drives performance(data rate)is greatly effected
when the system sends small blocks of data. Try setting the tape drive block size to a large block size and large
blocking factor. You should test your application to see at what blocksize and blocking factor you get the best
performance for the tape drive you are using.
Options chosen on the AIX commands. Some AIX commands have options that can improve performance. Refer to
the command reference for the commands you are using for the a description of the options.
Buffer size(the size of the data transfer AIX uses to communicate with the tape drive). Often increasing the buffer size
will reduce the amount of system overhead required to transfer data to or from the tape drive. Reducing system
overhead often results in better performance and faster backup/restore times. Refer to the command reference for the
commands you are using to increase the buffer size.
Tape drive compression setting On or Off. Not only does the option have to be set but if compression is selected the
tape drive and media must both support compression at the recording density specified.
The ability of the data to be compressed. Some data, such as text data, is often highly compressible, graphic or binary
data is often not very compressible. Data that is more compressible will normally take less time to backup/restore
because of the use of specialized compression chips in some tape drives.
AIX command compression option. Compressing data before sending the data to the tape drive may increase elapsed
time depending on the type of data and system activity. Data compression done by the drive will often result in faster
backup/restore, but due to other considerations such as network backup, etc., it may be faster to compress the data
prior to sending the data to the tape drive.
Clean the tape drive with the approved cleaning method. If the tape head is not clean the drive may have to
rewrite/reread the data. To reduce the need to rewrite/reread data the tape drive should be cleaned as recommended in
the user manuals.
The physical condition of the tape can have a impact on the time it takes to do a backup or restore. If a tape is not in
the best condition the tape drive may have to rewrite/reread data in order to do the backup/restore. This will this will
increase the time it takes to do the backup/restore.
Increase the "blocking factor" to put out larger blocks of data which will reduce the number of times the tape drive
and the system have to communicate before writing or reading.
Block size, can effect the time for backup/restore. Using large blocksizes may improve performance. Using small
block sizes can increase system overhead but before changing to a large blocksize it is necessary to be sure the user
application supports the larger blocksize chosen.
Very long restore times due to blocksize. If a backup is done with a fixed block length then the restore should be done
with the same fixed block length. If a backup is done with a fixed block length and the restore is done with variable
block length, the restore may work successfully but it may take many more hours to restore than it took to back up the
data. The reason for this is that when AIX reads fixed block length data in variable block mode, a check condition is
issued by the tape drive on every read. AIX must interpret every check condition and determine the proper action to
take. This often will put the tape drive into a mode of reading that will require the tape drive to stop tape motion,
rewind the tape some distance, then start reading again. This will reduce the life expectancy of the tape and increase
the time it takes to backup data.
Eliminate as many rewinds as you can. Do not write one file then rewind only to then space out to the end of the last
file written to write a new file. Use the .1 parameter on the rmt to reduce tape repositioning. Do not use this option
with the AIX mksysb command as mksysb handles tape positioning and rewind itself.
Device Driver/Robotics Driver(ATAPE)
Atape is the device and robotics driver for the 7332-005, 7332-110, and 7332-220.
Atape is the robotics driver for the 7331-205, 7331-305, 7334-410, and 7336-205.
Note: A minimum Atape level required for microcode download on the 7332-005 or 7332-110 is Atape 2.5.2.10.
To check the level of the Atape driver on a system do the following AIX command:
lslpp -l Atape.driver
file://C:\temp\TAPEWHDR.html
5/20/2008
Tape Help Package
Page 89 of 93
The current level of the Atape driver can be obtained(downloaded) via anonymous ftp service. Access the ftp server as you
would an anonymous service.
The current level of Atape device driver is available from:
ftp://service.boulder.ibm.com/storage/devdrvr/AIX
You should remove the older Atape driver before installing a newer level. To remove an older level of the Atape driver do
the Atape command:
/usr/lpp/Atape/lpp.deinst
You should remove the RMT's that of the devices supported by Atape before installing a newer level of the Atape driver. To
do this use the AIX command:
rmdev -dl rmtx <-- where x is the device you wish to remove
Do this for each of the RMT's associated with the device.
The AIX command to install the Atape driver is:
Diskette:
installp -acXd /dev/rfd0 Atape.driver
Directory: installp -acXd /pathname/filename Atape.driver
Note: If after rebooting your system you see a defined device at the same address as the 7332-005 you may need to do an
AIX command of
rmdev -dl rmtx <--- where the x is the defined device to remove
I may then be necessary to then do the AIX bosboot command, refer to your AIX documentation for information on the
bosboot command.
Tape Drive Microcode Download
There are two methods to download microcode to the Self Configuring SCSI Tape Drives(SCSD):
z
z
AIX 5.1(and higher) Diagnostics
SCSD Tape/Optical Ucode Download Utility(Genucode)
Drive Microcode Download with AIX 5.1 Diagnostics
AIX 5.1 Diagnostics
AIX 5.1(and higher) diagnostics now supports AIX diagnostic microcode download to Self Configuring SCSI Drives
(SCSD) that previously required the separate program "Genucode" from the external eServer and RS/6000 web site.
Note: The AIX 5.1 diagnostics must have a minimum PTF/APAR level of:
PTF# U477173 and APAR# IY27025.
Microcode Packaging
As new tape drive microcode is released the tape drive microcode packages will be updated to show how to use both
"Genucode" and AIX 5.1 diagnostics and higher.
file://C:\temp\TAPEWHDR.html
5/20/2008
Tape Help Package
Page 90 of 93
Using Older Microcode Packages
To use AIX 5.1 diagnostics with tape drive microcode packages that have not been updated yet you can copy the files using
the new naming conventions to the /etc/microcode directory and use AIX 5.1 to download the microcode to the tape drives.
The following is a sample of how to use the older files with AIX 5.1 diagnostics:
z
z
z
z
This example uses DLT8000 microcode in the /tmp directory but the same principles apply the other "SCSD" drives:
Download and the microcode to the /tmp directory
The /tmp directory contains:
/tmp/DLT8000.0250.A17002A3
/tmp/DLT8000.0250.A17002A3.dsdata
/tmp/dsdata
Copy and rename the files to the /etc/microcode directory:
cp /tmp/DLT8000.0250.A17002A3 /etc/microcode/DLT8000.A17002A3. 0250
cp /tmp/DLT8000.0250.A17002A3.dsdata /etc/microcode/DLT8000. A17002A3.dsdata
Note: The naming convention for the files in the /etc/microcode is:
MachineTypeModel.DeviceSpecific(LI).MicroCodeLevel
Or
MachineTypeModel.DeviceSpecific(LI).dsdata
The lscfg -vl rmt0 will show the drives information such as:
rmt1
1P-19-00-5,0
Differential SCSI DLT Tape
(40000 MB)
Manufacturer................QUANTUM
Machine Type and Model......DLT8000
Device Specific.(Z1)........0250
Serial Number...............B02P4343
Device Specific.(LI)........A17002A3
Part Number.................19P2026
FRU Number..................19P2042
EC Level....................H27532
Device Specific.(Z0)........0180020283000138
Device Specific.(Z3)........
Using AIX diagnostics
There are 2 ways to do the microcode download using the AIX diagnostics.
z
z
Using the AIX Diagnostics menu
Using the AIX Diagnostics via command line input.
Using the AIX Diagnostics menu
To use the AIX 5.1 diagnostics menu for microcode download do the following:
diag (enter)
Task Selection (enter)
Download Microcode (enter)
Select the drive you wish to download microcode to and follow the system instructions.
Note: When the system asks where the microcode file is to be found select /etc/microcode, not diskette.
file://C:\temp\TAPEWHDR.html
5/20/2008
Tape Help Package
Page 91 of 93
Using the AIX Diagnostics via command line input.
The command line to download microcode will use the highest level of microcode in the /etc/microcode directory for the
device selected. To use the AIX 5.1 diagnostics command line input for microcode download do the following:
diag -c -d rmt0 -T "download" (enter)
Sample Dsdata file
Dsdata files are unique to each drive.
The following is the dsdata file for the 60GB 8mm tape drive for use with the program "Genucode" or the AIX 5.1
diagnostics:
* Mammoth 2 Dsdata File
60GB 8mm Tape Drive
* May 9, 2003 V:01
* dsdata - Drive Specific Data for microcode download
*
* The dsdata file is used by both AIX Diagnostics, level 5.1 and higher,
* and the separate program "Genucode" available from IBM external WEB
* site.
*
* Format of the data:
* LINE1: blocksize(3-hex) buffer_offset(3-hex) binary_filesize(decimal)
* LINE1:(continued) timeout_value(decimal) write_buffer_type{4 or 7}
* LINE1:(continued) {PdDVLn string found from odmget -qname=devicex CuDv}
* LINE2: (vendorname) inquiry_page page_offset field_length value
*
* Note:
*
"Genucode" requires the firmware level in line 3 to match the
*
firmware level you wish to download.
*
Naming conventions for Genucode are:
*
Microcode file:
/tmp/Mammoth2.07pR.A1700295
*
dsdata
file:
/tmp/dsdata
*
*
AIX Diagnostics "Microcode Download" does not require the firmware
*
level in line 3 to match the firmware level you wish to download.
*
Naming conventions for AIX diagnostics are:
*
Microcode file:
/etc/microcode/Mammoth2.A1700295.07pR
*
dsdata
file:
/etc/microcode/Mammoth2.A1700295.dsdata
*
* LINE3: (firmware level) inquiry_page page_offset field_length value
* LINE4: (loadid) inquiry_page page_offset byte_length hexvalue
008000 000000 1201664 0600 07 tape
00 10 08 Mammoth2
00 20 04 07pR
00 2C 04 A1700295
SCSD Tape/Optical Ucode Download Utility
Genucode: SCSI microcode download utility for SCSD devices
Genucode is a program that can be used to download microcode to tape drives and other devices attached to an eServer
pSeries or RS/6000. The devices Genucode supports use the Self Configuring SCSI Device driver(SCSD) on these systems.
Information about using Genucode
Note: Do not power the tape drive off immediately after the microcode says it is complete as the tape drive may be still
doing internal processing that will take a few minutes to complete.
file://C:\temp\TAPEWHDR.html
5/20/2008
Tape Help Package
Page 92 of 93
On the 7205-311, wait until all LEDs stop flashing and the Green Open Door LED is the only LED on.
Microcode installation instructions:
z
z
z
z
z
z
z
z
z
You need to have "root" authority to run the microcode download utility "genucode".
Remove any tape from the drive.
Genucode requires the following files:
Genucode program files from the genucode package:
{ genucode
{ cpcat
{ genucode.cat
Device specific files from the device package:
{ dsdata
{ microcode file
"genucode", "cpcat", "genucode.cat", "dsdata", and the microcode file must all be put in the /tmp directory. Use the
following AIX command to change to the /tmp directory:
cd /tmp
Put "genucode", "cpcat", "genucode.cat", "dsdata", and the microcode file into the /tmp directory.
Make sure the files "cpcat" and "genucode" are marked executable using the following AIX commands:
chmod +x cpcat
chmod +x genucode
Run cpcat to copy "genucode.cat" to /usr/lpp/diagnostics/catalog/default
This only needs to be done once per system.
/tmp/cpcat
"dsdata" is the file name for the drive's specific data file used for customization of the download procedure. Use the
"dsdata" file from the microcode package you downloaded.
The binary microcode file must be in the form of VENDORNAME.FWLEVEL.LOADID as indicated in the "dsdata"
file, such as:
IBM-7205.V52.A0B00E24
z
The load id of the microcode file and the load id in the "dsdata" file must match the load id of the tape drive. The valid
load ids are:
12GB 4mm Tape drive
Single Ended
Load ID is 00000101 White or Black Bezel
20GB 4mm Tape drive
LVD
Load ID is 00000201 Black or White Bezel
Starting with microcode level C009
LVD
Load ID is A1700292 Black or White Bezel
13GB 1/4" Tape drive
Differential
Load ID is A0B00E11
30GB 1/4" Tape drive
LVD
Load ID is A1700298
20GB 8mm Tape drive
Internal White Bezel
7208-341
7331-305
Internal Black Bezel
Load
Load
Load
Load
60GB 8mm Tape drive
LVD
Load ID is A1700296
35GB DLT Tape drive
7205-311
7337-305/306
Load ID is A0B00E24
Load ID is A0B00E24
40GB DLT Tape drive
7205-440
7337-360
Load ID is A17002A3
Load ID is A17002A4
file://C:\temp\TAPEWHDR.html
ID
ID
ID
ID
is
is
is
is
A0000001
A0000002
A0000003
A0000004
5/20/2008
Tape Help Package
z
Page 93 of 93
160GB DLT Tape drive
7205-550
Load ID is A17002A9
80GB VXA Tape drive
7206-VX2
Load ID is A170029C
Run genucode to download the microcode to the tape drive:
/tmp/genucode -s rmt0 {rmt0 is Tape drive name}
Note:
z
z
z
z
Genucode will not prompt you before executing the download.
It is NOT necessary to recycle (powering the OFF then ON) the system or the tape drive to have the tape drive
microcode active.
If you are going to recycle the system or the tape drive, MAKE SURE the microcode download IS COMPLETE. If
the tape drive is recycled prior to the microcode download being complete, damage may be done to the internal
programming of the drive requiring the drive to have to be replaced.
If you try multiple microcode downloads to the drive without recycling the tape drive the microcode download may
fail.
Genucode Return Codes
Program failed with Return_code: -xx
NO INIT ODM
EXIT MAIN PANEL
EXIT SELECT RES
NO OPEN DSDATA
DSDATA ERROR
EXIT SELECT DEV
INQUIRY FAILED
MISMATCHED PARM
EXIT CONF DL
DOWNLOAD FAILED
NO RES DEVS
EXIT CFGRES DEV
CFGREQ FAIL
EXIT RES FAIL
RESTORE FAIL
NO DL DEVS
NO OPEN DEV
BAD INPUT PARM
(-1)
(-2)
(-3)
(-4)
(-5)
(-6)
(-7)
(-8)
(-9)
(-10)
(-11)
(-12)
(-13)
(-14)
(-15)
(-16)
(-17)
(-18)
file://C:\temp\TAPEWHDR.html
5/20/2008