1
WARNING - TO REDUCE THE RISK OF FIRE OR ELECTRIC SHOCK, DO NOT
EXPOSE THIS APPLIANCE TO RAIN OR MOISTURE.
CAUTION - TO REDUCE THE RISK OF ELECTRIC SHOCK, DO NOT REMOVE
QuickStart
Installation Guide
COVER (OR BACK). NO USER-SERVICEABLE PARTS INSIDE. REFER SERVICING TO
QUALIFIED SERVICE PERSONNEL.
Fantom Drives
20525 Manhattan Place
Torrance, CA 90501
Sales: 310-320-7272
Support: http://www.Fantomdrives.com/helpdesk
www.Fantomdrives.com
By MicroNet
FCC Compliance Statements
This equipment has been tested and found to comply with the limits for a Class B digital device, pursuant to Part 15 of the FCC rules. These limits
are designed to provide reasonable protection against harmful interference in residential installation. This equipment generates, uses, and can radiate
frequency energy and, if not installed and used in accordance with the instructions, there is no guarantee that interference will not occur in a particular
installation. If this equipment does cause harmful interference to equipment off and on, the user is encouraged to correct the interference by one or more
of the following measures:
• Reorient or relocate the receiving antenna
• Increase the distance between the equipment and receiver
• Connect the equipment into an outlet on a circuit different from that to which the receiver is connected
• Consult the dealer or an experienced radio/TV technician for help
12-13-2012 PN MAN-GFU3EK Rev A
The material in this document is for information only and is subject to change without notice. While reasonable efforts have been made in the preparation
of this document to assure its accuracy, Fantom Drives assumes no liability resulting from errors or omissions in this document, or from the use of the
information contained herein.
Fantom Drives reserves the right to make changes in the product design without reservation and without notification to its users.
Fantom Drives and the Fantom Drives Logo are registered trademarks of BNL Technologies, Inc. Macintosh, MacOS, and the MacOS logo are trademarks
of Apple Computer Inc. Microsoft Windows and the Windows logo are registered trademarks of Microsoft Corporation. All other names and logos are
property of their respective owners.
Copyright © 1999, 2012 Fantom Drives. All rights reserved. This publication may not be reproduced, stored in a retrieval system, or transmitted in any form
or by any means, in whole or in part, without the prior written consent of Fantom Drives, 20525 Manhattan Place, Torrance CA 90501.
Thank you for choosing Fantom Drives! Your Fantom Drives
G-Force Megadisk has been built to the highest standard of quality
and workmanship and, when used according to the instructions
in this guide, will provide years of trouble-free operation. We at
Fantom Drives take great pride in bringing personal satisfaction to
each of our customers.
Your Fantom Drives' disk drive is compatible with all USB-capable
Apple Macintosh computers running Apple® Mac® OS 10.4
(or greater) and PC-Compatible computers running Microsoft®
Windows ® Vista, Seven, 8, and Windows Server® 2003/2008.
14
Contents
Parts & Accessories List.......................................... 2
System Requirements .............................................. 2
Precautions............................................................. 3
Fantom Drives GreenDrive at a Glance....................... 4
Connecting the drive to Your Computer...................... 5
Formatting Your Fantom Drives External Hard drive.... 6
Formatting the drive in Mac OS X ............................... 6
Formatting the drive in Windows ................................ 7
Optimizing Windows Caching Algorithm ..................... 8
How to safely dismount and turn off your
Fantom Drives External Hard drive............................ 9
Troubleshooting /
Frequently Asked Questions (FAQ) ......................... 10
Contact Information............................................... BC
Q: I do not see my drive listed in the My Computer window,
but it does appear in the Device Manager list.
A: Right-click on My Computer. Select Manage in the pop-up
menu. In the Computer Management window and navigate to
Storage -> Disk Management. In the Disk Management window,
you should see a list of available storage devices. Look for the
disk that has a capacity closest to your Fantom Drives unit,
and right-click on the corrolating right-hand box. In the pop-up
menu that appears select "Delete Partition." The description will
change to say “Online" & "Unallocated”. Right-click on the box
and select Create New Partition in the pop-up menu. When the
Partition Wizard appears, select "Primary Partition" and click
"Next." Click "Next" in the next dialog, selecting the default value
for the drive. You will then see a drive letter (you can change
this drive letter if you wish); click "Next." You will then be asked
to format the drive.
Q: After I connected the drive to my PC, I got the following
alert message: HI-SPEED USB Device Plugged into non-HISPEED USB Hub.” What does this mean?
A: This alert message will appear if you plugged the drive into a
USB port that only supports USB 1.1 or 2.0. This is fine, except
your drive will operate at the nominal host connection speed
instead of USB 3.0.
If an issue cannot be resolved by using our FAQ, please
contact Technical Support via the Fantom Drives support site
at http://www.Fantomdrives.com/helpdesk
13
2
Q: I have a FAT32 disk, and when I try to copy a large file I
get an error saying there is not enough room on the drive-- I
have lots of free space!
A: FAT32 only allows files up to 4GB in size. To copy larger files,
please reformat the volume using MacOS Extended Format.
FAQs for PC Users:
Q: My computer does not recognize the drive.
A: Make sure all of your connections are secure. If you have an
add-on card, make sure it is working properly and/or update the
driver. Also, make sure you have all the latest updates for your
Windows installation
Q: I formatted my hard disk under Windows XP, but my Vista
machine does not allow me to delete or modify files on the drive.
A: Windows Vista and XP handle file permissions differently. In
Windows XP the default user group has full permissions to every
volume, whereas in Vista they do not. To fix this condition, you
need to grant the users group modify privileges to the drive:
1.Right-click the drive letter in Explorer and select properties
2.Click the security tab
3.Click "Edit." You will be asked to enter your administrator password.
4.Select "Users" and check the Modify box
5.Click OK.
Q: Where are the drivers for my operating system?
A: Windows 2000 and newer already include all the necessary
drivers. There are no drivers available for Windows NT or 98.
Q: When I leave my computer idle for a while, my drive won’t
work properly.
A: The most likely cause is that your computer is going into
sleep mode. The immediate solution is to shut down your computer
and turn off the drive, and then restart your computer. Once your
computer is completely booted up, turn on the drive. You should
see the drive in the Windows Explorer. To prevent this problem
from recurring, open the “Power Settings/Energy Saver” and set
it to never go into sleep mode.
Package Contents
The package should contain the following items:
•
•
•
•
•
Fantom Drives G-Force Megadisk Black
Drive Stand
USB 3.0 Cable
AC Adapter
Quick Start Installation Guide
If you are missing any items listed above, please fill out the
customer support form at:
http://www.fantomdrives.com/helpdesk
Please retain a copy of your receipt. You will need it if warranty
repair service is required in the future.
System Requirements
System Requirements for Mac
• G4/G5 or Intel based Apple Macintosh Computer
• Mac OS X 10.4 or newer
• Available USB 2.0 port*
System Requirement for PC
•
•
•
•
X86-based PC 1.6GHz or faster CPU
Microsoft® Windows® XP SP3, Vista, 7
Microsoft® Windows Server® 2003, 2008
Available USB 3.0 or 2.0 port
USB 3.0 compatibility with USB 2.0
USB 3.0 ports are backward compatible with USB 2.0 and
USB 1.1. However, if you connect the drive to an earlier USB
standard port, it will operate at that port's specified speed.
If your computer does not have eSATA ports, you may purchase
an eSATA expansion card for your computer. Contact your
authorized Fantom Drives reseller for further details.
3
12
Precautions
Failure to follow the precautions described below may cause
damage to your Fantom Drives External Hard drive and void the
warranty.
Q: I'm having trouble seeing my disk when connected via eSATA
A: eSATA host connections require the SATA host bus to support
and have AHCI mode enabled and active. Additionally, the eSATA
cable must be a proper shielded cable, 1M or less in length, with
a blade depth (the recessed plug of the cable) of 1cm.
• DO NOT use a third-party AC adapter or power cord. Doing so
may damage the drive and void the warranty.
Some host bus adapters have built-in RAID functionality and must
be configured before the disks will appear to the host computer.
For these cases, the eSATA controller will have either a BIOS
utility or a software RAID configuration utility that will need to
be configured prior to use. Please consult your eSATA host bus
adapter documentation for more information.
• DO NOT bump, jar or drop the drive as this may damage it and/
or result in loss of data.
FAQs for Mac Users:
• DO NOT open the case. Doing so will void the warranty.
• DO NOT disconnect any cables while the drive is powered on
without first properly dismounting the device via your operating
system; doing so can result in data loss and possible damage.
• DO NOT set any liquids or beverages on the drive as they may
damage the internal electronics.
• Fantom Drives highly recommends that you regularly back-up the
files stored on your Fantom Drives external hard drive.
Fantom Drives is not responsible for any data loss, nor will
Fantom Drives perform any recovery of lost data or files.
Q: Why is my drive asking me to format it? It was already
formatted and it contains data.
A1:Run a disk repair utility on the drive.
A2:Perform permission repair on your system drive. Open the
disk utility (located in /Applications/Utilities/Disk Utility.app.)
Select your system drive (usually the first disk listed) and click
"Repair Disk Permissions" in the "First Aid" Tab.
A3:Restart your computer. As soon as the bootup chime
sounds, press and hold down the option-command-p-r key
combination to reset the PRAM. Release the keys when
the chime sounds a second time. Please refer to your Mac
manual for more information on these procedures
Q: My computer does not recognize the drive.
A: Check to make sure that all of your connections are secure
and that the power switch is in the "ON" position. Then check if
your External Hard drive is listed in the Apple System Profiler. If the
problem persists, verify that the appropriate port used is functioning.
Q: I'm trying to copy files to/from FAT32 volumes or network
shares, and it keeps failing.
A: FAT32, HFS+, and other file system formats allow different
standards of filename length or use of special characters.
Rename the offending file(s) and try the operation again.
11
4
Q: Can I leave my G-Force Megadisk Black on all the time, or
should I turn it off when not in use?
A: The G-Force Megadisk Black is meant to be left on, but does not
add any limitations on being turned off. Drive reliability is affected
by repeated power cycles, and the G-Force Megadisk Black
cannot alleviate this. In addition, Micronet recommends that
the drive’s power supply is connected through a UPS or surge
protector; In the case of a power surge, or brown/black out, the
hard drive’s sensitive electrical components will not be damaged.
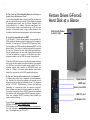
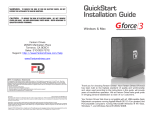
Fantom Drives G-Force3
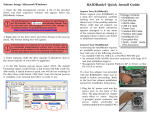
Hard Disk at a Glance
Disk Activity/Power
Indicator Light
Q: Is my drive compatible with my DVR?
A: All MicroNet / Fantom Drives products are compatible with
DVRs capable of addressing external disks over their respective
interface. For example, our G-Force eSATA+USB external disks
are compatible with DVRs capable of addressing eSATA or USB
external disks. That said, our products are explicitly supported
for use with Windows PCs and Apple Macintosh computers.
We can provide support for use under those platforms- we do
not have the equipment, training, or authorization from other
equipment vendors such as DVRs to support their platforms.
While many DVRs have the ports, the individual provider firmware
may or may not allow access to an external device; if you received
your DVR from your cable or satellite vendor, consult with their
customer support about whether the USB/eSATA ports are
active, or if there is a firmware update required. Alternatively,
consult the manufacturer of the DVR regarding this feature.
Q: How can I test my disk to make sure it is not defective?
A: Modern disks drives have a diagnostic on board processor
that monitors the disk during operation and records various
diagnostic values including any detected failures. This diagostic
method, S.M.A.R.T. (Self-Monitoring, Analysis and Reporting
Technology) is a monitoring system for computer hard disk
drives to detect and report on various indicators of reliability, in
the hope of anticipating failures. SMART data can be accessed
and used for active testing using a SMART diagnostic program.
There are numerous SMART monitoring tools available- we
recommend the following:
Smartmontools- http://smartmontools.sourceforge.net/
HDDScan (Windows) http://hddscan.com/
SMARTreporter (Mac)* http://www.corecode.at/smartreporter
For more information about SMART and its values, please see
http://en.wikipedia.org/wiki/S.M.A.R.T.
Power Switch
eSATA port
Security Lock Slot
USB 3.0 port
AC Adapter Port
5
10
Connecting the drive
to Your Computer
1. Plug the AC adapter cord into the power port on the back
of the drive. The plug should not require much effort to insert.
If the plug will not go in, do not force it; the plug is probably
upside down. Rotate the plug and try again. Incorrectly inserting
the plug could damage the drive and void the warranty. Plug the
other end into an AC outlet.
2. Connect the appropriate cable to your host:
eSATA and USB plugs are shaped so they can
only be properly inserted one way. Be sure
to insert the plugs properly or you may
damage the drive and void the warranty.
(USB) Connect the square USB connector
(type B) of the included USB 3.0 cable to the
square USB plug on the G-Force3. Connect
and rectangular end to a free USB port on
your computer.
(eSATA) Connect an eSATA cable to a free
eSATA port on your computer.
If your computer does not have USB
3.0 ports and/or eSATA ports, you may
purchase an expansion card for your computer. Contact your
authorized Fantom Drives reseller for further details.
3. Flip the power switch located on the back of the G-Force to
the "ON" position (labelled "-".) Once the drive is powered up,
your computer should recognize it and the drive will be ready to
format.
Troubleshooting/
Frequently Asked
Questions (FAQs)
General Questions
Q: I bought a 500GB drive, but my computer is showing
465GB. Where is the missing capacity?
A: Hard drive manufacturers market drives in terms of decimal
(base 10) capacity. In decimal notation, one megabyte (MB) is
equal to 1,000,000 bytes, and one Gigabyte (GB) is equal to
1,000,000,000 bytes. Many operating systems use the binary
(base 2) numbering system to describe disk capacity; In the
binary numbering system, one megabyte is equal to 1,048,576
bytes, and one gigabyte is equal to 1,073,741,824 bytes.
Simply put, decimal and binary translates to the same amount
of storage capacity.
Q: Is my external hard drive bootable?
A: Yes! As long as your host hardware and operating system
support booting from eSATA or USB. Refer to your computer’s
documentation for more information
Q: My drive was working fine yesterday but now its gone!
A: The disk may have been shut down without being dismounted,
or may have failed. If you do not hear and feel the drive spin up
when you connect the power, the drive will need to be replaced.
If you verify that the computer input and the drive data cable are
working, you may be able to repair or recover the data with your
computer’s disk repair utility or a third party utility.
If your disk repair utility cannot repair or see the disk, the
drive has failed and will need to be replaced. If data recovery
is desired, please contact an established professional data
recovery firm. For a checklist of what qualities you might seek,
see www.drivesavers.com/why_drivesavers/index.html or www.
ontrack.com/services.
9
6
How to Safely Dismount
and Turn Off Your G-Force
Megadisk Black
When a device such as a hard drive is mounted, the computer
‘sees’ the device and is able to communicate with it. When you
dismount a device, the computer will commit any outstanding
I/O and no longer recognizes the disk, preparing the disk to be
disconnected from the computer in an orderly fashion.
Never turn off or unplug a hard drive without dismounting it first.
Doing so could cause data on the drive to be lost or damaged.
How to safely dismount and turn off the
drive with the computer running
Mac Users
Drag the icon for the External Hard drive to the Trash. The drive will
dismount and you can then safely turn if off. You may then unplug the
power cord and data cable if you want to disconnect the drive.
PC Users
Left-click on the hot plug icon ( ) in your system tray, located
on the bottom right of your screen. You will receive the alert
message “Safely Remove..” followed by the drive description and
drive letter for the device.
(eSATA) If the ( ) icon does not appear it means that the current
installed driver for your eSATA host bus adapter does not support
hot plugging- this may be due to a hardware limitation or simply
that this feature is missing from the driver installed. Check with
your eSATA host bus adapter vendor for updated drivers.
Left-click on the appropriate device (with the drive letter matching the
one used by the External Hard drive). After a few seconds, Windows
will give you a message that it is safe to remove the device.
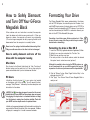
Formatting Your Drive
The G-Force Megadisk Black comes preformatted at the factory
with the NTFS file system, the native file system for Windows. Linux
and MacOSX hosts require a third-party driver such as NTFS-3G to
achieve full read/write capability with NTFS volumes. If you intend to
use this drive exclusively on MacOSX it is advised to reformat your
disk with the HFS ("Mac Extended") file system.
Formatting a hard drive erases all data contained on it. Please
be sure to create a copy of the files you wish to keep to another
location before reformatting.
Formatting the drive in Mac OS X
1.Launch the “Disk Utility” application located in Applications/Utilities.
2.Highlight your new drive and select the “Partition” tab
3.Select the new partition map type.
4.For each partition in the volume scheme, select the desired
file system format and volume name (optional)
Although it is possible to format using the DOS file system, we
do not recommend this as an artificial capacity limit may be
imposed on the drive and performance will be unpredictable.
5. Click the “Options” button. Select “Apple Partition Map” in the
dialog box and click “OK”.
6. Click “Apply.” Your Fantom Drives G-Force Megadisk Black is
ready to use!
3
3
4
2
5
6
7
8
Formatting the drive in
Windows Hosts
1. Open the disk management console. A list of the attached
drives and their respective volumes will appear. Select the G-Force
Megadisk Black Disk.
The Disk Management Console can be accessed by rightclicking on the "My Computer" icon (
) and selecting
"Manage" from the drop down menu. Disk Management
is found under "Storage" in the resultant window. For an
illustrated guide, please see
http://www.fantomdrives.com/helpdesk/faq
2. Right-click on the drive letter and select Format in the pop-up
menu. The Format dialog box will appear.
If the hard disk is not signed for use, the New Partition option
is unavailable (superimposed no-entry icon). In this case a
signature can be written on the hard drive by right clicking on
the disk description window and selecting "Initialize Disk".
3. Under Capacity, verify the drive capacity. It should be close to
the stated capacity of your drive in gigabytes.
4. In the File System pop-up menu,
select NTFS. The default formatting
option is full format. A full format
will fully verify the disk media. A
Quick format is quick, but will do
less verifying of the drive than a full
format. Click Start. Once the format process is complete, your
external hard drive is ready to use.
Optimizing Windows Caching Algorithm
By default, Windows XP optimizes caching for performance on
external drives. Windows Vista and 7 optimize caching for quick
removal. As a result, Windows XP appears to have faster
access to external disks but at a greater risk of data corruption
and loss. To change Windows' caching algorithm, open the disk
management console (as
described on page 8) on
your system drive. A list of
the attached drives and
their respective volumes
will appear. Right-click on
the Fantom external disk
in the disk list and select
properties. Select the
Policies Tab near the top
left of the window, and
click
your
desired
optimization level. press
OK when finished, and you
may
close
the
disk
management applet.
Optimizing for performance can greatly enhance the
throughput of your disk but is much more vulnerable to
data loss! Make sure to have appropriate backup strategies
before enabling this feature!