1
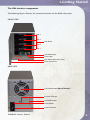
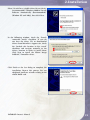
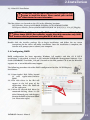
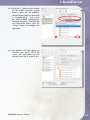
MicroNet SR4
Owner’s Guide
June 2007
www.MicroNet.com
FCC Compliance Statement
Federal Communications Commission
Radio Frequency Interference Statement
This equipment has been tested and found to comply with the limits for a Class B digital device, pursuant to
part 15 of the FCC Rules. These limits are designed to provide reasonable protection against harmful interference
in a residential installation. This equipment generates, uses and can radiate radio frequency energy and, if not
installed and used in accordance with the instructions, may cause harmful interference to radio or television
reception, which can be determined by turning the equipment off and on. The user is encouraged to try to
correct the interference by one or more of the following measures:
1.
2.
3.
4.
Reorient or relocate the receiving antenna.
Increase the separation between the equipment and receiver.
Connect the equipment into an outlet on a circuit different from that to which the receiver is connected.
Consult the dealer or an experienced radio/TV technician for help.
Changes or modifications not expressly approved by the party responsible for compliance could void the user’s
authority to operate the equipment.
Only use shielded cables, certified to comply with FCC Class B limits, to attach this equipment. Failure to install
this equipment as described in this manual could void the user’s authority to operate the equipment.
Canadian Department of Communications Compliance: This equipment does not exceed Class B limits per radio
noise emissions for digital apparatus set out in the Radio Interference Regulation of the Canadian Department of
Communications. Operation in a residential area may cause unacceptable interference to radio and TV reception
requiring the owner or operator to take whatever steps are necessary to correct the interference.
Conformite aux regiements du Department Canadien de Communications: Cet equipement n’excede pas les
limites de Classe B concernaut les bruits des emissions de radio pour le dispositif digital etablies par le Reglement
d’Interference de Radio du Departement Canadien de Communications. L’operation de cet equipement dans un
quartier residential peut occasionner des parasites inacceptables dans la reception de la radio ou de la television
exigeant le proprietaire ou l’operateur de faire routes les necessaires pour corriger cet interference.
FTZ/BTZ German Postal Service Notice: We hereby certify that the ADV, SB, SBS, SS, SBX, SBT, MO, MS, MR, MT,
MD, CPK, CPKT, CPKD, DD and DDW products are in compliance with Postal Regulation 1046/1984 and are RFI
suppressed. The marketing and sale of the equipment was reported to the German Postal Service. The right to
retest this equipment to verify compliance with the regulation was given to the German Postal Service.
Bescheinigung des Herstellers/Importeurs: Hiermit wird bescheinigt, daB der/die/das: SB, SBS, SS, SBX, SBT,
MO, MS, MR, MT, MD, CPK, CPKT, CPKD, DD, DDW in Ubereinstimmung mit den Bestimmungen der: VFG1046,
VFG243 funk-enstort ist. Der Deutschen Bundespost wurde das Inverkehrbringen dieses Gerates angezeigt
and die Berechtigung zur Uberprdfung der Serie auf Einhaltung der Bestimmungen eingeraumt MicroNet
Technology, Inc.
SATARAID Owner’s Manual
2
Warranty
Limitations of Warranty and Liability
MicroNet Technology has tested the hardware described in this manual and reviewed its
contents. In no event will MicroNet or its resellers be liable for direct, indirect, incidental, or
consequential damage resulting from any defect in the hardware or manual, even if they have
been advised of the possibility of such damages. In particular, they shall have no liability
for any program or data stored in or used with MicroNet products, including the costs of
recovering or reproducing these programs or data.
During the specified warranty period, MicroNet guarantees that the product will perform
according to specifications determined by the manufacturer, and will be free of defects. Parts
and labor of the received product, and replacement parts and labor are guaranteed during
the specified warranty period. The warranty covers defects encountered in normal use of the
product, and does not apply when damage occurs due to improper use, abuse, mishandling,
accidents, sand, dirt, excessive dust, water damage, or unauthorized service. The product must
be packed in its original packing material when shipped, or the warranty will be void. In all
cases, proof of purchase must be presented when a warranty claim is being made.
This manual is copyrighted by MicroNet Technology. All rights are reserved. This documentation
may not, in whole or part, be copied, photocopied, reproduced, translated, or reduced to any
electronic medium or machine readable form without prior consent in writing from MicroNet.
MicroNet and the MicroNet logo are registered trademarks of MicroNet Technology. Macintosh,
and the MacOS Logo are trademarks of Apple Computer Inc. Microsoft Windows and the
Windows Logo are registered trademarks of Microsoft Corporation. All other trademarks are
the property of their respective owners.
Technical Support Policy
If you have a problem installing your system or suspect it is malfunctioning, please contact
the Authorized MicroNet Reseller from whom you purchased the system. If the reseller fails
to resolve the problem, please visit our support page at www.micronet.com/help, or call
MicroNet’s Help Desk for assistance at (310) 320-0772. Please have the model, serial number,
date of purchase, and the reseller’s name available before calling. If possible, call from a
telephone near the system so we can more readily direct you to make any necessary system
corrections, should they be required.
Returning Materials
If a reseller or MicroNet Technician finds it necessary to have the system returned for testing
or servicing, a Return Materials Authorization (RMA) number will be issued. The RMA number
must be placed on the outside of the carton in large, visible letters near the address label.
Return the complete system including all cables and software. The system must be packed
in the original packing materials and shipped prepaid. MicroNet will repair the system and
return it prepaid by similar common carrier and priority. Please record the RMA number and
make reference to it when inquiring on the status of the system. A returned unit found to be
fault-free will carry a $65.00 charge for service and repackaging.
SATARAID Owner’s Manual
3
Welcome
Welcome From MicroNet Technology
We are pleased that you have chosen the SR4. Our systems are designed for
speed, reliability, compatibility, and performance. We think you will find the
system easy to install, and a productive addition to your computer system.
This manual presumes that you are familiar with standard computer operations;
this includes copying files, opening documents, clicking with the mouse, and
organizing files or folders within other folders. If you are unfamiliar with
these operations, please consult the User’s Guide that was supplied with your
computer system. Your computer dealer and local user’s groups are also good
sources of information. After you are comfortable with the operation of your
computer, continue reading this manual which describes hardware installation
and operation.
Thank you again for choosing a MicroNet system. Please fill out the enclosed
registration card and mail it to the address below. Mailing the registration card
registers your system and provides us with helpful information. Alternatively,
You may also register your product online at www.MicroNet.com
Your comments assist us in improving and updating our products. Please feel
free to share them with us. Please send comments to:
MicroNet Technology
Attn: Customer Service
19260 Van Ness Ave
Torrance, CA 90501
[email protected]
SATARAID Owner’s Manual
4
Table of Contents
Table of Contents
FCC Compliance Statement
Warranty Information
Welcome Note
Table of Contents
Chapter 1 -- Getting Started
Features and Benefits
System Requirements and Compatibility
Unpacking the SR4
What’s Included
Choosing a place for your SR4
Daily Use Tips
General Use Precautions
The SR4 Interface Components
Chapter 2- Installation
Connecting the SR4
Formatting your SR4
Performing Basic Tasks
Chapter 3- Understanding RAID
RAID
Span/JBOD
RAID 0
RAID 1
RAID 10
RAID 5
RAID Set
Volume Set
Hot Spare Drives
Hot Swap Disk Rebuild
Chapter 4- Troubleshooting
Frequently Asked Questions
Appendix A- Getting Help
Appendix B- RAID Level Comparison Table
Appendix C- Glossary of RAID Terms
Copyright Notice
SATARAID Owner’s Manual
2
3
4
5
6
6
6
7
7
7
8
8
9
10
10
11
13
14
14
14
15
15
15
16
16
16
17
17
18
18
20
21
22
BC
5
1-Getting Started
Chapter 1 - Getting Started
Thank you for purchasing The MicroNet SR4 storage solution. With speed, high capacity, ease
of use, and support for numerous applications, SR4 is the ideal solution for all of your data
storage needs.
Please take advantage of the information contained within this manual to ensure easy setup
and configuration. If at any time you require technical assistance, MicroNet’s Help Desk is
available at 310-320-0772 or at www.micronet.com/help
Features and Benefits
The SR4 Subsystem is 4 disk subsystem designed to meet or exceed the highest industry
standards. Outstanding features include:
•
Single cable eSATA-300 host connection
•
SATA II, NCQ enabled drive channels
Featuring high performance and availability RAID technology and advanced array management
features, The SR4 can serve in several applications:
•
As a high speed local storage device for a dedicated workstation
•
As a high-speed, fault tolerant server-attached storage device
•
As a redundant backup station
System Requirements and Compatibility
The SR4 features a single multiplexed eSATA host connection. While the SR4 can function
with a variety of hardware and software combination, MicroNet has tested and approved the
SR4 for compatibility with the following architectures:
Apple Hosts:
G4-400 and better, OS-X revisions 10.4.8 and newer (utilizing MicroNet’s eSATA-PCIX host bus adapter, MicroNet part number SATAPCIX4)
G5 and Mac Pro desktops with a PCI Express Slots, OS 10.4.8 and newer (utilizing MicroNet’s eSATA-PCIX host bus adapter, MicroNet part number SATAPCIE2)
!
ATTENTION: As of this printing, RAID 5 is not
supported on PCI Express Mac based hosts.
Intel PCs:
Pentium 3-500 and better, Windows revisions 2000/XP/2003/Vista (utilizing MicroNet’s eSATA-PCIX host bus adapter, MicroNet part number SATAPCIX4)
Pentium D-2800 and better with PCI express ports, Windows revisions 2000/XP/2003/
Vista (utilizing MicroNet’s eSATA-PCIX host bus adapter, MicroNet part number SATAPCIE2)
SATARAID Owner’s Manual
6
1-Getting Started
Unpacking the SR4
Please unpack your SR4 in a static free environment, carefully making sure not to damage or
discard any of the packing material. If the RAID subsystem appears damaged, or if any items
of the contents listed below are missing or damaged, please contact your dealer or distributor
immediately.
In the unlikely event you may need to return the SR4 for repair or upgrade, please use the
original packing material to ensure safe transport.
What’s Included
Your SR4 comes with the following items:
1 SR4 unit with 4 disk drives preinstalled
1 SR4 CD containing this manual in PDF format, warranty information, registration and
marketing materials
1 power cord
1 external SATA cable
Choosing a location for your SR4
When selecting a place to set up your Disk Array, be sure to follow these guidelines:
•Place on a flat and stable surface capable of supporting at least 30lbs
•Place the Disk Array close enough to the computer for the eSATA cable to reach.
•Use a grounded wall outlet.
•Avoid an electrical outlet controlled by wall switches or automatic timers. Accidental disruption
of the power source may wipe out data in the memory of your computer or Disk Array.
•Keep the entire system away from potential sources of electromagnetic interference, such
as loudspeakers, cordless telephones, etc.
!
CAUTION! Avoid direct sunlight, excessive heat, moisture, shock and
vibration, or dust
SATARAID Owner’s Manual
7
1-Getting Started
Daily Use Tips
• Read this User’s Guide carefully. Follow the correct procedure when setting up the device.
• Additional application software may have been included with your drive. Please review the
documentation included with this software for information on the operation and support
of this software. The documentation can usually be found in an electronic format on the
installation CD.
• Always operate your drive on a steady, level surface. Do not move the unit while it’s turned on.
• Plug your drive into a grounded electrical outlet. The use of “ground-defeating” adapters
will cause damage not covered by your warranty.
• Do not open your hard drive or attempt to disassemble or modify it. Never insert any
metallic object into the drive to avoid any risk of electrical shock, fire, short-circuiting or
dangerous emissions. Your drive contains no user serviceable parts. If it appears to be
malfunctioning, contact MicroNet Support.
• SR4 is compatible with the leading hard disk repair and defragmentation software. We
recommend using this software to maintain peak performance and data-integrity of your
drive. Contact your local software retailer for more information about the software best
suited for your computer.
General Use Precautions
• Do not expose the hard drive to temperatures outside the range of 5°C (41°F) to 45°C
(104°F). Doing so may damage the drive or disfigure its casing. Avoid placing your drive
near a source of heat or exposing it to sunlight (even through a window.)
• Never expose your device to rain, or use it near water, or in damp or wet conditions. Doing
so increases the risk of electrical shock, short-circuiting, fire or personal injury.
• Always unplug the hard drive from the electrical outlet if there is a risk of lightning or if it
will be unused for an extended period of time.
• Do not place the drive near sources of magnetic interference, such as computer displays,
televisions or speakers. Magnetic interference can affect the operation and stability of your
SR4.
• Do not place heavy objects on top of the drive or use excessive force on it.
• Never use benzene, paint thinners, detergent or other chemical products to clean the outside
of the SR4. Instead, use a soft, dry cloth to wipe the device.
SATARAID Owner’s Manual
8
1-Getting Started
The SR4 interface components
The following figures illustrate the connector locations for the RAID subsystems.
FRONT VIEW
Disk 4
Disk 3
Disk Drives
Disk 2
Disk 1
Host Status Light
Power Light
Disk Status and Activity Lights
Drive Access Door
REAR VIEW
Fan Exhaust Vents (DO NOT BLOCK!)
External SATA port
110V/220V Switch
Power Switch
Power Connector
SATARAID Owner’s Manual
9
2-Installation
Chapter 2 - Installation
Connecting the SR4 requires an available power socket, and a host with an available PCI,
PCI-X, or PCI Express slot. Your SR4 unit came with either a PCI-X eSATA RAID controller
(PCI compatible) or a single lane PCI-Express eSATA RAID controller. Should you require a
different or additional host bus adapter, contact your MicroNet Authorized Reseller for the best
solution for your environment.
2.1 Installing the Host Bus Adapter
2.1.1Turn off your host computer and remove the cover or door to access your computers
expansion slots. For more information on how to access your computer’s expansion slots
consult your computer’s user manual.
2.1.2Install the RAID controller into an available PCI or PCI-X slot (SR4 PCI-X models) or an
available PCI-Express slot (SR4 PCI-Express models, 1X ~ 16X lane slots supported).
2.1.3Replace your computer cover and reconnect power.
2.2 Connecting the SR4
Connecting the SR4 requires an available power socket, and a host with an external, port
multiplier capable eSATA port. Should you require a host bus adapter, contact your MicroNet
Authorized Reseller for the best solution for your environment.
!
CAUTION! Please make sure your voltage selection
switch is set to your local AC voltage supply
(110/220) before connecting the SR4 to power.
2.2.1Plug the AC adapter cord into the power port on the back of the SATA RAID. The plug
should not require much effort to insert. If the plug will not go in, do not force it; the
plug is probably upside down. Rotate the plug and try again. Incorrectly inserting the
plug could damage the drive and void the warranty.
2.2.2 Plug the power cord into the cord socket in the AC adapter. Plug the other end into an
AC outlet.
2.2.3 Connect the included eSATA cable to a free eSATA port on your computer.
!
CAUTION! eSATA plugs are shaped so they can only be
properly inserted one way. Be sure to insert the plugs properly
or you may damage the drive and void the warranty.
2.2.4Flip the power switch located on the back of the SR4 to the “ON” position (labelled
“-”.) Once the drive is powered up, your computer should recognize it and the drive
will be ready to format. If using the SR4 with a MicroNet eSATA RAID controller, launch
the RAID configuration utility as described in the controller Manual to begin RAID
creation.
SATARAID Owner’s Manual
10
2-Installation
2.3 Installing eSATA RAID host drivers
The SR4 includes an eSATA RAID card. MicroNet provides drivers that support Windows
2000,2003,XP, and Vista, both 32bit and 64bit, along with Mac OS X 10.3.9 and newer. Drivers
can be found on the included CD in the drivers directory, and the RAID utility is located in
the Silicon Image RAID Utility directory. Additional operating system support as well as driver
updates can be found on the Silicon Image web
site at www.siliconimage.com
2.3.1Windows 2000/XP/2003 Installation
The first time the computer is powered on
following the installation of the eSATA Raid
controller, Windows will discover the device
and display the new hardware wizard.
Insert the installation CD in the CD-ROM
drive before proceeding. On Windows XP
and 2003 installation, check (No) when
prompted to connect to the internet. Click
next to continue.
SATARAID Owner’s Manual
11
2-Installation
Select “Search for a suitable driver for my device
(recommended)” (Windows 2000) or “Install
Software Automatically (Recommended)”
(Window XP and 2003), then click Next.
In the following window, check the “Search
removable media” checkbox. If you do
not have the driver CD, or downloaded
drivers from MicroNet’s support site, check
the “Include this location in the search”
checkbox and navigate manually to the
drivers location in order to install them.
Click Next to install the Silicon Image
SoftRaid 5 Controller driver.
Click Finish at the last dialog to complete the
installation. Repeat this process for any
additional hardware wizards relating to the
eSATA RAID card.
SATARAID Owner’s Manual
12
2-Installation
2.3.2 MacOS X Installation
!
ATTENTION! You must have administrator privileges on your
system to install the drivers. Please consult your network
administrator for more information.
The Mac drivers are located on the CD in the following locations:
PCI-X Models: /Drivers/eSATA RAID-PCIX/Mac OS X/SATARAID5.MPKG
PCI-Express Models: /Drivers/eSATA RAID-PCIE/MAC OS X/SiI3132_1.1.9u_Sil_Pkg.pkg
!
ATTENTION: As of this printing, The PCI Express Mac drivers available for the
Silicon Image Sil3132 host controller support direct disk connection only. RAID
functions must be performed using Mac OS X’s disk utility.
Double click the installer package file to begin installation, and follow the on screen
instructions for the driver and utility installation. Once the installation is complete, the
installer will prompt you to reboot your computer.
2.4 Configuring RAID
RAID configuration for hosts operating Windows (all models) and Mac OS X PCI-X
installations is described in detail in the included SATARAID Management Software User
Guide (SATARAID5-UserGuide_1.10.pdf ) located on the SR4 product CD or on the MicroNet
support site at www.MicroNet.com/support
The following procedure describes RAID configuration for Mac OS PCI-Express
Installations:
2.4.1 Open Apple’s Disk Utility, located
in your applications/utilities
folder
2.4.2The disk drives in the SR4 will
appear in the left pane of the
application. Select the RAID tab
on the right pane.
2.4.3 Select the desired disk drives by
command-clicking them in the
drive (leftmost) pane, and dragging
them to the RAID selection window
(see illustration right.)
SATARAID Owner’s Manual
13
2-Installation
2.4.4Click the “+” button on the bottom
of the RAID selection screen.
Enter a name for the RAIDSet,
volume format (MAC OS Extended
is recommended)
and select
the desired RAID configurationMirrored, Striped, or Concatenated
(see illustration right.) Click the
“Create” button to complete the
operation.
2.4.5 The RAIDset will now appear on
the drive pane on the left of the
screen, and will mount on your
desktop. Your SR4 is ready to use.
SATARAID Owner’s Manual
14
3-Using Your SR4
Chapter 3 - Using Your SR4
3.1 Formatting your SR4
Formatting a hard drive erases all data contained on the drive. If you wish to reformat your
SR4, be sure to create a copy of the files you wish to keep before reformatting. This step is
not necessary for PCI-Express on Macintosh models.
!
ATTENTION! Please make sure to configure your eSATA RAID before
proceeding with the format. Consult the SATARAID utility Manual (SATARAID5UserGuide_1.10.pdf)
3.1.1 Formatting the drive in Mac OS X
1. Launch the Disk Utility application (Disk Utility is located in the Utilities folder,
inside the Applications folder). The Disk Utility window will open with a small
sub-window at left and a larger sub-window with a series of tabs at the top.
2. You should see the drive listed in the left sub-window. Click on the drive to highlight it; if
you see two icons for the drive, select the uppermost (root) instance. Information about the
drive will appear in the Information sub-window.
3. Click on the Erase tab. In the Erase sub-window you will see a Volume Format pop-up menu
and a Name field.
4. In the Volume Format pop-up, select the format
type (MacOS Extended is recommended.)
FYI:
Although it is possible to format a hard
drive on Mac OS X using the DOS
file system, we do not recommend this, as an
artificial capacity limit may be imposed on the
drive and performance will be unpredictable.
5.Click Erase. An alert pop up with the message:
“Erasing a disk will destroy all information on
all of volumes of the disk…” will appear. Click
(Erase). Once initializing is complete, you should see the drive listed in the left sub-window
of the Disk Utility screen. You should now see the drive icon on the Desktop.
SATARAID Owner’s Manual
15
3.1.2 Formatting the drive on Windows Hosts
1.Open the disk management console. A list of the attached drives and their respective
volumes will appear. Each Volume set will appear as an individual disk in the management
console. Upon the first time the SR4 is connected, a “Initialize and Convert Disk Wizard”
should appear when the disk management console is run. You may use the Wizard to set
up the volume, or follow the next steps for manual configuration.
Note:
The Disk Management Console can be found under \Windows\System32\diskmgmt.msc on your system
drive. For an illustrated guide, please see http://www.fantomdrives.com/support/faqs
2. Right-click on a SR4 volume. If it’s not initialized, a red “Do Not Enter” logo will cover
the disk icon. Right click on the disk and select “Initialize Disk.” Follow the on-screen
instructions.
2
3
3. Right click the initialized volume (The area right of the disk icon.) In the context menu,
select “New Partition.” Follow the on screen instructions. In the File System pop-up menu,
select NTFS. The default formatting option is Full format. A Full format will take about
30-90 minutes. A Quick format will take just a few minutes, but will do less verifying of
the Drive than a Full format. Click Start. Once the format process is complete, your SR4 is
ready to use.
SATARAID Owner’s Manual
16
3-Using Your SR4
3.2 Replacing Drives
1.Save all your work and turn off your
computer and SR4 unit.
2.Disconnect eSATA and power cords.
3.Remove the 3 thumb screws on the back of
the unit.
4. Gently pull the top cover about 1/2” and
remove from enclosure.
6.Open the drive door, and gently pull the
drive until it disconnects from the SATA
connector. Once disconnected, remove the
thumbscrews by unscrewing them.
7.Remove the disk. To install a new disk,
follow this procedure in reverse.
5.Loosen the thumb screws securing the
disk to the drive cage (on both sides of the
disk), but do not remove.
SATARAID Owner’s Manual
17
3-Using Your SR4
3.3 Performing Basic Tasks
Opening files and folders on the External Hard drive (MacOS or Windows)
1. Double-click on the drive icon. A window showing the files and folders stored on the drive
will appear.
2. Double-click on the file or folder that you want to open.
Copying files and folders to your External Hard drive
Mac Users
1. Highlight the file or folder that you want to copy by clicking on it, but do not release the
mouse button.
2. While keeping the mouse button pressed down, drag the highlighted file or folder to the
drive icon or to a specific folder on the drive.
3. Release the mouse button. The file or folder will copy over.
PC Users
1. Single-click the file or folder that you want to copy in order to highlight it.
2. Go to “Edit --> Copy”.
3. Double-click the drive icon to open it.
4. If you want to copy the file or folder to a specific folder on the drive, double-click that
folder to open it.
5. Go to “Edit --> Paste”. The file or folder will copy over.
Performing Data Backup
Backing up your data is best defined by the keeping duplicate copies of your files on a
separate storage device. It is always a good idea to keep important data in at least two
different places. We recommend that you obtain and use a quality backup software application
if the basic program that come with your operating system is not robust enough for your
particular purposes.
SATARAID Owner’s Manual
18
4-Understanding RAID
Chapter 4 - Understanding RAID
The SR4 controller subsystem is a high-performance SATA2 drive bus disk array. When
attached to the MicroNet SATA host bus RAID controller, the RAID subsystem can provide
non-stop service with a high degree of fault tolerance through the use of RAID technology
and advanced array management features.
The RAID subsystem can be configured to RAID levels 0, 1, 10, and 5. RAID levels other
than 0 are able to tolerate a hard disk failure without impact on the existing data, and failed
drive data can be reconstructed from the remaining data and parity drives. The SR4 features
the following high availability functions:
•
•
•
•
RAID Levels 0,1,10,5 Support
Automatic Drive Failure Detection
Automatic Failed Drive Rebuilding
Hot Spare Disk Drives
This section will help you gain understanding
of how these functions can serve your needs
best.
RAID
FYI:
The Berkeley RAID levels are a family of disk
array data protection and mapping techniques
described by Garth Gibson, Randy Katz, and David
Patterson in papers written while they were performing
research into I/O subsystems at the University of
California at Berkeley. There are six Berkeley RAID
Levels, usually referred to by the names RAID Level 1,
etc., through RAID Level 6.
RAID is an acronym for Redundant Array
of Independent Disks. It is an array of multiple independent hard disk drives that provide
high performance and fault tolerance through support of several levels of the Berkeley RAID
techniques. An appropriate RAID level is selected when the volume sets are defined or created,
and is based on disk capacity, data availability (fault tolerance or redundancy), and disk
performance considerations. The RAID subsystem controller makes the RAID implementation
and the disks’ physical configuration transparent to the host operating system, which means
that the host operating system drivers and software utilities are not affected regardless of the
RAID level selected.
SPAN (JBOD)
A Span is a simple concatanation of disks into one volume. Spanning does not offer any fault
tolerance, and exhibits performance characteristics on par with a single disk drive.
Pros: Spanning provide maximum usable space at a reasonable performance
Cons: The reliability of a disk span is equal to its member disk drives due to its lack of
redundancy.
SATARAID Owner’s Manual
19
4-Understanding RAID
RAID 0 (Striping)
This RAID algorithm writes data across multiple
disk drives instead of just one disk drive. RAID
0 does not provide any data redundancy, but
does offer the best high-speed data throughput.
RAID 0 breaks up data into smaller blocks and
then writes a block to each drive in the array.
Pros: Disk striping enhances both read and
write performance because multiple drives
are accessed simultaneously,
Cons: The reliability of RAID Level 0 is less than
any of its member disk drives due to its lack of redundancy.
RAID 1 (Disk Mirroring)
RAID 1, also known as “disk mirroring”, distributes
duplicate data simultaneously to 2 disk drives.
Pros: RAID 1 offers extremely high data reliability
as all the data is redundant. If one drive
fails, all data (and software applications)
are preserved on the other drive.
Read performance may be enhanced as the
array controller can access both members
of a mirrored pair in parallel.
Cons: RAID 1 volume requires double the raw
data storage capacity
During writes, there will be a minor performance penalty when compared to writing to a
single disk.
RAID 10 (Striped Mirror)
RAID 10 is a combination of RAID 0 and RAID
1, combing striping with disk mirroring. RAID
Level 10 combines the fast performance of
Level 0 with the data redundancy of Leve1 1.
In this configuration, data is distributed across
several disk drives, similar to Level 0, which are
then duplicated to another set of drive for data
protection. RAID 10 provides the highest read/
write performance of any of the Hybrid RAID
levels, but at the cost of doubling the required
data storage capacity.
Pros: Fastest read/write performance of any of the Hybrid RAID levels
High data reliability as all the data is redundant
Cons: Requires double the raw data storage capacity
SATARAID Owner’s Manual
20
4-Understanding RAID
RAID 5 (Parity RAID)
RAID 5 is sometimes called striping with parity
at byte level. In RAID 5, the parity information
is written to all of the drives in the subsystems
rather than concentrated on a dedicated parity
disk. If one drive in the system fails, the parity
information can be used to reconstruct the data
from that drive. All drives in the array system
can be used to seek operation at the same time,
greatly increasing the performance of the RAID
system. RAID 5 is the most often implemented
RAID algorithm in RAID arrays.
Pros: Very good general transfer performance
Fault tolerant
Cons: Can be slower then RAID 3 at large size file transfers
RAID Set
A RAID Set is a group of disks containing one or more volume sets. The MicroNet Platinum
RAID supports as follows:
• Up to three RAID Sets are supported. Please note that multiple RAID Sets on the same
disks are not supported.
• From one to five drives can be included in an individual RAID Set.
• A Volume Set must be created either on an existing RAID set or on a group of available
individual disks (disks that are not yet a part of a RAID set). If there are pre-existing
RAID sets with available capacity and enough disks for specified RAID level desired,
then the volume set will be created in the existing RAID set of the user’s choice.
Volume Set
A Volume Set is seen by the host system as a single logical device. It is organized in a RAID
level with one or more physical disks. RAID level refers to the level of data performance and
protection of a Volume Set. A Volume Set capacity can consume all or a portion of the disk
capacity available in a RAID Set. Multiple Volume Sets can exist on a group of disks in a RAID
Set. Additional Volume Sets created in a specified RAID Set will reside on all the physical disks
in the RAID Set. Thus each Volume Set on the RAID Set will have its data spread evenly across
all the disks in the RAID Set.
• Volume Sets of different RAID levels may coexist on the same RAID Set.
• The maximum addressable size of a single volume set is 2 Terabytes.
• Up to eight volume sets can be created in a RAID set
SATARAID Owner’s Manual
21
4-Understanding RAID
Hot Spare Drives
A hot spare drive is an unused online available drive, which is ready for replacing a failed
disk drive. In a RAID level 1, 10, 3, or 5 RAID set, any unused online available drive installed
but not belonging to a RAID set can be defined as a hot spare drive. Hot spares permit you to
replace failed drives automatically without powering down your SR4. When your SR4 detects
a drive failure, the system will automatically and transparently rebuild using any available hot
spare drive(s). The RAID set will be reconfigured and rebuilt in background, while the RAID
subsystem continues to handle system requests. During the automatic rebuild process, system
activity will continue as normal, but system performance and fault tolerance will be affected.
Hot-Swap Disk Rebuild
A Hot-Swap function can be used to rebuild disk drives in arrays with data redundancy such as
RAID level 1, 10, 3, and 5. If a hot spare is not available at time of drive failure, the failed disk
drive must be replaced with a new disk drive so that the data on the failed drive can be rebuilt. If
a hot spare is available, the rebuild starts automatically when a drive fails. The RAID subsystem
automatically and transparently rebuilds failed drives in the background with user-definable
rebuild rates. The RAID subsystem will automatically restart the system and the rebuild if the
system is shut down or powered off abnormally during a reconstruction procedure condition.
Please note that the system may no longer be fault tolerant during degraded operation or the
rebuild process- Fault tolerance will be lost until the damaged drive is replaced and the rebuild
operation is completed.
SATARAID Owner’s Manual
22
5-Troubleshooting
Chapter 5- Troubleshooting
FAQs for Mac Users:
Q: Why is my drive asking me to format it? It was already formatted and it contains data.
A1: Run a disk repair utility on the drive.
A2:Perform permission repair on your system drive. Open the disk utility (located in /Applications/
Utilities/Disk Utility.app.) Select your system drive (usually the first disk listed) and click "Repair
Disk Permissions" in the "First Aid" Tab.
A3: Restart your computer. As soon as the bootup chime sounds, press and hold down the option-commandp-r key combination to reset the PRAM. Release the keys when the chime sounds a second time.
Please refer to your Mac manual for more information on these procedures
Q: My computer does not recognize the drive.
A: First, check to make sure that all of your connections are secure, and that the power switch is in the
"ON" position. Then check if your External Hard drive is listed in the Apple System Profiler. If the
problem persists, verify that the USB port used is functioning.
Q: I'm trying to copy files to/from FAT32 volumes or network shares, and it keeps failing.
A: FAT32, HFS+, and other file system formats allow different standards of filename length or use of
special characters. Rename the offending file(s) and try the operation again.
Q: I have a FAT32 disk, and when I try to copy a large file I get an error saying there is not enough room
on the drive-- I have lots of free space!
A: FAT32 only allows files up to 4GB in size. To copy larger files, please reformat the volume using
MacOS Extended Format.
FAQs for PC Users:
Q: My computer does not recognize the drive.
A: Make sure all of your connections are secure. If you have an add-on card, make sure it is working
properly and/or update the driver. Also, make sure you have all the latest updates for your Windows
installation
Q: Does the drive work with Norton Ghost or other disk cloning software?
A: Yes. Many disk cloning software support SATA volumes. Consult your cloning software vendor;
Fantom Drives does not provide any additional drivers.
Q: Do you have “DOS driver” or a for the drive?
A: No.
Q: Where are the drivers for 2000/XP/2003/Vista?
A: Windows 2000, XP, 2003, and Vista already include all the necessary drivers! No additional drivers are
necessary. Consult the driver CD that came with your SATA host bus adapter for HBA drivers.
SATARAID Owner’s Manual
23
5-Troubleshooting
Q: When I leave my computer idle for a while, my drive won’t work properly.
A: The most likely cause is that your computer is going into sleep mode. The immediate solution is to
shut down your computer and turn off the drive, and then restart your computer. Once your computer is
completely booted up, turn on the drive. You should see the drive in the Windows Explorer. To prevent this
problem from recurring, open the “Power Settings/Energy Saver” and set it to never go into sleep mode.
Q: Can I boot from my SR4?
A: Yes! When used with MicroNet’s eSATA host bus adapters, the SR4 is bootable. consult the documentation
of your eSATA host bus adapter for more details.
Q: I do not see my drive listed in the My Computer window, but it does appear in the Device Manager
list.
A: Right-click on My Computer. Select Manage in the pop-up menu. In the Computer Management
window and navigate to Storage -> Disk Management. In the Disk Management window, you should see
a list of available storage devices. Look for the Disk that has a capacity closest to your Fantom Drives
External Hard drive. Right-click on the right-hand box; in the pop-up menu select Delete Partition. Once
you do this, it will say “Online" & "Unallocated”. Right-click on the box and select Create New Partition
in the pop-up menu. When the Partition Wizard appears, select "Primary Partition" and click "Next." You
will see a default value for the drive; click Next, You will then see a drive letter (you can change this drive
letter if you wish); click Next. You will then be asked to format the drive.
Q: Is the drive compatible with Windows NT 4.0?
A: No.
Q: I bought a 500GB drive, but my computer is showing 465GB. Where is the missing capacity?
A: Hard drive manufacturers market drives in terms of decimal (base 10) capacity. In decimal notation,
one megabyte (MB) is equal to 1,000,000 bytes, and one Gigabyte (GB) is equal to 1,000,000,000 bytes.
Many operating systems use the binary (base 2) numbering system to describe disk capacity; In the binary
numbering system, one megabyte is equal to 1,048,576 bytes, and one gigabyte is equal to 1,073,741,824
bytes. Simply put, decimal and binary translates to the same amount of storage capacity.
If an issue cannot resolved by using our FAQ, please contact Technical Support via the Fantom Drives
support site at http://www.MicroNet.com/help
SATARAID Owner’s Manual
24
A-Getting Help
Appendix A: Getting Help
If you experience problems with your SR4, please contact your Authorized MicroNet Reseller
for assistance. If the reseller is unable to resolve your issue, please contact MicroNet’s Help
Desk for assistance. Please have the model, serial number, date of purchase, and reseller’s
name available before making contact. If possible, call from a telephone near the system so
we can direct you in any necessary system corrections.
How To Contact MicroNet Technology, Inc.
MicroNet Technology, Inc.
19260 Van Ness Avenue
Torrance, CA 90501
(310) 320-7272 Sales
(310) 328-0202 Sales Fax
(310) 320-0772 Help Desk & Customer Service
http://www.MicroNet.com
MicroNet Technology can also be reached via email at the following addresses:
Sales: [email protected]
Help Desk: [email protected]
SATARAID Owner’s Manual
25
B-RAID Level Comparison Table
Appendix B: RAID Level Comparison Table
RAID
Level
0
1
10
5
Description
Min. Max.
Capacity Data
Drives Drives
Reliability
Also known as striping
1
5
(N)
No data
Data distributed across multiple drives
Disks
Protection
in the array. There is no data protection
Also known as mirroring
2
2
1 Disk Higher than
All data replicated on N
RAID 3,5
Separated disks. N is almost always 2.
This is a high availability
Solution, but due to the 100% duplication, it is also a costly solution.
Data
Transfer Rate
Very High
I/O
Request Rates
Very High for
Both Reads and Writes
Reads are higher
Than a single disk;
Reads are twice faster than
a single disk;
Also known as Block-Interleaved Parity. 4
Data and parity information is subdivided and distributed across all disk.
Parity must be the equal to the smallest
disk capacity in the array. Parity information normally stored on a dedicated
parity disk.
Also
known
Block-Interleaved 3
Distributed Parity.
Data and parity information is subdivided and distributed across all disk.
Parity must be the equal to the smallest
disk capacity in the array. Parity information normally stored on a dedicated
parity disk.
Transfer rates more similar Reads are twice faster than
to RAID 1 than RAID 0
a single disk;
SATARAID Owner’s Manual
4
(N/2)
Disks
Higher than
RAID 3,5
Writes similar to a single Write are similar to a single
disk
disk.
Writes are similar to a single disk.
5
(N-1)
Disks
Lower than RAID 1, 10
Reads are similar to
RAID 0;
Reads are similar to
RAID 0;
Higher than a single drive
Writes are slower than a Writes are slower than a
single disk
single disk.
26
C-Glossary
Appendix C-Glossary
ATA Acronym for “AT Bus Attachment” - a standard interface to IDE hard disks. Western
Digital’s IDE disk interface was standardized by ANSI to form the ATA specification using a
16-bit ISA bus.
Cache cache is a fast-access memory bank that serves as an intermediate storage for data that
is read from or written to secondary storage. Typically, high-speed caches are implemented in
RAM, though they can also be implemented on disk when speed is not a critical requirement.
Caches generally improve the efficiency of read operations due to the principles of “spatial
and temporal locality of data”. They can also improve the efficiency of write operations. See
also: Write Back Cache, Write Through Cache
Degraded Mode/Status All arrays, with the exception of RAID 0, are designed to handle
disk failures. However, there is limit on the number of hard disks that can fail before the
array is rendered inoperative. For instance, this limit value is 1 for RAID 1, 3, and 5. In the
case of RAID 10 or 50, the upper bound is equal to the number of parity groups. When the
number of disk failures occurring in an array are less than or equal to this upper bound, the
array is denoted to be in a degraded state. The failure of the disks does not impair reading
from or writing to the array. However, it impairs the efficiency of throughput in all RAID
types (with the exception of RAID 1) since data requested by read operations may have to be
“reconstructed” using parity. In the case of RAID 1 the throughput of read operations is cut in
half if a drive fails. Operating in degraded mode is considered an acceptable alternative only
for short durations. Generally this duration should span no more time than that required to
inform the user of the failures and to replace the failed disks with suitable spares.
Dirty Data Dirty data is data that has been written to a cache but has not been “flushed,” or
written to its final destination, typically some secondary storage device.
Disk Array A Disk Array is a logical disk comprised of multiple physical hard disks. The
number of hard disks in an disk array is dictated by the type of the array and the number of
spares that may be assigned to it. Furthermore, whether a disk array can be built using part
of the space on a disk (as opposed to being forced to use the whole disk) depends upon the
implementation. Disk Arrays are typically used to provide data redundancy and/or enhanced
I/O performance.
Disk Block Data is stored on disks in blocks that are generally of a predefined size. This size
is typically a value such as 512 bytes, 1 KB, 2 KB, etc. When a record is written to a disk, the
blocks used for that record are dedicated to storing the data for that record only. In other
words two records are not permitted to share a block. Consequently, a block may be only
partially used. For instance, assume a disk has a block size of 1 KB and a user record written
to it has a size of 3148 bytes. This implies that the user record will be written into 4 blocks,
with the contents of one of the blocks being only partially filled with (3148 – 3072) 76 bytes
of data.
Driver A piece of software that controls a hardware device. Typically drivers provide an
interface by which applications can use the device in a uniform and hardware-independent
manner.
SATARAID Owner’s Manual
27
C-Glossary
DHCP (Dynamic Host Configuration Protocol) a protocol that lets network administrators
manage centrally and automate the assignment of IP (Internet Protocol) configurations on
a computer network. When using the Internet’s set of protocols (TCP/IP), in order for a
computer system to communicate to another computer system it needs a unique IP address.
Without DHCP, the IP address must be entered manually at each computer system. DHCP
lets a network administrator supervise and distribute IP addresses from a central point. The
purpose of DHCP is to provide the automatic (dynamic) allocation of IP client configurations
for a specific time period (called a lease period) and to eliminate the work necessary to
administer a large IP network.
Ethernet A local-area network standard that is currently the most prevalent with an estimated
80% of desktops connected using this standard. It was developed jointly by Xerox, DEC and
Intel and employs a bus or star topology.
Fibre Channel A high-speed, full duplex serial communication scheme permitting data
transfer rates of up to 4 Gigabit per second with a roadmap extending up to 10 Gigabit per
second. The actual transfer rates and the distance over which they apply vary depending on
the physical media used such as video coaxial, shielded twisted pair, single/multi mode optical
fiber etc.
File System A file system is a layer between applications and the disks to which their I/O
is directed. File systems serve to hide the details of the physical layout of files on the disk,
allowing applications to address files as a contiguous logical area on disk accessible by a
name regardless of their physical location on the storage device.
Hot Spare One or more disks in a RAID array may fail at any given time. In fact, all RAID
types with the exception of RAID 0 provide methods to reconstruct the array in the event of
such an occurrence. A commonly used tactic is to earmark a hard disk that is not being used
by any RAID array as a backup. In the event a hard disk in a RAID array fails, this backup
is automatically mobilized by the RAID controller to step in place of the failed hard disk.
The data in the failed hard disk is “reconstructed” and written into the new hard disk. In the
case of a RAID 1, data is reconstructed by simply copying the contents of the surviving disk
into the spare. In the case of all other RAID types, reconstruction is performed using parity
information in the working hard disks of that RAID array. This backup hard disk is known as
a “hot” spare since the fail-over process is performed dynamically on a server within the same
session i.e., without the necessity for re-booting or powering down.
IDE Acronym for “Integrated Device Electronics”. A hard disk drive interface standard
developed by Western Digital and introduced. Also knows as Parallel ATA.
Logical Drive A logical drive is comprised of spaces from one or more physical disks and
presented to the operating system as if it were one disk.
Native Command Queuing (NCQ) a technology designed to increase performance of SATA
hard disks by allowing the disk firmware to internally optimise the order in which read and
write commands are executed. This can result in increased performance for workloads where
multiple simultaneous read/write requests are outstanding, which occurs most often in servertype applications.
SATARAID Owner’s Manual
28
C-Glossary
Online Capacity Expansion The ability to add space to an existing RAID array within a
session while preserving the RAID type and data within the array is known as online capacity
expansion. The availability of this feature enables the user to add space to a RAID array as and
when required without rebooting, thereby obviating the need for precise forecasts of capacity
requirements for the future.
Parity A mathematical function that serves as a method for error verification and correction.
In strict technical terms the parity of a group is set to 1 if the number of bits in the group that
are set to 1 is odd, and 0 otherwise. For instance, the parity of N bytes of data is obtained by
determining the number of ith bits in the N bytes that are set to 1. If that number is odd, then
the ith bit of the result is set to 1. This may sound complicated, but in reality the result can
be obtained by simply evaluating the XOR of the N bytes. Parity allows one error in a group
(of bytes) to be corrected.
Parity Group Complex RAID types such as RAID 10 or RAID 50 are built using two levels
of hierarchy. For instance, consider a RAID 50. A RAID 50 array is comprised of a group of
RAID 5 arrays at the first tier. Each RAID 5 array in the first tier is used just like a hard disk
in creating a RAID 0 at the next tier. The result is a RAID 50. In this example, each RAID 5
array at the first tier is denoted as a parity group. Each parity group is self-contained in the
sense that it is capable of withstanding a disk failure within its group and reconstructing the
data in the failed disk from parity information contained within that group.
Partition The space contributed to each array on a physical drive is referred to as a
partition.
PCI An acronym for “Peripheral Component Interconnect”. It is Intel’s local bus standard
that supports up to four plug-in PCI cards per bus. Since PCs can have two or more PCI
buses, the number of PCI cards they can support are a multiple of four. The current PCI
bus implementation (version 2.2) incorporates two 64-bit slots at 66 MHz. Consequently, the
highest throughput achievable using such a bus is 528 MB/sec.
PCI-X An enhanced version of PCI version 2.2. It supports one PCI slot per bus when running
at 133 MHz, two slots when running at 100 MHz and four slots when running at 66 MHz.
It is intended to provide throughputs in excess of 1 GB/sec using a 64-bit wide 133 MHz
implementation.
Performance Performance is an important criterion on which a customer judges a RAID
controller. There are a number of popular benchmarking utilities that are available to
measure the I/O performance of a controller. Some of these utilities simulate specific real-life
applications and provide the user a score indicating the controller’s overall performance in
that niche. Others allow the user to specify tests with specific I/O characteristics and generate
throughput numbers corresponding to each specification. The nature of the tests a user may
wish to conduct on a controller depends on the application space in which that controller is
anticipated to be deployed.
Physical Drive A single tangible drive is referred to as a physical drive.
SATARAID Owner’s Manual
29
C-Glossary
Primary Storage Main memory i.e., RAM is frequently referred to as primary storage.
RAID Abbreviation of Redundant array of independent disks. It is a set of disk array
architectures that provides fault-tolerance and improved performance.
RAID Type There are a number of RAID formats that are widely used. Some of the well-known
uni-level types are RAID 0, RAID 1, RAID 3, RAID 5 and RAID 6. The prevalent complex types
are RAID 10 and RAID 50. ,
RAID 0 RAID 0 utilizes simple striping, with the data being distributed across two or more
disks. No data redundancy is provided. The figure below illustrates a purely hypothetical
RAID 0 array comprised of three disks – disks A, B, and C – with four stripes – each uniquely
colored – across those disks. Advantage: Striping can improve the I/O throughput by allowing
concurrent I/O operations to be performed on multiple disks comprising the RAID 0 array.
However, this RAID type does not provide any data redundancy.
RAID 1 An array that uses a single pair of disks. Both disks in the pair contain the same
data It provides the best data protection but can’t improve system performance. And storage
space for the same data capacity should be double than in general cases. Hence storage cost
doubles. The capacity of RAID 1 will be the size of the smaller HDD, so we suggest you
connect HDDs of the same sizes to save HDD space. Advantage: RAID 1 ensures that if one
of the disks fails, its contents can be retrieved from the duplicate disk. Furthermore, a RAID
1 array can also improve the throughput of read operations by allowing separate reads to be
performed concurrently on the two disks.
RAID 3 RAID 3 utilizes a striped set of three or more disks with the parity of the strips (or
chunks) comprising each stripe written to a disk. Note that parity is not required to be written
to the same disk. Furthermore, RAID 3 requires data to be distributed across all disks in the
array in bit or byte-sized chunks. Assuming that a RAID 3 array has N drives, this ensures that
when data is read, the sum of the data-bandwidth of N – 1 drives is realized. The figure below
illustrates an example of a RAID 3 array comprised of three disks. Disks A, B and C comprise
the striped set with the strips on disk C dedicated to storing the parity for the strips of the
corresponding stripe. For instance, the strip on disk C marked as P(1A,1B) contains the parity
for the strips 1A and 1B. Similarly the strip on disk C marked as P(2A,2B) contains the parity
for the strips 2A and 2B. Advantage: RAID 3 ensures that if one of the disks in the striped
set (other than the parity disk) fails, its contents can be recalculated using the information
on the parity disk and the remaining functioning disks. Consequently read operations can
be time-consuming when the array is operating in degraded mode. If the parity disk itself
fails, then the RAID array is not affected in terms of I/O throughput but it no longer has
protection from additional disk failures. Also, a RAID 3 array can improve the throughput of
read operations by allowing reads to be performed concurrently on multiple disks in the set.
Disadvantage: Due to the restriction of having to write to all disks, the amount of actual disk
space consumed is always a multiple of the disks’ block size times the number of disks in the
array. This can lead to wastage of space.
SATARAID Owner’s Manual
30
C-Glossary
RAID 5 A RAID 5 array is similar to a RAID 4 array in that, it utilizes a striped set of three
or more disks with parity of the strips (or chunks) comprising a stripe being assigned to the
disks in the set in a round robin fashion. The figure below illustrates an example of a RAID
5 array comprised of three disks – disks A, B and C. For instance, the strip on disk C marked
as P(1A,1B) contains the parity for the strips 1A and 1B. Similarly the strip on disk A marked
as P(2B,2C) contains the parity for the strips 2B and 2C. Advantage: RAID 5 ensures that if
one of the disks in the striped set fails, its contents can be extracted using the information on
the remaining functioning disks. It has a distinct advantage over RAID 4 when writing since
(unlike RAID 4 where the parity data is written to a single drive) the parity data is distributed
across all drives. Also, a RAID 5 array can improve the throughput of read operations by
allowing reads to be performed concurrently on multiple disks in the set.
RAID 10 A RAID 10 array is formed using a two-layer hierarchy of RAID types. At the lowest
level of the hierarchy are a set of RAID 1 arrays i.e., mirrored sets. These RAID 1 arrays in
turn are then striped to form a RAID 0 array at the upper level of the hierarchy. The collective
result is a RAID 10 array. The figure below demonstrates a RAID 10 comprised of two RAID
1 arrays at the lower level of the hierarchy – arrays A and B. These two arrays in turn are
striped using 4 stripes (comprised of the strips 1A, 1B, 2A, 2B etc.) to form a RAID 0 at the
upper level of the hierarchy. The result is a RAID 10. Advantage: RAID 10 ensures that if
one of the disks in any parity group fails, its contents can be extracted using the information
on the remaining functioning disks in its parity group. Thus it offers better data redundancy
than the simple RAID types such as RAID 1, 3, and 5. Also, a RAID 10 array can improve the
throughput of read operations by allowing reads to be performed concurrently on multiple
disks in the set.
RAID 50 A RAID 50 array is formed using a two-layer hierarchy of RAID types. At the lowest
level of the hierarchy is a set of RAID 5 arrays. These RAID 5 arrays in turn are then striped to
form a RAID 0 array at the upper level of the hierarchy. The collective result is a RAID 50 array.
The figure below demonstrates a RAID 50 comprised of two RAID 5 arrays at the lower level of
the hierarchy – arrays X and Y. These two arrays in turn are striped using 4 stripes (comprised
of the strips 1X, 1Y, 2X, 2Y, etc.) to form a RAID 0 at the upper level of the hierarchy. The result
is a RAID 50. Advantage: RAID 50 ensures that if one of the disks in any parity group fails, its
contents can be extracted using the information on the remaining functioning disks in its parity
group. Thus it offers better data redundancy than the simple RAID types, i.e., RAID 1, 3, and 5.
Also, a RAID 50 array can improve the throughput of read operations by allowing reads to be
performed concurrently on multiple disks in the set.
Read Ahead Motivated by the principle of “spatial locality”, many RAID controllers read
blocks of data from secondary storage ahead of time, i.e., before an application actually
requests those blocks. The number of data blocks that are read ahead of time is typically
governed by some heuristic that observes the pattern of requests. The read-ahead technique
is particularly efficient when the spatial distribution of an application’s requests follows a
sequential pattern.
Read Around When using this methodology, a read operation circumvents the cache and
directly reads data from secondary storage into system memory.
SATARAID Owner’s Manual
31
C-Glossary
Read-Modify-Write This is a term used to characterize an efficient methodology using
which parity is calculated and written into a RAID array. However, before we describe this
methodology, let us briefly touch upon the most obvious and brute-force way of determining
and writing parity (in response to a write operation) into a RAID array. Assume that data is
being written into a strip on the RAID array that supports redundancy by the use of parity. Let
us denote this as the target strip. Also assume that there are N strips per stripe including the
parity strip and the target strip. Then to recalculate parity for that stripe, the following steps
may be taken. First the contents of the N – 2 non-parity strips (belonging to the same stripe as
the target strip) have to be read. This is followed by N – 2 XOR operations on the contents of
the N – 2 strips that were just read plus the new contents of the target strip. This is followed
by 1 operation to write the new data into the target strip and 1 operation to update the value
of the parity strip. In all the total number of read, XOR and write operations are N – 2, N – 2,
and 2 respectively adding up to a grand total of 2N – 2. Let us now discuss the “read-modifywrite” method for calculating and writing parity. It is based on simple algebra, and is more
efficient than the method described earlier when the value of N is large. Suppose d1, d2,…
dt,… dN-1 are the data contents of the N – 1 non-parity strips with dt being the contents of
the target strip. Let, p = d1 ^ d2 ^ … dt ^ …^ dN-1 Now suppose that the new data to be
written into the target strip is d’t.We wish to determine the value of p’ = d1 ^ d2 ^ … d’t ^
…^ dN-1. Now, p ^ p’ = (d1 ^ d2 ^ … dt ^ …^ dN-1) ^ (d1 ^ d2 ^ … d’t ^ …^ dN-1) p ^ p’
= dt ^ d’t, since ^ operation is commutative and associative p’ = dt ^ d’t ^ p In other words,
the new parity can be evaluated by calculating the XOR of the old data in the target strip, the
new data for the target strip and the old parity. Clearly this requires only 2 reads – one for the
old data and the old parity – followed by 2 XOR operations with 2 writes – one for writing
the new data into the target strip and the new parity, giving us a grand total of 6 operations.
Why is this better? When the value of N is large, i.e., the size of the parity group is large; the
brute-force method utilizes far more operations!
Read Through Using this methodology, a read operation not only reads data from secondary
storage into system memory but also places the data into the cache such that future need for
the same data can be addressed expeditiously by directing a read operation for that data into
the cache only.
Rebuild When a RAID array enters into a degraded mode, it is advisable to rebuild the array
and return it to its original configuration (in terms of the number and state of working disks)
to ensure against operation in degraded mode
SATA Acronym for “Serial ATA”. A hard disk drive interface standard developed to enhance
connectivity and speed over the IDE, or Parallel ATA disk interface. Current generation SATAII
supports speeds up to 300MB/S.
SCSI This is an acronym for “Small Computer System Interface”. It is a high-speed parallel
communication scheme permitting data transfer rates of up to 320 MB/sec using the Ultra320
specification. The current specification supports up to 15 devices per channel, each supporting up
to 8 Logical UNits (LUN,) with domain validation and CRC error checking on all transferred data.
Secondary Storage Mass storage devices such as hard disks, magneto-optical disks, floppy
disks and tapes are frequently referred to as secondary storage.
SATARAID Owner’s Manual
32
C-Glossary
Stripe A stripe is a logical space that spans across multiple hard disks with each constituent
hard disk contributing equal strips (or chunks) of space to the stripe. In the figure below,
strips 1, 2, and 3 from hard disk 1, 2, and 3 respectively comprise a (purple colored) stripe.
Synonym: major stripe
Stripe Set A stripe set is a set of stripes that spans across multiple hard disks. In the figure
below, the displayed stripe set has 4 stripes, with strip number 1 comprised of the purple
strips 1A, 1B and 1C. Stripe number 2 is comprised of the green strips 2A, 2B and 2C etc.
Stripe Size This is the size of the strips that constitute each stripe. This term is a misnomer
– though prevalent – since it should appropriately be called strip size or chunk size.
TCP/IP This is an acronym for “Transmission Control Protocol/Internet Protocol”. It is
comprised of two parts TCP and IP. The former, i.e., TCP is a peer-to-peer connection oriented
protocol that guarantees the delivery of data packets in the correct sequence between two
peers. The latter, i.e., IP is the protocol that defines and governs addressing, fragmentation,
reassembly and time-to-live parameters for packets.
Volume Set A volume set is a concatenation of storage elements that may be RAID arrays,
JBODs, or simply areas of disks that are not part of RAID arrays.
Write-back Cache When a cache is operating in write-back mode, data written into the cache
is not immediately written out to its destination in secondary storage unless the heuristics
governing the flushing of dirty data demands otherwise. This methodology can improve the
efficiency of write operations under favorable circumstances. However, its use can potentially
lead to incoherencies in a system that is not protected from power fluctuations or failures.
Write-through Cache When a cache is operating in write-through mode, data written into the
cache is also written to the destination secondary storage devices. Essentially write completion
does not occur until the data is written to secondary storage. Thus the contents of the cache
and the secondary storage are always consistent. The advantage is that the possibility of data
corruption is greatly reduced. The disadvantage is that write-through operations are more time
consuming
XOR Function All RAID arrays (with the exception of RAID 0, RAID 1 and RAID 10) require
parity to be calculated and written to the array in conjunction with data. Typically the parity is
a simple XOR on the bytes comprising a stripe. This is a computationally intensive operation
that many modern RAID controllers perform using a dedicated ASIC (instead of calculating
them in firmware on the main embedded processor’s core). This dedicated ASIC is often
referred to as a XOR-engine.
SATARAID Owner’s Manual
33
MicroNet Techology
19260 Van Ness Ave
Torrance, CA 90501
www.MicroNet.com
7-03-2007 Rev 1 (SRM1.0)
The material in this document is for information only and is subject to change without notice. While reasonable efforts have been made in the preparation of
this document to assure its accuracy, MicroNet Technology assumes no liability resulting from errors or omissions in this document, or from the use of the
information contained herein.
MicroNet Technology reserves the right to make changes in the product design without reservation and without notification to its users.
MicroNet and the MicroNet logo are registered trademarks of MicroNet Technology. Macintosh, and the MacOS Logo are trademarks of Apple Computer
Inc. Microsoft Windows and the Windows Logo are registered trademarks of Microsoft Corporation. All other logos and trademarks are the property of their
respective owners.
Copyright © 1999, 2007 MicroNet Technology. All rights reserved. This publication may not be reproduced, stored in a retrieval system, or transmitted in any
form or by any means, in whole or in part, without the prior written consent of MicroNet Technology, 19260 Van Ness Ave., Torrance CA 90501.