1
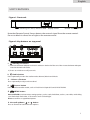
Model Number: SBEV40-3D
App Driven 5.1 Channel 40" 3D Soundbar with built-in subwoofer and
iPod®,iPhone® and iPad® Dock
User Manual
MODEL NUMBER: SBEV40-3D
English
TABLE OF CONTENTS
PAGE
Important Saftey Instructions .................................................................... 2-3
Unit Features ............................................................................................. 4-5
Wall Mount .................................................................................................... 5
General Operation ........................................................................................ 6
System Settings ............................................................................................ 7
Remote Control Features .............................................................................. 7
Quick Start Guide .......................................................................................... 8
Download APPs to the iPod/iPhone/iPad ..................................................... 9
Specifications ................................................................................................ 9
Limited Warranty .........................................................................................10
1
English
IMPORTANT SAFETY INSTRUCTIONS
1. Read these instructions.
2. Keep these Instructions.
3. Heed all Warnings.
4. Follow all instructions.
5. Do not use this apparatus near water.
6. Clean only with dry cloth.
WARNING: TO REDUCE THE RISK OF FIRE OR ELECTRIC SHOCK, DO NOT EXPOSE THIS
DEVICE TO RAIN OR MOISTURE.
IMPORTANT SAFETY INSTRUCTIONS
To reduce the risk of electrical shock, fire, etc.:
1. If you want to install this product on the wall, it must be properly installed in accordance with the installation instructions before it is used. See wall mount instructions
on page 5.
2. Do not install near any heat source such as radiators, heat registers, stoves, or other
3.
4. The device shall not be exposed to dripping or splashing and no objects filled with
liquids, such as vases, shall be placed on the device.
5. Protect the power cord from being walked on or pinched particularly at the plugs,
convenience receptacles, and at any point where they exit from the device.
6. Please read Rating Labels at the back of unit for power input and other safety
information.
7. Unplug your radio before cleaning or before making any repairs.
Note: If for any reason this product requires service, we strongly recommend
8. Unplug this device during lightning storms or when unused for long periods of time.
10. Repair or replace all electric service cords that have become frayed or otherwise
damaged immediately. Do not use a cord that shows cracks or abrasion damage
along its length, the plug, or the connector end.
2
English
SAVE THESE INSTRUCTIONS
Congratulations on your purchase of our product, the latest in 3D Audio Home Theater
technology.
Please take a few moments to read this entire manual, and be sure to retain this document
for future reference.
Please read your warranty and retain your receipt and original carton for possible future use.
Note: If any part of this product is damaged or missing, please connect your dealer.
IMPORTANT
To prevent fire or shock hazard, do not use this plug with an extension cord or other outlet
unless the blades can be fully inserted to prevent blade exposure.
To prevent fire or shock hazard, do not expose this device to rain or moisture.
To prevent electrical shock, match wide blade plug to wide slot, fully insert.
Do not place any heavy loads onto the unit, and do not step on it, the load may fall and cause
serious injury to the unit.
Do not attempt to carry out any service work yourself. By opening or removing the cabinet, you
may be exposed to dangerous voltage or other hazards. Any service work should be carried out
by qualified technicians.
During lightning or raining days, unplug the unit for additional protection during thunderstorms
or when the unit is not used for prolonged periods. This will prevent damage to the unit from
lightning and power surges.
FEATURES
Immense3D Sound experience from a single compact solution
Simple Plug & Play setup
Compatible with your TV, DVD, MP3 player, game console or computer
Enjoy movies, music, and games in incredible depth and dimension with 3D sound
Six high-efficiency drivers and two built-in subwoofers deliver an amazing audio experience
Unique designed iPod, iPhone, iPad Docking
Thank you for purchasing our Haier
product. This easy-to-use manual
will guide you in getting the best
use of your 3D Audio Home Theater.
.
Remember to record the model and
serial number. They are on a label
at rear of your radio.
Model number
Serial number
Date of purchase
Staple your receipt to your manual.
You will need it to obtain warranty service.
3
English
UNIT FEATURES
Figure 1. Front unit
D ock ing for iPod, iPhone , iPad
display screen
remote control sensor
Note that Remote Control Sensor detects the controls signal from the remote control.
Do not to block its direct line of sight to the remote control.
Figure 2. Key buttons on top panel
4
5
6
3
1
2
1.
Standby/on button
1.) Connect the Power Adaptor to the DC socket on the back of the unit. Then insert the Power Adaptor
into the desired wall outlet.
2.) Press to switch on or off your unit.
2.
Audio button
Press repeatedly to view the audio modes: Normal, Movie and Music.
3. - Volume + Buttons
Press repeatedly to adjust volume level.
4.
Source button
Press to shift to another mode, such as iPod/Line-in/Optical/Coaxial/AUX/ FM/AM.
5.
MENU button
Press and hold to activate menu setting options, such as seek, clock/date, set bass, set treble, audio delay,
sync iPod clock, iPod video, LCD contrast and LCD backlight.
Press to confirm an appointed option.
6. the scroll up/down
or
button
Press to forward or backward view options.
4
English
UNIT FEATURES
How to play video?
Figure 1. Key sockets on rear panel
2
3
4
a
b
1. Connect video cables to both video out
sockets of your radio and video source
of your TV.
2. Press
SOURCE to shift your radio into
iPod mode.
3. Press and hold
MENU until it goes into
system setting and then press or
to
’iPod video’, press
MENU , it will ask
you ‘video output on’, press
MENU.
4. Insert iPod/iPhone/iPad into the dock.
1
a. AM antenna socket
5
b. Power cord socket
5. Shift your iPod/iPhone/iPad in movie
mode, then enjoy it!
Note: For prolong the lifespan of your radio, please use the adapter your manufacturer provided only.
1. Video out socket
2. Coaxial input socket
This socket connects to an coaxial digital cable from your TV/component device.
3. Optical input socket
This socket connects to a fiber-optic digital cable will allow outer audio
igital signal to your radio.
4. Line in socket
This socket allows your radio to be used as an external amplifier for MP3 players, compact disc
players and similar devices.
5. Aux input socket
This input will accept stereo plugs from MP3 players, computers or TV which has RCA style jacks.
How to play ‘Coaxial in’/’Optical in’/’Line in’/ ‘AUX’?
Note that technically the working principle of sockets 2-5 has no difference.
This instructional manual will demonstrate ‘how to play coaxial?’ as for instance.
1. Plug audio source line into ‘coaxial in’ socket at the back of your radio.
2. Press SOURCE
to shift your radio into ‘coaxial’ mode.
3. Adjust volume level by pressing - volume +.
Wall Mount
These convenient keyhole slots allow you to mount your radio to the wall. Please ensure you use
a drywall anchor rated for 20lbs. Each drywall anchor should be placed 16” on center apart from
each other; please measure the distance of the keyhole slots on the back of your radio to ensure
accuracy. The keyhole slots accommodate #9 woodscrews or equivalent.
5
English
GENERAL OPERATION
How to play iPod/iPhone/iPad?
all Apple iPods/iPhones/iPad.
or press the iPad button on your remote control to convert into iPod
Repeatedly press SOURCE
mode.
iPod/iPhone/iPad models.
the latest
2. Press
or
to view , while your selecting program is showing up, trhen wait for a moment,
your radio will access to the appointed program quickly.
How to play programs through AUX IN?
Note that Aux In mode plays audio from an external source such as an MP3 player.
1. Connect the external audio source to the Aux input 3.5 mm stereo socket.
or press the AUX button on your remote control to convert
2. Repeatedly press SOURCE
into AUX mode, then adjust volume level is necessary.
SYSTEM SETTINGS
How to seek?
Note: this function is uniquely designed for you to automatically pick an AM/FM program in AM or FM
mode only.
1.
2.
3.
4.
Repeatedly press SOURCE
to convert into AM/FM mode if current it isn’t.
Press and hold MENU
until it goes into system setting mode with ‘SEEK’ is twinkling.
Press MENU
to confirm ‘SEEK’ , be quick.
Press
or
to downward or upward to seek programs.
How to set preset and how to recall?
Note: this function also limited to AM/FM mode only, it has preset up to 12AM and 12FM , and this order can be
only accessible through remote control.
1. While your favored AM/FM program is playing, press and hold one of preset numbers 1-12 on remote
control until current program being stored.
The way of access to preset stations:
or press the AM/FM button on your remote control to convert into
1. Repeatedly press SOURCE
corresponding AM/FM mode.
2. Press the relevant preset number via remote control.
How to set Bass/Treble?
Sometimes, you might thinking about set timbre level according to your personal preference, below
is a shortcut of recommending you how to do it.
> Press
Press and hold MENU
or
to ‘Bass/Treble’ > Press MENU
> Press
or
to adjust the range from -10dB to 10dB, done!
to confirm
6
English
SYSTEM SETTINGS
How to set clock/date ?
1.
2.
3.
4.
Press and hold MENU
> Press
or
to ‘Clock/Date’ > Press MENU
Now hour format ‘MODE : 24’ is twinkling.
to confirm.
Press
or to set clock mode 24/12, then press MENU
Follow your radio’s demonstration to set hour/minute/month/day/year in turn.
to confirm.
How to set sync iPod clock ?
1. Press and hold MENU
> Press
2. Now ‘SYNC: ON’ is twinkling.
3. Press MENU
to confirm.
or
to ‘sync iPod clock’
> Press MENU
to confirm.
.
How to set iPod video?
Please refer ’how to play video’ at P5.
How to set LCD contrast?
1. Press and hold MENU
> Press
to ‘LCD contrast’
or
buttons to your favorite option, done!
2. Press
> Press MENU
to confirm.
How to set LCD backlight?
Adjusting LCD backlight can be fun when you squeeze a time to smell fresh flowers,
Please refer above ’how to set LCD contrast?’ to do it.
REMOTE CONTROL FEATURES
press to switch on or off your unit
press to enter corresponding Audio souce
press to mute your radio and
press again to have mute exit.
iPod/iPhone/iPad mode use only:
press or
to backward or forward view tracks.
press
to pause, press again to play again.
press to forward view options
press to decrease volume
press to activate ‘select’ function to confirm
press and hold to enter main menu options
press to increase volume
press to backward view options
press to shift to corresponding mode
preset buttons
- for how to set preset and how to recall? See P6
7
English
QUICK START GUIDE
Congratulations on your purchase of
product SBEV40-3D-----The latest in 3D Audio Home Theater technology.
Included in box:
1 SBEV40-3D Sound Bar
1 Remote Control (Battery Included)
1 Product Manual (Quick Start Guide included)
1 Aux stereo cable
Installation Sequence
Connect Source
a. A single cable is needed per source.
b. S e e table below for common connection types & installation ol cations.
1
2
Plug power adaptor into rear of sound bar
3
Plug power adaptor into wall outlet
4
Press the
button to turn on
45 Press the SOURCE
to shift to another mode
6
Adjust to desired volume by pressing the - volume + button
7
Press the AUDIO
8
Press and hold MENU
to adjust audio mode to best suit for source
to active main menu settings, such as set Clock/Date, etc.
Press or to scroll backward or forward to view opt ions while you manange
to confirm
to setting menu, press MENU
9
1
Compatible Sources
(Only a single cable is used per source)
CD / DVD Player
Flat Panel TV
Computer
Common Connection Type
Common Connection Type
A
B
C
iPod/iPhone
C
iPad
Game Console
Common Connection Type
A
B
Common Connection Type
A
B
Laptop
Common Connection Type
C
C
8
English
DOWNLOAD APPS TO THE iPod Touch/iPhone/iPad
Getting apps onto your iPod Touch/iPhone/iPad by following the below procedure.
1. In your iPod Touch/iPhone/iPad’s main menu, open the App Store by click the App store icon:
App Store icon
2. In the App store, search for ‘Haier soundbar1’.
3. Touch ‘Haier soundbar1’ icon, and then hit the "free" button, it will then change the "free" to
"install". Click again to install. Here is where you will enter your user name and password. You should
only have to enter your username once and your iPod Touch/iPhone/iPad will remember it, but you
will need to always enter a password to prevent just anyone from downloading apps to your
equipment.
4. Once your iPod Touch/iPhone/iPad has started downloading the app, a status bar will show up to
indicate how long it will take to download. Once it is complete, you can access your new app.
SPECIFICATIONS
• Power Supply: 100 - 240VAC, 50/60Hz
• Digital 3D Sound Processing: sonic emotion wave field synthesis
• Speakers: 6 x 3” High Efficiency Magnetically Shielded Full Range Drivers, 2 x 4” Subwoofers
• S/N: > 80dB• Distortion: < 1%
• Audio Power: 6 x 20 Watt RMS, 1 x 40 Watt RMS for dual subwoofers
9
English
LIMITED WARRANTY
This Haier brand product, when shipped in its
original container will be free from defective
workmanship and materials, and agrees that
it will, at its option, either repair the defect or
replace the defective product with a new or
remanufactured equivalent at to the
purchaser, for parts or labor for the periods
set forth below:
This warranty does not apply to the
appearance of the product or the exterior
of the product, which has been damaged
or defaced, altered or modified in design or
construction. It does not apply to the
additional excluded items set forth below:
The warranty commences on the date the item
was purchased and the original purchase
receipt must be presented and the original
purchase receipt must be presented to the
authorized service center before warranty
repairs are rendered.
The limited warranty described herein is
in addition to whatever implied warranties
may be granted to the purchasers by law.
ALL IMPLIED WARRANTIES INCLUDING THE
WARRANTIES OF MERCHANTABILITY AND
FITNESS FOR USE ARE LIMITED TO THE
PERIOD(s) FROM THE DATE OF PURCHASE
SET FORTH BELOW. Some states do not allow
limitation on how long an implied warranty
lasts, so the above limitation may not apply
to you.
Neither the sales personnel of the seller nor
any other person is authorized to make any
warranties other than those described herein,
or to extend the duration of any warranties
beyond the time period described herein on
behalf of Haier.
The warranties described herein shall be
the sole and exclusive remedy available to
the purchaser. Corrections of defects in the
manner and for the period of time described
herein, shall constitute complete fulfillment of
all abilities and Responsibility of Haier to the
purchaser with respect to the product, and
shall constitute full satisfaction of all claims,
whether based on contract, negligence, strict
duality or otherwise. In no event shall Haier
be liable, or in any way responsible for any
damages or defects in the product which
were caused by repairs or attempted repairs
performed by anyone other than an
authorized service center or dealer; nor shall
Haier be liable, or in any way responsible
for incidental or consequential economic or
property damage. Some states do not allow
the exclusion of incidental or consequential
damages, so that above exclusion may not
apply to you.
THIS WARRANTY GIVES YOU SPECIFIC
LEGAL RIGHTS. YOU MAY ALSO HAVE
OTHER RIGHTS WHICH VARY FROM STATE
TO STATE.
Warranty period for this product: 1 year
parts and labor.
Additional items excluded from warranty
coverage: non-rechargeable batteries. Where
to obtain service: For the location of the
nearest Haier authorized service center or to
obtain product literature, accessories, supplies
or customer assistance, please call
1-877-337-3639.
What to do to obtain service: ship or carry in
your product to an authorized service dealer
or center. Be sure to have proof of purchase.
If you ship the product, be sure it is packaged
carefully.
Haier America
New York, NY 10018
10
IMPORTANT
Do Not Return This Product To The Store
If you have a problem with this product, please contact the
“Haier Customer Satisfaction Center” at 1-877-337-3639.
DATED PROOF OF PURCHASE, MODEL # AND SERIAL # REQUIRED FOR
WARRANTY SERVICE
IMPORTANT
Ne pas renvoyer cet appareil au magasin.
Si vous avez un problème avec cet appareil, veuillez contacter
le service à la clientèle de Haier au 1-877-337-3639.
IL EST OBLIGATOIRE DE FOURNIR UNE PREUVE D’ACHAT DATÉE, LE NUMÉRO DU MODÈLE
ET SON NUMÉRO DE SÉRIE AFIN DE BÉNÉFICIER DE LA COUVERTURE DE LA GARANTIE.
IMPORTANTE
No Devuelva Este Producto al Establecimiento Compra.
Si tiene problemas con este producto, por favor póngase en contacto con el
“Centro Haier de Atención al Cliente” en el 1-877-337-3639.
PARA EL SERVICIO DE GARANTÍA SE REQUIERE PRUEBA DE COMPRA, FECHADA,
No. DE MODELO Y No. DE SERIE
115 V, 60 Hz
Model Number: SBEV40-3D
Issued Date: 28/12/2011
Made in China
Fabriqué en Chine
Hecho en China
Haier America
New York, NY 10018
Printed in China
Model#Number: SBEV40-3D
Model
IssuedDate
January 2012
Issued
©2011
Haier
America
Trading,
©2012 Haier
America
Trading,
LLC.LLC.