1
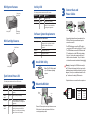
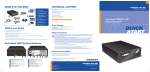
4
Load RDX Cartridge
Protection Plan Tab Tasks
Write Protect
Tab
What to Do
Start
Select one of the following protection plan options:
• Personal Data and Settings — backs up data that is located in the
Documents and Settings folder, such as email account and desktop
settings.
• Custom — backs up the files and folders that you manually select.
• Everything — backs up all disk drives on the host computer
(recommended).
• Exchange Storage Groups — backs up Microsoft Exchange Storage
Groups on the host computer. (This option only applies if MS Exchange
is installed on the host.)
• SQL Server Databases — backs up SQL Server databases on the host
computer. (This option only applies if SQL Server is installed on the
host.)
Keyed
Corner
5
Install AccuGuard Server for RDX
Note: AccuGuard installs only on Windows
operating systems.
Selections
• Follow the steps on your AccuGuard License Activation
card to download the software.
• Run the AccuGuard Server for
RDX.exe file.
• At the final screen of the setup
wizard, be sure the checkbox
“Run AccuGuard Server for RDX
now” is selected. Click Finish.
433985 Rev B
Tandberg Data AccuGuard™ License Activation
Thank you for selecting Tandberg Data AccuGuard
data protection software.
1
Visit
www.tandbergdata.com/login
Account Sign In
2 Sign in or create an account
Key Benefits:
• Powerful Data Deduplication
Enter the Promo Code
3 RDX10
• Quick Point-in-Time Recovery
• Fast File-Level Searching
• Microsoft Exchange Protection
• Microsoft SQL Protection
• Simple User Interface
4
License Agreement
Click to agree
5
Authorization Code
Enter the code LA C# ## ## ##
6 Download Software
Click the download link
7 License Key
Receive your key via email
• Select “Add a License Key.” Enter
the license key that you received via email in the above download
process.
Tandberg Blue
Pantone PMS 287
CMYK 100-068-000-012
Tandberg Orange
Fonts: Arial Black, Arial Regular
Pantone PMS 151
CMYK 000-043-087-000
• Click Yes to activate the software license, then click OK.
The AccuGuard Home screen opens.
6
Plan Name
Type a name and description for the backup plan.
Cartridges
Select the storage location(s) for the protection plan. If necessary, click
Add to include a storage location. You can add storage located on a local,
network, or removable disk drive.
Schedule
Choose a time and frequency for your protection plan.
(The Advanced option allows you to schedule a backup run time under
certain circumstances, such as when the system is idle.)
Create a Data Protection Plan
• From the Home screen, select
“Add a Protection Plan” in the
upper-right area of the screen.
The Create a Protection Plan
interface appears.
• Complete the tasks in order,
beginning with the Start tab and
ending with the Schedule tab.
Refer to the following Protection Plan Tab Tasks section
for more information.
The Selections tab function varies depending on which
plan option you initially selected.
• Personal Data and Settings-— select the user account settings to
include in your protection plan.
• Custom — select the drives, directories, and files to include in your
protection plan.
• Everything — the software automatically selects all disk drives on the
computer for backup.
• Exchange Storage Groups -— select one or more the storage groups
to include in your protection plan.
• SQL Server Databases — select one or more databases to include in
your protection plan.
with
Quick Start Guide
Internal USB and Internal SATA
Check Accessory Kit Contents
One of the following:
SATA Data Cable or Internal USB Data Cable
Mounting Screws
Power Adapter Cable
433985 Rev B
Tandberg Data AccuGuard™ License Activation
Thank you for selecting Tandberg Data AccuGuard
data protection software.
Key Benefits:
• Powerful Data Deduplication
• Quick Point-in-Time Recovery
• Fast File-Level Searching
• Microsoft Exchange Protection
• Microsoft SQL Protection
• Simple User Interface
For More Information
Visit the Support section of the Tandberg Data web site
(http://www.tandbergdata.com) for more information,
including product warranty and registration, knowledge
base articles, user documentation, and technical support.
© 2010 Tandberg Data. All rights reserved. RDX QuickStor and AccuGuard are trademarks of
Tandberg Data. RDX is a registered trademark of ProStor Systems, Inc. All other trademarks are
the property of their respective owners.
P/N 433822 Rev. D
1
Visit
www.tandbergdata.com/login
Account Sign In
2 Sign in or create an account
Enter the Promo Code
3 RDX10
4
License Agreement
Click to agree
5
Authorization Code
Enter the code LA C# ## ## ##
6 Download Software
Click the download link
7 License Key
Receive your key via email
RDX Utility CD
Warranty Card
AccuGuard License
Activation Card
Tandberg Blue
Pantone PMS 287
CMYK 100-068-000-012
Tandberg Orange
Fonts: Arial Black, Arial Regular
Pantone PMS 151
CMYK 000-043-087-000
RDX System Features
Emergency
Eject Hole
Activity LED
Eject Button/
Power LED
RDX Cartridge Features
Activity LED
The following table describes the Activity LED’s function:
LED Status
Meaning
Description
On Green
Ready
Cartridge is ready.
Blinking Green
Activity
Reading, writing, seeking.
On Amber
Fault
Unit has detected a cartridge fault
condition. For more information,
run a diagnostic application.
Software System Requirements
For AccuGuard Server for RDX software:
Operating System
Write Protect
Processor
Minimum 2.0 GHz CPU
Memory
Minimum 2 GB RAM
Free Disk Space
80 MB
1
Activity LED
Install RDX Utility
Note: The RDX Utility installs
only on Windows operating
systems.
Eject Button/Power LED
The following table describes the Power LED’s function:
LED Status
Meaning
Description
Off
No Power
Unit does not have power.
On Green
Ready
Power is On and the unit is working
properly.
Blinking
Green
Ejecting
Unit is rejecting the cartridge.
On Amber
Fault
Unit has detected a fault condition.
For more information, run a diagnostic
application.
Blinking
Amber
Prevent
Host computer is accessing the media
and the user has pressed the Eject
Button. The unit will eject the cartridge
after the Host access completes.
Windows Server 2003 (32-bit, 64-bit),
Windows 2008 (32-bit, 64-bit), Windows
2008 R2, Windows XP, Vista, and
Windows 7
2
3
Connect Data and
Power Cables
USB
SATA
• Connect the data cables and power cables to the
RDX dock.The dock connections are keyed to
ensure the correct fit.
• For SATA interfaces, connect the SATA cable to
your system’s SATA controller (built-in or PCI card).
For USB interfaces, connect the USB cable to the
PC motherboard or to the USB host bus adapter.
Align pin 1 on the cable connector with the pin 1
location on the motherboard. The pin 1 location
on the cable connector is marked with a triangle .
Warning: Connecting the USB Cable incorrectly to
the PC will result in damage. Verify pin layout on the
motherboard versus the cable connector pin-out (see
diagram). Consult your motherboard manual for the
pin 1 location on the mating USB connector.
• Replace the server cover and turn the computer on.
Mount the RDX Unit
Server
Front
Unit
• Power off the computer and open the server cover.
• Slide the unit in place and secure with the four
mounting screws provided.
+5VDC
DATA DATA +
GND
Key
1
2
9
10
PIN
1
3
5
7
9
SIGNAL PIN
VCC
2
USB04
USB0+
6
GND
8
Key
10
SIGNAL
VCC
USB 1USB 1+
GND
USBOC