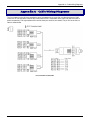
1
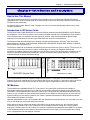
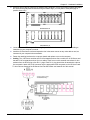
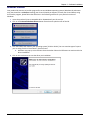
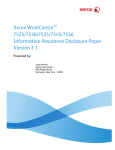
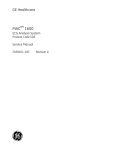
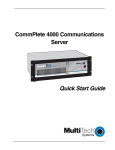
MultiModem® ISI
Intelligent Serial Interface
Server Cards
ISI5634UPCI & ISI9234PCIe
User Guide
MultiModem ® ISI User Guide
Models: ISI9234PCIe-4 & -8
ISI5634UPCI-4 & -8
P/N S000442E, Revision E
This publication may not be reproduced, in whole or in part, without prior expressed written permission from Multi-Tech
Systems, Inc. All rights reserved.
Copyright © 2010 by Multi-Tech Systems, Inc.
Multi-Tech Systems, Inc. makes no representation or warranties with respect to the contents hereof and specifically disclaims
any implied warranties of merchantability or fitness for any particular purpose. Furthermore, Multi-Tech Systems, Inc. reserves
the right to revise this publication and to make changes from time to time in the content hereof without obligation of Multi-Tech
Systems, Inc. to notify any person or organization of such revisions or changes.
Record of Revision
Revision
Date
Description
C
06/06/08
D
E
05/15/09
10/07/09
05/21/10
Remove ISI4604/8 Serial Cards, add procedures for Windows Server 2008 32-bit and 64bit driver installation, and change Windows XP, 2003, and 2000 driver installation
procedures.
Added web link for warranty information.
Added Support Portal link and updated FCC and EMC statements.
Added Windows Installer procedures.
Trademarks
MultiModem, Multi-Tech, and the Multi-Tech logo are trademarks of Multi-Tech Systems, Inc.
Microsoft, Windows 2000, 2003, XP, Vista, and Windows Server 2008 are registered trademarks or trademarks of Microsoft
Corporation in the United States and/or other countries.
Patents
This device covered by one or more of the following patents: 6,031,867; 6,012,113; 6,009,082; 5,905,794; 5,864,560; 5,815,567;
5,815,503; 5,812,534; 5,809,068; 5,790,532; 5,764,628; 5,764,627; 5,754,589; 5,724,356; 5,673,268; 5,673,257; 5,644,594;
5,628,030; 5,619,508; 5,617,423; 5,600,649; 5,592,586; 5,577,041; 5,574,725; 5,559,793; 5,546,448; 5,546,395; 5,535,204;
5,500,859; 5,471,470; 5,463,616; 5,453,986; 5,452,289; 5,450,425; D353,598; 5,355,365; 5,309,562; 5,301,274;
7082106;7082141;7092406. Other Patents Pending.
Contacting Multi-Tech Support
Online Support Portal:
https://support.multitech.com
In order to better serve our customers, manage support requests and shorten resolution times, we have created the online web
portal allowing you to submit questions regarding Multi-Tech products directly to our technical support team. Get answers to
your most complex questions, ranging from implementation, troubleshooting, product configuration, firmware upgrades and
much more.
To create an account and submit a Support Case on the Portal, visit https://support.multitech.com.
Knowledge Base and Support Services:
www.multitech.com/support.go
The Knowledge Base provides immediate answers to your questions and gives you access to support resolutions for all MultiTech products. Visit our support area on the website for other support services.
Technical Support
Country By Email
By Phone
Europe, Middle East, Africa:
[email protected] (44) 118 959 7774
U.S., Canada, all others: [email protected] (800) 972-2439 or (763) 717-5863
Warranty
Warranty information can be found at:
MultiModem ISI Server Cards User Guide
http://www.multitech.com/warranty.go
2
Table of contents
Contents
CHAPTER 1—INTRODUCTION AND DESCRIPTION ........................................................................................................ 4
How to Use This Manual............................................................................................................................................ 4
Introduction to ISI Server Cards .............................................................................................................................. 4
ISI Modems.................................................................................................................................................................. 4
ISI Reset Utility ........................................................................................................................................................... 5
Technical Specifications ........................................................................................................................................... 5
CHAPTER 2—HARDWARE INSTALLATION ...................................................................................................................... 6
Introduction................................................................................................................................................................. 6
Telecom Safety Warnings ......................................................................................................................................... 6
Hardware Installation Procedures ........................................................................................................................... 6
CHAPTER 3—SOFTWARE INSTALLATION....................................................................................................................... 8
Introduction................................................................................................................................................................. 8
Windows Installer ....................................................................................................................................................... 9
Manual Driver Installation for Windows 7....................................................................................................................... 11
Card Driver Installation ................................................................................................................................................. 11
Windows 7 Port and Modem Installation.................................................................................................................... 15
Installation of the Modems ........................................................................................................................................... 18
Un-Installing your ISI Unit............................................................................................................................................. 19
Driver Installation for Windows Server 2008 ................................................................................................................. 22
Card Driver Installation ................................................................................................................................................. 22
Installation of the Communications Port .................................................................................................................... 24
Installation of the Modems ........................................................................................................................................... 27
Un-Installing your ISI Unit............................................................................................................................................. 29
Driver Installation for Windows Vista .............................................................................................................................. 34
Card Driver Installation ................................................................................................................................................. 34
Port and Modem Installation ........................................................................................................................................ 37
Un-Installing ISI Drivers ................................................................................................................................................ 43
Driver Installation for Windows XP/2003........................................................................................................................ 46
Serial Port Installation. .................................................................................................................................................. 46
Port and Modem Installation ........................................................................................................................................ 50
Un-Installing ISI Drivers ................................................................................................................................................ 57
Installing the ISI Driver in Linux ..............................................................................................................................62
Linux Driver Installation Overview ................................................................................................................................... 62
Building the Linux Driver............................................................................................................................................... 62
Creating Linux TTY Device Names ............................................................................................................................ 63
Verifying Successful Loading of the Linux Driver ..................................................................................................... 63
Un-Installing the Linux ISI Driver ................................................................................................................................. 63
Configuring the Modems for your Country ...........................................................................................................64
CHAPTER 4 – RESET UTILITY ........................................................................................................................................... 65
APPENDIX A – CABLE WIRING DIAGRAMS ................................................................................................................... 66
APPENDIX B – REGULATORY COMPLIANCE ................................................................................................................ 67
APPENDIX C – ENVIRONMENTAL INFORMATION ........................................................................................................ 68
INDEX ..................................................................................................................................................................................... 71
MultiModem ISI Server Cards User Guide
3
Chapter 1 – Introduction and Description
Chapter 1—Introduction and Description
How to Use This Manual
This manual describes the Multi-Tech Intelligent Serial Interface, Server Cards Models ISI5634UPCI-4/8 and
ISI9234PCIE-4/8. The UPCI Cards install on Universal PCI-bus architecture and the PCI Express cards install on
PCI Express-bus architecture.
We assume that you have basic PC skills. Therefore, we have not included step-by-step instructions for basic
computer operations.
Introduction to ISI Server Cards
The ISI Server Cards, model ISI5634UPCI is a Universal PCI-bus architecture and the ISI9234PCIe is a PCI Expressbus architecture. The -4 ISI Server card is a server modem expansion card with four V.92 data/Super G3 fax modems.
The -8 ISI Server card is an expansion card with eight such modems. These excellent hardware products add
modems to communication servers and async hosts that have 32-bit PCI bus architecture.
The ISI Server Cards ship with drivers for the following multiuser operating systems: Windows® 2000 Server and
Advanced Server, Windows 2000 Professional, Windows 2003, Windows XP, Windows Vista, Windows 7, Windows
Server® 2008, and Linux kernel 2.4.x.
The ISI Server Cards can be combined to support asynchronous serial devices (local or dial-up). The ports can be
used to connect basic terminals (with or without multiple pages of memory) to multiplexer channels and
asynchronous modems. Each port can support as many screens as there are physical pages of memory on the
terminal. In Windows 2000/2003/XP/Vista/2008/7, a built-in autodetect utility enables detection of Multi-Tech
modems and sets the proper initialization strings.
ISI9234PCI Express Card
ISI5634UPCI Card
The -4 server card has one RJ-45 connector that fans out into four RJ-11 connectors, one for each of its modems.
Similarly, the -8 server card has two RJ-45 connectors that fan out into eight RJ-11 connectors, one for each of its
modems. Both server cards are full size add-on cards that support a high-speed interface up to 230 Kbps.
ISI Modems
The ISI modems are compatible with the ITU-T V.92 protocol. They make quick connections and operate at
downstream transmission speeds of up to 56K bps and upstream transmission speeds of up to 48K bps when
connected to V.92-compatible Internet Service Providers. The V.92 protocol can send data downstream from the
Internet to your computer at these speeds because data on the telephone network typically is converted from
digital to analog only once before it reaches your modem. Upstream transmissions and transmissions between
client modems are limited to 33.6 Kbps.
Upstream transmissions to non-V.92-compatible ISPs and downstream transmissions that are converted more than
once on the telephone line are also limited to 33.6K bps.
When calling into the ISI modem with another V92 modem over an analog phone line, the maximum speed
achievable is 33.6 Kbps. V90 or V92 connections are not possible when an analog line is calling another
analog line. Similarly, when the ISI modem is involved in a call between an analog line and a digital line, the higher
V.90/V.92 speeds cannot be used. However, ISI modems can achieve the higher V.90/V.92 speeds when dialing
out to a digital phone line that supports V.90/V.92.
MultiModem ISI Server Cards User Guide
4
Chapter 1 – Introduction and Description
Note: Though these modems are capable of 56 Kbps download performance, line impairments,
public telephone infrastructure flaws, and other external technological factors currently prevent
connections from reaching this maximum 56 Kbps speed.
Modems on the ISI Card are ‘Plug and Play’ capable with interactive automatic dialing and command mode
configuration. In standard mode, you can store up to three command lines or telephone numbers of up to 40
characters each in the modems' nonvolatile memory. The modems can dial using pulses or tones and can
recognize dial tones and busy signals for reliable call-progress detection. The modems can detect AT&T calling
card tones. They also have DTR dialing, remote configuration, and 11-bit capabilities, and they incorporate selfresetting lightning protection. Serial port speeds can be set as high as 230,400 bps. They are both FCC
registered for connection without notification to the telephone company.
The ISI Card has full-duplex intelligent modems with V.42 error correction, V.42bis, and V.44 data compression. The
ISI modems support "Super G3" ITU-T V.34 fax communications at speeds up to 33.6 Kbps with Class 2.1 fax
commands. The ISI modems also support voice functionality (+V commands).
ISI Reset Utility
Multi-Tech's ISI Reset Utility is shipped with each ISI Card. It allows you to reset the modems associated with the
ISI Card in a computer running Windows 2000 Professional, Windows 2000 Server, Windows 2000 Advanced
Server, Windows 2003, Windows XP, Windows Vista, or Windows Server 2008.
Technical Specifications
Computer requirements
Dimensions:
Baud Rates:
Bus Type:
Connectors:
Cables:
Temperature:
Approvals
Power:
Interrupt Request (IRQ):
Warranty:
Microsoft Windows 2003, Windows XP, Windows 2000 Professional, Windows 2000
Server and Advanced Server, Windows Vista, Windows 2008, Windows 7 or Linux
(kernel 2.4.x).
CD-ROM drive
2 MB of hard disk space
13.25" x 4.2" / 33.66 cm x 10.67 cm
300 bps to 230 Kbps per port
ISI9234 models are PCI Express form factor 1x, PCIe 1.0 compatible.
ISI5634 models are UPCI is PCI spec version 2.1 compatible.
one RJ-45 jack (female) on ISI-4; two RJ-45 jacks (female) on ISI-8
The ISI-8 is shipped with two four-port fan-out cables. Each cable has an RJ-45
plug (male) at one end and four RJ-11 plugs (male) at the other end.
The ISI-4 is shipped with one such four-port fan-out cable.
32° to 149° F (0° to 65° C)
CE Mark
R&TTE
EMC: FCC Part 15; EN55022; EN55024
Safety: UL60950-1; IEC60950-1; AS/NZS 60950-1
250 milliamps @ +5vDC (8 ports; ISI5634UPCI-8)
1.75A @3.3v DC (8 ports; ISI5634UPCI-8)
130 milliamps @ +5v DC (4 ports; ISI5634UPCI-4)
885 milliamps @ 3.3v DC (4 ports; ISI5634UPCI-4)
700 milliamps @ 3.3v DC (4 ports; ISI9234PCIE-4)
1.20A @3.3v DC (8 ports; ISI9234PCIE-8)
One IRQ per card (can be shared)
Two years
Manufactured in Mounds View, MN, U.S.A.
MultiModem ISI Server Cards User Guide
5
Chapter 2 – Hardware Installation
Chapter 2—Hardware Installation
Introduction
This chapter describes installation of the Multi-Tech ISI as an expansion card in your PCI-bus computer.
Telecom Safety Warnings
•
•
•
•
•
•
•
•
•
1.
This product must be installed by a qualified service person.
2.
Never install telephone wiring during a lightning storm.
3.
Never install a telephone jack in wet locations unless the jack is specifically designed for wet
locations.
4.
This product is to be used with UL and cUL listed computers.
5.
Never touch uninsulated telephone wires or terminals unless the telephone line has been
disconnected at the network interface.
6.
Use caution when installing or modifying telephone lines.
7.
Avoid using a telephone during an electrical storm. There may be a remote risk of electrical shock
from lightning.
8.
Do not use a telephone in the vicinity of a gas leak.
9.
To reduce the risk of fire, use only 26 AWG or larger telecommunication line cord.
10. This product must be disconnected from its power source and
telephone network interface when servicing.Hardware Installation
Procedures
Before inserting your ISI card into a PCI slot, please run the Windows Installer program from your product CD. This
makes all Windows operating systems installations faster than the manual methods described Chapter 3.
To install the ISI Card into your PCI-bus computer, follow the steps presented below.
1.
Turn off your computer, remove the power cord and any peripheral equipment connected to it.
2. Remove the cover of your computer as instructed in your computer's documentation.
Before handling the ISI Card, discharge any static in your body by touching a piece of grounded metal such
as the computer chassis. Electrostatic discharge (ESD) is the release of stored static electricity that can
damage electrical circuitry or components. Static electricity is often stored in your body, and discharged
when you come in contact with an object of a different potential.
Perform the procedure below described in this section only at an ESD workstation using an antistatic wrist
strap. If such a station is not available, you can provide some ESD protection by wearing an antistatic wrist
strap and attaching it to a metal ground screw (lug).
MultiModem ISI Server Cards User Guide
6
Chapter 2 – Hardware Installation
3.
Carefully remove the ISI Card from its antistatic bag, handling it only by the mounting bracket and edges.
Do not touch the gold-plated connectors along the bottom edge. (You may want to save packaging for
possible future use.)
ISI5634UPCI-8
4.
ISI9234PCIe-8
Locate the unused PCI slot you will be using for your ISI Card and remove the slot cover according to
instructions in your computer's manual.
5.
Install the ISI Card into the selected expansion slot in the same manner as any other add-on card, as
instructed in your computer’s documentation.
6.
Fasten the retaining bracket to the computer chassis and replace cover on the computer.
7.
Cabling. The -4 ISI Server card has one RJ-45 receptacle and one fan-out cable; the -8 ISI Server card
has two RJ-45 receptacles and two fan-out cables. Each fan-out cable extends connections for four
modems from the RJ-45 plug to four RJ-11 plugs. Each RJ-11 plug should then be attached to a phone
line receptacle. Attach the RJ-45 connector into the appropriate RJ45 receptacle on the ISI Server card.
To view a pin out diagram of the ISI Server Card Fan-Out Cables, see Appendix A of this manual.
Fan-Out Cable for ISI Server Card
MultiModem ISI Server Cards User Guide
7
Chapter 3 – Software Installation
Chapter 3—Software Installation
Introduction
The ISI Cards ship with drivers and software for each of the following operating systems: Windows Server® 2008,
Windows® 7, Vista, XP, 2003, and Linux. The ISI drivers are the same for the ISI5634-UPCI and the ISI9234-PCI
Express products. This chapter describes the installation of these drivers. You may need to configure the modems
for your country/region, the procedure for doing this is at the end of this chapter. The installation and use of the
Reset Utility is described in Chapter 4.
Installing a device driver modifies your system. For this reason, only the super user (system administrator) is
allowed to perform the installation. If you cannot login as administrator, find the person in your organization with
this authorization (i.e., password). To begin driver installation, login as administrator. Then proceed with the
appropriate installation section in this chapter.
Windows Drivers: The ISI Card product driver must be installed in your computer’s program directory. The
Windows drivers are located on the ISI Card product CD in the Drivers folder. There are four Windows driver
folders; Win32bit-Vista-2008-Win7 and a 64-bit version. Also, Win32bit-XP-2003 for the older Windows operating
systems and a 64-bit version.
For server users to determine whether they have a 32-bit or 64-bit operating system, go to Start I All Programs I
Accessories I System Tools I Computer and click on the System Properties button. Under System you will see
System Type: 64-bit Operating System.
Linux Drivers : Linux Operating System drivers are also located on the CD in the Drivers I Linux Folder. Refer to
the Readme file (also in the Linux directory) for the correct driver file and installation guide for your
distribution/version of Linux.
Overview of Windows Driver Installation:
Before inserting your ISI card into a PCI slot, please run the Windows Installer program from your product CD. This
makes all Windows operating systems installations faster than the manual method described below.
If you do not run the Driver Pre-installation program from your product CD, three install wizards will guide you
through the software installation in this order:
Part A installs the PCI driver.
Part B associates a PC port with the PCI driver, and finally
Part C installs the modem driver.
Note: Windows 7 no longer uses install wizards, so the manual install process is detailed for you.
MultiModem ISI Server Cards User Guide
8
Chapter 3 – Software Installation
Windows Installer
Your product CD contains an installer program for current Windows operating systems (Windows XP and newer
only) that should be used before installing your ISI card. Should you happen to install your ISI card before using
the installer program, please follow the directions in the following sections for your particular version of
Windows.
Insert the product CD into a compatible drive. Do not install your ISI card yet.
2. Click on the Preinstall Windows Drivers button from the main splash screen of the CD.
1.
Click the button that matches your operating system [32-bit or 64-bit]. You can see what type of system
you are using from the Control Panel | System screen.
a. Windows may pop-up a User Account Control window. Select the YES button to continue with the
driver installation.
4. Click on the next button to start the driver pre-installation.
3.
MultiModem ISI Server Cards User Guide
9
Chapter 3 – Software Installation
You will be prompted 3 times to confirm the installation of the three necessary drivers. Click the Install
button to continue each time.
6. There will be a transitory screen, then the process will complete. Click on the Finish button.
5.
Your driver installation is complete.
8. If you have not already done so, you can now shut down the PC, unplug the power cord and physically
install your ISI card per the instructions found in Chapter 2.
7.
MultiModem ISI Server Cards User Guide
10
Chapter 3 – Software Installation
Manual Driver Installation for Windows 7
If you did not use the pre-installer for Windows, this is the process for installing your modem.
The following driver installation procedure is based on Win 7 32-bit Operating System. The Win 7 64-bit Operating
System installs in the same manner.
Windows 7 operates differently than the older Microsoft Operating Systems when it is installing drivers, in that it
goes out to Windows Update and searches for the device driver as soon as it detects a new device. This is done in
the background so you don’t even see it is happening. When it does not detect the driver for the new device, it
returns control to you. This is represented in the display of the desk top. In order to get the install going you have to
bring up Control Panel. The device you are installing is displayed in Control Panel, PCI Serial Port. To start things
off, hit on the device, PCI Serial Port and then right click on it and initiate Update Driver Software. This adds the
Multi-Tech ISI5634UPCI/ISI9234PCIe 4 Port Analog Modem Card to the Multi-port serial adapters for the 4-port ISI
card.
Once the 4-port ISI card is installed, the communications ports/multifunction devices are installed for each port on
the ISI card, 4-ports for the ISI-4 or 8-ports for the ISI-8. When the communications port is installed, Windows 7
goes out to Windows Update and pulls in the device driver.
Important Note: If you do not have Internet access, go to the Vista Driver Installation procedures. The screens
may be slightly different, but the intent of the screen is similar. The Vista Drivers Installation procedures do not use
Windows Update, they pull all information from the ISI product CD.
Card Driver Installation
This wizard installs the files for the ISI Card.
1. Power up your computer. Windows 7 goes out to Microsoft Windows Update and searches for the device
driver for the product it detected during the boot up sequence.
2. Go to Control Panel I Systems and click on Device Manager.
Click on PCI Serial Port and then right click. A submenu comes up; now click on Update Driver
Software.
MultiModem ISI Server Cards User Guide
11
Chapter 3 – Software Installation
3. Update Driver Software – PCI Serial Port screen appears.
Select Browse my computer for driver software
4. Insert the ISI product CD that came with your device into the CD-ROM drive.
5. At the Browse for driver software on your computer screen.
Click Browse. Browse to the Drivers folder on your on your ISI product CD, then select the Drivers folder.
Within the Drivers folder, select Win32bit-Vista-2008-Win7 folder.
If you are installing drivers for a Vista 64-bit Operating System, you would browse to the Win64bit-Vista2008-Win7 folder.
MultiModem ISI Server Cards User Guide
12
Chapter 3 – Software Installation
Click Next.
6. Windows Security Would you like to install this device software screen appears.
Click Install.
7. Installing driver software on screen appears.
MultiModem ISI Server Cards User Guide
13
Chapter 3 – Software Installation
8. When the software for this device has been updated. The Windows screen Multi-Tech
ISI5634UPCI/ISI9234PCIE 4 Port Analog Modem Card is displayed.
Click Close.
MultiModem ISI Server Cards User Guide
14
Chapter 3 – Software Installation
Windows 7 Port and Modem Installation
Immediately after the ISI Card driver installation is complete, another set of installation wizard screens will appear.
With this installation wizard, you will install ISI ports and modems into the computer's operating system and then
associate the modem with its port.
This installation sequence occurs very rapidly and is repetitive. The installation wizard may appear to be
"stuck" in an endless loop, but that is not the case. For the ISI-4, the installation wizard must install four ports and
four modems, and must make four modem/port associations. Similarly, for the ISI-8, the installation wizard must install
eight ports and eight modems, and must make eight modem/port associations.
Each port and each modem entails a separate wizard screen sequence.
This is the beginning of a sequence of screens that will be repeated for each port to be installed.
Respond to the wizard screens as follows:
1. Go to Control Panel I Systems and click on Device Manager.
Click on one of the Multifunction Device in Other devices and then right click. A submenu comes up,
now click on Update Driver Software.
MultiModem ISI Server Cards User Guide
15
Chapter 3 – Software Installation
2. Update Driver Software – PCI Serial Port screen appears.
Select Browse my computer for driver software
3.
At the Browse for driver software on your computer screen.
Ensure that the Browse window still points to the Drivers folder on the ISI product CD. The Drivers folder,
Win32bit-Vista-2008-Win7 folder.
If you are installing drivers for a Windows 7 64-bit Operating System, you would browse to the Win64bitVista-2008-Win7 folder.
Click Next.
MultiModem ISI Server Cards User Guide
16
Chapter 3 – Software Installation
4. Windows Security Would you like to install this device software screen appears.
Click Install.
5. Installing driver software on screen appears.
6. When the software for this device has been updated. The Windows screen Updated Driver Software Multi-Tech Communications Port (COM6) – Multi-Tech Communications Port is displayed.
Click Close.
This wizard will return to the Please choose your search and installation option screen and repeat this
sequence for each port being installed. For example, four times for the ISI9234PCIE-4 and eight times for the
ISI9234PCIE-8.
MultiModem ISI Server Cards User Guide
17
Chapter 3 – Software Installation
Installation of the Modems
As each Multi-Tech Communication Port (COM_) is installed, Win7 goes out and pulls the modem driver from
Windows Update and installs the modem under Modems, Multi-Tech Systems MT9234SMI#_, as shown in Device
Manager. If you do not have Internet access, the modem drivers are also on your product CD.
When all modems have been installed, you need to reboot.
Completion
Software installation for the ISI Card is complete. You may need to configure the modem for your country/region,
refer to ‘Configure the modems for your Country’ at the end of this chapter.
Verification
You can verify successful installation of the ISI Card, the ports, and the modems by going to Start I Control
Panel I System. Select the Hardware tab and click on Device Manager to view a list of devices. Then click on
"Multi-port serial adapters" to view the entry for the card driver. Click on "Ports (COM & LPT)" to view the list of
ports established. Click on "Modems" to view the list of modems installed to the ports.
Subsequent Installations
After any ISI Card has been installed in a computer, the sequence for installing any additional boards will be
different. Some screens in the installation wizard will be omitted, making the process somewhat shorter. Because
the installation affects the computer's registry, even if an ISI Card has been uninstalled after its initial installation,
any subsequent installation will be shortened in this way.
MultiModem ISI Server Cards User Guide
18
Chapter 3 – Software Installation
Un-Installing your ISI Unit
Conduct the un-installation in this order: remove the modems associated with the ISI Card first, then the ports, and,
finally, the ISI Card. Following this procedure will ensure removal of all ISI components. We present details below.
Delete Modem Drivers
1. Go to Control Panel I System. Go to the Hardware tab and click on Device Manager. The Device
Manager list will appear.
2. Click on Modems to expand the list.
3. Select one of the modems being used with the ISI Card. The modems are designated "MultiTech systems
MT5634SMI-V92#_" (followed by number designations for all modems except the first, #2, #3, etc.).
Right-click on the first modem driver to be deleted (the order of removal is not important) and select
"Uninstall."
4. At the Confirm Device Removal screen.
Click on Delete the driver software for this device. Then click OK.
5. Repeat steps 3 through 5 for each additional modem driver to be removed.
MultiModem ISI Server Cards User Guide
19
Chapter 3 – Software Installation
Delete COM Ports
1. In Device Manager, click on Ports (COM & LPT) to expand the list.
2. Select one of the COM ports being used with the ISI Card. These are designated as "Multi-Tech
Communications Port (COMx)" where x is usually 3 or greater.
3. Right-click on the first port to be deleted (the order of removal is not important) and select "Uninstall."
4. At the Confirm Device Removal screen.
Click on Delete the driver software for this device. Then click OK.
5. Repeat steps 2 through 5 for each additional ISI COM port to be removed.
MultiModem ISI Server Cards User Guide
20
Chapter 3 – Software Installation
Delete ISI Card Driver
1. In Device Manager, click on Multi-port serial adapters to expand the list.
2. Select the entry for the specific ISI Card to be removed, either Multi-Tech ISI5634UPCI/ISI9234PCIEX Card. Here "x" will be either 4 or 8. If multiple ISI Cards are present, those beyond the first will be further
specified as #2, #3, etc.
3. Right-click on the ISI Card to be deleted and select Uninstall.
4. At the Confirm Device Removal screen, click OK.
5. Repeat steps 4 and 5 for each additional ISI Card to be removed.
6. Shut down the computer.
7. With the computer's power off, you can remove the ISI Card physically from the computer.
MultiModem ISI Server Cards User Guide
21
Chapter 3 – Software Installation
Driver Installation for Windows Server 2008
If you did not use the pre-installer for Windows, this is the process for installing your modem.
The following driver installation procedure is based on Windows Server 2008 64-bit Operating System. The
procedure may vary slightly for the Windows Server 2008 32-bit Operating System.
Card Driver Installation
1. Power up your computer.
2. Windows Server 2008 will detect the ISI Card. A screen from the tray area, at the bottom right of the screen
will appear briefly Installing Device Driver Software.
3. The Found New Hardware screen appears for Windows to install driver software for your PCI Serial Port.
Click on Locate and install driver software (recommended). Windows will guide you through the process
of installing driver software for your device.
4. A Found New Hardware – PCI Serial Port screen appears and asks: Allow Windows to search online for
driver software for your PCI Serial Port?
Select Don’t search online.
MultiModem ISI Server Cards User Guide
22
Chapter 3 – Software Installation
5. The next screen prompts you to Insert the disc that came with your PCI Serial Port. If you have the disc
that came with your card, insert it now.
Click Next. Windows may prompt you to search online, but this is not necessary.
6. Searching disc for software…screen appears.
7. Windows can’t verify the publisher of this driver software screen appears.
Click Install.
MultiModem ISI Server Cards User Guide
23
Chapter 3 – Software Installation
8. When the software for this device has been successfully installed screen appears, Windows has
finished installing the driver software for this device: Multi-Tech ISI5634UPCI/ISI9234PCIE 8 Port Analog
Modem Card.
Click Close.
Installation of the Communications Port
1. A Found New Hardware – Multifunction Device screen appears and asks: Allow Windows to search online
for driver software for your Multifunction Device?
Select Don’t search online.
MultiModem ISI Server Cards User Guide
24
Chapter 3 – Software Installation
2. The Found New Hardware – Multifunction Device screen appears. If you have the disc that came with your
device, insert it now.
The ISI Card CD is still in the CD ROM drive. Click Next.
3. Searching disc for software…screen appears.
4. Windows can’t verify the publisher of this driver software screen appears.
Click Install.
MultiModem ISI Server Cards User Guide
25
Chapter 3 – Software Installation
5. The Found New Hardware – Multi-Tech Communications Port (COM3) screen appears. The software
for this device has been successfully installed. Windows has finished installing the driver software for this
device: Multi-Tech Communications Port.
Click Close.
6. If you open Device Manager, you will see ‘Other devices’ with four Multifunction Devices for the ISI-4 Card.
Similarly, for the ISI-8 Card you will see eight Multifunction Devices.
MultiModem ISI Server Cards User Guide
26
Chapter 3 – Software Installation
Installation of the Modems
1. A Found New Hardware – Multifunction Device screen appears and asks: Allow Windows to search
online for driver software for your MultiTech Systems MT9234SMI?
Select Don’t search online.
2. The Found New Hardware – MultiTech Systems MT9234SMI screen appears. If you have the disc that
came with your device, insert it now.
The ISI Card CD is still in the CD ROM drive. Click Next.
MultiModem ISI Server Cards User Guide
27
Chapter 3 – Software Installation
3. Searching disc for software screen appears.
4. Windows can’t verify the publisher of this driver software screen appears.
5. Select Install this driver software anyway
6. The software for this device has been successfully installed screen appears. Windows has finished
installing the driver software for this device: Multi-Tech Systems MT9234SMI.
7. Click Close.
MultiModem ISI Server Cards User Guide
28
Chapter 3 – Software Installation
8. View the Device Manager as the Modems are being installed. For the ISI 1-4, the installation wizard must
install four Multifunction Devices. Similarly, for the ISI 1-8, the installation wizard must install eight
Multifunction Devices under Other Devices.
When MultiTech Systems MT9234SMI #8 is displayed, the eight modems on the ISI Card are successfully
installed.
9. When all modems have been installed, you need to reboot.
Completion
Software installation for the ISI Card is complete. You may need to configure the modem for your country/region,
refer to ‘Configure the modems for your Country’ at the end of this chapter.
Verification
You can verify successful installation of the ISI Card, the ports, and the modems by going to Start I Control
Panel I System. Select the Hardware tab and click on Device Manager to view a list of devices. Then click on
"Multi-port serial adapters" to view the entry for the card driver. Click on "Ports (COM & LPT)" to view the list of
ports established. Click on "Modems" to view the list of modems installed to the ports.
Subsequent Installations
After any ISI Card has been installed in a computer, the sequence for installing any additional boards will be
different. Some screens in the installation wizard will be omitted, making the process somewhat shorter. Because
the installation affects the computer's registry, even if an ISI Card has been uninstalled after its initial installation,
any subsequent installation will be shortened in this way.
Un-Installing your ISI Unit
Conduct the un-installation in this order: remove the modems associated with the ISI Card first, then the ports, and,
finally, the ISI Card. Following this procedure will ensure removal of all ISI components. We present details below.
MultiModem ISI Server Cards User Guide
29
Chapter 3 – Software Installation
Delete Modem Drivers
1. Go to Control Panel I System. Go to the Hardware tab and click on Device Manager. The Device
Manager list will appear.
2. Click on Modems to expand the list.
3. Select one of the modem drivers being used with the ISI Card. The modem drivers are designated
"MultiTech systems MT5634SMI-V92" (followed by number designations for all modems except the first, #2,
#3, etc.). Right-click on the first modem driver to be deleted (the order of removal is not important) and
select "Uninstall."
MultiModem ISI Server Cards User Guide
30
Chapter 3 – Software Installation
4. At the Confirm Device Removal screen, click OK.
5. Repeat steps 3 through 5 for each additional modem driver to be removed.
Delete COM Ports
1. In Device Manager, click on Ports (COM & LPT) to expand the list.
2. Select one of the COM ports being used with the ISI Card. These are designated as "Multi-Tech
Communications Port (COMx)" where x is usually 3 or greater.
MultiModem ISI Server Cards User Guide
31
Chapter 3 – Software Installation
3. Right-click on the first port to be deleted (the order of removal is not important) and select "Uninstall."
4. At the Confirm Device Removal screen, click OK.
5. Repeat steps 3 through 5 for each additional ISI COM port to be removed.
MultiModem ISI Server Cards User Guide
32
Chapter 3 – Software Installation
Delete ISI Card Driver.
1. In Device Manager, click on Multi-port serial adapters to expand the list.
2. Select the entry for the specific ISI Card to be removed, either "Multi-Tech ISI5634UPCI/ISI9234PCIEX Port Analog Modem Card”. Here "x" will be either 4 or 8. If multiple ISI Cards are present, those beyond
the first will be further specified as #2, #3, etc.
3. Right-click on the first ISI Card to be deleted (the order of removal is not important) and select "Uninstall."
4. At the Confirm Device Removal screen, click OK.
5. Repeat steps 3 through 5 for each additional ISI Card to be removed.
6. Shut down the computer.
7. With the computer's power off, you can remove the ISI Card physically from the computer.
MultiModem ISI Server Cards User Guide
33
Chapter 3 – Software Installation
Driver Installation for Windows Vista
The following driver installation procedure is based on Windows Vista 32-bit Operating System. The Windows Vista
64-bit Operating System installs in the same manner.
Card Driver Installation
This wizard installs the files for the ISI Card.
1. Power up your computer.
2. Vista will detect the ISI Card.
3. Windows needs to install driver software for your PCI Serial Port.
Click on Locate and install driver software (recommended). Windows will guide you through the process
of installing driver software for your device.
4. The User Account Control – Windows needs your permission to continue screen appears. Click Continue.
5. The next screen prompts you to Insert the disc that came with your PCI Serial Port. If you have the disc
that came with your ISI card, insert it now.
Click on I don’t have the disc. Show me other options.
MultiModem ISI Server Cards User Guide
34
Chapter 3 – Software Installation
6. Windows couldn’t find the driver software for your device screen appears.
Choose Browse my computer for driver software (advanced).
7.
At the Browse for driver software on your computer screen.
Click Browse. Browse to the Drivers folder on your on your ISI product CD, then select the Drivers folder.
Within the Drivers folder, select Win32bit-Vista-2008-Win7 folder.
If you are installing drivers for a Vista 64-bit Operating System, you would browse to the Win64bit-Vista2008-Win7 folder.
MultiModem ISI Server Cards User Guide
35
Chapter 3 – Software Installation
8. Windows Security Would you like to install this device software screen appears.
Click Install.
9. Installing driver software on screen appears.
10. When the software for this device has been successfully installed screen appears, Windows has finished
installing the driver software for this device: Multi-Tech ISI5634UPCI/ISI9234PCIE 4 Port Analog Modem
Card.
Click Close.
MultiModem ISI Server Cards User Guide
36
Chapter 3 – Software Installation
Port and Modem Installation
Immediately after the ISI Card driver installation is complete, another set of installation wizard screens will appear.
With this installation wizard, you will install ISI ports and modems into the computer's operating system and then
associate the modem with the ports.
This installation sequence occurs very rapidly and is repetitive. The installation wizard may appear to be
"stuck" in an endless loop, but that is not the case. For the ISI-4, the installation wizard must install four ports and
four modems, and must make four modem/port associations. Similarly, for the ISI-8, the installation wizard must install
eight ports and eight modems, and must make eight modem/port associations.
Each port and each modem entails a separate wizard screen sequence.
Port Installation.
This is the beginning of a sequence of screens that will be repeated for each port to be installed.
Respond to the wizard screens as follows:
1. The Found New Hardware – Multifunction Device screen appears.
Click on I don’t have the disc. Show me other options.
2. The User Account Control – Windows needs your permission to continue screen appears. Click Continue.
MultiModem ISI Server Cards User Guide
37
Chapter 3 – Software Installation
3. Windows couldn’t find the driver software for your device screen appears.
Choose Browse my computer for the driver software (Advanced).
4. At the Browse for driver software on your computer screen.
Click Next.
5. Windows can’t verify the publisher of this driver software screen appears.
Click Install.
MultiModem ISI Server Cards User Guide
38
Chapter 3 – Software Installation
6. Installing driver software on Multifunction Device screen appears.
7. The Found New Hardware – Multi-Tech Communications Port (COM6) screen appears. The software
for this device has been successfully installed. Windows has finished installing the driver software for this
device: Multi-Tech Communications Port.
Click Close.
This wizard will return to the Please choose your search and installation option screen and repeat this
sequence for each port being installed. For example, four times for the ISI9234PCIE-4 and eight times for the
ISI9234PCIE-8.
MultiModem ISI Server Cards User Guide
39
Chapter 3 – Software Installation
Installation of the Modems
1. A Found New Hardware – Multi-Tech Systems MT9234SMI screen appears with Insert the disc that
came with your Multi-Tech Systems MT9234SMI.
Click on I don’t have the disc. Show me other options.
2. The User Account Control – Windows needs your permission to continue screen appears. Click Continue.
3. Windows couldn’t find driver software for your device screen appears.
Choose Browse my computer for driver software (advanced).
MultiModem ISI Server Cards User Guide
40
Chapter 3 – Software Installation
4. At each Found New Hardware Wizard —Please choose your search and installation options screen.
Ensure that Search for the best driver in these locations is selected and that Include this location in the
search is also selected. The Browse window shows the drive location, for example, E:\Drivers\Win32bitVista-2008-Win7.
If you are installing drivers for a Vista 64-bit Operating System, ensure that you are browsing to
E:\Drivers\Win64bit-Vista-2008-Win7.
Then click Next.
5. Would you like to install this device software? screen appears.
Click Install.
6. Please wait while the wizard installs the software… for the Multi-Tech Systems MT9234SMI.
MultiModem ISI Server Cards User Guide
41
Chapter 3 – Software Installation
7. For each port, Completing the Found New Hard Wizard screen for the Multi-Tech Systems MT9234SMI#_
appears.
Click Finish.
This wizard will return to the Please choose your search and installation option screen and repeat this
sequence for each modem being installed. For example, four times for the ISI9234PCIe-4 and eight times for
the ISI9234PCIe-8.
8. When all modems have been installed, you need to reboot.
Completion
Software installation for the ISI Card is complete. You may need to configure the modem for your country/region,
refer to ‘Configuring the Modems for your Country’ at the end of this chapter.
Verification
You can verify successful installation of the ISI Card, the ports, and the modems by going to Start I Control
Panel I System. Select the Hardware tab and click on Device Manager to view a list of devices. Then click on
"Multi-port serial adapters" to view the entry for the card driver. Click on "Ports (COM & LPT)" to view the list of
ports established. Click on "Modems" to view the list of modems installed to the ports.
Subsequent Installations
After any ISI Card has been installed in a computer, the sequence for installing any additional boards will be
different. Some screens in the installation wizard will be omitted, making the process somewhat shorter. Because
the installation affects the computer's registry, even if an ISI Card has been uninstalled after its initial installation,
any subsequent installation will be shortened in this way.
MultiModem ISI Server Cards User Guide
42
Chapter 3 – Software Installation
Un-Installing ISI Drivers
Conduct the un-installation in this order: remove the modems associated with the ISI Card first, then the
ports, and, finally, the ISI Card. Following this procedure will ensure removal of all ISI components. We present
details below.
Delete Modem Drivers
1. Go to Control Panel I System. Go to the Hardware tab and click on Device Manager. The Device
Manager list will appear.
2. Click on Modems to expand the list.
3. Select one of the modems being used with the ISI Card. The modems are designated "Multi-Tech systems
MT5634SMI-V92#_" (followed by number designations for all modems except the first, #2, #3, etc.).
Right-click on the first modem driver to be deleted (the order of removal is not important) and select
"Uninstall."
4. At the Confirm Device Removal screen.
Click on Delete the driver software for this device. Then click OK.
5. Repeat steps 3 through 5 for each additional modem driver to be removed.
MultiModem ISI Server Cards User Guide
43
Chapter 3 – Software Installation
Delete COM Ports
1. In Device Manager, click on Ports (COM & LPT) to expand the list.
2. Select one of the COM ports being used with the ISI Card. These are designated as "Multi-Tech
Communications Port (COMx)" where x is usually 3 or greater.
3. Right-click on the first port to be deleted (the order of removal is not important) and select "Uninstall."
4. At the Confirm Device Removal screen.
Click on Delete the driver software for this device. Then click OK.
5. Repeat steps 2 through 5 for each additional ISI COM port to be removed.
MultiModem ISI Server Cards User Guide
44
Chapter 3 – Software Installation
Delete ISI Card Driver
1. In Device Manager, click on Multi-port serial adapters to expand the list.
2. Select the entry for the specific ISI Card to be removed, either Multi-Tech ISI5634UPCI/ISI9234PCIEX Card . Here "x" will be either 4 or 8. If multiple ISI Cards are present, those beyond the first will be further
specified as #2, #3, etc.
3. Right-click on the ISI Card to be deleted and select Uninstall.
4. At the Confirm Device Removal screen, click OK.
5. Repeat steps 4 and 5 for each additional ISI Card to be removed.
6. Shut down the computer.
7. With the computer's power off, you can remove the ISI Card physically from the computer.
MultiModem ISI Server Cards User Guide
45
Chapter 3 – Software Installation
Driver Installation for Windows XP/2003
If you did not use the pre-installer for Windows, this is the process for installing your modem.
The following driver installation procedure is based Windows XP 32-bit Operating System. The ISI Driver
installation process includes three install wizards: (1) PCI Serial Port, (2) Communications Port/Multifunction
Device, and (3) the modem. Each installation wizard appears repeatedly during this procedure. This is not an
error. Do not discontinue the procedure when the installation wizards appear repeatedly. The install wizard repeats
for each modem and port on the ISI Board.
Serial Port Installation.
This wizard installs the files for the ISI Card
1. Power up your computer.
2. Windows will detect new hardware to install.
3. Found New Hardware Wizard screen appears and asks you: Can Windows connect to Windows
Update to search for software? Select No, not this time. Then click Next.
In response to the question, “Can Windows connect to Windows Update to search for software?” select
“No, not this time” and Click Next.
4. The next screen prompts you to insert the product CD into the computer. Insert the product CD, select
Install from a list or specific location (Advanced).
Click Next.
MultiModem ISI Server Cards User Guide
46
Chapter 3 – Software Installation
5. Please choose your search and installation options screen appears.
Select Include this location in the search: and Click Browse. Browse to the Drivers folder on your ISI
product CD, and then select the Drivers folder. Within the Drivers folder, select Win32bit-XP-2003 folder.
If you are installing drivers on an XP 64-bit Operating System, you would browse to the Win64bit-XP2003 folder.
Click Next.
MultiModem ISI Server Cards User Guide
47
Chapter 3 – Software Installation
6. Please wait while the wizard searches for the PCI Serial Port.
7. Then a Hardware Installation—Windows Logo Testing screen will appear. The software you are
installing for this hardware: Multi-Tech ISI534UPCI/ISI9234PCIE 4 Port Analog Modem Card has not
passed Windows Logo testing to verify compatibility with Windows XP.
Click Continue Anyway.
8. Please select the best match for your hardware from the list below.
Select the top choice, e:\drivers\win32bit-xp-2003\ser15x-xp-2003.inf for Windows 32-bit Operating
System: or select the second choice for Windows 64-bit Operating System
e:\drivers\win64bit-xp-2003\ser15x-sp-2003.inf.
MultiModem ISI Server Cards User Guide
48
Chapter 3 – Software Installation
9. ‘Please wait while the wizard installs the software...’ screen appears.
10. A completing the Found New Hardware Wizard screen appears. Click Finish.
MultiModem ISI Server Cards User Guide
49
Chapter 3 – Software Installation
Port and Modem Installation
Immediately after the ISI Card driver installation is complete, another set of installation wizard screens will appear.
With this installation wizard, you will install ISI ports and modems into the computer's operating system and then
associate the modems with the ports.
This installation sequence occurs very rapidly and is repetitive. The installation wizard may appear to be
"stuck" in an endless loop, but that is not the case. For the ISI-4, the installation wizard must install four ports and
four modems, and must make four modem/port associations. Similarly, for the ISI-8, the installation wizard must install
eight ports and eight modems, and must make eight modem/port associations.
Each port and each modem entails a separate wizard screen sequence.
Port Installation
This is the beginning of a sequence of screens that will be repeated for each port to be installed.
Respond to the wizard screens as follows:
1. If the Welcome to the Found New Hardware Wizard screen – ‘Can Windows connect to Windows update to
search for software?’ appeared when you were installing the driver, it will come up here also.
Select No, not this time. Then click Next.
2. The Found New Hardware Wizard screen appears with Multifunction Device. Select Install from a list or
specific location (Advanced).
3. Then click Next.
MultiModem ISI Server Cards User Guide
50
Chapter 3 – Software Installation
4. Please choose your search and installation options screen appears.
5. Ensure that the Search for the best driver in these locations is selected and that Include this location
in the search is also selected. The browse window shows the drive location, for example
E:\Drivers\Win32bit-XP-2003. Click Next.
6. Please wait while the wizard searches… Multifunction Device
7. Then a Hardware Installation—Windows Logo Testing screen will appear. The software you are
installing for this hardware: Multi-Tech Communications Port has not passed Windows Logo testing to
verify compatibility with Windows XP.
Click Continue Anyway.
MultiModem ISI Server Cards User Guide
51
Chapter 3 – Software Installation
8. Please select the best match for your hardware from the list below.
Ensure that the top choice is selected, e:\drivers\win32bit-xp-2003\oemport-xp-2003.inf is selected for
32-bit operating system; or select the second choice for a Windows 64-bit Operating System
e:\drivers\win64bit-xp-2003\oemport-xp-2003.inf.
9. Please wait while the wizard installs the software… Multi-Tech Communications Port screen appears.
MultiModem ISI Server Cards User Guide
52
Chapter 3 – Software Installation
10. For each port, a completion screen will appear. Click Finish.
This wizard will return to the Please choose your search and installation option screen and repeat this
sequence for each port being installed. For example, four times for the ISI9234PCIe-4 and eight times for the
ISI9234PCIe-8.
Modem Driver Installation
This wizard will install the file for the modems on the ISI card.
1. The Welcome to the Found New Hardware Wizard screen.
In response to the question, “Can Windows connect to Windows Update to search for software?
Select “No, not this time” and click Next.
MultiModem ISI Server Cards User Guide
53
Chapter 3 – Software Installation
2. The Found New Hardware Wizard screen appears with Multi-Tech Systems MT9234SMI.
Select Install from a list or specific location (Advance). Then click Next.
3. At each Found New Hardware Wizard —Please choose your search and installation options screen.
Ensure that Search for the best driver in these locations is selected and that Include this location in the
search is also selected. The Browse window shows the drive location, for example, E:\Drivers\Win32bitXP-2003. Then click Next.
4. Please wait while the wizard searches… for the MultiTech Systems MT9234SMI.
MultiModem ISI Server Cards User Guide
54
Chapter 3 – Software Installation
5. At each Hardware Installation screen with ‘The software you are installing for this hardware: Multi-Tech
Systems MT9234SMI has not passed Windows Logo testing to verify its compatibility with Windows XP’.
Click Continue Anyway.
6. Please select the best match for your hardware from the list below:
Ensure that the top choice is selected, e:\drivers\win32bit-xp-2003\multitech_pcie_upci_zpc.inf is
selected for 32-bit operating system; or select the second choice for a Windows 64-bit Operating System
e:\drivers\win64bit-xp-2003\multitech_pcie_upci_zpc.inf.
7. Please wait while the wizard installs the software… for the MultiTech Systems MT9234SMI.
MultiModem ISI Server Cards User Guide
55
Chapter 3 – Software Installation
8. For each port, ‘Completing the Found New Hard Wizard’ screen for the Multi-Tech Systems MT9234SMI
appears.
Click Finish.
This wizard will return to the Please choose your search and installation option screen and repeat this
sequence for each modem being installed. For example, four times for the ISI9234PCIe-4 and eight times for
the ISI9234PCIe-8.
9. When all modems have been installed, you need to reboot.
Completion
Software installation for the ISI Card is complete. You may need to configure the modem for your country/region,
refer to ‘Configuring the Modems for your Country’ at the end of this chapter.
Verification
You can verify successful installation of the ISI Card, the ports, and the modems by going to Start I Control
Panel I System. Select the Hardware tab and click on Device Manager to view a list of devices. Then click on
"Multi-port serial adapters" to view the entry for the card driver. Click on "Ports (COM & LPT)" to view the list of
ports established. Click on "Modems" to view the list of modems installed to the ports.
Subsequent Installations
After any ISI Card has been installed in a computer, the sequence for installing any additional boards will be
different. Some screens in the installation wizard will be omitted, making the process somewhat shorter. Because
the installation affects the computer's registry, even if an ISI Card has been uninstalled after its initial installation,
any subsequent installation will be shortened in this way.
MultiModem ISI Server Cards User Guide
56
Chapter 3 – Software Installation
Un-Installing ISI Drivers
Conduct the un-installation in this order: remove the modems associated with the ISI Card first, then the
ports, and, finally, the ISI Card. Following this procedure will ensure removal of all ISI components. Details are
presented below.
Delete Modem Drivers
1. Go to Control Panel I System. Go to the Hardware tab and click on Device Manager. The Device
Manager list will appear.
2. Click on Modems to expand the list.
MultiModem ISI Server Cards User Guide
57
Chapter 3 – Software Installation
3. Select one of the modems being used with the ISI Card. The modems are designated Multi-Tech systems
MT9234SMI (followed by the number designation for all modems except the first, #2, #3, etc.). Right-click on
the last modem that was installed and select Uninstall.
4. At the Confirm Device Removal screen, click OK.
5. Repeat steps 3 through 5 for each additional modem to be removed.
MultiModem ISI Server Cards User Guide
58
Chapter 3 – Software Installation
Delete COM Ports
1. In Device Manager, click on Ports (COM & LPT) to expand the list.
2. Select one of the COM ports being used with the ISI Card. These are designated as Multi-Tech
Communications Port (COMx) where x is usually 3 or greater.
3. Right-click on the last port that was installed and select Uninstall.
MultiModem ISI Server Cards User Guide
59
Chapter 3 – Software Installation
4. At the Confirm Device Removal screen, click OK.
5. Repeat steps 3 through 5 for each additional ISI COM port to be removed.
Delete ISI Card Driver
1. In Device Manager, click on Multi-port serial adapters to expand the list.
2. Select the entry for the specific ISI Card to be removed, either Multi-Tech ISI5634UPCI/ISI9234PCIEX Card . Here "x" will be either 4 or 8. If multiple ISI Cards are present, those beyond the first will be further
specified as #2, #3, etc.
3. Right-click on the ISI Card to be deleted and select Uninstall.
MultiModem ISI Server Cards User Guide
60
Chapter 3 – Software Installation
4. At the Confirm Device Removal screen, click OK.
5.
6.
7.
Repeat steps 3 through 5 for each additional ISI Card to be removed.
Shut down the computer.
With the computer's power off, you can remove the ISI Card physically from the computer.
MultiModem ISI Server Cards User Guide
61
Chapter 3 – Software Installation
Installing the ISI Driver in Linux
Multi-Tech's version 1.01 driver for the ISI Cards works with the 2.4.x Linux kernel. It has been tested with
RedHat Release Versions 7.3, 8.0, and 9.0.
System Requirements, Prerequisites, & Conditions of Use:
Hardware Platform:
Linux kernel version:
GNUC Compilerversion:
ISI capacity per computer:
Drivertype:
Full Linux Installation:
Intel x86
2.4.x
2.72 or later
up to 4 boards
use Multi-Tech driver only; do not use any drivers included with the Linux OS (like
Exar drivers).
For the ISI Card to operate properly, all components of the Linux OS should be
installed. If the ISI Card does not operate properly in a Linux installation where
some components are missing, then those missing Linux components should be
added and the ISI Card should be uninstalled and re-installed.
NOTE: The 'make' utility, the GNU C compiler, and the kernel sources need to
be installed on your system. If any of these are missing, the compilation will fail.
Most later Linux OSs install these elements automatically. In any event, for best
results, the Linux OS installation should include all elements.
Linux Driver Installation Overview
The Linux driver files can be obtained from the Multi-Tech FTP site, or from the ISI Product CD. Installation
consists of three processes:
(A) building the driver using the 'make install' script,
(B) creating tty device names, and
(C) verifying successful loading of the driver.
We describe this installation in detail in the sections below.
Note: All Linux line command expressions are case-sensitive. The commands shown in this procedure will
work only if you use capital letters and lower-case letters exactly as shown.
Building the Linux Driver
1. Create a temporary directory: "mkdir /mtsi_upci"
2. Copy the tar file to the temporary directory
"cp ISI_U_PCI_LINUX_V_1 01 .tar.gz /mtsi_upci"
3. Go to the temporary directory "cd /mtsi_upci"
4. Untar the file, "tarxvfzISI_U_PCI_LINUX_V_1 01 .tar.gz". This command will unzip the source files to the
"mtsi_upci_driver" directory.
5. Switch to the newly created directory "cd mtsi_upci_driver"
6. Run the "make" command. The files "mtsi_upci.o" and "resetport" will be created.
7. Run the "make install" script. The script will create the driver module and tty devices, and modify the rc
files in order to load the driver automatically on system reboot. Successful compilation and loading of the
module is displayed on the screen. Specifically, when the script has finished running successfully, it
will display the message "Multi-Tech ISI driver loaded successfully YY" The script will also create the
"ttyMUxy" ports and list the ports it has created. If this message and a list of ports do not appear,
watch for error messages.
MultiModem ISI Server Cards User Guide
62
Chapter 3 – Software Installation
Creating Linux TTY Device Names
1. This driver retains the standard serial device properties: dial-in port files (named in the form "ttyMUxy"), and
call-out port files (named in the form "cumxy"). File names of these two special types become
associated with each serial port. The first file type is for the dial-in port and has a name of the form
"ttyMUxy" where the "x" denotes the card number and the final "y" denotes the port number on that
card. The second file type is for the call-out port and has a name of the form "cumxy" where, again, the "x"
denotes the card number and the "y" denotes the port number on that card.
2. Consider the situation of installing two 8-port Modem Cards in the server computer. In that case, the driver
would create TTY devices "ttyMUla" to "ttyMUlh" and devices "cumla" to "cumlh" under the "/dev"
directory for card 1. Similarly, devices ttyMU2a to ttyMU2h and devices "cum2a" to "cum2h" would be
created for card 2. (If a 4-port card were installed as card 1, the driver would create TTY devices "ttyMUla"
to "ttyMUld.")
Verifying Successful Loading of the Linux Driver
1. To confirm the successful loading of the driver, execute the command "lsmod". The driver "mtsi_upci"
should be listed in the list of modules. If the driver is not listed, invoke the "lsmod" command again and
watch for errors.
2. Check that the tty devices (with names of the form "ttyMUxy") are listed under the /dev directory. If the tty
devices are not listed, invoke the ". /mknod_script" command again (it was previously run as part of the
"make install" script in step 7 of the "Building the Linux Driver" procedure) and watch for errors.
3. To confirm that the tty devices function for each modem on the ISI Card, execute the utility "minicom" and
dial out on each modem.
Un-Installing the Linux ISI Driver
1.
2.
3.
4.
5.
6.
7.
8.
Run the "make clean" script. You must run this command from the "mtsi_upci_driver" directory.
The "make clean" script will delete the "resetport" and "mtsi_upci.o" files.
Run the "make uninstall" script.
You must run this command from the "mtsi_upci_driver" directory. The "make clean" script will remove the
module "mtsi_upci".
Execute the "lsmod" command. The "mtsi_upci" module should no longer be listed. If this module is still
listed, then invoke the command "rmmod mtsi_upci" and check again to see whether or not the module
is listed.
Delete serial ports (these are files with names of the form "ttyMUxy").
To do so, go to the "dev" directory.
Enter the command "rm ttyMUZ".
Using the Linux Port Reset Utility
For the Modem Cards, the port-reset utility allows you to reset ports without rebooting. For the modem cards, the
port-reset utility allows you to reset both ports and modems without rebooting.
To reset a serial port, the DTR pin is set to the low logic level for one second. To reset the modem port, the
Reset pin is toggled (i.e., its logic state is inverted and then restored).
1. To reset the port (for serial card) or modem (for modem card) run the command
"resetport /dev/ttyMUxy" (where 'x' stands for card number and 'y' for the port number).
2. On the Modem Cards, the DTRLED will toggle indicating that the reset has occurred and this toggling might
be observable on the modem attached to the port (if the modem is equipped for this indication). There is no
similar indication of successful reset on the modem cards.
MultiModem ISI Server Cards User Guide
63
Chapter 3 – Software Installation
Configuring the Modems for your Country
Different countries have different requirements for how modems must function. Therefore, before you use the
modems in your ISI Card, you must configure them to match the defaults of the country in which you are using
them. Use the Global Wizard to configure each modem as described below. The Global Wizard configuration utility
works with computers running Windows 2000/2003/XP/Vista/2008/7.
1. Insert the ISI product CD into the CD-ROM drive. The main splash screen appears.
2. Click Initial Setup & Country Sel.
3. The Global Wizard page appears. You can select to run the Global Wizard from the CD or install it on your
hard drive. Click on the Install or Run button.
4. The Global Wizard dialog box appears. Click Next.
5. The Global Wizard searches for your modems and identifies them. Click Next. Select a modem to
configure. Click Next.
6. Select the country in which the modem will be used, and then click Next.
7. Review your choice of country. If it is correct, click Next to configure the modem.
8. When Global Wizard announces that the parameters have been set, click Finish to exit.
9. Repeat steps 4 through 8 for each modem on the ISI Card.
MultiModem ISI Server Cards User Guide
64
Chapter 4 – Reset Utility
Chapter 4 – Reset Utility
The Reset Utility allows you to reset a single modem or reset all the modems.
PREREQUISITE: The ISI drivers must be install before the Reset Utility can function.
1. Insert the ISI Product CD into the CD-ROM drive. The CD starts automatically. Any other utility accessing
the first com port needs to be closed before you can access the first com port in the Reset Utility.
2. When the main screen appears, click on Install Reset Utility icon. The ISI Port Modem Reset screen
appears with the Select first COM port on the ISI Card drop down window blank.
3. Click OK and the Select first COM port on the ISI Card displays the COM ports, e.g., COM3. If you want to
display all the COM ports, click on Display All Ports and all the ports are displayed in the drop down
window.
4. Click on the drop down arrow and choose the first COM port for your ISI Card.
5. Then select the modem to be reset by clicking on the corresponding Modem button. The following message
will be displayed if the modem is successfully reset.
6. The following error message is displayed if you select other than the first COM port.
Appendix A – Cable Wiring Diagrams
Appendix A – Cable Wiring Diagrams
The four modems on the ISI-4 are attached to phone receptacles by a single fan-out cable that has an RJ45
connector on one end (which connects to the card) and four RJ11 connectors on the other end (which connect to
phone receptacles). The eight modems ISI-8 are served by two such fan-out cables. The pin out for the fan-out
cable is shown below.
Pin out for ISI Fan-Out Cable
Appendix B – Regulatory Compliance
Appendix B – Regulatory Compliance
FCC Part 15
This equipment has been tested and found to comply with the limits for a Class B digital device, pursuant to 47
CFR – FCC Part 15 regulations. The stated limits in this regulation are designed to provide reasonable protection
against harmful interference in a residential environment. This equipment generates, uses, and can radiate radio
frequency energy, and if not installed and used in accordance with the instructions, may cause harmful interference
to radio communications. However, there is no guarantee that interference will not occur in a particular installation.
If this equipment does cause harmful interference to radio or television reception, which can be determined by
turning the equipment off and on, the user is encouraged to try to correct the interference by one or more of the
following measures:
● Reorient or relocate the receiving antenna.
● Increase the separation between the equipment and receiver.
● Plug the equipment into an outlet on a circuit different from that to which the receiver is connected.
● Consult the dealer or an experienced radio/TV technician for help.
This device complies with 47 CFR – FCC Part 15 rules. Operation of this device is subject to the following
conditions:
1. This device may not cause harmful interference, and
2. This device must accept any interference that may cause undesired operation.
Warning: Changes or modifications to this unit not expressly approved by the party responsible for compliance
could void the user’s authority to operate the equipment.
EMC, Safety, and R&TTE Directive Compliance
The CE mark is affixed to this product to confirm compliance with the following European Community Directives:
Council Directive 2004/108/EC of 15 December 2004 on the approximation of the laws of Member States relating to
electromagnetic compatibility;
and
Council Directive 2006/95/EC of 12 December 2006 on the harmonization of the laws of Member States
relating to electrical equipment designed for use within certain voltage limits;
And
Council Directive 1999/5/EC of 9 March 1999 on radio equipment and telecommunications terminal equipment
and the mutual recognition of their conformity.
MultiModem ISI Server Cards User Guide
67
Appendix C – Environmental Info
Appendix C – Environmental Information
Waste Electrical and Electronic Equipment (WEEE) Statement
July, 2005
The WEEE directive places an obligation on EU-based manufacturers, distributors, retailers and importers to takeback electronics products at the end of their useful life. A sister Directive, ROHS (Restriction of Hazardous
Substances) complements the WEEE Directive by banning the presence of specific hazardous substances in the
products at the design phase. The WEEE Directive covers all Multi-Tech products imported into the EU as of
August 13, 2005. EU-based manufacturers, distributors, retailers and importers are obliged to finance the costs of
recovery from municipal collection points, reuse, and recycling of specified percentages per the WEEE
requirements.
Instructions for Disposal of WEEE by Users in the European Union
The symbol shown below is on the product or on its packaging, which indicates that this product must not be
disposed of with other waste. Instead, it is the user’s responsibility to dispose of their waste equipment by handing
it over to a designated collection point for the recycling of waste electrical and electronic equipment. The separate
collection and recycling of your waste equipment at the time of disposal will help to conserve natural resources and
ensure that it is recycled in a manner that protects human health and the environment. For more information about
where you can drop off your waste equipment for recycling, please contact your local city office, your household
waste disposal service or where you purchased the product.
MultiModem ISI Server Cards User Guide
68
Appendix C – Environmental Info
REACH Statement
Registration of Substances:
After careful review of the legislation and specifically the definition of an “article” as defined in EC Regulation
1907/2006, Title II, Chapter 1, Article 7.1(a)(b), it is our current view Multi-Tech Systems, Inc. products would be
considered as “articles”. In light of the definition in § 7.1(b) which requires registration of an article only if it contains
a regulated substance that “is intended to be released under normal or reasonable foreseeable conditions of use,”
our analysis is that Multi-Tech Systems, Inc. products constitute nonregisterable articles for their intended and
anticipated use.
Substances of Very High Concern (SVHC)
Per the candidate list of Substances of Very high Concern (SVHC) published October 28, 2008 we have reviewed
these substances and certify the Multi-Tech Systems, Inc. products are compliant per the EU “REACH”
requirements of less than 0.1% (w/w) for each substance. If new SVHC candidates are published by the European
Chemicals Agency, and relevant substances have been confirmed, that exceeds greater than 0.1% (w/w), MultiTech Systems, Inc. will provide updated compliance status.
Multi-Tech Systems, Inc. also declares it has been duly diligent in ensuring that the products supplied are compliant
through a formalized process which includes collection and validation of materials declarations and selective
materials analysis where appropriate. This data is controlled as a part of a formal quality system and will be made
available upon request.
Restriction of the Use of Hazardous Substances (RoHS)
Multi-Tech Systems, Inc.
Certificate of Compliance
2002/95/EC
Multi-Tech Systems, Inc. confirms that this product now complies with the chemical concentration limitations set
forth in the directive 2002/95/EC of the European Parliament (Restriction Of the use of certain Hazardous
Substances in electrical and electronic equipment - RoHS)
These Multi-Tech Systems, Inc. products do not contain the following banned chemicals:
Lead, [Pb] < 1000 PPM
Mercury, [Hg] < 1000 PPM
Hexavalent Chromium, [Cr+6] < 1000 PPM
Cadmium, [Cd] < 100 PPM
Polybrominated Biphenyl, [PBB] < 1000 PPM
Polybrominated Diphenyl Ether, [PBDE] < 1000 PPM
Moisture Sensitivity Level (MSL) =1
Maximum Soldering temperature = 260C (wave only)
Notes:
1. Lead usage in some components is exempted by the following RoHS annex; therefore, higher lead
concentration could be found.
a. Lead in high melting temperature type solders (i.e., tin-lead solder alloys containing more than 85%
lead).
b. Lead in electronic ceramic parts (e.g., piezoelectronic devices).
2. Moisture Sensitivity Level (MSL) – Analysis is based on the components/material used on the board.
MultiModem ISI Server Cards User Guide
69
Appendix C – Environmental Info
MultiModem ISI Server Cards User Guide
70
Index
INDEX
C
P
Country configuration ................................................................64
PCI bus variations .........................................................................4
D
R
Driver installation .........................................................................8
Reset utility ................................................................................65
E
S
EMC, Safety and R&TTE ..............................................................67
Specifications ...............................................................................5
F
V
FCC Part 15 .................................................................................67
Vista and Installation of the Modem ..........................................27
H
W
Hardware installation ...................................................................6
WEEE statement .........................................................................69
Windows 7 installation ...............................................................11
Windows installer.........................................................................9
Windows Server 2003 installation..............................................46
Windows Server 2008 installation..............................................22
Windows Vista installation .........................................................34
Windows XP installation .............................................................46
L
Linux Drivers .................................................................................8
Linux installation ........................................................................62
MultiModem ISI Server Cards User Guide
71