1
MICRO MUSIC SYSTEM
QX-D5370
Operator's manual
(GB) 1~27
IMPORTANT SAFETY INSTRUCTIONS
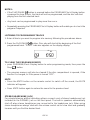
CAUTION
RISK OF ELECTRIC SHOCK
DO NOT OPEN
The lightning flash with arrowhead symbol within an equilateral triangle is intended to alert the user to the
presence of uninsulated dangerous voltage within the product* enclosure that may be of sufficient magnitude
to constitute a risk of electric shock to persons.
The exclamation point within an equilateral triangle is intended to alert the user to the presence of important
operating and maintenance (servicing) instructions in the literature accompanying the appliance.
1. READ INSTRUCTIONS - All the safety and operating instructions should be read before the product is operated.
2. RETAIN INSTRUCTIONS - The safety and operating instructions should be retained for future reference.
3. HEED WARNINGS - All warnings on the product and in the operating instructions should be adhered to.
4. FOLLOW INSTRUCTIONS - All operating and use instructions should be followed.
5. CLEANING - Unplug this product from the wall outlet before cleaning. Do not use liquid cleaners or aerosol cleaners.
Use a damp cloth for cleaning.
6. ATTACHMENTS - Do not use attachments not recommended by the product manufacturer as they may cause hazards.
7. WATER AND MOISTURE - Do not use this product near water - for example, near a bath tub, wash bowl, kitchen sink,
or lau ndry tub; in a wet basement; or near a swimming pool; and the like.
8. ACCESSORIES - Do not place this product on an unstable cart, stand, tripod, bracket, or table. The
product may fall, causing serious injury to a child or adult, and serious damage to the product. Use only
with a cart, stand, tripod, bracket, or table recommended by the manufacturer, or sold with the product.
Any mounting of the product should follow the manufacturer* instructions, and should use a mounting accessory
recommended by the manufacturer.
A Product and Cart Combination Should Be Moved with Care - Quick stops, excessive force and uneven surfaces may
cause the product and cart combination to overturn.
9. VENTILATION - Slots and openings in the cabinet are provided for ventilation and to ensure reliable operation of the
product and to protect it from overheating, and these openings must not be blocked or covered. The openings should never
be blocked by placing the product on a bed, sofa, rug or other similar surface. This product should not be placed in a builtin installation, such as a bookcase or rack, unless proper ventilation is provided or the manufacturer* instructions have been
adhered to.
10. POWER SOURCES - This product should be operated only from the type of power source indicated on the marking
label. If you are not sure of the type of power supply to your home, consult your product dealer or local power company.
For products intended to operate from battery power, or other sources, refer to the operating instructions.
11. GROUNDING OR POLARIZATION - This product may be equipped with a polarized alternating-current line plug (a
plug having one blade wider than the other). This plug will fit into the power outlet only one way. This is a safety feature: If
you are unable to insert the plug fully into the outlet, try reversing the plug. If the plug should still fail to fit, contact your
electrician to replace your obsolete outlet. Do not defeat the safety purpose of the polarized plug.
12. POWER-CORD PROTECTION - Power-supply cords should be routed so that they are not likely to be walked on or
pinched by items placed upon or against them, paying particular attention to cords at plugs, convenience receptacles, and
the point where exit from the product.
13. NONUSE PERIODS - The power cord of the product should be unplugged from the outlet when left unused for long
periods of time.
14. LIGHTENING - For added protection for this product during a lightening storm, or when it is left unattended and unused
for long periods of time, unplug it from the wall outlet and disconnect the antenna or cable system. This will present damage
to the product due to lightening and power-line surges.
15. POWER LINES - An outside antenna system should not be located in the vicinity of overhead power lines or other
electric light or power circuits, or where it can fall into such power lines or other electric light or power circuits, or where it
can fall into such power lines or circuits. When installing an outside antenna system, extreme care should be taken to keep
from touching such power lines or circuits as contact with them might be fatal.
16. OVERLOADING - Do not overload wall outlets, extension cords, or integral convenience receptacles as this can result
in a risk of fire or electric shock.
17. OBJECT AND LIQUID ENTRY - Never push objects of any kind into this product through openings as they may touch
dangerous voltage points or short-out parts that could result in a fire or electric shock. Never spill liquid of any kind on the
product.
18. SERVICING - Do not attempt to service this product yourself as opening or removing covers may expose you to dangerous
voltage or other hazards. Refer all servicing to qualified service personnel.
GB 1
19. DAMAGES REQUIRING SERVICE - Unplug this product from the wall outlet and refer servicing to qualified service
personnel under the following conditions.
a) When the power-supply cord or plug is damaged.
b) If liquid has been spilled, or objects have fallen into the product.
c) If the product has been exposed to rain or water.
d) If the product does not operate normally by following the operating instructions. Adjust only those controls that are
covered by the operating instructions as an improving adjustment of other controls may result in damage and will
often require extensive work by a qualified technician to restore the product to its normal operation.
e) When the product exhibits a distinct change in performance - this indicates a need for service.
20. REPLACEMENT PARTS - When replacement parts are required, be sure the service technician has used replacement
parts specified by the manufacturer or have the same characteristics as the original part, Unauthorized substitutions may
result in fire, electric shock or other hazards.
21. SAFETY CHECK - Upon completion of any service or repair to this product, ask the service technician to perform
safety checks to determine that the product is in proper operating condition.
22. HEAT - The product should be situated away from heat sources such as radiators, heat registers, stoves or other
products (including amplifiers) that produce heat.
CAUTION!
HAZARDOUS LASER RADIATION WHEN
OPEN AND INTERLOCK FAILED OR
DEFEATED. AVOID EXPOSURE TO BEAM.
CLASS 1 LASER PRODUCT
PRECAUTIONS FOR UNIT
SECURITY
• Before operation, check if the voltage of the unit is in line with the local voltage.
• Hold the plug to disconnect it from the mains outlet. Do not pull the power cord.
• When the plug of the unit is connected to the mains outlet, the unit will be still connected to AC even of the power is
turned off.
• Disconnect the plug as soon as liquid or objects enter the unit. The unit cannot be used until being checked by experts.
• Do not open the cabinet. Laser rays employed by the unit may damage eyes. Any servicing should be done by qualified
service personnel.
PLACEMENT
• Put the unit where ventilation is good enough to prevent overheating.
• Never put the unit in direct sunlight or near heat sources.
• Put the unit horizontally, never put any heavy object on the unit.
• To protect the pickup, do not put the unit where there is much dust. If there is dust on the pickup, use a cleaning disc
to clean it.
• Refer to the operation instructions of the cleaning disc you bought.
CONDENSATION
Moisture will appear on the pickup lens in the following cases:
• The unit is suddenly moved from a cold place to a warm place.
• The unit is put in a room with a heater, or in cold air from an air - conditioner.
• Use the unit in a humid place. In these cases, the unit cannot work. Unload the disc and leave the unit on for about
one hour evaporates the water.
CLEANING
• Use soft cloth with a little neutral detergent to wipe the cabinet, panel and controls. Never use abrasive paper, polishing
powder or solvent like alcohol and gasoline.
PRECAUTIONS FOR DISCS
HANDLING DISC
• To keep the disc clean, do not touch the play sides of the disc.
• Do not attach paper or ape to the disc.
• Keep the disc away from direct sunlight or heat sources.
• Store the disc in a disc case after playback.
CLEANING DISC
• Before playback, wipe the disc outwards from the center with clean cloth.
• Do not use any type of solvent such as thinner, benzine, commercially available cleaners or anti-static spray.
GB 2
IMPORTANT SAFETY INSTRUCTIONS..............................................................................1
PRECAUTIONS FOR UNIT..................................................................................................2
PRECAUTIONS FOR DISCS...............................................................................................2
TABLE OF CONTENTS.......................................................................................................3
IMPORTANT NOTES...........................................................................................................4
PREPARATION FOR USE....................................................................................................5
LOCATION OF CONTROLS.................................................................................................6
OPERATING INSTRUCTIONS.............................................................................................8
CARE AND MAINTENANCE..........................................................................................................23
TROUBLESHOOTING GUIDE.............................................................................................25
TECHNICAL SPECIFICATION.............................................................................................26
BEFORE WE BEGIN
Thank you .......................
for purchasing this audio product. This is your assurance of quality, performance and
value.
Our engineers have included many useful and convenient features in this product. Please
be sure to read this Owner's Manual completely to make sure you are getting the maximum
benefit from each feature.
This product was manufactured using the highest quality components and standards of
workmanship. It was tested by inspectors and found to be in perfect working order before
it left our factory. However, there is always the chance that some problem may occur
because of rough handling during shipment to the retail store or to the final consumer.
If, after reading this Manual, you experience any problems with the operation of this
product, please refer to the instructions for obtaining services at the end of this Manual.
Once again, thanks for purchasing this audio product.
For future reference, record the serial number in the space provided.
Model No: QX-D5370
Serial Number:
CLASS 1 LASER PRODUCT
CLASS 1 LASER PRODUCT
APPAREIL Á LASER DE CLASSE 1
PRODUCTO LAESR DE CLASE 1
CAUTION
INVISIBLE LASER RADIATION
WHEN OPEN AND INTERLOCKS
DEFEATED.
AVOID EXPOSURE TO BEAM.
This product contains a low power Laser Device.
GB 3
IMPORTANT NOTES
• Avoid installing this unit in places
exposed to direct sunlight or close to
heat radiating appliances such as electric
heaters, on top of other stereo equipment
that radiates heat, places lacking
ventilation or dusty areas, places subject
to constant vibration and/or humid or
moist areas.
• Do not attempt to clean this unit with
chemical solvents as this might damage
the finish. Use a clean dry cloth.
• Operate controls and switches as
described in the manual.
• Before turning on the power, make certain
that the connecting cords and power
cord are properly installed.
• Store your CDs in a cool area to avoid
damage from heat.
• When moving the set, be sure to first
disconnected the power cord and remove
cords connected to other equipment.
WARNING: TO PREVENT FIRE OR SHOCK HAZARD,
DO NOT EXPOSE THIS UNIT TO RAIN OR MOISTURE.
GB 4
PREPARATION FOR USE
UNPACKING AND SET-UP
• Carefully remove the unit from the carton and remove all packing material from the unit.
• Remove any labels or stickers which may be on the front or top of the set, but do not
remove any labels from the back or bottom.
• We suggested that you retain the original carton and packing materials in case it ever
becomes necessary to return your unit for service. This is the only sure way to protect
the unit from damage in transit.
• If you do dispose of the carton and packing materials, please do so properly. We cares
about our environment.
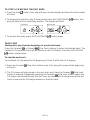
POWER SOURCE
This system is designed to operate on 230V 50Hz AC house current. Connecting this
system to any other power supply could result in damage to the unit which is not covered
by your warranty.
AC Outlet
AC Plug
AC OPERATION
1. Unwind the AC Power cord completely.
2. Insert the plug into any convenient 230V 50Hz AC outlet.
GB 5
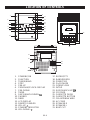
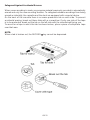
LOCATION OF CONTROLS
11
1
12
13
2
15
4
3
5
14
16
17
18
19
20
21
22
23
24
CD
6
7
8
9
25
10
26
31
27
29
30
28
1.
2.
3.
4.
5.
6.
7.
8.
9.
10.
11.
12.
13.
14.
15.
16.
STANDBY/ON
FUNCTION
TUNER/BAND
STOP
PRE-UP
PROGRAM/CLOCK-DISPLAY
PRE-DOWN
TIMER
SKIP/SEARCH DOWN
PHONES
DBBS
LCD DISPLAY
REMOTE SENSOR
VOL-UP
STANDBY INDICATOR
VOL-DOWN
GB 6
17.
18.
19.
20.
21.
22.
23.
24.
25.
26.
27.
28.
29.
30.
31.
REPEAT/PTY
RANDOM/RDS
PRESET EQ
PLAY/PAUSE
OPEN/CLOSE
INTRO
SKIP/SEARCH UP
CD DOOR
CASSETTE DOOR
CASSETTE BUTTON
FM ANTENNA WIRE
AC CORD
SPEAKER R
SPEAKER L
BEAT CUT
REMOTE CONTROL
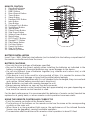
1. Standby/On Button
2. Preset EQ Button
3. DBBS Button
4. Direct Search Button
5. Timer Button
6. Sleep Button
7. Random/RDS Button
8. Intro Button
9. Stop Button
10. Program/Clock Button
11. Tuner/Band Button
12. Tape Button
13. Preset Down Button
14. Skip Down Button
15. Volume Down Button
16. Mute Button
17. ESP/Find/ST Button
18. Repeat/PTY Button
19. Play/Pause Button
20. Function Button
21. Preset Up Button
22. Skip Up Button
23. Volume Up Button
1
2
16
3
4
17
5
7
9
11
13
6
8
18
19
10
12
20
21
22
14
15
23
BATTERY INSTALLATION
Insert 2 pcs 'AAA' (Alkaline) size batteries (not included) into the battery compartment of
the remote controller and close the cover.
BATTERY CAUTIONS
• Use only the size and type of batteries specified.
• Be sure to follow the correct polarity when installing the batteries as indicated in the
battery compartment. Reversed batteries may cause damage to the device.
• Do not mix different type of batteries together (e.g. alkaline and carbon-zinc) or old
batteries with fresh ones.
• If the device in not to be used for a long period of time, it is required to remove the
batteries to prevent damage or injury from possible battery leakage.
• Do not try to recharge batteries which is not intended to be recharged; they can overheat
and rupture. (follow battery manufacturer's directions)
• Weak batteries can leak and severely damage the unit.
• Always remove batteries as soon as they become weak.
• The batterie of remote control handset may last approximately one year depending on
how much the remote control handset is used.
For the best performance it is recommended the batteries of remote control handset be
replaced on a yearly basis, or when remote control operation becomes erratic.
USING THE REMOTE CONTROLLER CORRECTLY
• Point the remote controller at the Remote Sensor.
• The functions of the buttons on the remote control are the same as the corresponding
controls on the main unit.
• When there is a strong ambient light source, the performance of the infrared Remote
Sensor may be degraded, causing unreliable operation.
• The maximum effective distance for remote control operation is about 15 feet.
GB 7
OPERATING INSTRUCTIONS
SPEAKER CONNECTION
Connect each speaker to the corresponding speaker terminals on the back panel of the
main unit. Make sure that the left speaker plug is connected to the left (L) speaker jack
and the right speaker plug is connected to the right (R) speaker jack.
PRESET EQUALIZER
• This unit is equipped with a preset equalizer which has been added to enhance your
listening pleasure by altering the frequency response of the music.
• Press the Preset EQ button on main unit repeatedly to cycle through the following
equalization modes.
CLASSIC
ROCK
POP
JASS
PASS
Batterijien niet weggooien, maar inleveren als KCA.
GB 8
DBBS
Press DBBS button to obtain the DBBS effect. Press this button again the "DBBS" resume
to the normal sound effect.
Random
In CD mode, press "Random" button, the display will show "Random" and CD disc will
play in random sequence immediately. Press "Random" again, the "Random" mark will
disappear from display and CD disc will play in normal sequence. Press "Stop" button
to stop the CD.
SLEEP FUNCTION
You can set the unit to switch off after certain period of time as follows:
1. Press STANDBY/ON to turn on the unit.
2. Press the SLEEP button. The display will show SLEEP and 90.
3. Keep pressing the SLEEP button to change the minute shown in display. You can set
the unit to switch off after 10-90 minutes.
4. Release the SLEEP button to take effect.
5. At any time, you can press SLEEP button the second time to cancel the sleep function.
LISTENING TO RADIO OPERATION
1. Press the STANDBY/ON button to turn the unit 'ON'.The STANDBY/ON indicator
lights'OFF'.
2. Select the Tuner function by pressing the TUNER/BAND button.
3. Select the desired band (AM or FM) with the TUNER/BAND button.
4. Tune to the desired radio station by pressing the UP TUNING or DOWN TUNING buttons
on the unit or on the remote control.
5. If you hold the UP TUNING or DOWN TUNING button for more than half a second the
Tuner will begin to automatically scan until a strong signal is found.
6. To turn off the radio, press the STANDBY/ON button to switch the unit into standby
mode. The STANDBY/ON indicator lights 'RED'.
STORING PRESET STATIONS
1. Tuner either automatically or manually (as described in
steps 4 or 5 above) to the station to be stored.
2. Press the PROGRAM(Memory) Clock-Display button once.
Channal number will flash in the display and "PROG"
will display 5 seconds. During this time you must select
the desired memory location by pressing the REPEAT/
M-UP button.
3. Press the PROGRAM(Memory) Button again to store the
station at that location.
4. The unit can store up to 10 FM stations, 10 AM stations.
GB 9
FM
FM
TUNING TO A PRESET STATION
Select the desired station preset number by pressing the PER-UP/PER-DOWN button.
ANTENNA
For FM reception there is a built-in antenna wire at the rear of the unit. Unravel the wire
and move it around to obtain the best reception
RDS (RADIO DATA SYSTEM)
RDS is a system transmitting additional information via FM stations. Broadcasting stations
with RDS transmit their program name or program type for instance . This is indicated in
the multifunction display.
Reviewing for Stations with RDS:
While station with RDS received, press RDS mode button to review their program type,
radio name, program type , travel program, traffic announcement, radio test clock time
if avaliable from the received stations.
1. Press "RDS MODE" repeatedly
PS
PTY
RT
Frequency
RANDAM
RDS
2. RT (Radio Text mode)
Display Radio text information
If the station does not provide Radio
Text or reception is poor,(NORT)
appears in the display
REPEAT/PTY
Searching for stations according to type of program
PTY (Program Type)
1. Press RDS SEARCH button. PTY appear.
2. Press RDS search button repeatedly, choose among 31 types of progams the type
that the tuner should search for.
3. In order to start the search mode, press SKIP up or down button.
If a sender is fround with the desired program type, the search mode stops and the
program name appears in the display unit.
GB 10
CLOCK SETTING
1) Press the STANDBY/ON button to turn the unit off standby.
2) Press and hold the PROGRAM button, the 24Hr will appear on the display. Press the
skip/search or button. Once for select your suitable Hours for the clock.
3) Press the PROGRAM button ONCE. The Minutes segments
display "0". The Hour segments flash continuously.
4) Press the Skip/Search or button to select the desired
hour.
5) Press the PROGRAM button again and the minute segments
flash.
6) Press the Skip/Search or button to select the desired
minute.
7) Press the PROGRAM button once more. The flashing stops
and the time is set.
TO SET THE TIMER
1) Press and hold TIMER button. The LCD display will change
to TIMER mode and then the Hour segments flash.
2) Press the skip/search or button to select the wakeup hour.
3) Press the TIMER button again. The hour segment stops
flashing. The minute segment flashes.
4) Press the Skip/Search or button to select to wakeup minute.
5) Press TIMER button again. The minute segment stop
Flashing. The hour segment flashes.
6) Press the Skip/Search or to select wake-down Hour.
7) Press TIMER button again. The Hour segment Stop Flashing,
the minute segment Flashers.
8) Press the Skip/Search or to select wake-down minute.
9) Press TIMER button again to select wake-up mode
(Tuner/CD/Tape/Volume Lever)
10) Press TIMER button again to complete the timer setting.
ON
ON
OFF
OFF
TUNER
VOL
GB 11
15
NOTE:
• Clock time is only retained while the unit is plugged into the AC outlet. In the event of
a power failure the clock will need to be reset the power supply resumes.
PLAYING COMPACT DISCS/MP3 DISCS
LOADING AND UNLOADING COMPACT DISCS/MP3 DISCS
1. Press the STANDBY/ON button to turn the unit 'ON'.The STANDBY/ON indicator
lights'OFF' and the LCD Backlights'ON'.
2. Select the CD function by pressing the FUNCTION or CD button.
3. Press the CD OPEN/CLOSE button to open the CD compartment.
4. When the disc compartment has opened, insert the disc with the label side facing up.
5. Close the disc compartment by pressing the CD OPEN/CLOSE button. When the
compartment is fully closed, the disc wills start turning automatically. The total number
of tracks and playing time will appear in the display.
6. The disc compartment may be opened at any time by first pressing the stop
button
and then pressing the CD OPEN/CLOSE button. Remove the CD only after the
compartment has fully opened and the disc has stopped spinning.
CAUTION
• Do not put anything except a compact disc into the compartment.
• Foreign objects can damage the mechanism.
• Keep the disc compartment closed when not in used to prevent dirt and dust from
entering the mechanism.
• Never place more than one disc into the disc compartment at any time.
• If the disc is correctly loaded, the total number of tracks on the disc will be displayed.
NOTES:
After the disc compartment is fully closed, the disc information may not appear on the
display. This means that the disc is improperly loaded (most likely it is upside down). To
check, open the disc compartment again and reload the disc.
The CD door may be can not closed, when turned power off during the CD door opened.
The CD door can be closed by turn the power on again.
CDRW PLAYBACK
This unit can play CD-RW disc
MP3 PLAYBACK
This unit can play MP3 disc.
NOTE:
"CD-R/CD-RW play capability of this unit may vary depend on quality of media, CD burner
and application software".
Playback of MP3 CD-R and CD-RW may depand on recording conditions.
GB 12
DISC PLAY
1. Insert a CD as described in the previous section and close the disc compartment.
2. The display will then show the total number of tracks and total play time.
3. Press the PLAY/PAUSE
track of the disc.
button. Disc play will begin from the start of the first
4. As each track on the CD disc is played, show in the display.
CD MODE
MP3 MODE
CD
5. A particular track can be selected using either of the CD Skip
buttons. If
/
button, disc play will start with
this is done before pressing the PLAY/PAUSE
the selected track when the PLAY/PAUSE
button is pressed.
6. At the end of the disc, the unit will switch to stop mode.
NOTES:
• If the disc is deeply scratched, or too dirty, disc play may not start.
• If the disc is inserted incorrectly, or the disc is damaged the "no disc" indicator will
appear on display.
NO DISC
DISC ERRORS
• This compact disc player has built-in error compensation circuits to correct for minor
defects in a disc. There are limits, however, to the amount of correction available.
• In some cases, the CD player may skip some tracks, or parts of tracks, on a disc during
disc play. This problem may be caused by defects (such as scratches) in the disc being
played, which are too large for the error compensation circuits to handle. If you encounter
this problem, check the CD player's operation as follows, before having the until serviced:
Play a new disc. If the CD player operates normally, the skipping problem is probably
due to a defective disc.
GB 13
TO STOP A CD BEFORE THE DISC ENDS
1. Press the Stop
button. Disc play will stop, and the display will show the total number
of tracks.
2. To temporarily stop disc play (Pause mode), press the PLAY/PAUSE
play will stop at the current play position. The display will flash.
CD MODE
button. Disc
MP3 MODE
CD
3. To resume disc play, press the PLAY/PAUSE
button again.
TRACK SKIP
Starting disc play from the beginning of a particular track.
Press the Forward
or Reverse
Skip Track buttons to select the desired track. The
number of the selected track will be shown on the CD display. Press the PLAY/PAUSE
button to start play.
To skip the next track.
For example, to skip ahead to the beginning of track 5 while trace 4 is playing.
1. Press the Forward
of track 5.
Skip track button once. Disc play will resume at the beginning
2. The CD player will skip ahead to the next track each time the Forward
Skip track
Skip track button makes the
button is pressed. Repeatedly pressing the Forward
CD player skip ahead through the disc track by track. Once the beginning of the last
track is reached the CD player advance to the first track.
GB 14
To skip to the previous track on a disc.
For example to skip back to the beginning of track 3 while track 4 is playing.
1. Press the Reverse
Skip track button twice. Disc play will resume at the beginning
of track 3.
Skip track button is
2. The CD player will skip back one track each time the Reverse
pressed. If this button is pressed in the middle of a track, the CD player will skip back
to the beginning of that track. To make if skip back to the previous track press the
Reverse
Skip track button twice.
3. Repeatedly pressing the Reverse
Skip track button makes the CD okayer skip back
through the disc track by track. Once the beginning of the first track is reached, the
CD player will go to the last track.
NOTES:
The Forward
and Reverse
Skip track buttons can be used to select a desired track
to play before disc play starts. In this case the number of the selected track will be
displayed until the Play/Pause
button is pressed.
TRACK SEARCH
or Reverse
You can search through the track by holding the Forward
button down. Normal play will resume when the button is released.
track skip
Repeat disc play of one of the tracks
1. Select the desired track by pressing the Forward
The track will be shown in the display.
2. Press the REPEAT/PTY button once. The "
will show in the display.
or Reverse
Skip track buttons.
CD MODE
" indicator
MP3 MODE
3. Press the PLAY/PAUSE
button.
4. The selected track will then begin playing through to its
end. At which point it will automatically return to the beginning of that track. This will
continue until the Stop
button is pressed.
5. If the REPEAT/PTY button is pressed twice more(thrice more for MP3 mode), the "
"
indicator will disappear and, repeat play will end. Normal disc play will resume from
that point.
6. When the last track has finished playing, the CD player will then Stop.
GB 15
REPEAT DISC PLAY
Use the REPEAT button to play an entire disc or one track continuously.
CD MODE
Repeat play of all tracks
1. Press the REPEAT/PTY button twice. The "ALL
appears in the display.
" indicator
MP3 MODE
2. Press the Play/Pause
button.
3. The disc will then begin playing through to the end of the
last track. At which point it will automatically return to the beginning of the first track.
This will continue until the Stop
button is pressed.
4. If the REPEAT/PTY button is pressed once more (twice more for MP3 mode), the
"ALL
" indicator will disappear and repeat play will end. Normal disc play will resume
from that point.
5. When the last track has finished playing, the CD play will Stop.
REPEAT ALBUM PLAY (ONLY MP3 MODE)
1. Select the desired album by pressing the PRE-UP or PRE-DOWN button. The album
will be shown in the display.
2. Press the REPEAT/PTY button thrice the "
ALBUM"
indicator appears in the display.
3. Press the PLAY/PAUSE button.
4. The disc will then begin playing through to the end of the album. At which point it will
automatically return to the beginning of the album. This will continue until the stop
button is pressed.
5. If the REPEAT/PTY button is pressed once more, the "
ALBUM" indicator will disappar
and repeat play will end. Normal disc will resume from that point.
6. When the last track has finished playing, the CD player will stop.
PROGRAMMED DISC PLAY (FOR CD ONLY)
• It is possible to program the tracks you wish to play in a sequence of your choice. It
is not possible to enter program a disc during playback. Press the Stop button first,
then follow the instructions below.
• It is easier to use the remote control for the following settings, however, you may also
use the controls on the main unit if desired.
GB 16
ENTERING A PROGRAM
1. Press the PROGRAM/Clock-Dispaly button. "PROG" appears
and the following information will be display on the display:
2. Select the first desired track using the Forward
Skip Buttons.
and Reverse
3. Press the PROGRAM/Clock-Dispaly button. The first program
selection is now stored in the program memory. The display
will now show:
4. Select the next desired track using the Forward
Reverse
Skip Buttons.
and
5. Press the PROGRAM/Clock-Dispaly button. Continue entering tracks in this way until
all the desired tracks are stored (up to 64 tracks).
PROGRAMMED DISC PLAY (FOR MP3 ONLY)
• It is possible to program the tracks you wish to play in a sequence of your choice. It
is not possible to enter program a disc during playback. Press the Stop button first,
then follow the instructions below.
• It is easier to use the remote control for the following settings, however, you may also
use the controls on the main unit if desired.
ENTERING A PROGRAM
1. Press the PROGRAM/Clock-Dispaly button. "PROG" appears and the following
information will be display on the display. The "album No" will flashing.
2. Select the first desired album using the Forward
Reverse Skip Buttons.
and
3. Press the PROGRAM/Clock-Dispaly button change to select
the first desired track using the Forward
and Reverse
Skip Buttons.
4. Press the PROGRAM/Clock-Dispaly button. The first program selection is now stored
in the program memory. The display will now show.
5. Repeat Step 2-3.
5. Press the PROGRAM/Clock-Dispaly button. Continue entering tracks in this way until
all the desired tracks are stored (up to 64 tracks).
GB 17
NOTES:
• If the PLAY/PAUSE
button is pressed before the PROGRAM/Clock-Display button
is pressed to store a track, the track will not be programmed, and the disc will start
playing from the first selected track.
• Any track can be programmed to play more than once.
• Repeatedly pressing the PROGRAM/Clock-Display button will enable you to check the
program if required.
LISTENING TO PROGRAMMED TRACKS
1. Enter all tracks you want to program into memory following the procedures above.
button. Disc play will start at the beginning of the first
2. Press the PLAY/PAUSE
programmed track. "PROG" indicator appears on the display display.
CD
TO CLEAR THE PROGRAM MEMORY
• press PROGRAM/Clock-Display button to enter programming mode, then press the
Stop
button.
• The program memory will also be cleared if the disc compartment is opened, if the
function is changed, or if the power is turned "OFF".
MUTE
• Press the MUTE button on the remote control to switch off the sound, the MUTE
indicator will appear.
• Press MUTE button again to restore the sound to the previous level.
STEREO HEADPHONE JACK
For private listening without disturbing others connect a set of stereo headphones (not
included) to the PHONES Jack on the front panel. The built-in speakers automatically
shut off when stereo headphones are connected to the headphone jack. When using
stereo headphones always start with the volume control set to a low level and gradually
increase until you find the desired level.
GB 18
NOTES ON MP3 DISCS
An MP3 file stores audio data compressed using MPEG 1/2, the audio layer-3 file-coding
scheme. In this manual, we refer to what, in PC terminology, are called "folders" and "Files"
as "albums" and "tracks" respectively.
Notes on playing MP3 discs
• An MP3 track must be recorded on a disc in the format compliant with ISO 9660. Note
however, that system may not play tracks in the order they were recorded.
• The maximum allowable number of tracks and/or albums in a disc is 255, including the root
albums (directory).
• The maximum allowable depth of a nested folder is 8, including tracks. Note that since the
maximum path length is 128 characters long, the total number of characters including
slashes, hyphens and underscores from the root album name to the track name must be
less than 128.
• If a disc contains audio tracks and MP3 tracks, the system can only play audio tracks.
• The system can play multi-session discs correctly.
• The system can play only MP3 tracks which were converted with a sampling frequency of
44,1 kHz and a fixed or variable bit rate.
• The system may not play MP3 tracks recorded using a packet writing utility.
• The system can play only MP3 tracks having the file extension ".mp3".
• It may take 30 seconds or more before the system can start playback of MP3 tracks,
depending on the number of recorded tracks and the complexity of the album tree.
• If you play a non-MP3 track that has the ".mpa" file extension, you may hear some noise.
Notes on displey indications during playback
• Up to 30 characters are displayed for the name of an album and up to 30 characters for
the name of track.
• Characters other than letters ("A" to "Z" and "a" to "z"), numerals ('0" to "9"), hyphen (-)
and underscore (_) may not be displayed, or may be displayed as different characters.
• The system support ID3TAG.
• The elapsed play time may not be dispteyed correctly for MP3 tracks.
Glossary
File extension:
A 3-character string added to a file name under the Window or DOS environment is called a
"file extension". The file extension is used mainly to identify types of files. The file extension
for MP3 files is ".mp3".
ISO 9660:
ISO stands of the "International Organization for Standardization". ISO 9660 determines the
file structure for the CD-ROMs. This system can play MP3 files recorded in the formal compliant
with ISO 9660.
Nesting of folders (albums):
To organize data files stored in a PC, you can store related files in a folder. A folder can contain
other folders as well as files. For example, folder A can contain folder B, and folder B can
contain folder C; this is called "nesting of folders".
Session:
A session is one uninterrupted section of written data on a disc.
A multi-session disc is a disc which has two or more sessions.
FIND MP3
In MP3 mode, press the FIND button (remote Conbtrol) change to title search mode, press
the FIND button twice change to album search mode. Use the Skip Up & Down button to search
the song. Press the FIND 2 sec, the LCD Display will show the IDT3 information. Press the
FIND button again return to normal mode.
GB 19
CASSETTE TAPE OPERATIONS
Playing A Cassette Tape
1. Select the Tape function by pressing the FUNCTION button.
2. Press the Cassette Stop/Eject
button to open the Cassette Compartment door.
3. Insert a pre-recorded cassette tape into the slots on the inside of the cassette door
with the full reel on the right side and the open edge facing up. Close the Cassette
Compartment Door.
button to begin playback.
4. Press the Cassette Play
5. Adjust the Volume and DBBS controls as desired.
6. To advance or rewind the tape rapidly, press the Fast Forward
or Rewind
buttons. To resume normal playback press the Cassette Play button again.
7. To pause temporarily during playback, press the Cassette Pause button.Press Pause
again to cancel the pause mode and resume playback.
8. To stop the tape before the end, press the Cassette Stop button
. Press this button
again to open the Cassette Door and remove the tape.
When the tape ends the Auto-Stop feature releases the Play button and shuts the power
‘Off’.
NOTE: Auto-Stop only operates in the Play or Record modes. Auto-Stop does not work
during Fast Forward or Rewind operation.
To play the other side of the tape, turn the cassette over so that the full reel is again on
the right side, insert it into the Cassette Compartment, close the door and press the Play
button.
Making A Tape Recording
You can record directly from the radio or the CD player to the built in stereo cassette
recorder. No separate microphones or external connections are required. In addition, the
cassette recorder has an Automatic Recording Volume Level Control circuit that automatically
controls the recording volume level to prevent distortion. You may adjust the volume control
during recording, or shut the volume ‘Off’ completely without affecting the recording.
1. Select the source you wish to record, Radio or CD Player, and follow the
operating instructions for that source.
2. Press the Cassette Stop/Eject
button to open the Cassette Compartment door.
3. Insert a good quality blank cassette tape into the slots on the inside of the
cassette door with the full reel on the right side and the open end facing up.
Close the cassette door.
GB 20
4. Press the Cassette Record button. The Cassette Play button will also engage and
recording will begin.
If you wish to stop the tape temporarily to avoid recording certain material such as a
radio commercial, press the Cassette Pause button. Press again to cancel the pause
mode and resume recording.
button to stop the tape and
5. When you are finished recording press the Stop/Eject
open the Cassette Compartment Door.
CD Cassette Synchro Recording
When recording from CD to cassette, the CD cassette synchro recording feature in this
unit allows you to start both the CD player and the cassette recorder with the push of a
single button.
1. Open the CD door and place the CD to be recorded in the CD player as usual. Close
the CD door.
2. Open the cassette compartment and insert a blank cassette tape into the slots in the
cassette door with the full reel on the right side and the open edge facing up. Close
the cassette compartment door.
3. Set the function selector to the CD position.
4. Press the cassette
“Record” button. The cassette recorder and the CD player will
start simultaneously and all of the material on your CD will be recorded directly
onto the blank cassette.
NOTE : If a CD is already playing and you press the cassette “Record” button, the CD
player will back up to the beginning of the track being played and the cassette
will begin recording at that point automatically.
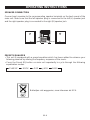
Cassette Tape Recommendations
Standard tape lengths have 15(C-30) and 30(C-60) minutes of
recording time on each side. Longer length tapes of 45 (C-90) and
60 (C-120) minutes of recording time on each side are available,
Fig.1
but because longer tapes in the same size package necessitate
the use of thinner materials, the chance for malfunction is much
greater. Longer length tapes are not recommended. Use only high
quality tapes. If a problem develops, check the unit first with another
Fig.2
cassette to determine if the problem is with the cassette, and not
the unit.If there is any slack in the tape in the cassette, it should
be removed before inserting the cassette. Place a pencil in one of the hubs and rotate
toward the outside of the cassette until all slack is taken up.
GB 21
Safeguard Against Accidental Erasure
When a new recording is made, any program material previously recorded is automatically
erased and only the new recording remains. To safeguard valuable recordings from being
erased accidentally, the cassette and the deck are equipped with a special device.
On the back of the cassette there is an erase prevention tab on each side. To prevent
accidental erasing, break out these tabs with a screwdriver. If only one side of the tape
is to be protected, break out the tab on the left side with the side desired facing you.
To record on a tape in which the tab has been broken, place a piece of cellophane tape
over that area.
NOTE:
When a tab is broken out, the RECORD
key cannot be depressed.
GB 22
CARE AND MAINTENANCE
COMPACT DISC CARE
• To remove a disc from its storage case, press down on the centre of the case and lift
the disc outs, holding if carefully by the edges.
• Fingerprints and dust should be carefully wiped off the disc's recorded surface with a
soft cloth. Unlike conventional records, compact discs have no grooves to collect dust
and microscopic debris, so gently wiping with a soft cloth should remove most particles.
Wipe in a straight line from the inside to the outside of the disc. Small dust particles
and light stains will have absolutely no effect on reproduction quality.
• Clean the disc periodically with a soft, lint-free, dry cloth. Never use detergents or
abrasive cleaners to clean the disc. If necessary, use a CD cleaning it.
• Never write on or affix labels to the surface of compact discs.
CARE OF THE CABINETS
• If the cabinets become dusty wipe them with a soft dust cloth. Do not use any wax or
polish sprays on the cabinets.
• If the front panel becomes dirty or smudged with fingerprints it may be cleaned with
a soft cloth slightly dampened with a mild soap and water solution. Never use abrasive
cloths or polished as these will mar the finish of your unit.
CAUTION:
Never allow any water or other liquids to get inside the unit while cleaning.
GB 23
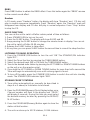
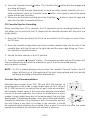
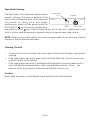
Tape Head Cleaning
Cotton Swab
The tape heads, pinch roller and capstan require
Capstan
periodic cleaning. This removes particles of the
metal oxide coating that wear off the tape and
accumulate on these parts and impair
performance. Switch off the power, press the
Head
Pinch Roller
STOP/EJECT
key to open the cassette door,
key. Clean the tape heads, pinch roller and capstan with a soft
and press the PLAY
cloth or cotton swab dampened in isopropyl alcohol or special tape head cleaner.
NOTE: Never use any metal objects on or near the tape heads. Do not allow any cleaning
material to fall into the tape assembly.
Cleaning The Unit
•
•
•
To prevent fire or shock hazard, disconnect your unit from the AC power source when
cleaning.
If the cabinet becomes dusty wipe it with a soft dry dust cloth. Do not use any wax
or polish sprays on the cabinet.
If the cabinet becomes dirty or smudged with fingerprints it may be cleaned with a
soft cloth slightly dampened with a mild soap and water solution. Never use
abrasive cloths or polishes as these will mar the finish of your unit.
Caution:
Never allow any water or other liquids to get inside the unit while cleaning.
GB 24
TROUBLESHOOTING GUIDE
Should this unit exhibit a problem, check the following before seeking service.
Symptom
Radio
Noise or sound distorted
on AM or FM
broadcasts.
Possible Cause
Solution
Station not tuned properly for
AM or FM.
FM: Antenna is not
extended.
AM: The bar antenna is not
positioned correctly.
Retune the AM or FM
broadcast station.
Extend FM antenna.
FM STEREO indicator
does not light.
FM station is mono or station
signal is weak.
Extend FM antenna. Try other
strong stations.
AM or FM, no sound.
Function is not set to Tuner.
Volume at minimum.
Press TUNER button to select
Tuner function.
Increase Volume.
Function switch is not set to
TAPE.
Volume at minimum.
Dirty head.
Tape old or worn.
Dirty roller and capstan.
Set the Function switch to
TAPE
Increase Volume.
Clean the head.
Replace the tape.
Clean roller and capstan.
Will not record.
Erase prevention tab removed.
Cover hole with tape.
Distorted sound on
Defective tape or dirty tap
Replace tape or clean
playback.
head.
tape head.
Compact Disc Player
CD Player will not play.
Function is not set to CD.
Reposition the unit best
reception is obtained.
Cassette Player
No sound.
Sound distorted.
Speed varies.
Cassette Recorder
Press CD button to select CD
function.
CD is not installed or installed Insert CD with label side up.
incorrectly.
CD skips while playing. Disc is dirty or scratched.
Wipe disc with cloth or use
another disc.
Remarks:
If there is any abnormal situation arise, press the RESET button at the bottom cabinet.
Then the unit will be re-started and back to normal. (All previons memories or programming
will be deleted)
GB 25
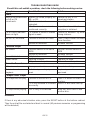
Model : QX-D5370
Specification
Main Unit
FM tuner section
Tuning range
Usable sensitivity (30 dB S/N)
Antenna terminals
87.5 MHz to 108 MHz (50 KHz Step)
22 dBµ
Antenna Wire
MW tuner section
Tuning range
522 KHz to 1620 KHz (9 KHz Step)
Usable sensitivity
Antenna
65 dB/M
Ferrite Bar
Amplifier section
Power Output
Output
RMS 5.0 Watt (3.0 Ω)
PHONES (Stereo mini jack) : accepts
Headphones of 32 ohms or more
Cassette deck section
Track format
Frequency response
Signal - to - noise ratio
Recording system
Heads
4 tracks, 2 channels stereo
Normal tape : 100 Hz to 10 KHz
45 dB
AC bias
Recording/playback head x 1 erase
head x 1
Compact disc player section
Laser
D -A converter
Signal -to -noise ratio
Harmonic distortion
Wow and flutter
Semiconductor laser (760 ~ 800 mm)
1 bit dual
60 dB (1 KHz, 0 dB)
0.5% (1 KHz, 0 dB)
Immeasurable
General
Power requirements
Power consumption
Standby power consumption
Dimensions of main unit
Weight of main unit
230VAC, 50Hz
32W
8W
165 (W) x 210 (H) x 256 (D) mm
2.9 Kg
Speaker system
Cabinet type
Speakers
Impedance
2 Way bass reflex
Wood
Tweeter:
27mm Piezo
3 ohms
DBBS (Bass Boot)
4 Band EQ
100 Hz 8 dB
Classic/Rock/Pop/Jass
Specifications and external appearance are subject to change without notice.
GB 26