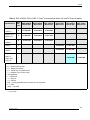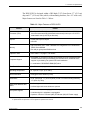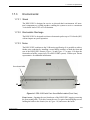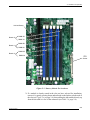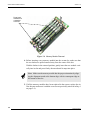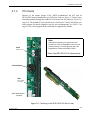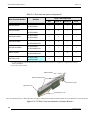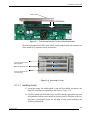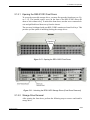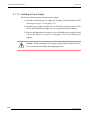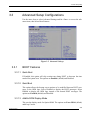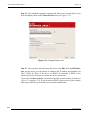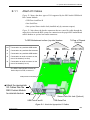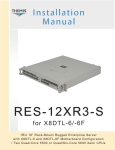
1
Installation Manual RES-21XR3 For X8STi/X8STi-F/X8STi-LN4/X8STi-3F 2RU 19”x17” Rack-Mount Rugged Enterprise Server with X8STi/-F/-LN4/-3F Motherboard Configurations/ One Quad/Dual-Core 5500 or Quad/Six-Core 5600 Xeon® CPU RES-21XR3 for X8STi/-F/-LN4/-3F One Quad/Dual-Core Xeon 5500 or Quad/Six-Core Xeon 5600 CPU RES-21XR3 for X8STi/-F/-LN4/-3F One Quad/Dual-Core Xeon 5500 or Quad/Six-Core Xeon 5600 CPU RES-21XR3 for X8STi/-F/-LN4/-3F One Quad/Dual-Core Xeon 5500 or Quad/Six-Core Xeon 5600 CPU RES-21XR3 for X8STi/-F/-LN4/-3F One Quad/Dual-Core Xeon 5500 or Quad/Six-Core Xeon 5600 CPU RES-21XR3 for X8STi/-F/-LN4/-3F One Quad/Dual-Core Xeon 5500 or Quad/Six-Core Xeon 5600 CPU RES-21XR3 for X8STi/-F/-LN4/-3F One Quad/Dual-Core Xeon 5500 or Quad/Six-Core Xeon 5600 CPU RES-21XR3 for X8STi/-F/-LN4/-3F One Quad/Dual-Core Xeon 5500 or Quad/Six-Core Xeon 5600 CPU RES-21XR3 for X8STi/-F/-LN4/-3F One Quad/Dual-Core Xeon 5500 or Quad/Six-Core Xeon 5600 CPU RES-21XR3 Installation Manual* Version 1.0— January 2012 * SuperMicro Motherboards X8STi, X8STi-F, X8STi-LN4, X8STi-3F Themis Computer—Americas and Pacific Rim 47200 Bayside Parkway Fremont, CA 94538 Phone (510) 252-0870 Fax (510) 490-5529 World Wide Web http://www themis com Themis Computer—Rest of World 5 Rue Irene Joliot-Curie 38320 Eybens, France Phone +33 476 14 77 80 Fax +33 476 14 77 89 Copyright © 2012 Themis Computer, Inc. ALL RIGHTS RESERVED. No part of this publication may be reproduced in any form, by photocopy, microfilm, retrieval system, or by any other means now known or hereafter invented without the prior written permission of Themis Computer. The information in this publication has been carefully checked and is believed to be accurate. However, Themis Computer assumes no responsibility for inaccuracies. Themis Computer retains the right to make changes to this publication at any time without prior notice. Themis Computer does not assume any liability arising from the application or use of this publication or the product(s) described herein. RESTRICTED RIGHTS LEGEND: Use, duplication, or disclosure by the United States Government is subject to the restrictions set forth in DFARS 252.227-7013 (c)(1)(ii) and FAR 52.227-19. TRADEMARKS and SERVICEMARKS Themis® is a registered trademark of Themis Computer, Inc. Intel® and Xeon® are registered trademarks of Intel Corporation. Red Hat® is a registered trademark of Red Hat, Inc. Linux® is a registered trademark of Linus Torvalds. SuperMicro® is a registered trademark of Super Micro Computer, Inc. All other trademarks, servicemarks, or registered trademarks used in this publication are the property of their respective owners. CE Marking This product complies with the European EMC Directive (2004/108/EC) and the European Low Voltage Safety Directive (2006/95/EC)/. Safety Precautions Instructions regarding safety precautions during installation, operation, or maintenance of the equipment are given in the section entitled “Safety Instructions” on page iv. WARNINGS and CAUTIONS The definitions of WARNINGS and CAUTIONS as used in this document are given in the Preface in the section entitled “Notes, Cautions, Warnings, and Sidebars”. Themis Customer Support North America, South America, and Pacific Rim Telephone: Fax: E-mail: Web Site: RES-21XR3 Installation Manual, Version 1.0 January 2012 Part Number: 118188-024 510-252-0870 510-490-5529 [email protected] http://www.themis.com RES-21XR3 Installation Manual Version Revision History Version 1.0 .................................................................................. January 2012 Themis Computer iii RES-21XR3 Installation Manual Version 1.0 Safety Instructions To maximize user safety and ensure correct device operation, all instructions contained in this section should be read carefully. Caution: It is important that the user observe all warnings and instructions that are on the device and contained in this manual. • The device must be used in accordance with the instructions for use. • Electrical installations in the room must correspond to the requirements of respective regulations. • Take care that there are no cables, particularly mains cables, in areas where persons can trip over them. • Do not use a mains connection in sockets shared by a number of other power consumers. Do not use an extension cable. • Only use the mains cable supplied. • The unit is completely disconnected from the power source only when the power cord is disconnected from the power source. Therefore the power cord and its connectors must always remain easily accessible. • Do not set up the device in the proximity of heat sources or in a damp location. Make sure the device has adequate ventilation. • All connection cables must be screwed or locked to the chassis housing. • The device is designed to be used in horizontal position only. • The device is no longer safe to operate when — the device has visible damage or — the device no longer functions. iv • In these cases, the device must be shut down and secured against unintentional operation. • Repairs may only be carried out by a person authorized by Themis Computer. • The device may only be opened for the installation and removal of extension (PCI) cards, memory modules, storage drives, fan housings, power supplies, Themis Computer RES-21XR3 Installation Manual Safety Instructions and the lithium battery—all in accordance with the instructions given in this manual. • If extensions are made to the device, the legal stipulations and the device specifications must be observed. • The device must be switched off when removing the top cover; for example, before installing extension (PCI) cards. Operation of Laser Source Devices DVD/CD-ROM drives contain laser light-emitting diodes (classified in accordance with IEC 825-1:1993: LASER CLASS 1) and, therefore, must not be opened. If the enclosure of such a drive is opened, invisible laser radiation is emitted. Do not allow yourself to be exposed to this radiation. The laser system meets the code of Federal Regulations 21 CFR,1040 for the USA and Canadian Radiation Emitting Devices Act, REDR C 1370. Electrostatic Discharge (ESD) A sudden discharge of electrostatic electricity can destroy static-sensitive devices or micro-circuitry. Proper packaging and grounding techniques are necessary precautions to prevent damage. Always take the following precautions: 1. Transport boards in static-safe containers such as boxes or bags. 2. Keep electrostatic-sensitive parts in their containers until they arrive at staticfree stations. 3. Always be properly grounded when touching a sensitive board, component, or assembly. 4. Store electrostatic-sensitive boards in protective packaging or on conductive foam. Grounding Methods Guard against electrostatic damage at workstations by following these steps: 1. Cover workstations with approved anti-static material. Provide a wrist strap connected to a work surface and properly grounded tools and equipment. Themis Computer v RES-21XR3 Installation Manual Version 1.0 2. Use anti-static mats, heel straps, or air ionizers to give added protection. 3. Handle electrostatic-sensitive components, boards, and assemblies by the case or the PCB edge. 4. Avoid contact with pins, leads, or circuitry. 5. Turn off power and input signals before inserting and removing connectors or test equipment. 6. Keep the work area free of non-conductive materials such as ordinary plastic assembly aids and Styrofoam. 7. Use field service tools, such as cutters, screwdrivers, and vacuums that are conductive. 8. Always place drives and boards PCB-assembly-side down on the foam. Instructions for the Lithium Battery Systems are equipped with a lithium battery installed on the motherboard. To replace this battery, please observe the instructions that are described in this manual. Warning: There is a danger of explosion when the wrong type of battery is used as a replacement. vi Themis Computer Table of Contents Version Revision History ....................................................................................................... iii Safety Instructions ................................................................................................................. iv Preface.................................................................................................................................. xvii Overview and Specifications .............................................................................................. 1-1 1.1 Overview ................................................................................................................ 1-1 1.2 Chipset Overview .................................................................................................. 1-7 1.2.1 Features of the LGA 1366 Processor and the X58 Chipset ....................... 1-7 1.3 PC Health Monitoring ............................................................................................ 1-7 1.3.1 Recovery from AC Power Loss ................................................................. 1-7 1.3.2 Onboard Voltage Monitoring ..................................................................... 1-8 1.3.3 Fan Status Monitor with Software ............................................................. 1-8 1.3.4 CPU Overheat LED and Control ............................................................... 1-8 1.4 Power Configuration Settings ................................................................................ 1-9 1.4.1 Slow Blinking LED for Suspend-State Indicator ...................................... 1-9 1.4.2 BIOS Support for USB Keyboard ............................................................. 1-9 1.4.3 Main Switch Override Mechanism ............................................................ 1-9 1.4.4 Wake-On-LAN (WOL) .............................................................................. 1-9 1.5 Super I/O .............................................................................................................. 1-10 1.5.1 Winbond WPCM450 Controller (X8STi-F/-3F Only) ............................ 1-10 1.6 System LEDs and I/O Connectors ....................................................................... 1-11 1.7 Specifications ....................................................................................................... 1-15 1.7.1 General ..................................................................................................... 1-15 1.7.2 Electrical .................................................................................................. 1-16 1.7.2.1 System Power ........................................................................... 1-16 1.7.2.2 Output Voltage .......................................................................... 1-16 1.7.3 Environmental .......................................................................................... 1-17 1.7.3.1 Shock ........................................................................................ 1-17 1.7.3.2 Electrostatic Discharge ............................................................. 1-17 1.7.3.3 Noise ......................................................................................... 1-17 Themis Computer vii RES-21XR3 Installation Manual Version 1.0 1.8 Packaging and Shipping ....................................................................................... 1-19 1.8.1 Accessory Kit ........................................................................................... 1-19 1.8.2 Rack-Mount Slides (Optional) ................................................................. 1-20 Installation and Operation ................................................................................................. 2-1 2.1 Installation Procedures ........................................................................................... 2-1 2.1.1 Remove Protective Top Cover ................................................................... 2-2 2.1.2 Memory Modules ....................................................................................... 2-3 2.1.2.1 Installation .................................................................................. 2-4 2.1.3 PCI Cards ................................................................................................... 2-7 2.1.3.1 Installing Cards ........................................................................... 2-9 2.1.4 Lithium Battery ........................................................................................ 2-11 2.1.4.1 Removing the Lithium Battery ................................................. 2-11 2.1.4.2 Installing a Lithium Battery ...................................................... 2-12 2.1.5 SAS/SATA Storage Drive ....................................................................... 2-12 2.1.5.1 Opening the RES-21XR3 Front Doors ..................................... 2-13 2.1.5.2 Storage-Drive Removal ............................................................ 2-13 2.1.5.3 Storage-Drive Installation ......................................................... 2-15 2.1.6 Hot-Swappable 80-mm Fan ..................................................................... 2-15 2.1.6.1 Removing and Installing a 80-mm Fan ..................................... 2-15 2.1.7 Power Supply ........................................................................................... 2-16 2.1.7.1 Removing a Power Supply ....................................................... 2-16 2.1.7.2 Installing a Power Supply ......................................................... 2-18 2.2 Rack Mounts ........................................................................................................ 2-19 2.2.1 Mounting Brackets ................................................................................... 2-19 2.2.2 Rack-Mount Slides (Optional) ................................................................. 2-19 2.3 Operation ............................................................................................................. 2-20 2.3.1 Plugging in the AC Power Cords ............................................................. 2-20 2.3.2 Turning the System On ............................................................................ 2-20 2.3.3 Getting Started ......................................................................................... 2-21 2.3.3.1 Configuration ............................................................................ 2-21 2.3.3.2 Linux Installation ...................................................................... 2-21 2.3.4 Turning the System Off ........................................................................... 2-21 BIOS Setup Utility .............................................................................................................. 3-1 3.1 Introduction ........................................................................................................... 3-1 3.1.1 How To Change the Configuration Data ................................................... 3-2 3.1.2 Starting the Setup Utility ........................................................................... 3-2 viii Themis Computer Table of Contents 3.2 Main BIOS Setup ................................................................................................... 3-3 3.2.1 System Overview ....................................................................................... 3-3 3.2.1.1 System Time/System Date .......................................................... 3-3 3.2.1.2 AMI BIOS ................................................................................... 3-4 3.2.1.3 Processor ..................................................................................... 3-4 3.2.1.4 System Memory .......................................................................... 3-4 3.3 Advanced Setup Configurations ............................................................................ 3-5 3.3.1 BOOT Features .......................................................................................... 3-5 3.3.1.1 Quick Boot .................................................................................. 3-5 3.3.1.2 Quiet Boot ................................................................................... 3-5 3.3.1.3 AddOn ROM Display Mode ....................................................... 3-5 3.3.1.4 Bootup Num-Lock ...................................................................... 3-6 3.3.1.5 PS/2 Mouse Support ................................................................... 3-6 3.3.1.6 Wait For 'F1' If Error .................................................................. 3-6 3.3.1.7 Hit 'Del' Message Display ........................................................... 3-6 3.3.1.8 Watch Dog Function ................................................................... 3-6 3.3.1.9 Power Button Function ............................................................... 3-6 3.3.1.10 Restore on AC Power Loss ......................................................... 3-6 3.3.1.11 Interrupt 19 Capture .................................................................... 3-7 3.3.2 Processor and Clock Options ..................................................................... 3-7 3.3.2.1 CPU Ratio ................................................................................... 3-7 3.3.2.2 Clock Spread Spectrum .............................................................. 3-7 3.3.2.3 Hardware Prefetcher .................................................................... 3-7 3.3.2.4 Adjacent Cache Line Prefetch ..................................................... 3-8 3.3.2.5 MPS and ACPI MADT Ordering ................................................ 3-8 3.3.2.6 Intel Virtualization Technology................................................... 3-8 3.3.2.7 Execute-Disable Bit Capability ................................................... 3-8 3.3.2.8 Intel® AES-NI (When supported by the CPU) .......................... 3-8 3.3.2.9 Simultaneous Multi-Threading .................................................... 3-9 3.3.2.10 Active Processor Cores ................................................................ 3-9 3.3.2.11 Intel® EIST Technology.............................................................. 3-9 3.3.2.12 Intel® Turbo Boost Configuration............................................... 3-9 3.3.2.13 C1E Support .............................................................................. 3-10 3.3.2.14 Intel® C-STATE Tech .............................................................. 3-10 3.3.2.15 C-State package limit setting .................................................... 3-10 3.3.2.16 C1 Auto Demotion .................................................................... 3-10 3.3.2.17 C3 Auto Demotion .................................................................... 3-11 3.3.2.18 ACPI T State ............................................................................. 3-11 Themis Computer ix RES-21XR3 Installation Manual 3.3.3 3.3.4 3.3.5 3.3.6 3.3.7 3.3.8 3.3.9 3.3.10 3.3.11 Version 1.0 3.3.2.19 DCA Technology ...................................................................... 3-11 3.3.2.20 DCA Prefetch Delay ................................................................. 3-11 Advanced Chipset Control ....................................................................... 3-11 3.3.3.1 QPI and IMC Configuration ..................................................... 3-11 3.3.3.2 QPI Links Speed ....................................................................... 3-12 3.3.3.3 QPI Frequency .......................................................................... 3-12 3.3.3.4 QPI L0s and L1 ......................................................................... 3-12 3.3.3.5 Memory Frequency ................................................................... 3-12 3.3.3.6 Memory Mode .......................................................................... 3-12 3.3.3.7 Demand Scrubbing ................................................................... 3-13 3.3.3.8 Patrol Scrubbing ....................................................................... 3-13 3.3.3.9 Throttling - Closed Loop .......................................................... 3-13 Intel VT-d ................................................................................................ 3-13 SR-1OV Support ...................................................................................... 3-13 Intel I/OAT .............................................................................................. 3-14 Active State Power Management ............................................................. 3-14 Route Port 80h Cycles To ........................................................................ 3-14 3.3.8.1 Extend PCI Hole ....................................................................... 3-14 USB Functions ......................................................................................... 3-14 USB 2.0 Controller .................................................................................. 3-14 Legacy USB Support ............................................................................... 3-14 3.4 IDE/SATA/Floppy Configuration ....................................................................... 3-15 3.4.1 Floppy A .................................................................................................. 3-15 3.4.2 SATA#1 Configuration ............................................................................ 3-15 3.4.2.1 Configure SATA#1 as ............................................................... 3-15 3.4.2.2 ICH RAID CodeBase................................................................. 3-15 3.4.3 SATA#2 Configuration............................................................................. 3-15 3.4.4 IDE Detect Timeout (sec) ........................................................................ 3-15 3.4.5 Primary IDE Master/Slave, Secondary IDE Master/Slave, Third IDE Master, and Fourth IDE Master............................................... 3-16 3.4.5.1 Type .......................................................................................... 3-16 3.4.5.2 LBA/Large Mode ...................................................................... 3-16 3.4.5.3 Block (Multi-Sector Transfer) .................................................. 3-16 3.4.5.4 PIO Mode .................................................................................. 3-16 3.4.5.5 DMA Mode ............................................................................... 3-17 3.4.5.6 Self-Monitoring Analysis and Reporting Technology............... 3-18 3.4.5.7 32-Bit Data Transfer ................................................................. 3-18 3.4.6 PCI/PnP Configuration ............................................................................ 3-18 x Themis Computer Table of Contents 3.4.6.1 3.4.6.2 3.4.6.3 3.4.6.4 3.4.6.5 3.4.6.6 3.4.6.7 3.4.6.8 3.4.6.9 3.4.7 3.4.8 3.4.9 3.4.10 3.4.11 3.4.12 3.4.13 Themis Computer Clear NVRAM .......................................................................... 3-18 Plug & Play OS ......................................................................... 3-18 PCI Latency Timer .................................................................... 3-18 PCI IDE BusMaster .................................................................. 3-18 PCIe IO Performance ................................................................ 3-19 Slot 6 Width .............................................................................. 3-19 ROM Scan Ordering ................................................................. 3-19 Slot PCI 33MHz, PCI Slot from SXB, Slot 6 PCIE x16 .......... 3-19 Load Onboard LAN1 Option ROM/Load Onboard LAN2 Option ROM Load Onboard LAN3 Option ROM/Load Onboard LAN4 Option ROM (X8STi- LN4 Only) ................... 3-19 3.4.6.10 Load SAS Option ROM (X8STi-3F Only) ............................... 3-19 3.4.6.11 Boot Graphics Adapter Priority ................................................ 3-19 Super IO Device Configuration ............................................................... 3-19 3.4.7.1 Serial Port1 Address/Serial Port2 Address ............................... 3-20 3.4.7.2 Onboard Floppy Controller ....................................................... 3-20 Remote Access Configuration ................................................................. 3-20 3.4.8.1 Remote Access .......................................................................... 3-20 Hardware Health Configuration ............................................................... 3-21 3.4.9.1 CPU Overheat Alarm ................................................................ 3-21 3.4.9.2 CPU Temperature/System Temperature ................................... 3-22 3.4.9.3 Fan 1—Fan 6 Reading .............................................................. 3-24 3.4.9.4 Fan Speed Control Modes ......................................................... 3-24 3.4.9.5 Voltage Monitoring ................................................................... 3-24 ACPI Configuration ................................................................................. 3-24 3.4.10.1 High Performance Event Timer ................................................ 3-25 3.4.10.2 ACPI Aware O/S ...................................................................... 3-25 3.4.10.3 AMI OEMB Table .................................................................... 3-25 3.4.10.4 ACPI APIC Support .................................................................. 3-25 3.4.10.5 APIC ACPI SCI IRQ ................................................................ 3-25 3.4.10.6 Headless Mode .......................................................................... 3-25 3.4.10.7 ACPI Version Features ............................................................. 3-25 IPMI Configuration (X8STi-F/X8STi-3F Only) ..................................... 3-26 3.4.11.1 IPMI Firmware Version ............................................................ 3-26 3.4.11.2 Status of BMC .......................................................................... 3-26 View BMC System Event Log ................................................................ 3-26 3.4.12.1 Clear BMC System Event Log ................................................. 3-26 Set LAN Configuration ............................................................................ 3-26 xi RES-21XR3 Installation Manual Version 1.0 3.4.13.1 BMC Watch Dog Timer Action ................................................ 3-28 3.4.14 Event Log Configuration ......................................................................... 3-28 3.4.14.1 View Event Log ........................................................................ 3-28 3.4.14.2 Mark All Events as Read .......................................................... 3-28 3.4.14.3 Clear Event Log ........................................................................ 3-28 3.4.14.4 PCIE Event Log ........................................................................ 3-28 3.4.14.5 Memory ECC Error Log ........................................................... 3-28 3.5 Security Settings .................................................................................................. 3-29 3.5.1 Supervisor Password ................................................................................ 3-29 3.5.2 User Password .......................................................................................... 3-29 3.5.3 Change Supervisor Password ................................................................... 3-30 3.5.4 User Access Level .................................................................................... 3-30 3.5.5 Change User Password ............................................................................ 3-30 3.5.6 Clear User Password ................................................................................. 3-30 3.5.7 Password Check ....................................................................................... 3-30 3.5.8 Boot Sector Virus Protection ................................................................... 3-30 3.6 Boot Configuration .............................................................................................. 3-31 3.6.1 Boot Device Priority ................................................................................ 3-31 3.6.2 Storage Drives .......................................................................................... 3-32 3.6.3 Removable Drives .................................................................................... 3-32 3.6.4 CD/DVD Drives ...................................................................................... 3-32 3.7 Exit Options ......................................................................................................... 3-33 3.7.1 Save Changes and Exit ............................................................................ 3-33 3.7.2 Discard Changes and Exit ........................................................................ 3-33 3.7.3 Discard Changes ...................................................................................... 3-33 3.7.4 Load Optimal Defaults ............................................................................. 3-34 3.7.5 Load Fail-Safe Defaults ........................................................................... 3-34 Appendix A. Connector Pinouts ...................................................................................... A-1 A.1 PS/2 Keyboard and Mouse ................................................................................... A-1 A.2 USB Ports ............................................................................................................. A-2 A.3 Serial Ports ............................................................................................................ A-2 A.4 Gigabit Ethernet LAN Ports ................................................................................. A-3 A.5 VGA Display Port ................................................................................................. A-4 A.6 IPMI Dedicated LAN Port .................................................................................... A-5 xii Themis Computer Table of Contents A.7 UID (Unit Identifier Switch) ................................................................................. A-5 Appendix B. Rack-Mount Slide Installation ...................................................................B-1 Appendix C. Red Hat Enterprise Linux 5 Installation ..................................................C-1 C.1 Introduction ............................................................................................................C-1 C.2 Installation .............................................................................................................C-1 Appendix D. Optional Remote On/Off Switch .............................................................. D-1 D.1 Remote On/Off Configuration .............................................................................. D-1 D.2 Remote Only Configuration .................................................................................. D-2 D.3 Ordering the Remote On/Off Switch .................................................................... D-2 Appendix E. Optional RES Audio/USB/Serial Port Module ....................................... D-1 E.1 RES Audio/USB/Serial Port Custom Module ...................................................... D-1 E.1.1 Attach I/O Cables ...................................................................................... D-3 E.1.2 Connector Pinouts ..................................................................................... D-4 E.1.2.1 USB Ports A and B .................................................................... D-4 E.1.2.2 Serial Port COM1 ...................................................................... D-5 E.1.2.3 Stereo Audio Ports (Optional) ................................................... D-6 E.2 Ordering the RES Audio/USB/Serial Port Custom Module ................................. D-7 Appendix F. Re-packaging Instructions ......................................................................... F-1 F.1 Re-packaging for Shipment ................................................................................... F-1 F.2 Packaging Components .......................................................................................... F-2 F.3 Instructions for Re-packaging ................................................................................ F-3 Index .............................................................................................................................. Index-1 Reader Comment Card Themis Computer xiii RES-21XR3 Installation Manual xiv Version 1.0 Themis Computer Table of Contents List of Figures Figure 1 Rugged Enterprise Server Model RES-21XR3............................................... xvii Figure 2 Front View of a Standard Rear-I/O RES-22 Chassis......................................... xx Figure 3 Rear View of a Standard Rear-I/O RES-22 Chassis........................................ xxi Figure 4 Front View of a Front-I/O RES-22 Chassis..................................................... xxi Figure 5 Rear View of a Front-I/O RES-22 Chassis ...................................................... xxi Figure 1-1 RES-21XR3 (with Front Doors installed) ....................................................... 1-1 Figure 1-2 External Features of the RES-21XR3 .............................................................. 1-3 Figure 1-3 X8STi series Motherboard Block Diagram ..................................................... 1-4 Figure 1-4 Open Top View of the RES-21XR3 ................................................................ 1-6 Figure 1-5 RES-21XR3 System LEDs and I/O Connectors............................................ 1-11 Figure 1-6 RES-21XR3 with Front Sound Baffle Installed (Front View) ...................... 1-17 Figure 1-7 RES-21XR3 with Rear Sound Baffle Installed (Rear View)......................... 1-18 Figure 2-1 Remove the RES-21XR3 Protective Access Cover......................................... 2-2 Figure 2-2 Remove RES-21XR3 Air-Flow Deflector ....................................................... 2-4 Figure 2-3 Memory Module Slot Locations ...................................................................... 2-5 Figure 2-4 Memory Module Removal............................................................................... 2-6 Figure 2-5 Positioning of the RES-21XR3 PCI Riser Cards............................................. 2-7 Figure 2-6 PCI Riser Cards are attached to a Retainer Bracket … ................................... 2-8 Figure 2-8 Horizontal I/O slots.......................................................................................... 2-9 Figure 2-7 Then inserted into the PCI slot of the Motherboard ........................................ 2-9 Figure 2-9 PCI Card Retainer Clip .................................................................................. 2-10 Figure 2-10 The RES-21XR3 Lithium Battery ................................................................. 2-11 Figure 2-11 The RES-21XR3 Lithium Battery and Socket............................................... 2-12 Figure 2-12 Opening the RES-21XR3 Front Doors .......................................................... 2-13 Figure 2-13 Unlocking the RES-21XR3 Storage Drives................................................... 2-13 Figure 2-14 RES-21XR3 Storage Drive Removal ............................................................ 2-14 Themis Computer xiii RES-11XR3 Installation Manual Version 1.1 Figure 2-15 The RES-21XR3 Hot-Swappable 80-mm Fans ............................................. 2-16 Figure 2-16 The RES-21XR3 Power Supply Locking Mechanism .................................. 2-17 Figure 2-17 Right Rack-Mount Bracket ............................................................................ 2-19 Figure 2-18 AC Power Socket and LED on the RES-21XR3 Rear................................... 2-20 Figure 2-19 System Power Button and LED on the RES-21XR3 Front ........................... 2-20 Figure 3-1 Main BIOS Setup Screen ................................................................................. 3-3 Figure 3-2 Advanced Settings ........................................................................................... 3-5 Figure 3-3 Security Settings ............................................................................................ 3-29 Figure 3-4 Boot Settings.................................................................................................. 3-31 Figure 3-5 Exit Options ................................................................................................... 3-33 Figure A-1 USB Connector Pinout.................................................................................... A-2 Figure A-2 COM 1 Serial Connector Pinout ..................................................................... A-2 Figure A-3 Ethernet Connector, Type RJ45...................................................................... A-3 Figure A-4 VGA Connector Pinout................................................................................... A-4 Figure B-1 Screw Locations for Rack-Mount Slides ......................................................... B-1 Figure B-2 RES-21XR3 Rack-Mount Slide Installation.................................................... B-3 Figure C-1 Power On after Linux DVD is Inserted into Drive .......................................... C-2 Figure C-2 Skip Key .......................................................................................................... C-2 Figure C-3 Welcome Screen .............................................................................................. C-3 Figure C-4 Language Selection.......................................................................................... C-4 Figure C-5 Selecting Layout Type ..................................................................................... C-5 Figure C-6 Enter Installation Number................................................................................ C-6 Figure C-7 Partitioning....................................................................................................... C-7 Figure C-8 Reviewing Option ............................................................................................ C-8 Figure C-9 Creating a Custom Layout ............................................................................... C-9 Figure C-10 Setting Up Boot Loader ................................................................................. C-10 Figure C-11 Master Boot Record (MBR) .......................................................................... C-11 Figure C-12 Network Devices List .................................................................................... C-12 xiv Themis Computer Table of Contents Figure C-13 Edit Interface Pop-Up Screen ........................................................................ C-13 Figure C-14 Selecting Time Zone ...................................................................................... C-14 Figure C-15 Setting Up Root Account and Password........................................................ C-15 Figure C-16 Package Installation Default Screen .............................................................. C-16 Figure C-17 Optional Packages.......................................................................................... C-17 Figure C-18 Option to Review or Continue ....................................................................... C-18 Figure C-19 Installation Begins ......................................................................................... C-18 Figure C-20 Installation is Complete ................................................................................. C-19 Figure C-21 Login Screen .................................................................................................. C-20 Figure C-22 Ready to use the Desktop............................................................................... C-20 Figure D-1 Remote On/Off Switch Module ...................................................................... D-1 Figure E-1 RES Audio/USB/Serial Port Custom Module ................................................ D-1 Figure E-2 Install the RES Audio/USB/Serial Port Custom Module ............................... D-2 Figure E-3 Attach the Appropriate I/O Cables ................................................................. D-3 Figure E-4 Dual USB Connector Pinouts ......................................................................... D-4 Figure E-5 COM1 Serial Connector Pinout ...................................................................... D-5 Figure E-6 Stereo Audio Connector Pinout ...................................................................... D-6 Figure F-1 Packaging Components.................................................................................... F-2 Figure F-2 Order of Assembly........................................................................................... F-3 List of Tables Table 1 RES-x2XR3 20”-Deep Chassis Manual Matrix ........................................... xviii Table 2 RES-x2XR3S / RES-x1XR3 17”-Deep Chassis Manual Matrix..................... xix Table 3 Front I/O 16”-Deep Chassis Manual Matrix..................................................... xx Table 1-1 RES-21XR3 Motherboard Options................................................................. 1-2 Table 1-2 Differences Between Main Features of the X8STi motherboards .................. 1-2 Table 1-3 Major Features of RES-21XR3....................................................................... 1-5 Themis Computer xv RES-11XR3 Installation Manual Version 1.1 Table 1-4 Power Supply LED Behavior ....................................................................... 1-12 Table 1-5 System LEDs ................................................................................................ 1-13 Table 1-6 Rear-Panel I/O Connectors ........................................................................... 1-14 Table 1-7 RES-21XR3 General Specifications ............................................................. 1-15 Table 1-8 RES-21XR3 Electrical Specifications .......................................................... 1-16 Table 1-9 Approximate Weights of the RES Series...................................................... 1-20 Table 2-1 RES-21XR3 Memory Capacity ...................................................................... 2-3 Table 2-2 RES-21XR3 Optimal Memory Population (CPU1 Installed)......................... 2-3 Table 2-3 Riser card and system configurations ............................................................. 2-8 Table 3-1 PIO Mode Select Options ............................................................................. 3-17 Table 3-2 DMA Mode Select Options .......................................................................... 3-17 Table A-1 PS/2 Keyboard/Mouse Pinouts and Signal Definitions ................................. A-1 Table A-2 USB Connector Signal Definitions................................................................ A-2 Table A-3 COM 1 Serial Connector Signal Definitions ................................................. A-2 Table A-4 RJ45 Ethernet Pinout Signals ........................................................................ A-3 Table A-5 VGA Connector Pinout Signal Descriptions ................................................. A-4 Table E-1 Dual USB Connector Pinout Signal Descriptions (J10) ................................ D-4 Table E-2 COM1 Serial Connector Pinout Signal Descriptions (J8 and J9) .................. D-5 Table E-3 Stereo Audio Out Connector Pinout Signal Descriptions (J1) ...................... D-6 xvi Themis Computer Preface This document, entitled RES-21XR3 Installation Manual, provides instructions on how to install, configure, power up, and boot the Themis Rugged Enterprise Server RES-21XR3 (see Figure 1 below), based on a single Intel XeonTM Quad/Dual-Core 5500 or Quad/Six-Core 5600 CPU in an LGA1366 socket. The RES-21XR3 supports one of four motherboards in a 17”-deep chassis: • SuperMicro X8STi, X8STi-F, X8STi-LN4, and X8STi-3F (a matrix describing 20”-deep chassis manuals is given in Table 1, page xviii. A matrix describing 17”-deep chassis manuals is given in Table 2, page xix.) Figure 1. Rugged Enterprise Server Model RES-21XR3 Themis Computer xvii RES-21XR3 Installation Manual Version 1.0 Table 1. RES-x2XR3 20”-Deep Chassis Manual Matrix (AC and DC Power Supplies) Category Configuration 1 Motherboard X8DTH-iF X8DTH-6F a CPU Soc kets RES-32XR3 Manual Part Number RES-22XR3 Manual Part Number 2 116790-024 1176789-024 2 117022-024 117017-024 2 117023-024 117018-024 2 117024-024 117019-024 2 117025-024 117020-024 2 117026-024 117021-024 RES-22XR3 with Riser Manual Part Number RES-12XR3 Manual Part Number 117280-024 116970-024 X8DTi Configuration 2 X8DTi-F X8DTi-LN4F X8DT3 Configuration 3 X8DT3-F X8DT3-LN4F Configuration 4 Configuration 5 X8DTN+ X8DAi X8DA3 Configuration 6* X8DAH+-F Configuration 7 X8DTU-F Naming Key: X8Dvwxyz System RES-x2XR3, where x = 3, 2, or 1 v: A = Sound chip; no graphics chip T = Graphics chip; no sound chip * Configuration 6 motherboard X8DAH+-F supports both audio and video; however, the naming key does not contain a “T” in the title. w: H = Two Tylersberg Northbridge chips blank = One Tylersberg Northbridge chip U = Motherboard with cutout x: i = SATA only 3 = SAS 1.0 6 = SAS 2.0 y: LN4 = Extra gigabit Ethernet controller for two extra ports z: F = IPMI blank = No IPMI a—All motherboards measure 12”W x 13”L except X8DTN+ and X8DAH+-F, which are 13.68”W x 13” L. xviii Themis Computer Preface Table 2. RES-x2XR3S / RES-x1XR3 17”-Deepa Chassis Manual Matrix (AC and DC Power Supplies) Motherboard CPU Soc kets RES-32XR3S Manual P/N RES-22XR3S Manual P/N RES-12XR3S Manual P/N 2 117408-024 117412-024 117416-024 2 117409-024 117413-024 117417-024 2 117411-024 117415-024 117419-024 X8DTL-6F X8DTL-6 X8DTL-3F/-iF X8DTL-3/-i X8DAL-3 X8DAL-i X8SAX X8ST3-F X8STE RES-31XR3 Manual P/N RES-21XR3 Manual P/N 1 117420-024 117421-024 1 117385-024 117422-024 RES-11XR3 Manual P/N X8STi X8STi-F X8STi-LN4 1 118188-024 117423-024 X8STi-3F Naming Key: X8uvwxyz System RES-x2XR3S and RES-x1XR3, where x = 3, 2, or 1 u: D = Double CPU sockets S = Single CPU socket v: A = Sound chip; no graphics chip T = Graphics chip; no sound chip w: Not applicable x: i = SATA only 3 = SAS 1.0 6 = SAS 2.0 y: LN4 = Extra gigabit Ethernet controller for two extra ports z: F = IPMI blank = No IPMI a—The 17”-deep RES XR3 chassis actually measures 17.07” deep, but for simplicity will continue to be referred to as being 17” deep throughout these manuals. Themis Computer xix RES-21XR3 Installation Manual Version 1.0 A matrix describing RES chassis that are configured for front-I/O connector and front-PCI card access in a 16”-deep chassis is given in Table 3. This chassis design makes it more convenient to install cables to the system and demands no access to the rear of the chassis except to replace a fan. Figure 2 shows the front view of a standard rear-I/O RES-22 chassis (Figure 3 on page xxi shows the rear view); Figure 4 on page xxi shows the front view of a front-I/O RES-22 chassis (Figure 5 on page xxi shows the rear view). Table 3. Front I/O 16”-Deep Chassis Manual Matrix (AC and DC Power Supplies) Motherboard CPU Sockets RES-32XR3/FIO Manual P/N X8DAH+-F* 2 117611-024 X8DTU-F 2 Naming Key: X8uvwxyz x = 3, 2, or 1 RES-22XR3/FIO Manual P/N 117664-024 System RES-x2XR3S and RES-x1XR3, where *RES-32XR3/FIO motherboard X8DAH+-F supports both audio and video; however, the naming key does not contain a “T” in the title. u: D = Double CPU sockets S = Single CPU socket v: A = Sound chip; no graphics chip T = Graphics chip; no sound chip w: Not applicable x: i = SATA only 3 = SAS 1.0 6 = SAS 2.0 y: LN4 = Extra gigabit Ethernet controller for two extra ports z: F = IPMI blank = No IPMI Figure 2. Front View of a Standard Rear-I/O RES-22 Chassis (Doors Removed) xx Themis Computer Preface Figure 3. Rear View of a Standard Rear-I/O RES-22 Chassis Figure 4. Front View of a Front-I/O RES-22 Chassis Figure 5. Rear View of a Front-I/O RES-22 Chassis Themis Computer xxi RES-21XR3 Installation Manual Version 1.0 The 2RU-high (3.50”) RES-21XR3 has been designed to fit into a standard 19” rack and is provided with rack-mount brackets with handles. Optional rack-mount slides are also available. The RES-21XR3 is rugged enough to withstand extreme shock (up to 35G), temperature, and EMI associated with such demanding markets as the military, aerospace, and telecommunications industries. The single Quad/Dual-Core 5500 or Quad/Six-Core 5600 Series Intel Xeon CPU operates up to 6.4 GT/s (with a 1333-MHz front-side system bus) and supports up to 24 GB of DDR3 ECC DIMM memory modules. The RES-21XR3 is based on the functionality and capability of the following Intel chipset: • Intel X58 Express chipset • ICH1OR An overview of RES-21XR3 design and specifications is given in Chapter 1, "Overview and Specifications", of this manual. This manual is intended for an experienced system administrator with a knowledge of both networking and high-speed server systems. Website Information Themis Computer corporate and product information may be accessed on the World Wide Web by browsing the website http://www.themis.com. Your Comments are Welcome We are interested in improving our documentation and welcome your comments and suggestions. You can email your comments to us at [email protected]. Please include the document part number in the subject line of your email. xxii Themis Computer Preface Notes, Cautions, Warnings, and Sidebars The following icons and formatted text are included in this document for the reasons described: Note: A note provides additional information concerning the procedure or action being described. Caution: A caution describes a procedure or action that may result in damage to the equipment. This may involve—but is not restricted to—heavy equipment or sharp objects. To reduce the risk, follow the instructions accompanying this symbol. Warning: A warning describes a procedure or action that may cause injury or death to the operator as a result of hazardous voltages. To reduce the risk, follow the instructions accompanying this symbol. Sidebar: A “sidebar” adds detail to the section within which it is placed, but is not absolutely vital to the description or procedure of the section. Themis Computer xxiii RES-21XR3 Installation Manual xxiv Version 1.0 Themis Computer General Section Chapter Overview and Specifications 1.1 Overview The RES-21XR3 (see Figure 1-1 below; a block diagram is given in Table 1-3, page 1-4). Is a rack-mounted high-performance system designed specifically for aboveaverage shock and vibration environments. The RES-21XR3 supports one Intel® 1366-pin LGA 64-bit 5500/5600-Series Xeon™ processor, with a QPI (Quick-Path Interconnect) up to 6.4GT/s (Giga-Transfers per Second) supporting 24 GB of 1333/1066/800-MHz DDR3 ECC Registered memory modules. Its computer/graphics-intensive and diverse-I/O capabilities are ideal for military/aerospace and commercial telecommunications applications. Motherboard options supported by the RES-21XR3 are listed in Table 1-1, page 1-2. Figure 1-1. RES-21XR3 (with Front Doors installed) Themis Computer 1-1 RES-21XR3 Installation Manual Version 1.0 Table 1-1. RES-21XR3 Motherboard Options PCI-e and PCI Slotsc Motherboarda IPMI SATA SAS Memory Slotsb Graphics Audio PCI-e 2.0 x16 PCI-e x8d PCIe X8STi No Yes No 6 Yes — 1 1 1 X8STi-F Yes Yes No 6 Yes — 1 1 1 X8STi-LN4 No Yes No 6 Yes — 1 1 1 X8STi-3F Yes Yes Yes 6 Yes — 1 1 1 a—SuperMicro Computer, Inc. b—Max DIMM size per slot is 4 GB. c—please refer to “PCI Cards”, page 2-7 for PCI/-E usage and restrictions. d—SXB:PCI-E x8 e—Due to the physical constraints of the system configuration, the PCI Slot is not used. Table 1-2. Differences Between Main Features of the X8STi motherboards Feature X8STi X8STi-F X8STi-3F X8STi-LN4 LAN3/LAN4 No No No Yes NIC3(LAN3)_LED/ NIC4(LAN4)_LED No No No Yes JPL3/JPL4 (LAN3/4 Enable) No No No Yes IPMI 2.0 Support/IPMI Jumper (JBMC1) No Yes Yes No IPMI Dedicated LAN No Yes Yes No I-Button No No Yes No SAS Ports 0~7 No No Yes No 3-GPIO1/2 (Serial Link IO) No No Yes No SAS LEDs (LES1/LES2) No No Yes No 1-2 Themis Computer 1—Overview and Specifications Overview The RES-21XR3 is designed within a 2RU-high (3.50”) form-factor, 17” (43.2 cm) deep and 17” (43.4 cm) wide, (which, with mounting brackets, fits a 19”-wide rack; see). Major features of the RES-21XR3 are described in Table 1-3, page 1-5. System Power ON/OFF Switch CD-RW/DVD-ROM Combo Drive Front View (Doors Removed) 3.50” (2RU) Storage Drive (SAS/SATA) Front LED Indicator Panel (see Figure 1-5, page 1-12) 17” (42.7 cm), 19” with Rack Mounts 17” (43.2 cm) deep Dual Power Supplies Power Supply Latch Lock AC Power Socket (3-prong NEMA 15) Rear View Expansion Card Slots (Note: Only the middle slot is support by this configuration) Rear I/O Panel (see Figure 1-5, page 1-12) Figure 1-2. External Features of the RES-21XR3 Themis Computer 1-3 RES-21XR3 Installation Manual Version 1.0 DDR3: 1333/1066/800 Intel LGA 1366 Socket CPU Intersil VRD 11.1 DIMM_CHA DIMM_CHB QPI (Up to 6.40 GT/s) DIMM_CHC (2 DIMMs per Channel, 6 DIMMs total) SAS x8 (X8STi-3F) SAS1068E (X8STi-3F) PCIE x16 Intel X58 Intel 82574L RJ-45 Intel 82574L PCIE x1 PCIE x8 RJ-45 PCIE x1 Intel 82574L (X8STi-LN4 only) PCIE x1 SATA x6 Intel SATA II / 3.0G ICH10R RJ-45 PCI-E Gen1 x8 (in x4) North Bridge DMI RJ-45 PCI-E Gen2 x16 PCIE x8 Intel 82574L (X8STi-LN4 only) PCIE x1 USB x8 South Bridge USB 2.0 SPI PCI 32 BUS W83627DHG LPC I/O Keyboard Mouse Floppy COM1 COM2 PCI 32 x1 Slots SPI BIOS BMC WPCM450 IPMI LAN (for X8STi-F/-3F only) Onboard VGA Figure 1-3. X8STi series Motherboard Block Diagram 1-4 Themis Computer 1—Overview and Specifications Overview The RES-21XR3 is designed within a 2RU-high (3.50”) form-factor 17” (43.2 cm) deep and 17” (43.4 cm) wide (which, with mounting brackets, fits a 19”-wide rack). Major features are listed in Table 1-3 below. Table 1-3. Major Features of RES-21XR3 Feature Details One Quad-Core/Dual-Core Intel® 5500 Series or Quad/Six-Core 5600 Series Xeon Processor with QPI (QuickPath Interconnect) links up to a 51.2 GT/s data-transfer rate (6.4 GT/s per direction) Intel® X58 Express chipset ICH10R Up to 24 GB of 1333 / 1066 / 800-MHz ECC Registered / ECC Unbuffered DDR3 72-bit SDRAM Six 240-pin gold-plated DIMM sockets See Table 1-1 on page 1-2 for details Eight SAS, or five SATA II storage drives directly from the motherboard with one SATA header being consumed by the CD/DVD drive; additional SATA supporta is provided by an optional PCI-card installation. 1 combination CD-RW/DVD-ROM (IDE) drive Rear-Panel I/O See Table 1-6 on page 1-14 for details Operating temperatureb 0° up to 65° C (32° up to 149°F) Shock endurancea 35G @ 25-msec duration (3 axis) Dimensions 3.50” (2RU) high, 17” (43.4 cm) wide (19”/48.3 cm with mounting brackets), 17” (43.2 cm) deep Rack-mount brackets and slides Left and right rack-mount tabs are attached to the chassis Left and right rack-mount slides are optional 750 watts each, auto-ranging (100–265 Vac) Load-sharing N+1 redundant, hot-pluggable Optional—Choice of 750-watt (48V) or 500-watt (28V) DC Power supply Processor (CPU) Chipset Memory Expansion slots Peripheral Support Dual power supplies a—Chassis supports a total of 8 storage drives. b—Specifications are dependent on the configurations specified in this manual. Themis Computer 1-5 RES-21XR3 Installation Manual Version 1.0 PCI-e x 16 (Riser Card Slot) AC Power Supply (right) AC Power Supply (left) Intel X58 PCI Card Slot Intel ICH10R CPU 6 DIMM Memory Module Slots SAS Controller LSI 1068E 80-mm Fan (Three Total) Storage Drives Front CD/DVD Combo-Drive Housing Figure 1-4. Open Top View of the RES-21XR3 1-6 Themis Computer 1—Overview and Specifications 1.2 Chipset Overview Built upon the functionality and the capability of the Intel X58 Express chipset, the X8STi/X8STi-F/X8STi-3F/X8STi-LN4 motherboard provides the performance and feature set required for single-processor-based high-end systems with configuration options optimized for intensive application and high-end server platforms. The X8STi/X8STi-F/X8STi-3F/X8STi-LN4 supports the Intel® Xeon® 5500/5600 series processors, the Intel X58 Express chipset, and the ICH10R. With Intel QuickPath Interconnect (QPI) technology built in, the X8STi/ X8STi-F/X8STi-3F/X8STiLN4 offer point-to-point system interconnect interface, replacing the current Front Side Bus technology, providing substantial system performance enhancement by utilizing serial link interconnections to increase bandwidth and scalability. 1.2.1 Features of the LGA 1366 Processor and the X58 Chipset • Intel QuickPath Interconnect link, up to 6.4 GT/s of data transfer rate in each direction. • Virtualization Technology, Integrated Management Engine support • Point-to-point cache coherent interconnect, Fast/narrow unidirectional links, and Concurrent bi-directional traffic • Error detection via CRC and Error correction via Link level retry 1.3 PC Health Monitoring This section describes the PC health monitoring features of the X8STi/X8STi-F/ X8STi-3F/X8STi-LN4 motherboards. These features are supported by an onboard System Hardware Monitor chip. 1.3.1 Recovery from AC Power Loss BIOS provides a setting for you to determine how the system will respond when AC power is lost and then restored to the system. You can choose for the system to remain powered off (in which case you must hit the power switch to turn it back on), or for it to return to a power on state. See the Power Loss Control setting in the BIOS chapter of this manual to change this setting. The default setting is Last State. Themis Computer 1-7 RES-21XR3 Installation Manual 1.3.2 Version 1.0 Onboard Voltage Monitoring The onboard voltage monitor will scan the following voltages continuously: CPU Core, Chipset Voltage, Memory Voltage, +1.8V, +3.3V, +3.3V standby, +5V, +5V Standby, Vbat and ±12V. Once a voltage becomes unstable, it can give a warning by email notification alert, or send an error message to the screen. Users can adjust the voltage thresholds to define the sensitivity of the voltage monitor by using SDIII (SuperDoctor III). Please refer to http://www.supermicro.com/PRODUCT/Manuals/SDIII/UserGuide.pdf for more information regarding system monitoring with SDIII. Note: All Supermicro products are designed to support hardware monitoring on preselected features. However, SuperDoctor III allows the user to select items to be monitored and to change both the high and low limits of these items on the configuration page. 1.3.3 Fan Status Monitor with Software The RES-21XR3 has three 80-mm cooling fans and one within each power supply. PC Health Monitoring can check the RPM status of the cooling fans. 1.3.4 CPU Overheat LED and Control This feature is available when the user enables the CPU overheat warning feature in the BIOS. This allows the user to define an overheat temperature. When this temperature reaches this pre-defined overheat threshold, the CPU thermal trip feature will be activated and it will send a signal to the buzzer and, at the same time, the CPU speed will be decreased. Caution: To avoid possible system overheating, please be sure to provide adequate airflow to your system and that all chassis air vents are free of blockage and debris. 1-8 Themis Computer 1—Overview and Specifications 1.4 Power Configuration Settings This section describes the features of your motherboard that deal with power and power settings. 1.4.1 Slow Blinking LED for Suspend-State Indicator When the CPU enters a suspend state, the Power LED will start blinking to indicate that the CPU is in suspend mode. Pressing any key on the keyboard will awaken the CPU, at which time the power LED will stop blinking and remain on. 1.4.2 BIOS Support for USB Keyboard If the USB keyboard is the only keyboard in the system, it will function like a normal keyboard during system boot-up. 1.4.3 Main Switch Override Mechanism When an ATX power supply is used, the power button can function as a system suspend button. When the user presses the power button, the system will enter a SoftOff state. The monitor will be suspended and the hard drive will spin down. Pressing the power button again to wake-up the whole system. During the SoftOff state, the ATX power supply provides power the system to keep the required circuitry “alive”. In case the system malfunctions and you want to turn off the power, just press and hold the power button for 4 seconds. The power will turn off and no power will be provided to the motherboard. 1.4.4 Wake-On-LAN (WOL) Wake-On-LAN is defined as the ability of a management application to remotely power up a computer that is powered off. Remote PC setup, up-dates and asset tracking can occur after hours and on weekends so that daily LAN traffic is kept to a minimum and users are not interrupted. The motherboard has a 3-pin header (WOL) to connect to the 3-pin header on a Network Interface Card (NIC) that has WOL capability. In addition, an onboard LAN controller can also support WOL without any connection to the WOL header. The 3-pin WOL header is to be used with a LAN add-on card only. Themis Computer 1-9 RES-21XR3 Installation Manual 1.5 Version 1.0 Super I/O The disk drive adapter functions of the Super I/O chip include a floppy disk drive controller that is compatible with industry standard 82077/765, a data separator, write pre-compensation circuitry, decode logic, data rate selection, a clock generator, drive interface control logic and interrupt and DMA logic. The wide range of functions integrated onto the Super I/O greatly reduces the number of components required for interfacing with floppy disk drives. The Super I/O supports two 360 K, 720 K, 1.2 M, 1.44 M or 2.88 M disk drives and data transfer rates of 250 Kb/s, 500 Kb/s or 1 Mb/s. It also provides two high-speed, 16550 compatible serial communication ports (UARTs). Each UART includes a 16-byte send/receive FIFO, a programmable baud rate generator, complete modem control capability and a processor interrupt system. Both UARTs provide legacy speed with baud rate of up to 115.2 Kbps as well as an advanced speed with baud rates of 250 K, 500 K, or 1 Mb/s, which support higher speed modems. The Super I/O provides functions that comply with ACPI (Advanced Configuration and Power Interface), which includes support of legacy and ACPI power management through a SMI or SCI function pin. It also features auto power management to reduce power consumption. 1.5.1 Winbond WPCM450 Controller (X8STi-F/-3F Only) The Winbond WPCM450 Controller is a Baseboard management Controller (BMC) that supports the 2D/VGA-compatible Graphics Core with the PCI interface, Virtual media, and Keyboard/Video/Mouse Redirection (KVMR) modules. The WPCM450 interfaces with the host system via a PCI interface to communicate with the Graphics core. It supports USB 2.0 and 1.1 for remote keyboard/mouse/virtual media emulation. It also provides LPC interface to control Super I/O functions. The WPCM450 is connected to the network via n external Ethernet PHY module. The WPCM450 communicates with onboard components via six SMBus interfaces, fan control, and Platform Environment Control Interface (PECI) buses, and General Purpose I/O (3SGPIO) ports.The WPCM450 also includes the following features: • One X-Bus parallel interface for expansion I/O connections • Three ADC inputs, Analog and Digital Video outputs • Two serial ports for boundary scan and debug Note: For more information on IPMI configuration, please refer to the Embedded I P M I U s e r ’s G u i d e p o s t e d o n t h e S u p e r M i c r o w e b s i t e a t http://www.supermicro.com/support/manuals/. 1-10 Themis Computer 1—Overview and Specifications 1.6 System LEDs and I/O Connectors A LEDs ENET1 ENET2 < > < > Storage Drives Left Power Supply Power Fail (PS1) Power Fail (PS2) NIC1 NIC2 C Overheat/ Fan Fail Power ON/OFF Button Right Power Supply B PCI Expansion Card Slots Rear Panel (Note: Only the middle slot is supported by this configuration) IPMI_Dedicated LAN (X8STi-F/-3F) Rear I/O Panel (X8STi-LN4 Only) LAN 3 LAN 4 UID Switch PS/2 Mouse (green) PS/2 Keyboard (purple) USB Port 1 (top) USB Port 0 (bottom) COM Port 1 VGA LAN 1 LAN 2 Gigabit Ethernet Figure 1-5. RES-21XR3 System LEDs and I/O Connectors All RES-21XR3 system LEDs are located on the front panel (see A, Figure 1-5); all I/O connectors are located on the rear panel (see B, Figure 1-5). LEDs are described in Table 1-5 on page 1-13; I/O connectors are described in Table 1-6, page 1-14 Themis Computer 1-11 RES-21XR3 Installation Manual Version 1.0 Table 1-4. Power Supply LED Behavior Symbol LED Power On (red LED) On (red LED) And Off Rear Power Supply Modules Power Fail LED (Left Power Supply) Description If system is powered on, warns that the left power supply has failed or has lost AC input. If system is powered on, warns that the right power supply has failed or has lost AC input. System is powered on and power supply modules are functioning normally, or system has been shut down and there has been no interruption to the AC power. AC power has been interrupted to both power supply modules. When power is restored but system is still off, one of the two indicator lights will be lit. System is receiving DC power (3.3V, 5V, 12V) from the power supply module System is off and not receiving DC power from the Power Supply module. Note: system is powered on Power Fail LED (Right Power Supply) Note: system is powered on Power Fail LED (Left & Right Power supply) Note: system is powered on On (red LED) Or System LED On (green LED) Offb Power Fail LED (Left or Right Power Supply)a Note: system is powered off Green LED (adjacent to AC input) Note: system is powered on Green LED (adjacent to AC input) Note: system is powered off a—This LED behavior indicates only that AC power has interrupted to both power supplies, and does not indicate which power supply module lost power first, or regained power first. b—This LED behavior indicates that DC power is not being used, and the system is off. It does not indicate a loss of AC power to the power supply module. 1-12 Themis Computer 1—Overview and Specifications System LEDs and I/O Connectors Table 1-5. System LEDs Symbol LED Description Power Indicates that the system is turned on. Storage Drive Indicates storage-drive activity. ENET1 NIC1a (Gb Ethernet) Indicates network activity on LAN 1. ENET2 NIC2 (Gb Ethernet) Indicates network activity on LAN 2. Overheat/Fan Fail Warns that the system is exceeding specified temperature parameters. The CPU overheat warning function must be enabled in the BIOS, thus allowing the user to define an overheat temperature, which—when exceeded—triggers the overheat warning LED. < > < > C Symbol —Normally OFF —RED light when temperature limits are exceeded Rear Panel LED(s) Description Each Ethernet port contains two LEDs: The color of the left LED (when facing the port) N/A indicates the LAN connection speed: LAN1 and LAN2 - Off = 10 MHz LAN3b and LAN4b - Green = 100 MHz - Amber = 1 GHz The right LED, when lit, indicates LAN activity. a—NIC = Network Interface Controller. b—LAN3 & 4 supported by extra gigabit Ethernet controller on the X8DTi-LN4F Themis Computer 1-13 RES-21XR3 Installation Manual Version 1.0 Table 1-6. Rear-Panel I/O Connectors Connector Description PS/2 Mouse 6-pin mini-DIN connector to attach a PS/2 mouse device. PS/2 Keyboard 6-pin mini-DIN connector to attach a PS/2 keyboard device. Two 4-pin USB connectors to attach serial devices to USB port 0 and USB port 1. USB 0 and USB 1 Hi-Speed USB 2.0 Serial Ports Note: Six additional USB ports (USB 2 through USB 7) can be accessed directly from the motherboard. COM 1 Serial Port One DB9 (male) connector on rear panel to attach a serial device to COM 1port A second serial port (COM 2) can be accessed directly from the motherboard. VGA Graphics Connector One 17-pin VGA connector to provide a video and CRT display Standard RJ45 connector to attach one or two gigabit Ethernet LAN line(s)—LAN 1 and LAN 2. X8STi-LN4 has an extra gigabit Ethernet controller for two extra ports (LAN 3 and LAN 4). Standard RJ45 connector to attach a dedicated IPMI LAN line with full KVM support (X8STi-F and X8STi-3F only) A Unit Identifier Switch and two LED indicators are located on the motherboard. When the UID switch is pressed, both LEDs are turned on (one LED is located at the rear edge of the motherboard, the other LED is at the front of the motherboard). Pressing the UID again turns off both LED indicators. The UID indicators provide an easy identification of a system unit that may be in need of service. Ethernet LAN Ports IPMI Dedicated Ethernet LAN Port Unit Identifier (UID) Switch Note: The UID can also be triggered via IPMI. 1-14 Themis Computer 1—Overview and Specifications 1.7 1.7.1 Specifications General Table 1-7 lists general specifications for the RES-21XR3. Table 1-7. RES-21XR3 General Specifications Parameter Dimensions Weighta 19” Rack-Mountable with Slide capability Temperatureb Operating: Non-Operating: Description 3.50” (2RU) high 17” (43.4 cm) wide (19” rack-mountable) 17” (43.2 cm) deep Approximately 22.5 pounds (10.2 kg), includes 1 CPU, 6 DIMMs, 1 full-length (up to 12.25”) PCI card, 1 CDRW/DVD-ROM drive, 2 storage drives, and 2 power supplies Add 8.8 pounds (4 kg) for the shipping container and two AC power cords The manual and associated shipping paperwork weighs approximately 1 lb (0.45 kg) Left and right rack-mount tabs attached to chassis Left and right rack-mount slides are optional 0° up to 65° C (32° up to 149°F) –40° to 70° C (–40° to 158° F) Relative Humiditya Operating: Non-Operating: 8% to 95% (non-condensing) 5% to 95% (non-condensing) Maximum Wet Bulba Operating: Non-Operating: 163°C, non-condensing 180°C, non-condensing Altitudea Operating: Non-Operating 0 to 10,000 feet above sea level 0 to 40,000 feet above sea level a—Exact weight is dependent on the specific type of hardware, and amount, installed in your syste. b—Specifications are dependent on the configurations as specified in this manual. Themis Computer 1-15 RES-21XR3 Installation Manual 1.7.2 Version 1.0 Electrical Table 1-8 lists the electrical specifications for the RES-21XR3. Table 1-8. RES-21XR3 Electrical Specifications Description Parameter AC (120 volts, 750W) a DC (48 volts, 750W) a DC (28 volts, 500W) Input Power (typical) 370 watts (typical) 370 watts (typical) 450 watts (typical) Input Current 3.5 amperes @120 Vac 13.5 amperes @48 Vdc 16 amperes @28 Vdc Input Frequency 50/60 Hertz 100–265 Vac, internally fused Input VA Rating 425 VA BTU Rating 1447 BTU/hour Power Factor 0.99 NA NA Input Leakage Current 3.5 mA NA NA Plug Type IEC Input Voltage NAb 40–72 Vdc, internally fused NAb NA 1447 BTU/hour Y-Type (SVS5-4 or equivalent) 18–36 Vdc, internally fused NA 1447 BTU/hour Y-Type (SVS5-4 or equivalent) a—Tested using a SuperMicro X8DA3 Motherboard (32GB RAM) with a nVidia GeForce 9600 GT graphics card. Please contact Themis if exact electrical specifications are needed for a specific system configuration. b—NA = Not Applicable. 1.7.2.1 System Power The RES-21XR3 operates with two N+1 redundant power supplies of 750-watts capacity each that auto-range single-phase AC input from 100 to 265 Vac (47 to 63 Hertz) sources. Filtered and fused (internal) AC is supplied to each power supply from a rear-mounted power connection. Two optional N+1 redundant DC power supplies of 750 watts (48 volts) or 500 watts (28 volts) each may be substituted for the AC power supplies (see Table 1-8). These supplies should be specified at the time of your order. Note: Some AC RES systems may be installed with 650-watt instead of 750watt power supplies, which should not affect the performance of the system. 1.7.2.2 Output Voltage The RES-21XR3 power supply provides output voltages that are split between +3.3V, +5V, +5Vsb, +12V, and -12V rails. 1-16 Themis Computer 1—Overview and Specifications Specifications 1.7.3 Environmental 1.7.3.1 Shock The RES-21XR3 is designed to survive an elevated shock environment. All structural components are welded together, enabling the system to survive a maximum 3-axis shock load of 35G at 25-ms duration. 1.7.3.2 Electrostatic Discharge The RES-21XR3 is designed to tolerate electrostatic pulses up to 15 kilovolts (KV) with no impact on system operation. 1.7.3.3 Noise The RES-21XR3 conforms to the 54-db noise specification. It is possible to achieve further noise reduction by installing a sound baffle (muffler) on both the front and rear of the RES-21XR3 chassis (Figure 1-6 and Figure 1-7 on page 1-18 show the front and rear baffles, respectively, for a RES-21XR3 system). Contact your Themis representative for additional information. Front Sound Baffle A A Figure 1-6. RES-21XR3 with Front Sound Baffle Installed (Front View) Front Access—Opening the two front doors of the RES-21XR3 requires removing the front sound baffle. To do this, loosen the two (2) captive knurled Phillips screws holding the baffle to the chassis (see A, Figure 1-6) and remove the baffle. Themis Computer 1-17 RES-21XR3 Installation Manual Version 1.0 Note: All RES systems are shipped with BIOS fan speed set to the quietest mode. As such, the BIOS setting will read as“Energy Saving/ES”. Rear Sound Baffle B Rear Right Side Rear Left Side B B B B A A A A Figure 1-7. RES-21XR3 with Rear Sound Baffle Installed (Rear View) Rear Access—Accessing the I/O connectors and PCI card I/O on the rear of the RES-21XR3 requires opening the rear sound baffle door. To do this, loosen the four (4) captive knurled Phillips screws A holding the baffle door to the chassis (see A in Figure 1-7) and swing the door downward away from the chassis, exposing the rear connectors and PCI cards. Removing the protective top cover for access to the interior requires that the rear sound baffle be totally removed (this can be done with the baffle door closed). To do this, five (5) M3x4 flathead Phillips screws B must be removed, two on each side of the baffle and one (captive) in the middle on the top (see Figure 1-7). After removing the rear baffle, the top cover can be removed as described in Section 2.1.1, “Remove Protective Top Cover,” on page 2-1 (Chapter 2, "Installation and Operation"). 1-18 Themis Computer 1—Overview and Specifications 1.8 Packaging and Shipping The RES-21XR3 is packaged in a reusable shipping container. Approximate weight of an empty container and two AC power cords is 8.8 pounds (4 kg). The approximate weight of a RES-21XR3 (loaded with 1 CPU, 6 DIMMs, 2 storage drives, 2 full-length PCI cards, 1 CD-RW/DVD-ROM drive, and two power supplies) is approximately 22.5 pounds (10.2 kg). [See Table 1-7 on page 1-15 for a general weight table for all models of the RES Series.] The approximate weight of a manual and associated shipping paperwork is one pound (0.45 kg). Therefore, both the shipping container and a fully installed RES-21XR3 including power cords, manual, and associated paperwork, weigh approximately 32.3 pounds (14.65 kg). Caution: Do not discard the original packaging in which your system was shipped. The original packaging was designed specifically to withstand the stress and rigors of today’s shipping environment. It will be needed in the event the system must be shipped back to Themis Computer. For re-packing instructions, refer to Appendix F, “Re-packaging for Shipment” 1.8.1 Accessory Kit Each RES-21XR3 is packaged with an Accessory Kit, consisting of the following items: A. Two AC Power Cords B. Two Front-Bezel Barrel Keys When you unpack the RES-21XR3, please verify that all of these items are included. If any of these items are missing or not as pictured, please call Themis Technical Support at 510-252-0870, or send an email to [email protected]. To learn how to secure the AC power cords and the power-cord retainer bracket, refer to Section 2.3.1, “Plugging in the AC Power Cords,” on page 2-20. Themis Computer 1-19 RES-21XR3 Installation Manual 1.8.2 Version 1.0 Rack-Mount Slides (Optional) Rack-Mount Slides can be mounted on each side of the RES-21XR3 for the purpose of sliding the unit in and out of a rack. Mounting slides are optional and can be ordered at the time of purchase. To learn how to install rack-mount slides, refer to Appendix B, “Rack-Mount Slide Installation”. Table 1-9. Approximate Weightsa of the RES Series Model Weight (Approximate) CPU Sockets Depth RES-12XR3 19.5 lbs (8.9 kg) 2 20” RES-12XR3-S 17 labs (7.7 kg) 2 17” RES-11XR3 14.6 lbs (6.6 kg) 1 17” RES-22XR3 25 lbs (11.4 kg) 2 20” RES-22XR3-S 23 lbs (10.4kg) 2 17” RES-22XR3/FIO 25.3 lbs (11.5kg) 2 16” RES-21XR3b 22.5 lbs (10.2 kg) 1 17” RES-32XR3 28.5 lbs (12.9 kg) 2 20” RES-32XR3-S 26.5 lbs (12 kg) 2 17” RES-32XR3/FIO 29 lbs (13.2 kg) 2 16” RES-31XR3 26 lbs (11.8 kg) 1 17” Description Includes: All CPU sockets filled 6 DIMMs 2 storage drives 2 PCI cards (one for 11XR3) 1 CD-RW/DVD-ROM drive 2 power supplies Includes: All CPU sockets filled 6 DIMMs 2 storage drives 2 PCI cards 1 CD-RW/DVD-ROM drive 2 power supplies Includes: All CPU sockets filled 6 DIMMs 2 storage drives 2 PCI cards 1 CD-RW/DVD-ROM drive 2 power supplies a—Exact weight depends on the specific type, and amount, of hardware installed in your system. b—This system configuration only allows for 1 full-length PCI card, and one CPU. 1-20 Themis Computer Installation Section Chapter Installation and Operation This chapter describes: • How to install a memory module, storage drive, PCI card, 80-mm-fan, power supply, and lithium battery • Rack-mount brackets • How to turn the RES-21XR3 on and off 2.1 Installation Procedures Caution: Use industry-standard ESD grounding techniques when handling all components. Wear an antistatic wrist strap and use an ESD-protected mat. Store ESD-sensitive components in antistatic bags before placing them on any surface. Handle all IC cards by the front panel or edges only. To install or replace a SAS/SATA storage drive, fan, or power supply, skip the next section and proceed directly to page 2-12, page 2-15, or page 2-16, respectively. Replacement of motherboard components requires removal of the protective cover, and is some cases the air-flow deflector. Themis Computer 2-1 RES-21XR3 Installation Manual 2.1.1 Version 1.0 Remove Protective Top Cover To access a motherboard component, open the RES-21XR3 as follows: 1. Loosen the two captive Phillips screws holding the protective top access cover to the rear of the RES-21XR3 chassis (see A, Figure 2-1). 2. Both the front and sides of the cover have flat hooks or tabs underneath that fit under slots on the chassis top edges (see B, Figure 2-1). Remove the cover by sliding it toward the rear until it is free of these chassis slots. 3. Store the cover in a safe location until it is replaced. 4. Proceed to the appropriate section to install or replace a memory module (page 2-3), PCI card (page 2-7), or lithium battery (page 2-11). Rear View A Loosen the 2 captive access-cover screws… Chassis slot Chassis slot Left-side top edge B …and slide the top cover toward the rear until the top hooks and tabs clear all chassis slots Figure 2-1. Remove the RES-21XR3 Protective Access Cover 2-2 Themis Computer 2—Installation and Operation Installation Procedures 2.1.2 Memory Modules The RES-21XR3 supports memory according to Table 2-1. Table 2-1. RES-21XR3 Memory Capacity Memory Parameters Capacity DDR3 Registered ECC Speed (MHz) Number of DIMMS Pins per DIMM Max DIMM size 24 GB Yes 1333/1066/800 6 240 4 GB Motherboard X8STi series Caution: Exercise extreme caution when installing or removing Memory Modules to prevent any possible damage. Table 2-2. RES-21XR3 Optimal Memory Population (CPU1 Installed) DIMMs Branch 0 3 DIMMs P1 DIMM1A 6 DIMMs P1DIMM1A Branch 1 P1 DIMM2A P1 DIMM1B P1DIMM2A Branch 2 P1 DIMM3A P1 DIMM2B P1 DIMM3A P1 DIMM3B When installing memory, follow these rules for best memory performance: • It is strongly recommended that you do not mix memory modules of different speeds and sizes. If DIMMs of different speeds have been installed, verify that the BIOS setup is configured for the fastest speed of RAM used. Caution: The motherboard will NOT boot if DIMM module(s) are installed in any of the Bank 2 slots but none in the Bank 1 slots. The first DIMM module must be installed in DIMM1A (see Figure 2-3 on page 2-5 for DIMM locations), and all Bank1 slots must be filled before populating any Bank 2 slot(s). Maximum DIMM size per slot is 4 GB. Themis Computer 2-3 RES-21XR3 Installation Manual Version 1.0 2.1.2.1 Installation The following procedure explains how to install the DDR3 Memory Modules. 1. Loosen and remove the seven (7) screws securing the air-flow deflector (see Figure 2-2). Figure 2-2. Remove RES-21XR3 Air-Flow Deflector 2. After the air-flow deflector is removed, the memory modules will be exposed (see Figure 1-4 on page 1-6). 2-4 Themis Computer 2—Installation and Operation Installation Procedures Lithium Battery Branch 0 DIMM 1B DIMM 1A DIMM 2B Branch 1 DIMM 2A DIMM 3B Branch 2 DIMM 3A CPU Socket Figure 2-3. Memory Module Slot Locations 3. If a module is already seated in the slot you have selected for installation, remove it by gently pressing down and outward on the latches at both ends of the slot (see Figure 2-4 on page 2-6), then pulling the old module directly up from the slot until it is free of the connector (see Table 2-4, page 2-6). Themis Computer 2-5 RES-21XR3 Installation Manual Version 1.0 Press latch downward & outward at each end Figure 2-4. Memory Module Removal 4. Before inserting a new memory module into the vacant slot, make sure that the two latches are pulled outward away from the center of the slot. With the latches in the outward position, gently insert the new module vertically into its slot and press firmly downward until it snaps into place. Note: Make sure the memory module has the proper orientation by aligning the alignment notch at the bottom edge with its counterpart ridge at the bottom of the slot. 5. If all the memory modules have been replaced in the system, replace the air flow diverter and secure it with the seven screws previously removed in Step 1 on page 2-4). 2-6 Themis Computer 2—Installation and Operation Installation Procedures 2.1.3 PCI Cards Because of the unique design of the X8STi motherboard, the PCI card on RES-21XR3 must be installed on a x16 PCI Riser Card (see Figure 2-5 below), positioned horizontally through the middle PCI slot on the rear I/O panel (see Figure 2-8, page 2-9). The middle PCI slot will allow for a full-size PCI card (Call Themis customer support for details relating to specific card configurations). See Table 2-3 on page 2-8 for a list of popular Riser Cards that are supported by Themis. Note Slot 6 Although the possibility for custom riser card solutions do exist, the SuperMicro x16 riser card (as seen below) is currently the only riser card supported by Themis for the RES-21XR3. PCI-E 2.0 x16 Riser Card RSC-RR1U-E16 shown below Lithium Battery SXB PCI-E 2.0 x8 (in x4 slot) X8STi Motherboard (Top View) Figure 2-5. Positioning of the RES-21XR3 PCI Riser Cards Themis Computer 2-7 RES-21XR3 Installation Manual Version 1.0 Table 2-3. Riser card and system configurationsa Riser Card Output Slots Riser Card Part Number XR3 Box RSC-R1UU-E16 RSC-R1UU-2E8 RSC-R1UU-AXE8 RSC-R2UU-A4E8 RSC-R2UU-A3XE8 Themis Custom RES-12XR3 RES-22XR3 RES-12XR3 RES-22XR3 RES-12XR3 RES-22XR3 RES-22XR3 RES-22XR3-FIO RES-22XR3 RES-22XR3-FIO RES-22XR3 RES-22XR3-FIO RES-11XR3 RES-21XR3 RSC-RR1U-E16 UIO PCI-E x8 PCI-E x16 PCI-X — — 1 — — 2 — — — 1 — 1 — 4 — — — 1 — 3 — — 2b — — — 1 — a—This list includes the most popular Riser Cards. Call Themis Customer Support for a complete list of supported riser card and system combinations. b—One x16, one x16 in x8 slot Retainer Bracket Retainer Bracket Screws Universal I/O (UIO) Right Riser Card PCI-Express 2.0 x16 Note: P/N of Riser Card shown = RSC-R1UU-UE16. This figure is intended to demonstrate the retainer bracket only, as the X8STi does not have an UIO slot. Figure 2-6. PCI Riser Cards are attached to a Retainer Bracket … 2-8 Themis Computer 2—Installation and Operation Installation Procedures Retainer Bracket Figure 2-7. Then inserted into the PCI slot of the Motherboard Please note that the RES-21XR3 with X8STi-Family motherboard only supports use of the middle PCI expansion slot at present time. Upper PCI Expansion Slot (Not Supported) Middle PCI Expansion Slot Lower PCI Expansion Slot (Not Supported) Figure 2-8. Horizontal I/O slots 2.1.3.1 Installing Cards 1. Locate the empty slot within which a card will be installed and remove the blank I/O faceplate corresponding to the slot (see Figure 2-8). 2. Carefully install each PCI card (lower card first) into the appropriate slot until all expansion cards have been installed, securing each I/O faceplate to the rear I/O panel—if permitted. Secure the side edge of each card according to the following instructions: Themis Computer 2-9 RES-21XR3 Installation Manual Version 1.0 Lower PCI Expansion Slot—Themis has provided a pair of threaded standoffs to secure the card installed in the lower PCI expansion slot to the motherboard. Remove the standoff screws, install the PCI card into the lower slot, and secure the PCI card with the standoff screws. Figure 2-9. PCI Card Retainer Clip Middle PCI Expansion Slot—Secure the middle and upper cards as indicated below. Upper PCI Expansion Slot—After installing the upper PCI expansion card, install a PCI Retainer Clip—two if necessary—that was shipped with your order onto the edge of the PCI cards (see.Figure 2-9.) 3. Attach any internal I/O cables to the installed PCI cards, and carefully fold and tuck any exposed ribbon cables into the cabinet. If you have no further installations to perform, close the RES-21XR3 chassis by refastening the top cover removed in step 1 on page 2. Note: Call Themis Technical Support if the PCI card being installed does not conform to the rear panel shown in Figure 2-8 on page 2-9. The RES-21XR3 with RSC-RR1U-E16 Riser Card only support use of the middle PCI Expansion Slot. 2-10 Themis Computer 2—Installation and Operation Installation Procedures 2.1.4 Lithium Battery 2.1.4.1 Removing the Lithium Battery Perform the following steps to remove the lithium battery: 1. Make sure the system is powered off (see “Operation” on page 2-20 to safely power down your RES-21XR3). Lithium Battery (CR2032) Figure 2-10. The RES-21XR3 Lithium Battery 2. Locate the lithium battery socket and squeeze the latch (see A, Figure 2-11 on page 2-12) together until the battery lifts out of its socket. Carefully remove the battery without disturbing any of the motherboard components. Themis Computer 2-11 RES-21XR3 Installation Manual Version 1.0 3. Remove the old battery and replace with a new battery (see next section). Battery Latch A To release, squeeze the battery latch together... B . and remove the battery from socket Figure 2-11. The RES-21XR3 Lithium Battery and Socket 2.1.4.2 Installing a Lithium Battery Perform the following steps to insert a new lithium battery: 1. Tilt the replacement battery into the empty socket so that it is angled under the battery latch (see B, Figure 2-11). 2. Carefully press down on the battery until it clicks firmly into place. 2.1.5 SAS/SATA Storage Drive Perform the following steps to remove and install a SAS/SATA storage drive. Note: For SATA drives, the upper left-hand removable drive (SATA ID0) is designated as the boot drive. The front bezel (door) of the RES-21XR3 must be unlocked and opened to access the SAS/SATA storage drives. 2-12 Themis Computer 2—Installation and Operation Installation Procedures 2.1.5.1 Opening the RES-21XR3 Front Doors To access the removable storage drives, you must first open the front doors (see Figure 2-12). The knurled captive screw on the front of the RES-21XR3 allows the doors to lock without a key. To unlock the front doors, turn the screw counterclockwise and pull both bezel doors away from the chassis. The accessory kit shipped with your RES-21XR3 contains two barrel lock keys. This provides you the option of unlocking/locking the storage drives. Knurled Screw Figure 2-12. Opening the RES-21XR3 Front Doors Figure 2-13. Unlocking the RES-21XR3 Storage Drives (Front Doors Removed) 2.1.5.2 Storage-Drive Removal After opening the front doors, perform the following steps to remove and install a storage drive: Themis Computer 2-13 RES-21XR3 Installation Manual Version 1.0 Note: Since RES-21XR3 storage drives are “hot-swappable”, it is not necessary to turn off system power in order to remove and replace a drive (except the operating system drive). However, after a warning has been broadcast to all users, the drive being replaced should be dismounted before being removed. Consult your operating system manual for specific details. 1. Make sure the necessary precautions have been observed as per the previous Note (see “Operation” on page 2-20). 2. Locate the drive to be removed. 3. Insert the barrel lock key into the storage drive you want to remove, and turn it 45 degrees clockwise (presuming the storage drive is locked). 4. Firmly push in the latch lock until the latch handle releases from the drive. 5. Grab the latch handle and pull the drive completely away from its slot. Caution: When pulling the storage drive from the chassis, hold it at the bottom to prevent it from falling and damaging the drive. A Insert key into barrel lock and turn 45 degrees clockwise,… B … push the latch lock,… C … and pull drive out with the latch handle Barrel Key Latch Lock Latch Handle Figure 2-14. RES-21XR3 Storage Drive Removal 2-14 Themis Computer 2—Installation and Operation Installation Procedures 2.1.5.3 Storage-Drive Installation To install a storage drive, 1. Make sure the latch handle of the drive to be installed is in the open position. 2. Properly orient the new drive and insert it into the vacant drive slot. If the drive cannot be inserted into the slot (it might be backwards), rotate it 180 degrees. 3. Push the drive toward the rear (DO NOT CLOSE the latch handle while pushing) until the drive is flush with the front of the chassis. The handle will swing closed when it comes into contact with the RES-21XR3 chassis. 4. When the drive is fully inserted in its slot, insert the key into the barrel lock and turn it 45 degrees counter-clockwise. The drive is now locked. Caution: When in the closed position, the latch handle secures the drive to the chassis. If the handle is closed before the drive is fully inserted, the latch mechanism may not fully engage to secure the drive. 5. If you are installing another storage drive, repeat Steps 1–4 for each additional drive. 2.1.6 Hot-Swappable 80-mm Fan The RES-21XR3 contains three high-speed 80-mm fans (see Figure 2-15, page 216), each of which can be “hot-swapped” in the field in the event of a fan failure. 2.1.6.1 Removing and Installing a 80-mm Fan Perform the following steps to remove and install a 80-mm fan: Note: Since RES-21XR3 fans are “hot-swappable”, it is not necessary to turn off system power in order to remove and replace a fan, 1. Push the fan lid lock left to unlock the fan lid (see Figure 2-15 on page 2-16). Pull the fan lid upward exposing the three 80-mm fans. Themis Computer 2-15 RES-21XR3 Installation Manual Version 1.0 2. Each fan is secured by a fan lock located on the side of the fan. To remove a fan, push the fan lock toward the front of the fan and pull the fan directly upward (see Figure 2-15 below). 3. When the fan is removed, its 4-wire connector will automatically be disconnected from the chassis. Insert the replacement fan carefully into the empty fan slot until it is flush with the other fans. The 4-wire connector will automatically engage its counterpart successfully. Locking Stud (1 of 3) 80-mm Fan Hinged Fan Lid Fan Lock Fan Lid Lock Figure 2-15. The RES-21XR3 Hot-Swappable 80-mm Fans 2.1.7 Power Supply Each load-sharing (N+1 redundant) power supply can be hot-swapped while the system is still on and operational. 2.1.7.1 Removing a Power Supply Perform the following steps to remove a power supply: 1. Loosen the two screws holding the power supply locking bracket to the chassis (see A, Figure 2-16, page 2-17). Place the bracket in a safe place. 2. Put the right index finger on the power supply extraction handle and the right thumb on the left side of the power supply locking lever (see B, Figure 2-16, page 2-17). 2-16 Themis Computer 2—Installation and Operation Installation Procedures A Remove power supply locking bracket... Knurled captive Phillips screw Knurled captive Phillips screw Power supply locking bracket B ... then push locking lever to the right and remove power supply Push lever to the right to release power supply System Power LED Phillips Screw Hole for knurled captive screw Power Supply Locking Lever Phillips Screw Hole for knurled captive screw on power supply locking bracket Extraction Handle AC Input Power Supply Locking Lever Figure 2-16. The RES-21XR3 Power Supply Locking Mechanism 3. Squeeze the locking lever toward the extraction handle and firmly pull the power supply from the chassis. Caution: When pulling the power supply from the chassis, hold it at the bottom to prevent it from falling and damaging the unit. Themis Computer 2-17 RES-21XR3 Installation Manual Version 1.0 2.1.7.2 Installing a Power Supply Perform the following steps to install a power supply: 1. Insert the replacement power supply into an empty slot with the power LED at the top (see Figure 2-16 on page 2-17). 2. Push the power supply carefully into its slot until it is firmly seated (a click will be heard when the locking lever is securely fastened to the chassis). 3. Replace and tighten the two captive screws to hold the power supply locking lever to the chassis (see Figure 2-16 on page 2-17) to secure both power supplies. Caution: When inserting the power supply into the chassis, hold it at the bottom to prevent it from falling and damaging the unit. 2-18 Themis Computer 2—Installation and Operation 2.2 2.2.1 Rack Mounts Mounting Brackets The rack-mount brackets (flanges) are used to secure the chassis to the 19” rack (see Figure 2-17). Handles are used to pull the RES-21XR3 from the rack when rackmount slides have been installed on the sides of the chassis (see following section). Right Mounting Bracket Right Handle Figure 2-17. Right Rack-Mount Bracket 2.2.2 Rack-Mount Slides (Optional) Rack-Mount Slides can be mounted on each side of the RES-21XR3, for the purpose of sliding the unit in and out of a rack. Mounting slides are optional and should be ordered at the time your system is purchased. To learn how to install rack-mount slides, refer to Appendix B, “Rack-Mount Slide Installation”. Caution: Any screws used to mount a slide to a RES-21XR3 chassis must not exceed a length of 3/8” to prevent excessive penetration of the chassis. Themis Computer 2-19 2—Installation and Operation 2.3 2.3.1 Operation Plugging in the AC Power Cords Before powering on the RES-21XR3, plug in the AC power cords as follows: 1. On the rear of the RES-21XR3, plug an AC power cord (shipped with unit) into the AC power socket on each power supply (see Figure 2-18). Locking Lever AC Power Socket System Power LED Figure 2-18. AC Power Socket and LED on the RES-21XR3 Rear 2.3.2 Turning the System On 1. Plug the AC power cord from each of the RES-21XR3 power supplies into a “live” AC outlet. 2. On the front of the RES-21XR3 push the system power on/off button (see Figure 2-19). This will cause the system POWER LED to light (green), as well as the power supply module to light (green). System Power LED System Power On/Off Button Figure 2-19. System Power Button and LED on the RES-21XR3 Front Themis Computer 2-20 2—Installation and Operation Operation 2.3.3 Getting Started 2.3.3.1 Configuration 1. Make sure all SAS/SATA drives are installed (see “SAS/SATA Storage Drive” on page 2-12). Drive ID numbers are shown in Figure 2-13 on page 2-13, Chapter 2. Changes may be made through the BIOS. 2. Connect a multiscan monitor to the VGA connector, or to the appropriate connector on the PCI-E graphics card (if installed). 3. Attach a PS/2 keyboard and mouse to the appropriate connectors on the rear I/O panel of the RES-21XR3 (see Figure 1-5 on page 1-11) 4. Turn the system on (see previous section). 2.3.3.2 Linux Installation The subject of installing the Linux operating system onto the RES-21XR3 is detailed in Appendix C, “Red Hat Enterprise Linux 5 Installation”. 2.3.4 Turning the System Off Caution: Before turning your system off, make sure to save all open files, properly close applications, and broadcast a warning to all users on any active networks. 1. To turn the RES-21XR3 power off, press and hold the system power on/off button (see Figure 2-19, page 2-20) for at least four (4) seconds. This will shut down the system and turn off the POWER LED, as well as the power supply LED. As an alternative, a modern operating system (Windows 9x or newer and Linux, for example) can turn off the system after a graceful OS software shutdown. Themis Computer 2-21 RES-21XR3 Installation Manual 2-22 Version 1.0 Themis Computer Installation Section Chapter BIOS Setup Utility 3.1 Introduction Note: The information on this chapter is based on the Super Micro Computer, Inc., User Manuals for the X8STi Series motherboard installed in the system. This chapter describes the starting, and using, the BIOS Setup Utility To enter the AMI BIOS Setup Utility screens, press the <Delete> key while the system is booting up. Note: In most cases, the <Delete> key is used to invoke the AMI BIOS setup screen. There are a few cases when other keys are used, including <F1>, <F2>, etc. Each main BIOS menu option is described in this manual. The Main BIOS setup menu screen has two main frames. The left frame displays all the options that can be configured. Grayed-out options cannot be configured. Options in blue can be configured by the user. The right frame displays the key legend. Above the key legend is an area reserved for a text message. When an option is selected in the left frame, it is highlighted in white. Often a text message will accompany it. Themis Computer 3-1 RES-21XR3 Installation Manual Version 1.0 Note: The AMI BIOS has default text messages built in. Themis has the option to include, omit, or alter any of these text messages. The AMI BIOS Setup Utility employs a key-based navigation system called “hot keys”. Most of the AMI BIOS setup utility “hot keys” can be employed at any time during the setup navigation process. These keys include <F1>, <F10>, <Enter>, <ESC>, arrow keys, etc. Note: Options printed in Bold are default settings. 3.1.1 How To Change the Configuration Data The configuration data that determines the system parameters may be altered by entering the AMI BIOS Setup utility. This Setup utility can be accessed by pressing <Del> at the appropriate time during system boot. 3.1.2 Starting the Setup Utility Normally, the only visible Power-On Self-Test (POST) routine is the memory test. While the memory is being tested, press the <Delete> key to enter the main menu of the AMI BIOS Setup Utility. From the main menu, you can access the other setup screens. An AMI BIOS identification string is displayed at the left bottom corner of the screen below the copyright message. Caution: Do not upgrade the BIOS unless your system has a BIOS-related issue. Flashing the wrong BIOS can cause irreversible damage to the system. In no event shall Themis be liable for direct, indirect, special, incidental, or consequential damages arising from a BIOS update. If you have to update the BIOS, do not shut down or reset the system while the BIOS is updating. This is to avoid potential boot failure. 3-2 Themis Computer 3—BIOS Setup Utility 3.2 Main BIOS Setup When you first enter the AMI BIOS Setup Utility, you will enter the Main setup screen. You can always return to the Main setup screen by selecting the Main tab on the top of the screen. The Main BIOS Setup screen is shown in Figure 3-1. Figure 3-1. Main BIOS Setup Screen 3.2.1 System Overview The following BIOS information will be displayed: 3.2.1.1 System Time/System Date Use this option to alter the system time and date. Highlight System Time or System Date using the arrow keys. Key in new values through the keyboard and press <Enter>. Press the <Tab> key to move between fields. The date has be entered in Day MM/DD/YY format. The time is entered in HH:MM:SS format. Note: The time is in the 24-hour format. For example, 5:30 P.M. appears as 17:30:00. Themis Computer 3-3 RES-21XR3 Installation Manual Version 1.0 3.2.1.2 AMI BIOS • Version: This item displays the BIOS revision employed in your system. • Build Date: This item displays the date when this BIOS was finished. 3.2.1.3 Processor The AMI BIOS will automatically display the status of the processor employed in your system: • CPU Type: This item displays the type of CPU used in the motherboard. • Speed: This item displays the speed of the CPU detected by the BIOS. • Physical Count: This item displays the number of processors installed in your system as detected by the BIOS. • Logical Count: This item displays the number of CPU Cores installed in your system as detected by the BIOS. 3.2.1.4 System Memory This displays the size of memory available in the system: • Populated Size: This item displays the populated memory size detected by the BIOS. • Available Size: This item displays the memory size that is available for use. 3-4 Themis Computer 3—BIOS Setup Utility 3.3 Advanced Setup Configurations Use the arrow keys to select Advanced Settings and hit <Enter> to access the submenu items, then select Boot Features: Figure 3-2. Advanced Settings 3.3.1 BOOT Features 3.3.1.1 Quick Boot If Enabled, this option will skip certain tests during POST to decrease the time needed for system boot. The options are Enabled (default) and Disabled. 3.3.1.2 Quiet Boot This option allows the bootup screen options to be modified between POST messages or the OEM logo. Select Disabled to display the POST messages. Select Enabled to display the OEM logo instead of the normal POST messages. The options are Enabled (default) and Disabled. 3.3.1.3 AddOn ROM Display Mode This sets the display mode for Option ROM. The options are Force BIOS (default) and Keep Current. Themis Computer 3-5 RES-21XR3 Installation Manual Version 1.0 3.3.1.4 Bootup Num-Lock This feature selects the Power-on state for Numlock key. The options are Off and On (default). 3.3.1.5 PS/2 Mouse Support Select Enabled to enable PS/2 Mouse support. Select Auto (default) to enable the onboard PS/2 mouse when a PS/2mouse is detected. The options are Enable, Disabled, and Auto (default). 3.3.1.6 Wait For 'F1' If Error This forces the system to wait until the 'F1' key is pressed if an error occurs. The options are Disabled and Enabled (default) 3.3.1.7 Hit 'Del' Message Display This feature displays “Press DEL to run Setup” during POST. The options are Enabled (default) and Disabled. 3.3.1.8 Watch Dog Function If enabled, the Watch Dog Timer will allow the system to reboot when it is inactive for more than 5 minutes. The options are Enabled and Disabled (default). 3.3.1.9 Power Button Function This setting allows you to decide if the power button will instantly turn the system off, or wait 4 seconds to turn off while the button is depressed. The options are 4 Seconds Override and Instant Off (default). 3.3.1.10 Restore on AC Power Loss Use this feature to set the power state after a power outage. Select Power-Off for the system power to remain off after a power loss. Select Power-On for the system power to be turned on after a power loss. Select Last State to allow the system to resume its last state before a power loss. The options are Power-On, Power-Off and Last State (default). 3-6 Themis Computer 3—BIOS Setup Utility Advanced Setup Configurations 3.3.1.11 Interrupt 19 Capture Interrupt 19 is the software interrupt that controls the boot disk function. When this item is set to Enabled, the ROM BIOS of the host adaptors will “capture” Interrupt 19 at boot and allow the drives that are attached to these host adaptors to function as bootable disks. If this item is set to Disabled, the ROM BIOS of the host adaptors will not capture Interrupt 19, and the drives attached to these adaptors will not function as bootable devices. The options are Enabled (default) and Disabled. 3.3.2 Processor and Clock Options This submenu allows the user to configure the Processor and Clock settings. Warning: Take caution when changing the Advanced settings. An incorrect value, a very high DRAM frequency or incorrect DRAM timing may cause system to become unstable. When this occurs, revert to the default setting. 3.3.2.1 CPU Ratio This feature allows the user to use the CPU clock multiplier to multiply CPU speed in order to enhance performance. Select Manual to manually set the multiplier setting. Select Auto to allow the BIOS to automatically select the CPU multiplier setting for your system. The options are Auto (default) and Manual. 3.3.2.2 Clock Spread Spectrum Select Enable to use the feature of Clock Spectrum, which will allow the BIOS to monitor and attempt to reduce the level of Electromagnetic interference caused by the components whenever needed. Select Disabled to enhance system stability. The options are Disabled (default) and Enabled. 3.3.2.3 Hardware Prefetcher (Available when supported by the CPU) If set to Enabled, the hardware pre fetcher will pre fetch streams of data and instructions from the main memory to the L2 cache in the forward or backward manner to improve CPU performance. The options are Disabled and Enabled (default). Themis Computer 3-7 RES-21XR3 Installation Manual Version 1.0 3.3.2.4 Adjacent Cache Line Prefetch (Available when supported by the CPU) The CPU fetches the cache line for 64 bytes if this option is set to Disabled. The CPU fetches both cache lines for 128 bytes as comprised if Enabled (default). 3.3.2.5 MPS and ACPI MADT Ordering Choose the method of ordering for the Multiple APIC Description Table (MADT). Select Modern Ordering for Microsoft Windows XP or later. Select Legacy Ordering for Microsoft Windows 2000 or earlier. The options are Modern Ordering (default) and Legacy Ordering. 3.3.2.6 Intel Virtualization Technology (Available when supported by the CPU) Select Enabled to employ the feature of Virtualization Technology to allow one platform to run multiple operating systems and applications in independent partitions, producing multiple “virtual” systems in one physical computer. The options are Enabled (default) and Disabled. Note: If there is any change to this setting, you must power off and restart the system for the change to take effect. Please refer to Intel’s web site for detailed information. 3.3.2.7 Execute-Disable Bit Capability (Available when supported by the OS and the CPU) Set to Enabled to enable the Execute Disable Bit which will allow the processor to delegate areas in the system memory where an application code can execute and where it cannot, thus preventing a worm or a virus from flooding illegal codes to overwhelm the processor or damage the system during an attack. The default is Enabled (default). (Refer to Intel and Microsoft Web Sites for more information.). 3.3.2.8 Intel® AES-NI (When supported by the CPU) Intel® AES instructions are a new set of instructions available beginning with the all new 2010 Intel® Core™ processor family based on the 32nm Intel® microarchitecture. These instructions enable fast and secure data encryption and decryption, using the Advanced Encryption Standard (AES). The options are Disabled (default) and Enabled. 3-8 Themis Computer 3—BIOS Setup Utility Advanced Setup Configurations 3.3.2.9 Simultaneous Multi-Threading (Available when supported by the CPU) Set to Enabled to use the Hyper-Threading Technology, which will result in increased CPU performance. The options are Disabled and Enabled (default). 3.3.2.10 Active Processor Cores Set to Enabled to employ a processor's Second Core and beyond. (Please refer to Intel's web site for more information.) The options are All (default), 1 and 2. 3.3.2.11 Intel® EIST Technology EIST (Enhanced Intel SpeedStep Technology) allows the system to automatically adjust processor voltage and core frequency in an effort to reduce power consumption and heat dissipation. Please refer to Intel’s web site for detailed information. The options are Disable (Disable GV3) and Enable (Enable GV3). 3.3.2.12 Intel® Turbo Boost Configuration (Available if supported by the CPU) Turbo Ratio Limit Program Select Enabled to set the processor’s clock ration in relation to the bus speed. The options are Enabled (default) and Disabled. The default value depends on the type of CPU installed. Note: All example default values shown below represent that of an Intel® Core™ i7 965 Extreme Edition. Core 1 Ratio Limit This increases (multiplies) the processor’s core 1 clock speed in relation to the bus speed. The default setting is 27. Press “+” or “-” on your keyboard to change this value. Core 2–4 Ratio Limit This increases the processor’s core 2–4 clock speeds in relation to the bus speed. The default setting is 27 for core 2 and 26 for cores 3 and 4. Press “+” or “-” on your keyboard to change this value. Themis Computer 3-9 RES-21XR3 Installation Manual Version 1.0 TDC Limit Override This option will override the system’s default electrical current setting for the processor. The options are Enabled (default) and Disabled. TDC Limit Value This option sets the processor’s electrical current value. The default setting is 880. Press “+” or “-” on your keyboard to change this value. TDP Limit Override Select Enabled to override the default power setting for the processor. The Options are Enabled (default) and Disabled. TDP Limit Value Use this option to set the processor’s power value. The default setting is 1040. Press “+” or “-” on your keyboard to change this value. 3.3.2.13 C1E Support Select Enabled to use the feature of Enhanced Halt State. C1E significantly reduces the CPU's power consumption by reducing the CPU's clock cycle and voltage during a “Halt State.” The options are Disabled and Enabled (default). 3.3.2.14 Intel® C-STATE Tech If enabled, C-State is set by the system automatically to either C2, C3, or C4 state. The options are Disabled and Enabled (default). 3.3.2.15 C-State package limit setting If set to Auto, the AMI BIOS will automatically set the limit on the C-State package register. The options are Auto (default), C1, C3, C6, and C7. 3.3.2.16 C1 Auto Demotion When enabled, the CPU will conditionally demote C3, C6 or C7 requests to C1 based on un-core auto-demote information. The options are Disabled and Enabled (default). 3-10 Themis Computer 3—BIOS Setup Utility Advanced Setup Configurations 3.3.2.17 C3 Auto Demotion When enabled, the CPU will conditionally demote C6 or C7 requests to C3 based on un-core auto-demote information. The options are Disabled and Enabled (default). 3.3.2.18 ACPI T State This feature enables the ACPI throttling support for the processor to save power. The options are Disabled (default) and Enabled. 3.3.2.19 DCA Technology This feature accelerates the performance of TOE devices. Note: A TOE device is a specialized, dedicated processor that is installed on an add-on card or a network card to handle some or all packet processing of this addon card. For this motherboard, the TOE device is built inside the ESB2 South Bridge chip. This feature is supported only by some types of processors. The options are Enabled (default) and Disabled. 3.3.2.20 DCA Prefetch Delay A DCA Prefetch is used with TOE components to prefetch data in order to shorten execution cycles and maximize data-processing efficiency. Prefetching too frequently can saturate the cache directory and delay necessary cache accesses. This feature reduces or increases the frequency the system prefetches data. The options are [8], [16], [32] (default), [40], [48], [56], [64], [72], [80], [88], [96], [104], [112], [120]. 3.3.3 Advanced Chipset Control The items included in the Advanced Settings submenu are listed below: 3.3.3.1 QPI and IMC Configuration QuickPath Interconnect (QPI) is the connection between the CPU and the motherboard’s I/O hub. Use this feature to modify speed and power management settings. Themis Computer 3-11 RES-21XR3 Installation Manual Version 1.0 3.3.3.2 QPI Links Speed This feature selects QPI’s data transfer speed. the option are Slow-mode, and Full Speed (default). 3.3.3.3 QPI Frequency This selects the desired QPI frequency. The options are Auto (default), 4.800 GT, 5.866GT, 6.400 GT. 3.3.3.4 QPI L0s and L1 QuickPath Interconnect (QPI) offers three power states called L0, L0s and L1: • L0 is a normal operational state where data and control packets can be transmitted and received. All power management states are entered from this state. • L0s is intended as a power saving state. It allows a link to quickly enter and recover from a power saving state without going through recovery. • L1 is a power saving state that allows an additional power saving over L0s, but with additional resume (wake-up) latency. Select Enabled to activate QPI power saving (L0s and L1 are automatically selected by the motherboard), select Disabled for normal operational state without any power-saving function. The options are Disabled and Enabled (default). 3.3.3.5 Memory Frequency This feature forces the system memory to run at a different frequency than the default frequency. The available options are Auto (default), Force DDR-800, Force DDR-1066, and Force DDR-1333. 3.3.3.6 Memory Mode The options are Independent (default), Channel Mirror, Lockstep, and Sparing. Independent—All DIMMs are available to the operating system. Channel Mirror—The motherboard maintains two identical copies of all data in memory for redundancy. Lockstep—The motherboard uses two areas of memory to run the same set of operations in parallel. 3-12 Themis Computer 3—BIOS Setup Utility Advanced Setup Configurations Sparing—Memory sparing occurs when on-demand inactive memory is automatically activated by the system to temporarily replace failed memory until a service action can be performed (supported only on 2010 Intel® Core™ processor family based on the 32nm Intel® micro architecture). 3.3.3.7 Demand Scrubbing Demand Scrubbing is a process that allows the CPU to correct correctable memory errors found on a memory module. When the CPU or I/O issues a demand-read command, and the read data from memory turns out to be a correctable error, the error is corrected and sent to the requestor (the original source). Memory is updated as well. Select Enabled to use Demand Scrubbing for ECC memory correction. The options are Enabled and Disabled (default). 3.3.3.8 Patrol Scrubbing Patrol Scrubbing is a process that allows the CPU to correct correctable memory errors detected on a memory module and send the correction to the requestor (the original source). When this item is set to Enabled, the North Bridge will read and write back one cache line every 16K cycles, if there is no delay caused by internal processing. By using this method, roughly 64 GB of memory behind the North Bridge will be scrubbed every day. The options are Enabled and Disabled (default). 3.3.3.9 Throttling - Closed Loop Throttling improves reliability and reduces power in the processor by automatic voltage control during processor idle states. Available options are Disabled and Enabled (default). 3.3.4 Intel VT-d Select Enabled to enable Intel's Virtualization Technology support for Direct I/O VT-d by reporting the I/O device assignments to VMM through the DMAR ACPI Tables. This feature offers fully-protected I/O resource-sharing across the Intel platforms, providing the user with greater reliability, security and availability in networking and data-sharing. The settings are Enabled and Disabled (default). 3.3.5 SR-1OV Support Select this item to support Single Root I/O Virtualization and Sharing (SR-IOV). The options are Enabled and Disabled (default). Themis Computer 3-13 RES-21XR3 Installation Manual 3.3.6 Version 1.0 Intel I/OAT The Intel I/OAT (I/O Acceleration Technology) significantly reduces CPU overhead by leveraging CPU architectural improvements, freeing resources for other tasks. The options are Disabled and Enabled (default). 3.3.7 Active State Power Management Select Enabled to start Active-State Power Management for signal transactions between L0 and L1 Links on the PCI Express Bus. This maximizes power-saving and transaction speed. The options are Enabled and Disabled (default). 3.3.8 Route Port 80h Cycles To This feature allows the user to decide to which bus to send debug information. The options are Disabled, PCI (default) and LPC. 3.3.8.1 Extend PCI Hole Select Enabled when using a 64-bit Operating System. The options are Disabled, and Enabled (default). 3.3.9 USB Functions This feature allows the user to decide the number of onboard USB ports to be enabled. The Options are: Disabled, 2 USB ports, 4 USB ports, 6 USB ports, 8 Ports, 10 Ports and 12 USB ports (default). 3.3.10 USB 2.0 Controller Select Enabled to activate the onboard USB 2.0 controller. The options are Enabled (default) and Disabled. 3.3.11 Legacy USB Support Select Enabled to use Legacy USB devices. If this item is set to Auto, Legacy USB support will be automatically enabled if a legacy USB device is installed on the motherboard, and vice versa. The settings are Disabled, Enabled, and Auto (default). 3-14 Themis Computer 3—BIOS Setup Utility 3.4 IDE/SATA/Floppy Configuration When this submenu is selected, the AMI BIOS automatically detects the presence of the IDE, SATA, and floppy devices and displays the following items: 3.4.1 Floppy A This feature allows the user to select the type of floppy drive connected to the system. The options are Disabled, 360KB 5 1/4”, 1.2MB 5 1/4”, 720KB 3 1/2”, 1.44MB 3 1/2” (default) and 2.88MB 3 1/2”. 3.4.2 SATA#1 Configuration If Compatible is selected, it sets SATA#1 to legacy compatibility mode, while selecting Enhanced sets SATA#1 to native SATA mode. The options are Disabled, Compatible and Enhanced (default). 3.4.2.1 Configure SATA#1 as This feature allows the user to select the drive type for SATA#1. The options are IDE (default), RAID and AHCI. 3.4.2.2 ICH RAID CodeBase (Available if RAID is selected above) Select Intel to enable the Intel SATA Host RAID Utility. Select Adaptec to use the Adaptec Host RAID Utility. The options are Intel (default) and Adaptec. 3.4.3 SATA#2 Configuration (Available when the optionIDE is selected under “Configure SATA #1 as” above.) Selecting Enhanced will set SATA#2 to native SATA mode. The options are Disabled, and Enhanced (default). 3.4.4 IDE Detect Timeout (sec) Use this feature to set the time-out value for the BIOS to detect the ATA, ATAPI devices installed in the system. The options are 0 (sec), 5, 10, 15, 20, 25, 30, and 35 (default). Themis Computer 3-15 RES-21XR3 Installation Manual 3.4.5 Version 1.0 Primary IDE Master/Slave, Secondary IDE Master/Slave, Third IDE Master, and Fourth IDE Master These settings allow the user to set the parameters of Primary IDE Master/Slave, Secondary IDE Master/Slave, Third and Fourth IDE Master slots. Hit <Enter> to activate the following submenu screen for detailed options of these items. Set the correct configurations accordingly. The items included in the submenu are: 3.4.5.1 Type Select the type of device connected to the system. The options are Not Installed, Auto (default), CD/DVD and ARMD. 3.4.5.2 LBA/Large Mode LBA (Logical Block Addressing) is a method of addressing data on a disk drive. In the LBA mode, the maximum drive capacity is 137 GB. For drive capacities over 137 GB, your system must be equipped with 48-bit LBA mode addressing. If not, contact your manufacturer or install an ATA/133 IDE controller card that supports 48-bit LBA mode. The options are Disabled and Auto (default). 3.4.5.3 Block (Multi-Sector Transfer) Block Mode boosts the IDE drive performance by increasing the amount of data transferred. Only 512 bytes of data can be transferred per interrupt if Block Mode is not used. Block Mode allows transfers of up to 64 KB per interrupt. Select Disabled to allow data to be transferred from and to the device one sector at a time. Select Auto to allow data transfer from and to the device to occur multiple sectors at a time if the device supports it. The options are Auto (default) and Disabled. 3.4.5.4 PIO Mode The IDE PIO (Programmable I/O) Mode programs timing cycles between the IDE drive and the programmable IDE controller. As the PIO mode increases, the cycle time decreases. The options are Auto, 0, 1, 2, 3, and 4. Select Auto (default) to allow the AMI BIOS to automatically detect the PIO mode. Use this value if the IDE storage drive support cannot be determined. Select 0—4 to allow the AMI BIOS to use PIO mode 0—4. It has a data transfer rate of 3.3 MB/s—16.6MB/s. See Table 3-1 on page 3-17 for PIO Mode Select options. 3-16 Themis Computer 3—BIOS Setup Utility IDE/SATA/Floppy Configuration Table 3-1. PIO Mode Select Options Option Selected PIO Mode Max. Transfer Rate 0 PIO Mode 0 3.3 MB/s 1 PIO Mode 1 5.2 MB/s 2 PIO Mode 2 8.3 MB/s 3 PIO Mode 3 11.1 MB/s 4 PIO Mode 4 16.6 MB/s 3.4.5.5 DMA Mode Select Auto to allow the BIOS to automatically detect IDE DMA mode when the IDE storage device support cannot be determined. The options are Auto (default), SWDMAn, MWDMAn, and UDMAn. See Table 3-2 below for DMA Mode Select Options. Table 3-2. DMA Mode Select Options Themis Computer Option Selected DMA Mode Max. Transfer Rate SWDMA 0 Single-Word DMA 0 2.1 MB/s SWDMA 1 Single-Word DMA 1 4.2 MB/s SWDMA 2 Single-Word DMA 2 8.3 MB/s MWDMA 0 Multi-Word DMA 0 4.2 MB/s MWDMA 1 Multi-Word DMA 1 13.3 MB/s MWDMA 2 Multi-Word DMA 2 16.6 MB/s UDMA 0 Ultra DMA 0 16.6 MB/s UDMA 1 Ultra DMA 1 25 MB/s UDMA 2 Ultra DMA 2 33.3 MB/s UDMA 3 Ultra DMA 3 44.4 MB/s UDMA 4 Ultra DMA 4 66.6 MB/s UDMA 5 Ultra DMA 5 100 MB/s UDMA 6 Ultra DMA 6 133 MB/s 3-17 RES-21XR3 Installation Manual Version 1.0 3.4.5.6 Self-Monitoring Analysis and Reporting Technology (S.M.A.R.T.) Self-Monitoring Analysis and Reporting Technology (SMART) can help predict impending drive failures. Select Auto to allow the AMI BIOS to automatically detect storage drive support. Select Disabled to prevent the AMI BIOS from using the S.M.A.R.T. Select Enabled to allow the AMI BIOS to use the S.M.A.R.T. to support hard drive disk. The options are Disabled, Enabled, and Auto (default). 3.4.5.7 32-Bit Data Transfer Select Enable to enable the function of 32-bit IDE data transfer. The options are Enabled (default)and Disabled. 3.4.6 PCI/PnP Configuration This feature allows the user to set the PCI/PnP configurations for the following items: 3.4.6.1 Clear NVRAM This feature clears the NVRAM during system boot. The options are No (default) and Yes. 3.4.6.2 Plug & Play OS Selecting Yes allows the OS to configure Plug & Play devices. (This is not required for system boot if your system has an OS that supports Plug & Play.) Select No (default) to allow the AMI BIOS to configure all devices in the system. 3.4.6.3 PCI Latency Timer This feature sets the latency Timer of each PCI device installed on a PCI bus. Select 64 to set the PCI latency to 64 PCI clock cycles. The options are 32, 64 (default), 96, 128, 160, 192, 224, and 248. 3.4.6.4 PCI IDE BusMaster When enabled, the BIOS uses PCI bus mastering for reading/writing to IDE drives. The options are Disabled and Enabled (default). 3-18 Themis Computer 3—BIOS Setup Utility IDE/SATA/Floppy Configuration 3.4.6.5 PCIe IO Performance This feature selects the setting for the IOH PCIE maximum payload size. The options are 128B (default) and 256B. 3.4.6.6 Slot 6 Width This feature selects the bus width of the motherboard's Slot 6 PCIE slot. The options are x4x4x4x4, x8x4x4, x8x8, x16 and Auto (default). 3.4.6.7 ROM Scan Ordering This item determines what kind of option ROM activates over another. The options are Onboard First (default) and Add-on First. 3.4.6.8 Slot PCI 33MHz, PCI Slot from SXB, Slot 6 PCIE x16 Use this feature to enable or disable a PCI-E or a PCI slot. The options are Disabled and Enabled (default). 3.4.6.9 Load Onboard LAN1 Option ROM/Load Onboard LAN2 Option ROM Load Onboard LAN3 Option ROM/Load Onboard LAN4 Option ROM (X8STi- LN4 Only) This feature is to enable LAN OPROM for PXE. This is to boot computers using a network interface. The options are Disabled (default) and Enabled. 3.4.6.10 Load SAS Option ROM (X8STi-3F Only) This feature is to load the Serial Attached SCSI (SAS) option ROM, if available. The options are Disabled and Enabled (default). 3.4.6.11 Boot Graphics Adapter Priority Use this feature to select the graphics controller to be used as the primary boot device. The options are Other, Onboard VGA (default) and Slot 6. Select Slot 6 if a graphics controller is installed in the CPU-controlled Slot 6 slot. 3.4.7 Themis Computer Super IO Device Configuration 3-19 RES-21XR3 Installation Manual Version 1.0 3.4.7.1 Serial Port1 Address/Serial Port2 Address This option specifies the base I/O port address and the Interrupt Request address of Serial Port 1 and Serial Port 2. Select Disabled to prevent the serial port from accessing any system resources. When this option is set to Disabled, the serial port physically becomes unavailable. Select 3F8/IRQ4 to allow the serial port to use 3F8 as its I/O port address and IRQ 4 for the interrupt address. The options for Serial Port1 are Disabled, 3F8/IRQ4 (default), 2E8/IRQ3. The options for Serial Port2 are Disabled, 2F8/IRQ3 (default), and 2E8/IRQ3. 3.4.7.2 Onboard Floppy Controller Select Enabled to enable the onboard Floppy Controller. The options are Enabled (default), and Disabled. 3.4.8 Remote Access Configuration 3.4.8.1 Remote Access This allows the user to enable the Remote Access feature. The options are Enabled (default) and Disabled. If Remote Access is set to Enabled, the following items will be displayed: Serial Port Number This feature allows the user decide which serial port to be used for Console Redirection. The options are COM1, COM2 and COM3 (default). An additional option, Onboard IPMI (default) is featured on the X8STi-F/X8STi-3F motherboard only and becomes the default. Serial Port Mode This feature allows the user to set the serial port mode for Console Redirection. The options are 115200 8, n 1 (default); 57600 8, n, 1; 38400 8, n, 1; 19200 8, n, 1; and 9600 8, n, 1. Flow Control This feature allows the user to set the flow control for Console Redirection. The options are None (default), Hardware, and Software. 3-20 Themis Computer 3—BIOS Setup Utility IDE/SATA/Floppy Configuration Redirection After BIOS POST Select Disabled to turn off Console Redirection after Power-On Self-Test (POST). Select Always to keep Console Redirection active all the time after POST. Note: This setting may not be supported by some operating systems. Select Boot Loader to keep Console Redirection active during POST and Boot Loader. The options are Disabled, Boot Loader, and Always (default). Terminal Type This feature allows the user to select the target terminal type for Console Redirection. The options are ANSI, VT100 (default), and VT-UTF8. VT-UTF8 Combo Key Support A terminal keyboard definition that provides a way to send commands from a remote console. Available options are Enabled (default) and Disabled. Sredir Memory Display Delay This feature defines the length of time in seconds to display memory information. The options are No Delay (default), Delay 1 Sec, Delay 2 Sec, and Delay 4 Sec. 3.4.9 Hardware Health Configuration This feature allows the user to monitor hardware health of the system and review the status of each item when displayed. 3.4.9.1 CPU Overheat Alarm This option allows the user to select the CPU Overheat Alarm setting which determines when the CPU OH alarm will be activated to provide warning of possible CPU overheat. Themis Computer 3-21 RES-21XR3 Installation Manual Version 1.0 Warning: Any temperature that exceeds the CPU threshold temperature predefined by the CPU manufacturer may result in CPU overheat or system instability. When the CPU temperature reaches this predefined threshold, the CPU and system cooling fans will run at full speed. The options are: • The Early Alarm: Select this setting if you want the CPU overheat alarm (including the LED and the buzzer) to be triggered as soon as the CPU temperature reaches the CPU overheat threshold as predefined by the CPU manufacturer. • The Default Alarm: Select this setting if you want the CPU overheat alarm (including the LED and the buzzer) to be triggered when the CPU temperature reaches about 5°C above the threshold temperature as predefined by the CPU manufacturer to give the CPU and system fans additional time needed for CPU and system cooling. In both the alarms above, please take immediate action as shown below. 3.4.9.2 CPU Temperature/System Temperature This feature displays current temperature readings for the CPU and the System. The following items will be displayed for your reference only: CPU Temperature Note: The CPU thermal technology that reports absolute temperatures (Celsius/Fahrenheit) has been upgraded to a more advanced feature by Intel in its newer processors. The basic concept is that each CPU is embedded with unique temperature information sensing that the motherboard can read. This ‘Temperature Threshold’ or ‘Temperature Tolerance’ has been assigned at the factory and is the baseline by which the motherboard takes action during different CPU temperature conditions (i.e., by increasing CPU Fan speed, triggering the Overheat Alarm, etc.). Since CPUs can have different ‘Temperature Tolerances’, the installed CPU can now send its ‘Temperature Tolerance’ to the motherboard resulting in better CPU thermal management. Supermicro has leveraged this feature by assigning a temperature status to certain thermal conditions in the processor (Low, Medium and High). This makes it easier for the user to understand the CPU’s temperature status, rather than by just simply seeing a temperature reading (i.e., 25°C). For more information on thermal management, please refer to Intel’s Web site at www.Intel.com. 3-22 Themis Computer 3—BIOS Setup Utility IDE/SATA/Floppy Configuration The CPU Temperature feature will display the CPU temperature status as detected by the BIOS: Low – This level is considered as the ‘normal’ operating state. The CPU temperature is well below the CPU ‘Temperature Tolerance’. The motherboard fans and CPU will run normally as configured in the BIOS (Fan Speed Control). User intervention: No action required. Medium – The processor is running warmer. This is a ‘precautionary’ level and generally means that there may be factors contributing to this condition, but the CPU is still within its normal operating state and below the CPU ‘Temperature Tolerance’. The motherboard fans and CPU will run normally as configured in the BIOS. The fans may adjust to a faster speed depending on the Fan Speed Control settings. User intervention: No action is required. However, consider checking the CPU fans and the chassis ventilation for blockage. High – The processor is running hot. This is a ‘caution’ level since the CPU’s ‘Temperature Tolerance’ has been reached (or has been exceeded) and may activate an overheat alarm: The Default Alarm – the Overheat LED and system buzzer will activate if the High condition continues for some time after it is reached. The CPU fan will run at full speed to bring the CPU temperature down. If the CPU temperature still increases even with the CPU fan running at full speed, the system buzzer will activate and the Overheat LED will turn on. The Early Alarm – the Overheat LED and system buzzer will be activated exactly when the High level is reached. The CPU fan will run at full speed to bring the CPU temperature down. Note: In both the alarms above, please take immediate action as shown below. See CPU Overheat Alarm to modify the above alarm settings. User intervention: If the system buzzer and Overheat LED has activated, take action immediately by checking the system fans, chassis ventilation and room temperature to correct any problems. Note: 1. The system may shut down if it continues for a long period to prevent damage to the CPU. Themis Computer 3-23 RES-21XR3 Installation Manual Version 1.0 IOH Temperature This feature displays the absolute Input/Output Hub (IOH) temperature (i.e., 51° C). System Temperature: This feature displays the absolute system temperature (i.e. 34° C). 3.4.9.3 Fan 1—Fan 6 Reading This feature displays the fan speed readings from fan interfaces Fan0 through Fan5. 3.4.9.4 Fan Speed Control Modes This feature allows the user to decide how the system controls the speeds of the onboard fans. The CPU temperature and the fan speed are correlative. When the CPU on-die temperature increases, the fan speed will also increase for effective system cooling. Select Full Speed to allow the onboard fans to run at full speed (or 100% of the Pulse Width Modulation Duty Cycle) for maximum cooling. The Full Speed setting is recommended for special system configuration or debugging. Select Performance for the onboard fans to run at 70% of the Initial PWM Cycle for better system cooling. The Performance setting is recommended for high-power-consuming and high-density systems. Select Balanced for the onboard fans to run at 50% of the Initial PWM Cycle in order to balance the needs between system cooling and power saving. The Balanced setting is recommended for regular systems with normal hardware configurations. Select Energy Saving for the onboard fans to run t 30% of the Initial PWM Cycle for best power efficiency and maximum quietness. The Options are: Full Speed/FS (@100% of PWM Cycle), Performance/PF (@70% of PWM Cycle), Balanced/BL (@50% of PWM Cycle), and Energy Saving/ES (@30% of PWM Cycle)(default). 3.4.9.5 Voltage Monitoring This feature displays the current voltage detected of the various components in the system: Vcore, VDIMM, 5V, 12V, -12V, 3.3Vcc, 3.3VSB, VBAT, Vtt 3.4.10 ACPI Configuration Use this feature to configure Advanced Configuration and Power Interface (ACPI) power management settings for your system. 3-24 Themis Computer 3—BIOS Setup Utility IDE/SATA/Floppy Configuration 3.4.10.1 High Performance Event Timer Select Enabled to activate the High Performance Event Timer (HPET) that produces periodic interrupts at a much higher frequency than a Real-time Clock (RTC) does in synchronizing multimedia streams, providing smooth playback, and reducing the dependency on other timestamp calculation devices such as an x86 RDTSC Instruction embedded in the CPU. The HPET is used to replace the 8254 Programmable Interval Timer. Options are Enabled (default) and Disabled. 3.4.10.2 ACPI Aware O/S Enable ACPI support if it is supported by the OS to control ACPI through the Operating System. Otherwise, disable this feature. The options are Yes (default) and No. 3.4.10.3 AMI OEMB Table This enables the OEMB table support. The options are Enabled (default) and Disabled. 3.4.10.4 ACPI APIC Support Select Enabled to include the ACPI APIC Table Pointer in the RSDT (Root System Description Table) pointer list. The options are Enabled (default) and Disabled. 3.4.10.5 APIC ACPI SCI IRQ When this item is set to Enabled, APIC ACPI SCI IRQ is supported by the system. The options are Enabled and Disabled (default). 3.4.10.6 Headless Mode This feature is used to enable system to function without a keyboard, monitor, or mouse attached. The options are Enabled and Disabled (default). 3.4.10.7 ACPI Version Features The options are ACPI v1.0, ACPI v2.0 (default), and ACPI v3.0. Please refer to ACPI's website for further explanation: http://www.acpi.info/. Themis Computer 3-25 RES-21XR3 Installation Manual 3.4.11 Version 1.0 IPMI Configuration (X8STi-F/X8STi-3F Only) Intelligent Platform Management Interface (IPMI) is a set of common interfaces that IT administrators can use to monitor system health and to manage the system as a whole. For more information on the IPMI specifications, please visit Intel's website at www.intel.com. 3.4.11.1 IPMI Firmware Version This item displays the current IPMI Firmware Version. 3.4.11.2 Status of BMC The Baseboard Management Controller (BMC) manages the interface between system management software and platform hardware. This is an informational feature which returns the status code of the BMC micro controller. 3.4.12 View BMC System Event Log This feature is used to view any BMC events. It shows the total number of entries and will allow the viewing of each event by scrolling down on an Entry Number and pressing Enter. 3.4.12.1 Clear BMC System Event Log This feature is used to view any BMC events. It shows the total number of entries and will allow the viewing of each event by scrolling down on an Entry Number and pressing Enter. Caution: Any cleared information is unrecoverable. Make absolutely sure that you no longer need any data stored in the log before clearing the BMC Event Log. 3.4.13 Set LAN Configuration Set this feature to configure the IPMI LAN adapter with a network address. Channel Number Enter the channel number for the SET LAN Config command. This is initially set to [1] (default). Press “+” or “-” on your keyboard to change the Channel Number. 3-26 Themis Computer 3—BIOS Setup Utility IDE/SATA/Floppy Configuration Channel Number Status This feature returns the channel status for the Channel Number selected above: “Channel Number is OK” or “Wrong Channel Number”. IP Address Source This feature selects whether the IP address, Subnet Mask and Gateway Address are automatically assigned by the network's DHCP server (Dynamic Host and Configuration Protocol) or manually entered by the user (Static). If Static is selected, the IP Address, Subnet Mask and Gateway Address must be manually entered below. If DHCP is selected, the next three items will be configured automatically and will be grayed out. The options are Static and DHCP (default). IP Address Enter the IP address for this machine. This should be in decimal and in dotted quad form (i.e., 192.168.10.253). The value of each three-digit number separated by dots should not exceed 255. Subnet Mask Subnet masks tell the network which subnet this machine belongs to. The value of each three-digit number separated by dots should not exceed 255 (i.e., 255.255.255.0). Gateway Address Enter the Gateway address this machine will use (i.e., 192.168.10.1). Mac Address The BIOS will automatically enter the MAC address (also known as Hardware Address) of this machine, however it may be over-ridden. MAC addresses are 6 twodigit hexadecimal numbers (Base 16, 0 ~ 9, A, B, C, D, E, F) separated by dots. (i.e., 00.30.48.D0.D4.60) This sets the pre-determined time to delay PEF alerts after system power-ups and resets. Refer to Table 24.6 of the IPMI 1.5 Specification for more information at www.intel.com. The options are No Delay (default), 30 sec, 60 sec, 1.5 min, 2.0 min. Themis Computer 3-27 RES-21XR3 Installation Manual Version 1.0 3.4.13.1 BMC Watch Dog Timer Action Allows the BMC to reset or power down the system if the operating system hangs or crashes. The options are Disabled (default), Reset System, Power Down, Power Cycle. BMC Watch Dog TimeOut [Min:Sec] This option appears if BMC Watch Dog Timer Action (above) is enabled. This is a timed delay in minutes or seconds, before a system power down or reset after an operating system failure is detected. The options are [5 Min] (default), [1 Min], [30 Sec], and [10 Sec]. 3.4.14 Event Log Configuration 3.4.14.1 View Event Log Use this option to view the System Event Log. 3.4.14.2 Mark All Events as Read This option marks all events as read. The options are OK and Cancel. 3.4.14.3 Clear Event Log This option clears the Event Log memory of all messages. The options are OK and Cancel (default). 3.4.14.4 PCIE Event Log Use this option to enable logging of errors encountered in the system's PCIe bus. The options are Yes and No (default). 3.4.14.5 Memory ECC Error Log Use this option to enable logging of errors encountered in the system's memory. The options are Yes (default) and No 3-28 Themis Computer 3—BIOS Setup Utility 3.5 Security Settings The AMI BIOS provides a Supervisor and a User password. If you use both passwords, the Supervisor password must be set first. Figure 3-3. Security Settings 3.5.1 Supervisor Password This item indicates if a Supervisor password has been entered for the system. Clear means such a password has not been used and Set means a supervisor password has been entered for the system. 3.5.2 User Password This item indicates if a user password has been entered for the system. Clear means such a password has not been used and Set means a user password has been entered for the system. Themis Computer 3-29 RES-21XR3 Installation Manual 3.5.3 Version 1.0 Change Supervisor Password Select this feature and press <Enter> to access the submenu, and then type in a new Supervisor Password. 3.5.4 User Access Level (Available when Supervisor Password is set as above) Available options are Full Access (default): grants full User read and write access to the Setup Utility, View Only: allows access to the Setup Utility but the fields cannot be changed, Limited: allows only limited fields to be changed such as Date and Time, No Access: prevents User access to the Setup Utility. 3.5.5 Change User Password Select this feature and press <Enter> to access the submenu, and then type in a new User Password. 3.5.6 Clear User Password (Available only when User Password has been set) This item allows you to clear a user password after it has been entered. 3.5.7 Password Check This item allows you to check a password after it has been entered. The options are Setup (default) and Always. 3.5.8 Boot Sector Virus Protection When Enabled, the AMI BIOS displays a warning when any program (or virus) issues a Disk Format command or attempts to write to the boot sector of the hard disk drive. The options are Enabled and Disabled (default). 3-30 Themis Computer 3—BIOS Setup Utility 3.6 Boot Configuration Use this feature to configure boot settings. Figure 3-4. Boot Settings 3.6.1 Boot Device Priority This feature allows the user to specify the sequence of priority for the Boot Device. The settings are 1st boot device, 2nd boot device, 3rd boot device, 4th boot device, 5th boot device and Disabled. • 1st Boot Device - 1st Floppy Drive • 2nd Boot Device - [USB: XXXXXXXXX] • 3rd Boot Device - [SATA: XXXXXXXXX] • 4th Boot Device - [Network: XXXXXXXXX] • 5th Boot Device - [Network: XXXXXXXXX Themis Computer 3-31 RES-21XR3 Installation Manual 3.6.2 Version 1.0 Storage Drives This feature allows the user to specify the boot sequence from all available storage drives. The settings are Disabled and a list of all storage drives that have been detected (i.e., 1st Drive, 2nd Drive, 3rd Drive, etc). • 1st Drive - [SATA: XXXXXXXXX] 3.6.3 Removable Drives This feature allows the user to specify the boot sequence from available Removable Drives. The settings are 1st boot device, 2nd boot device, and Disabled. • 1st Drive • 2nd Drive - [USB: XXXXXXXXX]/ 3.6.4 CD/DVD Drives This feature allows the user to specify the boot sequence from available CD/DVD Drives (i.e., 1st Drive, 2nd Drive, etc). 3-32 Themis Computer 3—BIOS Setup Utility 3.7 Exit Options Select the Exit tab from the AMI BIOS Setup Utility screen to enter the Exit BIOS Setup screen. Figure 3-5. Exit Options 3.7.1 Save Changes and Exit When you have completed the system configuration changes, select this option to leave the BIOS Setup Utility and reboot the computer, so the new system configuration parameters can take effect. Select Save Changes and Exit from the Exit menu and press <Enter>. 3.7.2 Discard Changes and Exit Select this option to quit the BIOS Setup without making any permanent changes to the system configuration, and reboot the computer. Select Discard Changes and Exit from the Exit menu and press <Enter>. 3.7.3 Discard Changes Select this option and press <Enter> to discard all the changes and return to the AMI BIOS Utility Program. Themis Computer 3-33 RES-21XR3 Installation Manual 3.7.4 Version 1.0 Load Optimal Defaults To set this feature, select Load Optimal Defaults from the Exit menu and press <Enter>. Then, select OK to allow the AMI BIOS to automatically load Optimal Defaults to the BIOS Settings. The Optimal settings are designed for maximum system performance, but may not work best for all computer applications. 3.7.5 Load Fail-Safe Defaults To set this feature, select Load Fail-Safe Defaults from the Exit menu and press <Enter>. The Fail-Safe settings are designed for maximum system stability, but not for maximum performance. 3-34 Themis Computer Appendix Connector Pinouts This appendix provides connector pinouts for all standard user I/O interfaces on the rear I/O panel of the RES-21XR3. A.1 PS/2 Keyboard and Mouse The RES-21XR3 provides a 6-pin female mini-DIN connector for the PS/2 keyboard, and another for the PS/2 mouse. Pinouts and signal definitions for both connectors are defined in Table A-1. Table A-1. PS/2 Keyboard/Mouse Pinouts and Signal Definitions Pin Pinout 5 6 3 4 1 Themis Computer 2 Signal Name 1 Keyboard/Mouse data 2 N/C 3 Ground 4 Vcc (+5V) 5 Keyboard/Mouse clock 6 N/C A-1 RES-21XR3 Installation Manual A.2 Version 1.0 USB Ports The RES-21XR3 supports two USB (Universal Serial Bus) ports (see Figure A-1 for pinouts), USB 0 and USB 1, on the rear I/O panel. In addition, six USB ports are supported from internal headers: USB 2/3, USB 4/5, USB 6, and USB 7. Pinout descriptions are listed in Table A-2. Figure A-1. USB Connector Pinout Table A-2. USB Connector Signal Definitions A.3 Pin Signal Name Pin Signal Name 1 +5V 3 PO+ 2 PO– 4 GND Serial Ports The RES-21XR3 supports one male DB9 serial port connector on the rear I/O panel (see Figure A-2)—TTYA (COM 1). Another serial port TTYB (COM 2) is accessed from the motherboard. COM 1 signal definitions are listed in Table A-3, page A-2. Figure A-2. COM 1 Serial Connector Pinout Table A-3. COM 1 Serial Connector Signal Definitions A-2 Pin Signal Name Pin Signal Name Pin Signal Name 1 DCD 4 DTR 7 RTS 2 RXD 5 GND 8 CTS 3 TXD 6 DSR 9 RI Themis Computer A—Connector Pinouts A.4 Gigabit Ethernet LAN Ports The RES-21XR3 supports two RJ45 Gigabit Ethernet LAN port connectors—LAN 1 and LAN 2—each with two embedded LEDs (see Figure A-3). Pinout signal descriptions are listed in Table A-4. Link Speed Network Traffic 1 8 Figure A-3. Ethernet Connector, Type RJ45 Table A-4. RJ45 Ethernet Pinout Signals Pin Signal Name Pin Signal Name 1 TRD0+ 5 TRD2+ 2 TRD0– 6 TRD2– 3 TRD1+ 7 TRD3+ 4 TRD1– 8 TRD3– • The color of the left LED indicates the LAN connection speed: — Off = 10 MHz — Green = 100 MHz — Amber = 1 GHz • The right LED, when lit, indicates LAN activity (network traffic). Themis Computer A-3 RES-21XR3 Installation Manual A.5 Version 1.0 VGA Display Port The RES-21XR3 supports a single 15-pin (three 5-pin rows) female VGA graphics display port connector on the rear I/O panel (see Figure A-4 for a connector pinout). Pinout signal descriptions are listed in Table A-5. Symbol VGA Display Port 5 1 6 10 15 11 Figure A-4. VGA Connector Pinout Table A-5. VGA Connector Pinout Signal Descriptions Pin A-4 Signal Description 1 RED Red video 2 GREEN Green video 3 BLUE Blue video 4 MS2 Monitor ID bit 2 5 GROUND Ground (HSync) 6 GROUND Red return 7 GROUND Green return 8 GROUND Blue return 9 NC Key (no pin) 10 GROUND Ground (VSync) 11 MS0 Monitor ID bit 0 12 MS1: SDA (DDC Data) Monitor ID bit 1 13 HSYNC Horizontal sync 14 VSYNC Vertical sync 15 MS3: SCL (DDC CLK) Monitor ID bit 3 Themis Computer A—Connector Pinouts A.6 IPMI Dedicated LAN Port The Single IPMI dedicated Ethernet LAN port on the RES-21XR3 (X8STi-F/-3F) rear I/O panel has identical pinout and signal descriptions as the LAN Ethernet ports described in Section A.4 "Gigabit Ethernet LAN Ports", page 3. The IPMI port is located just above the two USB ports on the rear I/O panel. Note that the X8STi and X8STi-LN4 motherboards do not support IPMI, hence does not have the IPMI dedicate LAN prot installed. A.7 UID (Unit Identifier Switch) The UID is used in conjunction with the UID LEDs. When you push the UID Switch, the UID Indicators (LEDs) will be turned on. As such, pushing the UID Switch again will turn off the UID Indicators (LEDs). These UID Indicators provide easy identification of a system unit that may be in need of service. Themis Computer A-5 RES-21XR3 Installation Manual A-6 Version 1.0 Themis Computer Appendix Rack-Mount Slide Installation An optional set of two rack-mount slides (left side and right side) is available for all RES-21 systems, and should be ordered at the time of purchase. The RES-21XR3 chassis contains six threaded screw holes on each side to accommodate #8-32 size screws (included with the rack-mount slide kit); steel slides require four mounting holes, and aluminum slides require three mounting holes (see Figure B-1). Front Mounting Bracket 418.68 373.85 345.78 196.18 31.33 0 43.65 Legend Screw Hole Size = #8-32 Note: All dimensions are given in millimeters (mm) and measured from the base of the chassis. (See Figure B-2 on page B-3 for an exploded view.) Figure B-1. Screw Locations for Rack-Mount Slides Dimensions of the screw-hole patterns on the sides of the RES-21XR3 chassis for installing rack-mount slides are shown in Figure B-1. The required holes for a specific steel or aluminum slide will have to be measured before installation. Themis Computer B-1 RES-21XR3 Installation Manual Version 1.0 Caution: Any screws used to mount a slide to a RES-21XR3 chassis must not exceed a length of 3/8” to prevent excessive penetration of the chassis. The rack-mount slide installation kit includes the following items: a. Two inside slide sections b. Two outside slide sections c. Two front (short) slide brackets d. Two rear (long) slide brackets e. Assorted screws, washers, and nuts Follow these steps to install a steel rack-mount slide to the RES-21XR3 chassis: 1. Attach the inside slide section (see Figure B-2 on page B-3) to both sides of the RES-21XR3 chassis using four #8-32 screws per side. 2. Measure the depth of the 19” equipment rack into which the RES-21XR3 system will be installed (this can vary from 24” to 30”). 3. Using the depth of the equipment rack, adjust and attach the front and rear slide brackets to the outside slide section using the screws, washers, and nuts provided with the slide kit. 4. With all slide brackets securely attached to both the right and left outside slide sections, install both sections to the inside right and inside left of a 19” rack with two bolts per bracket, making sure there is adequate room for the 2RU height (3.50”) of a RES-21XR3 system. 5. Carefully insert the RES-21XR3 system into the 19” rack so that the inside slides on both sides of the chassis travel smoothly into the channels of the outside slide sections. Push the system into the rack until the mounting brackets on the front of the chassis are flush with the front of the rack. 6. Secure the RES-21XR3 system to the 19” rack with two bolts on each side. B-2 Themis Computer B—Rack-Mount Slide Installation B RES-21XR3 Rack-Mount Slide Installation Outside slide section 3 2 1 Attach the rear (long) slide bracket to the outside slide section with screws, washers, and nuts (included in slide kit) Attach the front (short) slide bracket to the outside slide section with screws, washers, and nuts (included in slide kit) Attach both inside slide sections to the left and right sides of the RES-21XR3 chassis with #8-32 screws (included in slide kit) Note: Graphic shown above is for slide placement only; chassis shown may not be an accurate representation of the RES-21XR3. Figure B-2. RES-21XR3 Rack-Mount Slide Installation Themis Computer B-3 RES-21XR3 Installation Manual B-4 Version 1.0 Themis Computer Appendix Red Hat Enterprise Linux 5 Installation C.1 Introduction Welcome to the Red Hat® Enterprise Linux® Installation Guide. This guide contains useful information to assist you during the installation of Red Hat Enterprise Linux via DVD device. From fundamental concepts such as installation preparation to the step-by-step installation procedure. C.2 Installation Step 1: Insert the Redhat Enterprise Linux 5 DVD and Power on the system; you will see the first installation screen with a boot prompt, press “ENTER” to begin installation (see Figure C-1 on page C-2). Themis Computer C-1 RES-21XR3 Installation Manual Version 1.0 Figure C-1. Power On after Linux DVD is Inserted into Drive Step 2: Press the “tab” key to move focus to the “Skip” key, then press “Enter” key to Continue (see Figure C-2). Figure C-2. Skip Key C-2 Themis Computer C—Red Hat Enterprise Linux 5 Installation Installation Step 3: Press Enter and you will see the Welcome screen. Welcome screen does not prompt you for any input. From this screen you can access the Release Notes for Red Hat Enterprise Linux 5.0.0 by clicking on the Release Notes button (see Figure C-3.) Figure C-3. Welcome Screen Click on the Next button to continue. Step 4: Using your mouse, select a language to use for the installation. The language you select here will become the default language for the operating system once it is installed. Selecting the appropriate language also helps target your time zone configuration later in the installation. The installation program tries to define the appropriate time zone based on what you specify on this screen (see Figure C-4 on page C-4). Themis Computer C-3 RES-21XR3 Installation Manual Version 1.0 Figure C-4. Language Selection Once you select the appropriate language, click Next to continue. Step 5: Using your mouse, select the correct layout type (for example, U.S. English) for the keyboard you would prefer to use for the installation and as the system default (see Figure C-5 on page C-5). C-4 Themis Computer C—Red Hat Enterprise Linux 5 Installation Installation Figure C-5. Selecting Layout Type Once you have made your selection, click Next to continue. Step 6: Enter the installation number, if you don’t have an installation number; select the Skip Entering Installation Number Radio Button. Click OK, and if you did not enter an installation number, you’ll be given a warning. Click Skip to continue (see Figure C-6 on page C-6). Themis Computer C-5 RES-21XR3 Installation Manual Version 1.0 Figure C-6. Enter Installation Number Click Next to continue. Step 7: Partitioning allows you to divide your storage drive into isolated sections, where each section behaves as its own storage drive. Partitioning is particularly useful if you run multiple operating systems. On this screen you can choose to create the default layout or choose to manual partition using the 'Create custom layout' option of Disk Druid. The first three options allow you to perform an automated installation without having to partition your drive(s) yourself. If you do not feel comfortable with partitioning your system, it is recommended that you do not choose to create a custom layout and instead let the installation program partition for you. You can configure an iSCSI target for installation, or disable a dmraid device from this screen by clicking on the 'Advanced storage configuration' button (see Figure C-7 on page C-7). C-6 Themis Computer C—Red Hat Enterprise Linux 5 Installation Installation Figure C-7. Partitioning Click Next to continue. Step 8: Create default layout allows you to have some control concerning what data is removed (if any) from your system. Your options are: • Remove all partitions on selected drives and create default layout — select this option to remove all partitions on your storage drive(s) (this includes partitions created by other operating systems such as Windows VFAT or NTFS partitions). • Remove Linux partitions on selected drives and create default layout — select this option to remove only Linux partitions (partitions created from a previous Linux installation). • This does not remove other partitions you may have on your storage drive(s) (such as VFAT or FAT32 partitions). • Use free space on selected drives and create default layout — select this option to retain your current data and partitions, assuming you have enough free space available on your storage drive(s). Using your mouse, choose the storage drive(s) on which you want Red Hat Enterprise Linux to be installed. If you have two or more drives, you can choose which drive(s) should contain this installation. Unselected drives, and any data on them, are not touched. Themis Computer C-7 RES-21XR3 Installation Manual Version 1.0 To review and make any necessary changes to the partitions created by automatic partitioning, select the Review option. After selecting Review and clicking Next to move forward, the partitions created for you in Disk Druid appear. You can make modifications to these partitions if they do not meet your needs (see Figure C-8). Figure C-8. Reviewing Option Click Next once you have made your selections to proceed. Step 9: If you chose one of the automatic partitioning options and selected Review, you can either accept the current partition settings (click Next), or modify the setup using Disk Druid, the manual partitioning tool. If you chose to create a custom layout, you must tell the installation program where to install Red Hat Enterprise Linux. This is done by defining mount points for one or more disk partitions in which Red Hat Enterprise Linux is installed. You may also need to create and/or delete partitions at this time (see Figure C-9 on page C-9). C-8 Themis Computer C—Red Hat Enterprise Linux 5 Installation Installation Figure C-9. Creating a Custom Layout Click Next. Step 10: Once you have configured your partitions, set up a boot loader. If you select “No” Boot Loader will be Installed, you’ll need to use a third-party boot loader such as Partition Magic or Microsoft’s TLDR. Unless you want to set up a Boot Loader Password or Configure Advanced Boot Loader Options (see Figure C-10 on page C-10). Themis Computer C-9 RES-21XR3 Installation Manual Version 1.0 Figure C-10. Setting Up Boot Loader To configure more advanced boot loader options, such as changing the drive order or passing options to the kernel, be sure Configure advanced boot loader options is selected before clicking Next. Step 11: Now that you have chosen which boot loader to install, you can also determine where you want the boot loader to be installed. You may install the boot loader in one of two places: • The master boot record (MBR) — This is the recommended place to install a boot loader, unless the MBR already starts another operating system loader, such as System Commander. • The MBR is a special area on your storage drive that is automatically loaded by your computer's BIOS, and is the earliest point at which the boot loader can take control of the boot process. If you install it in the MBR, when your machine boots, GRUB presents a boot prompt. You can then boot Red Hat Enterprise Linux or any other operating system that you have configured the boot loader to boot (see Figure C-11 on page C-11). C-10 Themis Computer C—Red Hat Enterprise Linux 5 Installation Installation • The first sector of your boot partition — This is recommended if you are already using another boot loader on your system. In this case, your other boot loader takes control first. You can then configure that boot loader to start GRUB, which then boots Red Hat Enterprise Linux. Figure C-11. Master Boot Record (MBR) If your system only uses Red Hat Enterprise Linux, you should choose the MBR. Click the Change Drive Order button if you would like to rearrange the drive order or if your BIOS does not return the correct drive order. Changing the drive order may be useful if you have multiple SCSI adapters, or both SCSI and IDE adapters, and you want to boot from the SCSI device. Click Next. Themis Computer C-11 RES-21XR3 Installation Manual Version 1.0 Step 12: The installation program automatically detects any network devices you have and displays them in the Network Devices list (see Figure C-12). Figure C-12. Network Devices List Step 13: Once you have selected a network device, click Edit. From the Edit Interface pop-up screen, you can choose to configure the IP address and Netmask (for IPv4 - Prefix for IPv6) of the device via DHCP (or manually if DHCP is not selected) and you can choose to activate the device at boot time. If you select Activate on boot, your network interface is started when you boot (see Figure C-13 on page C-13). If you do not have DHCP client access or you are unsure what to provide here, please contact your network administrator. C-12 Themis Computer C—Red Hat Enterprise Linux 5 Installation Installation Figure C-13. Edit Interface Pop-Up Screen Click OK. Step 14: Set your time zone by selecting the city closest to your computer's physical location. Click on the map to zoom in to a particular geographical region of the world (see Figure C-14 on page C-14). From here there are two ways for you to select your time zone: • Using your mouse, click on the interactive map to select a specific city (represented by a yellow dot). A red X appears indicating your selection. • You can also scroll through the list at the bottom of the screen to select your time zone. Using your mouse, click on a location to highlight your selection. Themis Computer C-13 RES-21XR3 Installation Manual Version 1.0 Figure C-14. Selecting Time Zone Click Next. Step 15: Setting up a root account and password is one of the most important steps during your installation. Your root account is similar to the administrator account used on Windows NT machines. The root account is used to install packages, upgrade RPMs, and perform most system maintenance. Logging in as root gives you complete control over your system (see Figure C-15 on page C-15). C-14 Themis Computer C—Red Hat Enterprise Linux 5 Installation Installation Figure C-15. Setting Up Root Account and Password Click Next. Step 16: Now that you have made most of the choices for your installation, you are ready to confirm the default package selection or customize packages for your system. The Package Installation Defaults screen appears and details the default package set for your Red Hat Enterprise Linux installation. This screen varies depending on the version of Red Hat Enterprise Linux you are installing (see Figure C-16 on page C16). To customize your package set further, select the Customize now option on the screen. Clicking Next takes you to the Package Group Selection screen. You can select package groups, which group components together according to function (for example, X Window System and Editors), individual packages, or a combination of the two. Themis Computer C-15 RES-21XR3 Installation Manual Version 1.0 To select a component, click on the checkbox beside it: Figure C-16. Package Installation Default Screen Step 17: Select each component you wish to install. Once a package group has been selected, if optional components are available you can click on Optional packages to view which packages are installed by default, and to add or remove optional packages from that group (see Figure C-17 on page C-17). If there are no optional components, this button will be disabled C-16 Themis Computer C—Red Hat Enterprise Linux 5 Installation Installation Figure C-17. Optional Packages Click Next. Step 18: Once you have selected the package groups of your choice, you get one last chance to go back before starting the installation process. Click Next if you’re happy with your choices, or click Back to make changes (see Figure C-18 on page C-18). Themis Computer C-17 RES-21XR3 Installation Manual Version 1.0 Figure C-18. Option to Review or Continue Click Next. Step 19: Installation Starts (see Figure C-19). Figure C-19. Installation Begins C-18 Themis Computer C—Red Hat Enterprise Linux 5 Installation Installation Step 20: Congratulations! Your Red Hat Enterprise Linux installation is now complete! The installation program prompts you to prepare your system for reboot. Remember to remove any installation media if it is not ejected automatically upon reboot (see Figure C-20). Figure C-20. Installation is Complete After your computer's normal power-up sequence has completed, the graphical boot loader prompt appears at which you can do any of the following things: • Press Enter — causes the default boot entry to be booted. • Select a boot label, followed by Enter — causes the boot loader to boot the operating system corresponding to the boot label. • Do nothing — after the boot loader's timeout period, (by default, five seconds) the boot loader automatically boots the default boot entry. Do whatever is appropriate to boot Red Hat Enterprise Linux. One or more screens of messages should scroll by. Themis Computer C-19 RES-21XR3 Installation Manual Version 1.0 Step 21: Eventually, a login: prompt or a GUI login screen (if you installed the X Window System and chose to start X automatically) appears (see Figure C-21. Figure C-21. Login Screen Step 22: Once logged in, you are ready to use the desktop (see Figure C-22). Figure C-22. Ready to use the Desktop C-20 Themis Computer Appendix Optional Remote On/Off Switch D.1 Remote On/Off Configuration Customers interested in installing an optional switch from which to remotely turn the RES-21XR3 on or off are able to order a Remote On/Off Switch module that is easily installed in an available storage-drive bay (see Figure D-1, which shows the Remote On/Off Switch installed in an RES-32XR3/FIO system). Figure D-1. Remote On/Off Switch Module Themis Computer D-1 RES-21XR3 Installation Manual Version 1.0 The Remote On/Off Switch module is installed after first removing one of the existing RES-21XR3 storage drives (any except the boot drive), then installing a cable with a standard male DB9 connector at one end and an On/Off switch (an LED is optional) at the other end. When operational, if the RES-21XR3 is turned OFF, pressing the remote switch ON will turn the system on. If the RES-21XR3 is turned ON, pressing the switch OFF for less than 4 seconds will gracefully shut down the system through the BIOS; pressing the switch OFF for 4 seconds or more results in a “hard” power off (equivalent to pulling the plug” on the system). D.2 Remote Only Configuration When the Remote On/Off Switch module is configured as an ON-only device, pressing the remote switch ON will turn the system on. Turning the RES system off, however, requires pressing the ON/OFF button located on the front of the RES-21XR3 chassis. D.3 Ordering the Remote On/Off Switch Because internal modifications must be made to the RES-21XR3 in order to support the Remote On/Off Switch module, the module must be ordered and installed at the time your system is ordered. Please contact Themis for ordering options, or further information regarding the Optional Remote On/Off Switch. D-2 Themis Computer Appendix Optional RES Audio/USB/Serial Port Module E.1 RES Audio/USB/Serial Port Custom Module Customers interested in adding audio, USB, and serial port capabilities to the front of any RES system can easily order an optional RES Audio/USB/Serial Port Custom Module (see Figure E-1) that is installed at the Themis factory into an available storage-drive bay (see following Caution). Custom Module Carrier Custom Module PCB I/O Headers I/O Connectors Figure E-1. RES Audio/USB/Serial Port Custom Module Themis Computer E-1 RES-21XR3 Installation Manual Version 1.0 Caution: Because connections must be made internally from the RES Custom Module to the RES motherboard, the RES Custom Module must be installed at the Themis factory before being shipped to the customer. Do not attempt to remove the RES Custom Module from its drive slot unless you have some hardware experience (see the following paragraph, Figure E-2, and Figure E-3 on page E-3. The RES Audio/USB/Serial Port Custom Module is installed after first removing one of the existing RES storage drives (any one except the boot drive) then connecting the appropriate I/O cables from the RES Audio/USB/Serial Port Custom Module to the external devices. After the storage drive has been removed from the system, cables from the internal RES motherboard are fed through the open drive slot and attached to the I/O headers on the top surface of the Custom Module PCB, and the Module is inserted into the vacant drive slot (see Figure E-2). [Note that a RES32XR3/FIO is shown in this Appendix, although the Module may be installed into any RES system.] Figure E-3 on page E-3 shows the internal connections that are made between the RES Custom Module and the RES motherboard. RES-32XR3 / FIO Header cables After attaching header cables through a vacant drive slot to RES motherboard headers (and optional rear-panel audio I/O connectors), insert the RES Custom Module into the vacant drive slot. RES Audio/USB/Serial Port Custom Module Figure E-2. Install the RES Audio/USB/Serial Port Custom Module E-2 Themis Computer E—Optional RES Audio/USB/Serial Port Module RES Audio/USB/Serial Port Custom Module E.1.1 Attach I/O Cables Figure E-3 shows the three types of I/O supported by the RES Audio/USB/Serial Port Custom Module: • USB Port A and Port B • One Serial Port • One optional Stereo Audio Jack (installed only by customer request) Figure E-3 also shows the header connectors that are routed by cable through the empty drive slot into the RES system for connection to the proper RES motherboard surface headers or optional rear audio connectors. To Rear of Chassis (Optional) To RES Motherboard surface (top-side) headers J10 Connected to any available USB header J8 Connected to any available Serial header J1 Connected to any available USB header* J2 Connected to an audio connector on the rear of the chassis (Line Out) J4 Connected to an audio connector on the rear of the chassis (Line In) Serial Header USB Header J10 J8 USB to Audio Chip J1 Audio Out Audio In (Line Out) (Line In) J2 * The RES Custom Module contains an Audio chip on its PCB, routed to J1. J4 PCB (Printed Circuit Board) Attach the appropriate I/O Cables from the RES Custom Module to external devices. Port A J11 J3 Port B J9 USB Ports A and B Stereo Audio Out Jack (Optional) DB9 Serial Port Figure E-3. Attach the Appropriate I/O Cables Themis Computer E-3 RES-21XR3 Installation Manual Version 1.0 If the RES Audio/USB/Serial Port Custom Module is removed from its drive slot, it is recommended that the end of the motherboard I/O cable attached to the Module header be appropriately tagged so that it can be correctly reconnected when the Module is reinstalled. If the I/O cable is removed from its motherboard header, it should also be appropriately tagged for proper reconnection at a later time. E.1.2 Connector Pinouts E.1.2.1 USB Ports A and B The RES Audio/USB/Serial Port Custom Module supports two USB (Universal Serial Bus) port connectors (see Figure E-4 for pinouts), USB A and USB B, on the front I/O panel. USB pinout descriptions are listed in Figure E-4; pinout signal descriptions are described in Table E-1. USB A USB B J10 J11 USB2 5V (To J10, Pin 2) USB1 5V (To J10, Pin 1) A1 B1 USB2 DM (To J10, Pin 4) A2 B2 USB1 DM (To J10, Pin 3) USB2 DP (To J10, Pin 6) A3 B3 USB1 DP (To J10, Pin 5) USB2 GND (To J10, Pin 8) A4 B4 USB1 GND (To J10, Pin 7) Header 1 2 3 4 5 6 7 8 9 10 Figure E-4. Dual USB Connector Pinouts Table E-1. Dual USB Connector Pinout Signal Descriptions (J10) E-4 Pin Signal Name Pin Signal Name 1 +5V 2 +5V 3 DM (Data Minus) 4 DM (Data Minus) 5 DP (Data Plus) 6 DP (Data Plus) 7 Ground 8 Ground 9 Cut Off for Keying 10 No Connection Themis Computer E—Optional RES Audio/USB/Serial Port Module RES Audio/USB/Serial Port Custom Module E.1.2.2 Serial Port COM1 The RES Custom Module supports one male DB9 serial port connector (J9) on the front I/O panel (see Figure E-5)—COM1. The COM1 pinout is listed in Figure E-5; pinout signal descriptions are described in Table E-2, which also shows the serial header (J8) connections to serial port J9. Serial Port COM1 J9 J8 Header 1 2 3 4 5 6 7 8 9 10 Figure E-5. COM1 Serial Connector Pinout Table E-2. COM1 Serial Connector Pinout Signal Descriptions (J8 and J9) J8 Pin Signal Name Connected to J9 Pin J8 Pin Signal Name Connected to J9 Pin J8 Pin Signal Name Connected to J9 Pin 1 DCD 1 4 RTS 7 7 DTR 4 2 DSR 6 5 TXD 3 8 RI 9 3 RXD 2 6 CTS 8 9 GND 5 Themis Computer E-5 RES-21XR3 Installation Manual Version 1.0 E.1.2.3 Stereo Audio Ports (Optional) The RES Custom Module supports one optional Stereo Audio Out jack on the front I/O panel (see Figure E-6). The Stereo Audio Out pinout is listed in Figure E-6; header J1 pinout signal descriptions are described in Table E-3. Stereo Audio Out Jack 5 1 2 Left Line Out Right Line Out 4 3 J3 USB to Audio Chip Header Line In Header Line Out Header J2 J1 J4 1 1 1 2 +5 Volts 3 4 USB DM Line Out Left 2 Line In Left 2 5 6 USB DP Line Out Right 3 Line In Right 3 7 8 9 10 = No Connection 4 DM = Data Minus 4 DP = Data Positive Figure E-6. Stereo Audio Connector Pinout Table E-3. Stereo Audio Out Connector Pinout Signal Descriptions (J1) E-6 Pin Signal Name Pin Signal Name Pin Signal Name 1 No Connection 4 Data Minus 7 Ground 2 + 5 volts 5 No Connection 8 Ground 3 No Connection 6 Data Plus 9 No Connection Themis Computer E—Optional RES Audio/USB/Serial Port Module E.2 Ordering the RES Audio/USB/Serial Port Custom Module Because internal modifications must be made to the RES chassis in order to support the RES Audio/USB/Serial Port Custom Module, the Custom Module must be specified on the purchase order for your RES system. Please contact Themis for further information regarding the RES Audio/USB/Serial Port Custom Module. You can reach Themis on the web at www.themis.com, or by calling +1 510.252.0870. Themis Computer E-7 RES-21XR3 Installation Manual E-8 Version 1.0 Themis Computer Appendix Re-packaging Instructions F.1 Re-packaging for Shipment If it becomes necessary to return equipment to Themis Computer, it is very important that the equipment be shipped in the original packaging which provides adequate protection against crushing and moisture invasion. Failure to use original packaging materials, exactly as described in this appendix may invalidate the warranty. If the original packaging is no longer serviceable, or no longer available, please contact Themis Customer Support for a new shipping box to send back your RES-21XR3 ensuring protection from damage in transit. If it becomes necessary to ship in packaging other than that provided by Themis, equipment should be wrapped in a moisture resistant covering and placed either in double boxes, or in boxes with crush resistant insulation between the equipment and the outer walls of the container. When using the original packaging, the clear plastic membrane should be placed next to the equipment; i.e., up against the bottom, or down against the top. The following instructions assume the original packing components are still available, and in serviceable condition. Caution: Failure to use the original Themis packaging materials, and failure to follow the instructions of this Appendix F, may invalidate the warranty. Please contact Themis if new packaging materials are required. Themis Computer F-1 RES-21XR3 Installation Manual F.2 Version 1.0 Packaging Components The original packaging components are shown in Figure F-1, page F-2. They comprise a packaging box, bottom crush-resistant layer, and top crush-resistant layer. The bottom and top crush-resistant layers are identical components, placed so that the side with the plastic membrane is against the equipment. Top Layer Membrane Bottom Layer Packing Container Figure F-1. Packaging Components F-2 Themis Computer F—Re-packaging Instructions F.3 Instructions for Re-packaging Reassemble the packaging material about the equipment in accordance with the following instructions (see Table F-2 on page F-3): • Inspect the original packaging materials for serviceability. • Place one crush-resistant layer open side down, membrane side up, in the bottom of the box. • Place the equipment on top of the bottom layer, right side up. • Place the other crush-resistant layer, membrane side down, open side up, on top of the equipment. • Press down on the top layer to firmly compress the layers around the equipment, and allow for the box flaps to be closed. • Seal the top of the box with strong packaging tape, wrapping the tape completely around the box, both lengthwise, and crosswise. • Prepare for shipment in accordance with the instructions received from Themis Computer. Figure F-2. Order of Assembly Themis Computer F-3 RES-21XR3 Installation Manual F-4 Version 1.0 Themis Computer Index Numerics 240-pin DIMM sockets 1-5 2RU form-factor 1-3 32-Bit Data Transfer 3-18 80-mm-fan housing 2-1 A AC power cord 1-19, 2-20 power LED 2-21 power loss, recovery 1-7 power socket 2-20 accessory kit 1-19 ACPI Configuration 3-24 ACPI APIC Support 3-25 ACPI Aware O/S 3-25 ACPI Version Features 3-25 APIC ACPI SCI IRQ 3-25 Headless Mode 3-25 High Performance Event Timer 3-25 Advanced Chipset Control 3-11 Active State Power Management 3-14 Demand Scrubbing 3-13 Intel VT-d 3-13 Legacy USB Support 3-14 Memory Frequency 3-12 Memory Mode 3-12 Patrol Scrubbing 3-13 QPI and IMC Configuration 3-11 QPI Frequency 3-12 QPI L0s and L1 3-12 QPI Links Speed 3-12 SR-1OV Supported 3-13 Throttling - Closed Loop/Throttling - Open Loop 3-13 USB 2.0 Controller 3-14 Advanced Setup Configurations 3-5 Themis Computer AMI BIOS 3-4 AMI BIOS Setup Utility 3-1 AMI OEMB Table 3-25 antistatic bags 2-1 antistatic wrist strap 2-1 audio connectors D-3 Audio/USB/Serial Port Custom Module D-1 COM1 Serial Connector Pinout D-5 COM1 Serial Connector Pinout Signal Descriptions D-5 header connectors D-3 I/O cables D-2 I/O headers D-2 installation D-2 ordering D-7 PCB and Carrier D-1 rear audio connectors D-3 Stereo Audio Connector Pinout D-6 Stereo Audio Out Connector Pinout Signal Descriptions D-6 Stereo Audio Out jack D-6 USB Connector Pinout Signal Descriptions D-4 USB Connector Pinouts D-4 automatic voltage control 3-13 B BIOS advanced settings 3-5 BIOS Build Version 3-4 BIOS Support for USB Keyboard 1-9 Block (Multi-Sector Transfer) 3-16 Boot Configuration 3-31 Boot Device Priority 3-31 CD/DVD Drives 3-32 Hard Disk Drives 3-32 Removable Drives 3-32 BOOT Features Index-1 RES-21XR3 Installation Manual AddOn ROM Display Mode 3-5 BOOT Features Quick Boot 3-5 Bootup Num-Lock 3-6 Hit ’Del’ Message Display 3-6 Interrupt 19 Capture 3-7 PS/2 Mouse Support 3-6 Restore on AC Power Loss 3-6 Wait For ’F1’ If Error 3-6 Watch Dog Function 3-6 BOOT Features Quiet Boot 3-5 Boot Graphics Adapter Priority 3-19 Boot Loader 3-21 C CD-RW/DVD-ROM drive 1-5 Channel Mirror 3-12 chassis 2-2 Chipset 1-5 Chipset Overview 1-7 Clear NVRAM 3-18 COM1 / COM2 serial port/header 1-14 Configuration, system 2-21 Configure SATA#1 as 3-15 Console Redirection 3-20, 3-21 CPU Bridge Configuration Demand Scrubbing 3-12 Memory Frequency 3-12 Memory Mode 3-12 Patrol Scrubbing 3-12 CPU OH alarm 3-21 CPU Overheat LED and Control 1-8 D DCA Technology 3-11 DDR-1066 3-12 DDR-1333 3-12 DDR-800 3-12 Device I/O 3-13 Dimensions, chassis 1-5 Direct I/O VT-d 3-13 DMA Mode 3-17 DMAR ACPI Tables 3-13 Index-2 Version 1.0 DMI Event Log Configuration 3-28 Clear Event Log 3-28 Mark All Events as Read 3-28 PCIE Event Log 3-28 View Event Log 3-28 E ECC SDRAM memory modules 2-4 Electrical Specifications 1-16 Electrostatic Discharge 1-17 Energy Sav ing/ES 1-18 Environmental Specifications 1-17 ESD grounding techniques 2-1 protected mat 2-1 Ethernet A-3 Exit Options 3-33 Discard Changes 3-33 Discard Changes and Exit 3-33 Load Fail-Safe Defaults 3-34 Load Optimal Defaults 3-34 Save Changes and Exit 3-33 Expansion slots 1-5 F Fan Status Monitor 1-8 Features of the LGA 1366 Processor and the X58 Chipset 1-7 features of the X8STi family 1-2 flanges 2-19 Floppy A 3-15 form-factor, 2RU 1-3 front bezel 2-12 front doors 2-12 fused AC 1-16 G General Specifications 1-15 Gigabit Ethernet A-3 Graphics Port Connector Pinout Descriptions A-4 Themis Computer Index H Hardware Health Monitor 3-21 CPU Overheat Alarm 3-21 CPU1 Temperature/CPU2 Temperature 3-22 Fan 1—Fan 8 Reading 3-24 Fan Speed Control Modes 3-24 System Temperature 3-24 Voltage Monitoring 3-24 hot keys 3-2 How To Change the Configuration Data 3-2 I I/O Cables attaching D-3 I/O Connectors Ethernet LAN Port 1-14 PS/2 keyboard 1-14 PS/2 mouse 1-14 Serial Ports 1-14 USB Serial Ports 1-14 I/O connectors 1-11 IDE 3-15 IDE Detect Timeout 3-15 IDE/SATA/Floppy Configuration SATA#1 Configuration Configure SATA#1 3-15 Independent 3-12 Installation procedures 2-1 installing rack-mount slides B-1 memory modules 2-4 Intel I/OAT 3-14 Intel X58 Express chipset 1-7 Intel® AES-NI (When supported by the CPU 3-8 Intel® Turbo Boost (Available if Intel® EIST Technology is Enabled 3-9 Introduction 3-1 IPMI Configuration 3-26 IPMI Firmware Version 3-26 Status of BMC Working 3-26 Themis Computer K keys, front bezel 1-19 L LAN port A-3 LBA/Large Mode 3-16 LEDs 1-11 NIC (Gb Ethernet) 1-13 SATA storage drives 1-13 Linux 5 Installation C-1 Linux Installation 2-21 Creating a Custom Layout C-9 Edit Interface Pop-Up Screen C-13 Enter Installation Number C-6 Installation Begins C-18 Installation is Complete C-19 Language Selection C-4 Login Screen C-20 Master Boot Record (MBR) C-11 Network Devices List C-12 Option to Review or Continue C-18 Optional Packages C-17 Package Installation Default Screen C-16 Partitioning C-7 Power On C-2 Ready to use the Desktop C-20 Reviewing Option C-8 Selecting Layout Type C-5 Selecting Time Zone C-14 Setting Up Boot Loader C-10 Setting Up Root Account and Password C-15 Skip Key C-2 Welcome Screen C-3 Linux Installation Guide C-1 lithium battery 2-1 installation 2-12 lithium battery and socket, illustration of 2-11, 2-12 removal 2-11 Load Onboard LAN1 Option ROM/Load Onboard LAN2 Option ROM Load Onboard Index-3 RES-21XR3 Installation Manual LAN3 Option ROM/Load Onboard LAN4 Option ROM (X8STi- LN4 Only) 3-19 Load SAS Option ROM (X8STi-3F Only) 3-19 Lockstep 3-12 Lower PCI Expansion Slot 2-10 M Main BIOS Setup 3-3 System Time/System Date 3-3 Main BIOS Setup Screen 3-3 Main Switch Override Mechanism 1-9 memory 1-5 memory modules, ECC SDRAM 2-4 Middle PCI Expansion Slot 2-10 SET PEF Configuration BMC Watch Dog TimeOut 3-28 N noise reduction 1-17 noise specification 1-17 NVRAM 3-18 O OEM logo 3-5 Onboard Floppy Controller 3-20 Onboard Voltage Monitoring 1-8 Opening the RES-21XR3 Front Doors 2-13 Operating temperature 1-5 Optional Remote On/Off Switch D-1 Output Voltage 1-16 Overheat LED 1-13 Overview of the Winbond WPCM450 Controller 1-10 P Packaging and Shipping 1-19 Packaging Components F-2 PC Health Monitoring 1-7 PCI cards 2-1, 2-7 PCI IDE Bus Master 3-18 PCI IDE BusMaster 3-18 Index-4 Version 1.0 PCI latency 3-18 PCI Latency Timer 3-18 PCI/PnP Configuration Clear NVRAM 3-18 PCI IDE Bus Master 3-18 PCI Latency Timer 3-18 PCIe IO Performance 3-19 Plug & Play OS 3-18 pinouts Gigabit Ethernet LAN A-3 serial ports A-2, D-5 USB port A-2 VGA Connector A-4 PIO Mode 3-16 Plug & Play 3-18 Plug & Play OS 3-18 Plugging in the AC Power Cords 2-20 POST 3-5 power button and LED 2-20 LED 2-21 Power Configuration Setting 1-9 power cords 2-20 power supply 1-5, 2-1 installation 2-18 locking mechanism 2-17 Power Supply Module 1-12 PSM LED (Off) 1-12 PSM LED (On) 1-12 Power-On Self-Test (POST) 3-2 Primary IDE Master/Slave, Secondary IDE Master/Slave, Third IDE Master, and Fourth IDE Master 3-16 Processor Processor CPU Type 3-4 processor 1-5 Processor and Clock Options 3-7 Active Processor Cores 3-9 Adjacent Cache Line Prefetch 3-8 C1E Support 3-10 C3 Auto Demotion 3-11 Clock Spread Spectrum 3-7 Themis Computer Index CPU Ratio 3-7 C-State package limit setting 3-10 DCA Prefetch Delay 3-11 DCA Technology 3-11 Execute-Disable Bit Capability 3-8 Hardware Prefetcher 3-7 Intel EIST Technology 3-9 Intel Virtualization Technology 3-8 Intel® C-STATE Tech 3-10 Intel® TurboMode Technology 3-9 Simultaneous Multi-Threading 3-9 Processor Logical Count 3-4 Processor Micro_code Revision 3-4 Processor Physical Count 3-4 Processor Speed 3-4 protective cover 2-2 PS/2 keyboard A-1 PS/2 mouse A-1 R rack-mount brackets 2-19 rack-mount slides 1-20, B-1 installation kit B-2 screw locations B-1 rack-mount slides (optional) 2-19 Red Hat Enterprise Linux C-1 Remote Access Configuration 3-20 Flow Control 3-20 Redirection After BIOS POST 3-21 Remote Access 3-20 Serial Port Mode 3-20 Serial Port Number 3-20 Sredir Memory Display Delay 3-21 Terminal Type 3-21 VT-UTF8 Combo Key Support 3-21 Re-packaging Instructions F-1 Order of Assembly F-3 Packaging Components F-2 Re-assembling F-3 Shipping F-1 RES Audio/USB/Serial Port Custom Module D-1 Themis Computer ROM Scan Ordering 3-19 S SATA mode 3-15 SATA#1 3-15 SATA#1 Configuration 3-15 ICH RAID Code Base 3-15 SATA #2 Configuration 3-15 SATA AHCI 3-15 SATA#2 Configuration 3-15 SATA#2 3-15 screw locations for rack-mount slides B-1 Section 2.3.1, “Plugging in the AC Power Cords,” on page 2-20 1-19 Security Settings 3-29 Boot Sector Virus Protection 3-30 Change Supervisor Password 3-30 Change User Password 3-30 Clear User Password 3-30 Password Check 3-30 Supervisor Password 3-29 User Access Level 3-30 User Password 3-29 Self-Monitoring Analysis and Reporting Technology (S.M.A.R.T.) 3-18 Serial Port D-3 Serial Port 2 Mode 3-20 Serial Port COM1 D-5 serial ports A-2, D-5 Set LAN Configuration 3-26 Channel Number 3-26 Channel Number Status 3-27 Gateway Address 3-27 IP Address 3-27 IP Address Source 3-27 Mac Address 3-27 Subnet Mask 3-27 SET PEF Configuration BMC Watch Dog Timer Action 3-28 Shock 1-17 Shock endurance 1-5 Slot 6 Width 3-19 Index-5 RES-21XR3 Installation Manual Slot PCI 33MHz, PCI Slot from SXB, Slot 6 PCIE x16 3-19 Slow Blinking LED for Suspend-State Indicator 1-9 Sound Baffle Installed front 1-17 rear 1-18 Sparing 3-12, 3-13 Specifications Altitude 1-15 BTU Rating 1-16 Dimensions 1-15 Electrostatic Discharge 1-17 Input Current 1-16 Input Frequency 1-16 Input Leakage 1-16 Input Power 1-16 Input VA Rating 1-16 Input Voltage 1-16 Maximum Wet Bulb 1-15 Packaging and Shipping 1-19 Plug Type 1-16 Power Factor 1-16 Relative Humidity 1-15 Shock 1-17 Temperature 1-15 Weight 1-15 Starting the Setup Utility 3-2 Stereo Audio Jack D-3 Stereo Audio Ports D-6 Storage drives installation 2-14 storage drives 2-1 removal 2-13 storage drives, unlocking 2-13 Super I/O 1-10 Super IO Device Configuration 3-19 Serial Port1 Address/Serial Port2 Address 3-20 system LEDs 1-11 NIC (Gb Ethernet) 1-13 Overheat 1-13 Index-6 Version 1.0 Power 1-13 Power Fail LED 1-12 Power Fail LED (Left) 1-12 Power Fail LED (Off) 1-12 Power Fail LED (Right) 1-12 SATA storage drives 1-13 System LEDs and I/O Connectors 1-11 System Memory System Memory Size 3-4 System Power 1-16 T Technical Support 1-19 Throttling - Closed Loop/Throttling - Open Loop 3-13 TTYA (COM1) A-2 Turning the System Off 2-21 Turning the System On 2-20 Type 3-16 U Upper PCI Expansion Slot 2-10 USB Functions 3-14 USB Port A and Port B D-3 USB Ports D-4 USB ports A-2, D-4 USB Serial Ports 1-14 V VGA connector 2-21 VGA graphics port A-4 View BMC System Event Log 3-26 Clear BMC System Event Log 3-26 Virtualization Technology 3-13 VMM 3-13 W Wake-On-LAN (WOL) 1-9 Themis Computer Place Stamp Here Themis Computer 47200 Bayside Parkway Fremont, CA 94538 Attn: Publications Department Fold here; tape at top to seal Reader Comment Card We welcome your comments and suggestions to help improve the RES-21XR3 Installation Manual (118188-024). Please take time to let us know what you think about this manual. • Information provided in the manual was complete. Agree___ • Not Applicable___ Disagree___ Not Applicable___ Disagree___ Not Applicable___ The manual was useful. Agree___ • Disagree___ Information was easily accessible. Agree___ • Not Applicable___ Information was well documented and easy to follow. Agree___ • Disagree___ Please write down any comments you may have about this manual, including how it can be improved: ___________________________________________________________ ___________________________________________________________ ___________________________________________________________ ___________________________________________________________ ___________________________________________________________ ___________________________________________________________ ___________________________________________________________ ___________________________________________________________ ___________________________________________________________ Name: _____________________________________________________ Title: _____________________________________________________ Company: _____________________________________________________ Address: _____________________________________________________