1
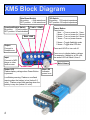
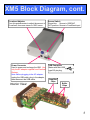
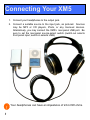
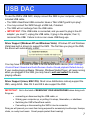
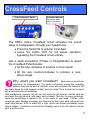
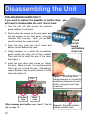
XM5
Headphone Amplifier
User’s Manual
Thank you, and congratulations on your purchase of the XM5 Portable
Headphone Amplifier!
We’ve worked very hard to provide you with what may be one of
the most advanced, feature packed, and best sounding headphone
amplifiers on the market today. The XM5 is designed to be durable, flexible,
easy to use, practical, and above all, sound great. Each unit is carefully
manufactured, and then rigorously tested for performance, durability, and
sound quality.
If you have any questions that are not answered by this manual,
please feel free to send us an email. Enjoy the amp!
Yours truly,
PLEASE
READ!
James Forest
President & CEO
A Word About Protecting Your Hearing:
The most
valuable piece of audio equipment you own are your ears. Smart people protect
their hearing. When using the XM5, or any headphones, get in the habit of
removing the headphones from your ears whenever you:
•
•
•
•
•
Turn the XM5 on;
Connect or disconnect any cables, including the USB cable;
Turn your computer off/on/sleep/standby with the USB cable connected;
Press the USB select button on the back of the XM5.
Anything that may cause a sudden burst of loud sound.
Your only have one set of ears, and you can’t replace them. Always listen to
music at reasonable volume, and most importantly, use good common sense.
©2008 Practical Devices Corporation. All rights reserved.
www.practicaldevices.com
Table of Contents
XM5 Block Diagram ....................4
Connecting Your XM5 .................6
USB .............................................7
Power Button Functions ..............8
Crossfeed Controls......................9
Bass, Treble, Gain Boost...........10
75Ω output, Voltmeter................11
Disassembling the Unit..............12
Re-assembling the Unit .............13
Battery Power Systems .............14
Frequently-Asked Questions .....15
Troubleshooting.........................16
Warranty and Guarantee ...........17
Technical Specifications ............18
3
XM5 Block Diagram
Gain Boost Switch
IN position: +10db extra boost
OUT position: + 0db extra boost
Crossfeed Enable Switch
IN position: XFeed enabled.
OUT position: XFeed disabled
75Ω Switch
IN position: 75Ω output impedance
OUT position: 0Ω output impedance
Treble +2.5dB
Bass +6dB
2 times = Toggle flashlight mode
5 times = Toggle blue LED dim
Output
Connect to
Headphones
Press and HOLD to turn unit off.
Press once to display battery voltage.
For example, if battery is at 8.5 volts,
the amber LED will flash 8, then 5
Input
Connect to MP3
player or other
audio source.
Amber LED
Flashes battery voltage when Power Button
is pressed.
Low-Battery warning: Flashes a one-flash
warning when the battery is low (below 6.5
volts). Flashes a two-flash warning when the
battery is very low (below 5.2 volts).
4
Power Button
Press button:
1 time = Turn on power for 1 hour
3 times = Turn on power for 3 hours
6 times = Turn on power for 6 hours
7 times = Turn on power forever
Main Volume
Blue LED
Indicates
power is on
XM5 Block Diagram, cont.
Crossfeed Adjuster
Turn this potentiometer to adjust the amount of
Crossfeed, from near-stereo to 100% mono.
Power Connector
Used to power and recharge the XM5. Use
only the AC adapter supplied from Practical
Devices.
Note: Before plugging in the AC adapter:
unplug the USB cable, plug in the adapter,
then reconnect the USB cable.
Interior View:
Source Switch
IN position: Source is USB DAC
OUT position: Source is FrontPanel input
USB Connector:
Mates with Mini-USB
type B 5-pin plug.
Amplifier
Chips
Buffer
Chips
5
Connecting Your XM5
1. Connect your headphones to the output jack.
2. Connect a suitable source to the input jack, as pictured. Sources
may be MP3 or CD players, iPods, or any line-level devices.
Alternatively, you may connect the XM5’s rear-panel USB port. Be
sure to set the rear-panel source-select switch (switch-out selects
front panel input; switch-in selects USB).
Your headphones can have an impedance of 24 to 600 ohms.
6
USB DAC
To use the XM5’s USB DAC, simply connect the XM5 to your computer, using the
included USB cable.
• The XM5’s RearPanel USB connector takes a “Mini USB Type B 5-pin plug”.
• You may connect the XM5 through a USB hub, if desired.
• The XM5 will not recharge from the USB cable.
• IMPORTANT: If the USB cable is connected, and you want to plug in the AC
adapter: you must 1) unplug the USB cable, 2) plug in the adapter, then 3)
reconnect the USB. Failure to do so can cause USB hang-ups.
Driver Support (Windows XP and Windows Vista): Windows XP and Windows
Vista have built-in drivers to support the XM5. The first time you plug in the XM5,
the drivers will automatically install:
You may have to choose the XM5 to be the default audio device (Start->Settings>Control Panel->Sounds and Audio Devices->Audio->Sound playback Default device).
If your media-playing software (Winamp, Windows Media Player, etc) was running
when you plugged in the XM5, you may have to exit and restart the mediaplaying software.
Driver Support (Linux, MAC OS): Most Linux distributions natively support the
XM5, using ALSA. Mac OS X and OS 9 also support the XM5
IMPORTANT: Get in the habit of REMOVING YOUR HEADPHONES when doing such
things as:
• connecting or disconnecting the USB cable, or
• Waking your computer up, or putting it to sleep, hibernation, or shutdown
• Switching the XM5’s RearPanel switch
• Connecting or disconnecting the XM5’s Line-In connector
Doing so will prevent your ears from being exposed to excessively-loud bumps, thumps,
clicks, or overly-loud music. Smart people protect their hearing!
7
Power Button Functions
Power Button
The power button functions are activated by pressing repeatedly
within a three second window:
1 press: Turn unit on. The XM5 turns off
automatically after one hour.
3 presses: Turn unit on for three hours.
6 presses: Turn unit on for six hours.
7 presses: Turn unit on. The XM5 will not turn itself off.
Press and hold: Turn unit off.
The unit will respond to button presses by flashing the
blue LED once for each hour it will stay on.
Additional power button functions:
2 presses: Toggle flashlight mode (all LEDs on full).
5 presses: Toggle LED dimming.
8
CrossFeed Controls
Crossfeed Enable Switch
Crossfeed Adjuster
Only works when
switch is enabled.
The XM5’s Active Crossfeed circuit simulates the sound
stage of loudspeakers, through your headphones.
• Press the Switch IN to activate Crossfeed.
• Leave the button OUT for full stereo operation,
bypassing the Crossfeed circuit entirely.
Use a small screwdriver (Philips or Straightblade) to adjust
the Crossfeed Potentiometer:
• All the way clockwise to produce a mono signal;
• All the way counter-clockwise to produce a nearstereo image.
Why would you want Crossfeed?
Most music is mixed to be
listened to on loudspeakers. The studio technicians mixing the recording
assume there will be alot of crosstalk, since with speakers the listener's left
ear clearly hears the right speaker's output, and vice versa. Thus, most music is mixed
with a very wide stereo soundstage.
With headphones, however, the left ear only hears the left channel, and the right ear
only hears the right channel, with nearly zero crosstalk. This can, for many recordings,
cause the soundstage to appear to be "in the center of your head". Further, some
recordings (early Beatles recordings are infamous for this) have each instrument and
vocal track panned 100% to either left or right, which can almost immediately cause
listener fatigue. Crossfeed corrects this by bleeding some of the left channel into the
right, and vice-versa.
9
Bass and Treble Boost
You may use the bass and treble boost buttons to give the following
approximate boosts:
Bass Boost: +6dB @ 100Hz
Treble Boost: +3dB @ 10kHz
Frequency response with
Bass Boost enabled
Frequency response with
Treble Boost enabled
Gain Boost
With the volume knob at full, your XM5 will deliver +12dB of gain.
Additionally, you can enable the gain boost switch, which will give you an
extra +10dB of gain, for a total of approximately +22dB.
In order to get the best possible noise floor, you should not enable the Gain
Boost unless:
a) the volume of your headphones is too quiet, and,
b) you have already tried turning up the volume of your source (mp3
player).
Usually, the Gain Boost is only needed when using headphones which
have an impedance greater than around 150 ohms.
10
75Ω Output Impedance
You can insert a 75 ohm impedance at the output jack by pushing the 75Ω
switch:
Switch = OUT; Normal mode.
Output Impedance: 0Ω
Switch = IN; High-impedance mode.
Output Impedance: 75Ω
Why would you want 75Ω output impedance?
There are several headphone systems which can benefit. In particular,
etymotic’s ER-4P in-ear headphones, when used with the 75Ω feature
enabled, perform nearly identically to the generally-regarded-as-muchbetter ER-4S’s.
Other headphones, especially lower-impedance
headphones, can also benefit. It is a matter of personal preference.
Testing the Battery
The XM5 also acts as a battery tester.
When the XM5 is turned on, the amber LED will display the battery voltage
by flashing. For example, if the voltage is 8.5 volts, the LED will flash 8
times, then 5 times.
To see the battery voltage if the unit is already on, press the power button
The XM5 will warn you if the power falls below certain thresholds:
• At around 6.5 volts, the amber LED will begin to flash.
• Below around 5.2 volts, the amber LED will doubleflash, indicating the battery is very low.
11
Disassembling the Unit
FOR ADVANCED USERS ONLY!
If you want to replace the amplifier or buffer chips, you
will need to disassemble the unit. Here's how:
1. Turn the unit off, and remove the external
power adapter if connected.
2. Remove the two screws on the rear panel, and
the two screws on the front panel, using the
included 7/64” hex key. Note: you do NOT
need to remove the volume knob!
3. From the rear, push the circuit board and
battery out the front of the case.
4. Using tweezers or a small flat screwdriver,
gently wedge the chips out of their sockets.
Take care not to bend the pins of the chips.
See Figure 1.
Push
circuit
board
and battery
from rear.
5. Insert the new chips (also known as “rolling”
the amp). Make sure pin 1 is oriented properly.
Take care not to bend the pins. Alternatively,
copper Busbars may be used instead of buffer
chips (see Figure 2).
Pin 1
Op-Amp
chips
Figure 1. Removing chips:
Wedge tweezers or a small flat
screwdriver between chip and
socket, and gently work chip
up and out.
Buffer
chips
What opamps and buffers can I use? See the Figure 2. Busbars installed
faq on page 15,.
instead of buffer chips.
12
Re-assembling the Unit
To re-assemble the unit:
1. Slide the unit together (make sure the
circuit board slides smoothly on the
case's guide rails). When sliding,
ensure the following:
Battery cable
should be
neatly under
battery
Fig. 1
2. Battery should be oriented such that
battery clip is toward FRONT of unit
(Fig 1)
3. Battery cable is neatly underneath
battery and circuit board (Fig1)
4. All 3 circuitboards in the correct slot
(Fig.2).
5. Volume pot may catch edge of case
(Fig. 3).
Note: Make sure all
THREE circuit
boards slide in
the correct slot.
DO NOT FORCE.
6. Press on Faceplate to ensure
circuitboards are inserted completely.
7. Re-install the two front screws.
Do not overtighten.
8. Re-install the rear panel.
Fig. 2
Important! When
sliding together: the
“volume pot body”
may interfere with
the metal case
(shown by arrow).
If so, push on black
bezel to allow pot
body to clear. Fig3
Other Reassembly Hints:
1. Don’t put excessive force on the volume knob. The pot is
precision equipment, and doesn’t like to be manhandled.
2. Similarly, don’t put force on the power button (this can
happen if the faceplate slips off during reassembly).
3. Never try to remove the plastic pushbutton switch caps
while the switch is in the “IN” position, or you will break
the switch.
13
Battery Systems
Your XM5 was equipped with one of the following battery systems:
1. Lithium-Ion FastCharge™ System, including a rechargeable battery, and an AC
adapter/recharger.
2. Alkaline battery
1. Lithium Battery FastCharge™
System
If your XM5 came equipped with the optional
Lithium-Ion rechargeable system, just plug the
charger into the powerjack on the rear of the
XM5.
• The battery will fully charge within two
hours. When charging is finished, the LED
on the charger will turn from red to green.
• The battery will charge even if the XM5 is
turned on.
• You can leave the charger connected indefinitely.
• You can expect up to 40 hours of use per charge, with no buffers installed.
• Your Charger is a “World” charger—it will work with AC Mains voltages from 105 to
240 VAC, at 50 or 60Hz. If you are using the charger outside of North America,
you may need a plug adapter (available from your local electronics store).
• DO NOT plug anything else into the powerjack, or damage may result.
2. Alkaline battery
You CANNOT use any AC adapter whatsoever when using an alkaline battery.
3. Lithium NON-rechargeable battery
You may use a 9.6V Lithium non-rechargeable battery (often used in smoke detectors).
These give extremely long battery life, and slightly higher headroom from the higher
voltage. The downside is they are not cheap. You CANNOT use any AC adapter
whatsoever when using a Lithium non-rechargeable.
Want to upgrade your existing alkaline unit to Lithium
FastCharge? Email us at [email protected].
14
NOTE: Do not use any AC adapter with an alkaline or non-rechargeable
battery. Doing so may cause device damage, battery leakage, or battery
overheating, explosion, or fire.
Frequently-Asked Questions
Can I use a line-level input to the XM5, such as from a CD/DVD
player or VCR?
Yes, the XM5 will accept a line-level input.
Can I use the XM5 to drive speakers?
Usually, no. The XM5 was designed as a headphone amp, and
will usually not do a good job of driving speakers, even small
ones (most speakers have impedances of around eight ohms).
What you are looking for is a power amplifier, not a headphone
amplifier
What are my options for buffering the amp?
The XM5 has two sockets for two amplifier chips, and two
sockets for two buffer chips.
•
Amplification: The XM5 comes with two OPA134 amplifier
chips. There are many other amp chips you can also use.
•
Buffering: For the buffer sockets, you can use:
1) Copper Busbars, which connect pins 3 and 6 of the
buffer sockets. In this case, all output drive from the
XM5 comes from the amplifier chips.
2) BUF634 buffer chips from TexasInstruments, which
are very strong and quiet dedicated buffers.
For more FAQs, see our website:
http://www.practicaldevices.com/faq.htm
15
Troubleshooting
Here are some common problems, and their solutions:
USB doesn’t work:
•
Unplug the USB connector, wait 10 seconds, then plug it back in,
and restart your multimedia application.
•
Remember: plugging in the AC adapter while USB is connected
can cause USB malfunction. You must disconnect USB, connect
the AC adapter, then reconnect USB. Always connect AC before
USB!
Amp does not turn on or respond to pushing the power button:
•
•
Battery is flat, and needs to be recharged or replace.
Disconnect the battery, hold down the power button for 10
seconds, then reconnect the battery.
Headphone volume is too quiet, even with the volume knob at full:
•
Increase volume of source (MP3 player). If it is still too quiet, then
use the Gain Boost.
Output is in one ear only; the other channel is dead:
•
Check that all cables are completely plugged in all the way
•
Check that your cable is a stereo cable, not a mono cable.
Output is louder in one ear than the other:
•
•
Source is too strong—turn down volume on source
Headphone impedance is too low. Use headphones with a higher
impedance.
No Sound:
•
16
Rearpanel audio source selector switch is set wrong. Switch it.
Warranty and Guarantee
Practical Devices stands behind its products with a full
no-risk warranty and money-back satisfaction guarantee.
Practical Devices offers a 30-day money-back guarantee on all of
our products. If, for any reason whatsoever, you are unsatisfied with
your purchase, you may return it for your money back, including
your original shipping cost. (The fine print: Unit must be returned
within 30 days of sale; Unit must be returned in the same
undamaged, good working order as it was received; Practical
Devices will refund you the original cost, plus the cost of the original
shipping. Customer must pay for return shipping cost).
Further, we warranty, for a period of one year, that our products are
free from any defects in workmanship. Should you have any
problems, we promise to make it right. (The fine print: warranty is in
effect for a period of one year. Problems must be reported to
[email protected] This warranty covers any defects in
workmanship. It does not cover abuse, physical damage, or the like).
Should you need any service, please email us at
[email protected]
17
Specifications
Description:
Portable Audio Headphone Amplifier
Weight:
157 grams (5.5 oz)
Power Source:
• Optional Lithium-Ion Rechargeable
System, or
• 9-volt Alkaline, or
• 9.6V Lithium non-rechargeable
External Power Supply:
Optional Lithium-Ion charger
Battery Charge Time
Lithium FastCharge System: 1.5 hours
Battery Life (approximate):
Alkaline:
50 hours
Lithium-Ion:
40 hours
Lithium NON-rechargeable: 100 hours
Maximum Gain:
+20.6 dB (Gain Boost enabled)
+12.1 dB (Gain Boost disabled)
Frequency Response (20-20,000Hz,
typical, FrontPanel input):
+0.1dB, -0.4dB
-3dB Point
(typical, FrontPanel input):
21 kHz at top end;
9 Hz at low end
Total Harmonic Distortion
(typical, FrontPanel input)
0.0007%
Intermodulation Distortion
(typical, FrontPanel input)
0.005%
Signal to Noise ratio
(20-20,000Hz, typical, FrontPanel
input):
18
103 dB
Specifications (Continued)
Dynamic Range
(20-20,000Hz, typical):
103dB
Bass Boost (approx.)
+6dB @ 100Hz
Treble Boost (approx.)
+3dB @ 10kHz
Crossfeed
Active, user-adjustable from mono to
stereo using potentiometer;
User can bypass using pushbutton.
Auto Power-OFF
User selects between 1, 3, or 6 hour
poweroff interval, or unit can be set to
stay on indefinitely
Status Indicators
Two LEDS (one blue, one amber)
Integrated Voltmeter
accuracy (typical)
±100mV
Mechanicals
Anodized aluminum case;
Glossy laser-anodized faceplate;
Polished aluminum volume knob;
FR-4 dual-layer Printed Circuit Board with
1 oz. copper
Other Features
Flashlight Mode: Turns on both LEDs to
full brightness;
Dimming mode: Allows user to optionally
dim the blue LED.
USB DAC
Japanese TI2702/04 DAC, 0.006% THD;
44.1/48kHz, USB 2.0 Compliant; Native
compatibility with Windows XP, Vista,
MAC OS 9, OS X, and most Linux
installs.
19
XM5r6_v39 ©2008
www.practicaldevices.com