1
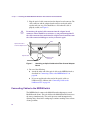
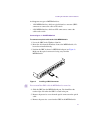
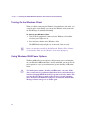
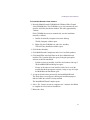
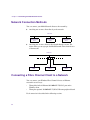
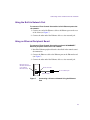
Avid Unity™ MediaNetwork
Windows® Fibre Channel Client
Setup Guide
m a k e m a n a g e m ove | m e d i a ™
Avid
®
Copyright and Disclaimer
Product specifications are subject to change without notice and do not represent a commitment on the part
of Avid Technology, Inc. The software described in this document is furnished under a license agreement.
You can obtain a copy of that license by visiting Avid's Web site at www.avid.com. The terms of that license
are also available in the product in the same directory as the software. The software may not be reverse
assembled and may be used or copied only in accordance with the terms of the license agreement. It is
against the law to copy the software on any medium except as specifically allowed in the license
agreement. Avid products or portions thereof are protected by one or more of the following United States
patents: 4,746,994; 4,970,663; 5,045,940; 5,267,351; 5,309,528; 5,355,450; 5,396,594; 5,440,348;
5,452,378; 5,467,288; 5,513,375; 5,528,310; 5,557,423; 5,568,275; 5,577,190; 5,584,006; 5,640,601;
5,644,364; 5,654,737; 5,715,018; 5,724,605; 5,726,717; 5,729,673; 5,745,637; 5,752,029; 5,754,851;
5,799,150; 5,812,216; 5,852,435; 5,883,670; 5,905,841; 5,929,836; 5,929,942; 5,930,445; 5,946,445;
5,987,501; 5,995,115; 6,016,152; 6,018,337; 6,023,531; 6,035,367; 6,038,573; 6,058,236; 6,061,758;
6,091,778; 6,105,083; 6,118,444; 6,128,001; 6,130,676; 6,134,607; 6,137,919; 6,141,007; 6,141,691;
6,157,929; 6,198,477; 6,201,531; 6,211,869; 6,223,211; 6,239,815; 6,249,280; 6,269,195; 6,301,105;
6,317,158; 6,317,515; 6,327,253; 6,330,369; 6,351,557; 6,353,862; 6,357,047; 6,392,710; 6,404,435;
6,407,775; 6,417,891; 6,426,778; D396,853; D398,912. Additional U.S. and foreign patents pending. No
part of this document may be reproduced or transmitted in any form or by any means, electronic or
mechanical, including photocopying and recording, for any purpose without the express written permission
of Avid Technology, Inc.
Copyright © 2003 Avid Technology, Inc. and its licensors. All rights reserved. Printed in USA.
The following disclaimer is required by Apple Computer, Inc.
APPLE COMPUTER, INC. MAKES NO WARRANTIES WHATSOEVER, EITHER EXPRESS OR IMPLIED,
REGARDING THIS PRODUCT, INCLUDING WARRANTIES WITH RESPECT TO ITS
MERCHANTABILITY OR ITS FITNESS FOR ANY PARTICULAR PURPOSE. THE EXCLUSION OF
IMPLIED WARRANTIES IS NOT PERMITTED BY SOME STATES. THE ABOVE EXCLUSION MAY NOT
APPLY TO YOU. THIS WARRANTY PROVIDES YOU WITH SPECIFIC LEGAL RIGHTS. THERE MAY BE
OTHER RIGHTS THAT YOU MAY HAVE WHICH VARY FROM STATE TO STATE.
The following disclaimer is required by Sam Leffler and Silicon Graphics, Inc. for the use of
their TIFF library:
Copyright © 1988–1997 Sam Leffler
Copyright © 1991–1997 Silicon Graphics, Inc.
Permission to use, copy, modify, distribute, and sell this software [i.e., the TIFF library] and its
documentation for any purpose is hereby granted without fee, provided that (i) the above copyright notices
and this permission notice appear in all copies of the software and related documentation, and (ii) the
names of Sam Leffler and Silicon Graphics may not be used in any advertising or publicity relating to the
software without the specific, prior written permission of Sam Leffler and Silicon Graphics.
THE SOFTWARE IS PROVIDED “AS-IS” AND WITHOUT WARRANTY OF ANY KIND, EXPRESS,
IMPLIED OR OTHERWISE, INCLUDING WITHOUT LIMITATION, ANY WARRANTY OF
MERCHANTABILITY OR FITNESS FOR A PARTICULAR PURPOSE.
IN NO EVENT SHALL SAM LEFFLER OR SILICON GRAPHICS BE LIABLE FOR ANY SPECIAL,
INCIDENTAL, INDIRECT OR CONSEQUENTIAL DAMAGES OF ANY KIND, OR ANY DAMAGES
WHATSOEVER RESULTING FROM LOSS OF USE, DATA OR PROFITS, WHETHER OR NOT ADVISED
OF THE POSSIBILITY OF DAMAGE, AND ON ANY THEORY OF LIABILITY, ARISING OUT OF OR IN
CONNECTION WITH THE USE OR PERFORMANCE OF THIS SOFTWARE.
The following disclaimer is required by the Independent JPEG Group:
Portions of this software are based on work of the Independent JPEG Group.
The following disclaimer is required by Paradigm Matrix:
Portions of this software licensed from Paradigm Matrix.
The following disclaimer is required by Ray Sauers Associates, Inc.:
“Install-It” is licensed from Ray Sauers Associates, Inc. End-User is prohibited from taking any action to
derive a source code equivalent of “Install-It,” including by reverse assembly or reverse compilation, Ray
Sauers Associates, Inc. shall in no event be liable for any damages resulting from reseller’s failure to
perform reseller’s obligation; or any damages arising from use or operation of reseller’s products or the
software; or any other damages, including but not limited to, incidental, direct, indirect, special or
consequential Damages including lost profits, or damages resulting from loss of use or inability to use
reseller’s products or the software for any reason including copyright or patent infringement, or lost data,
even if Ray Sauers Associates has been advised, knew or should have known of the possibility of such
damages.
The following disclaimer is required by Videomedia, Inc.:
“Videomedia, Inc. makes no warranties whatsoever, either express or implied, regarding this product,
including warranties with respect to its merchantability or its fitness for any particular purpose.”
“This software contains V-LAN ver. 3.0 Command Protocols which communicate with V-LAN ver. 3.0
products developed by Videomedia, Inc. and V-LAN ver. 3.0 compatible products developed by third parties
under license from Videomedia, Inc. Use of this software will allow “frame accurate” editing control of
applicable videotape recorder decks, videodisc recorders/players and the like.”
The following disclaimer is required by Altura Software, Inc. for the use of its Mac2Win
software and Sample Source Code:
©1993–1998 Altura Software, Inc.
The following disclaimer is required by Ultimatte Corporation:
Certain real-time compositing capabilities are provided under a license of such technology from Ultimatte
Corporation and are subject to copyright protection.
The following disclaimer is required by 3Prong.com Inc.:
Certain waveform and vector monitoring capabilities are provided under a license from 3Prong.com Inc.
Attn. Government User(s). Restricted Rights Legend
U.S. GOVERNMENT RESTRICTED RIGHTS. This Software and its documentation are “commercial
computer software” or “commercial computer software documentation.” In the event that such Software or
documentation is acquired by or on behalf of a unit or agency of the U.S. Government, all rights with
respect to this Software and documentation are subject to the terms of the License Agreement, pursuant to
FAR §12.212(a) and/or DFARS §227.7202-1(a), as applicable.
Trademarks
888 I/O, AirPlay, AirSPACE, AirSPACE HD, AniMatte, AudioSuite, AudioVision, AutoSync, Avid,
AVIDdrive, AVIDdrive Towers, AvidNet, AvidNetwork, AVIDstripe, Avid Unity, Avid Xpress, AVoption, AVX,
CamCutter, ChromaCurve, ChromaWheel, DAE, D-Fi, D-fx, Digidesign, Digidesign Audio Engine,
Digidesign Intelligent Noise Reduction, DigiDrive, DINR, D-Verb, Equinox, ExpertRender, FieldPak,
Film Composer, FilmScribe, FluidMotion, HIIP, HyperSPACE, HyperSPACE HDCAM, IllusionFX,
Image Independence, Intraframe, iS9, iS18, iS23, iS36, Lo-Fi, Magic Mask, make manage move | media,
Marquee, Matador, Maxim, MCXpress, Media Composer, MediaDock, MediaDock Shuttle, Media Fusion,
Media Illusion, MediaLog, Media Reader, Media Recorder, MEDIArray, MediaShare, Meridien, MetaSync,
NaturalMatch, NetReview, NewsCutter, OMF, OMF Interchange, OMM, Open Media Framework,
Open Media Management, ProEncode, Pro Tools, QuietDrive, Recti-Fi, rS9, rS18, Sci-Fi, Softimage,
Sound Designer II, SPACE, SPACEShift, Symphony, Trilligent, UnityRAID, Vari-Fi, Video Slave Driver,
VideoSPACE, and Xdeck are either registered trademarks or trademarks of Avid Technology, Inc. in the
United States and/or other countries.
iNEWS, iNEWS ControlAir, and Media Browse are trademarks of iNews, LLC.
Macintosh is a trademark of Apple Computer, Inc., registered in the U.S. and other countries. Emulex is a
registered trademark of Emulex Corporation. Microsoft, Windows, and Windows NT are either registered
trademarks or trademarks of Microsoft Corporation in the United States and/or other countries. All other
trademarks contained herein are the property of their respective owners.
Avid Unity MediaNetwork Windows Fibre Channel Client Setup Guide •
Part 0130-05494-01 • February 2003
Contents
Using This Guide . . . . . . . . . . . . . . . . . . . . . . . . . . . . . . . . . . . . . 9
Who Should Use This Guide . . . . . . . . . . . . . . . . . . . . . . . . . . . . . . . . . . 9
About This Guide . . . . . . . . . . . . . . . . . . . . . . . . . . . . . . . . . . . . . . . . . . 10
Symbols and Conventions . . . . . . . . . . . . . . . . . . . . . . . . . . . . . . . . . . . 11
If You Need Help . . . . . . . . . . . . . . . . . . . . . . . . . . . . . . . . . . . . . . . . . . 12
Related Information . . . . . . . . . . . . . . . . . . . . . . . . . . . . . . . . . . . . . . . . 13
If You Have Documentation Comments . . . . . . . . . . . . . . . . . . . . . . . . . 14
How to Order Documentation . . . . . . . . . . . . . . . . . . . . . . . . . . . . . . . . . 14
Avid Educational Services . . . . . . . . . . . . . . . . . . . . . . . . . . . . . . . . . . . 14
Chapter 1
Installing the MediaNetwork Windows Fibre Channel Client
Hardware . . . . . . . . . . . . . . . . . . . . . . . . . . . . . . . . . . . . . . . . . 15
Before You Begin . . . . . . . . . . . . . . . . . . . . . . . . . . . . . . . . . . . . . . . . . . 16
Installing the Windows Client Hardware . . . . . . . . . . . . . . . . . . . . . . . . . 16
Shutting Down the Avid Workstation . . . . . . . . . . . . . . . . . . . . . . . . 17
Placing the Components . . . . . . . . . . . . . . . . . . . . . . . . . . . . . . . . . 17
Adding the Fibre Channel Adapter Board . . . . . . . . . . . . . . . . . . . . 17
Using the Grounding Wrist Strap. . . . . . . . . . . . . . . . . . . . . . . . 18
Installing the Fibre Channel Adapter Board. . . . . . . . . . . . . . . . 18
Connecting Cables to the Windows Client . . . . . . . . . . . . . . . . 19
Connecting Cables to the MEDIASwitch . . . . . . . . . . . . . . . . . . . . . 20
Connecting Cables to the LANserver EX. . . . . . . . . . . . . . . . . . . . . 24
Turning On the Windows Client . . . . . . . . . . . . . . . . . . . . . . . . . . . . 26
Using Windows 2000 Power Options. . . . . . . . . . . . . . . . . . . . . . . . 26
Fibre Channel Adapter Board LED States . . . . . . . . . . . . . . . . . . . . . . . 27
Chapter 2
Installing the MediaNetwork Windows NT Client Software . . 29
Installation Prerequisites . . . . . . . . . . . . . . . . . . . . . . . . . . . . . . . . . . . . . 29
Windows NT Hotfix . . . . . . . . . . . . . . . . . . . . . . . . . . . . . . . . . . . . . . 30
Installing the Avid Products Software . . . . . . . . . . . . . . . . . . . . . . . . . . . 31
Fibre Channel Adapter Board Software . . . . . . . . . . . . . . . . . . . . . . . . . 31
Installing the Fibre Channel Adapter Board Driver . . . . . . . . . . . . . . 31
Installing the Client Software. . . . . . . . . . . . . . . . . . . . . . . . . . . . . . . . . . 32
Setting the Date, Time, and Time Zone . . . . . . . . . . . . . . . . . . . . . . . . . 34
Updating the Emergency Repair Disk . . . . . . . . . . . . . . . . . . . . . . . . . . . 34
Additional Client Procedures. . . . . . . . . . . . . . . . . . . . . . . . . . . . . . . . . . 35
Chapter 3
Installing the MediaNetwork Windows 2000 or Windows XP
Client Software . . . . . . . . . . . . . . . . . . . . . . . . . . . . . . . . . . . . 37
Installation Prerequisites . . . . . . . . . . . . . . . . . . . . . . . . . . . . . . . . . . . . . 38
Fibre Channel Adapter Board Software . . . . . . . . . . . . . . . . . . . . . . . . . 38
Installing the Fibre Channel Adapter Board Driver . . . . . . . . . . . . . . 39
Windows 2000 Hotfixes . . . . . . . . . . . . . . . . . . . . . . . . . . . . . . . . . . 40
Installing the Avid Products Software . . . . . . . . . . . . . . . . . . . . . . . . . . . 42
Installing the Client Software. . . . . . . . . . . . . . . . . . . . . . . . . . . . . . . . . . 42
Setting the Date, Time, and Time Zone . . . . . . . . . . . . . . . . . . . . . . . . . 44
Updating the Emergency Repair Disk . . . . . . . . . . . . . . . . . . . . . . . . . . . 44
Additional Client Procedures. . . . . . . . . . . . . . . . . . . . . . . . . . . . . . . . . . 45
Chapter 4
Networking the MediaNetwork Clients. . . . . . . . . . . . . . . . . . . 47
Network Connection Methods . . . . . . . . . . . . . . . . . . . . . . . . . . . . . . . . . 48
Connecting a Fibre Channel Client to a Network . . . . . . . . . . . . . . . . . . 48
Using the Built-in Network Port. . . . . . . . . . . . . . . . . . . . . . . . . . . . . 49
Using an Ethernet Peripheral Board . . . . . . . . . . . . . . . . . . . . . . . . . 49
6
Appendix A
Installing the Fibre Channel Adapter Board Firmware. . . . . . 51
Appendix B
Regulatory and Safety Notices . . . . . . . . . . . . . . . . . . . . . . . . . 53
FCC Notice . . . . . . . . . . . . . . . . . . . . . . . . . . . . . . . . . . . . . . . . . . . . . . . 53
Canadian ICES-003 . . . . . . . . . . . . . . . . . . . . . . . . . . . . . . . . . . . . . . . . 54
European Union Notice . . . . . . . . . . . . . . . . . . . . . . . . . . . . . . . . . . . . . 54
Australia and New Zealand EMC Regulations . . . . . . . . . . . . . . . . . . . . 56
Taiwan EMC Regulations . . . . . . . . . . . . . . . . . . . . . . . . . . . . . . . . . . . . 57
7
Figures
Figure 1
Attaching an Optical Cable to the Fibre Channel
Adapter Board . . . . . . . . . . . . . . . . . . . . . . . . . . . . . . . . 20
Figure 2
Installing a GBIC Connector . . . . . . . . . . . . . . . . . . . . . . . 21
Figure 3
Port Layout for 1-Gb MEDIASwitches . . . . . . . . . . . . . . . 22
Figure 4
Installing an SFP Connector. . . . . . . . . . . . . . . . . . . . . . . 23
Figure 5
Port Layout for 2-Gb MEDIASwitches . . . . . . . . . . . . . . . 24
Figure 6
Attaching an Optical Cable to the LANserver EX . . . . . . . 25
Figure 7
Connecting a Client to a Network Using
the Ethernet Port . . . . . . . . . . . . . . . . . . . . . . . . . . . . . . 49
8
Using This Guide
You can connect your Avid Unity™ MediaNetwork Windows® Fibre
Channel client to a MediaNetwork workgroup to share media files and
other project data with various Avid® workstations. These workstations
can be any of the following:
n
•
Windows systems — Avid Symphony™, Media Composer®,
Film Composer®, Media Station XL, Avid Xpress®, Avid Xpress DV,
NewsCutter®, or NewsCutter XP workstations
•
Macintosh® systems — Avid Symphony, Media Composer,
Film Composer, Avid Xpress, Avid Xpress DV, or Digidesign® Pro
Tools® workstations
The documentation describes the features and hardware of all models.
Therefore, your system might not contain certain features and hardware
that are covered in the documentation.
Who Should Use This Guide
This guide is intended for qualified Avid Field Support personnel or Avid
Resellers who are installing, configuring, or maintaining a MediaNetwork
workgroup and its attached MediaNetwork clients.
Using This Guide
About This Guide
This guide contains the information that you need to do the following:
•
Set up the MediaNetwork client hardware.
•
Install and configure the MediaNetwork client software.
•
Create a network of MediaNetwork clients and other systems.
This guide is organized as follows:
10
•
Chapter 1, “Installing the MediaNetwork Windows Fibre Channel
Client Hardware,” provides step-by-step instructions for connecting a
MediaNetwork Windows Fibre Channel client to a MediaNetwork
workgroup.
•
Chapter 2, “Installing the MediaNetwork Windows NT Client
Software,” provides step-by-step instructions for installing the
MediaNetwork Windows NT® Fibre Channel client software needed to
use the MediaNetwork workgroup.
•
Chapter 3, “Installing the MediaNetwork Windows 2000 or
Windows XP Client Software,” provides step-by-step instructions for
installing the MediaNetwork Windows Fibre Channel client software
needed to use the MediaNetwork workgroup.
•
Chapter 4, “Networking the MediaNetwork Clients,” describes
connecting clients to a network to use other Avid products, non-Avid
products, or other network resources.
•
Appendix A, “Installing the Fibre Channel Adapter Board Firmware,”
describes how to reinstall the adapter board firmware when needed.
•
Appendix B, “Regulatory and Safety Notices,” lists the national and
international regulatory and safety notices to which the Avid products
conform.
Symbols and Conventions
Symbols and Conventions
Unless otherwise noted, the MediaNetwork Windows Fibre Channel client
documentation applies to the Windows NT, Windows 2000, and
Windows XP operating systems.
Avid documentation uses the following symbols and conventions:
Symbol or Convention Meaning or Action
n
A note provides important related information,
reminders, recommendations, and strong suggestions.
c
A caution means that a specific action you take could
cause harm to your computer or cause you to lose
data.
w
A warning describes an action that could cause you
physical harm. Follow the guidelines in this
document or on the unit itself when handling
electrical equipment.
>
This symbol indicates menu commands (and
subcommands) in the order you select them. For
example, File > Import means to open the File menu
and then select the Import command.
t
This symbol indicates a single-step procedure.
Multiple arrows in a list indicate that you perform
one of the actions listed.
Margin tips
In the margin, you will find tips that help you perform
tasks more easily and efficiently.
Italic font
Italic font is used to emphasize certain words and to
indicate variables.
Courier Bold font Courier Bold font identifies text that you type.
Click
Quickly press and release the left mouse button
(Windows) or the mouse button (Macintosh).
11
Using This Guide
Symbol or Convention Meaning or Action
Double-click
Click the left mouse button (Windows) or the mouse
button (Macintosh) twice rapidly.
Right-click
Quickly press and release the right mouse button
(Windows only).
Drag
Press and hold the left mouse button (Windows) or
the mouse button (Macintosh) while you move the
mouse.
Ctrl+key
Press and hold the first key while you press the
second key.
If You Need Help
If you are having trouble using your MediaNetwork Windows Fibre
Channel client, you should:
1. Retry the action, carefully following the instructions given for that task
in this guide. It is especially important to check each step of your
workflow.
2. Check the release notes supplied with your Avid application for the
latest information that might have become available after the hardcopy
documentation was printed.
3. Check the documentation that came with your Avid application or your
hardware for maintenance or hardware-related issues.
4. Visit the online Knowledge Center at www.avid.com/support. Online
services are available 24 hours per day, 7 days per week. Search this
online Knowledge Center to find answers, to view error messages, to
access troubleshooting tips, to download updates, and to read/join
online message-board discussions.
5. For Technical Support, please call 800-800-AVID (800-800-2843).
For Broadcast On-Air Sites and Call Letter Stations, call
800-NEWSDNG (800-639-7364).
12
Related Information
Related Information
The following documents provide more information about the
MediaNetwork workgroup, the MediaNetwork client, and other storage
options:
•
Avid Unity MediaNetwork Site Preparation Guide
•
Avid Unity MediaNetwork File Manager Setup Guide
•
Avid Unity MediaNetwork File Manager Failover Installation Notes
•
Avid Unity MediaNetwork Upgrade Notes
•
Avid Unity MediaNetwork System Overview
•
Avid Unity MediaNetwork Management Guide
•
Avid Unity MediaNetwork Troubleshooting Guide
•
Avid Unity MediaNetwork Macintosh Fibre Channel Client Setup
Guide
•
MediaNetwork Macintosh Fibre Channel Client Quick Start Card
•
MediaNetwork Windows Fibre Channel Client Quick Start Card
•
Avid Unity MediaNetwork Macintosh Ethernet Client Setup Guide
•
MediaNetwork Macintosh Ethernet Client Quick Start Card
•
Avid Unity MediaNetwork Windows Ethernet Client Setup Guide
•
MediaNetwork Windows Ethernet Client Quick Start Card
•
Avid Unity MediaNetwork Release Notes
•
Avid Unity MediaNetwork Media Server Setup Guide
•
Avid Unity LANserver EX Setup Guide
•
Avid Unity LANserver Upgrade Notes
•
Avid Unity LANserver Release Notes
•
Avid Unity MediaNetwork PortServer Setup Guide
•
Avid Unity MediaNetwork Supported Configurations
13
Using This Guide
If You Have Documentation Comments
Avid Technology continuously seeks to improve its documentation. We
value your comments about this guide, the Help, and other Avid-supplied
documentation.
Simply e-mail your documentation comments to Avid Technology at
[email protected]
Please include the title of the document, its part number, and the specific
section you are commenting on in all correspondence.
How to Order Documentation
To order additional copies of this documentation from within the
United States, call Avid Sales at 800-949-AVID (800-949-2843). If you are
placing an order from outside the United States, contact your local
Avid representative.
Avid Educational Services
For information on courses/schedules, training centers, certifications,
courseware, and books, please visit www.avid.com/training or call
Avid Sales at 800-949-AVID (800-949-2843).
14
Chapter 1
Installing the MediaNetwork
Windows Fibre Channel
Client Hardware
Installing the Avid Unity MediaNetwork Windows Fibre Channel client on
your Avid workstation requires adding hardware and software to create a
functioning Windows client.
When your Avid workstation becomes a Windows client, it connects to a
Fibre Channel Arbitrated Loop (FC-AL). This loop requires that you add a
Fibre Channel adapter board to the Windows client you are connecting to
the MediaNetwork workgroup.
This chapter includes the following topics:
•
Before You Begin
•
Installing the Windows Client Hardware
•
Fibre Channel Adapter Board LED States
Chapter 1 Installing the MediaNetwork Windows Fibre Channel Client Hardware
Before You Begin
Keep the shipping
boxes that come with
your Windows client.
You might need to
repackage and ship the
components in the
future.
Before you begin to install the Windows client hardware, do the following:
•
Unpack the Windows client kit.
•
Check the contents of the Windows kit against the packing sticker on
the outside of the shipping box to confirm you have received all the
components.
After you unpack your Windows client kit, make sure the kit contains:
n
•
One 2-Gb optical Fibre Channel adapter board for the Windows client
•
One optical small form-factor pluggable (SFP) connector
•
One Windows client software kit containing
-
Avid Unity MediaNetwork Windows Fibre Channel Client Setup
Guide
-
MediaNetwork Windows Fibre Channel Client Quick Start Card
-
Avid Unity MediaNetwork software CD-ROM
Avid does not supply an optical cable with the Windows client kit. You must
supply the cable separately.
Installing the Windows Client Hardware
The Windows client kit allows you to connect your Avid workstation to the
MediaNetwork workgroup. You can connect an existing Avid workstation
or a new Avid workstation to the workgroup.
To install the Windows client hardware:
16
t
If you are connecting an existing Avid workstation, begin your
installation with “Shutting Down the Avid Workstation” on page 17.
t
If you are connecting a new Avid workstation, begin your installation
with “Placing the Components” on page 17.
Installing the Windows Client Hardware
Shutting Down the Avid Workstation
Before you install the Windows client hardware, shut down the Avid
workstation you are adding to the MediaNetwork workgroup.
To shut down the workstation:
1. Quit all running applications.
2. Click the Start button, and select Shut Down.
The Shut Down Windows dialog box opens.
3. Select Shut down, and then click OK.
4. After the Avid workstation shuts down, turn off the power to the
workstation and to all connected peripherals.
Placing the Components
When you are setting up your Windows client:
n
•
Position the components for the Windows client as described in the
setup guide that came with your Avid product.
•
Position the Windows client within the limits of the optical cable you
are using:
-
1650 feet (500 meters) maximum for 50-micrometer (µm)
125 optical cables
-
575 feet (175 meters) maximum for 62.5-µm 125 optical cables
Avid does not support copper cables for 2-Gb Fibre Channel adapter
boards.
Adding the Fibre Channel Adapter Board
You connect the MediaNetwork workgroup to the Fibre Channel adapter
board in the Windows client through the MEDIASwitch. The
MEDIASwitch allows several MediaNetwork clients to access the
MediaNetwork workgroup at the same time.
17
Chapter 1 Installing the MediaNetwork Windows Fibre Channel Client Hardware
Using the Grounding Wrist Strap
To prevent damage to the Avid workstation, the peripheral boards, or the
workstation memory, you must wear the grounding wrist strap when
handling the boards.
c
The peripheral boards are sensitive to electrostatic discharge. Do not
handle any of the boards unless you are properly grounded. Put on the
grounding wrist strap, and do not take it off until you complete the
board removal and installation.
To use the grounding wrist strap:
1. Make sure the Windows client is plugged into a wall outlet but is not
turned on.
2. Put the grounding wrist strap on your wrist and adjust the elastic strap
to fit your wrist. Attach the grounding clip to the metal case of the
power supply in the Windows client.
Installing the Fibre Channel Adapter Board
You need to install a Fibre Channel adapter board in the Windows client
that you are connecting to the MediaNetwork workgroup. The location of
the adapter board in your workstation depends on the workstation platform
you are using, the type of video I/O on the platform, and the location of
other Avid peripheral boards within the workstation.
n
The Fibre Channel adapter board is installed in different slots in the
different Avid products workstations. To determine the correct slot for
installing the adapter board, see the setup guide and the release notes that
came with the workstation.
To install the Fibre Channel adapter board in your Windows client:
1. Remove the cover of the Windows client according to the
manufacturer’s documentation.
2. Make sure you are wearing a grounding wrist strap. For information on
attaching the grounding wrist strap, see “Using the Grounding Wrist
Strap” on page 18.
3. Locate the Fibre Channel adapter board in the Windows client kit.
18
Installing the Windows Client Hardware
4. Install the adapter board in the recommended slot. For information on
slot assignments, see the setup guide that came with your Avid
product.
5. Replace the cover according to the manufacturer’s documentation.
Connecting Cables to the Windows Client
The Windows client requires an optical cable with an LC optical cable
connector on the client end of the cable.
If you need to install an optical cable for the Windows client, contact your
optical cable installer to arrange for them to install a 50-µm or 62.5-µm
multimode cable.
n
•
If you are installing the optical cable for use with a 2-Gb
MEDIASwitch, the cable needs LC optical cable connectors at both
ends.
•
If you are installing the optical cable for use with a 1-Gb
MEDIASwitch, the cable needs an SC optical cable connector at the
switch end and an LC optical cable connector at the client end.
Before you begin the Windows client hardware installation, make sure the
optical cables have been installed. Look in the area where you are
installing the client for a loose cable end.
To connect an optical cable to the Windows client:
1. Locate the optical cable. Look for a cable with a dual plug on one end
(see Figure 1).
2. Make sure the cable has an LC (small) optical connector to match the
connector on the adapter board. If the connector is not the correct one,
contact your optical cable installer to arrange for them to change the
connector.
3. Remove the protective covers from the optical connector on the optical
cable.
4. Remove the protective cover from the Fibre Channel adapter board in
the client.
19
Chapter 1 Installing the MediaNetwork Windows Fibre Channel Client Hardware
5. Plug the optical cable connector into the adapter board connector. The
cable connector and the adapter board connector are keyed and fit
together only one way. You should hear a click when the cable is
properly seated (see Figure 1).
c
Do not force the optical cable connector into the adapter board
connector. There should be no resistance as you put them together. If
the cable connector does not fit into the adapter board connector, turn
the cable connector 180 degrees and try to insert it again.
LEDs
Optical cable Fibre
Channel adapter board
Optical cable
Optical cable
connector
Figure 1
Attaching an Optical Cable to the Fibre Channel Adapter
Board
6. Do one of the following:
t
Attach the other end of the optical cable to the MEDIASwitch as
described in “Connecting Cables to the MEDIASwitch” on
page 20.
t
If you are attaching the other end of the optical cable to a
LANserver EX, continue with “Connecting Cables to the
LANserver EX” on page 24.
Connecting Cables to the MEDIASwitch
The MEDIASwitch connects the MediaNetwork workgroup to several
MediaNetwork clients. The switch allows the MediaNetwork clients to use
the storage simultaneously. The switch prevents work interruptions by
allowing other clients in the workgroup to continue working if one or more
clients go offline.
20
Installing the Windows Client Hardware
Avid supports two types of MEDIASwitches:
•
1-Gb MEDIASwitches, which use gigabit interface converter (GBIC)
connectors to connect the cables to the switch
•
2-Gb MEDIASwitches, which use SFP connectors to connect the
cables to the switch
Connecting to a 1-Gb MEDIASwitch
To connect an optical cable to the 1-Gb MEDIASwitch:
1. Locate the GBIC in the Windows client kit.
2. Route the cable from the Windows client to the MEDIASwitch, if it
has not been installed already.
3. Position the GBIC in front of a MEDIASwitch port (see Figure 2).
Make sure the optical connector is facing away from the
MEDIASwitch.
Figure 2
n
Installing a GBIC Connector
You can install the GBIC while the MEDIASwitch is turned on.
4. Slide the GBIC into the MEDIASwitch port. You should hear the
retainer clips click when the GBIC is seated in the port.
5. Remove the protective covers from the optical connector on the optical
cable.
6. Remove the protective cover from the GBIC in the MEDIASwitch.
21
Chapter 1 Installing the MediaNetwork Windows Fibre Channel Client Hardware
7. Attach the connector on the cable into the GBIC for the client (see
Figure 3). Firmly push the plug on the cable into the connectors on the
GBIC.
MediaNetwork client ports
MGMT
7100
Act/Col 100
1
3
2
4
5
6
File Manager ports
MEDIASwitch
model number
7
RS232
8
Storage ports
File Manager ports
MediaNetwork client ports
MGMT
7200
1
2
3
4
5
6
7
8
9
10
11
12
13
14
15
16
MediaNetwork client ports
Figure 3
Act/Col 100
RS232
Storage ports
Port Layout for 1-Gb MEDIASwitches
8. Label the cable with the name or location of the Windows client to
which it connects.
Connecting to a 2-Gb MEDIASwitch
To connect an optical cable to the 2-Gb MEDIASwitch:
1. Locate the SFP in the Windows client kit.
2. Route the cable from the Windows client to the MEDIASwitch, if it
has not been installed already.
22
Installing the Windows Client Hardware
3. Position the SFP in front of a MEDIASwitch port (see Figure 4). Make
sure the optical connector is facing away from the MEDIASwitch.
ol
MT Act/C
MG
RS
23
10
0
2
8
7
6
5
4
3
2
1
Figure 4
n
Installing an SFP Connector
You can install the SFP while the MEDIASwitch is turned on.
4. Slide the SFP into the MEDIASwitch port. You should hear a click
when the SFP is seated in the port.
5. Remove the protective covers from the optical connector on the optical
cable.
6. Remove the protective cover from the SFP in the MEDIASwitch.
7. Attach the connector on the cable into the SFP for the client (see
Figure 5). Firmly push the plug on the cable into the connectors on the
SFP.
8. Label the cable with the name or location of the Windows client to
which it connects.
23
Chapter 1 Installing the MediaNetwork Windows Fibre Channel Client Hardware
File Manager port
9100
Storage ports
MGMT
RS232
1
2
3
MediaNetwork client ports
MEDIASwitch
model number
File Manager port
9200
Act/Col 100
4
Storage ports
MGMT
RS232
1
2
3
4
5
6
7
Act/Col 100
8
MediaNetwork client ports
Figure 5
Port Layout for 2-Gb MEDIASwitches
Connecting Cables to the LANserver EX
The LANserver EX allows you to connect up to five Fibre Channel clients
to use the storage simultaneously with any attached Ethernet clients. The
Fibre Channel clients connect directly to the dual-channel Fibre Channel
boards in the LANserver EX.
To connect a Windows client to the LANserver EX:
1. Locate the optical cable. Look for a cable with a dual plug on the end
(see Figure 6).
2. Make sure the cable has an LC (small) optical connector to match the
connector on the adapter board in the LANserver EX. If the connector
is not the correct one, contact your optical cable installer to arrange for
them to change the connector.
3. Remove the protective covers from the optical connector on the optical
cable.
4. Remove the protective cover from the Fibre Channel adapter board in
the LANserver EX.
24
Installing the Windows Client Hardware
5. Plug the optical cable connector into the adapter board connector. The
cable connector and the adapter board connector are keyed and fit
together only one way. You should hear a click when the cable is
properly seated (see Figure 6).
c
Do not force the optical cable connector into the adapter board
connector. There should be no resistance as you put them together. If
the cable connector does not fit into the adapter board connector, turn
the cable connector 180 degrees and try to insert it again.
Ethernet adapter
board
Optical cable Fibre
Channel adapter
board
Optical cable connector
Optical cable
Figure 6
Attaching an Optical Cable to the LANserver EX
25
Chapter 1 Installing the MediaNetwork Windows Fibre Channel Client Hardware
Turning On the Windows Client
When you finish connecting the Windows client hardware and cables, you
can start up the client. Before you start up the Windows client, make sure
the File Manager is installed and running.
To start up your Windows client:
1. Turn on all the peripherals connected to the Windows client. Make
sure their power lights are on.
2. Press the Power button on the Windows client.
The MEDIASwitch port lights are on when the client is ready.
n
Before you attempt to install the MediaNetwork Windows Fibre Channel
client software, make sure the Windows client starts up properly.
Using Windows 2000 Power Options
Windows 2000 offers power options to help manage power consumption
on your Windows 2000 workstation. Avid recommends you do not use the
power options to cause your workstation to go into Standby or Hibernate
mode.
c
26
Two of the power options, Standby and Hibernate, can cause all the
drives connected to a workstation (both local drives and remote drives
connected through MEDIASwitches) to go into an inactive mode. This
prevents the File Manager from seeing the drive set and rebooting.
Also, all clients with mounted workspaces are unusable until the File
Manager and the storage are available again.
Fibre Channel Adapter Board LED States
Fibre Channel Adapter Board LED States
You can use the Fibre Channel adapter board LEDs to determine if the
adapter board is working or might be experiencing problems. Table 1
shows the LED colors, the LED states and meanings, and the action you
should take if a failure occurs.
Table 1
LED States and Required Action
LED Color LED State
Meaning
Required Action
Green
On
Normal (link up)
No action is required.
Yellow
On
Link down
Check the cable connections to the MEDIASwitch
and the adapter board. If the condition persists,
contact Avid Customer Support.
Yellow
Flashing
Fault
Contact Avid Customer Support.
Green or
Yellow
Off
Driver not installed
Install the driver. If the condition persists, contact
Avid Customer Support.
27
Chapter 1 Installing the MediaNetwork Windows Fibre Channel Client Hardware
28
Chapter 2
Installing the MediaNetwork
Windows NT Client Software
The Avid Unity MediaNetwork Windows NT client needs the correct
software to function properly in the MediaNetwork workgroup.
This chapter includes the following topics:
•
Installation Prerequisites
•
Installing the Avid Products Software
•
Fibre Channel Adapter Board Software
•
Installing the Client Software
•
Setting the Date, Time, and Time Zone
•
Updating the Emergency Repair Disk
•
Additional Client Procedures
Installation Prerequisites
The Windows NT Fibre Channel client software requires that you install
several software packages before you start an installation. Installing a
MediaNetwork client without the prerequisite software causes the client
installer to quit.
Chapter 2 Installing the MediaNetwork Windows NT Client Software
The Fibre Channel client requires the following software:
•
Windows NT Service Pack 5 or 6a
•
Windows NT hotfix
•
Internet Explorer 5.5 or later
For instructions on installing the necessary service pack, see the release
notes that came with your Windows NT workstation.
If you need to install a copy of Internet Explorer, a copy of the browser is
provided on the MediaNetwork CD-ROM in the directory \Extras\IE\IE5
(Internet Explorer 5.5) or \Extras\IE\IE6 (Internet Explorer 6.0).
c
Failing to install the hotfix can cause unpredictable results or
performance problems when you attempt to use the client.
Windows NT Hotfix
The Windows NT client requires the hotfix scsiport.sys. This update fixes a
problem that can cause a client to crash to a blue screen when applications
make SCSI bus scan calls. The hotfix is provided on the MediaNetwork
CD-ROM.
To install the hotfix:
1. Navigate to \Extras\HotFixes\NT40\Scsiport\ on the MediaNetwork
CD-ROM.
2. Double-click Hfx.exe.
The Hotfix Manager dialog box opens.
3. Click Install New Fix.
4. Follow the instructions provided to install the hotfix.
5. Click Done to close the Hotfix Manager dialog box.
6. Reboot the client.
30
Installing the Avid Products Software
Installing the Avid Products Software
The Windows NT Fibre Channel client requires a qualified version of the
Avid products software, which allows it to use the MediaNetwork shared
storage when the client is connected to a MediaNetwork workgroup.
Before you install the Fibre Channel client software, install the qualified
version of the Avid products software. To determine if you have a qualified
version of the Avid products software, see the Avid Unity MediaNetwork
Release Notes.
Fibre Channel Adapter Board Software
After you install the Fibre Channel adapter board in the Windows NT
client, you need to install the latest Fibre Channel adapter software. The
software contains a driver that you add to the Windows NT operating
system.
Installing the Fibre Channel Adapter Board Driver
To install the Fibre Channel adapter board driver:
1. Insert the MediaNetwork CD-ROM in the Windows Fibre Channel
client CD-ROM drive. The CD-ROM is set to start automatically and
open the Avid Unity Installation window. This takes approximately
1 minute.
If your system is not set to start the CD-ROM automatically, skip
step 2.
2. Click Exit to close the installation window.
3. Click the Start button, and select Settings > Control Panel.
The Control Panel opens.
31
Chapter 2 Installing the MediaNetwork Windows NT Client Software
4. Double-click SCSI Adapters.
The SCSI Adapters dialog box opens.
5. Click the Drivers tab, and then click Add.
The Install Driver dialog box opens.
6. Click Have Disk.
The Install From Disk dialog box opens.
7. Click Browse, and navigate to \Drivers_Firmware\HostBusAdapters\
ATTO\Drivers\Nt4\2.12 on the MediaNetwork CD-ROM.
8. Select the OEMSETUP.INF file, and click Open.
The Install from Disk dialog box opens.
9. Click OK.
The Install Driver dialog box opens, showing ATTO ExpressPCI-FC,
PCI Fibre Channel Adapter.
10. Click OK.
The Copying Files From Disk dialog box opens while the files are
copied from the CD-ROM.
After the driver is installed, the System Settings Change dialog box
opens, recommending that you restart the client.
11. Click Yes to reboot the Windows client.
Installing the Client Software
The Windows NT Fibre Channel client requires software that allows it to
log in to the MediaNetwork workgroup and to mount accessible
workspaces. The client software is provided on the MediaNetwork
CD-ROM in the Windows client kit.
32
Installing the Client Software
To install the Windows client software:
1. Insert the MediaNetwork CD-ROM in the Windows Fibre Channel
client CD-ROM drive. The CD-ROM is set to start automatically and
open the Avid Unity Installation window. This takes approximately
1 minute.
If the CD-ROM does not start automatically, start the installation
manually as follows:
a. Double-click the My Computer icon on the desktop.
The My Computer window opens.
b. Right-click the CD-ROM icon, and select AutoPlay.
The Avid Unity Installation window opens.
2. Click Product Installers.
3. Click MediaNetwork Components on the list of available products.
4. Click Install Fibre Attached Client on the list of MediaNetwork
installers. The Question dialog box opens, listing the prerequisite
software needed for installation.
-
If all the software is installed, click Next and continue with step 5.
The InstallShield Wizard dialog box opens.
-
If some of the software is not installed, click Cancel to exit the
installer. Install the prerequisite software, and go to step 1 to begin
the MediaNetwork installation again.
5. Accept the default values presented by the InstallShield Wizard.
The Setup Status screen appears, showing the installation progress
indicator while the software is being installed.
The InstallShield Wizard Complete opens.
6. Select “Yes, I want to restart my computer now,” and then click Finish
to complete the client software installation.
7. Reboot the client.
33
Chapter 2 Installing the MediaNetwork Windows NT Client Software
Setting the Date, Time, and Time Zone
You need to set the date, time, time zone, and Daylight Saving Time
options correctly on the Windows client. This allows the “Synchronize
time with server” function on the client to work properly.
To set the date, time, time zone, and Daylight Saving Time options on
the Windows Fibre Channel client:
1. Double-click the time in the taskbar.
The Date/Time Properties dialog box opens.
2. Set the date and time using the Date & Time tab.
3. Click the Time Zone tab.
4. Set the time zone for the location of the Windows client. By default,
Windows sets the time zone to “(GMT - 8:00) Pacific Time (US &
Canada); Tijuana.”
5. If your location observes Daylight Saving Time, select “Automatically
adjust clock for daylight saving changes.”
6. Click OK to close the dialog box and save the settings.
7. Reboot the client.
Updating the Emergency Repair Disk
You need to update the Windows client’s emergency repair disk (ERD)
now because you have installed new software. For instructions on creating
and updating the emergency repair disk, see the release notes that came
with the Avid products software.
34
Additional Client Procedures
Additional Client Procedures
You have completed the installation of the Windows NT client.
•
If you need to connect your Windows client to a network, continue
with Chapter 4.
•
If you need to create user accounts and workspaces for the Windows
client, see the Avid Unity MediaNetwork Management Guide.
35
Chapter 2 Installing the MediaNetwork Windows NT Client Software
36
Chapter 3
Installing the MediaNetwork
Windows 2000 or
Windows XP Client Software
The MediaNetwork Windows 2000 client and Windows XP Professional
client need the correct software to function properly in the MediaNetwork
workgroup.
The following sections describe the software and how to install each
software component:
•
Installation Prerequisites
•
Fibre Channel Adapter Board Software
•
Installing the Avid Products Software
•
Installing the Client Software
•
Setting the Date, Time, and Time Zone
•
Updating the Emergency Repair Disk
•
Additional Client Procedures
Chapter 3 Installing the MediaNetwork Windows 2000 or Windows XP Client Software
Installation Prerequisites
The Windows Fibre Channel client software requires that you install
several software packages before you start an installation. Installing a
MediaNetwork client without the prerequisite software packages causes
the client installer to quit.
The Fibre Channel client requires the following software:
•
Windows 2000 Service Pack 1 or Service Pack 2, or Windows XP
•
Internet Explorer 5.5 or later
•
Windows 2000 hotfixes
If you need to install a copy of Internet Explorer, a copy of the browser is
provided on the MediaNetwork CD-ROM in the directory \Extras\IE\IE5
(Internet Explorer 5.5) or \Extras\IE\IE6 (Internet Explorer 6.0).
You should install the Windows 2000 hotfixes on the Windows client
immediately after installing the Fibre Channel adapter board driver. These
hotfixes are required. For more information on the hotfixes and how to
install them, see “Windows 2000 Hotfixes” on page 40.
c
n
Failing to install the hotfixes with Service Pack 1 or Service Pack 2 can
cause unpredictable results or performance problems when you
attempt to use the client.
Windows XP clients do not require hotfixes or service packs.
Fibre Channel Adapter Board Software
After you install the Fibre Channel adapter board in the Windows client,
you need to install the latest Fibre Channel adapter software. The software
contains an ATTO™ driver that you add to the Windows 2000 or
Windows XP operating system.
38
Fibre Channel Adapter Board Software
c
On a Windows 2000 or a Windows XP client, installing the ATTO
driver causes prompts for a digital signature on every drive. This
occurs as a result of the Windows plug-and-play functionality. To
avoid this condition, make sure the File Manager is running before you
install the ATTO driver on your Windows client.
Installing the Fibre Channel Adapter Board Driver
To install the Fibre Channel adapter board driver:
1. After you install the Fibre Channel adapter board, reboot the Windows
client.
The Found New Hardware Wizard opens.
2. Click Next.
The Install Hardware Device Drivers dialog box opens.
3. Click “Search for suitable device driver,” and then click Next.
The Locate Driver File dialog box opens.
4. Deselect “Floppy disk drive,” deselect “Specify a location,” and then
select “CD-ROM.”
5. Insert the MediaNetwork CD-ROM in the Windows client CD-ROM
drive.
The Avid Unity Installation window opens in approximately 1 minute.
6. Click Exit to close the installation window.
7. In the Locate Driver File dialog box, click Next.
The Driver Files Search Results screen appears. After approximately
30 seconds, the following path appears: CD-ROM drive:\
Drivers_Firmware\HostBusAdapters\ATTO\Drivers\Win2k\
Expresfc.inf.
8. Click Next.
The Hardware Install screen opens while the driver installs. When the
driver installation is finished, the Completing the Found New
Hardware Wizard dialog box opens.
39
Chapter 3 Installing the MediaNetwork Windows 2000 or Windows XP Client Software
9. Click Finish to complete the installation.
10. Reboot the client.
To check the driver installation:
1. Right-click the My Computer icon on the desktop, and select Manage.
The Computer Management window opens.
2. Click Device Manager.
3. Expand SCSI and RAID Controllers.
A list of available controllers appears. If ATTO ExpressPCI-FC 3300
Fibre Channel Adapter appears in the list, the driver is installed.
Windows 2000 Hotfixes
Windows 2000 clients include qualified Avid products, MediaManager,
TransferManager, ProEncode™, and PortServer. You need to install the
correct hotfixes on these clients as described in the following sections.
Windows 2000 Clients Running Service Pack 1
Windows 2000 clients running the Avid products software and Service
Pack 1 require several hotfixes to improve system stability and
performance. These hotfixes currently resolve problems with drive-letter
assignments, Emulex® driver blue screens, hot-swap controllers, and drivemode page settings. The hotfixes are provided on the MediaNetwork
CD-ROM in the following location: \Extras\HotFixes\Win2k.
For the best results, install the hotfixes from the folders in the following
order:
1. SmartDrive (Q259545)
2. DriveLetterAssignment (Q266647)
3. EmulexBSODFix (Q276409)
40
Fibre Channel Adapter Board Software
To install the hotfixes:
1. Navigate to \Extras\HotFixes\Win2k on the MediaNetwork CD-ROM.
2. Open one of the folders (follow the order listed previously).
3. Double-click the Qxxxxxx_W2K_SP2_x86_en.exe file, where xxxxxx
is the number for the hotfix.
The Windows 2000 Hotfix Setup dialog box opens.
4. Click OK.
5. Reboot the client.
Windows 2000 Clients Running Service Pack 2
Windows 2000 clients require several hotfixes to improve system stability
and performance. These hotfixes currently resolve problems with
drive-letter assignments, Emulex driver blue screens, hot-swap controllers,
and drive-mode page settings. The hotfixes are provided on the
MediaNetwork CD-ROM in the following location:
\Extras\HotFixes\Win2k.
MediaManager, TransferManager, ProEncode, and PortServer require
Service Pack 2 and the same hotfixes as the Avid products to improve
system stability and performance.
For the best results, install the hotfixes from the folders in the following
order:
1. WebDAVServiceProvider (Q296441)
2. Service Rollup (w2kSP2SRP1)
To install the WebDAVServiceProvider hotfixes:
1. Navigate to \Extras\HotFixes\Win2k\WebDAVServiceProvider on the
MediaNetwork CD-ROM.
2. Double-click the Q296441_W2K_SP3_x86_en.exe file.
The Windows 2000 Hotfix Setup dialog box opens when the
installation is complete.
41
Chapter 3 Installing the MediaNetwork Windows 2000 or Windows XP Client Software
3. Click OK.
4. Reboot the client.
To install the Service Rollup hotfixes:
1. Navigate to \Extras\ServicePacks\Win2k\ on the MediaNetwork
CD-ROM.
2. Double-click the w2kSP2SRP1.exe file.
The Windows 2000 Hotfix Setup dialog box opens when the
installation is complete.
3. Click OK.
4. Reboot the client.
Installing the Avid Products Software
The Windows 2000 or Windows XP Fibre Channel client requires a
qualified version of the Avid products software, which allows it to use the
MediaNetwork shared storage when the client is connected to a
MediaNetwork workgroup. Before you install the Fibre Channel client
software, install the qualified version of the Avid products software. To
determine if you have a qualified version of the Avid products software,
see the Avid Unity MediaNetwork Release Notes.
Installing the Client Software
Each Windows 2000 or Windows XP Fibre Channel client requires
software that allows it to log in to the MediaNetwork File Manager and to
map accessible workspaces. The Windows Fibre Channel client software is
provided on the MediaNetwork CD-ROM.
42
Installing the Client Software
To install the Windows Fibre Channel client software:
1. Insert the MediaNetwork CD-ROM in the Windows client CD-ROM
drive. The CD-ROM is set to start automatically and open the
Avid Unity Installation window. This takes approximately 1 minute.
If the CD-ROM does not start automatically, start the installation
manually as follows:
a. Double-click the My Computer icon on the desktop.
The My Computer window opens.
b. Right-click the CD-ROM icon, and select AutoPlay.
The Avid Unity Installation window opens.
2. Click Product Installers.
3. Click MediaNetwork Components on the list of available products.
4. Click Install Fibre Attached Client on the list of MediaNetwork
installers. The Question dialog box opens, listing the prerequisite
software needed for installation.
-
If all the software is installed, click Next and continue with step 5.
The InstallShield Wizard dialog box opens.
-
If some of the software is not installed, click Cancel to exit the
installer. Install the prerequisite software, and go to step 1 to begin
the MediaNetwork installation again.
5. Accept the default values presented by the InstallShield Wizard.
The Setup Status screen appears, showing the installation progress
indicator while the software is being installed.
The InstallShield Wizard Complete opens.
6. Select “Yes, I want to restart my computer now,” and then click Finish
to complete the client software installation.
7. Reboot the client.
43
Chapter 3 Installing the MediaNetwork Windows 2000 or Windows XP Client Software
Setting the Date, Time, and Time Zone
You need to set the date, time, time zone, and Daylight Saving Time
options correctly on the Windows client. This allows the “Synchronize
time with server” function on the client to work properly.
To set the date, time, time zone, and Daylight Saving Time options on
the Windows client:
1. Double-click the time in the taskbar.
The Date/Time Properties dialog box opens.
2. Set the date and time using the Date & Time tab.
3. Click the Time Zone tab.
4. Set the time zone for the location of the Windows client. By default,
Windows sets the time zone to “(GMT - 8:00) Pacific Time (US &
Canada); Tijuana.”
5. If your location observes Daylight Saving Time, select “Automatically
adjust clock for daylight saving changes.”
6. Click OK to close the dialog box and save the settings.
7. Reboot the client.
Updating the Emergency Repair Disk
You need to update the Windows client’s emergency repair disk (ERD)
now because you have installed new software. For instructions on creating
and updating the emergency repair disk, see the release notes that came
with the Avid products software.
44
Additional Client Procedures
Additional Client Procedures
You have completed the installation of the Windows 2000 or Windows XP
client.
•
If you need to connect your Windows client to a network, continue
with Chapter 4.
•
If you need to create user accounts and workspaces for the client, see
the Avid Unity MediaNetwork Management Guide.
45
Chapter 3 Installing the MediaNetwork Windows 2000 or Windows XP Client Software
46
Chapter 4
Networking the
MediaNetwork Clients
You can connect your Windows Fibre Channel client to an Ethernet
network so it can share project information with other MediaNetwork
clients. You can also use the network connection to allow TransferManager
and MediaManager to move and control your video media, graphics and
effects, audio media, and finishing materials.
n
An Ethernet network is not required for Windows clients. Avid does not
install, configure, or troubleshoot Ethernet networks. If you are having
trouble with your network, consult your Information Services department
or your network vendor.
Avid does install and configure Windows clients that communicate over
Ethernet networks.
The Ethernet network can be either a standalone network or an existing
in-house network. The network can be either 10BASE-T or 100BASE-T.
The client must be properly configured with a valid IP address and a subnet
mask.
Topics in this chapter include the following:
•
Network Connection Methods
•
Connecting a Fibre Channel Client to a Network
Chapter 4 Networking the MediaNetwork Clients
Network Connection Methods
You can connect your MediaNetwork clients to the network by:
t
Attaching one or more clients directly to the network.
Ethernet
MediaNetwork
client
t
MediaNetwork
client
MediaNetwork
client
Attaching one or more clients to the network through a router. The
router allows you to segregate the MediaNetwork clients from the rest
of the network.
Ethernet
Router
MediaNetwork
client
MediaNetwork
client
MediaNetwork
client
Connecting a Fibre Channel Client to a Network
You can connect your Windows Fibre Channel client to an Ethernet
network in several ways:
•
Through the built-in Ethernet 10/100BASE-T (RJ-45) port on the
Windows client
•
Through an optional 10/100BASE-T (RJ-45) Ethernet peripheral board
Each connection is described in the following sections.
48
Connecting a Fibre Channel Client to a Network
Using the Built-in Network Port
To connect a Fibre Channel client with a built-in Ethernet port to the
site network:
1. Connect one end of the Ethernet cable to the Ethernet port on the rear
of the client (see Figure 7).
2. Connect the other end of the Ethernet cable to a site network jack.
Using an Ethernet Peripheral Board
To connect a Fibre Channel client with an optional 10/100BASE-T
Ethernet peripheral board to the site network:
1. Install the Ethernet peripheral board as described in the manufacturer’s
documentation.
2. Connect the Ethernet cable to the Ethernet port on the Ethernet board
(see Figure 7).
3. Connect the other end of the Ethernet cable to a site network jack.
Ethernet port (on
Windows workstation
or on optional
Ethernet board)
RJ-45 connector
To site network jack
Ethernet cable
Figure 7
Connecting a Client to a Network Using the Ethernet
Port
49
Chapter 4 Networking the MediaNetwork Clients
50
Appendix A
Installing the Fibre Channel
Adapter Board Firmware
Each Windows client kit contains two floppy disks: one boot disk and one
driver/firmware disk. These floppy disks allow you to reinstall the
firmware for the Fibre Channel adapter board.
c
You should not need to reinstall the Fibre Channel adapter board
firmware. Each board ships with the correct firmware already
installed. In some cases, the firmware might become corrupted. If this
occurs, install the firmware under the direction of Avid Customer
Support.
To install the Fibre Channel adapter board firmware:
1. Insert the boot floppy disk in the Windows client floppy drive.
2. Reboot the client.
The client reboots from the floppy disk, and an A:\> prompt appears
on the monitor.
3. Remove the boot floppy disk, and insert the driver/firmware floppy
disk in the floppy drive.
4. At the A:\> prompt, type cd dos\utility and press Enter.
This command changes the working directory to the Utility directory
on the driver/firmware floppy disk.
Appendix A Installing the Fibre Channel Adapter Board Firmware
5. Type flash, and press Enter.
The firmware update begins. This process takes approximately
1 minute.
6. When you are prompted to confirm, type y and press Enter.
7. Once the firmware update is completed, remove the driver/firmware
floppy disk and press Ctrl+Alt+Delete to reboot the client.
52
Appendix B
Regulatory and Safety
Notices
FCC Notice
This device complies with Part 15 of the FCC Rules. Operation is subject
to the following two conditions:
1. This device may not cause harmful interference.
2. This device must accept any interference received, including
interference that may cause undesired operation.
This equipment has been tested and found to comply with the limits for a
Class A digital device, pursuant to Part 15 of the FCC Rules. These limits
are designed to provide reasonable protection against harmful interference
when the equipment is operated in a commercial environment. This
equipment generates, uses, and can radiate radio frequency energy and, if
not installed in accordance with the instruction manual, may cause harmful
interference to radio communications. Operation of this equipment in a
residential area is likely to cause harmful interference in which case the
user will be required to correct the interference at his own expense.
Appendix B Regulatory and Safety Notices
Canadian ICES-003
This Class A digital apparatus meets all requirements of the Canadian
Interference Causing Equipment Regulations.
Cet appareil numérique de la classe A respecte toutes les exigences du
Règlement sur le matériel brouilleur du Canada.
European Union Notice
Declaration of Conformity
(According to ISO/IEC Guide 22 and EN 45014)
Application of Council 73/23/EEC, 89/336/EEC.
Directives:
Standards to which
Conformity is
Declared:
EN60950:1992 + A1 + A2 + A3 + A4 + A11
CISPR 22:1997 / EN55022:1994 + A1:1995 +
A2:1997 Class A
EN55024:1998/EN61000 — 3-2, 4-2, 4-3, 4-4, 4-5,
4-6, 4-8, 4-11
Manufacturer’s Name: Avid Technology, Inc.
1925 Andover Street
Tewksbury, MA 01876, USA
54
European Contact:
Nearest Avid Sales and Service Office or
Avid Technology International B.V.
Sandyford Business Center
Unit 3,
Dublin 18, Ireland
Type of Equipment:
Information Technology Equipment
European Union Notice
Product Name:
Products for the Windows NT, Windows 2000, or
Windows XP Operating System: Avid Equinox
Break-Out-Box, Avid|DS, Avid Xpress,
Avid Xpress DV, Film Composer, Media Composer,
MediaDock 2+, MediaDock LVD, MediaDrive,
MediaRAID, MEDIArray, MEDIArray Drive,
MEDIArray II, MEDIArray II Drive, Meridien I/O
box, NewsCutter, NewsCutter DV, NewsCutter XP,
Symphony
Products for the Mac OS X Operating System:
Avid Xpress, Avid Xpress DV, Film Composer,
Media Composer, MediaDock 2+, MediaDock
LVD, MediaDrive, MediaRAID, MEDIArray,
MEDIArray Drive, MEDIArray II, MEDIArray II
Drive, Meridien I/O box, Symphony
Products for the UNIX Operating System: AirPlay,
VideoSPACE
Products for MediaNetwork and Workgroups:
Avid ProEncode, Avid Unity MediaManager,
Avid Unity MediaNetwork, Avid Unity
TransferManager, LANserver, LANserver EX,
MEDIArray, MEDIArray Drive, MEDIArray II,
MEDIArray II Drive, Nearchive, PortServer, Xdeck
Base Model Numbers: None
Product Options:
All
Year of Manufacture:
2002
(1) Products for the Windows NT, Windows 2000, or Windows XP
Operating System: products were tested in a typical Avid Equinox
Break-Out-Box, Avid|DS, Avid Xpress, Avid Xpress DV, Film Composer,
Media Composer, MediaDock 2+, MediaDock LVD, MediaDrive,
MediaRAID, MEDIArray, MEDIArray Drive, MEDIArray II,
MEDIArray II Drive, Meridien I/O box, NewsCutter, NewsCutter DV,
NewsCutter XP, or Symphony configuration.
55
Appendix B Regulatory and Safety Notices
(2) Products for the Mac OS X Operating System: products were tested in
a typical Avid Xpress, Avid Xpress DV, Film Composer, Media Composer,
MediaDock 2+, MediaDock LVD, MediaDrive, MediaRAID, MEDIArray,
MEDIArray Drive, MEDIArray II, MEDIArray II Drive, Meridien I/O
box, or Symphony configuration.
(3) Products for the UNIX Operating System: products were tested in an
AirPlay or VideoSPACE configuration.
(4) Products for MediaNetwork and Workgroups: products were tested in a
typical Avid ProEncode, Avid Unity MediaManager, Avid Unity
MediaNetwork, Avid Unity TransferManager, LANserver, LANserver EX,
MEDIArray, MEDIArray Drive, MEDIArray II, MEDIArray II Drive,
Nearchive, PortServer, or Xdeck configuration.
I, the undersigned, hereby declare that the equipment specified above
conforms to the above Directives and Standards.
George R. Smith, Director of Hardware Engineering
Australia and New Zealand EMC Regulations
N1709
56
John Kells, Australian Operations Manager
Avid Technology (Australia)
Unit B
5 Skyline Place
French Forest NSW 2086
Australia
Phone: 61-2-8977-4800
Taiwan EMC Regulations
Taiwan EMC Regulations
Taiwan EMC Regulations BSMI Class A EMC Warning
57
Appendix B Regulatory and Safety Notices
58