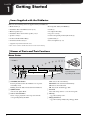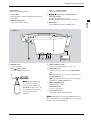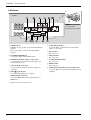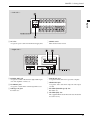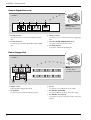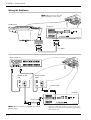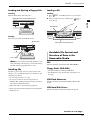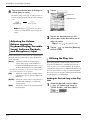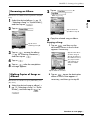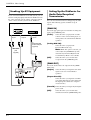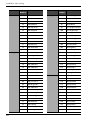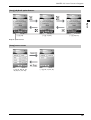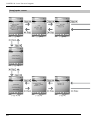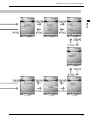
1
IMPORTANT NOTICE
FOR THE UNITED KINGDOM
Connecting the Plug and Cord
IMPORTANT: The wires in mains lead are coloured in
accordance with the following code:
GREEN-AND-YELLOW : EARTH
BLUE
: NEUTRAL
BROWN
: LIVE
As the colours of the wires in the mains lead of this
apparatus may not correspond with the coloured markings
identifying the terminals in your plug, proceed as follows:
Alleen voor klanten in Nederland
Bij dit produkt zijn batterijen
geleverd.
Wanneer deze leeg zijn, moet u
ze niet weggooien maar
inleveren als KCA.
The wire which is coloured GREEN and YELLOW must be
connected to the terminal in the plug which is marked by the
letter E or by the safety earth symbol or coloured GREEN
and YELLOW.
The wire which is coloured BLUE must be connected to the
terminal which is marked with the letter N or coloured
BLACK .
The wire which is coloured BROWN must be connected to
the terminal which is marked with the letter L or coloured
RED.
The Control Unit is classified as a Class 1 laser product. One of
the labels below or similar is located on the inside of the CD
drive unit.
CAUTION—Use of controls or adjustments or performance
of procedures other than those specified herein may result in
hazardous radiation exposure.
ATTENTION—L’utilisation de commandes ou de r glages,
ou l’exécution de procédures, autres que celles qui sont
spécifiées ici peuvent conduire une exposition des
rayonnements dangereux.
Laser Diode Properties
* Material: GaAlAs
* Wavelength: 790/795 nm
* Laser Output Power at the lens of the Laser Pick Up Unit:
max. 5mW
VORSICHT—Die Verwendung von Bedienungselementen
oder Einstellungen, oder die Anwendung von Verfahren, die
nicht in dieser Anleitung angegeben sind, kann zu
gefährlicher Freisetzung von Strahlung fü hren.
SPECIAL MESSAGE SECTION
PRODUCT SAFETY MARKINGS: Yamaha electronic
products may have either labels similar to the graphics shown
below or molded/stamped facsimiles of these graphics on the
enclosure. The explanation of these graphics appears on this
page. Please observe all cautions indicated on this page and
those indicated on the safety instruction section.
ENVIRONMENTAL ISSUES: Yamaha strives to produce
products that are both user safe and environmentally friendly.
We sincerely believe that our products and the production
methods used to produce them, meet these goals. In keeping
with both the letter and the spirit of the law, we want you to be
aware of the following:
Battery Notice: This product MAY contain a small
nonrechargeable battery which (if applicable) is soldered in
place. The average life span of this type of battery is
approximately five years. When replacement becomes
necessary, contact a qualified service representative to perform
the replacement.
SEE BOTTOM OF ENCLOSURE OR LOWER FRONT
PANEL FOR GRAPHIC SYMBOL MARKINGS
The exclamation point within the equilateral
triangle is intended to alert the user to the
presence of important operating and
maintenance (servicing) instructions in the
literature accompanying the product.
The lightning flash with arrowhead symbol
within the equilateral triangle is intended to
alert the user to the presence of uninsulated
“dangerous voltage” within the product’s
enclosure that may be of sufficient magnitude to
constitute a risk of electrical shock.
IMPORTANT NOTICE : All Yamaha electronic products are
tested and approved by an independent safety testing laboratory
in order that you may be sure that when it is properly installed
and used in its normal and customary manner, all foreseeable
risks have been eliminated. DO NOT modify this unit or
commission others to do so unless specifically authorized by
Yamaha. Product performance and/or safety standards may be
diminished. Claims filed under the expressed warranty may be
denied if the unit is/has been modified. Implied warranties may
also be affected.
Warning: Do not attempt to recharge, disassemble, or
incinerate this type of battery. Keep all batteries away from
children. Dispose of used batteries promptly and as regulated by
applicable laws. Note: In some areas, the servicer is required by
law to return the defective parts. However, you do have the
option of having the servicer dispose of these parts for you.
Disposal Notice: Should this product become damaged
beyond repair, or for some reason its useful life is considered to
be at an end, please observe all local, state, and federal
regulations that relate to the disposal of products that contain
lead, batteries, plastics, etc.
NOTICE : Service charges incurred due to lack of knowledge
relating to how a function or effect works (when the unit is
operating as designed) are not covered by the manufacturer’s
warranty, and are therefore the owners responsibility. Please
study this manual carefully and consult your dealer before
requesting service.
NAME PLATE LOCATION: The graphic below indicates the
location of the name plate. The model number, serial number,
power requirements, etc., are located on this plate. You should
record the model number, serial number, and the date of
purchase in the spaces provided below and retain this manual as
a permanent record of your purchase.
SPECIFICATIONS SUBJECT TO CHANGE : The
information contained in this manual is believed to be correct at
the time of printing. However, Yamaha reserves the right to
change or modify any of the specifications without notice or
obligation to update existing units.
Model ___________________________________________
Serial No. _________________________________________
Purchase Date _____________________________________
IMPORTANT SAFETY INSTRUCTIONS
WARNING — When using any electrical or electronic product,
basic precautions should always be followed. These precautions
include, but are not limited to, the following:
1) Read these instructions.
2) Keep these instructions.
3) Heed all warnings.
4) Follow all instructions.
5) Do not use this apparatus near water.
6) Clean only with dry cloth.
7) Do not block any ventilation openings. Install in
accordance with the manufacturer’s instructions.
8) Do not install near any heat sources such as radiators, heat
registers, stoves, or other apparatus (including amplifiers)
that produce heat.
9) Do not defeat the safety purpose of the polarized or
grounding-type plug. A polarized plug has two blades with
one wider than the other. A grounding type plug has two
blades and a third grounding prong. The wide blade or the
third prong are provided for your safety. If the provided
plug does not fit into your outlet, consult an electrician for
replacement of the obsolete outlet.
10) Protect the power cord from being walked on or pinched
particularly at plugs, convenience receptacles, and the
point where they exit from the apparatus.
11) Only use attachments/accessories specified by the
manufacturer.
12) Use only with the cart, stand, tripod, bracket, or table
specified by the manufacturer, or sold with the apparatus.
When a cart is used, use caution when moving the cart/
apparatus combination to avoid injury from tip-over.
13) Unplug this apparatus during lightning storms or when
unused for long periods of time.
14) Refer all servicing to qualified service personnel. Servicing
is required when the apparatus has been damaged in any
way, such as power-supply cord or plug is damaged, liquid
has been spilled or objects have fallen into the apparatus,
the apparatus has been exposed to rain or moisture, does
not operate normally, or has been dropped.
15) This product shall not be exposed to dripping or splashing
and that no objects filled with liquids, such as vases, shall
be placed on the apparatus.
16) Do not place this product or any other objects on the power
cord or place it in a position where anyone could walk on,
trip over, or roll anything over power or connecting cords
of any kind. The use of an extension cord is not
recommended! If you must use an extension cord, the
minimum wire size for a 25’ cord (or less) is 18 AWG.
NOTE : The smaller the AWG number, the larger the
current handling capacity. For longer extension cords,
consult a local electrician.
17) WARNING - To reduce the risk of fire or electric shock,
do not expose this apparatus to rain or moisture.
18) Care should taken that objects do not fall and liquids are
not spilled into the enclosure through any openings that
may exist.
19) This product, either alone or in combination with an
amplifier and headphones or speaker/s, may be capable of
producing sound levels that could cause permanent hearing
loss. DO NOT operate for a long period of time at a high
volume level or at a level that is uncomfortable. If you
experience any hearing loss or ringing in the ears, you
should consult an audiologist. IMPORTANT : The louder
the sound, the shorter the time period before damage
occurs.
20) Some Yamaha products may have benches and/or
accessory mounting fixtures that are either supplied as a
part or the product or as optional accessories. Some of
these items are designed to be dealer assembled or
installed. Please make sure that benches are stable and any
optional fixtures (where applicable) are well secured
BEFORE using. Benches supplied by Yamaha are
designed for seating only. No other uses are recommended.
21) Do not modify internal AC connection for the I/O Center
“DIO-100”.
22) This product shall be connected to a MAINS socket outlet
with a protective earthing connection.
23) This product has a power switch for shutting off all system.
The switch is located on the Power Supply Unit nearby the
entrance of the AC cord. Note that the switch on the I /O
Center does not shutdown all system but I /O Center and
Media Center only. Pressing the [I] side of the switch turns
the I/O Center on and the [O] side off.
24) Make sure that the plug of the I/O Center’s power cable can
easily be disconnected from the AC outlet as a measure of
precaution.
Battery
– Use your Pocket Controller “PRC-100” only with “EABL08” batteries, the “EA-70” AC adapter.
– Danger of explosion if battery incorrectly replaced. Replace
only with the same type.
Outlets for Speakers
– Connect speakers of 2A or less of totals. Do not connect other
products except speakers.
– Consult Yamaha service technician when using the outlets
outside the purchased area.
PLEASE KEEP THIS MANUAL
STATEMENTS REGARDING THE WIRELESS LAN CARD
RADIATION EXPOSURE STATEMENT
The available scientific evidence does not show that any health problems are associated with using low power wireless devices.
There is no proof, however, that these low power wireless devices are absolutely safe. Low power Wireless devices emit low
levels of radio frequency energy (RF) in the microwave range while being used. Whereas high levels of RF can produce health
effects (by heating tissue), exposure to low level RF that does not produce heating effects causes no known adverse health
effects. Many studies of low level RF exposures have not found any biological effects. Some studies have suggested that some
biological effects might occur, but such findings have not been confirmed by additional research. The WD05740 has been tested
and found to comply with the Federal Communications Commission (FCC) guidelines on radio frequency energy (RF)
exposures. The maximum SAR levels tested for the WD05740 has been shown to be 0.563W/kg at body.
This device should not be co-located or operated with any other antenna or transmitter.
In addition, use of the equipment other than PDA may not ensure compliance with FCC RF exposure guidlines.
FCC AND INDUSTRY CANADA INFORMATION (U.S.A , CANADA)
This device complies with Part 15 of the FCC Rules. Operation is subject to the following two conditions :
(1) this device may not cause harmful interference, and (2) this device must accept any interference received, including
interference that may cause undesired operation.
FCC WARNING: Changes or modifications not expressly approved by the party responsible for compliance could void the
user’s authority to operate the equipment. Properly shielded an grounded cables and connectors must be used for connection
to host computer and/or peripherals in order to meet FCC emission limits.
L’utilisation de ce dispositif est autorisee seulement aux conditions suivantes : (1) il ne doit pas produire de brouillage et (2)
l’utilisateur du dispositif doit etre pret a accepter tout brouillage radioelectrique recu, meme si ce brouillage est susceptible
de compromettre le fonctionnement du dispositif.
The installer of this radio equipment must ensure that the antenna is located or pointed such that it does not emit RF field in
excess of Health Canada limits for the general population; consult Safety Code 6, obtainable from Health Canada’s website
www.hc-sc.gc.ca/rpb
« L’installateur du présent matériel radio doit s’assurer quel’antenne est située ou pointée demanière à ce
que cette dernière n’émette pas de champs radioélectriques supérieurs aux limitess pécifiées par Santé
Canada pour le grand public; consulterl e Code de sécurité 6, disponible sur le site Web de Santé Canada, à l’adresse
suivante : www.hc-sc.gc.ca/rpb. »
Hereby, Yamaha, declares that this Wireless LAN Card, model WD05740 is in compliance with the
essential requirements and other relevant provisions of Directive 1999/5/EC.
In some regions, there are restrictions in the outdoor use of the Wireless LAN Card.
Yamaha vakuuttaa täten että langaton LAN-kortti, malli WD05740 tyyppinen laite on direktiivin 1999/5/EY oleellisten
vaatimusten ja sitä koskevien direktiivin muiden ehtojen mukainen.
Bij deze verklaart Yamaha dat deze Wireless LAN-kaart, model WD05740 voldoet aan de essentiële eisen en aan de overige
relevante bepalingen van Richtlijn 1999/5/EC.
Par la présente, Yamaha déclare que cette carte réseau sans fil, modèle WD05740 est conforme aux exigences essentielles et
aux autres dispositions de la directive 1999/5/CE qui lui sont applicables.
Härmed intygar Yamaha att denna trådlösa LAN-kort, modell WD05740 står I överensstämmelse med de väsentliga
egenskapskrav och övriga relevanta bestämmelser som framgår av direktiv 1999/5/EG.
Undertegnede: Yamaha erklærer herved, at følgende udstyr: Trådløst netværkskort, model WD05740 overholder de væsentlige
krav og øvrige relevante krav i direktiv 1999/5/EF.
Hiermit erklärt Yamaha, dass sich diese drahtlose LAN-Karte, Modell-WD05740 in Übereinstimmung mit den grundlegenden
Anforderungen und den anderen relevanten Vorschriften der Richtlinie 1999/5/EG befindet.
Με την παρούσα, η Yamaha, δηλώνει ότι η ασύρµατη κάρτα LAN, µοντέλο WD05740 συµµορφώνεται µε τις απαραίτητες
απαιτήσεις και τις λοιπές σχετικές διατάξεις της οδηγίας 1999/5/ΕΚ.
Con la presente Yamaha dichiara che questa sche da LAN senza filo, modello WD05740 è conforme ai requisiti essenziali ed
alle altre disposizioni pertinenti stabilite dalla direttiva 1999/5/CE.
Por medio de la presente Yamaha declara que la tarjeta de red inalámbrica, el modelo WD05740, cumple con los requisitos
esenciales y cualesquiera otras disposiciones aplicables o exigibles de la Directiva 1999/5/CE.
Yamaha declara que este cartão Wireless LAN, modelo WD05740 está conforme com os requisitos essenciais e outras
disposições da Directiva 1999/5/CE.
In some cases Wireless LAN card type WL1100C-CF may be used in place of Wireless LAN card type WD05740. All statements on
this page also apply to the WL1100C-CF.
FOR U.S.A.
COMPLIANCE INFORMATION STATEMENT
(DECLARATION OF CONFORMITY PROCEDURE)
Responsible Party
Address
Telephone
Fax
Type of Equipment
Model Name
: Yamaha Corp of America
: 6600 Orangethorpe Avenue, Buena Park, CA 90620 USA
: 1-714-522-9011
: 1-714-522-9301
: Pocket Controller/Tablet Controller
: PRC-100/TRC-100 (TRC-100 is optional)
These devices complies with Part 15 of the FCC Rules.
Operation is subjected to the following conditions;
1) this device may not cause harmful interference, and
2) this device must accept any interference received including interference that may cause undesigned operation.
See user manual instructions if interference to radio reception is suspected.
FCC INFORMATION (U.S.A.)
1. IMPORTANT NOTICE: DO NOT MODIFY THIS UNIT!
This product, when installed as indicated in the instructions contained in this manual, meets FCC requirements. Modifications
not expressly approved by Yamaha may void your authority, granted by the FCC, to use the product.
2. IMPORTANT: When connecting this product to accessories and/or another product use only high quality shieldedcables.
Cable/s supplied with this product MUST be used. Follow all installation instructions. Failure to follow instructions could
void your FCC authorization to use to use this product in the USA.
3. NOTE: This product has been tested and found to comply with the requirements listed in FCC Regulations, Part 15 for Class
“B” digital devices. Compliance with these requirements provides a reasonable level of assurance that your use of this product
in a residential environment will not result in harmful interference with other electronic devices. This requirement generates/
uses radio frequencies and, if not installed and used according to the instructions found in the users manual, may cause
interference harmful to the operation of other electronic devices. Compliance with FCC regulations does not guarantee that
interference will not occur in all installations. If this product is found to be the source of interference, which can be determined
by turning the unit “OFF” and “ON”, please try to eliminate the problem by using one of the following measures: Relocate
either this product or the device that is being affected by the interference.
Utilize power outlets that are on different branch (circuit breaker or fuse) circuits or install AC line filter/s.
In the case of radio or TV interference, relocate/reorient the antenna. If the antenna lead-in is 300 ohm ribbon lead, change
the lead-in to co-axial type cable.
If these corrective measures do not produce satisfactory results, please contact the local retailer authorized to distribute this
type of product. If you can not locate the appropriate retailer, please contact Yamaha Corporation of America, Electronic
Service Division, 6600 Orangethorpe Ave, Buena Park, CA 90620
FOR U.S.A.
The Pocket Controller and the Tablet Controller contain a small amount of mercury. Disposal of this material may be
regulated due to environmental considerations.
For disposal information in the United States, refer to the Electronic Industries Alliance web site: www. eiae.org
This applies only to products distributed by
YAMAHA CORPORATION OF AMERICA.
English
Introduction
• Play the acoustic piano or the digital piano
• Play back songs accompanied by live piano
performance
• Create a library of favorite songs in the
Disklavier
• Practice playing songs using Disklavier’s
innovative functions
• Play along with professional recordings
• Connect the Disklavier with a computer to
compose ensemble songs
• Synchronize piano performance with a video
recording
Before using your Disklavier, please read this manual
thoroughly and keep it on hand for future reference.
• Note that we shall bear no responsibility whatsoever
for any damage arising from changes (additions/
deletions) made to the software for this product by a
third party other than Yamaha (or party authorized by
Yamaha).
English
Congratulations and thank you for purchasing the
Disklavier PRO/Mark IV Series Piano.
The Disklavier PRO/Mark IV Series Piano is an exciting
new type of grand piano that brings together the
excellence of Yamaha’s finest acoustic piano and stateof-the-art innovations into an expansive home
entertainment station. The new pocket controller offers
greater ease of use to allow players of any level to enjoy
the exciting functions of the piano from basic keyboard
playing to PianoSoft playback entertainment. Let your
imagination go, and enjoy the Disklavier to your heart’s
content.
Here are some examples of how you can enjoy your
Disklavier
• Note that re-use of source code released to the public
domain by Yamaha is unguaranteed, and Yamaha shall
not bear any responsibility whatsoever for the source
code.
Note on the online document
Additional license information is included in the HDD in
the Disklavier system. Connect the LAN port on the I/O
Center to your network router, and then open the
respective documents in the [Document] folder in the
Disklavier’s HDD.
Trademarks & Copyrights
• This product is manufactured under license of U.S. Patents
No. 5231671, No. 5301259, No. 5428708, and No. 5567901
from IVL Technologies Ltd.
• Yamaha, Disklavier, Silent, PianoSoft, PianoSoft·Plus,
PianoSoft·PlusAudio, PianoSmart, and Smart PianoSoft are
trademarks of Yamaha Corporation.
• SmartKey, CueTIME, and You Are The Artist are trademarks
of Yamaha Corporation or Yamaha Corporation of America.
• Disklavier MarkIV software, Copyright © 2004 YAMAHA
CORPORATION.
• This contains programs licensed under the GNU General
Public License, GNU Lesser General Public License, the BSD
Copyright, the Artistic License, and the others.
Note on source code
distribution
For three years after the factory shipment, you may
request from Yamaha the source code for any portions of
the product which are licensed under the GNU General
Public License by writing to the following address:
1480 Ryoke, Kakegawa, Shizuoka, 436-0038, JAPAN
Piano International Sales Division, YAMAHA
Corporation
The source code will be provided at no charge; however,
we may require you to reimburse Yamaha for the cost of
delivering the source code to you.
The source code download is also available on the
following website;
http://www.global.yamaha.com/download/
disklavier_markiv/
i
Important Precautions
Read the following before operating the Disklavier.
Warning
• Do not locate the Disklavier in a place subject to
excessive heat, low temperatures, or direct sunlight.
This could be a fire hazard and may damage the finish
and internal parts.
• The cover of the unit should be removed only by
qualified service technicians.
• Do not place liquid containers such as vases, potted
plants, glasses, cosmetic bottles, medicines, etc., on top
of the Disklavier.
• Excessive humidity or dust can lead to fire or electric
shock.
• Do not try to modify the Disklavier, as this could lead
to fire or electric shock hazard.
• Connect the plug on the Disklavier power cable to a
compatible AC outlet. Failure to do so will present a
fire and electric shock hazard. If the power cable plug
is not compatible with your AC outlet, consult your
dealer.
• When moving the Disklavier to another location, turn
off the power, remove the power plug from the AC
outlet, and remove all cables connected to external
devices.
• Do not plug several devices into the same AC outlet.
This can overload the AC outlet, and lead to fire and
electric shock hazard. It may also affect the
performance of some devices.
Cautions
• Do not place heavy objects on the power cable. A
damaged power cable is a potential fire and electric
shock hazard. If the power cable runs under a carpet,
make sure heavy objects, including the Disklavier, are
not placed on top of the cable.
• Set the volume level on all the devices to minimum
before applying power.
• If the power cable is damaged (i.e. cut or a bare wire is
exposed), ask your dealer for a replacement. Using the
Disklavier in this condition is a fire and shock hazard.
• When disconnecting the power cable from an AC
outlet, always pull by the plug. Never pull the cable.
Damaging the cable in this way is a potential fire and
electric shock hazard.
• Turn off all audio devices when connecting to the
Disklavier. Refer to the user’s guide for each device.
Use the correct cables and connect as specified.
• Do not play the Disklavier at a high volume for
extended periods; you may damage your hearing. This
is especially important when using headphones. If you
think your hearing ability is impaired, consult your
doctor.
• If the Disklavier is worked extremely hard — that is,
prolonged playback of very “busy” songs — the
Disklavier’s thermal relay may trip. The thermal relay
will automatically reset when the Disklavier has cooled
down.
• If you notice any abnormality — such as smoke, odor,
or noise — turn off the Disklavier immediately, and
remove the power plug from the AC outlet. Consult
your dealer for repair.
ii
• If a foreign object or water gets inside the Disklavier
turn it off immediately, and remove the power plug
from the AC outlet. Consult your dealer.
• If you plan not to use the Disklavier for a long period
of time (such as when you are on vacation), disconnect
the electrical mains.
Interference
• The Disklavier uses high-frequency digital circuits that
may cause interference to radios and TVs placed close
to it. If interference does occur, relocate the affected
equipment.
Handling Rechargeable
Battery
• Do not use benzene, thinner, cleaning detergent, or a
chemical cloth to clean the Disklavier.
• Only use the “EA-BL08” rechargeable battery.
• Do not place metal objects with rubber feet on top of
the Disklavier. The color and finish of the Disklavier
can be damaged.
• Do not place heavy objects on the Disklavier. Doing so
can damage the Disklavier.
• Use a soft, dry cloth to clean the Disklavier. However,
if you discover a stain, carefully use a soft damp cloth
to remove it.
English
• Always remove the power plug from the AC outlet
before cleaning the Disklavier. Leaving the power plug
connected presents a risk of electric shock.
• When charging, be sure to use the Pocket Controller
only with the “EA-70” AC adaptor.
• Do not dispose of the battery in a fire.
• Also keep the battery away from open flames.
• Never attempt to disassemble the battery pack.
• Do not short-circuit the terminals as they will become
very hot and will damage the battery.
• Do not drop or subject the battery to shock.
• After storing the battery for a long period of time, be
sure to charge the battery completely prior to use.
• Charge the battery properly, according to the details
described in this manual.
• Fluid from a leaking battery accidentally entering an
eye could result in serious injury. Should this occur,
wash with clean water and immediately consult a
doctor.
• Should fluid from a leaking battery come into contact
with your skin or clothes, immediately wash with clean
water.
Please keep this manual for future
reference.
iii
Table of Contents
CHAPTER
1
Getting Started
CHAPTER
1
Items Supplied with the Disklavier ........................1
Names of Parts and Their Functions .....................1
3
Piano Playing Features
37
Playing the Disklavier along with the Internal
Metronome................................................ 37
Preparing the Pocket Controller .........................15
Playing the Disklavier Accompanied
by the Additional Voice(s)
(Performance Mode) ................................... 37
Initial Settings of the Pocket Controller ................16
Adding Expressive Effect to Your Play................ 38
Basic Precautions for Using Floppy Disks
and CDs ....................................................19
Adding Chords to a Melody Line
(Harmony Mode)........................................ 39
Available File Format and Structure of Data
in the Removable Media ..............................20
Applying Reverb Effects to the Digital Piano ....... 40
Setting Up the Disklavier...................................11
CHAPTER
CHAPTER
2
Song Playback Features
22
4
Recording
41
Recording a New Song ................................... 41
Changing the Playback Tempo ..........................22
Titling a Song at the Start of Recording.............. 42
Repeating Song Playback .................................23
Recording the Left- and Right-Hand Parts
Separately (Overwrite Recording)................. 42
Repeating a Specific Section of a Song
(A-B Repeat) ...............................................23
Video Synchronized Recording......................... 43
Playing Back Only the Desired Piano Part ...........24
Adjusting the Volume Balance among the Keyboard
Playing, Ensemble Sound, Software Playback,
and Microphone’s Input ...............................25
CD Synchronized Recording ............................ 45
Recording Ensemble Parts ................................ 45
Overdubbing an Existing Part........................... 47
Utilizing the Play Lists .......................................25
Recording Songs Based on Measures
and Beats (Metronome Mode Recording) ...... 48
Temporarily Changing the Voice of a Track ........26
Quantize Function........................................... 49
Editing Tracks..................................................28
Changing the Default Tempo ............................ 50
Checking and Modifying the Song Information....31
Presetting Playback Control Options
for Each Song.............................................34
SmartKey™ Playback .......................................35
Adding Disklavier Accompaniment
to Commercial CD Songs (PianoSmart) ..........36
Video Synchronized Playback ...........................36
iv
Quick Recording............................................. 42
Playing Back Songs in a Different Key
(Transposition) ............................................22
CHAPTER
5
Creating a Song Library
CHAPTER
51
Creating an Album in the Library .......................51
Renaming an Album ........................................52
7
Enhancing the Disklavier
Features by Hooking Up a MIDI
Device
78
Hooking Up a MIDI Device .............................. 78
Making Copies of the Entire Contents
in a Medium or Song Library........................53
Setting Up the Disklavier for MIDI Data Reception
(MIDI IN)................................................... 79
Deleting Songs or Albums.................................54
Setting Up the Disklavier for MIDI Data Transmission
(MIDI OUT)................................................ 80
Rearranging the Order of Songs/Albums............54
CHAPTER
English
Making Copies of Songs or Albums ...................52
Setting Up the Disklavier for Keyboard Playing Data
Transmission (KBD OUT) ............................. 81
6
Other Settings
55
Skipping the Blank Part at the Beginning
of a Song...................................................55
Inactivating the Key Movement During
Playback....................................................55
Using Timer Play..............................................55
Tuning the Tone Generator (MasterTune) ............57
CHAPTER
Troubleshooting
CHAPTER
Hooking Up AV Equipment ...............................61
Setting Up the Disklavier for Audio Data
Reception/Transmission ...............................61
CHAPTER
Making Backups and Restoring the Song
Library .......................................................64
CHAPTER
Formatting a Floppy Disk ..................................65
10
11
Glossary
Restoring the Contents in the Demo Album ..........65
Making an Install Floppy Disk ...........................65
84
Screen Transition Diagrams 85
Lyric Screen ....................................................62
Converting MIDI Data to a Standard Form
(Strip XP)....................................................63
82
9
Error Messages
Applying an Effect to Your Voice
(Vocal Harmony).........................................57
Preparing for Use of Foot Controls/Switches .......59
8
CHAPTER
91
12
Specifications
93
Resetting the Disklavier .....................................66
Assigning a Specific Function to the ONE TOUCH
Button ........................................................66
Diagnosing the Disklavier .................................66
Appendix
A-1
Piano Voice List ...............................................67
Ensemble Part Playback Voice List......................68
Drum Voice List................................................76
Vocal Harmony Type List ..................................76
v
CHAPTER
1
Getting Started
Items Supplied with the Disklavier
Make sure the following items are supplied with your Disklavier:
• Media Center (1)
• Rechargeable battery EA-BL08 (1)
• Installation kit for the Media Center (1 set)
• Cradle (1)
• Monitor speaker (2)*
• AC adaptor EA-70 (1)
• Installation kit for the monitor speaker (1 set)*
• AC power cord (1)
• Speaker cord (2)*
• Advanced Operating manual (this book) (1)
• Pocket Controller PRC-100 (1)
• Quick Guide (1)
• CF wireless LAN card (2)**
• Stereo headphones (1 set)
* Supplied only with the Mark IV Series.
**One of two cards is attached to the I/O Center at the factory.
Names of Parts and Their Functions
Media Center
— Front —
Note: The location of
STANDBY/ON
QUIET
REC
User PianoSoft CD
FD
each unit differs
depending on the model.
VOL.
OPEN/
CLOSE
A STANDBY/ON button
Pressing the button turns the Disklavier on or puts it
in Standby mode.
Holding down the button shuts down the Disklavier.
1
User: Selects the User Library.
PianoSoft: Selects the PianoSoft Library.
CD: Selects the loaded CD.
FD: Selects the loaded floppy disk.
B QUIET button
Activates the Quiet Mode.
D Front lid
Draw and swing down to cover the front panel.
C Source Select buttons
Starts or stops playback of the songs stored in the
corresponding library/medium.
E CD tray
→ pg. 20 “Loading a CD”
F Floppy disk drive
→ pg. 20 “Loading and Ejecting a Floppy Disk”
CHAPTER 1: Getting Started
G Eject button
Ejects the loaded floppy disk.
J VOL –/+ (volume) buttons
Adjusts the overall volume.
H Access lamp
Lights while the system is reading/writing data on the
floppy disk.
K
L REC button
Set the Disklavier in Record Standby mode.
English
I OPEN/CLOSE button
Opens and closes the CD tray.
(Song Select, Fast Reverse/Fast
/
Forward) buttons
Pressing the button selects a song.
Holding down the button fast reverses/forwards.
— Bottom —
M PHONES jacks
Accept headphones.
O FOOT CNTRL1/2 jacks
Accepts foot controls/switches. (→ pg. 59)
N USB
(type A) port
Accepts a USB flash memory, etc.
P MIC/LINE switch
Switches the input sensitivity of the MIC/LINE IN
jack.
MIC: Select this when you connect a microphone to
the MIC/LINE IN jack.
LINE: Select this when you connect an external audio
equipment to the MIC/LINE IN jack.
Note: Certain USB storage
devices may not function
properly with the Disklavier
PRO/Mark IV Series. For a list
of compatible products, please
visit www.yamaha.com/
disklavier.
Q INPUT VOLUME knob
Adjusts the input volume.
R MIC/LINE IN jack
Accepts a microphone.
S To I/O Center port
Accepts the cable from the I/O Center.
Note: Although the chassis of the Media Center may
become hot when you use the Disklavier for a long period
of time, this is not a malfunction.
2
CHAPTER 1: Getting Started
I/O Center
— Front —
Note: The location of
each unit differs
depending on the model.
A OUTPUT jacks
L/(L+R): Accepts speaker cord from the left Monitor
speaker*.
R: Accepts speaker cord from the right Monitor
speaker*.
G SYNC OUT (L/R) jacks
Accept the RCA cords from the microphone/line
input of a camcorder.
B TO MEDIA CENTER port
Accepts the cable from the Media Center.
I LED indicators
For service use.
C OMNI IN (L/R) Multi-purpose input jacks
Accept the RCA cords from the audio output of an
external CD player, etc.
J SYSTEM INSTALL button
For service use.
D SYNC IN (L/R) input jacks
Accept the RCA cords from the audio output of a
camcorder.
E USB
(type B) port
Accept the USB cable from a computer.
F MIDI (IN/OUT) terminals
Accept the MIDI cable from the input/output of a
MIDI device.
* Supplied only with the Mark IV Series.
3
H Dip switches
For service use.
K RESET button
For service use.
L OMNI OUT (L/R) Multi-purpose output jacks
Accept the RCA cords from the audio input of an AV
amplifier.
CHAPTER 1: Getting Started
— Left side —
English
M AC inlet
Accepts the power cable from the Power Supply unit.
N MAINS switch
Turns the I/O Center on/off.
— Right side —
DIGITAL
OUT
O DIGITAL OUT jack
Accepts the coaxial cable from the digital audio input
of an AV amplifier or mixer, etc.
TO PIANO
R LAN (RJ 45) port
Accepts the LAN cable from a personal computer.
P TO PIANO jacks
Accept the cords from the Central Signal Processor.
S VIDEO OUT jack
Accepts the video cable from composite video input
of a TV.
Q USB (Type A) port
For future use.
T PC CARD (PCMCIA type II) slot
For future use.
U CF CARD (PCI) slot
The supplied CF wireless LAN card is attached to this
slot at the factory.
4
CHAPTER 1: Getting Started
Central Signal Processor
— Front —
Note: The location of
TO PD
TO MD
TO PS
GREEN
BLUE
TO I/O CENTER
TO SENSOR
each unit differs
depending on the model.
A TO PD terminal
Accepts the power cord from the Pedal Drive (PD)
unit.
C TO PS terminal
Accepts the power cord from the Power Supply (PS)
unit.
B TO MD terminal
Accepts the power cord from the Motor Drive (MD)
unit.
D TO I/O CENTER (GREEN/BLUE) jacks
Accept the cords from the I/O Center.
E TO SENSOR port
Accepts the cable from the Disklavier.
Power Supply Unit
— Front —
MAINS
AC OUTLET 2A 480VA
AC IN
Note: The location of
each unit differs
depending on the model.
SWITCHED
AC OUTLET 2A 480VA TOTAL
A MAINS switch
Turns the Power Supply unit on/off.
C AC IN
Accepts the power cable from an AC outlet.
B AC OUTLET
Accepts the power cable from the I/O Center.
D AC OUTLET SWITCHED
Accepts the Monitor speakers’ AC power cables.
E AC OUTLET (unswitched)
Accepts the AC power cord of the cradle’s AC power
adaptor.
5
CHAPTER 1: Getting Started
— Right side —
English
F TO DRIVE terminal
Accepts the power cord from the Key Drive (KD)
unit.
G TO CSP terminal
Accepts the power cable from the Central Signal
Processor (CSP).
6
CHAPTER 1: Getting Started
Pocket Controller
— Front —
1
ME
VOLU
3
6
4
5
Copy
Paste
7
8
9
2
0
E R T Y U I
Q @W # $ % – & ∗ ( O De P
l
D F G –H + J K L
A S Cut
=
)
B N M , ,.
Z X C V
!
Caps
Fn
STOP
Tab
Num
/?
Symbol
Space
~
` "
<
. ..
>
PLAY
ON/STANDBY
A Touch screen
→ pg. 3 “Tapping with the stylus pen” in “Quick
Guide”.
G Cursor buttons
Selects the item on the touch screen or move the slider
on a control bar.
B Charge indicator (amber)
Lights up when the Pocket Controller is being
charged. The indicator goes out when charging is
completed.
H AC adapter jack
Accepts the AC adaptor.
I
PLAY button
Starts playback.
C VOLUME –/+ buttons
Adjust the overall volume.
J
(Song Select, Fast Reverse/Fast
/
Forward) buttons
Pressing the button selects a song.
Holding down the button fast reverses/forwards.
K
(Back) button
Returns to the previous screen.
D
STOP, ON/STANDBY button
Stops playback, and turns the Pocket Controller on/
off.
E Select button
Executes the selected operation.
F I/O port
Accepts the terminal on the cradle.
L Screen protector
Open or remove the protector when you tap on the
touch screen. To remove the screen protector, lift it up
and fold it back until it comes off.
M Keyboard
Enters characters. (→ pg. 33 “Entering Characters”)
7
CHAPTER 1: Getting Started
— Rear —
English
RESET
N Security eyelet
Accepts an anti-theft cord.
O Speaker
P Battery compartment lid
Q RESET button (located inside of the battery
compartment lid)
Resets the Pocket Controller.
R Battery replacement switch
(→ pg. 15 “Preparing the Pocket Controller”)
— Top/Left side —
S Stylus pen
For operating the touch screen.
T CF card slot
Holds the CF wireless LAN card.
U Stereo headphone jack
For future use.
V Microphone
W IR port
For future use.
X SD card slot
Holds the SD card.
8
CHAPTER 1: Getting Started
Cradle
H
ONE
A AC adaptor jack
Accepts the AC adaptor.
B I/O port
Accepts the I/O port on the Pocket Controller.
C ONE TOUCH button
(→ pg. 66 “Assigning a Specific Function to the ONE
TOUCH Button”)
9
C
TOU
CHAPTER 1: Getting Started
Monitor Speakers*
* Supplied only with the Mark IV Series.
— Front —
English
Note: The location of
each unit differs
depending on the model.
LOW
1
HIGH
2
LINE
D LINE1/2 volume controls
Adjust the sound volume for each line input.
A Woofer unit
B LOW/HIGH volume controls
Adjust the base/treble sound volume.
Note: For normal use, turn down the LINE1
volume completely, and turn up the LINE2 volume at
the three o’clock position.
C Power indicator
Lights up while the speaker is turned on.
E Tweeter unit
— Rear —
POWER
ON
INPUT
LINE 1
( 10dB)
OFF
LINE 2
(+4dB)
PARALLEL
F POWER switch
Turns the monitor speaker on/off.
G AC power cable
H INPUT LINE2 (XLR connector/phone jack)
Accepts the line output from the I/O Center or
external AV equipment.
I INPUT LINE1 (RCA jack)
Accepts the line output from external AV equipment.
10
CHAPTER 1: Getting Started
Setting Up the Disklavier
Installing the Media Center
1 Screw the supplied screws into the nuts.
Nuts
Leave 5 mm of
the shank.
Screws (M5 x 16) (supplied)
2 Hang the Media Center.
Note: When you hang the
Media Center, be sure to hold
the unit securely with both
hands preventing the unit from
falling down.
3 Tighten the screws to secure the Media Center.
11
CHAPTER 1: Getting Started
Installing the Monitor Speaker (for the Mark IV Series only)
Attach the hanger to the bottom.
1 Slant
installation
Horizontal installation
Hanger (supplied)
English
Screws (M5 x 16) (supplied)
You can adjust the
angle of the
Monitor Speaker.
Connect the speaker cord to the INPUT LINE2 phone jack. (→ pg. 13 “Wiring the
2 Disklavier”)
3 Hang the Monitor Speaker to the bracket.
Bracket
Note: When you hang the
Monitor Speaker, be sure to hold
the unit securely with both hands
preventing the unit from falling
down.
4 Screw the thumbscrews to secure the Monitor Speaker.
Thumbscrews (M4 x 15) (supplied)
12
CHAPTER 1: Getting Started
Wiring the Disklavier
Note: The location of each unit
differs depending on the model.
Media Center
I/O Center
Cable
Power Supply unit
SWITCHED
AC OUTLET 2A 480VA TOTAL
Monitor speaker
(left)
Monitor speaker
(right)
INPUT
PARALLEL
INPUT
LINE2
LINE2
(+4dB)
(+4dB)
PARALLEL
LINE2
(+4dB)
Speaker cord*
R
R
I/O Center
Speaker cord*
L
L
Note: Monitor speakers are supplied only with the
Mark IV Series.
13
* When you replace the speaker cord, prepare the cord
equivalent to the supplied one that has L-shaped phone
jacks at both ends.
CHAPTER 1: Getting Started
*
PD
MD
English
Central Signal Processor
TO PD
TO MD
TO SENSOR
*
SENSOR
Cradle
AC power cord
AC power adaptor
Power Supply unit
AC OUTLET 2A 480VA
AC IN
AC OUTLET 2A 480VA TOTAL
Power cable
Mini-DIN cable*
To AC wall outlet
PS
PS
Central Signal
Processor
TO PS
BLUE
GREEN
TO I/O CENTER
Power cable*
Blue marks
RCA cords*
Green marks
I/O Center
DIGITAL
OUT
Note: Be sure to connect the Power Supply unit’s
TO PIANO
* These cords/cables are hooked up at the factory.
power cable to an AC wall outlet after all other
connections are done.
14
CHAPTER 1: Getting Started
Preparing the Pocket
Controller
the card slot protector, and
1 Remove
then insert the supplied CF wireless
LAN card into the CF card slot.
the battery replacement switch
4 Set
back to the [NORMAL OPERATION]
position.
the I/O port cover, and then
5 Remove
set the Pocket Controller on the
cradle.
I/O port cover
the battery replacement switch to
2 Set
the [REPLACE BATTERY] position.
Charge indicator
NORMAL OPERATION
REPLACE BATTERY
the rechargeable battery into the
3 Put
battery compartment.
Make sure that the ,
and
marks on
the battery are aligned correctly with those
printed inside the battery compartment.
15
Charging starts and the charge indicator lights
amber. When the battery is fully charged, the
indicator goes out.
CHAPTER 1: Getting Started
Initial Settings of the Pocket
Controller
The following functions are available to control the
Disklavier remotely. Set up a variety of useful functions
to your preference.
The following procedure calibrates the touch screen to
improve the accuracy of the tapping operation.
Tap on
[Recalibrate] in the [PRC100 Menu] screen, and then firmly
tap on the cross hairs that appear in
sequence one by one.
English
Title Bar
Calibrating the Touch Screen
[PRC-100 Menu] icon
Task Bar (→ pg. 19)
[PRC-100 Menu] screen
Tip: Tap on
([PRC-100 Menu] icon) to return to
the [PRC-100 Menu] screen.
[Interface]: Usually utilize this function to control
the Disklavier remotely. The [Main] screen is the top
menu of this function. (→ pg. 12 in “Quick Guide”)
[Interface Updater]*: Updates the [Interface].
[Piano Assign]*: (→ pg. 18 “Pairing the Pocket
Controller and the Disklavier”)
[Service Center]*: (→ pg. 66 “Diagnosing the
Disklavier”)
Cross hair
When the recalibration is completed, the [PRC-100
Menu] screen resumes.
Setting up the Current Date and Time
on
[Date/Time] in the [PRC1 Tap
100 Menu] screen.
City time button
[Date] button
[Light & Power]*: Makes energy conserving
settings.
[Recalibrate]: (See “Calibrating the Touch Screen”
below.)
[Date/Time]: (See “Setting up the Current Date and
Time” below.)
[Network]*: Lists available network services.
[System Info]*: Shows system information
(memory, storage, version).
* For normal use, modification of these setups are not
required.
[Set System Time] screen
on [Time Zone] , and then on
2 Tap
your time zone in the drop down list.
Note: If your time zone does not appear in the
drop down list, add the zone to the list by
following the procedure in “Adding Your City
to the [Time Zone] Drop Down List” on page
17, and then repeat step 2.
Continue to next page...
16
CHAPTER 1: Getting Started
on [Hour]/[Minutes]
3 Tap
time.
to set the
on [Time format] , and then
4 Tap
select the desired format.
on , and then on [AM] or [PM],
5 Tap
if necessary.
To correct the city selection, tap on
, and then perform step 2 thru 4 again.
Rebooting the Pocket Controller
When a problem occurs, first see the “Troubleshooting”
on page 82. If the problem persist, follow the procedure
below.
1 Tap on
on the task bar.
on the [Date] button, and then
6 Tap
tap on current date on the minicalendar that appears.
on [Weeks start on] , and then
7 Tap
tap on [Sunday] or [Monday] that is to
be shown as the first day of the week
in the mini-calendar.
on [Date format]
8 Tap
the desired format.
9 Tap on
2 Tap on [Reboot] on the menu that appears.
, and then on
on the title bar.
The [PRC-100 Menu] screen resumes.
10
Reboot the Pocket Controller.
(→ “Rebooting the Pocket Controller” below)
Adding Your City to the [Time Zone] Drop
Down List
1 Tap on .
2 Tap on the time zone to be replaced with your desired
city.
3 Tap on your country, and then on your city in the list.
4 Tap on
on the “Select City” title bar.
17
3 Tap on
.
The [Main] screen appears after approximately three
minutes.
4 Reset the Pocket Controller.
(→ pg. 18 “Resetting the Pocket Controller”)
CHAPTER 1: Getting Started
Resetting the Pocket Controller
For normal use, this setup is not required.
1 Make sure that other wireless equipment is turned off.
2 Tap on
[Piano Assign] in the [PRC-100 Menu]
screen.
English
When rebooting cannot be performed or the Pocket
Controller does not work correctly even after rebooting,
follow the procedure below.
1 Turn the Disklavier off.
(→ pg. 6 “Turning the Disklavier Off (Standby
Mode)” in “Quick Guide”)
2 Connect the AC adapter to the AC adaptor jack, and
then set the battery replacement switch to the
[REPLACE BATTERY] position.
Pairing the Pocket Controller and the
Disklavier
NORMAL OPERATION
REPLACE BATTERY
3 Move the Pocket Controller close to the Disklavier,
and then tap on
.
3 Wait for five seconds, remove the battery
compartment lid, and then press the [RESET] button
with the stylus pen.
ESS-ID number
RESET
4 Tap on
.
5 Tap on
on the [Assigned successfully] screen.
The [PRC-100 Menu] screen resumes.
Note: Do NOT abort the procedure before step 4.
Otherwise you cannot control the Disklavier.
4 Replace the battery compartment lid, and then set the
battery replacement switch back to the [NORMAL
OPERATION] position.
5 Press
to turn the Pocket Controller on.
The [Main] screen appears after approximately two
minutes.
Continue to next page...
18
CHAPTER 1: Getting Started
Description of the Task Bar
The task bar is always displayed at the bottom of the
screen to show various information and status of the
Pocket Controller. Tapping on the icon shows the
respective setup screen, etc.
:
Shows the function menus such as
[Reboot], etc.
:
Shows the wireless connection status.
Blue: Excellent
Green: Good
Yellow: Average
Red: Poor
:
No connection (Tap to show the detailed
Network screen.)
:
Shows the volume of the Pocket Controller
itself. (Tap on it, and then move the slider
up or down to adjust the volume.)
:
Basic Precautions for Using
Floppy Disks and CDs
Handling Floppy Disks
In order to protect data stored on floppy disks from
damage or loss, be sure to handle them with care, and
observe the following precautions.
• Do not touch the surface of the internal disk.
• Do not store or place disks near a television, radio,
loudspeaker, or any other device that generates a
magnetic field.
• Do not expose disks to extreme temperature or
humidity. The working temperature range for disks is
between 4°C and 52°C (40°F and 125°F).
• Do not use disks in a dusty, dirty, or smoky
environment.
• Remove the disk from the floppy disk drive before
turning the Disklavier off.
:
Tap on it, and then on [Eject card] before
you remove the CF card.
:
Tap on it, and then on [Eject SD-card]
Write Protection
before you remove the SD card.
Floppy disks have a write protection tab to keep from
accidentally formatting the disk or erasing files.
Shows the battery status.
Blue: Good
Yellow: Low
Red: Very low
Green: Charging
: Shows the current time. (Tap on it to open
the [Set System Time] screen.)
19
Protected
Unprotected
The tab window is
open.
The tab window is
closed.
CHAPTER 1: Getting Started
Loading and Ejecting a Floppy Disk
Loading a CD
Loading
Push the disk until it clicks into place.
Loading
OPEN/ on the Media Center to open the CD
1 Press
CLOSE
tray.
OPEN/ to
2 Place the CD on the tray, and then press
CLOSE
close the tray.
Floppy disk drive on the Media Center
English
Labeled side
Ejecting
Press the eject button on the Media Center.
Eject button
Access lamp
Note: Do not eject the floppy disk while the access
lamp is flashing or lit. Doing so can seriously damage
the disk and the floppy disk drive as well.
Handling CDs
In order to protect data stored on compact discs from
damage or loss, handle them with care, and observe the
following precautions.
• Do not touch the surface of a CD.
• Do not expose CDs to extreme temperatures or
humidity. The working temperature range is between
4°C and 52°C (40°F and 125°F).
• Wipe CDs with a clean cloth before playback.
• Remove the CD from the CD drive before turning the
Disklavier off.
CD tray on the Media Center
Available File Format and
Structure of Data in the
Removable Media
CDs
The files should be formatted in ISO 9660 LEVEL1.
Floppy Disks (2DD,2HD)
• The files should be formatted in MS-DOS.
• The Disklavier reads only the files nested in the root
directory.
USB Flash Memories
The files should be formatted in FAT16 or FAT32 file
system.
USB Hard Disk Drives
The files should be formatted in FAT32 file system.
Continue to next page...
20
CHAPTER 1: Getting Started
Notes on the limitation of the compatible
file format
• SMF format 0: For playback and recording.
• SMF format 1: For playback only.
• E-SEQ: For playback and overwrite recording.
• The name of the SMF file should have an extension as
“.MID” or “.mid”.
• The name of the E-SEQ file should have an extension
as “.FIL” or “.fil”.
Notes on the files created on the Disklavier
PRO Series
The song file created on the Disklavier PRO Series
contains various data that enable high-accuracy in song
playback. However, those data can not produce any
expected results and, moreover, may control the keys
unnaturally when the song file is modified on the external
MIDI device such as sequencer, etc. The above
mentioned problem does not occur in the following cases:
• When the song file stored/loaded in the Disklavier PRO
Series is played back on the Disklavier PRO Series
through an external MIDI device without any
modification on that device.
• When the song file is output from the [MIDI OUT]
terminal or the [USB
] port on the front of the I/O
Center and played back on another MIDI device. Any
modifications are available.
• When the following event is deleted from the song file.
A0 kk dd : Polyphonic Key Pressure
A1 kk dd : Polyphonic Key Pressure
B0 10 dd : Control Change (General Purpose)
B1 10 dd : Control Change (General Purpose)
B0 51 dd : Control Change (General Purpose)
B1 51 dd : Control Change (General Purpose)
21
CHAPTER
2
Song Playback Features
This could be useful, for example, when listening
carefully to a piano part at slow tempo, and also when
practicing a difficult piano part at slow tempo.
1
Select the desired song. (→ pg. 12
“Selecting a Song” in “Quick Guide”)
2
Tap on
3
Tap on
/
to adjust the
tempo value, and then on
.
in the [Song] screen.
Playing Back Songs in a
Different Key (Transposition)
This could be useful, for example, when you want to sing
along in a more comfortable key.
the desired song. (→ pg. 12
1 Select
“Selecting a Song” in “Quick Guide”)
2 Tap on
in the [Song] screen.
on
/
to adjust the
3 Tap
transposition value, and then on
.
The adjusted value appears instead of the character,
[Tempo] on
.
The adjusted value appears instead of the character,
[Trans.] on
.
To resume the original tempo, tap on
in step 3.
To cancel the transposition, set the value to
[0] in step 3.
Tip: The value can be adjusted from -50% to
+20% in 1% increments.
English
Changing the Playback
Tempo
Tip: The song can be temporarily transposed in
half-step keys up or down two octaves (-24 to
+24).
Note: Care must be taken when transposing songs on
CDs, as increasing or decreasing the transposition value
too much may have an adverse effect on sound quality.
22
CHAPTER 2: Song Playback Features
Repeating Song Playback
This could be useful, for example, when providing nonstop background music at a party.
the desired song. (→ pg. 12
1 Select
“Selecting a Song” in “Quick Guide”)
Repeating a Specific Section
of a Song (A-B Repeat)
In addition to the A-B Repeat feature, you can locate the
registered points (point A and B) during playback and
fast-reversing/forwarding.
the desired song. (→ pg. 12
1 Select
“Selecting a Song” in “Quick Guide”)
Playback options
Tap on / in the
[Song] screen to show
the desired playback
options.
2 Tap on
3 Tap on
in the [Song] screen.
.
on
repeatedly in the
2 Tap
[Song] screen until the following
screen appears.
Repeat mode button
on the desired repeat mode, and
4 Tap
then on
.
: Repeats all songs in the current album.
: Repeats the current song only.
: Repeats all songs in the current album in
random order.
The selected mode appears instead of the character,
[Repeat] on
.
To cancel repeat mode, tap on
4.
23
in step
3 Press
to start playback.
on
at the beginning of
4 Tap
the section you want to repeat (point
A).
CHAPTER 2: Song Playback Features
on
at the end of the
5 Tap
section you want to repeat (point B).
The beginning of the section is located and
playback stops.
mode.
: When point B is reached, the
beginning of the section is located
and playback stops.
This could be useful, for example, when listening
carefully to one part, and also when you practice only the
left- or right-hand part while the Disklavier plays the
other.
the desired song. (→ pg. 12
1 Select
“Selecting a Song” in “Quick Guide”)
: When point B is reached, the
beginning of the section is located
and playback starts.
Playback options
: Repeat mode is canceled but points A
and B are retained.
Tap on / in the
[Song] screen to show
the desired playback
options.
To locate the registered points (point A
and B) during playback or while
stopped, tap on
or
.
Tip: You can also locate a point by fastreversing/forwarding between points A and B.
To clear the registered point, tap on
.
English
on the Repeat mode button
6 Tap
repeatedly to select the desired
Playing Back Only the
Desired Piano Part
2 Tap on
3 Tap on
in the [Song] screen.
.
Left-hand part
Right-hand part
Pedal part
Accompaniment part
Tip: Tapping on
in step 1 also shows
this screen.
Continue to next page...
24
CHAPTER 2: Song Playback Features
on the desired part to change its
4 Tap
setting (play or mute).
1 Tap on
Volume bar
Each time you tap on the part, its setting changes as
follows showing the status with the color of the part
icon:
Play (green)
.
Adjusted value
Mute (white)
Note: Blank part
(shown in yellow)
contains no sound and you cannot change the
setting.
[Balance] control screen
on the desired point on the
2 Tap
volume bar of the desired sound to
Adjusting the Volume
Balance among the
Keyboard Playing, Ensemble
Sound, Software Playback,
and Microphone’s Input
Besides adjusting the overall volume, the volume balance
among the different sound sources as described below
can be adjustable.
[Voice]: Adjusts the volume of the digital piano
sound* that you play on the Disklavier’s
keyboard in Quiet/Headphone mode. (→ pg.
16 “Basic Piano Playing” in “Quick Guide”)
* Note that this setting has no effect on the volume of the
pre-recorded piano part in the software.
[TG]:
Adjusts the volume of the ensemble sound
reproduced by the tone generator (TG) of the
Disklavier.
[Audio]: Adjusts the volume of the accompaniment or
standard audio sound pre-recorded in the
software (CDs).
[MIC]:
Adjusts the volume of the sound input from
the microphone.
adjust its value.
Tip: Pressing
on
to clear the [Balance]
3 Tap
control screen.
Utilizing the Play Lists
By creating play lists of your favorite songs, you can
program your Disklavier to automatically play back a
series of songs, not to mention eliminate the trouble of
changing CDs, floppy disks, or USB flash memories each
time you want to listen to songs on a different medium.
First create your own play list, and then play back that list
by following the procedures below.
Adding the Desired Song to the Play
Lists
the desired song or album
1 Select
(→ pg. 12 “Selecting a Song” in
“Quick Guide”), and then tap on
or
.
Function Menu appears.
25
also adjust the value.
CHAPTER 2: Song Playback Features
2 Tap on
.
To cancel this operation, tap on
.
on
, and then on the
3 Tap
destination list (album) if necessary.
Temporarily Changing the
Voice of a Track
English
You can change the voice of the ensemble tracks to your
preference. For details on the track structure, see
“Ensemble Part Recording and Track Structure” on page
45.
the desired song. (→ pg. 12
1 Select
“Selecting a Song” in “Quick Guide”)
Tap to cancel the
selection.
4 Tap on .
on
after the completion
5 Tap
message appears.
Note: If necessary, change the order of the songs in the
on
2 Tap
screen.
once in the [Song]
lists (albums). (→ pg. 54 “Rearranging the Order of
Songs/Albums”)
Playing Back the Desired Songs in
the Desired Order
Select the Play Lists that you created
in the above procedure (→ pg. 12
“Selecting a Song” in “Quick Guide”),
and then press
.
3 Tap on
.
The track information screen appears.
Track list
Continue to next page...
26
CHAPTER 2: Song Playback Features
on the desired track number to
4 Tap
be edited in the track list.
6 TapTip:on the desired voice name.
You can also select the desired voice by
specifying the voice number. Tap
, and
the voice number selection screen appears.
Selected track
Tap to cancel selection.
5 Tap on [Voice].
The voice list screen appears.
Group name
Voice name
Tap to close the list.
27
Confirm the desired voice number referring to
“Ensemble Part Playback Voice List” (→ pg. 68),
enter the number with the keyboard on the pocket
controller, and then tap on
.
7 Tap on
.
To adjust the volume of the track, tap [Volume],
and then press
.
CHAPTER 2: Song Playback Features
Editing Tracks
3 Tap on
.
The track information screen appears.
You can edit the existing ensemble tracks to your
preference by using the following options.
[Mix Track]:
This could be useful for saving tracks by mixing two
tracks.
[Move Track]:
This could be useful for changing the voice by
moving a track.
[Copy Track]:
This could be useful for creating unison parts by
copying and pasting a track.
[Delete Track]:
Deletes an unwanted track.
[Transpose Track]:
This could be useful for arranging existing ensemble
parts. For example, when you have transposed a
specific track to suit its instrument voice in advance,
you can transpose other tracks in the same key.
Mix/Move/Copy Track
1
Select the desired song. (→ pg. 12
“Selecting a Song” in “Quick Guide”)
Track list
Each track number in the track list is colored
depending on its status.
Black:
Recorded track
Gray:
Blank track
With white background:
Track assigned to a piano part
Underlined:
Track assigned to a rhythm part
on the desired track number to
4 Tap
be edited in the track list.
5 Tap on
on
2 Tap
screen.
English
Selected track
.
once on the [Song]
Continue to next page...
28
CHAPTER 2: Song Playback Features
on the desired edit track option
6 Tap
button (
,
7 Tap on the destination track button.
The destination track selection screen appears.
, or
).
Destination track
button
Tap to cancel selection.
Tap to cancel editing.
[Mix Track] screen
8 Tap on the destination track number.
[Mix Track]:
The track selected in step 4 will be mixed with
the destination track.
[Move Track]:
The destination track will be overwritten by the
track selected in step 4 (the selected track will
be blank).
[Move Track] screen
[Copy Track]:
The destination track will be overwritten by the
track selected in step 4 (the selected track will
be retained).
that the destination track
9 Confirm
number is marked with a blue square,
and then tap on
.
on
after the completion
10 Tap
message appears.
[Copy Track] screen
29
CHAPTER 2: Song Playback Features
Delete Track
Transpose Track
steps 1 thru 5 in “Editing
1 Perform
Tracks (Mix/Move/Copy Track)”.
steps 1 thru 5 in “Editing
1 Perform
Tracks (Mix/Move/Copy Track)”.
(→ pg. 28)
English
2 Tap on
.
2 Tap on
.
Selected track button
Key change button
Tap to cancel editing.
Tap to cancel editing.
3 Tap on
4
.
Tap on
after the completion
message appears.
3 Tap on the key change button.
The key change screen appears.
Continue to next page...
30
CHAPTER 2: Song Playback Features
on
/
to adjust the
4 Tap
transposition value, and then tap on
.
Tip: The track can be transposed in half-step
keys up or down (–60 to +60).
5 TapTip:on
.
To transpose all the tracks, tap on the
selected track button. The selected track number
indication changes to [All Tracks]. Note that the
rhythm track cannot be transposed.
Checking and Modifying the
Song Information
Checking the Song Information
(Song-Info Screen)
You can check the following information of the selected
song:
[Song Type]: Shows the type of the software.
[Length]:
Shows the total playback time.
[Date]:
Shows the recording/modification
date.
[File Name]:
Shows the file name.
[Last Played]: Shows the latest playback date.
[Play Count]: Shows the number of times the song
has played in its entirety.
[Copyright]:
Shows the copyright.
the desired song. (→ pg. 12
1 Select
“Selecting a Song” in “Quick Guide”)
6 Tap on
.
on
after the completion
7 Tap
message appears.
on
repeatedly in the
2 Tap
[Song] screen so that the following
screen appears.
Song-Info screen
31
CHAPTER 2: Song Playback Features
Checking and Modifying the Song
Information (Song-Tag screen)
on the title of the desired
3 Tap
information.
You can modify the following information of the selected
song:
For [Song Title] and [Comment]
[Song Title]: Modifies the title of the song.
The text box for the selected information title
appears.
[Rate]:
English
Modifies the arbitrary rating by
changing the number of the star icons.
[Comment]: Modifies your comment.
the desired song. (→ pg. 12
1 Select
“Selecting a Song” in “Quick Guide”)
Tap to cancel the
modification.
For [Rate]
The selected title ([Rate]) is highlighted.
the information.
4 Modify
For [Song Title] and [Comment]
on
repeatedly in the
2 Tap
[Song] screen so that the following
screen appears.
Modify the information, and then tap on
For details on modifying the information, see
“Entering Characters” on page 33.
.
For [Rate]
Press
to select the rating (shown by the
number of the stars).
Song-Tag screen
Continue to next page...
32
CHAPTER 2: Song Playback Features
Entering Characters
1 Slide the front panel of the Pocket Controller to
show the keyboard.
2 Press a key to enter the corresponding letter.
3
2
4
6
5
7
8
9
0
E R T Y U I
Q @W # $ % – & ∗ ( O DelP
!
D F G –H + J K L
A S Cut Copy
=
)
C V B N M , ,.
X
Z
1
Paste
Caps
Fn
Keys
/?
Symbol
Space
~
` "
<
. ..
>
Will shift the mode to enter “UPPERCASE” letters or lowercase letters when the Caps
lock key is active.
Will enable the entry of numbers and symbols printed on the keyboard in yellow.
Fn
Fn
Tab
(Caps)
Will change the entering mode to enter uppercase (capital) letters (Caps lock). To
cancel the function, press Fn Tab again.
Will insert a space.
Space
Will act as a tab key. On the Edit screen, the cursor will move to the next field.
Tab
(Back space)
Fn
/?
Will delete the character to the left of the cursor.
(Delete)
Will delete the character to the right of the cursor.
(Num)
Will change the entering mode to enter numbers (Num lock) and symbols. To cancel
the function, press Fn /? again.
(Carriage return)
33
Num
Will enter lowercase letters on respective keys.
(Shift)
Fn
Tab
Will start a new line.
Fn
X
(Cut)
Will cut the selected text.
Fn
C
(Copy)
Will copy the selected text.
Fn
V
(Paste)
Will paste the selected text.
CHAPTER 2: Song Playback Features
Presetting Playback Control
Options for Each Song
the desired song. (→ pg. 12
1 Select
“Selecting a Song” in “Quick Guide”)
You can customize the manner of playback for each song
in advance.
[Piano Part Ch R]:
Selects the desired channel ([01] thru [16]) to
which you assign the right-hand part or not
([##]).
[Piano Velocity Curve]:
In acoustic mode, the loud notes may get
distorted when you play a MIDI song designed
not for acoustic piano playback, but for a
certain instrument voice. In such a case, you
can automatically adjust only the volume of
the acoustic piano part moderately without
changing the volume of other parts.
Select the desired acoustic piano volume
([Soft 85] thru [Soft 20]), or select [Thru] to
inactivate this function.
Note: The smaller the [Soft] value, the softer the
volume becomes.
English
[Piano Part Ch L]:
Selects the desired channel ([01] thru [16]) to
which you assign the left-hand part or not
([##]).
on
repeatedly in the
2 Tap
[Song] screen so that the following
screen appears.
Song-Option screen
[Main Volume Adjust]:
Adjusts the overall volume.
3 Tap on the title of the desired option.
[Audio Volume Adjust]:
Adjusts the volume of the accompaniment or
standard audio sound pre-recorded on the
software (CDs).
to select/adjust the desired
4 Press
option/level, and then press
The selected title is highlighted.
(select button).
[Audio Pitch Adjust]:
Adjusts the pitch of the accompaniment or
standard audio sound pre-recorded on the
software (CDs).
[Skip]: Sets the song to be played ([OFF]) or not
([ON]) during playback a series of songs in an
album.
[Guide]:
Turns the SmartKey function on ([ON]) or off
([OFF]). When [ON] is selected, you can set
the on/off setting of the SmartKey function
respectively for each part ([L] and [R]). For
details, see “Selecting the Part to Be Guided”
on page 35.
Note: The [Guide] option is automatically set to
[ON] when SmartKey song is played.
34
CHAPTER 2: Song Playback Features
SmartKey™ Playback
The SmartKey feature of your Disklavier is a unique
application of Yamaha’s patented “Guide” system
technology and compatible with SmartKey software.
With the SmartKey software, non-players can play
simple melodies by following the guidance of the prompt
key without a written music book.
Key notation
As a reference, “C3” is middle “C”, which means “C4”
is an octave above middle “C” and so on.
Note: SmartKey software may not be available in
Middle “C”
some countries.
Note: SmartKey is a trademark of Yamaha
Corporation or Yamaha Corporation of America.
3 Follow and play the prompt key.
The Disklavier plays a simple melody.
1
Select the desired song with
icon.
(→ pg. 12 “Selecting a Song” in
“Quick Guide”)
2 Press
.
to play the prompt keys one
4 Continue
by one until the end of the song.
Notice that the Disklavier patiently waits for you to
play the right key before proceeding to the next key.
Also, notice that if you happen to miss the prompt
key, it will gently remind you the right key every
few seconds until you play the right key.
Selecting the Part to Be Guided
Key prompt
You can activate the SmartKey function only for your
desired part ([L] or [R]). The [Guide] option should be
turned on in advance. (→ pg. 34)
the [Part] screen. (→ pg. 24
1 Show
“Playing Back Only the Desired Piano
Part”)
Left-hand part
Right-hand part
Key prompt (The key slightly moves
downward)
[Part] screen
35
CHAPTER 2: Song Playback Features
on the desired part to change its
2 Tap
setting (guide, normal play, or mute).
Each time you tap on the part, its setting changes as
follows showing the status with the color of the part
icon:
Guide
(orange)
→
Normal play
(green)
Mute
(white)
Adding Disklavier
Accompaniment to
Commercial CD Songs
(PianoSmart)
You can add a Disklavier piano performance provided on
SmartPiano software floppy disks to the playback of
songs on commercial CDs. Furthermore, once you
playback a SmartPiano song to the end, the paired song
on the CD is automatically copied to the [CD Library].
This feature eliminates the trouble of changing CDs and
enables quick playback later.
the desired SmartPiano song (a
1 Select
song with
). (→ pg. 14 in “Quick
Guide”)
When you select a SmartPiano song for the first
time, [Please insert the CD.] screen appears.
Tip: It is convenient that you copy the
SmartPiano software to the [User Library] in
advance. (→ pg. 53 “Making Copies of the
Entire Contents in a Medium or Song Library”)
a CD paired with the
2 Load
SmartPiano software, if necessary.
(→ pg. 20 “Loading a CD”).
Note: When you perform PianoSoft playback
for the first time, it takes 15 seconds to
synchronize the SmartPiano song and the CD
with the [Registering] appearing on the screen.
PianoSmart playback.
Note: If [Different CD!] screen appears in
step 2, confirm that the CD paired with the selected
SmartPiano song is loaded, and then tap on
.
English
→
until the [Registering] disappear,
3 Wait
and then press
to start
Video Synchronized
Playback
the video synchronized
1 Perform
recording in advance. (→ pg. 43)
Note: Be sure to rewind the video cassette to
locate the beginning of the recording.
sure that the video
2 Make
synchronization is on. (→ pg. 43
“Setting Up the Camcorder and the
Disklavier”)
down the volume completely on
3 Turn
the camcorder.
Note: Although noises (synchronizing signal)
are heard from the camcorder’s speaker when
the volume is not turned down completely, this
is not a malfunction.
4 Start playback on the camcorder.
The Disklavier automatically selects the song
paired with the video, and then starts playback as
well.
Note: You cannot change the playback tempo during
video synchronized playback.
Note: When the song paired with the video is stored in
[User Library] (songs recorded with Video Synchronized
Recording will automatically be stored here) or
[PianoSoft Library], the song is automatically selected
and starts playback. However, it is required to select the
desired song after step 2 when the song is stored in the
removable medium.
36
CHAPTER
3
Piano Playing Features
Playing the Disklavier along
with the Internal Metronome
The beats of the metronome help you play the Disklavier
with a steady tempo. The tempo, the meter (beat), and the
volume of the click can be adjusted.
Note: The [Tempo] value indicates the number of
beats in a minute, and one beat represents a quarter
note. When you play a song written in different
measure unit, convert the unit to quarter note (e.g.
When playing a song in 3/2, set [Beat] to 6/4).
1 Tap on
in the [Main] screen.
Playing the Disklavier
Accompanied by the
Additional Voice(s)
(Performance Mode)
This function lets you play the piano sound of the
Disklavier accompanied by other voices produced by the
internal tone generator. A maximum of two voices sound
in unison with the right-hand part that you play and one
voice does with the left-hand part. You can also mute the
piano sound to your preference.
1 Tap on
in the [Main] screen.
Tap to change the split
point (see step 3.)
Voice name
2
Tap on
metronome.
to start the
The color of
changes to blue.
To stop the metronome, tap on
.
on
/
to adjust the
3 Tap
value of the desired option.
Tip: Tap on
to resume the default tempo.
In such a case, note that the operation changes
only the [Tempo] value.
on
4 Tap
operation.
37
to complete the
Turns on/off the left-hand/right-hand1/righthand2 part accompanying voice
on
/
/
to turn on/off
2 Tap
the accompanying voice for the
respective part.
Each time you tap on
/
/
, the
respective voice turns on (blue) and off (yellow)
alternately.
CHAPTER 3: Piano Playing Features
[SplitPoint], and then press
3 Tap onto select
a note as the split point
(within the range from [A-1] to [C7]) if
necessary.
Note: The split point can be set only when
both
(blue).
and
/
are turned on
on the voice name of the desired
4 Tap
part.
In Quiet or Headphone mode, when a voice contained in
[AEM Brass], [AEM Sax], or [AEM Section] Instrument
Group is selected, depressing the pedal adds articulations
specific to the wood/brass wind. Three types of
articulation are assigned to the respective pedals.
English
The selected note and notes lower than that note are
assigned to the left-hand part, and the notes higher
than that are assigned to the right-hand part.
Adding Expressive Effect to
Your Play
Soft pedal:
Assigned for adding Head (blow-up) articulation to
the manner of beginning a note.
Sostenuto pedal:
Assigned for adding Joint articulation to the interval
of two notes.
Damper pedal:
Assigned for adding Tail (fall-down) articulation to
the manner of ending a note.
5 Tap on the desired voice.
on [Volume]
/
to
6 Tap
adjust the volume of the selected
voice.
on
7 Tap
operation.
to complete the
To mute the piano sound, tap on
.
turns to red. Each time you tap on
, the piano sound
turns on and off alternately.
Soft pedal
Sostenuto
pedal
Damper pedal
the desired voice contained in
1 Select
[AEM Brass], [AEM Sax], or [AEM
Section] Instrument Group. (→ pg. 67
“Piano Voice List” and pg. 19
“Selecting the Voice in Quiet/
Headphone Mode” in “Quick Guide”)
the key and the desired
2 Operate
pedal.
The key and pedal operation varies depending on
the type of the articulation.
For Head (blow-up) articulation
1 Press and hold the soft pedal, and then press the
desired key.
The blow-up speed is controlled in accordance
with the angle of the pedal that is pressed.
Continue to next page...
38
CHAPTER 3: Piano Playing Features
For Joint articulation
1 Press the desired key to be jointed with the next
key.
2 Depress and hold the sostenuto pedal, and then
press another key in a certain interval.
The first note leads to the second one by added
glissando between them.
Tip: This articulation is the most effective
when the interval of the two notes is an octave.
Note: When the interval of the jointed notes
is narrower or wider than an octave, Joint
articulation may not effect those notes.
For Tail (fall-down) articulation
1 Press the desired key.
2 While the key is pressed, depress the damper
pedal, and then release the key.
3 Release the damper pedal to mute the note.
The note sustains for a while with its pitch
falling down to the lower octave’s note before
muting the note completely.
Adding Chords to a Melody
Line (Harmony Mode)
In Quiet or Headphone mode, the Disklavier can add a
chord suitable for the melody line played on the keys
higher than the split point in accordance with the notes
played (but without sound) on the keys* lower than the
split point.
* The Disklavier creates a chord based on the notes of up
to three keys.
Note: In this mode, the keys lower than the split
point are muted.
Setting up Harmony Mode
You can select the desired split point and the balance
between the chord’s volume and the melody line’s
volume.
on
1 Tap
and then on
in the [Main] screen,
.
Tip: When you immediately release the
damper pedal, short Tail articulation effects on
that note. When you slowly release the damper
pedal, long Tail articulation effects on that note.
Note: The Disklavier stops sustaining the
note, and then adds Tail articulation at the
release of the damper pedal (not at the release of
the key).
on [Split Point]/[Volume], and
2 Tap
then press
to select/adjust the
selected option.
on
3 Tap
operation.
39
to complete the
CHAPTER 3: Piano Playing Features
Playing the Disklavier in Harmony
Mode
Quiet or Headphone Mode.
1 Activate
(→ pg. 16 “Basic Piano Playing” in
“Quick Guide”)
in the Information Area.
A piano sounds differently depending on the size of the
room in which it is played. The reverberation is the major
reason for this difference. Controlling the reverberation
simulates the acoustics of the digital piano played in a
concert hall. This effect can be also applied to the
microphone input.
on
1 Tap
and then on
English
2 Tap on
Applying Reverb Effects to
the Digital Piano
in the [Main] screen,
.
Selects the desired
reverb type.
on
3 Tap
Mode.
Adjusts the reverb level
of the digital piano
sound.
to activate Harmony
Adjusts the reverb level
of the microphone.
Each time you tap on
, Harmony Mode is
activated or inactivated alternately.
on
4 Tap
screen.
to clear the [Voice]
the desired chord on the keys
5 Play
lower than the split point and play the
melody line on the keys higher than
the split point.
on [Type], on the desired reverb
2 Tap
type, and then on
.
on [Depth (Voice)]/[Depth (Mic)],
3 Tap
and then press
to adjust the
reverb level.
on
4 Tap
operation.
to complete the
40
CHAPTER
4
Recording
Recording a New Song
When you record both left- and righthand part, go to step 4.
A song that you play on the Disklavier can be recorded in
the [User Library] and the recorded song can be easily
played back. Furthermore, you can select and exclusively
record the desired part.
1 Tap on
in the [Main] screen.
A new song will be created automatically.
When you record either left- or righthand part, go to step 5.
[Split Point], and then press
4 Tap on
to select the desired note as the
split point.
2 Tap on
.
The selected note and notes lower than that note are
assigned to the left-hand part, and the notes higher
than that are assigned to the right-hand part.
to start, and then
5 Press
immediately pause recording.
The white part won’t
be recorded.
The red part will be
recorded.
Note: When the video synchronization is on
(→ pg. 43 “Video Synchronized Recording”),
recording does not pause in this step.
that [Recording] appears in
6 Confirm
the Information area, and then start
playing the Disklavier.
desired part (
,
3 Tap on, the
or
) to change its
setting (record or not).
Each time you tap on the part, its setting changes
alternately.
41
The Disklavier starts recording.
7 Press
to stop recording.
To play back the recorded song, press
.
CHAPTER 4: Recording
Quick Recording
2 Tap on
With the simple operation of the buttons on the Media
Center, you can quickly start recording. The new song
will be recorded as the last song of the last album in the
[User Library] by following the procedure below.
REC
REC
Song title area
English
1 Press
.
on the Media Center.
lights up red and User flashes green.
To cancel recording, press REC again.
2 Press
User
to start recording.
stops flashing green, and then remains lit.
User
3
4 Press
Play the Disklavier.
REC
REC
or
User
on the song title area, name the
3 Tap
song (→ pg. 33 “Entering
Characters”), and then tap on
To cancel this operation, tap on
.
.
to stop recording.
and User turn off.
Titling a Song at the Start of
Recording
Recording the Left- and
Right-Hand Parts Separately
(Overwrite Recording)
During the recording procedure, you can title a new song
before you start recording. You can also title the recorded
song later on. (→ pg. 31 “Checking and Modifying the
Song Information”)
You can overwrite the desired part to a previous
recording. For example, if you record the left-hand part of
a song, and then record a right-hand part over the
previously recorded song, both recording will be
combined.
the procedures from step 1
1 Perform
thru step 2 of “Recording a New
the desired part of a song in
1 Record
advance. (→ pg. 41 “Recording a
Song”. (→ pg. 41)
New Song”)
the song to be overwritten, if
2 Select
necessary. (→ pg. 12 “Selecting a
Song” in “Quick Guide”)
Tip: When you start overwriting in succession
to the previous recording, skip this step and go
to step 3.
Continue to next page...
42
CHAPTER 4: Recording
3 Tap on
, and then on
.
Video Synchronized
Recording
desired part (
,
4 Tap on, the
or
) to select its
setting (to be recorded/overwritten).
Each time you tap on the part, its setting changes as
follows showing the status with the color of the part
icon:
Not record (white)/Not overwrite (green) ↔
Record/overwrite (red)
Tip: You can also overwrite the previously
recorded part along with the blank part.
By recording a song played on the Disklavier
synchronized with the video recording, later on, you can
enjoy piano playback with the video. (→ pg. 36 “Video
Synchronized Playback”) First set up the camcorder and
the Disklavier, and then start recording by following the
procedures below.
Setting Up the Camcorder and the
Disklavier
up a camcorder to the I/O
1 Hook
Center.
to start, and then
5 Press
immediately pause recording.
To MIC/LINE input
Camcorder
To audio
output
(L/R)
RCA cord
(not
supplied)
I/O Center
that [Recording] appears in
6 Confirm
the information area, and then start
playing the Disklavier.
The Disklavier starts recording.
7 Press
tap on
to stop recording, and then
(to overwrite) or
(to
record as a new song) to complete the
recording.
To cancel the recording, tap on
.
on
2 Tap
and then
in the [Main] screen,
.
For normal use, the
adjustment of this
option is not required.
Adjusts the length of
the offset time that
leads the actual
playback of entire
recording.
43
CHAPTER 4: Recording
on
to turn the video
3 Tap
synchronization on.
Each time you tap on
, the video
synchronization turns on and off alternately.
To cancel the adjustment, press
5 Press
value.
.
(select button) to set the
Tip: The shortcut button on the [Song] screen
is also available. Tap on
to turn on
video synchronization, and
to turn it
off.
repeatedly until the [Main]
1 Press
screen appears, and then tap on
in the [Main] screen.
English
4
Tap on the desired option ([Sync
Level] or [Offset]), and then press
to adjust its value.
Starting Video Synchronized
Recording
2 Start recording on the camcorder.
that [Rec Wait] appears in
3 Confirm
the information area, and then press
to start recording.
for approximately ten seconds,
4 Wait
and then start playing the Disklavier.
Note: This step is necessary for
synchronization of the song and the video
playback, and should not be omitted.
the Disklavier, press
5 After toplaying
stop recording.
Each time you tap on
this button,
and
alternates.
6 Stop recording on the camcorder.
Note: Video synchronization does not
function under the following conditions:
• While songs on SmartPianoSoft,
PianoSoftPlusAudio, SmartKey, and audio
CD are played back.
• While Vocal Harmony mode is activated.
In such cases, the icon
is shown in gray.
44
CHAPTER 4: Recording
CD Synchronized Recording
You can record a Disklavier piano performance in the
[User Library] along with the playback of songs on
commercial CDs. Once you record a song to the end with
this feature, the played back song on the CD is
automatically copied to the [CD Library]. When you play
back the performance recorded with this feature, follow
the procedure in “Adding Disklavier Accompaniment to
Commercial CD Songs (PianoSmart)” on page 36.
1
Load the desired CD, if necessary. (→
pg. 20 “Loading a CD”)
the desired song. (→ pg. 12
2 Select
“Selecting a Song” in “Quick Guide”)
on
3 Tap
and then on
in the [Song] screen,
.
Tip: Tap on the desired part to change its
setting (record or not) if necessary. (→ pg. 41)
Recording Ensemble Parts
In addition to making piano-only recordings, you can
record a part in a voice different from the piano as an
ensemble part. (The piano can also be selected as an
ensemble voice.) You can also overwrite an existing song
with an ensemble part.
Ensemble Part Recording and Track
Structure
Piano and ensemble parts played on the Disklavier are
recorded as MIDI data. MIDI data consist of 16 tracks,
with a single voice assigned to each track (There is a
resemblance to a score with 16 staves). Generally the lefthand part of the piano (including half-pedal data) is
assigned to Track 1, the right-hand part (including halfpedal data) to Track 2, and the ensemble and rhythm parts
to the remaining tracks.
the Disklavier in Quiet Mode or
1 Put
Headphone Mode. (→ pg. 16 “Basic
Piano Playing” in “Quick Guide”)
4 Start playing the Disklavier.
5 Press to stop recording.
2 Tap on
3 Tap on
4 Tap on
in the [Main] screen.
.
.
Track list
Selected track
Each track number in the track list is colored
depending on its status.
45
CHAPTER 4: Recording
.
7 Tap on
on [Volume], and then press
8 Tap
to adjust the volume of the ensemble
Black:
Recorded track
Gray:
Blank track
Underlined:
Track assigned to a rhythm part
5
Tap on the track number to be
overwritten in the track list.
Tip: After tapping on a track number, you can
select tracks by pressing
6
part.
, and then play the
9 Press
Disklavier along with the playback of
English
With white background:
Track assigned to a piano part
the song.
Recording starts automatically.
the Disklavier, press
10 After toplaying
stop recording.
.
Tap on [Voice], and then the desired
voice.
on
(to overwrite) or
(to
11 Tap
record as a new song) to complete the
recording.
To cancel recording, tap on
Appears when there
are more voices not
shown in the window.
In such a case, tap on
either end of this bar to
show the hidden
voices.
.
To change a voice and its volume without
overwriting with a new performance,
perform the above procedures from steps 1 thru 11,
omitting steps 9 and 10.
Tip: Checking in advance the desired voice
number in “Ensemble Part Playback Voice
List” (→ pg. 68) helps you quickly select the
voice.
Tap on
appears.
, and the following screen
Enter the voice number with the keyboard on
the pocket controller, and then tap on
.
46
CHAPTER 4: Recording
Overdubbing an Existing
Part
4 Tap on
twice.
You can overdub* a track (part) in an existing song.
* The existing and new performances will be mixed when
you play back an overdubbed song.
a song to be overdubbed.
1 Select
(→ pg. 12 “Selecting a Song” in
“Quick Guide”)
2 Tap on
, and then
.
on [Overdub], and then press
5 Tap
to select [ON].
, and then play the
6 Press
Disklavier along with the playback of
the song.
Recording starts automatically.
the Disklavier, press
7 After toplaying
stop recording.
3
Select a track (part) to be
overdubbed.
Overdubbing a Piano Part
Tap on the desired part to turn the color from green
to red. (→ pg. 42 “Recording the Left- and RightHand Parts Separately (Overwrite Recording)”)
Overdubbing an Ensemble Part
Tap on
, and then the desired track
(black number). (→ pg. 45 “Recording Ensemble
Parts”)
47
on
(to overwrite) or
(to
8 Tap
record as a new song) to complete the
recording.
To cancel recording, tap on
.
Tip: To overwrite (not overdub) a track, select
[OFF] in step 5.
CHAPTER 4: Recording
Recording Songs Based on
Measures and Beats
(Metronome Mode
Recording)
Making a New Recording
1
Set up the metronome. (→ steps 1
and 3 of “Playing the Disklavier along
with the Internal Metronome” on
pg. 37)
2 Tap on
3 Press
.
the song to be overwritten
1 Select
(→ pg. 12 “Selecting a Song” in
“Quick Guide”), and then tap on
.
English
There are two recording modes available for the
Disklavier: Time Mode (recording mode based on the
elapsed playing time) and Metronome Mode. Once you
record songs in Metronome Mode, you can start
overwriting recordings synchronized with the beats of the
internal metronome over the recorded songs.
Furthermore, you can change the tempo of the recorded
songs afterward by editing its original data.
Overwriting a Part on an Existing
Song
.
2 Tap on
up the overwritten part (track) and
3 Set
its voice. (→ pg. 42 “Recording the
Left- and Right-Hand Parts Separately
(Overwrite Recording)”, → pg. 45
“Recording Ensemble Parts”)
4 Press .
the Disklavier along with the
5 Play
metronome.
Recording starts automatically.
the Disklavier, press
6 After toplaying
stop recording.
.
on
(to overwrite) or
(to
7 Tap
record as a new song) to complete the
recording.
To cancel recording, tap on
.
Measure-number
counter starts.
the Disklavier along with the
4 Play
metronome.
Recording starts automatically.
the Disklavier, press
5 After toplaying
stop recording.
48
CHAPTER 4: Recording
Quantize Function
5 Press
.
The metronome starts clicking.
This function is used to compensate for slight
inaccuracies in the playing data (the length of a note and
the timing of the key stroke). A measure is equally
divided into a certain number of sections (4, 6, 8, 12, and
16 sections) and the key strokes are fit exactly into the
sections. In the Disklavier, each section indicates a
quarter note.
Measure-number
counter starts.
steps 1 and 2 of “Recording
1 Perform
Songs Based on Measures and Beats
(Metronome Mode Recording)”. (→
pg. 48)
on the desired song in the list that
2 Tap
appears.
on
repeatedly until the
3 Tap
following screen appears.
[Quantize], and then press
4 Tap onto select
the desired option
([1/4], [1/6], [1/8], [1/12], [1/16]).
The lower number of the fraction indicates the
number of sections a measure is evenly divided
into.
49
the Disklavier along with the
6 Play
metronome.
Recording starts automatically.
the Disklavier, press
7 After toplaying
stop recording.
To cancel Quantize function, select [OFF]
in step 4.
CHAPTER 4: Recording
Changing the Default Tempo
You can change the default tempo of a recorded song
afterward. When you change the tempo, note that the
current tempo is overwritten by the new one.
“Quick Guide”), and then tap on
.
.
2 Tap on
up the overwritten part (track) and
3 Set
its voice. (→ pg. 42 “Recording the
Left- and Right-Hand Parts Separately
(Overwrite Recording)”, → pg. 45
“Recording Ensemble Parts”)
4 Tap on
.
EX.: A song recorded
in Time Mode
on
/
5 Tap
adjust the tempo.
EX.: A song recorded
in Metronome Mode
.
Time Mode:
Playback starts.
Metronome Mode:
Metronome starts.
English
the song to be overwritten
1 Select
(→ pg. 12 “Selecting a Song” in
6 Press
the Disklavier along with the
7 Play
metronome.
Recording starts automatically.
the Disklavier, press
8 After toplaying
stop recording.
on
(to overwrite) or
(to
9 Tap
record as a new song) to complete the
recording.
To cancel recording, tap on
.
To change a tempo without overwriting
with a new performance, perform the above
procedures from step 1 thru 9, omitting steps 3,6 and 7.
of [Tempo] to
To resume the original tempo, tap on
.
Note: You cannot change the [Beat] setting of
a song recorded in Metronome Mode.
50
CHAPTER
5
Creating a Song Library
The following functions listed in the Function Menu are
useful for organizing the contents in the song libraries
([PianoSoft Library], [CD Library], and [User Library])
as well as [Play Lists]. (→ pg. 25 “Utilizing the Play
Lists”)
Note: Be sure to read “album” as “list” during
operation for the [Play Lists].
Ex.: Function Menu for the Album List of [User
Library]
Menu items
Note: The menu items differ depending on the
screen.
To clear the Function Menu screen, tap on
or
, or press
.
Creating an Album in the
Library
This function is available for [PianoSoft Library], [User
Library], and [Play Lists].
the desired source (→ pg. 12
1 Select
“Selecting a Song” in “Quick Guide”),
and then tap on
2 Tap on
.
.
Tap to cancel album
creation.
To name the new album, see step 3 in
“Renaming an Album” on page 52.
3 Tap on .
on
after the completion
4 Tap
message appears.
51
CHAPTER 5: Creating a Song Library
2 Tap on
Renaming an Album
This function is available for all song libraries and [Play
Lists].
or
.
Ex.: Copy Song
and then tap on
English
the desired album (→ pg. 12
1 Select
“Selecting a Song” in “Quick Guide”),
.
2 Tap on
.
Tap to cancel the
operation in step 3.
3 Copy the selected song or album.
Tap to cancel
renaming in step 3.
Copying a Song:
1 Tap on
, and then on the
destination source in the list that
appears if necessary.
on
, rename the album
3 Tap
(→ pg. 33 “Entering Characters”),
and then tap on
Appears when there
are more songs or
albums not shown in
the window. In such a
case, tap on either
end of this bar to
show the hidden
songs.
.
4 Tap on .
on
after the completion
5 Tap
message appears.
Tap to cancel the selection.
Making Copies of Songs or
Albums
2 Tap on
, tap on the destination
album in the list that appears if
necessary, and then go to step 4.
This function is available except for [CD Library] and
[Play Lists].
the desired song or album (→
1 Select
pg. 12 “Selecting a Song” in “Quick
Guide”), and then tap on
.
or
Continue to next page...
52
CHAPTER 5: Creating a Song Library
Copying an Album:
— only when [FD] is selected as the source
4 Tap on .
on
after the completion
5 Tap
message appears.
Making Copies of the Entire
Contents in a Medium or
Song Library
Tap on
, and then on the
destination source in the list that
appears, and then go to step 4.
E-SEQ (Piano1) format conversion
When a song is saved in this format, the song can be
played back on all Disklaviers.
To convert the format of the album stored in a
floppy disk, tap on the check box for [Convert to ESEQ (Piano1)].
This function is available except for [CD Library] and
[Play Lists].
the desired source (→ pg. 12
1 Select
“Selecting a Song” in “Quick Guide”),
and then tap on
.
2 Tap on
.
Copying an Album:
— when a source other than [FD] is selected
Tap to cancel making
a copy.
on
, and then on the
3 Tap
destination source in the list that
appears if necessary.
Tap on
.
Destination album list screen
Tap on the desired album, and then
go to step 4.
53
4 Tap on
.
CHAPTER 5: Creating a Song Library
Deleting Songs or Albums
This function is available for all song libraries and [Play
Lists].
Guide”), and then tap on
.
2 Tap on
or
.
.
3
on
after the completion
4 Tap
message appears.
Tap on
.
the desired song or album (→
1 Select
pg. 12 “Selecting a Song” in “Quick
Guide”), and then tap on
.
or
To cancel deletion, tap on
This function is available for all song libraries and [Play
Lists].
2 Tap on
English
the desired song or album (→
1 Select
pg. 12 “Selecting a Song” in “Quick
Rearranging the Order of
Songs/Albums
or
or
.
Ex.: Sort Song List
Tap to cancel
rearrangement.
on
/
repeatedly so that the
3 Tap
selected song or album moves to the
desired position.
4 Tap on .
on
after the completion
5 Tap
message appears.
54
CHAPTER
6
Other Settings
Skipping the Blank Part at
the Beginning of a Song
To inactivate this function, select [OFF] in step 2.
Tip: The shortcut button on the [Song] screen is also
available. Tap on
above, and on
to activate the function
to inactivate it.
When there is a blank part created at the beginning of the
recorded song, turning on this function automatically
skips the unwanted part and starts playback from the
actual beginning of the song.
on
1 Tap
and then on
in the [Main] screen,
.
Each time you tap on this
button,
and
alternates.
[Skip Space],and then press
2 Tap on
to select [ON].
on
3 Tap
operation.
to complete the
Using Timer Play
To inactivate this function, select [OFF] in step 2.
Inactivating the Key
Movement During Playback
During playback of a song, keys normally move in
accordance with the playback of the respective note’s
key. In Quiet or Headphone mode, you can select an
option of stopping this key movement. This enables you,
for example, to play along with the song being played
back, to add your own improvisation, or to create a fourhand duet.
on
1 Tap
and then on
55
Note: Be sure to set the date, time, and time zone in
advance. (→ pg. 16 “Setting up the Current Date and
Time”)
1 Tap on
in the [Main] screen,
.
[Quiet Key], and then press
2 Tap on
to select [ON].
on
3 Tap
operation.
You can start or stop playback of a song automatically at
specific times. A maximum of 99 timer programs can be
set.
to complete the
Timer list screen
in the [Main] screen.
CHAPTER 6: Other Settings
on the desired row in the timer
2 Tap
list.
on [Album], and then the desired
8 Tap
album.
9 Tap on
.
English
Tap to delete the
current timer program.
Tap to close the list.
on [Day], and then press
3 Tap
select the desired day.
to
The following day settings are available: All Days,
Sunday, Monday, Tuesday, Wednesday, Thursday,
Friday, Saturday, Sunday, Monday-Friday,
Monday-Saturday.
Tip: The following indications in the [Album]
column show the type of song library.
[PS-]: PianoSoft Library
[UR-]: User Library
[CD-]: CD Library
on [Hour], and then press
4 Tap
select the desired hour.
to
on [Minute], and then press
5 Tap
to select the desired minute.
6
Tap on [Command], and then [Play]
or [Stop].
on [Library], and then the desired
7 Tap
library.
[PL-]: Play list
If you do not specify a library in step 7, the
current album is selected for the timer program
and [- - - - -] appears in the [Album] column.
on
10 Tap
setting.
to complete the
To delete all timer program settings, tap
on
on the timer list screen, and
then
in the confirmation screen.
Tip: If you want to select the current album,
tap on
. [- - - - -] appears in the [Album]
column in the timer list screen.
56
CHAPTER 6: Other Settings
Tuning the Tone Generator
(MasterTune)
Applying an Effect to Your
Voice (Vocal Harmony)
The digital piano has already been tuned to match the
acoustic piano (A3 = 440 Hz). However, you can re-tune
the digital piano in accordance with the pitch of the
acoustic piano by following the procedure below.
By connecting a microphone to the Disklavier and
singing along with the piano, you can enjoy a variety of
effects such as adding harmony to your voice and
changing the pitch of your voice. You may feel as if you
were singing in a bar lounge. It’s great fun to use this
function.
on
1 Tap
and then on
on
2 Tap
Disklavier.
in the [Main] screen,
.
/
to tune the
the microphone.
To cancel tuning, tap on
on
3 Tap
operation.
up a microphone (not supplied)
1 Hook
to the Media Center, and then turn on
.
Microphone
(not supplied)
to complete the
Media Center
[MIC/LINE]
switch
[INPUT VOLUME]
knob
the [MIC/LINE] switch to the [MIC]
2 Set
position.
the [INPUT VOLUME] knob to
3 Turn
adjust the input volume of the
microphone.
the [MIC] volume on PRC-100.
4 Adjust
(→ pg. 25)
57
CHAPTER 6: Other Settings
the desired reverb effect.
5 Apply
(→ pg. 40)
6
Tap on
in the [Main] screen.
on
to clear the [Vocal
11 Tap
Harmony] screen.
Tip: The shortcut button on the [Song] screen
is also available. Tap on
to activate the
mode above, and on
to inactivate it.
English
Vocal harmony type
[Vocal Harmony]
screen
on the desired vocal harmony
7 Tap
type.
For the entire list, see “Vocal Harmony Type List”.
(→ pg. 76)
8
Tap on
Each time you tap on this button,
switches.
and
Note: The following features are not
available while Vocal Harmony Mode is
activated.
• Video synchronized playback
.
• Video synchronized recording
The [Balance] setting screen appears.
Note: Vocal Harmony Mode does not
function while playing back songs in
SmartPianoSoft, PianoSoftPlusAudio, and
audio CDs or receiving analog MIDI data.
on [Balance], and then press
9 Tap
to adjust the balance between your
voice and the effect.
Tip: The balance can be adjusted from 0 to
100%.
on
10 Tap
Vocal Harmony mode.
to activate
Each time you tap on
, the
mode is activated (the color turns to blue) or
inactivated.
58
CHAPTER 6: Other Settings
Preparing for Use of Foot
Controls/Switches
on
2 Tap
and then
in the [Main] screen,
.
The optional foot controller (FC7) or the foot control
switch (FC4, FC5) can be connected to the Disklavier and
the desired function is assigned to them. At the maximum
of two controllers/switches can be connected
simultaneously.
Assignable functions are as follows:
[Play/Stop]:
Controls starting/stopping of playback. Tempo
control is also available (only in the FC7).
[Main Volume]:
Controls the overall volume.
on [Function] of the desired foot
3 Tap
control/switch, and then the desired
function.
[Voice Volume]:
Controls the volume of the piano voice in Quiet Mode
and Headphone Mode.
[Pitch Bend]:
Controls the pitch of the piano voice.
Assignable functions
Setting Up the Disklavier for Foot
Controls/Switches
a foot control/switch to the
1 Connect
FOOT CNTRL1/2 jack.
Bottom of the Media Center
4 Tap on
.
Go to step 6 when you select the [Play/Stop]
function.
5 Select the detailed setting.
When [Main Volume]/[Voice Volume] is
selected
Tap on [Direction], and then press
to select
the option.
[Up]:
Raises the volume when the foot
control/switch is pressed and turns down
the volume when released.
[Down]: Lowers the volume when the foot
control/switch is pressed and turns up
the volume when released.
Foot control/switch
(not supplied)
59
CHAPTER 6: Other Settings
When [Pitch Bend] is selected
Tap on [Direction], and then press
the option.
[Up]:
to select
Raises the key when the foot control/
switch is pressed and resumes the
original pitch when released.
Tap on [Polarity], and then press
option.
to select the
When [Play/Stop] is selected for [Function]
When the switch is pressed, playback will start. When the
switch is released, playback will pause.
When [Main Volume] or [Voice Volume] is
selected for [Function] (with [Direction] set
to [Down]*3)
When the switch is pressed, the sound will be muted.
When the switch is released, the original volume will
resume.
[+]:
Raises/lowers the key when the foot
control/switch is pressed and resumes
the original pitch when released.
*3 When [Up] is selected and the switch is pressed, the
volume will increase all the way. (There is no effect for
[Voice Volume].)
[–]:
Raises/lowers the key when the foot
control/switch is released and resumes
the original pitch when pressed.
When [Pitch Bend] is selected for [Function]
(with [Polarity] set to [+]*4)
When the switch is pressed, the song will be keyed up to
+2 key. When the switch is released, the original key will
resume.
on
6 TapNote:
to complete the setting.
You cannot assign the same function to
both [Foot Cntrl 1] and [Foot Cntrl 2].
English
[Down]: Lowers the key when the foot control/
switch is pressed and resumes the
original pitch when released.
Operating an Optional Foot Switch
(FC4/FC5)
*4 When [–] is selected and the switch is pressed, the song
will be keyed down.
Operating an Optional Foot Control
(FC7)
When [Play/Stop] is selected for [Function]
When the control is pressed down all the way, playback
will start in the original tempo. When the control is
released completely, playback will pause. Playback
tempo varies depending on the angle of the controller
within the range of 0 to –50%.
When [Main Volume] or [Voice Volume] is
selected for [Function] (with [Direction] set
to [Down]*1)
When the control is pressed down all the way, the sound
will be muted. When the control is released completely,
the volume turns up all the way. The volume varies
depending on the angle of the controller.
*1 When [Up] is selected, the direction of control is
reversed.
When [Pitch Bend] is selected for [Function]
(with [Polarity] set to [+]*2)
When the control is pressed down all the way, the song
will be keyed up to +2 key. When the control is released
completely, the original key will resume. The key varies
depending on the angle of the controller.
*2 When [–] is selected, the song will be keyed down.
60
CHAPTER 6: Other Settings
Hooking Up AV Equipment
If you connect the Disklavier to an audio system, you can
hear the sound played/played back on the Disklavier from
the connected audio system, and the sound played back
on the connected audio system from the Disklavier.
AV amplifier, CD player, etc.
Setting Up the Disklavier for
Audio Data Reception/
Transmission
You can select the kind of the incoming/going out audio
signals. The following options should be set up in
advance.
[OMNI IN]
Selects the appropriate option to match the incoming data
input to the [OMNI IN] jacks.
To audio
inputs
To audio
outputs
To digital audio
inputs
Coaxial digital
audio cord (not
supplied)
[Audio]:
Select this when you play back an audio
software on the connected CD player, etc.
and reproduce the sound from the Monitor
speakers*.
[Analog MIDI-YM]:
Select this when you play back
PianoSoft·PlusAudio song.
RCA cord
(not
supplied)
Note: While this option is selected, you
cannot adjust the [ONMI IN Vol] value,
and Video Synchronized Playback and
Vocal Harmony Mode is not available.
[OFF]:
Select this when you cancel the data
reception from the [OMNI IN] jacks.
DIGITAL
OUT
[OMNI OUT]
I/O Center
Selects the desired data to be output from the [OMNI
OUT] jacks.
[Output]:
Select this when you output the same audio
signals as the ones for the Monitor
speakers*.
[Output+PianoTG]:
Select this when you output the ensemble
part and the digital piano sound. (Note that
the digital piano sound is also output in
Acoustic mode.)
[PianoTG]: Select this when you output only the digital
piano sound.
[OFF]:
61
Select this when you cancel the data
transmission from the [OMNI OUT] jacks.
CHAPTER 6: Other Settings
[Digital Out]
Selects the desired data to be output from the [DIGITAL
OUT] jack.
[OUTPUT]: Select this when you output the same audio
signals as the ones for the Monitor
speakers*.
[SYNC OUT]:
Select this when you output the same audio
signals as the ones to be output from the
[SYNC OUT] jacks.
[OFF]:
Select this when you cancel the data
transmission from the [DIGITAL OUT]
jack.
* Supplied only with the Mark IV Series.
1
Tap on
and then on
By hooking up a TV or a monitor display to the I/O
Center, lyrics are automatically displayed on the TV or
the monitor display during playback a song with lyrics
prerecorded.
English
[OMNI OUT]:
Select this when you output the same audio
signals as the ones to be output from the
[OMNI OUT] jacks.
Lyric Screen
Note: For purchasing songs with lyrics, consult
your Disklavier dealer.
Note: For users in North America, refer to page 27
thru 29 in the “Tablet Controller Operating Manual”
as well.
Showing the Lyrics on a TV or a
Monitor Display during Playback
up a TV or a monitor display to
1 Hook
the I/O Center.
TV, monitor display, etc.
in the [Main] screen,
.
To Video input
RCA cord
(not supplied)
on [OMNI IN]/[OMNI OUT]/
2 Tap
[Digital Out], and then press
to
I/O Center (Right side)
select the desired option.
on
3 Tap
operation.
to complete the
on the TV or the monitor display,
2 Turn
and then select the input mode that
corresponds to the connected TV or
monitor display.
Continue to next page...
62
CHAPTER 6: Other Settings
playback of a song with lyrics on
3 Start
the Disklavier.
The lyrics appear with a colorful background
picture. A color bar behind the lyrics stretches
gradually as the song goes on to indicate the current
playback point.
Note: The lyrics are shown only when the
song includes the lyric data.
Changing the Background Picture of
the Lyric Screen
A number of colorful background pictures are prepared
and categorized in the following subjects: Nature,
Flowers, Vacation, World, Textures, Holidays, and
Romantic.
the Lyric Screen on the TV or the
1 Show
monitor display to monitor the picture
selection. (See above.)
on
2 Tap
and then on
in the [Main] screen,
.
3 Tap on
.
Converting MIDI Data to a
Standard Form (Strip XP)
Disklavier PRO pianos record highly precise control
information (XP events) that becomes part of the MIDI
song files. This data is used to achieve accurate playback
on the Disklavier PRO, but is not used when the file is
played back on general MIDI devices.
When you edit the song with external MIDI products (for
example a software sequencer), the relationship between
the note data and the XP event as well as the actual
performance may not be maintained. There may be cases
in which songs edited in this manner cannot be played
back normally, depending on the instrument’s settings. In
such cases, use the Strip XP function to remove the XP
event to convert the song to standard MIDI format before
using it for playback. Strip XP also makes it possible to
reduce the size of MIDI files when desired.
Note: Once the XP event is stripped, the original
data cannot be restored. Before converting valuable
music data, be sure to backup the original data.
the song to be converted
1 Select
(→ pg. 12 “Selecting a Song” in
“Quick Guide”), and then tap on
or
.
2 Tap on
.
on [Category], press
to select
4 Tap
the desired option, and then tap on
.
[Picture No.], and then press
5 Tap onto select
the desired option.
on
6 Tap
operation.
63
to complete the
.
3 Tap on
on
after the completion
4 Tap
message appears.
CHAPTER 6: Other Settings
Making Backups and
Restoring the Song Library
Note: Be sure to use a USB HDD formatted in a
FAT32 file system in the following procedure. The
NTFS file system is not supported for this function.
steps 1 and 2 in “Making
1 Perform
Backups” above.
on
2 Tap
screen,
in the [System]
, and then
English
You can make a backup copy of the song libraries and
play lists, and restore the songs in the Disklavier. In order
to protect your valuable music data, Yamaha strongly
recommends that you backup your Mark IV hard drive on
a regular basis.
Restoring the Song Library
.
3 Tap on
.
4 Tap on
.
Making Backups
an external USB HDD to the
1 Connect
USB port on the Media Center.
on
2 Tap
and then
3
in the [Main] screen,
.
Tap on
screen,
in the [System]
, and then
.
4 Tap on
.
5 Tap on
.
The Disklavier will start restoring the song library.
5 Tap on
.
on
after the completion
6 Tap
message appears, and then
.
The Disklavier will start making backups.
on
after the completion
6 Tap
message appears, and then
.
64
CHAPTER 6: Other Settings
Restoring the Contents in the
Demo Album
2 Tap on
3 Tap on
on
4 Tap
operation.
in the [Main] screen,
.
To cancel erasure, tap on
to start restoring.
to complete the
Making an Install Floppy
Disk
In the case of updating the Disklavier, be sure to make a
install floppy disk.
in the [Main] screen,
.
a formatted floppy disk (2HD) to
2 Load
the drive. (→ pg. 20 “Loading and
Ejecting a Floppy Disk”)
.
The Disklavier will start making a backup floppy
disk.
on
, and then on
4 Tap
complete the operation.
65
.
.
.
3 Tap on
on
after the completion
4 Tap
message appears.
erased.
3 Tap on
“Quick Guide”), and then tap on
.
2 Tap on
.
Note: The contents saved in the demo album will be
on
1 Tap
and then on
You can format a floppy disk.
on in the [Main] screen
1 Tap
(→ pg. 12 “Selecting a Song” in
If the demo songs are erased by chance, they can be
restored by following the procedure below.
on
1 Tap
and then on
Formatting a Floppy Disk
to
CHAPTER 6: Other Settings
Resetting the Disklavier
To inactivate the ONE TOUCH button, select
[No Function] in step 2.
If you want to return your Disklavier to its initial factory
settings, follow the procedure below.
2 Tap on
in the [Main] screen,
.
.
Diagnosing the Disklavier
English
on
1 Tap
and then on
The piano diagnostics may be required as the occasion
demands. In such a case, follow the instructions of your
Yamaha dealer and perform the following procedure.
on
[Service Center] in the
1 Tap
[PRC-100 Menu] screen.
Tap to cancel resetting.
3 Tap on
on
4 Tap
operation.
to start resetting.
to complete the
on the desired option, and then
2 Tap
follow the instructions that appears
on the screen.
Assigning a Specific Function
to the ONE TOUCH Button
on
to return to the [PRC-100
3 Tap
Menu] screen.
You can assign the ONE TOUCH button on the cradle a
series of procedures for an often used function. The
followings are the available functions.
[REC]:
Sets the Disklavier in recording mode. (→
pg. 41)
[Performance]:
Turns on the Performance function. (→
pg. 37)
[Standby]: Turns off the Disklavier. (→ pg. 6 in
“Quick Guide”)
on
1 Tap
and then on
in the [Main] screen,
.
on [Function], press
to select
2 Tap
the desired option, and then on
.
on
3 Tap
operation.
to complete the
66
CHAPTER 6: Other Settings
Piano Voice List
The following table lists the voices in the internal tone
generator only for the piano playing in Quiet or
Headphone mode. For details on the voice selection, see
“Selecting the Voice in Quiet/Headphone Mode” on page
19 in “Quick Guide”.
Instrument
Group
Grand Piano
E.Piano
Electric Piano
Modern Electric Piano
DX Electric Piano
Galaxy Electric Piano
Vintage Electric Piano
Vibraphone
Vibraphone
Marimba
Celesta
Guitar
Bass
Church Organ Principal
Church Organ Flute
Church Organ Full
Drawbar Organ
Jazz Organ
Rotor Organ
Nylon Guitar
Steel Guitar
Acoustic Bass
Finger Bass
Fretless Bass
A.Bass and Cymbal
Strings
Strings 1
Strings 2
Synth Strings
Choir
Choir
Slow Choir
Scat
Pad
67
Grand Piano
Bright Piano
Mellow Piano
Harpsichord 4’
Harpsichord 4’+8’
Clavinet
Jazz Organ
AEM Brass
AEM Sax
Voice Name
Harpsichord
Church Organ
Instrument
Group
New Age Pad
Warm Pad
AEM Section
Voice Name
AEM-Trumpet 1
AEM-Trumpet 2
AEM-Trombone
AEM-Alt Sax 1
AEM-Alt Sax 2 (for Solo)
AEM-Tenor Sax
AEM-Baritone Sax
AEM-Brass Section
AEM-Sax Section
CHAPTER 6: Other Settings
Ensemble Part Playback
Voice List
Voice
Number
Piano
28
DX Electric Piano
29
Galaxy Elec. Piano
30
XG-E.Piano2
31
XG-El.Pno2K
32
XG-Chor.EP2
33
XG-DX Hard
34
XG-DXLegend
The following table lists the voices in the internal tone
generators for the ensemble part contained in the
PianoSoft·Plus, or for MIDI file playback on the
Disklavier or external MIDI device (synthesizer,
sequencer, etc.). (→ pg. 78 “Enhancing the Disklavier
Features by Hooking Up a MIDI Device”)
Group Name
Piano
Voice
Number
Voice Name
Voice Name
1
Grand Piano
35
XG-DX Phase
2
XG-GrandPno
36
XG-DX+Analg
3
XG-GrndPnoK
37
XG-DXKotoEP
4
Mellow Piano
38
XG-VX El.P2
5
XG-MelloGrP
39
Harpsichord 4'
6
XG-PianoStr
40
Harpsichord 4'+8'
7
XG-Dream
41
XG-Harpsi.
8
Bright Piano
42
XG-Harpsi.K
9
XG-BritePno
43
XG-Harpsi.2
10
XG-BritPnoK
44
XG-Harpsi.3
11
XG-E.Grand
45
Clavinet
12
XG-ElGrPnoK
46
XG-Clavi.
13
XG-Det.CP80
47
XG-Clavi. K
14
XG-ElGrPno1
48
XG-ClaviWah
15
XG-ElGrPno2
49
XG-PulseClv
16
XG-HnkyTonk
50
XG-PierceCl
17
XG-HnkyTnkK
51
Celesta
18
Electric Piano
52
XG-Celesta
19
Modern Elec. Piano
53
XG-Glocken
20
Vintage Elec. Piano
54
XG-MusicBox
21
XG-E.Piano1
55
XG-Orgel
22
XG-El.Pno1K
56
Vibraphone
23
XG-MelloEP1
57
XG-Vibes
24
XG-Chor.EP1
58
XG-VibesK
25
XG-HardEl.P
59
XG-HardVibe
26
XG-VX El.P1
60
Marimba
27
XG-60sEl.P
Percussion
English
Group Name
Continue to next page...
68
CHAPTER 6: Other Settings
Group Name
Voice
Number
Percussion
61
XG-Marimba
62
Organ
69
Voice Name
Group Name
Voice
Number
Organ
95
XG-RockOrgn
XG-MarimbaK
96
XG-RotaryOr
63
XG-SineMrmb
97
XG-SloRotar
64
XG-Balafon2
98
XG-FstRotar
65
XG-Log Drum
99
Ch. Organ Principal
66
XG-Xylophon
100
Ch. Organ Flute
67
XG-TubulBel
101
Ch. Organ Full
68
XG-ChrchBel
102
XG-ChrchOrg
69
XG-Carillon
103
XG-ChurOrg3
70
XG-Dulcimer
104
XG-ChurOrg2
71
XG-Dulcimr2
105
XG-NotreDam
72
XG-Cimbalom
106
XG-OrgFlute
73
XG-Santur
107
XG-TrmOrgFl
74
Drawbar Organ
108
XG-ReedOrgn
75
Jazz Organ
109
XG-Puff Org
76
XG-DrawOrgn
110
XG-Acordion
77
XG-DetDrwOr
111
XG-AccordIt
78
XG-60sDrOr1
112
XG-Harmnica
79
XG-60sDrOr2
113
XG-Harmo 2
80
XG-70sDrOr1
114
XG-TangoAcd
81
XG-DrawOrg2
115
XG-TngoAcd2
82
XG-60sDrOr3
116
Nylon Guitar
83
XG-EvenBar
117
XG-NylonGtr
84
XG-16+2"2/3
118
XG-NylonGt2
85
XG-Organ Ba
119
XG-NylonGt3
86
XG-70sDrOr2
120
XG-VelGtHrm
87
XG-CheezOrg
121
XG-Ukulele
88
XG-DrawOrg3
122
Steel Guitar
89
XG-PercOrgn
123
XG-SteelGtr
90
XG-70sPcOr1
124
XG-SteelGt2
91
XG-DetPrcOr
125
XG-12StrGtr
92
XG-LiteOrg
126
XG-Nyln&Stl
93
XG-PercOrg2
127
XG-Stl&Body
94
Rotor Organ
128
XG-Mandolin
Guitar
Voice Name
CHAPTER 6: Other Settings
Group Name
Voice
Number
Voice Name
Voice
Number
Guitar
129
XG-Jazz Gtr
130
Guitar
163
XG-Fretless
XG-MelloGtr
164
XG-Fretles2
131
XG-JazzAmp
165
XG-Fretles3
132
XG-CleanGtr
166
XG-Fretles4
133
XG-ChorusGt
167
XG-SynFretl
134
XG-Mute.Gtr
168
XG-Smooth
135
XG-FunkGtr1
169
XG-SlapBas1
136
XG-MuteStlG
170
XG-ResoSlap
137
XG-FunkGtr2
171
XG-PunchThm
138
XG-Jazz Man
172
XG-SlapBas2
139
XG-Ovrdrive
173
XG-VeloSlap
140
XG-Gt.Pinch
174
XG-SynBass1
141
XG-Dist.Gtr
175
XG-SynBa1Dk
142
XG-FeedbkGt
176
XG-FastResB
143
XG-FeedbGt2
177
XG-AcidBass
144
XG-GtrHarmo
178
XG-Clv Bass
145
XG-GtFeedbk
179
XG-TeknoBa
146
XG-GtrHrmo2
180
XG-Oscar
147
Acoustic Bass
181
XG-SqrBass
148
A.Bass and Cymbal
182
XG-RubberBa
149
XG-Aco.Bass
183
XG-Hammer
150
XG-JazzRthm
184
XG-SynBass2
151
XG-VXUprght
185
XG-MelloSB1
152
Finger Bass
186
XG-Seq Bass
153
XG-FngrBass
187
XG-ClkSynBa
154
XG-FingrDrk
188
XG-SynBa2Dk
155
XG-FlangeBa
189
XG-SmthBa 2
156
XG-Ba&DstEG
190
XG-ModulrBa
157
XG-FngrSlap
191
XG-DX Bass
158
XG-FngBass2
192
XG-X WireBa
159
XG-ModAlem
193
XG-Violin
160
XG-PickBass
194
XG-SlowVln
161
XG-MutePkBa
195
XG-Viola
162
Fretless Bass
Strings
Voice Name
English
Group Name
Continue to next page...
70
CHAPTER 6: Other Settings
Group Name
Voice
Number
Strings
196
XG-Cello
197
Ensemble
71
Voice Name
Group Name
Voice
Number
Ensemble
230
Slow Choir
XG-Contrabs
231
Scat
198
XG-Trem.Str
232
XG-ChoirAah
199
XG-SlowTrStr
233
XG-S.Choir
200
XG-Susp Str
234
XG-Ch.Aahs2
201
XG-Pizz.Str
235
XG-MelChoir
202
XG-Harp
236
XG-ChoirStr
203
XG-YangChin
237
XG-VoiceOoh
204
XG-Timpani
238
XG-SynVoice
205
Strings 1
239
XG-SynVox2
206
XG-Strings1
240
XG-Choral
207
XG-S.Strngs
241
XG-AnaVoice
208
XG-SlowStr
242
XG-Orch.Hit
209
XG-ArcoStr
243
XG-OrchHit2
210
XG-60sStrng
244
XG-Impact
211
XG-Orchestr
245
AEM-Trumpet 1
212
XG-Orchstr2
246
AEM-Trumpet 2
213
XG-TremOrch
247
XG-Trumpet
214
XG-VeloStr
248
XG-Trumpet2
215
Strings 2
249
XG-BriteTrp
216
XG-Strings2
250
XG-WarmTrp
217
XG-S.SlwStr
251
AEM-Trombone
218
XG-LegatoSt
252
XG-Trombone
219
XG-Warm Str
253
XG-Trmbone2
220
XG-Kingdom
254
XG-Tuba
221
XG-70s Str
255
XG-Tuba 2
222
XG-Str Ens3
256
XG-Mute.Trp
223
Synth Strings
257
XG-Fr.Horn
224
XG-Syn.Str1
258
XG-FrHrSolo
225
XG-ResoStr
259
XG-FrHorn2
226
XG-Syn Str4
260
XG-HornOrch
227
XG-SS Str
261
XG-BrasSect
228
XG-Syn.Str2
262
XG-Tp&TbSec
229
Choir
263
XG-BrssSec2
Brass
Voice Name
CHAPTER 6: Other Settings
Group Name
Voice
Number
Brass
264
XG-HiBrass
265
Pipe
Group Name
Voice
Number
Pipe
298
XG-Flute
XG-MelloBrs
299
XG-Recorder
266
XG-SynBras1
300
XG-PanFlute
267
XG-QuackBr
301
XG-Bottle
268
XG-RezSynBr
302
XG-Shakhchi
269
XG-PolyBrss
303
XG-Whistle
270
XG-SynBras3
304
XG-Ocarina
271
XG-JumpBrss
305
XG-SquareLd
272
XG-AnaVelBr
306
XG-Square 2
273
XG-AnaBrss1
307
XG-LMSquare
274
XG-SynBras2
308
XG-Hollow
275
XG-Soft Brs
309
XG-Shmoog
276
XG-SynBras4
310
XG-Mellow
277
XG-ChorBrss
311
XG-SoloSine
278
XG-VelBras2
312
XG-SineLead
279
XG-AnaBras2
313
XG-Saw.Lead
280
XG-SprnoSax
314
XG-Saw 2
281
AEM-Alto Sax 1
315
XG-ThickSaw
282
AEM-Alto Sax 2
316
XG-DynaSaw
283
XG-Alto Sax
317
XG-DigiSaw
284
XG-Sax Sect
318
XG-Big Lead
285
XG-HyprAlto
319
XG-HeavySyn
286
AEM-Tenor Sax
320
XG-WaspySyn
287
XG-TenorSax
321
XG-PulseSaw
288
XG-BrthTnSx
322
XG-Dr. Lead
289
XG-SoftTenr
323
XG-VeloLead
290
XG-TnrSax 2
324
XG-Seq Ana
291
AEM-Baritone Sax
325
XG-CaliopLd
292
XG-Bari.Sax
326
XG-Pure Pad
293
XG-Oboe
327
XG-Chiff Ld
294
XG-Eng.Horn
328
XG-Rubby
295
XG-Bassoon
329
XG-CharanLd
296
XG-Clarinet
330
XG-DistLead
297
XG-Piccolo
Synth Lead
Voice Name
English
Reed
Voice Name
Continue to next page...
72
CHAPTER 6: Other Settings
73
Group Name
Voice
Number
Voice Name
Group Name
Voice
Number
Synth Lead
331
XG-WireLead
332
Synth Lead
365
XG-Pan Pad
XG-Voice Ld
366
XG-Halo Pad
333
XG-SynthAah
367
XG-SweepPad
334
XG-VoxLead
368
XG-Shwimmer
335
XG-Fifth Ld
369
XG-Converge
336
XG-Big Five
370
XG-PolarPad
337
XG-Bass &Ld
371
XG-Celstial
338
XG-Big&Low
372
XG-Rain
339
XG-Fat&Prky
373
XG-ClaviPad
340
XG-SoftWurl
374
XG-HrmoRain
341
New Age Pad
375
XG-AfrcnWnd
342
XG-NewAgePd
376
XG-Caribean
343
XG-Fantasy2
377
XG-SoundTrk
344
Warm Pad
378
XG-Prologue
345
XG-Warm Pad
379
XG-Ancestrl
346
XG-ThickPad
380
XG-Crystal
347
XG-Soft Pad
381
XG-SynDrCmp
348
XG-SinePad
382
XG-Popcorn
349
XG-Horn Pad
383
XG-TinyBell
350
XG-RotarStr
384
XG-RndGlock
351
XG-PolySyPd
385
XG-GlockChi
352
XG-PolyPd80
386
XG-ClearBel
353
XG-ClickPad
387
XG-ChorBell
354
XG-Ana Pad
388
XG-SynMalet
355
XG-SquarPad
389
XG-SftCryst
356
XG-ChoirPad
390
XG-LoudGlok
357
XG-Heaven2
391
XG-XmasBell
358
XG-Itopia
392
XG-VibeBell
359
XG-CC Pad
393
XG-DigiBell
360
XG-BowedPad
394
XG-AirBells
361
XG-Glacier
395
XG-BellHarp
362
XG-GlassPad
396
XG-Gamelmba
363
XG-MetalPad
397
XG-Atmosphr
364
XG-Tine Pad
398
XG-WarmAtms
Synth
Effects
Voice Name
CHAPTER 6: Other Settings
Group Name
Voice
Number
Voice Name
Voice
Number
Synth
Effects
399
XG-HollwRls
400
XG-NylonEP
401
Synth
Effects
433
XG-Banjo
434
XG-MuteBnjo
XG-NylnHarp
435
XG-Rabab
402
XG-Harp Vox
436
XG-Gopichnt
403
XG-AtmosPad
437
XG-Oud
404
XG-Planet
438
XG-Shamisen
405
XG-Bright
439
XG-Koto
406
XG-FantaBel
440
XG-T.Koto
407
XG-Smokey
441
XG-Kanoon
408
XG-Goblins
442
XG-Kalimba
409
XG-GobSyn
443
XG-Bagpipe
410
XG-50sSciFi
444
XG-Fiddle
411
XG-Ring Pad
445
XG-Shanai
412
XG-Ritual
446
XG-Shanai2
413
XG-ToHeaven
447
XG-Pungi
414
XG-Night
448
XG-Hichriki
415
XG-Glisten
449
XG-TnklBell
416
XG-BelChoir
450
XG-Bonang
417
XG-Echoes
451
XG-Gender
418
XG-EchoPad2
452
XG-Gamelan
419
XG-Echo Pan
453
XG-S.Gamlan
420
XG-EchoBell
454
XG-Rama Cym
421
XG-Big Pan
455
XG-AsianBel
422
XG-SynPiano
456
XG-Agogo
423
XG-Creation
457
XG-SteelDrm
424
XG-Stardust
458
XG-GlasPerc
425
XG-Reso Pan
459
XG-ThaiBell
426
XG-Sci-Fi
460
XG-WoodBlok
427
XG-Starz
461
XG-Castanet
428
XG-Sitar
462
XG-TaikoDrm
429
XG-DetSitar
463
XG-Gr.Cassa
430
XG-Sitar 2
464
XG-MelodTom
431
XG-Tambra
465
XG-Mel Tom2
432
XG-Tamboura
Percussive
Voice Name
English
Group Name
Continue to next page...
74
CHAPTER 6: Other Settings
Group Name
Voice
Number
Percussive
466
XG-Real Tom
467
SFX Voice
75
Voice Name
Group Name
Voice
Number
Voice Name
SFX Voice
511
XG-WindChm
XG-Rock Tom
512
XG-Telphon2
468
XG-Syn.Drum
513
XG-CarEngin
469
XG-Ana Tom
514
XG-Car Stop
470
XG-ElecPerc
515
XG-Car Pass
471
XG-RevCymbl
516
XG-CarCrash
472
XG-FretNoiz
517
XG-Siren
473
XG-BrthNoiz
518
XG-Train
474
XG-Seashore
519
XG-Jetplane
475
XG-Tweet
520
XG-Starship
476
XG-Telphone
521
XG-Burst
477
XG-Helicptr
522
XG-Coaster
478
XG-Applause
523
XG-SbMarine
479
XG-Gunshot
524
XG-Laughing
491
XG-CuttngNz
525
XG-Scream
492
XG-CttngNz2
526
XG-Punch
493
XG-Str Slap
527
XG-Heart
494
XG-Fl.KClik
528
XG-FootStep
495
XG-Rain
529
XG-MchinGun
496
XG-Thunder
530
XG-LaserGun
497
XG-Wind
531
XG-Xplosion
498
XG-Stream
532
XG-FireWork
499
XG-Bubble
500
XG-Feed
501
XG-Dog
502
XG-Horse
503
XG-Bird
504
XG-Ghost
505
XG-Maou
506
XG-Tel.Dial
507
XG-DoorSqek
508
XG-Door Slam
509
XG-Scratch
510
XG-Scratch 2
CHAPTER 6: Other Settings
Drum Voice List
Vocal Harmony Type List
Group Name
Drum
Voice
Drum Voice Name
Number
The following table lists the available vocal harmony
types.
For details on the type selection, see “Applying an Effect
to Your Voice (Vocal Harmony)” on page 57.
Vocal Harmony
Type
Vocal Harmony
Mode
Instrument Scat
Vocoder
480
XG-StandKit
Octave Up Scat
Vocoder
481
XG-Stnd2Kit
Auto Key Harmony
Vocoder
482
XG-Room Kit
Auto Harmony-M
Vocoder
483
XG-Rock Kit
Auto Harmony-F
Vocoder
484
XG-ElectKit
Octave Up
Chromatic
485
XG-AnalgKit
Octave Down
Chromatic
486
XG-Jazz Kit
Country Quartet
Vocoder
487
XG-BrushKit
Closed Men Quartet
Vocoder
488
XG-ClascKit
Mix Acap Quartet
Vocoder
489
XG-SFX Kit1
Womem Choir
Vocoder
490
XG-SFX Kit2
Jazz Sisters
Vocoder
Standard Duet
Vocoder
Men Choir
Vocoder
Closed Choir
Vocoder
Girl in Duet
Vocoder
Speedy Mouse
Chromatic
High Male Quartet
Vocoder
Jazz Quartet
Vocoder
Mixed Choir
Vocoder
Country Girls
Vocoder
Sister Trio
Vocoder
Country Men
Vocoder
A Capella Boy
Vocoder
A Capella Mix
Vocoder
Gospel Diva
Vocoder
Lisa and Tina
Vocoder
Acap Mem Quartet
Vocoder
Jazz Mem Choir
Vocoder
English
The following table lists the drum voice in the internal
tone generators for MIDI file playback on the Disklavier
or external MIDI device (synthesizer, sequencer, etc.).
(→ pg. 78 “Enhancing the Disklavier Features by
Hooking Up a MIDI Device”)
Continue to next page...
76
CHAPTER 6: Other Settings
77
Vocal Harmony
Type
Vocal Harmony
Mode
Vocal Harmony
Type
Vocal Harmony
Mode
Jazz Closed Cho
Vocoder
ChromaticXG
Chromatic
Jazz Women Cho
Vocoder
Voice & Inst
Vocoder
Ladies Quartet
Vocoder
Sing B+G
Vocoder
Barber shop
Vocoder
Jazz Mixed Cho
Vocoder
Dream Girls
Vocoder
Sing the Bass
Chromatic
Falsetto Duet
Vocoder
Falsetto Trio
Vocoder
Falsetto Dia
Vocoder
Fal A Capella
Vocoder
Falsetto Jazz
Vocoder
2 Unison Low
Vocoder
3 Unison Low
Vocoder
Diatonic Jazz
Vocoder
Diatonic Girl
Vocoder
A Capella Dia
Vocoder
Chordal XG
Vocoder
Karaoke Auto
Vocoder
Karaoke Mode
Vocoder
Karaoke Girl
Vocoder
Karaoke Pitch
Vocoder
2 Unison High
Vocoder
3 Unison High
Vocoder
Vocoder Auto Upper
Vocoder
Vocoder Auto Lower
Vocoder
DetuneXG
Detune
VocoderXG
Vocoder
Vocoder Mode Upper
Vocoder
Vocoder Mode Lower
Vocoder
Vocoder Girl Upper
Vocoder
Vocoder Girl Lower
Vocoder
Vocoder PitchUpper
Vocoder
Vocoder PitchLower
Vocoder
CHAPTER
7
Enhancing the Disklavier Features by
Hooking Up a MIDI Device
Note: When you use the USB connection, it is
required to install the USB driver to the connected
device. In such a case, visit the following website and
download the driver.
English
MIDI (an acronym for Musical Instrument Digital
Interface) allows electronic device (synthesizers, etc.) to
interact and work in synchronization with other MIDI
compatible device. Disklavier enables you to enjoy a
variety of MIDI features by connecting a MIDI device or
computer to the Disklavier’s I/O Center.
http://www.global.yamaha.com/download/usb_midi/
Hooking Up a MIDI Device
MIDI device (Drum Machine, sequencer,
synthesizer, tone generator, etc.) or computer
To USB
port
To MIDI output
To MIDI
input
USB cable (not
supplied)
MIDI cable* (not
supplied)
I/O Center
* Be sure to use the commercially available MIDI cable
with the L-shaped connector on the I/O Center end.
78
CHAPTER 7: Enhancing the Disklavier Features by Hooking Up a MIDI Device
Setting Up the Disklavier for
MIDI Data Reception (MIDI
IN)
The Disklavier can play back the MIDI data being
received from the connected MIDI device as well as the
software loaded or stored in the Disklavier itself. The
following options should be set up in advance.
[Delay]
When the Disklavier receives two kinds of data (strong
and weak note) at the same time, the weak note sounds a
little bit later than the strong one due to the characteristics
of the Disklavier’s mechanism. To eliminate this delay in
the sound reproduction and the notes are sounded in
accurate timing at 500 millisecond after the data
reception, usually a delay is applied to the incoming
MIDI data.
[ON]:
Select this when you apply this delay to the
incoming MIDI data.
[OFF]:
Select this when you do not apply this
delay.
[Port]
Selects the terminal/port used for the data reception.
[MIDI]:
Select this when the MIDI device is
connected to MIDI IN terminal.
[USB]:
Select this when the MIDI device is
connected to USB port on the front of the
I/O Center.
on
1 Tap
and then on
in the [Main] screen,
.
[Piano Rcv Ch]
The MIDI data consists of multi channels that are
respectively assigned to a certain instrument’s part. This
option assigns the desired channel(s) to the piano part(s)
that is (are) played back on the Disklavier’s keyboard.
[##]:
Select this when you assign no channel to
the piano part.
[01] thru [16]:
Select the desired channel to which you
assign the piano part.
[HP]:
Select this when you assign the “01” and
“02” channels to the piano parts, and the
“03” channel to the pedal part.
[1+2]:
Select this when the “01” and “02”
channels are assigned to the piano parts.
[Prg]:
Selects the smallest number channel
assigned to the piano group voice (→ pg.
68) to be played on the Disklavier.
[Prg(All)]: Selects all channels assigned to the piano
group voice (→ pg. 68) to be played on the
Disklavier.
79
The MIDI screen
consists of three
screens. Tap on
or
switch the screen.
to
on [Port]/[Piano Rcv Ch]/[Delay],
2 Tap
and then press
to select the
desired option.
3 Tap on
to complete the setup.
CHAPTER 7: Enhancing the Disklavier Features by Hooking Up a MIDI Device
Setting Up the Disklavier for
MIDI Data Transmission (MIDI
OUT)
in the [Main] screen,
.
on
/
so that the
2 Tap
following screen appears.
English
The Disklavier can transmit the information of piano
playing/ensemble part playback on the Disklavier as the
MIDI data to the connected MIDI device to reproduce the
sound with its sound generator, etc. or to record the MIDI
data. The following options should be set up in advance.
on
1 Tap
and then on
[Port]
Selects the terminal/port used for the data transmission.
[MIDI]:
Select this when the MIDI device is
connected to MIDI OUT terminal.
[USB]:
Select this when the MIDI device is
connected to USB port on the front of the
I/O Center.
on [Port]/[Transmit]/[P-Part ESBL
3 Tap
Out], and then press
to select the
desired option.
[Transmit]
Selects one of the following parts to be transmitted to the
connected MIDI device.
4 Tap on
to complete the setup.
[ESBL Out]:Select this when you transmit the ensemble
part played back on the Disklavier.
[KBD Out]: Select this when you transmit the piano
part played on the Disklavier.
[P-Part ESBL Out]
Selects the channel(s) to which the piano part is assigned.
[ON]:
Select this when you assign the piano parts
to both the piano and the ensemble
channels at data transmission.
[OFF]:
Select this when you assign the piano parts
to only the piano channels at data
transmission.
80
CHAPTER 7: Enhancing the Disklavier Features by Hooking Up a MIDI Device
Setting Up the Disklavier for
Keyboard Playing Data
Transmission (KBD OUT)
Besides the [MIDI OUT] options, more detailed setups
for the keyboard playing data transmission is available.
The following options should be set up in advance.
[Out Ch]
[Split]
Sets the split point on the desired note that divides the
keyboard into left-hand and right-hand part. The selected
note and the notes lower than that note are assigned to the
channel set in [Out Ch] option, and the notes higher than
that note are assigned to the channel next to the channel
set in [Out Ch] option.
[A-1] thru [C7]:
Select the desired note as the split point.
[OFF]:
Assigns the piano part to the desired channels.
[##]:
Select this when you assign no channel to
the piano part.
[01] thru [16]:
Select the desired channel to which you
assign the piano part.
[HP]:
Select this when you transmit the ON/OFF
pedal data to the “01” and the half-pedal
data to the “03”. (This option is prepared
for the data format used on the former
version of the Disklavier.)
[Local]
Selects whether you reproduce or not the piano part
playing with the Disklavier’s internal tone generator.
[ON]:
Select this when you reproduce the piano
part with the Disklavier’s internal tone
generator.
[OFF]:
Select this when you reproduce the song
(played on the Disklavier) on the external
MIDI device. This option inactivates the
internal tone generator to prevent both the
internal and external tone generator sound
at the same time.
Select this when you assign all the notes to
one channel.
[Trans L]
Transposes the left-hand part to the desired key at
transmission.
[Trans R]
Transposes the right-hand part to the desired key at
transmission.
on
1 Tap
and then on
in the [Main] screen,
.
on
/
so that the
2 Tap
following screen appears.
on [Out Ch]/[Local]/[Split]/[Trans
3 Tap
L]/[Trans R], and then press
to
select/adjust the selected option.
on
4 Tap
operation.
81
to complete the
CHAPTER
8
Troubleshooting
The Disklavier does not turned on.
• Make sure that the Power Supply unit is securely
connected to an AC wall outlet with the supplied power
cord. (→ pg. 14)
• Make sure that the Mains switches on both the Power
Supply unit and the I/O Center are turned on.
• When the
does not light green and stays
flashing green several minutes after the I/O Center is
turned on, turn the Power Supply unit off, wait
approximately 10 seconds or more, and then turn the
unit back on. (→ pg. 4 “Turning the Disklavier On” in
“Quick Guide”)
No sound is heard from the supplied
Monitor speakers.
• Make sure the Monitor speakers’ AC power cables are
connected to the SWITCHED AC outlets on the Power
Supply unit.
• Make sure that the POWER switches on both Monitor
speakers are turned on.
• Make sure the Monitor speakers are connected to the
OUTPUT jacks on the I/O Center with the supplied
speaker cords. (→ pg. 13)
• Make sure that the overall volume is adequately turned
up on the Pocket Controller. (→ pg. 12 “Adjusting the
Overall Volume” in “Quick Guide”)
• In Quiet mode, no sound is heard other than the solo
piano sound during playback of a PianoSoft Solo song.
English
If you are having difficulty operating your Disklavier, see
if any of the symptoms listed below apply to your
problem and follow the recommended remedy.
• The Monitor speakers are not supplied with the
Disklavier PRO Series. In such a case, prepare active
speakers equivalent to the Monitor speakers supplied
with the Mark IV Series. (→ pg. 93 “Specifications”)
The Disklavier cannot be controlled on the
Pocket Controller.
• The Pocket Controller is beyond the maximum
operating range (approx. 20 m (65.6 ft.)). In such a
case, move closer to the Disklavier.
• Make sure that the CF wireless LAN card is securely
inserted into the Pocket Controller’s CF card slot.
When you reinsert the card, be sure to reboot the
Pocket Controller. (→ pg. 17)
The Disklavier does not read a song file.
• The maximum number of the readable files in an album
(folder) is 999.
• Make sure that the name of the SMF song has an
extension as “.MID”/“.mid” and the E-SEQ song has
“.FIL”/“.fil”.
The playback order differs from the order
on another device.
• The playback order depends on the recording software
or other factors. Naming the file starting from numbers
such as 01, 02, etc. may solve the problem.
• Make sure that the volume adjusted in [Balance] screen
is adequately turned up on the Pocket Controller. (→
pg. 25 “Adjusting the Volume Balance among the
Keyboard Playing, Ensemble Sound, Software
Playback, and Microphone’s Input”)
Continue to next page...
82
CHAPTER 8: Troubleshooting
The Disklavier does not recognize an USB
flash memory.
• The Disklavier restricts the usage of the USB flash
memories to seven identical ones by recognizing the ID
information of the memories that have been inserted to
the USB
port. (→ pg. 2) If you use USB flash
memories other than the ones already recognized, shut
down the Disklavier once before using them.
• Certain USB storage devices may not function properly
with the Disklavier PRO/Mark IV Series. For a list of
compatible products, please visit
www.yamaha.com/disklavier.
The Disklavier does not read a CD-R/-RW.
• The song files should be formatted in ISO 9660
LEVEL1. The Disklavier may not read song files other
than this format.
Some notes drop out during playback.
• In Acoustic mode, when a piano song is played back at
a low volume, some notes in trill or tranquil part may
drop out. This is a characteristic of the Disklavier and
not a malfunction.
PianoSmart playback cannot be performed.
• Makes sure that the numbers indicated on both the
SmartPianoSoft floppy disk and the paired CD are the
same.
The I/O Center becomes hot.
• Although the chassis of the I/O Center may become hot
while the Disklavier is turned on (also in Standby
mode), this is not a malfunction.
Noise is heard from the I/O Center.
• The I/O Center contains HDD (Hard Disk Drive) and
the HDD makes a disk spinning noise. This is not a
malfunction.
83
CHAPTER
9
Error Messages
While operating your Disklavier, an error message may appear in the display. If an error message appears, refer to the
table below for an explanation of the message.
Error Messages
Description
You tried to copy copy-protected
song files into a removable medium.
CANNOT EXECUTE PROTECTED FILE
The commercially available copy-protected song
files cannot be copied into any removable media.
You tried to copy song files into an
album that already contains 3,000
song files.
CANNOT EXECUTE Exceeds limit of 3,000
songs
The maximum number of the files in an album
(folder) is 3,000.
You tried to copy song files into a
library that already contains 10,000
songs.
CANNOT EXECUTE Exceeds limit of 10,000
songs
The maximum number of songs in a library or
playlist is limited to 10,000.
You tried to copy song files into a
certain medium.
NOT ENOUGH DISK
SPACE
The storage space in the destination medium is not
enough.
You tried to erase entire contents in
a floppy disk. ([Delete All])
CANNOT EXECUTE DISK FORMAT
The floppy disk is not formatted in MS-DOS. In
such a case, reformat on a Windows PC.
CANNOT EXECUTE PROTECTED FILE
EXIST
When the floppy disk contains copy-protected
song files, this function cannot be executed.
CANNOT EXECUTE NOT 2DD DISK
The destination floppy disk must be 2DD.
CANNOT EXECUTE Exceeds limit of 60 songs
The maximum number of songs on an E-SEQ type
disk is limited to 60.
You tried to copy an album to a
floppy disk in E-SEQ (Piano1)
format.
English
Situation
84
CHAPTER
10
Screen Transition Diagrams
[Main] screens
(→ pg. 9 in “Quick Guide”,
and 37, 41)
85
(→ pg. 6, 7, 9 in “Quick Guide”, and
37, 55, 57, 59, 62 – 66, 79 – 81)
CHAPTER 10: Screen Transition Diagrams
[Rec] screens
English
L/R (Piano) mode
(→ pg. 41)
Ensemble mode
(→ pg. 45)
Time mode
(→ pg. 50)
Metronome mode
(→ pg. 50)
Time mode
(→ pg. 47)
Metronome mode
(→ pg. 47, 49)
86
CHAPTER 10: Screen Transition Diagrams
[Song] screens
(→ pg. 15 in “Quick Guide”)
(→ pg. 24)
(→ pg. 23)
(→ pg. 31)
PianoSmart manual adjustment
screen*
(only for PianoSmart playback)
* For normal use, modification of these
setups are not required.
87
(→ pg. 34)
(→ pg. 32)
CHAPTER 10: Screen Transition Diagrams
[Song] playback option buttons
English
(→ pg. 22)
(→ pg. 23, 55)
(→ pg. 44, 57)
Playback option buttons
[Setup] menu screens
(→ pg. 39, 40, 43, 57,
59, 62, 66, 79 – 81)
(→ pg. 55, 63, 65, 66)
88
CHAPTER 10: Screen Transition Diagrams
[Setup] option screens
(→ pg. 61)
(→ pg. 43)
(→ pg. 79)
(→ pg. 63)
(→ pg. 55)
(→ pg. 64)
(→ pg. 65, 66)
89
CHAPTER 10: Screen Transition Diagrams
English
(→ pg. 80)
(→ pg. 81)
(→ pg. 59)
(→ pg. 40)
(→ pg. 66)
(→ pg. 57)
(→ pg. 39)
90
CHAPTER
11
Glossary
This glossary provides basic definitions of terms used frequently in Disklavier manuals.
Clavinova™
Incremental Pedal
A series of Yamaha digital pianos.
Piano pedals are not always completely up or down and
may be held somewhere in-between. Using incremental
pedal data (also called continuous or half pedal data) the
Disklavier precisely records the up and down movement
of the piano pedals.
Continuous Pedal
See “Incremental Pedal”.
Ensemble Song
A song which contains piano parts and accompanying
instrumental voices. An Ensemble song contains the
same left and right-hand parts as an L/R song, and in
addition, up to 13 accompanying instrument tracks.
These extra tracks are played by the internal XG tone
generator. The accompanying tracks may be used for
acoustic bass, drums, strings, vibes, etc.
L/R Song
In a L/R song, the left-hand piano part is stored on track
1 (L) and the right-hand piano part is stored on track 2
(R). During playback you can cancel either part, and then
play that part yourself. When recording an L/R song, you
can record the two parts simultaneously or separately.
MIDI
E-SEQ Song Format
A song file format developed by Yamaha for saving
songs.
An acronym for Musical Instrument Digital Interface.
MIDI allows electronic musical instruments to
communicate with each other.
Floppy Disk
Piano Parts
The magnetic storage medium that the Disklavier uses to
save songs. The Disklavier uses the 3.5 inch 2DD and
2HD floppy disks commonly used for computers.
Refers to the left- and right-hand piano parts of a song.
The left-hand piano part is recorded onto track 1 and the
right-hand piano part is recorded onto track 2. These
track assignments are the default settings and can be
changed.
General MIDI (GM)
An addition to the MIDI standard that simplifies the
transfer of MIDI song files between instruments of
different manufacturers. A MIDI song recorded using a
GM compatible tone generator should play back
correctly when used with any GM compatible tone
generator. The standard specifies that a GM compatible
tone generator must support 24-note polyphony, 16 parts,
and 128 standard voices.
PianoSoft™
The PianoSoft Disk Collection is a library of prerecorded
song disks made by Yamaha specifically for use with the
Disklavier.
PianoSoft·Plus™
PianoSoft·Plus disks contain Ensemble songs that can be
played on the Disklavier.
Half Pedal
See “Incremental Pedal”.
Polyphony
The maximum number of voices (or sounds) that can be
produced at a time from MIDI instruments.
91
CHAPTER 11: Glossary
Quiet Mode
TG Master Tune
A Silent system mode in which sound is output through
the speakers, enabling you to freely adjust the volume of
the piano.
The function that allows you to tune the internal XG tone
generator, and if connected, an external tone generator
simultaneously so that their tunings match that of the
Disklavier.
Reverb
Tone Generator
Rhythm Track
Transpose
Tracks of an ensemble song designated for the
accompanying rhythm. The rhythm track is unaffected by
the playback transposition function.
Changing the key of a song. For example, a song in the
key of C is transposed to the key of D when it is moved
up two semitones.
Sequencer
Velocity
A sequencer can be used with the Disklavier to play back
and record MIDI data.
Because the loudness of a piano note is determined by the
speed (velocity) with which a string is struck by a
hammer, note loudness is referred to as velocity.
English
Short for “reverberation.” The effect that adds a more
realistic feel to a sound by simulating the reflection of the
sound in rooms and halls of various sizes.
An electronic device that can generate tones or
instrument voices.
Smart PianoSoft™
Software made by Yamaha containing MIDI signals for
playing back along with standard audio CDs.
Voice
The sounds produced by a tone generator expressing
various instruments.
SMF
Abbreviation for Standard MIDI File.
SMF Song Format
A song file format supported by MIDI sequencers and
music software.
Song
Normally, a short piece of music with lyrics. However,
for clarity in Disklavier manuals, the term is used to refer
to any piece of music of any genre.
XG
Yamaha XG is an extension of the GM (General MIDI)
format. Its greater polyphony, more voices, and use of
effects enhances the compatibility between MIDI
devices. When a song in the Yamaha XG format is played
on another XG-compatible tone generator or synthesizer,
it plays and sounds as the original composer/creator
intended.
Sound Muting Mode
Yamaha’s innovative system in which a tap of
keeps the hammers from striking the strings, effectively
silencing the acoustic piano. Sound is sent to the digital
piano tone generator and output through the speakers
(Quiet mode) or headphones (Headphone mode).
Standard MIDI File (SMF)
A file of MIDI data that can be read and used by a number
of different MIDI devices and computers.
92
CHAPTER
12
Specifications
General
Sensor System
Key Sensors
Noncontact optical fiber/grayscale shutter sensing system for 88 keys (senses
the key position, keying velocity, and key releasing velocity)
Hammer Sensors*
Noncontact optical fiber/grayscale shutter sensing system
* Equipped with the C3 grand
piano or higher specification
models only.
Pedal Sensors
Noncontact digital optical sensing system (senses the pedal position*)
* Continuous sensing for the damper and soft pedals, and on/off sensing for the
sostenuto pedal.
Drive System
Keys
DSP servo drive system (high-power servocontrolled solenoids with
supersensitive magnetic sensor*)
* The supersensitive magnetic sensor is only for the PRO Series.
Pedals
DSP servo drive system (servocontrolled solenoids)
Internal HDD
80 GB
File Format
Standard MIDI File (SMF) FORMAT 0/1, E-SEQ
Compact Disc
Yamaha PianoSoft·PlusAudio, audio CD (ISO 9600-compliant), Data CD
(ISO 9660 Level1-compliant)
Floppy Disk
3.5” 2DD (720 KB) or 2HD (1.44 MB) floppy disk
USB Flash Memory
Yamaha does not assure the operation of all the commercially available USB
flash memories. For a list of compatible products, please visit
www.yamaha.com/disklavier.
USB Hard Disk Drive
FAT32 format
Drive
CD and floppy disk drive
Dimensions (W × H × D)
405 × 257 × 73 mm (16 × 10 1/8 × 2 7/8 in.)
Weight
3.3 kg (7.3 lb.)
Dimensions (W × H × D)
74 × 138 × 23 mm (2 15/16 × 5 7/16 × 15/16 in.)
Weight
210 g (7.4 oz.) (not incl. screen protector, wireless LAN card, incl.
rechargeable battery)
Monitor Speakers*
Rated Power Output
20W × 2 with tone and volume controls
* Supplied only with
the Mark IV Series.
Drivers
16 cm (6 5/16 in.) woofer × 2, 2.5 cm (1 in.) tweeter × 2
Dimensions (W × H × D)
144 × 236 × 167 mm (5 11/16 × 9 5/16 × 6 5/8 in.)
Data Storage
Removable Media
Media Center
Pocket Controller
Weight
Standard mode (Mark IV Series), XP mode (PRO Series)
Pitch Control
Set at A=440 Hz, tunable ±50 cents in 1 cent increment
Silencing Mechanism
Motor-driven hammer shank stopper
Piano Voice and
Performance Tone
93
4.4 kg (9.7 lb.)
Record/Playback Mode
Type
AWM2/Articulation Element Modeling (AEM)
Polyphony
64 notes digital stereo sampling (90 MB wave memory, 16 bit linear)
(AWM2)/ 6 notes Articulation Element Modeling (AEM)
Normal Voices
Piano (digital stereo sampling) and other 42 voices
CHAPTER 12: Specifications
Ensemble Tone
Type
Advanced Wave Memory 2 (AWM2)
Polyphony
32 notes (max.)
Ensemble Parts
16 parts
Voice Module Modes
XG, GM
Normal Voices
676
Drum Voices
21 kits
Local AC current, 100 – 240 V, 50/60 Hz
Power Consumption
180 W
Supplied Accessories
Media Center (1), Installation kit for the Media Center (1 set), Monitor
speaker (2)*, Installation kit for the Monitor speaker (1 set)*, Speaker cord
(2)*, Pocket Controller PRC-100 (1), CF wireless LAN card (2),
Rechargeable battery EA-BL08 (1), Cradle (1), AC adaptor EA-70 (1), AC
power cord (1), Advanced Operating Manual (this book), (1), Quick Guide
(1), Stereo headphones (1 set)
English
Power Source
* Supplied only with the Mark IV Series.
Optional Accessories
HPE-170 headphones
Features
Playback Features
Piano Playing
Features
Media Select
Floppy disk, CD, USB media, internal HDD
Arrangement of Songs
Song Libraries (PianoSoft Library, User Library, CD Library) → pg. 9 in
“Quick Guide”
Polyphony
32 keys (PRO Series), 16 keys (Mark IV Series)
Volume
128 levels
Repeat
ALL (all songs in current album), RPT (current song), RND (all songs in
current album in random order), A-B repeat
Programming
Play Lists feature
Part cancel
L (left), R (right), Pedal, Accompaniment
Tempo
-50 to +20% in 1% increment
Transposition
±24 semitones (2 octaves) in 1 semitone increment
Balance
Volume balances among Voice (digital piano sound), TG (ensemble sound),
Audio (accompaniment or standard audio sound on a CD), and MIC
(microphone input)
Track Voice changing
→ pg. 26
Track Editing
Mix, Move, Copy, Delete, Transpose → pg. 28
SmartKey
→ pg. 35
SmartPiano
→ pg. 36
Video Synchronization
→ pg. 36
Metronome
→ pg. 37
AEM Articulation
Head (blow-up), Joint, Tail (fall-down)
Harmony
→ pg. 39
Reverb
Hall1, 2, Room1, 2, 3, Stage1, 2, Plate (with 0 to 128 depth control)
Continue to next page...
94
CHAPTER 12: Specifications
Recording Features Overwrite Recording
Other Features
→ pg. 42
Video Synchronization
→ pg. 43
Ensemble Part Recording
→ pg. 45
Overdubbing
→ pg. 47
Metronome Mode
Recording
→ pg. 48
Quantize
→ pg. 49
Tempo Changing
→ pg. 50
Timer Play
→ pg. 55
Vocal Harmony
→ pg. 57
Foot control/switch
→ pg. 59
XP Strip
→ pg. 63
Backup
→ pg. 64
One Touch Button
→ pg. 66
Specifications are subject to change without prior notice.
95
Appendix
Appendix
GNU GENERAL PUBLIC LICENSE
Version 2, June 1991
Copyright © 1989, 1991 Free Software Foundation, Inc.
59 Temple Place, Suite 330, Boston, MA 02111-1307 USA
Everyone is permitted to copy and distribute verbatim copies of this license document, but changing it is not allowed.
When we speak of free software, we are referring to
freedom, not price. Our General Public Licenses are
designed to make sure that you have the freedom to
distribute copies of free software (and charge for this
service if you wish), that you receive source code or can
get it if you want it, that you can change the software or
use pieces of it in new free programs; and that you know
you can do these things.
To protect your rights, we need to make restrictions that
forbid anyone to deny you these rights or to ask you to
surrender the rights. These restrictions translate to
certain responsibilities for you if you distribute copies of
the software, or if you modify it.
For example, if you distribute copies of such a program,
whether gratis or for a fee, you must give the recipients
all the rights that you have. You must make sure that
they, too, receive or can get the source code. And you
must show them these terms so they know their rights.
We protect your rights with two steps: (1) copyright the
software, and (2) offer you this license which gives you
legal permission to copy, distribute and/or modify the
software.
Also, for each author’s protection and ours, we want to
make certain that everyone understands that there is no
warranty for this free software. If the software is
modified by someone else and passed on, we want its
recipients to know that what they have is not the original,
so that any problems introduced by others will not reflect
on the original authors’ reputations.
Finally, any free program is threatened constantly by
software patents. We wish to avoid the danger that
redistributors of a free program will individually obtain
patent licenses, in effect making the program proprietary.
To prevent this, we have made it clear that any patent
must be licensed for everyone’s free use or not licensed
at all.
The precise terms and conditions for copying,
distribution and modification follow.
GNU GENERAL PUBLIC LICENSE
TERMS AND CONDITIONS FOR COPYING, DISTRIBUTION AND MODIFICATION
0. This License applies to any program or other work
which contains a notice placed by the copyright
holder saying it may be distributed under the terms of
this General Public License. The “Program”, below,
refers to any such program or work, and a “work
based on the Program” means either the Program or
any derivative work under copyright law: that is to
say, a work containing the Program or a portion of it,
either verbatim or with modifications and/or
translated into another language. (Hereinafter,
translation is included without limitation in the term
“modification”.) Each licensee is addressed as “you”.
Activities other than copying, distribution and
modification are not covered by this License; they are
outside its scope. The act of running the Program is
not restricted, and the output from the Program is
covered only if its contents constitute a work based on
the Program (independent of having been made by
Continue to next page...
A-1
Appendix
Preamble
The licenses for most software are designed to take away
your freedom to share and change it. By contrast, the
GNU General Public License is intended to guarantee
your freedom to share and change free software--to make
sure the software is free for all its users. This General
Public License applies to most of the Free Software
Foundation’s software and to any other program whose
authors commit to using it. (Some other Free Software
Foundation software is covered by the GNU Library
General Public License instead.) You can apply it to your
programs, too.
running the Program). Whether that is true depends
on what the Program does.
1. You may copy and distribute verbatim copies of the
Program’s source code as you receive it, in any
medium, provided that you conspicuously and
appropriately publish on each copy an appropriate
copyright notice and disclaimer of warranty; keep
intact all the notices that refer to this License and to
the absence of any warranty; and give any other
recipients of the Program a copy of this License along
with the Program.
You may charge a fee for the physical act of
transferring a copy, and you may at your option offer
warranty protection in exchange for a fee.
2. You may modify your copy or copies of the Program
or any portion of it, thus forming a work based on the
Program, and copy and distribute such modifications
or work under the terms of Section 1 above, provided
that you also meet all of these conditions:
a)You must cause the modified files to carry
prominent notices stating that you changed the files
and the date of any change.
b)You must cause any work that you distribute or
publish, that in whole or in part contains or is
derived from the Program or any part thereof, to be
licensed as a whole at no charge to all third parties
under the terms of this License.
c)If the modified program normally reads commands
interactively when run, you must cause it, when
started running for such interactive use in the most
ordinary way, to print or display an announcement
including an appropriate copyright notice and a
notice that there is no warranty (or else, saying that
you provide a warranty) and that users may
redistribute the program under these conditions,
and telling the user how to view a copy of this
License. (Exception: if the Program itself is
interactive but does not normally print such an
announcement, your work based on the Program is
not required to print an announcement.)
These requirements apply to the modified work as a
whole. If identifiable sections of that work are not
derived from the Program, and can be reasonably
considered independent and separate works in
themselves, then this License, and its terms, do not apply
to those sections when you distribute them as separate
works. But when you distribute the same sections as part
of a whole which is a work based on the Program, the
distribution of the whole must be on the terms of this
License, whose permissions for other licensees extend to
A-2
the entire whole, and thus to each and every part
regardless of who wrote it.
Thus, it is not the intent of this section to claim rights or
contest your rights to work written entirely by you;
rather, the intent is to exercise the right to control the
distribution of derivative or collective works based on the
Program.
In addition, mere aggregation of another work not based
on the Program with the Program (or with a work based
on the Program) on a volume of a storage or distribution
medium does not bring the other work under the scope of
this License.
3. You may copy and distribute the Program (or a work
based on it, under Section 2) in object code or
executable form under the terms of Sections 1 and 2
above provided that you also do one of the following:
a)Accompany it with the complete corresponding
machine-readable source code, which must be
distributed under the terms of Sections 1 and 2
above on a medium customarily used for software
interchange; or,
b)Accompany it with a written offer, valid for at least
three years, to give any third party, for a charge no
more than your cost of physically performing
source distribution, a complete machine-readable
copy of the corresponding source code, to be
distributed under the terms of Sections 1 and 2
above on a medium customarily used for software
interchange; or,
c)Accompany it with the information you received as
to the offer to distribute corresponding source code.
(This alternative is allowed only for
noncommercial distribution and only if you
received the program in object code or executable
form with such an offer, in accord with Subsection
b above.)
The source code for a work means the preferred form of
the work for making modifications to it. For an
executable work, complete source code means all the
source code for all modules it contains, plus any
associated interface definition files, plus the scripts used
to control compilation and installation of the executable.
However, as a special exception, the source code
distributed need not include anything that is normally
distributed (in either source or binary form) with the
major components (compiler, kernel, and so on) of the
operating system on which the executable runs, unless
that component itself accompanies the executable.
If distribution of executable or object code is made by
offering access to copy from a designated place, then
offering equivalent access to copy the source code from
the same place counts as distribution of the source code,
even though third parties are not compelled to copy the
source along with the object code.
4. You may not copy, modify, sublicense, or distribute
the Program except as expressly provided under this
License. Any attempt otherwise to copy, modify,
sublicense or distribute the Program is void, and will
automatically terminate your rights under this
License. However, parties who have received copies,
or rights, from you under this License will not have
their licenses terminated so long as such parties
remain in full compliance.
6. Each time you redistribute the Program (or any work
based on the Program), the recipient automatically
receives a license from the original licensor to copy,
distribute or modify the Program subject to these
terms and conditions. You may not impose any
further restrictions on the recipients’ exercise of the
rights granted herein. You are not responsible for
enforcing compliance by third parties to this License.
7. If, as a consequence of a court judgment or allegation
of patent infringement or for any other reason (not
limited to patent issues), conditions are imposed on
you (whether by court order, agreement or otherwise)
that contradict the conditions of this License, they do
not excuse you from the conditions of this License. If
you cannot distribute so as to satisfy simultaneously
your obligations under this License and any other
pertinent obligations, then as a consequence you may
not distribute the Program at all. For example, if a
patent license would not permit royalty-free
redistribution of the Program by all those who receive
copies directly or indirectly through you, then the
only way you could satisfy both it and this License
would be to refrain entirely from distribution of the
Program.
If any portion of this section is held invalid or
unenforceable under any particular circumstance, the
It is not the purpose of this section to induce you to
infringe any patents or other property right claims or to
contest validity of any such claims; this section has the
sole purpose of protecting the integrity of the free
software distribution system, which is implemented by
public license practices. Many people have made
generous contributions to the wide range of software
distributed through that system in reliance on consistent
application of that system; it is up to the author/donor to
decide if he or she is willing to distribute software
through any other system and a licensee cannot impose
that choice.
This section is intended to make thoroughly clear what is
believed to be a consequence of the rest of this License.
8. If the distribution and/or use of the Program is
restricted in certain countries either by patents or by
copyrighted interfaces, the original copyright holder
who places the Program under this License may add
an explicit geographical distribution limitation
excluding those countries, so that distribution is
permitted only in or among countries not thus
excluded. In such case, this License incorporates the
limitation as if written in the body of this License.
9. The Free Software Foundation may publish revised
and/or new versions of the General Public License
from time to time. Such new versions will be similar
in spirit to the present version, but may differ in detail
to address new problems or concerns.
Each version is given a distinguishing version number. If
the Program specifies a version number of this License
which applies to it and “any later version”, you have the
option of following the terms and conditions either of that
version or of any later version published by the Free
Software Foundation. If the Program does not specify a
version number of this License, you may choose any
version ever published by the Free Software Foundation.
10. If you wish to incorporate parts of the Program into
other free programs whose distribution conditions are
different, write to the author to ask for permission.
For software which is copyrighted by the Free
Software Foundation, write to the Free Software
Foundation; we sometimes make exceptions for this.
Our decision will be guided by the two goals of
preserving the free status of all derivatives of our free
software and of promoting the sharing and reuse of
software generally.
Continue to next page...
A-3
Appendix
5. You are not required to accept this License, since you
have not signed it. However, nothing else grants you
permission to modify or distribute the Program or its
derivative works. These actions are prohibited by law
if you do not accept this License. Therefore, by
modifying or distributing the Program (or any work
based on the Program), you indicate your acceptance
of this License to do so, and all its terms and
conditions for copying, distributing or modifying the
Program or works based on it.
balance of the section is intended to apply and the section
as a whole is intended to apply in other circumstances.
NO WARRANTY
11. BECAUSE THE PROGRAM IS LICENSED FREE
OF CHARGE, THERE IS NO WARRANTY FOR
THE PROGRAM, TO THE EXTENT PERMITTED
BY APPLICABLE LAW. EXCEPT WHEN
OTHERWISE STATED IN WRITING THE
COPYRIGHT HOLDERS AND/OR OTHER
PARTIES PROVIDE THE PROGRAM “AS IS”
WITHOUT WARRANTY OF ANY KIND, EITHER
EXPRESSED OR IMPLIED, INCLUDING, BUT
NOT LIMITED TO, THE IMPLIED WARRANTIES
OF MERCHANTABILITY AND FITNESS FOR A
PARTICULAR PURPOSE. THE ENTIRE RISK AS
TO THE QUALITY AND PERFORMANCE OF
THE PROGRAM IS WITH YOU. SHOULD THE
PROGRAM PROVE DEFECTIVE, YOU ASSUME
THE COST OF ALL NECESSARY SERVICING,
REPAIR OR CORRECTION.
12. IN NO EVENT UNLESS REQUIRED BY
APPLICABLE LAW OR AGREED TO IN
WRITING WILL ANY COPYRIGHT HOLDER,
OR ANY OTHER PARTY WHO MAY MODIFY
AND/OR REDISTRIBUTE THE PROGRAM AS
PERMITTED ABOVE, BE LIABLE TO YOU FOR
DAMAGES, INCLUDING ANY GENERAL,
SPECIAL, INCIDENTAL OR CONSEQUENTIAL
DAMAGES ARISING OUT OF THE USE OR
INABILITY TO USE THE PROGRAM
(INCLUDING BUT NOT LIMITED TO LOSS OF
DATA OR DATA BEING RENDERED
INACCURATE OR LOSSES SUSTAINED BY
YOU OR THIRD PARTIES OR A FAILURE OF
THE PROGRAM TO OPERATE WITH ANY
OTHER PROGRAMS), EVEN IF SUCH HOLDER
OR OTHER PARTY HAS BEEN ADVISED OF
THE POSSIBILITY OF SUCH DAMAGES.
GNU LESSER GENERAL PUBLIC LICENSE
Version 2.1, February 1999
Copyright © 1991, 1999 Free Software Foundation, Inc.
59 Temple Place, Suite 330, Boston, MA 02111-1307 USA
Everyone is permitted to copy and distribute verbatim copies of this license document, but changing it is not allowed.
[This is the first released version of the Lesser GPL. It also counts as the successor of the GNU Library Public License,
version 2, hence the version number 2.1.]
Preamble
The licenses for most software are designed to take away
your freedom to share and change it. By contrast, the
GNU General Public Licenses are intended to guarantee
your freedom to share and change free software--to make
sure the software is free for all its users.
This license, the Lesser General Public License, applies
to some specially designated software packages-typically libraries--of the Free Software Foundation and
other authors who decide to use it. You can use it too, but
we suggest you first think carefully about whether this
license or the ordinary General Public License is the
better strategy to use in any particular case, based on the
explanations below.
When we speak of free software, we are referring to
freedom of use, not price. Our General Public Licenses
are designed to make sure that you have the freedom to
distribute copies of free software (and charge for this
service if you wish); that you receive source code or can
get it if you want it; that you can change the software and
use pieces of it in new free programs; and that you are
informed that you can do these things.
A-4
To protect your rights, we need to make restrictions that
forbid distributors to deny you these rights or to ask you
to surrender these rights. These restrictions translate to
certain responsibilities for you if you distribute copies of
the library or if you modify it.
For example, if you distribute copies of the library,
whether gratis or for a fee, you must give the recipients
all the rights that we gave you. You must make sure that
they, too, receive or can get the source code. If you link
other code with the library, you must provide complete
object files to the recipients, so that they can relink them
with the library after making changes to the library and
recompiling it. And you must show them these terms so
they know their rights.
We protect your rights with a two-step method: (1) we
copyright the library, and (2) we offer you this license,
which gives you legal permission to copy, distribute and/
or modify the library.
To protect each distributor, we want to make it very clear
that there is no warranty for the free library. Also, if the
library is modified by someone else and passed on, the
recipients should know that what they have is not the
original version, so that the original author’s reputation
will not be affected by problems that might be introduced
by others.
Finally, software patents pose a constant threat to the
existence of any free program. We wish to make sure that
a company cannot effectively restrict the users of a free
program by obtaining a restrictive license from a patent
holder. Therefore, we insist that any patent license
obtained for a version of the library must be consistent
with the full freedom of use specified in this license.
Most GNU software, including some libraries, is covered
by the ordinary GNU General Public License. This
license, the GNU Lesser General Public License, applies
to certain designated libraries, and is quite different from
the ordinary General Public License. We use this license
for certain libraries in order to permit linking those
libraries into non-free programs.
We call this license the “Lesser” General Public License
because it does Less to protect the user’s freedom than
the ordinary General Public License. It also provides
other free software developers Less of an advantage over
competing non-free programs. These disadvantages are
For example, on rare occasions, there may be a special
need to encourage the widest possible use of a certain
library, so that it becomes a de-facto standard. To
achieve this, non-free programs must be allowed to use
the library. A more frequent case is that a free library
does the same job as widely used non-free libraries. In
this case, there is little to gain by limiting the free library
to free software only, so we use the Lesser General Public
License.
In other cases, permission to use a particular library in
non-free programs enables a greater number of people to
use a large body of free software. For example,
permission to use the GNU C Library in non-free
programs enables many more people to use the whole
GNU operating system, as well as its variant, the GNU/
Linux operating system.
Although the Lesser General Public License is Less
protective of the users’ freedom, it does ensure that the
user of a program that is linked with the Library has the
freedom and the wherewithal to run that program using a
modified version of the Library.
The precise terms and conditions for copying,
distribution and modification follow. Pay close attention
to the difference between a “work based on the library”
and a “work that uses the library”. The former contains
code derived from the library, whereas the latter must be
combined with the library in order to run.
GNU LESSER GENERAL PUBLIC LICENSE
TERMS AND CONDITIONS FOR COPYING, DISTRIBUTION AND MODIFICATION
0. This License Agreement applies to any software
library or other program which contains a notice
placed by the copyright holder or other authorized
party saying it may be distributed under the terms of
this Lesser General Public License (also called “this
License”). Each licensee is addressed as “you”.
A “library” means a collection of software functions and/
or data prepared so as to be conveniently linked with
application programs (which use some of those functions
and data) to form executables.
The “Library”, below, refers to any such software library
or work which has been distributed under these terms. A
“work based on the Library” means either the Library or
any derivative work under copyright law: that is to say, a
work containing the Library or a portion of it, either
verbatim or with modifications and/or translated
straightforwardly into another language. (Hereinafter,
translation is included without limitation in the term
“modification”.)
“Source code” for a work means the preferred form of the
work for making modifications to it. For a library,
complete source code means all the source code for all
modules it contains, plus any associated interface
definition files, plus the scripts used to control
compilation and installation of the library.
Activities other than copying, distribution and
modification are not covered by this License; they are
Continue to next page...
A-5
Appendix
When a program is linked with a library, whether
statically or using a shared library, the combination of the
two is legally speaking a combined work, a derivative of
the original library. The ordinary General Public License
therefore permits such linking only if the entire
combination fits its criteria of freedom. The Lesser
General Public License permits more lax criteria for
linking other code with the library.
the reason we use the ordinary General Public License for
many libraries. However, the Lesser license provides
advantages in certain special circumstances.
outside its scope. The act of running a program using the
Library is not restricted, and output from such a program
is covered only if its contents constitute a work based on
the Library (independent of the use of the Library in a
tool for writing it). Whether that is true depends on what
the Library does and what the program that uses the
Library does.
1. You may copy and distribute verbatim copies of the
Library’s complete source code as you receive it, in
any medium, provided that you conspicuously and
appropriately publish on each copy an appropriate
copyright notice and disclaimer of warranty; keep
intact all the notices that refer to this License and to
the absence of any warranty; and distribute a copy of
this License along with the Library.
You may charge a fee for the physical act of transferring
a copy, and you may at your option offer warranty
protection in exchange for a fee.
2. You may modify your copy or copies of the Library
or any portion of it, thus forming a work based on the
Library, and copy and distribute such modifications
or work under the terms of Section 1 above, provided
that you also meet all of these conditions:
a)The modified work must itself be a software library.
b)You must cause the files modified to carry
prominent notices stating that you changed the files
and the date of any change.
c)You must cause the whole of the work to be
licensed at no charge to all third parties under the
terms of this License.
d)If a facility in the modified Library refers to a
function or a table of data to be supplied by an
application program that uses the facility, other
than as an argument passed when the facility is
invoked, then you must make a good faith effort to
ensure that, in the event an application does not
supply such function or table, the facility still
operates, and performs whatever part of its purpose
remains meaningful.
(For example, a function in a library to compute
square roots has a purpose that is entirely welldefined independent of the application. Therefore,
Subsection 2d requires that any application-supplied
function or table used by this function must be
optional: if the application does not supply it, the
square root function must still compute square roots.)
These requirements apply to the modified work as a
whole. If identifiable sections of that work are not
derived from the Library, and can be reasonably
considered independent and separate works in
A-6
themselves, then this License, and its terms, do not apply
to those sections when you distribute them as separate
works. But when you distribute the same sections as part
of a whole which is a work based on the Library, the
distribution of the whole must be on the terms of this
License, whose permissions for other licensees extend to
the entire whole, and thus to each and every part
regardless of who wrote it.
Thus, it is not the intent of this section to claim rights or
contest your rights to work written entirely by you;
rather, the intent is to exercise the right to control the
distribution of derivative or collective works based on the
Library.
In addition, mere aggregation of another work not based
on the Library with the Library (or with a work based on
the Library) on a volume of a storage or distribution
medium does not bring the other work under the scope of
this License.
3. You may opt to apply the terms of the ordinary GNU
General Public License instead of this License to a
given copy of the Library. To do this, you must alter
all the notices that refer to this License, so that they
refer to the ordinary GNU General Public License,
version 2, instead of to this License. (If a newer
version than version 2 of the ordinary GNU General
Public License has appeared, then you can specify
that version instead if you wish.) Do not make any
other change in these notices.
Once this change is made in a given copy, it is
irreversible for that copy, so the ordinary GNU General
Public License applies to all subsequent copies and
derivative works made from that copy.
This option is useful when you wish to copy part of the
code of the Library into a program that is not a library.
4. You may copy and distribute the Library (or a portion
or derivative of it, under Section 2) in object code or
executable form under the terms of Sections 1 and 2
above provided that you accompany it with the
complete corresponding machine-readable source
code, which must be distributed under the terms of
Sections 1 and 2 above on a medium customarily used
for software interchange.
If distribution of object code is made by offering access
to copy from a designated place, then offering equivalent
access to copy the source code from the same place
satisfies the requirement to distribute the source code,
even though third parties are not compelled to copy the
source along with the object code.
5. A program that contains no derivative of any portion
of the Library, but is designed to work with the
Library by being compiled or linked with it, is called
a “work that uses the Library”. Such a work, in
isolation, is not a derivative work of the Library, and
therefore falls outside the scope of this License.
However, linking a “work that uses the Library” with the
Library creates an executable that is a derivative of the
Library (because it contains portions of the Library),
rather than a “work that uses the library”. The executable
is therefore covered by this License. Section 6 states
terms for distribution of such executables.
If such an object file uses only numerical parameters,
data structure layouts and accessors, and small macros
and small inline functions (ten lines or less in length),
then the use of the object file is unrestricted, regardless of
whether it is legally a derivative work. (Executables
containing this object code plus portions of the Library
will still fall under Section 6.)
Otherwise, if the work is a derivative of the Library, you
may distribute the object code for the work under the
terms of Section 6. Any executables containing that work
also fall under Section 6, whether or not they are linked
directly with the Library itself.
6. As an exception to the Sections above, you may also
combine or link a “work that uses the Library” with
the Library to produce a work containing portions of
the Library, and distribute that work under terms of
your choice, provided that the terms permit
modification of the work for the customer’s own use
and reverse engineering for debugging such
modifications.
You must give prominent notice with each copy of the
work that the Library is used in it and that the Library and
its use are covered by this License. You must supply a
copy of this License. If the work during execution
displays copyright notices, you must include the
copyright notice for the Library among them, as well as a
reference directing the user to the copy of this License.
Also, you must do one of these things:
b)Use a suitable shared library mechanism for linking
with the Library. A suitable mechanism is one that
(1) uses at run time a copy of the library already
present on the user’s computer system, rather than
copying library functions into the executable, and
(2) will operate properly with a modified version of
the library, if the user installs one, as long as the
modified version is interface-compatible with the
version that the work was made with.
c)Accompany the work with a written offer, valid for
at least three years, to give the same user the
materials specified in Subsection 6a, above, for a
charge no more than the cost of performing this
distribution.
d)If distribution of the work is made by offering
access to copy from a designated place, offer
equivalent access to copy the above specified
materials from the same place.
e)Verify that the user has already received a copy of
these materials or that you have already sent this
user a copy.
For an executable, the required form of the “work that
uses the Library” must include any data and utility
programs needed for reproducing the executable from it.
However, as a special exception, the materials to be
distributed need not include anything that is normally
distributed (in either source or binary form) with the
major components (compiler, kernel, and so on) of the
operating system on which the executable runs, unless
that component itself accompanies the executable.
It may happen that this requirement contradicts the
license restrictions of other proprietary libraries that do
not normally accompany the operating system. Such a
contradiction means you cannot use both them and the
Library together in an executable that you distribute.
Continue to next page...
A-7
Appendix
When a “work that uses the Library” uses material from
a header file that is part of the Library, the object code for
the work may be a derivative work of the Library even
though the source code is not. Whether this is true is
especially significant if the work can be linked without
the Library, or if the work is itself a library. The
threshold for this to be true is not precisely defined by
law.
a)Accompany the work with the complete
corresponding machine-readable source code for
the Library including whatever changes were used
in the work (which must be distributed under
Sections 1 and 2 above); and, if the work is an
executable linked with the Library, with the
complete machine-readable “work that uses the
Library”, as object code and/or source code, so that
the user can modify the Library and then relink to
produce a modified executable containing the
modified Library. (It is understood that the user
who changes the contents of definitions files in the
Library will not necessarily be able to recompile the
application to use the modified definitions.)
7. You may place library facilities that are a work based
on the Library side-by-side in a single library together
with other library facilities not covered by this
License, and distribute such a combined library,
provided that the separate distribution of the work
based on the Library and of the other library facilities
is otherwise permitted, and provided that you do these
two things:
a)Accompany the combined library with a copy of the
same work based on the Library, uncombined with
any other library facilities. This must be distributed
under the terms of the Sections above.
b)Give prominent notice with the combined library of
the fact that part of it is a work based on the Library,
and explaining where to find the accompanying
uncombined form of the same work.
8. You may not copy, modify, sublicense, link with, or
distribute the Library except as expressly provided
under this License. Any attempt otherwise to copy,
modify, sublicense, link with, or distribute the
Library is void, and will automatically terminate your
rights under this License. However, parties who have
received copies, or rights, from you under this
License will not have their licenses terminated so
long as such parties remain in full compliance.
9. You are not required to accept this License, since you
have not signed it. However, nothing else grants you
permission to modify or distribute the Library or its
derivative works. These actions are prohibited by law
if you do not accept this License. Therefore, by
modifying or distributing the Library (or any work
based on the Library), you indicate your acceptance
of this License to do so, and all its terms and
conditions for copying, distributing or modifying the
Library or works based on it.
10. Each time you redistribute the Library (or any work
based on the Library), the recipient automatically
receives a license from the original licensor to copy,
distribute, link with or modify the Library subject to
these terms and conditions. You may not impose any
further restrictions on the recipients’ exercise of the
rights granted herein. You are not responsible for
enforcing compliance by third parties with this
License.
11. If, as a consequence of a court judgment or allegation
of patent infringement or for any other reason (not
limited to patent issues), conditions are imposed on
you (whether by court order, agreement or otherwise)
that contradict the conditions of this License, they do
not excuse you from the conditions of this License. If
A-8
you cannot distribute so as to satisfy simultaneously
your obligations under this License and any other
pertinent obligations, then as a consequence you may
not distribute the Library at all. For example, if a
patent license would not permit royalty-free
redistribution of the Library by all those who receive
copies directly or indirectly through you, then the
only way you could satisfy both it and this License
would be to refrain entirely from distribution of the
Library.
If any portion of this section is held invalid or
unenforceable under any particular circumstance, the
balance of the section is intended to apply, and the section
as a whole is intended to apply in other circumstances.
It is not the purpose of this section to induce you to
infringe any patents or other property right claims or to
contest validity of any such claims; this section has the
sole purpose of protecting the integrity of the free
software distribution system which is implemented by
public license practices. Many people have made
generous contributions to the wide range of software
distributed through that system in reliance on consistent
application of that system; it is up to the author/donor to
decide if he or she is willing to distribute software
through any other system and a licensee cannot impose
that choice.
This section is intended to make thoroughly clear what is
believed to be a consequence of the rest of this License.
12. If the distribution and/or use of the Library is
restricted in certain countries either by patents or by
copyrighted interfaces, the original copyright holder
who places the Library under this License may add an
explicit geographical distribution limitation
excluding those countries, so that distribution is
permitted only in or among countries not thus
excluded. In such case, this License incorporates the
limitation as if written in the body of this License.
13. The Free Software Foundation may publish revised
and/or new versions of the Lesser General Public
License from time to time. Such new versions will be
similar in spirit to the present version, but may differ
in detail to address new problems or concerns.
Each version is given a distinguishing version number. If
the Library specifies a version number of this License
which applies to it and “any later version”, you have the
option of following the terms and conditions either of that
version or of any later version published by the Free
Software Foundation. If the Library does not specify a
license version number, you may choose any version ever
published by the Free Software Foundation.
14. If you wish to incorporate parts of the Library into
other free programs whose distribution conditions are
incompatible with these, write to the author to ask for
permission. For software which is copyrighted by the
Free Software Foundation, write to the Free Software
Foundation; we sometimes make exceptions for this.
Our decision will be guided by the two goals of
preserving the free status of all derivatives of our free
software and of promoting the sharing and reuse of
software generally.
NO WARRANTY
16. IN NO EVENT UNLESS REQUIRED BY
APPLICABLE LAW OR AGREED TO IN
WRITING WILL ANY COPYRIGHT HOLDER,
OR ANY OTHER PARTY WHO MAY MODIFY
AND/OR REDISTRIBUTE THE LIBRARY AS
PERMITTED ABOVE, BE LIABLE TO YOU FOR
DAMAGES, INCLUDING ANY GENERAL,
SPECIAL, INCIDENTAL OR CONSEQUENTIAL
DAMAGES ARISING OUT OF THE USE OR
INABILITY TO USE THE LIBRARY
(INCLUDING BUT NOT LIMITED TO LOSS OF
DATA OR DATA BEING RENDERED
INACCURATE OR LOSSES SUSTAINED BY
YOU OR THIRD PARTIES OR A FAILURE OF
THE LIBRARY TO OPERATE WITH ANY
OTHER SOFTWARE), EVEN IF SUCH HOLDER
OR OTHER PARTY HAS BEEN ADVISED OF
THE POSSIBILITY OF SUCH DAMAGES.
Continue to next page...
A-9
Appendix
15. BECAUSE THE LIBRARY IS LICENSED FREE
OF CHARGE, THERE IS NO WARRANTY FOR
THE LIBRARY, TO THE EXTENT PERMITTED
BY APPLICABLE LAW. EXCEPT WHEN
OTHERWISE STATED IN WRITING THE
COPYRIGHT HOLDERS AND/OR OTHER
PARTIES PROVIDE THE LIBRARY “AS IS”
WITHOUT WARRANTY OF ANY KIND, EITHER
EXPRESSED OR IMPLIED, INCLUDING, BUT
NOT LIMITED TO, THE IMPLIED WARRANTIES
OF MERCHANTABILITY AND FITNESS FOR A
PARTICULAR PURPOSE. THE ENTIRE RISK AS
TO THE QUALITY AND PERFORMANCE OF
THE LIBRARY IS WITH YOU. SHOULD THE
LIBRARY PROVE DEFECTIVE, YOU ASSUME
THE COST OF ALL NECESSARY SERVICING,
REPAIR OR CORRECTION.
NOTIFICATION
On December 23, 2002 Metrowerks Corporation, a
wholly owned subsidiary of Motorola Inc., acquired
certain assetts of Embedix Inc., formerly Lineo Inc. As a
result of the acquisition, the Embedix® and Embedix®
Plus PDA™ brand products have now become
Metrowerks Linux® and Metroworks OpenPDA™ brand
products. The Metrowerks Linux and Metrowerks
OpenPDA products are governed by the Metrowerks
Software License Agreement below. If you have
questions or would like more information on OpenPDA
products and other Metrowerks solutions, please visit the
following websites www.openpda.com and
www.metrowerks.com
METROWERKS SOFTWARE LICENSE AGREEMENT
THIS METROWERKS SOFTWARE LICENSE
AGREEMENT (“LICENSE”) IS AN AGREEMENT
BETWEEN YOU AND METROWERKS
CORPORATION (“METROWERKS”).
METROWERKS IS WILLING TO LICENSE THE
ENCLOSED SOFTWARE TO YOU ONLY UPON THE
CONDITION THAT YOU ACCEPT ALL OF THE
TERMS CONTAINED IN THIS LICENSE. PLEASE
READ THIS LICENSE CAREFULLY BEFORE
USING THE SOFTWARE, AS BY USING THE
SOFTWARE YOU INDICATE THAT YOU AGREE
TO BE BOUND BY THE TERMS OF THIS LICENSE.
IF YOU DO NOT AGREE TO THE TERMS OF THIS
LICENSE, METROWERKS IS UNWILLING TO
LICENSE THE SOFTWARE TO YOU.
1. Grant of License. This software including
application, demonstration, system and all other
software accompanying this License, whether
electronically distributed or distributed on CD-ROM
or any other media (the “Software”) and the related
documentation are licensed to you by Metrowerks
according to the terms of this License. This License
allows you to use the Software on the product the
Software is distributed with (“Product”). If you have
purchased a concurrent uses license (i.e., Locating of
Server License), you may install the Software on a
common storage device that is accessible by multiple
devices provided that you have a software mechanism
that locks out any concurrent uses in excess of the
number of licensed copies of he Software. One
backup copy of the software may be made solely as a
part of the routine backup activities of your company
or business, you are not licensed to make additional
copies. You may transfer to another party all your
license rights in the Software and related
documentation by transferring to that party both the
original media on which the Software and related
documentation were provided, the Product and a copy
of this License, provided that the other party reads and
A-10
agrees to accept the terms and conditions of this
License. Immediately upon transfer, you have no
further rights to use or own copies of the Product,
Software or related documentation and must destroy
all copies in your possession or control. If this
Software is an update, patch, error correction or
upgrade to a prior version, then you must be licensed
to use the prior version of the Software in order to
exercise the license rights granted hereunder and you
agree all previous licenses are hereby replaced by this
license. If you are a corporation or other organization,
you must designate one individual to have the rights
provided herein. Certain components of the Software
is licensed pursuant to the GNU General Public
License Version 2. You may obtain a copy of the GPL
General Pubic License at http://www.fsf.org/
copyleft/gpl.html.Metrowerks will provide source
code for the components of the Software licensed
pursuant to the GNU General Public License. To
obtain such source code, send email to
[email protected]
2. Restrictions. The Software contains copyrighted
material, trade secrets, and other proprietary material
of Metrowerks and its licensors. You agree that in
order to protect those proprietary materials, except as
expressly permitted by applicable legislation, you
will not decompile, reverse engineer, disassemble or
otherwise reduce all or any part of the Software to
human-readable form unless Metrowerks provided it
to you in human-readable form. You may not modify,
rent, lease, loan, distribute or create derivative works
based upon the Software in whole or in part, except as
expressly permitted in Section 3. If the Software is
labeled as an academic version or is otherwise
licensed to you for academic use, you may not use the
Software for commercial product development, but
you may use the Software to develop freeware or
shareware within your academic community only. If
the Software licensed to you is part of the Discover
Programming series or is labeled as a Learning
Edition, Demo Version, Evaluation Edition or Lite
version, you may not use the Software to develop any
product for distribution, whether commercial,
freeware, or shareware. No press releases or any other
public announcements regarding this Software shall
be made without the written consent of Metrowerks.
3. Ownership. The Software and documentation are
licensed, not sold, to you for use only under the terms
of this License, and Metrowerks and its Licensors
reserve all rights not expressly granted to you in this
License. You own the media on which the Software
and documentation are recorded but Metrowerks and/
or Metrowerks’ licensors retain title to the Software
and related documentation, and all intellectual
property rights therein. Third Party Products which
may accompany the Software may also be subject to
their own licensing terms.
5. Export Law Assurances. You agree and certify that
neither the Software nor any other technical data
received from Metrowerks, nor the direct product
thereof, will be exported outside the United States
except as authorized and as permitted by the laws and
regulations of the United States. If the Software has
been rightfully obtained by you outside of the United
States, you agree that you will not re-export the
Software nor any other technical data received from
Metrowerks, nor the direct product thereof, except as
permitted by the laws and regulations of the United
States and the laws and regulations of the jurisdiction
in which you obtained the Software.
6. Government End Users. If you are acquiring the
Software and fonts on behalf of any unit or agency of
the United States Government, the following
provisions apply. The Licensed Software constitutes a
“commercial item”, as that term is defined at Federal
Acquisition Regulation (FAR) 2.101 (MAY 2001),
consisting of “commercial computer software” and
“commercial computer software documentation”, as
such terms are used in FAR 12.212 (SEP 1995), and
is provided to the U.S. Government only as
7. Limited Warranty on Media. Metrowerks warrants
the media on which the Software is recorded to be free
from defects in materials and workmanship under
normal use for a period of ninety (90) days from the
date of purchase as evidenced by a copy of the receipt.
Metrowerks’ entire liability and your exclusive
remedy will be replacement of the media not meeting
Metrowerks limited warranty returned to Metrowerks
with a copy of the receipt. Metrowerks will have no
responsibility to replace any media damaged by
accident, abuse or misapplication. ANY IMPLIED
WARRANTIES ON THE MEDIA, INCLUDING
THE IMPLIED WARRANTIES OF
MERCHANTABILITY AND FITNESS FOR A
PARTICULAR PURPOSE, ARE LIMITED IN
DURATION TO NINETY (90) DAYS FROM THE
DATE OF DELIVERY. THIS WARRANTY GIVES
YOU SPECIFIC LEAGAL RIGHTS, AND YOU
MAY ALSO HAVE OTHER RIGHTS WHICH
VARY BY JURISDICTION.
8. Disclaimer of Warranty. THE SOFTWARE,
RELATED DOCUMENTATION, THIRD PARTY
PRODUCTS IF ANY, AND ANY APPLICATIONS
CREATED WITH THE SOFTWARE ARE
PROVIDED “AS IS” AND WITHOUT
WARRANTY OF ANY KIND. YOU EXPRESSLY
ACKNOWLEDGE AND AGREE THAT USE OF
THE SOFTWARE AND RELATED
DOCUMENTATION IS AT YOUR SOLE RISK.
SHOULD THE SOFTWARE OR RELATED
DOCUMENTATION PROVE DEFECTIVE, YOU
(AND NOT METROWERKS OR ANY
METROWERKS REPRESENTATIVE) ASSUME
THE ENTIRE COST OF ALL NECESSARY
SERVICING, REPAIR OR CORRECTION.
METROWERKS AND METROWERKS’
LICENSORS (FOR THE PURPOSES OF THIS
SECTON 9. METROWERKS AND
METROWERKS’ LICENSORS SHALL BE
COLLECTIVELY REFERRED TO AS
“METROWERKS”) EXPRESSLY DISCLAIM ALL
OTHER WARRANTIES WITH RESPECT TO THE
SOFTWARE AND RELATED
Continue to next page...
A-11
Appendix
4. Termination. This License is effective until
terminated. You may terminate this License at any
time by destroying all copies of the Software and
related documentation in your possession or control.
This License will terminate immediately without
notice from Metrowerks if you fail to comply with
any provision of this License. Upon termination you
must destroy all copies of the Software and related
documentation in your possession or control.
commercial software (with “Restricted Rights”. if
applicable). Use, duplication, or disclosure by the
U.S. Government is subject to restrictions set forth in
this license agreement and as provided in DFARS
227.7202-1(a) and (c) (JUN 1995), DFARS
227.7202-3(a) (JUN 1995), FAR 12.212 (a) (SEP
1995), FAR 52.227-19 (JUN 1987), or FAR 52.22714 (ALT III) (JUN 1987), as applicable.
DOCUMENTATION, WHETHER SUCH
WARRANTIES ARE EXPRESS OR IMPLIED,
INCLUDING, BUT NOT LIMITED TO, THE
IMPLIED WARRANTIES OF
MERCHANTABILITY, FITNESS FOR A
PARTICULAR PURPOSE AND
NONINFRINGEMENT. WITHOUT LIMITING
THE GENERALITY OF THE FOREGOING,
METROWERKS MAKES NO WARRANTY OR
REPRESENTATION THAT THE FUNCTIONS
CONTAINED IN THE SOFTWARE WILL MEET
YOUR REQUIREMENTS, THAT THE
OPERATON OF THE SOFTWARE WILL BE
UNINTERRUPTED OR ERROR-FREE, THAT
DEFECTS IN THE SOFTWARE WILL BE
CORRECTED, NOR WITH RESPECT TO THE
CORRECTNESS, ACCURACY, OR
RELIABILITY OF THE SOFTWARE AND
RELATED DOCUMENTATION. METROWERKS
DISCLAIMS ANY AND ALL EXPRESS OR
IMPLIED WARRANTIES OF ANY KIND, AND
YOU EXPRESSLY ASSUME ALL LIABILITIES
AND RISKS, FOR ANYONE’S USE OR
OPERATION OF ANY APPLICATION
PROGRAMS YOU MAY CREATE WITH THE
SOFTWARE. YOU ACKNOWLEDGE AND
AGREE THAT THE SOFTWARE HAS NOT BEEN
DESIGNED, TESTED, MANUFACTURED, OR
INTENDED FOR USE IN DEVELOPING
APPLICATIONS WHERE THE FAILURE,
MALFUNCTION, OR ANY INACCURACY OF
THE APPLICATION CARRIES A RISK OF
DEATH, SERIOUS BODILY INJURY, OR
DAMAGE TO TANGIBLE PROPERTY,
INCLUDING, BUT NOT LIMITED TO, USE IN
FACTORY CONTROLS SYSTEMS, MEDICAL
DEVICES OR FACILITIES, UNCLEAR
FACILITIES, AIRCRAT OR AUTOMOBILE
NAVIGATION OR COMMUNICATION,
EMERGENCY SYSTEMS, OR OTHER
APPLICATIONS WITH A SIMILAR DEGREE OF
POTENTIAL HAZARD. NO ORAL OR WRITTEN
INFORMATION OR ADVICE GIVEN BY
METROWERKS OR ANY OF ITS EMPLOYEES,
REPRESENTATIVES, OR RESELLERS SHALL
CREATE ANY WARRANTY IN ADDITION TO
THOSE GIVEN HEREIN. SOME JURISDICTIONS
DO NOT ALLOW THE EXCLUSION OF IMPLIED
WARRANTIES, SO THE ABOVE EXCLUSION
MAY NOT APPLY TO YOU.
9. Limitation of Liability. UNDER NO
CIRCUMSTANCES SHALL METROWERKS BE
A-12
LIABLE FOR ANY INCIDENTAL, SPECIAL,
PUNTIVE OR CONSEQUENTIAL DAMAGES
THAT RESULT FROM THE USE OR INABILITY
TO USE THE SOFTWARE OR RELATED
DOCUMANTATION UNDER ANY THEORY,
INCLUDING CONTRACT, TORT, OR
NEGLIGENCE, EVEN IF METROWERKS HAS
BEEN ADVISED OF THE POSSIBILITY OF
SUCH DAMAGES. SOME JURISDICTIONS DO
NOT ALLOW THE LIMITATION OR
EXCLUSION OF LIABILITY FOR INCIDENTAL
OR CONSEQUENTIAL DAMAGES SO THE
ABOVE LIMITATION OR EXCLUSION MAY
NOT APPLY TO YOU.
IN NO EVENT SHALL METROWERKS’ TOTAL
LIABILITY TO YOU FOR ALL DAMAGES,
LOSSES, AND CAUSES OF ACTION (WHETHER
IN CONTRACT, TORT (INCLUDING
NEGLIGENCE) OR OTHERWISE) EXCEED THE
AMOUNT PAID BY YOU FOR THE SPECIFIC
LICENSE OF THE SOFTWARE AND RELATED
DOCUMANTATION TO WHICH THE LIABILTY
IS RELATED.
10. Controlling Law and Severability. THIS LICENSE
SHALL BE GOVERNED BY AND CONSTRUED
IN ACCORDANCE WITH THE LAWS OF THE
UNITED STATES AND THE STATE OF TEXAS,
EXCEPT FOR ITS CONFLICT OF LAWS
PRINCIPLES. The United Nations Convention on
Contracts for the International Sale of Goods is
hereby excluded in its entirety and does not apply to
this agreement. If for any reason a court of competent
jurisdiction finds any provision of this License, or
portion thereof, to be unenforceable, that provision of
the License shall be enforced to the maximum extent
permissible so as to effect the intent of the parties, and
the remainder of this License shall continue in full
force and effect.
11. Complete Agreement. This License constitutes the
entire agreement between the parties with respect to
the use of the Software and related documentation
and supersedes all prior or contemporaneous
understandings or a agreements, written or oral,
regarding such subject matter. No amendment to or
modification of this License will be binding unless in
writing and signed by an authorized officer of
Metrowerks.
Should you have any questions or comments concerning
this License, please do not hesitate to contact Metrowerks
Corporation at 9801 Metric Boulevard, Austin, TX,
78758, USA. attn: Warranty Information or by email:
[email protected]
Embedix is a trademark of Metrowerks Corporation.
Metrowerks United States
9801 Metric Blvd.
Austin, Texas 78758 USA
Phone: +1.512.997.4700
Fax: +1.512.997.4901
E-mail: [email protected]
Metrowerks Europe
Riehenring 175, CH-4058
Basel, Switzerland
Phone: +41.61.690.7500
Fax: +41.61.690.7501
E-mail: [email protected]
Appendix
Metrowerks Japan
Shibuya Mitsuba Bldg. 5F
Udagawa-cho 20-11
Shibuya-ku Tokyo 150-0042 Japan
Phone: +81-3-3780-6091
Fax: +81-3-3780-6092
E-mail: [email protected]
© Copyright. 2003. Metrowerks Corp. All rights
reserved. Metrowerks, the Metorwerks logo,
CodeWarrior and OpenPDA are trademarks or registered
trademarks of Metrowerks Corp. in the U.S. and/or other
countries. Metrowerks is a Motorola company. All other
tradenames and trademarks are the property of their
respective owners and are hereby recognized. Printed in
U.S.A.
A-13