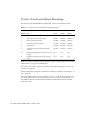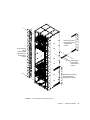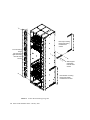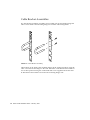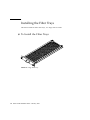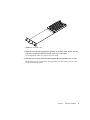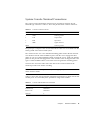
1
Netra™ ft 1800
Installation Guide
Sun Microsystems, Inc.
901 San Antonio Road
Palo Alto, CA 94303-4900 USA
650 960-1300
Fax 650 969-9131
Part No.: 805-4533-10
Revision A, February 1999
Send comments about this document to: [email protected]
Copyright 1999 Sun Microsystems, Inc., 901 San Antonio Road • Palo Alto, CA 94303 USA. All rights reserved.
This product or document is protected by copyright and distributed under licenses restricting its use, copying, distribution, and
decompilation. No part of this product or document may be reproduced in any form by any means without prior written authorization
of Sun and its licensors, if any. Third-party software, including font technology, is copyrighted and licensed from Sun suppliers.
Parts of the product may be derived from Berkeley BSD systems, licensed from the University of California. UNIX is a registered trademark in
the U.S. and other countries, exclusively licensed through X/Open Company, Ltd.
Sun, Sun Microsystems, the Sun logo, AnswerBook, Java, the Java Coffee Cup, Netra and Solaris are trademarks, registered trademarks, or
service marks of Sun Microsystems, Inc. in the U.S. and other countries. All SPARC trademarks are used under license and are trademarks or
registered trademarks of SPARC International, Inc. in the U.S. and other countries. Products bearing SPARC trademarks are based upon an
architecture developed by Sun Microsystems, Inc. Registered Excellence (and Design) is a certification mark of Bellcore.
The OPEN LOOK and Sun™ Graphical User Interface was developed by Sun Microsystems, Inc. for its users and licensees. Sun acknowledges
the pioneering efforts of Xerox in researching and developing the concept of visual or graphical user interfaces for the computer industry. Sun
holds a non-exclusive license from Xerox to the Xerox Graphical User Interface, which license also covers Sun’s licensees who implement OPEN
LOOK GUIs and otherwise comply with Sun’s written license agreements.
RESTRICTED RIGHTS: Use, duplication, or disclosure by the U.S. Government is subject to restrictions of FAR 52.227-14(g)(2)(6/87) and
FAR 52.227-19(6/87), or DFAR 252.227-7015(b)(6/95) and DFAR 227.7202-3(a).
DOCUMENTATION IS PROVIDED “AS IS” AND ALL EXPRESS OR IMPLIED CONDITIONS, REPRESENTATIONS AND WARRANTIES,
INCLUDING ANY IMPLIED WARRANTY OF MERCHANTABILITY, FITNESS FOR A PARTICULAR PURPOSE OR NONINFRINGEMENT, ARE DISCLAIMED, EXCEPT TO THE EXTENT THAT SUCH DISCLAIMERS ARE HELD TO BE LEGALLY INVALID.
Copyright 1999 Sun Microsystems, Inc., 901 San Antonio Road • Palo Alto, CA 94303 Etats-Unis. Tous droits réservés.
Ce produit ou document est protégé par un copyright et distribué avec des licences qui en restreignent l’utilisation, la copie, la distribution, et la
décompilation. Aucune partie de ce produit ou document ne peut être reproduite sous aucune forme, par quelque moyen que ce soit, sans
l’autorisation préalable et écrite de Sun et de ses bailleurs de licence, s’il y en a. Le logiciel détenu par des tiers, et qui comprend la technologie
relative aux polices de caractères, est protégé par un copyright et licencié par des fournisseurs de Sun.
Des parties de ce produit pourront être dérivées des systèmes Berkeley BSD licenciés par l’Université de Californie. UNIX est une marque
déposée aux Etats-Unis et dans d’autres pays et licenciée exclusivement par X/Open Company, Ltd.
Sun, Sun Microsystems, le logo Sun, AnswerBook, Java, le logo Jave Coffee Cup, Netra et Solaris sont des marques de fabrique ou des marques
déposées, ou marques de service, de Sun Microsystems, Inc. aux Etats-Unis et dans d’autres pays. Toutes les marques SPARC sont utilisées sous
licence et sont des marques de fabrique ou des marques déposées de SPARC International, Inc. aux Etats-Unis et dans d’autres pays. Les
produits portant les marques SPARC sont basés sur une architecture développée par Sun Microsystems, Inc.
L’interface d’utilisation graphique OPEN LOOK et Sun™ a été développée par Sun Microsystems, Inc. pour ses utilisateurs et licenciés. Sun
reconnaît les efforts de pionniers de Xerox pour la recherche et le développement du concept des interfaces d’utilisation visuelle ou graphique
pour l’industrie de l’informatique. Sun détient une licence non exclusive de Xerox sur l’interface d’utilisation graphique Xerox, cette licence
couvrant également les licenciés de Sun qui mettent en place l’interface d’utilisation graphique OPEN LOOK et qui en outre se conforment aux
licences écrites de Sun.
CETTE PUBLICATION EST FOURNIE "EN L’ETAT" ET AUCUNE GARANTIE, EXPRESSE OU IMPLICITE, N’EST ACCORDEE, Y
COMPRIS DES GARANTIES CONCERNANT LA VALEUR MARCHANDE, L’APTITUDE DE LA PUBLICATION A REPONDRE A UNE
UTILISATION PARTICULIERE, OU LE FAIT QU’ELLE NE SOIT PAS CONTREFAISANTE DE PRODUIT DE TIERS. CE DENI DE
GARANTIE NE S’APPLIQUERAIT PAS, DANS LA MESURE OU IL SERAIT TENU JURIDIQUEMENT NUL ET NON AVENU.
Please
Recycle
Contents
1.
Before Installation
1
Electrical Supply Considerations
Environmental Considerations
Dimensions
1
1
2
Airflow Consideration when Mounting in the Equipment Frame
2
Mechanical Considerations when Mounting in the Equipment Frame
Mounting Requirements
2.
Hardware Installation
6
9
Unshipping and Mounting the System
Mounting Flanges
6
9
13
19-inch Mountings
13
23-inch, 24-inch and 600mm Mountings
Cable Bracket Assemblies
22
Removing and Installing Modules
23
Module Injector/Ejector Mechanisms
Replacing an RMM
23
30
Replacing a Disk Chassis
Flexible Module Cabling
18
32
35
iii
Installing the Filter Trays
36
CAF External I/O Connections
38
System Console Terminal Connections
3.
Modem Port Connections
40
Alarms Port Connections
41
Electrical Supply Installation
43
System Switch
43
DC Source Site Requirements
44
Overcurrent Protection Requirements
Required Connection Materials
Dual Grounding Environment
Connecting the Power Leads
44
48
DC Supply and Ground Conductor
48
49
51
4.
Powering on the System
55
5.
Software and Operating Environment Installation
Netra ft 1800 Install Media
Disk Space Requirement
Installation Methods
Local Installation
Before You Start
57
57
58
58
Network Installation
59
60
Finishing Installation
63
Setting up Access to
Netra ft 1800 CMS Utilities
Setting the MANPATH Variable
iv
39
Netra ft 1800 Installation Guide • February 1999
63
63
57
6.
Installing and Configuring Sun StorEdge Volume Manager
Before You Install Sun StorEdge Volume Manager
Installing the Volume Manager Software
Mounting the CD-ROM Manually
Running the Installation
67
67
Initializing the Volume Manager
Boot Disk Aliases
Index
68
69
70
Setting up Other Disks
Configuring Storage
65
67
Setting up the Volume Manager Environment
Setting up Boot Disks
65
71
71
72
73
Contents
v
vi
Netra ft 1800 Installation Guide • February 1999
Figures
FIGURE 1-1
Netra ft 1800 Airflow Requirements (External)
FIGURE 1-2
Netra ft 1800 Airflow Requirements (Internal)
FIGURE 2-1
Shipping Brackets and Sacrificial Plinth
FIGURE 2-2
Location Matrix For Mounting Flange Screws (19-inch rack) 14
FIGURE 2-3
Support Rail and Fixings (19-inch Rack)
FIGURE 2-4
Orientation of Support Rail Spacers 16
FIGURE 2-5
Rear Rack Mounting (19-inch Rack)
FIGURE 2-6
19-inch Rack Mounting Flange Kit 17
FIGURE 2-7
23-inch Rack Mounting Flange Kit 19
FIGURE 2-8
24-inch Rack Mounting Flange Kit 20
FIGURE 2-9
600-mm Rack Mounting Flange Kit
FIGURE 2-10
Cable Bracket Assembly
FIGURE 2-11
Module Injector/ejector Lever
24
FIGURE 2-12
Removing a CPUset Module
26
FIGURE 2-13
Removing a CAF
FIGURE 2-14
Removing a PCI Card Carrier 28
FIGURE 2-15
Removing a Power Supply
FIGURE 2-16
Removing an RMM Module
FIGURE 2-17
Removing a Disk Drive 33
4
5
11
15
16
21
22
27
29
31
vii
viii
FIGURE 2-18
Removing a DSK Module 34
FIGURE 2-19
Cable Management Shelf
FIGURE 2-20
Large Filter Tray 36
FIGURE 2-21
Small Filter Tray 37
FIGURE 2-22
External I/O Connections on CAF Module
FIGURE 3-1
Circuit Breakers for Single Power Rails 46
FIGURE 3-2
Circuit Breakers for Dual Power Rails
FIGURE 3-3
Location of Chassis-to-Logic-0V Link and Grounding Points, and Wrist Strap Connection
Point 50
FIGURE 3-4
Power Inlet Filter
FIGURE 3-5
Power Connector Wiring Polarity and Securing Screws
FIGURE 3-6
Power Lead Receptacles 53
FIGURE 3-7
Power Lead Securing Screws 53
FIGURE 3-8
Power Cable Arrangement for Strain Relief
FIGURE 4-1
System Switches (Front Panel) 56
35
38
47
51
Netra ft 1800 Installation Guide • February 1999
54
52
Tables
TABLE 1-1
Mounting Hole Pattern Dimensions 7
TABLE 2-1
19-inch Mounting Flange Kit
TABLE 2-2
Support Rail Screw Hole Locations 15
TABLE 2-3
23-inch, 24-inch and 600mm Mounting Flange Kits
TABLE 2-4
Console Connector Pinout
TABLE 2-5
Console and Modem Port Parameters
TABLE 2-6
Modem Port Pinout
TABLE 2-7
Alarms Port Pinout 41
TABLE 3-1
Overcurrent Protection Requirements
TABLE 5-1
Suggested Disk Layout
13
18
39
39
40
44
62
ix
x
Netra ft 1800 Installation Guide • February 1999
Preface
This document describes the installation procedures for the core hardware and
software used in the Netra™ ft 1800. Upon completion of the procedures in this
manual, the Netra ft 1800 is fully functional as a fault-tolerant Solaris™ server.
Who Should Use This Book
This guide is intended to be read by installation engineers, software support
personnel and service personnel. It is not intended for the end user of the system.
How This Book Is Organized
This guide is arranged as follows:
Chapter 1 “Before Installation” gives guidelines on site preparation and
environmental considerations.
Chapter 2 “Hardware Installation” describes how to unpack the system, fit the
mounting flanges and install the chassis in a rack.
Chapter 3 “Electrical Supply Installation” provides the information required to
install the electrical supply.
Chapter 4 “Powering on the System” tells you how apply power to the Netra ft 1800.
Chapter 5 “Software and Operating Environment Installation” explains the software
installation procedure.
xi
Chapter 6 “Installing and Configuring Sun StorEdge Volume Manager” summarizes
what you need to know in order to use the Volume Manager on the Netra ft 1800.
Related Books
■
■
■
■
■
■
■
■
■
■
Netra ft 1800 Software Release Notes (Part No. 805-4527-10)
Netra ft 1800 Hardware Release Notes (Part No. 806-0179-10)
Netra ft 1800 CMS API Developer’s Guide (Part No. 805-5870-10)
Netra ft 1800 CMS Developer’s Guide (Part No. 805-7899-10)
Netra ft 1800 Developer’s Guide (Part No. 805-4530-10)
Netra ft 1800 Hardware Reference Guide (Part No. 805-4531-10)
Netra ft 1800 User’s Guide (Part No. 805-4529-10)
Netra ft 1800 Reference Manual (Part No. 805-4532-10)
Netra ft 1800 Safety and Compliance Manual (Part No. 805-7019-10)
Sun StorEdge™ Volume Manager 2.5.4 Installation Guide (Part No. 805-5706-10).
What Typographic Changes Mean
The following table describes the typographic changes used in this book.
TABLE P-1
Typographic conventions
Typeface or
Symbol
xii
Meaning
Example
AaBbCc123
The names of commands, files,
and directories; on-screen
computer output
Edit your .login file.
Use ls -a to list all files.
machine_name% You have mail.
AaBbCc123
What you type, contrasted with
on-screen computer output
machine_name% su
Password:
AaBbCc123
Command-line placeholder:
replace with a real name or
value
To delete a file, type rm filename.
AaBbCc123
Book titles, new words or terms,
or words to be emphasized
Read Chapter 6 in User’s Guide. These
are called class options.
You must be root to do this.
Netra ft 1800 Installation Guide • February 1999
Shell Prompts in Command Examples
The following table shows the default Open Boot PROM (OBP) prompt and the
system prompt and superuser prompt for the C shell, Bourne shell, and Korn shell.
TABLE P-2
Shell prompts
Shell
Prompt
Open Boot PROM prompt
ok
C shell prompt
machine_name%
C shell superuser prompt
machine_name#
Bourne shell and Korn shell prompt
$
Bourne shell and Korn shell superuser prompt
#
Symbols
The following symbols mean:
Note – A note provides information which should be considered by the reader.
!
Caution – Cautions accompanied by this Attention icon carry information about
procedures or events which if not considered may cause damage to the data or
hardware of your system.
Caution – Cautions accompanied by this Hazard icon carry information about
procedures which must be followed to reduce the risk of electric shock and danger
to personal health. Follow all instructions carefully.
Preface
xiii
Sun Documentation on the Web
The docs.sun.comsm web site enables you to access Sun technical documentation
on the Web. You can browse the docs.sun.com archive or search for a specific book
title or subject at:
http://docs.sun.com
Sun Welcomes Your Comments
We are interested in improving our documentation and welcome your comments
and suggestions. You can email your comments to us at:
[email protected]
Please include the part number of your document in the subject line of your email.
xiv
Netra ft 1800 Installation Guide • February 1999
CHAPTER
1
Before Installation
This section provides information on what should be considered when choosing a
location for a Netra ft 1800 system.
Note – This equipment is only intended for installation in a Restricted Access
Location as defined by UL1950, 3rd Edition, and EN60950: 1992 / A11: 1997.
Electrical Supply Considerations
Before you install the system, verify that the correct power supply is available. Refer
to “DC Source Site Requirements” on page 44 for further information.
Environmental Considerations
The system can be installed in an environment with the following specific parameter
ranges:
■
Ambient temperature
■
Operating: 0 to 40 degrees Celsius (short term operation up to a temperature of
50 degrees Celsius is possible; however, the operation of removable media
devices cannot be guaranteed.)
■
Storage: –40 to 70 degrees Celsius
1
■
Relative humidity
■
Operating: 5 to 85% noncondensing1
■
Storage: 10 to 90% noncondensing1
■
Elevation
■
Operating: 0 to 3000 meters
■
Storage: 0 to 12000 meters
Dimensions
■
■
■
■
■
■
Height: 1466.85 mm (57.75 inches) 33U NOM
Width: 437.60 mm (17.22 inches)
Depth: 392.8 mm (15.4 inches)
Weight: Maximum 190.5 kg (420 lb) (excluding rack or AC converter items)
Maximum rate of heat release for fully configured system: 3000W
(10,200 Btu/hour)
GR 63 CORE heat release calculation result: 425.4 W per square foot
[3000 W / (3.25 ft x 2.17 ft)] (4579 W per square meter).
These dimensions are for the product without rack-mount flange adapters; the
overall width of the flanges varies according to the equipment mounting
requirements.
The depth given does not include any I/O or power connectors. The power
connectors add 50 mm (2 inches) to the depth.
Airflow Consideration when Mounting in the
Equipment Frame
The Netra ft 1800 system has been designed to function while mounted in a natural
convection airflow, but to meet the declared environmental specification the
following rules apply. Refer to FIGURE 1-1 on page 1-4 and FIGURE 1-2 on page 1-5.
1. Adequate airflow through the equipment frame must be ensured. The
Netra ft 1800 system utilizes internal fans that can achieve a maximum airflow of
840 cfm in free air.
2. The inlet air must enter at the bottom of the Netra ft 1800 cabinet and in front of
the Power Supply Units (PSUs); the airflow exhausts vertically from the top of the
cabinet.
1. Subject to a maximum absolute humidity of 0.024Kg of water per Kg of dry air.
2
Netra ft 1800 Installation Guide • February 1999
3. A minimum of 2U (88.9 mm/3.5 inches) clearance must be allowed at both top
and bottom of the Netra ft 1800 cabinet when mounted to allow adequate inlet
and exhaust ventilation.
4. The Netra ft 1800 system must not be mounted above any heat-generating sources
within the same frame unless a heat deflector is used to provide fresh inlet air at
ambient temperature.
5. To maintain adequate airflow, replace the environmental filters every six months
(contact your local support organization for further information). The
environmental filter replacement kit (X-Option No.X6952A) contains six PSU
filters and three base filters.
Chapter 1
Before Installation
3
Minimum 2U
(90 mm) gap
Minimum 2U
(90 mm) gap
FIGURE 1-1
4
Netra ft 1800 Airflow Requirements (External)
Netra ft 1800 Installation Guide • February 1999
Min. 2U (90 mm)
gap at top of
system
CAF
CAF
PSU
PSU
CPU
CPU
PSU
CPU
PSU
PSU
PSU
CAF
CAF
Front
Rear
Front
Front
Rear
Min. 2U (90 mm)
gap at base of
system
Fan unit
Min. 75 mm between
front of system and
rack door (if fitted)
FIGURE 1-2
Netra ft 1800 Airflow Requirements (Internal)
Chapter 1
Before Installation
5
Mechanical Considerations when Mounting in the
Equipment Frame
Caution – Mechanical assistance is required if installing a loaded chassis.
If you intend not to use a lifting device for installation, all modules other than the
motherboards must be removed from the system prior to lifting. The empty chassis
weighs approximately 49 kg (108 lb), or 68 kg (150 lb) with the motherboards, plus
the adaptors. The weight of any removable module depends on its configuration.
Weight warning labels are for guidance only.
See “Removing and Installing Modules” on page 23 for information about adding
modules to the motherboard.
The Netra ft 1800 chassis has been designed to accommodate most mounting
configurations. Adaptor flanges to suit 19-inch, 23-inch, 24-inch and 600-mm (ETSI)
rack sizes are available as required.
The Netra ft 1800 system is shipped with a plinth, which protects the bottom of the
chassis during transit and handling, and also ensures that the correct airflow inlet
plenum is provided during installation. The plinth must be removed once the
Netra ft 1800 is installed in a rack, then stored in a safe place.
The Netra ft 1800 chassis must be mounted using screws suitable for the equipment
frame. The screws should be M5, M6 or 10-32 UNF. All screws must be fitted. The
recommended tightening torque value for either M5 or 10-32 UNF recess head
screws is 3.8 Nm (2.8 lbf/ft), and that for M6 screws is 6 Nm (4.4 lbf/ft).
Mounting Requirements
The Netra ft 1800 is available with the following removable mounting flanges:
■
■
■
■
19 inch EIA pattern
23 inch EIA pattern
24 inch EIA pattern
600 mm IEC917 (ETSI) pattern
Any of these flanges can be fitted in the following positions:
■
■
■
Flush with the front of the system
65 mm (2.56 inches) from front of system
196.1 mm (7.72 inches) from front of system
The second and third positions are intended for use with 5-inch web open frames
(relay racks).
6
Netra ft 1800 Installation Guide • February 1999
Adjustable rear flanges can be fitted. They provide a mounting face anywhere
between 400 mm and 500 mm (15.75 inches and 19.7 inches) from the front of the
system (see “Mounting Flanges” on page 13).
The vertical mounting hole pattern should conform to the standard dimensions
given in TABLE 1-1.
TABLE 1-1
Mounting Hole Pattern Dimensions
Standard
Pattern
EIA/RETMA (RU)
Repeating pattern of 5/8 inch, 5/8 inch, 1/2 inch
IEC917/ETSI (SU)
Constant pitch of 25 mm
Loading
The rack must be capable of supporting 230 kg (500 lbs) for a fully configured and
cabled Netra ft 1800.
In Seismic (Earthquake) Risk Zones 3 and 4, it is recommended that the Netra ft 1800
is installed in an appropriate secured seismic rack or cabinet.
Vertical space
The Netra ft 1800 chassis occupies 33RU (57.75 inches) of vertical height.
To allow adequate airflow, the rack must provide a minimum of 38RU (66 inches) of
rackable height, together with minimum inlet and exhaust vents of 2U gap each. If
the rack provides unobstructed vertical airflow via vents of adequate size in the top
and/or bottom panels, then the minimum rack vertical opening required is 37RU
(64.75 inches).
When you fit the Netra ft 1800 into a rack with its red transit plinth in place, allow
1U (1.75 inches) of clearance beneath the plinth. This space permits removal of the
plinth.
Note – The plinth must be removed to allow fitment of the chassis environmental
filters.
Chapter 1
Before Installation
7
Depth
The front door (if fitted) must provide a minimum of 75 mm (3 inches) of clearance
across the entire front surface of the Netra ft 1800 to allow for routing of I/O cables.
As all I/O cables must be routed from the front of the Netra ft 1800 system, due
consideration should be made of the space required within the rack for these cables,
as well as the power cables at the rear of the system.
There must be a minimum of 545 mm (21.5 inches) usable internal depth in the rack/
cabinet. This dimension includes space for connector housings, cabling and the
power inlet filters.
Safety
All racks must be bolted to the floor, to adjacent frames or to both. This must be
done in accordance with the rack manufacturer’s instructions, using the
recommended hardware and fixings.
Free-standing racks with a footprint of less than 600 mm x 600 mm (23.6 inches x
23.6 inches) are likely to be unstable and should be treated with caution.
8
Netra ft 1800 Installation Guide • February 1999
CHAPTER
2
Hardware Installation
This chapter provides information on the initial hardware installation procedure,
including installing modules and external I/O connections.
Unshipping and Mounting the System
Once you have removed the packaging from the system, you must then unship the
system from the delivery pallet and brackets before attempting to mount the chassis
in a rack.
Caution – Do not attempt to remove the red plinth before the chassis has been
mounted in the rack.
There is an instruction card attached to the front of the system; the instructions
below are intended to supplement this.
Note – Do not discard the packaging after removing it from the system. It should be
stored in safe, dry place so it can be used in the event that the system requires
moving or returning for repair.
Tools
The tools required to unship the system are contained in a cloth bag attached to the
chassis.
9
Note – Do not discard the tools after unshipping and mounting the system. They
can be stored in the cloth bag supplied and attached to the rack adjacent to the
system for easy access when required.
10
Netra ft 1800 Installation Guide • February 1999
▼
To Unship and Mount the System
3 x Phillips screws
at rear of plinth
4 x Phillips screws
at front of plinth
2 x Allen bolts
securing bracket to
pallet
Insert lifting
device here
2 x Phillips screws
on each bracket
FIGURE 2-1
Shipping Brackets and Sacrificial Plinth
Chapter 2
Hardware Installation
11
1. Remove all modules except the motherboards from the chassis and put them in a
safe place.
Refer to “Removing and Installing Modules” on page 23.
2. Using the Phillips No.2 screwdriver (supplied), remove the two Phillips screws
securing the four red brackets (two on each side) to the chassis (see FIGURE 2-1).
You may also need to remove the brackets from the pallet. Use the Allen key
supplied to remove the two Allen screws from each bracket. The brackets are not
attached to the red mounting plinth.
3. Install the appropriate mounting flanges.
Refer to “Mounting Flanges” on page 13.
4. Use an appropriate lifting device to lift the chassis by the red mounting plinth,
and install it in the rack.
Caution – If using a fork-lift device, ensure the tines of the lift extend right through
the mounting plinth and beyond the rear of the chassis. The chassis could deform if
you use incorrect lifting techniques.
5. Secure the chassis into the rack using the appropriate mounting points.
See “Mounting Flanges” on page 13.
6. Remove the mounting plinth.
Use the No.2 Phillips screwdriver supplied to remove the four screws from the front
and the three screws from the rear.
Mounting the chassis with the plinth attached ensures that the minimum amount of
clearance for air flow is provided beneath the system.
7. Install the two large and one small filter trays in the spaces immediately beneath
the chassis revealed by the removal of the plinth.
Refer to “To Install the Filter Trays” on page 36. The filter tray thumbscrews are
inserted in the tapped threads exposed by removal of the mounting plinth.
8. Install the modules into their appropriate locations.
Refer to “Removing and Installing Modules” on page 23.
12
Netra ft 1800 Installation Guide • February 1999
Mounting Flanges
The system is supplied with the appropriate mounting flanges; other mounting
flanges kits are available, as follows, to enable the system to mounted in different
industry-standard racks:
■
■
■
■
19-inch racks X-Option No.X6938A
23-inch racks X-Option No.X6939A
24-inch racks X-Option No.X6940A
ETSI (600 mm) racks X-Option No.X6941A
Each mounting kit also includes six cable bracket assemblies, which can be fitted to
the mounting flanges to facilitate cable management; see “Cable Bracket
Assemblies” on page 22.
19-inch Mountings
The 19-inch mounting kit consists of the following items:
TABLE 2-1
19-inch Mounting Flange Kit
Quantity
Item
Part number
1
Front left-hand mounting flange
340-4699
1
Front right-hand mounting flange
340-4698
1
Rear top left mounting flange
340-5479
1
Rear top right mounting flange
340-5480
1
Rear bottom left mounting flange
340-5481
1
Rear bottom right mounting flange
340-5482
16
Spacers
340-5483
8
Support rails
340-5484
6
Cable hook bracket with hooks already installed
340-5553
16
M4 10mm panhead screws (for rear flanges)
N/A
16
M4 crinkle washers (for M4 screws)
N/A
20
M5 8mm countersunk screws (for front flanges)
N/A
16
M5 10mm countersunk screws (for support rails)
N/A
Refer to FIGURES 2-3 to 2-6.
Chapter 2
Hardware Installation
13
The sides of the system chassis are provided with tapped screwholes as shown in
FIGURE 2-2.
Front of system
Rear of system
Columns
D
C
B
A
1
2
3
4
5
Row numbers
Support rails
(340-5484)
6
7
8
9
10
FIGURE 2-2
Location Matrix For Mounting Flange Screws (19-inch rack)
The front flanges (see FIGURE 2-6 on page 17) are screwed to holes in column C or
column D. Use column B only if the rear flanges are not going to be used.
The support rails (see FIGURE 2-7 on page 19) are screwed to holes A and B in rows 1,
4, 7 and 10. The spacers provided must be used between the rails and the chassis to
prevent the rails being fouled by the rivets in the chassis metalwork.
14
Netra ft 1800 Installation Guide • February 1999
Spacer
Spacer (340-5483)
G
G
F1
F2
FIGURE 2-3
F3
F4
E1 E2
F5
E3
E4
E5
Support Rail and Fixings (19-inch Rack)
The mounting screws should be placed in position pairs E1 and F1, E2 and F2, E3
and F3, E4 and F4 or E5 and F5. The pair of holes to be used depends on the frontto-back depth of the rack (mounting flange to mounting flange). The holes marked
with the appropriate figure, as shown in TABLE 2-2, should be closest to the rear of
the chassis.
TABLE 2-2
Support Rail Screw Hole Locations
Rack depth
Screw holes
480 mm
E5 and F5
530 mm
E4 and F4
580 mm
E3 and F3
630 mm
E2 and F2
680 mm
E1 and F1
The slots labeled G are used for mounting the rear flanges (see FIGURE 2-6 on
page 17). Only one of the vertical pairs of holes in the rear flanges should be used.
The spacers must be placed with the flat side towards the chassis and the
countersink towards the support rail (see FIGURE 2-4).
Chapter 2
Hardware Installation
15
Support rail (340-5484)
Chassis
Screw
Spacer (340-5483)
FIGURE 2-4
Orientation of Support Rail Spacers
The rear flanges are used to mount the chassis in the rear of the rack as shown in
FIGURE 2-5.
M5 10mm countersunk screw
Chassis
Support rail (340-5484)
Spacer (340-5483)
M5 10mm countersunk screw
M4 10mm panhead screw
and crinkle washer
Rack
Rear flange (340-5479/5480)
Lockable fixing (not supplied)
Rack rear mounting flange
FIGURE 2-5
16
Rear Rack Mounting (19-inch Rack)
Netra ft 1800 Installation Guide • February 1999
Support rail
(340-5484)
Spacer
Use M5 10mm
(340-5483)
screws
Rear top mounting
flange
(left 340-5479
right 340-5480)
Use M4 10mm
screws
Front mounting flange
(left 340-4699
right 340-4698)
Use M5 8mm screws
Rear bottom mounting
flange
(left 340-5481
right 340-5482)
Use M4 10mm screws
FIGURE 2-6
19-inch Rack Mounting Flange Kit
Chapter 2
Hardware Installation
17
23-inch, 24-inch and 600mm Mountings
The 23-inch, 24-inch and 600mm mounting kits consist of the following items:
TABLE 2-3
23-inch, 24-inch and 600mm Mounting Flange Kits
Part number
Quantity
Item
23-inch
24-inch
600mm
1
Front left-hand mounting flange
340-4592
340-5445
340-5328
1
Front right-hand mounting flange
340-4591
340-5446
340-5329
2
Rear top mounting flange
340-5449
340-5447
340-5331
2
Rear bottom mounting flange
340-5450
340-5448
340-5427
8
Support rails
340-5330
340-5330
340-5330
6
Cable hook bracket with hooks already
installed
340-5553
340-5553
340-5553
40
M5 6mm panhead screws (for front and rear
flanges)
N/A
N/A
N/A
16
M5 8mm countersunk screws (for support
rails)
N/A
N/A
N/A
Refer to FIGURE 2-7 on page 19 for 23-inch kits, FIGURE 2-8 on page 20 for 24-inch kits
and FIGURE 2-9 on page 21 for 600mm kits.
The sides of the system chassis are provided with tapped screwholes as shown in
FIGURE 2-2 on page 14.
Fit the front brackets using the screwholes in columns C and D, or just column C, or
just column D.
Screw the slide mounts to holes A and B in rows 1, 4, 7 and 10. You can then screw
the rear brackets to the rear of the rack (see FIGURE 2-7, FIGURE 2-8 and FIGURE 2-9)
and slide the chassis onto the brackets until the front brackets are flush with the
front of the rack.
18
Netra ft 1800 Installation Guide • February 1999
Rear top mounting
flange (340-5449)
Use M5 6mm
screws
Front mounting
flange
(left 340-4592
right 340-4591)
Use M5 6mm
screws
Slide support
(340-5330)
Use M5 8mm
screws
Rear bottom mounting
flange (340-5450)
Use M5 6mm screws
FIGURE 2-7
23-inch Rack Mounting Flange Kit
Chapter 2
Hardware Installation
19
Rear top mounting
flange (340-5447)
Use M5 6mm
screws
Front mounting
flange
(left 340-5445
right 340-5446)
Use M5 6mm
screws
Slide support
(340-5330)
Use M5 8mm
screws
Rear bottom mounting
flange (340-5448)
Use M5 6mm screws
FIGURE 2-8
20
24-inch Rack Mounting Flange Kit
Netra ft 1800 Installation Guide • February 1999
Rear top mounting
flange (340-5331)
Use M5 6mm screws
Front mounting
flange
(left 340-5328
right 340-5329)
Use M5 6mm
screws
Slide support
(340-5330)
Use M5 8mm
screws
Rear bottom mounting
flange (340-5427)
Use M5 6mm screws
FIGURE 2-9
600-mm Rack Mounting Flange Kit
Chapter 2
Hardware Installation
21
Cable Bracket Assemblies
Six cable bracket mounting assemblies are provided with each mounting flange kit.
These can be fitted to the mounting flanges to facilitate cable management.
FIGURE 2-10
Cable Bracket Assembly
The brackets can be fixed to the mounting flanges in the required position, using the
same screws that fix the flanges to the rack. The hooks can be fitted to the brackets in
one of three positions using the countersunk M3 screws supplied. The hooks must
be fitted before the brackets are fixed to the mounting flange/rack.
22
Netra ft 1800 Installation Guide • February 1999
Removing and Installing Modules
This chapter describes how to remove and insert:
■
CPUset, PCI, CAF and PSU modules (“To Remove a Module” on page 24)
■
CPUset modules: “CPUset Modules” on page 25
■
PCI modules: “PCI Modules” on page 28
■
CAF modules: “CAF Modules” on page 27
■
PSU modules: “PSU Modules” on page 29
■
Drive chassis (“Replacing a Disk Chassis” on page 32)
■
Removable media module (“Replacing an RMM” on page 30)
Caution – The wrist-strap provided must be used when replacing modules, or
making cable connections to the rear of the system. The wrist-strap connection point
on the Netra ft 1800 system is located on the panel at the bottom rear of the chassis.
All modules have their own guides in slots in the chassis, into which they fit exactly.
No module will fit into a slot allocated to a different class of module. No module
will fit into its own slot if it is upside down.
Module Injector/Ejector Mechanisms
All the modules except the disk chassis (DSK) and RMM have an injector/ejector
lever (CPUset modules have two). They are all similar in function and usage. A
common feature is a slide which engages and disengages the module’s electrical
connection to the motherboard, and a lever which physically engages and
disengages the module. When the latch is disengaged, a red dot is exposed. This
facilitates the identification of unlatched injectors.
Chapter 2
Hardware Installation
23
Open
Closed
FIGURE 2-11
Red warning dot
Module Injector/ejector Lever
The module is disengaged from its electrical connection when the slide is moved
towards the rounded end of the lever, exposing the red warning dot.
The general procedure refers to CPUset, CAF, PCI and PSU modules. For more
specific instructions for the RMM and disk chassis, refer to:
■
■
▼
“Replacing an RMM” on page 30
“Replacing a Disk Chassis” on page 32
To Remove a Module
1. Move the slide in the lever on the module to the disengaged position.
This will expose the red warning dot.
2. Lower the lever.
The module will slide out a small amount when the lever is fully lowered.
3. Slide the module out of its slot, using the handle if there is one.
For specific procedures relating to individual modules, refer to:
24
■
“CPUset Modules” on page 25
■
“CAF Modules” on page 27
■
“PCI Modules” on page 28
■
“PSU Modules” on page 29
Netra ft 1800 Installation Guide • February 1999
CPUset Modules
CPUset modules have two injector levers which must be operated simultaneously.
As you pull out the CPUset module, the handle in the top panel pops up and must
be depressed again manually in order to withdraw the module fully from the chassis
(see FIGURE 2-12). Once the handle is clear of the crossbar and has popped up again,
it can be used to take the weight of the module.
Caution – CPUset modules are very heavy. The weight warning label on the
CPUset is for guidance only. The actual weight of a CPUset depends on its
configuration. Both the front and top handles must be used simultaneously once the
module has been withdrawn as illustrated in FIGURE 2-12.
On inserting the CPUset module the handle must be depressed in order to push the
module fully into the chassis.
Chapter 2
Hardware Installation
25
FIGURE 2-12
26
Removing a CPUset Module
Netra ft 1800 Installation Guide • February 1999
CAF Modules
FIGURE 2-13
Removing a CAF
Chapter 2
Hardware Installation
27
PCI Modules
FIGURE 2-14
28
Removing a PCI Card Carrier
Netra ft 1800 Installation Guide • February 1999
PSU Modules
FIGURE 2-15
Removing a Power Supply
Chapter 2
Hardware Installation
29
▼
To Replace a Module
1. Slide the module into its slot but not fully home.
A module will not fit into a slot designed for a different class of module.
2. When the lever engages with the chassis, raise it to push the module fully home.
3. Move the slide in the lever into the engaged position.
Replacing an RMM
RMM modules have a slide with an actuator microswitch on an ejector handle. The
slide controls the electrical connection to the motherboard. When the slide is closed
(to the right), the electrical connection is engaged; when it is open (to the left), the
electrical connection is disengaged. The handle is lifted to disengage the module
physically, and lowered to engage it.
▼ To Remove the RMM
1. Slide the latch in the handle of the RMM to the left (towards the ‘unlocked’
symbol).
2. Lift the handle.
3. Slide the RMM out of its slot.
30
Netra ft 1800 Installation Guide • February 1999
FIGURE 2-16
Removing an RMM Module
Chapter 2
Hardware Installation
31
▼ To Replace the RMM
1. Slide the RMM into its slot until it is almost completely home.
A module will not fit into a slot designed for a different class of module.
2. Lower the handle to engage the RMM fully in its slot.
3. Slide the latch in the handle to the right (towards the ‘locked’ symbol).
Replacing a Disk Chassis
DSK modules have a slide on an ejector handle. The handle is lifted to disengage the
module physically, and lowered to engage it.
▼ To Remove the Disk Chassis
1. Remove any HDD modules (hard disks) in the disk chassis.
Refer to FIGURE 2-17 on page 33.
Caution – Always remove all hard disk drive modules before removing a disk
chassis. Always put a hard disk back in the same location from which you removed
it.
2. Slide the latch in the handle of the disk chassis to the left (towards the ‘unlocked’
symbol).
3. Lift the handle.
4. Slide the disk chassis out of its slot.
32
Netra ft 1800 Installation Guide • February 1999
NOTE: The injector/ejector lever of a disk drive
module does not switch the power on and off. If the
chassis is powered on, the disk drive will power off
when it is removed and power on as soon as it is
inserted, regardless of the position of the lever.
FIGURE 2-17
Removing a Disk Drive
Chapter 2
Hardware Installation
33
FIGURE 2-18
Removing a DSK Module
▼ To Replace the Disk Chassis
1. Slide the disk chassis into its slot until it is almost completely in.
2. Lower the handle to engage the disk chassis fully in its slot.
3. Slide the latch in the handle to the right (towards the ‘locked’ symbol).
4. Replace the hard disk drives.
34
Netra ft 1800 Installation Guide • February 1999
Flexible Module Cabling
The cable management shelf is illustrated in FIGURE 2-19.
FIGURE 2-19
Cable Management Shelf
The cable management shelf adjacent to the PCI card locations is flexible and can be
used in a number of different configurations. The holes are equidistant, and the
hooks can be inserted in whatever position is required. The hooks are a firm push-fit
into the holes.
Chapter 2
Hardware Installation
35
Installing the Filter Trays
The Netra ft 1800 has three filter trays, two large and one small.
▼
To Install the Filter Trays
FIGURE 2-20
36
Large Filter Tray
Netra ft 1800 Installation Guide • February 1999
FIGURE 2-21
Small Filter Tray
1. Insert the trays into the appropriate apertures at the base of the chassis; the two
large trays are fitted on the left and the small tray on the right.
It is unimportant which way up the trays are fitted.
2. Push the trays securely home and hand-tighten the two thumbscrews on each.
The thumbscrews are inserted into the tapped threads exposed by removal of the
sacrificial mounting plinth.
Chapter 2
Hardware Installation
37
CAF External I/O Connections
The Netra ft 1800 system has the following connectors on each CAF module:
■
■
■
■
Modem
port
(DB-25)
Female 25-pole D-type connectors for the system console and modem ports
(RS232).
A male 9-pole D-type connector for the Remote Control Processor (RCP) ports.
A male 15-pole D-type connector for the alarm relay/reset signals.
Two RJ45 Ethernet ports.
Ethernet ports
(RJ45)
CAF
Console
port
(DB-25)
FIGURE 2-22
38
Remote
Control
Processor
port (DB-9)
Alarm port
(DB-15)
External I/O Connections on CAF Module
Netra ft 1800 Installation Guide • February 1999
System Console Terminal Connections
The system console and modem connections are provided on separate 25-pole
female D-type connectors. TABLE 2-4 shows the pin allocation on these connectors.
TABLE 2-4
Console Connector Pinout
Pin
Function
Description
1
GND
Chassis ground
2
TxD
Output data
3
RxD
Input data
7
SREF
Signal reference
Shield
Chassis ground
Except for pin 1, all pins of the console and modem connectors are isolated from the
frame ground of the Netra ft 1800 system.
The connectors have two screw-threaded mounting pillars with 4-40 UNC threads.
You should secure the cable headshell in place with the screws engaged in these
pillars. If you use a cable headshell without securing the screws, make sure that the
pillars do not prevent full engagement of the connector. This can happen with some
types of cable headshell where screw heads can foul against the mounting pillars.
You must also secure the other end of the cable to the console terminal if the
terminal provides some means of locking.
Note – To ensure EMC compliance always use a high quality screened cable that has
metal connector shells.
TABLE 2-5 shows the console terminal configuration parameters for both console and
modem ports. You can modify these parameters using Solaris utilities.
TABLE 2-5
Console and Modem Port Parameters
Parameter
Setting
Transmit rate
9600 baud
Receive rate
9600 baud
Data bits
8
Chapter 2
Hardware Installation
39
TABLE 2-5
Console and Modem Port Parameters (Continued)
Parameter
Setting
Stop bits
1
Parity enable/sense
off/off
XON/XOFF protocol
on
System consoles can be connected only to the CAF module.
Modem Port Connections
The modem port pinout is described in TABLE 2-6.
TABLE 2-6
Modem Port Pinout
Pin
Function
Description
1
GND
Chassis ground
2
TxD
Output data
3
RxD
Input data
4
RTS
Output handshake
5
CTS
Input handshake
7
SREF
Signal reference
8
DCD
Input status
20
DTR
Output status
Shield
40
Netra ft 1800 Installation Guide • February 1999
Chassis ground
Alarms Port Connections
The alarms port pinout is described in TABLE 2-7.
TABLE 2-7
Alarms Port Pinout
Pin
Description
Pin
Description
1
RESET0+
9
ALARM0-NC
2
RESET0-
10
ALARM0-COM
3
RESET1+
11
ALARM1-NO
4
RESET1-
12
ALARM1-NC
5
SYSTEM-NO
13
ALARM1-COM
6
SYSTEM-NC
14
ALARM2-NO
7
SYSTEM-COM
15
ALARM2-COM
8
ALARM0-NO
Chapter 2
Hardware Installation
41
42
Netra ft 1800 Installation Guide • February 1999
CHAPTER
3
Electrical Supply Installation
This chapter provides information about the Netra ft 1800 system switches and the
installation of the electrical supply. See the Netra ft 1800 Hardware Reference Manual
for full details of the electrical supply hardware.
The Netra ft 1800 has six power input feed pairs, three for each side, which plug in
to the back of the system. These must be assembled by the user, as described in
“Connecting the Power Leads” on page 51.
Note – This equipment is only intended for installation in a Restricted Access
Location as defined by UL1950, 3rd Edition, and EN60950: 1992 / A11: 1997.
Note – In NORWAY, this requirement does not apply to permanently connected
equipment or pluggable equipment type B, installed in areas where equipotential
bonding has been applied, e.g. a telecommunications Central Office.
System Switch
The Netra ft 1800 in fault tolerant mode consists of two sides: processors and
associated modules which function and are powered as separate systems. The
system switches of the Netra ft 1800 function as standby devices for their respective
sides, enabling and disabling the power supply units (PSU) outputs. The system
switches are push, momentary switches. They are located on the CAF module on
each side of the system.
The system does not contain any integral circuit breakers. The only means of
isolating the system from power is by means of external circuit breakers, to be
provided by the user.
43
Note – The system On and Stby switches handle low voltage signals only; the highpower circuits do not pass through these switches.
DC Source Site Requirements
The DC source site requirements are as follows:
■
■
■
■
Suitable for use in –48 Vdc ((classified SELV) nominal or –60 Vdc (classified
TNV-2) nominal systems.
The supply source must be electrically isolated by double or reinforced insulation
from any hazardous AC or DC source.
The DC source must be reliably connected to earth (that is, battery room positive
bus is connected to the grounding electrode).
The DC source must be capable of providing up to 925W of continuous power per
feed pair. The sum of all three feeds on one side will be less than 1500W for
single-feed and 3000W for dual feed.
Overcurrent Protection Requirements
Overcurrent protection devices must be provided as part of each host equipment
rack.
Circuit breakers meeting the requirements shown in TABLE 3-1 must be fitted
between the DC source and the Netra ft 1800.
TABLE 3-1
44
Overcurrent Protection Requirements
Current rating
30A maximum
Voltage
Maximum 60 Vdc rated in –48 Vdc power systems
Maximum 75 Vdc rated in –60 Vdc power systems
Type
Fast trip
Protection
Double pole breaking (both grounded and ungrounded conductor
open on fault)
Contact gap
Minimum 3 mm
Nuisance tripping
Circuit breaker must not operate when presented with an inrush
current of 27 amps and a duration of 2.5 microseconds
Quantity
One per feed, up to 12 per system
Netra ft 1800 Installation Guide • February 1999
Caution – Double pole circuit breakers are required on each rail for DC
installations. This is necessary because the return path of the current is not isolated
in the PSU.
FIGURE 3-1 on page 3-46 shows the required arrangement for single power rails.
FIGURE 3-2 on page 3-47 shows the required arrangement for dual power rails.
Note – Overcurrent devices must meet applicable national and local electrical safety
codes and be approved for the intended application.
Chapter 3
Electrical Supply Installation
45
Return A
CB
CB
–48V supply
A
CB
CB
CB
CB
Return B
RTN B
RTN A
–48V A
–48V B
–48V supply
B
RTN B
RTN BA
–48V A
–48V B
RTN B
RTN A
–48V A
–48V B
CB
RTN B
RTN A
–48V A
–48V B
CB
CB
RTN B
RTN A
–48V A
–48V B
CB
CB
RTN B
RTN A
–48V A
–48V B
FIGURE 3-1
46
Circuit Breakers for Single Power Rails
Netra ft 1800 Installation Guide • February 1999
CB
Return A
CB
CB
–48V supply
A
CB
CB
CB
CB
CB
RTN B
RTN A
–48V A
–48V B
CB
Return B
–48V supply
B
CB
RTN B
RTN A
–48V A
–48V B
CB
CB
RTN B
RTN A
–48V A
–48V B
CB
CB
CB
CB
CB
CB
CB
CB
FIGURE 3-2
RTN B
RTN A
–48V A
–48V B
CB
CB
RTN B
RTN A
–48V A
–48V B
CB
CB
RTN B
RTN A
–48V A
–48V B
CB
Circuit Breakers for Dual Power Rails
Chapter 3
Electrical Supply Installation
47
Required Connection Materials
DC branch circuits:
■
The required number of field wiring kits are supplied in the shipkit with each
system, according to configuration.
Grounding:
■
■
■
One Thomas & Betts two-hole lug (part number: 54204-UB) suitable for 8 AWG
conductor or UL/CSA approved equivalent having 5/8-inch pitch; torque value:
3.5 Nm maximum.
A Thomas & Betts crimping tool (part number: TBM 5-S), or approved equivalent
to secure the lug on to the cable.
A grounding bus bar that is near the equipment and easily accessible.
Dual Grounding Environment:
■
!
Additional Thomas & Betts two-hole lug for logic 0V studs.
Caution – External filtering and/or surge suppression devices may be required on
the power feeds where branch circuit electromagnetic characteristics are unknown.
DC Supply and Ground Conductor
The requirements are:
■
■
■
■
■
■
■
48
Suitable conductor material: copper only.
Supply conductors: 8 AWG (6 mm2) (between the Netra ft 1800 and the circuit
breaker).
Ground conductor: 8 AWG.
Cable insulation rating: minimum 75 degrees Celsius, Low Smoke Fume (LSF),
Flame Retardant.
Cable type must be one of:
■
UL style 1028 or other UL 1581 compliant equivalent.
■
IEEE 383 compliant.
■
IEEE 1202-1991 compliant or classified.
Branch circuit cable insulation color: per applicable national electrical codes.
Grounding cable insulation color: green/yellow.
Netra ft 1800 Installation Guide • February 1999
Dual Grounding Environment
Caution – To be compatible with grounding environments requiring isolation
between logic 0V and chassis ground, the fitted grounding bridge plate must be
removed and individual connections made to logic 0V and chassis ground studs.
The grounding bridge plate is located on the middle rear left edge of the unit
between the motherboards. The grounding studs at the base of the chassis are M5
studs with appropriate nuts already installed.
Before installation for dual grounding systems, remove the link from the chassis to
logic 0V. This exposes a 2-hole lug with tapped M5 threads (refer to FIGURE 3-3).
Caution – The use of certain PCI cards causes the frame and logic grounds to be
commoned. Refer to the documentation supplied with the PCI card.
▼
To Connect the Ground Lead
1. Strip 9mm of insulation from each end of the grounding lead.
2. Insert the lead into the Thomas & Betts two-hole lug provided (part no. 52024-UB).
Ensure that both the conductor and its insulation are gripped by the lug.
3. Position the lug and grounding lead assembly over the grounding studs.
Refer to FIGURE 3-3 on page 3-50. Tighten the two M5 nuts over the locking washers
provided.
4. Make the connection to the earthing bar at the end of the grounding lead.
Ensure there is adequate strain relief for the cable.
Chapter 3
Electrical Supply Installation
49
Chassis to
logic 0V link
Wrist strap
connection
point
Grounding
studs
FIGURE 3-3
50
Location of Chassis-to-Logic-0V Link and Grounding Points, and Wrist Strap
Connection Point
Netra ft 1800 Installation Guide • February 1999
Connecting the Power Leads
The inlet power filter must be plugged into the power sockets on the motherboards
at the back of the Netra ft 1800, then the six power leads must be attached to the
input power filter.
Note – Disengage all the PSUs before you insert the power connectors. Inserting the
connectors with the PSUs engaged can damage the connectors.
Top of chassis
Power lead
securing screws
Power lead
receptacles
Captive
spring-loaded
securing screw
(2 off)
Power inlet
sockets
Cable management loops
FIGURE 3-4
Power Inlet Filter
Chapter 3
Electrical Supply Installation
51
▼
To Assemble the Power Inlet and Leads
1. Insert the socket in the appropriate slot on the motherboard.
The socket can only be inserted one way round. The label on the front of the filter
indicates the correct orientation.
2. Tighten the captive spring-loaded screws, preferably finger-tight only.
If you use a screwdriver, these screws should be tightened no more than 6 in-lbf
(0.68 Nm). Refer to FIGURE 3-5.
+ RETURN B
+ RETURN A
Inlet filter
securing
screws
– Negative A
– Negative B
FIGURE 3-5
Power Connector Wiring Polarity and Securing Screws
3. Strip 9mm of insulation from boths ends of each power lead.
The connectors will not accommodate leads of greater than 8 AWG (6 mm2).
52
Netra ft 1800 Installation Guide • February 1999
4. Insert the leads into the appropriate receptacles in the terminal block.
Refer to FIGURE 3-6.
Insert power
leads here
FIGURE 3-6
Power Lead Receptacles
5. Tighten the terminal block power lead M4 securing screws to 1.5-1.8 Nm.
Refer to FIGURE 3-7.
Power lead
securing
screws
FIGURE 3-7
Power Lead Securing Screws
Chapter 3
Electrical Supply Installation
53
6. Use cable ties to secure the wires to the swivel loops in the mounting bracket (see
FIGURE 3-8).
The loops can be rotated to a convenient position. This strain relief method must be
implemented.
Caution – Observe correct working practices regarding the termination of cable ties.
Cable tie
FIGURE 3-8
Power Cable Arrangement for Strain Relief
7. Ensure the circuit breakers are open, then connect the other ends of the leads to
the circuit breakers.
Secure the cables using adequate strain relief.
54
Netra ft 1800 Installation Guide • February 1999
CHAPTER
4
Powering on the System
This chapter describes the procedure for powering on the Netra ft 1800.
▼
To Power On the System
1. Prior to powering on, inspect the supply conductors for mechanical security.
2. Activate the external circuit breakers.
Note – The power supply units (PSUs) remember their last requested state. They are
shipped in the ON state. Because the external circuit breaker is activated when the
last state of the PSU was ON, the PSU will power up at this point.
3. Push the On system switch on either CAF.
55
4. Push the other On system switch (on the other CAF front panel).
On
switch
Standby
switch
CAF
FIGURE 4-1
System Switches (Front Panel)
The PSU, CPUset and CAF Power LEDs will successively light, and the terminal will
display the output from the Power On Self Test (POST). The POST sequence may
take some time.
The CPUset LEDs will perform their own test sequence towards the end of the POST
procedure, then the Target LED on one of the CPUsets will flash as the OBP ok
prompt appears.
56
Netra ft 1800 Installation Guide • February 1999
CHAPTER
5
Software and Operating
Environment Installation
This chapter describes all the steps necessary to install a software and operating
environment release for the Netra ft 1800. To perform the steps described here, you
should be familiar with the Solaris operating environment.
Netra ft 1800 Install Media
The release software consists of the following:
■
■
■
Netra ft 1800 Full Installation containing Solaris and Netra ft 1800 install software.
Sun StorEdge Volume Manager 2.5 media kit and Sun StorEdge Volume Manager
patches.
Supplemental CD, which contains PCI card drivers, SunVTS and other utilities.
Disk Space Requirement
Netra ft 1800 release software occupies approximately 540 Mbytes of disk space.
57
Installation Methods
The Netra ft 1800 supports two types of installation: local, from a local CD-ROM
drive; or network, from a machine set up as a Solaris installation server. The
requirements for these two types of installation are described in the following
subsections.
You must install the Sun StorEdge Volume Manager package when the Netra ft 1800
installation is complete in order to implement fault tolerant operation. See Chapter 6
“Installing and Configuring Sun StorEdge Volume Manager” for more details.
You should install patches after the Netra ft 1800 software installation.
Recommended Solaris patches are included on the Netra ft 1800 Installation CDROM. Any recommended patches should be installed immediately after the reboot
at the end of the installation.
The local and network installation procedures differ only in their initial steps.
Otherwise, the procedure is the same for both types of installation.
Note – Inadvertent keyboard use during installation can abort installation.
Local Installation
To perform a local installation of the Netra ft 1800 software, you must have an RMM
module that contains a CD-ROM drive in slot A-RMM or B-RMM of the Netra ft 1800
to be installed.
Local installation involves booting the Netra ft 1800 from one of its CD-ROM drives
while an installation CD-ROM is in the drive.
Note – The CD-ROM cannot be loaded into the CD-ROM drive unless the drive is
powered on. Do not attempt to load the CD-ROM unless the module’s Power LED is
lit.
58
Netra ft 1800 Installation Guide • February 1999
Network Installation
To perform a network installation of the Netra ft 1800 software, you must ensure the
following:
■
■
Access to a SPARC server on which the Netra ft 1800 software can be installed. (A
CD-ROM drive is needed for the initial server installation but need not be present
for the network installation.) In the following instructions, this will simply be
referred to as the server.
That the Netra ft 1800 system to be installed is on the same subnet as the server.
In the following instructions, this will be simply referred to as the client.
Chapter 5
Software and Operating Environment Installation
59
Before You Start
Caution – Before inserting a CD-ROM disk into your system read “Handling and
!
Taking Care of your CD-ROM Disks” in the Netra ft 1800 Compliance and Safety
Manual. In some circumstances if your CD-ROM disk does not have a clean data
surface your system may fail to boot.
1. Establish the following:
■
■
■
■
■
The system Ethernet address (displayed in the BOOT PROM messages at system
startup, which you can display with the banner utility, invoked from the ok
prompt).
The system IP address (see your system administrator).
The machine name (see your system administrator).
The netmask (see your system administrator).
The name service (for example, NIS or NIS+; see your system administrator).
2. You need to be at the OBP ok prompt in order to perform the installation.
▼
To Install the Software
This section describes the steps necessary to install a Netra ft 1800 system with the
Solaris operating environment and Netra ft 1800 software.
Note – It is recommended that you install Solaris on one hard disk only in order to
optimize the performance of the Volume Manager.
1. Disengage all the hard disk drive modules except the one in the location on which
you wish to install the operating environment.
See FIGURE 2-17 on page 2-33. You do not need to remove the modules from their
slots completely.
2. If the system is powered down, power on the system.
See “To Power On the System” on page 55.
3. Perform Step a for network installation or Step b for local installation.
a. Set up an install server with the Netra ft 1800 CD-ROM
Follow the procedures outlined in Chapter 7 of the Solaris Advanced Installation
Guide (part number 802-5740-10).
60
Netra ft 1800 Installation Guide • February 1999
b. Insert the Netra ft 1800 CD-ROM in the drive on side A, at the top of the
system, or the drive on side B at the bottom of the system.
Check that the Power LED is lit on the RMM that contains the CD-ROM drive.
4. Boot the system.
a. For local installation, type:
ok boot a-cdrom0
if you inserted the CD in the CD-ROM drive on side A, or
ok boot b-cdrom0
if you inserted the CD in the CD-ROM drive on side B.
b. For network installation, go to the OBP ok prompt and type:
ok boot a-net0
The Target LED on one CPUset will flash rapidly, and the Diag LED on the other
CPUset will flash at approximately half the speed.
Wait for booting to complete. The Netra ft 1800 software installation program then
starts.
5. Install the Solaris operating environment.
Refer to the Solaris 2.6 documentation for full details of installing the operating
environment. The following Solaris installation documents are shipped with
Netra ft 1800:
■
“Start Here” (a fold-out card) part number 805-3866-10
■
Solaris 2.6 Hardware: 3/98, Chapter 1, part number 805-3540-10
■
Solaris Advanced Installation Guide, part number 802-5740-10
In the course of Solaris installation, follow the instructions on the screen, using the
following information:
a. Accept the device offered by the system as the default disk.
b. Choose Manual Layout.
Chapter 5
Software and Operating Environment Installation
61
You must leave two free slices for Sun StorEdge Volume Manager. The disk layout
should have a maximum of five slices, plus the overlap slice, similar to the
following:
TABLE 5-1
Suggested Disk Layout
Slice
Size
/
3000
swap
512 (rounds up to 513)
overlap
no change
/export
2000
/opt
2000
/var
1050
There will be some rounding differences.
You must also leave 1024 sectors, or 512K, free for Sun StorEdge Volume Manager
within the total space available. This space is required for the allocation of an ondisk database to allow the disk to be encapsulated. See the Sun StorEdge
Volume Manager Release Notes for full details.
6. Select Manual Reboot.
7. After Solaris has finished booting, set the default boot device:
# eeprom boot-device=a-dsk0 diag-device=a-dsk0
This sets the boot device to the disk in location A-DSK0. If you installed on a disk
drive in a different location, replace a-dsk0 with the location that corresponds to
the default device that you set during Solaris installation.
8. Re-engage the HDD modules which you removed before installation, and remove
the CD from the drive if you installed locally.
Eject the CD using vold.
9. Reboot the system by typing:
# reboot
A few minutes after the system has rebooted to the system prompt, the Sync LEDs
on the CPUsets will illuminate and remain steadily lit, indicating that the system is
now running in synchronization.
62
Netra ft 1800 Installation Guide • February 1999
10. Install the appropriate patches.
Refer to the Release Notes accompanying the CD.
11. Install the required PCI drivers and, if desired, SunVTS.
Refer to the Release Notes accompanying the CD.
5.1
Finishing Installation
Finishing installation includes:
5.1.1
■
Appending the path to the Netra ft 1800 CMS utilities to the PATH variable;
■
Setting the MANPATH environment variable to include path to the man pages
shipped with the Netra ft 1800 software.
Setting up Access to
Netra ft 1800 CMS Utilities
To allow access to Netra ft 1800 CMS utilities, append the following path to your
PATH variable in your shell start-up file.
For a C-shell, in your $HOME/.cshrc file type:
setenv PATH ${PATH}:/usr/platform/SUNW,Ultra-4FT/SUNWcms/sbin
For a Bourne or Korn shell, in your $HOME/.profile file type:
PATH=${PATH}:/usr/platform/SUNW,Ultra-4FT/SUNWcms/sbin:
export PATH
5.1.2
Setting the MANPATH Variable
To obtain access to the Netra ft 1800 man pages, you must assign or append
/opt/SUNWsms/mfs/lib to the MANPATH environment variable.
Chapter 5
Software and Operating Environment Installation
63
For a C-shell, in your $HOME/.cshrc file type:
setenv MANPATH ${MANPATH}:/opt/SUNWftm
For a Bourne or Korn shell, in your $HOME/.profile file type:
MANPATH=${MANPATH}:/opt/SUNWftm
export MANPATH
64
Netra ft 1800 Installation Guide • February 1999
CHAPTER
6
Installing and Configuring
Sun StorEdge Volume Manager
This section contains guidelines for installing Sun StorEdge Volume Manager to
provide fault tolerant mass storage on the Netra ft 1800 system.
The main steps involved are:
1. Using pkgadd to load the Volume Manager packages, and install any required
patches.
2. Configuring the Volume Manager software as described in “Setting up the
Volume Manager Environment” on page 68.
3. Initializing the Volume Manager disk storage as described in “Initializing the
Volume Manager” on page 69.
Refer to the Sun StorEdge Volume Manager documentation for full information
about installing and using the Volume Manager, and to the Netra ft 1800 User’s Guide
for information about using the cmsconfig utility. (You use cmsconfig to obtain
the device name of the root disk when you add disks to your server.)
You perform all of the steps in this chapter as root.
Before You Install Sun StorEdge
Volume Manager
Sun StorEdge Volume Manager is installed on the Netra ft 1800 system in the same
way as other applications.
65
In the following procedure, you use cmsconfig to obtain the Disk attribute of the
HDD module and the Funct_0 attribute of the CD-ROM drive (plus Funct_1 if you
have an additional drive).
To identify the device name of the root disk:
1. Start cmsconfig:
# /usr/platform/SUNW,Ultra-4FT/SUNWcms/sbin/cmsconfig
2. Locate the HDD modules in the list.
You can press p to page down to see second and subsequent pages.
3. For each HDD module in the list:
a. Enter the number next to the module.
The attributes of the module are displayed.
b. Note the Disk attribute of the module.
This is a normal Solaris device name.
c. Press q to return to the list of modules
4. For each RMM module in the list:
a. Enter the number next to the module.
The attributes of the module are displayed.
b. Note the Funct_0 attribute of the module.
This is the device name of the CD-ROM drive. It is a normal Solaris device name.
If there is a second CD-ROM drive in the module, note the Funct_1 attribute.
This is the device name of the second CD-ROM drive. It is a normal Solaris device
name.
c. Press q twice to exit cmsconfig.
You will need this information when you initialize the Volume Manager. It can be
useful for other purposes, so you may wish to keep it.
You should install the Volume Manager after the Netra ft 1800 software and any
required patches, and before other applications. You should also configure the
Volume Manager volumes before you install other applications.
Before you install Sun StorEdge Volume Manager, copy the file /etc/vfstab to /
etc/vfstab.prevm. This standard practice helps Sun support engineers to recover
a system in the very rare event of serious system failure.
66
Netra ft 1800 Installation Guide • February 1999
!
!
Caution – Failures during the Sun StorEdge Volume Manager boot disk
encapsulation process could result in loss of data on the root file system.
Caution – Encapsulation of the boot disk will require that the installed system is
shutdown and rebooted several times.
Installing the Volume Manager Software
This section describes the special requirements when you install the Volume
Manager on the Netra ft 1800. You must install Sun StorEdge Volume Manager and
patches specified in the Release Notes.
See the Sun StorEdge Volume Manager Installation Guide for full details of the Volume
Manager installation.
Mounting the CD-ROM Manually
If the Solaris daemon vold is running (the default situation), you can simply refer to
the path to the CD-ROM, /cdrom/cdrom0/netra_ft1800. If, for some reason,
vold is not running, mount the CD-ROM with the command:
# mount -F hsfs -r /dev/dsk/drive_id /cdrom
Replace drive_id with the correct value for the CD-ROM drive on your system.
Running the Installation
Follow the instructions in the Sun StorEdge Volume Manager Installation Guide and
any instructions in the Sun StorEdge Volume Manager and Netra ft 1800 Release
Notes to run the installation.
You use pkgadd to load the standard set of packages for Sun StorEdge
Volume Manager. You must also follow any instructions in the Release Notes to
obtain and install Volume Manager patches required for the Netra ft 1800.
Chapter 6
Installing and Configuring Sun StorEdge Volume Manager
67
Setting up the Volume Manager Environment
When you have loaded the Volume Manager software, and before you run
vxinstall to initialize it, you must configure the software to run as required on the
Netra ft 1800. This involves the following:
■
■
■
■
Setting default volume creation to mirror disks by default when they are created
Configuring the Volume Manager to deal with stale boot disks
Configuring the Volume Manager’s recovery behavior when a physical disk fails
Enabling boot disk detection
Setting Default Volume Creation
Note – Disk mirroring in Volume Manager provides the fault tolerance for the disk
storage of the Netra ft 1800. This step is essential to ensure that all disks are
mirrored.
To mirror disks by default when they are created, enter the following:
$ echo "mirror=yes" > /etc/default/vxassist
Note – If the vxassist file already exists, resolve any differences between the
contents of the file and the line mirror=yes. The resulting file must contain the line
mirror=yes.
The preceding command creates the /etc/default/vxassist file with the
required line in it. This sets the tunable parameters used by the Volume Manager
vxva GUI. (These parameters can be overriden via the command line.) See the
Sun StorEdge Volume Manager documentation for full details.
Dealing with Stale Boot Disks
To prevent the system from stopping when it encounters a stale boot plex during the
boot sequence, enter the following:
# mkdir -p /etc/vx/sbin
# echo ’/sbin/uadmin 2 1 "stale"’ > /etc/vx/sbin/vxaltstale
# chmod +x /etc/vx/sbin/vxaltstale
68
Netra ft 1800 Installation Guide • February 1999
These commands create a startup script that enables the Volume Manager to exit
back to the OBP upon encountering a stale boot plex, allowing the Volume Manager
to try alternative boot disks.
Enabling Recovery Behavior and Boot Disk Detection
To enable correct recovery behavior and boot disk detection, make the following
changes to the startup file /etc/rc2.d/S95vxvm-recover:
# vxrelocd root & commenting out this line enables correct recovery behavior
# start the boot disk utility the following line enables boot disk detection
/usr/platform/SUNW,Ultra-4FT/SUNWcms/lib/vxbootcheck &
Make the edits exactly as shown, commenting out the vxrelocd line and with the
complete path to vxbootcheck. Be sure to append an ampersand to the
vxbootcheck line.
The default behavior of Sun StorEdge Volume Manager when a physical disk fails is
not compatible with the hot-plug of HDD modules on the Netra ft 1800. By default,
when the Volume Manager detects I/O failure on mirrored volumes, it restores
redundancy by relocating the objects to spare disks. This is called hot relocation. You
need to disable this default behavior. By commenting out the vxrelocd line, as
shown above, you prevent hot relocation.
You must repeat all these modifications after system upgrades.
Initializing the Volume Manager
When you have loaded the Sun StorEdge Volume Manager, run vxinstall as
described in the Sun StorEdge Volume Manager Installation Guide. This section
describes the special actions you must take to initialize the Volume Manager for the
Netra ft 1800.
Note – Volume Manager mirroring provides the fault tolerance for disk storage on
the Netra ft 1800. This is provided by default when you add a disk to the Volume
Manager provided you have added the required line to /etc/default/vxassist
as described in “Setting Default Volume Creation” on page 68.
Chapter 6
Installing and Configuring Sun StorEdge Volume Manager
69
Setting up Boot Disks
You must encapsulate the boot disk for Sun StorEdge Volume Manager to be able to
mirror it. You are strongly recommended to do the following to ensure that the boot
disk is configured for the Netra ft 1800:
■
Assuming that A-DSK0 is the Solaris install disk, you should have entered the
command shown below at the end of the Solaris installation. See eeprom (1) for
details on using eeprom command to change the boot device.
# eeprom boot-device=a-dsk0 diag-device=a-dsk0
■
Encapsulate the boot disk when the vxinstall process asks whether you want
to do so.
■
To mirror this root disk, add another disk, for example, b-dsk0, as a new disk.
See the Sun StorEdge Volume Manager Installation Guide for details of how to do
this during the vxinstall process.
The vxinstall process proposes the rootdg disk group by default. Accept this to
add the boot disk and disks intended to mirror the boot disk to this group.
When the vxinstall process is complete, use the vxdiskadm utility to make the
new disk a mirror of the boot disk, for example, make b-dsk0 a mirror of a-dsk0.
To start vxdiskadm:
# vxdiskadm
Select option 6, Mirror volumes on a disk.
See the Sun StorEdge Volume Manager System Administrator’s Guide for full details of
using vxdiskadm.
Note – To assist recovery of data in the event of disk failure, use the boot disk only
for data required to boot the system. Do not add user-data disks to the rootdg
group.
70
Netra ft 1800 Installation Guide • February 1999
Setting up Other Disks
Use vxdiskadm to add disks other than the boot disks to the system as new Volume
Manager disks after the vxinstall process is complete. Select option 1, Add or
initialize disks.
See the Sun StorEdge Volume Manager System Administrator’s Guide for full details of
using vxdiskadm.
See the Netra ft 1800 User’s Guide for details of adding disks that are not already in
the system.
Note – You should plan to store all non-boot data on disks in groups other than
rootdg.
▼ To Add a New Disk
1. Use the cmsconfig utility to check that the disk is enabled.
The disk must be physically present and enabled.
2. Check that the disk is known to the Volume Manager:
# vxdisk list
3. Add the disk to a disk group.
See the Sun StorEdge Volume Manager User’s Guide for details of creating and adding
disks to disk groups.
Create new disk groups for user data with names other than rootdg.
Note – If the new disk is not visible to the Volume Manager, enter the command:
vxdctl enable
Configuring Storage
Once a disk belongs to a disk group, you can allocate storage using any of the
methods described in the Sun StorEdge Volume Manager User’s Guide or the
Sun StorEdge Volume Manager System Administrator’s Guide.
Chapter 6
Installing and Configuring Sun StorEdge Volume Manager
71
Boot Disk Aliases
Sun StorEdge Volume Manager boot disk aliases are not automatically updated
when a disk is physically relocated. You must update boot aliases manually using
the eeprom command when you relocate an HDD module.
You might prefer to use the aliases defined by the PROM, for example, a-dsk1.
These aliases, however, reflect the location of disks, rather than the specific virtual
disk. See the OpenBoot 3.x Command Reference Manual (Part Number 802-5837-10) for
details.
Note – Be sure that the EEPROM variable use-nvramrc is set to true. Use of the
NVRAM startup file (NVRAMRC) is required for correct operation of the Volume
Manager software.
Note – There is a limit to the number of characters that can be stored in the
NVRAMRC. Therefore, there is a limit on the number of boot disk aliases that can be
recorded in it.
72
Netra ft 1800 Installation Guide • February 1999
Index
A
airflow
clearance, 3
direction of, 2
inlet plenum, 6
natural convection, 2
requirements, 2
alarms connector, 38
alarms port
pinout, 41
B
boot device, setting default, 62
boot disk detection, configuring, 69
brackets, removing, 12
C
cable bracket assemblies, 13, 22
cable management, 35
cable routing, 8
CAF module
connectors, 38
removing, 27
CD-ROM drive
name for Volume Manager, 66
circuit breaker
requirements, 43, 44
connection materials, 48
Console Alarms and Fans module, See CAF module
console connector, pinout, 39
console port, parameters, 39
CPUset
changing, 25
D
DC source requirements, 44
dimensions, 2
disk
adding for Volume Manager, 71
layout for Volume Manager, 62
mirroring with Volume Manager, 65, 68
removing, 33
space requirements, 57
disk chassis
injector/ejector mechanism, 30, 32
removing, 30, 32
replacing, 32
E
eeprom command, boot disks setup for Volume
Manager, 70
EEPROM variable, enable NVRAM startup file, 72
electricity supply installation, 43
elevation, limitations for operating and storage, 2
environment variable
PATH, 63
73
environmental considerations, 1
environmental filters, installing, 37
Ethernet address, 60
F
filter replacement kit, 3
filters, installing, 37
flanges, See mounting flanges
frame ground, 49
G
GR 63 Core heat release calculation result, 2
grounding
connections, 51
dual, 48
isolation, 49
materials required, 48
requirements, 48
H
hard disk drive
name for Volume Manager, 66
hardware installation, 9
heat release
GR 63 Core calculation result, 2
maximum rate of, 2
hostname, 60
humidity, limitations for operating and storage, 2
I
I/O connections, 38
injector/ejector mechanism, 23
disk chassis, RMM chassis, 30, 32
installation methods, 58
installation, electricity supply, 43
IP address, 60
74
Netra ft 1800 Installation Guide • February 1999
L
LD_LIBRARY_PATH environment variable, 63
local installation
procedure, 58
requirements, 58
location, considerations, 1
logic ground, 49
M
machine name, 60
modem port
parameters, 39
pinout, 40
modules
injector/ejector mechanism, 23
mounting configurations, 6
mounting flanges
19-inch, 14
23-inch, 18
24-inch, 18
600mm, 18
description, 6
sizes, 13
mounting kit
19-inch, 13
23-inch, 18
24-inch, 18
600mm, 18
mounting platform, 12
mounting plinth, 12
mounting requirements, 6
mounting screws, 6
N
name service, 60
netmask, 60
network installation
requirements, 59
NVRAMRC, specify boot disk aliases, 72
O
On system switch, 56
ON/STBY switch, 43, 44
operating environment installation, 57
overcurrent protection, 44
P
packaging, 12
partitions, required by Volume Manager, 62
patches, required, 58
PATH, setting up, 63
PCI card carrier
removing, 28
platform, shipping, 12
plinth, mounting, 12
power
DC source requirements, 44
DC supply and ground, 48
power cable arrangement, 54
power leads, connecting, 51
power supply
removing, 29
power switch, 43
power-on, 55
R
rack
considerations, 6
depth requirement, 8
height requirement, 7
loading capacity, 7
mounting, 6
safety considerations, 8
rack sizes, 6
recovery behavior, configuring, 69
Remote Control Processor ports, 38
RJ45 connectors, on CAF module, 38
RMM chassis
injector/ejector mechanism, 30, 32
removing, 30, 32
RMM module
name for Volume Manager, 66
RS232 ports, on CAF module, 38
S
screws, mounting requirements, 6
Securing, 53
SEVM, See Volume Manager
shipping configuration, 6
software installation, 57
software release contents, 57
Solaris installation
local CD-ROM, 58
pre-installed software, 57
Solaris installation documents, 61
Solaris installation server, 59
stale boot plex, in Volume Manager, 68
system
power on, 55
unpacking, 9
unshipping, 9
T
temperature
ambient, 1
operating, 1
storage, 1
terminal configuration parameters, 39
tools supplied, 9
V
Volume Manager
boot disks setup, 70
environment setup, 68
initializing with vxinstall, 69
installation procedure, 65
installation sequence, 66
loading packages and installing patches, 67
use with server, 65
vxassist file, 68
vxdiskadm, configure disks in Volume
Manager, 71
Index
75
W
weight
empty chassis, 6
maximum, 2
removable modules, 6
76
Netra ft 1800 Installation Guide • February 1999