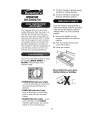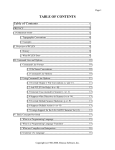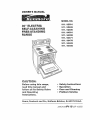
1
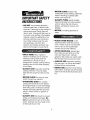
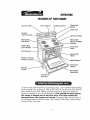
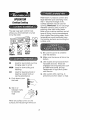
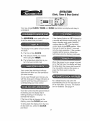
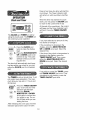
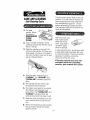
OWHER'S
IVIAHUAL
CAUTEON:
Before
using this
read this manua!
foHlow
all
its
Safety
range,
and
Rules
and Operating
_nstructions.
Sears,
Roebuck
and
Co.,
Hoffm_n
•
.
.
°
Safety
instructions
Operation
Care and Cleaning
Problem
Solving
Estates,
IL 60179
229C4020Pt
18
U.S.A.
(SR- 10323)
ELECTRICFREE-STAHDING
Table of Contents
Range Safety ....................
3_6
Stability Device ...................... 3
Features of Your Range ........ 7
Removal of Packaging Tape. 7
Cooking Elements .............
8
Control Settings ................... 8
Home Cannfng ..................
8
Hour/Minute Arrow Pad ....... 9
Display ..............................
9
Indicator Lights ................
9
Black Out The Display .......... 9
F-Codes ...............................
g
Power On ..........................
9
Automatic Oven Shut-off ..... 9
To Set the Clock ................. 10
To Set the Timer .............
10
To Reset The Timer ........... 10
To Cancel The Timer ......... 10
Oven Cooking Tips ....... 11-t4
Strong Smell or Odor ............ 11
Aluminum Foil ....................
11
Oven Vent ..........................
11
Preheating ............................ 11
Temperature Sensor ........... 11
No Peeking .........................
1l
Bakeware ............................... 12
Bakeware Placement .......... t 2
Oven Racks ........................
12
Oven Control .....................
13
Hide-A-Way Handle ............ 13
To Set Bake ......................
Element Cycling ...............
Oven Temperature
Adjustment ............
13,
Broiling
............................
NUMBER:
25
I5
Self-Cleaning ................
16-17
Control Panel ......................
I8
Broiler Pan and Grid .......... 18
Walls of The Oven ...........
18
Cooktop and Burner Box
Bottom .............................
18
Painted Surface ................
18
Control Knobs ..................
19
Replacing Oven Light Bulb. 19
Storage Drawer .................
20
Lift Up Cooktop .................. 21
Cooktop Units ....................
21
Oven Racks ........................
22
Oven Door ............................ 22
Before Calling for
Service ..........................
23,
Temperature Adjustment ....
Warranty ...............................
Consumer Service
Numbers .............................
For your convenience
and future
reference,
your model
and serial
number
in the space
located
behind
the storage
drawer.
MODEL
14
14
SERIAL
please
provided.
NUMBER:
24
25
27
28
write
down
They
are
IMPORTANTSAFETY
iNSTRUCTIONS
SAVE
THESE
iNSTRUCTIONS
Read all instructions
before
using this appliance.
When using
gas or electrical
appliances,
basic
safety
precautions
should
be followed,
including
the following=
Outside
Bracket
Edge Of
To Be
Left Or
Right Side Of Range
Could Result
_:,_'"
• Install Anti-tip
_,:_
Device Packed With i:i_i
Range
_.i
. See Installation
Instructions
i_:_
Tools
you
will
Fig.
1
need:
o Phillips head screwdriver
° 1 3/8" open end or adjustable wrench
1. Remove the bracket from the
prepack located inside the oven
2. Decide whether the bracket will be
installed on the right or left side of
range location
1
Fasten the bracket securely with
the screws provided, Screws are
self-drilling in wood, plywood,
particle and chip board, and most
metal framing. If attaching to
masonry, you can buy suitable
screws and anchors at hardware
stores Use a masonry drill to drill
the required holes
Bracket I I Wall
Screw Must Enter
\ I I Plate
Wood Or Metal
3. If the bracket side of the range is
adjacent to a cabinet, place the
bracket against back wall and
cabinet as shown in Figure 1,
Fig. 2
w
If there is no adjacent cabinet,
determine where the location of
the range side (painted outside
panel) will be Place the bracket
with its outside edge at this
location and against back wall,
See Figure 2.
11
4. Determine whether you wili anchor
the bracket to the floor or wal!,
Make sure this location is clear of
electrical wiring or plumbing,
3
. _1
/
Attachment To Wall
Using the wrench, back out the
four leg levelers at least two turns.
See your installation guide for
rpore leveling information before
positioning range
Slide the range into place. Be sure
rear leg leveler fully engages the
slot in the bracket. If range cannot
be moved back far enough for
rear leg leveler to enter bracket,
move bracket forward as required
and attach to floor in new location,
IMPORTANTSAFETY
iNSTRUCTiONS
CAUTION:
NEVER STORE items
of interest to children on the
backguard or in cabinets above the
appliance. Children climbing on the
appliance could be seriously injured
• KEEP THIS book for later use
• NEVER USE your appliance for
warming or heating the room
i i,Hiil
iii
,,i,i
WARHiNG!
To pre-_
•_,/
vent accidental
tipping
_
x_i
J of the range from ab-_
normal
usage,
including
excessive
loading
of the oven
door, attach the range to the
wall or floor by installing
the
Anti-Tip device supplied.
If the
range is moved
for cleaning,
servicing
or any reason,
be
sure the Anti-Tip
device is reengaged
properly
when
the
range is slid back in the open.
Bng. Failure
to do so could
result in the range tipping
or
personal injury. To inspect
the
anti-tip
device,
remove
the
storage
drawer
and look to
see if the rear leg leveler
fully
engages
the
slot
in the
bracket.
Important:
To insure safety for
yourself, family and home, please read
your Owner's Manual carefully Keep it
handy for reference Pay close attention
to Safety Sections BE SURE your
appliance is installed and grounded by a
qualified technician.
• DO NOT leave children alone or
unattended near an appliance in use
• TEACH CHILDREN not to play with
controls or any part of the appliance,
and not to sit, climb or stand on the
door, or any other part of the appliance r
• NEVER TRY to repair or replace any
part of the appliance unless instructions are given in this manual. All other
work should be done by a qualified
technician
• ALWAYS KEEP combustible wall
coverings, curtains, dish cloths,
towels, potholders, and other linens a
safe distance from the appliance.
• NEVER HEAT unopened food
containers. Pressure buildup can
cause the container to burst and cause
injury.
• NEVER LEAVE jars or cans of fat or
drippings in your oven,
• ALWAYS KEEP the oven and
surface unit areas free from things that
will burn. Food, wooden utensils, and
grease buildup could catch fire.
Plastic utensils could melt and canned
foods could explode. Your appliance
should never be used as a storage
area,
• ALWAYS KEEP your appliance clear
of things that will burn (gasoline and
other flammable vapors or liquids),
• NEVER TRY to clean a hot surface.
Some cleaners produce noxious
fumes, and wet cloths or sponges
could cause steam burns.
• NEVER WEAR loose fitting clothing
when using your appliance.
• NEVER USE a towel or other bulky
cloth as a potholder, and make sure
the potholder is dry. Moist potholders
and wet cloths or sponges could
cause steam burns, DO NOT let
potholders touch hot heating elements.
NEVER LEAVE surface units
unattended at high settings Boilovers
result in smoking or greasy spills
which could catch fire
IMPORTANTSAFETY
INSTRUCTIONS
- ALWAYS TURN utensil handles
inward and away from other surface
units to reduce the risk of burns
ignition Unintended contact and
spillage
• DO NOT touch heating elements
surfaces near them or interior oven
surfaces These may be hot enough to
cause burns even though they are
dark in cotor During and after use do
not touch or let clothing or flammable
material contact the elements or hot
surfaces until they have had time to
cool Other surfaces near the oven
vent openings oven door and
window and cooktop surfaces may
also be hot enough to cause burns
• NEVER
water
put heating elements in
PLACE OVEN RACKS in the
desired position while the oven is
cool If racks must be moved while
oven is hot do not let potholder
contact the hot oven element
• AFTER BROILING,
always take
the broiler pan and grid out of the
oven and clean them Leftover
grease in the broiler pan could catch
fire the next time you use your oven
. ONLY SOME kinds of glass or
ceramic cookware can be used for
cooktop cooking Make sure the
cookware you choose to use is
designed for cooktop cooking without
breaking due to the sudden tempera
ture change
° ALWAYS USE care when opening
the oven door Let hot air and steam
escape before moving foods
° NEVER USE aluminum foil to line the
oven bottom Improper use of foi! could
result in the risk of electrical shock and
fire
. ALWAYS USE care when touching
cooktop elements They will retain
heat after the range has been turned
off
• NEVER BLOCK the oven air vent
under the right rear element
• COOKWARE
USED for cooktop
cooking should be flat on the bottom
and large enough to cover the heating
area being used Undersized utensils
expose the heating element and may
result in direct contact or ignition of
clothing
• ALWAYS USE drip bowls to prevent
wiring and component damage Do
not use aluminum liners or foil in drip
bowls Improper use may result in risk
of electrical shock or fire
5
. iii
IMPORTANTSAFETY
INSTRUCTIONS
ii i
foil.
_q
CAUTION:line the drip
Never
bowls
with
aluminum
Foil can block the normal
heat flow and damage
the
range.
Always
use cookware
and woks that are flat on the
bottom
and the same
size as
the cooking
element
being
used. Cookware
should
not
• CLEAN ONLY the parts listed in this
manual, Follow all cleaning
instructions Be sure to remove broiler
pan and grid before the self-clean
cycle,
extend
more than
1" beyond
the edge of the cooking
element.
READ AND UHDERSTAHD
THIS INFORMATION
HOW!
• NEVER RUB, move or damage the
door gasket on self-cleaning ranges
o NEVER TRY to clean utensils,
cookware, removable parts, or broiler
pan and grid in the self-clean cycle
• DO NOT USE oven cleaners - No
commercial oven cleaner, or protective
coating of any kind, should be used in
or around any part of the oven,
Be sure everyone
in your home
knows
what to do in case of fire.
Never
use water
on a grease
fire; it will only spread
the
flames,
• HEVER FORCE the latch handle
open while oven is hot
1.
Turn off the surface
2,
Smother the flame with a tightly
fitting lid Use baking soda or a dry
chemical, foam, or halon type
extinguisher,
COOKTOP
Never
IMPORTAHT
SAFETY
NOTICE!
OVEN
Do not
The California
Safe Drinking
Water
and Toxic
Enforcement
Act requires
the governor
California
to publish
a list
substances
known
to the
to cause
birth defects
or
reproductive
businesses
1.
of
of
state
other
21_
harm and requires
to warn their cus-
tomers
of potential
exposure
to
such substances.
The fiberglass
insulation
in a self-cleaning
oven
will give off a very
of carbon
monoxide
cleaning
minimized
open door
ventilation
small amount
during the
cycle.
Exposure
can be
by venting
with an
or window
or using
fan or hood.
a
6
pick
GREASE
FIRE:
up a flaming
pan..,
elements
FIRE:
try to move
the
pan!
Close the oven door and turn
controls off
If fire continues, carefully open the
door, throw baking soda on the fire,
or use a dry chemical, foam, or
halon type extinguisher
OPERATION
FEATURES
OFYOURRANGE
Clock & Timer
Oven Control
Cooktop
Control
Oven Light
Oven Vent
Surface
Indicator
Light
Lift-up Cooktop
Removable
Removable
Plug-in Cooktop
Element
Drip Bowls
Hide-A-Way
Latch Handle
Broil
Oven Door
Latch
Element
Removable
Racks
Model and Serial
Number Location
Bake Element
Door
Gasket
Storage
Drawer
Removable
Oven Door
Broiler Pan
and Grid
To remove the adhesive left from packaging tape, use household dishwashing
liquid, mineral oil or cooking oil. With a soft cloth rub into the area and allow to
soak Rinse and dry well. Repeat procedure using an appliance polish to
insure no damage is done to the appliance. This should be done before
the range is turned on for the first time. The tape cannot
be
removed
once the range has heated,
Packaging tape can be found in
the following areas: Cooktop Surface, Door Handle, Oven Area, Control Panel
Area and Door Trim Area
7
Water-bath or pressure canners and
large diameter pots extending more
than 1" beyond the edge of the
cooktop element may be used 1or
canning However,
do not use large
diameter canners, pots or pans for
anything other than boiling water
Most syrup or sauce mixtures, and all
types of frying, cook at temperatures
much higher than boiling water. Such
temperatures could eventually harm
the cooktop surfaces surrounding the
surface units.
OPERATION
CooktopCooking
The sign near each control knob
shows you which element is turned
on by that knob
LEFT
FRONT
LEFT
REAR
RIGHT
REAR
1. Be sure the canner is centered
over the elementr
2. Make sure the canner is flat on the
bottom
HI
Used for quick starts, such as
bringing water to a boil
MED
Used for slow boiling and
saut6ing.
LO
Used for steaming foods or
keeping cooked foods at
serving temperature
t,
Push down to turn
the knob
2. Set on or
between marks
for desired
heat
I,_,
3. Use recipes and procedures from
reputable sources These are
available from manufacturers such
as Ball@ and Kerr@, and the
Department of Agriculture Extension Service.
4, Use caution while canning, to
prevent burns from steam or heat.
.
OFF
When any surface unit is on, the
surface unit indicator light will be on
8
OPERATION
Clock, Timer& OvenControl
Your new range CLOCK, TIMER
understand.
and OVEN operations are simple and easy to
The HOUR/MIN
arrow pads allow you
to set the exact time you need
If the display flashes an "F _' followed by
a number and beeps continuously, you
have a function error code. Note the
number after the "F" Turn the oven
control knob to the OFF position, Allow
the oven to cool for about 1 hour and
retry the oven operation If the problem
repeats call for service. Advise the
technician what the flashing code was
The display in the center of your control
will show:
1. The time of day CLOCK,
2. The amount of time you choose
when using the TIMER
3. The temperature selection as you
turn the oven control knob
When the power to your range is turned
on for the first time, the display will flash
the time when the power was turned off,
You can set the clock at this point, or
press the Clock pad to stop the
flashing
Your control has individual indicator
lights that will show you the operations
you have chosen
As you read through your manual, you
will find what each of these indicators is
used for and how they will help you in
understanding your new control
As a safety feature, this oven will
automatically shut off if it has been left
on for more than 12 hours, This feature
can be disabled See page 14
Your new control has the special feature
of blacking out the display (have
nothing showing in the display) To
activate this feature:
If the time of day is showing in the
display, press the CLOCK pad once
To bring back the display from the time
of day black-out, press the CLOCK
pad twice
9
three to five times, the timer wilt start the
count down. The Timer Indicator Light
will remain on until countdown reaches
OPERATION
When the timer has started the countdown, you may press the CLOCK pad
to return to the current time of day,
Clock and Timer
T_
At the end of the countdown, the control
will beep and the Timer Indicator Light
will flash. Press the TIMER ON/OFF
pad
,
The CLOCK and TIMER are set by
using the touch pads, The TIMER will
not control any oven operation,
If you have selected an amount of time,
but decide to change it:
If the countdown is showing in the
display, press the MINUTE/'_OUR
UP or DOWN arrow pad Select the
desired time,
1. Press the CLOCK pad
twice to make the display
flash.
2. Press the HOUR/MINUTE
UP or DOWN pads to set
the time of day The colon
will flash while you are setting the time.
If the time of day clock or temperature is
showing in the display, press the
TIMER ONtOFF pad. Then, press
either the MINUTE/HOUR
UP or
DOWN arrow pad. Select the desired
time.
The clock will automaticafly start keeping time within one minute or you may
press the CLOCK pad for immediate
start.
If you wish to cancel the TII_ER, press
the TIMER ON/OFF pad once. If the
countdown is not showing, press the
TIMER ON/OFF pad twice
The TIMER is only a minute timer It wilt
not control oven operations The maximum time you may set is 1l hours and
59 minutes.
Press the TIMER OH/OFF
pad "0:00" and the Timer
indicator light will flash,
i_
i, 2. Press the HOUR/
_::.:..
'
MINUTE UP or DOWN
arrow pads to set the time
you prefer to use The colon wilt flash while you are
setting the time
After releasing the arrow pad, the timer
indicator light and the colon will blink
10
Preheating is bringing the oven
temperature up to the temperature
you will be using during baking Let
the oven preheat thoroughly when
recipes call for preheating
OPERATION
OvenCookingTips
it is normal to have some odor when
using your oven for the first time. To
help eliminate this odor, ventilate
the room by opening
a window
or using a vent hood=
In the back of the
a small tube. This
that maintains the
oven Never move
IMPORTANT:
Never cover the oven
bottom or oven rack with aluminum
foil Improper use can cause poor
heat flow, poor baking results, and
may damage the oven finish
Temperature
oven you will notice
is a heat sensor
temperature of the
or bend this tube
Sens
Opening the door often to check
foods wilt cause heat toss and poor
baking results
The oven vent is located under the
right rear element This area could
become very hot during oven use
Never block
this vent,
,Oven Vent
Location
11
The oven racks are designed with
stop locks, a convenience as well as
a safety precaution. The guides have
a bump to prevent the racks from tilting when racks are pulled out of the
oven,
OPERATION
OvenCookingTips
Bump in
rack guide
FLAT COOKIE
SHEETS,
without
sides, allow air to circulate all around
the cookies for even browning.
Your oven has four (4) rack positions
Above the top guide cannot be used
for a rack position,,
" X-----J'
\q
GUIDE
SHINY PANS reflect heat, and are
perfect for cakes and quick breads
that a light golden brown crust
_4
4_
3_
GLASS, DARK NON.STaCK
OR
DARKENED
BY AGE BAKE.
WARE, absorb heat, and can be
used for yeast breads, pie crust or
foods that need a brown crust The
oven temperature when using these
pans should be reduced by 25°F.
2_
_3
_2
-
!
--1
Always
place
oven
the proper
position
is cool.
If baking with more than on.e pan,
place the pans so each has at least 1
to I 1/2" of air space around it. Place
pans so one is not directly above the
other
t2
racks
whale
in
oven
1. The door handle is
a baking or broiling
2. The door handle is
during a self-clean
OPERATION
latched during
function;
not latched
function,
OvenCookingTips
Your new range is equipped with a
hide-away-handle
(used for self-clean
only) that can be hidden under the
maintop when it is in the unlocked
position°
You may feel that your new oven
cooks differently than the oven it replaced. We recommend
that you
use your new oven a few weeks to
become more familiar with it, following the times given in your recipes
as a guide,, See Do It Yourself Temperature Adjustment in the back of
this manual to make the adjustment if
you feel your oven is too hot or too
cool for your cooking preference,
1. Be sure the handle is in the
unlocked position and raise the
cooktop
2. Push the handle into the latch
cover until it stops,
3. Lower the cooktop,
Your oven control has a selector knob
for choosing BAKE, BROIL, or
CLEAN, There are also three
indicator lights:
• PREHEATED
indicator
Light
-- turns on and stays on when oven
has reached selected bake temperature,
• OVEN ON Indicator
Light -turns on and stays on when bake,
broil, or clean function has been
chosen.
• CLEAN Indicator
Light -- turns
on for sd-ciean
If the CLEAN
Indicator Light flashes, you should
check for one of the following:
13
Never
latch
during
baking
the
oven
door
or broiling,
OPERATION
1. With the oven control in the OFF
position, press and hold the
MINUTE
UP and DOWN arrow
pads, at the same time, until
"ON" or "OFF" shows in the display.
2. Holding the MINUTE
UP and
DOWN arrow pads, at the same
time again, wilt alternate between
12 hour shut-off on or off,
OvenCookingtips
1. Turn the OVEN
CONTROL
KNOB to selected temperature
from WM to 550°F As the knob
turns the control display will show
the changing temperatures
When
the display shows your selected
temperature release the control
knob The temperature will remain
in the display for 5 seconds then
return to the time of day, To recall
the temperature display press the
_NUTE
down arrow pad
2. The "OVEN ON" indicator light
wilt glow,
3. When the oven has reached the
selected temperature, a series of
short tones will sound, and the
"PREHEATED"
and "OVEH
ON" indicator lights will glow,
4,. The "PREHEATED"
and
"OVEN
OH" indicator lights will
remain on until baking is complete
and the control knob is turned to
the OFF position
The Oven Temperature
Sensor continuously senses and controls the
temperature
inside the oven To
keep a constant set temperature,
the elements will cycle or turn on
and off during cooking
14
The US Department of Agriculture
notes that meat cooked rare is
popular, but meat cooked to only
140°F (rare) moans that some food
poisoning organisms may survive
OPERATION
Broiling
The closer you place foods to the
broil element, the faster foods brown
on the outside yet remain red to pink
in the center.
Broiling is cooking by direct heat
from the upper element The oven
door should remain open to the broil
stop position during broiling
Moving meats away from the element
will allow the meat to cook to the
center while browning on the outside
Cook side 1 at least 2 minutes longer
than side 2 If your oven is connected
to 208 volts, you may want to use a
higher rack position and/or broil
foods longer.
The size, weight, thickness, starting
temperature and your preference of
the doneness of the meat will affect
broiling This chart is based on meats
at refrigerator temperature..
It is not necessary to preheat the
oven when broiling. Use the broiler
pan and grid that came with your
range Both are designed for proper
drainage of fat and liquids.
RACK
POSITION
3
FOOD
Steak 1" thick
be molded tightly to
lf foilgrid
is used
it must
the
and slits
cut
into the foil to match
those of the grid. This
allows fats and liquids to
drain into the broiler pan,
preventing
fire and
excessive
smoke.
, ...........................
TIME (M|N.)
9-11
Ground beef
patties
1" thick
Fish (fillets)
Chicken (pieces)
TO SET
t6-18
=
Pork Chops-l/2"
thick
Always
remove the pan and
grid from the oven.
_
Storing or forgetting
._>
a soiled broiler pan
in the oven is a potential
smoke or fire hazard.
b-
TOTAL
3
3
2
27-29
11_13
45_55
BROIL:
1. Set the OVEN CONTROL
KNOB to BROIL,
2. The "OVEN
will glow.
•
ON" indicator
light
3, When broiling is finished, turn the
OVEN CONTROL
KNOB
to the
"OFF" position
15
CAREANDCLEANING
Sel C anmgCyc
t,
The door gasket is designed to have
a 5-6' gap at the bottom of the door
This allows for proper air circulation
Remove the broiler pan and grid,
oven racks, utensils and any foil
that may be in the oven.
Door Panel
2, Soil on the front frame, 1" inside
the oven, and outside the door
gasket will need to be cleaned
by hand.
Front
D
Frame
i]
-_D°°r
Gasket
Door Liner
.;t.. _
_"-4
oOr Liner
It is normal for your oven door to give
the appearance of not having a good
seal against the range This is due to
the gasket The location of the gasket
on the oven door maintains a good
seal and prevents any heat toss
i
i,,'- i ,,, ,,,,,,,,,,,,,
/_
Gasket
, ,,,,,
,,
, ,,,,,
,,
,,,
"_
-_-
_
Clean these areas with hot water,
soap-filled steel wool pads or
cleansers such as Soft Scrub@ to
remove any soft Rinse well with clean
water and dry.
3. Wipe up any heavy spillovers
the oven bottom.
be left in the oven
tensiJs a self-clean
should never
during
cycle.
The oven racks may be
cJeaned during the selfclean cycle, but will lose
their luster and become
hard
to slide, if you choose to
leave them in during the
cycle, wiping them down
with vegetable
oil after the
cycle will help them slide
easier,
on
4, Do not clean the door gasket. The
fiberglass material of the oven
door gasket cannot withstand
abrasion, tt is essential for the
gasket to remain intact. If you
notice it becoming worn, frayed or
displaced on the door, it should be
replaced
For the first clean cycle,
vent the room with an
opened window
or hood
vent, This wiil reduce the
odor when hearing new
parts,
k._
16
...............
__
Turn the oven control knob to the off
position. You wilt need to wait for the
oven temperature to drop below the
lock temperature (approx 1 hour)
before attempting to open the door
The indicator light will not blink if the
cycle is interrupted
CAREANDCLEANING
Self-CleaningCycle
11. For best
results, follow
the steps in
PREPARING
YOUR
OVEN,
After the cycle, you
may notice some
white ash in the
oven. ,Just wipe it
up with a damp
cloth or sponge.
2. if your handle is hidden, lift the
cooktop and pull the handle out as
far as it will go.
3. Slide the handle to the right. Do
not force the handle If it does not
slide easily, you have not pulled it
out from the latch cover as far as it
will go. Repeat Step 2.
If white spots remain, scrub them with
a soap-filled steel wool pad. Be sure
to rinse thoroughly These are usually
deposits of salt that cannol be
removed during the cycle.
If for any reason
you are not
satisfied
with the cleaning
results,
just repeat the cycle.
4, Turn the oven control knob to
"CLEAN"
The "CLEAN"
and
"OVEN
ON" indicator lights will
glow.
5. The handle will lock when high
temperatures are reached.
6. The clean cycle lasts 4 hours and
20 minutes, this includes cool
down time The "OVEN
ON" and
"CLEAN"
indicator lights will
blink at the end of the clean cycle
7, After the cycle is finished, turn the
oven control knob to the off position.
8. When the temperature has cooled,
the door latch handle will easily
slide to the left
17
CAREANDCLEAfllNG
CLEANING
Cleaning
CLEANING
• Dishwashing
• Warm water
• Soft cloth
CLEANING
•
*
•
•
• Dishwashing detergent
• Warm water
,_Paper towel
• Ammonia
• Abrasive cleaner
° Scouring pad
TO CLEAN
Clean after each use If acidic foods
(hot fruit filling, milk, tomatoes,
sauerkraut or sauces with vinegar or
lemon juice) spill, use a dry paper
towel to wipe up as much as possible.
When surface has cooled thoroughly
clean cooktop.
MATERIALS
detergent
Do not use abrasive
industrial
cleaners,
MATERIALS
cleaners,
or bleach.
MATERIALS
Dishwashing detergent
Warm water
Soap-filled steel wool pad
Commercial oven cleaner
CLEANING
MATERIALS
• Dishwashing detergent
o Warm water
• Paper towels
TO CLEAN
TO CLEAN
Allow the pan to soak Sprinkle the
grid with dishwashing detergent and
cover with a damp cloth or paper
towel and let stand Scour as needed.
Wash, rinse, and dry well. You may
also place both the pan and grid in
the dishwasher
Do not use oven cleaners, cleansing
powder, or harsh abrasives. If
marinades, tomato sauce, basting
materials, etc., should spill, wipe up
as much as possible. When surfaces
have cooled thoroughly clean painted
areas
Clean only as touch up between
clean cycles Use dishwashing liquid,
warm water or soap-filled steel wool
pad Rinse wel! after cleaning and
dry
NEVER USE OVEH CLEA_¢ERS
IN OR AROUHD
ANY PART OF
THE OVEN,
When cleaning, be sure not to bend
or displace the temperature sensor
located on the back wall of the oven.
t8
CAREANDCLEAHIH8
P" I I'
RemovableParts
CLEANING
o Dishwashing
o Warm water
• Soft cloth
detergent
Rib
Clear
_roove
I 'J_ltlI
the oven light
CAUTION:is inBethesure
switch
off
position.
Do not
touch a hot light bulb with
wet hands or a wet cloth.
Wait until the bulb has
cooled and use a dry cloth.
Never touch the live collar
of the bulb. If you are re.
placing a broken light bunb,
make sure the power supply
is off.
MATERIALS
Holded
I'PlI_
I II
,----.-._,
in
__-
Glass
Live
Sp_ing Clip
TO REHOVE
"-.,_,)
Bulb _\---J-..
1, Be sure the control knob is in the
off position,
Glass
2. Pull straight off the stem, Using a
piece of string can make removing
the knob easier, Slip the string
under and around the knob,
pulling straight out,
Cover
Collar
"_
TO REPLACE
I.
Unscrew
2. Unscrew
TO CLEA_
glass cover and remove.
the light blub.
3. Replace the bulb with a 3 1/2" 40
watt appliance bulb,
Wash the knob thoroughly with soapy
water. Dry completely with a soft
cloth. DO NOT let the knob
soak.
4.. Replace the cover.
TO REPLACE
t.
Retainer
Check the back of the knob,
2. The molded rib of the knob is
designed to fit perfectly onto the
knob stem,
3. Align the molded rib to the clear
groove in the knob stem. Push the
knob back as far as it wilt go.
19
TO REPLACE
1, Lift the front of the drawer stop
and lower the stop of the drawer
through the opening of the base
rail
CAREANDCLEANING
RemovableParts
CLEANING
MATERIALS
• Dishwashing detergent
• Damp cloth
• Warm water
TO
Stop
2. Lower the front of the drawer and
push back the drawer until it
stops.
REMOVE
1, Pull the drawer out until it stops,
3, Lift up on the front of the drawer
untN the stop guide of the drawer
clears the stop guide of the base
rail, Slide the drawer into place
CAUTION=
The drawer
gives you space
for
keeping
cookware
and
bakeware.
Plastics
and
flammable
materials
should
not be kept in this drawer,
Do not overload
the storage
drawer,
If the drawer
is too
heavy, it may slip off the
base rai! when opened.
2. Lift the front of the drawer until the
stop guide of the drawer clears the
stop guide on the base rail
Stop
Guide
Guide
3. Lift the drawer up and over the
drawer stop
TO CLEAN
Wipe the inside and outside with
warm soapy water and a damp cloth
or sponge Do not use harsh abrasives or scouring pads on the drawer
2O
CAUTION:
Do not lift
the element
more than
1". Lifting the element
more
than 1" can damage
the receptacle,
causing
the element not to lie flat when it is
iiiiii1,1,,,q
CAREANDCLEANING
RemovableParts
_plugged
3.
back
Lift out the drip
TO CLEAN
1. Grasp the edge of the cooktop
lift up
and
3. When cleaning is finished, lower
the support rod(s) and the
cooktop.
CAUTION:
When working In this area, be care
ful not to bump into the support rod(s). The porcelain
enamel
surface
of the cookif dropped.
...............
bowl.
DRIP
BOWL
For blue-gold
heat stains -- use
a metal polish These stains are
caused by overheating, and are usually permanent. To help minimize this
effect, avoid excessive use of high
heat settings and use flat bottom
pans that do not extend more than 1°
from the edge of the cooking element
F(_
can chip
THE
•
For brown food stains -- use
dishwashing detergent, warm water,
plastic scouring pads, mild abrasive
cleaners, soap-filled scouring pads or
ammonia, Clean drip bowls after each
use, Rinse and dry well Foods that
are not removed can cause permanent stains that cannot be removed
For heavily soiled bowls, place an ammonia-soaked paper towel over the
bowl to loosen the soil, then gently
scrub the bow! with a plastic scouring
pad
2. Holding the cooktop with one
hand, lift the support rod(s) up and
rest the edge of the cooktop on it
top
in, .........................
d
,
iiiiiii
i
ii
CAUTIOH:
Do not
ate the cooktop
ele-operments without
the drip bowl
in place, Scorching
of the
cooktop,
burning of wiring insulation
and loss of energy
will occur.
Element
I_
TO REMOVE
iii qii iiiii1,111 ii1!, ii H
TO REPLACE
1. Be sure the controls are in the off
position and the elements are cool
before attempting to remove them
THE
UNIT
1. Place the drip bowl into the opening and make sure the receptacle
is visible.
2_ Grasp the element and lift slightly,
just enough to clear the drip bowl
and pull it straight out,
2. Slide the element firmly back into
the receptacle and lower it onto
the drip bowl.
21
Broil
CAREANDCLEANING
Stop
Position
RemovableParts
r_Tf
/
CLEANING
,
MATERIALS
• Dishwashing detergent
• Warm water
° Scouring pad or soap-filled
wool pad
TO REMOVE
steel
1. Open the door to the broil stop
position.
.
Bump in
rack guide
Raised back
of the rack
Grasp the door at each side and
lift up and off the hinges. DO NOT
LIFT DOOR BY THE
HANDLE.
F
i
ii,
, ,I
iiiiiii
door is removed
and
AUTION:
When the
the hinge arms are at
the broil stop position,
as a
precaution,
cover the hinge
arms with toweling
or an
empty paper towel roll. Do
not bump or try to move the
hinge arms while working
in
the oven area. They could
snap back causing injury to
the hands or damage
the
porcelain
finish of the front
_
TO REMOVE
1, Pull the racks out to the stop lock
position.
2, Pull up the front of the rack and
slide under the .bump of the rack
guide
TO CLEAN
_
_frame.
,111
Clean with warm water and detergent
For hard to remove stains, gently
scrub with a scouring pad or a soapfilled steel wool pad Rinse well
TO REPLACE
TO REPLACE
1, Place the raised back of the rack
onto the rack guides
2, Lift the front of the rack until the
raised back slides under the bump
of the rack guides
3, Line up the slots at the bottom
edge of the door with the hinge
arms
1. Make sure the hinge arms are in
the broil stop position
2, Lift the door by the sides
4. Slide the "door down onto the hinge
arms as far as it will go
5, Close the door
3, Slide the rack all the way back
22
BEFORECALLINGFORSERVICE
To save you time and money, before making a service cal!, check the list below
for any problem you may feel you have with the performance of your range, If
the problem is something you cannot repair, use the Consumer Service
Numbers located at the back of this manual, When making
any calls, have
the model number,
repair parts list, use and care manual and the
date of purchase
available.
PROBLEM
POSSIBLE
CAUSE
POSSIBLE
,1111
Range will not
work; totally
inoperative.
No power to range
I,IHII,!,I!
Foods
bake
do not
,i,iiiii
,
,i
III
b, Oven vent
blocked or
covered
c. Improper use of
foil
d. Improper
temperature
setting for
utensil used
e. Recipe not
followed
f. Improper oven
control
calibration.
g. Range and oven
rack not level,
.................
Oven
temperature
seems
inaccurate.
i,,11,11 ii
Oven
does
work,
light
not
i,iii1,11111111111111,11
I ii
i
ii
I
i
SOLUTIOH
.....................................................
a. Check the household circuit
breaker or fuse box
b. Check to make sure the range is
plugged in,
a. Improper rack or
pan placement
properly.
i I
,I
I
II
,1111'1'
i
a. Maintain uniform air space
around pans and utensils, See
oven cooking section
Keep vent clear
ba
c, Racks should not be covered
during baking
d. Reduce temperature 25
degrees for glass or dull/
darkened pans,
e. Check recipe and
measurement
f. Check the temperature
adjustment following this
section
g. Check the installation
instructions for leveling
,,i ,i
iii
Oven control
calibration
See oven temperature
section
a. Light switch is in
off position,
b. Bulb needs
replacing
a. Check switch setting.
adjustment
i i
23
b
i,ii,
Check or replace light bulb
,
BEFORECALLINGFORSERVICE
PROBLEM
J
J
POSSIBLE
i1,1,
nl,',u
Foods do
not broil
properly.
I
,1'1,,
i1,,i,
i i iii1
i
ii
ii
iii
..... _,_
ok.
c. Door not latched for
clean
i iiiiiii
_
m
Cleaning
results
were poor.
i
iI
i i iiiiii
c. Clean pan and grid after each
use,
inuln
,
i inlll..................
I
i
u ilUlU,,,lUlll,,,llnlllU
ii1,111,11
a, Check the control and oven cooking sections.
b, Be sure to unlatch the door after
the self-clean cycle is finished and
the oven has cooled
c, Be sure to retrieve hidden latch
handle and slide to the right
a. Control set improperly.
b, Door latched.
Oven door
accidentally locked
white
baking or
broiling.
,, iiiii
a, Check the elements; make sure
they are properly plugged into the
receptacle
b, Push knob in while turning to
temperature setting
b. Control set
improperly
iii,frlf_
I
a. Check for heavy spillovero
b, Use of foil not recommended
n innii1"
s oven
ii....
i
e, Use higher rack position and/or
longer cooking time.
lf, Check broiling chart in broiling
section
a. Elements
unplugged.
Oven wii!
not work,
Cooktop
i,
a. Check broil pan placement; see
broiling section.
b, Do not preheat when broiling.
c, Check broiling section.
d, Open door to broil stop position
i i.........................
i
is ok.
I
....
SOLUTION
i
ii
a. Dirty oven.
b. Improper use
of aluminum foil.
c. Broiler pan containing
grease left in the oven.
Cooktop
wiU not
work
POSSIBLE
illll,
a, Improper rack
position.
b. Oven preheated.
c. Improper use of foil.
d, Oven door closed
during broiling
e, Low voltage (208
volts)
f, Improper broiling
time
Oven
smokes,
i
CAUSE
,
ii iii1,11111i
Do not force the lock
handle Temperatures
above the locking
temperature will
prevent the lock handle
from sliding to the
unlock position
i
Turn the control knob to the off
position.• Allow the oven to coo! until
the temperature inside drops below
the lock temperature and the handle
slides easily
I'JlIIIHI'IM,lU
•
'111'11
a, Allow the oven to clean its full
cycle
b. Heavy spillovers should be
cleaned before the cycle is set.
a. Clean cycle
interrupted.
b. Oven was heavily
soiled
24
1. While the control knob is in the off
position, press and hold, at the
same time, the HOUR UP and
DOWN arrow pads until the
display shows a two digit number.
"DO IT YOURSELF"
TEMPERATURE
ADJUSTMENT
2. Press the HOUR UP arrow pad to
increase the temperature from the
original setting up to +35 ° F hotter
You may fee! that your new oven
cooks differently than the oven it
replaced We recommend that you
use your new oven a few weeks to
become more familiar with it, following
the times given in your recipes as a
guide
or
Press the HOUR DOWN arrow
pad to decrease the temperature
from the original setting down to 35° F cooler.
If you think your new oven is too hot
(burning foods) or not hot enough
(foods are undercooked) you can
adjust the temperature yourself, The
appearance and texture of foods is a
better indicator of oven accuracy than
an oven thermometer, to check the
temperature setting of your new oven.
These thermometers can vary by 2040 degrees In addition, the oven door
must be opened to read these
thermometers
Opening the door will
change the temperature of the oven.
3. When this adjustment has been
made the display will return to the
time of day
This adjustment will remain in memory
until these steps are repeated, and a
new temperature is selected. It will
remain in memory even after a power
failure
This adjustment will not affect the Broil
or Clean temperatures.
To decide how much to change the
temperature, set the oven
temperature 25 degrees higher (if
foods are undercooked) or 25
degrees lower (if foods are burning)
than the temperature in your recipe,
then bake The results of this "test"
should give you an idea of how much
the temperature should be changed,
25
NOTES
26
RANGEWARRANTY
•
jr
u
rFUU. ONEYEARWARRANTYOff THEFUNCTIONINGOF ALLPARTSEXCEPTGLASS
PARTS
If,within oneyearfromthedateof installation,anypart,otherthan a glasspart,failstofunction
properlydueto a defectin materialor workmanship,Searswill repairor replaceit, freeof charger
FULL30-DAY WARRANTYONGLASSPARTSAND FINISH OF PORCELAINEPJ_,MEL,
PAINTEDORBRIGHTMETALFIHISHEDPARTS
If, within 30 daysfromthedateof JnstallaUon,
anyglasspartor thefinishon anyporcelainenamel,
]aintedor brightmetalpart is defectivein materialor workmanship,SearswUi replacethepart,free
of charge,,
FULL90-DAY WARRANTYOHMECHANICALADJUSTMENTS
For90 daysfromthe dateof installation,SearswiUprovide,freeof charge,anymechanical
adjustmentsnecessaryfor proper operationof the range,exceptfor normalmaintenance
If therangeis subjectedto otherthanprivatefamilyuse, the abovewarrantycoverageis effectivefor
only 90 days,
WARRANTY
SERVICEISAVNLABLEBY CONTACTING
THENEAREST
SEARSSERVICECENTER!
DEPARTMENT
INTHEUNITEDSTATES
ThiswarrantyappUesonlywhUethisproductis in usein the Unil_dStates,This warrantygivesyou
specific legalrights,andyoumay alsohaveother rightswhich vary from stateto state
_,, ......
SearsRoebuckand Co_Dept,817 WAHoftmanEstates,IL 60179
To further
add to the value
Buy a Sears Maintenance
Year=
of Ownership
.....................
1
Covorag_
lit
,,
.J
of your Range,
Agreement.
YoQr
2x_d Yemr
3rd Y_r
MA
MA
MA
MA
.,,,.,
.........
Rep|acenmld
of Def_cf_w_
p,,,,,o_.._..,_,or=,.,,_
W
or Glass
90 DAYS
2
M_chatll=d
3
Porcelain and Gi_=_ Par_
Ad]ustrrmnt
W
30 DAYS )
W
'(#t
(l VIA
MA
.,ILrmu_( Pr_ventlvo M_lnt_rt*
ance Ch=Jckst your re,quest
W - Wa_ty
MA - MaJnte_n_
A grlv,_n(
KenmoreRangesaredesigned,manufacturedand testedlot yearso(dependableoperation, Yet,any
modernappliancemayrequireservicefrom timeto time TheSearsWarrantyplus the Sears
MaintenanceAgreementprovidesprotectionfromunexpectedrepairbills andassuresyou of enjoying
maximumrangeefficiency.
Thechartabovecomparesthewarrantyand MaintenanceAgreementand showsyou the benefitsof a
SearsRangeMaintenanceAgreement.
Contactyour SearsSalesAssociateor LocalSearsServiceCentertodayand purchasea Sears
MaintenanceAgreement,
27
For the repair or replacement parts you need
delivered directly to your home
Call 7 arn - 7 pro, 7 days a week
t -800-366-PART
(1-800-366-7278)
For in-homemajor brandrepair service
Call 24 hours a day, 7 days a week
t =800=4-REPAIR
(1-800-473-7247)
For the location of a
Searsparts and Repair Centerin your area
Call 24 hours a day, 7 days a week
! =800-488-t
222
ii ii ,,,,,,,,
For information on purchasinga Sears
Maintenance Agreementor to inquire
about an existing Agreement
Ca[I9 am - 5 pro,Monday-Saturday
t -800-527-6655
America's
Repair
28
Specialists
,
ii=
=
i,,,,,,,,,,i,i
i
,,,
,,=,,