1
5
Ken_oPe
HOME CLEANING SYSTEM
MODEL NO. 175.8690390
CAUTION:
Read Instructions
and Rules for
Safe Operation
Carefully
For Household
Use Only
Save this
Manual for
Future Reference
%RS, ROEBUCK
i
b"5--K-"
19s)
AND
ii
CO., Hoffman
i
Estates,
iJ iililllllllllllllllli I II ii II
IL 60179 U.S.A.
I
liillililiilllillil
I
PRINTED 1NU.S.A
Read all instructions
When usin8
anY electrical
appliance,
WARNING
before
basic precautions
using
should
this cleaner.
always
be followed,
including
the following:
- To reduce the risk of fire, electric shock, or injury:
1. Do not leave cleaner when plugged into electrical outlet. Unplug from outlet when not in use and before servicing.
2. WARNING: TO AVOID ELECTRIC SHOCK, DO NOT EXPOSE TO RAIN E STORE INDOORS.
3. WARNING: DO NOT REMOVE GROUNDING
PRONG FROM POWER CORD PLUG. Connect to a properly
grounded outlet ONLY. See Grounding Instructions.
GROUNDING INSTRUCTIONS:
This vacuum cleanermust be grounded. If it should malfunction or breakdown,
grou_ndingprovides a pathof least resistancefor electricalcurrenttoreducethe risk
ofelectricshock. Thisvacuum cleanerisequipped with a cordhavingan equipmentgrounding wnductor and grounding plug. The plug must be plugged into an
appropriateoutlet that is properly installed and grounded in accordancewith all
local codesand ordinances.
figure A) can beinstalled by a qual_Ledelectrician. Thetabfor grounding screw (see
figure B) extendingfrom theadapter must heconnectedtoa permanentgmund such
as a proporlygrounded outlet box cover. Whenever the adapter is in use, it must be
held inplace by a metal screw (see Figure B).
ADAPTER
' --
(3Z)
WARN'halG:Improper connection of the equipment-grounding conductor can
result in a riskof electric shock.Checkwith a qual_ed electrician or service person
!_you are in doubt as towhether the outlet isproperly grounded. DO NOT modify
theplugprovided with the vacuumcleaner--if it will not fit theou&t, have aproper
outlet installed by a qualified electrician.
Thisvacuumcleanerisfor useon a nominal120-volt circuit,andhasagrounded
plug(seefigure,4).A temporaryadapter(seefigureB)maybeusedto connectthis
plugtoa2-polereceptacle(seefigureB) ifaproperlygroundedoutletis notavailable.
Thetemporaryadaptershouldbeusedonly untila properlygroundedoutlet(see
-
@
®
GROUNDED
PLUG
/
GROUNDED
OUTLET
,A
TABFOR
GROUNDING
2-POLE
SCREW
RECEPTAC_
4.
DISCONNECT POWER CORD FROM ELECTRICAL OLrgLETbefore the recovery tank is emptied, the solution tank
is refilled, or the cleaner is serviced in any way.
5. DO NOT store this cleaner in an drea which may reach freezing temperatures. Should this occur, DO NOT operate this
cleaner until it has been at room temperature for at least two (2) hours.
6. DO NOT use any cleaning solution or chemicals other than those discussed in this n-uanual.
7. For maximum efficiency, empty container frequently and keep inside of hose, wands, nozzle and container clean.
8. DO NOT overwet carpet or upholstery. If three or more cleaning strokes are required, let the carpet or upholstery
material dry and then repeat cleaning process.
9. Do not allow children to operate cleaner, nor should they play with cleaner as a toy. Close attention is necessary when
used around or near children.
10. Use this cleaner ONLY for its intended use as described in this manual. Use only the attachments recommended in this
manual.
11.
12.
13.
14.
15.
16.
17.
18.
19.
20.
21.
22.
Always turn cleaner OFF when connecting or disconnecting the Spraymate or "dry floor" motorized nozzles.
Do not use with damaged cord or plug. If cleaner is not working properly, has been dropped, damaged, left outdoors,
or dropped into water, return it to a Sears Service Center.
Do not pull or carry by cord, nor use cord as a handle, nor close a door on cord, nor pull cord around sharp edges or
corners. Do not run cleaner over cord. Keep cord and cleaner away from heated surfaces.
Do not unplug from electrical outlet by pulling on the cord. To unplug, grasp the plug, not the cord, and pull.
DO not handle plug or cleaner with wet hands.
Do not put any objects in ventilation openings. Do not use with any opening blocked; keep openings free of dust, lint,
hair, and anything that may reduce air flow.
Keep hair, loose clothing, fingers, and all parts of the body away from openings and moving parts.
NEVER vacuum materials such as hot coals, cigarette butts, matches, etc.
When "dry" vacuuming, do not use without filter in place.
Turn off all controls before unplugging.
Use extra care when using on stairs.
Do not use to pick up flammable or combustible liquids such as gasoline or use in areas where such liquids may be
present.
--- SAVE THESE INSTRUCTIONS---
@
TABLEOF CONTENTS
Safety Instructions ...........................................................
page 2
Warranty ...........................................................................
page 3
Introduction ......................................................................page 3
Assembly ...........................................................................
page 4
Operation .......................................................................page 5-8
i,iii
Additional Uses / Optional Accessories ................... page 8-9
Trouble Shooting Chart ................................................
page 10
Exploded Views and Parts Lists ............................ page 11-15
Ordering Parts ................................................................
page 16
i
FULLONE YEAR WARRANTY
When used for private household purposes, if within one year from the date of purchase, this vacuum cleaner fails due to
a defect in material or workmanship, RETURN IT TO THE NEAREST SEARS SERVICE CENTER/DEPARTMENT
IN THE
UNITED STATES, and Sears will repair it, free of charge.
If this vacuum cleaner is used for commercial or rental purposes, the above warranty coverage applies for only 90 days from
the date of purchase.
This warranty gives you specific legal fights, and you tray also have other fights, which vary from state to state.
SEARS, ROEBUCK AND CO., D/731CR-W, SEARS TOWER, CHICAGO, IL 60684
iiiiiiiiiiiiiiiii ii i
iiiiiiiii,
i iii
i iiii
iii i
ij
in|llll
ii
IF"
INTRODUCTION
ANGLED WAND
Your new Kenmore Home Cleaning System is a deluxe high performance cleaner,
designed for today's cleaning requirements.
With proper care and maintenance,
it
should provide you with years of service.
It is important that you read this manual to
fully understand the cleaner's capabilities
as well as providing you with the essentials
regarding maintenance
and safety. A complete list of operating parts and features is
shown in figure 1.
RECOVERY
TANK POWER
HEAD
2-SPEED PUMP
SWITCH
WAND
RECOVERY
TANK
VACUUM HOSE
SOLUTION
TANK
\
SOLUTION TUBE
FLOOR NO77LE
@
ASSEMBLYOF RECOVERYTANK
AND SOLUTION TANK
POWER
HEAD
POWER
SeeFigure2
1. Place Recovery Tank into Solution Tank (align the word
"VACUUM" on Recovery Tank with "VACUUM" on
Solution Tank) and secure with Metal Latch.
2. Insert the plug on the Short Cord from the Solution Tank
into the Recovery Tank Power Head.
ASSEMBLYOF HOSE, WANDS,
NOZZLEAND SOLUTION TUBING
PLUG
SHORT
CORD IN
HERE
RECOVERY
TANK
SHORT
CORD
See Figure 1
1. Assemble the two Straight Wands.
2. Assemble the upper Straight Wand to the Angled Wand
of the Hose.
3.
SOLUTION
TANK
Assemble the Floor Nozzle to the lower Straight Wand.
NOTE: Be sure locking button engages properly when
assembling
straight
wands,
angled
wand,
and
floor
nozzle.
4. Push the Solution Tube Quick-DisconnectNutonto
Trigget Valve. Twist clockwise to lock. See DETAIL "A" Figure 3,
5. Push Solution Tube into Retaining Clips on Wands. Tubing may be wrapped around Wands to take up excess
slack.
LATCH
6. Attach the Vacuum
Hose to Recovery
Tank inlet
(Vacuum Inlet).
7, Push solution tube quick disconnect nut onto the quick
disconnect valve. Turn clockwise so valve posts lock into
notches in nut. See DETAIL "B" - Figure 3.
NOTE: To remove metal retaining clips from hose and solution
tube, squeeze tube with fingers before removing, Clips will dislodge
easily. Also squeeze tube befvre reattaching clips to prevent hose
punctures.
TRIGGER
VALVE
SOLUTION TUBE
NUT
RETAINING
CLIP
INLET
SOLUTION TUBE QUICK
DISCONNECT NUT
QUICK DISCONNECT
VALVE
DETAIL "B"
CARPETPREPARATION
For best results prepare carpet for cleaning as follows:
1. Vacuum carpet to remove loose dirt before using Cleaner.
2. To remove stains and ground in dirt present in heavy traffic
areas of the carpet, spray or rub Sears Heavy Traffic PreTreatment (82833) into carpet before using Cleaner. Follow
directions on the bottle.
FILLING CLEANER WITH WATER AND
CLEANING SOLUTION
FILLER
)PENING
See Figure 4
SOLUTION
TANK
1. Open lid of the Filler Opening.
2. Add Sears All In One Carpet Cleaner (82813) solution or
Sears Upholstery Cleaner (82843) solution to Solution Tank
(depending
on type of cleaning to be performed). Follow
directions on label of bottle.
3. Pour clean, hot water (from tap) into Filler Opening in the
Solution Tank -- use two (2) gallons of water.
4. Close Filler Opening.
NOTE: This unit may become damaged if boiling water is used.
POWERCORD AND SWITCH
See Figure 5
1. Make sure Short Cord is plugged in as shown.
2. Plug Power Cord into electrical outlet.
3. Turn Power Switch to "ON" position.
PUMP SWITCH
See Figure 5
1. Place Pump Switch from "OFF" position
"LO" position.
to either "HI" or
NOTE: "HI" pump speed is used for normal cleaning. "LO"
pump speed is used for delicate upholstery or light cleaning.
PUMP
SWITCH
SHORT
CORD
POWER
SWITCH
TESTFOR SOLUTION SPRAY
SeeFigure 6
1. Hold Floor Nozzle above floor level.
2. Pull Solution Release Trigger on Angled Wand.
Depress SolutionReleaseTriggerfor30-60 secondsuntil
solutionbeginsto/low.
RELEASE
TRIGGER
3. Observe Floor Nozzle to make sure cleaning solution is being sprayed evenly. (seeDETAIL"A" )
NOTE: If solution is not being sprayed
Trouble Shooting Chart.
evenly, refer
FLOOR
NOZZLE
SPRAYS OF
SOLUTION
CLEANING THECARPET
See Figures 7 & 8
Solution Dispensing Stroke:
1. Start at a corner (recommended).
2. Place Floor Nozzle so Suction Inlets are flush with
carpet.
3. While exerting light pressure down on Floor
Nozzle, depress Solution Release trigger and slowly
pull Floor Nozzle towards you. Depress Solution Release Trigger fvr 30-60 seconds until solution begins to
I,'.
SUCTION INLETS
NOTE: Do not overwet. If three or more cleaning strokes
are required, let dry and then repeat cleaning process.
Solution Recovery Stroke:
I. Release Solution Release Trigger.
2. Lift Floor Nozzle off carpet.
3. Return Floor Nozzle to point where you dispensed
cleaning solution and pull across carpet, recovering
dirty solution.
LIFT,
SET FORWARD,
PULL BACK ACROSS CARPET
\
\
t
!
I
WHEN TO EMPTY RECOVERYTANK
W
See Figure 9
During normal operation, your cleaner may stop recovering
solution from your carpel When this occurs there are three
check points to alert you:
1. An increase in motor noise.
2. No solution visibly being recovered by the floor nozzle.
3. No air coming from the exhaust port of your cleaner.
When
EXHAUST
PORT
RECOVERY
TANK
this occurs:
1. The Recovery Tank is full and the Float Valve in the
Recovery Tank has been activated. The Recovery Tank
should be emptied.
--
or
2. The Recovery Tank has foam in the Tank and the Float
Valve has been activated.
NOTE: If cleaner is accidently turned over while in operation,
the float may activate and shut off the suction. If this occurs,
set the cleaner upright. Turn Power Switch "OFF' and let
motor come to a complete stop. Then turn switch back on and
continue cleaning.
LOCK BUTTON
VACUUM
HOSE
TO EMPTYRECOVERY TANK
QUICK
DISCONNECT
VALVE
See Figure I0
1. Turn Power Switch "OFF" and Disconnect Power Cord
from Electrical Outlet.
2. Disconnect Short Cord located between Solution Tank
and Recovery Tank.
3. Disconnect Vacuum Hose by depressing the Lock Button
and remove.
4. Twist Solution Tube Quick DisconnectNut
counterclockwise; lift and remove from Quick Disconnect Valve (See
DETAIL "A" ).
5. Lift Latches on Power Head.
SOLUTION
TUBING
DETAIL "A"
POWER HEAD
HANDLE
RECOVERY
TANK
ALIGN
OVER
HOSE
INLET
SHORT
6. Lift power Head, by Handle, and remove from Recovery
Tank.
7. Rotate Metal Latch on the Solution Tank and lift Recovery
Tank from the Solution Tank.
8. Empty Recovery Tank.
9. Reassemble cleaner and resume cleaning. NOTE: Power
Head is designed to go on in only one position. Make sure
the word "VACUUM" on the Power Head is lined up
directly over the Hose Inlet on Recovery Tank as shown in
Fig. 10 or Power Head will not seal to unit properly.
LATCH
SOLUTION
TANK
TO EMPTYTHESOLUTION TANK
See Figure 1I
When cleaning is completed, both the Recovery Tank and the
Solution Tank should be emptied prior to storage. Empty the
Recovery Tank as described earlier. There are three methods
of emptying the Solution Tank.
Method 1:
,
Jr
illllllLit
Ji
METHOD 1
1. Disconnect Short Cord from Recovery Tank.
2. Remove Recovery Tank from Solution Tank and pour
solution out of the Filler Opening.
Method 2:
1. Place Floor Nozzle in bath tub or container.
2. Depress Solution Release Trigger and spray until empty.
Method 3:
1. Remove Floor Nozzle and insert Wand into Solution
2.
3.
Tank through the Filler Opening.
Vacuum solution out.
All solution is now in Recovery Tank. Empty Recovery
Tank as described earlier.
/
METHOD 3
METHOD 2
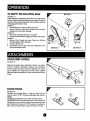
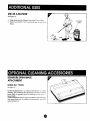
UPHOLSTERYNOZZLE
See Figure 12
Cleanmore Carpet Cleaner Upholstery Nozzle is an attachment for furniture upholstery cleaning. The upholstery
nozzle may also be used to dean auto upholstery or carpeting. In addition, the nozzle may be used to clean carpeted
stairs and other areas difficult to clean with the normal floor
nozzle.
FLOORTOOLS
See Figure i3
The Bare Floor/Carpet
Brush (1) may be used on floors
without carpet for DRY cleaning with paper dust bag installed.
The Squeegee Attacbanent (2) is useful for WET pickup.
CA UT/ON: D O NOT run the Pump Motor when using these
attachments. To prevent Pump Motor from operating, make
sure Pump Motor Switch is in "OFF" position, or unplug the
Short Cord from the Solution Tank to the Recovery Tank.
®
®
%%
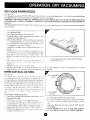
DRY FLOOR POWER NOZZLE
See Finite 14
Y¢ _r cleaner, comes with a DRY FLCS) R Power Nozzle...,wImh'-"h......_
,.,_,
_-_<_
t_,t__zed Beater Brush. Use Power Nozzle with the Paper
Oust Bag be!ow to convert your cleaner fiw regular househoM vacauming,
WARNING - DRY ONLY! TO REDUCE THE RISK OF ELECTRIC SHOCK_ DO NOT USE DRY POWER NOZZLE ON
WET SURFAC ES. CONNECT CLEANER TO A PROPERLY GROUNDED OL'°I'LET. (SEE SAFETY INSTRUCTIONS
ON
PAGE 23
POWER NOZZLE
Service Center.
ISDC)UBLE _NSULAFEO.
Should anc:ed ever exist for repairer
i.
Turn Power Switch OFF and disc;_mnect Power
from electrical outlet.
!nstal! Paper Dust Bag as described below,
:3. Disconnect Short Cord located betwc:_n Soiution
Cord
Tank
and Recove D, Tank (Figure 5).
Remove Metal Retainer (_:lips from Hose by sqn,,ezing
bo;-:e wbik, put]ink c!ips h'ee Disc_mnect Sc lu _ ot_JT_xbi_g
from. Angtc<t Wa;nd a_d S;¢,t_ion Tank (See !;tep 4 imder
'"To Emp_ Recovery 'Tank" on pg. 7,)
::: Assemble two straight wa_ds t_ Angled Wand a m.i i:L_we_
Nozzle,
service, simplyconmctyour
nearest Sears
r
4
:,
Push Nozzle Pow_.r Cord int_ dips on Wand:s: roir_: (.lord
up Vacuum Hose and sec_r_ with Metal Retainer Clips.
Align power cord _4th notch h'_ metal re_ai.ncr :hg_s
}Squeeze hose belt:re pm:hing clips onto t_ose and !::+;,ver
cord
DO NOT USE THISPOWER NOZZLE WITHOUT PAPER
7
inser_ Plug <:.f Nozzle t'_,,-_er Cord into recepta::i._:_ ;n_
DUST BAG IN PLACE,
Recovery 'r_'_:_&
P_;wer N:-_a.,:J
(where,Shrift{-i_:r_.i
w,s_':s
p!ugged m).
Phlg Vac Power (h,rd int,': e!e_:trica! ot_tlet.
9. Place Power Switch in "ON" pesition and t:"_._mpSv,,itc.i_Jn 7t-ii" position (See Fig. 5), When vacuuming
Pump Switch in "OFY" position to prevent Beater i3rush from rotating.
bare floors, place
PAPER DUST BAG (20 5086)
_:_:'
Figure t5
Thb cleaner u._e.s a di_p_>_;fi._!cpaper Jw_t ba._ t,:, trap arid
c:_;b-:_.:tdirt when us_'.d f,:>rdry pick up. IHs very imp,;rta_v !b :_t
the disposable paper dust bag remain clean to allow air to,pass
through i_ white trapping dirt. If the d:.fst bag _s over fi!l_d err
its pores become ciogged from fine powd .;rs, :m:,air can pass
through. This greatly r_!uces the efficie_v.:y of your cb,:a'n_:r
,Seaner's peak efficiency,
often and
ch_ck ti,e disposable
DUST
BAG
p_per du-;t bag
replace wi_efi ch;_,g<:_i
tw _,pc_<oximak:ly F:._e!_df
h,ql.
TO INSTALL PAPER DIDST BAG
1. r,_rn Power Switch OFF a_,.d disconnect
Power
from electrica! outlet.
2. Lift Latci_es and ::env_ve Puw;.:'_ Head from unit.
CAiqDBOARD
COLLAR
(Z.;'d
5,
_
?.end top flap of Cardboard Collar inward.
R_.:?!a(c Power 'Head on unit being careflfi not to cmsb
Dust Bag or to d,::f,,mn flexible splash plate on Power
,3 Grasp Cardbc.ard Collar of Dust Bag _.nd push Ch;llc_rn::;
[le;:a:!.
-h'_r_.spossible onto Bag AdaF, ter'T_ff;:e NOTE: n,,c,_'_
.....
o ..............__.
7
M_ke sure the Pump Switch is turned "OFF" for D D"
_._asein assembly, slide bottom of Cardbeard
CoEar one:;
Vacmmfing,
Adapter Tube first, th_n pt_l! top of Co!tar ,?ver ]k_b_:_.
CA.UT__ON: PAPER DUST BAG IS FOR DRY PICK UP
4. Posi|io¢_ Dust Bag aro_md side5 of tank to a!Io_ meier
ONLY_ DO NOT USE WHEN VACUUMING
LIQUIDS!
acsemb!y to fit back in tm.'.:.t.
O
USEAS A BLOWER
See Figure 16
1+ Insert Hose into the Exhaust Port of the Power Head.
2, Turn Power Switch "ON" and direct hose t_, ;area to be
blown.
EXHAUST
PORT
/
++ +.+.:+_ ++,+,,,+
KENMORESPRAYMATE
ATTACHMENT
MODEl. NO, 2°83252
See Fig_re ! 7
Cleanmore Spraymate is ar_ optional attachmen_ _,, carpet
cleaning, The Cleanmore Spraymate has a motorized _ea_.e'_"
brush which is especially go_xl fi)r difficult to clea_ ;_r_2a_;
;_f
heavy traffic°
Optional cleaning accessvrie:_may be pur+zhasc,
d or ar&_ed _hr+mg_
wur nearest Sears store. A complete set of instructio_ c_tn_ _fi_h
each attachment set.
/
PROBLEM
!. Neither vacuum
runs.
POSSIBLE SOLUTIONS*
motor nor pump motor
2. Vacuum
motor runs, but lhere
sp_ay at lhe nozzle.
is no
!. Be sure power switch is in "ON" position,
2. Be sure power cord is plugged in secure!y,
3. Check wall electrical
outlet (by piuug,_,_, in Q i-:nc_wn
working electrical appliance).
1. Be sure Short Cord from Power Heo,_,-_
!o Sok_tion 1,;_nk is
securely plugged into receptacle
on Jhe Powe,, '_-_,_
2. Check that Solution Tank is full.
3, Be sure Pump Switch is in the "HI" or "LO _ _,,._,--,,.
_,,:,,r
4. Nozzle Ports may be clogged.
See ilIust[otic'n b_kTv,.' tc.
unclog
,
4,
Spray from The floor
come out evenly,
nozzle does
not
Motor runs but cleaner does not pick up
solution from carpet (no exhaust from
top of cPeaner).
5 Sp_ay connections
leak.
t. Unclog the Nozzle Port, See illustration
be!ow.
!. Recovery Tank ts full of dirty water and mus! be emptied.
2, Check for clogged hose o,, nozzle. C._og_ co,._d ._e_._t from
picking up materialsuch
as carpet strings,shoe'
"-=_ ',*, -
1, Disassemble. nut at leaking connection.
Be scue w,._s[<, i,;properly seated, Rea&semble and +_*'_,+^'_,
-_=c-.... _,,
m
* If the "Possible Solutions" to "Problems" listed in the chart do not correct the problem, take your ciea[_e_ to Q Sears
Service Center for professional service. Repairs not listed in this chart require professional and specific k_owledge
of this model cleaner and could resull in safety hazards and personal injury if r_otmade by a qual[_ed Sear_ Service
Technician.
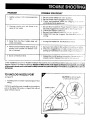
TO UNCLOG NOZZLEPORT
CAUTION: Do not _et needi÷
or pin touch this. surface,
See Figure 18
1.
_msert the point of a needle or pm into Spray Port to
unclog.
NOTE: Do not let the point of needle or pin touch any
part of the Spray Pad surface or Spray Pad will not
spray scflution properly.
\
SPRAY POR!
\\
x
\
\
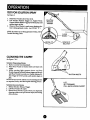
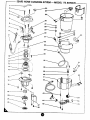
SEARSHOME CLEANING SYSTEM-- MODEL 175.8690390
FIGUREA PARTSLIST
(SEE PAGE 12 FOR EXPLODED VIEW)
KEY
I
2
=
l
I
5
6
7
8
9
t0
ti
i2
D3
14
I _,_
16
17
!8
19
20
21
22
23
24
25
PARTNO.
644147-.006
642337.002
642338-['49
6423t5_,q'i4
641798-003
643492-003
642149-004
643509-00_
641843-014
642367-006
6.44548-004
642367-004
643909-902
642367-004
642406-02!
641857-015
641866-044
642409_002
643584-000
642405-001
643579*002
642313-000
64.27!3-005
662252-002
968702-007
26
27
28
644846-00i
64.2470-006
640218-005
9
706382-319
q_
642339-062
l
!
DESCRIPTION
Handle Plate
Handle Screws (2}
Handle Shroud w/Label
Switch Cap
Motor Housing Screws (2)
Female Pigtail
Wiring Nut (5)
Switch
Power Cord
Motor Sea!
Motor Cover
Motor Sea!
Carbon Brush Asm. (2)
Motor Sea!
Motor Asm. Complete
Latch (2)
Cover Asm. wi #19, 20, 21,22
Cover Screws (4)
Foam Filter
Valve Asm. w/#21, 22
Valve Screws (2)
Sensor Guard
Pump Switch Cap
Bag Adapter
Screws (2)
Two Speed Switch - PulT_:_wlSwitch Cap
Rivet
Wave Washer
Washer (2)
Separator Plate
KEY
PART NO.
DESCRIPTION
31
663402-001
Quick Disconnect Valve
32
33
34
35
37
37A
38
39
40
41
42
43
44
45
46
47
48
49
50
51
52
640145-005
643565-023
706405-303
644802-001
643562-007
663486-00t
643535-001
643438-006
643536-000
643566o018
643531-008
643533-002
888493-304
643685-001
642046-018
989629-002
660081-002
640940_001
643431-014
643454-003
643583-000
Separator Plate Screws (2)
Upper Container wi Fillet Doc,r
Hex Nut
Ground Lead Screw
Tubing Assembly (w #39 & 34)
Hose Clamps (2)
Valve Seat Screws (2)
Valve Seat
Gasket
Lower Container
Pigtaif wi Termina!
Lower Containel Sclews (3)
Strain Reiief
Motor Screws (2)
Dirt Container wi #24 & 25
Latch Screw
Latch
Spacer
Fiifer Door
Washers (3)
Foam Filter
53
54
55
56
57
58
59
643685-001
661393-00 !
643t71-003
644089-016
662381-00t
968702-007
20-50500
661654-198
Motor Screws (4)
Casters (3)
"O'; Ring Ga_ket
Pump Motor w/#5_
Splash Piale
Screw (2)
Disposab!e Dust Bag
Owner's Manual
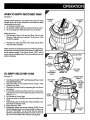
FIGUREB PARTSLIST
(SEE PAGE 14 FOR EXPLODED VIEW)
i
I
l
KEY
PART
NO.
!2
3
4
5
663513-00I
662262-002
644037-004
644848-007
663224-00!
_
,
_
9
10
644038-009
663487-001
663488-001
968702-007
643502-010
643570-028
i
1!
12
i5
661404-007
663324-004
644038.010
I
'_4
643572-008
662266"001
i
!6
662266'O02
i
i
I
I
t
l
!
I
I
l
DESCRIPTION
Angled Wand wi Key # 2, !4.
1 rigger
Ferrule Nut (2)
Hose Connector
Metal Clip (7)
Tubing - Hose
Auxiiiary Handie (Left)
Auxiliary Handle (Right)
Auxiliary Handle Screws (5)
Hose Fitting
Hose and Angled Wand Asm.
8' Hose wi #4, 9
Quick Disconnect Nul
Tubing - to Nozzle
Valve Asm, Kit w/trigger
"O" R_ng
"O" Ring (2)
KEY
!7
18
!9
20
PART NO,
662264-00t
662263-00I
643186-022
643571-018
21
22
23
24
25
26
28
31
644159-004
662368-002
642458-006
641671-022
662149-004
662148-004
663324-003
643737-015
66t654-198
DESCRIPTION
Va!ve Shut O[!,'
Spring, Va!ve
Straight Wands (2)
Nozz!e Asm. Corn_lete
w! Key # 3, !2,!3
Retaining Ciip
Dry Floor Too!
We! Floor Too!
Crevice Toot
Dust Brush
Dry Upholstery. Tool
Nut w! "O" Ring
Wet Uphostery "I,_</_Co!hi: fete
Owne£s Mamas!
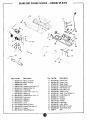
SEARS HOME CLEANING SYSTEM----MODEL
175.8690390
1
!
I
i
le
15
14
t
i
/
o,
2!
19
I
(See page t5 for
exploded view)
!
i
i
_=_!_J
-'y
/,,',
31
r--2o
_/
I I........
i
'?
i 28
I
I
I
"
SEARSDRY POWER NOZZLE-- MODEL SP-8 I PS
Key Part No.
1
2
3
4
5
6
7
9
t0
tt
12
13
14
!5
16
17
16
661964-001
660685-002
999349-003
999350-002
661652..001
660697-00!
643526-002
607182-00i
661182-001
661525-009
661497-001
661496-001
66!523-001
611135-003
643146-002
661061-0! 1
661130-00!
Description
MolorComplete
Motor Housir_g
Field
Armature {includes #151_
Bearing Strap (2)
Field Strap
Screw, Pan Head (17 i
Clamp (2)
Carbon Brush Asm. (2)
Top Cover
Reflector
Reflector
Lens
Bearing, Sleeve
Screw, Flat Head (_)
Swivel
Swivel Strap (2)
Key
i9
20
21
Part No.
661129-001
662464-002
661262-001
22
23
24
25
2_
27
28
29
30
3I
661679-001 Wheel Bushing (2)
661082-001 Felt Washer (2)
660688-007 Rear Wheel (2)
_'_1124-005 Volute Covet
66!392-00t
Shaft, Front Whee! (2}
661391-001 Front Whee! (2)
660689-01t Bumper
661524-707 Chassis
966770-002 Socket
966790-001 Light Bulb
661649-001 Lead, White
642149-004 Wire Nut, Ivory (2)
661685-001 Floor Brush Asm
SMB-4
Belt
35
36
37
Description
Swivel Sea!
Power Cord
Strain Relief
iii _Ulii/11111_11111
iiiiii
:L
_2:
7£2
}
Kenmore
HOME CLEANING
SYSTEM
SERVICE
N,:)_v_hat you _,_.,,_ p_re:based your K.enmo_e P{em €_t2ieap, mg S},,_e:m,
sh<>uk! a r_eed >_..e:' e;,i._t _<)rrepair pa,:t:_ >r servi:::e. >{;%.-,iy,:ontact a_y
Sears:; Se;wk:e (Ltai<r.
cM1 1:,_'vi._;ii
Be sure
to provide
alt pertic.,en.t facts when
you
MODI_L1'40. ] 75.8690390
HOW TO ORDER REPAIR PARTS
WHEN "
"-'_'_'_
LOW{NC, .......... x, ..... _"
" "r'_
,.,,_,,/,;
_ _';
.....
12>t:.,;-...i-z{[
] {{. !'4
"- ,, , _"'_
*........
]2]'*
_'q.A_At:,¢2I::
l[ the [3a_i_3,,_";" _,_,_,J a:t";_'_
...
" '
....... _',,3
eled_'ouit::_l: v _c:._,:::>id:e,i t,,)a tSear5 gepai_ Pgt_:{.>
Oi:t;i_f_;._ti:.:::_P>!-_.,v
{:or'
SEARS, ROEBUCK
"
""_:"
:t"-.,c,.{ _{!t'_4
*MND LPL...i.,..,
....-,
D
.....t.ates_
a'_ , .._- [L, 69170
. ..... U ?_,A.