1
for Service
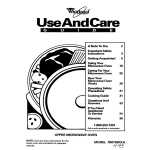
ReadThis Use and Care Book
BeforeYou Cdl
Takethetime to readthis book and learnhow to enjoy
your new MicrowaveOven.it containsdetailedoperating instructionsand recommendedmaintenance,as
well ashandytips to help you gain maximum benefits
from your MicrowaveOven.Once you haveread the
book, keepit handyto answerany questionsyou may
have.
If you haveany additional questionsccmcerningthe
operation of your MicrowaveOven, write—including
your phonenumber—to:
ConsumerAffairs
GeneralElectricCompany
AppliancePark
Louisville,Kentucky40225
IF YOU RECEIVEDA DAMAGEDOVEN,immediately
contact the dealer (or builder) from whom you purchased it. They have been informed of the proper
procedure to take care of such matters and can
handleit for you.
Check “Common Problems” section. (See page 20.)
It lists many minor causes of operating problems
that you can correct yourself and may save you an
unnecessary service call.
RegisterYour (km
It is important that we, the manufacturer,know the
locationof your MicrowaveOvenshould a needoccur
for adjustments.
Pleasecheck with your supplier to be sure he has
registeredyou as the owner; also send in your PurchaseRecordCard, If you move,or if you are not the
original purchaser pleasewrite to us, stating model
and serial numbers. This appliancemust be registered.Pleasebe certainthatIt k.
Write to:
GeneralElectricCZwnpany
FlangeProductSewIce
AFT?-210
AppliancePark
Louisville,Kentucky4(3225
Record
and Serial
Your MicrowaveOven has a nameplatecm which is
stamped the model number and serial number.
(Seepage5 for location.)
Model and serial numbers are also cm the Purchase
RecordCard which camewith your MicrowaveOven.
Recordthe numbersin the spacesbelow.
Pleaserefer to both model and serial numbers in any
future corrcxponcfcmtw or product service calls concerning your MicrowaveOven
ModelNumber
SerialNumber
DatePurclwmd
KEEPPURCHASERECEIPTWITH ‘THi$-BOOK-‘TO
ESTABLISHTHE WARRANTY’
PERIOD.
If ‘YOLU
Need Service
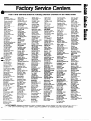
[n many cities, there’s a General Electric Factory
Service Center. Caii, and a radio-dispatched truck
will come to your home by appointment—-morning
or afternoon. Charge the work, if you like. All the
centers accept both Master Card and Visa cards.
(See Inside Back Cover.)
Or look for General Electric franchised Customer
Care@servicers. You’ll find them in the Yellow
Pages under “GENERAL ELECTRIC CUSTOMER
CARE@SERVICE” or “GENERAL ELECTRIC––
HOTPOINTCUSTOMERCARE@SERVICE”.
If you need serviceIlteraturt?,parts lists,parts or
accesfmrhn,contact one of the Factory Service
Centers, a franchised Customer Care@servicer or
your General Electric dealer.
ExtendedServiceContracts:The terms of your warranty provide free service covering failures due to
manufacturingdefectsfor a definite period of time.
After \his warranty expires you may purchase an
ExtendedServiceContract which will enable you to
budget your service needs. This coverage beyond
warrantyISavailablefrom our FactoryServiceCenters
and from manyfranchisedCustomerCareRservicers.
It is a good ideato apply for this coveragebeforeyour
warrantyexpires,
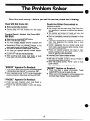
to Follow
for FurtherHelp
First,contact the people who serviced your microwaveoven Explain why you are dissatisfied.In most
cases,this will solvethe problem.
Next,if you are still dissatisfied,write all the details–
including your phone number-to:
Manager,ConsumerRelations
GeneralElectricCompany
WCE=312
AppliancePark
Louisville,Kentucky40225
Finally,If your problem is still not resolved,write:
Major ApplianceConsumerAction Panel
20 North WackerDrive!
Chicago,Illinois 60606
This panel, known as MACAP, is a group of independent consumm’experts under the sponsorshipof
wwral industry associations.Its purpose is to study
practicesand advisethe industry of ways to improve
clistomer service.BecauseMACAPis free of industry
control and influence, it is able to make impartial
recommendations,consideringeachcaw?individually
2
(~1981(_jeneral~lectri~Co,, U,S,A, All rjqhtsresel+ved,
IIEi
———-
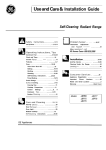
Before Microwaving
* .**,.*..,**..,*,*”****,****,*******
2
Grounding Instructions & Precautions . . . . . . . . . . . . . . . . . 3
Safety Tips .., ..** ... ... ... ... .,. ***. , **e******,***,**,* 4
Introduction to Oven *.*.*..*.,.....,.*.*,,.**.**,*..,**
5
Touch Control Panel . . . . . . . . . . . . . . . . . . . . . . . . . . . . . . . . . . . 6
Set the Clock . .*...*.,.......,...*,,***.***,,,**,,*,,***
6
Automatic Cooking ... ... Q.,... .., *.. *.. *.*oo, ***, ,o*e8,9 “
Automatic Roasting & Chart .,...,......,,,.,,..,,.
10, II
Defrost ● ***. *.. *.. ,*. ... *., .*. **, ,**, *,*, e****,,**,,,*, 13
Cook Code’MControl ● ****...*,,**,..,..*.**,,*,,,,,***
13
Time Cook **. .*. .,, ... ,,. *., .,. ,, *#,,,,***,***,******, 14
Temp Cook **. ... .., ,**, .,, ,,, ***, *#*,,,*,*,,,,***,,***
15
Hold/Timer ● *.*9****,.,*.,.**,*,,*,,*,*,*,,*,,*********
16
The Exhaust Feature ● *..***,*********,***,**,***,,**,,
17
Care of Your Oven ***. ***, *,. ,*, .,, ,*, *,*, ,, e***,*, 18, 19
The Problem Solver ● *,. **, ,*. ..*, *.*, **, ,,, ,,, *a,e*,e*20
Automatic Cooking Recipe Guide **. *,, ,,, . . *.*......, 21
Meats .#****. **. .*. ***. ***. ***. **, ,*, ,e, ***, a**,* 22,23
Vegetables **. .*9. .**, **** **** *,*e*, **,,9,,*,**** 24$25
Desserts... ***. ... ... .**, , ******e,,***,*,,****,*,
26,27
Automatic Cooking Chart . . . . . . . e. a .0.. . . . . . . . . . . 28,29
Factory Service Centers . . . . . . . . . . . . . . . Inside Back Cover
Warranty ● .,, *.. *.** *.. .*. ,***, **9****9*,, *8,*Back Cover
●
For personalsafety,this appliancemust be properly
grounded,
TheIXVAKM
cordcdthis apphance IS EKWIpped with
a Wifee=pnxg [gjrcnmdmg)plug whId7 mates ‘with a standard
Wee=prmng (cycmr=dmg)wall receptacle. (See picture, left, )
lb mmirn!ze the pcssbhty d severe or EM deem shock
shouldhavethe wall
nazard from IIIIS appl@nce,{hectisdcwner
RXJII checked by i3 c@dled !2k33rtCMn10
WWpE@eand 131
make sw the receptacle @properly grounded.
Where a standard two-prong wall receptacle E encountered,
II IS{hepersonal respcmshlity and obllgamm of the customer
ICI have a qualdwl electrician replace It with a properly
grounded Ifwe=prong wall receptacle.
DO not,underanyckurnstances,cutorremovethethkd
(ground)prongwornthepowercord.
—
3
—
1. For personalsafety the oven must be properiy
grounded.See groundinginstructionson Page3 of
this book
2. Cooking utensils may become hot because of
heat transferred from the heated food. This is especially true if plastic wrap has been covering the top
and handles of the utensil. Pot holders may be
needed.
3. Sometimes,
the ovenshelfcan becometoo hot to
touch.Be careful when touching the shelf during and
after cooking.
4 ~$Bo~lable’*
~~~~i~g pouches and tightly closed
p~asticbags+should be slit, pricked or vented as directed in Cookbook. If they are not, plastic could
burst during or immediately after cooking, possibly
resulting in injury, Also, plastic storage containers
should be at least partially uncovered because they
form a tight seal. When cooking with containers
tightly covered with plastic wrap, remove covering
carefully and direct steam away from hands and
face.
5. Ronstdefrostfrozenbeveragesin narrow necked
bottles especially carbonated ones, Even if the container is opened, pressure can build up. This can
causethe container to burst, resulting in injury.
6. Don’t overcook. Excessive overcooking ctehydrates potatoes,and may cause them to catch fire
causingdamage.
7, If food shouid ever Ignite, keep the oven door
ciosed. Turn off the power immediately. Touch
CLEAR/OFF or disconnect power cord or shut off
power at the fuse or circuit breaker panel.
& I?er?wvethe
probe from the oven
whennot u$ingiit to cook with, If you leavethe probe
inside the oven without inserting it in food or liquid
and turn on microwaveenergy, it can createelectrical
arcing in the oven, and damage oven walls or shelf.
9. Remove wire twist4hm on paper and plastic
bags before placing in oven. Twist-ties sometimes
cause bag to heat, and may causefire.
10. 130iiingeggs(in or outof the sheil)is not recoin=
mendedfor microwave cooking. Pressure can build
up inside egg yolk and cause it to burst, resulting in
injury,
11, 00 not pop popcorn in your microwaveoven
unlessin a special microwave popcorn accessory or
unless you use popcorn in a package labeled for
microwave ovens. Because of the heat generated,
without these precautions, the container could catch
fire,
12. Use metai oniy as directed in cookbook.Metal
strips as used on meat roasts are helpful in cooking
food when used as directed. Metal trays may be used
for TV dinners. However, when using metal in the
microwave
oven, keep metai at ieast l-inch away
fromsidesof microwaveoven.
13, Do not use any thermometerin food you are
microwavingunless that thermometer is designed or
recommendedfor use in the microwaveoven.
14. Do not store fiammabiematerials in an oven.
Also, do not use flammable fluids in the vicinity of
your oven.
15. Do not use your microwaveoven to dry newspapers.If overheated,they can catch fire.
16, Piastic IJtensiis-Plastic utensils designed for
microwave cooking are very useful, but should be
used carefully. Evenmicrowave plastic may not be as
tolerant of overcooking conditions as are glass or
ceramic materials and may soften or char if subjected to short periods of overcooking, In longer exposures to overcooking, the food and utensils may
even ignite. For these reasons: 1) Use microwave
plastics only and use them in strict compliance with
the utensil manufacturer’s recommendations. 2) Do
not subject empty utensils to microwaving. 3) Do not
permit children to use plastic utensils without complete supervision.
17. Don’t operatethe oven while empty in order to
prolong the life of the oven and save energy, If, by
accident, the oven should run empty a minute or two,
no harm is done.
18. When cooking pork either convemtiormiiy or in
the microwave oven, follow our directions exactly
and aiways cook the meat to at least 17W. This
assures that, in the remote possibility that trichina
may be present in the meat, it will be killed and meat
will be safe to eat.
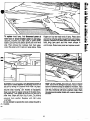
THE HOOD:
1, HaveIt In$talted
andproperlyground~d
byaqua}ifled lm+taller,See the special Installationbookiet
packed with the microwaveoven.
2, ‘?’he writ fan In your Spacemaker’”
oven will
operateautomatically
undercertainfxmditlorw(see
AutomaticFan Feature,page7)0Whilethe fan is
operatingcautionIsrequiredto preventthesttwtlng
andspreadingof accidentalcookingfireswhilethe
ventfan18inuse.Forthisreason:
A. Neverleavesurfaceunitsunattendedat high
causessmoking and greasy
heat$etting$.E30110ver
splilovers that may Ignit$ and spread if vent fan is
operating, To minimize automatic fan operation,
use adequate sized utensils and use high heat settings only when necessary.
B. In the eventof a grea$efire, smother flaming
pan on surface unit by covering pan completely
whh well-fitting IM, cookie sheet or flat tray.
C, Neverflamefoed$undertheovenwiththevent
fanoperatingbecause It may spread the flames.
D, KcMphoodandgreasefiltersclean,acccwding
to instructions on pages 17 arid 19, to maintain
good venting and avcddgreasefires,
E. U$ecareInral$lngandIowarlngthe$mokeand
$pattershieldto avoid tipping over tall cooking
utensils.
–
—
4!$
A
is securely latched.
2. DoorLatch.Push in to open door,
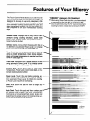
3. Wndow with Metal Shield.Screen allows cooking to be viewed while keepingmicrowavesconfined in oven.
4, Plastic Made Stirrer Cover.Protects the mode
stirrer which distributes microwave energy into
the oven.
5, OvenVent.
6* OverILight. Goes on when door is opened or
when oven is operating in any function.
7* OvenShelf.
8. MicroThermomWw7M
TemperatureProbe. Use
with Temperature Cook and Auto Roast functions oniyi
9. Receptaclefor TemperatureProbe.
10. Time or Temperature Display. During microwaving, shows ~ooking times in minutes and
seconds or temperature in degrees. When oven
is not in use, dispiay shows time of day,
11, Function Display. Cooking signai lights as to
what to do n6xt,-then iets you-know what func=
tion is being used as well as what Power Level
or Auto Code.
~12. Ciock. Oven wiii work without setting the ciock,
but will not dispiay correct time of day. (To set
the Clock see the following page,)
—
13. Function Pads. Use these to select a microwaving method--either cooking or Hoid/Timer,
(See foiiowing page for brief explanation of
each.)
Temperature,and PowerLevel or Autu Code,
1%PowerLevelPad.Toset or change Power Lewi,
touch this pad first, then number.
16 Start.Aiways touch Start last after setting all
other controls.
17 ClearK)fL Stops the oven and erases all settings except time of day,
18 AutoCookPad.Chart helps you select appropriate Code, Using codes for popuiar foods
eliminates Iooklng in Cookbook for cooking
timesand power ievei,
4n
~=.Auto Roast Pad, Use this Automatic cooking
Controi for temperature cooking of meats o;
slow simmering. Temperature Probe must be
usedduring Auto Roast function.
20, GreaseFilters.
21, CooktopLight.
22, HoodControls:
Fan Switch,Press once for high and twice for
low speeds,Pressagain for off,
Lamp$lwltch,Push and hoid untli iamp iights.
23, Model and Serial Number%. Located either
inside oven at top left side or on bottom lower
left corner of case.
24. $mokoand
$patter$hleld.
This convenientshieid
is hinged. When using range top flip shieid into
out position. Shield directs surface smoke to
exhaust system, When vent fan is not in use,
shield bends under microwave oven,
5
—.-——
—. .....——.—
—
...-—..
.-.
—
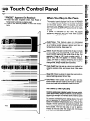
The Touch Control Panelallows you to set the oven
controls electronically with the touch of a finger, It’s
designed to be easy to use and understand. With
your microwaveoven, you have the option of using
your automatic cooking control pads for quick and
easy convenience cooking. (X you may make your
own programs to suit your individualized cooking
style.
“ERROR” Appears On Readout:
ReadoutPanel. Displays time of day, time or temperature during cooking functions, power level
being used, cooking mode and pertinent instructions of what to do next.
+---
@ WhenusingTemp Cook function, YOUhaveentered
a temperature lessthan 80° or more than 199°,
@ Door is opened during “AUTO” cycle of Automatic
Cooking function. Close door and touch START.
-“-J
‘-=-:-—...
Defrost.Gentle, more uniform thawing with little or
no attention at automatic Power Level 3, or change
power levelafter entering time, (See page 13.)
...—..
----—...
-.. .—.
A–
TernpCook. Usethe temperature probe to cook by
using a preset temperature. Oven shows temperature until preset temperature is reached and then
turns off. (Seepage 15.)
w=---=--
~
9
–1
——
~~
‘–———~
-“---- —-— —.
Y----..
-%EaEz%..
-—==..-————===,-——
——-.—- —————-- —-----
——--—.
—-–
——
——
I
Time Cook. Microwave for a preset amount of time
~:=e’i’:;-:=%’i’’-=--using automatic Power Level 10 or change
-. power
ieve~aftersetting time. (Seepage 14.)
Number Pads, Touch these pads to enter Time,
Temperature,Power Level,Cook Code digits, or Automatic Cooking Code number.
Power Level, ‘Touch this pad before entering an= —.—
other power level number if you waflt to change
from automatic Power Level 10 (HIGH) for cooking
or Power Level3 (LOW)for defrosting.
Start. Must touch this pad for oven to begin any
functions.
.——.
..
-
..—
—
—
---—
-.
-.,._.—
----—-
I
—-—.
——
_-—
—==—-:
=n————.——T—
.——
~~
——
~—
—— ———
—
-—
—
Auto Cook. Touch this pad and then number pad for desired Code number, and oven automatically
microwaves at pre-programrned power levels and
determines the proper amount of cooking times until the food is done and oven shuts off,
-.__—
-~
------
.,—-—..———.
.9 mk *AT
—-------
— —–––
—-—-.—
—-----—..
.--.—
—.——
—
---—
z = - -.————
—
—
—......
........ ..... ..... .—
-.
. . --—.
——-.
—
....—--———-.
..-————-.
.. —---.-—.—
...-=—~—=——--====
.—
.. —---...-..-...==..--.
:-.
.=———
- a=,
..- -.-—- ... ..——
-—.--.
...
—...----. ..... . .-.
.. ...—
. .:.:..-.
. ... . .. . .
- ——.-._ ...——
-—. —.. .... .—-. .
.. .. ..
. . . . .... .... .. .. ...... .. ...... .... .. ..... ...——
...
-———-— ---- ..——.
.——
.
-——.
——
—
------—
—-. -——
. . . .. . . . . . . . .. .... .... .... . .. ... . . . . . . .
.
.
.
.
.
.
—
--.—
.
—.—
—.—
—
-.,-...
...:
=—=
.=
...=....
..,...m——
_-.m::z.:..==, .-,. s.....ins.,
—
— .-.=---:~———
. .................
..— ........ .
-——--_
_...
..=.
.-==.
_..
=.
==——_——-..—
—..-—.
...---—
—
—
------== ~=
.—.
——.
..——.——.
--.
-.——.
—-.....
--.
...
....
———.—.
.—
—
—
—
———
LIGHT
——
/
6
—
—
“FWKM3E?y
Appears CMReadout:
YouIPIu3
-w intheOven
@ Probe has been forgotten when Auto Roast or
TempCook functions are being used,
@ Probe
. . is not securely seated in oven wall receptacle.
The readout panel displays five 8’s and 18 POWER
on the upper portion and all of the oven functions
on the lower portion, After 15 seconds, all lights
disappear and “RESET” flashes in the upper portion, Touch the CLEAR/OFF pad and oven is ready
for use,
if power is disrupted at any time, the above
sequence reoccurs, and you must reset CLOCK
after touching CLEAR/OFF,
/
.1
D~—
~ Hold/Timer. This feature uses no microwave
energy while it functions as both a kitchen timer or
as a holding period between defrost and time or
temperaturecooking, (See page 16.)
‘9 ———
-A.-:..R
.-—-- .—-. . .. . .
-fimzi-==
—.
——..-—-....
.—
. . .. .
..—.
— . . - — ------
I
Clock.Touch this pad to enter time of day or check
time of day while microwaving, To set clock, first
touch CLOCK pad and then enter time of day, For
example, if time is 1:30, touch number pads 1, 3,
and 0 and 1:30 will appear in readout ciispkiy,
P.-a- .,**a
-. *#a4. – .
awm ww nawl 9n reaaod directing you to touch
STARTthus setting the clock, If you wish W reset or
change time, simply repeat above process.
A
-—L————-...——.——–—
——
—
—
— . .-—.=.
—
————
.——.—.—.
--—
.—
—m—
——
. --——
——
----.-x-----
—
--
—
—....
—
————
—
-
----
-
——
.—
●
—
—-
—
●
P
Cook Cod&~Usethis pad as a short-cut method for
entering cooking time, and power ievel. (See page
13s)
..-.— —
.- ...-::
.._.
._..— ..
Clear/Off, When touched, it stops the oven and erasesail settings except time of day.
— -Auto
m~
—
-—
-=
--..- -----------—-.....——
--...-——
——
_—.
.—-...
..-—,—
..
. —...-——-.
-—
——
—-—
— ———
—
———
— ——
—
AIJTOMATICFANFEXWF?IE
Cooking appliances instaiied under the oven might,
under some heavy usage conditions, cause temperatures high enough to overheat some internai parts
of the microwaveoven,
To prevent overheating from taking piace, the vent
fan is designed to automatically turn on at low
speed if excessivetemperatures occur, Should this
happen, the fan cannot be manuaiiy turned off, but
it wili automatically turn off when the internai parts
have cooied, The fan may stay on up to approximately 30 minutes after the range and microwave
oven controis have been turned off,
—
.-— .——
——
-...=—.——
-...—
.——
—
..... . ....... ——
_—
‘AiIailQmmii
~
“AN
.—
‘east- Insert Probe, touch this pad,and &
sired number pad for Code to siow-cook or temperature cook meatwith automatic preset program.
\
7
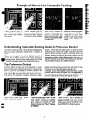
The Auto Cook pad may be used to eliminate your
need to look up cooking time in the Cookbook, or
guessing how long to set cooking time. By actually
sensing the steam which escapes as food microwaves,this feature automatically adjusts the oven’s
cooking time to various types and amounts of food.
Becausecooking containers must be covered, this
feature is best with foods which you wish to steam
or tc retain moisture, Foods which are best microwaved uncovered or only lightly covered should be
cooked using time or temperature settings,or Cook
Code’mcontrol.
After touching the Auto Cook pad, and pressing
Start, you will see the word AUTO on the readout,
which indicates that the sensor has been activated
to sense steam from the food, To prevent the escape of steamfrom the oven, do not open the door
while the word AUTO is on the readout. If door is
opened, ERROR appears. Close door and touch
STARTimmediately.
Setting 1, which is designed for easy reheating of
foods, automatically turns the oven off as soon as
the sensor detects steam from the foods. Other
Auto Cook control settings, which are for fresh or
frozen foods, need additional time after steam has
been sensed. For these foods, the oven determines
the amount of additional time needed, then automatically switches the oven to Time Cook for the
necessary cooking time remaining. Oven beeps
when it switches to Time Cook (AUTO on readout is
replaced by numbers indicating cooking time), and
oven door can be opened for stirring or rotating
food,
Be careful of steam when removing tight covers.
When you remove cover, direct the steam away
from hands and face,
Be sure the exterior of the cooking container and
interior of microwaveoven are dry.
Always coverfoodcontainers
usingIldsor plastic
wrap.Plastlcwrapshouldbe loom overfoodto
allowforexpansion,Sealbypressingplasticwrap
firmlyaroundedges.Forbestresults,neverstretch
plasticwraptightlyoverfood,or usetlght+eallng
plastlc{Ids.
Alwaysstirorrotateafterbeeping#lgnal.
MATCHTHEAMCNJNTOFFOODTO THE SIZECW7’HECONTAINER,FILLCONTAINERSAT LEAST1/2FULL
BESURE‘THEEXTEHIOI?0!=THE COOKINGCC)NTAUIN%?
ANDINTERIOHOF MICROWAVEOVENARE DRY,
WliV~ - 4’?t%tik=~
PfiM?AShIk=~=
EWW9
AI I-A
BAAU
Ah##% e-sea
em
E5#49AV~
apwem
ms-e-..a-.-..
a .
.&~
m.....
-. . . . .Efifif%
~Ww
~~~~
s n~wwgr*w
3 Wn
-V
z v
WWWm
FW*W
w
*
SE-S
Wn
nv
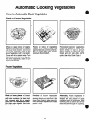
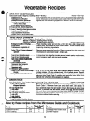
Use microwave-s~fe casseroles or
bowls for entrees and vegetables.
Coverwith lids that fit. If lids are not
available, use plastic wrap. Plastic
wrap should be loose over food to
allowfor expansion,Sealby pressing
plastic wrap firmly around edges.
Use oblong or square containers
for chicken or corn on the cob,
Plastic wrap covering should be
loose over food to allow for
expansion, Sealby pressingplastic
wrap firmly around edges,
Do not use paper plates with automatic cooking, Use rnicrowave”safe
platesor bowls for reheating,Cover
with plastic wrap (you can still
use paper plates with regular Time
Cooking, Defrosting, etc.).
Slit plastic pouches l-inch as
shown above, Break food up thoroughly after oven signals. For alternate pouch method seepage 24,
g ma
~
~g-
c ~~
m~~~l~s~
~:~<~.~~.
FrozenEntreesInPaperboard
‘Ww:
Do not remove film” over tray; r&
move tray from box. Thick entrees
may need longer time. Se%chart
on page 28, FrozenFoodin Metal
Tray: Remove foil, reinsert into
box and close ends.
Follow control panel or Automatic
Cooking Chart settings for casseroles. Cover casserole meat and
vegetables with sauce. Cool hot
ingredients or sauces, If not, use
TIME COOK,
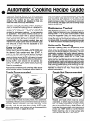
of fiow to trmke
Place covered food in
oven. Touch Auto Cook
pad. “Enter Code” flashes
on readout.
Touch number pad for
desired code, Code 2
shows and “Start” flashes
cmreadout.TouchSTART.
Word AUTO shows on
readout, indicating steam
sensor is activated. DC)
NOT OPEN DC)C)R.MAY
AFFECTCOOKING PERFORMANCE.
sounds wfien steam
is sensed and AUTO is
replaced by cook time+
Rotate or stir food, When
done, oven beeps and
stops.
Beep
Control
ChokingCodes& Preference
Code 1, which has the least power, is used for quick
reheating jobs while the longer cooking foods like
stew or chili use higher codes. A Cooking Chart and
recipes,starting on page 21 give many tested uses for
automatic cooking codes. Remembering that yQu~a~
adjust the power up or down by increasing or decreasing the C@e will give you added flexibility.
Automatic cooking codes 1through 9 are designed to
give you easy automatic results with a number of
foods.
Codes are arranged in lowest to highest amount of
-power.
For examPl@tCode 1 gives least microwave
ooklng power, Code 2 gives more power than Code
1, Code 3 increases power over Code 2 and so on,
The
Another feature to give you more flexibility In Automatic Cooking is the preference control, which can be
usedto “fine tune” the power of Codes 2 through 9, By
simply adding a 1after a Code, you can set the oven to
cook using X)% less time than the code would regu=
Iarly deliver, For example, if Code 4 cooks your vege=
Touch Auto Cook Pad. “Enter
Code” flashes on readout,
tables more done than you like them, set Code 41 next
time and you wiHget 2CW’O
less cooking time,
Likewise, if you wish slightly more time than a code
delivers, add a 9 after the Code. For the vegetables in
the example above, Code 49 wouldprovide 20°/0more
time for cooking than would the regular Code 4.
Touch number pads4 and! In that
order, Code flashes on rmdout
until “Start” Is touched showing
that preference control is used,
Code 4 shows and ‘Start” flashes
on readout.
9
~otich ~TAfW.AUTO shows on
readout display, DC) NOT OPEN
DOOR until first oven signal, then
rotatedish 1/2 turn, Close door and
touch START to finish cooking,
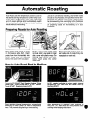
Auto Roast uses the temperature probe to cook to
the desired serving temperature.UnlikeTempCook,
which uses a single power level, Auto Roast uses
up to 3 power settings which automatically switch
during roasting,thus providing eventender cooking
results without overcooking.
Just as in conventional roasting, only tender roasts
should be Auto Roasteduntil specified internal temperatures are reached. Less tender roasts should
be microwavedby time, according to the Cookbook
which comes with your oven. Complete information
on preparing roasts for microwaving is in your
Cookbook
RoastsforAuto
1
I
——.——
l“”
[11-
,/,.-~-.
—.
. -. T-+J\
#’”r.
—:
Place tender beef roasts on trivet
in microwave safe dish. Insert
probe from front horizontally into
center meaty area not touching
hnma
nr #m+ Pntinr
-VI Vw Wf v-n. Wwvwr
tfi~ikh
Tzr*f 1 MI*U
w~-n
n-new
~wpwr
.
Poultry, pork or ham roasts need
no trivet. Add %cup water to roast
dish, cover with plastic wrap. (For
cooking bag method, see cookw*n4n*
hnab \ p~:~ @&~ p:~ Wwl
I LVI
wus#n*J
meatyarea.
Place meat with probe in oven. insert cable end of probe firmly into
receptacleon ovenwall,
“
HowtoAutoF?oast
Beefto
Touch AUTO FKIAST Pad. Readout flashes “Enter
RoastCode”, Touch number pad 2.“START” flashes.
TOUChSTART. Readout shows AUTO.
At 80”, readout switches to show meat’s internal
temperature. Turn roast over and restart oven by
touching START.
Oven monitors internal temperature, automatically
switching to lower pow~r as meat’s temperature
rises,This preventstoughening or overcooking,
After temperature Is reached, oven switches to
HOLD for 1 hr,, then shuts off. Hold prevents overcooking whi’lekeeping meat warm,
10
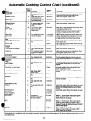
Auto
@Use containers
and coverings
as directed
Roastchart
at left. Place probe
correctly In roast before cooking,
Turn eve: when 80 (except pork) has been reached,
Beef
Tender Roast
Rare
Medium
80°
80°
2
3
Well
Meatloaf
(loaf or round)
Pofi’
Loin Roast
Precooked
.- Ham
4
4
. .—
- .—. . -... .4
1
125°
140”
12-14
14-16
5-10
‘10-1 5
80°
170°
17-18
30
170°
No Turn
30”40
5-10
Over
. . - .—
.--—.—.——_———_————
-.
—.._
_.,_—
.,.——--.—
—
——
—---- —
..-,-.,.- .,..
.--._—.
..-——-- .
120°
-——— 80°
170’
18-20
17-19
115Q
. .. . - -------———-——-.———.—.
20
5-1o
Poultry
Whole Chicken
(31b,)
Whole Turkey
!5
80”
190°
13-15
20
5
80”
190°
13-15
20
12 tbs.)
(Insert probe into meatiestarea of inner thigh from below end and parallel to leg,)
(UP tO
Turkey Breast
4
(Insert probe horizontally into meatiest area)
_*l?f&oirn;;d;~-
&-JQ
17(Y’
13”15
20
.--.———
. —.——.—. —-—— . .—=--—-—==
—..-—- .——
——
- =--=
—.
.. .—
stan-tiing time before serving,
(AutoRoastCock6)
Your Cookbook has a chapter on Automatic Simmering, including charts and recipes. Refer to this
chapter for addit~onaltechniques and cooking time.
Total time includes time to bring food to 180° and
hold at that temperatureuntil
done,
.
Automatict?dmmer
(AutoRoastCode6)
Set Auto Simmer like Auto Roast,
example left, Readout shows
AUTO until food is 8( IQ,then
switches to show food temperature until 180~.
Oven switches to HOLD at 180°
until you remove food and turn off
oven. If stirring is recommended,
you can reset oven by retouching
START*Touch CLEAR/OFF after
cooking.
11
Beef
Pot Roast’
6-8
Stew
6-8
Chili
11“13
Chicken*
Stewing
11-12
Broiler/Fryer
4-6
Ham or Pork
Roast
4-6
soup
Stock/Vegetable
3-6
Split Pea
13”15
‘For frozen,add2 to 3 hours.
Q. Whydoesmyovenautomaticallycutoff afterthe
AUTOcyclewhen usingAutoCook Contro\Code 1
whenit doesnot forothersettings?
A. When using Code 1,there is no second phase of
minutes counting down. All the cooking is complWed in the first phase or AUTO.
Q. If my food is not completelycookedafter using
the suggested Auto Cook Control Code, what
shouldI dO?
A. Thick starchy or dense foods may req’uiresome
additional time cooking. Use TIME COOK and
Power Level 10for a few minutes until completion.
Q. Do all fresh or frozen vegetables require a
standingperiodaftercookingw!thAUTOCOOK?
A, Most vegetables are cooked to a crisp.state during Auto cook, just as in regular microwaving,
Therefore, it is recommended that you let the vegetables stand for up to 5 minutes depending on size
and density of pieces. This standing time also enhances the overall flavor and appearance of most
vegetables,
Q. What if I dm’t fully cover the dish in Auto
Cook?
A. Oven senses steam tgo quickly which shgrbqs
the cooking time thus leaving undercooked dish.
Recovertightly and resetAuto Cook,
Q. 130the shapesand sizesof food make a dlffererwewhenusingAutoCook?
A. Yes,in some cases, larger pieces will require additional Time Cooking. Be sure to check suggested
arrangement of pieces in the dish, since proper arm
rangement is often a successfultip in regular micro=
waving.
Q. Should i use Auto Cook to cuok pudding or
WXKXX3?
A. Most pudding and sauce recipes require stirring
many times during cooking: therefore, Time Cook is
recommended since you should not open the door
during the AUTO phase of cooking without affect=
ing end cooking results.
Q. My scalloped potatoes were not completely
cooked when I removedthe $Ish after Auto Cook.
Whatis wrong?
A. if you prepared the sauce in the oven prior to
combining the sauce with potatoes, there may have
been too much remaining moisture in the oven,
Make sure you dry the oven completely before using Auto Cook since this function operates properly
by sensing steam in the oven, Also, starting Auto
Cook with hot foods cre~tes steam in the oven too
soon, and decreasesthe first sensing cycle.
Q. Are there any other foods which are best Time
Cooked,ratherthafiAutoCooked?
A. Bakery foods, candies, melted chocolate or
foods when a dry or crisp surface% desirable, are
cooked best by Time Coak.
12
Q. Do fresh or frozen vegetables require water
whenusingAutoCook?
A. Yes.Add water as recommendedon chart to the
vegetables and cover well for even, complete
cooking.
Q. Would my piasticcontainerswith verytight fitting lidsbe appropriatefor AutomaticCooking?
A, No, most types of plastic storage dishes, butter
tubs, etc. with tight fitting lids are not recommended
for microwaving. Aiso tight fitting piastic lids may
prevent adequate steam from escaping and food
may not cook properly during Automatic Cooking,
CL I tried to warmsomechow meinnoodlesusing
Auto Cook. Whydidn’tthiswork?
A. Food must havesome moisture in order to create
steam which heips the auto sensor function.
Extremely dry foods such as chow mein noodles,
potato chips and other such foods do not have
enough moisture,
Cl. May I use Auto Cook when I am cookingmany
foodsin morethan one dishor casserole?
A. No,becauseofdifferentfood densities,attention
neededduring cooking, and food amounts, it is best
to use TIME COOK when cooking many foods.
Q. Whywas my roastnot fullycookedev~nthough
the temperatureon the readout was corre~t and
AutoRoastcompleted?
A. When cooking with Auto Roast,the temperature
probe must be inserted properly as Wily described
in the Cookbook, After turning meat over or rotating, the probe should be checked to make sure it
hasn’t slipped or changed position,
Q. Lastthe Iused Auto RoastI removedthe roast
fromthe ovento turn it over,When1replacedroast
In oven and reccannectedthe meat probe, AUTO
reappeared,Why?
A. The oven and roast may have cooled to below
80”, or probe may have been repositioned, Continue roasting and numbers will soon reappear,
Q. Are there any particulartrivetsthat work better
thanothers?
A. Yes,flat glass trivets such as lids or dish covers
give more even cooking results than plastic trivets,
Also, ceramic ridge-bottomed roasting dishes work
well. Plastic trivets require meat to be turned over
more frequently because the grid design and legs
allow the bottom of the meat to stay cooler as it
cooks, than glass trivets do,
Q. Why doesn’tthe roast continuecooking during
the standingor holdingtime?
A, The oven automatically reaches finished temperature and then decreases to a lower power level to
prevent overcooking. Thus an even temperature is
maintained,
—
_.
.-—
—
l-lowtouse
~00~
CodeT~Control
control and the highest Power Level is 10 which is
represented by “O”. When setting a 2 digit Cook
Code control entry, the first is time, the second is
power level.
Step t: Touch COOK CODE Pad. “Enter Cook
Code” flashes on readout.
Step2: Enter the proper code into Cook Code control. For example, a recipe calling for 12 ●
minutes
cooking time at Power Level 10would be 120.Code
number appears and “START” flashes immediately
after entering a 3-digit code, but when a 2-digit
code is used, there is a delay before “START”
flashes,
J
Stop 3: Touch START, “Cook Time Left, time
counting down and Power 10” show on display,
Cook CodeTMcontrol gives a short-cut way for
entering time and the Power Level on your microwave oven. Be sure to check your Cookbook for
specific codes for specific recipes.
To understand the Cook Code control, it is important to know what the numbers mean and what the
sequence is. The first and second numbers, if setting a 3 digit code, indicate the amount of time you
desire; the last control entry number is always the
Power Level, For example, 125means 12minutes at
Power Level 5. NOTE: Your oven can only be programmed to 99 m~nuteswhen using the Cook Code
bk)Wto
The Defrost setting is designed for
even thawing necessary for large
amounts of food and is one of the
most important advantages of a
microwave oven, making defrostinrt
_
fit I in & am~
q“twn
M, -w
aamtf
wG3uy
tAli*k+
1;+41***-VVIKI I ll\tl G QLSGI
1-
Power Level3 is automatically
—
set for defrosting, but you may
changethis for more flexibility. See
your Cookbook for fhe complete
defrosting chart.
To become better acquainted with
your Defrost function, defrost frozen pork chops by following the
steps below,
Step 1: Place package of frozen
chops in the oven and close door.
:ll-g=
Cl.When I press START, I hear a
dull thumping noise. What is it?
A. This sound is normal. It is letting
you know the oven is using a
Power Level lower than HIGH,
Q. Can I Defrost small items in a
hurry?
A. Yes,but they will need more frequent
attention than usual. Raise
—
“-,: Power Level after entering the
‘- by touching POWER LEVEL
- and 7 or 10,Power Level 7 cuts the
time in !+; Power Level 10 cuts the
time to ‘x~.During either, rotate or
stir food frequently,
Step 2: Touch DEFROST.Display
reads :0 and Power 3. “Enter Def
Time” flashes,
Step3: Touch 8,0, and Ofor 8 minutes. “Def Time”, 8:00 and Power
3 are displayed,
A.
~-.
r-$*TA
m~~~ – ~ *’ -@am
mi
I Ime
i VUurl
G2 1Mm I .
u t qJ
=?.
Left’” shows and time counts down
on display, When cycle is completed, “END” flashes, the oven
signals and automatically shuts
off.
Step 5: Turn package over, close
door and repeatSteps 2,3 and 4,
Step & When oven signals, *’END”
flashes and oven shuts off, Re=
movepackageand separatechops
to finish defrosting,
Q. Can I ofxzmthe door during DEFROST to check on the progress
of my food?
A. Yes, You may open the door at
any time during microwaving, To
resume defrosting, close the door
and press START,
Q. Why don’t {he defrosting times
in the Cookbook seem right for my
food’?
A. Cookbook times are average,
Defrostingtime can vary according
to the temperature in your freezer,
Set your oven for the time in”
dicated in your Cookbook. If your
food is still not completely thawed
at the end of that time, re-set your
oven and adjust the time accordingly,
13
Defrosting Tips
@ Foods frozen in paper or plastic
can be defrosted in the package.
@ For even defrosting, many foods
need to be turned over, rotated, or
broken up part of the way through
the defrosting time,
@ Homemadedinners can be frozen in shallow foil trays and heated
for later use, Select_foods which
microwavewell,
o Pre-packaged frozen dinners
can be defrosted and microwave
cooked.
@ Check your Cookbook for other
defrosting tips,
Q. When I enter the fourth digit using Cook Code control, nothing
happens,What went wrong?
A. The oven will take only 2 or 3
numbers. If more are pressed,
oven does not respond, Touch
Clear/Off and begin again,
Q. Can I select a Power Level other
than automatic Power Level 3 for
defrosting?
A, Yes.Some smaller foods may be
defrosted quicker on higher Power
Levels but for even, carefree defrosting, Power Levd 3 is suggested. Check the chart in the
Cookbook for specific times and
Power Levels.
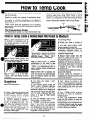
Time Cooking, or cooking your food according to a predetermined amount of time, is probably familiar to you from
conventional cooking. With your microwave oven, however,
you presetthe time and the oventurns off automatically.
Lh3ing
Yourovento TimeCook
Follow the cooking steps below to
help you learn to Time Cook
properly,
Step 5: When time is up, oven
sounds. Display flashes “END”.
Oven, light, and fan shut off.
— —. ~.-..>
&—-~(~6kJ~
h
*- /---------------j~
““ --=
-J!
Step 3: Select your time. Touch 1,
/
—----———--—...———
2,
and O for a minute and 20 seci .—m.
-...
-.,
.--.,
..,,..
-.-.
---.—....
-...
.e-. onds. “Cook Time”, Power 10,and
1:20 appear on the display, If anStep 1: Fill a cup % full of water
and 1 teaspoon of freezedried cof- other Power level is desired touch
fee. Use a cup that has no metal POWERLEVELand the number aldecoration. Place cup in oven and though Power Level 10 (HIGH) is
preferred for this cup of coffee.
close door.
Step 2: Touch TIME (XX3K. ‘l’he
read-out panel shows :0 and
Power 10. “Enter Cook Time”
flashes.
and
Q. I set my oven for the time called
for in the recipe but at the end of
the time allowed, my dish wasn’t
done, What happened?
A. Sincm house power varies due
to time or location, many Time
Cook recipes give you a time range
to prevent overcooking, Set the
oven for minimum time, test the
food for doneness, and cook your
dish a little longer, if necessary.
Step 4: Touch START,‘*Cook Time
Left”, Power 10,and time counting
down show on display.
Q. I want to cook my dish cm a
Power Level other than HIGH,what
do I need to do?
A, To change the Power Level,
touch the W3WER LEVEL pad.
“Enter Power” flashes on the display panel, Enter the desired
number,
Q. Can I interrupt my Time Cook
function to check the food?
A, Yes,To resume cooking, simply
close the door and touch START,
NOTE: Microwave power will not
come on until you are ready. You
must touch START for cooking to
begifl,
Microwaving Tips
0 MakeSumdl utensils
used in
your microwave oven are Iab’eled
“suitable for microwaving”. Check
your Cookbook for specific test to
determine “microwave-safe” utensils.
o paper towels, wax Papzr, and –
plastic wrap can bs used to cover
dishes in order to retain moisture
and prevent spattering.
O Most microwaved foods require
stirring, rotating, or rearranging.
Check your Cookbook for specific
instructions for the food you are
microwaving,
O Some foods such as uns!wlled
eggs and hot dogs must be
pricked to allow steam to escape
during cooking,
Q. I touched the number pads and
selected my power level, When I
touched START,however, my oven
didn’t come on. Why not?
A, The TIME COOK pad must be
touched before setting the number
pads or else your oven will not begin cooking.
14
—
...———.——-.
...—
—
gauges the internal temperature of your food; it
must be used when using TEMP COOK or AUTO
ROAST.To utilize your temperature probe properly,
follow the directions for use and insertion in this
book in the section entitled “How to Auto Roast”.
For many foods, internal temperature is the best
test of doneness.
Roasts or poultry are cooked to perfection when
temperature cooking. Heating or reheating foods
accurately to a serving temperature you desire is
simple and easy.
TEMP COOK takes the guesswork out of cooking
because the oven shuts off automatically when the
food is done.
HANDLE
4
111~ Temperature Probe
The temperature probe is a food thermometer that
Howto
CA13LE
END
I
/
.
SENSOR
w
CLIP
Cooka RolledPeefRibRoastto
CookingTips
Step 1: Insert temperature probe
as directed in Cookbook and attach probe securely in oven wall.
Closethe door,
Step 2: Touch TEMP COOK. The
display panel shows F and Power
10.“Enter Ternp” flashes,
SEW 3: Touch 1, S, 0 for 130”.
“Temp”, 180F and Power 10show
on display.
and
0. After I followed the steps and
touched START,“ERROR” flashed
in the display and a signal
sounded. What is wrong?
A. “ERROR” flashes on dlspiay if
you set th~ temperature either below 80(3or greater than !99”, The
tells you between thciiflashof “ERROR” what the incorrect entry was that you set. To
re-enter, touch CLEAR/OFF pad
and begin steps again.
Step 4: Touch POWER LEVEL pad.
“Enter Power” flashes.Touch 5 for
MEDIUM power. “Ternp”, 130 F
--A
mA...
- ~ -k -.,.- +- 4:-.-1-..
at
m rvwd d mtuw= vi I umpay.
Step 5: Touch START, If internal
temperature of the roast is less
than 80”, display will show
“COOL’” or if temperatureis 80° or
above, display shows temperature
counting up.
Step6:When 1308is reached, the
oven will sound and automatically
shut off, Remove probe and food
from the oven,
Q. Are there any foods I can’t
TEMPCOOK?
A. Yes. Delicate butter icings, ice
cream, frozen whipped toppings,
etci, soften rapidly at warm temperatures. Batters and doughs as
weli a$ frozen foods are also difficult to cook precisely with the
probe, It is best to TIME COOK
these foods,
Q.,Why did “PROBE” flash on the
display after I touch~d Start?
A. “PROBE” wiil flash on the display if you have not securely
seated the end of the probe into
the receptacle in the oven wall or if
you touch TEMP COOK and have
forgotten to usethe probe,
@Where you have a choice of
Power Levels, use a lower setting;
it will heat more eveniy even
though requiring moretime.
@ Be sure frozen food has been
completely defrosted before inserting probe. Probe may break off
if used in frozen foods.
e Always insert probe into the
b-b+
--0nnn4aw
n~ Mnqdta
we: G
GKXS;
lane
f11uclLy
U*1
1s-1VI
not to touch the fat or the bena.
@ insert probe as horizontally as
possible into foods as direc!ad in
the recipes, Make sure the handle
does not touch the food. The probe
is easiest to use when inserted
from the front,
@Usethe clip to keep the probe in
placewhile heating,
@ Cover foods as directed in
Cookbook for moisture control and
quick, even heating.
Q, Can I leave my probe in the
oven if it’s not inserted in the food?
A. No. If the probe is left inside the
oven, touching the oven wall, and
not inserted in food, you may damage the over?,
Q. Can I TEMP COOK different
portions of food at different
temperatures?
A. Yes. The temperature probe
gives you the freedom to cook difm
ferent portions of food at different
temperatures to suit individual eating styles, Simply place the probe
in the food and change the temperature setting as needed,
15
...-
Your HOLD/TIMER, which operates without microwave energy,
hasthree timing functions,
It operates as a Minute Timer, it
can be set to delay cooking or may
be used as a hold setting after defrosting. Hold/Timer can be set up
to 99 minutes.
Step 1: Touch HOLD/TIMER pad.
The read-out panel shows :0, “Enter Time” flashes.
Step 2: Select the amount of time
you desire. Touch the appropriate
number pads. If, for example, you
are timing a three minute phone
call, touch 3, 0 and O.The readout
panel shows 3:00 and “HOLD”
appearson display.
Step3: Touch START,The readout
display shows the time as it counts
down, and “Hold Time Left”.
Step 4: When time is up, oven
sounds.The readoutflashes“END”
and the timer turns off.
The klOLD/TIMER can also be
used to program “standing time”
between microwave cooking func-
Flowto
tions. The time can range from one
second to 99 minutes and 99 seconds. A HOLD,or “standing” time
may be found in some of your own
recipesor Cookbook.
To set the oven to delay cooking
up to 99 minutes follow Steps 1
and 2 to enter hold time, then set
time or temperaturedesired before
pressing START.When holding before temperature cooking, be sure
probe is in food before pressing
START.
Cook
To help you become acquainted with the HOLDITIMER feature as used with Time Cook or Temp Cook
follow Steps below to defrost a frozen casserolefor 15 minutes, then hold 10minutes and then cook 25 minutes.
If using Temp Cook after Hold/Timer, be sure to insert probe correctly as shown in Automatic Roasting
section of this book.
Step1: Removecasserolefrom the
freezer and place in oven. Touch
the DEFROST pad. The readout
panel shows c’EnterDef Time”, :0,
arid i%wwr3.
Step 5: Touch the TIME C(3OK
pad, The display shows “Enter
Cook Time”, :0, and Power 10
Step 3: Set standing or hold time
(HIGH).
by touching l+OLD/TIMER. “Enter
Time” and :0appear on display.
Step 6: Touch 2, 5, 0, and O for
twenty-five minutes of cooking
time. “Cook Time”, 25:00, and
Power 10 appear on the display panel,
Step 2: Touch 1, 5, 0 and O for
defrosting time. Def Time, 15:00,
Step 7: Touch START. “Def Time
and Power 3 appear on the display
Left”, Power 3, and 15:00counting
panel. (Defrosting is automatically
down show on display. As each
set on Power Level 3 but can be
function is automatically perStep 4: Touch 1,0,0, and Oto hold
changed by touching P0WEf3
for ten minutes. 10:00and *’HOLD”
formed oven display shows enLEVEL pad and the new Power
appear on the display,
tered information.
Level.)
Ii
and
Q. What will happen if I accidentally reversethe instructions?
A, if you accidentally reverse the
sequence of programming instructions, your oven automatically
rearranges your program, 13efrosting always comes first, then hold,
and then the cooking function.
CL Can I Defrost-Hold only cm my
oven?
A. Sometimesyou may want to defrost a food, hold it, and refrigerate
it to be cooked later. All you need
to do is program in Defrost and
amount of time. Then program
Hold and amount of time, Put your
thawed dish in the refrigerator and
cook later at a convenient tirrm.
NOTE: Allow foods to remain at
room temperature only as long as
safe, Times will vary.
16
Q. I programmed my oven for a
specific defrosting time but it defrosted longer than necessary,
What happened?
A. When instructions conflict, the
oven carries out the last instruction. You may have set the oven to
Defrost for 4 minutes, HoldiTinie
for 2 minutes, and then Defrost for
6 minutes. In this case, the oven
would Defrost for 6 minutes and
Hold/Time for 2 minutes,
—
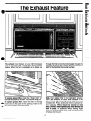
The exhau$t hood feature on your GE microwave
oven is equipped with a metal ‘filter which collects
grease. When the fan is operated, air is drawn up
through the filter and is then discharged through the
provided venting to the outside. The hood also has a
iight for illuminating the counter surface,
To removegrease filter, grasp the “finger hold” on
the filter and push to the rear.The filter wiii drop out.
To replace grease fllfer, insert the fiiter In the top
frame slot on the back of the opening, Push to the
rear and upward to $wuap
into place.
Soak, then agitate fiiter In hot detergent solution.
Don’t use ammonia or other aikali because it w!!!
darken metal. Light brushing can be used to remove
inbeddectdirt, Rinse, shake and remove moisture before repiacingt Filtersshould be cleaned at least
once a month.Neverommte vour hood withoutthe
filter in place, In situations “where flaming might
occur on surfaces below hood, filter can retard entry
of flames into the unit.
17
YourNew MicrowaveOvenis a ValuableAppliance,
ProtectIt FromMisuseByFollowingTheseRules:
@bKeep your oven ck?an and sweet-smelling.
Openingthe oven door a few minutes after cooking
helps “air-out” the interior. An occasional thorough
wiping with a solution of baking soda and water
keepsthe interior fresh.
@ Don’t use sharp-edgedutensilswith your oven.
The interior and exterior oven wails can be
scratched.The control panel can be darnagbd.
@ Don’t removethe coverover the “stirrer”at the
top of the oven (microwave feature 4 on page 5).
Youwill damagethe oven.
BECERTAINPOWERIS OFF13EFORECLEANINGANYPARTOFTHE OVEN.
to CleantheInside
Walls,floorand plasticcover.Becausethereislittle
heat except in the food, or sometimes in the utensils, spills and spatters are easy to remove. Some
spatters are easy to remove.Some spatters can be
RXl~fi’ad“fi’ifh~ pap~i tO”w-~i,GiiiiX5 fiIF3yrGquiR3a
damp cloth, Remove greasy spatters with a sudsy
cloth, then rinse and dry. Do not use abrasive
cleaners on oven walls. NEVER USE A COMMERCIAL OVEN CLEANER ON ANY PART OF
YOURMICROWAVEOVEN,
Door-inside.Glass: Wipe up spatters daily, wash
when soiled, with a minimum of sudsy warm water.
Rinsethoroughly and dry
Metal and plastic parts on door: Wipe frequently
with a damp cloth to remove ail soilt DO NOT USE
ABRASIVES,SUCH AS CLEANING POWDERSOFl
STEELAND PLASTICPADS,THEY WILL MAR THE
SURFACE
Specialnote when usingBrown‘N Sear Dish:High
heat generated on bottom of Brown ‘N Sear Dish
can cause scorched appearing stains to bake onto
the oven shelf if grease is present, These may be removed with Delete” Polishing Cleanser by the
13rackettProducts Co.
After using Delete, rinse and dry thoroughly, following instructions on can. Do not use Delete.on the
painted surfaces such as walls. It will scratch the
paint.
Deletemay be purchased from your local dealer or
from your Authorized Service Center. Check the
“yellow pages” for location and phone number.
Delete may be sold in grocery or hardware stores,
or in the housewares ~ection-of some department
stores,
AutomaticTemperatureProbe.Probeis sturdy,but
care should be taken in handling.Do not twist or
bend;avoid dropping temperature probe.
Clean as soon after using as possible. To clean,
wipe with sudsy cloth, then rub lightly with plastic
scouring ball if necessary.Rinse and dry. (Or wash
in dishwasher,)
Howto Cleanthe
Case.Clean the outside of your oven with soap and
water, then rinse and dry. The outer pane of the
window is glass, Just wipe clean with a damp cloth.
Chrome trim is best wiped with a damp cloth and
then with a dry towel.
ControlPanel.Cleanthe control panelof your microwave only with lightly dampened cloth. DO NOT
USEcleaning sprays or large amounts of soap and
water, These can cause problems with the control
mechanisms,
1$
.
5%?A
To replacehood lamp, first disconnectpowerat
rnalnfuse or clrcult tweaker panel or pull plug.
Remove 2 screws from each side of lower panel,
steady the $m@keand spatter shield with one hand
while removing and replacing the 2 screws on each
side. Then remove the 3 screws from front edge,
Lower the panel until it rests on range below. Place
fingers on top near each end of lamp. Press down
and roll top of lamp gently toward front until it stops,
Remove.Replacewith same type and wattage lamp,
Hold lamp near each end and insert prongs in
sockets, Gently roll top of lamp toward rear of range
until it stops. Raiselower panel and replace screws.
J
To replaceyour oven lamp, first disconnectpowerat
mainfum or chcult breakeror pull plug.Removethe
top grill by taking off 2 screws which hold it in place,
Next, remove the single screw on top left that
secures lamp housing, (On models so equipped.)
Open oven door for easier removal of the lamp hous=
ing assembly,Then grasp tab and pull out and up to
clear door hinge and front lip of oven. To remove
bulb, push it inward gently and turn to left, theri pull
outward from socket, Replace with GE Lamp
s 25?’8DC.
Clean off the grease and dust on hood surfaces
often, Usea warm detergent solution. About 1 tablespoon of ammonia may be added to the water. Take
care not to touch the filters and enameled surfaces
with this, Ammonia wINtend W darken metal, Wash
the smoke and spatter shield with a warm detergent
solution,
19
—
.
Save time and money. . before you calllfor service, check the Wowing:
(Mm Will Not Come On:
~ Main circuit breaker is tripped.
* One of house fuses has blown.
@ 3-prong plug isn’t fully inserted into wail receptacle.
Control Pane! Lighted, Yet Oven Will
Not start:
Makesure you touched STARTbutton,
Door is not securely closed.
You have already entered another program and
not touched CLEAR/OFFto cancel it.
Temperature Probe not inserted properly or not
being used during Auto Roastor TempCook,
You have not entered numbersafter Time Cook,
You have not entered desired finished temperature after TempCook.
CLEAR/OFFwas touched accidentally,
After touching Cook Code, Auto Cook, or Auto
Foods Are Either overcooked or
LJnciercc)okect:
Not enough time set when using Time Cook function because of variance of starting food temperatures.
The density and amount of foods will vary and
thus may needmore time for completion.
Dish not completely covered as directed for Auto
Cook.
Previous microwaving left humidity or moisture in
oven thus lessening the cooking time in Auto
Cook function.
Certain vegetables that are cooked using Auto
Cook need a standing period after cooking. Check
Automatic Cooking Chart.
Probe not inserted properly into meat or dish,
Check Cookbook and Auto Roast section in this
book for specific probe placement.
Incorrect Cook Code numbers entered.
Incorrect f%wer L@veleflterad.
Dish was not rotated, turned or stirred !! these in-
structions were given in recipe,
Oven was opened during “AUTO” cycia d Auto
Cook function.
Too many dishes in oven at sametime,
“EFtFK)R99
Appears (h Readout:
Temp Cook function, you haveentered
@When
using
a temperature less than $(Y’or more than 199°,
@ Door is opened during “AUTCY’cycleof Automatic
Cooking function, Close door and touch START,
cm
@ Probe has been forgotten when Auto Roast or
TempCook functions are being used.
@ Probe is not securely seated in oven wall receptacle.
“RESET flashes cmReadout:
@ There has been a power interruption.
Touch
CLEAFW3FFand oven is ready for use,
@ When oven is first plugged in, all the readout is lit
and then Resetflashes,Touch CLEAFVOFF.
.
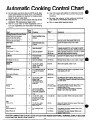
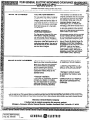
Automatic Cooking Control is a fully automatic
electronic control system that lets your microwave
oven do the cooking for you. The charts and
recipes in this section are designed to help you
size to the size of the food being cooked, Coverings
such as plastic wrap secured on all sides, the lid
that came with the container, or microwave-safe
plastic domes are ideal. For examples of containers
and coverings, see page 8 and the following recipe
section of this book.
make the most of this truly new feature.
Standard cooking techniques require setting the
oven for a specified cooking time or a selectedfinished temperature. And that means looking up
recipes in a cookbook. . trying to convert old
With Preference Control, you can adjust the Automatic Cooking Feature to your individual taste by
adding either”1” or W“ after Code number. If after
trying the suggested Code, you would prefer less
cooking time, simply add the number “1” after the
Code and the oven automatically lessensthe cooking time by 20%0,
If you wish more cooking time, add
“9” after the Code to increasecooking time by 20°/0,
recipes for microwave cooking. . .cx just resorting
to guesswork. This control method works on an
entirely different basis—with a special electronic
sensor that detects steam from cooking food, The
oven “knows” how the foc?dis cooking; so it can
automatically set the correct cooking time and
maintain the proper power I$vel for different types
and amounts of food, And it’s adjustable to suit
your individual taste.
Easy‘toLJse
Automatic Roasting uses the temperature probe
rather than the electronic sensor to cook meats
evenly to the desired degree of doneness.The oven
continually monitors the food’s internal temperature. Unlike ordinary Temperature Cooking, the
oven changes power levels two or three -times
depwding Gn”ine uegr~e of doneness@ur-ingcd&ing to give you the best results automatically,,Meat
is cooked evenly,without toughening km~alusekwer
power levels ar@usedas the fieat te-mperaturerises
thus cooking meats evenly while retaining the natural juices. After cooking, the oven switches automatically to Hold for an hour. Food stays warm
without overcooking.
Simply touch two control pads–AUTO COOK and
the desired Code number–and then START, A
chart on the oven control panel gives a complete
list of Codes for frequently prepared foods. The
readout displav.sho~s ALITO.-Mn~il
[email protected] sgnswl
and then signals, and displays time counting down.
During AUTO, oven should not be opened, but
when ‘oven signals, most foods should-be turned,
stirred, or rotated. Check the Automatic Cooking
Chart far suggestions.
Appropriate containers and coverings help assure
good cooking results. Containers should match in
Not
lt~~~t~~i~~,[~ft~v~rs,
and convenience fOOdScan be Auto
Cooked. Match container size with the food, cover
securely, and do not OPW door during AUTO cycle.
When oven signals, turn, rotate or stir as recommended in
Cookbook or chart cm pages 28 and 29,
21
-—
.—.-..
uncovered, or which require constant attention, or adding ingredients during cooking
should be microwaved by TIME CXXIK, For
foods that microwave best using temperature
probe, uw TEMP COOK or AUTO ROAST,
Foods requiring a dry or crisp surface after
cooking cook best with TIME COOK.
and
The benefit is automatic setting and control of cooking, but just Ilke conventional microwaving you must
check the food after the AUTO cycle (oven beepsand cook time begins to count down on display) and turn,
rotate or stir as recommended.
To
- —.-... ............... ....
Formeatand fishloavesuse either
the round or {oaf microwave-safe
containers, Fish loaves made with
precooked or canned fish use Auto
Cook (Xde 4. Beef loaf uses Auto
Cook Code 8. Cover with plastic
wrap and rotate M turn after oven
signals. Seethe chart on following
page for recipes.
Whole ehlcken, chicken braasts
and pieces,or turkey parts should
be plmxxl in a microwave-safe &
in, square dish, 12 x $ x 2+. dish
or 3 qt. casserole. Cover securely
with plastic wrap or container lid,
If cocking bag is used for whole
chicken, shield breast bone with
small strip of foil. Rotate dish %
turn when oven signals. Use Auto
Cook Code 4.
PorkChopsautomaticallycook well
in 8 x 12 x 2-in, dish, ccweredwith
plastic wrap, Add barbeque sauce
or other sauce on each chop.
Microwave using Auto Cook Code
49 which is Code 4 with the added
digit 9 giving the Gode 200/9more
time, (Seepage 21.)
_. .—
>
L~
-k-----’””--=’=
-—”
‘-”::’@-*-*
.
,P
t
-. L=,
-,
+
7.>.<!’==
‘1
FM fil!ds, whole fish or seafood
pieces should be in single layer in
flat pie plate or oblong dish to fit=
Cover with plastic wrap or con=
tainer lid. Use Auto Cook Code 6
for fillets arid Auto Cook Code 1
for seafood pieces=
Spa?%?
ribs and Iwiskatshould be
automatically cooked in round
glass conta’irmr with lid or plastic
wrap, Makesureliquid coversmeat.
After cwen signals, turn over or
rearrange meatsoften.
to
Use
tlw following step-by-step instructions and tips whw adapting your casserole recipes for Automatic
topped casseroltw, rerncnwcover after oven signals and add topping, the~ continue cooking
uncovered,
4: Allow precooked ingredients or hd $%Ncesto
coedslightly before adding ether ingredients.
5: Meats and vegetables should be submerged in
liquid,
6: After oven signals, rotata dish % turn and stir
covering all ingreditmts with liquid.
1:
2:
3:
22
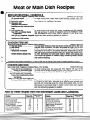
Q
CASSEROLE
Cook Code 6 (Approx.CookingThne–35 min.)
JIuto
Makes6 to 8 Servings
1 lb. ground ChUCk. . . . . . . . . . . . . . in large mixing bowl, place meat, bread crumbs, pepper, salt, chili
1/2 cup dry breadcrumbs
powder, onion and egg. Mix well and form into 12 balls. Arrange balls
in a circle
in 2 qt. casserole. Set aside.
1/8teaspoonpepper
1/2 teaspoonsalt
~ teaspoonchilipowder
2 tablespoonsdry mincedonions
1 egg
and chili powder.
1/2 cup regularrice . . . . . . . . . . . . . . . In small mixing bowl place rice, beans, tomatoes
1 can (15V2oz.) kidneybearss
Mix well and pour in center of casserole and over meatballs. Cover
(undrained)
and microwaveat Auto Cook Code 6. Rotate 1/2 turn when oven
1 can (~6 oz.) tomatoes,choppedsignals and time remaining appearscmreadout.
and undrahmd
1 tablespoonchillpowder
Auto Cook Code 4 (#$pprox.Cooking
1/4 cup soy $auce.•c.,,••
,,.,
1/3 cup honey
1/3 cup $tMW’y
4 teaspoonscornstarch
● ●
1 wholechicken[about3 It).)
—
—
—-
-I’hm-’w min.)
Makes4 Servings
M Z-cup glass measure,place soy sauce, honey and sherry. Stir until
blended. Add cornstarch; mix well. Microwave at HIGH (10) for 3 to
3-1/2 minutes, stirring every minute until thickened, Tie chicken legs
and place in f2 X 8 X 2-in. microwave-safedish, breast side up, Brush
with half of sauce (reservehalf forlateruse.)Coverwith plasti~ wrap,
no vent, Microwsve on Auto Cook Code 4, When oven signals and
time remaining appears on readout, apply remaining sauce, rec~vw
- -.- —. ,
and continue cooking.
*H breast bone seems prominent, a 1’}strip of foil maybe placed over bone to prevent splitting of wrap;
Makes6 Servings
(Appr’ox.Coddng ‘fhne--l hr. 15 mhh)
1 can (10-1/2 oz.) mxwhnsed . . ,In small mixing bowl mix soup and milk; reserve 1/2 cup of the
mixture. Blend remaining soup mixture, rice, mushrooms and haif of
cream of
Mxlp
the onion soup mix, Pour into 12X 8 x 2-in. glass dish.
1=1/4cupsm[lk(1 soupcan M)
3/4 GupIwq@m’I’Ice,twlcodmt
1 can (4 oz.)
stems
andpieces
1 pk$. (1-1/2 OZ,)dry onionSGMpmix
1 cutup chicken(about3 fb.) . . .Placechickenpieceson rice mixture, arranging with meatiest pieces
to outside of dish, Pour reserved soup mixture over chicken and
sprinklo wKh remaining soup mix. Cover with plastic wrap, no vent.
Microwave at Auto Cook Code 7, rotate 1/2 turn when oven signals
and time remaining appears on readout,
Auto ($OOk Code?
Recipe
g
sweet & soul’ l-km
b-d
“Au&oCJok’
121
Chicken & Dressing
Round Salmon Loaf
Heef Burger Stf’ogarloff
BBC)Franks
CheeseStuffed Meatloaf
Polynqsiafi Swiss Steak
Chow Mein
.
...—.—.-—
-
23
..
140
164
82
13f
$31
97
119
.
5..
4
4
7
2
8
8
6
cook
Freshor CannedVegetables
Q
/.-
Whole or large halves of vegetaMes such as cauliflower or squash
use Auto Cook Code 5. Use round
or square container close to the
sizeof vegetable.Add %cup water.
Cover with lid or plastic wrap. Turn
cauliflower over after oven signals.
---. .
‘ \
Pleces or siices 0? vegetables
require % to % cup of water. Use
appropriatesizecoveredcontainer.
Stir or rotate after oven signals.
Use Auto Cook Code 5.
Precooked/canned vegetables
should be placed in round container similar in size to amount
being cooked (at least half full).
Cover and stir well after AUTO
cycle. Use Auto Cook Code 1,
For other vegetables, rotate % turn
when oven signals.
FrozenVegektbles
--
Block or ioose plmxw of frozen
vegetablesshould be placedIn suitable size contahw (at least half
fuli) ccwwxx.f with lid or plastic
wrap.Add 1or 2 tablespoonswater,
Stir after oven dgnaiai LJsoAuto
Cook Code 3.
Pouches of frozen vegetables
should be slit 1“ in center b6fore
placing directly on oven floor, Use
Auto Cook Code 4,.After oven signal~,rearrangevegetableand rotate
pouch %turn,
24
-
Alternataiy, frozen vegetables in
pouches can be slit with an “X”
shaped sIN and placed in glass
container with “X” downward, After
cooking, pick up p~uch and wmpty
food into dish through “X” opining,
STIR FRY
Makes 4 Servings
Auto Cook Code 5 (Approx.CookingTiIne-016min.)
1 tablespoonoil . . . . . . . . . . . . . . . . . . .Tossvegetableswith oil and butter in 2 qt. microwave-safecasserole.
1 tablespoonsoftiwtter
Cover. Microwaveon Automatic Cook Code 5 stirring well when oven
signals and time remaining appearson readout. Serveimmediately.
3 mediumonions,quartered
1 smallgreenpepper,cut in
l/4-in. widestrips
2 cupsthhtly-slicoci
cabbage
2/3 cup carrots,sliceddiagonally
1/4 cup (1 bunch)slicedgreenonions
1 cup broccoliflowerets
1 cup cauliflowerflowerets
2 stalkscelery,sliceddiagonally
6 Ia$agnanoodles(1/3 pkg.) . . . . . . Place n~ociles,water and cdl into a 13 X 9 X 2-in. dish. Cover w~h
4 cupswater
plastic wrap. Microwave on Auto Cook Gcxte1. Allow to stand while
1 tablespoonvegetableoil
preparing remaining ingredients.
1 pkg. (10 oz.} frozenchopped ..., Removepaper wrapping from box. Placeunopened box into oven and
spinach
microwave on Auto Cook Code 1. Drain well.
1 can (8 oz.) tcnnatomum ,..,...
M large bowl mix together tomato sauce, tomato paste, mushrooms,
—
1 can@ oz.) tomatopaste
onion, oregano, bssil, salt and garlic powder.
1 jar (4 cm.)slicedmushrooms
(ufrahwt)
f/4 cup choppedonion
1 teaspoonleaforegano
1 teaspoonbasil
1 teaspoonsalt
1/4 tetwpoongarlicpowder
2 cupa(I=pt,) smaHcurd cottage ,. In a 13 X 9 X 2-in, dish layer well drained lasagna noodies, 1 cup
cottage cheese, 1/2 pkg,spinach and 1/2 of tomato sauce, Repeat.
ch~eas
8 QZ,gratedmmx+mrella
CIMMW
Sprinkle mozzarellacheeseover top, Cover with plestie wrap, Mkwowwe m Auto Cook(3x@ 2, rotatingand removing wrap when oven
slgnais and rerrwinlng time appears on readout.
Atito Cook Code-S@@Fteclpe(Approx. CX?ok!fi$
Tlm@+i?2to 25 min.)
Makes4-6 Servings
$ pkg. (10 oz.) frozen *****m***** Place box of spinach in rrdcrowaveoven and partially cook on Auto
chopped splnsch
Cook Code 1, Remove from box and drain well, Set aside. In
2 qt. casserole placericeand water,Gover,Microwaveat Auto Cook
1/2 cup regularrkm
Code&Tocookedrice, add butter, onion, rtiilk, egg, salt and cheese,
1 cup water
Mix weili Ccwr and microwave at Auto Cook Code 2, Rotate 1/4 turn
‘t/4 cup butter,melted
when ov~n signals and time remaining appears on readout, Let stand
1/4 GUPfhwlychoppedordon
5 ~inute$ covered before serving,
1 cup milk
1 Qg$,Im4ten
1/2
mm
1 cur?shreddedehddar ehmxm
---
‘Recipe
h
Eggplant italiano
Corn Pudding
.
*
-
r
Page NO* “Au$N$gok”
Rocip@
1
-Cabbage Rolls Italian Style
stuff~d Peppers
I 220 5
219
4
25
—
B*
Page No.
-
-t
L
Pinaappte Ca$serole is a tangy
dessert or meat accompaniment,
In 12 x 8 x 2-in. dish spread2 cans
(20 oz. ea.) drained pineapple
chunks, 1 cup sugar and % cup
flour. Cover and microwave on
Auto Cook code 2, When oven
signalsand time remaining appears
on readout, remove covering and
top with mixture of 2 cups butteryfkwored cracker crumbs and %cup
melted butter, Da not recover,
Touch “Start” and finish cooking.
to
,
BakedApplesautomatic cook well
using Auto Cook Code 2, Match
number of apples to size of microwave-safe covered container (see
page 246 in Microwave Guide and
Cookbook). Use Auto Cook Code
2 for Baked Pearsand Applesauce
also.
Stewed Fruit and Fruit Compotes
should bestirred well before microwaving,especiallyif sugar is added.
Cover; use Auto Cook Code 2 and
stir once or twice after oven signals and time appears on readout.
Touch “Start” and finish cooking.
&
After preparing the ingredients for the individual recipe as shown below tho picture, follow these steps
for cooking,
Step 1:Cover with plastic wrap and use Auto Cook
Step3:When cooking is finished, turn out (upside
Code 3,
down) the Nut Cake and Cornbread. Invert Caramel
Step 2: When oven signals and time remaining
Biscuit Ring and let dish stand over ring a few
appearson readout,removecovering artd ?atatedish
minutes before serving,
% turn,
km
Gretlw3boitonl arwf
aidesof
fluted cake
mmtairmrandsprinkle bottomtwenly with 1/3 cup chopped nuts or
coconut, Carefully pour batter from
one box {24ayarsize)cake mix over
nuts, cover with plastia wrap. See
Stepsabovefor Autcmwi!i~Choking,
;
26
,
EASY
CAKE
AutcICook Code 3 (Approx.CookingTime-18 rein,)
Makes 1 (lO-in.) Tube Cake
1 pkg. (2-layersize) . . . . . . . . . . . . . In large bowl place cake mix, eggs, vanilla, oil and water. Blend on
fudgecakemix
medium speed of mixer, about 2 minutes, until smooth and creamy.
2 eggs
1 teaspoonvanillaextract
2/3 cup cookingoil
1-?/4 cupswater
1/4 cup finelychoppedpecans. . . . .Lightly greasea 16cup plastic microwave fluted or straight+ided ring
mold. Sprinkle chopped nuts evenly over bottom, Pour batter over
- nuts.
Cover with plastic wrap and microwave on Auto Cook Code 3, Rotate
dish 1/4 turn and removewrap when oven signals and remaining time
appearson readout,Touch “Start” and continue cooking. Let stand in
dish 5 minutes before turning out,
Auto Cook Code 3 (Approx.CookingTime--l6 min.)
1 can (20-22 oz.) prepared. . . . . . . In S-in. square glassdish, spread pie filling.
cherrypie fiiilng
2 cupsdry yellowor white ,,..,.,
cake mlx (1 pkg.[9. oz.] or
1/2 pk~. [17. OZ.]]
1/4 cup meltedbutt+w
1/2 cup coarselychoppednuts
1 teaspoongroundcinnamon
Makes6 to 8 Servings
In smallbowl,mixtogethercakemix,butter,nuts,andcinnamonuntil
crumbly, Sprinkle evenly over cherries or, in three rows so cherries
are visible. Cover with plastic wrap.
Microwave on Auto Cook Code 3 rotating dish 1/2 turnand removing
plastic wrap when oven signals and remaining time appears on
readout. Touch “Start” and c~ntinue cooking,
‘:=-=-”
--=‘ }
.~r
.;
. --.>,, “
Makes 1 (tl-in, round) Cake
Auto Cook Code 3 IApprox.Cooking‘17me-’lflmin.)
1/4 cup butter . . . . . . . . . . . . . . . . . . . . In 8 in. round dish place butter. Microwave at HIGH (10) for 3/4 to 1
minute until melted,Sprinkle sugar over butter. Drain pineapple (save
1/3 cup brownsugar(packed)
1 can (8-1/4 oz.) pineappleslices liquid) on paper towels and arrange in dish. Decorate with cherries,
4 maraschinoor candled
Placea 2“ diameter drinking glass (4” tail) open side up in center of
cherries,cut in half
dish,’
3/4 cup all purposeflour .,,.,..,,,
1/2 cup sugar
l-~/2 teaspoonsbakingpowder
1/4 teaspoonsait
1/4 cup soft shortertlng
1 egg
Ilqu!dfrom plne~pple(1/3 e.)
3/4 teaspoonvsniiiaextract
In small mixer bowl place flour, sugar, baking powder, salt, shortening, egg, liquid and vanilla. Beat 3 minutes on lowest mixer speed,
scraping bowl constantly first 1/2 minute. Carefully spreadbatter over
fruit in dish. Cover with plastic wrap-no vent, Microwave on Auto
Cook Code 3. Rotate 1/4 turn and remove wrap when oven signals
and time remaining appears on readout, Touch ‘*Start” and continue
cooking.
‘Tip: L.Gwa srnail
drinking glass /ike We ?y#e you buy containing
cheese spreads.
~’
1
Page?40, “Au&oc~~~k”
“~=”
.,4. -
Recipe
Recipe
Yellow+Wrtdt
Pillsbury Gsrman
Chocolate 13undt
Applesauce
Stewed Dried Fruit
(Apple-Apricot)
wI
272
3
246
248
9
2
Steamed Pudding
IMreuseledApples
Cornbread Ring
Steamed Brown f3read
~’
27
“
f.
280
246
232
232
4
2
3
7
.
@
@
@
!30not open oven door during AUTC)cycle, May
effect cooking performance. After first beeping
signal (time appearson readout for codes except
Code 1), stir or rotate food.
Match the amount of the food to the size of the
container. Fill containers at least %full.
Add %-Y.z
cup water to fresh vegetables. Stir or
turn overvegetablesand meatsafter first beeping
signal.
-
Food
Reheatingand Frozen Foods:
CannedFoods
RoomTemp.or thin (small
,amountsat refrig, temp.)
Refrig. temp. or thick (large
‘amountsat room temp.)
Dell Foods
-.
Q Use microwave-safeplates or casseroles,except
DO NOT USE PAPER PLATES with Automatic
Cooking.
o
@
2
Stir
Microwave-safecontainer matchedto size
of food.
1#
Coverwith plastic wrap or lid to dish.
4 mini/cup
2 or moreservingsare consideredlarge
amounts.Cover with plastic wrap or lid.
Coverwith plastic wrap or lid to dish.
.
12-14min.
Thick (over l“) 10 oz.
4
16-18min.
21 oz.
Leftovers
4
Cook in container.
(seecomrn~nts)
TV Olrmer(10-1202.)
.—
4
Casseroles
Precookedingredient
fafiw
meats& Poultry
–
~hlcken
Breasts (4)
Microwave-safe
container matchedto
size of food.
Cook in container,
(3W comments)
64%min.
Whenovensignals, rotate %turn.
6
2 qt. casserolewith lid
or coverwith plastic
wrap.
35=45mlnj
Makesure liquid covers8!1ingredients,When
oven signals,stir well,
I*
7
45=55 mim
12x Elx 2“hl, glass
Cassorolo
FWces
7
4
Olho!e( 8 tbs.)
4
GhuckRoaat
~Llpto 5 lb.)
9
(1 lb, )
.——
6
3akedPears(4)
2
XHXi min.
50-70 min.
2-4 min./piec~
42=44rein,
12x
20
8 x 2=h
gkm
2 qt. casserolewith
iid.
##
No wktithzmalW@d needed.When oven sig-
rmls, rotate Mturn. Note the preferencecontrol
1 is usedwRhbreasts10decreasecooking time
for best results.
12x Etx 2-in. glass
dish or cooking bag.
CovCW
with 2 piecesof
owwl$ppingplastic
wrap,
53x 9 x 2-in. glass
dish, Put in’cooking
ba~ and securewith
tie, Slit bag 1“ at top
mar tie, J
.....—-—.
dish. ~OV@f With
plastic wrap,
%Jlt
3akedAPPIEM
(4)
17-19rein,
12x 8 x 2+, glass
dish lined with paper
towels. Coverwith
plastic wrap.
dish, Coverwith
plastic wrap,
NOTE:Makesure
meatdoesn’ttouch
covering.
It
##
‘illot5
25-35min.
2-3 mint/cup
Cookin owncontainer,or for quicker cooking,
in glasscontainer. NOTE:If entree is in aluminum pan, removefrom box, removelid and put
back M original closed box. If entree is in paperboard container, removefrom box and microwavewith original plastic covering.
Usebowl with plastic wrap or cover plate with
microwave-safeplastic dome.
)—
Removefoil top and put back in box. If dinner
hascake or brownies, removekxdo[ecooking.
~
41
.———.—
~i~h
signal.
2-3 minq/cup
Cook in container.
(seecomments)
(4 slices)
container
Comments
3
;;:::;s
:::o:ing:
cooking
Approx.
Time
Microwave-safecontainer matchedto size
of food.
1
of the
or rotate after beeping
1
Thin (under f“)
the exterior
—
“A@o
cook”
Code Container
1
Be sure
and interior of microwave oven are dry.
1 hr. 40 rein,
When ovensignals, stir well and rotate %turn.
N6 addithmd liquid needed.Whm oven
signals, rotate V2 turn.
Put on trivet and sit as strfdght as possible.
Rotate %turn when ovensignals,
Add %cup water. Whenoven si~nais, rotate
%turn,
—
~in,
14-18rein,
14-18min.
Bastewith butter and lemon juice. Whenovon
signals, rotate %turn,
Gore apples,No water needed,When ova?
signals, rotate %turn,
Core pears,No water needed,When oven
signals, rotate %turn,
IF AFTERCOMPLETION OF AUTO COOK CYCLE FOOD NEEDS A13!MTIOMALWARMING, SIMPLY RECOVER
Ft31XiIAND USE AUTO COOK CODE #1.
28
,
————
“Aufo
Cook”
Code Container
..,-5..
----->:.>...-..... ... . .
.=,:-=;
-- ‘=---7
;?t.
glassd’is~with
Hambuiggf ‘- ~~~ ‘
Casserole
#ll:ox*
~
.. - ,
- 45-55min.”
,s-
r.
‘
Glassloaf
dish. Cover
with plastic wrap.
e’: WJare dish. Cover
with plastic wrap,
30-40min.
Makesure liquid coversall ingredients.When
ovensignals,stir well and rotate %turn.
Whenovensignals,rotate Y2turn,
12-14min.
Whenovensignals,rotate %turn.
8“ glasssquaredish,
Coverwith plastic
wrap.
12x 8 x 2-in. glass
dish. Coverwith
p{asticwrap,
8 min.
Whenovensignals,rotate ‘/2turn.
33-38min.
8$ste with 1 tbsp. barbequesauce/chop.When
L
cwensignals,rotate 1/2 turn.
NOTE:The PreferenceControl 9 is usedfor
chaps to increasecooking time for better
results,
Meatmust be coveredwith liquid. Whenoven
signals,rearrangemeat makingsure it is submergedM liquid, It may be necessaryto rearrangeanother time during final cooking.
Meatloaf(1%lb.}
8
Patties(4-5)
5
Pork
SausagePatties
(Y.z”thick–4)
5
Chops
[V4-l°thick)
49
SpareRibs
[up tO3 lb.)
9
2 qt. glassdish. Cover
with lid or plastic
wrap,
1hr, 30 min.1hr, 50 min.
Mce
Instant(Minute-1%cups)
2
;~t. glassdish with
9 mini
~aw(1 cup)
6
Seafood
Pieces
(1 lb. Shrimp or scallops)
1
Casserole
“
24 min.
5-6 min.
Whenovensignals,rotate1/2turn.
6
1I/zqt. glassdish with
lid,
2 qt. casserolewith lid
or coverwith plastic
wrap.
35-45min.
Makesure liquid coversall ingredients.When
ovensignals, rotate %turn or stir.
SWJ8S
steak
[1%lb, round steak)
7
;$t. casserolewith
.
55-60min.
Cut into pieces.Makesure Iiqu!d-cmversall
meat,Whenovensignals,Mh’& rotate
.—— %turn,
Qegetabfes
Cresh
4rtichokes
:upto 4 med.)
2
2 qt. glassdish with
lid.
10-12min.
Oarrots(1 lb. sliced)
cauliflower (1 med. head)
5
5
Mparagu$(1 lb, cut spears)
5
Placeartichokes in dish stemside down. Add
1/,cup water, Rotatedish %turn after oven
signals.
Add Y?cup water. Whenovensignals,stir well.
No water needed.Start cooking stem side
down. At signal turn over.
$cf~;~ cup water. Whenovensignals,rotate
)fussel sprouts (1 lb!)
“
Follow instructions on package.Cover.When
ovensignals,stir.
Use 1 cup rice&2 cups water. Whenovensignals, rotate Mturn.
tt
8P
5
1
5
‘roawnBfock (10 oz.)
lroccoil
3?
1Y2q!, giassdish with
lid,
18-20min.
14-16min.
,6
##
II
;orn
teas
4
41
Lay pouch in d
microwave+nfedish,
No cmmrneeded,
II
18
Ipmach
4
II
—
##
11rnin,
6~Smin.
3
3
3
-’
I
dit?hwith
1qf.91$ss
lid.
~?t+glassdish wifh
IrusgelSprouts
.eaf Spinach
AixedVegetables
%omlnPouch
laby Lima$
4
14min.
12x 8 x 2-in. 18s$
di~h. ~OVt3~ W! th
plastic wrap,
I ?hqt, ~Ia$sdish with
lid,
!5
‘OF8W3S
*
13min.
15min.
L-
1%=18
rein,
11-13mini
10=12min.
Add 2 tbsp, wafer. Whenovensignals,stir well,
NOTE:The PreferenceControl 1 is usedfor
broccoli to ctscreasecooking time for better
--results,
Add 2 tbsp. water. Whenovensignals,stir well,
##
*V
Makea 1“ slit in pouch. Whenoven sf~nal$,
br$ak up frozen canter, and rotate f/t turn.
NOTE:Watch for hot steam,
It
8-10 min.
MO mini
8-10 rein,
10*12min.
4H?F
-
Whenovensignals, rotate ‘/t turn, NOTE:Watch
hot dish & steam!
to
~,
Makea 1;’alit in pouch, Wtt@novensignats,
break up frozon oenter,and rotate% turn.
NOTE:Watchfor hot steam,t40TE: Preference
Control 1 is usedfor peasto dedreasecooking
time for best rtwult$,
MakeB 1“ slit in pouch, Whenovensignals,
break up frozen center, and rotate ‘h turn,
NOTE:W@chfor hqtsteam. A@Hw
“Excessivelydry potatoes may not releww enough moisture to activate sensor. l% sum potatoes
and dried-out.
.—
—— .———
...
29
are fresh
not old
w
‘You’ll
find General Electric Factory Service Centers in all these cities.
ALABAMA
Bwm!rtgharn-35210
2500 Crestwood Boulevard
(205) 956-0333
(Decatur.1-tuntswlle)
Hun!swlle -35805
1209 Putnam Drive
(205) 830-0150
Mobile -36609
1107 Eielthne Highway So,
(205) 471-1451
ARlZ0?4A
Phoertlx -85031
25 South 51st Avenue
P 0 BOX 14278
(602) 269-2121
Tucson -65705
2015 North Forbes Blvd
Suite 111
(602) 623-8415
ARKANSAS
I.lttle Rock -72209
8405 Now Ebnton Hwy.
(501) 558-7630
CALIFORNIA
(Sftrt Bornordmo.Rworslde)
Bloomington .92316
10121 Cactus Avenue
(714) 877.3434
(San
Fmcmo)
Burhrtgomo .94010
1645 Adrian Road
(415) 981-8760
Frosno -93727
1809 North Helm Stroot
(209) 255.1851
Los Angeles -90058
2815 East 46th Streor
(213) 583.1141
Si3cramr3nto. 958t5
1613’, ArrJon Way
~916)
929.2247
Dlqm .92101
,+>: Kottner Boulovfrrd
-(714)
297.322!
San Joses !)5123
5763 Wlnhr!ld Road
[40fj) 629.3500
Van NUyS .91405
6843 Lfrnrmx Avonuo
(213) !789~5710
COLOfiAOO
Colorncm Springs= 80909
1665 N Acficiomy . SUIIO6
(303) 597 ”8492
Om=wor. 00207
5390 Easf 3!im Avwm@
(203) 320.330!
CONNE’C77CIJT
EhldgePoft * 06604
t315Norlfi Wfwhtngton Ave
(203i 3674531 t
East Hwtford . 06f68
265 Pfmltlfp Prlfk. Wrt6 3
(203) 528s981 I
DELAWARE
(Brancfywmo =Wllmmr$on)
GIw} MIll$, PA . t9342
R () #? Box 210
(215) 358’1500
LNtiTfilCT OF COLUMf31A
J@$su~ MD .20794
820f Stiryton t)fwe
(Ocft) ‘353.9f30
FL0Fllt3A
FWI f-~udrrrdnle * 33309
1101 West McNi)b Road
(305) 974.6708
Fort MIIyQrS -33901
4160 S Clr?vninndAve
(813) 939-2812
Jdcksr)nvillo s32205
52?6 Hqhway hw!tluP
!330
{fhmpmll>.wf Pilltl\ f!om:h)
~,lk:! worth . :i34ao
I tic);] hAI(lr Id Avon\ If!
(!)04) ?83.
Mlamt -33167
3200 N.V/. 110th Streel
(305) 685-5144
orlando -32807
6545 East Colonial Dr.
(305) 273-6370
Tallahassee. 32301
1205 South Adams St.
(904) 222-6931
Tampa -33611
5201 S. Westshore Blvd
Box 13708- Irrlerbay Stalion
(813) 837-1906
GEORGIA
Atlanla -30325
1695 Marietta Blvd.
PC). Box 19917
(404) 897-6400
Savannah -31406
211 Telewston Ctrcle
(912) 925-0445
HAWAII
Honolulu. 96813
404 Cooko Street
(80S) 533.74$2
IOAHO
(801s0)
Gordon CIly =63704
5250 Chmcion E)lvd
(208) 376.5680
lLLINOIS
Champatgn. 61820
1205 Norlft Hiigen
(217) 359.4088
Chicago -60638
5600 West 73rd Stroel
(312) 594.2424
Elk Grovo Wllago. 80007
10 Klrt@ SIreol
(312) 593.2525
Lombard z60148
827=835 Westmcw@Avo
(312) O2943O1O
Pecrrla =61614
7708 North Crosflmo Clrlwt
(309) 692=5070
Ffockford . 6i 107
401 Ncrrfft 2nrj Slrttot
(815) 962.7200
‘~9rinQfmhj .62702
2252 %ruth lfith Sfroo{
(217) 753.8088
INOIANA
Evar=mwito. 47714
10I6=K S WOiflMI@r Iv/c
(8t2) 476=lo4i
Fcrf! WayfM =40800
4632 t4r?w@yQoRow
(E’t9) 484’$035
Clar z 46409
WkmMway
(2t9) 9r31=253Li
Inthanopolm = 46219
6233 Elrocrkwlte f?m?d
(3t7) 35EMM61
South E)@nd. 4fi6t3
1902 Miirrm Stfe@l
(219) 28&O(K15
lOWA
Cedar Raplcts =52405
! 18 Fwjt Strw?l, N W
(3f9) 3664579
t)dven~otf A52802
1074 South Dtlmef
P () &fM 3tLi8
(3t9) 326=5tOt
~es Moines -50313
t637 N E 5f3!h Avenue
(5!5) 2664? 191
Wllloflrm .50703
28X) FoI19Avcww
(3tf)) 230.1393
KANSA$
Komtas Cl!y . 08! !h
?940 Gtwy$fw lW;Id
(8 I 3) 37 i .Z242
Wlchlta -67211
820 East Irtdianapohs
(316) 267-3366
KENTUCKY
Lexington -40505
1144 Floyd Drive
(606) 255.0848
Lowsvdle -40218
4421 Bishop Lane
P.O. BOX 32130
(502) 452-3511
LOUISIANA
Baton Rouge -70814
2935 Crater Lake Drive
(504) 926-5062
(New CMeans)
Harahan -70123
701 Edwards Avenue
(504) 733.7901
Shreveport. 71102
1430 DiIIM_JllStreet
(318) 425.8654
MAINE
SQuth Portland= 04106
54 Darhng Avrw’rue
(207) 775=6385
MA!lYLANB
Fahribury. 21801
Twdly Cortlre
329 Limt $17CWICAvenue
(301) 742-3900
&fSSUP -20794
8201 Slay Ion Orwo
(301) 953.9130
MASSACHUSETTS
(Captf Cod)
i+yanrw$ =02601
80 Ertlerprn30 - Umt 11
(617) 771=5905
Pmmrld =01201
1450 EON Sheet
(413) 49t-t=431tl
(f30mff=Sr3utff~
Woslwcrmt =02030
346 Univtmmt AVWNM
(617) 329=124
(BoMon.Nofwt)
Wmmrfgmn =01887
281 Mom Stteel
(!317) 944=7500
MICHIGAN
Gfrrncf RaPKJfi=49508
3.50 28th StrmN@S E
(616) @2s975d
LantImg =4891?
1004 E M!ciiigiwr Av@
(51?} 484=256’1
Tfoy = 4Kf84
1i%t Rafttvm
(313) 5f33=lt316
Westlimwll =40185
953 Manufaekffef% t3fwe
(3t3} 5M=5190
MlNt4Et30TA
([email protected] Paul)
Rima =55435
74!30 Mp!fo Rrulevatd
(61’2) Kk%wo
fbwrmslwl
Jackson =39209
325 Induwflal Dfw@
(601) a%?=337t
Mlssoul?l
Kan~~~
City, KS - 6fJt !5
2Q49 Cfirysk?t Road
(913) 37 f~2242
-St LOUIS~ 63178
13$5 Watson Road. No
P o El&x 14559
(3!4) 9!)3%200
Spfmghctds
f15807
1334 Wc!sl Sun5hme
(417) 831.05! t
NEBRASKA
Ltncotn -60503
t t’dfi Norfil dtffl St
{402) dfjd-gidt)
Omaha -68117
6636 “F” Street
(402) 331-4045
NEVADA
Las Vegas -89109
3347 S. Highland Dr.
Suite 1
(702) 733-1500
Reno. 89511
Del Monte Shopping Clr
6465 S. Virgmla Street
(702) 826-7070
NEW JERSEY
Mount Holly -08060
Route 38 & Eashck Ave
(609) 261-3500
North Caldwell -07006
5 Ffnrflotd Road
(201) 256=8850
(Aribury Park)
Oi!khurst. 07712
2111 Highway 35
(201) 493s2100
Vlnfrland. 08360
749 North f2elsfM 13rwe
(609) 69&1506
NEW MEXICO
Albuquorquo -87107
3334 Princeton Dr.. N,E.
(505) 864s1861
NEW YORK
Albany -12205
2 Irttorstato Avenuo
(518) 430.3571
Brooklyn = 11234
54I32 Avenue “’N”’
(212) 253.8181
Buffalo = 14225
3837 Linion f%nd
(716) 606=2268
(Weedciwter GO Area)
ElmsktffJs 10523
FMrvImv Imkrslrml Pk
%3Y1Q s$=~
(914) 502.4330
R&3i#f-J3:;u@
(21;) $86=E@Cf
(Elingfmmfcm)
John$cm CAY= i3790
278 Mm SImrf
(607) 729=9248
(NrffXfu=S!ffkXk Ccrwtfy]
MelvIllo = 11747
336 $outif Sefvico Rood
(516) Wf4=MXi0
{Ofaftgf? f3@Lmi Area]
N!twoufQh = 12#50
t 135 IJfilctfi Av@riu@
(914)W34=mOf3
Rrxitirsfet = 14$22
ffwl RlfJQe
FhMJEasl
(?16] 544=7100
R0rIki3nkcrma = 117?9
f%?LJrmn Avortuir
(516) 4t37=7700
NOf3?H CAROLINA
Charl&lle =28234
?(itt Tuck flt$eWJrWi%ad
P 0 f36x 34396
(704) 372=8010
t#teenWmro. 27406
29tb i3aIIIc Avenue
[9!9) 272.7153
f%lo,~h .27604
2013 Nwr Mtpe
Cfturcfl Road
(919) 670.5803
OHIO
Akron -44319
X%2 S Aflm@mr flood
(2t6) 7734)361
‘z?! FORCHANGES,A~~iwwG~6ml td~ph~rw t) UlT)bCt5
,, -.
book
Look tn the White Pagesunder
Clncmnatl -45242
10001 Alhance Road
(513) 745-55G0
Cleveland -44142
20600 Sheldon Road
(216) 362-4200
Columbus -43212
1155 West Fifth Avenue
(614) 294-256 I
Dayton -45414
5701 Webster Streel
(513) 898-7600
Toledo -43611
3300 Summit SWxN
(419) 729-1651
OKi.AHOMA
Oklahoma City. 73118
3228 North !jantn Fe
(40!5) 528-2381
Tuls,a -74112
6913 East 13th
(918) 83543526
OREGON
fPorllartd Area)
Eiormrton -97005
14305 SW. Mtlhkort WfIy
(503) 646-1176
Eugorro. 97.402
1492 West Sixth Street
(503) 342-7285
PENNS’fLVANIA
(Brandy wmo.Wdmmgtonl
GiorTMIIIS .19342
R ~. 82, $OX 210
(215) 358=1500
Johnstown -15805
214 Wr)slwood Siwrppmg Pi,
(814) 255=6721
(f+iwrmbur~)
Lomo ni! = 17043
1059 f! Wrmbtm Avrmwr
4717) ?6143185
MWtw@AllQ = 15146
150Soc@Fimf$
Monroovtllcr lfidufitrial f%k
(4f2) 665=3700
Philadelohio = 19115
9900 Global Road
(215) 698=3270
(Allonlown)
WhitQhall -18052
1906 MacArihur Road
(215) 437=X$71
RlltiOE ISLAND
Eiltll Pff3VldOfWQ=02914
1015 Waterman AVQnLJQ
(401) 43i3=0309
SOUTH CAROLINA
f%lufttbiit = 2%s02
:i&M#toa6
[803) 77!=7980
MytIle E3eacit=29577
702 soft Board Ehfeol
S@aBoard Irrdu$lfml Pafk
(603) 626,7411
N Citafloslcm .29405
732543 AstiocIaIe Dflv@
Peuptwdan lrtrjuslfirj %fk
(803) 552=5193
tGfeenvdle)
Taytom. 2963?
25 Hamplcm Village
(803) 292=0030
TENNESSEE
Chattanooga. 37403
613 Ehml 1lth SIfeel
(015} 26543598
Johgson Ctty. 3760 I
2912 Br15101Nighi$rfly
(6i5) 202.4545
Knotwillt! = 37919
325o fvfyrmlf Siroei, N W
(615) 524z76?1
Metnpitm . 38i ill
3770 Soulft %?rkm$
Nashwlle -37204
3607 Trousdale
(615) 834-2150
TEXAS
Aushn -78704
2810 S. First Street
(512) 442-7893
Corpus Chrisb -78415
3225 Ayers Street
(512) 884-4897
Dallas -75247
8949 Ilplomacy Fiow
PO BOX 47601
(214) 631-1380
El Paso -79925
7600 Booing (hive
(915) 778.5361
(f3rownsvdlr3)
Httrlmgen -78550
1204 North %rvtmth
(512) 423-1204
Houston -77207
P>O. BOX 26837
2425Bro8d Slroot
(713) 841-0311
Lubbock =79490
4623 I.00P 289Wo8t
PO. BOX 16288
(806) 793-1620
(Odessa)
M\dland -79701
P,O. $OX 6286
Midland Terminal
(915) 563-3483
Son Antoruo -78216
7622 Jonos-Mallsberg~r
(512) 227.7531
UTAH
S81t Lako City - f34125
2425 South 900 West
P Ct EIQZ30904
(r-lctl) !174.4600
VIRGINIA
Fairfax . 22Li31
2810 Oorr Avorw
(703) 280.2020
Norfolk. 23502
4552 E. Ptmcess Anne Or
(804) 857=5937
Richmond -23228
2810 Hurtgnr Spring fld
(604) 288=62#1
WASHINGTON
(Tfl=clly)
Kennowwh =99336
Limon !3qunfo
SUlte 2ot3
101Nt3f(tt tJRloti Wee!
(509)783=7403
SeaIlle =98188
40t Tukwikl f%fkway
(208) 5?%271 i
Spokane -99206
OB24E Montgomery S1.
[509)928s9562
WEST VIRGINIA
(Ch3f@310rt)
Hunlmgloft =2!3704
1217 Adams Avonuo
P o Elm
7538
(30d) 529.3307
Wheehng -26003
137 North River Road
(804) 283’8511
WISCONSIN
Afmlom .54911
343 W WKfcortsm Ave
(414) 731.951d
Mattmon =53764
4630 E Washmglon Av@
(600) 241.9321
Milwaukee. 53225
11100 W SIlvm !3prmg Rd
(4i4) Ii62.9225
sometirne9
change. Art~ new centers open. If the nutnt.mrs chtirtg%, check ycmr
‘“GENERAL ELECTRIC COMPANY”OFI “GENERAL ELECTRIC FACTORY SERVICE”.
31
—
(includesmicrowavecookingcentersand ovens)
Saveproof of original purchasedate such as your sales slip or cancelledcheck to establish warrantyperiod,
WHAT IS COVERED
FULLONE-YEARWARRANTY
For one year from date of original
purchase, we will provide, free of
charge, parts and service labor in
your home to repairor replaceany
part of the microwaveoven/range
that fails becauseof a manufacturing #efect.
LIMITEDADDITIONAL
FOUI+YEARWARRANTY
For the second through fifth year
from date of original purchase,
we will provide,freeof charge,a
replacementmagr?etmntube if the
magnetrontube fails becauseof a
manufacturingdefect, Youpay for
the servicetrip to your home and
service labor charges.
This warranty is extendedto the
original purchaserand any succeeding owner for products purchased
for ordinary home use in the 48
mairdandstates,Hawaii and
Washington,D.C.In Alaska the
warranty is the sameexcept that it
is LIMITEDbecauseyou must pay
to ship the productto the service
shop or for the servicetechnician’s
travelcosts to your home.
All warrantyservicewill be provided
by our Factory ServiceCentersor
by our franchisedCustomerCare@
servicersduring normal working
hours,Check the White Pagesfor
GENERALELECTRICCOMPANY
or GENERALELECTRICFACTORY
SERVICE.Look in the Yellow
Pagesfor GENERALELECTRIC
CUSTOMERCARE@
SERVICE01’
GENERALELECTRIC410TPOINT
CUSTOMERCARE” SERVICE,
!!L—
. .
WHAT IS NOTCOVERED
● Servicetrips to your home to
teach you how to use the product,
Readyour Use andCare material,
If you then haveany questions
about operating the product,
please contact your dealer or our
ConsumerAffairs office at the
addressbelow,
● Replacementof house fuses
or resettingof circuit breakers,
li,, —
,..
● Failureof the product if it is
used for other than its intended
purposeor used commercially.
.—
.._—-i!
—.,,
-XII
—...
,,
—
r=
,1 11P
1!——,..
,,11P
!!=
,..
11:-
11
xx
::r—~~~ij~
jl~
11
:x
,... -
!!—
,g<—
!!:,..—
;;._
H&.
19r
Warrantor:General E16mWicCompany
II
ii
,,
..=
...i,.
—
———
‘-:
::-
Iz=
—T—+/~
:-:q
!~.—
IIII =
may not apply to you,Th\swarrantygivesyou specific legal dghts, andyou mayalso haveother rights which vary from state to state,
Toknowwhat your legal rights are in your state, consult yourlocalor stateconsumer
affairsoffice or your state’s AttorneyGeneral,
-qi?!~
11,, —
,..
IB&–—
I@ —
II
Somestatesdo not allow the exclusionor Iimitatkm of incidentalor consequentialdamages,so the abovelimitation or exclusion
=X
,,=
11:
@Damageto productcaused
by accident, fire, fioods or acts
Of God.
@Improperinstallation,
If you havean installation problem, WARRANTORISN(3TRESPON=
contact your dealeror installer.
SIBLEFORCONSEQUENTIAL
Youare responsiblefor providing
DAMAGES.
adequateelectrical, exhausting
and other connecting facilities,
-:%11
x z
—,,=
,,,
=
,,=—
If furtherhelpIs needed cxmcxwningthis warranty, contact:
Manager-Consumer Affairs, General Electric Company, Appliance Park, Louisville, KY 40225
Part No. 862A725P23
Pub, ~Ow49-4491
10/81
EIIAL
ELECTRIC
-
11=
x
=!S-