1
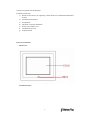
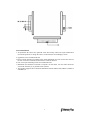
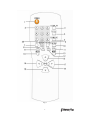
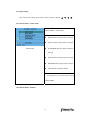
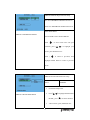
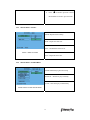
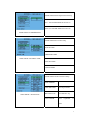
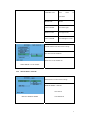
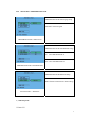
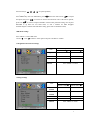
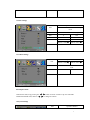
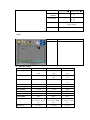
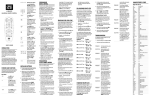
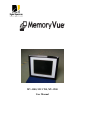
MV-1500, MV-1700, MV-1900
User Manual
Product Introduction
Congratulations! You are the proud owner of a MemoryVuetm Digital Picture Frame. Boasting high-quality image resolution the MemoryVuetm is the
perfect product for displaying your favorite digital photos and video files, or listening to your favorite MP3’s. Because MemoryVuetm has a
changeable decorative frame, you can suit your décor whether in the home or office. The MemoryVuetm can be configured to display photos in a
slide show or as a still picture. With its ease of use and configuration, you can now display all your favorite pictures or video files for everyone to
see!
Package Contents
Before using the MemoryVuetm, be sure to check all the accessories contained in the package. MemoryVuetm comes with the following items:
A.
MemoryVuetm unit
B.
Desktop Stand
C.
AC.Power Adapter
D.
Remote Control
E.
User Manual
Features
9
Display photos and videos without a computer
9
Listen to MP3 audio while displaying photos
9
Simple operation, insert the media card into the convenient slots to view pictures, video, or listen to MP3’s
9
Support: CF—MS/SD/XD/MMC
9
TFT-LCD with high resolution, wide view angle and rich color
9
Easy to use remote control for displaying and managing your files
9
Built-in stereo speakers
9
The frame is changeable, various decorative frame in style and color for your selection
2
Introduction
This user manual covers operation instructions and technical specifications of 15”, 17” and 19”
MemoryVue Digital Frames.
2. Safety Precautions and Maintenance
To ensure your digital Album work properly, please pay attention to following instructions:
1、Read these instructions and heed all warnings.
2、Please carefully read this manual at the first use.
3、Do not use this apparatus near water.
4、Prevent the use of unsuitable external force to the surface of the machine, as it may cause
damages. Please place it on flat and steady places in case of fall or shock.
5、Do not block any ventilation holes and never use or store this machine near heat
sources and dusty places.
6、Please follow the power supply rules on the base or back of the machine. If you are not sure
of the local voltage, please contact dealer or local electric power company.
7、If you use an extension cord to connect with the machine, please make sure the total ampere
of all electronics which share the extension cord doest not exceed the prescriptive value of it or the
socket on wall.
8、Do not insert unsuitable things into the empty slot of the machine. It has dangerous voltage
inside which may causes electric shock or fire or module damages.
9、LCD screen is a very important part of the machine. Please take good care of it. Prevent clash
and extrusion.
10、Avoid directly contacting the bottom of the machine after its long time working or your skin
would be burned by the heat.
11、Unplug the power cord from the AC outlet before cleaning the product. Use a clean,
soft cloth to gently clean the screen. Do not use liquid cleaners or aerosol cleaners.
12、Make sure that the power is off before moving.
Warranty
Our warranty does not cover the following:
3
1. Removed or altered serial number label
2. Damagers result from:
a) Disaster such as misuse, fire, lightening or other natural ones, unauthorized modification
or abuse
b) Unauthorized maintenance
c) Transportation
d) Movement or improper installation
e) Such as power change or off
f) Unauthorized Accessory
g) No Defect Found
3. Exterior connections
1.Front View:
2.Connections View:
4
4. Recommendations
1. All parameters have been set to optimum values from factory and do not require modification
for normal operation. To change the values, see the OSD (On Screen Display) section.
2. Application advice of multimedia card
a. Please read the instructions carefully before install multimedia card. Do not force the card into
the slot. If insertion is difficult, should check its insertion direction.
b. New card require formatting and saved in multimedia files.
c. Multimedia card should be connected to computer via card reader. You can either choose the
card reader offered by us, or purchase editor yourself.
e. This machine supports above-mentioned multimedia formats (JPEG, MP3, MPEG-1, MPEG-2
and MPEG-4).
5
Fig.8
6
1.
2.
POWER
Numerical Buttons
Turn power On/Off
In Media mode, press numbered buttons to select FILE
directly.
3.
DISPLAY
Show the Media information
4.
TITLE
1. In Media mode, to play the files, press arrow buttons (15,
16, 17, 18 ) to select and press ENTER (19) to confirm.
5.
B. MUSIC
6.
ROTATE
7.
Play music and photo at the same time. (Background Music)
Rotate an image in 90-degrees clockwise increments
1. In Media mode, press it to play or pause files.
2. When playing photo or music at the same time, press it once
to pause photo, music continues; second press to pause music;
third press to resume playing photo and music.
8.
In Media mode, press them to transition to previous or next
file.
9.
10.
SETUP
11.
VOL+
12.
VOL-
13.
MENU
In Media mode, press it to change settings.
In Media mode, press them to jump to Adjust volume
Activate OSD setup menu.
7
14.
MUTE
Turn sound off.
15.
up
16.
left
17.
right
18.
down
19.
ENTER
Confirm selections.
20.
REPEAT
In Media mode, press it to return to the first file to
display
8
6.Media Guide
6.1 Play Media Files
1. Insert multimedia memory card into corresponding slot.
2. Press “TITLE” Button, change to Media mode.
3. For the first use (or new card is inserted), the menu will show as following (Fig. 9):
Fig. 9
4. Play Photo: Highlight “PHOTO”, press arrow buttons or numerical buttons to select the
pictures, press “ENTER” to confirm. Machine will play photo automatically if no action is
taken.
5. Press “Mode” to change the pictures sliding form.
6. Play Music: Highlight “MUSIC” and use same operation as “PHOTO” to play music
7. Watch Video: Highlight” VIDEO” and use same operation as “PHOTO” to play video games.
8. While playing media files, press “
9. Press “
” and “
” to pause,press
again to continue
” to play the previous or next file.
10. Press “DISPLAY” button to switch between “PHOTO”, “MUSIC”, and “VIDEO”.
11. Press “ TITLE” to browse all the media files
12. Background Music
1) While playing pictures, press “B.MUSIC” to play background music.
2) Press “
” to pause pictures and continuing play music; press it again to pause both
music and pictures ; the third press to continue both.
Note: Make sure your card include both music and picture files
13. Other function please reference Remote control guide
9
6.2 Change Settings
Tips: To change the settings fast and easily, operate with arrow buttons,
、
、 、
。
6.2.1 SETUP MENU―MAIN PAGE
SETUP MENU – MAIN PAGE
MAIN PAGE
z
PHOTO SETUP (Change Photo’s settings)
z
MUSIC SETUP (Change Music’s settings)
z
SLIDESHOW SETUP (Change Slideshow’s
settings)
z
MOVIE SETUP (Change Movie’s settings)
z
PREFERENCES (Change Menu’s settings)
z
EXIT SETUP (Exit MAIN PAGE)
Press SETUP (13) on remote control to open
SETUP MENU.
6.2.2 SETUP MENU―PHOTO
10
PHOTO Thumbnail Digest Function Setup
ON: Turn THUMBNAIL DIGEST function on.
OFF: Turn THUMBNAIL DIGEST function off.
Enter MAIN PAGE.
PHOTO−THUMBNAIL DIGEST
Press ENTER to enter submenu PHOTO.
Press (
) to select menu item and open
submenu, press (
,
) to highlight your
choice, press ENTER to save.
Press (
) to return to pre-menu, then
highlight MAIN PAGE to return to previous
menu.
PHOTO Transition Mode Function Setup
FAST
PHOTO−TRANSITION MODE
NORMAL
1.
Enter Photo Setup menu.
2.
Press(
、 )to highlight TRANSITION
MODE,press( )the show submenu.
3.
11
After selection, press (ENTER)to save.
4.
Press( )to return to pre-menu. Choose
MAIN PAGE to return to previous menu.
6.2.3 SETUP MENU−MUSIC
MUSIC Repeat Function Setup
ONE:Repeat one music file.
OFF:Turn REPEAT function off.
MUSIC−REPEAT MODE
ALL:Repeat all music files.
6.2.4 SETUP MENU−SLIDE SHOW
SLIDE SHOW Playing Function Setup
MANUAL:Slide show plays manually.
AUTO:Slide show plays automatically.
SLIDE SHOW−SLIDE SHOW MODE
12
SLIDE SHOW Folder Repeat Function Setup
ON:Turn FOLDER REPEAT function on.
OFF: Turn FOLDER REPEAT function off
SLIDE SHOW−FOLDER REPEAT
SLIDE SHOW Interval Time Setup
ONE SECOND
THREE SECONDS
SLIDE SHOW−INTERVAL TIME
FIVE SECONDS
TEN SECONDS
SLIDE SHOW Transition Function Setup
FULL SCREEN
SLIDE SHOW−TRANSITION
TOP->BOTTOM
From top to bottom
BOTTOM->TOP
From bottom to top
T/B->CENTER
From
top/bottom
to
center
3
CENTER->T/B
From
center
to
top/bottom
BLIND:T/B
Blinder
LEFT->RIGHT
From left to right
RIGHT->LEFT
From right to left
L/R->CENTER
From left/right to center
SLIDE SHOW Auto Start Function Setup
ON: Turn AUTO START on.
OFF: Turn AUTO START off.
SLIDE SHOW−AUTO START
6.2.5 SETUP MENU−MOVIE
MOVIE Interval Time Function Setup
REPEAT MODE:SINGLE
ONE LOOP
MOVIE−REPEAT MODE
CONTINUOUS
4
6.2.6 SETUP MENU−PREFERENCES PAGE
PREFERENCES PAGE OSD Language Setup
ENGLISH:OSD in English
PREFERENCES PAGE−OSD LANG
PREFERENCES PAGE OSD MESSAGE Setup
ON:
Turn OSD MESSAGE on.
OFF:Turn OSD MESSAGE off.
PREFERENCES PAGE−OSD MESSAGE
PREFERENCES PAGE DEFAULTS Setup
RESET:Restore manufacturer’s default settings.
SETUP VALUES-----DEFAULT
7、OSD Setup Guide
※※Note※※
5
Press arrow keys,
、
、 、
for quick operations。
Press MENU Key enter into OSD Menu, press“
”Select the item and use “
” to adjust
the option, then press “
” to increase or decrease the numerical value. If the item is optional,
please use “
” to select it and press ENTER to confirm. After parameter setting, user can press
RETURN to up menu till exit OSD menu, or wait a moment for OSD disappear
automatically.(have relation with OSD timer setting, please refer to introduction later)
OSD Menu Settings
Press “MENU” to enter OSD menu.
Use the “
” and “
” buttons to select options and press “ENTER” to confirm.
7.1 Brightness and Contrast Settings
Note
Brightness
Operation Method
Remote control
0
Remote control
100
Contrast
0
100
Backlight
0
100
Return
Press “MENU” to return.
7.2Image Settings
Note
Horizontal
Position
Operation Method
Remote control
0
Remote control
100
Vertical
Position
0
100
Clock
0
100
Phase
0
100
Return
Press “MENU” to return.
6
7.3Color Settings
Operation Method
Note
Press “ENTER” to enter Color Settings
menu
Color
Press “ENTER” to auto configure
Red
0
100
Green
0
100
Blue
0
100
Return
Remote control
Remote control
Press “MENU” to return.
7.4 Volume Settings
Note
Mute
Operation Method
Remote control
Remote control
Press “ENTER” to turn ON/OFF
mute
Volume
0
100
Return
Press “MENU” to return.
Fast Adjust Volume
Under PLAY mode, keep pressing the “ / ” button for three seconds to flip out VOLUME
ADUST SETTINGS menu, then use “ / ” to change the volume.
7.5 System Settings
Note
Operation Method
7
OSD
Timeout
Remote control
0
0
Power Save
Remote control
60(s)
60(S)
Reset
Press “ENTER” to resume the
original settings.
Return
Press “MENU” to return.
7.6Exit
Note
Operation Method
Exit
Press “MENU” to exit OSD menu.
8. SPECIFICATIONS
15 Inch
17 Inch
19 Inch
Active Matrix TFT
LCD
Active Matrix TFT
LCD
Active Matrix TFT
LCD
Active Area (mm)
304.1 (H) x 228.1 (V)
337.92 (H) x 270.34
(V)
376.3(H)x301.01
(V)
Pixel
0.297 (H) x 0.297 (V)
0.264 (H) x 0.264 (V)
0.294 (H) x 0.294
(V)
48KHz
64KHz
61KHz
60Hz
60Hz
60Hz
16.77M
16.77M
16.2M
50,000Hours
50,000Hours
40,000Hours
250cd/m²
270cd/m²
300cd/m²
450:1
450:1
500:1
View Angel
Top 40 /Bottom
60 /Left 60 /Right
60°
Top 40 /Bottom
60 /Left 60 /Right
60°
Top 70 /Bottom
60 /Left75 /Right
75°
Input Power
AC 110 V
AC 110V
AC 110V
Panel
Horizontal Frequency
Vertical Frequency
Color Numbers
Lifetime
Brightness
Contract Ratio
8
35W
Power Consumption
40W
45W
(55)w
Supported Multimedia
File
MPEG-1/MPEG-2/MP
EG-4
MP3,
Supported Media Card
9.
(70)w
MPEG-1/MPEG-2/MP MPEG-1/MPEG-2/
EG-4
MPEG-4
MP3,
MP3,
JPEG,
JPEG,
JPEG,
CF, SM, SD, MMC,
MS, MS Pro
CF, SM, SD, MMC,
MS, MS Pro
CF,
SM,
SD,
MMC, MS, MS Pro
CHECK LIST
Check List
1. Album TV(1)
2. Installation Bar (1)
3. Remote Control (1)
4. Warranty Card (1)
5. User's Manual (1)
6. Expansion Screw (2)
5.Remote Control Guide
9