1
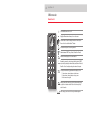
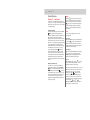
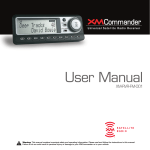
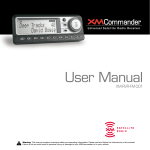
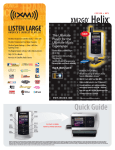
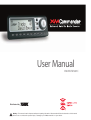
User Manual
XM-RVR-FM-001C
Distributed by
Warning: This manual contains important safety and operating information. Please read and follow the instructions in this manual.
Failure to do so could result in personal injury or damage to your XMCommander or to your vehicle.
Welcome
Thank you for purchasing an XMCommander Satellite Radio FM Modulator and Receiver System. Your
XMCommander gives you access to over 80 XM Satellite Radio channels of music, news, and information.*
Your XMCommander must be used with the enclosed connecting devices to ensure maximum performance
and safety. Professional installation is highly recommended.
*XM subscription required for reception. Not available in Alaska or Hawaii.
About XM
One big idea can change everything. And XM
Satellite Radio is one big idea: Radio to the Power
of X The number one Satellite Radio Service
in the universe gives you the power to choose
what you want to hear on – talk, sports, and
entertainment. That’s 80 basic channels in all, for a
low monthly subscription. Additional devices may
qualify for a reduced subscription fee through the
XM Family Plan.
Contents
Section 1
Getting Started: Activating XMCommander . . . . .
Section 2
XMCommander
Controls . . . . . . . . . . . . . . . . . . . . . . . . . . . . . . .
Remote Control. . . . . . . . . . . . . . . . . . . . . . . . . .
Display Screen . . . . . . . . . . . . . . . . . . . . . . . . . .
Section 3
Basic Operations
Turning XMCommander On and Off . . . . . . . .
Basic Channel Selection . . . . . . . . . . . . . . . . . .
Select a Channel by Category . . . . . . . . . . . . . .
Save and Recall Functions . . . . . . . . . . . . . . . .
Exploring the radio dial was never like this. Find the
spirit and the passion that made radio fun, now reborn
in all-digital sound without endless commercial
interruptions. Get to know the richness and range of
Menu Commands and Settings
80 channels of continuous programming. XM is a
FM Frequency . . . . . . . . . . . . . . . . . . . . . . . . . . .
sonic frontier where you’ll discover a new kind of radio.
Output Level . . . . . . . . . . . . . . . . . . . . . . . . . . . .
Contrast . . . . . . . . . . . . . . . . . . . . . . . . . . . . . . . .
About XMCommander
TuneSelectTM. . . . . . . . . . . . . . . . . . . . . . . . . . .
XMCommander allows you to receive and play
Direct Tune . . . . . . . . . . . . . . . . . . . . . . . . . . . . .
XM’s 80 digital channels over your existing vehicle
Section 4
audio system. Integrated seamlessly into your
Special Features
existing vehicle sound system**, the XMCommander
TuneSelectTM. . . . . . . . . . . . . . . . . . . . . . . . . . .
provides endless hours of rich radio entertainment—
Jump . . . . . . . . . . . . . . . . . . . . . . . . . . . . . . . . . .
Radio to the Power of X® !
Scan . . . . . . . . . . . . . . . . . . . . . . . . . . . . . . . . . . .
**Professional installation is highly recommended.
Important: The serial number for this device is located on
the top of the receiver unit. For your own security and
convenience, be sure to record this number on the
enclosed warranty card.
2
3
4
5
6
6
7
7
7
7
7
7
7
8
8
8
Section 5
Reference
Taking Care of Your XMCommander . . . . . . . . 9
Warranty . . . . . . . . . . . . . . . . . . . . . . . . . . . . . . . 9
Troubleshooting . . . . . . . . . . . . . . . . . . . . . . . . 10
2
section 1
Getting Started: Activating XMCommander
To quickly begin enjoying XM Satellite Radio, follow these simple steps:
1. Set up your XMCommander using the instructions in the installation guide or with the help of a professional
installer.
2. Press the power button to turn the XMCommander on and verify that it is playing Channel 1, the XM
Preview Channel.
3. Select Channel 0. The receiver’s eight-character XM Satellite Radio ID number will appear on the display.
Write the number here:
Note: Carefully check your XM Radio ID. The letters I, O, S, and F are not used.
4. Activate your XM Satellite Radio service. To subscribe, make sure you have a major credit card and your
XM Satellite Radio ID number handy and log onto www.xmradio.ca. You can also activate your service
by calling 1-877-GET-XMSR. Reduced fees apply for online activation.
Note: You will need to keep your XMCommander on for at least one hour after requesting activation to receive the full channel line-up.
Warning: When using this product it is always important to keep
your eyes on the road and your hands on the wheel. Not doing
so could result in injury to you or to others or in property damage.
Caution: Failure to properly follow all installation
instructions may result in personal injury or damage to your
XMCommander or to your vehicle.
Technical Information
Dimensions
Controller. . . . . . . . . . . . . . . . . . . . . . . . . . . . . . . . . . . . . . 4.5 in W x 1.75 in x H .83 in D (115 mm x 45 mm x 21 mm)
Receiver. . . . . . . . . . . . . . . . . . . . . . . . . . . . . . . . . . . . . . . 3.75 in W x 4.3 in x H 1.25 in D (95 mm x 109 mm x 32 mm)
Weight
Controller. . . . . . . . . . . . . . . . . . . . . . . . . . . . . . . . . . . . . . 2 oz (75 g)
Receiver. . . . . . . . . . . . . . . . . . . . . . . . . . . . . . . . . . . . . . . 11.8 oz (335 g)
Inputs/Outputs
Antenna. . . . . . . . . . . . . . . . . . . . . . . . . . . . . . . . . . . . . . . 1 RF SMB Connector
Power. . . . . . . . . . . . . . . . . . . . . . . . . . . . . . . . . . . . . . . . . P13 connector, 12V DC, 500 mA maximum
Audio output. . . . . . . . . . . . . . . . . . . . . . . . . . . . . . . . . . . 3.5 mm diameter ministereo jack
3
section 2
XMCommander
Controls
Figure 1. XMCommander
Control keys
Power button
Enter button
Tuning wheel
Number keys
The XMCommander unit has a power button, two control buttons, tuning wheel, enter button and 10 number keys.
Turns the XMCommander on or off.
The display/menu button toggles between three display options:
1. Channel name, channel number, and artist name
2. Channel name, channel number, and song name
3. Artist name and song title
Switches between DIRECT entry, Preset A, Preset B and Preset C.
Use the tuning wheel to scroll through and select a channel or a menu option. Pressing the center of the
tuning wheel acts as an enter function and selects channels or menu options.
Number keys are used to select a channel directly (when in DIRECT entry mode) by entering its number.
Select presets (when in Preset A, Preset B, or Preset C mode) by entering the number of the preset.
4
section 2
XMCommander
Remote Control
Figure 2. XMCommander Remote Control.
Turns the XMCommander on or off.
Highlights different channel/menu options on the screen.
The enter button is used in selecting channels and menu options.
Press and hold to activate TuneSelectTM feature.
Locates channels by various scanning methods.
Switches between DIRECT entry, Preset A, Preset B and Preset C.
Reverts to channel played prior to current selection.
Number keys are used to select a channel directly (when in DIRECT
entry mode) by entering its number. Select presets (when in Preset A,
Preset B or Preset C mode) by entering the number of the preset.
The display/menu button toggles between three display options:
1. Channel name, channel number, and artist name
2. Channel name, channel number, and song name
3. Artist name and song title
Memory saves artist name and song title for the currently playing
song which can later be recalled. Press and hold memory key to
recall information.
Enters category search and scrolls through available categories.
5
section 2
XMCommander
Display Screen
While tuned to an XM channel, the XMCommander default display contains information about that channel and
the XMCommander settings. See figure 3.
Your XMCommander display can be customized. See page 7.
Figure 3. XMCommander display screens.
Signal strength indicator
(zero to three bars)
Scan mode
Display Options
Category search
indicator
Keypad mode (DIRECT, Preset A,
Preset B or Preset C)
Channel name
and number
Preset bank
indicator
Artist name
Display Option 1
Display Option 2
Display Option 3
6
section 3
Basic Operations
Turning XMCommander On and Off
Press
to power the unit on or off. When first
turned on, the receiver will automatically tune in to
the last channel listened to and recall the previous
settings.
Basic Channel Selection
Select a channel by number
1. Verify that XMCommander is in DIRECT entry
mode. DIRECT should appear in the upper right
corner of the display. If A, B or C appears, press
until the display says DIRECT.
2. Enter channel number using the number keys.
Select using presets
Your XMCommander can store up to 30 preset
channels. They are organized into three different
groups, or memory banks (Preset A, Preset B and
Preset C), each with 10 channels corresponding to the
10 number keys.
Select channel presets
Press
until an A, B, or C appears in the
upper right corner of the display. Press the number
key corresponding to the desired preset.
Setting channel presets
1. Tune in the channel you want to register as a
preset.
2. Select either Preset A, Preset B or Preset C by
pressing
until an A, B, or C appears in the
upper right corner of the display.
3. Press and hold the number key corresponding
to the preset you would like to set. The channel
name and number will highlight and the audio
will mute for 2 seconds to indicate that the
preset is registered.
Tune to a channel using Tuning Wheel
Tune up and down the channel list by turning the
.
tuning wheel
Turn the tuning wheel
one increment or
decrement to progress through a list of channels.
Continue to turn the wheel to scroll through the list
and display a new channel with each increment. To
.
select a channel, press
Select a channel by remote control
When in DIRECT entry mode the up/down arrow
on the remote control can be used
buttons
to move up or down the channel list one channel at
a time. When in PRESET mode they can be used to
move up or down the preset channels in the
current bank. Each new channel will be displayed
for your preview without leaving your current
selection.
1. To display a new channel using the up/down
buttons.
arrow buttons, press
. If a channel is not
2. To select a channel, press
selected within 6 seconds, the unit reverts to the
current selection.
3. For a fast tuning through the channel listing,
buttons continuously.
hold down the
Caution: Set the volume control at a comfortable sound
level—one that can be heard clearly without distortion.
The Electronics Industry Association’s Consumer Electronics
Group suggest that you avoid prolonged exposure to
excessive noise to reduce the risk of hearing damage or loss.
7
section 3
Basic Operations
Menu Commands and Settings
Select Channel by Category (remote control)
Press and hold
enters the menu section of
XMCommander. Here, you can change each of the
on
following options using the tuning wheel or
remote and pressing to select the highlighted option.
Following are the settings that can be changed:
On the remote control, press either of the category
keys
to enter category search.
1. Continue pressing one of the category keys
until a category you are interested in appears.
buttons to display a channel within
2. Use the
the given category.
to select a channel.
3. Press
4. If you do not select a channel, category search will
time out after several seconds.
Save and Recall Functions
FM Frequency
In “FM Frequency” mode, the current frequency
and five additional frequencies are displayed. To
select another frequency, rotate tuning wheel
on the remote to
or press up or down
highlight the desired frequency.
. “Set” and the new frequency number
Press
are displayed for 2 seconds.
You can save the artist name, song title, channel name
and channel number on the current channel for future
reference.
to save the information for the current
1. Press
song. Up to 15 different items can be saved at once,
after which any new information that is saved will
replace the oldest information in memory.
for
2. To recall saved information, press and hold
2 seconds. “Memory 1” is displayed on the first
line. The channel name and number appear on
the second line. Next, the artist name and song
title are displayed. To advance through your list
on the remote control.
of favorites press
This control allows you to adjust the contrast of your
display.
Display Options
TuneSelectTM
The DISP/MENU
button toggles between
three display options:
1. Channel name, channel number, and artist name
2. Channel name, channel number, and song name
3. Artist name and song title
Output Level
Use this to adjust the XMCommander audio-level
output if it is too high, causing distortion, or too low
for your car. Most users will NOT need to change this
level from the factory setting. This is not a volume
control. You should set the volume using the audio
system connected to your XMCommander.
Contrast
See pg 8.
Direct Tune
This feature changes the functionality of the tuning
wheel so that it automatically selects a channel each
time it is rolled, without having to press tuning wheel
in. Note: XMCommander does not have a
preview mode when this feature is active.
8
section 4
Special Features
TuneSelect™ — New Feature!
TuneSelect is a new XM feature which allows you
to “tag” up to 15 songs you like and have your XM
Radio alert you when any of those songs is playing
on a different channel.
Activating TuneSelect
To activate TuneSelect, press and hold the ENTER
button at anytime during the playing of a
particular song. When TuneSelect is activated, you
will hear a beep and Song Selected will be
displayed on the screen for 2 seconds and then the
unit will revert to the previous screen information.
When one of your designated songs begins playing
on any other channel, your unit will beep and
SONG FOUND and the channel number and song
name will display on the screen. To go to that
button. If no
song, simply press the ENTER
action is taken within 8 seconds, your unit will
revert to the previous screen information of the
currently selected channel and TuneSelect will be
de-activated for that song only until the unit is
powered off and powered on for the next listening
session.
Managing TuneSelect Songs
To erase some or all of the songs identified in
memory with TuneSelect, press the DISP/MENU
button and using the tuning wheel, scroll to
to select.
the TuneSelect option. Press ENTER
You will have the option to erase all songs or only
selected songs. TuneSelect can accommodate up
to 15 selections. Once 15 songs are selected,
adding new songs will automatically replace the
oldest song in the list.
Jump
Pressing
on the remote causes the radio to
revert to the last channel selected immediately
prior to the current selection. A second press of
returns you to the original channel played
prior to initiating the jump process. With this
feature, you can cycle back and forth between
two channels.
Scan
You can scan through channels in one of the
following ways:
Scan presets
When in the PRESET mode (in preset bank A, B or
scrolls you through the preset
C), pressing
channels in the active bank only. The unit scans
channels beginning with the next preset higher in
number than the current preset.
Scan Category
When in the CATEGORY SEARCH mode, pressing
scrolls you through the channels in the
current category only, beginning with the next
higher channel than the current channel.
Scan All
scrolls you
When in DIRECT mode, pressing
through all channels, beginning with the next
higher channel than the current preset.
Each channel scanned will play audio for 5 seconds
after which the radio tunes to the next channel in
the scanning order. To lock onto a particular
or
within 5 seconds.
channel, press
Locking onto a channel automatically exits you
from the scan mode. You can also exit the scan
mode without making a selection by pressing any
,
or
.
of the following
XMCommander returns to the mode in which it
operated prior to entering scan mode.
9
section 5
Reference
Taking Care of Your XMCommander
(Failure to follow these instructions may result in
personal injury or damage to your XMCommander
or to your vehicle.)
• Use only a soft, dry cloth to clean the outside of
your XMCommander and any peripherals.
• Do not use any solvents, chemicals, or cleaning
solutions containing alcohol, ammonia or abrasives.
• Do not allow liquids to spill on the unit.
• Do not use sprays near your XMCommander.
• It is best to keep XMCommander out of direct
sunlight or other sources of extreme heat.
• Avoid placing XMCommander in a setting where air
cannot circulate around the unit.
Warranty
AUDIOVOX ELECTRONICS CORPORATION (the
Company) warrants to the original retail purchaser of
this product that should this productor any part thereof,
under normal use and conditions, be proven defective
in material or workmanship within 12 months from the
date of original purchase, such defect(s) will be repaired
or replaced with new or reconditioned product (at the
Company's option) without charge for parts and repair
labor. To obtain repair or replacement within the terms
of this Warranty, the product is to be delivered with
proof of warranty coverage (e.g. dated bill of sale),
specification of defect(s), transportation prepaid, to an
approved warranty station or the Company at the
address shown below. This Warranty does not extend
to the elimination of externally generated static or
noise, to costs incurred for installation, removal or
reinstallation of the product, damage to speakers,
accessories, or vehicle and home electrical systems,
malfunction of satellite transmissions, repeater signal or
receiver unit. This Warranty does not apply to any
product or part thereof which, in the opinion of the
Company, has suffered or been damaged through
alteration, improper installation, mishandling, misuse,
neglect, accident, or by removal or defacement of the
factory serial number/bar code label(s). THE EXTENT
OF THE COMPANY'S LIABILITY UNDER THIS WARRANTY IS
LIMITED TO THE REPAIR OR REPLACEMENT PROVIDED ABOVE
AND, IN NO EVENT, SHALL THE COMPANY'S LIABILITY
AEXCEED THE PURCHASE PRICE PAID BY PURCHASER FOR
THE PRODUCT. This Warranty is in lieu of all other express
warranties or liabilities. ANY IMPLIED WARRANTIES,
INCLUDING ANY IMPLIED WARRANTY OF MERCHANTABILITY,
SHALL BE LIMITED TO THE DURATION OF THIS WRITTEN
WARRANTY. ANY ACTION FOR BREACH OF ANY WARRANTY
HERE UNDER INCLUDING ANY IMPLIED WARRANTY OF
MERCHANTABILITY MUST BE BROUGHT WITHIN A PERIOD OF
48 MONTHS FROM DATE OF ORIGINAL PURCHASE. IN NO
CASE SHALL THE COMPANY BE LIABLE FOR ANY CONSEQUENTIAL OR INCIDENTAL DAMAGES FOR BREACH OF THIS
OR ANY OTHER WARRANTY, EXPRESS OR IMPLIED,
WHATSOEVER. No person or representative is authorized to
assume for the Company any liability other than expressed
herein in connection with the sale of this product. Some states
do not allow limitations on how long an implied warranty lasts
or the exclusion or limitation of incidental or consequential
damage so the above limitations or exclusions may not apply to
you. This Warranty gives you specific legal rights and you may
also have other rights which vary from state to state.
U.S.A.: AUDIOVOX ELECTRONICS CORPORATION,
150 MARCUS BLVD., HAUPPAUGE, NEW YORK 11788
1-800-645-4994
CANADA : CALL 1-800-645-4994 FOR LOCATION OF
WARRANTY STATION SERVING YOUR AREA
128-7351
10
section 5
Troubleshooting
Your XMCommander is designed and built to provide you with trouble-free performance without the need
for service. If it does not appear to be functioning correctly, please make sure all connectors are properly
attached and follow these troubleshooting steps:
If you see this on the display:
You should:
NO SIGNAL
Cause: The XM signal is being blocked.
The message should disappear as soon as you move out of an
obstructed area such as an indoor garage. If the problem
persists, make sure your antenna is mounted outside and on top
of your car with a clear view of the sky.
ANTENNA
Cause: Antenna connector may not be
securely seated. Cable may be damaged.
Make sure antenna is correctly attached to the receiver and that
antenna cable is undamaged and free from kinks. Turn the
XMCommander off and back on to reset this message.
OFF AIR
Cause: The channel selected is not
currently broadcasting.
Tune to another channel.
If this happens:
You should:
You do not receive all XM channels. Cause:
Your XMCommander is not activated.
Contact XM as described in “Getting Started: Activating
XMCommander” on page 2.
The audio sounds distorted
Reduce audio output level as described under “Menu Commands
and Settings: Set Level” on page 7.
The audio level is too low
Increase audio output level as described in “Menu Commands
and Settings: Set Level” on page 7.
You cannot tune in to a
channel
Verify that you are authorized to receive that channel as part of
your subscription with XM and that you have not asked XM to
block that channel on your XMCommander unit.
No song title or artist name
displays
Nothing is wrong with your receiver. This is normal on many talk
and news channels where there is no song playing. Also, this
information may not be available for some music channels.
Distributed by
Printed on Recycled Paper
©2003 XM Satellite Radio Inc. All rights reserved.
The XM name, and related logos are trademarks of XM Satellite Radio Inc.