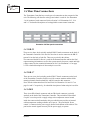
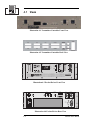
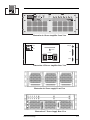
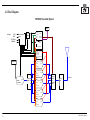
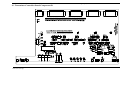
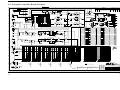
1
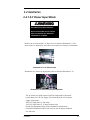
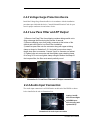
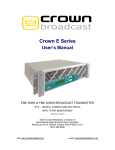
®
FM10000
RF Transmitter Package
User's Manual
©2006 Crown Broadcast, a division of International Radio and Electronics, Inc.
25166 Leer Drive, Elkhart, Indiana, 46514-5425 U.S.A.
(574) 262-8900
i
Revision Control
Revision
Print Date
Initial Release (Rev. 1)
April 2006
Important Notices
©2006, Crown Broadcast, a division of International Radio and Electronics Corp.
All rights reserved. No part of this publication may be reproduced, transmitted,
transcribed, stored in a retrieval system, or translated into any language in any
form by any means without the written permission of Crown Broadcast.
Printed in U.S.A.
Crown attempts to provide information that is accurate, complete, and useful.
Should you find inadequacies in the text, please send your comments to the
following address:
International Radio and Electronics
P.O. Box 2000
Elkhart, Indiana, 46515-2000 U.S.A.
ii
Contents
Section 1 – Getting Acquainted
1.1 Your Transmitter Package ………………………………………
1.2 Transmitter Package Specifications …………………………….
1.3 Safety Considerations …………………………………………..
1.3.1 Dangers ……………………………………………………….
1.3.2 Warnings ………………………………………………………
1.3.3 Cautions ……………………………………………………….
1-2
1-3
1-4
1-4
1-4
1-4
Section 2 – Installation
2.1 Operating Environment …………………………………………
2.2 Tools Required …………………………………………………
2.3 Unpacking ………………………………………………………
2.4 Installation ………………………………………………………
2.4.1 AC Power Input Block ………………………………………..
2.4.2 Voltage Surge Protection Device ……………………………..
2.4.3 Low Pass Filter ………………………………………………..
2.4.4 Audio Input ……………………………………………………
2.5 Remote I/O Connections …………………………………………
2-2
2-2
2-2
2-3
2-3
2-4
2-4
2-4
2-5
Section 3 – Operation
3.1 Initial Power-up Procedures …………………………………….. 3-2
3.2 AC Power Switch for Controller ………………………………… 3-3
3.3 Front Panel Controls and Display ……………………………….. 3-4
3.3.1 Remote/Local Switch ………………………………………….. 3-4
3.3.2 Local Enable Switch …………………………………………… 3-4
3.3.3 Transmitter RF Power Control ………………………………… 3-5
3.3.4 Raise/Lower Power Control …………………………………… 3-5
3.3.5 Power Reading ………………………………………………… 3-6
3.4 Rear Panel Connections …………………………………………. 3-7
3.4.1 DB-25 …………………………………………………………. 3-7
3.4.2 DB-37 …………………………………………………………. 3-7
3.4.3 DB-9 …………………………………………………………... 3-7
3.4.4 BNC ……………………………………………………………. 3-8
3.4.5 Chassis Ground ………………………………………………… 3-8
iii
Section 4 – Reference Drawings
4.1
4.2
4.3
4.4
Views …………………………………………………………….
System Block Diagram …………………………………………..
Transmitter Controller Board Component ID ……………………
Transmitter Controller Board Schematic ………………………...
4-2
4-4
4-5
4-6
Section 5 – Service and Support
5.1 Service …………………………………………………………… 5-2
5.2 24-Hour Support ………………………………………………… 5-2
5.3 Spare Parts ………………………………………………………. 5-2
Warranty Statement ………………………………………………….. 5-3
Glossary …………………………………………………………… G-2
iv
I
INFORMATION
Section 1—Getting Acquainted
This section provides a general description of the FM10000
transmitter system and introduces you to safety conventions
used within this document. Review this material before installing or operating the system.
Getting Acquainted
1–1
I
1.1 Your Transmitter Package
The FM10000 is a highly efficient transmitter package designed to set a new standard
in FM transmitter design offering modularity, ease of use, and long-term reliability. The FM10000 package has five (5) PA2000-10K amplifiers, three (3) 5,600 watt
power supplies, a transmitter controller, a low pass filter and an optional FM250.
The FM10000 transmitter package requires no tuning and typically provides 80% RF
efficiency. The three (3) 5600W power supplies are power factor corrected and
90% efficient. Modern MOSFET technology ensures high AC to RF efficiency
(better than 70% overall typical) and long-term reliability. The unmatched efficiency
of this transmitter significantly improves your bottom line by providing cooler
operation and lower power costs.
These modular units are uniquely designed to be compact for convenient shipping
and simple installation with minimal floor space. Installation is easy with three
connections; AC power in, Audio in, and antenna out. In addition, built in metering
and status indicator capabilities enable intuitive operation to further augment
the user-friendly design.
Economic long-term reliability is ensured through our carefully engineered solidstate design. Each PA2000 features four field-replaceable 500–watt power modules.
This transmitter delivers 2500 to over 10000 watts of RF power output. Use your
existing exciter or purchase the FM10000T which includes our award-winning FM250
exciter for an unbeatable 10 kW transmitter package.
This transmitter also includes an internal grounding strap that can connect to
your station ground providing quality protection for your transmitter. The
transmitter also includes a high quality Line Voltage Surge Protector which
properly installed will provide quality protection for your transmitter.
Illustration 1–1 FM10000 Transmitter Package
1–2
FM10000 User’s Manual
1.2 Transmitter Package Specifications
RF Power Output:
2500 to 11000 watts continuous with remote
controlled power adjust
RF Drive Requirement:
250 watts for full output
RF Output Impedance:
50 ohms (unbalanced)
Maximum SWR:
2.0:1 (With power foldback at high SWR)
Frequency Range:
87–108 MHz
RF Harmonics/Spurious Products: Better than –80 dB
Asynchronous AM S/N Ratio:
Meets FCC specifications (-50 dB)
(typically > 60 dB)
Synchronous AM S/N Ratio:
Meets FCC specifications (-50 dB)
(typically > 60 dB)
Operating Environment:
Temperature Range:
Humidity Range:
0°–50°C at sea level
0–80% at 20°C (noncondensing)
AC Power:
240 Volts AC +10/-15%, 50–60 Hz with neutral
Power Consumption:
Less than 18000 watts at 11000 watts RF output
typical
Power Factor:
.96 typical
Overall Efficiency:
70% typical
RF Output Connector:
1 5/8 " EIA flange
Cabinet dimentions :
7 x 17.25 x 23 inches (17.78 x 43.82 x
58.42 cm) exclusive of rack ears, but inclusive of connectors
Overall dimentions :
65 x 24 x 29 (cabinet only)
83 x 27 x 29 (including external filter)
Weight:
FM10K cabinet (950 lbs)
FM10K shipping weight (997 lbs)
Note: System performance is specified using Crown Broadcast
Model FM250 Exciter where applicable.
Getting Acquainted
1–3
I
1.3 Safety Considerations
Crown Broadcast assumes the responsibility for providing you a safe product and
safety guidelines during its use. “Safety” means protection to all individuals who
install, operate, and service the transmitter as well as protection of the transmitter
itself. To promote safety, we use standard hazard alert labeling on the product and
in this manual. Follow the associated guidelines to avoid potential hazard.
1.3.1 Dangers
DANGER represents the most severe hazard alert. Extreme bodily harm or death
will occur if DANGER guidelines are not followed.
1.3.2 Warnings
WARNING represents hazards which could result in severe injury or death.
1.3.3 Cautions
CAUTION indicates potential personal injury or equipment or property damage if
the associated guidelines are not followed. Particular cautions in this text also
indicate unauthorized radio-frequency operation.
Type of Hazard
WARNING
Severe shock hazard!
Pictorial Indication
of Hazard
Turn power off and
wait approximately 1
minute for capacitors
to discharge before
handling them.
Explanation of
Hazard
Illustration 1–2 Sample Hazard Alert
1–4
FM10000 User’s Manual
®
Section 2—Installation
This section provides important guidelines for installing your
transmitter. Review this information carefully for proper
installation.
Installation
2–1
2.1 Operating Environment
You can install the FM10000 transmitter on any flat surface which should be clean and
well-ventillated as possible.
2.2 Tools Required
To install the FM10000, you will need the following tools:
❑ Medium phillips screwdriver
❑ Small flat-blade screwdriver
❑
3/16
/ inch hex driver
❑
1/2 inch wrench and/or nut driver
❑ ESD (Electrostatic Discharge) protection grounding strap and/or mat.
2.3 Unpacking
1) Remove outer crate.
2) At the bottom of the cabinet are retainer brackets holding the
cabinet to the shipping platform. Use 1/2 inch wrench to remove
these brackets.
3) Carefully move the cabinet off the shipping platform to the
position of final installation using appropriate methods to ensure the
cabinet doesn't tip over.
4) Cabinet is now ready for installation.
2–2
FM10000 User’s Manual
2.4 Installation
2.4.1 AC Power Input Block
WARNING
Possible Electric Shock Hazard!
Do not connect AC source until all
other connections are made and
installation is complete.
Remove the 4 screws and the AC block cover as shown in Illustration 2-11 for
access to the AC input block. Save these screws and cover for later re-installation.
Illustration 2-11 AC block access
Attach main AC feed to the appropriate points as labled in Illustration 2-12.
Illustration 2-12 AC block feed point definition
The AC mains feed-point requires 240 Volts single phase with neutral
(which allows for 120 Volt supply). The following is the AC feed-point
supply requirements :
240 VAC single phase @ 100 Amps
120 VAC single phase @ 15 Amps (Neutral wire)
Provide the appropriate supply feed to match these requirements.
Consult the National Electrical Code for your area for proper conductor
size and color.
Installation
2–3
2.4.2 Voltage Surge Protection Device
Install the Voltage Surge Protection Device in accordance with the installation
procedures provided with the device. Consult National Electrical Code for your
area for proper conductor size and colors of wire.
2.4.3 Low Pass Filter and RF Output
1) Remove Low Pass Filter from shipping container being careful not to
drop or damage the filter during the process of removal.
2) Remove shipping cover from output connector at the bottom of the
cabinet and save bolts for Low Pass Filter installation.
3) Install low pass filter onto the connector along with upper retaining
clamp as shown in illustration 2-13. Use bolts from previous step to
fasten down filter to connector. Connect "input" to connector on cabinet.
4) Tighten bolts onto connector and then tighten upper retaining clamp
for a snug fit. Do not over tighten clamp enough to deform the shape of
the low pass filter; the filter must remain perfectly round.
Illustration 2-13 Low Pass Filter and RF Output connections
2.4.4 Audio Input Connection
The Audio input connection is an XLR Female on the back of the FM250 as shown
below installed in the rack in illustration 2-14.
Analog L and R :
XLR Left and Right
AES/EBU Input :
XLR Left only (with
optional DP-3)
Illustration 2-14 Audio Input connection
2-4
FM10000 User's Manual
2.5 Remote I/O Connections
The I/O connections on the back of the controller consist of 3 main ports; Port A
(DB-25 Female), Port B (DB-37 Female), and Port C (DB-37).
Port A has the metering and control of the System as well as the metering for PA5
(bottom PA). Port B and Port C have the amplifier metering for PA1 (top) through
PA4 (next to bottom).
I/O port A is described in illustration 2-15, I/O port B is described in illustration
2-16, and I/O port C is described in illustration 2-17.
Port A
Pin
1
2
3
4
5
6
7
8
9
10
11
12
13
14
15
16
17
18
19
20
21
22
23
24
25
Description
PA # 5 - # 8 current 1V = 2A of current
PA # 5 - # 7 current 1V = 2A of current
System Lock-Out Reset - Momentary to Ground to reset power control to normal
Remote RF Power RAISE - Momentary to Gnd to raise power 200 watts/second
Cabinet Temperature - 0.01 Volts/degrees Celsius reading of internal cabinet temp.
Ground
Remote High Voltage ON/OFF - Hold to ground to turn ON High Voltage
Fault Summary - TTL Logic HIGH (+5 VDC) when any fault light is ON
Ground
PA # 5 - ALC
PA # 5 - PA Temperature (Celcius) 1V = 20 degrees C
PA # 5 - SWR
PA # 5 - RF Output power 1V = 1000 Watts RF power
PA # 5 - In Ref.
Remote RF Power LOWER - Momentary to Gnd to lower power 20 watts/second
PA # 5 - # 6 current 1V = 2A of current
PA # 5 - # 5 current 1V = 2A of current
Remote RF Power, Forward - 1 VDC = 1000 Watts of Forward power
PA # 5 - # 4 current 1V = 2A of current
PA # 5 - # 3 current 1V = 2A of current
Remote RF Power, Reverse - 1 VDC = 1000 Watts of Reverse power
PA # 5 - # 2 current 1V = 2A of current
PA # 5 - # 1 current 1V = 2A of current
PA # 5 - PA Total Current 1V = 20 Amps
PA # 5 - PA Volts 1V = 10 Volts
13
25
1
14
Illustration 2-15 Remote I/O Port A Female DB-25
Installation
2–5
Port B
Pin
1
2
3
4
5
6
7
8
9
10
11
12
13
14
15
16
17
18
19
20
21
22
23
24
25
26
27
28
29
30
31
32
33
34
35
36
37
Description
(PA1) RF Power - 1V = 1000 Watts of power
(PA1) SWR - Calculated reading of SWR in VDC (1.00 VDC = 1.0 to 1.0 VSWR)
(PA1) PA Volts - 1V = 10 V on the PA
(PA1) PA Temperature - 1V = 20 degrees Celsius on the PA
Ground
(PA1) PA Total Current - 1V = 20 A on the PA
(PA1) PA#1 current - 1V = 2A of current
(PA1) PA#2 current - 1V = 2A of current
(PA1) PA#3 current - 1V = 2A of current
Ground
(PA1) PA#4 current - 1V = 2A of current
(PA1) PA#5 current - 1V = 2A of current
(PA1) PA#6 current - 1V = 2A of current
(PA1) PA#7 current - 1V = 2A of current
Ground
(PA1) PA#8 current - 1V = 2A of current
(PA1) ALC - A direct reading of the ALC voltage on the PA
(PA1) In Ref - A DC voltage reference representing RF input power to the PA
(PA2) RF Power - 1V = 1000 Watts of power
(PA2) SWR - Calculated reading of SWR in VDC (1.00 VDC = 1.0 to 1.0 VSWR)
Ground
(PA2) PA Volts - 1V = 10 V on the PA
(PA2) PA Temperature - 1V = 20 degrees Celsius on the PA
(PA2) PA Total Current - 1V = 20 A on the PA
(PA2) PA#1 current - 1V = 2A of current
Ground
(PA2) PA#2 current - 1V = 2A of current
(PA2) PA#3 current - 1V = 2A of current
(PA2) PA#4 current - 1V = 2A of current
(PA2) PA#5 current - 1V = 2A of current
Ground
(PA2) PA#6 current - 1V = 2A of current
(PA2) PA#7 current - 1V = 2A of current
(PA2) PA#8 current - 1V = 2A of current
(PA2) ALC - A direct reading of the ALC voltage on the PA
Ground
(PA2) In Ref - A DC voltage reference representing RF input power to the PA
19
37
1
20
Illustration 2-16 Remote I/O Port B Female DB-37
2-6
FM10000 User's Manual
Port C
Pin
1
2
3
4
5
6
7
8
9
10
11
12
13
14
15
16
17
18
19
20
21
22
23
24
25
26
27
28
29
30
31
32
33
34
35
36
37
Description
PA # 3 - RF Power - 1V = 1000 Watts of power
PA # 3 - SWR
PA # 3 - PA Volts - 1V = 10 V
PA # 3 - PA Temperature - 1V = 20 degrees Celsius on the PA
Ground
PA # 3 - PA Total Current - 1V = 20 A on the PA
PA # 3 - PA#1 current - 1V = 2A of current
PA # 3 - PA#2 current - 1V = 2A of current
PA # 3 - PA#3 current - 1V = 2A of current
Ground
PA # 3 - PA#4 current - 1V = 2A of current
PA # 3 - PA#5 current - 1V = 2A of current
PA # 3 - PA#6 current - 1V = 2A of current
PA # 3 - PA#7 current - 1V = 2A of current
Ground
PA # 3 - PA#8 current - 1V = 2A of current
PA # 3 - ALC - A direct reading of the ALC voltage on the PA
PA # 3 - In Ref - A DC voltage reference representing RF input power to the PA
PA # 4 - RF Power - 1V = 1000 Watts of power
PA # 4 - SWR
Ground
PA # 4 - PA Volts - 1V = 10 V on the PA
PA # 4 - PA Temperature - 1V = 20 degrees Celsius on the PA
PA # 4 - PA Total Current - 1V = 20 A on the PA
PA # 4 - PA#1 current - 1V = 2A of current
Ground
PA # 4 - PA#2 current - 1V = 2A of current
PA # 4 - PA#3 current - 1V = 2A of current
PA # 4 - PA#4 current - 1V = 2A of current
PA # 4 - PA#5 current - 1V = 2A of current
Ground
PA # 4 - PA#6 current - 1V = 2A of current
PA # 4 - PA#7 current - 1V = 2A of current
PA # 4 - PA#8 current - 1V = 2A of current
PA # 4 - ALC - A direct reading of the ALC voltage on the PA
Ground
PA # 4 - In Ref - A DC voltage reference representing RF input power to the PA
19
37
1
20
Illustration 2-17 Remote I/O Port C Female DB-37
Installation
2-7
Section 3—Operation
This section provides general operating parameters of your
transmitter system and a detailed description of the front panel
displays.
Operation
3–1
3.1 Initial Power-up Procedures
These steps summarize the operating procedures you should use for the initial
operation of the power amplifier and power supply. More detailed information
follows.
1. Ensure that the external remote control unit is properly connected to the
transmitter controller port A (see illustration 2-15, Section 2.5, page 2–5
for proper pin configuration).
2. Connect Antenna feed-line to the output of the Low Pass Filter.
Raise/Lower RF
Power control
Fwd/Refl power
select switch
RF Power (KW)
Remote/Local switch
Power control
Local Enable switch
Illustration 3-1 Transmitter Controller Front Panel Controls
3. Locate the Remote/Local switch and select "Local". Verify the Local Enable
switch is in the "0" position (indicating OFF) and that the enable LED is OFF.
4. Locate the Exciter (Crown FM250) and be certain that the Power and Carrier
switches are ON as well as the breaker on the back of the unit. Refer to Low
Power Manual FM30 - FM500 for further instructions.
5. Locate Fwd/Refl power select switch and verify it is in Fwd position. The
Green LED will indicate the proper position once power is ON.
6. Apply AC power to cabinet.
7. Adjust the RF output power on the exciter (Crown FM250) for 250 - 275 watts.
SPECIAL NOTE : This system is not a drive dependent amplifier design;
therefore drive level must remain constant regardless of main output level. Use
remote control to raise and lower RF output power, not the RF output level of the
driver.
Note: The FM10000 is set for 10000 watts at 98MHz at the factory unless a
specific frequency or power is specified at the time of order.
8. Enable the RF power by moving the "Local Enable" to the 'up' position. This
should be indicated with a RED LED below the switch.
3–2
FM10000 User’s Manual
Note : If no RF power is achieved, check the DPM display for a flashing dot in the
lower right corner of the display. If this is present, the system needs to be reset
before power can be restored. Refer to illustration 2-15, section 2.5, Remote I/O
connections pin 3 of Port A for further information.
9. Using the 'raise/lower RF power' buttons, raise or lower the RF power to the
desired setting (unless the power was specified at time of order).
10. Use the 'Fwd/Rev' selector switch to check for reflected power on antenna
feed-line if desired.
11. Use the PA1 through PA5 power controls to limit the amount of power output
the transmitter can achieve. The FM10000 is set to limit at 11000 watts in the
preset condition. For settings lower than this, adjust each PA control counterclockwise in small equal increments to the desired level. For a more secure
method, use the power set control located behind each front panel of each PA. The
settings on the individual PA's are unconventional in that a lowering of power is
achieved by adjusting the control clockwise.
The remainder of this section describes the controller and its functions.
3.2 AC Power Switch
The Transmitter Controller's AC power is controlled by a switch located on
the AC input filter. The AC input range is 100-250 VAC. The fuse type and
size are 3AGC at 1/2 amp slo-blo and there are 2 fuses. See illustration 3-2
for switch location.
Illustration 3–2 AC Input Power
Switch
Operation
3–3
3.3 Front Panel Controls and Display
Refer to illustration 3-1 for additional information when going through section 3.3.
3.3.1 Remote/Local Switch
The Remote/Local switch is used to be able to 'break' the interlock line from the
remote control unit to allow for local control of the High Voltage supply that
feeds the PA's. It has a green LED which illuminates when the switch is in the
remote position (allowing for control via remote control unit) and a red LED
which will illuminate when the switch is in the local position (disabling the
remote control from turning on the high voltage). See illustration 3-3.
Illustration 3-3 Remote/Local and Local Enable switches with indicators
3.3.2 Local Enable Switch
The Local Enable Switch is used to enable the high voltage supply for the PA's
when the Transmitter Controller is in the 'Local' mode. The switch in the ON
position (up, or 1) will enable the supplies and illuminate the red indicator
LED. The switch in the OFF position (down, or 0) will disable the supplies and
extinguish the red LED. See illustration 3-3.
3–4
FM10000 User’s Manual
3.3.3 Transmitter RF Power Control
The Transmitter Controller has the ability to internally set the maximum RF output
power for the 10000 watt system using the power control setting for each PA. These
controls are located behind the front panel and have an access hole in front of each
control. A small flat blade screwdriver is needed to adjust each control. For
maximum output level, these controls need to be set fully Clock-wise. Adjust the
controls for each PA separately (PA1 thru PA5) in small steps (less than 300 watts
difference) to prevent any unnecessary VSWR problems to the other amplifiers (the
ones not being adjusted). These controls will effect the final RF output power that
the remote control can adjust to. Whatever these are set for as a maximum level, that
level is all the higher the remote control will be able to set the power to. See
illustration 3-4 for location of these controls.
Illustration 3–4 Power Control Adjustment location
3.3.4 Raise/Lower RF Power Control
The Transmitter Controller has the ability to Raise or Lower the RF Power in
small increments using the control switches on the front panel. Refer to
illustration 3-4 for the location of these controls. To raise the power, depress
the switch under the "Raise" label. Press and hold this switch to change the
power in 200 watts/second increments. Pressing once should only change the
power 20 - 30 watts. To lower the power, depress the switch under the "Lower"
label. Press and hold this switch to change the power in 200 watts/second
increments. Pressing this switch once will change the power 20 - 30 watts.
Both switches are momentary contact type switches and parallel the remote
control for Raising and Lowering power via Port A on the back of the unit. A
remote control unit is not required for this operation. These controls will
change the RF output power on all PA's simultaneously, reducing the need for
separate controls for each PA.
Operation
3–5
3.3.5 RF power reading and selector switch
The Transmitter Controller has a digital panel meter which displays Forward RF
Power and Reverse RF Power as detected by the RF power sampler built into the
output combiner. The reading on the display is determined by the setting of the
selector switch and accompanying green LED indicator. The readings are in
Kilowatts and have an accuracy of better that 2% at the specified RF level and
frequency at the time of order. However, it is recommended that an external watt
meter be used for a more accurate reading. See illustration 3-5 for the location of the
panel meter and selector switch with accompanying green LED indicators.
Illustration 3-5 RF Power Reading and Selector Switch
3-6
FM10000 User's Manual
3.4 Rear Panel connections
The Transmitter Controller has several types of connections on the rear panel of the
unit. The following will describe each type and what it is used for. See illustration
3-6 for location of each connector. Refer to Section 2.4.5 illustrations 2-15, 2-16
and 2-17 for detailed descriptions of each applicable remote control connector.
Illustration 3-6 Rear panel connections
3.4.1 DB-25
There are six (three, dual vertically stacked) DB-25 female connectors on the back of
the Transmitter Controller. PA1 thru PA5 are what is used to connect to the DB-25
remote I/O on the back of each PA. These are pre-wired in the cabinet.
The connector labeled I/O Port A is used for the Remote Interface and has the final
output metering information as well as the system controls for power control and high
voltage control. It also contains information for PA5. See illustration 2-15 on page
2-5 for a detailed description of what each pin is used for.
3.4.2 DB-37
There are two (one, dual vertically stacked) DB-37 female connectors on the back
of the Transmitter Controller. Port B is used for a remote monitor and has all the
metering channels found on both PA1 and PA2 routed to this connector.
Port C has the information from PA3 and PA4. See illustration 2-16 and 2-17 on
page 2-6 and 2-7 respectively, for a detailed description of what each pin is used for.
3.4.3 DB-9
There is one DB-9 female connector and one DB-9 male connector (vertically
stacked) on the back of the Transmitter Controller. The port labeled ‘Directional
Coupler’ is used to provide a supply voltage to the temperature sensor located
inside the connector shell attached to this port which in turn provides an internal
cabinet temperature reading available on I/O port A. The port labeled ‘Power
control’ is connected to the power supply located in the bottom of the cabinet. This
port has the control signals necessary for the power supply to operate.
Operation
3-7
3.4.4 BNC Connectors
The Transmitter Controller has provisions for two BNC connectors on the back
panel labeled Fwd and Rev. Both of these connectors are used in the FM10000 to
receive DC voltage readings from the directional coupler located internal to the
output combiner.
3.4.5 Chassis Ground
The Transmitter Controller has a provision to connect the chassis to the cabinet
ground. A ground strap is pre-wired to the chassis ground.
3-8
FM10000 User's Manual
Section 4—Reference Drawings
The illustrations in this section may be useful for making
adjustments, taking measurements, troubleshooting, or
understanding the circuitry of your RF power amplifier and
power supply.
Reference Drawings
4–1
4.1 Views
Illustration 4-1 Transmitter Controller Front View
Illustration 4-2 Transmitter Controller Back View
10
2
RF Power
High Band
High
Expand
2
Compress
SWR
20
ALC
PA DC Volts
Wide Band
PA DC Amps
-6
SWR
Over
Lock
100
Input
90
PA DC
80
PA Temp
70
60
PA Temperature
+6 dB
+12 dB
Power
50
Supply DC Volts
-12
Carrier
Modulation
Fault
Audio Input
Stereo
Voltmeter
40
30
-18
20
Low
Pilot
Input Gain
Mono
Processing
RF Output
FM BROADCAST TRANSMITTER
Illustration 4-3 Exciter/Driver Front View
SCA IN
MONITOR
COMPOSITE IN
R
RIGHT
LEFT/MONO
L
REMOTE I/O
1
2
3
FUSE
B
A
T
T
E
R
Y
+
CIRCUIT
BREAKER
OFF
36 VDC
Illustration 4-4 Exciter/Driver Rear View
4–2
FM10000 User’s Manual
Fault
Metering
In Ref
SWR
ALC
Power Out
PA Temp
PA Voltage
Tot Current
PA1
PA2
PA5
PA6
PA3
PA4
PA7
PA8
Fuses
Antenna
RF Drive
PA Temp
PA DC
PA1
PA2
PA3
PA4
PA5
PA6
PA8
PA7
®
Illustration 4-4 Power Amplifier Front View
DC input +
DC Input -
RF Input
RF Monitor
RF Output
I/O
Control
Illustration 4-5 Power Amplifier Rear View
Illustration 4-6 Power supply Front View
Illustration 4-7 Power Supply Rear View
Reference Drawings
4-3
4.2 Block Diagram
FM10000 Transmitter System
Remote I/O
AC Input
HOT
HOT
NEUTRAL
GROUND
AC Distribution
Panel
120 V 15A
Quad Box
AC Input
Transmitter
Controller
PS Control
Metering
Input
AC Input
RF Sample In
Remote I/O
Low Voltage
Supply
+12, -12, +24 VDC Output
PS Control
AC Input PS #1
AC Input PS #2
AC Input PS #3
DC Output
High Voltage Power Supply
5600W x 3
I/O
Audio Input
PA # 1
RF Input
DC Input
RF Output
Low Voltage In
I/O
PA # 2
RF Input
RF Output
Low Voltage In
AC Input
RF Output
FM250
Exciter/Driver
DC Input
RF Input
Splitter
I/O
PA # 3
RF Input
DC Input
RF Output
RF Output
Combiner
with
Directional
Coupler
Low Pass
Filter
Antenna Out
Low Voltage In
I/O
PA # 4
RF Input
DC Input
RF Output
Low Voltage In
I/O
PA # 5
RF Input
DC Input
RF Output
Low Voltage In
4-4
FM10000 User's Manual
4.3 Transmitter Controller Board Component ID
Reference Drawings
4-5
4.4 Transmitter controller Board Schematic
3
J6
REV.
201233-SCH
A
5
9
14
P/S CONTROL
.1
U10D
D23
13
R68
12
TL074
14
1K
U11D
9
R65
8
U11C
10K
12
1K
REV METER
DS2
-5V
R39
POLY
G
C79
.1
+5V
GRN
TO
R34
220
21
22
23
24
25
26
27
28
29
30
31
32
33
34
35
36
37
38
39
40
470K
C78
.1
J7
C77
100pF
METER REV PWR
1
2
3
4
5
6
R41
100K
21
22
23
24
25
26
27
28
29
30
31
32
33
34
35
36
37
38
39
40
20
19
18
17
16
15
14
13
12
11
10
9
8
7
6
5
4
3
2
1
20
19
18
17
16
15
14
13
12
11
10
9
8
7
6
5
4
3
2
1
ICL7107
METER FWD PWR
21
22
23
24
25
26
27
28
29
30
31
32
33
34
35
36
37
38
39
40
HEADER 6
TL074
1N4148
+12V
R46
20K
R45
R57
20K
R58
R80
20K
20K
D13
1N4148
C106
7
D19
1N4148
1
U11A
3
10K
9
K2B
PA 4, ALC
3
U13A
220
74HC132N
4
+5V
3
TL074
1N4148
R76
8
R55
2
+12V
10
C108
6
K2A
+
+
-
+5V
1
5
R72
1
4.7K
R52
R48
13
10K
10K
D14
6
7
U10B
5
TL074
C75
.1
1N4148
R50
20K
R49
20K
R53
20K
R54
20K
D15
1N4148
C112
6
U13B
D16
R51
9
8
D17
1N4148
1N4148
U10C
6
Q1
TL074
13
U12D
10K
16
METER FWD PWR
1
2
3
4
8
C7
.1
1
4
C3
R4
100K
D1
1N6263
C4
.01
R6
62K
-12V
C9
.01
2
1
U2A
MC33282P
3
C1
B1
E1
N/C
C2
B2
E2
N/C
1
2
3
4
R13
3.3K
C1
B1
E1
N/C
C2
B2
E2
N/C
R3
22K
C103
.01
C28
.01
C102
.01
C27
.01
C101
.01
C26
.01
PA 5, Total Current
D4
1N4148
6
8
7
6
5
U2B
5
7
MC33282P
C10
.01
LM394CN OR AD SSM2210
+12V
FWD
C29
.01
PA 5, SWR
R17
100
R15
49.9K 1%
8
7
6
5
LM394CN OR AD SSM2210
U4
D3
1N4148
8
.1
-12V
R5
10K
4
TL072CP
J11
MCX
E
U3
U1A
2
C1
.01
R16
10.0K 1%
R14
49.9K 1%
C8
.1
R18
1.15K 1%
-5V
PA 5, PA TEMPERATURE
U6
(FRONT PANEL)
5
R8
220K
C5
.01
J8
7
U1B
TL072CP
R10
D2
100K
1N6263
C6
.01
1
2
3
4
5
6
R11
10K
R12
62K
-12V
C13
.01
4
6
2
3
D5
1N4148
1
2
3
4
R19
3.3K
MC33282P
C1
B1
E1
N/C
C2
B2
E2
N/C
R21
49.9K 1%
8
7
6
5
LM394CN OR AD SSM2210
U7
1
U5A
8
TO
D
LOCAL ENABLE SWITCH
R36
220
1
2
3
4
C11
.1
C25
.01
C99
.01
C24
.01
C98
.01
C23
.01
C1
B1
E1
N/C
C2
B2
E2
N/C
6
8
7
6
5
HEADER 6
C14
.01
LM394CN OR AD SSM2210
+12V
R9
22K
7
U5B
MC33282P
5
C97
.01
C22
.01
C96
.01
C21
.01
C95
.01
C20
.01
C94
.01
C19
.01
C93
.01
C18
.01
C92
.01
C17
.01
C91
.01
C16
.01
R20
49.9K 1%
C12
.1
PA 5, #4 Current
R22
10.K 1%
R24
1.15K 1%
-5V
LOCAL
DS10
RED
PA 3, In Ref
U13D
1
5
2
74HCT02
JP1
3
12
J1A PA HV ON/OFF
C110
.1
U12A
3
1
2
2
74HCT02
JP6
3
PA 4, #7 Current
PA 4, PA Temperature
PA 3, #7 Current
C56
.01
C40
.01
C55
.01
C39
.01
C54
.01
C38
.01
C53
.01
C37
.01
C52
.01
C36
.01
C51
.01
C35
.01
C50
.01
C34
.01
C49
.01
C33
.01
C48
.01
C32
.01
C47
.01
C31
.01
C46
.01
PA 1, #2 Current
PA 1, ALC
PA 1, #1 Current
PA 2, ALC
PA 2, #1 Current
PA 1, #8 Current
PA 1, PA Total Current
PA 2, #8 Current
PA 2, PA Total Current
PA 2, #7 Current
PA 2, PA Temperature
PA 1, #7 Current
PA 1, PA Temperature
PA 2, #6 Current
PA 2, PA Volts
PA 1, #6 Current
PA 1, PA Volts
PA 1, #5 Current
PA 1, SWR
PA 2, #5 Current
PA 2, SWR
PA 1, #4 Current
PA 1, RF output power
PA 2, #4 Current
C70
.01
C69
.01
E
C68
.01
C67
.01
C66
.01
C65
.01
C64
.01
C63
.01
C62
.01
D
C61
.01
PA 4, #4 Current
C30
.01
PA 1, In Ref
C71
.01
PA 3, #4 Current
C15
.01
PA 2, In Ref
PA 2, #2 Current
C72
.01
PA 4, #5 Current
PA 3, RF output power
C85
.01
C41
.01
PA 1, #3 Current
C73
.01
PA 3, #5 Current
PA 4, SWR
PA 5, #8 Current
C57
.01
PA 3, #6 Current
PA 3, SWR
PA 5, In Ref
C42
.01
PA 4, #6 Current
PA 3, PA Volts
PA 5, #7 Current
C58
.01
PA 4, #8 Current
PA 3, PA Temperature
PA 5, #6 Current
C43
.01
C74
.01
PA 3, #8 Current
PA 4, PA Volts
PA 5, #5 Current
C59
.01
PA 4, ALC
PA 4, PA Total Current
PA 2, RF output power
PA 2, #3 Current
C44
.01
PA 3, ALC
PA 3, PA Total Current
PA 5, #2 Current
D6
1N4148
PA 4, In Ref
PA 4, #2 Current
PA 4, #1 Current
PA 5, ALC
R23
100
PA 3, #3 Current
PA 3, #1 Current
C100
.01
PA 5, #1 Current
Remote RF output power, Reverse-Total system
LOCAL ENABLE
DS11
RED
R7
1K
3
6
F
PA 3, #2 Current
PA 5, #3 Current
+5V
U12B
74HC132N
PA 4, RF output power
PA 4, #3 Current
C104
.01
PA 5, PA Volts
Remote RF output power, Forward-total system
+12V
3
R2
220K
REV
JP2
/PA HV ON/OFF
METER REV PWR
J10
MCX
2
D25 1N4004
Cabinet Temp
.1
1
8
J1B PA HV ON/OFF
4
13
11
+5V
C109
.1
REV
R1
1K
9
9
74HC132N
12
74HCT02
2N5210
R42
220
U12C
74HCT02
U13C
11
+12V
1
G
J2A PA HV ON/OFF
10
10K
10
JP3
3
10
8
R71
PA 3, ALC
PA 5, RF output power
DB9STACKED
J3A PA HV ON/OFF
JP4
2
R74
1K
4
9
K1
4
FWD
C2
3
5
R75
JP5
2
2
47/20V
11
8
J5B
1B
6B
2B
7B
3B
8B
4B
9B
5B
DP
J2B PA HV ON/OFF
R73
4.7K
47/20V
1
C76
.1
R33
2.49K 1%
1
1
C111
74HC132N
R47
10K
PE
DW
3
2
+5V
220
+5.00V
R32
24.9K 1%
+12V
Q2
2N5210
C107
2
.1
R40
10.K 1%
FWD METER
1
2
3
4
5
6
7
8
9
10
10K X 10
+5V
F
+5V
10K
R81
10K
+ C116
1000/35V R82
100K
Q3
2N5210
.1
-12V
D18
.1
DISPLAY
DP
R70
10K
C114
.1
10K
1
U10A
+5V
R31
TL072CP
+12V
R61
1M
D12
100K
R35
220
3
R83
100K
10K
5
R79
1
R77
100K
PA 5, ALC
TL074
.1
2
3
DW
1
-12V
10K
8-18-05
-5V
R56
C105
R43
PA 1, ALC
PA 2, ALC
DS1
GRN
U11B
R44
10K
20
20
19
10,000'S
19
18
18
17
17
16
16
15
15
14
14
1,000'S
13
13
12
12
11
11
10
10
9
9
100'S
8
8
7
7
6
6
5
5
4
4
3
10'S3
2
2
1
1
R59
6
7
D21
1N4148
1N4148
1N4148
+5V
XDS3
21
22
23
24
25
26
27
28
29
30
31
32
33
34
35
36
37
38
39
40
20K
D20
11
+5V
U8
C80
0.1
R62
20K
11
P/S OFF/ON
C89
.1
4
C88
47UF/20V
P/S CONTROL
+
1A
6A
2A
7A
3A
8A
4A
9A
5A
D22
RELEASE TO PRODUCTION
APPROVALS
CHK
CM
.1
U14A
2
10K
6.2V
R67
A
DWN
H
R63
J5A
12
DATE
C113
-12V
R60
D24
10
TL074
TL074
11
6
REVISION HISTORY
DESCRIPTION
REV
4
13
R64
1K
E . C . N.
.001
8
C87
+
20K
4
C86
47UF/20V
+12V
R66
R69
10K
R30
20K
10
5
C115
-12V
(FRONT PANEL)
8
C90
.1
+
1N4148
PWR SUPPLY CONTROL
7
R78
100K
+5V
HEADER 6
FWD/REV SWITCH
6
+12V
C84
47UF/20V
1
2
3
4
5
6
H
4
+
2
+
DWG. NO.
1
C45
.01
C60
.01
/PA HV ON/OFF
R37
220
(FRONT PANEL)
U14B
5
7
J9
6
1
2
3
4
5
6
TL072CP
/PA HV ON/OFF
HV ON/OFF - Sys
HEADER 6
C
S1
PA 1, In Ref
PA 2, In Ref
PA 2, RF output power
PA 2, #8 Current
PA 1, #8 Current
PA 2, ALC
PA 1, ALC
PA 1, #6 Current
PA 2, #6 Current
PA 1, #7 Current
PA 2, #7 Current
PA 2, #4 Current
PA 1, #4 Current
PA 2, #5 Current
PA 1, #5 Current
PA 1,
PA 2,
PA 1,
PA 2,
#2 Current
#2 Current
#3 Current
#3 Current
PA 2, PA Total Current
PA 1, PA Total Current
PA 2, #1 Current
PA 1, #1 Current
PA 1, PA Volts
PA 2, PA Volts
PA 1, PA Temperature
PA 2, PA Temperature
PA 1, RF output power
PA 2, SWR
PA 1, SWR
PA 3, In Ref
PA 4, In Ref
PA 4, RF output power
PA 4, #8 Current
PA 3, #8 Current
PA 4, ALC
PA 3, ALC
PA 3, #6 Current
PA 4, #6 Current
PA 3, #7 Current
PA 4, #7 Current
PA 4, #4 Current
PA 3, #4 Current
PA 4, #5 Current
PA 3, #5 Current
PA 3, #2 Current
PA 4, #2 Current
PA 3, #3 Current
PA 4, #3 Current
PA 4, PA Total Current
PA 3, PA Total Current
PA 4, #1 Current
PA 3, #1 Current
PA 3, PA Volts
PA 4, PA Volts
PA 3, PA Temperature
PA 4, PA Temperature
PA 3, RF output power
PA 4, SWR
PA 3, SWR
PA 5, #2 Current
PA 5, ALC
PA 5, #1 Current
PA 5, PA Temperature
PA 5, Total Current
PA 5, SWR
PA 5, PA Volts
PA 5, RF output power
PA 5, #4 Current
HV ON/OFF - Sys
PA 5, #3 Current
Fault Summary
Remote RF output power, Reverse-Total system
PA 5, #8 Current
PA 5, In Ref
PA 5, #7 Current
PA Lower RF Power - System
PA 5, #6 Current
PA Raise RF Power - System
PA 5, #5 Current
Cabinet Temp
Remote RF output power, Forward-total system
D11
PA 5, #2 Current
PA 5, ALC
PA 5, #1 Current
PA 5, PA Temperature
PA 5, Total Current
PA 5, SWR
PA 5, PA Volts
PA 5, RF output power
PA 5, #4 Current
J3A PA HV ON/OFF
PA 5, #3 Current
PA5 Fault Summary
PA 5, #6 Current
PA Raise RF Power - System
PA 5, #5 Current
PA 5, #8 Current
PA 5, In Ref
PA 5, #7 Current
PA Lower RF Power - System
1N4148
D10
PA 4, #2 Current
PA 4, ALC
PA 4, #1 Current
PA 4, PA Temperature
PA 4, PA Total Current
PA 4, SWR
PA 4, PA Volts
PA 4, RF output power
PA 4, #4 Current
J2B PA HV ON/OFF
PA 4, #3 Current
PA4 Fault Summary
PA 4, #6 Current
PA Raise RF Power - System
PA 4, #5 Current
PA 4, #8 Current
PA 4, In Ref
PA 4, #7 Current
PA Lower RF Power - System
1N4148
D9
1N4148
PA 3, #4 Current
J2A PA HV ON/OFF
PA 3, #3 Current
PA3 Fault Summary
PA 3, #6 Current
PA Raise RF Power - System
PA 3, #5 Current
PA 3, #2 Current
PA 3, ALC
PA 3, #1 Current
PA 3, PA Temperature
PA 3, PA Total Current
PA 3, SWR
PA 3, PA Volts
PA 3, RF output power
1N4148
PA 3, #8 Current
PA 3, In Ref
PA 3, #7 Current
PA Lower RF Power - System
PA 1, #4 Current
J1A PA HV ON/OFF
PA 1, #3 Current
PA1 Fault Summary
PA 1, #6 Current
PA Raise RF Power - System
PA 1, #5 Current
PA 1, #8 Current
PA 1, In Ref
PA 1, #7 Current
PA Lower RF Power - System
1
SYSTEM
LOWER
POWER
PA 2, #4 Current
J1B PA HV ON/OFF
PA 2, #3 Current
PA2 Fault Summary
S2
2
PA 2, #2 Current
PA 2, ALC
PA 2, #1 Current
PA 2, PA Temperature
PA 2, Total Current
PA 2, SWR
PA 2, PA Volts
PA 2, RF output power
1N4148
GRN
REMOTE
D7
SYSTEM
RAISE
POWER
+5V
D8
1
PA 2, #6 Current
PA Raise RF Power - System
PA 2, #5 Current
2
PA 2, #8 Current
PA 2, In Ref
PA 2, #7 Current
PA Lower RF Power - System
R38
DS9 220
PA 1, #2 Current
PA 1, ALC
PA 1, #1 Current
PA 1, PA Temperature
PA 1, Total Current
PA 1, SWR
PA 1, PA Volts
PA 1, RF output power
TO
C
REMOTE/LOCAL SWITCH
+5V
3
C81
1.0
4
NC
TEMP Vout
GND
TRM
J1A
DB25STACKED
8
7
6
PA1
J2A
DB25STACKED
J2B
DB25STACKED
J3A
DB25STACKED
J3B
DB25STACKED I/O PORT A
5
PA1
POWER
CONTROL
R25
10K
PA2
POWER
CONTROL
R26
10K
PA3
POWER
CONTROL
R27
10K
PA4
POWER
CONTROL
R28
10K
PA5
POWER
CONTROL
C82
1.0
GND
Vin
1
2
Vout
3
C83
1.0
1. ALL RESISTORS ARE IN OHMS, 1/4W, 5% TOL.
UNCONTROLLED
2
3
4
5
6
7
UNLESS OTHERWISE MARKED IN RED INK BY CM AS A
CONTROLLED COPY, COPIES OF THESE DOCUMENTS
INCLUDING ASSOCIATED ELECTRONIC REPRODUCTIONS
ARE FOR REFERENCE ONLY.
8
APPROVALS
THESE DRAWINGS AND SPECIFICATIONS ARE THE
PROPERTY OF INTERNATIONAL RADIO AND ELECTRONICS CORP.
AND SHALL NOT BE REPRODUCED, COPIED OR USED AS
THE BASIS FOR THE MANUFACTURE OR SALE OF APPARATUS OR
DEVICES WITHOUT PERMISSION.
9
GND
GND
GND
GND
GND
GND
GND
GND
GND
GND
GND
1B
20B
2B
21B
3B
22B
4B
23B
5B
24B
6B
25B
7B
26B
8B
27B
9B
28B
10B
29B
11B
30B
12B
31B
13B
32B
14B
33B
15B
34B
16B
35B
17B
36B
18B
37B
19B
I/O PORT B
UNLESS OTHERWISE SPECIFIED:
-5V
C 8634-5C 8634-5C 8634-5C 8634-5
4-6
J4B
DB37STACKED
2. ALL CAPACITORS ARE IN MICROFARADS.
DS101A DS101B DS101C DS101D
1
I/O PORT C
NOTES:
R29
10K
VR1
LM79L05ACZ
-12V
GND
J4A
DB37STACKED
+5.00V
REF02
A
GND
GND
1A
20A
2A
21A
3A
22A
4A
23A
5A
24A
6A
25A
7A
26A
8A
27A
9A
28A
10A
29A
11A
30A
12A
31A
13A
32A
14A
33A
15A
34A
16A
35A
17A
36A
18A
37A
19A
GND
GND
PA5
1B
14B
2B
15B
3B
16B
4B
17B
5B
18B
6B
19B
7B
20B
8B
21B
9B
22B
10B
23B
11B
24B
12B
25B
13B
GND
GND
GND
GND
GND
PA4
1A
14A
2A
15A
3A
16A
4A
17A
5A
18A
6A
19A
7A
20A
8A
21A
9A
22A
10A
23A
11A
24A
12A
25A
13A
GND
GND
GND
GND
GND
PA3
1B
14B
2B
15B
3B
16B
4B
17B
5B
18B
6B
19B
7B
20B
8B
21B
9B
22B
10B
23B
11B
24B
12B
25B
13B
GND
GND
GND
GND
GND
PA2
1A
14A
2A
15A
3A
16A
4A
17A
5A
18A
6A
19A
7A
20A
8A
21A
9A
22A
10A
23A
11A
24A
12A
25A
13A
GND
GND
1B
14B
2B
15B
3B
16B
4B
17B
5B
18B
6B
19B
7B
20B
8B
21B
9B
22B
10B
23B
11B
24B
12B
25B
13B
J1B
DB25STACKED
PA5 Local power control
NC
Vin
PA4 Local power control
NC
PA3 Local power control
2
PA2 Local power control
U9
1
GND
GND
GND
+12V
PA1 Local power control
GND
GND
1A
14A
2A
15A
3A
16A
4A
17A
5A
18A
6A
19A
7A
20A
8A
21A
9A
22A
10A
23A
11A
24A
12A
25A
13A
GND
GND
B
GND
B
10
DWN
CHK
DW
05-02-05
DP
05-02-05
CM
DW
05-02-05
PE
DP
05-02-05
DISTRIBUTION
K
FILENAME:
IREC
INTERNATIONAL RADIO AND ELECTRONICS CORP.
25166 LEER DRIVE ELKHART, IN. 46514
574-262-8900
WWW.IREC1.COM
TITLE:
SIZE
A
SCH, TRANSMITTER CONTROLLER
DWG . NO .
D
SCALE :
NONE
11
REV
201233-SCH
PROJ NO.
539
A
SHEET
1
OF
12
FM10000 User's Manual
Section 5—Service and Support
We understand that you may need various levels of support or
that the product could require servicing at some point in time.
This section provides information for both of these scenarios.
Service and Support
5–1
5.1 Service
The product warranty (see opposite page) outlines our responsibility for defective
products. Before returning a product for repair or replacement (our choice), call
our Customer Service department using the following telephone number:
(866) 262-8917
Our Customer Service Representative will give you further instructions regarding
the return of your product. Use the original shipping carton or a new one obtained
from Crown.
Please fill out the Factory Service Instructions sheet (page 5–4) and include it with
your returned product.
5.2 24–Hour Support
In most instances, what you need to know about your product can be found in this
manual. There are times when you may need more in-depth information or even
emergency-type information. We provide 24–hour technical assistance on your
product via a toll free telephone call.
For emergency help or detailed technical assistance, call
(866) 262-8917
You may be required to leave a message at this number but your call will be
returned promptly from our on-call technician.
5.3 Spare Parts
To obtain spare parts, call Crown Broadcast Service at the following number :
(866) 262-8917
You may also write to the following address:
Service Manager
International Radio and Electronics Corp.
P.O. Box 2000
Elkhart, Indiana, U.S.A. 46515-2000
5–2
FM10000 User's Manual
Crown Broadcast Three Year Limited Product Warranty
SUMMARY OF WARRANTY
Crown Broadcast, IREC warrants its broadcast products to the ORIGINAL PURCHASER of a NEW Crown
Broadcast product, for a period of three (3) years after shipment from Crown Broadcast. All products are
warranted to be free of defects in materials and workmanship and meet or exeed all specifications published
by Crown Broadcast. Product nameplate with serial number must be intact and not altered in any way. This
warranty is non - transferable. This warranty in its entirety is the only warranty offered by Crown Broadcast. No
other warranties, expressed or implied, will be enforceable.
EXCLUSIONS
Crown Broadcast will not warranty the product due to misuse, accident, neglect and improper installation or
operation. Proper installation included A/C line surge supression, lightning protection and proper grounding of
the entire transmitter, and any other recommendations designated in the Instruction manual. This warranty
does not extend to any other products other than those designed and manufactured by Crown Broadcast. This
warranty does not cover any damage to any accessory such as loads, transmission line or antennas resulting
from the use or failure of a Crown Broadcast transmitter. Warranty does not cover any loss of revenue resulting
from any failure of a Crown Broadcast product, act of God, or natural disaster.
Procedure for Obtaining Warranty Service
Crown Broadcast will repair or service, at our discretion, any product failure as a result of normal intended use.
Warranty repair can only be performed at our plant facility in Elkhart, Indiana USA or at a factory authorized
service depot. Expenses in remedying the defect will be borne by Crown Broadcast, including two-way ground
transportation cost within the continental United States.
Prior to returning any product or component to Crown Broadcast for warranty work or repair, a Return
Authorization (RA) number must be obtained from the Crown Broadcast Customer Service Department.
Product must be returned in the original factory pack or equivalent. Original factory pack materials may be
obtained at a nominal charge by contacting Crown Broadcast Customer Service. Resolution of the defective
product will be made within a reasonable time from the date of receipt of the defective product.
Warranty Alterations
No person has the authority to enlarge, amend, or modify this warranty, in whole or in part. This warranty is not
extended by the length of time for which the owner was deprived the use of the product. Repairs and
replacement parts that are provided under the terms of this warranty shall carry only the unexpired portion of
the warranty.
Product Design Changes
Crown Broadcast reserves the right to change the design and manufacture of any product at any time without
notice and without obligation to make corresponding changes in products previously manufactured.
Legal Remedies of Purchaser
This written warranty is given in lieu of any oral or implied warranties not covered herein. Crown Broadcast
disclaims all implied warranties including any warranties of merchantability or fitness for a particular purpose.
Crown Broadcast
25166 Leer Drive
Elkhart, Indiana 46514-5425
Phone 574-262-8900 Fax 574-262-5399 www.crownbroadcast.com
Service and support
5–3
Factory Service Instructions
To obtain factory service, complete the bottom half of this page, include it with the unit, and ship to:
International Radio and Electronics Corp.
25166 Leer Drive
Elkhart, Indiana, U.S.A. 46514-5425
For units in warranty (within 3 years of purchase from any authorized Crown Dealer): We pay for
ground UPS shipments from anywhere in the continental U.S. and Federal Express Second Day service
from Hawaii and Alaska to the factory and back to you. Expedited service/shipment is available for an
additional charge. You may ship freight collect (COD for cost of freight) or forward your receipt for
shipping charges which we will reimburse. We do not cover any charges for shipping outside the U.S.
or any of the expenses involved in clearing customs.
If you have any questions about your Crown Broadcast product, please contact Crown Broadcast
Customer Service at:
Telephone: (866) 262-8917 or (574) 262-8900
Fax: (574) 262-5399
Name:
Company:
Shipping Address:
Phone Number:
Fax:
Model:
Serial Number:
Purchase Date:
Nature of the Problem
(Describe the conditions that existed when the problem occurred and what attempts were made to correct it.)
Other equipment in your system:
If warranty has expired, payment will be:
Card Number:
Cash/Check
VISA
Please Quote before servicing
Exp. Date:
Return Shipment Preference if other than UPS Ground:
Mastercard
COD
Signature:
Expedite Shipment
Other
ENCLOSE WITH UNIT—DO NOT MAIL SEPARATELY
5-4
FM10000 User's Manual
A B C
Glossary
The following pages define terms and abbreviations used
throughout this and other Crown Broadcast manuals.
Glossary
G–1
A B C
AF
Audio Frequency; the frequencies between 20 Hz
and 20 kHz in the electromagnetic spectrum.
ALC
Automatic Level Control
AM
Amplitude Modulation; the process of impressing
information on a radio-frequency signal by varying
its amplitude.
bandwidth
The range of frequencies available for signalling.
BCD
Binary-Coded Decimal; a digital system that uses
binary codes to represent decimal digits.
BFO
Beat Frequency Oscillator
BNC
A bayonet locking connector for miniature coax;
said to be short for Bayonet-Neill-Concelman.
broadband
As used in the FM transmitter, refers to the entire
audio spectrum as opposed to the spectrum influenced by the pre-emphasis; also called "Wideband."
carrier
A continuous signal which is modulated with a
second, information-carrying signal.
crosstalk
In FM broadcasting, this term generally refers to
the interaction between the main (L+R) and the
subcarrier (L–R) signals as opposed to "separation"
which generally refers to leakage between left (L)
and right (R) channels.
density (program)
A high average of modulation over time.
deviation
The amount by which the carrier frequency
changes either side of the center frequency.
DIP
Dual In-line Package; term used to describe an IC
or socket that has two parallel rows of pins.
distortion
The unwanted changes in signal wave shape that
occur during transmission between two points.
DPM
Digital Panel Meter
EPROM
Erasable Programmable Read Only Memory
ESD
Electrostatic Discharge; a discharge that is potentially distructive to sensitive electronic components.
G–2
FM10000 User's Manual
exciter
FET
(1) A circuit that supplies the initial oscillator used
in the driver stage. (2) A transmitter configuration
which excludes stereo generation and audio
processing.
Field-Effect Transistor
frequency synthesizer
A circuit that generates precise frequency signals
by means of a single crystal oscillator in conjunction with frequency dividers and multipliers.
FM
Frequency Modulation; the process of impressing
information on a radio signal by varying its frequency.
FSK
Frequency Shift Keying; an FM technique for
shifting the frequency of the main carrier at a
Morse code rate. Used in the on-air identification
of frequencies.
gain reduction
The process of reducing the gain of a given amplifier.
harmonics
Undesirable energy at integral multiples of a
desired, fundamental frequency.
HF
High Frequency; Frequencies in the 3.0 to 30.0
MHz range.
Highband
Frequencies affected by the pre-emphasis.
IC
Integrated Circuit
I/O
Input/Output
LED
Light-Emitting Diode
modulation
The process by which a carrier is varied to represent an information-carrying signal.
MOSFET
Metal Oxide Semiconductor Field Effect Transistor;
a voltage-controlled device with high input impedance due to its electrically isolated gate.
nearcast
A transmission within a localized geographic area
(ranging from a single room to a several kilometers).
PA
Power Amplifier
Glossary
G–3
A B C
PAI
Power Amplifier Current
PAV
Power Amplifier Voltage
pilot
A 19–kHz signal used for stereo transmissions.
pre-emphasis
The deliberate accentuation of the higher audio
frequencies; made possible by a high-pass filter.
processing
The procedure and/or circuits used to modify
incoming audio (keeping its level around 75 kHz
deviation) to make it suitable for transmission.
receiver
An option which adds incoming RF capability to an
existing transmitter. See also "Translator."
RF
Radio Frequency; (1) A specific portion of the
electromagnetic spectrum between audio-frequency and the infrared portion. (2) A frequency
useful for radio transmission (roughly 10 kHz and
100,000 MHz).
SCA
Subsidiary Communications Authorization; see
"subcarrier."
S/N
Signal to Noise
spurious products
Unintended signals present on the transmission
output terminal.
stability
A tolerance or measure of how well a component,
circuit, or system maintains constant operating
conditions over a period of time.
stereo pilot
See "pilot."
stereo separation
The amount of left-channel information that bleeds
into the right channel (or vice versa).
subcarrier
A carrier signal which operates at a lower frequency than the main carrier frequency and which
modulates the main carrier.
suppression
The process used to hold back or stop certain
frequencies.
G–4
FM10000 User's Manual
SWR
Standing-Wave Ratio; on a transmission line, the
ratio of the maximum voltage to the minimum
voltage or maximum current to the minimum
current; also the ratio of load impedance to intended (50 ohms) load impedance.
THD
Total Harmonic Distortion
translator
A transmitter designed to internally change an FM
signal from one frequency to another for retransmission. Used in conjunction with terrestrial-fed
networks.
satellator
A transmitter equipped with an FSK ID option for
rebroadcasting a satellite-fed signal.
UHF
Ultra High Frequency; frequencies in the 300 to
3000 MHz range.
VCO
Voltage-Controlled Oscillator
VHF
Very High Frequency; frequencies in the 30 to 300
MHz range.
VSWR
Voltage Standing-Wave Ratio; see "SWR."
Wideband
See "broadband."
Glossary
G–5