1
Samsung
SMARTCAMCORDER
USeR
UA_
HMX ©20BN/HMX
©20TN/HMX
©20RN
HMX Q200BN/HMX
Q200TN/HMX
Q200RN
HMX QF20BN
Important ¢afeCyincVuotion¢
4
Follow all instructions,
5
Do not use this apparatus
CAUTION: TO REDUCE THE RISK OF ELE©TRIC SHOOK.
6
Clean only with dry cloth,
DO NOT REMOVE COVER (OR BACK}
NO USER SERVIOBS,BLE PARTS INSIDE REFER SERVICING TO QUALIFIED
7
Do not block any ventilation openings, Operate in accordance
with the manufacturer's instructions,
DO NOT OPEN
SERVICE PERSONNEL,
This symbol indicates that dangerous
voltage constituting a risk of
electric shock is present within this unit.
This symbol indicates that there are important operating and
VVatt tg
To Reduce The Risk Of Fire Or Electric Shock, Do Not Expose This
Apparatus To Rain Or Moisture.
Cauto
Apparatus shall not be exposed to dripping or splashing and no
objects filled with liquids, such as vases, shall be placed on the
apparatus,
To disconnect the apparatus from the mains, the plug must be pulled
out from the mains socket, therefore the mains plug shall be readily
operable.
1
Read these instructions.
2
Keep these instructions.
3
Heed
all warnings,
near water,
Do not place near any heat sources such as radiaIors, heat
registers, stoves, or other apparatus (including amplifiers) that
produce heat,
Do not defeat the saft_ty purpose of the polarized or grounding-type plug. A polarized plug has two blades with one wider than
the other. A grounding type plug has two blades and a third
grounding prong. The wide blade or the third prong is provided
for your safety, If the provided plug does not fit into your outlet,
consult an electrician for replacement of the obselete outlet.
10 Protect the power cord from being walked ors or pinched
particularly at the plug, at wall outlets, and at the point where the
cord exits from the apparatus.
11 Only use attachment/accessories
specified by the manufacturer,
12 Use only with the cart, stand, tripod, bracket, or
table specified by the manufacturer, or sold with
the apparatus, When a cart is used, use caution
when moving the cart/apparatus combination to
avoid injury from tipow_r,
13 Unplug this apparatus during lightning storms or when you leave
it unused for long periods of time.
Impo_¢ant safety instnJctions
14 Refer all servicing to qualified service personnel, Servicing is
required when the apparatus has been damaged in any way,
such as when the power supply cord or plug is damaged, liquid
has been spilled or objects have fallen into the apparaIus, the
apparatus has been exposed to rain or moisture, does not
operate normally, or has been dropped,
15 Do not expose this apparatus to dripping or splashing. Do not
put objects filled with liquid, such as a vase, on this apparatus,
18 GROUNDING OR POLARIZATION:
This CAMCORDER may be equipped with either a polarized
2-wire AC line plug (a plug having one blade wider than the
othe o or a 3--wire grounding type plug (a plug having a third pin
for grounding). II you are unable to insert the plug fully into the
outlet, try reversing the plug, If the plug still fails to fit, contact
your electrician to replace your outlet, Do not def_)at the safety
purpose of the polarized plug,
19 POWER-CORD
16 VENTILAIION:
Slots and openings in the cabinet are provided for ventilation to
ensure reliable operation of the CAMCORDER and to protect
it from overheating, These openings must not be blocked or
covered, Never place your CAMCORDER ors a bed, sofa, rug,
or other similar surface or ors or near a radiator or heat register,
This CAMCORDER should not be placed in a built--in installation
such as a bookcase or rack unless proper ventilation is provided
or the manufacturer's instructions have beers adhered to,
17 POWER SOURCES:
Operate the CAMCORDER using only the types and sources
of power indicated ors the label, II you are not sure of the type
of power supplied to your home, consuk your local power
company. This CAMCORDER is intended to be powered by
a rechargeabb battery or by its power supply, Ref_)rto the
operating instructions.
PROTECTION:
Route power supply cords so that they are not likely to be
walked ors or pinched by items placed on or against them, Pay
particular attention to the plug, areas around wall outlets, and
the point where the cord exits from the unit,
2O LIGHTNING:
To protect the CAMCORDER during a lightning storm or when
you leave it unattended and unused for long periods of time,
unplug it from the wall outlet, This will prew_nt damage to the
CAMCORDER due to lightning and powerline surges,
21 OVERLOADING:
Do not overload wall outlets and extension cords as this can
result in a risk of fire or electric shock.
22 OBJECTS AND LIQUIDS:
Never push objects of any kind into the CAMCORDER through
the openings in its case. The objects may touch dangerous
voltage points or short out a part that could result in a fire
or electric shock. Newer spill liquids of any kind onto the
CAMCORDER, Should spillage occur, unplug the unit and have
it checked by a technician before use,
Impo_¢ant safety instnJctions
23 SERVICING:
25 REPLACEMENT
Do not attempt to service this CAMCORDER yourself. Opening
or removing the covers may expose you to dangerous vokage or
other hazards. Refer all servicing to qualified service personnel.
24 DAMAGE REQUIRING SERVICE:
Unplug this CAMCORDER from the wall outlet and refer servicing
to qualified service personnel under the following conditions:
a. When the power-supply
26 SAFEI_
cord or plug is damaged.
27 To prevent damage which may result in a fire or shock hazard,
do not expose this appliance to rain or moisture.
If the CAMCORDER has been exposed to rain or water.
d. If the CAMCORDER does not operate normally when you
follow the operating instructions. Do not continue to adjust
the controls. Improper adjustment of the controls may result
in sew_re damage. If this occurs, it will often require extensive
work by a qualified technician to restore the CAMCORDER
to its normal operation.
e. If the CAMCORDER
damaged.
f.
CHECK:
After the CAMCORDER has been serviced or repaired, ask
the service technician to perform safety checks ors the unit to
confirm that the CAMCORDER is in safe operating order.
b. If any liquid has been spilled onto or objects have fallen into
the CAMCORDER.
c.
PARTS:
When replacement parts are required, be sure the service
technician has used replacement paris specified by the
manufacturer that have the same characteristics as the original
part. Unauthorized substitutions may result in fire, electric shock
or other hazards.
28 Before using the power supply with a 240V AC wall outlet,
attach a plug adaptor that matches the design of local wall
outlets to the power supply's plug.
has been dropped or the case has beers
When the CAMCORDER exhibits a distinct change in
performance.
iv
bspo_¢ant safety instructions
USER
INSTALLER
CAUTION:
Your authority to operate this FQC certified equipment could be voided if you make
changes or modifications not expressly approved by this party responsible for
compliance to part 15 FCQ rules
NOTE:
_
B_,MP(S) INSIDETHIS PRODUQT QONTAIN IvlERQURY AND MUST
BE RECYQLED OR DISPOSED OF AQQORDING TO LOQAL STATE
OR FEDERAL bs,V\/S For details see lamprecycle,org,
eiae org, or call
1 800 Samsung (7267864)
CAUFORNIA
USA ONLY
This Perchlorate
warning
Dioxide) Lithium coin cells
California USA"Perchlorate
applies
only to primary
CR (Manganese
in the product sold or distributed
ONLY in
Material - special handling may apply, See
www.dtsc.ca.gov/hazardouswaste/perchlorate".
N()/
This equipment has been tested and found to comply with the
limits for a Class B digital device, pursuant to part 15 of the FCO
Rules,
These limits are designed to provide reasonable protection against
harmful interference in a reside_tial installation,
This equipme_t generates, uses and can radiate radio
frequency energy and, if not installed and used in accordance
with the instructions, may cause harmful interference to radio
communications, However, there is no guarantee that interference
will not occur in a particular installation,
If this equipment does cause harmful interterence to radio or
television reception, which can be determined by turning the
equipment off and on, the user is encouraged to try to correct the
interterence by one or more of the following measures:
Reorientor relocatethe receivingantenna, Increasethe separationbetween
the equipmentand receiver
Qonnectthe equipmentinto anoutlet on a circuitdifferentfromthat to which
the receiveris connected
Qonsultthe dealeror an experiencedradio/TVtechniciantor help and tor
additionalsuggestions The user may findthe followingbooklet prepared
by the FederalQommur/icationsQornmissionhelpful:"How to Identityand
ResolveRadioTVInterterenceProblems" This Bookletis availablefrom
the US, GovernmentPrintingOffice, Washir/gton,DO, 20402. Stock No,
004 000 00845 4
::CCVVar
<3
The user is cautioned that changes or modifications not expressly
approved by the manufacturer could void the user's authority to
operate the equipment,This device complies with Part 15 of FCO
Rules, Operation is subject to the following two conditions:
(1)This device may not cause harmfulinterterence,and
(2)This device must accept any interterencereceived, includinginterference
that may cause undesired operation
Before reading thi¢ ucer maqual
Before
reading
this
user manual,
review
the following.
Precautions
Safety warnings
Warning!
•
/_"
Warning
There
qury. s a potentla nsk of death or sel ous
(_
Caution
There
sa
a nsk of personal injury or
damage
topotent
the product.
•
When using the AO power ac arxor WITrlyour camcoraer, conDecI
rne aaaDtor to an outer_ wtr/protecTive grounqlng
Do r/or expose the camcoraer Da_er} to erect sun Ignr, neaier8
raalator._ fire. or a
}ther source of excessive heat
Caution
f you replace
Icons used in this manual
exp]osloH.
Caution
To reduce the risk of fke, explosion, electric
shock, or pelsonal injury when using your
camcolder,
follow these basic safety
The battery
Replace
tot
rtCo/t;;/Pcl
Do not
Note
you will find helpful when
camcolder,
Here a_e additional
Definition
definitions
you will find helpful when
camco_der.
references
you opelate
the
or information
you opelate
the
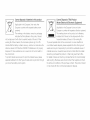
Tlqese warning icons are here to prevent injury to you and others or to
help you operate your camoorder belier, Please follow them explicitly,
After reading this section, keep it in a safe place for future reference.
oa_ery,
battery
yOL sar cause
or an equivalent
a_
ty be
f you p ug the AC adaptor st(} a 240V AC outlet, De St re to use a
su table p ug aaa >tot tnat maTcnes The aesgn of )ca wa outlets
precautions.
Here a_e hints or page number
WTD 1.he Wrong
only WITr/The same
reoora
_,snqn,_._
vlaeos
arid
photos
of oeoole
WKnOUt
tnelr
ahc_" )nTatlorl
or oonsent
e
De net
record
vlaeos
ana
c sotos
in torbidden
Do not
record
videos
and
snotos
_n onvate
record
E aces
qg E aces,
Befo_'e reading this t,sse_manual
hmportant infonmation on use
Thank you tot purehasing this Samsung Camcorder. Please read this
user manual carefully before you use the camcorder and keep it handy
for future reference, Should your camcorder fail to opert_te correctly,
refer to Troubleshooting, ,mpages 108-- 120
This camcorder records video in H.264 (MPEG4/AVC) format.
• You can play back and edit the video recorded by the
This User Manual covers HMX-Q20, HMX-Q2O0, and
HMX-QF20 models,
• Illustrations of model HMX Q20 are used in this user mar/ual,
•
Please note that this camcorder
digital video formats.
•
Before recording an important video, make a trial recording.
Play back your trial recordir/g to make sure the video and audio
• The HMX OF20 has the wireless networking function. "-,pages 72,-80
Although some features of HMX Q20, HMX Q200, and HMX OF20
are different they operate in the same way,
• The displays in this riser manual may not be exactly the same as
those you see on the LGD screen,
• The design and specifications ot the camcorder and other
accessories are subject to change without notice,
• Before use, read the 'Safety information' carefully and then opert_te
the product properly,
• In this manual, a 'memory card (card)' means an SD, SDHG, or
SDXC,
•
In this user manual's function description tables, the icon shown in a
description of a subrnenu item indicates it will appear on the screen
when you set the corresponding function,
Ex) Tele Macro Subrnenu item "-,page 97
On (_): Set to record close up images dvery small objects,
If set to On, the corresponding icon (,_,) will appear on the screen.
• Samsung is not responsible for any injury or damage caused by not
foNowing the user manual.
camcorder on a personal computer
software of this camcorder.
"
using the internal
is not compatible
with other
have been recorded properly.
Recorded contents may be lost due to errors in handling
the
camcorder or memory card, etc.
Samsung will not provide compensation for damages caused by
the loss of recorded contents.
•
Make a backup
of important
recorded
data.
Protect your important recorded data by copying the files to a
PC. We also recommend you copy them frorn your PC to other
recording media for storage, Rder to the software installation and
USB connection guide,
• Copyrights:
Please note that this camcorder
individual use only.
is intended
for
Data recorded on the storage media in this car-ncorcler using other
digital/analog media or devices is protected by the Copyright
Act and cannot be used without permission of the owner ot the
copyright, except tot personal enjoyment. Even if you record an
event such as a show, performance, or exhibition for personal
enjoyrT/ent, we strongly recommend that you obtain permission
beforehand.
Befo_'e reading this use_ manual
• The wireless version of this camcorder may emit radio
interference. Avoid using it near pacemakers
and similar
medical equipment.
Always use caution when transfering files via Wi-Fi. There is
a danger that your data could be intercepted.
Take the appropriate
security precautions when using
wireless network products. Sarnsung is not responsible for
ar V damages that may arise from seeunty problems caused by
the failure to imp]emer/t security measures or from unavoidable
circumstances associated with the use of a wireless network.
•
For Open Source licenses information,
'Opensource-Q20.pdf'
in the provided
refer to the
CD-ROM.
All the trade rlames and registered trademarks mentioned in this
manual or other documentation provided with your Sarnsung
product are trademarks or registered tradernarks ot their respective
holders. Furthermore, 'TM' and '_' are not rnentioned in each case in
this rnar/uak
The SD, SDHO and SDXG Iogos are tradernarks of SD SO, LLG.
Microsott®, Windows _, Windows Vista _, Windows ® 7, and
DirectX_ are either registered tradernarks or trademarks ot the
Microsott Corporation in the United States and/or other countries.
InteP, Gore TM, Core 2 Duo ® and Pentiurn _ are the registered
trademarks or trademarks of the Intel Corporation in the United
States and other countries.
AMD and Athlon TM are either registered trademarks or tradernarks
of AMD in the United States and other countries.
Macintosh, Mac OS are either registered trademarks or trademarks
of Apple Inc. in the United States and/or other countries.
YouTube is a trademark of Google Inc.
,
,
,
Flickr is a trademark of Yahoo,
Facebook is a trademark ot Facebook Inc,
Twitter is a trademark ot twitter Inc.
,
,
Picasa is a trademark of Google Ino,
HDMI, the HDMI logo and High Definition Multimedia Interface are
trademarks or registered tradernarks of HDMI Licensing LLO,
Adobe, the Adobe logo, and Adobe Acrobat are either registered
trademarks or tradernarks ot Adobe Systems ]ncorporated in the
United States and/or other countnes,
,
,
Wi Fi®, the Wi Fi CERTIFIED logo, and the Wi Fi logo are registered
trademarks ot the Wi Fi Alliance,
,
AIIShare TM is a Samsung's trademark.
afet
"-'h
The safety
/
information
'
pfeccquIloNs
'
I JSII sJtea D@OW sl'e to Dfev@NI D@reoNsI INjury 0[ meter al aaFNages=
Do not overload outlets or ex_ens o
cores as mJs ms esut IN aDnorma
neat or tire
No sand or dust! Fne sane or ausl
cause them to matunoIlOr
Do not bend the ,ower oorxJ or
damage the AC power adaptor by
press ng on t wm a heavy ODJeC_.,_
aamagea power cars or power supp !
carl cause a tire aNC )oses a risk ol
eeol 3 snoc
us rig me camcoraer
IN®®G 8! INSI_UCIIONS )E]r@tL/I
at _em )erasures
Do not alow water me_aJo_
afammab e matter to _nter the
carqcoraer or AC )ower aoaDt@
temps ature ma, cause an exDioson
Dang
No o I! Oil enter ng role oamcorser o
s,C power adapt@ can damage bat
units cause mem to matunotJon ant
Doses _ sk of sect s snook
Do riot am tee eamooraer alreot y INK
the sun. Dot j so couJa cause eye
ajures ana cause nterna )arts ofthe
sduot to maltunc_lon
Do not d scar sect the AC adap_or D_
pulling on its Ic)wer cold. Th s ca
Do not use the AC adaptor t t has
aamage the )ower cora
5
SO
aamagec
me,
DOSE
a
tie
sazai_
._sl_ or DroKeri oo_as
Never use dean ng tluid or slmlJar
cnemlcas tc sear me camcoraer
Datte%
Ree } the canlcorxser awa trom
181aeIRe camcor@er can cause ittc
maltunctlon anc }oses a rak ot electric
ST'lOOK
to exDioae.
["""'7
Do not p ug in or unr ug me power
cord wth wet hands. You c su d
_
recei .........
trsshoc
vvnen c[eanlr _ the AC adaptor, unplL ]
the _)wer cord, Leaving the adaptc
Do not spra} seaners erect
)n me
eameorder. Do ng sc may pose a tire
nazarc
Reed me usea m um papery o_
memo% sa@ out ot the reach ot
ci dren. It the m um Dasery i
memo% _arrJ Is svva_JoweaDy a OS C
COnSUI a an} SlOlaRimmea ate,
It the carncorder
emirs an aDNorm,_
sauna or sme or smokes, ur plug
suppy or ounng ignmlng storms
There s a usa aTtire
sere/ice center. There s a r sk ot fire c
per soR_
It the camoorder
mal_nctlorls
s_mea ate y cetach the AC adaptor c
baser! trom the camcorder, Ther9 is a
rsk ot I _ or InJury
To avo a a rsk of tire or e ectrio snocK
ao riot ase_ K to a sassemDl8, reo8
or modly the carncorae or the AC
aaaDto
3
1ju['}
Do not )res _tne SL "race ot the LCD
)u carl cause else a, unevenness
or
aamage me olspJay,
Do not droo or exE Dse trie camcorae_
battery, AC adaptc
or omer
accessones _o severe viBraTions or
]1Boot, Severe vlbrat on or _]-pact can
cause tnese terns to me?unction aria
Do not Jse me camcoraer on a tr Boa
Dt SUBBIJea)In a E ace where t is
suBjeo_ to severe vBra_ Dn8 Drimpact,
_eaa to DersonaJ injury,
Do not use tne camcorser
SUnllC
-it or
near
neat
ng
n a reo]
Do not leave
closed
eeuJomen_
E,xoess heat carl cause t_ B camcor_le[
to maltunoton aria eaa tc persona
tne camooraet
veh c e tc
_ne temDeta_ure
} Io Lc time
n a
where
Do not e> Dose me camcorser to soo_
c _teaFr Thioksoc[orsteaR_oouJc
carnage tne camcorser
a maltunct or
LS very n gn
case x cause
Jury,
Do not use the cameo aer near eense
or olesel
engl
so me}
_'c
Doin,c
_ermna8,
Doe tne
alsaBJng
ex[ernal
scram
Do not put me camcoraer
the LCD s xeen ooen
or interns
operatJor
aovvn wll
Do not e> }ose tne camcoroer ic
Do not e> }ose me can]corset
-_sec<looe, _risec<cae entel ig triE
camcoraer coum cause _ne oroauot _o
< eerate aBnorma
Turn the
camcorder off and cove t wm vr
sneel etc. betore using inseotlcia_
sueaen cnanges 1_emBeraturs
or n gn numml W, Jse car9 wnen
<oe[atlng the camcorser ou<eoors
during a llghtn ng storm. Raplc
Do not w De the oarMoor]er
Doay
Benzene
or in /net, The _ eerier
D< not leave the LCD screen c )er
coati/g
oouJc
Wits
peel off or the Sb race
oou e ee_erloF_te
tc
_empe[a_ure cnanges one n gb
numleJty can eamage [ne camcorse
ano gntnJng storms Bose tne i 9at ot
e_ectrc snoc
vnen no_ us ng _ne camcoraer
Do
not
hold
the
camooroe
bythe
LCD
monitor
when
ltng
t.The
LCD
scrgen
couJa
ae_acn
ana
_ne
camcoraer
ma,
ta
Do
not
use
the
oarnoordey
near
aTV
orrado:
TsoouLa
cause
olstortLor
cqthe
TV
screen
ornterterenoe
inthe
raa
oDroaaoas_e
Do
not
use
the
camoorder
nea
eouroes
ofstrong
_a
owaves
c
magnetism
SUCh
as
s
oeaKers
or1at
je
motors.
No
setrc_these
sources
cDu
ca
astort
_ne
v]ecDaua
r oyoL
are
reoc
]F_
Use
Samsu
gapt}yea
aocessone&
only,
using"
)roduets
trom
othe
manutaoturgrs
may
tceec_rc
overheating,
tre,
exeao
)OS_OF
snook
ol}ersonal
njunes
oauseo
Dy
aDnolmaJ
operation
Place
the
oamcorser
onastaD_e
surtace
that
sweven_
la_ec
Sto_e
]Tpor]an_
aa_a separate% trom
the camoorder on a PC DVD disc CD
Only p ug the adaptor p ug nto a
SOCKeI_rla_ s eas accessible. If an
Manutacturers
E DDlem OCOUrSWIR in6 )rocauo] yOL
must pull _rle p ug out ot the socket
[o a soonneo_ tne Dower oomp e_ey.
Turrlirlg olt the Do/!ver Du_on O/
_FleE Dauo_aoes no_comple_e_
c eeonneo_ _ne DOW6
also etc. Samsunc_ is not resoo/-isi )le
tot data loss
ot unauthorizec
aooessones oo_ noatlDle wl_n _rlls
oamooraer are res_ 0nsible tot the
owr- Droauet8, use _rle ootonal
aocessones acoors 1_zo tnel
satet% nstruotlons. Samsung is no]
rgsoc _sibe tor ans _altunctons to
tirgs or eec_ne snooks c tot damage
causea oy unau_nor zea accesso les
B
Conten
G_ing _a_ed ..............................................
Ur_packing
Camcorde_
.....................................
_2
ayec_ ................................
13
Iwsodlr_7/_ i_';', ng the b_!_:te_y arid memory, card .................
Ir/sert ng/ejeet ng the battery ....................................................
Ir/sert ng/eject ng a mernory card (not supped)
........................
Cha_f:_ ng the batte_'y .........................................................
Checking the battery state ......................................................
T}_m r_g ye_s_ camcordor
U:si_f_ the to:sc-h screc_
Pedo(m
orWcff .....................
15
15
16
20
21
.......................................................
2b
24:5
........................................................
29
Learn ng _cons ................................................
30
Using the Home screen ..................................................
34
Accessng the Home screen ...................................................
bons on the Horne screen ......................................................
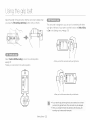
U'_ir_g the gdp bell ...............................................................
B_sic [__ndions ..............................................
Record
rig \/ideos
Usinf_ the Manual modes .........................
White Ba ar/ce .......................................................................
45
45
EV (Exposde Value) ................................................................
Back Ught ..............................................................................
Focus ....................................................................................
46
47
48
Super C.Nite ..........................................................................
Selt 3met ...............................................................................
49
50
Cont Shot .............................................................................
50
Using the A_t Fire modes ....................................................
Fader .....................................................................................
51
51
D_g_aJEffect ...........................................................................
52
24
ng the niHa} seh,_p .........................
S¢_lec-I ng the lang,}age
11
.................................
34
34
35
36
37
Recording videos n portrait mode ...........................................
39
Tagging great moments whlb record rig (My Cip tunct oil) ........ 40
Urging the A_t Tree Lapse
mode ..........................................
P!nybncki[ iJi/ir_i7............................................
Vleww_:_ \4cos
or photo'_
n [_!ayback
mode ..........
53
55
5r_
Starting the #aybaek mode .....................................................
56
Play rig baek_deos
57
................................................................
Tagg ng great moments during payback. .................................
60
View rig photos .......................................................................
61
Edit r_g \/ideos
or photos
.....................................................
63
Share (HMX QF20 enly) ..........................................................
D_ete ....................................................................................
63
65
Record
rig phe_<_ ................................................................
41
D_ete My Oip ........................................................................
66
Record
ng _vSth ease fc
42
My O© Creatlen .....................................................................
Protect ...................................................................................
66
67
Smart BGM ............................................................................
67
Divide. ....................................................................................
68
be@nne_s (SMAHI
Zoom ng .......................................
AI iT@ ......
43
Contents
Combine ................................................................................
69
File Into ...................................................................................
70
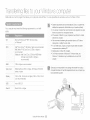
l_asle
fes
o yo_
Nindovvs
corT p £e
88
89
Transferring files by connecting the camcorder as a removable
disk ........................................................................................
93
,,/irele............
ne/work,'HL,/X(]F2() only) ................ Tl
Cornnct
gloaWIANandcorfgsrngnetworksett/gs
Connecting to a WLAN ...........................................................
[rg
Transferring files with Intelli studio ............................................
72
72
5ielliniTs ........................................................
Configurir/g the network seltings ..............................................
Manually setting the IP address ...............................................
73
74
_ ettings enu
...................................................................................................
9Q
Accessing the settings menu ..................................................
96
Network connection tips .........................................................
75
Shooting ................................................................................
97
Enterirlg text ...........................................................................
75
Playback ................................................................................
Display .................................................................................
98
101
Connectivity ..........................................................................
General ................................................................................
103
104
Usngv:,/eoor
pl_oosha_ngwe
s/es .............................................
76
Accessing a web site ..............................................................
76
Uploading videos or photos .....................................................
76
Vewrgvdeoso
Usng
Auto
p_(t(so
Backup
a lVLnke/aDed
to send videos
opt
IV ..................
77
otos
Appendi×es .................................................
78
.................................................................
Installing the program for Auto backup on your PC ...................
78
Warning icons and messages ...............................................
Sending photos or videos to a PC ...........................................
78
Symptoms and solutions .......................................................
About the Wakeup on LAN (%/O/) feature ................................
79
lJsinfl with o/hot
:lovi )ca ................................
(}ornect
g ca IV
Connecting to a high definition TV with HDMI ...........................
_)1
83
Viewing on a TV screen ...........................................................
84
P_tngp
I( VCR or DVD/HDD
o/osw/haPctBrdgep_otopr_te
Usrg
82
82
Connecting to a regular TV ......................................................
D,_bD r g vdeos
M::_rte
eco dens .........................
_:>
................
86
10
ace
yo,_ can_co tier aboad
95
107
108
108
114
121
...............................................................
123
Glossa[y
..................................................................................................................
124
{:)ecfca
ons .....................................................................................................
125
Getting Started
Learn
about
your
Unpacking
Camcorder
camcorder's
Layout,
icons,
and home
screen.
...........................................................................
layout ................................................................
qserting/Ejecting
the battery
and memory
card .................
ser_ng/ejectlng the battery ....................................................
ser_ng/ejectlng a memory card (riot suppl ed) ........................
Charging
the battery ............................................................
3hecBng the battery state ......................................................
Turning
your camcorder
Using the touch
Performing
Selecting
Learning
screen
on/off ............................................
12
13
15
15
16
20
21
24
.......................................................
25
the initial setup ..................................................
28
the language
........................................................
icons .....................................................................
Using the Home screen .......................................................
/<ccess ng the Home screen ...................................................
ons on _ne Home screen ......................................................
Using the grip belt ...............................................................
29
30
34
34
34
35
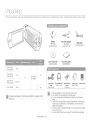
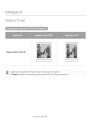
Unpacking
Your new camcorder comes with the following accessories.
If any of these items is missing from your box, call Samsclng's Customer Care Center.
(AD43-00197A)
(AD44-00151A)
0
User
manual
CD
Quiok
(AD46_OO428A)
HMX Q20BN
HIVIX Q200BN
Black
Titan
HMX
Q20TN
HMX
Q200TN
HMX
Q20RN
X20 iOptical)
X40 (Digital)
Red
HIVIX Q200RN
HMX QF20BN
guide
No
No
Wine
start
(AD68_D6831A)
Black
Audio/Video
cable
(AD39 00184A)
Yes
_]'
t_
@/Although
seine featu(es of the models ace diffelTent, they ope[ate in the
_!,_
same way,
Getting Started
]2
•
Micro HDMI cable
(AD39 00179A
External battery
charger
(IA BCeUA4)
Carrying case
(AD69 O9929A)
Memory
card
Th .....
t appearar/ce
of each item may vanj by model,
The conterlts may vary depending
on the sales region,
i
You ca n purchase
dealer.
®
SAMSUNG
parts
and accessories,
o
A memory card is not inclt]ded, See page 1_ 10r memory
with your camcorder,
"/our carncorder
includes the user marlual CD and printed
is not responsible
for reduced
Consul t YOUr !ogal Samsung
baltery
life time or mal£unctions
cards
compatible
quick start guide,
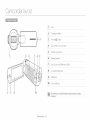
Camoorder layout
s
{_
Lens
Charging indicator
} Horn÷
(O) button
4
LCD screen (Touch screen)
_}
Internal microphone
t
6
}
Internal speaker
7
Jack cover (AV/HDMI/rnicro USB)
8
AV (Audio/Video) jack
t ......
micro
U_jack
iloi
Getthg Started
]3
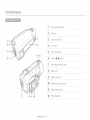
Ca,mco_de_ layout
1
Lens open/dose switcln
Gripbelt
S
s
Jack cover (DO IN)
DO IN jack
Zoom (T/VV) button
(
}
(7
lVly Clip (_/_)
button
Recording start/stop buSon
Battery slot
Memory card slot
i0"
ii
7
,s,
10
/
!_1
Getting Started
]4
Sattery/Memory
card cover
Battery release switch
Tflpod
Feceptac,e
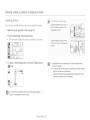
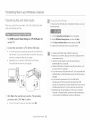
Insei ting/Ejectingthe battei ! and memoir! calrd
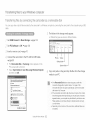
Inse_rtin{_/eiectin{_the batte_ry
Battery release switch
.......
Slide, and then open the battery slot cover as shown
in the
7 Slide, and then open the battery slot cover as shown in the
figure.
figure.
Insert the battery into the battery slot until it locks.
Slide the Battery release switch
!}_ Close the battery slot cover.
:_
Close the battery slot cover.
Purchase extra batteries to allow continuous use of your oarnoorder,
Getting Started
in the direction
figure, and then pull out the battery.
Make sure that the SAMSUNG logo is facing down and the
battery is placed as shown in the figure.
]5
shown
in the
Inse_ting/Eiecting
the batte_y and memo_'y card
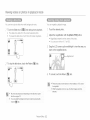
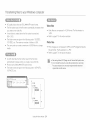
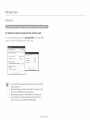
Inselrtin_/eiectin_ a memory cared{not supplied}
......
','i <,.,._£
s
7
Slide, and then open the memory
card cover as shown
in
7 Slide, and then open the memory
the figure.
Insert the memory
card into the card slot until it softly clicks.
Gently push the memory
Make sure that the label portion of the card is facing Lip and the
camcorder is placed as shown in the figure.
:_
Close the memory
card cover as shown in
the figure.
i_
card cover.
Getting Started
]G
Close the memory
card to eject it,
card cover.
Inserting/Ejecting
the battery and memory ca,_d
• You can use SD SDHC, and SDXC cards with this camcorder, We
recornmend you use an SDHC card, This camcorder supports SD
cards up to 2GB. We cannot guarantee normal oper_tion with SD
cards bigger thar_ 2GB,
Terminals
MMC (Multi Media Card) and MMC Plus are not supported.
Cornpatible memory card capacity:
SD: 1GB--2GB
SDHC: 4GB--S2GB
SDXC: ,-Lip to 64GB
<BD>
Whet/you use unauthorized memory cards, the camcorder cannot
record videos correctly and your recordings may be lost.
The mernory cards released alter the release date of this camcorder
may not be compatible with the camcorder,
• To ensure stable operation, use 6MB/S (Class 6) or above memory
cards,
SD/SDHC/SDXC rnemory cards have a mechar/ical wnte protection
switch, Setting the switch prevents accidental erasure ot files
recorded on the card. To enable writing, move the switch up in the
direction of the terminals. To set write protection, move the switch
down,
SDHC/SDXC cards are a higher version of SD memory cards arid
provide more rnernory capacity than SD rnernory cards.
SD cards can be used with current SD enabled host devices,
Getting Started
]7
<SDHC>
<SDXC>
Inserting/Ejecting
•
the battery and memo_'y ca,_d
Damaged data may not be recoverable. We recommend you make
a back up of important data separately on the hard disk of your PC.
Turning the power off or removing a memory card during an
operation such as formalting, deleting, recording, and playback may
cause data loss.
If you modify the name of a file or folder stored in the mer//ory card
with your PC, your camcorder may not recognize the modified file.
The memory card does not support any data recovery mode.
Therefore, care should be taken in case the rr_emory card is
damaged while recording,
Make sure to format the memory card on this camcorder, If the
memory card had been formatted by a PC or other device, using
it on this carncorder without reformatting it on the camcorder may
result in trouble with recording and/or playback. Samsung is not
responsible for damage to recorded contents caused by a failure to
format the memory card properly.
You have to format newly purehased memory cards and memory
cards with data that your camcorder cannot recognize or with data
saved by other devices, Note that formatting erases all data on the
memory card and deleted data cannot be recovered,
A memory card has a certain life span, If you cannot record new
data, you have to purchase a new mernory card.
Do not bend, drop, or subject the card to strong impacts,
Do not place foreign substances on the memory card terminals,
Use a soft dry cloth to clean the terminals if required.
Do not paste anything other than the label provided with the card
on the label pasting area of the card.
Do not use a damaged memory card,
Be careful to keep the memory card out of the reach of children,
who might swallow it.
The data storage speed of cards may differ, depending on the
manufacturer and production system,
SLC (single level cell) system: taster write speed enabled.
MLC (multi level cell) system: only lower write speed is
supported,
For best results, we recommend using a memory card that
supports a faster write speed.
Using a lower write speed memory card for recording video may
cause difficulties when storing.
You may even lose your video data during the recording. In an
altempt to preserve every bit of the recorded video on a low speed
card, the camcorder forcibly stores the video on the memory card
and displays a warning:
Low speed card, Please record at a lower resolution.
If you are unavoidably using a low speed mernory card, the
resolution and quality of the recording may be lower than the value
you set. _page 97
The higher the video resolution and quality, the more memory the
camcorder uses,
We recorrlmen d using a memory card case to avoid data 10ssthat
can be caused by m0ving the card or by static electric!ty,
,,
Getting Started
]
Alter a period of USe, the memo!}/card
and is not a malfunction,
may get warm, Th!s is normal
Inse_ting/Eiecting
the batte_y and memo_'y card
1GB _ 1,000,000,000
as the internal
Full HD 1080/60i
7
14
30
61
123
247
497
HD 720/60p
10
21
42
86
174
349
702
Web/HD
9
19
40
81
167
336
665
bytes
firmware
: Actual
formatted
uses a portion
capacity
may be less
of the memory.
The higher the qua!ity and r÷sq!utign_ the mors memory the
carrlcotder uses.
Lower resolut!en and qua!lty !ncreases the record!ng t!me, but the
-
The bit rate automatically adjusts to the image be!ng recorded.
.................................................................
*
(Unit: Approximate minutes of recording)
may vary.
Memory cads bigger than 64GB may not operate normal!y.
The maximum video file size is 1.8GB. When a video fi!e exceeds
1.SGB, a new video file is created autornat!cally
The maximum number of recordabb
Rhqto and video files is 9999,
respectively.
The reco]d!ng
settings.
5.3M 3072X1728
878
1847
2832
5770
9999
9999
9999
2M 1920X1080
1097
2309
4602
9352
9999
9999
9999
(Unit:Approximate
numberofimages)
Getting Started
]9
length of Art T!me Lapse may vary depend!ng on
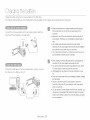
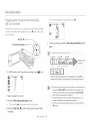
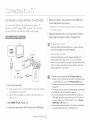
Gharging the batteIV
Charge
the
The charging
battery
using
indicator
the AO power
adaptor
lights up and charging
or the
starts.
USE_ cable.
After the
battery
is fully charged,
the
,,
Connect
the A© power
plug the AO Power
adaptor
adaptor
to the camcorder
properly,
and then
charging
indicator
turns green,
Make sure that there at6 no Torelgn suDaranoe8 on the plug a s
the soar et when DUconnect the AC ec !er supply to the
cart ¸3orDer
Make sure tc turn err tne cams srder before discomecting
in the wall outlet,
oowe
the AC
adaptor, Otherwnse. you cars aamage tne siorage meaEa or
data.
•
use a lsearE ..all ot tlet 'when using the AC power adaptor
Disc )nneet tne A© Dower aaaDtot lrors the wall outlet imrned arely •
_ny
mahl_eetlON
Occurs WNIleUS 9g _ ur eamooraer,
_o riot DioDe the AC Adaotor it/a coetlned space £/neN you use It
st cn as Dewveen a wall aria a xece of turn_ure
I_
e
?Vhen charging if both the USB cat e and AC Dower adaptor ate
connected, the AC Dower aaaDtor wl override the USB
YOUcannoi o berale the camcorder using USB power c sly use the
AC Dower adaptor or basery to power ins canlcolaer
USB snarglng tlrrle may aeper :_cn the type of USB host or
Connect the USB cable to the camcorder properly, and then connect
the other end to a USB port of a PC.
®
If you use tne cameoroer
our
wn_le } )u are cnarglng the Da_ePt, ons_glng
"no _aKe _onger,
Be sure to use the ]nell Jed AC Dower adaptor to Dewar the
carncoraer, using other AC power aaaDiars coula cause eleeinc
SHOCKor result in t_re,
su can use the AC Dower aaaDior arouna tne wens
However, you
will need an AC plug aaaptor that matches trie design ot k ca
ou_lets in some tereign countries, It you need an adaptor, purchase it
trorn aur o_s_-_Du_or,
Getthg Staned
20
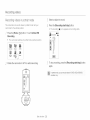
Cha_ging the ba,tte_y
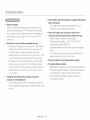
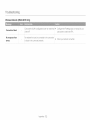
©llneckin_#the batten/state
The battery level display shows the
amount of battery power remaining in
the battery.
You can check the charging state and remaining battery capacity.
_
_i
The color of the LED indicates the power or charging state_
Fully charged
_1
Gharging
•
Fully charged
-ll,.
, _
Exhausted
torced
25-50%
used
50-75%
used
75-95%
used
95-98%
used
(tlicker8:
I]le
camcorder
will be
to turn off after S minutes
©hange
battery as soon as possible
the
Error
Alter
Getting Started
2]
3 seconds,
the carncorder
turns
oft
Low
IBattei'y
i
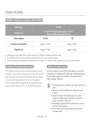
Charging the battery
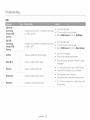
Video resolution
Continuous
recording
Playback
•
time
Full HD
time
HD
Approx,
105 rain,
Approx.
120 min.
Approx,
140 rain,
Approx.
160 rain.
Charging time: Approxirnate time in rninutes required to fully charge a cornpletely exhausted battery.
Recording/Playback tirne: Approximate time available when you have fully charged the battery,
Tirnes shown above are measured under Samsung's test conditions. Your times may differ, depending on your tlsage and conditions,
The corltinuous recording time above shows the available recording
We recommend that you use the AC power adaptor to power the
camcorder from a household AC outlet when recording and playing
the camcorder indoors. The connection is the same as that for
battery charging, "_page 20
tirne when you record without using any other function alter recording
starts, The battery may discharge 2 3 times faster than this reference
if you use the recording start/stop, the zoorn, and the playback
functions, Prepare additional batteries with the expectation that the
actual recording time is about 1/3 to 1/2 of the tirnes listed above.
•
The baltery is charged over 95% alter about 2 bouts, arid the
indicator color changes to gr÷en, It takes about 2 hours ar!d 40
minutes tot the battery Io charge 100%,
The reoordiog and playbaoktimes
oarncorder irl Jow temperatures,
,
We reoornrnend using the AC power adaptor when using the Art
Time Lapse tunotion,
Getting Started
22
wi!l b e shorter when you use your
Cha,_gin9 the battery
•
•
,, Check whether the battery terminal is damaged if the battery
falls or is dropped.
If you install a battery with the damaged terminal into the
camcorder, you can darnage the camcorder.
Battery properties
A lithium ion battery is small sized and has a high capacity, Low
ambient temperature (below 50<;F(10°O)) may shorten its usage
time and affect its function. Before recording in low temperatures,
put the battery into your pocket to warm it, then install it in the
camcorder,
•
Make sure to store the battery separately after use.
A small amount of battery power is cor/sumed when the battery
is stored in the camcorder even if the camcorder power is off.
The battery may be completely discharged, if it has been
installed and left in the camcorder for a long period of time. If this
occurs, the battery may not fully operate even if you charge it,
If the battery is not used for a long time, fully charge the battery
and then, using your camcorder, drain the charge completely
once every 3 months to keep the battery functioning properly, To
store the battery, remove it from your camcorder and put it in a
cool, dry place,
The battery terminals can become rusty or malfunction if the
battery is stored in a smoky or dusty location,
Recycle or dispose
of your dead batteries
properly.
The battery lifetime is limited.
Battery capacity decreases over time and through repeated use.
If decreased usage time between charges becomes significant,
it is probably time to replace the battery with a new one.
Each battery's life is affected by storage, operating, and
environmental conditions.
• Charge an extra battery before using the camcorder
outdoors in cold temperatures.
The cold temperature may shorten the available recording time.
Carry the supplied AC power adaptor to charge the battery while
travelling,
Getting Started
Remove the battery and the memory card from the
camcorder and disconnect
the power adaptor after use.
Store the battery in a stable, cod and dry place,
(Recornmended temperature : 59°F - 77°F (15°0--25°C),
recornmended humidity: 40%--60%)
Temperatures that are too high or too low shorten the battery
lifetime,
23
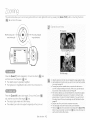
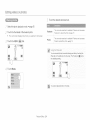
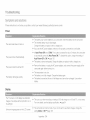
Tu rningyou r camco rder on/off
[Home (In')]
button
_'
•
The cerncoroer operates the seEf*dlagnosls function WNeNyou turn It
:_n, _pages 108-113
e
If the Quick On STBY tunctl
_- s set to 5 Min and you close the LCD
screen when tne _ower is or- the nOW6 savlnc
--bage
The camooraer
_aaDt(
oDer
LCD screen
_oae aouvates
105
tulns on automatically if you comect the AC powel
Dr _nsert_ne battery _n]) tne carscor_er wltn the LOB _oreer
•
,3 C/;II'//COIL#©F OF/lie/IF_I
/vnen you use _ )ur camcorder
l[('e;
for the t 3t time or reset IT [ne time zone
screen appears at start-up. Select your geograpnlcal
location an8 tnen
set T le aate aria ilme, "_ )age 28
7
Turn
•
on the
camcorder
Your oamcorder
turns
by opening
the
on automatically
LCD
when
screen.
you open
• sou do not set tne aa_e ana time tne time zone screen appears every
the LCD
t_me you IU_N ONthe oamoorx_er
sor@er/.
To turn the carncorder
To
open,
press
turn
off the
on when
and hold the
camcorder,
the/CD
[Home
(1_)]
press
and
screen
is already
bulton.
hold
the
[Home
(13")]
button.
•
Your carncorder
turns
off even
when
you close
the LCD screen.
Getting Started
24
U¢ing the touch ¢0r
n
The touch screen lets you playback and recording with a simple touch of your finger. Place your hand on the rear side of the L©D screen to
support it Then, touch the items displayed on the screen,
Drag the touch screen up, down, left or right to select the desired
items or files.
Lightly touch items with your finger to select or execute.
!_
_
DOnot place any protect a fi]rn on the L©B sc een
Ifyou leave a tffn altaohed for a long tl he, strong aaneslen Dewveen
tne film and the surface ot the sereerl m@ sause a maHunctic q of
tne toucn scree
Be caretul
not to aOOleental
_vnlle using
The
¸[aDS 8e(]
ouR-er_
e
The
ca
_ooris
25
that
recor(]ln_playD_Dk
3oree_ eoes
DOIDIS on the Screen
Getting Started
Dress
tne
DUIIOn near
tne
_CD
LOB screen
deoene
screen
[Be [OUCh Screen
aDDear
on the
,status
ne_ reoc _nlze IOL 3hes
a_ the same
on the
ot youL eamoof(]er
tlree,
Touch
f you teuon
on6
)olnt
more the q wvc
a_ a t me
Usin 9 the touch sc_een
You can switch the on screen information display mode,
Each time you touch the LCD screen, the full and minimum display
modes alternate.
Full display mode
Minimum display mode
Getting Started
2_
Using the touch sc_een
/Vhen you reverse ana cJose Trle LCD screen by rotating _
to 180 ° towaras the lens, Tne camcoraer swE_cnestc tne
The wide LGD screen on your camcorder offers high quality image
viewing.
}layDaoK
mooe
8 JTor/°laTIOaHy
180
90
°
'\
\
\
Excessive rotation may aamage the connective
screen ana the carncoraer
/
7
}lean finger[: lnts or dust on l__escreen wil_/a sot[ dot_
Open the LCD screen with your finger.
* The screen opens up to 90 °.
2
Rotate the LCD screen towards
nine6 between tne
the lens.
* You car/rotate it tip to 180° towards the lens and up to 90°
backward. To vlevvrecordings more conveniently, rotate the screen
by 1S0 ° tevvards the lens, then told it back to the body.
Getting Started
27
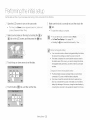
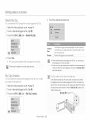
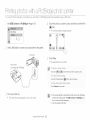
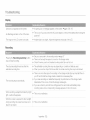
Pe fforming the initialcetup
Set the date
7
Open
and time
the
LCD
The time
London
Select
screen
zone
local
on the
area
LCD
local area when
to turn
(Home)
(Greenwich
your
tab
of your
screen
Mean
on the
turning
on this camcorder
for the first time.
Make sure the clock
camcorder.
appears
based
on Lisbon
_
and
Time).
on the
screen,
set, and then touch the
The date/time seltt/g is complete.
map
and
is correctly
tab.
by touching
then
press
the
the
or
YOUcats set the year up to 2037, based on Home,
tab.
Set Date/Time
e
....
o
Display
tc On, "*page
)2
_c_lvatlrlg the -_@_icon moves tee time torward lay
,, ,_, ,a b' "_' "-
laOL
i)//rl el y
c sr carecorxser incluees a interr_al reonargeaDl8 Da_terythat reta as
the Gate alas time se_r _8 even alter the sower is tumea off,
®
.... Touch
the up or down arrows
rtr}e Da_er'
_secretes, the current
ecna_ _eaDle battery (see la£ovvk ana teen r÷-set tne £ s_rent ease
anti time,
a
_'le
ir_ternal
oagery
is always
_onr _ _ed
to AC
Dower
• /ou nave
not used
_ave no_ colanec_eo
oasery
s/
Touch
the
time
(@)
tab,
and
then
set
the
_te/_wse values are reset _c
the deta_£ values, If Irlls occurs, you neerx to recharge Tee irlte na
to set the date.
time.
the
2_
wn
e your
the Dat[ery
can]corder
tully @sohar_es.
It this
for eL sut 2 _,_eeKs ano
ocours,
to the
CaRlCOr_]er
charge
8uoolled
is
s a_[aelaeo
_ee AO E :)vver or tee Daxery
?or_lr_lectlng tlae carecorxser
Getting Started
recnaJ-ge(]
or wnlle
AO
_ne
[o i[
tee
Ir/rernal
adaotar
you
leterlas
laarter?/la)
tot 24 hours
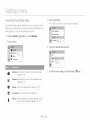
Selecting the language
You can select the language in wlsiels the eameorder displays the menu screen or messages. The camcorder retains the language setting even
whets you turn it off,
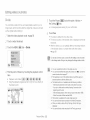
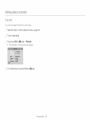
7
Press the [Home
screen left.
(1Q')] button,
and then drag the Home
.... Touch the desired
language.
Franqais
[i Deutsch
Touch the Return (l)tab
to complete
the setting.
• The oarncorder displays the menus screen and messages in
the language you selected.
+
conrsected to the battery 0r AC power,
The date and time format rnay ehar+ge deper+d!n9 en the !anguage
you selected.
Touch
Settings
_ General
-
Language.
Getting Started
29
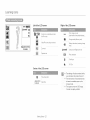
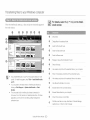
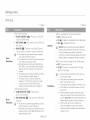
Lealrningicons
The available functions vary depending on the operation mode you have selected. Different icons appear depending on the setting values,
ly .........
Left of the LCD screen
_
°
_x/_/
Right
of
the
LCD
screen
_#_........
Storage
Smart Auto mode/Manual
mode/
Art Film mode/Art
Time Lapse mode/
..... /L...................................................
Video/Photo
recording
mode tab
media
(Memors/card)
Batter}/inforrnation
level)
!lld_T
Optical
Video
zoom/Digital
(remaining
zoom
charge
bar
resolution
...........................................................................
...............................................
!8OOAM.............................
Zoom tab
Playback
,_
Tele
_$
OIS Duo
Macro
tab
Center of the LCD screen
8 _ BY/o/[][]
00:00:00
Operating
pause)
Time
status
(standb_drecording/
•
counter
(video recording
•
[253Min]
Remaining
recordable
Clip
Time Zone
JAN/01/2012
12:00 AM
For warning
sons ana messages, se_
pages 1O8_ 118
The illusl_ated items above and the
eosmons can De onangeu /l_nou_
notice to _rnorove Der_omsance
Date/Time
Getting Started
(Visit)
ne screen above _san e: 8yso_ean8
rna differ/_om the actual dis xay,
time
My
The icons aJ-e>ased on an 32GB
SDHC memc y tara capacl_
time)
30
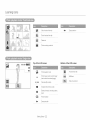
Leamin9 icons
Left
@
/
H/
of
the
......
LCD
Right of the LCD screen
screen
@,_;_ .....
_*/_/
SmartAuto
mode/Manual
mode/
_999
A£ Film mode
Video/Photo
....
recording
Jhoto
ms je oounlet
lO_al number ot recordab
e PhOtOS}
3turage
med a (MemorT_ card
5attery
eve
ntormat
Optca
zoom/Dg_a
mode tab
on (rema n ng charge
_ JAN/01/2012
}_
Zoom
tab
Playback
I,[I_T
zoom
Par
tab
Jhoto
r_so uton
Te e Macro
_1_
DiS Du(
Center of the LCD screen
_]
Time Zone
JAN/01/2012
12:00 AM
(Visit)
•
The seltlngs of functions marked w In a
are lost wnen tne Drxbduct turns oft
•
1_hetotal r ]mber of reoordabb
storage meo_a,
•
The larges_ r ynber the OSD Image
Counter cars dis xay is 999,c
Getting Started
DnoIos
Daseq on ava__Dle SDace on the
Date/Time
31
Leamin9 icons
Video thumbnail
view tall
O_
Erase protection
Photo
view
_
My Clip
thumbnail
Combine
Delete
tab
tab
tab
Vid .......
ding
mode tab
Top of the LCD screen
Video
/[][]
oo:oo:2o/oo:o1:o3
lOO OOOl
playback
Operating
Bottom
(playback/pause
Time code (elapsed
File name
time/recorded
media
Battery
information
(memory
progress
bar
Video resolution
Video
playback
Erase
protection
My Clip
Getting Started
hu,nbnai,
iew
tab
time)
MENU
tab
32
option
Playback
(skip/ .....
card)
(remaining
level)
O_
tab
etc)
(File number)
Storage
Playback
Volume
mode
status
of the LCD screen
battery
related function tab
h/pause/playbacW
Learning icons
...............
Video thumbnail
view tab
Photo
thumbnail
view
Delete
tab
Photo
recording
Erase protection
tab
mode
tab
Bottom
Top of the LCD screen
.....
_
1/12
Photo
playback
Photo
image
total number
100
0001
of the LCD screen
• _@ .......
File name
Storage
counter
(current
of recorded
image/
images)
(file number)
media
Batter}/information
level)
Photo
resolution
Erase
protection
Getting Started
Thumbnail
mode
33
(memory
card)
(remaining
battery
view
tab
i_,;_;;__Otab
S,de_how
_ta_
tab
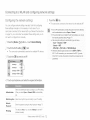
Using the Home sot
Acce,_lng
n
the Holme SClfeeln
IOOINS OIN
the Home
screen
You carl select an operating mode or access the seltings menu by
touching the icons on the Horne screen.
Smart Auto: Record a vdeo c photu usng a scene
°noae selecte® au_oma_ca y by the carncordeh
pac D 42
Press the [Home (1_')] button to access the Home screen,
Manual Record a vdeo ( photo using tunctons you set
_lanual, "_pages 45-_50
Art Film: Reco/d a video or photo us ng terns for a tun
ano Jnoue loop '-pages 51,-,02
Art Time Lapse Reco a time apse vdeo us ng Art
Tree Lr sse functions _ }a{ es 53-_b4
Vertical lid Recording
_noae, _page 89
Record a video in portrat
Album yews
leosorpnotosusngplaybackoredtng
functons _ sages 5G_70
Social Sharing _,_>oa®rodeos c photus to share web
3tes. -,page 76 (HMX QF20 mode only)
Auto Backup: :}end videos or photos to a PC Hsng
Auto Backu ) "_pages 78,-80 (HMX OF20 mode only)
@
Touch an icon to access a mode or function,
"IV Link
Drag or flick your finger on the LCD screen to move to
TV, -,page 77 (HMX OF20 model only)
the next page,
@
lew
_eos (
otos on a TV Lnk enabec
Settings:/_CllUSt ses_ngs to rna_cn yoL
_pa{ ÷s 96,_10(-
The number of the current page (O, O)
Getthg StaRed
34
sreterences,
U ing the glrip belt
Adjust the length ot the grip belt so that the camcorder is stable when
you press the [Recording start/stop] button with your thumb.
The camcorder is designed so you can use it conveniently with either
your right or left hand. If you want to use this function, set Switch Grip
to On in the Settings menu, "-page 105
Select Vertical HD Recording to reco@ in a vertical position.
,-page 39
Rotate your camcorder to the vertical posKion.
<When you hold the oamoorder with your right hand>
<Wherl
!ou hold the oamoorder with your left bland>
When you change the Switch Gdp direotioo whib recording, the
recording may be ternporaJily irlterrupted,
Getting Started
35
Basic functions
Learn
about
basic
functions
for video
and photo
shooting.
Recording videos ................................................................
Recording videos in portrat mode ...........................................
37
39
Tagg ng great moments wh le record ng (My C p tunctlon) ........ 40
Recording
photos ................................................................
41
Recording
with ease for beginners
42
Zooming
(SMART
AUTO) ............
..............................................................................
43
Recolrdingvideos
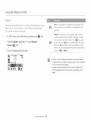
Learn how to record videos easily and quickly in the video recording mode.
Press the [Recording
start/stop]
button.
• The recording (@)icon appears and recording starts.
r
[Recording
start/stop]
button
s/
In STBY mode, touch
the Video recording
mode (_/)
tab.
To stop recording,
again.
The
cart
3oraer
A/th th s fL aetlor
press the [Recording
allows
yOL
| |
ice
Select a subject
) pause
you ear/r÷cora
iaD
io
teFsporarlJy
your
favorite
to eause
resume
to record.
/
00 oo:®
• Adjust the LCD screen to the best angle for recording.
Use the [Zoom (T/W)] bulton or Zoom (_I)
tab on the LOB
screen to adjust the size of the subject. --page 43
Basic functions
°
37
25SM.,
_Q/
°1
wr/lle
startJstop]
wnlJe
reoofll
button
ng a v oec
scenes
as a single
vlaeo.
reoorc
ng. Tc _ sn ine
Recording videos
t
r_L
If the power i,sinterrupted or an error Occurs dudng recoldir!g, the
video may not be recorded/edited.
•
•
Samsung is not responsible for any damage caused by a fa!!ure of
vlaeos are camp _ssed in the H 264 MPEG-4 # C) tormat
Eject the battery when you _-_ve finished recording to prevent
unnecessary
Da_ery power consumption,
normal recording or playback operation because ef memory card error.
®
For the on-scrserl
_,
Note that damaged
-
Fo sDDr_axrrnarerecorsEng t_me, see page 19,
Q
Do not tuJlt]off the camcorde_ or _em0ve the memory Cad v,#/ile
data cannot be recovered,
information display, see page 80
® Sauna rs recarx]ea ey the internal arereo microbehone rocatea o
the trxx]t of 1]e camcorder, Make sure [nat tne mlor_Dcnone is not
accessing the stol]age media. Doing so max darnag e tbe sto!age
s_ooKea
media or the data in the storage media.
e
3etore reoordw _ an _mportant v_aeo, maKe sure, o lest _ne reoorol
functiontosee itthere,
any _:)elems w_inine aaaloor vlaeo
reoor@ng
•
ForVSJlOUSruno[lons
ava ableoutingreooldlnc_
see pages 45,-54,
e
f the E Dvv'eroae_e/DalTep; s _]lsoonneotea of
_urF]g
s alsarolec
reoolalng
tne e} _tem _sswltonea to _ne Iota reoov6, y moae
-eoarx]lng_
_A/h_le
data isbe_r_ ecoverea,no olneri
_l_O s enaD_ea vvner
ine "eoor_Jng
ilmeissnol_,
ire aarareoovep/mlgt]_
Tall
®
YOU
C_]
aajusl
Ine
Drl_ 9tness
st
%e
LCD
screen
h ine
mar]u
options.AdjustingtheLCD screen aoe_ -_ot
attect
the image belng
"ecor_ec _page
10
The menu eettir _ _aes sno//vn orl the LOB sar_e
]o no[ affeo[ _ne
nage Deans reooraea
•
The [Home (I_I')]
buttarcanno_ De usea aunng vloeomcoralng
Reoold_ng vlaeos in a quiet env_r©nmerlt increases mlorL_Dnon_
set _mvl_y
_rla_
may r_colasum_undlrlgambierltnoise.The inoreaslng
_n_oFopnone
sensitivity/car]
aunng zooming
let
ire
csRic(-
]er
reoar_]
zoom
F b_ses
{__esound st the zc sm mechanism etc
vvner you recora inaoors or _ntne aam slates, leo sens_tMty _s
su_c]]ar_ca_y aajuarea, F tne reooralng env onmen_ is too aam tn_s
can cause _n_er_erenceelteots on _mages ana prevent images 1ran
eelng recoraea coH-ect_} ZVerecomrnend
eamcoraers
you use a srotessional
sucn as an irFraJea camcorxser s hen recoralng at nlgt]_
images carl De @started ifthe C S Duo tunctlar] is ena_ ea ana _ne
ca ncoraer is moun_ea c_ a tricod or fixed - ')laee. Turr sff the SIS
Duo tunotion when the carncorxser is moun_ea on a _ pea
Basic functions
38
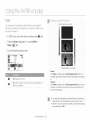
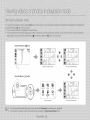
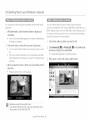
Reco_din9 videos
Recording videos in portrait mode
.... Select a subject to record.
The camcorder can record videos in portrait mode, Set your
camcorder to the vertical position.
s/
Press the [Home
(121")] button
_ touch
Vertical
Press the [Recording
• The recording (0)icon
start/stop]
button.
appears and recording starts.
HD
Recording.
• The oamcorder switches to portrait mode (vertical position).
N
Smart Auto
N
Manual
Art Film
Rotate the camcorder
To stop recording,
again.
to 90 ° for vertical recording.
Basic functions
39
press the [Recording
start/stop]
button
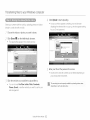
Reco_ding videos
•
Tagging great moments while recording
{My Clip function}
Using
the
and then
My Clip function,
extract
you car/tag
the scenes
tagged
good
scenes
as My Clip
The
camcorder
as My Olip (_).
o,
while recording,
()_) from
tags the scene
a long video
later for viewing.
[My Clip (_)]
[Recording
7
In STBY
mode,
To
start/stop]
touch
®:00:0_,,_
the
Video
recording
mode
(I_i)
:_
a subject
Press
the
°
s/
The recording
Press
the
[My
Clip
[Recording
start/stop]
button
•
The camcorder tags tne scene so that it starts 8 seconds betore /ou
ores _ed the [My Clip (_)] b_ton and ends 5 seconds alter 'ou
-o skip boring parts et a vJdee and enjoy exolung parts, _ su ear
start/stop]
(_)]
the
can a _o tag any _ senes in a vlaeo uy pressing the [My Clip (_)]
aur[on aunng a vlaeo playeaeK _page 60
to record.
(O)icon
press
vvnen tne camcc _er extracts tne _cenes tagged as My Clip {,_ ana
creates one tile wr[h them the tile is saved in the qaeo thumbnail vie4
_
[Recording
recording,
tab.
_J
Select
stop
again.
appears
button
oorr sine tr/e tagged scenes sequentially, _page 6(
7he oameor ]er cars TagL ) te 999 scerles trem a video as Rly ClllC
button.
and recording
every
great
starts.
moment
(_1-)_cerles
while
recording.
Basic functions
40
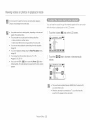
Recording photo
Learn
how to capture
photos
easily
and quickly
in the
photo
recording
mode.
Center the subject
[Recording
in the LCD screen,
start/stop]
and then press the
button.
• The shutter sound is heard and the photo is recorded.
[Recording start/stop]
In STBY
mode,
touch
the
Photo
recording
button
mode
(_)
tab.
Do not turn oft the oamcotder or remove [ne memory card when taking
)notos as it may damage the storage meo_a or data.
•
The recordabb
r amber or D}")IOS varies depending on t e onoto
"eseluuon. _page
•
19
TP,e ca£1oorder does not recc J aUdiO wnen you lake [: 4otos
m You can adjust the Dr_gntness of the hOD screen
Select
a subject
•
Adjust
•
Use the
soreefl
the
LCD
[Zoom
to adjust
to record,
screen
to the best
(T/C/)]
button
the
] tne menu
spuons. !_djUSt_ngthe LCD screen does not a_ect tne image being
ang e tot recording.
or Zoom
sze ot the subject.
(@)
tab
'_ page
on the
"ecc Yaed. _page 101
® For on-screen dis slay inTormatlon_ see page 3"
L©D
•
o
43
% vanous tunotions available durlr _ recording, see pages 45 _52.
Shoto files conform to tne DCF (Design rule for Camera File systernj
_tandard estaDllsned Dy JEmA (Japan Electronics and -itormatlon
Technolc _y
Basic functions
4]
:tustries Associatlor
Re¢ording with ease for beginners (SMART AUTO}
User
7
friendly
SMART
AUTO
Press the [Home
optimizes
(121")] button
your
camcorder
_ touch
Smart
to the recording
conditions
automatically,
providing
beginners
with the
best
performance.
Auto.
#<r}ears wl en the camcotder tails to recogn ze _ne recoralr j
situations
#<r}ears wnen recorang
at ngnl
(Nignt)
£r }ears wnen recora ng image8 ot andscaees
with )aoK gn_ln_
(Back ight)
#<r}ears wnen recora ng people
Align your subject
Portrait
in the frame.
#<r}ears wnen recora ng a very Drgn_ scene
• The oamcorder automatically detects the scene (landscape,
etc.) and adjusts the oamoorder seltings accordingly.
• The appropriate scene icon appears on the LCD screen.
_,r }ears wnen recoran{
]n outaoor 8cene
ar }ears wnen recora ng image8 using cose
vvnte
Lanaecaoe}
up
4ac
_K }ears wnen recora ng images ot c ear sk es (B ue SKVJ
_K }ears wnen recora ng images ot torested areas
_K }ears wnen recora ng images ot sunsets
....
To
record
stop]
the
video
or photo,
press
the
[Recording
start/
o
button.
(_a_ura green)
Sunset
Most settings aJe au_omatlca y aajuscea n the Smart Aub moas
To set or adjust tunct bns on you owr select Manual on the Home
screer
The eamcorxser ms
_ }Tselec_ _rle correc_ scene as _enalng on
snooung corlaltlons
SUCh as cayncorxser snaKe, ilgrmng, aria
31stance to trle sur,jec_
•
The earnco_xser may not oete st the }ortraEt moae oepenelng
orlerltatlorl or the o ightness of taces
Basic functions
42
}n trle
Zooming
This camcorder allows you to record using optical X20 zoom and digital X40 zoom by pressing the [Zoom (T/W)] button or touching the Zoom
(_/; tabontheLeDscreen.
_]
_,,a
Li_)[Oof zoor//
i[/OH
T: Teleonoto
Recording enlarged
image (telephoto)
W: Nlde-arlgle
Press the [Zoom (T)] bulton (telephoto). Or touch the Zoom
i
,]_;
tab,
,
and then touch the Telephoto (_) tab.
The distant subject is gradually magnified.
The highest zoom magnification ratio is X20 in the normal zoom in.
o
using _ne c x ca] zoom Tunotlon aces no_ aegraae _ne image qual_y aria cla_ my
use tne c _- {d zoom lunot on _ nen you want to zoom mo_ tna_l tne o_lc@
zoom ra_ ge, _*page 98
Focusing
ma}
oeoome
uns_aole
/unen
'ou _ecorc
mlth a tast zoom
or
zoom irlto a suojec_ s_anaJng loc ta_ awa}/ f th s occurs,
use 1/e Irl_Tua
bcus tunct or
v aeo recoralng
moae only) _page
48
The m nlmum a s_a_lce
Du can nave oe_veen tne carncoraer
aria suojeot
wrme maintain ng snarp tocus is aoou_ i cm _bout 0,4 nchesl tot w de
_Tgle aria aoou_ I m/about
40 inchesl tor telephoto,
It you vvanz _o snoo_
Press the [Zoom (W)] bL£on (wide angle), Or touch the Zoom (¢(;)
tab, and then touch the Wide angle (_)tab.
The subject gets smaller and further away,
The smaNestzoom ratio is the subject's odginal size in the zoom out,
_ne suoject c ose _o tne lens at a w ae ar lie
Jse the Tee Mac o tunotlon
- page 97
Freauent use ol the zoom function consumes
more sower
]]_e carnc sraer can recora _ne souna or the zc om mecnanlsm
]]TeZuor
_
sutson moves
use the zoom
Basic functions
43
tabontheLODsx-eenmovesslowlyandthe[Zoorn(TA'V)]
more quicldy, Use the Zoorr
function with accurac
_
tab on the LCD
screen
tc
Extended functions
Learn
how
to record
a video
and photo
by selecting
a mode.
Using the Manual modes ....................................................
vvn_e Baanee .......................................................................
45
45
E_ Exsosure Vaue ................................................................
46
Back UCqt ..............................................................................
Focus
47
48
:}_ oer C.Nite ..........................................................................
49
:_elt Timer ...............................................................................
50
3c/it Shot .............................................................................
50
Using the Art Film modes ....................................................
Fude
51
51
Dig t_ Effect ...........................................................................
Using
the Art Time Lapse mode ..........................................
52
53
U¢ing the Manual modes
Wlhit÷ Balance
71necolor of your image depends on the type and quality ot the lig/nt
source. If you want the color ot your image to be realistic, select a
white balance setting that matches the kind of light illuminating your
scene (Fluorescent, T_lngsten, Daylight, etc.).
Press the [Home
(12_)] button
White
Balance
Touch
the desired
-
touch
7
Custom
o
The
Fill the
Manual
mode,
WB
touch
White
Balance
(_)
tab
(_})tab.
_,.J Set White
screen
with
Balance
a white
icon appears.
object,
and
then
touch
the
tab.
(i_i)tab.
submenu
In Manual
* The white balance setting is stored.
* The stored white balance setting will be applied the next time
you record.
item.
Auto: Adjusts the white balance automatically according
recording conditions,
to the
_4#9
_
When
setting
oteewvise,
•,11_,
Daylight: Use outdoors in norrnal daylight, Adjusts the white
balance according to outdoor lighting conditions.
_%
Cloudy:
_
Fluorescent:
-,6,'
Tungsten: Use when recording under halogen lamps and
incandescent lights.
!
Custom WB: Manually adjust the white balance to match the
light source or situation.
The
e
manua
may
y, tne
not oetect
suojeet
must
an aeeroorlate
De White
se_
adju_ea
During
se_eg
r©rmaE
remains
UF_ _/DU set the wnl_e
OU_L1oor reeoralng,
set[_ng
to Auto
eaJanoe
may
proviQe
_esu_s
•
lights.
o
Extended functions
Nnl_e Dalanoe
3ameoraer
_g
value,
Use wherl recording iri the shade or cloudy weather,
Use when recording under white fluorescent
tne
your
45
3ancel
the
--page
98
Reset
the
c gl_al zoom
whrte
balance
tunctlon
for dear
it Iignt
conal_lorls
ana
prease
change
seslng
again
Ds_er
Using the Manual modes
EV {ExposuT_eValue}
Depending on the intensity of the ambient light, your videos and
photos may be too bright or dark, In these cases, you can adjust the
E DQe_e V81ueIs Ine totaE amount OT gF_ aJloweo IO tall oD _ne
exposure to get a better videos and photos.
)hotos o[ wdeos, The h _ner tne number, tne gr÷ate
photographic
rnedium (Image sensor) during the process ot taldng
exam xe. +0.3 lets in more grit than -0,8
7
Press the [Home
(ID')]
button
-
touch
Manual
EV (_3)tab.
Touch
the _/@
tab to adjust the setting values,
The setting vakles range from
2.0 to +2.0
EV
Extended functions
4_
[ne exposure, F(
Using the Manual modes
Back Light
When a subject is lit from behind, this function compensates for back
lighting so that the subject does not appear too dark,
Press the [Home
Back
Touch
Light
the desired
(12t')] button
-
touch
[ typlOall_
Manual
e
The
oerss{ n you
M_
s in front
warlI
ot a window
to reoora
a DrlgF_
DacKg
is weanng
While
OU I_, The
eersc
or snlrly
-
The
®
The
Off: Disables the function,
On: Backlight compensation
brightens the subject.
Extended functions
47
_uDjeo[
IS outaoors
j it sources
sub
are
eot is in front
ano In6
[oo
DaOKgrC ln(]
aright
ot a snowy
DaoKglouna
C otnes
aria
1 s Taoe 18 %oo cJsh
to olst_ngJisrlhlsh-lerteaturss
item.
The
_1_::1::
WFleF
_uE eot
s plaoec_ 8gaEnst
tab.
submenu
Doomrs
The
18 overoast
Using the Manual modes
Focus
Auto:
The camcorder usually focuses on a subject automatically (auto focus).
When you turn the camcorder on. focus is always set to automatic.
n most sltuat ons t } pelter lo use lne automatic focus
feature, as it ets
Manua
7
in STBY mode, touch
the Video recording
mode (_)tab.
Focus
the
[Home
(12_)]
button
-
touch
ou ma
which automatc
the focus
Press
)u concentrate on lne creative side at your
recoraiF j
You can also set the focus manually.
Manual
/eed to focus manua
tocusng
aace and hod your f nger on the
8UDleCl ana on tr/e
tarthe sop _/oo)
([_F])tab.
Jnaer oonalt on8
s @flcut o unre able, To adjust
__
tar a nearer
so > tab tar a farther subject The nearer or
a_.}ears when tocus adjustment reaches
the end. The camcorder app ies the adjusted value Hght after you
.... Touch
the desired
submenu
cOUChtne
item.
•
<_
or
co > [a
[ne zc sm atlOhas seen onar jea,
vner trle came )raer exits kom ManuaE moae or switches to Irle
anotc eoorolnc moae the Focus function is a_tomatloally set to
Auto,
Extended functions
4_
Using the Manual modes
Super C_Nite
You
can adjust
or recording
the shutter
a bnghter
speed
image
when
in dark
recording
places
a slow moving
without
object
Off: Disables the function
compromising
Normal: The shutter opens for 1/60 of a second in the normal
color.
7
In STBY mode, touch
the Video recording
mode (_)
[]
tab.
mode and automatically switches to open for 1/30 of a second
in a dark place. Use this function to get bright images in a dark
place
Press the [Home
Super
C. Nite
(12I')] button
-
touch
Manual
_,)tab.
sr_p-E_
.... Touch
the desired
submenu
item.
Super: The shutter opens for 1/60 of a second in the normal
mode and automatically switches to open for 1/15 of a second
in a dark place. Use this function to get bright images in a darker
place
Extended functions
49
Using the Manual modes
Self Timer
When
the self timer
before
7
recording
in 8TBY
Press
Self
<2
Cont, Shot
Touch
_FF
_,_
mode,
the
[Home
Timer
(:_i)
the
is enabled,
starts.
You
touch
desired
there
is a time delay
can take
the
photos
Photo
(121")] button
recording
-
touch
of 10 seconds
The
of yourself.
mode
(!Q!)
tab.
7
In STBY
Manual
tab.
submenu
Continuous
Shot function
lets you capture
Lip to eight
photos
in
rapid succession.
item.
<_
mode,
Press
the
Cont.
Shot
Touch
the
touch
[Home
the
(I2]')]
Photo
button
recording
_
touch
desired
submenu
Off' The camcorder
10 Sec: There is a time delay of 10 seconds after you press the
[Recording
Start/Stop]
button.
,_
On: Whet yc oress_ne [Recording
camcor@er can take • _ to 8 Eqo_os
When the oamcorder exits from Manual mode, the Self Timer
records or y one pnoto image.
start/stop]
usor
one secon@
When an evor occurs
e
_eoorc]Lng8tops 8r]@arq e_ror message appeaJs
6/hen the }ont, Shot is On. the Dnoto resolution is tlxed at
lunction is au_orrlatlca
_ne
(Card FLm,etc,) ounng toni quc Js _noi [ne
080
'A -len _rle camcorder
50
-
-
2M 1920xl
Extended functions
tab.
item.
_o_F
function is automatically set to Off,
Manual
(/Q})
(_ii)tab.
Off: Disables the function.
_
mode
exits tl )m Marlual mode the Cor/t. Shot
set to Off
Udng the Aft Film modes
Fade_f
Fade In {Auerox,3 seconds
You can give your recording a professional look by using special
effects such as fade in at the beginning of a sequence or fade out at
the end of a sequence.
7
2
in STBY mode, touch
Press the [Home
Fader
.... Touch
(i__i)
the Video recording
(121")] button
-
submenu
item.
touch
mode (_)tab.
Art Film
tab.
the desired
Cade Out {ADDI©x, 3 seconds/
Fade in
With Fader sel to On pr÷ss the [Recording
r_cora_ng _tartswiTn aaamscreer
start/stop]
anatnent_e
au_Ton The
mage aria souna _ae
Off: Disables the function.
Fade ouI
On: When you start or stop recording, the recording fades in or
fades out accordingly
th Fader set to On, press the [Recording
start/stop]
button tc stoe
recording, The image an(] scene race ou_. the screen joes elac
ano
[hen the rscoroJr _ stops,
_
_
The camcorder automaucally turns the Fad@l tunotlon oft alter K 1as
aeen usea onee, YOU %_ustreset _t eaor_tlm_ Du want to use K
•
'A -len the carrlcoroe
exits rrom the Art Film mode the Fader tunction
s au_orrlatlca _ set to Off
Extended functions
_]
Using the Aft Film modes
Digital Effect
Using
7
the
Press
Digital
Touch
•
Digital
the
Effect
Effect
the
function
[Home
(12i')]
(
your
-
recording
touch
Art
a creative
look.
displayed
during
or playback,
off: Without
any recording
Digital Effect,
a normal, natural image is
Film
) tab.
desired
You can view
gives
button
submenu
the hidden
or right or touching
the
Black & White:
white
item.
items
_/_
by dragging
the LCD
screen
This mode changes the image to black and
left
tab,
Sepia: This mode gives the image a reddish brown look
Negative:
This mode reverses the colors, creating a negative
image
Art: This mode helps adjust for facial imperfections,
I_/
_m_
_
YOU car-, aBo apply digital effect s in order easi!y by Shaking the
carrlcorde_ !n ihe A!t Rkn mode, _ou do not need to set the Digital
Effect function manually. _page
98
Noir: This mode creates a stronger image by increasing
contrast,
Western:
This mode creates a faded and old film vintage look,
Dazzle: This mode creates a brighter image by increasing
color saturation
Ghost:
This mode creates a drawn out image effect like an
apparition or ghost
Extended functions
_2
(Video recording mode only)
Using the Art Time Lapse mode
Using
the Art Time
Lapse
function,
you can sot the camcorder
to add emotion
and something
different
experience
on a dry and
boring
time
lapse
video.
In STBY mode, touch
Press the [Home
.... Touch
the desired
the Video recording
(12_)] button
_ touch
mode (_ii)
In Art Time Lapse mode, you can record videos in 1920x1080/
SOp resolution only,
Press the [Recording start/stop] bulton if you want to stop
the Art Time Lapse mode,
tab.
Art Time Lapse.
menu.
Normal:
(_
•
Set to record frames at an intewal that you define.
a scene
is captured once every 0.1
interval: An image of
1, 3, or 5 seconds
Jumping:
:°'L_
"o-+
Set to record frames of a jumping time lapse video at
10, or 20 seconds
Touch
the MENU (!;_N) tab.
Touch
the desired
(._
submenu.
Audio is also recorded.
Set a zoom effect for a time lapse video.
Interval: An image of a scene is captured once every 0.1.0.5.
1,3, or 5 seconds
•
Zoom: Adds the zoom in/out effect to a time lapse video
Panning:
Set a panning
Interval:
_
0.5,
an interval that you define
• interval: The scene is recorded for 3 seconds in every 1, S, 5,
Zooming:
s/
L
7
effect for a time lapse video
An image of a scene is captured once every 0.1.0.5.
1,3, or 5 seconds
Direction:
Adds the panning effect (left/righWup/down) to a
time lapse video.
Zooming
+ Panning:
Set a zoom and panning effect to add
them simultaneously.
interval:
-(}i Touch
7
the desired
submenu
item.
After setting the Art Time Lapse mode,
start/stop]
%_:a
An image of a scene is captured once every 0.1.0.5.
1, 3, or 5 seconds
Direction: Adds the panning effect (left/righWup/down) to a
time lapse video.
press the [Recording
Zoom: Adds the zoom in/out effect to a time lapse video
button.
Night: Set night motion for a time lapse video.
The Art Time Lapse recording starts.
Extended functions
$3
Using the Aft Time Lapse mode
@Ad Time La )s@ fc sotlon
r÷ooras
nTerval over _ne _o_al recorawig
mage
frarnes
TIrTe TO r _oauce
a_ a DreaeTinec
a
tlrT 9q8 )se Vla@O
Art TErne La }se Es useTk for f _ Jng _ne folbwir_g
•
Bloon-
ng flowers
/4 Era
Dullalrlg
® Obuds
t,
subjects
a r @s[
roiling oy Ir The SKy
Time tot recora[ng on _ne
s_orage meq a {a video c D ot -Art Tree Lasse RE }
)0:00:25/00:01:0: lvv _1
I_E(_
___/
_ 00:00:25/g0:01:031000001 13ml_
Dunng Art Time Lapse recording, the SL }er C llte turlctlon does not work
•
-
Art Time Lapse rscorolng s turned oft once recording s finished, To stair another Art Time loose mode. rsDeaT steDs 1 to
80 caetured ]1ages compose a video ot 1 second leng_n Since %e m_nimum ler _n or a vloeo ]nat your cays£ }roe can save is one seconci me _n_erv8
defines the total minimum recording time tor the Art Time Ls }se mode, For exan sle. if you set the irltenval to 5 Sec
ou neeo _o se_ _ne reoorxalrlg _lrrle tol
the A_tTirne La_ _e mode to at least 2 mlnu_es and 30 seconds to r÷coro a minimum video length ot 1 second (SC mage@,
ou canne_ cause recoldlng during Time lapse i_com ng
Audio is not rec ?raea aunt ? Art Time lapse r÷corang
/4ualo is r÷coraea on aunng Jumping recoralng q Art Time L_ c _emoae
The maximum video file size is 1,8GB, When a video tile exceeds q ,SGE a new w4eo Tile _crea_eo au_oma_lo_
/re recommena uslr __rle power aaaptor instead of the battery ter Art Time lapse,
It the battery orlaJ-ge is exnaus_eo oaring Art Time Lapse recording, _ne camcorxser saves recorq g
wnlle [ alsplays a warning message, and then turns off autornatica
_the storage meala becomes Tu
nsxlmum memo_' available
•
_unr _ Art Tirne Lapse recoraln% _ne camcoraer
Dunng Art Time Lapse lecordlng, the Switch GI ) turlctlorl does not work,
Extended functions
_4
up _c tna_ ooln_ ana swl[cnes _( s_a_soey moae,/ater
svvl_cnes _o_ne slanae} mode otter saving _ne recoralng ulc [o (ne
a
Playback/Editing
Learn
how
to play back
and edit
videos
and photos.
Viewing videos or photos in playback mode .......................
:}tart ng the playback mode .....................................................
56
56
Playing back v deos ................................................................
Tugg ng great rnomet/ts durng playback ..................................
57
60
view _/g photos .......................................................................
Editing videos
or photos
.....................................................
61
63
:}hare (HMX OF20 ony) ..........................................................
Delete ....................................................................................
63
65
Delete My CI p ........................................................................
66
C p Creation .....................................................................
Pt()ted ...................................................................................
66
(77
:}mart BGL ............................................................................
67
Divide .....................................................................................
6S
3omb_ne
69
F e nfo ...................................................................................
70
Using
thePlayback
(_) tab
<Video thumbnail view>
Using
the [Home
<Photo
thumbnail
view>
('C]')] button
<Home screen>
<Video thumbnail view>
Viewing videos o__photos in playback mode
Playin{_ back videos
You carl preview recorded videos in the thumbnail view and find and
play your desired video directly.
7
Select the video playback
Touch
the thumbnail
mode.
-page
of the desired
D_a_ the
)n tne
Ine tnu
56
INUmDFlaEIs
LCD
_Dnalle
on the LCD screen appears. The color of the My 0lip icon is
changed for S seconds when the scenes tagged as My Clip
appear.
/VNeN
screen
lext
ouor
l
and return to the thumbnail
view, touch
tab.
PlaybacWEdithg
57
c_rag
leT[ or rl{ 1t ON [Ne LCE
to gQ Io _ne previous
el ¸
tile
a point
xayDaoK
tne waeo
view (IZl)
tor
_ )U WaNI
pJayDaOK IS pause(],
the Jrnage
q IN6
the Thumbnail
L e or (3OWN
to search
video clip.
• The camco_der plays the video you selected.
• If you select a video tagged as My Clip the My Clip (_) icon
.... To stop playback
screen
or (]rag
progress
)u WaNI
the
polnte_
ear or
_.®!
.....
o
Viewin9 videos o__photos in playback mode
Do not power off or eject the memory card dunng pnoto payeac_.
Doing so may aarnage the recoraea aaia.
You
while
•
[ may lake some t_me _osta_ DlayeaoK uepenang
quails] }f the sebcted video
•
The cart soraer may not pla} }ack the toJlowlng video tiles:
_ s waeo ecoraea o _notner oewce
o
You oars use ¢arcue olayDacK op_ one aunng the waeo p_ayeac_
'_
on the size aria
1
can hear the
the video
Touch
the
sound
is playing
Volume
through
back
x:;
(4_)
the internal
speaker
on the LCD
screen.
tab
LCD
on the
of the camcorder
screen.
z_ aeo wnose file format is not _UDOOrteaD_ the oamcorael
--page 59
•
You cats set pie, eaos settings using the Video Play Option
--page
ou cats play baokthe
_eages
o
menu
_>
82-83,
recorded videos on aTV c PC
Touch the _/_
volume.
88 -91
It _ou touch the MENL
tab to increase
or decrease
audio
ME_ tab or press the [Home (12_ Ducat
aL ng p_ayDaoK,the waec payeaoK _s Dausea aria tne menu screen
aE }ears
Wh÷o the camcorder
is connected
to a TV, vou will oot heaEthe
sound from the speaker on the camoorder.
PlaybacWEditing
_
Viewing videos o__photos in playback mode
•
,
,
Playback and pause alternate when you touch the Playback
Touching the Forward skip (:
l) tab plays the next video.
Touching the Reverse skip (i_ii) plays the beginning of the scene.
If reverse skip (_I)is
touched within 3 seconds from the start of
the file, the previous video [}lays,
_}}
/Pause
tab during playback.
• Touch the Thumbnail view
tab to stop playback and return to
the thumbnail,
o Place and hold your fir/ger on the Reverse skip (_il)/Forward
skip
(ii_/i)tab to search for a video quickly. When you lift off your finger,
the selected video plays.
When playback is paused, touching the Reverse slow ( _i )/Forward
slow ( ii_ ) tab reduces the playback speed:
, For Reverse/forward slow playback, each touch changes the speed
in the following order: xl/2 _ xl/4 _ xl/8 _ xl/2
] _J_
Dumg playback touching theReverse
se_reh
( _ )/Forward
se_rch
(_!)
tab increases the playback speed:
• For RPS (Reverse Playback Searoh)/FPS (Forward Playback
Search. each touch changes the speed in the folloiwng order: x2 -_
x4 -', xS -', x2
i
.....
....
]
i
i
When playback is paused, touching the Reverse frame advance
( ::_!! )/Forward frame advance (l!_) tab makes playback go in
reverse or forward one frame at a time.
Touch the Reverse•• .skp (i_)/Forw:_rd_
•
playback.
skip (_)tab
When playing back the MY Clip tags, the search playback and slow
during
PlaybacWEditing
motion playback functions do not operate,
_9
Viewin9 videos o__photos in playback mode
Tagging great moments duning playback
s/
To stop playback
the Thumbnail
You
can use My Clip (_)
then view
7
only the scenes
Select
the
video
Touch
the
thumbnail
to tag good
tagged
playback
scenes
as My Clip
mode.
during
(_)
_page
playback,
¢_
Press
the
[My
Clip
(_)]
desired
and
_
56
button
video
to tag
view, touch
later.
® The carncorSer tags s scene 8 seconds arid 5 seconds alte
sress the [My (Slip (_)] [ ]son
-
of the
and return to the thumbnail
view (_)tab.
great
To skip boring ca ts of a ,video anc _njoy excmng parts, you car
coracles tne _aggea scenes sequermally, _page
clip.
moments
during
'OL
6C
-
YOUcars also tag a scene wnen you _ave paused Video pla, sacs
e
)u cannot use the My Clip function w#/en a video tagged as
My Clilc _') pla_ _ [ _CKIrl the searcn olaveacK aJ_ldSlow moiler
playback.
9layDaoK eoqes,
[My Clip
-
(_)]
Ifthere is nor enougn storage space available in the media sic]rage
ou cannot use the My C _ functior
* The camcorder tags the scene as My Clip (_).
PlaybacWEditing
_0
Viewing videos o__photos in playback mode
Viewing photos
J I(M i
Drac
You can view recorded photos by using various playback functions.
7
Select the photo playback
Touch
the thumbnail
mode.
of the desired
-page
the
t _ LCD
56
thumbnails
screen
L E Dr aown
to sem-ch
on
_
tot the
..............
yo......
© _i...........
<°_, ;_,-
photo.
• The camcorder displays the photo you selected in full screen.
Drag the image bit )r ngn_ on the
LOB so een to go to me brevlous or
]ext tile
.... To return to the thumbnail
view, touch the Thumbnail
view
8r/,f_
_
LOaolng
onQIo
o
Dt
3amooroer
[hat does
may
reoo_aea
_ Photo with
@]
]eoen@r
g )n Ine
size ano
quality
ot the
_ DU se_eoiea
A DnoIo
PlaybacWEditing
vary
llme may
©
not
a flls
F DI p_ay DeCK _r_e To_ow_ng
or1 anotnsr
format
contorm
r_oI SL Dpo_Teo
to DOF
DI
)to t_les norrT aE_y
aev_oe
standmds
D_ this oamooroer
_ne
Viewin9 videos o__photos in playback mode
You can view a photo slide show with background mLISiC.
7 Touch
the Slide show (_i)tab
You can magnify a playback image.
7 Touch the desired
during photo playback.
The slide show starts from the current selected photo,
To pause the slide show, touch the LCD screen anywhere.
photo.
Adjust the magnification
with the [Zoom
(T/W)] button.
Magnification starts from the center of the photo.
o You can zoorn in frem X1.1 to XS.0,
:_ Drag the LCD screen up/down/left/right
want on the magnified
iiii_il
to view the area you
photo.
part
2
To stop the slide show, touch
the Return ()tab.
×i{ To cancel, touch
•
you can adjust%e baqkground mgs!c'svolume level usingthe
vo_um_
(_iii)t_b
PlaybacWEditing
_2
the Return (_)
tab
While the plaYbagk zeom !Sin use, the ©ther irnages car!net be
selected,
Editing videos olr photos
Shan"e(HMX QF20 only}
During
video
or photo
you are viewing
playback,
to a sharing
Touch the desired submenu
you can upload
the video
item.
or photo
web site.
Facebook
The camcorder
searches tor aval able AP aevlces ana accesses
Facebook to L oloacl me vcleo. _
YouTube
The camcorder
searches
age 76
tor aval able AP @evlces ana accesses
suTube to • _loao me v@ec _page
7
Select
the
Touch
a video
o
video
playback
mode.
recorded
in the
plays
the video
The camoorder
_page
Web/HD
resolution.
you selected.
ou can access one last oonnectec
snanng wed site oy taucnlng me
Share tel: on Tne ngr/s side of LOD scr÷er
....
Touch
the
MENU
(!_i_)
7
56
tab,
The Facebook
I _li}
lab Is
me detaultlng setthg
00:0o:2o/00:01
1000eel_!II_E]
s/
Touch
?u canno: snare vl@ec_ recorded
Share.
enc HD t1280x720/60o
o
PlaybacWEditing
@3
in the Full HE /1920xl 080/60
-esc u_lons
YOUcannot u _load videos to Picasa,
Editing videos o__photos
Touch
7
Select the photo playback
Touch
the thumbnail
mode.
of the desired
_page
the
desired
submenu
item.
56
Facebook
photo.
The camcorder
searches for available AP devices and accesses
Facebook to upload the photo
_page
76
o The camcorder displays the photo you selected in full screen.
Picasa
:2 Touch
the MENU (_)
10o 0001_II_::B
x/
Touch
The camcorder
searches for available AP devices and accesses
Picasa to upload the photo. ,,,,page 76
tab.
Share.
i!i@_ii@_!i{!i!i!i!i{{{{{iii!i!i!!!ii!_!ii!ii!ii!i!i!iiiii_iiiiii{iq
PlaybacWEditing
G4
Editing videos o__photos
Delete
//
Touch the i0_
tab.
° A message appears asking for your confirmation.
You can erase your recordings one by one or all at once.
7
Select the video or photo playback
Touch
mode.
the Delete (}W}I!)tab on the thumbnail
-page
Touch Yes.
56
* The camcorder deletes all the files having the selection (_)
indicator,
view.
recorded on the storage media. Doing so may damage the storage
media or data,
_
.... Touch
_
Tom can
flqoes
®
Te
thumbnails.
* The selection (_j) indicator appears on the selected files,
Whenever you touch the thumbnail file, selection (,_J) and
release alternate.
image
-
_ou
cannot
-
If the
PlaybacWEditing
_
qe_ete
sFotectlon
ae_ete
The
delete
We
reoornmena
aunng
function
in the
h err
ir
_avance,
xotected
tu
ane
aocKlental
tiles,
_page
Cancel
sir
jle
erasure,
the
image
aol rate
alsplay
_ne
6Z
protect
TUFICII )n _ B1
67
wnte
cannot
tnls Tunction
T_DOHant }mages
p etectlon
--page
" To delete all the files, buds the Select all (/_l)tab,
The
selection (_) indbator appears on all the thumbnails.
* To release the selection (_£) indbator for all photos at once,
a _o operate
protect
the
rues,
fun xlon
aeletlo
you
IaD orl the
_page
-nemop
ac as not work
use
care
is set to _OCK, yOL
_
AC
pewer
it the
battery
ona-ge
to F 9\aae conunuous
is insult_clent
sower
Editing videos o__photos
Touch
Delete My Clip
You
7
....
can delete
the My Clip tags
from
video
mode.
Select
the
Touch
a thumbnail
playback
Touch
the
MENU
i
tagged
,(_.u_
a video
",_page
as My
ta r'_ -
tagged
Clip
Delete
the
desired
submenu
item.
as 'My Clip'.
i:
56
(_).
My
Clip.
:111 ::
Comb nee the _aggea scenes sequent a i} ana tnen saves lne
Creation
com bned h es as a s ng e video t le n the ast t le E ss t on st the
Start
vlaeo tnumDn8
Preview
ve_
Prevews tile taggea scenes sequen_ a ly.
J/ Touch Yes.
The camcorder
will delete
all My Clip tags from
o
the video.
Wh le preview ng the scenes tagged as My C ip, you canno_ arag
the xogress Esr c n the LOB eoreer
f there is _ot enougn storage sg ace avalJaDle ]n tne rr 9o]a storage to
sreate new files frorr /deos Iagged as 'My C] p' the Creation Start
lad WIJDe aJF lleo
My Clip Creation
You
can extract
and create
7
....
the
exalting
scenes
tagged
as 'My Clip' from
a video
n tne vises tnumnea_ wevv [ne osrnoorse_ carl extract aria combine
one file with them.
Select
the
Touch
a thumbnail
tagged
Touch
the
i_)
i
video
_ne _aggea scenes from a, waeos tagged as 'My Clip ana creaze one
MENU
playback
mode.
tab
",_page
as My
-
My
Clip
Clip
file fi-oITIthern. The camcorder carl on ¢ create a My }lid tile from vlaeos
56
recoraea n _ne SSITle rest u_ion. Press t _e [My Clip (,_)] but_or n _ne
(_).
aeo tnumDna_ v_ew.
[My Clip
Creation.
:
PlaybacWEditing
66
(_
] butter-
Editing videos or photos
Protect
Smart BGM
You can protect important recordings from accidental erasure,
The protected videos and photos cannot be deleted unless you format
You can enjoy music dunng video playback, If the odginal sound in the
video is loud, the volume of the background music will be decreased
the mernory card or cancel the protection.
naturally. On the other I-_and,if the onginal sound in the video is quiet,
the volume of the background music will be increased naturally.
7
Select the video or photo playback
Touch
.... Touch
a thumbnail
mode.
_page
56
7 Select the video playback
to protect.
the MENU (_)
Touch
tab _ Protect,
i
s/
Touch
the
desired
_page
56
a video thumbnail.
.... Touch the MENU (_)
submenu
mode.
tab _ Smart
BGM,
item.
Off
Turns off protection
On
Protects the selected image
s/
on a protected image
Touch
the
desired
submenu
item.
off
Turns off the background
On
Turns on the background music.
music.
camcorder during playbac k, You do not need to set the SrnaJt BGM
function manually, _, page 101
I_
_:_
_
_
Y°uqan°peratethisfuncti°ninthesingieview0nly'
!f the write pr©tect!on tab on the mernory eard is set t o !ock, you
cannot apply this function, _page
_, You can change the desired background music in the Settings
menu. _page
17
PlaybacWEditing
67
98
Editing videos o__photos
Divide
Touch the Pause (II)tab
the Cutting (_)tab.
You can divide a video into two, and easily delete a section you no
longer need. As this function edits the original file, make sure to back
up the original before dividing it.
at the point of division -
o A message appears asking for your confirmation.
Touch Yes.
7
Select the video playback
Touch
a video thumbnail.
.... Touch
the MENU (_{)tab
mode.
-
-page
56
° Thevdeo s dvded nbtwovdeo
c ps.
° The second porton st the diwded video is displayed as the last
thurnbnai.
° Attetthe dvson, you can partaly delete unnecessary sectons
st the divided v deos or comb ne them w th other videos.
Divide.
-page
69
Do not eject a memo -y caJ-d or power off while ec _ng _waeo recoraeo
,,9the storage media, Doing so may cls£1age tne storage meala or clots
Find the point of division by touching
tabs.
• nayb_ok
control
tabs:
/
the playback
•
•
control
_J_J_/_
• Drag the playback progress bar left or right to move directly to
the division point.
-
YOUcan oceratethis/unction in the singleview only.
YOUcannot olv_e fliesthat @sDlay
the Droteo_son {_L Calso__ne
srotecttunctlon first. _page 67
The beg_nnlr_
9 or ena OTthe aw_aeav_aeosmay anit b, eDor©x.2
seconds betoreor arLertne aMslon oolnt
The D ulaeT_actionis not avalableunderthe fc }wng eonamons
_ i_[ne totc recordedtime st ne vlaeo is lessthan 6 seconds
i_ you tr 3 to aMae
Deglnnln
-
G 8ha
sections
wJ_nouT leaving
8 seconds
at the
_ne era
- Itthe remalnw_ secuonOTtrle memoryspace is lessthan 15MB,
- vvnentne number of f es r÷aches9999,
This tuncuon is available 1tne vlaeo singleview only,
'_ol
Dan_ot
¢dher
oMoe
:>u divide
vloeos
a video
reooraeo
with
My C
i__ the Web/HD
D tc _s, the
resolu[ior
My Clip
tags
]IsaDQ@SY
o Youcannot dMde a video recorded ii_Art Time loose mooe
PlaybacWEditing
_8
Editing videos o__photos
Combine
You
s/
can combine
original
two
files, make
different
sure to back
videos.
As this function
up the
original files
edits
before
Touch
o
the
combining
Select
the
video
playback
Touch
the
©ombine
(i_)
mode.
tab
-page
on the
asking
view.
_
De net eject a memory cad or pewee off while ed!ting a video reo0rded
on the storage media. Doing so may darnage the sto_iage media or data.
tiTs} e
YOUcannot combine tne Tilestrial 8J-eE s_ected _€_,H 3ancel %ne
orotect function first. _page
:_ Touch the video thumbnails
combined.
for your confirmation.
* The carncorder combines the video files you selected in the
order you designated, and then stores the combined videos as
a single video file,
56
thumbnail
tab.
appears
Touch Yes.
them,
7
the
A message
67
•
The _ _lnal waeos aJ-enot preservec
e
The Combine function is not avallaole under the folio
g sorlc]mons:
tthe Vdeos aJ-e n different resolution formats For exarr x6 vlaeos
in the order you want them
_eorded at Video Resolution:
Full lid
1080/60i
ar J Video
Resolution: HD 720/60p car -lot oe corr sines
- Itthe tile size OTthe eornolnea
c]_Ds exceeds 1.8 GB
° The selection (_j_) ir/dicator and the order number appear
on the selected videos, When you touch a video thumbnail,
selection (+_) and release alternate,
* The checkbox on the video thumbnail does not appear if the
video files have different resolutions.
tthe remsir
15MB
g memory sp_ se on your memor'_ sac] is less Tna_
- Ita video tile format is rlo_ SL sper[ea oy Tne sameordel
? e _rle camcoraer is }laylng a vlqeo Tile
'_OUCe_ 1OI combine vlaeos lecolded in the tA/eb/HD lesolutlon
,
When } su combine
31sa[ Dear
a video with My CLip tags the My el@ tags
su cannot cornbine a video recorded in Art Time la )se mode
PlaybacWEditing
_9
Editing videos o__photos
File Info
You can see image information tot each image.
7
Select the video or photo playback
Touch
:2 Touch
mode.
',,page
56
a thumbnail.
the MENU (_)
tab _ File Info.
The intomlation for the selected file appears.
s/
To exit the menu, touch
the Return.. /i_
¸) tab,
PlaybacWEditing
70
reless network
(HMX-QF20 only)
Learn to connect
use functions.
to wireJess
Connecting
Local area
networks
to a WLAN and configuring
(WLANs)
network
and
settings
.. 72
3ot/_/ectlng tc_a WLAN ...........................................................
72
3ontigur ng the network sett ngs ..............................................
73
Manua y sett ng the P address ...............................................
74
Networ_ connection t_ps .........................................................
75
E_tenng text ...........................................................................
Using wdeo
or photo sharing
web sites ..............................
/_ccess ng a web ste ..............................................................
Jp oat1 ng v qeos or ohotc}s.....................................................
Viewing
videos
Using Auto
or photos
Backup
on a TV Link-enabled
to send videos
or photos
TV ............
....................
s_aling the program tor Autc_ backup on your PC ...................
75
76
76
76
77
78
78
:}end ng photc_s or vdeos t_ a PC ...........................................
78
/_Dout tile Wakeup on LAN (WOL) teature ................................
79
Oonneotingto a WLAN and configuringnetwork s ttings
Connecting to a WLAN
The Wi-Fi Setting screen appears.
the screen,
You car/connect to a WLAN clsing an AP (access print) in the wireless
network sen/ice area.
Press the [Home
(12i')] button
-
touch
Social
The camcorder
connects
to the network
uploaded to a social network or photo/video file management
site.
Touch
the Wi-Fi setting
(_;)
tab on the bottom
¢_))
left.
Ad hoc AP
I_1
• The camcorder automatically searches for and then displays
available AP devices,
• If the desired AP is not on the AP devices list, drag the list down
to the bottom, and then touch Add Wi-Fi Network to input
and then search for the desired AP name manually.
Secured AF
wPs
WPS AP
"_
Sgna strength
Wi Fi sect ng c _t ons
_
To select an unsecured
AP or an AP that requires
a
Retresh nc sonnectab e APs
password, touch the AP. if you selected an unsecured
AP, go to Step 7. If you selected an AP that requires a
password,
go to Step 4.
.................
To select a WPS supported AP, touch the _
the AP, and then go to Step 5.
The virtual keyboard
appears.
Input the required
......
!//;JI
tab next to
• You can also connect to a WPS supported AP by dragging the
list of APs down to the bottom touching WPS PBC, and then
pressing the [WPS] button on the AP device.
s/
Not conneotec
ve[}
password
using the virtual key board. _,,page 75
When done, press OK, and then go to Step 7.
_,
Weak
"_"
Nolmal
"_
Wireless network (HMX OF20 only)
of
-(}i Record the PIN code displayed on the screen, and then
enter the PIN code at the Wi-Fi access point within two
minutes.
Sharing.
• To begin this process, you must have some video or photo
files stored in the carncoder's memory card that you have not
2
Scroll to the bottom
and then touch WPS PIN.
72
9aK
cry strong
8Jfort
you have chosen.
Connecting
to a WLAN and configuring
netwo_k settings
Configuning the network settings
You
can configure
these
settings
camcorder
on page
network
manually
connected
72,
not need
settings
is not
to the network
your camco_der
to configure
them
manually,
necessary
Touch the
tab.
° The camoorder connects to the network via the selected AP.
Note that configuring
in most
cases.
If your
after you followed
has adjusted
these
_@"
°
the directions
settings
f the csmcoreer
manually.
2
Press
Touch
the
[Home
(1_)]
theWi-Fisetting(
button
_
aces
the nelwolk propertbs
-
7
Even IfAP autherltlcatlon
-
touch
Social
Sharing.
)tab.
-
]aJ-anteec
1
Samsung
2
S.......
Samsung
//
Touch
"_"
g3
4
each submenu
and enter the required
information.
Select an authentication type according to your AP's selting,
Authentication
When you select Open or Shared,
set,
Data Encryption
WPA is automatically
Select an encryption type according to your AP's selting
Network
Password
Enter the password using the virtual keyboard,
The default is Auto
IP Setting
orWEP
You can select Manual
_page
75
to set the IP
address manually,
Wireless network (HMX QF20 only)
73
Mixed
vvnen the Data Encryptlorl funct xt is set to WEP or TKIP for
n the 802,1
tab next to an AP.
Samsung
74
Shared _ WEP
WPA-PSK _ TKIP. AES, or TKIP/AES
902,11 n AP eonrlectle
the
lot oetect the AP automatically, yoL cart se;
directly, _page
Data enorypt_on se_ngs Dy autnent_oat_on [ype are De_ow
• Open _ Disabled
° The camcorder automatically searches for available AP devices.
.... Touch
and Data Er srypuen nave been aetectea
set I te authentication rhode to Open or Shared,
and you do
ou cart access lit tne 802,11 _ "- sue
g _toae, tne newvorK connection arlr_ soeea are no_
Connecting
to a WLAN and configuring
netwo_'k settings
Manually setting the IP address
Touch
each submenu
item and then enter the required
using the virtual keyboard.
--page
value
75
By entering the IP address, you car/connect to a WLAN via an AP
(access point) in the wireless network service area,
7
Press the [Home
Touch
_
(121")] button
the Wi-Fi setting
(
_ touch
Social
IP
Sharing.
Enter the statio IP address
Subnet
) tab.
Mask
Enter the subnet mask,
° The camcorder automatically searches for available AP devices,
Gateway
Enter the gateway,
Touch
DNS Server
Enter the DNS address,
/_ Touch
the _
tab next to an AP.
IP Setting
-
Manual.
(_;
Touch
•
the
The carncorder
•
tab,
connects
to the
network
via the selected
AP,
The netwo(k seltings may differ, dependir!g on nelvvork conditions,
Do not try t o connect to a networ k that yo U have no pem:!!Ssi0n to
aooess,
Use a fully cha-ged battery while you are usirlg network services.
Wireless network (HMX QF20 only}
74
Connecting
to a WLAN and configuring
Network connection
•
Compatibility
netwo_k settings
®
tips
Be cautious when you enter personal information for an AP connection.
not enter any payment or credit card intormation on your camcorder
with an AP that has not been formally Wi Fi certified cannot be
manufacturer
Do
The
is not liable for any problem caused by entering such inforrnation.
guaranteed.
•
The wireless network connection
connected AP
may not be stable, depending on the
•
When the distance from AP is large, the network connection takes longer and
You can use the virtual keyboard to enter your information and settings.
Touch the desired characters, numbers, or symbols.
video stultering may occur
•
If there is a device using the same frequency
camcorder,
•
range as the network near the
you may experience wireless interterence.
If an AP device is named in a language other than English, it may not be
displayed in the AP list or. if it is. it may appear in a corrupted format or tont
For the network settings and password,
contact the network administrator
or
the service provider
The lelters and numbers used in passwords
may differ, depending
on the
encryption type.
You may not be able to connect to the wireless network, depending on the
conditions.
The AP search may find a printer that supports the wireless network, but you
_
cannot use the printer to connect to the network.
@.
The service provider may charge you a fee for the wireless connection
Ente
U
Deete the ast ette
Channels available for networking differ according to the region (country).
123/!@#
Some countries may restrict wireless networking under local radio regulation
laws. We recommend
you connect your camcorder
country where you purchased
to networks only inside the
/,!'_C
ABC mode. switch to 123 moae.
] 123 mode swtcn _o s meol moae
_wltch to ABC mode
it.
If your AP name is not in English, the camcorder
Return to _ne _ evlous screer
may not be able to locate the
t
device or the name may appear incorrectly.
•
@
under
the contract made between you and the service provider
•
Move tile curse
If a WLAN requires authentication from the service provider, you may not be
_ABC mode. change _ne case.
Enter a soace.
able to connect to it. To connect the WLAN, contact your network service
OK
_ave the d,_ Da lea _ex_.
provider.
If you cannot connect to a WLAN, try another AP from the available AP list
•
You can also connect to free WLANs in some foreign countries.
/_
_ _
A Iogin page may appear when you select free Wb_,Ns provided by some
network service providers.
o
Enter your ID and password to connect to the
Wb_,N. For intorrnation about registering or the service, contact the network
service providers.
Wireless network (HMX QF20 only)
•
75
You eels enter the intormatlo sonly 1 English, regardless of the
language setungs
'You cars enter c } to 99 characters in the text field
Using video or photo sharing web sites
Acce_m_7 a web site
7
Press the [Home
(121")] button
Uploading videos or photos
-
touch
Social
Sharing,
7 Access
Select a web site.
a sharing web site with your camcorder.
Touch files _ the
tab.
• The camco_der will automatically attempt to connect to a WLAN
via the most recently connected AP device.
• If the carncorder has not previously been connected to a
WLAN, it will search tot available AP devices. _page 72
!!!i!i!Ti!i!iZil}Ti_i_i_!_i_i_i_i_i_i{_]!
_iiiii@;C
ili_L
¸7¸¸¸
i
.... Touch the Comment
s/
Enter your ID and password,
(
and then touch
Touch the Upload(
£I _
)tab.
the Login
_'
) tab.
• The method ot u )loaalrj \ aeos or onotos may differ dependingon
ine
• For ir/tormation about entenng text, refer to 'Entering text'.
_page 75
• To select an ID from the list, touch v
_ an ID.
• You may be logged in automatically, if you have previously
logged in to the web site.
wed
au_nermoauoe
he_vorK
sl_e,
serif
sewloe
js,
contact
your
or enoIos
You must haye ae ex!sting aecour!t or! the file shar!ng web sit9 to use
this feature,
7G
o_ wed
pages
TUAOIIOF
c
may aTFecI
now qulc_a} aeos
open
_heN _nerearenotiles inthe camcorder memo
IBiS
Password
ueloaa
rle_A _rF, adrnlnlsirator
C -OVlaer
The speed ot your irltemetOOrlrleOIIOn
•
Wireless network (HMX QF20 only}
seleciea
f y )u cannoi accessa weo sl_ebecauseot flrewc sr usel
ID/Email
_/
_!_
box _ input your comments.
ou cannot use
Viewing video8 or photo8 on a V\J Link-enabled 72/
View your videos or photos on a 72/that supports the 72/Link function.
Your camcorder acts as a server and you can search for shared
videos or plnotos with the TV remote control.
_/£/
e
On 8 TV, you can p _y DaCKonly tne _loeos aria onoIos lecoraeo
Dy
%hecameo ]e]o
The efteotive netwo]K connection ]_v je Dstween ire camooraer 8no
the TV may differ dependir _ on the AP
Press the [Home
the
(121")] button
-
touch
TV Link -
f the samoorder
tab
• The oamco_der will automatically attempt to connect to a WLAN
via the most recently connected AP device.
If the camoorder has not previously been connected to a
WLAN. it will search tot available AP devices. -.,page 72
Connect
o
Depenaln 9 on the size st the
•
connect to the TV and display,
}u cannot er _ble this/unction
8eo or pnoto Tae, it may taKe longer %0
ifthere aJ-eno ecoraea vlaeos c
snotes in you[ camcorae
C/hen playing HD quallt_ videos on a TV, use an 802,1
your TV to a WLAN via an AP device.
itto 802,11 n, Im )errant: It$ su set the Data Eric
° Refer to your TV's user manual for more information.
&P ar s set
stion/unction
our network to WEP c TKIP. the network detaults to 802,
mnecamcoraer
:_ On the TV, search for the camcorder
is turned off 8Dnorrrlally (ex: ne_vorK alsoonnectlor
wrme yet :_e playlrl9 a vlaeo or shots on the TV. the TV oonslaere
itselt sti comectea to ine 08 qoorac
and browse the shared
or
g ar s
canrlot play HD qual]ly videos on the T_
YOUcan selee_ L S to 1000 ohotos and videos tiles to watcn _nrouc
our TV, The more tiles bu select, tne slower Tvle cs£1ooraer
videos or photos,
ooerates, We recomrnerld
• For information about searching for the camcorder and browsing
the videos or photos on the TV, refer to the TV user manual.
This/unction
no AIIShare
TM
selecting fewer than 10/,_} files,
may not operate properly on a Samsung HDTV that nas
maJ-kon it
vlaeo stu_enng may occur, aepena]ng
BIF£US,
e
•
c i the TV type aria le_ Dis4.
f video stu_erlQC Dccurs. recola vlaeos you intena _oplay _nrougn a
.. eless COFineotlen at lower vlaeo resolu_lor
• v]aeo stuttering occurs frequently vdlen, ou use a wireless
c :)nrleetlon, cnsnge to HDMI or AV cable, _pages
82--83
IfyoL play back videos on a Sarnsung HDTV supporting AllShare T_
ana vlaeo siu_tenn9 occurs ]epeatealy fc
the Samsung cai] cente
}vet 8 seconds, consult
See the back cc/er for the x_one numDeR
We recomrnena you connect the l_d and AP uisn 9 a L/@q {local ares
he.YorK) sadie, iTyou cement
vlcleo 8tu_e]ln_ 08_ occur
Wireless network (HMX QF20 only)
77
inem using a wireless comeotlon
Using Auto Backup to send videos or photos
Installing the program for Auto backup on
your_PC
Connect
the camcorder
2
Touch the
to a PC with the USB cable.
Turn on the camcorder.
The computer recognizes the camcorder and Intelli studio
launches automatically,
:_ When the pop-up window for the Auto backup
program appears on the PC screen, click OK.
tab.
• The carncorder will autornatically attempt to connect to a WLAN
via the most recently connected AP device,
• If the camcorder has not previously been connected to a
WLAN, it will search for available AP devices, --page 72
• If your PC is on, the PC recognizes the camcorder and Intelli
studio launches automatically,
• If your PC supports the Wake on LAN (WOL) feature, you car/
turn on the PC automatically by searchir/g for the PC from your
camcorder. '_pages 79-_80
installation
The camcorder
the PC.
• To install the program, fallow the instructions on the pop up
window,
will prepare
the files and then send them to
You cannot select individual files to send, This function only
sends files that have been newly stored on the carncorder,
The progress will be shown on the PC monitor,
•Atter the installation is cornplete, disconnect the camcorder
frorn the PC, and ther/reconnect the camcorder for the PC to
confirm the sewer ir/tormation message.
To run the program, disconnect the camcorder from the PC,
I_
•
The carrlcorder will seaJ-chtor available access points even it } )u are
connecting K>tne same access tolnt again
-
Ifyak IUrN O_ the carncorxser or r÷move tne papery v,asuese 1can@
hies. the file tratsster will be Jr/tel ]la[e@
t
While you al 9 using tnis Teatur_. the ougon8 on the camcoraer
ae alsat_e(
Sending photos or videos to a PC
7
Press the [Home
Social
(I_)]
button
-
touch
Auto
o
Backup.
Sharing
settings
*O
Wireless network (HMX OF20 only)
78
YOUoat- :;onnect only one carncorder
IIles
to the PC at a twne tot set sing
o
The backup rna} )e canoelea <sueto newvor_, con@_uor
w@eos or E hom)s can De sent tc a PO one time on
-
:lies cannot be sent agah even if you reconnect
your carncorxser
Using Auto Backup to send videos o__photos
About the Wakeup on LAN (WOL) featuD"e
WOL is a technology that allows YOUto turn on a PC _!-0reanother location over a rlAtwA_ connection o_the lete!Tlet or to set a PC t° wake up flTorrlsleep
mode, With the WOL feature, you can adtornatically tuln on or wave up a PC with your camcorder by touching Auto Backup.
7
Click Start,
and then open the Control
Panel.
7 Turn on the PC and press F2 while the PC is booting,
o The BIOS setting menu will appear.
Configure
the network
connection.
Select Advanced
Wirldows 7:
Click Network and Intemet _ Network and Sharing
Change adapter settings.
Wirldows Vista:
Center
Click Network and Intemet _ Network and Sharing
Manage network connections.
Wirldows XP:
Click Network and hternet Connection
_ Network
Connection.
Center
:_
Right click Local
s/
Click Configure
device
:_ Select
s/
(jl
manage
tab _ Allow
this
to wake the computer.
Click OK.
(jl Restart the PC.
79
and continue
and then open the Control
Configure the network
Windows 7:
Setup.
booting.
Panel.
connection.
Click Network and Internet _ Network
Change adapter settings.
Windows Vista:
and Sharing
Center
Click Network and Internet _ Network
Manage network connections.
Windows XP:
Click Network and Internet Connection
and Sharing
Center
Connection.
Wireless network (HMX QF20 only)
management
on PME _ Enabled.
Press F10 to save your changes
/_ Click Start,
Area, and then click Properties.
_ the Power
Resume
tab _ Power
_ Network
Using Auto Backup to send videos o__photos
7
Select the driver for the network adapter.
{I_ Click the Advanced
values.
tab, and then set the WOL menu
/any changes to S )ur PC's BJOS settings otner than tee ones oesoriDeo
_
Delow ma, cJamage your PC 3amsun 9 is not resDons_£ e Tot cart _ge
oausea Dy yOU changing your PC's BIOS settir _s
_/_1
o
ou cannot use this teatb e acrx}ss a fir÷wall or if s secunty progral_
1as been lnstalleo
TO Turn orl tee PC
OONNeOIION
_Otee L_
LAI
•
th the WOL teature, the RC must have an acwe
Ensure that tee INL]EOSlOr
HgntONtee PO's
ooR Is on. wnlon snows InaI the LAN ooneeotlor
Depenalng on your PO model tee carncoraer
waKe the PC
s actwe
ma, only De able to
Depenalng on your PO's OS or drivers, tee names of the WOL
seslng menu may var_
examoles or se_ng menu n_ _les: Er_abb PME, VVake on LAN etc
- exam" )bs of setting menu values: Enable Magic [ _CKe[etc
Wireless network (HMX OF20 only)
80
Using with other devices
Learn how to connect
HDD recorders,
photo
your camcorder
to your
printer,
or computer.
TV, VCR
or DVD/
Connecting
to a TV ..............................................................
3ot/_/ectlng tc_a high detinlt on TV wth HDM ...........................
3or/netting t_ a regu ar TV ......................................................
vlewng oil a TV screen ...........................................................
Dubbing
videos
Printing
photos
Transferring
to VCR or DVD/HDD
with a PictBridge
files to your Windows
recorders
82
82
83
84
.................
85
photo printer ..................
86
computer
.....................
Transferring ties wth Intel studo ............................................
88
89
Transt_rdng fi es by con_/ectlng the camcorder as a removab e
:l s_ ........................................................................................
93
C or r ecting to a 72/
Connecting to a high definition TV with HDMI
s_ Set the TV's input or source selector
you've attached
You
car/view
resdution
supports
Hgh
Definition
on an HDTV
HDMI
output
using
(HD) quality
an HDMI
to deliver
videos
recorded
connection,
high definition
its HD
to the HDMI input
to,
o Refer to the TV's ir/struction manual to see how to select the
This camcorder
video
the camcorder
TV's input or source.
transfer,
_> Select the playback mode on your camcorder, and then
start to play back videos or photos, _*pages 56_62
HDTV
HDM Mlgn Detirlitlon Multimedia Irlte]lace} _a oornoact s £]]o/v]c_eo
qtel?ace for tra_ssmitdng uncomDresseo olc [al clata,
Camoorder
THe/_-_ynet+ function lets
DUcontrol al_aewce8 tnat SUDDOI]Ins
Anynet+ funct_c hWiThins same emote, YOUcan use the Anynet+
function on the oamcorder it the camcorder is corlnected wrth an HDI_
cable to an Anynet+ supported TV. For more
aft "mation, reter to the
_,rlynet+ suppo]ted
TV's use]- marlua
e
is oro_ (sea w]tn the TV Connect
Sig*_tlow
_
This camcorder
Guide menu
lunotion. Ifyou try t( oor -lec_ tne camcoroer to a TV and don'1 law
our users mar Jab you can use _ne TV Connect Guide menu
tur _'uon [o wew co qeo_lon instruction9 on Tne camcoraer Bscree
Turn on the camcorder.
page 103
If you do net turn on the camcorder first, the camcotder may tail
to recognize the connected TV,
Use the AO power adaptor to power the camcotder when you
attach it to a TV,
_ousanuseoryaDtoAtypemlcroHL'
The HDM acK on tne camcoraer
If an Anynet+ suppoited
caDlewl_nTnlE sarncDrae
_sTO[OU_DU_Chly
%/ s oonneotea _o_ne oamooiaer
Dy E
-tDMI cable, turning on the sarnoorder may turn the TV's power on
(an Anynet+ turlctlon) It Ssu aon _wanz _l-iis_o occur, set Anynet+
Select HDMI TV Out. _page
102
®
.... Connect
the camcorder
to the TV with a micro
HDMI cable.
Using with other devices
82
(HDMI-GEC) to Off, '_page 103
_/vrlen _ne camceraer is oonneotec
Io a T with a micro HDM] cable
_ne wireless Tur_cuons ao no_ worn
{HMX-QF20 only)
Connectin 9 to a,]°V
Connecting to a regular TV
You
can view
TV that
composite
images
supports
output
recorded
standard
with
definition.
for standard
7 Connect
your camcorder
on a regular
This oamoorder
supports
definition
video
the camcorder
to a TV with an Audio/Video
cable,
Set the TV's input or source selector to the input you've
attached the camcorder to,
the
Refer to the TV's instruction manual to see how to select the TV
transfer,
input,
:_ Select the playback mode on your camcorder, and then
start to play back videos or photos. _pages 56-62
Regular TV
Make sure you ve conneotea ine camoorx]er iotne correct ir Dul
;aeKs, The TV screen may not a _play tee ngrlt dec intormatDn it
oorlrlectea incorrect
/_ _0_,_._!.
•
Vhen eorlnectlng to a TV using the Au@o/Video cable mater [ne
eolo[ of the cables to tee color of the eorresponalng acKs
e
vlaeonpu_r
Camcorder
ayappeaJ-greenaepenalngontheTV.
oomect the yellow plug of the Audio/Video
the TV,
When the cameorder
Signal flow
is oomeeted
of cable, the oamcorder
Itthis ooours
cab e to the green aek o
to a TV with more than one kind
outputs video signals in the following order
of prionty:
Audio/Video
•
cab
- HDMI _ AudioA ideo (composite) output
This oamcorder is provided with the TV Connect
Guide menc
function. It you t B ta co qect tne can corder to a TV and ac -it nave
your users manual, _ )u can use the TV Connect
function
[a view connection
Guide menu
instruc%lc98 on %necar[ soraer s screer
_*page 103
It _ bur TV has one auelo ]oK {m )no InDuD,connect tee yellow pluc
9r tee/-kualo/vJaeo cable to tne vlaeo jacK, tne wnKe plug la [ne
aualo jao_ ana leave trle rea plug ]rloonnec_ea
When you connect r le camcorder to a TV us ng the Audio/vale(
caole, images r÷coraea in nlgn detlnltion irnage quahty (Full HD
1080/60i or HD 720/60p) are playea peek in stanaara detlnitlor
_]age quall_
Using with other devices
83
Connecting
to a I°V
Viewin_ on a [V screen
Emages recorded
in a 16:9 ratio
Using with other devices
84
Butting video¢ to \fOR or DVD/HDD reoorder¢
You
can dub videos
recorded
on your camcorder
to a VOR
or DVD/HDD
recorder.
Start the playback
recording
on your camcorder,
and record it on the
device.
Refer to the instruction manuals supplied with your recording
device for details.
\
When dubbing
Camcorder
is finished,
stop the recording
device, and
then your camcorder.
I_;_
;_
_'_
Sigr_low
e
e
v_aeo8 recoraeo on tn_8ce£1corder can oF De (]UDDeGus[n_c
the Audlo/Vdeo cable in SD (standaJ-d definition) image quality
l egardless of the recording resolution,
You cannot dub to a recorder with an HDMI cable,
To copy a video recolded
Audio/Video
s HD high definition) image aua ty in HD
use tne DUH_4nsotbvaJ-eof _/OLcarncorxser. ana copy _ne vJoeo to
ca
your computer, _page
89
3ecause auDDIng ISpe"_wrnea via anaog aata transTer, tne image,
Connect
DVD/HDD
your camcorder
recorder)
to the recording
with the AudioNideo
device (VCR or
•
cable.
screen ot the c )nnected monitor device set TV Display:
Connect your camcorder to the input jacks of the recording
device.
Off
cage 102
To record the date/time
If your recording device has an input selector, set it to the
correct input mode.
Insert the storage device (tape, disc, etc.) into the recording
device.
Using with other devices
quall_y may aetenorate
-o hide t e screen na_ca_ors sucn as tne counter, eto.i on _n6
8S
alspla,
it on the ser÷erl, _page
102
Pi'inting photo
with a PictE i'idge photo pi'intei"
You can print photos directly by connecting your camcorder to a PictBndge printer (sold separately) using a USE_cable.
7
Set USB Connect
to PictBridge.
-page
Touch the photo you want to print, and then touch the Print
103
(_)
tab.
The corresponding message appears.
_
Use a USB cable to connect
your camcorder
to the printer.
1000o01_
]
]_
Oamoorder
Touch Yes.
• The selected photo is printed,
TouchCancel on the screen,
.... Turn your printer on.
The photo thumbnails appear on the LGD screen.
therl corirlec_t the USB cable agair/_
Use the supplied USB cable,
Using with other devices
8G
Printing photos with a PictBddge
photo pdnte_
_xF_" _
7
In the
printer
mode,
touch
the
MENU
The date/time Jmprirlt option may not be supported
by a }nnters
3heck with your pnnter marluracturer. The aa_e/ume imbnnt OblIor
cannot be setu ) ITthe Eqnter aces not SUDDOrIthe ObllOR
(i"ff_i_) tab.
PlctBndg6
TM
is a registered tradernaJt_ ot C Ds Camera & Imaging
_roduets Assooist_oFi
Canor
e
an rmage TransTerstanaaJa aevelobea by
Fuji, He, Olympus, Seiko Epsor
Use the A(
Dower aaabtc
and Son}
to bower tne 3amooroer our_Qc
PlctBndge printing It the csrrlboraer
srlu_s off du ag prlmrlg,
it mlgn_
aa_T _ge aata on tee storage mea_a.
Di'lb[
']aeo
_mages
DUCS_Snotbr_et bnOlOS 'ecoraeo on otner oewces
DU CS_]eOI
various prlntlQc )pitons ale available Gepenaln 9 on tne printer. Reter
to tee E"_nter's user manual to[ details.
Touch
•
the
desired
The selected
date
submenu
item.
and time display
option
is set.
.... To exit the menu, touch the Return ()
tab,
• The selected date and time will be printed on photos.
Using with other devices
87
Transferring filos to your Window
Intelli studio
is a built in program
that allows
you to play back
oomputor
and edit files. You car/upload
Your computer must meet the following requirements to run Intelli
studio:
o
files to web
sites,
such
as YouTube
or Flickr,
On a slower }ore[ J_ertnsn r@oorem@noeo vloeo
_arnes or c berate In an ueexDectea manne
fthevel_lonofDir÷ctXor
yourcompu_er
D]ayDacK
[[lay
slowertha_sg,0c
SKI_
asia
DirectX 9,0o c _ grle
OS
Microsoft Windows
or Windows
7
XP SP2, Windows
Vista,
•
ve recorernend transternng tne recoraea wdeos to a PC betor÷
o
DaOKor eal_ hg the v_aeo aata
To run Intelli-stualo, a laDIaD ooreDL£er r_au_r_s _e_er aria _aster
olaylng
eorneonerlte tha_] a deskta_ PC
AMD Athlon TM X2 Dual Core 2,2 GHz or higher is
recommended
Intel Core 2 Duo 2.2GHz or AMD Athlon
X2 Dual Core 2,6GHz
recommer/ded)
RAM
1GB or higher
.......
Video Card
o
Display
5 XP, Wlndc
vs vista, an8
De installea and wolk as 82-bit
ol-ogl _R
is recommended
8500 or higher, ATI Radeon
1024 x 768, 16 bit color
odor
34-bit erlvirenmer/t ot Wlrldc
Wlrldows 7. qtellkstualo ma
or higher is
]
NVIDIA GeForce
series or highel
tel -studio is not Mac OS cored ar/t
Or
or highe_ (1280
_
HD 2600
x 1024,
Samsung is not responsible for any damage that results tram using s
someu_er tnat aces not meet the reau_lements SUCh as a computer yoh
lave assernDlea ourself.
32 bit
recommended)
[
USB
.....
Direct X
micro USB 2.0
[
DilectX
9.0c or highel
i
i'ii
TM!i_i:!!!_:!}_i_il
!i
\.ji
Using with other devices
88
]°ransfe_dng flies to you__Windows
compute_
Tiransfendng files with h_teIHi.studio
When
you connect
studio
automatically
-_z_'_
¸
_
7
USB
®
the camcorder
to a PC with
a USB cable,
To disconnect the c SB cable alter con Dbtlng the file transTer, you iY ust
follow these steos
Intelli
launches.
_;
_
_,,
,_
1. CIbk the Safely
Set
page
Connect:
Mass
Storage
and
PC
Software:
On.
Remove
2. Select USB Mass Storage
103
3. If the Stop a Hardware
Hardware
ic sn on the tasKDar
Device,
and then dick Stop.
device
wirldow aeDes _. click OK
4. Diseonr/ect the USB cable _rom the oamoorder and PC
Connect
•
the
mair/window.
window
•
camcorder
A new file saving
removable
appears
If your carncorder
for saving
Depending
to a PC
window
or/your
with
the
along
USB
with the
cable.
Intelli studio
has no new files, the
pop
up
_£_
•
new files will not appear.
version
disk window
ot Windows,
use tne _:ovided USB cable 'Supplied by Samsung
al e sure _ _u insert the USE plug into rne micro dSB jack wltn the
oEugor_enteo corr_ct_
Use the A( sower aoaDtor to Dower tne east sorT]er wrier
the Windows
may also appear.
Iranstelnng files to your corn }u_er
When tk _ USB cable is conr/ected
_urnlrlg _ne oameorder on or olt
_'ay cause the PC to molar suor
)u alsconnect _ne JSB cable from tne DO c _ne camcoraer
wn,,e
transternng files, the sata transmission w_ s_oo ana tne asia may De
o
aamagea
Ityo_ sonnec_neoamcordertoaPOviaaUSBHUBor
s_mu_sneou%
}onnec_ the camcoraer
along wil__otber USB
aevloes _ne camcoraer may not wod* properly. Itthls c sours, r÷rnove
all USB devices trc n the PC. and trier "econneo_ _ne carrleorxsel
.... Click Yes in the new file saving window.
procedure
[el_ks_ualo ela', no_ au_ornauca
un. Iftbis occurs _ccess My
Cc ]lD_ter or VVindows Explorer open the anve _na_cortes sonas to
find Intellkstudic and then rurl [email protected]
The uploading
starts. Click Yes to confirm.
• If you do not want to save any new files, select No.
Using with other devices
89
°Fransfe_dn9 flies to your Windows
compute_
[_Z_]
_
Widen the Intelli studio starts up, video and photo thumbnails appear in
the main window,
For detai s, select H_qp --* I/olelp on the Inte listudio screen.
Vlenu temls
Disp ay hes n the selected tuIdel
Bwltch to Photo e@t mode
Bwltch to Video ed t mode
Bwltch to Share mode
En a ge or reauce _ne _nurnDna 18in _ne 18[
Beect a t e type
u ew v aeos ant }hotos
Bhow or n ae race8
If you install Intelli studio on your PQ, the program will launch more
quickly. To install the program, select Tool
on PC.
®
_ install
uew vaeos ant
Intelli-studio
of the selected Uder
on your corn )u_e
an( E qotos ot the connec_ea aevJce,
shotos of the selected tuIder on the devce
dew h es as thumbnails or on a ma }
You can update to the latest version of Intelli studio software by
clicking on Web Support
Update.
® The camoorder's
_
Update Intelli-studio
_ Start
Browse folders -__ne connecteo
built in Intelli studio software is intended for
home use It is not for precision or industrial productions
applications, we recommend
aevJce
Browse folders stored on your compute
For these
ore to the _"evous or next tdde
an editing soflsvare designed tor
protessional use
sr nt hes. v ew tries on a m8 _
store h es n Qontents Mane jet,
-ec 8ter t,_ce8 or retresh oon_en_ manage
Using with other devices
9 0
Transfe_dn 9 flies to you__Windows
compute_
You can play back the recordings conveniently using the Intelli studio
application,
7 With Intelli-studio,
click the desired
You can edit the videos or photos in various ways with various
furlctions, (Change Size, Fine Tuning Image Effect, Insert Frame etc,)
Before editing a video or photo in Intelli studio, make a backup copy of
the video or photo file and store it on your computer for safe keeping
using My Computer or Windows Explorer,
folder to display your
recordings.
° Video or photo thumbnails appear on the screen, depending on
the folder you selected.
7 Choose
the videos
or photos you want to edit.
Choose the video or photo that you want to play back.
Click Movie Edit (_) or Photo Edit (_)
browser according to the selected file.
° You can view the file information by moving the mouse over the
file,
° The selected file appears in the editing window.
° If you click a video thumbr/ail once, the video plays back inside
the thumbnail frame, allowing you to search tor a desired scene
with ease.
_
After you select the video or photo you want, double-click
:_ Edit a video or photo with various
to
play back.
° Playback starts and the controls appear.
_ Photo formats: JPG, GIF, BMP, PNG, TIFF
Using with other devices
in the Intelli-studio
9]
edit functions.
]°ransfe_dn 9 flies to you__Windows
compute_
Click Upload
Share your contents with the world by uploading photos and videos
directly to a web site with one click.
7
to start uploading.
A pop up window appears containing your web browser
displaying the selected site or a pop up window appears asking
for your ID and password.
Choose the videos or photos you want to share.
Click Share
(_)
on the Intelli-studio
browser.
The selected file appears in the sharing window.
Enter your ID and the password
to access.
Access to the web site contents can be lirnited deper/ding on
your web access environment,
:_
Click the web site you would
You can choose YouTube,
like to upload files to.
twitter,
Flickr,
Facebook,
Picasa, E-mail, or another web site you want to use for your
site management,
Usingwithotherdevices 92
°l°ray_sfe_dn9files to your Windows
compute_
Transfenring files by connecting the camcorder as a rernovable disk
You can copy video or photo files recorded by the camcorder to a Windows computer by connecting the camcorder to the computer using a USB
cable,
The folders in the storage media appear.
•
7
Set USB Connect
Set PC Software
:_
Insert a memory
s/
Connect
_page
to Mass
Storage.
to Off. -page
card. --page
the camcorder
-page
Different file types are stored in different folders,
103
103
16
to the PC with the USB cable.
89
• The Removable Disk or Samsung
PO's screen after a moment.
• Select Open folders
and then click OK.
window appears on the
to view files using Windows
Explorer,
(jl
Copy and paste or drag and drop the files from the storage
media to your PC.
_@
•
f the Removable Disk window does riot appeal contlrmthe
sorlnectlorl _oage 89) or perTormsteps 1 to 4 agan, Ifthe
emovaele
O ISK Coe8
not aDoear
automatics%
open
Trle lemovaele
OISKrolaer irl MyOornpu_el
Ifthe DOFIrleoIeo
oamcoroers olsKonve ooes not eden or the OOrlleX_
slenu wsatsooears when rlgn_OIlOKIn_
your mouse seenor erowsel
appeaJsbroken,yourcomputer may be intected by an Autorur us,
_leaseupoate yc Jranu-wus sollwsre [oi_slatestversionsno sos
your
•
GISK
8)8 oreateo
Using with other devices
93
or/e8
De}erlolrl9 on the tunctlonsof the carncorder,additionalfolders cars
Tray_sfettin 9 flies to yOUFWindows
computer
• HD quality videos have an HDV_####,MP4 name format,
• The file number used in the file name automatically increases when
you create a new video file,
• A new folder is created when the file number has reached
Video
999-- 1,000.
• The folder names are given in the following order: 100VIDEO,
101 VIDEO, etc, The maximum number ot folders is 999.
• The camcorder can create a maximum of 9,999 files in a storage
media.
,Rder
,
flies
Video files are compressed in H,264 format, Tile file extension is
'.MP4',
to page 97 tot the video resdution,
Photo flies
,
,
Photo images are compressed in JPEG (Joint Photographic Experts
Group) format, The file extension is ',JPG',
Refer to page 97 for the photo resolution,
• As with video files, the file number used in the file name
•
autornatically increases when you create a new photo file.
Photos have a SAM_####,JPG name format.
For proper playback, the camco_der requires that flies have their
• The folder names are given in the following order: 100PHOTO,
101 PHOTO, etc.
"_,_:_
}
Usingwithotherdevices 94
orunal
folder and file names,
Settings
Refer
to items
to configure
your
camcorder's
settings.
Settings menu .....................................................................
/_ccess ng the sett ngs menu ..................................................
96
96
:)hooting ................................................................................
Pla/back ................................................................................
97
98
Disr_la'', ................................................................................
101
tonnectMty ..........................................................................
Seneral ................................................................................
103
104
Settings menu
Touch
Accessing the settings menu
a submenu,
The OIS Duo function is used here as an example,
The instructions below are an example of how to access and use the
Settings menu items, When you access and use other Settings menu
iterus (pages 97,- 106), use this example as a guide.
7
Press the [Home
Touch
(1_)]
button
_ touch
Settings,
a menu.
Touch the desired submenu
To exit the menu setting,
i_
Shooting:
Set the items in the video or photo recording mode.
_pages 97,-98
Playback:
Set the items in the video or photo playback mode
_pages 98-101
]
Display:
Customize the display seltings. _pages
Connectivity:
General:
Set the connection
items
_page
101-102
108
Change the seltings for the camcorder system such as
memory format and default set, "*pages 104,-106
Settings
9 6
item.
touch the Return ()tab.
Settings menu
* : Default
* : Default
Set the video
•
(1920xl
•
resolution.
Full HD 1080/60i*
080/60i)
HD 720/60p
Set to compensate
(_):
Records
in the Full HD
format.
(liD):
Records
its the HD (1280x720/
(_):
Use for videos
$_]
•
Video
Resolution
•
Records
in the WeWHD
you intend
to upload
to Web
(o,_.):
sites.
shake/blur.
Enables
tot camoorder
shake.
the function.
OIS Plus improves on existing Optical Image Stabilization
W allowing the camcorder lens to shift over a wider range
d motion in wide/tele zoom position This allows the
camcorder to compensate tor greater degrees d camcorder
shake and delivers a stunning level of image smoothness,
•
Off*:
(VBR), VBR is an encoding system that automatically
adjusts the bit rate in response to the image being
recorded.
,,
On
The available video recording time differs according to
the video resolution you select. _page 19
The videos recorded in Web/HD resolution are
_}
76
resolution.
3072X1728"
3072xl
for camcorder
the function,
(_, ): Enables to compensate
Set to record
5.3M
(_):
Records
in the
1920X1080
(_):
of very small objects.
on a small
portion
of a large
at a tele angle.
® When recording in the Tele Macro mode. the focus
speed may be lowered.
®
Macro
up images
the function,
(,,_,): Focuses
object
Tele
close
Disables
Use a tripod (not supplied) to prevent camcorder
shake in the Tele Macro mode
® Avoid shadows when recording in the Tele Macro mode.
® As the distance to the subject decreases, focusing
area narrows,
® When the distance between the camcorder
728 resdution.
and a
subject is too small and the camcorder cannot focus.
Records
in the
1920x10S0
resolution.
Resolution
•
Plus
Disables
scan mode at 60 frames per second.
Recorded files are encoded using Variable Bit Rate
reso!ut!or ! !n !he Social Sharing mode. "*page
2M
On
•
60i indicates the camcorder will record in interlaced
scan mode at 60 fields per second.
60p indicates the camcorder will record in progressive
Set the photo
Photo
,,
[_
format,
displayed in 1280X720/60p resolution in the video
thumbnail view and in WQGA (432x240/30p)
°
Off*:
OIS Duo
60p) format.
,, Web/HD
•
The number of recordable images differs according to
the photo resolution you select _page 19
Photos that are recorded on your camcorder may not
playback properly on other digital devices that do not
support these photo sizes.
Settings 97
press the [Zoom (W)] button and then adjust the total
distance between the camcorder and the subject
When the Tele Macro function is On and the
camcorder magnifies a subject in tele mode, the
minimum focal distance between the camcorder arid
a subject is 50cm,
Settings merits
* : Default
Set to increases
zoom
°
i_]
Digital
Zoom
of zoom
available
with
a
Set thumbnails to display in 3x3 or 4x4 format,
• 3X3": Displays thumbnails three across and three
down,
lens,
Off*:
optical
,,
the amount
* : Default
Disables
zoom
On: Enables
the
digital zoom
function.
Only
Thumbnail
is available.
higher
digital zoom
magnification.
'_i
When you use the digital zoom, the camcorder processes
the image digitally more than in the optical zoom mode.
As a result, the image resolution may deteriorate.
The top of the bar shows the
digital zooming zone.
Video Play
Option
•
when you press the
[Zoom (T/W)] button or use the
Zoom indicator
Repeat All (_):
Plays all the video clips
repeatedly until the Thumbnail view (_i) tab is
touched.
,, Repeat One (CO): Plays the selected video only
repeatedly ur/til the Thumbnail view (_)
tab is
totiched.
Set to apply digital effects by shaking the camcorder.
,, Off*: Disables the Shake It function.
,, On: Enables to Shake It function. Each time you
shake the camcorder in Art Film or Art Time Lapse
mode, it applies a digital effect in order.
Shake It
Smart BGM
Option
Set background music to play back with your
videos, You can select one of the 20 music files in
the camcorder, frorn The Flea Waltz to The Four
Seasons, or select the Random option, which plays
back the music files randomly.
[_'
Settings 9S
You canalso change Thumbnail to 3x3 or 4x4 by
pressingthe [Zoom (T/W)]buttonin the thumbnailview
Set a specific playback style according to your
preference.
Play AN* (_):
Plays video clips in succession
starting from the selected video to the last one,
then returns to the thumbnail view,
Play One (_!_): Plays the selected video only, and
returns to the thumbnail view,
Digital range
The zooming zone appears
Zoom (@]}) tab,
• 4X4: Displays thumbnails four across and four
down.
You canalso enjoy externalsongs by savingthem into
a memorycard. as well as 20 musicin Smart BGM
Option of the camcorder _pages 99-100
Settings merits
You can enjoy external songs, as well as the music files in the Smart BGM Option
card.
To set external
songs
as background
music
of the camcorder, by saving the external songs to a memory
.... z ,,
Convert your sor/gs to a compatible format using the Intelli studio
program built in to your camcorder so that the songs can recognized
by the camcorder.
_i_ _ x
7
Connect
the camcorder
the Intelli-studio
program.
,_x_
_
_'_ii x_i_ x: _ x _
to a PC with the USB cable to run
-page
Click Tool on the Intelli-studio
Smart BGM.
89
screen -
Sending
song for
i_
_;_d ii_ ¸ _'_;
When the transfer
is complete,
click OK.
You can save up to 5 converted songs in the camcorder's
memory card.
(}i The song saved to the memory
BGM
.... Click Browse
on the Smart BGM screen to select the
desired song.
//
Change the song's name so that it can be recognized
the camcorder, and then click Send - Yes.
by
The song is converted to a m4a file and transferred into the
memory card in the camcorder.
Settings 99
Option
card appears
menu in video playback
mode.
on the Smart
_page
98
Settings menu
To delete the external
You
can clelete
screen
or from
•
external
the
BGM
songs from the memory card
songs
tolder
frem
Manage
in the
memory
BGM
in the Smart
BGM
card.
The external sorlgs you want I0 oonver¢ must be in the rap3 ©r m4a
formats, Some MP3 files may not be supported,
External songs aJ-@
saved to _he BGM folder in the rnemory card,
,
If you transfer the converted
rn4a fi!es inlo the B,_M _older it! th@
mernory card, you qan use them as Srnart BGM ribs,
Settings
]00
Settings menu
* : Default
* : Default
Set the playback options for a slide show, and then
touch the ioK: tab.
• Music: Turns the background music ors or off.
If the Music function is On when the slide show
Slide Show
Option
Set the brightness of the LCD screen.
Touch the _/_
tab between 0 and 10,
LCD
'[_,
Brightness
starts, the 20 melodies will play back in shuffle
mode.
• Interval: Continuously plays back photos at the
intewal you select. You can choose 1 seo, or 3
® Ifthe surroundingsaretoo bright,adjustthe bnghtness
of the LCDscreen,
o Adjustingthe LCD screendoes not affectthe image
you are recording
A brighterLCD screen consumes morepower,
Set a gnd to help you compose a scene,
sec.
Off* ([6TFI):Disables the function.
• Cross (EJ_): Placing the subject at the center
cross point puts the subject in the middle of the
flame.
Effect: Continuously plays back photos using the
fade in/out effect to transition between photos.
Set to play back background music by shaking the
camcorder,
• Off*: Disables the Shake It function.
On: Enables the Shake It function, Shake the
•
Guideline
camcorder while a video is playing to have the
camcorder play background music.
Grid (_):
For recording multiple subjects. Pulting
subjects at or near the grid cross points creates a
balanced composition,
,, Safety Zone (_):
Positioning subjects within
the Safety Zone rectangle ensures they will be
recorded.
Shake It
'_i
Settings
]0]
_ Positioninga subject at the cross point of a guideline
providesa balanced composition.
Guidelinesare riot recorded,
Settings menu
* : Default
* : Default
Set to display the date and time on the camcorder's
display,
• Off*: Does not display the current date/time
information.
Date/Time
Display
Set the HDMI video output to match the TV you have
connected the camcorder to,
HDMI TV
Out
• Date: Displays the currer/t date,
° Time: Displays the current time,
• Date & Time: Displays the current date and time.
[#5/ * The date/timewill read JAN/01/2012 12:00 AM
when the internalrechargeablebattery is depleted
The date andtime dbplayed by this functiondepend
on the Date Type and Time Type settings.
_page 104
Set to darken the LCD screen for low power
consumption,
• Off: Disables the function,
,, On*: When the camcorder is idle for rnore than 2
Set whether or not to display the camcorder's On
Screen Display (OSD) on the TV screen,
° Off: Displays the OSD menus only on the LCD
screen,
TV Display
° On*: Displays the OSD menus on the LCD screen
and the TV screen as well,
i_
• Auto*: The video signals are output in the sarne
format as the recorded file. Use this setting only
when connecting to an HDTV,
• 480p: The recorded file is output in the 720x480p
format, Use this setting only when connecting to a
standard, analog TV which supports SD (Standard
Definition) progressive scan (480p) signals through
its HDMI jacks.
minutes in STBY mode, or for more thar/5 minutes
Auto LCD
Off
The menuscreen,thumbnaildisplay, and demo screens
are displayedon a TVeven if youset TV Display to Off,
Settings 102
when recording a video, the power saving mode
starts by dimming the LCD screen.
,_[
® When the Auto LCDOff function is On, youcan press
any button onthe camcorderto returnLCD brightness
to normal
The Auto LCD Off functionis Off inthe following
cases:
Whenthe camcorder has a cable connection.(USB
cable, AC power adaptor,etc.)
Whilethe Demo functionis inoperation.
Settings menu
* : Default
* : Default
Set to launch the built in editing software (Intelli studio)
automatically when you connect the camcorder to
your PC,
" Off: Disables the function,
PC
Software
USB
Connect
TV Connect
Guide
" On*: Laurlches Intelli studio when you connect the
camcorder to your PC,
[_]
Set to control some fur/ctior_s of the camcorder with a
Samsung TV remote control that supports Anynet+.
• Off: Disables the function,
• The PC Softwarefunctionis not availableunder the
followingconditions:
If USB Connect is set to PietBridge
To enablethe PC Softwarefunction,set USB
Connect to Mass Storage inthe Settingmenu,
• The PC Softwareis compatiblewithWindows OS's
only,
,
Anynet+
(HDMI-CEC)
On*: Lets you operate some fur-lotions of the
carncorder with a 71/remote control when
cor/neoting the camcorder to a Sarnsung Anynet+
supported TV.
,_'_; ® When youturn the camcorder on and connect it to a
SamsungAnynet+supportedTV with anHDMI cable,
the TVautomaticallyturns on.
Fordetails on the Anynet+(HDMICEC)function,
refer to the user manualof the SamsungAnynet+
supportedTV,
Select a mode to use when connectir/g the
camoorder to a PC or printer with a USB cable.
,, Mass Storage*: Connect to a PC to transfer
videos or photos, '-page 93
• PictBridge: Connect to a PictBddge pdnter to
print photos directly (when using the PictBridge
function). ",page 86
Settings
View the connection instructions before connecting
the camcorder to your TV set,
, HDMI: Displays the HDMI guide,
,, Composite:
Displays the Composite guide.
] 03
Settings merits
General
* : Default
* : Default
View the storage information of the inserted storage
media such as meruory space used and available
memory space.
Card Info
Set a date format,
[_L_] • The actualcapacity may be lessthan t_.... pacity
displayedon the LCD screenas the camcorder's
systemfiles occupy a part of the capacity,
If thereis no storagemedia inserted,you cannot
selectthe Card Infofunction and it will look dim inthe
menu,
Date Type
Assign file names to the recorded images,
• Series*: Assigns file numbers in sequence even
after you replace or format the storage media or
delete all files,
File No.
Time
Zone
Date/Time
Set
_;_ This functiondepends on the Date/TimeDisplaysetting,
"*page 102
Set a time format,
,, Reset: Resets the file number to 0001 after you run
format, delete all files, or insert a new memory card,
[l_]
,, 12 Mr*: Displays the time information in 1 2 hour
units,
Time
When y.... t File No. to Seri...... h file i.... igned
a differentnumberto avoid duplicatingfilenames,This
numbering schemeis very usefulwhen you wantto
manageyourfiles on a PC,
•
24 Hr: Displays the time information in 24 hour
units.
This functiondepends on the Date/TimeDisplaysetting,
"_page 102
Set whether or not to play the beep sound.
Off: Disables the function.
Beep Sound
,, On*: Turns on the beep sound, A beep sounds
when you press buttons or touch tabs.
{_}
2S
Settings
Type
_
Set the time zone for your location,
• Nome*: Select the Home function when using your
camoorder for the first time or returning the clock to
your holTletown date/time,
,, Visit (,_): Select the Visit function when traveling
in a different time zone, Touch the
tab,
and ther/the _ tab,
Set the date and time. '-page
,, 2012/01/01 : Displays the date in the year/month
(two digit)/day forrnat.
,, JAN/01/2012*:
Displays the date in the month/
day/year format,
• 01/JAN/2012: Displays the date in the day/month/
year format.
, 01/01/2012: Displays the date in the day/month
(two digit)/year forrnat.
]04
The BeepSound functionis disabledinthe followingcases:
Duringrecordingand playing
Whenthe camcorderhas a cable connection,(Audio/
Video cable, microHDMI cable,etc,)
Settings menu
General
* : Default
* : DefaL£
Set whether
or not to play the shutter
•
Off:
•
On*: Turns
Shutter
Disables
sounds
Sound
sound,
Use to reduce
the function,
when
on the shulter
when
[Recording
you take
sound.
a photo
start/stop]
Shutter
"click"
by pressing
•
the
,,
button.
has a cable connection.
to automatically
The
LCD
screen,
5 Min:
the
Quick
STBY
turn off if it
On
,[4
5 Min*:
Turns
operation
[_}_7 •
off the carncorder
camcorder
tunas off when
The camcorder
a short
and battery
for an extended
goes
period
After
the camcorder
into the Quick
the
On
of time after you close
5 minutes
turns
drain
time,
you close
in Quick
On STSY
off,
® We recommend turning off the cameorder
after use
to reduce energy consumption. However. as an
alternative, you can use the Quick On STBY function
performs
no operations
for 5 rT-_inutes.
• Off: Disables the furlction,
•
consumption
frequently
LGD screen,
mode,
(Audio/
Video cable, micro HDMI cable, etc.)
Set the camcorder
Off*:
STSY mode
I_L_] The Shutter Sound function is disabled in the following
cases:
When the camcorder
energy
recording
under most shooting conditions to reduce energy
if it performs
consumption
no
effectively.
® The charging indicator keeps blinking in Quick On
STBY mode
for 5 minutes.
•
The Auto Power Off function does not work in the
The Quick On STBY mode is not available under the
k_
Auto
Off
Power
following situations:
When the camcorder
following conditions:
has a cable connection.
(USB
When the LCD screen is open.
cable. AC power adaptor, etc)
When you operate the buttons on the camcorder,
While the Demo function is in operation.
Whib you are recording.
While you are recording (including the recording
Set to use the camcorder
pause>, playing (except pause), or running a photo
slide show
To turn the camcorder
conveniently
with
either
your riglat or left hand,
on again, close the LCD
Switch
screen and then open it,
Grip
•
Off
"
On*
: Disables
the functior/,
: Lets you use the
camcorder
easily
with
either
hand.
L_i
Settings
]O_
When you change the Switch Grip direction while
recording, the recording may be temporarily interrupted.
Settings menu
General
* : Default
Use
to delete
problems
•
all files completely
on the
storage
* : Default
or to correct
Reset
media.
all menu
settings
to the factory
if you want
all the settings
defaults
(factory
settings).
Touch
Do not remove the storage media or perform any
other operation (such as turning oft the power)
Default
during formatting. Also. be sure to use the provided
Set
Yes
returned
to the
defaults.
A(} power adaptor to power the camcorder while
Do not turn oft the power while using this function.
Initializing the camcorder settings to factory detaults
tormatting the storage media The storage media may
'_}
•
does not aftect recorded images.
be corrupted if the battery becomes exhausted during
tormatting
Language
If the storage media becomes corrupted, tormat it
again.
Format
[i,rr,_] •
•
Shew
major demo
functions
to display
for the cameorder.
•
Off:
Disables
•
On*:
Enables
You cannot tormat a memory card with the protection
i_11 The Demo mode is canceled in the tollowing cases:
If the L(}D screen is touched.
_page
17
the Demo
Home (1_), etc)
Demo
function.
start/stop,
However, the camcorder
enters
the Demo mode automatically atter 5 minutes in STBY
mode if it is idle tor 5 minutes without an operation If
Formatting completely deletes all files and options on
you don't want the Demo function to start, set Demo to
Off.
a memory card, including protected files By deleting
all files and options, tormatting typically corrects
problems,
the function.
If you press any button (Recording
If there is no storage media inserted, you cannot
select tile Format function, and its name will be
dimmed on the menu.
•
the
uses
29
Do not tormat the storage media on a PQ or other
device Make sure to tormat the storage media on this
camcorder.
tab set to lock
•
Select the language the camcorder
the menu and messages.
_page
enabling stable read/write speeds and
',_i
operation,
The Demo function does not work in the following case:
If you set Auto Power Off to 5 Min and you are using
the battery to power the camcorder, the Auto Power
Oft function turns tile camcorder off betore the Derno
function runs,
Settings
lOG
Appendixes
Get information
specifications.
about
error
messages,
maintenance,
and
Troubleshooting
................................................................
vvam Hg icor/s and messages ...............................................
:}ymptcx-ns and so utlor/s .......................................................
Maintenance
......................................................................
Using your camcorder
Glossary
abroad
..........................................
............................................................................
Specifications
....................................................................
108
108
114
121
123
124
125
Tr©utolosh©©ting
Before contacting a Samsur/g authorized service center, perform the following simple cheeks.
They may save you the time and expense of an unnecessary calk
Wanning icons and messages
Problems may occur because of the following reasons. Check the information and take corrective action.
Battery
_,
_,
Low Battery
_
............
_
•
The battery is almost discharged,
Check authenticity
of the battery.
Storage
_
The battery cannot pass authenticity check,
.......
Replace with a d/arged battery or conr/ect the A©
power adaptor,
o ©heck whether the battery is authentic, If noL
change to an authentic Samsung battery.
• We recommend you use only genuine Samsung
battenes in this camcorder,
media
Insert Card
Card Full
t_,_
There is no mernory card inserted ir/the mernory card
slot.
o Ir/sert a memory card.
There is not enough space to record on the memory
,, Delete unnecessary files from the memory card.
,, Back up files to a PC or ar/other storage media,
and then delete unneeded files.
card.
,, Replace the memory card with another card that
has enough free space,
Card Locked
The write protection tab on an SD or SDHC card has
been set to lock.
Appendixes
]08
-
Release the write protection tab,
Storage
media
Card Error
Not Formatted
_
•
Replace the memory card with another card.
The memory card is not formatted in this carncorder.
•
Format the rnernory card using this camcorder,
o
Files cannot be played as the memory card format
is not supported by the camcorder.
Format the card using the camcorder or replace
the card with a card formatted correctly.
o
Replace the memory card with a recommended
card.
The memory card may have been formatted by
another device and may still have e×isting images on
it,
Not Supported
Format
Not Supported
The memory card has a problem and the camcorder
cannot recognize it.
Card
Low Speed Card.
Please record at a
lower resolution.
The
memory
card is not supported
The memory ca@ is not fast
enough
0
in this camcorder,
to reooKJ at this
resolution.
io
o
Record video at a lower resolution and quality.
Replace memory card with a faster card.
Recording
o Rim the camco@er's power off and on for data
Write Error
Some problem occurred while writing data to the
storage media,
recovery,
If a file is not recovered, use the camcorder
to format the storage media after backing up
important files to a PC or another storage media,
Recovering Data...
Don't power off and
keep card inside,
_ Wait until data recovery is finished.
• Never turn off the power or qeot the memory card
during recording,
The file was not created normally,
Appendixes
]09
Recording
_
.......
The limit of video
files is reached.
Cannot record
video.
_ _
_ ..... _
_
The number of video files that carl be stored is 9,999.
_ ......
.....
o Delete unnecessary files from the storage media,
o Back up files to your PC or another storage media
and delete files,
• Change to another card which has enough free
•
space,
Set File No. to Reset.
Format the storage media.
The limit of photo
files is reached.
Cannot take a
Delete unnecessary files on the storage media,
o Back up files to your PC or another storage media
and delete files,
The number of photo files that carl be stored is 9,999,
photo.
File Limit is reached.
Cannot record
video.
File Limit is reached.
Cannot take a
photo.
Check the lens
•
o
The folder and file number have reached their
®
Format the storage media,
o
Set File I/o. to Reset and format the storage
media. Remember to back up important files before
formatting,
•
Set File No. to Reset and format the storage
media. Remember to back up important files before
formatting,
•
Open the lens cover,
rnaximum and you cannot record.
The folder and file number have reached their
rnaximum and you cannot record.
Lens cover is closed,
cover
Appendixes
]]O
Change to another card which has enough free
space,
Set File I/o. to Reset.
Playback
•
Read Error
A problem has occurred while the camoorder was
rertding data from the storage media.
storage device,
•
Corrupted
file
Use the carncorcler to format the storage media
after backing up importar_t files to a PC or another
This file cannot be read,
Use the camcorder to format the storage media
after backing up important files to a PC or another
storage device,
Editing videos
Cannot select
The filesyou want to combinehave different
different
resolutions,
resolution,
Not enough free
space in Card.
,, You cannot combinefilesthat have different
resolutions.
You cannot edit due to insufficient space in the
memory card.
Select 2 files for
combine.
Only l}!vo files car/be combined,
Total file size is over
than 1,8GB,
The files whose total size is likely to exceed 1 .SGB
cannot be combined,
®
Edit after deleting unnecessary files,
o
Combine ls!vofiles first, and then combine the
resulting file with an additional file. Note that
you cannot combine files if the total size of the
combined files exceeds 1,8GB.
o
Appendixes
]]]
Perform a divide or partial delete function first to
delete unnecessary parts of the files, and then
perform the combine function.
USB
.......
.... _
• ..............
, !_ •
Fail Printer
Connecting
Change 'USB
Connect'
...............
• Check the USB cable.
A proUem occurred when connecting the camcorder
via USB to a pnnter.
Try the connection procedure again.
Switch USB Connect function to PictBridge.
Fail USB
o
Check the USB cable.
o
Try the connection procedure again.
Switch USB Connect function to Mass Storage.
Connecting
Change 'USB
Connect'
A probler¢_occurred when conr_ecting the camcorder
via USB to a PC.
Ink Error
There is a problem with an ink cartridge.
Cheek the ink cartndge,
• Put a new ink cartridge into the pnnter,
Paper Error
There is a problem with the paper,
• Cheek the paper in the printer, If there is no paper,
insert paper,
File Error
There is a problem with the file.
• Your camcorder does not support this file format,
• Try another file recorded on your camcorder.
Printer
There is a problem with the printer,
• Turn the prirlter's power off and on.
o Contact the pnnter manufacturer's service center,
o
o
Error
Print Error
A problem occurred dunng pnnting,
Appendixes
o Do not remove power source or eject memory card
dunng pnnting,
]]2
Wireless
Network
Connection
No response
server,
failed,
from
(HMX-QF20
Only)
Oamcorder's WLAN configuration does not rnatcl_ that
of the AP,
o Configure the IP setdngs (auto or manual) of your
carncorder to match the AP's,
No renderer that car/be connected to the camcorder
is found in the connected network.
•
Appendixes
]]3
Checkyour
network connection,
Symptoms and solutions
If these instructions do not solve your problem, contact your nearest Samsung authorized service centen
Power
o The battery may not be installed in your carncorder. Insert the battery into the camcorder.
• The inserted battery may be discharged.
Gharge the battery or replace it with a charged one,
o If you use the AO power adaptor, make sure it is prope;ly connected to a wall outlet.
TIle camcorder does riot turn on.
o Is Auto Power Off set to 5 Min? If no button is pressed for about 5 minutes, the eamcorder
is automatically turned off (Auto Power Off), To disable this option, change the setting of
Auto Power Off to Off. _page 105
Tlae power turns off automatically.
The battery is almost exhausted. Oharge the battery or replace it with a charged one.
• Aernove the battery or unplug the AO power adaptor, and connect the power supply to the
camcorder again before turning it on.
The power cannot be turned off.
The temperature is too low.
o The battery is not fully charged. Oharge the battery again.
• The battery has reached the end of its lifespan and cannot be recharged. Use another
The battery discharges quickly.
battery.
Display
'
The TV screen or LQD display/has distorted
images or has stripes at the top/bottorn
the left/right.
or on
Unknown image appears on the L.QD screen.
,
..........
This can occur when recording or viewing a 16:9 ratio irnage on a 4:3 ratio TV. or vice versa.
For more details, see the display specification. ,_page 84
• The cameorder is in Derno mode. If you do not want to see Demo images, change the
settling Demo to Off. _page 106
Appendixes
]]4
Display
......
F_
.....
+'....
...............
Unknown icon appears on the screen.
,, A warning icon or message appears on the screen, --pages
An afterimage remains on the LCD screen,
• This occurs if you disconnect the AC power adaptor or remove the battery before turning the
power off.
108--113
The image on the LCD screen looks dark.
• Ambient light is too bnght. Adjust the bnghtness and angle of the LCD,
Recording
Pressing the [Recording
does not start recording.
start/stop]
button
,, Set your camcorder to the recording mode, _page 37
,, There is not enough free space to record on the storage media,
,, Check if memory card is not inserted or write protect tab is set to lock.
The actual recording time is less than the
estimated recording time.
,, The estimated recording time may vary depending on content and features used.
,, When you record an object that moves fast, the actual recording time may be shortened.
The recording stops automatically,
,, There is no more free space for recording on the storage media. Back up important files on
your PC and format the storage media or delete the unnecessary files.
,, If you make recordings or delete files frequently, the performance of the storage media
detenorates, If this occurs, format the storage media again.
,, If you use a memory card with low writing speed, the camcorder automatically stops
recording videos and a corresponding message appears on the LCD screen,
When recording a subject illuminated by bright
light, a vertical line appears.
When the screen is exposed to direct sunlight
during recording, the screen becomes red or
black for an instant,
,, This is not a malfunction,
,, This is not a malfunction,
Appendixes
]]5
Recording
During recording, the date/time does not
display,
You cannot record a photo image,
You don't hear the shutter sound when you
record a photo image.
You don't hear the beep sound,
There is a time difference between the pohqt
where you press the [Recording start/stop]
button and the point where the recorded video
,, Date/Time
Display is set to Off. Set the Date/Time
Display
to On. _page
102
,
,
,
Set your camcorder to the photo recording mode. '-_page 41
Release the lock on the wnte protection tab of the memory card if ar/y.
The storage media is full. Use a new mernory card or forrnat the storage media.
"_page 106 Or remove unnecessary images. '-page 65
o
Set Shutter Sound to On.
When the micro HDMI cable or Audio/Video cable is connected to the carncorder, the
.
Shutter Sound is disabled temporarily.
,
Set Beep Sound to On,
The Beep sound is turned off ternporarily when you record videos.
When the rnicro HDMI cable or Audio/Video cable is connected to the carncorder, the Beep
Sound is disabled temponsrily.
• On your camcorder, there may be a slight time delay between the point where you press the
[Recording start/stop] button and the actual point where the recorded video starts/stops.
This is not an error.
starts/stops,
o
Horizontal stripes appear on the images.
This can occur when recording images under a fluorescent lamp, sodium lamp, or mercury
lamp. This is not a rnalfunction.
Appendixes
JIG
Storage
Media
Memory card functions do not operate.
• Insert a rnemory card into your camcorder properly. `-page 16
• If you use a mernory card formatted on a computer, format it again directly on your
camcorder. _page 106
• Release the lock on the write protect tab of the memory card (SDHC/SD memory card), if
Image cannot be deleted,
any, _page 17
• You cannot delete a protected images, Release protection of the image using the Protect
function, ",page 67
" Release the lock on the write protect tab of the memory card (SF)Hc/sD
You cannot format the memory card,
The data file name is not indicated correctly,
Adjusting
the image
during
memory card), if
any, ',-,page 17
The memory card is not supported on your camcorder or card has some problems.
,, The file rnay be corrupted,
o The file format is not supported by your carnoorder,
- Only the file name is displayed if the directory structure complies with the international
standard,
recording
Focus does not adjust automatically,
o Set Focus to Auto. (Video recording mode only) '-page 48
- The recording oor/ditions are not suitable for auto focus, Adjust the focus manually, (Video
recording mode only) `-page 48
- The lens is dusty on the surface, Clean the lens and check the focus,
,, Recording is being made in a dark location. Use a light to brighten the area,
Appendixes
]]7
Adjusting
the image
during
recording
Image's color balance is not natural.
-
A subject passing quickly through the frame
o This is called the focal plane phenomenon, This is not a malfunctior/. Because of the way
the image device (CMOS sensor) reads out video signals, a subject passing through a frame
rapidly may appear to bend, dependh-/g on the recording conditions,
appears distorted,
Playback
on your
The white balance is irlcorrect. Set the proper White Balance.
_page
45
camcorder
.......
_!
_ ..............
Playback (playback/pause) function does not
work,
o Image files recorded usir/g another device may not play back on your camcorder,
- Check memory card compatibility. _page 17
Photo images stored on a storage media are
not displayed in the actual size.
-
Photo images recorded on other devices may not appear in their actual size, This is not an
error,
Playback is interrupted unexpectedly,
-
Check if the AC power adaptor or battery back is properly connected and secure,
You cannot view the image on or hear the
sound from the connected device,
.
Make sure that the connection cable is connected to the proper jack.
The image appears distorted on a TV.
-
This phenomenon is caused by connecting to a TV with 4:3 aspect ratio,
-
The camcorder cannot output Images from the HDMI jack if the material is copyright
protected,
Playback on other devices
(TV, etc.)
You cannot view the image on or hear the
sound from a TV connected usir/g the HDMI
cable,
Appendixes
]]8
Connecting/Dubbing
with
other
devices
You cannot dub correctly using the HDMI
cable.
You cannot dub correctly using the Audio/
Video cable,
Your PictBddge printer cannot pdnt photos
from your carnoorder.
Connecting
(Recorder,
PC, Printer,
etc.)
" You cannot dub images using the HDMI cable.
• The Audio/V£/eo cable is not connected properly, Make sure that the Audio/Video cable is
connected to the proper jack, i.e, to the input jack of the device used for dubbh-g images
from your oamcorder, _page 85
• Your printer may not print images edited on a computer or recorded usir/g other devices.
This is not an error,
to a computer
_
_/%_
.....
_
....
.....
Your cornputer does not recognize your
carnoorder,
,, Disconnect the USS cable from the computer and camcorder, restart the corr/puter, and
then connect the USB cable again correctly,
Cannot play back a video file preperly on a
PC.
,, You need a video codeo to play back the file recorded on your carncorder, Install the
sottware provided with your camcorder. _page $9
,, Make sure you insert the connector in the correct orientation, and connect the USB cable to
the micre USB jack on your camcorder firmly,
,, Disconnect the cable from the computer and carncorder, restart the computer, and then
connect the cable again properly,
To play back an HD video file, you need a cornputer with better specifications.
Use a computer with the recommended specifications. -,page SS
Intelli studio does not function properly,
,, Exit the Intelli studio application, and restart the Windows computer.
Intelli studio does not start.
-
Set PC Software
_pages
to On in the Settings mer/u or install Intelli studio on the computer.
89, 103
Appendixes
]]9
Connecting
to a computer
Your computer is not playing videos, images
or sound located on your camcorder property.
-
Video playback or sound may stop ternporarily depending on your computer. The video or
sound copied to your computer is not affected.
If your camcorder is connected to a computer that does not support Hi speed USB (micro
USE_2.0), the image or sound may not play back correctly. Images, video, and soclnd
copied from the camcorder to your computer are not affected.
Tile playback screen is paused or distorted.
Overall
,
- Gheck the system requirements to play a video.
- Shut down all other applications currently running on the cornputer.
,, If you play back a video on your camcorder when it is connected to a computer, the video
may not play back smoothly on the computer, depending on the transfer speed. Please
copy the file to your PC, and then play it back.
operations
• _,
_
Tl_e date and time are incorrect.
_
,
....
_
....
,,........
Has the camcorder been left unused for a long period of time?
The backup internal rechargeable battery may be discl/arged. ,,-,page 20
Appendixes
]20
Maintenance
To clean the LCD screen
Wipe very gently with a sort, dry eloth_ Be careful not to damage the
• To protect the camcorder:
Ttlrn it off
screen.
Remove the battery.
Remove the memory card,
_,_,._ 4¸ _
,_
_
,_
_ _,
Before cleaning, turn off the eamco_der and remove the ballery_
To clean the exterior
Wipe gently with a soft, dry cloth. Do not apply excessive force
when cleaning. Gently rub the su_faee_
To clean the lens
Use a blower brush to remove dust, and then wipe the lens gently
with a sort cloth.
If necessary, wipe gently with lens paper or tissue.
Mold may forr//if the lens is left dirty.
If the lens looks dim, turn off the camcorder and leave it off for
about 1 hour,
Appendixes
]2]
Maintenance
, To prolong its service life, do not rub the LGD screen with a coarse
cloth,
,
\5,¢-_atis aew oonaensation?
De\
Be aware of t/_e following LOD screen phenomena. Tl_ey are not
malfunctions.
When you use the camoorder, the surtace around the LCD
screen may heat up,
If you leave the power on for a long time, the surface around the
LGD screen becomes hot,
When using the camcorder in cold conditions, an atterlmage
may appear on the LCD screen.
, An LCD screen is manufactured using advanced technology
which creates screens with pixel failure rates of less than 0,01%.
However, a black or bright spot (red, blue white) may appear in the
center of the lad screen and up to two spots may appear outside
the center, These spots which are normally incurred during the
manufacturing process, do not affect the recorded images.
sonaensatlon
naD[ 9ns wnen s oamcoraer
_s movea to a
ocai_on wnere tnere _a s_gniTicar_itemperature ditterence tram the
E ewous location, The d£ sonaenses on tne extemm or F_iema
Darts of the came traer aria onzne r÷tlectlon lens, It there is dew or
*
or in _tur carncoraer, it may cause the camcoraer ta maETunstlon or
aamage the camcoraer wnen you turn the )ovver or
Exact ¢?nen aces (]evv oonaeesaiic _ oooul?
V_rlen _DU m )ve tne canlcorser ta a ic Dallon wBn a nlgner
[e_ terature than the trewous coat,or
>rwne you move i_to a no]
aea suddenly. Examples:
- • Du recora ou_s_ae ir_cola wea_ner aurF __ne w_n_erana _ne[
move _ne oarnoorxser _ _naoors,
tu r÷cora ou_s_ae ,_,r,o_ !eather atter being F_aoors or insiae
car where the A/O was running
V/!hat can _dos
-
T'JIT Ine Dowel of[, ae_aen [ne easer,/
Rna _eave_ne camcoraer
a ary area for 1 ~2 hours betore usir _ i_,
Be sure to use the recommended
accessories supplied with the
camcolder, Fo[ 8e!Mce, centact yeur nea(est Samsung a_hqr{z÷d
service center,
Appendixes122
F_
Ucing tour oamoorder abroad
Each country or region has its own electric and color systems, Before using your carncorder abroad, check the following items.
The AC adaptor provided lets you power, recharge, and use your
carncorder in any country/region that has AO power in the 100 V to
240 V, 50/60 Hz range. You may need a commercially available AC
plug adaptor depending on the design of local wall outlets.
Bahamas, Canada, Central America Japan, Korea, Mexico,
Philippines, Taiwan, United States of America, etc.
Australia, Austria Belgium, Bulgaria, China, OIS, Czech Republic,
Denmark, Egypt Finland, France, Germany, Greece Great Britain,
Ho/and, Hong Kong, Hungary, India, Iran, Iraq, Kuwait, Libya,
Malaysia, Mauritius, Norway, RorT-lania,Saudi Arabia, Singapore,
SIovak Republic, Spain, Sweden, Switzerland, Syria, Thailand,
Tunisia, etc,
Your camcorder is an NTSC based carncorder, If you want to view
your recordings on a TV or copy them to an external device it must
be an NTSO based TV or external device and have the appropriate
Audio/Video jacks. Otherwise, you may need to LIse a seF)arate video
format transcoder (For example, an NTSO to PAL format converte o,
i
Appendixes
]23
QIo saI7
AF
iAki/O
FookiS}
A system that automatically
uses the contrast to focus
focuses
the camcorder
automatically
lens on the subject
Your
camcorder
,L )( i_L! (
_FNo
The apenu@
(}81
i(;QI(
controls
(
the amount
I]a<@
of light that reaches
the camcorder's
sensor
(:sit JI}
(}<>/iC<'8
ioi
Composition
rule of thirds
in photography
leads to a good
tay
1el
M
means arranging
composition
ta (b_i<e
GMOS is an image sensor producing
coupled device) sensors
It consumes
camcorder
D-ital
z<<'i
Sei
objects
ic:<ti
in a photo
<cu:i<i
Usually,
abiding
by the
(GM(bS}
images approaching
the quality of GOD (charge
less power, meaning a longer battery life on your
A feature that artificially increases the amount of zoom available with zoom lens (Optical
zoom) W/_en using the Digital zoom, the image quality will deteriorate
as the magnification
increases
Go,
i!
Unlike the total pixel count,
(Id
I
I x
x'S(
><a
number
of pixels used
to capture
an image
e
MPEQ 4 AVQ/H 264 defines the latest video coding format standardized
by the ISO IE©
and the ITU T, in 2003
Compared
with the conventional
MPEQ 2 toFnat, MPEQ 4 AVQ/
H264
has more than twice the eflicieney
Your camcorder
employs
MPEQ 4 AV©/H 264
to encode high definition videos
()lti<:
zo<'li
This is a general zoom
quality of images
which
can enlarge
An expression
of the rate of compression
have a lower rate of compression,
which
F(
3()t
images
with a lens and does
(>If!It('
not deteriorate
used in a digital image
Higher quality
usually results in a larger file size
images
](( )11
contain
more
8)ee(
Shutter speed refers to the amount of time it takes to open and close the shutter, and it
is an important
faetor in the brightness
of a photo, as it controls the amount of light which
pass through the aperture before it reaches the image sensor A fast shutter speed allows
less time to let light in and the photo becomes
darker and more easily freezes subjects
in
motion
I@i@ M_£1:ro
of the camcorder's
shutter
speed
and lens aperture
that result
in the
This feature allows you to capture
Tele Macro feature, the camcorder
lite size ratio (1:1)
I(
The amount
combination
I
this is the actual
_i
All the combinations
same exposure
of lens aperture
//-3/2
The number of pixels present in a digital image
High resolution images
pixels and typically show more detail than low resolution images
i
IfectveF:_e
the brightness
of lens Smaller number lens has generally brighter
is directly proportional
to the focal length and inversely proportional
focal length/diameter
MI>E(
If the camcorder
is moved while the shutter is open, the entire image may appear blurted
This occurs more otten when the shutter speed is slow Prevent camcorder
shake by
raising the sensitivity,
using a faster shutter speed
Alternately, use a tripod, the DIS or OIS
function to stabilize the camcorder
(70/Oei
The f number defines
image The f number
to the lens diameter
of light allowed to reach the camcorder's
sensor
Exposure
of the shutter speed, the aperture
value, and ISO sensitivity
is controlled
by a
W
i(
I)]a
i(:(
((k
ba{I
close up images of very srnall objects
When
can maintain a sharp focus on small objects
(o}
An adjustment
of the intensities of colors (typically
blue), in an image
The goal of adjusting the white
_{I
The distance
from the middle of the lens to its focal point (in millimeters)
Longer focal
lengths result in narrower
angles of view and the subject
is magnified
Shorter focal
lengths result in wider angles of view
render
Appendixes124
the colors
in an image
using the
at a near
the primary colors red, green, and
balance, or color balance, is to correctly
Speoifio ion
HMX Q2OBN/HMX Q2OTN/HMX
HMX Q2OOBN/HMX
Q20RN
Q2OOTN/HMX Q2OORN
HMX QF2OBN
NTSC
Picture compression format
H264
Audio compression
AS,(} (Adw/nced Audio Coding)
format
Image device
(MPEG 4.AVC)
1/4" CMOS
1 75 mega pixels
Total pixels
5 1 mega pixels
Lens
F1 8 • F3.9. X20 Optical Zoom, X40 Digital Zoom
Focal length
26ram
Wireless networking protocol
WiFi (802 11b/g/n)
Size/dot number
27" Wide Touch LCD / 230k
LCD screen method
TFT LCD
Composite
1Vp p (75 _ terminated)
output
• 52ram
HDMI output
D type connector
USB output
micro USB 2.0
Power source
DO 5V. Lithium Ion battery 3 7 V
Power source type
Lithium Ion battery, Power supply (1 O0 V • 240 V) 50/60 Hz
Power consumption
HMX Q20/HMX
Q200: 25W.
HMX QF20: &0W
(LCD on)
32 OF,- 104_F (0°C ,- 40_0)
Operating humidity
Storage temperature
40% • 60%
4°F - 140_F ( 2O'Q - 60_0)
Storage media
Memory card (SD/SDHQ/SDXQ)
External dimensions (W x H x D)
Approx
428mm
Weight
Approx
1BOg (087 Ib, 6 oz) (Except tor Lithium Ion battery)
Internal MIC
Omni directional stereo microphone
The technical specifications and design may be changed without notice.
Appendixes
]25
(not supplied)
(1,69 inches) x 52 45ram (2,06 inches) xl 19rnrn (4,69 inches)
W lrlr lqty
SAMSUNG
LiMiTED WARRANTY
SAMSUNG Electronics America Inc. (SEA), warrants that this product is free from defective material and workrnanship,
SEA further warrar/ts that if product tails to operate properly within the specified warranty period and the failure is due to improper workmanship or
defective material, SEA will repair or replace the product at it's option.
All warranty repairs must be performed by a SEA authorized service center. The name and address of the location nearest you can be obtained by
calling toll free: 1 800 SAMSUNG (1 800 726 7864).
Labor
1 year carry in
Parts
1 year
On carry in models, transportation to and from the service center is the ct_stomer's responsibility.
The original dated sales receipt must be retained by the customer and is the only acceptable proof of purchase.
It must be presented to the authorized service centen
EXCLUSIONS
(WHAT iS NOT COVERED)
This warrar/ty does riot cover dar//age due to aceident, fire, flood arid/or other aets of God; misuse, ir/eorreot lir/e voltage, improper instaJlation,
improper or unauthorized repairs, commercial use, or damage that occurs in shipping,
B,<teHorand interior finish, lamps, and glass are not covered under this warranty,
Customer adjustments which are explained in the ir/struction rnar/ual are not covered under the terms of this warrar/ty.
This warranty will autorc/atioally be voided for any unit round with a missing or altered serial numben This warranty is valid only on products
purchased in the United States and Puerto Rico,
Some States do not allow the exclusior/s or limitations of incidental or consequential damages, or allow limitations on how long an implbd warranty
lasts, so the above limitations or exclusions may not apply to you.
This warranty gives you specific legal rights, and you may also have other rights which vary from State to State.
Correct
disposal
ofbatteries
inthisproduct
,
European
countries
separate
battery
return
(Applicable
intheEwith
uropean
Union
and
other
systems)
,
This marking on the battery, mar/ual or packaging
indicates that the batteries in this product should
not be disposed of with other household waste at the end of their
working life. Where marked, the chernical symbols Hg, Cd or Pb
indicate that the battery cor/tair/s mercury, cadmium or lead above the
reference levels in EO Directive 200(-3/66. If battenes are not properly
disposed of, these substances can cause harm to human health or
the envirorlment,
To protect natural resources and to promote material reuse, please
separate batteries from other types of waste and recycle them through
your local, free battery return system.
Correct Disposal
(Waste Electrical
of This Product
& Electronic Equipment)
(Applicable in the European Union and other
European countries with separate collection systems)
This marking shown or/the product or its literature,
indicates that it should not be disposed with other
household wastes at the end of its working life.
Te prevent possible harm to the environment or human heaJth from
uncontrolled waste disposal, please separate this from other types of
wastes and recycle it responsibly to prornote the sustainable reuse of
material resources, Household users should cont{_ct either the retailer
where they purchased this product, or their local government office,
for details of where and how they car/take this item for environmentally
safe recycling, Business users should contact their supplier and check
the terms and conditions of the purchase contract, This product should
not be mixed with other commercial wastes for disposal.
QUESTIONS OR COMMENTS?
1 600 SAMSUNG
IN THE US
""
RoHS
RollS
Samsung Electronics America, Ino
www samsung corn
(726 7864)
85 Challenger Road Ridgefield Park, NJ 07660
2112
compliant
Our product
complies
with "The Restriction
and we do not use the 6 hazardous
Brominated
Biphenyls
Of the use of certain
materials-
(PBBs), Poly Brominated
Cadmium
Diphenyl
Hazardous
Substances
(Cd), Lead (Pb), Mercury
Ethers (PBDEs)-
in electrical
(Hg), Hexavalent
in our products.
and electronic
Chromium
equipment",
(Or +6), Poly