1
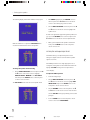
SP31.7 Multi-Channel Processor User Guide
§0 Preface
1
26/7/02, 12:50 pm
>
Preface
COPYRIGHT AND ACKNOWLEDGMENTS
Copyright © 2002 Primare Systems AB. All rights reserved.
Primare Systems AB
Idavägen 17D
SE-352 46 Växjö
Sweden
Issue: SP31.7/2
The information in this guide is believed to be correct as of the
date of publication. However, our policy is one of continuous
development and so the information is subject to change
without notice, and does not represent a commitment on the
part of Primare Systems AB.
Primare is a trademark of Primare Systems AB. Manufactured
under license from Dolby Laboratories Dolby, Pro Logic, and
the double-D symbol are trademarks of Dolby Laboratories.
Confidential Unpublished Works. Copyright 1992-1997 Dolby
Laboratories, Inc. All rights reserved. LaserDisc is a trademark
of Pioneer Electric Corp. All other product names are
trademarks or registered trademarks of their respective
owners.
FCC Warning: This equipment generates and can radiate
radio frequency energy and if not installed and used correctly
in accordance with our instructions may cause interference to
radio communications or radio and television reception. It has
been type-tested and complies with the limits set out in
Subpart J, Part 15 of FCC rules for a Class B computing device.
These limits are intended to provide reasonable protection
against such interference in home installations.
EEC: This product has been designed and type-tested to
comply with the limits set out in EN55013 and EN55020.
This guide was produced by Human-Computer Interface Ltd,
http://www.interface.co.uk
ii
§0 Preface
2
26/7/02, 12:51 pm
>
Contents
Introduction
Audio inputs . . . . . . . . . . . . . . . . . . . . . . . . . . . . . . . . . . . . . . . . . . . {12
Using the SP31.7 with other Primare products . . . . . . . . . . { 2
Video connections . . . . . . . . . . . . . . . . . . . . . . . . . . . . . . . . . . . . . {12
Technical specification . . . . . . . . . . . . . . . . . . . . . . . . . . . . . . . . . { 2
Record outputs . . . . . . . . . . . . . . . . . . . . . . . . . . . . . . . . . . . . . . . . {13
Front panel controls . . . . . . . . . . . . . . . . . . . . . . . . . . . . . . . . . . . { 3
Microphone, data and RS232 . . . . . . . . . . . . . . . . . . . . . . . . . . {13
Using the SP31.7 Multi-Channel Processor
Connecting to the Primare A30.5
Multi-Channel Amplifier . . . . . . . . . . . . . . . . . . . . . . . . . . . . . . . . {13
Front panel display . . . . . . . . . . . . . . . . . . . . . . . . . . . . . . . . . . . . { 3
Connecting to the Primare V25 DVD Player . . . . . . . . . . . . {13
Switching on and off . . . . . . . . . . . . . . . . . . . . . . . . . . . . . . . . . . . { 4
Configuring the speakers . . . . . . . . . . . . . . . . . . . . . . . . . . . . . . . {15
Selecting a source . . . . . . . . . . . . . . . . . . . . . . . . . . . . . . . . . . . . . { 4
Changing the volume . . . . . . . . . . . . . . . . . . . . . . . . . . . . . . . . . . . { 5
Changing the balance, center, side, rear, and subwoofer
levels . . . . . . . . . . . . . . . . . . . . . . . . . . . . . . . . . . . . . . . . . . . . . . . . . . { 5
Setting up the speakers
Setting the speaker delays . . . . . . . . . . . . . . . . . . . . . . . . . . . . . {16
Setting the speaker levels . . . . . . . . . . . . . . . . . . . . . . . . . . . . . . {17
Setting the analogue input level . . . . . . . . . . . . . . . . . . . . . . . . {18
Advanced use
Using the main menu . . . . . . . . . . . . . . . . . . . . . . . . . . . . . . . . . . . { 7
Setting up the sources
Using the menus . . . . . . . . . . . . . . . . . . . . . . . . . . . . . . . . . . . . . . . { 7
Standard sources . . . . . . . . . . . . . . . . . . . . . . . . . . . . . . . . . . . . . . {19
Choosing the surround mode . . . . . . . . . . . . . . . . . . . . . . . . . . . { 8
Removing sources . . . . . . . . . . . . . . . . . . . . . . . . . . . . . . . . . . . . . {19
Making recordings . . . . . . . . . . . . . . . . . . . . . . . . . . . . . . . . . . . . . { 9
Editing sources . . . . . . . . . . . . . . . . . . . . . . . . . . . . . . . . . . . . . . . . {20
Locking the front panel . . . . . . . . . . . . . . . . . . . . . . . . . . . . . . . . { 9
Examples of sources . . . . . . . . . . . . . . . . . . . . . . . . . . . . . . . . . . . {21
Connecting the SP31.7
Configuring the display
Back panel connections . . . . . . . . . . . . . . . . . . . . . . . . . . . . . . . . {11
Configuring the on-screen display . . . . . . . . . . . . . . . . . . . . . . {23
Power connection . . . . . . . . . . . . . . . . . . . . . . . . . . . . . . . . . . . . . {12
Configuring the front panel display . . . . . . . . . . . . . . . . . . . . . {23
Main outputs . . . . . . . . . . . . . . . . . . . . . . . . . . . . . . . . . . . . . . . . . . {12
Configuring the remote control . . . . . . . . . . . . . . . . . . . . . . . . . {23
iii
§0 Preface
3
26/7/02, 12:51 pm
>
Preface
Saving the configuration
Introduction . . . . . . . . . . . . . . . . . . . . . . . . . . . . . . . . . . . . . . . . . . . {25
Index
iv
§0 Preface
4
26/7/02, 12:51 pm
>
Introduction
Welcome to the Primare SP31.7 Multi-Channel Processor! This chapter introduces you to its key
features, and explains how you can take advantage of its configurability to create a system
perfectly suited to your requirements.
WELCOME TO THE SP31.7 MULTI-CHANNEL
PROCESSOR
The SP31.7 provides a comprehensive range of features to
make it ideal as the heart of an unparalleled music or home
entertainment system:
Exceptional processing performance
The SP31.7 uses proprietary DSP circuitry developed by
Primare, providing better analog performance than the
current off-the-shelf circuits used in many other surround
processors, resulting in a very high standard of multi-channel
audio reproduction. The SP31.7 provides up to 192kHz/
24 bit processing to accommodate all the current
multi-channel audio formats and allow for expansion as new
formats are introduced.
Flexible range of inputs
The SP31.7 provides a range of inputs flexible enough to
cater for virtually any combination of sources including:
seven analog RCA inputs, one analog XLR input, five coaxial
digital inputs, two TOSlink optical digital inputs, and one
AES/EBU digital input.
Video switching
The SP31.7 provides two component video inputs, three
S-Video inputs and four composite video inputs, allowing you
to switch up to nine audio-visual sources.
Digital Surround Processing
The SP31.7 can decode multi-channel sources encoded in the
Dolby Pro Logic, Dolby Digital (AC-3), or DTS formats to
provide eight discrete output channels for up to eight
loudspeakers in a surround system. The SP31.7 provides a
wide range of processing options to allow you to choose the
ideal mode for each type of material, including Dolby Pro
Logic II, an improved version of Dolby Pro Logic, and several
new processing modes designed to provide superb results
with eight-channel systems from Dolby Digital and DTS
encoded materials.
Multi-channel analog input
In addition to decoding encoded multi-channel sources, the
SP31.7 provides a discrete eight-channel analog input for a
DVD audio or SACD player that provides a multi-channel
output.
Full configurability
The SP31.7 is fully configurable from either the front panel or
remote control, using a simple set of on-screen menus, to
allow you to set it up with the exact combination of sources
and outputs that you want to use for your own system. The
SP31.7 is supplied already set up with a standard set of
sources, designed to cater for the most usual combination of
inputs and outputs in a typical system, but you can modify
these or define your own sources with total flexibility.
Intuitive user interface
In keeping with the philosophy of the Primare range of
systems, the SP31.7’s powerful range of features can be
controlled through a very simple and intuitive interface,
designed so that it will not distract you from the pleasure of
listening to music or watching movies on your system.
In fact almost all the features of the SP31.7 can be accessed
through just two front panel controls and four push buttons;
alternatively the same degree of control is provided through
the C31 Remote Control supplied with the SP31.7.
1
§1 Introduction
1
26/7/02, 12:51 pm
Introduction
>
Easy to set up
The SP31.7 is also exceptionally easy to set up for a
perfectly balanced surround sound. Simply plug a microphone
into the appropriate SP31.7 input, and position it at the
listening position. The built-in calibration test will then
balance the level of each output to give a correct sound
image for your system and the room you are listening in.
General (continued)
Modes
Dolby Pro Logic
Dolby Pro Logic II
Dolby Digital 5.1
Dolby Digital
Surround EX 6.1
Dolby Digital Matrix 6.1
DTS Neo:6
DTS 5.1
DTS ES 6.1
DTS ES 6.1 Discrete
Surround EX 7.1
Video
NTSC/PAL, component, S-Video, and
composite.
USING THE SP31.7 WITH OTHER PRIMARE
PRODUCTS
Although the SP31.7 is flexible enough to work with virtually
any other equipment you have in your system, it is ideal for
use with the other products in the Primare range, including
the Primare A30.5 Multi-Channel Amplifier and the Primare
V25 DVD Player. A particular benefit of using the SP31.7
with the Primare DVD Player is that you can control both
units with the single remote control, to give you a fully
integrated system with the simplest possible user interface.
TECHNICAL SPECIFICATION
Analog data
Bandwidth
1Hz – 100kHz, 1dB
THD
<0.005%, 20Hz – 20kHz
Signal-to-noise
-110dB
Frequency response
<10Hz – 100kHz, -1dB
Input impedance
15kΩ unbalanced, 10kΩ balanced
Output impedance
50Ω
Digital data
General
Analog inputs
1 XLR, 7 RCA (left and right).
Digital inputs
1 AES/EBU, 5 RCA, 2 TOSlink.
Video inputs
4 composite, 3 S-Video,
2 component.
Balanced analog outputs
Front (left and right).
Analog outputs
Front (left and right), center,
subwoofer, surround (left and right),
surround back (left and right).
Analog record output
2 RCA (left and right).
Digital outputs
1 TOSlink, 1 RCA.
Video outputs
2 composite, 2 S-Video, 1 component.
Frequency response
20Hz – 20kHz, ± 2dB
THD+noise
0.005% @ 1kHz
Dimensions (WxDxH)
430 x 385 x 100mm
Weight
10kg
2
§1 Introduction
2
26/7/02, 12:51 pm
>
Using the SP31.7 Multi-Channel Processor
This chapter explains how to operate the SP31.7 Multi-Channel Processor, using either the front
panel controls or the direct remote control commands.
FRONT PANEL CONTROLS
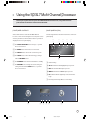
FRONT PANEL DISPLAY
Almost all the functions of the SP31.7 Multi-Channel
Processor can be accessed using the two front panel controls
and four push buttons, and information about its operation is
displayed on the front panel display:
The following illustration shows the information on the front
panel display:
(A
(A The INPUT SELECTOR selects an input, or operates
the on-screen menus.
(B The MENU button selects the on-screen menus.
(C The SELECT button selects the current menu option.
(B
(C
(D
57
AC-3
DTS
MPEG
VOLUME
DVD
(D The LEVEL button selects which setting you change
with the VOLUME control.
(E
P.L
(F
(E The STANDBY button switches the SP31.7 to standby.
(A Volume setting.
(F The VOLUME control changes the volume, changes a
setting selected with the LEVEL button, or operates
the on-screen menus.
(B AC-3 indicates that a Dolby Digital input is present.
(C DTS indicates that a DTS input is present.
(D MPEG indicates that an MPEG input is present.
(E P.L indicates that the digital input is two-channel Pro
Logic.
(F Currently selected input, Mute, or level setting.
INPUT SELECTOR
VOLUME
57
AC-3
VOLUME
DVD
MENU
SELECT
P.L
LEVEL
STANDBY
P30 PROCESSOR
(A
(B
(C
(D
(E
(F
3
§2 Using
3
26/7/02, 12:51 pm
>
Using the SP31.7 Multi-Channel Processor
To dim the front panel display
• Press the DIM button on the remote control.
The display will dim to a single bar. The normal display will
reappear while you adjust any settings.
any source to use different inputs, or configure your own
sources with any name you choose and using any particular
inputs as appropriate for the source.
To restore the front panel display
• Press the DIM button again.
SWITCHING ON AND OFF
To switch on
• Use the switch under the left-hand edge of the front
panel.
During normal operation you can leave the SP31.7 switched
on and in standby.
To switch to standby
• Hold down the STANDBY button on the front panel or
the STBY button on the remote control.
When the SP31.7 is in standby the red STANDBY indicator
will be illuminated.
To switch on from standby
• Operate any of the front panel controls, or press any of
the arrow keys on the remote control.
Source Audio
Video
Surround mode Description
CD
Analog 1
None
Bypass
High quality CD
player
DVD
Digital 2
S-Video 1
2-CH
DVD player
TapeD
Digital 3
None
PLII PL
Digital tape
recorder or
minidisc player
Laser
Digital 7
S-Video 2
PCM 2-CH
LaserDisc
player
Tuner
Analog 2 None
Stereo
FM radio tuner
TV
Analog 3 Video 1
PLII PL
Television or
monitor
TapeA
Analog 4 None
Stereo
Analog tape
output
Sat
Analog 5 Video 2
PLII PL
Satellite
receiver
To select a source
• Turn the INPUT SELECTOR control on the front panel
until the name of the source is shown on the front panel
display.
SELECTING A SOURCE
For example:
The SP31.7 Multi-Channel Processor allows you to define up
to 16 sources. Each source can use one of the eight digital
and eight analog inputs, and any source can be combined
with one of the video inputs. Alternatively, a multi-channel
source can be defined using analog inputs 5 to 8.
46
VOLUME
•
Tuner
The current source is also shown on the on-screen display:
You can simply disable any of these sources that you do not
need; see Removing sources, page 19. You can also change
4
4
P.L
Alternatively, press the A or V buttons on the remote
control to step between sources.
When the SP31.7 Multi-Channel Processor is first supplied
the eight standard sources shown opposite are already set
up for you.
§2 Using
AC-3
26/7/02, 12:51 pm
>
Using the SP31.7 Multi-Channel Processor
CHANGING THE VOLUME
The SP31.7 allows you to vary the volume from 0 (silence) to
99 (maximum volume), where each step is equivalent to
0.5dB.
To change the volume
• Rotate the VOLUME control on the front panel, or press
the > or < buttons on the remote control.
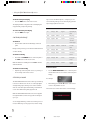
The current volume setting is shown on the front panel and
on-screen displays:
To mute the sound
• Press the MUTE button on the remote control.
CHANGING THE BALANCE, CENTER, SURROUND,
SURROUND BACK, AND SUBWOOFER LEVELS
You can independently change the balance, center level, side
levels, rear levels, and subwoofer level to alter the balance of
sound in your surround system.
Changing the balance alters the level of both the left and
right main loudspeakers to shift the position of the stereo
image, keeping the overall level of the sound the same. The
other adjustments change the level of the corresponding
speaker(s) without affecting the remaining speakers in the
surround system.
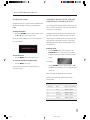
To change a level
• Press the LEVEL button on the front panel, or the
BAL/SETUP button on the remote control, until the
display shows the current value of the level you want to
change.
5
To restore the sound to its original volume
• Press the MUTE button again.
For example:
The sound is also restored to its original volume if you
increase the volume.
•
VOLUME
AC-3
C
P.L
+2.0
Use the VOLUME control on the front panel, or the >
and < buttons on the remote control, to adjust the value
of the level.
After a short delay the display will revert to volume.
The levels are selected in the sequence shown in the
following table:
Display
Level
Range
L, Balanced, R
Balance
Balanced to -9.5dB to OFF
C
Center
-10.0dB to +10.0dB
SS
Surround
-10.0dB to +10.0dB
SB
Surround back
-10.0dB to +10.0dB
S
Subwoofer
-10.0dB to +10.0dB
5
§2 Using
5
26/7/02, 12:51 pm
>
Using the SP31.7 Multi-Channel Processor
6
§2 Using
6
26/7/02, 12:51 pm
>
Advanced use
This chapter explains how to make use of the more advanced features of the SP31.7 Multi-Channel
Processor, including changing the surround mode and making recordings.
USING THE MAIN MENU
USING THE MENUS
The advanced options described in this chapter are all
available from the MAIN MENU, which you can display on
the on-screen display using the remote control.
You can select a menu option, and change its value, using
either the front panel controls or the remote control.
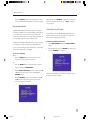
To display the main menu
• Press the MENU button on the front panel or remote
control.
The MAIN MENU will be displayed on the on-screen
display:
To select a menu option
Either:
• Turn the INPUT SELECTOR to highlight the menu
option you want to select.
Or:
• Press the A or V buttons on the remote control to step
between the menu options.
To change the currently highlighted option
Either:
• Turn the VOLUME control to step between the
alternative values for the current menu option.
Or:
• Press the < and > buttons on the remote control to step
between the alternative values for the current option.
The INPUT MODE option is initially highlighted to show
that it is selected.
To exit from the main menu
• Press the MENU button on the front panel or remote
control.
Selecting some menu options displays a further menu of
options which you can select and change in a similar way.
To exit from the current menu
• Press the MENU button on the front panel or remote
control.
From the main menu this returns to normal operation of the
SP31.7. From the submenus this exits to the previous menu.
7
§3 Advanced
7
26/7/02, 12:51 pm
>
Advanced use
CHOOSING THE SURROUND MODE
The surround mode determines how the sound is divided
between the loudspeakers in your surround system. Each
source is associated with a default surround mode, which will
be used when you select that source, but you can choose a
different surround mode for the source if you prefer.
For example, the standard surround mode for the TV source
is PLII PL, since most TV broadcasts are Pro Logic encoded,
but if you are watching a music concert you may prefer to
choose the Stereo or Bypass surround modes, as these give
a more natural sound when listening to music.
To change the surround mode
Either:
• Press the MODE button on the remote control to step
between the available surround modes.
Or:
• Press the MENU button on the front panel or remote
control to display the MAIN MENU.
•
Use the INPUT SELECTOR on the front panel or the A
and V buttons on the remote control to highlight the
SURROUND MODE option.
•
Use the VOLUME control on the front panel or the <
and > buttons on the remote control to step between
the available surround modes.
The menu option will flash while the SP31.7 Multi-Channel
Processor is locking to the input.
The options available depend on the source you are listening
to.
If you are listening to a conventional two-channel analog or
digital source, such as a CD, the following options are
available:
Option
Description
BYPASS
The inputs are fed directly to the output, with no
decoding for the most faithful possible reproduction of
stereo or multi-channel sources.
STEREO
Conventional stereo, using just the main left and right
loudspeakers.
PRO LOGIC
Dolby’s original Pro Logic decoder; PLII will almost
always give better results.
PLII PL
PLII C
PLII M
Dolby’s updated Pro Logic decoder provides 5.1
channel surround sound from any two-channel source,
with stereo surround back channels and full frequency
range. PLII C is ideal for movie soundtracks and PLII M
is ideal for music sources.
PARTY
The same signal to the front left and right, surround
left and right, and surround back left and right
loudspeakers, if connected and enabled.
DTS NEO:6 C
DTS NEO:6 M
DTS Neo:6 provides up to 6.1 channel surround sound
from conventional stereo sources, and can be used
with virtually any two-channel analog or digital stereo
source such as CD, tape, or TV. DTS Neo:6 M is ideal
for stereo music sources.
For Dolby Digital, DTS, or MPEG sources only the following
option is available:
Option
Description
AUTO
Automatically detects an incoming digital signal and
locks onto it.
The SP31.7 Multi-Channel Processor automatically detects a
Dolby Digital input and displays AC-3 on the front panel
display. If the Dolby Digital input only contains two channels,
P.L is also displayed.
To display information about the source
• Highlight the INPUT MODE option on the MAIN
MENU.
8
§3 Advanced
8
26/7/02, 12:51 pm
>
•
Advanced use
Press the SELECT button on the front panel or remote
control to display the characteristics of the source signal.
Alternatively, select NORMAL to make the record outputs
follow the currently selected source, or OFF to mute the
record outputs.
MAKING RECORDINGS
The SP31.7 Multi-Channel Processor allows you to make a
recording of a digital source to the two digital record outputs,
or of an analog source to the analog record output. If the
source also includes video, a copy of the video is made to the
corresponding composite video or S-Video output.
To make a recording you simply select the source you want to
record. Once set up, the recording is not affected by the
source you are listening to, the volume setting, or the setting
of any other parameters on the SP31.7.
LOCKING THE FRONT PANEL
If you always control the SP31.7 Multi-Channel Processor
with the remote control, you may prefer to lock the front
panel controls so they cannot be used.
To lock or unlock the front panel
• On the MAIN MENU highlight the FRONT PANEL
option.
•
Change the menu option to LOCKED to lock the front
panel, or NORMAL to unlock it:
To set up a recording
Either:
• Press the REC/S.T button on the remote control to
select the source you want to record from.
Or:
• Press the MENU button on the front panel or remote
control to display the MAIN MENU.
•
•
Use the INPUT SELECTOR on the front panel or the A
or V buttons on the remote control to highlight the
RECORD option.
Use the VOLUME control on the front panel or the <
and > buttons on the remote control to choose the
source you want to record from:
The front panel will also be unlocked if you switch off the
SP31.7 and switch it on again.
9
§3 Advanced
9
26/7/02, 12:51 pm
>
Advanced use
10
§3 Advanced
10
26/7/02, 12:51 pm
>
Connecting the SP31.7
This chapter explains how to connect the SP31.7 to the other components in your system, using the
connections on the back panel.
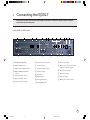
BACK PANEL CONNECTIONS
(B
(A
(C
(D
IN 1
PB
Y
2
3
DIGITAL INPUTS
4
5
6
7
8
2
3
4
5
6
(H
Y
PR
IN 2
PB
(K (L
(J
OUT
PB
Y
PR
7
8
FRONT
4
FRONT
VIDEO OUT
REC
OUT
SURR
L
R
R
(P
1
CENTER
L
S-VIDEO INPUTS
2
(M
PR
SURR BACK
S-VIDEO OUT
OUT
REC
3
(Q
DATA
RS232
REC
MIC
SUB
MAIN OUTPUTS
(O
(I
COMPONENT
VIDEO
VIDEO INPUTS
2
3
ANALOG INPUTS
(N
(G
DIGITAL OUT
2
1
1
1
(F
(E
12V OUT
REMOTE
(R
(S
(T
(U
(A Digital AES/EBU input.
(H Component video input 2.
(P XLR front outputs.
(B Digital SPDIF inputs.
(I S-Video inputs.
(C Digital optical TOSlink inputs.
(J Component video output.
(Q RCA front, surround, center, sub,
and surround back outputs.
(D Digital SPDIF and TOSlink
outputs.
(K S-Video outputs.
(R Analog record output.
(L Data input.
(S Microphone input.
(M RS232 input.
(T Remote output.
(N Analog XLR inputs.
(U Mains power input and fuse.
(E Component video input 1.
(F Composite video inputs.
(G Composite video outputs.
(O Analog RCA inputs.
11
§4 Connecting
11
26/7/02, 12:51 pm
>
Connecting the SP31.7
POWER CONNECTION
Warning: Before connecting power check that the required
supply voltage, indicated on the back panel, corresponds to
your local AC supply. If a different voltage is stated on the
type plate do not connect the SP31.7 to the mains power,
and seek advice from your dealer.
digital input, five SPDIF digital inputs, and two optical
TOSlink digital inputs.
Analog inputs
The SP31.7 provides eight analog inputs; one XLR input for
connection to a source providing balanced outputs, and
seven line-level stereo RCA inputs.
Connect the mains power using the enclosed mains cable.
VIDEO CONNECTIONS
Note: Always disconnect the SP31.7 and the other units in
your system from the mains power before connecting or
disconnecting any of the cables.
MAIN OUTPUTS
The main outputs provide eight discrete analog audio outputs
for connecting to the power amplifiers and loudspeakers in
the surround system. In addition, balanced outputs are
available for the main left and right channels, for use with a
power amplifier that provides balanced inputs.
AUDIO INPUTS
The SP31.7 provides a total of 16 audio inputs, eight digital
and eight analog. Because the SP31.7 is configurable, you
have total flexibility about which digital input you use for
each of your digital sources, and which analog input you use
for each of your analog sources. In addition, you can
optionally use four pairs of analog inputs for a single, multichannel source, such as DVD-A or SACD.
The SP31.7 is supplied with a suggested set of sources
already set up, and you may choose to leave the inputs
assigned in this way. However, if you prefer, you can
re-assign the inputs to sources in any way you prefer to suit
the equipment in your system, and the way you would like to
wire it up.
Digital inputs
The SP31.7 Multi-Channel Processor provides one AES/EBU
The SP31.7 provides a choice of either component, S-Video,
or composite video connections. If your source or monitor
provides a choice of video connections we recommend using
the component or S-Video connections, as these provide
higher quality. However, we recommend you first connect up
and calibrate your system using the composite connection.
Video inputs
The SP31.7 provides two component video, three S-Video,
and four composite video inputs.
Video outputs
The SP31.7 provides one component video, two S-Video, and
two composite video outputs. The on-screen display is only
provided on the S-Video and composite outputs.
Connecting to a television or monitor
Connect the appropriate output to your television or monitor.
If you are using video sources of more than one type you
may need to make a connection from each video output to
your monitor as the SP31.7 only performs conversion
between S-Video and composite.
If your television includes a tuner output you can use the
SP31.7 to perform switching between the television tuner
and your other video sources such as DVD or LaserDisc. In
this case connect the television tuner output to the video
input corresponding to your TV source. If your television
does not provide a tuner output you will need to switch the
television between its internal tuner and the external video
input.
12
§4 Connecting
12
26/7/02, 12:51 pm
>
Connecting the SP31.7
RECORD OUTPUTS
CONNECTING TO THE PRIMARE V25 DVD PLAYER
The SP31.7 provides three record outputs, two digital and
one analog.
The Primare V25 DVD Player is an ideal source for use with
the Primare SP31.7, to give superb quality video and 5.1
channel digital surround.
Digital record outputs
Both SPDIF and optical TOSlink digital record outputs are
provided.
•
Connect the S-Video or component output
(recommended), or composite output, from the DVD
player to an appropriate video input on the SP31.7.
Analog record outputs
One analog RCA record output is provided.
•
Connect the digital audio output from the DVD player to
digital input 2 on the SP31.7.
•
Configure the V25 audio mode to Bitstream.
MICROPHONE, DATA AND RS232
The MIC input allows you to connect a microphone to the
SP31.7, to allow you to run the SET LEVELS option which
sets up the relative balance of each of the output channels
for the optimum sound.
The DATA input allows you to connect the SP31.7 to an
external interface. The RS232 input allows an authorized
dealer to connect the SP31.7 to a computer, for service and
future upgrades. For more information contact Primare or
see the Primare Audio Web site at www.primaresystems.com.
CONNECTING TO THE PRIMARE A30.5
MULTI-CHANNEL AMPLIFIER
The Primare A30.5 Multi-Channel Amplifier is an ideal
component for a surround system since it provides five
discrete power amplifiers in a single case.
•
Connect the front, rear, and center main outputs to the
corresponding inputs on the multi-channel amplifier
using high-quality phono cables.
•
If your system includes a subwoofer, connect the sub
main output to the audio input of the subwoofer.
13
§4 Connecting
13
26/7/02, 12:51 pm
>
Connecting the SP31.7
14
§4 Connecting
14
26/7/02, 12:51 pm
>
Setting up the speakers
This chapter explains how to set up the speakers, levels, and delays for the best possible sound
with your surround sound configuration.
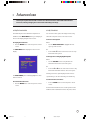
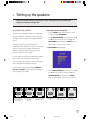
CONFIGURING THE SPEAKERS
The first step in configuring the speakers is to specify which
particular combination of speakers you have in your system.
The diagrams shown below give some suggested alternative
layouts.
The SP31.7 can drive up to seven full-frequency
loudspeakers and one subwoofer, but if your surround system
does not include a full set of speakers, the SP31.7 will
distribute the signals from these channels to the other
channels as appropriate in your system.
To specify the speaker configuration
• Press the MENU button on the front panel or remote
control to display the MAIN MENU.
•
Use the INPUT SELECTOR on the front panel or the A
and V buttons on the remote control to highlight the
SETUP MENU option and press the SELECT button on
the front panel or remote control to select it.
The SETUP MENU will be displayed:
For each channel you can also specify whether the speaker is
large, in which case it can handle the bass below the
crossover setting for that channel, or small, in which case the
bass for that channel is handled by a subwoofer.
You can define four speaker layouts, labelled GENERAL,
DTS, DD, and OTHER. These are selected automatically for
the appropriate source material.
Full surround system
with seven loudspeakers
and a subwoofer
Seven-channel surround
system with no
subwoofer
Five-channel surround
system with a subwoofer
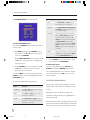
•
Use the INPUT SELECTOR on the front panel or the A
and V buttons on the remote control to highlight the
SPEAKER CONFIG option and press the SELECT
button on the front panel or remote control to select it.
Four-channel surround
system
Three-channel system
with a subwoofer
Conventional twochannel stereo system
15
§5 Setting up
15
26/7/02, 12:51 pm
>
Setting up the speakers
The SPEAKER CONFIG menu will be displayed:
Option
Description (continued)
SURR
Select NONE, SMALL, or LARGE to specify
information about the surround speakers.
SURR BACK
Select NONE, 1/SMALL, 1/LARGE, 2/SMALL,
or 2/LARGE to specify the number and size of
the surround back speakers.
BASS MODE
Specifies how to handle the bass from channels
defined as SMALL. TO SUB sends it to the
subwoofer, along with the LFE channel. TO
LARGE divides it between the channels defined
as LARGE. TO BOTH sends it to both the
subwoofer and the channels defined as LARGE.
EXTRA sends all bass information below the XOVER setting to the subwoofer, along with the
LFE channel.
X-OVER
Allows you to define the crossover frequency (40
— 200Hz) used for speakers defined as SMALL,
and by the BASS MODE EXTRA setting.
To define the GENERAL layout
First define the GENERAL layout; the other layouts will all
be based on this.
•
With MODE highlighted use the VOLUME control on
the front panel or the < and > buttons on the remote
control to select GENERAL.
•
Use the INPUT SELECTOR on the front panel or the A
and V buttons on the remote control to highlight each
menu option in turn.
•
Use the VOLUME control on the front panel or the <
and > buttons on the remote control to select the
appropriate value for each option.
If you select SMALL for a channel, frequencies below the
X-OVER setting are sent to the speaker(s) specified by the
BASS MODE option.
The options are explained in the following table:
Option
Description
SUBWOOFER
Select OFF or ON to specify whether the layout
should include a subwoofer.
FRONT
Select SMALL or LARGE to specify whether the
front speakers can handle bass.
CENTER
Select NONE, SMALL, or LARGE to specify
whether there is a center speaker in the system,
and whether it is small or large.
•
Press the MENU button on the front panel or remote
control to return to the SETUP MENU.
To define other layouts
You can now optionally define layouts DD, DTS, and
OTHER which modify the GENERAL layout when the
source is Dolby Digital, DTS, or two-channel. For example,
you can add a subwoofer to the DD layout for use with
movie soundtracks.
SETTING THE SPEAKER DELAYS
The next step in setting up the loudspeakers is to set the
speaker delays to ensure that the sound image is correctly
focused.
Delaying the sound from a speaker by 1 millisecond is
equivalent to moving the speaker one foot (0.3m) further
away from the listener.
Because the center speaker is usually physically closer to the
listener than the main left and right speakers you should add
a delay to the center speaker to ensure that the sound from
16
§5 Setting up
16
26/7/02, 12:51 pm
>
Setting up the speakers
all three front speakers reaches the listener at the same time.
In the case of the rear speakers you will normally add a delay
to increase the spaciousness of the sound.
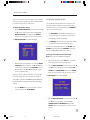
To change the speaker delays
• Use the INPUT SELECTOR on the front panel or the A
and V buttons on the remote control to highlight the
DELAY SETTINGS option and press the SELECT
button on the front panel or remote control to select it.
SETTING THE SPEAKER LEVELS
You should next set the speaker levels, so that the sound
from each speaker is equally loud at the listening position.
The SP31.7 allows you to set the levels for the GENERAL
layout in two alternative ways:
•
The AUTOMATIC option (where fitted) allows you to
connect a microphone to the SP31.7 to set the levels
automatically for all the loudspeakers.
•
The MANUAL option allows you to adjust each speaker
to equalize the loudness at the listening position.
The DELAY SETTINGS menu will be displayed:
You can also manually define levels for the DD, DTS, and
OTHER layouts which add to the GENERAL levels when
the source is Dolby Digital, DTS, or two-channel.
To change the speaker levels automatically
Note: This option is not available in all markets.
•
Highlight each of the speakers in turn, using the INPUT
SELECTOR on the front panel or the A and V buttons
on the remote control, and use the VOLUME control on
the front panel or the < and > buttons on the remote
control to adjust the delay.
Adjust the value according to the distance of each speaker
from the listening position. You can adjust the setting for
each speaker to between 0 and 100 feet (0 and 30m). The
SP31.7 will then automatically calculate the optimal delay
settings.
•
•
Connect the microphone to the MIC input on the back
panel, and position it at the listening position.
•
Use the INPUT SELECTOR on the front panel or the A
and V buttons on the remote control to highlight SET
LEVELS in the SETUP MENU and press the SELECT
button on the front panel or remote control to select it.
The SET LEVELS menu will be displayed:
Press the MENU button on the front panel or remote
control to return to the SETUP MENU.
•
Use the INPUT SELECTOR on the front panel or the A
and V buttons on the remote control to highlight
OUTPUT LEVELS - AUTOMATIC and press the
SELECT button on the front panel or remote control to
select it.
17
§5 Setting up
17
26/7/02, 12:51 pm
>
Setting up the speakers
The following display confirms that calibration is in progress:
•
With MODE highlighted use the VOLUME control on
the front panel or the < and > buttons on the remote
control to select the layout you want to define.
•
Use the INPUT SELECTOR on the front panel or the A
and V buttons on the remote control to highlight each
speaker in turn.
A white noise signal will be played through that speaker, and
you can use the VOLUME control on the front panel or the
< and > buttons on the remote control to adjust the level.
When the calibration is complete the SET LEVELS menu
shows the level that has been set for each speaker:
•
When you have adjusted each speaker to balance the
levels press the MENU button on the front panel or
remote control to exit.
SETTING THE ANALOGUE INPUT LEVEL
The SP31.7 allows you to adjust the input level to the
analogue-to-digital converter to achieve the best possible
signal-to-noise ratio.
To change the speaker levels manually
• Use the INPUT SELECTOR on the front panel or the A
and V buttons on the remote control to highlight
OUTPUT LEVELS - MANUAL in the SET LEVELS
menu and press the SELECT button on the front panel
or remote control to select it.
If the ADC input level is set too high clipping will occur on
loud signals, causing distortion. The SP31.7 detects this and
displays a Set ADC warning on the front panel and onscreen displays.
To adjust the ADC input level
• Select an analogue input.
•
Use the INPUT SELECTOR on the front panel or A
and V buttons on the remote control to highlight ADC
INPUT LEVEL and press the SELECT button on the
front panel or remote control to select it.
•
Use the VOLUME controls on the front panel or the <
and > buttons on the remote control to reduce the level
until the SET ADC warning stops flashing on the loudest
passages.
•
Press the MENU button on the front panel or remote
control to return to the SETUP MENU.
The SET LEVELS menu shows the current speaker levels:
18
§5 Setting up
18
26/7/02, 12:52 pm
Setting up the sources
>
This chapter gives details of the standard inputs that are defined when the SP31.7 is first supplied.
It then explains how to modify the standard inputs, or define new inputs, to give you total
flexibility in the way you set up the SP31.7 in your own system.
STANDARD SOURCES
•
The standard surround mode used for the source.
The SP31.7 Multi-Channel Processor allows you to define up
to 15 sources, referred to as INPUT 1 to INPUT 15.
•
For analog sources, an offset to balance the loudness
when switching between sources.
The SP31.7 Multi-Channel Processor is supplied with the
standard sources shown in the table below already defined:
Source Audio
Video
Surround mode Description
CD
Analog 1
None
Bypass
High quality CD
player
DVD
Digital 2
S-Video 1
2-CH
DVD player
TapeD
Digital 3
None
PLII PL
Digital tape
recorder or
minidisc player
Laser
Digital 7
Tuner
S-Video 2
PCM 2-CH
LaserDisc
player
Analog 2 None
Stereo
FM radio tuner
TV
Analog 3 Video 1
PLII PL
Television or
monitor
TapeA
Analog 4 None
Stereo
Analog tape
output
Sat
Analog 5 Video 2
PLII PL
Satellite
receiver
If this standard set of sources meets your requirements, you
will get excellent results by using them, and you can ignore
the remainder of this chapter.
If these standard sources meet all your requirements, but
include additional sources that you do not need, you may like
to remove the unused sources to avoid having to step past
them when selecting sources from the front panel or remote
control. To do this, see the next section, Removing sources.
Alternatively, it may be that these standard sources
generally meet your requirements, with one or two minor
changes. For example, if your CD player does not provide a
digital output you can modify the CD source so that it uses
one of the analog inputs instead of the digital input as
currently defined. To make changes to the existing sources
see Editing sources, page 20.
Finally, you may prefer to create your own set of sources to
suit the particular requirements of your system. To do this
you should read all the remaining sections in this chapter.
For each source you can define:
REMOVING SOURCES
•
A name for the source, to identify it on the front panel
display.
•
The analog or digital audio input used for the source.
•
The video input used for the source, if the source
includes video.
Every source can be enabled or disabled. If a source is
enabled it will appear in the sequence of sources when you
select sources using the INPUT SELECTOR on the front
panel or the A and V buttons on the remote control. If a
source is disabled it cannot be selected, but the settings are
retained in case you want to enable the source again at a
later date.
19
§6 Sources
19
26/7/02, 12:52 pm
>
Setting up the sources
To disable or enable sources
• Use the INPUT SELECTOR on the front panel or the A
and V buttons on the remote control to highlight
INPUT SETTINGS on the SETUP MENU and press
the SELECT button on the front panel or remote control
to select it.
•
Use the INPUT SELECTOR on the front panel or the A
and V buttons on the remote control to highlight the
options for the inputs, and use the VOLUME control on
the front panel or the < and > buttons on the remote
control to modify them as required.
The options are explained in the following table:
The INPUT SETTINGS menu will be displayed:
Option
Description
STATUS
ENABLED or DISABLED to specify whether the
source can be selected from the front panel or
remote control.
•
Use the VOLUME control on the front panel or the <
and > buttons on the remote control to select the
number of the input you want to enable or disable.
•
Use the INPUT SELECTOR on the front panel or A
and V buttons on the remote control to highlight
STATUS, and press the SELECT button on the front
panel or remote control to select ENABLED or
DISABLED as required.
ALIAS
A name of up to eight characters for the source;
see To edit the source alias below.
AUDIO
The audio input used for the source: ANALOG 1
to ANALOG 8, DIGITAL 1 to DIGITAL 8,
EXTERNAL, or NONE.
VIDEO
The video input used for the source: VIDEO 1 to
VIDEO 4, S-VIDEO 1 to S-VIDEO 3,
COMPONENT1 to COMPONENT2 or NONE.
12V
The state of up to four switches, to control
external devices.
OFFSET
Allows you to vary the sensitivity of analog or
external sources between - 10.0dB to
+ 10.0dB in 0.5dB steps.
MODE
The default surround mode for the source:
BYPASS, STEREO, 2-CH, PRO LOGIC, PLII
PL, PLII CINEMA, PLII MUSIC, PARTY, DTS
NEO:6 CINEMA, or DTS NEO:6 MUSIC. The
options available depend on the audio mode.
TV-SYSTEM
Specifies the TV system for the video input:
NTSC, PAL, or DEFAULT.
EDITING SOURCES
To edit an existing source
• Highlight INPUT SETTINGS in the SETUP MENU and
press the SELECT button on the front panel or remote
control to select it.
•
Use the VOLUME control on the front panel or the <
and > buttons on the remote control to select the input
you want to edit.
To edit the source alias
• Highlight ALIAS in the INPUT SETTINGS menu and
press the SELECT button on the front panel or remote
control to edit the alias.
•
Select the character you want to edit using the INPUT
SELECTOR on the front panel or the A and V buttons
on the remote control.
20
§6 Sources
20
26/7/02, 12:52 pm
>
Setting up the sources
The currently selected character is shown highlighted with a
block:
The following example shows how to define two sources,
with aliases MOVIES and MUSIC, designed for use with a
DVD player. Choosing the MOVIES source selects the PLII
CINEMA surround mode, which is ideal for movie
soundtracks. Choosing the MUSIC source selects the 2-CH
surround mode, for the best possible reproduction of audio
CDs.
The definition of each of the two sources are shown in the
following screen displays:
•
Use the VOLUME control on the front panel or the <
and > buttons on the remote control to change the
currently selected character.
Each key press steps the character through the sequence:
space, upper-case letters, lower-case letters, digits, and
symbols.
•
Press the MENU button on the front panel or remote
control when you have finished entering the alias.
To add a new source
• Proceed as for editing a source, but select an unused
source as the starting point.
Defining a multi-channel source
If you have a source that provides multi-channel analog
outputs, such as a DVD Audio or SACD player, you can define
a source that allows you to connect this to the SP31.7,
bypassing the internal surround processor.
•
Connect the multi-channel inputs to analog inputs 5, 6, 7,
and 8 as shown in the following table:
EXAMPLES OF SOURCES
The following examples show how to set up sources to cater
for more advanced applications.
Defining two sources that use the same input
Usually each source you define will correspond to a different
input on the back panel. However, there are occasions when
it is useful to be able to define two sources using the same
input, and the SP31.7 allows you to do this.
•
Input
Left
Right
Analog 5
Front left
Front right
Analog 6
Surround left
Surround right
Analog 7
Center
Subwoofer
Analog 8
Surround back left
Surround back right
Define a source with the AUDIO option set to
EXTERNAL and the VIDEO option set to the video
input used for the DVD Audio or SACD player.
21
§6 Sources
21
26/7/02, 12:52 pm
>
Setting up the sources
You can use the OFFSET option to adjust the relative level
of the multi-channel source compared with the other analog
sources:
22
§6 Sources
22
26/7/02, 12:52 pm
>
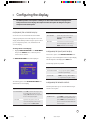
Configuring the display
The SP31.7 provides several options to allow you to choose how information is displayed on the
front panel and on-screen displays. This chapter describes the options for doing this, and gives
examples of each of the options.
CONFIGURING THE ON-SCREEN DISPLAY
Option
Description (continued)
You can choose to show information about the SP31.7
settings superimposed on the video image as an on-screen
display, and the SP31.7 provides a range of options to allow
you to configure the position, color, and duration of the
on-screen display.
OSD POSITION
Specifies the position of the on-screen
display as one of the options TOP or
BOTTOM.
OSD TIME
Set to 1-10 sec to determine how long the
on-screen display stays on the screen, or
NONE to disable the on-screen display.
To change the on-screen display
• Highlight DISPLAY SETTINGS in the SETUP MENU
and press the SELECT button on the front panel or
remote control to select it.
The DISPLAY SETTINGS menu will be displayed:
CONFIGURING THE FRONT PANEL DISPLAY
The next two options on the DISPLAY SETTINGS menu
allow you to choose the brightness of the front panel display,
and the delay before the display dims in DIM mode.
The following options are provided:
The following options on the DISPLAY SETTINGS menu
determine the on-screen display:
Option
Description
OSD TRANSPARENT Set to YES to allow the video image to show
through the background of the on-screen
display, or NO to blank the video image when
the on-screen display is displayed.
TV SYSTEM
Specifies the TV system to ensure the
correct size and position of the on-screen
displays. Can be set to NTSC or PAL.
Option
Description
DISPLAY BRIGHTNESS
1-4 to specify the brightness, or OFF to
blank the front panel display.
DISPLAY TIME
NONE for no delay, or 1 sec to 10 sec
for a specified time delay before dimming.
CONFIGURING THE REMOTE CONTROL
The final option allows you to control the SP31.7 using an
external control system:
Option
Description
REMOTE SELECT
Set to FRONT to control the SP31.7 using an
infra-red remote control pointed at the front
panel, or REAR to control it via an infra-red
repeater connected to the RJ45 DATA socket
on the back panel.
23
§7 Configuring
23
26/7/02, 12:52 pm
>
Configuring the display
24
§7 Configuring
24
26/7/02, 12:52 pm
>
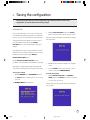
Saving the configuration
This chapter explains how to save the configuration of your SP31.7, and how to recall a saved
configuration, or reset the SP31.7 to the factory settings.
INTRODUCTION
•
Once you have defined your own custom set of inputs, and
have calibrated the speaker settings and other configuration
options to suit your own requirements, you should save your
settings permanently in the SP31.7. You can then return to
your saved settings at any time using the RECALL
SETTINGS option to undo any subsequent configuration
changes.
Highlight SAVE SETTINGS and press the SELECT
button on the front panel or remote control to select it.
After a short delay a message will confirm that the settings
have been saved:
If the SP31.7 was set up for you by an installer, the installer
will have saved a set of installer settings. You can also return
the SP31.7 to these settings using the RECALL
INSTALLER SETTINGS option.
Finally a RECALL FACTORY SETTINGS option is
provided, to return the SP31.7 to the default factory settings.
•
Wait 10 seconds to allow the settings to be completely
stored.
After saving or recalling settings always wait at least 10
seconds before switching off the unit using the mains switch.
•
Press the MENU button on the front panel or remote
control to return to the MEMORY MENU.
To save your settings
• Highlight MEMORY in the SETUP MENU and press
the SELECT button on the front panel or remote control
to select it.
The MEMORY MENU will be displayed:
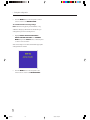
To recall your settings
• Highlight RECALL SETTINGS in the MEMORY
MENU and press the SELECT button on the front panel
or remote control to select it.
The following screen then confirms that your settings have
been recalled:
25
§8 Saving
25
26/7/02, 12:52 pm
>
•
Saving the configuration
Press the MENU button on the front panel or remote
control to return to the MEMORY MENU.
To recall the installer or factory settings
Note: This will lose any inputs you have defined, or any
calibration changes you have made. You should save your
settings first if you have not already done so.
•
Highlight RECALL INSTALLER SETTINGS or
RECALL FACTORY SETTINGS in the MEMORY
MENU and press the SELECT button on the front panel
or remote control to select it.
After a short delay a screen will confirm that the appropriate
settings have been recalled:
•
Press the MENU button on the front panel or the
remote control to return to the MEMORY MENU.
26
§8 Saving
26
26/7/02, 12:52 pm
>
Index
A
I
analog inputs.................................................................................... 12
analogue input level ....................................................................... 18
audio inputs ...................................................................................... 12
INPUT MODE option ....................................................................... 7
INPUT SELECTOR .......................................................................... 3
INPUT SETTINGS menu ............................................................. 20
inputs ...........................................................................................12, 13
B
back panel connections .................................................................. 11
L
C
layouts, speaker .............................................................................. 16
LEVEL button ................................................................................... 3
levels, changing ................................................................................. 5
configuration ................................................................................... 25
recalling settings .............................................................................. 25, 26
saving ......................................................................................................... 25
connections ................................................................................ 11, 12
D
DELAY SETTINGS menu ............................................................. 17
digital inputs ..................................................................................... 12
Digital Surround Processing ........................................................... 1
display, configuring ....................................................................... 23
DISPLAY SETTINGS menu ........................................................ 23
F
M
MAIN MENU ...................................................................................... 7
MEMORY MENU ........................................................................... 25
MENU button .................................................................................... 3
menu options, selecting .................................................................. 7
menus, using ...................................................................................... 7
MIC input ........................................................................................... 13
microphone, connecting ................................................................ 13
monitor, connecting ........................................................................ 12
multi-channel source ................................................................. 1, 21
muting .................................................................................................. 5
front panel
controls ......................................................................................................... 3
locking ........................................................................................................... 9
front panel display ............................................................................ 3
configuring ................................................................................................ 23
O
offsets, for analog sources.......................................................... 20
on-screen display, configuring ................................................... 23
outputs .............................................................................................. 12
dimming ......................................................................................................... 4
P
G
GENERAL layout ........................................................................... 16
power, connecting .......................................................................... 12
Primare A30.5 Multi-Channel Amplifier ..................................... 2
connecting to ............................................................................................ 13
Primare V25 DVD Player ............................................................... 2
connecting to ............................................................................................ 13
27
§9 Index
27
26/7/02, 12:52 pm
Index
>
R
RECALL FACTORY SETTINGS option ................................... 26
RECALL INSTALLER SETTINGS option ........................ 25, 26
RECALL SETTINGS option ........................................................ 25
record outputs ................................................................................. 13
recording ............................................................................................. 9
remote control, configuring ......................................................... 23
RS232 inputs .................................................................................. 13
SPEAKER CONFIG menu ............................................................ 16
speakers
changing the levels automatically ....................................................... 17
changing the levels manually ................................................................ 18
configuring ................................................................................................. 15
layouts ......................................................................................................... 16
setting delays ............................................................................................ 16
setting levels ............................................................................................. 17
specifying the configuration ................................................................. 15
S
SELECT button ................................................................................. 3
SET LEVELS menu ........................................................................ 17
SETUP MENU ................................................................................. 15
sources ......................................................................................... 4, 19
adjusting sensitivity ............................................................................... 20
defining aliases ........................................................................................ 20
disabling ..................................................................................................... 20
standby ................................................................................................ 4
STANDBY button ............................................................................. 3
surround mode, changing ............................................................... 8
SURROUND MODE options ......................................................... 8
T
technical specification ..................................................................... 2
television, connecting .................................................................... 12
displaying information .............................................................................. 8
editing ......................................................................................................... 20
V
examples ..................................................................................................... 21
recording ....................................................................................................... 9
video inputs ...................................................................................... 12
video outputs ................................................................................... 12
volume
removing ..................................................................................................... 19
changing ....................................................................................................... 5
selecting ....................................................................................................... 4
control ........................................................................................................... 3
multi-channel ............................................................................................. 21
sharing inputs ............................................................................................ 21
28
§9 Index
28
26/7/02, 12:52 pm