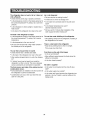
1
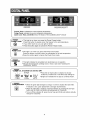
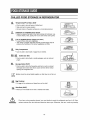
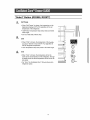
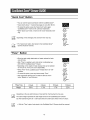
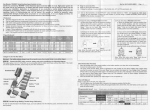
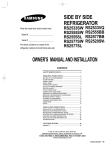
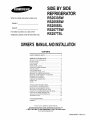
SIDEBYSIDE
REFRIGERATOR
RS2533SW
RS2555SW
RS2555SL
RS2577SW
RS2577SL
Write the model and serial number here:
Model #
Serial #
Find these numbers on a label of the
refrigerator cabinet at the left hand-side wall.
OWNER'S
MANUALAND
INSTALLATION
CONTENTS
SAFETY
WARNING
OPERATING
SIGNS ...............................................................
2
INSTRUCTIONS
........................................................
4
SETTINGUPTHE REFRIGERATOR........................................................
4
MAJORFEATURES.....................................................................................
4
CONTROLPANEL.......................................................................................
5
DIGITAL PANEL..........................................................................................
6
TEMPERATURECONTROL ......................................................................
7
ICE and COLDWATERDISPENSER.........................................................
7
SHELVESand BINS.....................................................................................
8
FOOD STORAGEGUIDE ...........................................................................
9
CoolSelectZoneTMDrawerGUIDE.............................................................
11
REMOVINGTHE FREEZERACCESSORIES.........................................
13
REMOVINGTHE REFRIGERATORACCESSORIES............................
13
BEVERAGESTATION(RS2577)..............................................................
14
CLEANINGTHE ACCESSORIES.............................................................
14
CHANGINGTHE INTERIORLIGHT.........................................................
15
WATER FILTER..........................................................................................
16
DOORS.......................................................................................................
16
INSTALLATION
INSTRUCTIONS
................................................
17
INSTALLATIONOFTHE REFRIGERATOR............................................
17
REMOVINGTHE REFRIGERATORDOORS.........................................
18
REATTACHINGTHE REFRIGERATORDOORS....................................
21
ADJUSTINGTHE CLEARANCEBETWEENTHE DOORS....................24
CHECKINGTHE WATERDISPENSERLINE..........................................
26
INSTALLINGTHE WATER DISPENSERLINE ........................................
26
TROUBLESHOOTING...............................................................................
30
CONSUMER SUPPORT ....................................................................
31
WARRANTY
...............................................................................................
31
In the US.for questions about features,
operation/performance, parts, accesories or service, call:
1-800-726-7864
(1-800-SAMSUNG), FAX:1-973-601-6001
www.samsungusa.com
DA68-00500T
REV(0.1)
• Before operating the appliance, please read this manual thoroughly and retain it for your reference.
//_
• Because
refrigeratormay
these following
differ slightlyfrom
operatingthose
instructionscover
described invarious
this manual
models, the characteristicsof your
• The applianceis not intendedfor use by childrenor infirmpersonswithoutadultsupervision.
WARNING
• Childrenshouldbe supervisedto ensurethat they do not playwith the appliance.
CAUTION/WARNINGSUSED
OTHER SIGNS USED
Q
/k
WARNING
/k
CAUTION
Represents something you must NOT do.
Represents something you must NOT
disassemble.
Indicates that a danger of
death or serious injury exists.
Indicates that a risk of
personal injury or material
damage exists.
Represents something you must NOT touch.
O
Represents something you must follow.
i_
Indicates that you must disconnect the
power plug from the socket.
O
Represents a ground is needed to prevent
electric shock.
It is recommended that this sentence be
handled by service man.
Because these warning signs are to prevent injury from users or other persons, please follow
safety warning signs. After reading the warning signs, keep them in a safe place for future reference.
//_
Q
Do notstorevolatileor flammablesubstancesin the
refrigerator.
• The storageof benzene,thinner,alcohol,ether,LP gas and
othersuch productsmay causeexplosions.
WARNING SIGNS
Do notplug severalappliancesintothe same multiple
receptical.
• This could causeoverheatingandthe risk offire.
Do
notdisassemble
repairthe
refrigeratorbyyourself.
• You
run the risk of or
causing
a fire,
malfunctions and/or
personal injury.
Makesure that the powerplug is notsquashedor damagedby the backof the refrigerator.
• A damagedpowerplug may overheatandcausefire.
Pull the power plug out of the socket before changing the interior light of the refrigerator.
• Otherwise,there is a risk of electric shock.
Do notdirectlyspraywaterinside or outsidethe refrigerator/freezer.
• There is a riskof electricshock.
If
dispose
of thethe
refrigerator/
it you
awaywish
aftertofirst
removing
doors andfreezer
seals. throw
• Do so in a way that it is not possiblefor a child to remain
trapped inside.
Do notuse aerosolsnear the refrigerator.
• There is a riskd explosionor fire.
O
Do notbend the powercordexcessivelyor place
heaveyarticleson it.
• This constitutesa fire hazard.If the powercord is damaged, haveit replacedimmediatelyby the manufacturer
or its serviceagent.
The refrigerator must be grounded.
• You must ground the refrigerator to prevent any power
leakages or electric shocks caused by current leakage
from the refrigerator.
O
Do not insertthe powerplug with wethands.
• Youmay receivean electricshock.
Do notput a containerfilledwith water on the refrigerator.
• If spilled,thereis a risk of fire or electricshock.
Do not installthe refrigerator in a dampplaceor a
placewhere it may come in contactwith water.
• Deterioratedinsulationof the electricalparts may cause
electricshockor fire.
2
Never use gas pipes, telephone lines or other potential lightening rods as ground.
• Improperuse of the groundplug can resultin a riskof
electricshock. If it is necessaryto use an extentioncord,
useonly a 3-wireextentioncordthat has a 3-bladeground
plug anda 3-slot receptaclethatwill acceptthe plug on the
appliance.The markedratingof the extensioncord should
beAC 115V~120V,10A,or more. if a groundingadapter is
used,makesurethe receptaclebox is fullygrounded.
//_
CAUTION SIGNS
Q
o not overfill the refrigerator with food.
• When you open the door, an item may fall out and cause
personal injury or material damage.
f
Do not put bottlesor glass containersin the freezer.
• When the contents freeze, the glass may break and
cause personal injury.
If the wall socket is loose, do not insert the power
plug.
• There is a risk of electric shock or fire.
Q
Do notdisconnectthe powercord bypullingon it.
• Damageto the cord may causea short-circuit,fire
and/orelectricshock.
@
• If the powercord is damaged,it must be replacedby
the manufacturer,a certifiedserviceagentor qualified
servicepersonnel.
Do not store articles on the top of the appliance.
• When you open or closethe door,the articlesmay fall
and causepersonalinjury and/ormaterialdamage.
Do not store pharmaceuticals products, scientific
materials and temperature-sensitive products in
the refrigerator.
• Productsthat requirestrict temperaturecontrolsmust
not be storedin the refrigerator.
Do not let childrenhang on the door. If not, a serious injury may occur.
If you sense pharmaceuticals smells or smoke, pull
out the power plug immediately and contactyour
SAMSUNGElectronics service center.
®
Do nottouch the insidewalls of the freezeror
productsstoredin the freezerwith wet hands.
• It may causefrostbite.
Do not insert your hands into the bottom area
under the appliance.
• Any sharp edgesmay causepersonalinjury.
Neverput fingers or other objects into the
dispenser hole and ice chute. It may cause personal injuryor materialdamage
Do notuse a wet or dampclothwhen cleaning
the plug. Removeany foreign matteror dustfrom
the powerplug pins.
• Otherwisethereis a riskof fire.
• Ifthe refrigerator is disconnectedfrom the power
supply,you shouldwaitfor at leastfive minutes
beforepluggingit back.
_,
If the refrigerator is notto be usedfor a long
periodof time, pullout the power plug.
• Deteriorationin the insulationmay causefire.
Once you have performedthe following steps, your refrigeratorshould be fully operational. If not, check
the power supply and electricity source. If you have any questions, contact your 8AMSUNG
service center.
Place the refigerator in an appropriate location with reasonable clearance between the
wall and the refigerator.
(refer to installationinstructionsin this mannal)
Set the temperature control to the coldest
temperature and wait for an hour.The
freezer should get slightly chilled and the
motor should run smoothly.
When the refrigerator is plugged in,
the interior light should come on when
you open the doors.
Once the refrigerator temperature is sufficiently low, you can store food in the
refrigerator.After starting the refrigerator,it
takes a few hours to reach the appropriate
temperature.
Twin Cooling System
• The refrigerator and the freezer have two evaporators. Given this
independent system, the freezer and the refrigerator are cooled
individually as required and are, therefore, more efficient. Food odor
from the refrigerator does not affect food in the freezer due to separate of air flow circulation.
Multi-Flow System
• Cool air circulates through multiple vents on every shelf level. This
provides even distribution of cooling inside cabinets to keep your
food fresh longer.
Xtra Space TM
• Vertical room next to the ice maker in the freezer provides space
for pizza etc.
Door Alarm
• A beeper reminds if you the door is left open.
Xtra Fresh TM
• Optimized humidity control keeps vegetables & fruits fresh.
Deodorizer
• Reusable twin deodorizers keep the refrigerator air fresh and
odor free.
CoolSelect Zone TM Drawer(RS2555, RS2577)
• User can select Quick Cool, Thaw, or Soft Freeze to quickly chill
items, thaw items, or keep meat and cheeses fresh longer. Select
Cool or Chill to control the temperature of the drawer.
4
RS2533
PowerFreeze SAMSUNG
PowerCool
Child Lock
Ice
Watel
iiiiiiiiiiiiiiiiiiiii_,
RS2555, RS2577
FREEZER TEME BUTTON
Toset the freezer temperature, press
the button repeatedly to change the set
temperature in sequence between
8°F and -14°F.
POWER FREEZER BUTTON
peeds up the freezing process in
I FRIDGE TEMP. BUTTON
Toset the fridge temperature, press the button
repeatedlyto change the set temperature in
sequence between 34°F and 46°F.
I
POWER COOL BUTTON
[ Speeds up the coo ng process n the refrigerator I
the freezer,
ICE TYPE BUTTON
Use this button to choose Cubed or
Crushed Ice or Ice off.
CHILD LOCK BUTTON
When this button is pressed for 3 sec., the Power
Freeze, Power Cool, Freezer Temp.and Fridge
Temp.are locked and can not be modified.The
Water and Ice dispensers are not locked they can
still be used.
_J
or
RS2533
RS2555,RS2577
Freezer Temp. indicates the current freezer temperature.
Fridge Temp. indicates the current refrigerator temperature.
Quick Cool, Thaw, and Select show the status of the CoolSelect Zone TM Drawer
l-,ower I-reeze
r_
• This light is on when you press the Power Freeze button.
Press this button to quickly return the freezer to the set temperature.
• if you need much ice, you can get ice faster.
• Press the button again to cancel the Power Freezer mode.
Power Cool • This light is on when you press the Power Cool button.
I
_
!
Press the button to quickly return the refrigerator to the set temperature.
• Press the button again to cancel the Power Cool mode.
"
er
•
This light indicates the recyclable twin deodorizers are in operation.
• Recycle the,honeycomb cartridge once or twice a year (see "Cleaning the
Accessories secuon)
_
"_
e,
I
\
I
_.,___'/
/
__
/Cu_e_
/
Crushed
IceType Ice and Ice
_13/
_
_
Crushed
" ICE "
_ OFF
•
Press the Ice Type button in seqence to choose
Cubed Ice, Crushed Ice or Ice Off to stop making ice.
Bright icon indicates the ice type is currently chosen.
Ice Off
• When the green light changes to orange, it is time to replace the water filter.
If indicator is red, quick replacement is strongly recommended.
• When the water filer is replaced, reset the indicator by pressing the Ice Type
button and the Child Lock buttons simultaneously for 3 seconds.
• To turn off this indicator off, press the Ice Type and Child Lock buttons simultaneously for 5 seconds.
6
M
Freezer
Refrigerator
• The freezer temperature can be set between
8°F and -14°F.
• Press the Freezer Temp. button repeatedly until the
desired set temperature is shown in the temperature
display.
• The temperaturedisplay changes in sequence
between 8°F and -14°F. When the display reaches
8°F,it returns to -14°F.
• After five seconds, the display reverts to the actual
freezer temperature. The unit will then work to adjust
to the new desired temperature.
• The refrigeratortemperature can be set between
46°F and 34°F.
• Press the Fridge Temp. button repeatedly until the
desired temperature is shown in the temperature display.
• The temperaturedisplay changes in sequence and
reverts in the same way as the freezer.
/k
WARNING
• When ice cream is stored above 4°F in freezer, it may melt.
• The temperature d the freezer or the refrigerator rises from frequent openings, when sweeping
and from warm food. This may cause the digital display to blink. The digital display will stop
blinkingwhen the freezer and refrigeratorreturn to the normal temperature.
Ice Dispenser
Water Dispenser
The ice maker produces 10 cubes at once and about
120 cubes a day automatically.This quantitymay be influencedby factorssuch as thefreezertemperature,Power
Freezefunctionand the numberd dooropenings.When
your refrigeratoris pluggedin, the Cubedicemode is
automaticallyselected.
The capacity of the water tank is approximely 0.3 gal.
Cold Water
• Push the water dispenser lever with a cup.
Press the Ice Type button to select the type of ice:
\
• Cubed ice
• If you have just installed the refrigerator,throw
away the first six glassfuls of water to flush out
impurities in the water supply system.
i/
:_:
//1\
\
'_
_
•
For Cubed ice
i
• Crushed ice
_/-_
_
/=\
•
For Crushed
• No ice
\_
_
:_::•
//
ice
No ice
\\
For ice off
(_
If the Ice remains in the Ice bucket, the
NOTE cubed ice is obtained.
Push the ice dispenser lever with a cup.
• Place a cup in line with the dispenser lever the
dispenser to prevent the ice from jumping out.
/k
If you have a long vacation or business trip
and won't use the water or ice dispensers,
CAUTION close the water valve. Otherwise, leakage
of water may occur.
Never put fingers or any other objects in the
NOTE dispenser opening. It may cause injury.
iiiiiiiiiiiiiiiiiiiii_.
Freezer
Xtra SpaceTM
Door Bin -Ice Maker-
E
z
Light
Ice Chute
Glass Shelf -Wire Shelf
Light Switch -Tilt Pockets
'_
Wire Drawers
Front Leg Cover
RS2533 Model
RS2577Model
with CoolSelectZoneTM
RS2555Model
with CoolSelectZoneTM
Refrigerator
Water Filter
--
Dairy Compartment
Light (upper)
--
Wine Rack (RS2577)
Spill-proof glass Shelf
--
Gallon Door Bin
--
BeverageStation(RS2577)
Light Switch
Foldable Shelf (RS2577)
Twin Deodorizer
--
Lights (lower) (RS2555,2577)
Egg Container
CoolSelect ZoneTM Drawer
( Chilled Bin for RS2533)
Door Bin Top Lips
Vegetable & Fruit Drawers
--
8
Gallon Door Bins
FROZEN FOOD STORAGE IN FREEZER
Xtra SpaceTM
• Can be used for frozen foods such as pizza, pasta, burri tos,
and fajitas.
• In order to prevent odor penetrationto the ice, stored food
should be wrapped securely.
...... Tempered Glass Shelf( Wire Shelf)
• Can be used to store all types of frozen food.
Door Bin (Tilt Pocket)
• Can be used for small packagesof frozen food.
Plastics Drawer (Wire Drawer )
• Can be used to store meat and dry foods. Stored food should
be wrapped securely usingfoil or other suitable wrapping
materialsor containers.
...... Icechute
DOnot put your fingers,hands or anY otherinsuitable objects inthe ChUteor ice'maker buckeL
WARNING
As this may result in personal injury or material damagel
CHILLED FOOD STORAGE IN REFRIGERATOR
Tempered Spill Proof Glass Shelf
• Can be used to store all types of chilledfood.
• Safe and hard to break resistant.
• Circular marks on the glass surface are a normal phenomenon.
Chilled Bin or CoolSelect ZoneTM Drawer
• Helps to preserve the taste of food and prolongs its freshness. Use
to store cheese, meat, poultry,fish or any other foods used quickly.
iiii .............
8 Fruit & Vegetable Drawer (Upper and Lower)
• Is used to store fruits and vegetables.
• This drawer is airtight. Optimizedhumidity control design helps to
preserve the freshness of the stored vegetables and fruits.
Dairy Compartment
iiiiii............
• Can be used to store butter, margarineand cheese.
Gallon Door Bins
• Can be used to store foods in small packages, such as milk and
yogurt.
BeverageStation(R82577)
• Can be used to store the frequently used items, such as canned
beverages and snacks and allows access to these itemswithout
opening the refrigerator door.
(_
Bottles should be stored tightly together so that they do not fall out.
NOTE
13
Egg Container
• Put eggs in the container and place them on the shelf.
iiiiit4Wine Rack (R82577)
• Place your wine bottle on the rack to maintain their taste.
• If you have a long vacation planned, you must decide to empty the refrigerator and turn it off. Wipe
WARNING
excess moisture from the inside and leave the doors open. Otherwise, odor and mold may develop.
10
"Select"
Button (RS2555, RS2577)
iiiiiil_
......... SoftFreeze
• When "Soft Freeze" is chosen, the temperatureon the
digtal panel displays 23°F(-5°C)regardless of the set
temperatured the refrigerator.
• "Soft-Freeze"temperature helps keep meats and fishes
fresh longer.
• Can cut meat easily without drips.
2
Chill
• When "Chill" is chosen, the temperature d the CoolSelect ZoneTM Drawer is kept at 30°F(-1°C)regardless d
the set refrigerator temperature.
• "Chill"temperature helps keep meat or fish fresh longer.
.............................
:'7
_"
_ck
Cool
Cool
• When "coor' is chosen, the temperaturewill be the
same as the set temperature of the refrigerator.The digital panel shows the same temperature as that d the display panel.
• For "Cool," the CoolSelectZoneTM Drawer allows extra
refrigeratorspace.
11
\
t
.
Soft
-_)Freeze
z'_\Ohil
I
_ _Select
"Quick
Cool" Button
• You can use the Quick Cool feature with the CoolSelectZoneTM.
• "QuickCool" allows 1~3 canned beverages to cool within 60 min.
• To cancel this option, press the "Quick Cool" button again.
CoolSelectZoneTM returns to the previous temperature.
• When "Quick Cool" ends, it returns to the "Cool" temperaturesetting.
NOTE
Dependingon the beverages,the cool-down time may vary.
\_ck
_o
Cool
Soft
Freeze
Ohill
NOTE
el
• For "Quick Cool" option, food stored in the CoolSelectZoneTM
Drawer should be removed.
"Thaw"
Select
Button
• Drips loss and quality deterioration of meats reduces the freshness d foods.
• After "Thaw"is selected, warm and cold air is alternatelysupplied into the CoolSelectZoneTM Drawer.
ck Cool
• Dependingon the weight d meat, thawing time can be selected
for 4 hrs, 6 hrs, 10 hrs, and 12 hrs sequentially.
N
• When "Thaw" ends, CoolSelectZoneTM displayreturns to "chill"
condition.
• To cancel this option, press any button except "Thaw".
Freeze
Soft
_
• The approximate thawing time of meat and fish are shown
below. (Based on linch thickness)
, Chill
b Cool
_
Thaw Time
Weight
Select
4 hours
6 hours
10 hours
12 hours
0.8 Ib
1.3 Ib
1.7 Ib
2.2 Ib
Depending on the size and thickness of meat and fish, the thawing time may vary.
TM
NOTE The above weight representsthe total weight of food in the CoolSelectZone Drawer.
Ex) The total thawing time for 1.3 lb frozen beef and 0.8 lb frozen chicken will be 10 hours.
• With the "Thaw"option, food stored in the CoolSelect ZoneTM Drawer should be removed.
NOTE
12
Ice Maker Bucket
......• Removethe bucket by lifting up and pulling out.
GlassShelf
• Pulltheshelfoutasfaras
itgoes.Thenliftitupand
remove
it.
5
Door Bin
• Hold the door bin with both
hands and then lift it up.
Front Leg Cover
• Open the freezer and refrigerator doors, remove three
screws and detach the cover.
• To reassemblethe cover leg
front, put it back to original
position and tighten the three screws.
Plastic Drawer (Wire Drawer)
• Removethe drawer by
pulling it out and lifting it up Ib ......................
..:..fill
NOTE
slightly.
1
/
• Do not use excessive force when
removing the cover. It may cause an
injury.
Spill Proof Glass Shelf
• Pull the shelf out as far as it will go. Then lift it up and remove it softly.
Vegetable & Fruit Drawer
iiii!i!i2_
........
• Removethe drawer by holding the handle, pulling the drawer out and lifting it up smoothly..
• Removethe optimized humidity control cover by pulling it towards you.
.......Gallon Door Bin
• Hold the bin with both hands and remove it by lifting it up.
......Wine Rack
• It is attached to the cabinet wall. To remove wine rack, slide the
wine rack in the direction d the arrow as shown.
• Simply take the rack out d the tabs.
L_=-I
NOTE
• Before removingthefreezer and refrigeratoraccessories,pleasemove the storedfoods to otherspace.
13
To openthe BeverageStationTM,holdthe BeverageStationTMdoor handleand pull it downward.
• The BeverageStationTMis convenient
and reducesenergyconsumption,
becauseyou do not need to open
the refrigeratordoor to accessstored
beveragesand snacks.
• It is recommendedthat you use the
BeverageStationTMfor storingmost
frequentlyneededfoods
• The door of the Beverage Station should never be removed.The Beverage Station cannot function if its door
is missing.
• When closing the Beverage Station door, be careful not to put your hands or fingers around the door frame
where they can be caught or injured.
• When you use the open door as a tray, do not place heavy objects on it. Do not allow children to
hang on the door because there is a risk of personal injury or material damage.
• When you open the beverage stationtMdoor, be careful not to hit children head.
TM
TM
TM
WARNING
Interior
• Clean the accessorieswith a mild detergent,then wipe out with a dry cloth.
• After washing the accessories, make sure that they are dry before using them again.
Exterior
• Wipe the digital panel and display panel with a clean cloth.
• The doors and handles should be cleanedwith a mild detergent and cloth. Dry them with a
clean cloth.
• The exterior part d refrigerator should be polishedonce or twice a year.
Rear
• Use a vacuum cleaner to remove dust once or twice a year.
Ice and water dispenser (R82555, R82577)
• Use a damp cloth to clean the ice and water dispenser.Then wipe it out with a dry cloth.
• To keep drainage grid dry, do not touch ice and water dispenser.
BeverageStationTM
(R82577)
• Use a damp cloth to clean the BeverageStationTM.Then wipe it out with a dry cloth.
Rubber door seals
• If the rubber door seals are dirty,the door will not close properly,The refrigeratorwill not be
able to function efficiently.Clean the doors with a mild detergent and damp cloth. Then wipe
with a dry cloth.
//_
WARNING
• Do not spray the refrigerator with water. It may cause a death by an electric shock.
• Do not clean it with benzene, thinner or car detergent. It may cause a fire.
14
TwinDeodorizer
• Removethe coverwith a fiat bladescrewdriveras shown.
• Takeoutthe cartridgefrom the cover and soak it in cleanand warm water
at least than4 hrs.Completelydry outthe cartridgewith sunlightfor at least 8 hrs in
an open area.
idge
• Repeatthis processonceor twicea year.
NOTE
• If it is dried in a confinedarea,odor may be spreadto that area.
• Keepthe childrenaway fromyellow water,they may drinkwater.
Before
changing
the interiorthe
light,
unplug
theyour
refrigeratorfrom
the power supply. If you
have difficulty
in changing
light,
contact
service center.
WARNING
INTERIORLIGHT IN THE REFRIGERATOR.
Upper
Pull out the screw cap (_ and
remove the screw.
Push the lamp cover in the
direction of the arrows.
After changing the bulb,
_ ............
reattach the light cover
and screw it in again.
Takethe lampcoveroutin
the dircotion of the arrows.
After changing the bulb,
iiiii_............
reattach the light cover
and screw it again.
Lower (RS2555,RS2577)
1 .............
Pull out the screw cap
remove the screw.
and
15
INTERIORLIGHT IN THE FREEZER.
The freezer light is located in the bottom of the auger motor case.
Use a screwdriver to remove
the light cover ((_).
NOTE
:2,
Change the bulb with a new
one (@)
Reattach the light cover
To replace freezer and refrigerator light bulbs (Bulb size E14, 30 watts), please contact
ADDRESS : SAMSUNG ELECTRONICS AMERICA, INC.
SERVICE DIVISION
400 VALLEY ROAD, SUITE 201, MT. ARLINGTON, NJ 07856
TELEPHONE : 1-800-SAMSUNG
FAX : 1-973-601-6001
Light bulb part no: 4713-001145
The water "Filter Indicator" light
• "Filter Indicator" light lets you know when it is time change your water filter cartridge. The light
will change from green to orange. This tells you that it is almost time to change the current cartridge.
It is recommended that you replace the cartridge when the light changes to red.
(see "Install the water filter" section for more informmation)
Using the dispenser without the water filter
• You can not use the water and ice dispenser without a water filter cartridge because the water line
blocks at water supply.
Ordering replacement filters
• To order more water filter cartridges, call 1-800-SAMSUNG and ask for accessory Part # DA2900003A or contact your authorized Samsung dealer.
The refrigerator doors have a special door opening and closing feature to make sure that the doors
close all the way and are securely sealed.
When opening the door, it will only open so far. After reaching a certain point, it will remain open.
When the door is partially open, it will close automatically.
16
Checking the Dimensions
of your Entrance Door
Check the dimensions of your entrance door to determine whether the refrigerator can pass
through it.
Model
Capacity
RS2533, RS2555, RS2577
25.2
(Cu. Ft)
Width
Dimension
(inch)
Case Height
Depth
36
without Hinge
69
with Hinge
with door
without door
70
35
29
Selecting the Location for the Refrigerator
• Select a location with easy access to the water supply.
• Select a location with enough space for the refrigerator.
• Select a location without direct exposure to sunlight.
aT
NOTE
• Before disassembl ng the freezer door: the Water supply !ine needs to be disconnected;
(if not the water supply line can be damage&)
• See ,Separating the water supply line from the refrigerator" on the next page,
Allow sufficient space to circulate the air at the internalcooling system.
• When refrigerator has not enough space, the internal cooling system may not work correctly.
1 inch
1
1 inch
0.1 inch
@
NOTE
Allow clearance to the right, left, back and top when installing the refrigerator.
This has the advantage of reducingpower consumption.
17
When you can remave the doors if, you can remove the doors.
Removing the Front Leg Cover
Open the freezer and refrigerator doors, and then take off the front leg cover by turning the
three screws counter-clockwise.
FRONT LEG COVER
/
_.
_
tj
SCREW
L_
Separating the Water Supply Line from the Refrigerator
1) Remove the screw from clamp (®).
2) Remove the water tube by pressing the coupler (@) and pulling the water tube (qb) away.
NOTE
Donotcut thewatertubebutseparateitfromthecoupler.
18
• Liftthedoorstraight
up.
NOTE • Becareful
nottopinchthewatertubing
andwireharness
onthedoor.
• Place
doors
onaprotected
surface.
Removing the Freezer Door
1) With the door closed, remove the upper hinge cover (qb) using a screwdriver, and then disconnect
the wires (@).
i
2) Remove bolts (®) and ground screw (®) counter-clockwise, and take off the upper hinge (®) along
the arrow (®). Take care when removing the door to ensure that it does not fall on you.
3) Remove the door from the lower hinge (@) by
4) Remove the lower hinge (®) from the bracket
carefully lifting the door (®).
lower hinge (®) by lifting the lower hinge (®) in
the direction of the arrow.
®
19
Removing the Refrigerator Door
1) With the door closed, remove the upper hinge cover (qb) using a screwdriver, and then disconnect
the wires (@).
I
2) Remove bolts (®) and ground screw (@) counter-clockwise, and take off the upper hinge (®) in the
direction of the arrow (®). Take care when removing the door to ensure that it does not fall on you.
3) Remove the door from the lower hinge (@) by
4) Remove the lower hinge (®) from the bracket
lifting the door (®).
lower hinge (®) by lifting the lower hinge (®) in
the direction of the arrow.
--®
\\\\\\
J
2O
Reattaching the Freezer Door
1) Insert the lower hinge (qb)in the bracket lower
2) Reattach the freezer door by inserting the hose
hinge (@).
(®) in the lower side of the door into the hole in
the lower hinge (®) and pulling the hose down.
d:P
3) Insert the upper hinge shaft (®) into the hole (®). After levelling between the upper hinge hole (@) and
the hole of the cabinet (®). Reattach bolts (®) and screw (®) in a clockwise direction.
(9
4) Connect the wires.
5) Put the front part of the upper hinge cover (@)on
the front part of the upper hinge (@) and reattach
from the front part of the upper hinge cover first.
21
Reattaching the Refrigerator Door
Insert the lower hinge (qb) in the bracket lower
2) Place the hole in the refrigerator door (®) over
hinge (®).
the lower hinge (®).
J
3) Insert the upper hinge shaft (®) into the hole (®). After levelling between the upper hinge hole (@) and
the hole of the cabinet (®). Reattach bolts (®) and screw (®) in the clockwise direction.
4) Connect the wires.
5) Put the front part of the upper hinge cover ((_) on
the front part of the upper hinge ((_) and reattach
it from the front part of the upper hinge cover
first.
22
Reattaching the Water Supply Line
1) While pressing the front face of coupler (@), insert the water line (qb) in the coupler.
2) Tighten the screw on the clamp (®).
I
Reattaching the Front Leg Cover
Put on the front leg cover by turning the three screws clockwise, as shown in the figure.
FRONT LEG COVER
SCREW
23
Please level the refrigerator first.
The doors will be uneven if the refrigerator is not level.
Case 1) Freezer door is lower than
that of the refrigerator
Insert a straight screwdriver (-) (¢) into a slot of the
control lever (@), turn it clockwise and level the
refrigerator.
DRIVER(-)
°.,°°.J
-.,j
Case 2) Freezer door is higher than
that of the refrigerator
(_ CONTROL LEVER
Insert a straight screwdriver (-) (¢) into a slot of the
control lever (@), turn it clockwise and level
the refrigerator.
DRIVER(-)
(_ CONTROL LEVER
Do not make small adjustments with the control lever, Please refer to the next page.
NOTE
24
Making small adjustments
between doors.
If the door of the freezer is lower than that of the
If the door of freezer is higher than that of the
refrigerator,
refrigerator.
f
_,
f
tdjustment
part
J
Please open the doors and adjust the doors as follows:
1) Release the nut (@)on the lower hinge until the upper end of the bolt (@).
(_
When you release the nut(@), use enclosed hex wrench (@)to turn the bolt(@) a little counterNOTE clockwise to make the nut(@) loose with your fingers.
F
® WRENCH
® WRENCH
.j
"'..
d) NUT
d_ NUT
#) BOLT
@ BOLT
2) Please adjust the height difference between the doors turning the bolt ((_) turn clockwise(_
clockwise ( _
(_
NOTE
) or counter
).
When you turn clockwise ( _
), the door goes up.
f
® WRENCH
..
® WRENCH
;./
,,.
..... ..-
..
#) BOLT
......
#) BOLT
3) After adjusting the doors, turn the nut (@)turn clockwise( _
) until the lower end of the bolt, then tight-
en the bolt again with the wrench (3_)to fix the nut(_)).
f
® WRENCH
® WRENCH
d) NUT
dh NUT
@ BOLT
cr
NOTE
#) BOLT
If you do not fix the nut (@)firmly, the bolt (@) may be released.
25
1) In order to operate the ice maker properly, water pressure of 20 ~125 psi is required.
In this range a 170 cc paper cup can be filled in 10 secs.
2) The water filter removes particles. It does not sterilize or destroy any micro-organisms.
3) If the refrigerator is installed in area with low water pressure (below 20psi), you should install a booster pump to compensate for the low pressure.
4) Ensure the water storage tank inside the refrigerator is properly filled initially, push the water dis
penser lever until the water runs from the outlet.
(_=
NOTE
A universal water supply kit is available at extra cost from your dealer. The refrigerator manufacturer recommends using a water supply kit containing copper tubing.
Connecting
to water supply line
1. Cold Water pipe
1) Shut off the main water supply and turn the Ice maker to
the off position.
2. Pipe Clamp.
3.Copper Tubing
4,Compression
Nut
2) Locate the nearest cold drinking water line.
5.Compression Sleeve
&Shut Off Valve
3) Follow the instructions in the ice maker installation kit.
7,Packing Nut,
6
26
5 4
Connect the water tube to the refrigerator.
1 Connect to the 3/16" white plastic tube on the back of the
refrigerator.
Nut
2) Slip the compression nut onto the white plastic tube.
3) Screw the union into the white plastic tube and tighten the
'_J_
compression nut.
@
Union
}leeve
Do not overtighten the compression nut.
NOTE
Nut
4) Silp the compression sleeve and compression nut on copper
tubing as shown. Tighten the comperssion nut onto the union.
5) Turn water on and check for any leakege.
C_
NOTE
Waterline must be connected to potable water only
Install the water filter.
1) As shown, the fixed cap separate in the refrigerator by rotating it
counterclockwise.
Remove the water filter from the box and put a month indicator
sticker on the filter as shown.
, r-q ,
2) Write the month you installed the filter on the label.
EX) If the water filter was installed in March, put "MAR"
\
\
3) Remove the protective cap then position and insert the
filter as ishown.
4) Slowly turn the water filter clockwise 90° to align
the indication mark on the cover, locking the filter in posi
tion. Do not overtighten.
'_2")
_
COVER FILTER
SEPARATION
OF RED
'J)
_N
I _, IxW_THLOCKPOSmON
STICKER
(MONTH INDICATION)
Please check that the indication line aligns with the lock position.
NOTE
27
Removeany residualmatterinsidethewatersupplyline afterinstallingfilter.
1 ) Turn on the main water supply & shut-off valve of the water
supply line.
2) Run water through the dispenser until the water runs clear
(6~7 minutes). This will clean the water supply system and
clear air from the lines.
3) Additional flushing may be required in some households.
ICE
4) Open the refrigerator door and check if water leaks around
the water filter.
NOTE
WATER
• A newly-installed water filter cartridge may cause water to briefly spurt from the dispenser.
° Before reinstalling the water filter, remove the wine rack (RS2577).
Check the amount of water supplied to the ice tray.
\
1) Lift up (@) and pull out (@)the ice maker bucket in the freezer.
ICE MAKER
2) When you press the test button, the ice cube container is
filled with water from the water supply tap.
Check the amount of water (see the illustration below).
If the water level is too low,
the ice cubes will be small.
CHECK
THE WATER
LEVEL
This is not a problem with the ice maker
but of the water pressure in
the pipe, and occurs frequently.
When this problem occurs, use
the following steps to check the
amount of water supplied.
TOO H IG H_'_
28
Adjust the amount of water supplied.
1) In order to set the display panel to the option mode, press the Freeze
Temp. and Power Cool buttons at the same time for about 12 seconds
until the temperature display panel switches to the option mode and you
hear a beep.
2) A number under "Fridge Temp." corresponds to the option number. Press
the Fridge Temp. button to increase the number and the Power Cool button to decrease the number. Set the option number 3.
--
Option number
3) Now, you have to select the "Input Data" to control the water supply time.
Press the Freeze Temp. button to increase the value. Press the Power
Freeze button to decrease the value.
input
Data
00
01
O2
O3
O4
O5
06
07
6
7
8
9
10
08
09
10
11
12
13
15
17
12
13
19
21
14
15
23
25
Choose the right amount of water supplied to the ice tray
4) Wait until the display panel automatically switches back to the control
mode.
Input Data
5) Check the amount of water supplied to the ice tray as shown
......__
o
PTIMU__M
CHECK
29
THE
WATER
"_
Water
Supply
Time
(sec)
5
4
3
LEVEL
.....
The refrigerator does not work at all or it does not
chill sufficiently
° Check that the power plug is properly connected.
° Is the temperature control on the display panel set to
the correct temperature? Try seting it to a lower temperature.
° Is the refrigerator in direct sunlight or located near a
heat source?
• Is the back of the refrigerator too close to the wall?
Ice is not dispensed
° Did you stop the ice making function?
° Is there any ice inthe icestorage unit?
° Is the water line connected and the shut-off valve
open?
° Is the freezer temperature too warm?
(Set the temperature lower)
° Did you wait for 12 hours after installationof the
water supply line before making ice?
The food in the refrigerator is frozen
° Is the temperature control on the display panel set to You can hear water bubbling in the refrigerator
the correct temperature? Try seting it to a warmer
• The bubbling comes from the refrigerant circulating in
temperature.
the refrigerator and is normal.
° Is the temperature in the room too low?
There is a bad smell in the refrigerator
° Did you store the food with a high water content in
• Wrap strong smelling food so that it is airtight.
the coldest part of the refrigerator.
Throw away any rotten food.
You can hear unusual noise or sounds
° Check that the floor is levelled and stable.
° Is the back of the refrigerator too near to the wall?
° Was anything dropped behind or under the refrigerator?
° A "ticking" sound may be heard from inside the
refrigerator, but this is normal. This occurs because
various accessories are contracted or expanded.
Frost forms on the wall of the freezer
• Is the air vent blocked?
• Allow sufficient space between the foods stored for
efficient air circulation.
• Is the door closed properly?
No water is supplied
The front corners and sides of the cabinet are hot; • Is the water line connected and the shut-off valve
condensation occurs.
open?
° Anti-condensators are installed in the front corners of • Is the water supply line crushed?
the refrigerator to prevent condensation.
• Is the water tank frozen because the refrigerator tem° Condensation can occur when you leave the door
perature is too low? Select a warmer setting on the
open for a long time.
display panel.
3O
SAMSUNG
REFRIGERATOR
(18 Cubic Feet and Larger Capacity)
This SAMSUNG brand product, as supplied and distributed by Samsung ElectronicsAmerica, Inc. (SAMSUNG)and delivered new,
in the original carton to the original consumer purchaser, is warranted by SAMSUNGagainst manufacturingdefects in materials
and workmanship for a limited warranty periodof:
One (1) Year Parts and Labor on Refrigerator
Five (5) Years Parts and Laboron Sealed RefrigerationSystem Only*
(*Compressor,evaporator,condenser,drier, connectingtubing)
This limited warranty beginson the original date of purchase, and is valid only on products purchased and used in the United
States. To receive warranty service, the purchaser must contact SAMSUNG for problem determinationand service procedures.
Warrantyservice can only be performedby a SAMSUNG authorizedservice center. The original dated bill of sale must be
presented upon requestas proof of purchase to SAMSUNG or SAMSUNG's authorizedservice center.
SAMSUNG will repair or replace any part found to be defective,at our option and at no charge as stipulated herein,with new or
reconditioned parts during the limited warranty period specified above. All replaced parts and products become the property of
SAMSUNG and must be returnedto SAMSUNG Replacement parts and products assume the remaining original warranty,or
ninety (90) days, whichever is longer.
In-homeservicewill be provided during the warranty labor period subject to availability within the contiguous United States. Inhome service is not available in all areas. To receive in-home service, the product must be unobstructedand accessiblefrom floor
level to service personnel. Ifduring in-home service repaircannot be completed, it may be necessaryto remove, repairand return
the product. If in-home service is unavailable,SAMSUNG may elect, at our option, to providefor transportationof our choice to
and from a SAMSUNG authorizedservice center. Otherwise,transportation to and from the SAMSUNG authorizedservice center
is the responsibilityof the purchaser.
This limited warranty covers manufacturingdefects in materials and workmanship encounteredin normal, noncommercialuse d
this product,and shall not apply to the following, including,but not limited to: damage which occurs in shipment; delivery and
installation;applicationsand uses for which this product was not intended; altered product or serial numbers;cosmetic damage or
exterior finish; accidents, abuse, neglect,fire, water, lightningor other acts of nature; use of products,equipment, systems, utilities,
services, parts, supplies, accessories,applications,installations,repairs, external plumbing and leaks, external wiring, circuit
breakers,fuses or connectors not supplied and authorizedby SAMSUNG, or which damage this product or result in service
problems; incorrectelectrical line voltage, fluctuationsand surges; customer adjustments and failure to follow operating instructions
cleaning, maintenance and environmentalinstructionsthat are coveredand prescribedin the instructionbook; loss of food due to
spoilage; consumable items includingfilters and light bulbs.
THERE ARE NO EXPRESSWARRANTIES OTHER THAN THOSE LISTED AND DESCRIBEDABOVE, AND NO WARRANTIES
WHETHER EXPRESSOR IMPLIED,INCLUDING,BUT NOT LIMITED TO,ANY IMPLIED WARRANTIESOF
MERCHANTABILITYOR FITNESS FOR A PARTICULARPURPOSE, SHALLAPPLYAFTER THE EXPRESS WARRANTY
PERIODS STATEDABOVE, AND NO OTHER EXPRESS WARRANTY OR GUARANTY GIVEN BYANY PERSON, FIRM OR
CORPORATIONWITH RESPECTTO THIS PRODUCTSHALL BE BINDING ON SAMSUNG. SAMSUNG SHALL NOT BE
LIABLE FOR LOSS OF REVENUE OR PROFITS, FAILURETO REALIZESAVINGS OR OTHER BENEFITS,ORANY OTHER
SPECIAL, INCIDENTALOR CONSEQUENTIAL DAMAGES CAUSED BY THE USE, MISUSE OR INABILITY TO USE THIS
PRODUCT,REGARDLESS OF THE LEGALTHEORY ON WHICH THE CLAIM IS BASED,AND EVEN IF SAMSUNG HAS BEEN
ADVISED OF THE POSSIBILITYOF SUCH DAMAGES. NOR SHALL RECOVERY OF ANY KIND AGAINST SAMSUNG BE
GREATER IN AMOUNT THAN THE PURCHASE PRICE OF THE PRODUCT SOLD BY SAMSUNGAND CAUSINGTHE
ALLEGED DAMAGE. WITHOUT LIMITING THE FOREGOING, PURCHASERASSUMES ALL RISK AND LIABILITY FOR LOSS,
DAMAGE OR INJURY TO PURCHASERAND PURCHASER'S PROPERTYAND TO OTHERS AND THEIR PROPERTY
ARISING OUT OF THE USE, MISUSE OR INABILITYTO USE THIS PRODUCT SOLD BY SAMSUNG NOT CAUSED DIRECTLY
BY THE NEGLIGENCEOF SAMSUNG. THIS LIMITEDWARRANTY SHALL NOT EXTEND TO ANYONE OTHER THAN THE
ORIGINAL PURCHASEROF THIS PRODUCT, IS NONTRANSFERABLEAND STATESYOUR EXCLUSIVE REMEDY,
Some states do not allow limitationson how long an implied warranty lasts, or the exclusionor limitationd incidentalor
consequentialdamages, so the above limitationsor exclusionsmay not apply to you. This warranty gives you specific legal rights,
and you may also have other rights,which vary from stateto state.
Toobtain warranty service, please contact SAMSUNG at:
SAMSUNG CUSTOMER CARE CENTER
400 Valley Road,Suite 201, Mt. Arlington, NJ 07856, Tel:973-601-6000, Fax: 973-601-6001
1-800-SAMSUNG (1-800-726-7864)and www.SAMSUNGUSA.com
061002
ADDRESS
: SAMSUNG ELECTRONICS
SERVICE DIVISION
TELEPHONE:
AMERICA,
INC.
400 VALLEY ROAD, SUITE 201, MT. ARLINGTON,
NJ 07856
1-800-SAMSUNG(1-800-726-7864)
FAX: 1-973-601-6001
ELECTRONICS