1
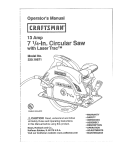
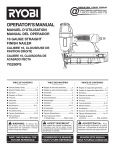
Operator's Manual
18.0 Volt
5 h-in. Cordless
Circular Saw
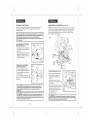
Battery Pack
is installed on
Drill/Driver
CHARGE
BEFORE
BATTERY
FIRST USE
z_ CAUTION
Read, understand and follow
all Safety Rules and Operating Instructions
in this Manual before using this product.
Sears, Roebuck and Co.,
Hoffman Estates, IL 60179 U.S.A.
Visit our Craftsman website: www.craftsman.com
I
I
I
• WARRANTY
• SAFETY
• UNPACKING
• DESCRiPTiON
• OPERATION
=MAINTENANCE
Warranty. ...................................................................................
Safety Symbols ..........................................................................
Safety Instructions .......................................................................
Glossary of Terms .......................................................................
Unpacking ..................................................................................
Description .........................................................................................
Operation ............................................................................................
Maintenance .......................................................................................
Troubleshooting ..................................................................................
Accessories ........................................................................................
Parts List ............................................................................................
Sears Repair Parts Phone Numbers ..................................................
ONE YEAR FULL WARRANTY
ON CRAFTSMAN
The purpose of safety symbols is to attract your attention to possible dangers.The safety
symbols, and the explanations with them, deserve your careful attention and
understanding. The symbol warnings DO NOT by themselves eliminate any danger. The
instructions and warnings they give are no substitutes for proper accident prevention
measures.
Page
2
Page
3
Pages 4-11
Pages 12-13
Page 13
Pages 14-15
Pages 16-27
Pages 27-30
Page 30
Page 31
Pages 31-33
Back Cover
Z_ WARNING:
BE SURE
manual, including
all safety
"CAUTION",
BEFORE using
result in electric
shock, fire
may
SYMBOL MEANING
=;
SAFETY ALERT SYMBOL: Indicates DANGER,WARNING,OR
CAUTION.May be used in conjunctionwith othersymbols or pictographs.
1
DANGER: Failureto obey this safety warningWILL result in death ]
or serious injury to yourself or to others. Always follow the safety
precautions to reducethe risk of fire, electric shock and personal
injury.
1
® PRODUCT
If this Craftsman product fails clue to a defect in material or workmanship
within one year from the date of purchase, RETURN JTTO THE NEAREST
SEARS STORE OR OTHER CRAFTSMAN OUTLET IN THE UNITED
STATES FOR FREE REPLACEMENT.
This warranty does not include expendable
bits or blades.
to read and understand
all safety instructions
in this
alert symbols
such as "DANGER",
"WARNING"
and
this tool. Failure to follow all instructions
listed below
and/or serious
personal
injury.
M
|_z_WARNING
iI Failureto
obey this
warning CAN
result
insafety
death or
serious I
injuryto yourself
orsafety
to others.Always
follow
the
precautions
to reduce the risk of fire, electric shock and personal injury.
J
i Z_
i Failureto obey this safety warning MAY result in personal injury to i
yourself or others or propertydamage. Always follow the safety
precautionsto reduce the risk of fire, electric shock and personal
injury.
parts such as lamps, batteries,
If this Craftsman product is used for commercial or rental purposes, this
warranty applies for only 90 days from the date of purchase.
This warranty gives you specific legal rights, and you may also have other
rights, which vary from state to state.
Sears, Roebuck and Co., Hoffman Estates, IL 60179
CAUTION
1
L
DAMAGE PREVENTIONAND INFORMATIONMESSAGES
These inform user of important informationand/or instructionsthat could lead to equipment or
other property damage if not followed.Eachmessageis preceded by the word "NOTE:" as in the
example below:
NOTE: Equipment
followed.
SAVE THESE INSTRUCTIONS!
READ ALL INSTRUCTIONS!
WEAR
]
[Z_
Some
using
chemicalsknown
to|!
the WARNING:
State of California
to dust
cause created
cancer by
and
birth power
defectstools
or contains
other reproductive
harm.
I
I
I
YOUR
and/or
property
damage
may result if these instructions are
not
J
Z_WARNING:
The operation of any power tool can result in
foreign objects being thrown into your eyes, which can result
in severe eye damage. Before beginning power tool operation,
ALWAYS wear safety goggles or safety glasses with side
shield and a full-face shield when needed. We recommend a
Wide Vision Safety Mask for use over eyeglasses or standard
safety glasses with side shield, available at Sears Stores or
other Craftsman Outlets.
before using this circular saw. Failure to follow all instructions may result in
i
PERSONAL SAFETY cont.
J
9. USE SAFETY EQUIPMENT. Always wear eye protection. Dust mask, non-skid safety
shoes, hard hat, or hearing protection must be used for appropriate conditions.
[ hazardous
/_WARNING:
SURE to electric
read andshock,
understand
all instructions
in this injury.
manual |
radiationBE
exposure,
fire and/or
serious personal
10. DO NOT USE ON A LADDER or unstable support. Stable footing on a solid surface
enables better control of the tool in unexpected situations.
WORK AREA SAFETY
TOOL
1. Keep your work area clean and well lit. Cluttered workbenches and dark areas
invite accidents.
4. Make your workshop childproof
tools away when not in use.
a power tool.
SAFETY
1. ALWAYS use clamps or other practical ways to secure and support the workpiece
to a stable platform. Holding the work by hand or against your body is unstable and may
lead to loss of control.
with padlocks and master switches. Lock
2. DO NOT force the tool. Use the correct tool and blade for your application.
The
correct tool and blade will do the job better and safer at the rate for which it is designed.
5. MAKE SURE the work area has ample lighting so you can see the work and that
there are no obstructions that will interfere with safe operation BEFORE using your saw.
PERSONAL
CARE
z_WARNING:
BE SURE to read and understand all instructions before operating
this tool. Failure to follow all instructions listed below may result in electric shock,
fire and/or serious personal injury.
2. DO NOT operate power tools in explosive atmospheres, such as in the presence
of flammable liquids, gases, or dust. Power tools create sparks which may ignite
the dust or fumes.
3. Keep bystanders, children and visitors away while operating
Distractions can cause you to lose control.
USE AND
3. DO NOT use the tool if switch does not turn it "On" or "Off".
controlled with the switch is dangerous and must be repaired.
Any tool that cannot be
4. Remove the battery pack from the saw before making any adjustments, changing
accessories or storing the tool. Such preventive safety measures reduce the risk of
starting the tool accidentally.
SAFETY
1. KNOW your cordless saw. Read the operator's manual carefully. Learn the saw's
applications and limitations, as well as the specific potential hazards related to this tool.
5. NEVER leave the tool running. ALWAYS turn it off. DO NOT leave the tool until the
blade comes to a complete stop.
2. STAY ALERT, watch what you are doing and use common sense when operating
a power tool.
6. STORE idle tools out of the reach of children and other untrained
Tools are dangerous in the hands of untrained users.
3. DO NOT use tool while tired or under the influence of drugs, alcohol or medication.
A moment of inattention while operating power tools may result in serious personal injury.
7. ALWAYS remove battery
4. DRESS properly. DO NOT wear loose clothing or jewelry. Pull back long hair. Keep
your hair, clothing, and gloves away from moving parts. Air vents often cover moving
parts and should also be avoided. Loose clothing, jewelry or long hair can be caught
in moving parts.
pack and store separately
persons.
when saw is not being used.
8. When battery pack is not in use, keep it away from other metal objects like: paper
clips, coins, keys, nails, screws, or other small metal objects that can make a
connection from one terminal to the other. Shorting the battery terminals together may
cause sparks, burns, or a fire.
5. AVOID accidental starting. Be sure switch is in "OFF" position before inserting the battery
pack. DO NOT carry tools with your finger on the switch. Carrying tools with your finger on
the switch or inserting battery pack in tools that have the switch in the "ON" position
invites accidents.
9. MAINTAIN tools with care. Keep cutting tools sharp and clean. Properly maintained
tools with sharp cutting edges are less likely to bind and are easier to control.
10. CHECK for misalignment
or binding of moving parts, breakage of parts, and any
other condition that may affect the tool's operation. If damaged, have the tool serviced
before using. Many accidents are caused by poorly maintained tools.
6. REMOVE adjusting keys or wrenches before turning the tool "ON". A wrench that is left
attached to a rotating part of the tool may result in personal injury.
7. Do not overreach. Keep proper footing and balance at all times. Proper footing and
balance enables better control of the tool in unexpected situations.
11. USE ONLY accessories that are recommended
for this tool. Accessories that may be
suitable for one tool may become hazardous when used on another tool.
8. ALWAYS SECURE YOUR WORK. Use clamps or a vise to hold work when practical. It is
safer than using your hand and frees both hands to operate tool.
12. Keep the tool and its handle dry, clean and free from oil and grease. Always use a
clean cloth when cleaning. Never use brake fluids, gasoline, petroleum=based
products, or any strong solvents to clean your tool. Following this rule will reduce the
risk of loss of control and deterioration of the plastic enclosure of the circular saw.
I
I
I
ELECTRICAL
SAFETY
SERVICE SAFETY cont.
operating this saw. Failure to follow all instructions
Z_ WARNING:
BE SURE to read and understand
electric shock, fire and/or serious personal injury.
listed below may result
all instructions before
in
2. Tool service must be performed only at a Sears Parts and Repair Center. Service
or maintenance performed by unqualified personnel could result in a risk of injury.
J
|
3. When servicing a tool, use only identical replacement parts. Follow instructions
in the maintenance section of this manual. Use of unauthorized parts or failure to
follow maintenance instructions may create a risk of electric shock or injury.
A battery operated tool with integral batteries or a separate battery pack must be
recharged only with the specified charging stand/transformer
for the battery. A
charger that may be suitable for one type of battery may create a risk of fire when
used with another battery.
SAFETY RULES FOR CORDLESS
1. Use battery operated saw only with specifically designated battery packs. Use of any
other batteries may create a risk of fire.
2. Use battery packs only with charging stand/transformers
listed.
CIRCULAR
SAWS
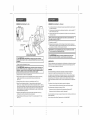
Keep hands away from cutting area and blade. Keep your
second hand on the auxiliary handle or motor housing. If both hands are holding
the saw, the blade cannot cut them.
]
/k CAUTION:
]
Blades coast after saw is switched off.
SAW
CHARGING STAND/TRANSFORMER
BATTERY PACK
172.67098
CDT218GU-103/BHY41-23.5V-200mA
CDT218GU-104(ABP318GU)
1. KEEP your body positioned to either side of the saw blade and not in direct
line with the saw blade. Kickback could cause the saw to jump backwards. (See
"Kickback...What Causes it and Ways to Prevent it"on pages 18 and 19).
Can also use 1426101 and 140295004
Can also use 1323509,
1323520, 130260001,
130139020 and 130139021
2. DO NOT reach underneath the work. The guard cannot protect you from the blade
beneath the workpiece.
When sawing through a workpiece, the lower blade guard DOES
NOT cover the blade on the underside of the workpiece (Pg. 16 Fig. 4). ALWAYS keep
your hands and fingers away from the cutting area.
3. Do not abuse the cord on the charging stand. Never carry the charging
stand/transformer by its power cord. Never pull the power cord to remove the transformer
from the power outlet. Damage to the cord or charging stand/transformer could occur and
create an electric shock hazard. Keep cord away from heat, oil, sharp edges or moving
parts. Replace damaged cords immediately. Damaged cords increase the risk of electric
shock.
SAFETY
SYMBOLS
3. CHECK lower guard for proper closing BEFORE each use. DO NOT operate the saw
if the lower guard does not move freely and dose instantly. Never clamp or tie the
lower guard in the open position. If the saw is accidentally dropped, the lower guard may
be bent. Raise the lower guard with the retracting lever.The guard is operating properly
when it moves freely, does not touch the blade or any other part in all angles and depths
of cut, and readily returns to the closed position.
FOR YOUR TOOL
The label on your tool may include
the following
symbols.
4. CHECK the operation and condition of the lower guard spring. If the guard and the
spring are not operating properly, they MUST BE serviced before use. The lower
guard may operate sluggishly, due to damaged parts, gummy deposits, or a buildup of
debris. DO NOT operate your saw until the damage has been repaired or replaced.
V.......................................................................Volts
A ......................................................................Amps
Hz ....................................................................Hertz
W.....................................................................Watts
....................................................................Alternating current
--.
................................................................Direct current
no ....................................................................No-load speed
[] ....................................................................Class II construction, Double Insulated
RPM ......................................................
Revolutions per minute
SPM .........................................................
Strokes per minute
OPM .........................................................
Orbits per minute
,4k....................................................................Indicates danger, warning or caution.
It means attention! Your safety is involved.
SERVICE
5. The lower guard should be retracted manually ONLY for making special cuts, such
as pocket or compound cuts. ALWAYS raise the lower guard by retracting its lever.
As soon as the blade enters the material, the lower guard MUST be released. For all
other sawing, the lower guard should operate automatically.
6. ALWAYS make sure that the lower guard is covering the blade BEFORE placing the
saw down on a work bench or floor. An unprotected moving blade will cause the saw to
walk backwards, cutting whatever is in its path. Make note of the time it takes for the blade
to stop spinning after the switch is released.
7. NEVER hold the piece being cut in your hands or across your legs. It is important to
support the workpiece properly in order to minimize body exposure, blade binding, or loss
of control.
SAFETY
1. If any part of this cordless saw is missing or should break, bend, or fail in any
way; or should any component fail to perform properly: have the missing, damaged
or failed parts replaced BEFORE resuming operation.
6
I
I
I
J
SAFETY RULES FOR CORDLESS
CIRCULAR
SAWS cont.
SAFETY RULES FOR CORDLESS
8. HOLD TOOL by insulated gripping surfaces (handles) when performing an operation
where the cutting tool may contact hidden wiring. Contact with a "live" wire will make
the exposed metal parts of the tool "live" and shock the operator.
SAWS cont.
23. Under extreme usage or temperature conditions, battery
comes in contact with your skin, wash immediately with
neutralize with lemon juice or vinegar. If liquid gets into
clean water for at least 10 minutes, then seek immediate
this rule will reduce the risk of serious personal injury.
9. ALWAYS clamp the workpiece securely so it will not move when making the cut.
10. When ripping, ALWAYS USE a rip fence or straight edge guide. This improves the
accuracy of the cut and reduces the chance of the blade binding.
leakage may occur. If liquid
soap and water, then
your eyes, flush them with
medical attention. Following
24. Save these instructions. Refer to them frequently and use them to instruct others who may
use this tool. If you loan someone this tool, loan them these instructions also to prevent misuse
of the product and possible injury.
11. ALWAYS USE blades that have the correct size and shape (diamond vs. round) arbor
holes. Blades that do not match the mounting hardware of the saw will run erratically and
cause loss of control.
12. NEVER use damaged or incorrect blade washers or bolts. The blade washers and bolts
were specially designed for your saw, for optimum performance and safety of operation.
SAFETY RULES FOR BATTERY CHARGING STAND/TRANSFORMER
13. NEVER cut more than one piece at a time. DO NOT STACK more than one workpiece
on the worktable at a time.
14. AVOID awkward operations and hand positions
hand to move into the blade.
CIRCULAR
Z_ WARNING:
READ AND UNDERSTAND ALL iNSTRUCTiONS.
Failure to
follow all instructions listed below may result in electric shock, fire and / or
serious personal injury.
where a sudden slip could cause your
15. NEVER reach into the cutting path of the blade.
16. ONLY USE the specifically listed battery pack and charging stand listed on page 6 of
this manual. Use of any other battery pack or charging stand/transformer
can create
risk of injury and fire.
NOTE: Before using battery charging stand / transformer,
read all instructions
and cautionary
markings in this manual, on battery charging stand /transformer,
battery pack, and circular saw using battery pack to prevent misuse of the
products and possibme injury or damage.
17. Cordless tools do not have to be plugged into an electrical outlet; therefore, they are
always in operating condition. Be aware of possible hazards when not using your
battery operated tool or when changing accessories. Following this rule will reduce the
risk of electric shock, fire, or serious personal injury.
z_ CAUTION:
USE ONLY the specifically designated battery charging
stand / transformer
that was supplied with this circular saw when charging the
battery pack.The use of any other battery charging stand / transformer
could
damage the battery pack, and create a hazardous condition. See page 6.
18. Do not place battery tools or their batteries near fire or heat. This will reduce the risk of
explosion and possible injury.
19. Do not crush, drop or damage battery pack. Never use a battery pack or charging
stand/transformer
that has been dropped or received a sharp blow. A damaged battery
pack is subject to explosion. Properly dispose of a dropped or damaged battery pack
immediately.
z_ CAUTION:
To reduce the risk of electric shock or damage to the battery
charging stand /transformer
and battery pack, charge only the specificalmy
designated battery pack that was included with this circular saw and charging
stand / transformer.
Charging other types of battery packs may cause them to
burst, causing personal injury and damage.
20. Batteries vent hydrogen gas and can explode in the presence of a source of ignition,
such as a pilot light. To reduce the risk of personal injury, never use any cordless product in
the presence of open flame. An exploded battery can propel debris and chemicals. If
exposed, flush with water immediately.
1. Do not use the battery charging stand / transformer outdoors or expose to wet or damp
conditions. Water entering charging stand will increase the risk of electric shock.
21. Do not charge battery in a damp or wet location. Following this rule will reduce the risk of
electric shock.
2. Use of an attachment with this battery charging stand / transformer that is not
recommended may resuff in a risk of fire, electric shock, or injury to persons.
22. For best results, your battery should be charged in a location where the temperature is more
than 50°F but less that 80°R Do not store battery outside or in vehicles.
I
I
I
|
1
3
|
1
SAFETY RULES FOR BATTERY CHARGING STAND/TRANSFORMER
cont.
Z_ WARNING:
Some dust created by using power tools contains chemicals
known to the State of California to cause cancer and birth defects or other
reproductive
harm, Some examples of these chemicals are:
• Lead from lead-based paints.
• Crystalline silica from bricks and cement and other masonry products.
• Arsenic and chromium, from chemically treated lumber.
3. Do not abuse the cord on the battery charging stand / transformer. Never carry the
charging stand / transformer by its power cord. Never pull the power cord to remove the
transformer from the power outlet. Damage to the cord or charging stand / transformer could
occur and create an electric shock hazard. Keep cord away from heat, oil, sharp edges or
moving parts. Replace damaged cords immediately. Damaged cords increase the risk of
electric shock.
Your risk from these exposures varies, depending upon how often you do
this type of work.To reduce your exposure to these chemicals:
• Work in a well-ventilated area.
• Work with approved safety equipment, such as those dust masks that are specially
designed to filter out microscopic particles.
4. Make sure cord is located so that it will not be stepped on, tripped over, come in
contact with sharp edges or moving parts, heat, oil, or otherwise subjected to
damage or stress. This will reduce the risk of accidental falls, which could cause injury,
and damage to the cord which could result in electric shock.
5. Keep cord and charging stand / transformer
housing or internal parts.
away from heat to prevent damage to
Avoid prolonged contact with dust from power sanding, sawing, grinding,
drilling and other construction
activities, Wear protective clothing and wash
exposed areas with soap and water. Allowing dust to get into your mouth, eyes, or
lay on the skin may promote absorption of harmful chemicals.
6. Do not let gasoline, oils, petroleum-based products, etc. come in contact with
plastic parts. They contain chemicals which can damage, weaken or destroy plastic.
7. An extension cord should not be used unless absolutely necessary. Use of improper
extension cord could result in a risk of fire and electric shock. If an extension cord must be
used, make sure: a) That pins on plug of extension cord are the same number, size and
shape as those on the transformer, b) That extension cord is properly wired and in good
electrical condition, and c) That you use a proper extension cord. ONLY use cords
listed by Underwriters Laboratories (UL). Other extension cords can cause a drop in line
voltage, resulting in a loss of power and overheating of charging stand/transformer. An
AWG (American Wire Gauge) size of at least 14-gauge is recommended for an extension
cord of 25-ft. or less in length. Use 12-gauge for an extension cord of 50-ft.
Extension cords 100-ft. or longer are not recommended.
/_, WARNING:
Use of this tool can generate and/or disburse dust, which may
cause serious and permanent respiratory
or other injury. Always use NIOSH/OSHA
approved respiratory protection appropriate for the dust exposure. Direct particles
away from face and body.
ADDITIONAL
RULES
FOR SAFE
OPERATION
/_, WARNING:
BE SURE to read and understand all instructions, Failure to
follow all instructions listed may result in electric shock, fire and/or serious
personal injury.
8. iNSPECT tool cords for damage. Do not operate charging stand with a damaged cord or
transformer, which could cause shorting and electric shock. Have damaged tool cords
repaired at a Sears Service Center.
1. Know your power tool. Read operator's manual carefully. Learn the applications and
limitations, as well as the specific potential hazards related to this tool. Following this rule
will reduce the risk of electric shock, fire or serious injury.
2. ALWAYS wear
safety glasses or eye shields when using this tool. Everyday
eyeglasses have only impact-resistant lenses; they are NOT safety glasses.
3. PROTECT your lungs. Wear a face mask or dust mask if the operation is dusty.
4. PROTECT your hearing. Wear appropriate personal hearing protection during use. Under
some conditions noise from this product may contribute to hearing loss.
5. ALL VlSTORS AND BYSTANDERS MUST wear the same safety equipment that the
operator of the tool wears.
6. ALWAYS check the tool for damaged parts. Before further use of the tool, a guard or
other part that is damaged should be carefully checked to determine if it will operate
properly and perform its intended function. Check for misalignment or binding of moving
parts, breakage of parts, and any other condition that may affect the tool's operation.
A guard or other part that is damaged should be properly repaired or replaced at a Sears
Service center.
9. Do not operate charging stand / transformer if it has received a sharp blow, been dropped,
or otherwise damaged in any way. Take it to an authorized serviceman for electrical check to
determine if the charging stand / transformer is in good working order.
10. Do not disassemble charging stand / transformer. Take it to a Sears Parts and Repair
Center when service or repair is required. Incorrect reassembly may result in a risk of
electric shock or fire.
11. Disconnect charging standltransformer from the power supply when not in use.
This will reduce the risk of electric shock or damage if metal items should fall into the opening in
the charging stand. It also will help prevent damage during a power surge.
12. Risk of electric shock. Do not touch un-insulated portion of output connector or un-insulated
battery terminal
13. Save these instructions. Refer to them frequently and use them to instruct others who may
use this tool. If you loan someone this tool, also loan them these instructions to prevent misuse
of the product and possible injury.
SAVE THESE INSTRUCTIONS. Refer to them frequently and use them to instruct
others who may use this tool. if someone borrows this tool, make sure they have
these instructions
also.
11
10
I
I
I
i
1
Spindle
The shaft on which a blade or cutting tool is mounted. Also called the Arbor.
Gum
A sticky, sap-based residue from wood products.
Resin
A sticky, sap-based substance that has hardened.
Revolutions Per Minute (RPM)
The number of turns completed by a spinning object in one minute.
Saw Blade Path
The area over, under, behind or in front of the blade, as it applies to the workpiece.
That area which will be or has been cut by the blade.
Set
The distance that the saw blade tooth is bent (or set) outward from the face of the blade.
Miter Cut
A cutting operation made with the blade at any angle other than 90 ° to the fence.
Your circular saw has been shipped completely assembled.
1. Remove the Saw from the Carton and Storage/Carry
Bag and inspect carefully to make
sure that no breakage or damage has occurred during shipping.
2. The saw's cutting blade is installed at the factory.
3. Make sure that all items listed in the packing list are included.
Compound Miter Cut
A compound miter cut is a cut made using a miter angle and a bevel angle at the
same time.
Cross cut
A cutting or shaping operation made against the grain of the workpiece.
Bevel Cut
A cutting operation made with the blade at any angle other than 90 ° to the miter table.
Dado Cut
A non-through cut which produces a square-sided notch or trough in the workpiece
(requires special blade).
Chamfer Cut
A cut removing a wedge from a block of wood so the end (or part of the end) is angled
at other than 90 °.
4. Do not discard any of the packing materials until all parts are accounted for.
5. Included with the circular saw; hex key.
6. If any of the parts are damaged or missing (refer to PARTS LIST below), return the saw to
your nearest Sears store or Craftsman outlet to have the tool replaced.
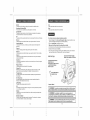
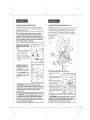
PARTS LiST (Fig. 1)
Circular Saw with Blade installed,
(Battery Pack installed on Drill/Driver)
Charging Stand/Transformer,
Battery Pack and
Storage/Carrying
Bag are Shown
in the Drill/Driver Manual,
Model 172.64120
Ripping or Rip Cut
A cutting operation along the length of the workpiece.
Freehand Cut
Performing a cut without using a fence, miter gauge, fixture, work clamp, or other
proper device to keep the workpiece from twisting or moving during the cut.
Hex Key Blade Wrench
Through Sawing
Any cutting operation where the blade extends completely through the thickness of
the workpiece.
(installed on Saw)
Non-Through Cuts
Any cutting operation where the blade does not extend completely through the
thickness of the workpiece, like a dado cut.
Leading Edge
The edge of the workpiece pushed into tool first.
Kerf
The material removed by the blade in a through cut or the slot produced by the blade
in a non-through or partial cut.
Kickback
A hazard that can occur when the blade binds or stalls, throwing the workpiece back
toward operator.
Operator's Manual
[ /_ WARNING:
If any parts are missing do not operate this tool until the missing
parts are replaced. Failure to do so could result in possible serious personal injury.
l
Z_ WARNING: Do not attempt to modify this tool or create accessories not
recommended for use with this tool. Any such alteration or modification is misuse and
could result in a hazardous condition leading to possible serious personal injury
[
Workpiece or Material
The item on which the cutting operation is being done. The surfaces of a workpiece
To prevent accidental starting that could cause serious personal
i z_ WARNING:
[ injury, always remove the battery pack from the tool when assembling parts.
13
are commonly referred to as faces, ends and edges,
12
I
I
I
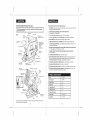
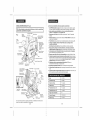
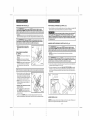
KNOWYOUR
CORDLESS
CIRCULAR
SAW(Fig.2)
i
This Cordless
Circular
Saw has the following
features:
1. 3400 RPM no-load speed provides power and torque for fast, sure cuts in wood, plywood,
hardboard and wood-base materials.
OTE: Before
attempting
features
and safety
rules. to use this product, familiarize
Trigger Switch
Fig. 2
yourself with all operating
i
2. Quick depth-of-cut
adjustments with a maximum
13/1s-inch at 45°; lS/8-inch at 90 °
Rear Handle
Power
Battery Pack
Button
(installed on Drill/Driver)
3. Easy-to-read
with Power Lock-Off
Button helps protect against accidental starts.
7. Oversized stamped Steel Base provides stability, glides smoothly for maximum control
during sawing applications.
8. Soft-Grip Ergonomically
Designed Contoured Rear Handle and Front Assist
for positive gripping, control, balance and comfort.
Bevel Scale
Guard
Brake stops blade rotation instantly when trigger is released.
6. Trigger Switch
ljection
Port with Cover Cap
(Remove cap to
attach 11/4-in,
vac hose,
sold separately)
Upper Blade Guard
bevel cut scale adjusts from 0° to 50 ° bevel capacity.
4. Aluminum Upper Guard and plastic Lower Guard for extra strength and durability.
5. Electric
Front
Handle
depth of cut:
9. includes Craftsman ® 24 Tooth Carbide-Tipped
for fast, smooth cuts.
Lever
Steel General Purpose
Handle
Blade
Bevel Adjustment
LockingKnob
10. Top Mounted Blade Spindle
Lower Blade Guard
Spindle
Mounting Slots
for Edge Guide
Edge Guide
Locking/Retaining
Knob
Clamping
Screw
12. Permanently Lubricated
Blade
13. Heavy-duty
Machined
100% Ball Bearings
Gearing
14. Durable impact-resistant
Battery Pack
(installed on Drill/Driver
Rear Handle
for smooth operation and long life.
for efficient power transmission.
housing helps protect tool from damage and reduces weight.
15. The Nickel-Cadmium
battery pack recharges in 3 to 6 hours under normal use, and
LED light on charger indicates when battery is charging.
Trigger Switch
Power
Lock-Off
Button
Latch to Release
Battery Pack
Lock for easy blade changes.
11. Built-in Sawdust Ejection Chute with Cover Cap. Remove cap to eject sawdust to the
rear of saw or leave cap attached to eject sawdust downwards, from the blade guards.
Remove cap to attach 11A-in vac hose, sold separately (see page 27).
Front Assist Handle
SpindleLock
Depth-of-Cut
Adj
Motor
18.0 Volt DC
No=load Speed
3400 RPM
Blade Diameter
51/2-in.
Bmade Arbor
5/8-in.
Cutting
Depth at 45 °
13/16-in.
Cutting
Depth at 90 °
15/8-in.
Maximum
Hex Key
Charger
Mounting Slot
for Edge Guide
Charge
Safety, performance and dependability have been given top priority in the design of this product,
making it easy to maintain and operate.
14
Bevem Angme
Input
Rate
50 °
120V, 60Hz AC
3 to 6 Hours
15
I
I
I
Z_ WARNING:
A 51/2-inch blade is the maximum blade capacity of your saw. A
larger than 51/2-inch blade will come in contact with the blade guards. Also, NEVER use
a blade that is so thick that it prevents the outer blade washer from engaging with the
flat side of the spindle. Blades that are too large or too thick can result in an accident
causing serious injury.
SAW BLADES
Fig.
All saw blades need to be kept clean,
sharp and properly set in order to cut
efficiently. Using a dull blade places a
heavy load on the saw and increases
the danger of kickback. Keep extra
blades on hand, so sharp blades are
always available. Gum and wood pitch
hardened on the blade slows the saw
down. Use gum and pitch remover,
hot water or kerosene to remove them.
DO NOT use gasoline.
BLADE
GUARD
SYSTEM
3
Lower
Blade
Guard
lever is
in UP
position
when
4. Sawing into knots or nails in the workpiece can cause
Kickback.
(Fig. 3)
CAUSES iT AND WAYS TO HELP PREVENT iT
(Fig. 4, 5 and 5a)
The Causes of Kickback
......
Blade is Set Too Deep
Fig. 4
1. Kickback is a sudden reaction to a pinched, bound or
misaligned saw blade, which causes an uncontrolled
saw to lift up and out of the workpiece and toward
the operator.
Correct Blade Depth
(Should not exceed 1/4-in. below work piece)
_
Fig.
5. Forcing a cut, or not supporting the workpiece
correctly can cause Kickback. (see Fig. 5)
6. Sawing into wet or warped lumber can cause
Kickback. (see Fig. 5a)
7. Kickback is a result of tool misuse and/or incorrect
operating procedures or conditions. It can be avoided
by taking the proper precautions, on page 19.
Ways to Help Prevent Kickback (Fig. 6)
saw stalls. Kickback could cause you to lose control of the saw. Loss of control can lead
_
ALWAYS release trigger switch immediately if the blade binds or the
to serious injury.
1. ALWAYS maintain a firm grip with both
(see Fig. 6) hands on the saw and position your
body and arms to allow you to resist Kickback
forces. Kickback forces can be controlled by the
operator, if the proper precautions are taken.
If the blade is binding, or when you are
interrupting a cut for any reason, ALWAYS
release the trigger and hold the saw motionless
in the material until the blade comes to a
complete stop. NEVER attempt to remove the
saw from the work or pull the saw backward while
the blade is in motion, or Kickback may occur.
CHECK and take corrective action to eliminate
the cause of blade binding.
K,CKBACKm=_
16
Fig. 5 __,_
Right
Support
3. If the blade becomes twisted or misaligned in the cut,
the teeth at the back edge of the blade can dig into
the top surface of the wood. This causes the blade to
climb out of the kerf and jump back towards the
operator.
z_ CAUTION: NEVER use the saw when the guard is not operating properly.The
guard should be checked for correct operation before each use. If you drop your saw,
check the lower blade guard and bumper for damage at all depth settings before using.
NOTE: The guard is operating properly when it moves freely and then readily returns to
the closed position. If for any reason your lower blade guard and bumper does not close
freely, take the saw to your nearest Sears Repair Center for service before using it.
L_
The Causes of Kickback cont.
2. When the blade is pinched or bound tightly by the kerf
closing down, the blade stalls and the motor reaction
drives the unit rapidly back towards the operator.
Lower Blade
The lower blade guard, attached to
Guard retracts
automatically
your circular saw, is there for your
Blade 1/4-in. or less
when
cut is
protection and safety, it should NEVER
is Exposedon
being made
be altered for any reason. If it becomes
Underside of Workpiece
damaged or begins to return slowly or
sluggishly, DO NOT operate your saw until the damage has been repaired or replaced.
ALWAYS leave the guard in its correct operating position when using the saw.
KICKBACK...WHAT
KICKBACK...WHAT
CAUSES iT AND WAYS TO HELP PREVENT iT
(Fig. 4, 5 and 5a) cont.
17
Fig. 6
1
I
1
Weys to Help Prevont KJckbnck con1
_pocI
1he wo_kp[#('.lo_o_"knot_ Or_
CHARG|NGTHE
b0]ofe cul]l_rj _voT D,'_wI_lo _ knotor _,11t
4 DO NOT cul warped _r w_l kimbor {_eoFig 5hi
5 ALWAYS _lip_o_l I_e _._nol_ lo n'__.imtz_ lh_ _ek ol blnde pinching nnd Kickl_,_k. Lr_rg0
p,_not_lend Io _g _ndol thei_own we_l_l (_
Fig. 5_). _ppOrl_ MU-_T b_ ptace_ unde_
(_ Wh_ te_,l_l_ng lho s_w In llte w_ikpfoc_, CENTER lhe blade In Ihr=k_ll _nd _h_Ck to bo
_ule thai lhe _aw le_lh ale noleng_O_t I_o Iho _'=_t_riat.ft fh_ _w _1_ i_ bil_llir_p,il _y
walk L_p_r Kickback k_m I110workpi_cl) whoetth_ e_w ts io_l_l_J
7 DO NOT u_o a dull or d_m_
BATTERY
PACK (Fig
0 and 8_)
Th_ Ll_ltOly pa_k l_" Ilzt_ I0o] h_5 b_OI1shlppo_Jill _t klw ch_rg_ con_tl_onto p_'_v_nlp{_lL_!O
p_bIom_ Thot_foro, yotl 6hould chl]rgo ovetnlghl prior to rise
I _*vor_t|
NOTE: B_tl_'i_s
wilt not roach
Á_ll ch_rgo
tho flr_|
it/no
Ibeyto_'_
ch_3rgod,Allow
cyr:lo_ {oprzro,tlott
foltowot_
by roch_l'glr
tg) frK
|horn
bocoml:,
f*Jlly chn_gozJ>
I Charge balloty pack o_ty with II'_o
chaP_oi/li_flslo_rnoi thzz[was stippiir_dwith
Fig.8
bt_e, U_sh,_poned. tmp_op_lly _;ol, _I gummed.L_pbl_de_
8 U_E EXTRA CAUTION who_ m_ktnf__ *P_ck_ Cu "i_ o exts ng w_ _ 0 _ ,_r bl_
Th_ p_otllidlng blade may c_ _bfoc s _1c_n c_.o Kickback.
_tloes
9 KEEP lh_ bl_o _I Iho ¢o_t0¢1_/oplll s_lli_[_ Th(_ (Jepths_lltltg sh_uflJn_l _xc_Qd 1/4-Inch
bol_w the malefiat botngcul (s_o Ft_. _). _IE SURE lh_l tho hi,do doplh ;_r_tJ_j_l_tlI_{l
Io_kt_[__ve_ ._i_ ti_t_l _n'_ _e_:wo BEFORE m_l_g _ _;ul 11bt_d_ adjustll_l_l _hlIIs wl_lo
3 CD_ne_:l b_tlely ch_rger'_ Imn_;l_Im_r Io
power _llppt_
4 PI_c_ _tle_
ch_ln_
p_ck irt ch_r_
_l_n_, Al_n
sland (So_ Ptg _l
ChZilg_ftSidled/
wilh c_t_!_l_ In ch_igtn_ slar_
_, Th_ ch_ing P,ttzne; hrzstwo ILED} i_cn!_r
1_1t1.%
_n_, _re_n P.ndon_ reel {_er_Pl_, l_aI,
WI',_ n lh_ t:_tl_ry p_c_ t_ pill fnl_ I1_ _-ha_01_g
_f_nd, _h_ _t_dLED wlfl tl_hl. Ir_d!cnllng lh_l
B!_d_!_ SOtTOODoap
REMOVING
CIRCULAR
BATTERY
SAW
(Flg
Corre_lBtnIl_ D_plh
lghould r_otez=:eod1/4,1_b_fow workple_:_l
7)
1
J
Localo t_lcho_ On sideG o{ L_tlo_ p_:tck _nd
dop_o_e, PUllback on b_ttery pack Wllife
_Joprossillg ]a_cheslo rote_o i_itttory pack
i_
oil,i
_a\v
1B
t
• .,-
Wh_r_ Ih_. _llery p_k is ch_rg0d and
_movx_ horn Ih_ ch,'lr_in_ eland> th_ _o_ I_hl
_tl go Of_ Th_ gr_on LED will o_ 7 come on
IPn_ i_ r_ql_l_o_Io fully roch_lgo balleiy p_ck
fi baito_y p_ck i_ colnplol_ _hE_rg0_,
II hlliiil; or hlngllt' llt tlh;t f(lfl_tl ltmO I;, mqUtlocf Ill ttllt 7 Itchal{iO balloiy p_lck
PACK FROM
Z_ WARNING:
Atwz_ysremovo bo:itory']
peck Imm your Gnw when you aro
_=_r_mbllng ]_r t_, ranking ndl_lment_.
]
_embl[ng
or romovtng blndo_
¢l_enlng, or when n_t In use Remr_vi_g
_tlory
p._ Will prevon! _CIII_tiZ|
/
starting thet €_uld c_use sortou_=
/
porson_t Injury.
Fig _n
tt Th_ billloiy p_ck wl_fbecc_n_!slighlf7 wttl'lel IO lh_ lolJ_h wt_ikl cbnrglit_
Tbi_ is normtll
g Do i!ol placo I1_ b_llQly _llJll_ll
lit_f_l ] I rllnr,!O_llll_r lrl llfl ti_o_ ol OXhom_tho_t _r cl_ld
]I witl woIk b _J_,l _I llll_liliil l_til lltt_ p_tt_lti_ll
&llllt pI;.W_r _lipplt, itilii _emllvrJ Ihil P_llo_ p_ck.
propolit'_ or the llhrir_ltn!] l_t rind ifoe_ no! l:hltf!to th_ baltory pit,k, _tum Ihe
_hli_'_lnll
slllndIhe
I lrarili_omloi"
trod baltel_/p_ck
Io yol_r
Sel_ do_loro
lit" olher
NOTE; Wlthln
w_rr=inly p_rlod,
If Ihe cillirgt_tt
elimd_el_re_t
LED IlghLl
nol operltlo
Crllftsmlin oulfo! ior froe rl!phtcement,
J
19
I
CHARGING
A HOT BATTERY
PACK
MAKING
When using your tool continuously, the batteries in your battery pack will become hot.
You should let a hot battery pack cool down for approximately 30 minutes before
attempting to recharge.
CIRCULAR
THE BATTERY
ADJUSTMENTS
(Fig. 11 and 1l a)
ALWAYS use the correct blade depth setting. The correct blade depth setting for all cuts should
not be more than 1/4-inch below the material being cut (see Fig. 4). Allowing more depth will
increase the chance of kickback and cause the cut to be rough.Your saw is equipped with a
depth-of-cut scale to help obtain depth-of-cut accuracy. The depth-of-cut scale is located
on the inside back of the upper blade guard.
NOTE: A hot battery pack only occurs when prolonged continuous use of your circular saw
causes the batteries to become hot. it does not occur with typical use. Within the warranty
period, if the battery pack becomes hot with typical use, return the charging
stand/transformer, and battery pack to your nearest Sears store or other Craftsman outlet
for free replacement.
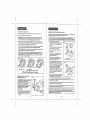
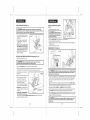
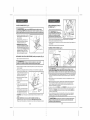
iNSTALLiNG
DEPTH-OF-CUT
Fig.ll
PACK iN
SAW (Fig. 9)
1. Place the battery pack in the saw, aligning
the raised rib on battery pack with groove
inside the saw.
2. Make sure the latches on each side of the
battery pack "snap" into place, and the
battery pack is secured in the circular saw
before beginning operation.
Bracket with
Depth-Of-Cut
Scale
TRIGGER SWITCH WiTH POWER
LOCK=OFF BUTTON (Fig. 10)
Pig. 10
To turn the saw ON, depress the power
lock-off button and depress the trigger switch.
The saw will stay ON as long as the trigger
switch is depressed.
To turn the saw OFF, release the trigger switch.
Depth
Adjust
Knob
I
Base
To Raise
To Lower
Power
Lock-Off,
Button
TO SETTHE
BLADE
DEPTH (Fig. 11a)
1. Loosen the Depth Adjust Knob (see Fig. 11).
2. Locate the Depth-of-Cut Scale on the
Bracket located behind the blade guard
(see Fig. 11).
3. To determine the depth-of-cut, hold the
base of the saw flat, on and against the edge
of the workpiece.
4. Raise or lower the saw blade until the arrow
indicator mark on the back of the upper blade
guard aligns with the inch mark on the
Depth-Of-Cut Scale on the Bracket at your
desired depth (see Fig. 1la).
the power lock-off button will return tothe center
OFF position
z_ CAUTION:
When placing battery pack in the tool, be sure raised rib on
battery pack aligns with the bottom of the saw and latches into place properly.
Improper installation of the battery pack can cause damage to internal
components.
back of blade
guard
_...._
Fig. 11a
5. Tighten Depth Adjust Knob.
Z_ WARNING:
Cordless Battery Tools are always in operating condition when
the battery pack is installed in the tool,Therefore
the Power Lock Button should
always be in the center position, locking the power off, when the tool is not in use
or when you are carrying it at your side.
A
WARNING:
Cordless Battery Tools are always in operating condition when the
battery pack is installed in the tool. Therefore the battery pack should be removed when
the tool is not in use or when you are carrying it at your side.
21
2O
I
I
I
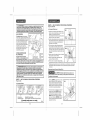
STARTING
A CUT
/_
TO HELP
(Fig. 12)
WARNING:
ALWAYS clamp and support workpiece securely. ALWAYS maintain
proper control of saw. Failure to clamp and support workpiece and loss of control of
saw could result in serious injury.
MAiNTAiN
CONTROL
cont.:
9. After completing your cut, release the trigger switch and allow the blade to come to
a complete stop. DO NOT remove the saw from the workpiece while the blade is moving.
]
l
_When
sawing through a workpiece, the lower blade guard DOES
NOT cover the blade on the underside of the workpiece (see Fig. 4, page 17). ALWAYS
keep your hands and fingers away from the cutting area. Any part of your body
coming in contact with the moving blade will result in serious injury.
1. ALWAYS use your saw with your hands positioned correctly, with one hand operating
the trigger switch and the other on the front assist handle (see Fig. 12).
Z_ WARNING:
ALWAYS maintain proper control of the saw to make sawing safer
and easier. Loss of control of the saw could cause an accident resulting in possible
serious injury.
MAKING
MAiNTAiN
CUTS AND RiP CUTS
(Fig. 14)
z_ WARNI NG: ALWAYS clamp and support workpiece securely. ALWAYS
2. NEVER use the saw with your hands
positioned as shown in Fig. 13
TO HELP
CROSS
maintain proper control of saw. Failure to clamp and support workpiece and loss of
control of saw could result in serious injury.
CONTROL:
1. ALWAYS use your saw with your hands positioned correctly (see Fig. 12).
1. ALWAYS support the workpiece near the cut.
2. ALWAYS support the workpiece so the cut
will be to the left of support.
3. ALWAYS clamp the workpiece so it will not
move during the cut. Place the workpiece
with the good side down.
/!k, WARNING:
ALWAYS maintain proper control of the saw to make sawing
safer and easier. Loss of control of the saw could cause an accident resulting
in possible serious injury.
2. When making cross or rip cuts, align your line of cut with the right side of the notch by the
0° indicator (see Fig. 14).
3. Since the thickness of blades varies, MAKE ATRIAL CUT in scrap material along the
guideline to determine how much, if any, you should offset the blade from the guideline to
allow for the kerf of the blade to get an accurate cut.
Right
I NOTE:The good side of the workpiece is the side where appearance is important.
4. Before starting a cut, draw a guideline
along the desired line of cut, then place the
front edge of the saw base on that part of
the workpiece that is solidly supported
(see Fig.12).
Fig. 13
Fig. 14
_=._ Line of Cut
i
i
5. NEVER place the saw on the part of the
workpiece that will fall off when the cut
is made (see Fig. 13).
6. Hold the saw firmly with both hands
(see Fig 12).
7. Squeeze the trigger switch to start the saw.
ALWAYS let the blade reach full speed
before you begin the cut into the workpiece.
Wrong
8. When making a cut, ALWAYS use steady, even pressure. Forcing the saw causes
rough cuts and could shorten the life of the saw or cause Kickback.
MAKING RiP CUTS
ALWAYS use a guide when making long or wide rip cuts with your saw.You can use either a
straight edge or use the edge guide that was included with your saw.
23
22
I
I
I
]
l
USING A STRAIGHT
HOWTO SETYOUR
(Fig. 17)
EDGE (Fig. 15)
BEVEL
ANGLE
1. Remove the battery pack from saw.
maintain proper control of saw. Failure to damp and support workpiece combined
l with
_ WARNING:
clampresult
and support
securely. ALWAYS
loss of control ALWAYS
of saw could
in seriousworkpiece
injury.
1. You can make an efficient rip guide
by clamping a straight edge to your
workpiece.
Z_ WARNING:
Failure to remove
battery pack from saw could result in
accidental starting causing possible
serious personal injury.
Fig. 15
Fig.
1'7
Bevel Adjustment
Lever
2. Place the Lock=Off Switch into the center position to lock the power off.
3. Loosen bevel adjustment lever (see Fig.17).
4. Raise the motor housing end of the saw until the bevel pointer reaches the desired angle setting
on the bevel scale.
5. Tighten the adjustment lever securely.
2. Carefully guide the saw along the
straight edge for a straight rip cut
(see Fig. 15).
3. ALWAYS LETTHE BLADE REACH
FULL SPEED, then carefully guide
the saw into the workpiece. DO NOT
bind the blade in the cut. Push the
saw forward at a speed where the
blade is not laboring.
MAKING BEVEL CUTS (Figs. 18)
m
Line of Cut=',
Fig. 18
m
450 Indicator_
iNSTALLiNG
AND USING
EDGE
GUIDE
(sold separately)
0 4s
(Fig. 16)
2
1. Remove the battery pack from saw.
/_ WARNING:
accidental
starting
i
Failure topossible
remove serious
battery personal
pack from injury.
saw could result in
causing
2. Place the Lock=Off Switch into the center position to lock the power off.
3. Position the edge guide so the arm with the inch increments is facing "up". Slide the arm of
the edge guide into the mounting slots at the front of the saw's base (see Fig. 15).
4. Adjust the edge guide to the desired
length of cut.
z_
WARNING:
ALWAYS clamp and support workpiece securely. ALWAYS maintain
proper control of saw. Failure to clamp and support workpiece and loss of control of
saw could result in serious injury.
Fig. 16
5. Tighten the edge guide retaining screw.
1.Your saw can be adjusted to cut at any angle between 0° and 50°. When making 45 ° bevel cuts,
there is a notch in the saw base to help you line up the blade with the line of cut (see Fig. 18).
2. Align your line of cut with the left side of the notch by the 45 ° indicator when making 45 °
bevel cuts.
3. Since blade thicknesses vary and different angles require different settings, MAKE ATRIAL
CUT in scrap material along the guideline to determine how much, if any, you should offset the
blade from the guideline to allow for the kerf of the blade to get an accurate cut.
4. When making a bevel cut HOLD the saw FIRMLY with both hands (see Fig. 18).
5. Rest the front edge of the base on the workpiece, then squeeze the trigger switch to start the
saw. ALWAYS let the blade reach full speed, then guide the saw into the workpiece.
6. After completing your cut, release the trigger switch and allow the blade to come to a complete
stop in the cut. DO NOT remove the saw from the workpiece while the blade is moving. It will
damage your bevel cut and cause Kickback.
6. Clamp and support the workpiece
securely before making your cut.
7. Place the edge guide firmly against
the edge of the workpiece
(see Fig. 16). Doing this will give you
a true cut without pinching the blade.
8. BE SURE that the guiding edge of the
workpiece is straight so you can get a
Rip/Edge Guide
straight cut.
Through Slots
Rip/Edge Guide
9. ALWAYS LETTHE BLADE REACH
FULL SPEED, then carefully guide
the saw into the workpiece. DO NOT bind the blade in the cut. Push the saw forward at a
Z_ WARNING:
if the blade comes in contact with the workpiece before it reaches
[ full speed, it could cause the saw to kickback towards you, possibly resulting in
serious injury.
speed where the blade is not laboring.
/
25
24
I
I
I
MAKING
POCKET
CUTS
( Fig. 19)
BUILT-IN
SAWDUST
EJECTION
CHUTE
(Fig. 20 and 20a)
• Remove the battery pack from saw.
1
/_
Attempting a pocket cut at any other setting can result in a loss of control of the saw,
/_ WARNING:
ALWAYS adjust bevel setting to zero before making a pocket cut. i
which can result in serious injury.
Failure to remove battery pack from saw could result in
starting causing possible serious personal injury.
1. Adjust the bevel setting to zero, set the blade to the correct blade depth setting,
then use the lower blade guard lever to swing the guard up.
I av°idserious
"/_ WARNING:
injury.
Fig. 20
ALWAYS raise the I°wer blade guard with the lever t°
2. While holding the lower blade
guard up by the lever, firmly rest the
front of the saw base flat against the
workpiece with the rear handle
raised so the blade does not touch
the workpiece (see Fig 19).
Fig. 20a
1
Fig. 19
3. Squeeze the trigger switch to start
the saw. ALWAYS let the blade
reach full speed, then slowly lower
the blade onto the workpiece until
the base is flat against the
workpiece. AS the blade enters
the material, you MUST release
the lower blade guard lever.
Your saw has a built-in sawdust ejection chute with a cover cap. The sawdust will be ejected down
from the blade guards with the cover cap attached to the chute.
If you remove the cover cap (turn to loosen and tighten) the sawdust will be ejected out of the
chute towards the rear of the saw.
Remove the cap to attach a 11/4-in.vac hose and a wet/dry vac (both sold separately).
Lever
4. After you complete the cut, release
the trigger switch and allow the blade to come to a complete stop. After the blade has stopped,
remove it from the workpiece, if the corners of your pocket cut are not completely cut through,
use a hand finishing saw to finish the corners•
/!k blade
WARNING:
NEVERresult
tie the
lower blade
guard in the raised position. Leaving
the
exposed could
in serious
injury.
/_
]
WARNING:
accidental
WARNING:
Always wear safety goggles or safety glasses with side shields
during power tool operations, or when blowing dust. if operation is dusty, also
wear a dust mask.
z_
WARNING:
To ensure safety and reliability, all repairs should be performed
I by a qua f ed serv ce techn c an at Sears Serv ce Center.
i
/!k WARNING:
Always remove battery pack from your saw when you are
assembling
parts, making adjustments,
assembling or removing blades, cleaning,
or when not in use. Removing battery pack will prevent accidental starting that
could cause serious personal injury.
i
ROUTINE
MAINTENANCE
Z_ WARNING:
DO NOT at any time let brake fluids, gasoline, petroleum=based
products, penetrating oils, etc. come in contact with plastic parts. Chemicals can
damage, weaken or destroy plastic, which may result in serious personal injury.
1. Remove the battery pack from saw.
2. When work has been completed, clean the tool to allow smooth functioning of the tool
over time.
3. Use clean damp cloths to wipe the tool.
4. Keep the motor air openings free from oil, grease and sawdust or woodchips, and store
tool in a dry place.
5. Be certain that all moving parts are well lubricated, particularly after lengthy exposure to
damp and/or dirty conditions.
27
26
I
I
I
I
I
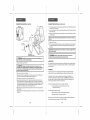
CHANGING THE BLADE (Figs. 21 and 21 a)
CHANGING THE BLADE (Figs. 21 and 21a) cont.
Fig. 21a
8. The remaining washer is the inner bushing washer that fits around the spindle shaft and it
does not need to be removed.
9. Put a drop of machine oil onto the inner bushing washer and outer "D" washer where they
will touch the blade.
10. Place the new saw blade inside the lower blade guard, onto the spindle shaft and against
the inner bushing.
Fig. 21
Spindle
SpindleLock
NOTE: The teeth of the blade should point upward at the front of the saw as shown in
(Fig. 21).
Outer "D"Washer
11. Replace the "D" washer.
12. Firmly hold down spindle lock button as you replace the spindle screw and hand tighten it
in a clockwise direction. Then use blade wrench to tighten the spindle clamping screw
thoroughly.
"A" Spindle
Clamping Screw\
NOTE: NEVER use a blade that is too thick to allow the "D" washer to engage with the
flat side of the spindle.
Blade Rotation
teeth point up at front
z_ WARNING:
accidental
z_
WARNING:
BEinjure
SUREunprotected
to wear protective
blade.The
blade can
hands. work gloves while handling
parts, making
adjustments,
LUBRiCATiON
All of the bearings in this tool are lubricated with a sufficient amount of high-grade lubricant
for the life of the tool under normal operating conditions. Therefore, no further lubrication of
bearings required.
assembling
or removing blades, cleaning,
or when
not in use.Always
Removing
battery
packpack
will from
prevent
accidental
Z_
WARNING:
remove
battery
your
saw whenstarting
you arethat
could cause serious
Failure to remove battery pack from saw could result in
starting causing possible serious personal injury.
a saw
1. Remove the battery pack from saw.
assembling
J
BATTERIES
personal injury.
The battery pack for this tool is equipped with nickel-cadmium rechargeable batteries.
Length of service from each charging will depend on the type of work you are doing.
2. Place saw on its side on a flat surface.
3. Loosen the depth-of-cut adjustment lever, raise the saw up all the way and tighten lever.
This gives you easier access to blade mounting area (see Fig. 21 ).
4. Place saw up, on its base and on a flat surface (see Fig. 21).
5. Loosen the spindle clamping screw "A", depress the spindle lock button (see Fig. 21 a).
Place the blade wrench on the spindle clamping screw "A". Move the wrench back and
forth until you feel the spindle lock button depress further and it locks the blade in position
so the spindle clamping screw can be removed. Keeping the spindle lock button firmly
depressed, turn the spindle screw counterclockwise to remove.
6. Raise lower blade guard using the blade guard lever and hold it in the raised position for
the next steps.
7. Completely remove the spindle clamping screw "A" and the outer "D" washer and the blade
(see Fig. 21).
The batteries in this tool have been designed to provide maximum trouble-free life.
However, like all batteries, they will eventually wear out. DO NOT disassemble battery
pack and attempt to replace the batteries. Handling of these batteries, especially when
wearing rings and jewelry, could result in a serious burn.
To obtain the longest possible battery life, we suggest the following:
1.
Remove the battery pack from the charger once it is fully
charged and ready for use.
For battery storage longer than 30 days:
,, Store the battery pack where the temperature
is below 80°F
,, Store battery packs in a "discharged" condition
See parts list or page 6 table for correct battery pack number for additional battery packs.
Order through Sears parts and repair, call 1-800-4-MY-HOME
28
29
I
I
I
J
1
BATTERY
PACK REMOVAL
AND
PREPARATION
FOR RECYCMNG
/_
To preserve natural resources, please recycle or dispose of batteries properly.
WARNING:
recommended
This product contains nickel-cadmium batteries. Local, state or federal laws may prohibit
disposal of nickel-cadmium batteries in ordinary trash.
The use of attachments
or accessories that are not
for this tool might be dangerous and could result in serious injury.
Sears and other Craftsman outlets have a selection of 51/2-inch Craftsman steel
carbide-tipped blades designed for specific cutting applications.
Consult your local waste authority for information regarding available recycling and / or
disposal options.
Sears and other Craftsman outlets also offer sawhorses, combination and framing squares,
straight edges, edge guides, and a large assortment of clamps to help you with all your
sawing needs.
/K WARNING:
Upon removal, cover the battery pack's terminals with heavy-duty
adhesive tape. Do not attempt to destroy or disassemble
battery pack or remove
any of its components.
Nickel=cadmium
batteries must be recycled or disposed of
properly. Also, never touch both terminals with metal objects and / or body parts as
short circuit may result. Keep away from children. Failure to comply with these
warnings could result in fire and /or serious injury.
Visit your local Sears store or other Craftsman outlets or shop sears.com/craftsman.
51/2-in. Cordless
Circular Saw
Model No. 172.67098 In Kit 9-11518
Item No.
,, Edge guide or straight edge is not being used.
if the blade
, Blade is
, Blade is
, Blade is
binds or smokes from friction:
dull.
on backwards.
bent.
, Workpiece is not properly supported.
, Incorrect blade is being used.
3O
No.
Part Description
PRESS
BOLT
1
2
CSC18GU-2
OUTER
FLANGE
1
3
CSC18GU-3
SAW
4
CSC18GU-4
INNER
5
CSC18GU-5
RETAINING
6
CSCl
LOWER
7
CSC18GU-7
TORSION
8
CSC18GU-8
SCREW
CSC18GU-101
GEAR
UNIT
9
CSCl
GEAR
COVER
10
CSC18GU-10
BALL
11
CSC18GU-11
SPINDLE
12
CSC18GU-12
GEAR
13
CSCl
SELF TAPPING
14
CSC18GU-14
RUBBER
RING
15
CSC18GU-15
SCREW
M4X12
102
CSC18GU-102
FIXED
16
CSC18GU-16
NEEDLE
17
CSC18GU-17
UPPER
18
CSC18GU-18
DUST
19
CSC18GU-19
LOCKING
20
CSC18GU-20
COMPRESSION
21
CSC18GU-21
FELT SEAL
1
103
CSC18GU-103
MOTOR UNIT
1
8GU-6
8GU-9
8GU-13
BLADE
1
FLANGE
1
RING 26
GUARD
1
1
SPRING
1
M5X16
2
1
1
BEARING
6000
1
1
1
SCREW M6X20
GUARD
1
1
2
NUIT
BEARING
1
BK061009
GUARD
1
1
EXTRACTOR
31
I
I
I
Qty.
CSC18GU-1
101
If the blade does not follow a straight line:
,, Teeth are dull. This is caused by hitting a hard object such as a nail, dulling teeth on one
side. The blade tends to cut to the side with the sharpest teeth.
,, Base is out of line or bent.
,, Blade is bent.
Parts
1
COVER
KNOB
1
1
SPRING
1
51/2-in. Cordless
Circular Saw
Model No. 172.67098 In Kit 9-11518
Item
No.
Parts
No.
Part Description
51/2-in. Cordless
Circular Saw
Model No. 172.67098 In Kit 9-11518
Qty.
22
CSC18GU-22
PINION
1
23
CSC18GU-23
DC MOTOR
1
24
CS018GU-24
BOLT M6xg0
1
25
CSC18GU-25
NUT M6
1
26
CSC18GU-26
BASE
27
CSC18GU-27
LOCKER
28
CSC18GU-28
WASHER
29
CSC18GU-29
BOLT M6X14
1
30
CSC18GU-30
RULER
1
31
CSC18GU-31
NUT M3
32
CS018GU-32
SCREW
33
CSC18GU-33
BOLT
34
CSC18GU-34
WARNING
35
CS018GU-35
LEFT/RIGHT
36
CS018GU-36
INNERWIRE
1
37
CSC18GU-37
INNERWIRE
1
38
CSC18GU-38
INNERWIRE
1
39
CS018GU-39
INNERWIRE
1
40
CSC18GU-40
TERMINAL
1
41
CSC18GU-41
SWITCH
1
42
CSC18GU-42
LOCK
43
CSC18GU-43
COMPRESSION
44
CS018GU-44
RUBBER
45
CS018GU-45
RATED
47
CSC18GU-47
SPANNER
48
CSC18GU-48
SCREW
49
CSC18GU-49
SELF TAPPING
SCREW ST3.5X30
1
50
CSC18GU-50
SELF TAPPING
SCREW ST3.5X20
7
51
CSC18GU-51
REAR
52
CSC18GU-52
BRAND
104
CS018GU-104
18V BATTERY
105
CS018GU-103
18V CHARGER
ASSEMBLY
1
KNOB
2
\
\
2
LOCKER
\
1
M3X10
1
M6X35
1
LABLE
HOUSING
BUTTON
1
1
1
SPRING
1
PIN
1
LABLE
1
\
1
M4X50
4
COVER
\
\
1
LABLE
\
1
PACK
1
1
\\
\
32
33
I
I
I
Manual del Operador
Your
For expert troubleshooting
18.0 Voltios
Home
and home solutions advice:
5V2 Pul adas
Circu r Inal m
www,managemyhome.com
For repair - in your home - of all major brand appliances,
lawn and garden equipment, or heating and cooling systems,
no matter who made it, no matter who sold it!
For the replacement parts, accessories and
owner's manuals that you need to do-it-yourself.
For Sears professional installation of home appliances
and items like garage door openers and water heaters.
1-800-4-MY-HOME
® (1-800469-4663)
Modelo No.
172.67098
En Equipo
9=11518
Cartucho de
Bater[a
instalada en
Taladro /
Destornillador)
CARGUE LA BATER|A
ANTES DE UTILIZAR POR PRIMERA
T_
SM
Trademark
/ ' Trademark
/
Service Mark of Sears Brands,
TM
SM
® Marca Registrada
/
Marca de F&brica /
Marca de Servicio
de Sears
MC Marque de commerce
/ MD Marque
deposee
de Sears Brands
LLC
® Registered
z_ PRECAUCION:
Lea, comprenda y siga todas las
Normas de Seguridad e Instrucciones de Operaci6n en
este Manual antes de usar este producto.
LLC
Brands,
VEZ
LLC
© Sears
Brands
Sears, Roebuck and Co., Hoffman Estates, IL 60179 EE.UU.
Vea nuestro sitio web de Craftsman:
www.sears.com/craftsman
LLC
I
I
I
• GARANTIA
° SEGURIDAD
° DESEIVIPACADO
• DESCRIPCION
° FUNCIONAMIENTO
, MANTENIMIENTO
Garantia ............................................................................
Simbolos de Seguridad ........................................................
Instrucciones de Seguridad ....................................................
Glosario de Terminos .................................................................
Desempacado ....................................................................
Descripci6n ........................................................................
Funcionamiento ......................................................................
Mantenimiento ............................................................................
Localizaci6n de Averias ..............................................................
Accesorios ..................................................................................
Lista de Partes ............................................................................
Nt]meros telef6nicos de piezas de reparaci6n Sears .................
GARANTiA
El prop6sito de los s[mbolos de seguridad es Ilamar su atenci6n con respecto a los posibles
peligros. Los simbolos de seguridad y la explicacion de ellos merecen cuidadosa atenci6n
y comprensi6n. La advertencia de los simbolos NO elimina ning_n peligro en si. Las
instrucciones y advertencias que brindan no son sustitutas de las medidas correctas de
orevenci6n de accidentes.
Pb_gina 36
Pdtgina 37
Pdtginas 38-45
Pb_ginas 46-47
Pb,gina 47
Pdtginas 48-49
Pdtginas 50-61
Pb_ginas 61-64
Pb,gina 64
Pdtgina 65
Pb,ginas 65-67
Contratapa
/_ ADVERTENCIA:
ASEGURESE de leer y comprender todas las instrucciones
de seguridad de este manual, incluso todos los simbolos de alerta tales como
"PELIGRO', "ADVERTENClA" y "PRECAUClON", ANTES de utilizar esta herramienta.
Si no se respetan todas las instrucciones que se incluyen en la siguiente lista se
pueden producir descargas el6ctricas, incendios y/o lesiones personales graves.
SlGNIFICADO
Z_
ADVERTENClA
SJMBOLO
DEO PRECAUClON.
ALERTA
DE Pueden
SEGURIDAD:
usarse en conjuncibn
Indica PELIGRO,
con otros
simbolos o pictogramas.
El incumplimiento de esta advertencia de seguridad RESULTARA
en LESIONES graves para usted u otros. Siempre siga las
precauciones de de seguridad para reducir el riesgo de incendio,
descarga el_ctrica y lesiones personales.
DE UN Al_O COMPLETO SOBRE PRODUCTOS CRAFTSMAN ®
Si este producto Craftsman falla debido a defectos en el material o mano de
obra entre un aSo desde la fecha de compra, REGRE_SELO a LATIENDA
SEARS U OTRO PUNTO DE VENTA CRAFTSMAN MAS CERCANO EN
LOS ESTADOS UNIDOS PARA REEMPLAZO GRATIS.
Esta garantia no incluye partes desechables
brocas u hojas.
DE SiMBOLOS
incumplimiento
esta advertencia
seguridad
PUEDE
z_ADVERTENCIA, i El
resultar
en lesionesdepersonales
graves de
para
usted u otros.
Siempre siga las precauciones de seguridad para reducir el
riesgo de incendio, descarga el_ctrica y lesiones personales.
tales como lamparas, pilas,
i /KPRECAUCIONj i resultar
El incumplimiento
esta advertencia
de seguridad
en lesionesdepersonales
para usted
u otros o PUEDE
dafios
materiales. Siempre siga las precauciones de seguridad para
reducir el riesgo de incendio, descarga el_ctrica y lesiones
personales.
Si este producto Craftsman se utiliza para fines comerciales o de alquiler,
esta garantia aplica solo para 90 dias desde la fecha de compra.
Esta garantia le otorga derechos legales especifios y es possible qu usted
tenga otros derechos, los cuales varian de un estado a otro.
Sears, Roebuck and Co., Hoffman Estates, IL 60179
PREVENCION
DE DAI_IOS Y MENSAJES
DE INFORIVlACION.
Estos comunican al usuario informaci6n y/o instrucciones
importantes
que si no no se
respetan, podr[an producir el dafie. Cada mensaje es precedido por la palabra "NOTA:" como
en el siguiente ejemple:
iGUARDE ESTAS INSTRUCClONES!
i LEATODAS LAS INSTRUCClONES!
y/o
NOTA:
la propiedad.
Si no se respetan
USE SUS
]
contiene
quimicos conocidos
pot el generado
estado depor
California
porherramientas
causar cancer
y defectos
l Z_
ADVERTENSIA:
Algun polvo
el uso de
electricas
de nacimiento
u otros defectos para la reproducci6n.
1
|
36
estas
instrucciones
producir
el dafio
del equipo
Z_ ADVERTENCIA:
El funcionamiento
de cualquier
herramienta el_ctrica puede causar la proyecci6n de objetos
extrafios hacia los ojos Io cual puede ocasionar dafios
graves en los ojos. Antes de poner en funcionamiento
una
herramienta el_ctrica, SIEMPRE use galas de seguridad o
anteojos de seguridad con protector lateral y protector facial
completo cuando sea necesario. Recomendamos el uso de
una mascara de seguridad de visi6n amplia para usar sobre
los anteojos o anteojos de seguridad est;_ndar con protector
lateral, disponibles en lasTiendas Sears u otros centros de
ventas Craftsman.
37
I
I
I
se puede
SEGURIDAD
z_ADVERTENSIA:
ASEGuRASE de leer y entender todas las instrucciones
en este manual antes de usar esta sierra inalambrica. No seguir todas las
instrucciones podria resultar en descargas electricas, incendio y/o lesiones
personales graves.
SEGURIDAD
9. USE EQUIPO DE SEGURIDAD. Use SIEMPRE protecci6n para los ojos. M&scaras
anti-polvo, zapatos de seguridad antideslizantes casco o protecci6n para los oidos deben
usarse en condiciones que Io requieran.
10. NO USE LA HERRAMIENTA SOBRE UNA ESCALERA o soporte inestable. Una
posici6n firme y estable sobre una superficie s61ida permite un mejor control e la
herramienta en situaciones inesperadas.
DEL AREA DETRABAJO
1. IVlantenga su area de trabajo limpia y bien iluminada. Los bancos de trabajo
abarrotados y las Areas oscuras invitan a los accidentes.
2. NO haga funcionar las herramientas electricas en atmosferas explosivas, como por
ejemplo en presencia de liquidos inflamables, gases o polvo. Las herramientas
electricas crean chispas que pueden encender el polvo o humo.
3. SIEMPRE mantenga alas personas que estan cerca de las inmediaciones, nifios y
visitantes alejados al utilizar una herramienta el4ctrica. Las distracciones pueden
hacerlo perder el control.
4. Haga su taller a prueba de nifios con candados e interruptores maestros. Guarde las
herramientas bajo Ilave cuando no las utiliza.
5. ASEGURESE de que el area de trabajo posea una buena iluminacion de modo que
pueda ver el trabajo y que no haya obstrucciones que interfieran con el seguro
funcionamiento ANTES de usar su sierra.
SEGURIDAD
PERSONAL cont.
SEGURIDAD
EN EL USOY
CUIDADO
DE LA HERRAMIENTA
/_k ADVERTENCIA:
ASEGORESE de leer y entender todas las instrucciones
antes de operar esta herramienta. No seguir todas las instrucciones indicadas abajo
podria resultar en descargas electricas, incendio y/o lesiones personales graves.
1. SIEMPRE use abrazaderas u otra manera practica de asegurar y apoyar la pieza de
trabajo sobre una plataforma estable. Sostener el trabajo con las manos o contra el
cuerpo es inestable y podria resultar en perdida de control.
2. NO fuerce la herramienta. Use la herramienta y hoja correcta para su aplicacion. La
herramienta y hoja correcta haran el trabajo de manera mejor y m_s segura para Io cual
fueron disefiadas.
3. NO use la herramienta si el interrupter no la Enciende o Apaga. Toda herramienta
que no puede ser controlada por el interruptor es peligrosa y debe ser reparada.
4. DESCONECTE el cartucho de hater{as antes de hacer cualquier ajuste, cambiar los
accesorios o guardar la herramienta. Tales medidas prevenidas reducen el riesgo de
encender la herramienta accidentalmente.
PERSONAL
1. FAMILIARJCESE con su sierra inalambrica. Lea cuidadosamente el manual del
operador. Aprenda las aplicaciones y limitaciones de la sierra, asi como los peligros
potenciales relacionados con esta herramienta.
2. PERMANEZOA ALERTA, mire Io que esta. haciendo y use el sentido comun mientras
hace funcionar una herramienta electrica.
5. NUNOA deje la herramienta en funcionamiento. Apague SIEMPRE. NO deje la
herramienta sin supervisi6n hasta que la hoja se haya detenido por completo.
6. GUARDE las herramientas sin usar fuera del alcance de los nifios y etras personas
no capacitadas.
Nifios NO DEBEN OPERAR esta herramienta. Las herramientas son
peligrosas en las manos de usuarios no capacitados.
7. SIEMPRE saque le cartucho de hater{as y guardelo en un lugar separado cuando la
sierra no se utiliza.
3. NO use la herramienta cuando este cansado o bajo la influencia de drogas, alcohol o
medicaci6n. Un momento de distracci6n mientras hace funcionar las herramientas
electricas podrfa resultar en lesiones personales graves.
4. VISTA apropiadamente.
NO use ropa suelta o joyas. Recoja el cabello largo. Mantenga
su cabello, ropa y guantes lejos de las piezas m6viles. La ropa suelta o el cabello largo
podrfan quedar atrapados en las piezas m6viles. Las aperturas de ventilaci6n a menudo
cubre piezas m6viles y tambien deben evitarse.
5. EVlTE la encendida de manera accidental. Asegt]rese de que el interruptor este en la
posici6n "OFF" ("APAGADO") antes de encajar el cartucho de baterfas. NO sostenga
herramientas con su dedo en el interruptor. Llevar herramientas con su dedo en el
interruptor o encajando el cartucho de baterfas con el interruptor en la posici6n "ON"
("ENCENDIDO") atrae accidentes.
6. RETIRE las Ilaves de ajuste de las hojas antes de encender la herramienta. Una Ilave de
ajuste que queda conectada a una pieza rotativa de la herramienta podrfa resultar en
lesiones personales.
7. No se extienda para alcanzar sobre la herramienta. Mantenga el pie firme as_ cemo
el balance en todo momento. Una posici6n y balance apropiados permiten un mejor
control de la herramienta en posiciones inesperadas.
8. ASEGURE SIEMPRE SU TRABAJO. Use abrazaderas o un tornillo para sostener el
trabajo cuando sea pr&ctico. Es m&s seguro que usar sus manos y libera ambas manos
para operar la herramienta.
8. Cuando no se utiliza el cartucho de baterias, mantengalo alejados de objetos de
metal come: sujetadores para papeles, monedas, llaves, clovos, tornillos u otros
objetos de metal pequefios que pueden hacer una conexi6n de un terminal al otro.
Hacer un cortocircuito juntando los terminales de bateria puede causar quemandura en
la piel, chispas y/o incendios.
9. BELE alas herramientas un mantenimiento
cuidadoso. SIEMPRE mantenga las
herramientas limpiadas y en buen orden de trabajar.
10. VERIFIQUE si las piezas moviles estan desalineadas o se atascan, se rompen o si
existe alguna otra condici6n que podrfa afectar la operaci6n de la herramienta. Si esta
dafiada, la herramienta debe recibir mantenimiento antes del uso. Muchos accidentes
ocurren debido a herramientas con un mantenimiento pobre.
11. USE SOLO los accesorios recomendados
para esta herramienta.
Los accesorios
aptos para una herramienta podrfan ser dafiinos si se utilizan con otra herramienta.
12. Mantenga la herramienta y su mango secos, limpios y libres de aceites y grasa.
Siempre utilice un patio limpio cuando limpia. Nunca utilice I{quidos para freno,
gasolina, productos a base de petroleo o cualquier solvente fuerte para limpiar su
herramienta. Seguir esta norma reducir& el riesgo de perdida de control y el deterioro
del pl&stico del gabinete.
39
38
I
I
I
SEGURIDAD
ELECTRICA
SEGURIDAD
z_ ADVERTENCIA:
ASEGURESE de leer y entender todas las instrucciones
antes de operar esta recortadora.
No seguir todas las instrucciones indicadas
abajo podr{a resultar en descargas electricas, incendio y/o lesiones personales
graves.
|
1
Una herramienta que funciona a bateria con bateria integrales o un cartucho de
hater{as separado se debe recargar salamente con el soporte de carga especificado
para la bateria. Un cargador que puede set apropiade para un ripe de bateria puede
crear un riesgo de incendio cuando se utiliza con otra bater{a.
REGLAS DE SEGURIDAD
1. Utilize la sierra que funciona a bateria unicamente con los cartuchos de baterias de
lista e×pecificamente designada. La utilizaci6n de cualquier otro cartucho de baterias
puede crear un riesgo de incendio.
2. Utilice los cartuchos de hater{as unicamente con el soporte de carga de la lista
especificamente dise_ado.
SOPORTE DE CARGA
CARTUCHO DE BATERiAS
172.67098
CDT218GU-103/BHY41-23.5V-200mA
CDT218GU-104(ABP318GU)
Tambien use 1426101 y 140295004
Tambien use 1323509,
1323520, 130260001,
130139020 y 130139021
DE SEGURIDAD
PARA SU HERRAMIENTA
La etiqueta de su herramienta
puede incluir los siguientes
INALAMBRICAS
//_ PRECAUCION:
La hoja se desacelera una vez apagada la sierra.
]
]
1. MANTENGA el cuerpo posicionado a cualquiera de los lades de la sierra y no en linea
directa con hoja de la sierra. El rebote podria ocasionar que la sierra salte hacia atras. (Vet
"Rebote... Que Io Ocasiona y Maneras para Prevenirlo" en paginas 52 y 53).
2. NO se extienda para alcanzar debajo del trabajo. El protector no le proteger,'_ de la hoja
debajo de la pieza de trabajo.
i
AI aserrar la pieza de trabajo, el protector inferior de la hoja NO
cubre la hoja del lade inferior de la pieza de trabajo (Pag. 50, Fig. 4). Mantenga
SIEMPRE sus manes y dedos lejos del area de carte.
3. NO abuse del cable del soporte de carga. Nunca Ileve el soporte de carga por el cable.
Nunca tire del cable para sacar el soporte de carga del tomacorriente. Si se daSa el cable o
el soporte de carga se pueden producir o crear peligros de descarga electrica. Mantenga el
cable fuera del alcance de fuentes de calor, aceite, bordes afilados o partes m6viles.
Reemplace los cables daihados inmediatamente. Los cables daSados aumentan el riesgo de
descargas electricas.
S{IVIBOLOS
PARA LAS SIERRAS CIRCULARES
Mantenga las manes lejos de los bordes cortantes y la hoja.
Mantenga su segunda mane en el mango auxiliar o cubierta del motor. Si ambas
manes estan sosteniendo la sierra, la hoja no podra cortarlas.
i
SIERRA
EN EL SERVlCIO cont.
2. El servicio tecnico de la herramienta se debe realizar solamente en un Centre de
Servicio Tecnico de Sears. El servicio tecnico o mantenimiento que se realice par
personal no calificado podria producir riesgo de lesiones.
3. Cuando realice el servicio tecnico de una herramienta, utilice solamente las piezas
de repuesto identicas. Respete las instrucciones de la seccion de mantenimiento
de
este manual. Si se utilizan partes no autorizadas o no se respetan las instrucciones de
mantenimiento, se puede crear un riesgo de descarga electrica o lesi6n.
1
3. VERIFIQUE que el protector inferior se cierra adecuadamente ANTES de cada use. NO
use la sierra si el protector inferior no se mueve libremente y no cierra instantaneamente.
Nunca sujete ni amarre el protector inferior en posicibn abierta, Si la sierra es dejada caer
acidentalmente se cae, el protector inferior podria doblarse. Levante el protector inferior usande
la palanca retractil. El protector funciona apropiadamente si se mueve libremente, no toca la
heja ni ninguna otra parte en cualquier angulo y profundidad de certe y si prentamente regresa
a al posici6n de cierre.
4. VERIFIQUE el funcionamiento y condici6n del resorte de protector inferior. Si el protector
y resorte no funcionan apropiadamente, DEBEN ser reparados antes del usa. El protector
inferior de la heja pedria funcionar lentamente, debido a piezas daSadas, depositos gomosos e
acumulaci6n de detritos. NO opere su sierra hasta que se haya reparado e reemplazado el daSo.
5. El protector inferior debe retraerse manualmente SOLO para hacer cortes especiales,
tales coma cortes de bolsillo o compuestos. Levante SIEIVIPRE el protector inferior
utilizando la palance retractil correspondiente. En cuanto la hoja penetre el material, el
protector inferior DEBE set liberade. Para toda otto carte, el protector inferior debe funcionar
automaticamente.
simbolos
V.......................................................................Voltios
A ......................................................................Amperios
Hz....................................................................Hercios
W .....................................................................varies
_-_ ....................................................................Oorriente alterna
--.
................................................................
Oorriente continua
no ....................................................................
Velocidad librede carga
[] ....................................................................Oonstruccion Olase II, Doble aislamiento
RPM.........................................................
Revoluciones per minute
SPM.........................................................
Carreras (Strokes) per minute
OPM .........................................................
0rbitos par minute
z_ ....................................................................Indica peligro, advertencia o precauci6n.
Significa: iiiAtencion!!! Su seguridad se
encuentra comprometida.
SEGURIDAD
EN EL SERVICIO
6. Asegurase SIEIVIPRE que el protector inferior est_ cubriendo la hoja ANTES de colocar la
sierra sabre un banco de trabajo o en el suelo. Una hoja m6vil sin protecci6n ocasionara que
la sierra se desplace hacia atras, cortando Io que encuentre en su camine. Preste atenci6n a
cuanto tiempo le toma a la hoja dejar de girar despues de que se libere el interrupter.
7. NUNCA sostenga en sus manes la pieza que se esta cortando ni en sus piernas. Es
importante soportar la pieza de trabajo apropiadamente para minimizar la exposici6n del cuerpo,
el atascamiento de la hoja o la perdida de control.
41
1. Si cualquier parte se pierde, se rompe, se dobla o falia de cualquier forma; o si
cualquier componente no funciona adecuadamente:
haga reemplazar la parte
perdida, dahada o que no funciona ANTES de utilizar nuevamente.
40
I
I
I
REGLAS DE SEGURIDAD PARA LAS SIERRAS ClRCULARES
INAL_.MBRICAS
cont.
REGLAS DE SEGURIDAD
8. SOSTENGA LA HERRAIVllENTA por los mangos aislados al realizar operaciones d6nde
la herramienta de corte pueda entrar en contacto con cables escondidos. El contacto con
un cable "vivo" hara que las piezas metalicas expuestas electrocuten al operador.
PARA LAS SIERRAS ClRCULARES
INALaMBRICAS
cont.
23. Bajo condiciones de uso o temperature extrema, se pueden producir perdidas en la
bated& Si el Hquido entra en contacto con su piel, lave inmediatamente con jabon y
agua, luego neutralice con jugo de lim6n o vinagre. Si el liquido entra en sue ojos,
lavelos con agua limpia durante al menos 10 minutos, luego busque atenci6n m_dica
inmediatamente. Si sigue esta norma reducira el riesgo de lesiones personales graves.
9. Sujete SIEMPRE la pieza de trabajo de manera segura para que no se mueva al realizar el
corte.
24. CONSERVE ESTAS INSTRUCCIONES. Remitase a elias frecuentemente y utilicelas para
capacitar a otras personas que puedan utilizar esta herramienta. Si le presta esta herramienta
a alguna persona, prestele tambien estas instrucciones para evitar el uso incorrecto del
products y posibles lesiones.
10. AI aserrar al hilo, USE SIEMPRE una guia de corte o guia de torte recto. Esto mejora la
precision del corte y reduce la posibilidad de atascamiento de la heja.
11. USE SIEIV]PRE hojas del tama5o correcto y forma correcta del orificio para el eje
(diamante vs. redondo). Las hejas que no concuerdan con la pieza de mentaje de la sierra
giraran de manera erratica y ecasienara.n la perdida de control.
NORMAS
12. NUNCA use arandelas o pernos de la hoja, daSados o incorrectos. Las arandelas y pernas
de la heja fueren diseSasdos especialmente para su sierra, para un 6primo rendimiente y
funcionamiento seguro.
DE SEGURIDAD
PARA EL SOPORTE
DE CARGA
DE BATERiA
z_ ADVERTENCIA:
ASEGURESE de leer y entender todas las instrucciones
antes de operar esta sierra. No seguir todas las instrucciones indicadas
abajo podda resultar en descargas el_ctricas, incendio y/o lesiones personales
graves.
13. NUNCA corte mas de una pieza a la vez. NO APILE mas de una pieza de trabajo sobre la
mesa de trabajo a la vez.
14. EVlTE un funcionamiento o posicionamiento de las manos incomodo donde un resbal6n
repentino podria ocasionar que su mano se mueva en el camino de la hoja.
NOTA:Antes de utimizar el soporte de carga de baterfa, lea todas las instrucciones
y las marcas de precaucion
de este manual, en el soporte de carga de la bateda,
cartucho de batedas, yen la sierra que utiliza el cartucho de baterl'as para evitar
el uso err6neo de los productos y posibles lesiones o da_os.
15. NUNCA alcance debajo del camino de torte de la hoja.
16.0NICAMENTE
pagina 40.
UTILICE los cartuchos
de baterias y soportes
de carga enumerados en la
17. Las herramientas inalambricas no necesitan enchufarse al tomacorriente; por Io tanto,
siempre se encuentran en condici6n de funcionamiento.Tenga
presente los posibles
peligros cuando no se utiliza la herramienta que funciona con bateria o cuando cambia
los accesorios. Si respeta esta regla, reducira, los riesges de descargas electricas, incendios
o lesiones personales graves.
PRECAUClON:
UNICAMENTE UTILICE el soporte de carga especificamente
deseSado que se suministr6
con la sierra cuando cargue el cartucho de baterfas.
El uso de cualquier otro soporte de carga podda da5ar el cartucho de baterl'as y
crear una condici6n
peligrosa.
18. No coloque las herramientas a bateria o sue baterias cerca del fuego o del calor. Esto
reducira, el riesgo de explosienes y posibles lesienes.
/K PRECAUCION:
Para reducir el riesgo de descarga el6ctrica o daho al
soporte de carga y el cartucho de baterias, cargue Qnicamente con el cartucho
de batedas specfficamente
disefiado que se incluye con esta sierra circular y
soporte de carga. Cargar otro tipo de catuchos de bateria puede causar su
explosi6n y provocar lesiones y da_os personal.
19. No aplaste, ni deje caer, ni da_e el cartucho de baterias. Nunca utilice un cartucho de
baterias o soporte de carga que se ha caido o ha recibido un golpe fuerte. Una bateria
daSada es susceptible a expletar. Deseche adecuadamente una bateria que se ha caido o
da5ado de manera inmediata.
20. Las baterias descargan gas de hidr6geno y pueden explotar en presencia de una fuente
de ignicibn, tal como una luz photo. Para reducir el riesgo de lesion personal, nunca utilice
ningOn products inala.mbrico en presencia de llamas abiertas. Una bateria que estalla puede
lanzar desechos y quimicos. Si queda expuesto, lave con agua inmediatemente.
1. No utilice el soporte de carga en el exterior ni exponga a condiciones de humedad.
Si ingresa agua en el soporte de carga aumentara el riesgo de descarga electrica.
21. No cargue el cartucho de bate#as en un lugar h=]medo o mojado. Si sigue esta norma
reducira, el riesgo de descarga electrica.
2. La utilizacion de un accesorio no recomendado con este soporte de carga puede
producir un riesgo de incendio, descarga eiectrica o lesion alas personas.
22. Para obtener mejeres resultados, se debe cargar el cartucho de baterias en un lugar en el cual
la temperatura sea mayor a 50°F pero menor que 80°R No guarde la bateria a la intemperie e
en vehicules.
42
43
I
I
I
i
J
NORMAS DE SEGURIDAD
PARA EL SOPORTE DE CARGA DE BATERJA cont.
Z_ADVERTENCIA:
AIgun pelve generado pot el use de herramientas el_ctricas
contiene
quimicos
conocido
per el estade de California
per causar cancer y defectes
de nacimiente
u otros defectes para la repreducci6n.
3. No abuse del cable del soporte de carga. Nunca Ileve el soporte de carga per el cable.
Nunca tire del cable para sacar del tomacorriente. Si se dalha el cable o el soporte de
carga se pueden producir o crear peligros de descarga electrica. Mantenga el cable
fuera del alcance de fuentes de calor, aceite, bordes afilados o partes m6viles.
Reemplace los cables dahados inmediatamente. Los cables daihados aumentan el riesgo
de descargas electricas.
4. Asegurase de que el cable este ubicado de manera tal que nadie Io piseo se
tropiece y que no entre contacto con hordes filosoe o partes m6viles, calor, aceite
o que se someta de alguna otra forma a daSo o tension. Esto reducirb, el riesgo de
caidas accidentales, que podrian causar lesiones, y daSos al cable que podrian producir
descargas electricas.
Algunos
ejemples de estes quJmicos son:
• El plomo de las pinturas a base de plomo.
• La sfiice cristalina de los ladrillos, el cemento y otros productos de albahileria.
• El arsenico y el creme, de la madera tratada quimicamente.
El riesge de estas exposicienes
varJa, dependiendo
de la frecuencia
con que realiza
este tipo de trabajo. Para reducir su exposici6n
a estes quimicos:
• Trabaje en areas bien ventiladas.
• Trabaje con los equipos de seguridad aprobados, tales come mascaras contra el polvo que
estan especialmente
disehadas para filtrar part[culas microsc6picas.
Evite el contacto
prolongado con el polvo de lijadoras, sierras, pulidoras,
perferadoras
electricas y etras actividades
de la construcci6n.
Utilice ropa de
protecci6n y lave las ;_reas expuestas
cen agua y jab6n. Si permite que el pelvo
ingrese a su boca, ejos e permanezca
en la piel, se puede fementar
la abserci6n
de quimicoe
nocivos.
5. Mantenga el cable y soporte de carga alejados del calor para evitar dairies a la
carcasa o partes internae.
6. No deje que la gasolina, aceites, productos a base de petr61eo, etc. entren en
contacto con las partes plasticas. Contienen quimicos que pueden daRar, quitarle
solidez o destruir el pl&stico.
7. No se debe utilizar un alargue a menos que absolutamente
necesario. La utilizaci6n
de un alargue incorrecto podria producir un riesgo de incendio y descarga electrica. Si se
debe utilizar un alargue, asegurase de a) que los homes del enchufe del alargue tengan
el mismo numero, tama5o y forma que los del transformador del cargador, b) que el
alargue se encuentre conectado adecuadamente yen buena condici6n electrica, y
c) utilizar un alargue adecuado. SOLAMENTE utilice los cables incluidos en la lista de
Underwirters Laboratories (UL). Otros alargues pueden causar una cafda en la Ifnea de
voltaje, Io que produce perdida en energfa y el sobrecalentamiento del soporte de carga.
Se recomienda un tamaSo de Medida de cable Americano (AWG, per su sigla en ingles)
de calibre 14 al menos para un alargue de 25 pies o menor Iongitud. Utilice un calibre 12
para un alargue de 50 pies. No se recomiendan los alargues de 100 pies o de mayor
Iongitud.
8. VERIFIQUE que los cables de la herramienta no esten dafados. No utilice el
soporte de carga con un cable daSado, que puede causar un corto circuito y
descarga electrica, Lleve los cables daihados de la herramienta a un Centre de Servicio
Tecnico de Sears para su reparaci6n.
9. NO utilice el soporte de carga si ha recibido un golpe fuerte, se ha caido o se ha
dahado de alguna otra manera. Llevelo a un tecnico autorizado para la verificaci6n
electrica para determinar si el soporte de carga funciona bien.
10. No desarme el eoporte de carga, Ll_veJo a Centre de Repuestos y Reparaciones
Sears cuando se requiera el servicio tecnico o la reparacion.
Si se vuelve a armar
de manera incorrecta puede producir un riesgo de descarga electrica o incendio.
11. Desconecte el soporte de carga del suministro
de energia cuando no se encuentra
en use. Esto reducir& el riesgo de descarga electrica o daSos en los articulos que caen
en el orificio del soporte de carga. Tambien ayudarb, a prevenir daSos durante una
sobretensi6n.
/_, ADVERTENCIA:
La utilizaci6n de esta herramienta
puede generar y/e
esparcir
polvo, que puede causar lesienes respiratorias
graves y permanentes
o de
etre tipe. Siempre utilice la pretecci6n
respiratoria
aprebada
per el institute Nacional
para la Seguridad
y Salud en el Trabaje/Departamento
gubernamental
de lee EE.UU.
para la administraci6n
de la Seguridad
y Salud en el Trabajo (NIOSH/OSHA,
per sus
siglas en ingles) aprepiada
para la exposici6n
al pelve. Dirija las particulas fuera del
alcance de la cara y el cuerpe.
REGLAS ADICIONALES
PARA LA SEGURA OPERACION
/_ ADVERTENCIA:
ASEGORESE de leer y entender tedas las instruccienes antes
de operar esta recertadora. Ne seguir todas las instruccienes indicadas abaje pedria
resultar en deecargas el_ctricas, incendio y/e leeienes persenales graves.
|
1
1. Cenczca su sierra circular. Lea cuidadosamente el manual de operaciones. Aprenda las
aplicaciones y limitaciones, asf come tambien los peligros potenciales especificos
relacionados con esta herramienta. Si respeta esta regla, reducirb, los riesgos de descargas
electricas, incendios o lesiones graves.
2. SIEMPRE utilice gafas de seguridad e pretecteres para la vista cuando emplee esta
herramienta. Los anteojos para todos los dias solamente tienen lentes resistentes a los
impactos; NO son gafas de seguridad.
3. PROTEJA sus pulmenes. Utilice una mascara para la cara o una mb.scara contra el polvo si el
trabajo es polvoriento.
4. PROTEJA su audici6n. Utilice una proteci6n auditiva personal adecuada durante el empleo.
Bajo ciertas condicines, el ruido de este producto puede contribuir a la perdida de la audici6n.
5. TODOS VISITANTESY PERSONAS PRESENTES DEBEN de Ilevar el mismo equipo de
seguridad que Ileva el operador de la herramienta.
6. SJEMPRE verifique las herramientas para determinar si existen partes daSadas. Antes de
seguir utilizando la herramienta, se deberia verificar con cuidado el protector u otra parte que se
haya da[iado para detrminar si funcionara apropiadamente y realizar_t la funci6n deseada.
Verifique si existen desajustes o atascamientos de las partes m6viles, ruptura de partes o
cualquier otra condici6n que pueda afectar el funcionamiento de la herramienta. Se debe
reparar o cambiar un protector u otra parte daSada en un Centre de Servicio Tecnico de Sears.
7. GUARDA ESTAS INSTRUCCIONES. Remitase a elias frecuentemente y utilicelas para
capacitar a etras personas que puedan utilizar esta herramienta. Si alguien le pide
esta herramienta prestada, asegurase de que se Ileve tambi_n estas instruccienes.
12. Riesgo de descarga el_ctrica. No toque la porci6n no aislada del conector de salida ni
el terminal de la bateria no aislado.
13. CONSERVE ESTAS INTRUOCIONES. Remitase a elias frecuentemente y utilicelas para
capacitar a otras personas que puedan utilizar esta herramienta. Si le presta esta
herramienta a alguna persona, prestele tambien estas instrucciones para evitar el use
incorrecto del producto y posibles lesiones.
45
44
I
I
I
Husillo
El eje sobre el cual la hoja o herramienta de corte es montada. Tambien se le conoce como Eje.
Goma
Un residue pegajoso a base de savia proveniente de productos de madera.
Resina
Sustancia pegajosa a base de savia que se ha endurecido
Revoluciones Por Minuto (RPM)
El n_mero de giros completos de un objeto rotativo en un minuto.
Camino de la hoja de la sierra
El area sobre, debajo, detras y frente a la hoja, a medida que se aplica a la pieza de trabajo.
Esa area que se cortara o se ha cortado con la hoja.
Triscado
La distancia a la cual el diente de la hoja de la sierra es doblado hacia fuera desde la cara
de la hoja.
Su sierra circular ha sido enviado completamente
ensamblado.
1. Saque la Sierra y Bolsa de Almacenamiento/Transportadora
del cart6n y inspeccione
con cuidado para ensegurar que no haya occurido rotura o da5o durante el envio.
2. La hoja de corte de la sierra ssta instalado en la fabrica.
3. Asegurase de que todos los articulos enumerados en la lista de contenido.
4. No tire la caja ni el material de embalaje hasta que todas las piezas scan examinadas.
5. Incluido con la sierra; un clave de tuerca hexagonal.
6. Si hay daho o si falta alguna parte (vea LISTA DE PARTES ABAJO), regresela al cualquier
comercio Sears u otros puntos de venta Craftsman para que le reemplacen la Sierra Circular
Inalb,mbrico.
Corte a inglete
Una operaci6n de corte hecha con la hoja a un angulo diferente de 90° con respecto al tope-guia.
Corte a inglete combinado
Un corte a inglete combinado es un corte usando un angulo de inglete y un angulo de bisel al
mismo tiempo.
Corte cruzado
Una operaci6n de corte o de formado en sentido contrario a la veta de la pieza de trabajo.
Corte biselado
Una operaci6n de corte hecha con una hoja a cualquier angulo distinto a 900 de la mesa de inglete.
Corte de ranura
Un corte sin traspaso que produce una muesca o un canal de lado a lado en la pieza de trabajo
(se requiere una hoja especial).
Chaflan
Corte efectuado para eliminar una cuSa de un bloque de madera de modo que el extremo
(o parts de este) quede a un angulo diferente de 90°.
Corte al file
Una operaci6n de corte a Io largo de la Iongitud de la pieza de trabajo.
Corte manos libres
Realizar un corte sin usar una guia, un calibre de inglete, sujeci6n, abrazadera de trabajo, ni otro
dispositivo apropiado para prevenir que la pieza de trabajo gire o se mueva durante el corte.
USTA DE PARTES (Fig. 1)
Soporte de Carga/Transformadora,
Cartucho de BaterJas y Bolsa de
AImacenamiento/Transportadora
mostrada en Manual de
Taladro / Destornillador,
Modelo 172.64120
Sierra Circular con Hoja instalada,
(Cartucho de Bateria instalada en
Taladro / Destornillador)
Aserrado en profundidad
Cualquier operaci6n de corte donde la hoja se extiende por completo a traves del espesor
de la pieza de trabajo.
(_
Cortes no en profundidad
Cualquier operaci6n de corte d6nde la hoja no se extiende por complete a traves del
espesor de la pieza de trabajo, como por ejemplo un corte rasurado.
Borde delantero
El borde de la pieza de trabajo que entra en contacto con la herramienta primero.
Linea de fractura
El material retirado por la hoja en un corte en profundidad o la ranura producida per
la hoja en un corte no en profundidad o parcial.
Rebote
Un peligro que puede ocurrir cuando la hoja se atasca, lanzando la pieza de trabajo
hacia atras hacia el operador.
Llave de Hoja
(Instalada
en Sierra)
CJave
de tuerca
hexagonaJ
Manual del Operador
sierra hasta que la pieza daSada sea reparada o reemplazada.
Si no se hace esto
i podrJan
_ADVERTENSlA:
alguna pieza
faltara graves.
o estuviera daSada, no enchufe la
ocurrir posibles Silesiones
personales
recomendados para utilizar con esta herramienta.
Cualquier alteraci6n o modificaci6n
considera uso err6neoNoy intente
podria producir
peligrosa
puede
[ se_ADVERTENSIA:
modificar una
estacondici6n
herramienta
o crearque
acccesorios
conducir posibles lesiones personales graves.
Pieza de trabajo o material
El objeto sobre el cual se esta realizando la opsracion de corte. Las superficies de la
pieza de trabajo se denominan comunments caras, extremes o bordes.
46
lesiones
personales
graves, siempre saque el cartucho de baterias de la herramienta
accidentales que podrian causar
i A
ADVERTENSIA:
Para evitar arranques
cuando
ensambla las partes.
47
I
I
I
no
CONOZCA
SU SIERRA CIRCULAR
(Fig. 2)
La Sierra Circular
i operacionales
NOTA: Antes de
intentar usar este
y requerimientos
deproducto,
seguridad. familiaricese
Interruptor
Fig.
2
Boton de
Interruptor
de Fijar Poder
con todos las caracteristicas
J
i
del Gatillo
Mango Posterior
Cartucho de Bater[as
(Instalada en Taladro /
Destornillador)
Mango
Delantero
de
Asistencia
inferior de la Hoja
Perillo de Sujeci6n
de Aj
inferior de la Hoja
Tornillo de Sujecion
Ranuras de Montaje
para el Borde Guia
Cartucho
de Baterias
(
Destornillador)
Seguro para Soltar
Cartucho de Baterias
del Husillo
Hoja
Perillo de Sujecion
del Borde Guia
Mango Posterior
Interruptor
del Gatillo
Boton de
Interruptor
de Fijar Poder
Mango
Delantero
de
Asistencia
Motor
18.0 Voltios
Velocldad
Fijacionde Eje
de Rotacion
Perillade Ajustede
Corteen Profundidad
Escala
en Profundidad
sin Carga
Ranuras de
Montaje para
el Borde Gufa
51/2 pulgadas
HusiHo de Hoja
5/8 pulgada
Profundidad
de corte a 45 °
13/16pulgada
Profundidad
de corte a 90 °
15/8 pulgada
Entrada
de biselado
de Cargador
indice de carga
Se ha dado maxima prioridad a la seguridad, desempe_o y confiabilidad en el dise_o del este
producto, Io que facilita su mantenimiento y funcionamiento.
48
3400 RPM
Di&metro de maHoja
Angulo m_ximo
Clave de
Tuerca Hexagonal
caracteristicas:
7. Grande base de acero sellado que ofrece estabilidad y se desliza suavemente.
8. Mango posterior y Mango de asistencia delantero, contorneados
y dise_ados
ergon6micamente,
de agarre suave para un agarre seguro, control,balance y confort.
9. Incluye hoja de acero Craftsman® 24 dientes con punta de carburo de tungsteno
de uso combinaci6n para cortes rapidos, y lisos.
10. Bloqueo superior del husillo de la hoja ensamblada para cambios f_iciles de la hoja.
11. Conducto de eyeccion de aserrin incororado con Tapa de cubrir Saque la tapa para
expulsar el aserrin a la trasera de la sierra o deja la tapa entacto para expulsar el asserin
hacia abajo, de los protectores de las hojas. Saque la tapa para sujetar 11/4-pulgada
manguera de vac, vendido separado (ver Pgtgina 61 )
12. Rodamientos esfericos permanentemente
lubricados a1100% para un
funcionamiento ininterrumpido y de larga duraci6n.
13. Engranajes maquinados duraderos para una transmisi6n de energia eficiente.
14. Carcasa durable, de alto impacto ayuda a proteger la herramienta de daho y reduce el
peso.
15. Cartucho de bateria de niquel-cadmio
recarga en 3 a 6 horas bajo el uso normal y luz
LED en soporte de carga indica cuando bateria estb, cargando.
Escala del Bisel
Protector
ofrece las siguientes
4. Protector Superior de la hoja aluminio moldeado y Protector Inferior de plb,stico para
mayor fuerza y durabilidad.
5. Freno Electrico detenga rotaci6n de la hoja instant&neamente cuando suelta el gatillo.
6. Interruptor de Gatillo con Boton de Fijar Poder ayuda con proteger contra
encendios accidentales.
Eyeccion con Tapa
de Cubrir (Saque la
tapa y sujeta a
11/4-pulgada
manguera, vendido
separado)
Protector Superior
de la Hoja
Inalambrica
1. 3400 RPM (velocidad sin carga) ofrece fuerza y torque para cortes rb,pidos y seguros
en madera, madera contrachapada, madera prensada y materiales a base de madera.
2. Ajustes r_ipidos para profundidad
de corte con una profundidad
maxima de
corte de: 13/16 pulgadas a 45°; 1518pulgadas a 90 °
3. Escala para corte en bisel de fAcil lectura se ajusta desde 0° hasta 50 ° capacidad
biselado.
50 °
120V, 60Hz AC
3 a 6 Horas
49
I
I
I
z_ ADVERTENSIA:
Una hoja de 51/2pulgadas es la capacidad maxima de las hojas
para su sierra. Una hoja m_isgrande que 51/2pulgadas entrar_i en contacto con los
protectores de la hoja. Adem_is, NUNCA use una hoja tan gruesa que previene que la
arandela de la hoja exterior se ajuste al lado piano del husillo. Hojas demasiado grandes
o demasiado gruesas podrfan resultar en un accidente y ocasionar lesiones graves.
HOJAS DE SIERRA
Toda hoja de sierra debe mantenerse
limpia, afilada y ajustada adecuadamente
para que corte eficientemente. El uso de
una hoja sin filo pone tension en exceso
en la sierra e incrementa el peligro de
rebote. Guarde hojas adicioinales a la
mano, para tener siempre hojas afiladas
disponibles. La goma y paz negra
endurecida sobre la hoja frena la sierra.
Use agua caliente o kerosene para
retirarlos. NO use gasolina.
El protector
rn,_s bajo
de la
hoja estfi
en
al hacer
®
SISTEIVlA DE PROTECCCION
DE LA HOJA (Fig. 3)
_-
El protector mas
bajo de la hoja
contrae
automaticamente
cuando se hace
un corte
La Hoja tiene 1/4-pulg.
El protector mas bajo de la hoja,
o menos exponido por
adherido a su sierrra circular, esta alli
debajo de pieza de trabajo
para su protecci6n. NUNCA debe ser
alterado por cualquier motivo. Si se lie lara a da_ar o comienza a girar lentamente, NO use
su sierra hasta que el daSo haya sido reparado o reemplazado. Deje SIEMPRE el protector
en su posici6n correcta de funcionamiento cuando use la sierra.
_'_ PRECAUCION:
NUNCA use la sierra cuando el protector no este funcionando
apropiadamente. El protector debe ser revisado para veriflcar su funcionamiento
apropiado antes de cada uso. Si la sierra cae al piso, verifique si el protector inferior y
parachoques han sufrido dahos en toda su configuracion de profundidad antes de usar
la sierra. NOTA: El protector funciona apropiadamente cuando se mueve libremente y
regresa prontamente a su posicion cerrada. Si por cualquier motivo su protector de
hoja inferior no se cierra libremente, Ileve la sierra a su cualquier Centro de Reparacion
Sears antes de usarla.
REBOTE...
QUE LO OCASIONA Y COMO AYUDAR A PREVENIRLO
(Fig. 4, 5 y 5a)
REBOTE _=m_>-
5O
1. El rebote es una reacci6n repentina debido a que la
hoja de la sierra esta.presionada, se atasca o esta mal
alineada, Io cual ocasiona que la sierra
descontroladamente se levante y salga de la pieza de
trabajo, hacia atra.s, hacia el operador.
2. Cuando la hoja est,. presionada o se atasca debido a
que la Ifnea de fractura se cierra, la hoja se atasca y la
reacci6n del motor empuja la unidad ra.pidamente
hacia atra.s, hacia el operador.
3. Si la hoja se tuerce o esta. real alineada durante el
corte, los dientes en el borde posterior de la hoja
pueden hundirse en la parte superior de la superficie
de la madera. Esto ocasiona que la hoja escale hacia
afuera de la linea de fractura y salte hacia atra.s, hacia
el operador.
4. Aserrar en nudos de la madera o clavos en la pieza de
trabajo pueden ocasionar el Rebote.
5. Aserrar en madera mojada o deformada puede
ocasionar el Rebote (ver Fig. 5a).
Fig. 5 __
Soporte
Correcto
Fig.
6. Forzar un corte o no soportar la pieza de trabajo
correctamente puede ocasionar un Rebote(ver Fig. 5a).
7. El Rebote puede resultar del real uso de la herramienta y/o procedimientos o condiciones de
funcionamiento erradas. Puede evitarse al tomar las precauciones apropiadas que se lista a
continuaci6n.
Maneras para Ayudar a Prevenir el Rebote (Fig. 8)
sierra se bloquea. El rebote podria ocasionar
resultando en lesiones graves.
Si la hoja se atasca o si interrumpe un corte por
cualquier motivo, libere SIEMPRE el gatillo y
sostenga la sierra sin moverla en el material
hasta que la hoja se detenga por completo.
NUNCA intente retirar la hoja en movimiento, o
podHa ocurrir el Rebote. VERIFIQUE y tome las
acciones correctivas para eliminar la cause de
atascamiento de la hoja.
Profundidad Correcta de Ho a
(No debe excederse 1/4-pu g. deba o de la pieza de trabajo
_
Las Causas del Rebote cont.
Mantenga SIEMPRE un agarre firme con ambas
manos en la sierra (ver Fig. 6) y posicione su
cuerpo y brazes de manera tal que le permitan
resistar las fuerzas del Rebote. Las fuerzas del
Rebote pueden ser controladas per el operador,
si se toman las precauciones apropiadas.
Las Causas del Rebote
La Ho a se fija
demas ado profunda
REBOTE...
QUE LO OCASIONA Y COMO AYUDAR A PREVENIRLO
(Fig. 4, 5 y 5a) cont.
Fig. 4
51
que usted pierda el control de la sierra,
Fig. 6
t
Manoras tm_'a Ayudor a Pmvonlr ol Robo{o (Fig 6} cord
PARA CARGAR
3 In_pec_Irano 1,3pJoz_d_ _f_o
p_II_ v_ri(icaf si exi_lo p_s onc_] do iludo_ o ctavo_8ttl_ do
col(.w Nu_ca cD(|ou_l nudo o ¢_v_
SO Onvi_ e( C_dUChO_ b_(Or_S p_t_ l}_h3 hol(ilI_'_lonlB con t_t_acul_diCi_ do Ca(g_ b,3_I
pnm eviblr p_slbl_ pmb]_m_s, Pot Io tt_nlo, dobm'|r_ cargar o _nr_ noc_ nn]_ do gt]llz_r.
4 NO code medo_a do_Jma0a o mot_a (_ Fi_ b_)
5 Soporle $1EMPRE p_nelo_; grandos pain minin_iza(ol de_go do ql_o _ hoja quede aplo_ada y
t_ebollL Lu_ panoi0_g_t_do_, l(onon _a!ondot_la a ¢om_(na_o b0 o _lt ptoptopeso
{w aFiI).5(I!.D_EIECOO¢_I _op0do_do an (_ parm u_oc_t:a
a _If_t_do_ol
_yo o
csrc_ dol b0_do el panel (v_ F g 5
AI _einic_f 01c_rte o¢_la pll_Z_d_ llat3_ o, CENTRE la do_ on _aItno=l do (n_l¢_lay a_Pgl_o
Bla_o_,,podda cami_tart_a¢i_at;iba o _obola_ do_d_ )_ pie_ do l(Bbajo _1ettc_ndor
EL CARTUCHO
DE BATER[AS
(Figs
8 y So)
Espom vados clc_os (fun¢lor=amll_nl_ sogu]L_o do rocarga) p_.ra quo t_ec_rguorl
ND'rA:
L_s ba_ortas no nlcanznr_n Io c_rga comp_nt_ In pdmom vo=quo so c_rg_,
complel_m_nl_*+
_l_porl_ _Jecarga meneton_d_ ¢_nI_ p_Dfm'l _0
....
o,o,o
dom0=o.o,
oo,
do
ooo,o,o
_: A_0g_)t0._O dO q_a O1s_mlni_l_o do onolgta
8 USE PI_ECAUCt_N EXTItA _,_hr_)
_r_"C_fl_ d_ _ _,_/_ _,_ paIl_do_ _x_l_lo_
u _hl:_.__)_
_) MANTENGA la ho_ on t_ conl_gtJmcl6ndo proh_ndidodcolmcla. _ cunl(gutacl6ndo
probn_da_ no d_b_ exc_d_r I/4 pl_lgad_dobbin _el mnloda) qo_ _o esl_ corlnndo (vor FI0 Gal
ASEGURASI_ que )a pmlund)dod do )a ho _ y _;1_pata_at_ do _!OdUel_do _ u_te er_t_n
);r_t_da_y _ogut_s ANTICS de (o_tizar oi code 8i ol a _t0 d_ la h_ _o munro dul_nle ol
cD_fn,podd_ _c_n_3f ql_0 a _ola _ a_a_qut_y Flabolr_
"
jt,J
:
_J
7/
.
'
do calga. A_in_o 1_O_lri_ _)ovstf_ d_l c_Hucho
5 Prol_tor_oOlCadlicIlo
d_ b_l_'rl_s on _I_l_pott_
do c_ ga e, so_u(_duse
do _u_ los c_n_aclos
SACANDO
EL CARTUCHO
Ptofund(d_lJcarfft_Inrio HO
DE EIATER[AS
WARNING:
Slompro sltca ¢d
c_rtuch_ do b_terf_s do (_ _t_tt_t
ollme_t_cl6_ cu_ndo u_led _s16
on_alnbl_ndo p]ozas hn¢(ond_ _j_sle_,
I _ns(n(n_do o ratlr_ndo hoJ_s, (/mp)_do_a
lu_
_do y
eel6c_
(FIG. 7)
i
_
acado
,-
'r_)
_,L_
_,_-_
-_r_/ _I-_-.
-:_
_'" -.*_1_(_
_ I) /
:;
1"" /
vnldoLEDoncJ_tlas_(amonteslh_y
CIRCULAR
. .
-
"_t,,._'_
LED
_)
so ca_gn E_lO05 no_ma_
g No co_oqgo elt_oOoflo
do C_lgt_a_ i;ni'Iroa
da cnlot0 ltioex!(nmD,F_C}_t_t_
un_ le_poralurn nmblenlo normal
10 Cttando elcall[_cho do b_Iodas 80 ca_ga comp_elamenlo, dosenculo
do(_umfnlstro
do on_g_a y _aque alcarlu_hta
do bailldml
NOTA: I_f no funclonnn adocuod_monto
c_luch_ do_al_r(_
y pros_
Tire hact_
_lr_5 _n _t c_d_cho d_ b_(nr(n_ miontras
pi_l_nndo Ins so_IKO,_pnr._ _ll_r el Carl=_ch_
52
....
!:;J
7 Oo,_(_i#_
dOl IISOflorins],
,qotoqufomn 3 hofzl_
o mono_,dr_ cn_a papa ca_g_t cornptolnm_nl8 el
C:arlllcl_ do batodo_, S_ _e doscnrg_ complc(,lmonle o) caducho da batorias so
t_qu)e(en 8 ho_aSO nllt_ de liompo do ca_g_ pnra calgar cumpletamonte ol ce r(_._l'o do
baleda_
8 _ _fll/C)_g dl_b_(eda_O_lor_}ovamonlo lib_o
_llncll_
mionl_
y no _tdic_ un_ probIem_
s(erra para pte,v_nh' qtJor_ enc[_l_d_
tlccldorl)_lmo_tl_, (o t:l_( oc_lF_onl_rln
o cuaf_do no o_(6 en uso. De.conjoin t_
st_slono_ p_rs_n_c_osg_vos.
I
DE LA SIERRA
'
nd cado _s un_ vardo y una O)_lCu._ndo So
por_t_Otc_i_Ichudo ba!odas on el supo_to do
c_rga la (U;_rOa LED onclendm IndJca_qua e_
Cuand_
I_ IIo_ =_efl r_
Ii:_
pUnlo de vont._ Cmlt_m_l
_lio)ot
n
el supor_odo ca_g_
1_1_lucks LED dot _oporto do cnrgn o ,al
pt_tt__U ropo_l¢16n.
53
(
CARGANDO
UN CARTUCHO
DE BATER{AS
CALIENTE
HACER
Cuando utiliza su herramienta continuamente, las bater_as del cartucho de baterias se
calentaran. Debe dejar enfriar un cartucho de baterias caliente durante aproximadamente
30 minutos antes de intentar recargar.
AJUSTES
DE LOS CORTES
EN PROFUNDIDAD
(Figs.
11 y 11a)
Use SIEIVlPRE la configuraci6n de profundidad de hoja correcta. La configuracion de profundidad
correcta de la hoja no debe ser mas de 1/4 pulgada por debajo del material que se est,. cortando
(ver fig. 4). Permitir una mayor profundidad incrementara, la posibilidad de rebote y ocasionara.
que el corte no sea presico. Su sierra esta.equipada con una esala para cortes en profundidad
que ofrece una mayor precision para la profundidad de corte. La escala para profundidad de corte
esta. ubicda en la parte interna
posterior del protector
superior de la hoja.
NOTA: Un cartucho de baterias caliente solamente ocurre cuando el uso continuo de su
sierra causa que las baterias se calineten. No ocurren bajo circunstancias normales.
Remitase a "Para cargar el cartucho de baterias" para la recarga normal de baterias. Si el
soporte del carga no carga su cartucho de baterias bajo circunstancias normales, regrese
tanto el eartucho de baterias como el soporte / transformador de carga a la tienda Sears u
otto punto de venta de Craftsman para su reemplazo gratis.
Fig.ll
PARA INSTALAR
EL CARTUCHO
DE
BATER{AS EN LA SIERRA CIRCULAR
(Fig. 9)
Fig. 9
1. Coloque el cartucho de bater_as en la sierra,
alineando la estria elevada del cartucho de
baterias con la ranura en la sierra.
Abrazadera con
Escala de
Profundidad-de-Corte
2. Asegurase que los cierres se encajen a
presiSn hacia lugar, y el cartucho de bateria
se asegura en la sierra antes de empezar la
operaci6n.
Perilla de
Ajuste
Profundidad
INTERRUPTOR
DE GATILLO
CON
BOTON DE FIJAR PODER (Fig. 10)
Fig. 10
Para ENCENDER la sierra, pulsa el bot6n de
fijar poder y pulsa el interruptor del gatillo.
Boton de
Interruptor
de Fijar
Base
Para Levantar
Para Bajar
PARA CONFIGURAR
La sierra queda ENCENDIDO mientras como
que sigue pulsando el interruptor del gatillo.
Para APAGAR la sierra, suelta el interruptor
del gatillo.
LA PROFUNDIDAD
DE LA HOJA (Fig. 11a)
1. Afloja la Perilla de Ajuste Profundidad
(ver Fig. 11).
2. Ubica la escala en la abrazadera ubicado en la
trasera del dispositivo protector de hoja
(ver Fig. 11).
3. Para determinar la Profundidad-de-Corte,
sujeta el base de la sierra piano, sobre y contra
el borde de la pieza de trabajo.
4. Levante o baje la sierra hasta que la marca de
flecha del indicador en la trasera del dispositivo
de hoja m_.salta alinee con la marca de
pulgada en la Escala de Profundidad-de-Corte
en la Abrazadera a su profundidad deseada
(ver Fig. 1la).
5. Apriete la perilla de ajuste de la profundidad.
/!k PRECAUCION:
Cuando coloque el cartucho de baterias en la sierra,
asegurase de que la estr{a elevada del cartucho de baterias se encuentre alineada
con la parte inferior de la sierra y los seguros en su lugar de manera adecuada. La
instalaci6n incorrecta del cartucho de baterias puede causar daSosa los
componentes
internos.
flecha en la
_f_
parte posteriora IS_
del protector
de la hoja
Fig. 11a
Z_ ADVERTENSIA:
Las Herramientas Inalambricas
siempre se encuentran en
condiciones de funcionamiento
cuando el cartucho de baterias se instala en la
herramienta. Por Io tanto, el Interruptor
de Gatillo Con Boton De Fijar Poder debe
ser en la posicion central, fijando el poder apagado, cuando la herramienta
no es
adentro uso y usted Io esta Ilevando al lado suyo.
/!k ADVERTENSIA:
condiciones
herramienta.
herramienta
Las Herramientas Inalambricas siempre se encuentran en
de funcionamiento
cuando el cartucho de bater{as se instala en la
Por Io tanto, el cartucho de baterias debe ser sacado cuando la
no es adentro uso y usted Io esta llevando al lado suyo.
55
54
I
I
I
COMENZANDO
UN CORTE
(Fig.
PARA AYUDARLE A MANTENER EL CONTROL cont.:
12)
=
/k
m
9. Una vez finalizado el corte, libere el gatillo y deje que la hoja se detenga por completo. NO
retire la sierra de la pieza de trabajo mientras la hoja contint)e en movimiento.
ADVERTENCIA:
Sujete y soporte SIEMPRE la pieza de trabajo de manera
I
segura. Mantenga SIEMPRE control adecuado sobre la sierra. No sujetar y soportar la
pieza de trabajo la perdida de control sobre la sierra poddan resultar en lesiones graves.]
_AI
aserrar una pieza de trabajo, el protecyor inferior de la hoja NO
cubra la parte inferior de la hoja que sobresale de la pieza de trabajo (ver Fig. 4,
pagina 50). Mantenga SIEMPRE sus manos y dedos lejos del area de corte. Cualquier
parte de su cuerpo que entre en contacto con la hoja en movimiento podria resultar
en lesiones graves.
1. SIEMPRE use su sierra con las manes posicionadas de manera correcta, con una mane
operando el interruptor gatillo y la otra sobre el mango delantero de asistencia (ver Fig.12).
/_ ADVERTENCIA:
Mantenga SIEMPRE el control apropiado sobre la sierra
para asegurar un aserrado mas seguro y facil. La perdida de control sobre la sierra
podria ocasionar accidentes que resulten en posibles lesiones graves.
i
J
HACIENDO
CORTES
CRUZADOSY
CORTES
AL FILO (Fig. 14)
=
2. NUNCA use la sierra con sus manos
posicionadas como se muestra en la
Fig. 13.
A
m
ADVERTENCIA:
Sujete y soporte SIEMPRE la pieza de trabajo de manera
segura. Mantenga SIEMPRE control adecuado sobre la sierra. No sujetar y soportar la
Fig. 12
I
pieza de trabajo la perdida de control sobre la sierra podrian resultar en lesiones graves.J
PARA AYUDARLE
EL CONTROL:
A MANTENER
1. SIEMPRE use su sierra con las manes posicionadas
(ver la Fig. 12).
1. SIEMPRE soporte la pieza de trabajo cerca
del corte.
de manera correctamente
z_
ADVERTENCIA:
Mantenga SIEMPRE el control apropiado sobre la sierra
para asegurar un aserrado mas seguro y facil. La perdida de control sobre la sierra
podr{a ocasionar accidentes que resulten en posibles lesiones graves.
2. SlEMPRE soporte la pieza de trabajo de
manera tal que el corte quede a su derecha.
3. SlEMPRE sujete la pieza de trabajo para que
no se mueva durante el corte. Coloque la
pieza de trabajo con el lade bueno hacia
abajo.
2. AI hacer cortes cruzados o cortes al file, alinee su Ifnea de corte con el lade derecho de
la muesca al lade del indicador 0° (ver Fig. 14).
3. En vista que el espesor de la hojas varian, HAGA UN CORTE DE PRUEBA en material
de desecho a Io largo de la Ifnea gufa para determinar de cu&nto debe separar, si es el
case, la hoja de la Ifnea guia para permitir que la Iinea de fractura de la hoja produzca u
corte precise.
i NOTA: El lado bueno de la pieza de trabajo es el lado del cual la apariencia es importante. ]
4. Antes de comenzar a cortar, dibuje una Ifnea
Fig. 13
guia a Io largo de la Ifnea de corte deseada,
luego coloque el borde delantero de la base
de al hoja en el parte de pieza de trabajo que
este s61idamente sorportada (ver Fig. 12).
5. NUNCA coloque la sierra sobre la parte de
la pieza de trabajo que caerb, al realizar el
corte (ver Fig. 13).
6. Sostenga la sierra firmemente con ambas
manos (ver Fig. 12).
7. Apriete el interrupter de gatillo encender la
sierra. SIEMPRE deja que la hoja alcanza
velocidad plena antes de empezar el corte en
Incorrecto
la pieza de trabajo.
8. AI hacer el corte, SIEMPRE aplique una presiSn estable y equitativa. Ferzar la sierra
producirA cortes imprecisos y podrfa acortar la vida Qtil de la sierra u ecasienar el rebote.
i
Fig. 14
,'_
Dnea de Corte
i
0 o
HACER CORTES AL FILO
SIEMPRE use una gu_aal hacer cortes al file largos o anchos con su sierra. Puede usar un
borde recto o usar la gufa de borde que se incluy6 con su sierra.
57
56
I
I
I
COMO CONFIGURAR
DEL BISEL (Fig. 17)
USO DE UN BORDE RECTO (Fig. 15)
EL ANGULO
1. Saque el cartuchode baterias de la sierra
segura. Mantenga SIEMPRE control adecuado sobre la sierra. No sujetar y soportar la
Z_
y soporte
la pieza resuitar
de trabajo
de maneragraves.
piezaADVERTENCIA:
de trabajo la perdida Sujete
de control
sobre SIEMPRE
la sierra podrian
en lesiones
1. Puede hacer una gufa para corte al filo
eficiente sujetando un borde recto a su
pieza de trabajo.
2. Cuidadosamente, guie la sierra a Io
largo del borde recto para obtener un
corte al filo recto (ver Fig. 15).
3. SIEMPRE DEJE QUE LA HOJA
ALCANCE SU M,_X[MA VELOCIDAD,
luego cuidadosamente guia la sierra en
la pieza de trabajo. NO atasque la hoja
en el corte. Empuje la sierra hacia
adelante a una velocidad a la cual la
hoja no este trabajando en exceso.
INSTALACION
/!k ADVERTENSIA:
NO sacar el
cartucho de baterias de la sierra podria
resultar en el encendido accidental,
causando lesiones personales graves.
Fig. 15
Fig.
17
Palanca de Ajuste de Bisel
2. Pone el interruptor del bloqueo-apagado en la posici6n central para fijar el poder apagado.
3. Afloje la palanca de ajuste del bisel (ver la Fig.17).
4. Levante el extremo de la cubierta del motor de la sierra hasta que alcance el angulo deseado en la
escala del bisel.
5. Apriete la palanca de ajuste del bisel de manera segura.
HACIENDO CORTES DE BISEL (Fig. 18)
Borde Recto
m
Linea de Corte --',
Indicador de
Y USO DE LA GU[A DE BORDE
(vendido
pot separado)
Fig. 18
(Fig. 16)
1. Saque el cartucho de baterias de la sierra.
[ resultar
Z_ ADVERTENCIA:
en el encendido
NO sacar e,causando
cartucho lesiones
de bateriaspersonales
de la sierra
podria
accidental,
graves.
1
2. Posicione el Interruptor de Gatillo con Boton de Fijar Poder en la posicion central para fijar el
poder en apagado.
3. Posicione la guia de borde de manera tal que el brazo con los incrementos en pulgadas este
de cara hacia arriba. Deslice el brazo
de la guia de borde en las ranuras de
Fig. 16
montaje en la parte delantera de la
base de la sierra (ver Fig. 16).
4. Ajuste la guia de borde a la Iongitud
de corte deseada.
[
5. Apriete la guia de borde con el tornillo
de sujecion
6. Sujete y soporte la pieza de trabajo
de manera segura antes de realizar
el corte.
3. Desde como el espesor de hojas vgtria y distintas a.ngulos requieren distintas configuraciones,
/iX ADVERTENCIA:
Sujete y soporte SlEMPRE la pieza de trabajo de manera
segura. Mantenga SIEMPRES control adecuado sobre la sierra. No sujetar y soportar la
pieza de trabajo y la perdida de control sobre la sierra podrian resultar en lesiones graves.
1. La sierra puede ajustarse para cortar a cualquier gmgulo entre 0 ° y 50 °. AI hacer cortes biselados
de 48 °, hay una muesca en la base de la sierra ayudar con alinear la hoja con la Ifnea de corte
(ver Fig. 18).
2,
Alfnea su Ifnea de corte con el lado izquierdo de la muesca cerca del indicador
cortando los biseles.
de 48 ° cuando
HAGA UN CORTE DE PRUEBA en material fragmento contra la linea de gufa determinar
cuanto, si cualquier, debes de compensar la hoja de la Ifnea de gufa dejar para la Ifnea de
fractura de la hoja obtener un corte preciso.
AI realizar un corte de bisel SOSTENGA
7. Coloque la guia de borde firmemente
ue Gufa de
contra el horde de la pieza de trabajo
Borde / Filapor
(ver la Fig.16). Hacer esto le dara un
Gufa de Borde / Fila
Ranuras
corte verdadero sin apretar la hoja.
8. ASEGURESE de que el borde guia de la pieza de trabajo este recta para obtener un corte a
la recta.
la sierra FIRMEMENTE
con ambas manos (ver la Fig. 18).
Reestablezca el borde delantero de la base de la pieza de trabajo, luego apriete el gatillo para
encender la sierra. SIEMPRE permita que la hoja alcance su maxima velocidad, LUEGO gufe
la sierra en la pieza de trabajo.
6. Una vez completado
el corte, libere el interruptor gatillo y permita que la hoja se detenga por
completo en el corte. NO retire la sierra de la pieza de trabajo mientras la hoja continue en
movimiento. DaSarfa su corte en bisel y podrfa ocasionar el Robots
I
9. PERMITA SIEMPRE QUE LA HOJA ALCANCE SU M._XIMA VELOCIDAD, luego
cuidadosamente guie la sierra en la pieza de trabajo. NO atasque la hoja en el corte.
Empuje la sierra hacia adelante a una velocidad a la cual la hoja no este trabajando en exceso.
z_ADVERTENCIA:
Si la hoja entra en contacto
con la pieza de trabaje antes de
alcanzar su maxima velecidad, podria ocasionar que la sierra rebote hacia usted,
resultando en pesibles lesiones graves.
59
58
I
I
I
HACENDO
/_
CORTES
DE BOLSILLO
(Fig.
19)
REMOCION
DE ASSER{N
(Figs.
• Saque el cartucho de baterias de la sierra•
ADVERTENCIA:
SIEMPRE ajuste la configuracion
del bisel en cero antes de
hacer un corte de bolsillo. Intentar un corte de bolsillo en cualquier otra
configuracion
podria resultar en perdida de control de la herramienta y consiguientes
lesiones graves.
/_
ADVERTENSIA:
resultar
en el encendido
NO sacar el cartucho
accidental, causando
Fig. 20
1. Ajuste en cero la configuracion del bisel, establezca la configuracion de profundidad correcta
de la hoja, luego use la palanca del protector inferior de la hoja para oscilar el protector
hacia arriba.
l palanca
_ ADVERTENCIA:
SlEMPRE
para evitar lesiones
graves. levante el protector
2. Mientras sostiene el protector inferior
de la hoja hacia arriba desde la
palanca, descanse la parte delantera
de la base de la hoja plana contra la
pieza de trabajo con el mango
posterior levantado para que la hoja no
toque la pieza de trabajo (ver la Fig. 19).
inferior de la hoja desde la
20 y 20a)
de bater{as de la sierra podr{a
lesiones personales graves.
Fig. 20a
1
Fig. 19
Su sierra incluye un portillo de eyeccion de aserrin incorporado en la sierra con una tapa de
cubierta. El aserrin ser_. eyectado hacia abajo del los dispositivos protectores de las hojas con la
tapa de cubierta sujetado al portillo.
Si quitas la tapa de cubierta (gire para ajlojar y aprietar) el asserin sera eyectado del portillo y
desde la trasera de la sierra•
Palanca
3. Apriete el interruptor gatillo para
encender la sierra• SlEMPRE permita
que la hoja alcance su maxima
velocidad, luego lentamente baje la
hoja sobre la pieza de trabajo hasta
que la base este plana contra la pieza
de trabajo A MEDIDA que la hoja
penetra en el material, usted DEBE
liberar la palanca del protector inferior de la hoja.
Saca la tapa para sujetar una manguera de 11/4-pulgada para aspiradora hemedo / seco
(los dos vendidos por separado).
z_ ADVERTENClA:
debe ser realizada
4. Una vez completado el corte, libere el gatillo y permita que la hoja se detenga por completo.
Una vez detenida la hoja, retirela de la pieza de trabajo. Si las esquinas de su bolsillo no se
han cortado por completo, use una sierra manual para darle el acabado alas esquinas.
,/_ ADVERTENSIA:
Siempre saque el eartucho de batedas de la herramienta
cuando ensamblando
partes, haciendo ajustes, ensamblando
o saeando hojas,
limpiando o cuando no estzi en el uso. Esto previene el encendido accidental, que
pueda causar lesion personal grave.
i
i levantada.
z_ ADVERTENCIA:
NUNCA amarre
el protector
inferior graves.
de la hoja en posicion
Dejar la hoja expuesta
podria resultar
en lesiones
•/_ ADVERTENCIA:
Use siempre gafas de seguridad o gafas con protectores
laterales durante las operaeiones con herramientas electricas, o al soplar el polvo.
Si la operacion es polvorienta, use tambien una mascara anti-polvo.
Para asegurar seguridad y confiabilidad, toda reparacion
por tecnicos ealificados en un Centro de Servicio Sears.
1
|
MANTENIMIENTO
DE RUTINA
/_ ADVERTENCIA:
NO permite en ningun momento que fluido de frenos,
gasolina, productos a base de petroleo, aceites penetrantes, etc. entren en contaeto
con las piezas plasticas. Los qu{mieos pueden daSar, debilitar o destruir el plastico,
Io cual podria resultar en lesiones personales graves.
i
1
1. Saque el cartucho de baterias de la sierra.
2. Una vez finalizado el trabajo, limpie la herramienta para permitir un buen funcionamiento
de la herramienta a Io largo del tiempo.
3. Use paros limpios y ht]medos para limpiar la herramienta.
4. Mantenga las aberturas de aire del motor libres de aceite, grasa y aserrfn o astillas de
madera y guarde la herramienta en un lugar seco.
5. Asegurese de que todas las piezas m6viles esten bien lubricadas, particularmente
despues de una exposici6n larga a condiciones de humedad y/o suciedad.
61
60
I
I
I
I
I
CAMBIANDO
LA HOJA
CAMBIANDO
(Fig. 21 y 21a)
Fig. 21a
8. La arandela restante es la arandela para buje que encaja alrededor del eje del husillo y
no requiere ser retirada.
9. Coloque una gota de aceite sobre la arandela para buje interna y sobre la arandela "D"
externa donde tocaran la hoja.
10. Coloque la nueva hoja de sierra en el protector de hoja inferior, sobre el eje del husillo y
contra el buje interne.
Fig. 21
Husillo
Fijaci6nde Huaillo
NOTA: Los dientes de la hoja deben apuntar hacia arriba en la parte delantera de la
hoja segun se muestra en la (Fig. 21).
Arandela Externo"D"
NOTA: NUNCA use una hoja demasiado gruesa como para permitir que la arandela
"D" entre en contacto con el lade piano del husillo.
Llave Hexagonal
Rotaci6n de Hoja dientes apuntan
hacia arriba en la parte delantera
z_ ADVERTENSIA:
NO sacar el cartucho de baterias de la sierra podria
resultar en el encendido accidental, causando lesiones personales graves.
utiliza la hoja de la sierra. La hoja puede lastimarle las manes si no estan
ASEGURASE de protegerse con guantes de trabajo
i Z_
ADVERTENSIA:
protegidas.
LUBRICACION
Todas los rodamientos en esta herramienta han side lubricados con lubricante de alto grade
suficiente para la vida util de la herramienta en condiciones normales de operaci6n. Por Io
tanto, no se requiere de ninguna otra lubricaci6n.
1. Saque el cartucho de baterfas de la sierra.
baterias
ANTES de instalar partes, realizando
ajustes, armado o sacado
de hojas,
BATERfAS
limpiando,
o cuando no esta
en el uso.
Sacando
el cartucho
de baterias
prevenira
i Z_
ADVERTENSIA:
SIEMPRE
apague
y desconecte
la sierra
del cartucho
de
arranque
accidental,
J
11. Reemplace la arendela "D".
12. Mantenga firmemente pulsado el bot6n de bloqueo del husillo mientras reemplaza el
tornillo del husillo y aprietelo a mano en direcci6n del reloj. Luego, use la Ilave de la hoja
para apretar por completo el tornillo de sujeci6n del husillo.
Tomillode Sujeclon.
de Husillo"A"
mientras
LA HOJA (Fig. 21 y 21a) cont.
que pueda causar lesiones
El cartucho de baterfas para esta sierra esta. equipado con baterfas recargable de
nfquel-cadmio. Longitud del servicio dependerb, en el tipo de trabajo que haces.
personales graves.
2. Coloque la sierra en su lado en un superficie piano.
Las batedas en esta herramienta se han disehado proporcionar a vida maxima del apuro
libremente. Sin embargo, como todas las baterfas, desgastaran eventual hacia fuera. NO
desensamble el cartucho de baterfas y intentar reponer las baterfas. Manejo de estas
baterias, particularmente al Ilevar los anillos y la joyeda, puede resultar en una quemadura
grave.
3. Afloja la palanca de ajuste de corte en profundidad, levanta la sierra toda la manera y
apriete la palanca. Esto le da un acceso mAs fAcil al Area de montando la hoja
(ver Fig. 21).
4. Coloque la sierra arriba, en su base yen un superficie piano (ver Fig. 21).
5. Afloja el Tornillo de Sujeci6n del Husillo "A", pulsa el bot6n de sujeci6n de husillo
(vet Fig. 21a). Coloque la Ilave de hoja en el tornillo de sujeci6n del husillo "A". Mueve la
Ilave de hoja hacia adelante y hacia atras hasta que sientas el bot6n de sujeci6n de husillo
pulsa mAs bajo y fija la hoja en posici6n asi que puede sacar el tornillo de sujeci6n del
husillo. Quedando el bot6n de sujeci6n de husillo pulsado, da vuelta al tornillo de husillo
contra el sentido del reloj para sacar.
Para obtener la vida mas larga de las baterias, sugerimos
los siguientes:
1. Saque el cartucho de baterfas del sorporte de carga cuando sea bien cargado.
Para almacenamiento
de baterfa mas largo que 30 dias:
,, Almacena el cartucho de baterfas donde la termperatura
estA bajo que 80°R
,, Almacena el cartucho de baterfas en condici6n "descargada".
6. Levante el protector inferior de la hoja usando la palanca del protector de la hoja y
mantengalo en posici6n levantada durante le paso siguiente.
Vea la lista de partes en la mesa en la pagina 40 para el n0mero correcto para cartuchos de
baterias adicionales.
7. Saque totalmente el tornillo de sujeci6n de husillo "A" y la arandela externo "D" y hoja
(vet Fig. 21).
Hace un 6rden pot Sears Partes y Repuestos, llama 1-800-4-MYHOME
62
63
I
I
I
J
]
i
REMOCION
DE CARTUCHO
DE BATER[AY
PREPARACION
PARA
RECICLAJE
Z_ AVERTENCIA:
El ueo de conexiones
o acceeorios no recomendadoe
para
esta herramienta podrian ser peligroeoe y podrian reeultar en leeiones graves.
Para preservar recursos naturals, favor de reciclar o disponer por las bateffas correctamente.
Este producto contiene baterfas de niquel-cadmio. Leyes locales, de estado o federal pueden
prohibir la disposici6n de bateffas de niquel-cadmio en la basura.
Sears y otros puntos de venta Craftsman cuenta con una amplia selecci6n de hojas de
51/2 pulgadas Craftsman de acero con dientes con punta de carburo de tungsteno,
diseffadas para aplicaciones especfficas de corte.
Consulte su autoridad int]til local para informaci6n en cuanto a opciones disponibles del
reciclaje y/o de la disposici6n.
Sears y otros puntos de venta Craftsman tambien ofrecen cabrillas, escuadras de encofrado
y combinadas, bordes rectos, gufas de borde y una gran variedad de abrazaderas para
ayudarle con todas sus necesidades de aserrado.
/_ WARNING:
Sobre retiro, cubre los terminales del cartucho de bateriae con
cinta adhesiva resistente. No procure destruir o desensamblar el cartucho de
baterias ni remover ningun de eus componentee. Bateriae de niquel-cadmio
tienen
que ser reciclado o dispuesto adecuadamente.Tambien,
nunca toca los dos
terminalee con ojectos metales y/o partes de cuerpo, porque occura cortocircuito.
Mant_ngaioe lejoe de niSos, Incidente de conformaree con eetas adverteneias
reeultara en fuego y/o leeiones graves.
Visite su tienda local Sears u otto punto de venta Craftsman o compre
pot Internet en sears.com/craftsman.
51/2 Pulgadas Sierra Circular
Inalambrica
Modelo No.172.67098
En Equipo 9-11518
No. del item
,, La hoja estb, doblada.
,, La gufa de borde o gufa recta no se estb_usando.
Si la hoja se atasca o emite humo producto de la friccion:
,, La hoja no tiene filo.
,, La hoja est,. al reves
,, La hoja estb, doblada
- La pieza de trabajo no esta soportada adecuadamente.
,, Se esta. usando una hoja inadecuada.
64
Descripci6n
Cantidad
PERNO OPRIMA
1
2
CSC18GU-2
PESTANA
1
3
CSCl
8GU-3
HOJA DE SIERRA
4
CSCl
8GU-4
PESTANA INTERIOR
5
CSCl
8GU-5
ANILLO
6
CSCl
8GU-6
PROTECTOR
7
CSCl
8GU-7
RESORTE
DE TORSION
1
8
CSCl
8GU-8
TORNILLO
M5 X 16
2
EXTERNA
1
1
DE RETENIENDO
26
1
INFERIOR
1
CSC18GU-101
UNIDAD DE ENGRANAJE
9
CSCl
8GU-9
TAPA DE ENGRANAJE
10
CSCl
8GU-10
RODAMIENTO
11
CSCl
8GU-11
HUSlLLO
12
CSC18GU-12
ENGRANAJE
13
CSCl
TORNILLO
14
CSC18GU-14
ANILLO
15
CSCl
TORNILLO
102
CSC18GU-102
UNIDAD DE PROTECTOR
16
CSCl
8GU-16
RODAMIENTO
17
CSCl
8GU-17
PROTECTOR
18
CSCl
8GU-18
TAPA DE EXTRACTOR
19
CSCl
8GU-19
PERILLA
20
CSCl
8GU-20
RESORTE
21
CSCl
8GU-21
SELLO DEL FIELTRO
1
103
CSC18GU-103
UNIDAD DE MOTOR
1
8GU-13
8GU-15
1
1
ESFERICO
6000
1
1
1
AUTOEMPEZANDO
M6X20
DE GOMA
1
1
M 4 X 12
2
FIJADA
DE AGUJABK
061009
SUPERIOR
DE POLVO
FIJANDA
65
I
I
I
de Parte
CSC18GU-1
101
Si la hoja no sigue una linea recta:
,, Los dientes estb,n sin filo. Esto es producto de golpear objetos duros tales como clavos,
Io cual hace que los dientes pierdan el filo de un lado. La hoja tiende a cortar del lado
con los dientes ma.s afilados.
,, La base estb_fuera de Ifnea o doblada.
NtJmero de Parte
1
DE COMPRESION
1
1
1
1
1
1
51/2 Pulgadas Sierra Circular
Inalambrica
Modelo No.172.67098
En Equipo 9-11518
No. del item
22
NtJmero de Parte
CSC18GU-22
Descripci6n
PINON 1
de Parte
Cantidad
1
23
CSC18GU-23
MOTOR DC
1
24
CSC18GU-24
PERNO M6 X 901
25
CSC18GU-25
TUERCA
26
CSC18GU-26
MONTAJE DE BASE
1
1
27
CSC18GU-27
PERILLA
1
2
28
CSC18GU-28
ARANDELA
29
CSC18GU-29
PERNO M6 X 141
30
CSC18GU-30
REGLA DE FIJAR
31
CSC18GU-31
TUERCA
32
CSC18GU-32
TORNILLO
33
CSC18GU-33
PERNO M6 X 351
34
CSC18GU-34
ETIQUETA DE ADVERTENCIA
35
CSC18GU-35
CARCASA
IZQUIERDA/DERECHA
36
CSC18GU-36
ALAMBRE
INTERIOR
1
1
37
CSC18GU-37
ALAMBRE
INTERIOR
1
1
38
CSC18GU-38
ALAMBRE
INTERIOR
1
1
39
CSC18GU-39
ALAMBRE
INTERIOR
1
1
40
CSC18GU-40
TERMINAL
1
41
CSC18GU-41
INTERRUPTOR
1
42
CSC18GU-42
BOTON DE FIJAR
43
CSC18GU-43
RESORTE
44
CSC18GU-44
CLAVIJA
45
CSC18GU-45
ETIQUETA CLASIFICADO
47
CSC18GU-47
LLAVE DE TUERCAS
1
1
48
CSC18GU-48
TORNILLO
4
4
49
CSC18GU-49
TORNILLO AUTOEMPEZANDOST 3.5 X 30
1
50
CSC18GU-50
TORNILLO AUTOEMPEZANDOST 3.5 X 20
7
51
CSC18GU-51
TAPA TRASERA
1
52
CSC18GU-52
ETIQUETA DE MARCA
104
CSC18GU-104
18VCARTUCHO
105
CSC18GU-103
18 V SOPORTE
M6
\
1
DE FIJAR
Circular Inalambrica
En Equipo 9-11518
\
1
1
1
2
M3
51/2 Pulgadas Sierra
Modelo No.172.67098
2
1
1
1
M3 X 10
\
1
1
1
1
1
1
1
DE COMPRESION
M4 X 50
\
1
1
DE GOMA
1
11
1
1
1
1
1
1
1
DE BATERfAS
DE CARGA
1
\
1
\
\
1
1
1
1
1
\\
\
66
67
I
I
I
Your
For expert troubleshooting
Home
and home solutions advice:
www,managemyhome.com
For repair - in your home - of all major brand appliances,
lawn and garden equipment, or heating and cooling systems,
no matter who made it, no matter who sold it!
For the replacement parts, accessories and
owner's manuals that you need to do-it-yourself.
For Sears professional installation of home appliances
and items like garage door openers and water heaters.
1-800-4-MY-HOME
T_
SM
Trademark
/ ' Trademark
/
Service Mark of Sears Brands,
T_I
SM
® Marca Registrada
/
Marca de F&brica /
Marca de Servicio
de Sears
MC Marque de commerce
/ MD Marque
deposee
de Sears Brands
LLC
® Registered
® (1-800-469-4663)
LLC
Brands,
LLC
© Sears
Brands
LLC
I
I
I