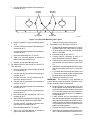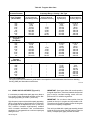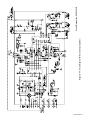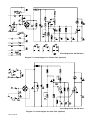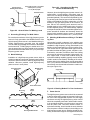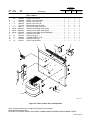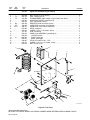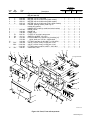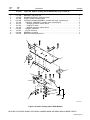
1
OM-530J May 1993 Eff. w/Serial Number KC237900 Processes TIG (GTAW) Welding Stick (SMAW) Welding Description Enables Welding Power Source to provide TIG as well as Stick capability TIG-RIG(Basic) Models And Models With Optional Pulser And Electroslope Shielded Metal Arc (Stick) Welding Automatic Welding From Miller to You Thank you and congratulations on choosing Miller. Now you can get the job done and get it done right. We know you don’t have time to do it any other way. That’s why when Niels Miller first started building arc welders in 1929, he made sure his products offered long-lasting value and superior quality. Like you, his customers couldn’t afford anything less. Miller products had to be more than the best they could be. They had to be the best you could buy. Today, the people that build and sell Miller products continue the tradition. They’re just as committed to providing equipment and service that meets the high standards of quality and value established in 1929. This Owner’s Manual is designed to help you get the most out of your Miller products. Please take time to read the Safety precautions. They will help you protect yourself against potential hazards on the worksite. We’ve made installation and operation quick and easy. With Miller you can count on years of reliable service with proper maintenance. And if for some reason the unit needs repair, there’s a Troubleshooting section that will help you Miller is the first welding figure out what the problem is. The parts list equipment manufacturer in will then help you to decide which exact part the U.S.A. to be registered to the ISO 9001 Quality System you may need to fix the problem. Warranty and Standard. service information for your particular model are also provided. Miller Electric manufactures a full line of welders and welding related equipment. For information on other quality Miller products, contact your local Miller distributor to receive the latest full line catalog or individual catalog sheets. To locate your nearest distributor or service agency call 1-800-4-A-Miller, or visit us at www.MillerWelds.com on the web. Working as hard as you do – every power source from Miller is backed by the most hassle-free warranty in the business. Miller offers a Technical Manual which provides more detailed service and parts information for your unit. To obtain a Technical Manual, contact your local distributor. Your distributor can also supply you with Welding Process Manuals such as SMAW, GTAW, GMAW, and GMAW-P. TABLE OF CONTENTS SECTION 1 – SAFETY PRECAUTIONS AND SIGNAL WORDS 1-1. General Information And Safety . . . . . . . . . . . . . . . . . . . . . . . . . . . . . . . . . . . . . . . . . . . . . . . . . . 1-2. Safety Alert Symbol And Signal Words . . . . . . . . . . . . . . . . . . . . . . . . . . . . . . . . . . . . . . . . . . . 1 1 SECTION 2 – SPECIFICATIONS 2-1. Description . . . . . . . . . . . . . . . . . . . . . . . . . . . . . . . . . . . . . . . . . . . . . . . . . . . . . . . . . . . . . . . . . . . . 2 SECTION 3-1. 3-2. 3-3. 3-4. 3-5. 3-6. 3-7. 3-8. 3-9. 3-10. 3-11. 3-12. 3-13. 3 – INSTALLATION OR RELOCATION Site Selection . . . . . . . . . . . . . . . . . . . . . . . . . . . . . . . . . . . . . . . . . . . . . . . . . . . . . . . . . . . . . . . . . Transporting Methods . . . . . . . . . . . . . . . . . . . . . . . . . . . . . . . . . . . . . . . . . . . . . . . . . . . . . . . . . . Component Installation On Factory Installed Units . . . . . . . . . . . . . . . . . . . . . . . . . . . . . . . . . . Field Installation Of TIG-Unit . . . . . . . . . . . . . . . . . . . . . . . . . . . . . . . . . . . . . . . . . . . . . . . . . . . . Field Installation Of Pulser . . . . . . . . . . . . . . . . . . . . . . . . . . . . . . . . . . . . . . . . . . . . . . . . . . . . . . Field Installation Of Electroslope . . . . . . . . . . . . . . . . . . . . . . . . . . . . . . . . . . . . . . . . . . . . . . . . . Procedure For Remote TIG-Unit Installation . . . . . . . . . . . . . . . . . . . . . . . . . . . . . . . . . . . . . . . Field Installation Of Optional Preflow Timer . . . . . . . . . . . . . . . . . . . . . . . . . . . . . . . . . . . . . . . . Field Installation Of Optional Spot Timer . . . . . . . . . . . . . . . . . . . . . . . . . . . . . . . . . . . . . . . . . . Remote 14 Receptacle Information And Connections . . . . . . . . . . . . . . . . . . . . . . . . . . . . . . . Gas Connections . . . . . . . . . . . . . . . . . . . . . . . . . . . . . . . . . . . . . . . . . . . . . . . . . . . . . . . . . . . . . . Coolant Connections (Optional) . . . . . . . . . . . . . . . . . . . . . . . . . . . . . . . . . . . . . . . . . . . . . . . . . . 115 Volts AC Duplex Receptacle And Circuit Breaker . . . . . . . . . . . . . . . . . . . . . . . . . . . . . . . 2 2 2 3 5 6 7 8 9 10 10 11 11 SECTION 4-1. 4-2. 4-3. 4-4. 4-5. 4-6. 4-7. 4-8. 4-9. 4-10. 4-11. 4-12. 4-13. 4-14. 4-15. 4-16. 4-17. 4-18. 4-19. 4-20. 4 – OPERATOR CONTROLS Amperage Adjustment Control And Remote Amperage Switch . . . . . . . . . . . . . . . . . . . . . . . Polarity Switch . . . . . . . . . . . . . . . . . . . . . . . . . . . . . . . . . . . . . . . . . . . . . . . . . . . . . . . . . . . . . . . . Gas/Coolant Switch . . . . . . . . . . . . . . . . . . . . . . . . . . . . . . . . . . . . . . . . . . . . . . . . . . . . . . . . . . . . Gas/Coolant Postflow Control . . . . . . . . . . . . . . . . . . . . . . . . . . . . . . . . . . . . . . . . . . . . . . . . . . . Remote Hand Controls . . . . . . . . . . . . . . . . . . . . . . . . . . . . . . . . . . . . . . . . . . . . . . . . . . . . . . . . . High Frequency Switch . . . . . . . . . . . . . . . . . . . . . . . . . . . . . . . . . . . . . . . . . . . . . . . . . . . . . . . . . High Frequency Control . . . . . . . . . . . . . . . . . . . . . . . . . . . . . . . . . . . . . . . . . . . . . . . . . . . . . . . . Meters (Optional) . . . . . . . . . . . . . . . . . . . . . . . . . . . . . . . . . . . . . . . . . . . . . . . . . . . . . . . . . . . . . . Pulser Switch (Pulser Models Only) . . . . . . . . . . . . . . . . . . . . . . . . . . . . . . . . . . . . . . . . . . . . . . % “On Time” Control (Pulser Models Only) . . . . . . . . . . . . . . . . . . . . . . . . . . . . . . . . . . . . . . . . Pulses/Second Control (Pulser Models Only) . . . . . . . . . . . . . . . . . . . . . . . . . . . . . . . . . . . . . . Background Control (Pulser Models Only) . . . . . . . . . . . . . . . . . . . . . . . . . . . . . . . . . . . . . . . . . Electroslope (Electroslope Models Only) . . . . . . . . . . . . . . . . . . . . . . . . . . . . . . . . . . . . . . . . . . Electroslope Switch (Electroslope Models Only) . . . . . . . . . . . . . . . . . . . . . . . . . . . . . . . . . . . . Percentage Initial Amperage Control (Electroslope Models Only) . . . . . . . . . . . . . . . . . . . . . Percentage Upslope Rate Control (Electroslope Models Only) . . . . . . . . . . . . . . . . . . . . . . . Percentage Downslope Rate Control (Electroslope Models Only) . . . . . . . . . . . . . . . . . . . . . Percentage Final Amperage Control (Electroslope Models Only) . . . . . . . . . . . . . . . . . . . . . Preflow Time Control & Switch (Optional) . . . . . . . . . . . . . . . . . . . . . . . . . . . . . . . . . . . . . . . . . Spot Time Control And Switch (Optional) . . . . . . . . . . . . . . . . . . . . . . . . . . . . . . . . . . . . . . . . . . 12 12 12 12 13 13 14 14 14 14 14 14 16 16 16 16 17 17 17 17 SECTION 5-1. 5-2. 5-3. 5 – SEQUENCE OF OPERATION Gas Tungsten Arc Welding . . . . . . . . . . . . . . . . . . . . . . . . . . . . . . . . . . . . . . . . . . . . . . . . . . . . . . Shielded Metal Arc Welding With TIG-Unit . . . . . . . . . . . . . . . . . . . . . . . . . . . . . . . . . . . . . . . . Shutting Down . . . . . . . . . . . . . . . . . . . . . . . . . . . . . . . . . . . . . . . . . . . . . . . . . . . . . . . . . . . . . . . . . 18 19 19 SECTION 6-1. 6-2. 6-3. 6-4. 6-5. 6-6. 6 – MAINTENANCE & TROUBLESHOOTING Routine Maintenance . . . . . . . . . . . . . . . . . . . . . . . . . . . . . . . . . . . . . . . . . . . . . . . . . . . . . . . . . . . Tungsten Electrode . . . . . . . . . . . . . . . . . . . . . . . . . . . . . . . . . . . . . . . . . . . . . . . . . . . . . . . . . . . . Spark Gap Adjustment . . . . . . . . . . . . . . . . . . . . . . . . . . . . . . . . . . . . . . . . . . . . . . . . . . . . . . . . . Overload Protection . . . . . . . . . . . . . . . . . . . . . . . . . . . . . . . . . . . . . . . . . . . . . . . . . . . . . . . . . . . . Circuit Board Handling Precautions . . . . . . . . . . . . . . . . . . . . . . . . . . . . . . . . . . . . . . . . . . . . . . . Troubleshooting . . . . . . . . . . . . . . . . . . . . . . . . . . . . . . . . . . . . . . . . . . . . . . . . . . . . . . . . . . . . . . . 19 20 21 22 22 22 OM-530J - 5/93 SECTION 7 – ELECTRICAL DIAGRAMS Diagram 7-1. Circuit Diagram For TIG-Unit With Options . . . . . . . . . . . . . . . . . . . . . . . . . . . . . . . . . . Diagram 7-2. Circuit Diagram For Postflow Timer . . . . . . . . . . . . . . . . . . . . . . . . . . . . . . . . . . . . . . . . . Diagram 7-3. Circuit Diagram For Pulser (Optional) . . . . . . . . . . . . . . . . . . . . . . . . . . . . . . . . . . . . . . . Diagram 7-4. Circuit Diagram For Electroslope (Optional) . . . . . . . . . . . . . . . . . . . . . . . . . . . . . . . . . . Diagram 7-5. Circuit Diagram For Preflow Timer (Optional) . . . . . . . . . . . . . . . . . . . . . . . . . . . . . . . . . Diagram 7-6. Circuit Diagram For Spot Timer (Optional) . . . . . . . . . . . . . . . . . . . . . . . . . . . . . . . . . . . 24 25 25 26 27 27 SECTION 8-1. 8-2. 8-3. 8-4. 8-5. 8-6. 8-7. 8 – CERTIFICATION FOR HIGH FREQUENCY ARC WELDING EQUIPMENT General . . . . . . . . . . . . . . . . . . . . . . . . . . . . . . . . . . . . . . . . . . . . . . . . . . . . . . . . . . . . . . . . . . . . . . Definitions . . . . . . . . . . . . . . . . . . . . . . . . . . . . . . . . . . . . . . . . . . . . . . . . . . . . . . . . . . . . . . . . . . . . High-Frequency Radiation . . . . . . . . . . . . . . . . . . . . . . . . . . . . . . . . . . . . . . . . . . . . . . . . . . . . . . Location . . . . . . . . . . . . . . . . . . . . . . . . . . . . . . . . . . . . . . . . . . . . . . . . . . . . . . . . . . . . . . . . . . . . . . General Installation Procedures . . . . . . . . . . . . . . . . . . . . . . . . . . . . . . . . . . . . . . . . . . . . . . . . . . Guidelines For Installation Of High-Frequency Assisted Arc Welding Power Sources . . . . Installation Guidelines Checklist . . . . . . . . . . . . . . . . . . . . . . . . . . . . . . . . . . . . . . . . . . . . . . . . . 28 28 29 29 29 31 31 SECTION 9 – PARTS LIST Figure 9-1. Main Assembly . . . . . . . . . . . . . . . . . . . . . . . . . . . . . . . . . . . . . . . . . . . . . . . . . . . . . . . . . . . . Figure 9-2. Panel, Control Rear w/Components . . . . . . . . . . . . . . . . . . . . . . . . . . . . . . . . . . . . . . . . . . Figure 9-3. HF Panel . . . . . . . . . . . . . . . . . . . . . . . . . . . . . . . . . . . . . . . . . . . . . . . . . . . . . . . . . . . . . . . . . Figure 9-4. Panel, Front w/Components . . . . . . . . . . . . . . . . . . . . . . . . . . . . . . . . . . . . . . . . . . . . . . . . . Figure 9-5. Switch, Polarity (300 & 400A Models) . . . . . . . . . . . . . . . . . . . . . . . . . . . . . . . . . . . . . . . . . Figure 9-6. Pulser (Optional) . . . . . . . . . . . . . . . . . . . . . . . . . . . . . . . . . . . . . . . . . . . . . . . . . . . . . . . . . . . Figure 9-7. Electroslope 9 (Optional) . . . . . . . . . . . . . . . . . . . . . . . . . . . . . . . . . . . . . . . . . . . . . . . . . . . . Figure 9-8. Switch, Polarity (500 & 600A Models) . . . . . . . . . . . . . . . . . . . . . . . . . . . . . . . . . . . . . . . . . Figure 9-9. Panel, Control Front w/Components . . . . . . . . . . . . . . . . . . . . . . . . . . . . . . . . . . . . . . . . . . Optional Equipment . . . . . . . . . . . . . . . . . . . . . . . . . . . . . . . . . . . . . . . . . . . . . . . . . . . . . . . . . . . . . . . . . . 32 34 35 36 38 39 40 41 42 43 LIST OF CHARTS AND TABLES Table 2-1. Specifications . . . . . . . . . . . . . . . . . . . . . . . . . . . . . . . . . . . . . . . . . . . . . . . . . . . . . . . . . . . . . . Table 6-1. Maintenance Schedule . . . . . . . . . . . . . . . . . . . . . . . . . . . . . . . . . . . . . . . . . . . . . . . . . . . . . . Table 6-2. Tungsten Size Chart . . . . . . . . . . . . . . . . . . . . . . . . . . . . . . . . . . . . . . . . . . . . . . . . . . . . . . . . . Table 6-3. Troubleshooting . . . . . . . . . . . . . . . . . . . . . . . . . . . . . . . . . . . . . . . . . . . . . . . . . . . . . . . . . . . . 2 20 21 23 SECTION 1 – SAFETY PRECAUTIONS AND SIGNAL WORDS 1-1. GENERAL INFORMATION AND SAFETY 1-2. SAFETY WORDS A . General Information presented in this manual and on various labels, tags, and plates on the unit pertains to equipment design, installation, operation, maintenance, and troubleshooting which should be read, understood, and followed for the safe and effective use of this equipment. The following safety alert symbol and signal words are used throughout this manual to call attention to and identify different levels of hazard and special instructions. This safety alert symbol is used with the signal words WARNING and CAUTION to call attention to the safety statements. The nameplate of this unit uses international symbols for labeling the front panel controls. The symbols also appear at the appropriate section in the text. WARNING statements identify procedures or practices which must be followed to avoid serious personal injury or loss of life. B . Safety The installation, operation, maintenance, and troubleshooting of arc welding equipment requires practices and procedures which ensure personal safety and the safety of others. Therefore, this equipment is to be installed, operated, and maintained only by qualified persons in accordance with this manual and all applicable codes such as, but not limited to those listed in the Arc Welding Safety Precautions in the welding power source Owner’s Manual. ALERT SYMBOL AND SIGNAL CAUTION statements identify procedures or practices which must be followed to avoid minor personal injury or damage to this equipment. IMPORTANT statements identify special instructions necessary for the most efficient operation of this equipment. SECTION 2 – SPECIFICATIONS Mounting Hole Dimensions 22-1/4 in. (565 mm) 16-1/2 in.* (419 mm) Inches Millimeters A 10 254.0 B 8-1/8 206.4 C D 1 35-3/4 25.4 908.1 E 33-3/4 857.3 F 7-1/2 190.5 G H 15 11-1/8 381.0 282.6 9/32 in. (7.1 mm) Dia. (6 Holes) B C A 35-3/4 in. (908 mm) 3/4 in. (19.0 mm) Dia. (1 Hole) E D 5/8 in. (15.9 mm) Dia. (2 Holes) *Add 2-5/8 in. (67mm) For Lifting Eye F G H ST-059 587-A Figure 2-1. Overall Dimensions And Mounting Hole Layout OM-530 Page 1 Table 2-1. Specifications 2-1. DESCRIPTION Model Rated Amperes Rated Duty Cycle Weight TIG-Unit 400 60% 175 lbs. (79.4 kg) TIG-Unit 56 600 60% 183 lbs. (83.9 kg) The TIG-Unit is an accessory package which enables the solid-state welding power source to provide Gas Tungsten Arc (GTAW) as well as Shielded Metal Arc Welding (SMAW) capability. This unit has high frequency, polarity switch, gas and water valves, postflow timer, and 115 volts ac auxiliary power as standard, with meters, electroslope, pulser, preflow timer, and spot timer as options. SECTION 3 – INSTALLATION OR RELOCATION IMPORTANT: Read entire Section 8 on equipment that produces output in the radio frequency range, such as high-frequency starters, for site selection information and installation requirements before beginning the installation procedures. 3-1. SITE SELECTION Even though the TIG-Unit is an accessory package providing Gas Tungsten Arc Welding (GTAW) capability for the solid-state welding power source, it is recommended that certain practices and procedures be followed to aid long life and efficient operation. The TIG-Unit for 300 and 400 ampere welding power sources is convection-cooled. It does not have or need a fan to aide the cooling process. The TIG-Unit for 500 and 600 ampere welding power sources is fan-cooled. However, it is recommended that a suitable location be chosen to provide adequate airflow, not only for the welding power source, but for the TIG-Unit as well. See welding power source Owner’s Manual for proper installation site information. WARNING: RESTRICTED AIRFLOW can cause overheating and possible damage to internal parts. • Maintain at least 18 inches (457 mm) of unrestricted space on all sides of unit, and keep underside free of obstructions. • Do not place any filtering device over the intake air passages that provide airflow for cooling this unit. Warranty is void if any type of filtering device is used at intake air passages. 3-2. TRANSPORTING METHODS This unit is equipped with a lifting eye for moving during installation. Weight capacity of the lifting eye only allows for supporting the unit and welding power source. WARNING: ELECTRIC SHOCK can kill. • Do not touch live electrical parts. • Disconnect input power conductors from deenergized supply line BEFORE moving unit and welding power source. OM-530 Page 2 FALLING EQUIPMENT can cause serious personal injury and equipment damage. • Use lifting eye to lift unit only, NOT running gear, gas cylinders, or any other heavy accessories or devices. • Use equipment of adequate capacity to lift the unit. • If lifting or moving this unit with lift forks under the base, be sure that lift forks are long enough to extend beyond opposite side of the base. Using lift forks too short can damage internal parts if tips of the lift forks penetrate the unit base, or may cause personal injury and/or equipment damage if unit falls off the lift forks. 3-3. COMPONENT INSTALLATION ON FACTORY INSTALLED UNITS (Figure 3-1) WARNING: ELECTRIC SHOCK can kill. • Do not touch live electrical parts. • Shut down welding power source, and disconnect input power employing lockout/tagging procedures before inspecting or installing. Lockout/tagging procedures consist of padlocking line disconnect switch in open position, removing fuses from fuse box, or shutting off and red-tagging circuit breaker or other disconnecting device. IMPORTANT: Read entire Section 8 on equipment that produces output in the radio frequency range, such as high-frequency starters, for site selection information and installation requirements before beginning the installation procedures. The TIG-Unit was shipped installed on and wired into the welding power source. To prepare the TIG-Unit for operation, proceed as follows: 1. Open access door on lower front of TIG-Unit, remove component bag, and route short interconnecting cord (approximately 4 ft. or 1.2 m) with plug attached through access opening on left side of TIG-Unit. Connect plug to REMOTE 14 (Amperage And Contactor Control) receptacle on welding power source; align keyway, insert plug, and rotate threaded collar clockwise. Interconnecting Cord Positive Output Terminal Positive Lead (No. 17) Negative Output Terminal Negative Lead (No. 12) ST-059 589-A Figure 3-1. Component Installation 2. Attach plug from remote control cord (long cord, approximately 28 ft. or 8.5 m) to amphenol receptacle on left side of TIG-Unit (under front access door); align keyway, insert plug, and rotate threaded collar clockwise. Route remote control cord through access opening on left side of TIG-Unit to desired location. 3. Remove and discard bottom center sheet-metal screw from right side panel of welding power source. 7. Install proper welding cables (see welding power source’s Owner’s Manual for correct size) to the weld output terminals behind access door on TIGUnit (see Figure 4-1). 3-4. FIELD INSTALLATION OF TIG-UNIT WARNING: ELECTRIC SHOCK can kill. • Do not touch live electrical parts. • Shut down welding power source, and disconnect input power employing lockout/tagging procedure before beginning this installation. 4. Route welding cables (labeled POSITIVE and NEGATIVE) from rear of TIG-Unit down right side of welding power source. Lockout/tagging procedures consist of padlocking line disconnect switch in open position, removing fuses from fuse box, or shutting off and red-tagging circuit breaker or other disconnecting device. 5. Slide supplied clamps (in bag) over welding cables, and attach clamps with new sheet-metal screw (in bag) to bottom center hole on right side panel of welding power source. Before securing sheet-metal screw, route welding cables from rear of TIG-Unit to output terminals under front access door on welding power source and connect POSITIVE lead (No. 17) and NEGATIVE lead (No. 12) to correspondingly labeled terminals on the welding power source (see Figure 3-1). Secure clamps with sheet-metal screw; secure cables to terminals. IMPORTANT: Although this unit was primarily designed to be mounted directly to the welding power source, remote installation is possible if necessary. For remote installation procedures, see Section 3-7. All directions, such as left or right, are with respect to the operator facing the welding power source front panel. Retain all hardware removed during this procedure for reinstallation. For installation onto 600 ampere welding power sources which require different mounting instructions, see Section 3-4C. 6. Make the necessary connections to the gas and water valves also located behind access door on lower front panel of TIG-Unit in a proper manner. The valves are labeled; ensure that connections are correct (see Figure 4-1 and Sections 3-11 and 3-12). IMPORTANT: There are two methods for supplying power to the TIG-Unit, one of which must be chosen at the beginning of this installation. Never use both methods. After choosing the desired method, follow the accompanying instructions for that particular installation. The first method (A) is to connect the TIG-Unit to an outOM-530 Page 3 side 115 volts ac power supply. The second method (B) is to connect the TIG-Unit to 230 volts ac inside the welding power source. A. Procedure When Using An External 115 Volts AC Power Supply IMPORTANT: Read entire Section 8 on equipment that produces output in the radio frequency range, such as high-frequency starters, for site selection information and installation requirements before beginning the installation procedures. 1. Remove the six sheet-metal screws from top cover of welding power source (three from each end). It is not necessary to remove the two screws next to lifting eye (top cover of welding power source is not removed). 2. Remove top cover from TIG-Unit, and lay it aside. 9. Open access door on lower front of TIG-Unit, remove component bag, and route short interconnecting cord(approximately 4 ft or 1.2 m; see Figure 3-1) with plug attached through access opening on left side of TIG-Unit. Connect plug to REMOTE 14 (Amperage And Contactor Control) receptacle on welding power source; align keyway, insert plug, and rotate threaded collar clockwise. 10. Attach plug from remote control cord (long cord, approximately 28 ft. or 8.5 m) to amphenol receptacle on left side of TIG-Unit (under front access door); align keyway, insert plug, and rotate threaded collar clockwise. Route remote control cord through access opening on left side of TIG-Unit to desired location. 11. Ensure that the AMPERAGE control switch and OUTPUT (CONTACTOR) switch on welding power source are both in the REMOTE position. IMPORTANT: The TIG-Unit is shipped with two 5 ft. (1.5 m) leads (with terminal lugs attached) inside component bag under front access door of TIG-Unit. These leads are for 230 volts ac internal connections only (Procedure B), and should be discarded when a 115 volts ac external power supply is used. 12. Open access door on front of welding power source, and remove welding cables from the output terminals. 3. Place TIG-Unit on top of welding power source (controls facing same direction); lifting eye from welding power source fits through bottom of TIGUnit (into U-shaped section at bottom of TIG-Unit’s lifting eye bracket.) 14. Remove and discard bottom center sheet-metal screw from right side panel of welding power source. 4. Insert supplied 3/4 in. (19mm) diameter bolt (in bag) through U-shaped section at bottom of TIG-Unit’s lifting eye bracket and lifting eye of welding power source; before securing bolt, align end hole in bottom of TIG-Unit with end holes in top of welding power source. 13. Reinstall welding cables to proper output terminals on front of TIG-Unit (labeled ELECTRODE and WORK). 15. Route welding cables (labeled POSITIVE and NEGATIVE) from rear of TIG-Unit down right side of welding power source (see Figure 3-1). 5. Install the six sheet-metal screws (removed in Step 1) into end holes to secure TIG-Unit to top of welding power source. Secure 3/4 in. (19mm) diameter bolt. 16. Slide supplied clamps (in bag) over welding cables, and attach clamps with new sheet-metal screw (in bag) to bottom center hole on right side panel of welding power source; before securing sheet-metal screw, route welding cables from rear of TIG-Unit to output terminals under front access door on welding power source; connect POSITIVE lead (No. 17) and NEGATIVE lead (No. 12) to correspondingly labeled terminals on the welding power source (see Figure 3-1). 6. Make up a cord (16/3 is recommended) of the desired length to connect the 115 volts ac power supply. 17. If an Electroslope and/or Pulser is to be installed, see Section 3-5 and/or 3-6, and install the desired units at this point. 7. Route cord through supplied connector on rear of TIG-Unit, and attach it to terminal labeled 115V on terminal strip TE1 located on center mounting panel toward back of TIG-Unit (see Figure 3-2). (A ground stud is provided at extreme rear end of this terminal strip; use if desired.) Secure cord in connector. 18. Reinstall cover onto TIG-Unit, and connect the necessary associated equipment (shielding gas, water, etc.). 8. Attach an appropriate plug to the remaining end of the 115 volts ac cord. WARNING: ELECTRIC SHOCK can kill. • Do not touch live electrical parts. • Do not connect the 115 volts ac plug to its power supply until this entire installation is complete and the TIG-Unit is ready to be put in operation. OM-530 Page 4 B. Procedure When Using 230 Volts AC Internal Power IMPORTANT: Read entire Section 8 on equipment that produces output in the radio frequency range, such as high-frequency starters, for site selection information and installation requirements before beginning the installation procedures. 1. Remove top cover from welding power source, and lay it aside. 2. Remove top cover from TIG-Unit, and place it on welding power source. Be sure that front of cover is placed on front of welding power source. Secure in place with two sheet-metal screws, one on either side of lifting eye near center of cover. Do not install the remaining sheet-metal screws (three on each end) until instructed to do so. 3. Remove blank snap-in from access hole toward rear of cover installed on welding power source. Install supplied grommet into access hole. 4. Place TIG-Unit on top of welding power source (controls facing same direction); lifting eye from welding power source fits through bottom of TIGUnit (into U-shaped section at bottom of TIG-Unit’s lifting eye bracket). 5. Insert supplied 3/4 in. (19 mm) diameter bolt (in component bag under front access door of TIGUnit) through U-shaped section at bottom of TIGUnit’s lifting eye bracket and lifting eye of welding power source; before securing bolt, align end holes in bottom of TIG-Unit with end holes in top of welding power source. 6. Install the six sheet-metal screws (three in each end) into end holes to secure TIG-Unit (and cover) to top of welding power source. Secure 3/4 in. (19 mm) diameter bolt. 7. Remove left side panel from welding power source. 8. Locate the two 5 foot (1.5 m) leads (with terminal lugs attached) inside component bag which are to be used for obtaining 230 volts ac from the welding power source. 9. Connect the two leads to the welding power source as follows: a. For 60 Hertz Welding Power Sources Locate fan motor leads 9 and 36. Trace these leads to the inside of the primary terminal board. Connect the 230 volts leads to the two terminals on inside (not jumper link side) of primary terminal board where fan motor leads 9 and 36 are connected. b. For 50 Hertz Welding Power Sources Locate fan motor leads 9 and 20. Trace lead 9 to the inside of the primary terminal board. Connect one of the 230 volts leads to this terminal on inside (not jumper link side) of primary terminal board where lead 9 is connected. Trace fan motor lead 20 to splice (covered with sleeving) near main transformer. Slide sleeving back to expose the connection, and splice remaining 230 volts lead to this connection in a proper manner. 10. Maintain a proper lead dress around fan and wind tunnel, and route leads through access hole in cover into TIG-Unit. 11. Connect the two leads to the terminal labeled 230V on rear terminal strip TE1 (on center mounting panel; see Figure 3-2). 12. Repeat Steps 9 through 17 from method A. 13. Reinstall cover (set aside in Step 1) onto TIG-Unit and right side panel onto welding power source, and connect the necessary associated equipment (shielding gas, water, etc.). C. Procedure When Mounting To 600 Ampere Welding Power Sources. For installation onto 600 ampere welding power sources, the mounting procedure is different since the holes in the bottom of the TIG-Unit do not line up with the top of the welding power source. The rest of the installation is the same. To mount the TIG-Unit to a 600 ampere welding power source, proceed as follows: 1. Remove top cover from TIG-Unit, and lay it aside. 2. Place TIG-Unit on top of welding power source (controls facing same direction); lifting eye from welding power source fits through bottom of TIGUnit (into U-shaped section at bottom of TIG-Unit’s lifting eye bracket). Insert supplied 3/4 in. (19 mm) diameter bolt (in bag) through U-shaped section at bottom of TIG-Unit’s lifting eye bracket and lifting eye of welding power source; do not secure bolt at this time. 3. Using bottom of TIG-Unit as a template, mark locations for mounting holes and location of lead access hole (if 230 volts ac from the welding power source is to be used for operational power). 4. Remove 3/4 in. (19 mm) bolt, and remove TIG-Unit from top of welding power source. CAUTION: METAL FILINGS AND/OR TOOL CONTACT WITH INTERNAL COMPONENTS can damage unit. • Cover internal components. • Clean unit, and remove internal covering material before resuming operation. 5. Drill six 5/32 in. (3.9 mm) holes in marked locations for mounting TIG-Unit to welding power source. 6. If desired, drill a 1/2 in. (12.7 mm) lead access hole in marked location. 7. Place TIG-Unit on top of welding power source, insert 3/4 in. (19 mm) bolt, and install the six supplied sheet-metal screws. Tighten screws and secure bolt. Install supplied grommet into access opening, if applicable. 8. Proceed to Section 3-4A Step 6, or Section 3-4B Step 7 as selected, and follow the remaining instructions for the chosen procedure. OM-530 Page 5 3-5. FIELD INSTALLATION OF PULSER WARNING: ELECTRIC SHOCK can kill. • Do not touch live electrical parts. • Shut down welding power source, and disconnect input power employing lockout/tagging procedure before beginning this installation. Lockout/tagging procedures consist of padlocking line disconnect switch in open position, removing fuses from fuse box, or shutting off and red-tagging circuit breaker or other disconnecting device. 1. Remove top cover from TIG-Unit, if applicable. 2. Remove right blank panel from front of TIG-Unit. Save screws; discard blank panel. 3. Examine inside of TIG-Unit behind front panel for location of lead harnesses, etc. 4. Carefully slide Pulser unit into opening on front panel of TIG-Unit. Secure Pulser with the four screws removed from blank panel in Step 2. 5. Route leads from Pulser down top of center mounting panel and then to right of terminal strip 1T. (The terminal strip is located on top of center mounting panel toward rear of TIG-Unit; the terminals are labeled directly below the strip; see Figure 3-2.) 4. Carefully slide Electroslope unit into opening on front panel of TIG-Unit. Secure Electroslope with the four screws removed from blank panel in Step 2. 5. Route leads from Electroslope down top of center mounting panel and then to right of terminal strip 1T. (The terminal strip is located on top of center mounting panel toward rear of TIG-Unit; the terminals are labeled directly below the strip; see Figure 3-2.) 6. Connect grey lead 42 from rear of Electroslope case to front center mounting panel where existing grey lead 42 is connected to chassis (not to terminal strip). 7. Remove jumper links 1 (across terminals 3 and 2), 2 (across terminals 71 and 70), and 3 (across terminals 76 and 78) on terminal strip 1T. See Circuit Diagram 7-1. 8. For Models Effective With Serial No. HK261770: Connect Electroslope leads to correspondingly numbered terminals (3, 2, 5, 6, 7, 41, *42, 43, 71, 70, 56, 61, *42, 62, 76, 78, 72, 58, 59) on terminal strip 1T. Connect Electroslope leads 30 and 37 to corresponding terminal on terminal strip 2T. The leads from Electroslope are all numbered. Connect lead 60 from Electroslope to terminal 1 on relay CR2 (see Figure 3-2). *Connect only one lead 42 to each 42 terminal. The leads are cut to proper length and will only reach the appropriate segment of the terminal strip. 6. Remove jumper link 4 (across terminals 84 and 83) on terminal strip 1T. See Circuit Diagram 7-1. 7. Connect Pulser leads to correspondingly numbered terminals (41, 42, 43, 84, 83, 72) on terminal strip 1T. The leads from Pulser are all numbered. 8. Connect grey lead 42 from rear of Pulser case to front center mounting panel where existing grey lead 42 is connected to chassis (not to terminal strip). 9. For Models Prior To Serial No. HK261770: Connect Electroslope leads to correspondingly numbered terminals (3, 2, 5, 6, 7, 41, *42, 43, 71, 70, 56, 61, *42, 62, 76, 78, 72) on terminal strip 1T. Connect Electroslope lead 60 to terminal 1 on relay CR2. If The Unit DOES NOT Have Preflow: c. 9. Secure leads to existing harness with nylon cable ties or tape to maintain a proper lead dress. 10. Reinstall cover onto TIG-Unit, if applicable. 3-6. FIELD INSTALLATION OF ELECTROSLOPE WARNING: ELECTRIC SHOCK can kill. • Do not touch live electrical parts. • Shut down welding power source, and disconnect input power employing lockout/tagging procedure before beginning this installation. Lockout/tagging procedures consist of padlocking line disconnect switch in open position, removing fuses from fuse box, or shutting off and red-tagging circuit breaker or other disconnecting device. 1. Remove top cover from TIG-Unit, if applicable. 2. Remove left blank panel from front of TIG-Unit. Save screws; discard blank panel. 3. Examine inside of TIG-Unit behind front panel for location of lead harnesses, etc. OM-530 Page 6 Replace existing connector on Electroslope lead 59 with a 3/16 in. female friction connector, and connect lead 59 to terminal 4 on relay CR2. d. Individually tape and tie remaining Electroslope leads 30, 37, and 58 to existing wiring harness. If The Unit DOES Have Preflow: a. Replace existing connectors on Electroslope leads 30 and 37 with a 1/4 in. piggyback (dual friction) connector. b. Disconnect leads 30 and 37 from Preflow switch S200. c. Reconnect lead 30 (from Step b) to piggyback connector on Electroslope lead 30, and reconnect lead 37 (from Step b) to piggyback connector on Electroslope lead 37. d. Install piggyback connector on Electroslope lead 30 onto terminal of Preflow switch from which lead 30 (from Step b) was removed. e. Install piggyback connector on Electroslope lead 37 onto terminal of Preflow switch from which lead 37 (from Step b) was removed. f. Cut off and discard existing connectors on Electroslope leads 58 and 59. CAUTION: SOLDER can damage unit. • Do not allow solder to fall into unit. • Cover exposed area of unit when soldering connections. • Remove cover(s) and clean unit when finished soldering. g. Splice and solder Electroslope lead 59 to lead 59. (Make connection near Preflow Circuit Board.) Insulate connection with tape. h. Connect lead 58, originating at Preflow Circuit Board, to terminal 4 of relay CR2. i. Splice and solder Electroslope lead 58 to lead 58. (Make connection near terminal 4 of relay CR2.) Insulate connection with tape. 10. Secure leads to existing harness with nylon cable ties or tape to maintain a proper lead dress. Lifting Front Center Front Of Eye Mounting Panel Tig-Unit Relay CR2 Primary Connection Terminal Strip TE1 Lead 60 From Electroslope TOP VIEW 3. Route cord through supplied connector on rear of TIG-Unit, and attach it to terminals labeled 115V on terminal strip TE1 located on center mounting panel toward back of TIG-Unit (see Figure 3-2). A ground stud is provided at extreme rear end of the terminal strip and must be used. CAUTION: LACK OF GROUND CONNECTION will damage the Pulser. • Ground TIG-Unit back to welding power source or to a good building ground whenever TIG-Unit is separated from welding power source. 4. Attach an appropriate plug to the remaining end of the 115 volts ac cord. WARNING: ELECTRIC SHOCK can kill. • Do not touch live electrical parts. • 11. Reinstall cover onto TIG-Unit. Terminal Strips 1T 2. Make up cord (16/3 is recommended) of the necessary length to connect to a 115 volts ac power supply. (The 230 volts procedure from Section 3-4, Procedure B must not be employed.) Terminal Strip 2T ST-081 854-C Figure 3-2. Location Of Relay CR2 And Other Components 3-7. PROCEDURE FOR REMOTE TIG-UNIT INSTALLATION WARNING: ELECTRIC SHOCK can kill. • Do not touch live electrical parts. • Shut down welding power source, and disconnect input power employing lockout/tagging procedures before inspecting or installing. Lockout/tagging procedures consist of padlocking line disconnect switch in open position, removing fuses from fuse box, or shutting off and red-tagging circuit breaker or other disconnecting device. 1. Remove top cover from TIG-Unit, and lay it aside. IMPORTANT: The TIG-Unit is shipped with two 5 ft. (1.5 m) leads (with terminal lugs attached) inside component bag under front access door of TIG-Unit. These leads are for 230 volts ac internal connections only (Section 3-4, Procedure B), and should be discarded when a 115 volts ac external power supply is used. Do not connect the 115 volts ac plug to its power supply until this entire installation is complete and the TIG-Unit is ready to be put in operation. 5. Open access door on lower front of TIG-Unit, remove component bag, and route short interconnecting cord (approximately 4 ft or 1.2 m) with plug attached through access opening on left side of TIG-Unit. Connect extension cord (not supplied; optional) to short cord from TIG-Unit, and then connect plug (remaining end) to REMOTE 14 (Amperage And Contactor Control) receptacle on welding power source; align keyway, insert plug, and rotate threaded collar clockwise. 6. Attach plug from remote control cord (long cord, approximately 28 ft. or 8.5 m) to amphenol receptacle on left side of TIG-Unit (under front access door); align keyway, insert plug, and rotate threaded collar clockwise. Route remote control cord through access opening on left side of TIG-Unit to desired location. 7. Ensure that the AMPERAGE control switch and OUTPUT(CONTACTOR) switch on welding power source are both in the REMOTE position. 8. Open access door on front of welding power source, and remove welding cables from the output terminals. 9. Reinstall welding cables to proper output terminals on front of TIG-Unit (labeled ELECTRODE and WORK). 10. Route welding cables (labeled POSITIVE and NEGATIVE) from rear of TIG-Unit in direction of welding power source. 11. Connect (with bolts) power cables (not supplied) of adequate size and length to the welding cables of the TIG-Unit, and then connect the remaining ends OM-530 Page 7 to proper output terminals on welding power source; ensure that proper polarity is maintained. 4. Affix supplied PREFLOW TIME label to front panel over both controls. ELECTRIC SHOCK can kill. • Secure and insulate with sleeving any exposed cable connections to prevent contact with personnel, equipment, etc. 5. Attach supplied knob to Preflow Time control shaft. 12. If an Electroslope and/or Pulser is to be installed, see Section 3-5 and/or 3-6, and install the desired units at this point. B. Electrical Installation (Figure 3-2) IMPORTANT: Before preceeding with this installation familiarize yourself with the circuit diagram provided in this manual. For All Models: 13. Reinstall cover onto TIG-Unit and connect the necessary associated equipment (shielding gas, water, etc.). 1. Remove and discard jumper lead 70 from terminal 70 on terminal strip 1T and terminal 73 on terminal strip 2T. 3-8. FIELD INSTALLATION OF OPTIONAL PREFLOW TIMER 2. Connect new lead 70 from the preflow timer assembly to terminal 70 on 1T. WARNING: ELECTRIC SHOCK can kill. • Do not touch live electrical parts. • Shut down welding power source, and disconnect input power employing lockout/tagging procedure before beginning this installation. Lockout/tagging procedures consist of padlocking line disconnect switch in open position, removing fuses from fuse box, or shutting off and red-tagging circuit breaker or other disconnecting device. 3. Connect lead 73 from preflow timer assembly to terminal 73 on 2T. IMPORTANT: All directions, such as left or right, are with respect to the operator facing the welding power source front panel. Retain all hardware removed during this procedure for reinstallation. 4. Connect lead 33 from preflow timer assembly to terminal 33 on 1T. 5. For Models With Electroslope: a. Disconnect lead 6 from electroslope edge connector pin X. Tape and tie off lead 6. b. Insert new lead 92 into pin X where lead 6 was removed in Step a. c. Connect new lead 6 from preflow timer assembly to terminal 6 on 1T. A. Mechanical Installation (Figure 3-3) 6. For Models Without Electroslope: Tape and tie off leads 6 and 92. 1. Remove TIG-Unit top cover and left side panel. 7. For Models Effective With Serial No. JA373511: CAUTION: METAL FILINGS AND/OR TOOL CONTACT WITH INTERNAL COMPONENTS can damage unit. • Cover internal components. • Clean unit, and remove internal covering material before resuming operation. 2. Mount Preflow ON/OFF switch S200 in the 1/2 in. (12.7 mm) diameter hole using supplied hardware. 3. Mount Preflow Time control with attached printed circuit card assembly TD2 in the 3/8 in. (9.5 mm) diameter hole using supplied hardware. OM-530 Page 8 a. Remove jumper link 6 from terminals 58 and 59 on terminal strip 1T b. Connect lead 32 from preflow timer assembly to terminal 32 on 1T. c. Connect new lead 30 from preflow timer assembly to terminal 30 on 2T. d. Connect lead 37 from preflow timer assembly to terminal 37 on 2T. e. Connect lead 59 from preflow timer assembly to terminal 59 on 1T. f. Connect lead 58 from preflow timer assembly to terminal 58 on 1T. Pre-Flow Assembly Spot Time Assembly 1/2 in. (12.7 mm) Dia. 3/8 in. (9.5 mm) Dia. ST-048 698-A Figure 3-3. Front Panel Mounting Hole Layout g. Remove jumper link 7 from terminals 89 and 90 on 2T. h. Connect lead 89 from preflow timer assembly to terminal 89 on 2T. i. Connect lead 90 from preflow timer assembly to terminal 90 on 2T. j. Discard supplied leads 30, 37, and 58. k. Tape or tie new leads together to maintain a proper lead dress inside the unit. l. Replace left side panel and top cover. 8. For Models Effective With Serial No. HK261770 Thru JA373510: a. Remove jumper link 6 from terminals 58 and 59 on terminal strip 1T. b. Connect lead 32 from preflow timer assembly to terminal 32 on 1T. c. Connect new lead 30 from preflow timer assembly to terminal 30 on 2T. d. Connect lead 37 from preflow timer assembly to terminal 37 on 2T. e. Connect lead 59 from preflow timer assembly to terminal 59 on 1T. f. Connect lead 58 from preflow timer assembly to terminal 58 on 1T. g. Disconnect lead 89, originating at CR1, from terminal 89 on 2T. h. Splice lead 89 (disconnected in Step g) to lead 90 originating at preflow timer switch S200. i. Connect lead 89, originating at preflow timer switch S200, to terminal 89 on 2T. j. Discard supplied leads 30, 37, and 58. k. Tape or tie new leads together to maintain a proper lead dress inside the unit. l. Replace left side panel and top cover. 9. For Models Prior to Serial No. HK261770: a. Locate lead 32 between transformer T1 and integrated rectifier SR2. Splice lead 32, originating at the preflow circuit card, onto lead 32 between T1 and SR2. b. Disconnect lead 30 from fuse F1. c. Connect lead 30, originating at CR3, to F1 where lead 30 was removed in Step b. d. Connect lead 30 disconnected in Step b to the dual terminal friction connector on lead 30 at F1. e. If applicable, insulate leads 89 and 90 from preflow timer assembly, and secure to wiring harness. f. For models with Electroslope proceed to Step g. For all other models, isolate remaining wires by taping ends and proceed to Step o. g. Remove electroslope box cover. IMPORTANT: This procedure is only applicable on models with the proper electroslope. If questions arise, contact the factory Service Department. h. Locate terminal FF on electroslope circuit card. Route supplied lead 30 through the grommet in the electroslope box and connect it to terminal FF on the electroslope circuit card. Connect remaining end of lead 30 to fuse F1 in addition to existing leads 30. i. Locate terminal GG on electroslope circuit card. Route supplied lead 37 through the grommet in the electroslope box and connect it to terminal GG on the electroslope circuit card. Connect remaining end of lead 37 to preflow timer in addition to existing lead 37. j. Remove lead 59 from control relay CR2. k. Splice lead 59, originating at the preflow circuit card, to lead 59 that was removed from CR2. OM-530 Page 9 l. Connect lead 58, originating at the preflow circuit card, to the terminal on CR2 where lead 59 was removed in Step j. m. Locate terminal JJ on electroslope circuit card. Route supplied lead 58, through the grommet in the electroslope box and connect it to terminal HH on the electroslope circuit card. Connect remaining end of lead 58 to CR2 in addition to existing lead 58. n. Replace electroslope box cover. o. Cover all splices with electrical tape. Tape or tie new or unused leads to existing wiring harnesses. p. Replace left side panel and top cover. 2. Connect lead 32 from spot time assembly to terminal 32 on 1T. 3. Connect lead 89 from spot time assembly to terminal 89 on terminal strip 2T. 4. Connect lead 88 from spot time switch S201 to terminal 88 on 1T. 5. Connect lead 33 from S201 to terminal 33 on 1T. 6. Tape or tie new leads together to maintain a proper lead dress inside the unit. 7. Replace both side panels and top cover. 3-10. REMOTE 14 RECEPTACLE INFORMATION AND CONNECTIONS (Figure 3-4 And Figure 4-1) 3-9. FIELD INSTALLATION OF OPTIONAL SPOT TIMER (Figure 3-3) REMOTE 14 WARNING: ELECTRIC SHOCK can kill. • Do not touch live electrical parts. A • OUTPUT (CONTACTOR) Shut down welding power source, and disconnect input power employing lockout/tagging procedure before beginning this installation. Lockout/tagging procedures consist of padlocking line disconnect switch in open position, removing fuses from fuse box, or shutting off and red-tagging circuit breaker or other disconnecting device. IMPORTANT: All directions, such as left or right, are with respect to the operator facing the welding power source front panel. Retain all hardware removed during this procedure for reinstallation. A. Mechanical Installation (Figure 3-3) 1. Remove TIG-Unit top cover and both side panels. 2. Mount Spot Time switch S201 in the 1/2 in. (12.7 mm) diameter hole using supplied hardware. 3. Mount Spot Time control with attached printed circuit card assembly TD3 in the 3/8 in. (9.5 mm) diameter hole using supplied hardware. 4. Affix supplied SPOT TIME label to front panel over both controls. 5. Attach supplied knob to Spot Time control shaft. B. Electrical Installation (Figure 3-2) IMPORTANT: Before preceeding with this installation familiarize yourself with the circuit diagram provided in this manual. For All Models: 1. Remove jumper link 5 from terminals 33 and 88 on terminal strip 1T. OM-530 Page 10 AMPERAGE REMOTE 14 receptacle RC2 is used to connect any of the following equipment to the welding power source circuitry: a. Remote Contactor b. Remote Amperage control c. Combination of the above. To make connections, align keyway, insert plug, and rotate threaded collar fully clockwise. The following socket information is included in case the supplied cord is not suitable, and it is necessary to wire a plug or cord to interface with REMOTE 14 receptacle RC2. IMPORTANT: When contact closure is provided between sockets A and B, the welding power source output/contactor control circuit is energized. Receptacle RC2 socket connections to the TIG-Unit control circuitry are as follows; Socket A: Contactor control switch connection. Socket B: Contactor control switch connection. Socket C: Amperage control connection (maximum side). Socket D: Amperage control connection (minimum side). Socket E: Amperage control connection (wiper contact). IMPORTANT: The remaining sockets in the receptacle are not used. 3-12. COOLANT (Figure 4-1) A D (Optional) J K B C CONNECTIONS L I N H M E COOLANT IN G F Ref. S-0004-A Figure 3-4. Front View Of REMOTE 14 Receptacle With Socket Locations COOLANT OUT CAUTION: OVERHEATING Gas Tungsten Arc Welding (GTAW) torch can damage torch. • If using a water-cooled torch and recirculating coolant system, make connections from the coolant system directly to the torch hoses. Do not use water connections on the TIG-Unit. The COOLANT IN and COOLANT OUT fittings have 5/8-18 left-hand threads. Obtain proper size, type, and length hose, and make connections as follows: 1. Connect hose from coolant supply to COOLANT IN fitting. 3-11. GAS CONNECTIONS (Figure 4-1) 2. Connect coolant hose from torch to COOLANT OUT fitting. 3-13. 115 VOLTS AC DUPLEX RECEPTACLE AND CIRCUIT BREAKER (Figure 4-1) 115V 15A GAS IN AC GAS OUT ON The GAS IN and GAS OUT fittings have 5/8-18 righthand threads. Obtain proper size, type, and length hose, and make connections as follows: 1. Connect hose from shielding gas supply regulator/ flowmeter to GAS IN fitting. 2. Connect shielding gas hose from torch to GAS OUT fitting. OFF OVERLOAD PRESS TO START A grounded duplex receptacle, located behind the front access door of the TIG-Unit, is provided to furnish up to 2 kva of 115 volts ac to operate external accessories. A 15 ampere circuit breaker, located next to the receptacle, protects this circuit in case overloading of the duplex receptacle occurs. OM-530 Page 11 SECTION 4 – OPERATOR CONTROLS ♦Meters Remote Amperage Switch Amperage Adjustment Control Polarity Switch ♦Pulser Postflow Control Gas/Coolant Switch ♦Electroslope High Frequency Control High Frequency Switch Remote 14 Receptacle Circuit Breaker (See Section 6-4) Interconnecting Cord 115 Volts AC Duplex Receptacle Coolant Valve Inlet Gas Valve Outlet Gas Valve Inlet Coolant Valve Outlet Work Output Terminal ♦Preflow Time Control And Switch ♦Spot Time Control And Switch Electrode Output Terminal TB-059 588-A Figure 4-1. Front Panel View 4-1. AMPERAGE ADJUSTMENT CONTROL AND REMOTE AMPERAGE SWITCH (Figure 4-1) A A AMPERAGE AMPERAGE ADJUSTMENT 14 PANEL IMPORTANT: The AMPERAGE ADJUSTMENT control may be adjusted while welding. A. Without Electroslope When not using an Electroslope and the AMPERAGE switch on the TIG-Unit is in the PANEL position, the AMPERAGE ADJUSTMENT control on the TIG-Unit always functions as a fine amperage adjustment (calibrated in percent) of the AMPERAGE ADJUSTMENT control on the welding power source. If a remote control is used and the AMPERAGE switch on the TIG-Unit is in OM-530 Page 12 the REMOTE 14 position, the remote control always functions as a fine amperage adjustment (in percent) of the AMPERAGE ADJUSTMENT control on the welding power source. B. With Electroslope IMPORTANT: For the TIG-Unit to function properly, ensure the the AMPERAGE control switch on the welding power source is always in the REMOTE 14 position. The position of the OUTPUT (CONTACTOR) control switch on the welding power source is determined by the situation. If Remote Contactor Control is desired, place the switch in the REMOTE 14 position. If Remote Contactor Control is not desired, place the switch in the ON position. When using an Electroslope, the AMPERAGE switch on the TIG-Unit must be in the PANEL position and then the AMPERAGE ADJUSTMENT control on the TIGUnit has complete control of the current of the welding power source. 4-2. POLARITY SWITCH (Figure 4-1) POLARITY SWITCH LECTRODE ( ) NEGATIVE ( +) ELECTRODE POSTIVE Rotating the control in a clockwise direction increases the postflow time. The scale surrounding the POSTFLOW time control is calibrated in seconds to aid in the selection of a postflow time period suited to the individual welding operation. DO NOT SWITCH WHILE WELDING CAUTION: ARCING can damage switch contacts. • Do not change POLARITY SWITCH position while welding or under load. The POLARITY switch provides a means of selecting either electrode negative or electrode positive weld output polarity without having to change the output cable connections. Placing the POLARITY switch in the ELECTRODE NEGATIVE position causes the ELECTRODE output terminal to be negative and the WORK output terminal to be positive. Conversely, if the POLARITY switch is placed in the ELECTRODE POSITIVE position, the ELECTRODE output terminal is positive and WORK output terminal is negative. 4-3. GAS/COOLANT SWITCH (Figure 4-1) ON GAS/COOLANT / OFF The function of the GAS/COOLANT switch is to govern the operation of the gas and water solenoids and the POSTFLOW timer. When this switch is in the OFF position, the gas and coolant valves and POSTFLOW timer are disabled (out of the circuit). When this switch is in the ON position, the gas and coolant valves and POSTFLOW timer are energized (in the circuit). The ON position of this switch is normally used for Gas Tungsten Arc Welding applications; the OFF position is used for Shielded Metal Arc Welding applications. 4-4. GAS/COOLANT (Figure 4-1) POSTFLOW An adjustable 0 to 60 seconds gas-coolant POSTFLOW time control is provided for controlling the period of time shielding gas and coolant are allowed to flow after the arc is extinguished. The POSTFLOW time control governs the operation of a postflow timer within the TIGUnit. CONTROL POSTFLOW t2 IMPORTANT: The POSTFLOW timer is disabled whenever the GAS/COOLANT switch is in the OFF position. As soon as the contactor is deenergized, the postflow timer begins to time out the selected period of postflow time. Once the timer has timed out, the gas and coolant valves close and thereby cut off shielding gas and coolant flow. The timer automatically resets and is ready for another weld cycle. 4-5. REMOTE HAND CONTROLS WARNING: ELECTRIC SHOCK can kill; UNEXPECTED HIGH FREQUENCY DURING PREFLOW can cause serious injury and equipment damage. • Do not allow electroslope switch or other unit control switch to be maintained closed during preflow time. • Always close and immediately open control switch to ensure that high frequency will not be present during preflow. If the unit is equipped with the optional electroslope and preflow timer, it is possible to have high frequency present during preflow without machine contactor energized. A fingertip control (RCC-14) is supplied with every unit. This control is a maintained-contact type switch used for remote Amperage and Output (Contactor) control. The fingertip control must be connected to the REMOTE 14 receptacle (see Figure 4-1 and Section 3-10) under the front access door of the TIG-Unit to be functional. This control is designed to be strapped to the torch handle for convenient operation. IMPORTANT: When employing the RCC-14 remote control, the AMPERAGE switch on the TIG-Unit must be in the REMOTE position for proper remote control operation. A momentary-contact type switch (RMLS-14) is additionally supplied with each unit equipped with an Electroslope. This control must be connected to the REMOTE 14 receptacle (see Figure 4-1 and Section 3-10) under the front access door of the TIG-Unit to be functional. It is necessary to press this switch each time a new or different weld condition is desired. This switch allows the operator to manually control the selection of the welding conditions and duration of that condition. It further gives the operator the capability of moving rapidly from one condition to the next, if desired. It is necessary to press this switch four times to advance the unit through a complete weld cycle. Anytime that the arc is broken (except during the initial condition), the Electroslope will automatically reset to Off. During the initial OM-530 Page 13 condition resetting to Off is accomplished manually by pushing the switch once, provided that an arc has not been established. This control is designed to be taped to the torch handle for convenient operation. 4-6. HIGH FREQUENCY SWITCH (Figure 4-1) HIGH FREQUENCY ON switch (RMLS-14) is closed. High frequency will remain energized until an arc is established or only as long as the momentary-contact switch is held closed. Provided that an arc has been established, releasing the momentary-contact switch will deenergize the high frequency. If an arc is not established, the high frequency will remain energized until an arc is established or until the momentary-contact switch is pushed again shutting the unit down. 4-7. HIGH FREQUENCY CONTROL (Figure 4-1) HIGH FREQUENCY OFF WARNING: USING HIGH FREQUENCY WITH THE SHIELDED METAL ARC WELDING PROCESS can result in serious personal injury. • Place the HIGH FREQUENCY switch in the OFF position before using Shielded Metal Arc Welding process. The attempted use of high frequency to establish an arc with a stick electrode could cause an arc to form between the electrode holder and operator. The HIGH FREQUENCY switch provides two positions: ON and OFF. When the HIGH FREQUENCY switch is in the OFF position, high frequency will not be available. The OFF position should be used for Shielded Metal Arc Welding applications. When the HIGH FREQUENCY switch is in the ON position, high frequency will be in a ready status and will be present when the contactor in the welding power source is closed until an arc is established. The ON position is normally used for Gas Tungsten Arc Welding applications. A. Basic And Pulser Models Only When in the ON position, high frequency will be present at the welding electrode when the fingertip control (RCC-14) is closed. The high frequency unit will remain energized until an arc is established, at which point it will deenergize. If an arc outage occurs, high frequency will automatically be present until a new arc is established. B. Electroslope Models Only WARNING: ELECTRIC SHOCK can kill; UNEXPECTED HIGH FREQUENCY DURING PREFLOW can cause serious injury and equipment damage. • Do not allow electroslope switch or other unit control switch to be maintained closed during preflow time. • Always close and immediately open control switch to ensure that high frequency will not be present during preflow. If the unit is equipped with the optional electroslope and preflow timer, it is possible to have high frequency present during preflow without machine contactor energized. When in the ON position, high frequency will be present at the welding electrode when the momentary-contact OM-530 Page 14 The HIGH FREQUENCY control is calibrated in percent and determines the amount of high-frequency energy that is available to initiate the arc. Rotating the control clockwise increases the intensity of the high-frequency energy. Normally the control needs to be adjusted only initially. IMPORTANT: As the high frequency is increased, the possibility of causing interference with local radio and television receivers also increases. It is recommended that the HIGH-FREQUENCY control be set at as low a position as practical while still maintaining a satisfactory welding operation to avoid such interference. 4-8. METERS (Optional) (Figure 4-1) The meters are provided to monitor the welding operation. They are not intended for exact amperage or voltage measurements. These meters are internally connected to the output terminals. The voltmeter will indicate the voltage at the output terminals, but not necessarily the actual voltage at the welding arc (due to cable resistance, poor connections, etc.). The ammeter will indicate the amperage output of the unit. 4-9. PULSER (Figure 4-1) SWITCH (Pulser Models Only) The PULSES switch governs the operation of the pulse unit. By placing the PULSES switch in the ON position, the welding power source output amperage will pulse between the background amperage level and the peak amperage level. By placing the PULSES switch in the OFF position, the welding power source output will not pulse, but rather remain at the peak amperage level. The PULSES switch may be placed in either the ON or OFF position prior to or during the welding operations. If the PULSES switch is placed in the ON position prior to welding operations, the output amperage may be at either the peak or background amperage level. If the PULSES switch is placed in the ON position during weld operations, the pulsing begins with the output amperage remaining at the peak amperage level, then pulsing to the background amperage level. There is no interaction between the BACKGROUND control, PULSES/SECOND control, % “ON TIME” control, or the PULSES switch and any of the other controls. Pulsing operations may be performed when the POLARITY SWITCH is in either the ELECTRODE NEGATIVE or ELECTRODE POSITIVE position. When remote control of the output amperage is employed, only the peak amperage level is remotely controlled; the background amperage level is still established by the position of the BACKGROUND control. 4-10. % “ON TIME” CONTROL (Pulser Models Only) (Figure 4-1) % “ON TIME” The % “ON TIME” control provides pulse width selection of the welding power source output amperage. The % “ON TIME” control is operational only when the PULSES switch is in the ON position. Rotating the % “ON TIME” control in a clockwise direction increases the peak amperage “on-time” relative to the entire pulse time; the balance of the time is background amperage. Hence, this control establishes the peak amperage pulse width relative to the entire pulse width. The scale surrounding the % “ON TIME” control is calibrated in percent and does not indicate an actual time value. IMPORTANT: welding. This control may be adjusted while 4-11. PULSES/SECOND CONTROL (Pulser Models Only) (Figure 4-1) PULSES/SECOND The PULSES/SECOND control provides pulse frequency selection of the welding power source output amper- age. The PULSES/SECOND control is operational only when the PULSES switch is in the ON position. Rotating the PULSES/SECOND control in a clockwise direction increases the pulse frequency. The scale surrounding the PULSES/SECOND control is calibrated in pulses per second to aid in the selection of a pulse frequency suitable for the application. IMPORTANT: welding. This control may be adjusted while 4-12. BACKGROUND CONTROL (Pulser Models Only) (Figure 4-1) BACKGROUND The BACKGROUND and AMPERAGE ADJUSTMENT control provide amperage selection within the welding power source output amperage range being used. The setting of the background control establishes the background level from which the output amperage travels to the pulse level established by the setting of the AMPERAGE ADJUSTMENT control. When the AMPERAGE ADJUSTMENT control is adjusted to a setting above the BACKGROUND control, there will be positive pulse peaking from the background reference level. This unit does not have negative pulsing capability. The background amperage is always a percentage of the peak amperage. If the peak amperage is adjusted (by means of the AMPERAGE ADJUSTMENT control), the background amperage will always vary with it according to the percentage setting of the BACKGROUND control. The background amperage can never be higher than the peak amperage. Rotating the AMPERAGE ADJUSTMENT control and BACKGROUND control in a clockwise direction increases the output amperage. OM-530 Page 15 ST-009 477-D ST-007 648-G OM-530 Page 16 The scale surrounding the BACKGROUND control is calibrated in percentage and does not indicate an amperage or voltage value. IMPORTANT: welding. 4-15. PERCENTAGE INITIAL AMPERAGE CONTROL (Electroslope Models Only) (Figure 4-1) PERCENTAGE INITIAL AMPERAGE This control may be adjusted while 4-13. ELECTROSLOPE (Electroslope Models Only) A ELECTROSLOPE 9 The Electroslope in this unit allows the operator (by means of the momentary-contact switch, RMLS-14) to manually select the welding condition and the duration of that condition. The welding conditions that the Electroslope provides are PERCENTAGE INITIAL AMPERAGE, PERCENTAGE UPSLOPE RATE, PERCENTAGE DOWNSLOPE RATE, and PERCENTAGE FINAL AMPERAGE. Additionally, adjustment of each condition is provided by means of a control on the front panel of the Electroslope. IMPORTANT: A momentary-contact type switch (RMLS-14) is supplied with each unit equipped with an Electroslope, It is necessary to press the switch each time a new or different weld condition is desired. This switch allows the operator to manually control the selection of the welding condition and the duration of that condition. It further gives the operator the capability of moving rapidly from one condition to the next, if desired. Anytime that the arc is broken (except during the initial condition), the Electroslope will automatically reset to Off. During the initial condition resetting to Off is accomplished manually by pushing the switch once, provided that an arc has not been established. (For further explanation of this switch, see Section 4-5). Adjust the PERCENTAGE INITIAL AMPERAGE control for the approximate starting amperage desired. This control is not linear and its settings represent a percentage of the AMPERAGE ADJUSTMENT control value in use and not an actual amperage reading. Adjustment of the PERCENTAGE INITIAL AMPERAGE control will vary the amperage from minimum of the amperage range used to the setting of the AMPERAGE ADJUSTMENT control in the TIG-Unit. For example: If the Range Switch setting has a amperage range of 100 to 500 amperes and the AMPERAGE ADJUSTMENT control on the TIG–Unit is set for 300 amperes, the setting of the PERCENTAGE INITIAL AMPERAGE control on the Electroslope will then determine the initial amperage between 100 and 300 amperes. If the PERCENTAGE INITIAL AMPERAGE control is set at 50, initial amperage will be approximately 200 amperes and will remain at this amperage until the Upslope is energized. The initial amperage can never be higher than the weld amperage provided by the TIG-Unit. IMPORTANT: welding. 4-16. PERCENTAGE UPSLOPE RATE CONTROL (Electroslope Models Only) (Figure 4-1) 4-14. ELECTROSLOPE SWITCH (Electroslope Models Only) (Figure 4-1) PERCENTAGE UPSLOPE RATE 0.25-20 SEC. ON t 0.25-20s OFF The Electroslope switch provides two positions: ON and OFF. When the Electroslope switch is in the OFF position, the Electroslope will be bypassed or out of the welding power source control circuit. When the Electroslope switch is in the ON position, the Electroslope will be connected into the welding power source control circuit. Ensure that the AMPERAGE switch on the TIG-Unit is in the PANEL position whenever the Electroslope is to be utilized. The AMPERAGE ADJUSTMENT control on the TIG-Unit has complete control of the amperage at this point. This control may be adjusted while The PERCENTAGE UPSLOPE RATE control is calibrated in percent and can be adjusted for an upslope rate of approximately .25 (FAST) to 20 (SLOW) seconds. With the control set at minimum, initial amperage will rise immediately to the amperage setting of the TIGUnit AMPERAGE ADJUSTMENT control. When the PERCENTAGE UPSLOPE RATE control is set at 50, it takes approximately 10 seconds for initial amperage to reach welding amperage provided that the difference between initial amperage and weld amperage is great enough. By increasing the control setting to 100, the upslope rate will be approximately 20 seconds. IMPORTANT: welding. This control may be adjusted while OM-530 Page 17 4-17. PERCENTAGE DOWNSLOPE RATE CONTROL (Electroslope Models Only) (Figure 4-1) PERCENTAGE DOWNSLOPE RATE 0.25-20 SEC. t 0.25-20s The PERCENTAGE DOWNSLOPE RATE control is calibrated in percent and can be adjusted for a downslope rate of approximately .25 (FAST) to 20 (SLOW) seconds. The settings of this control are comparable to the PERCENTAGE UPSLOPE RATE control and determine the time rate at which weld amperage will decrease to the setting of the PERCENTAGE FINAL AMPERAGE control. IMPORTANT: welding. This control may be adjusted while 4-18. PERCENTAGE FINAL AMPERAGE CONTROL (Electroslope Models Only) (Figure 4-1) PERCENTAGE FINAL AMPERAGE A The PERCENTAGE FINAL AMPERAGE control adjusts the welding amperage at the finish of the weld and operates on the same principle as the PERCENTAGE INITIAL AMPERAGE control. The final amperage cannot be higher than the weld amperage provided by TIGUnit. IMPORTANT: welding. This control may be adjusted while 4-19. PREFLOW TIME CONTROL & SWITCH (Optional) (Figure 4-1) PREFLOW TIME t1 WARNING: ELECTRIC SHOCK can kill; UNEXPECTED HIGH FREQUENCY DURING PREFLOW can cause serious injury and equipment damage. • Do not allow electroslope switch or other unit control switch to be maintained closed during preflow time. • Always close and immediately open control switch to ensure that high frequency will not be present during preflow. If the unit is equipped with the optional electroslope and preflow timer, it is possible to have high frequency present during preflow without machine contactor energized. OM-530 Page 18 An adjustable 0 to 15 second coolant-gas PREFLOW TIME control can be provided for controlling the period of time shielding gas and coolant flows before the arc is initiated. The PREFLOW TIME control governs the operation of a preflow timer within the TIG-Unit. Rotating the control in a clockwise direction increases the preflow time. The scale surrounding the PREFLOW TIME control is calibrated in seconds to aid in the selection of a preflow time period suited to the individual welding operation. As soon as the remote contactor control switch has been closed, the preflow timer begins to time out the selected period of preflow time. Once the timer has timed out, the gas and coolant valves remain open and the contactor closes providing weld power. The timer automatically resets and is ready for another weld cycle whenever the contactor is opened. When coolant-gas preflow is desired, the PREFLOW TIME switch must be placed in the ON position. Conversely, by placing the PREFLOW TIME switch in the OFF position and rotating the PREFLOW TIME control to minimum, coolant-gas preflow is not available. WARNING: ELECTRIC SHOCK can kill. • Do not touch live electrical parts. • Set PREFLOW TIME control (if applicable) to 0 (minimum) when not using the preflow device. The preflow device (if applicable) is always active even though the PREFLOW TIME switch is in the OFF position. 4-20. SPOT TIME CONTROL (Optional) (Figure 4-1) AND SWITCH SPOT TIME t An adjustable 0 to 5 second SPOT TIME control can be provided for controlling the period of time weld power is available for spot welding. The SPOT TIME control governs the operation of a spot timer within the TIG-Unit. Rotating the control in a clockwise direction increases the spot time. The scale surrounding the SPOT TIME control is calibrated in seconds to aid the selection of a spot time period suited to the individual welding operation. When spot welding is desired, the SPOT TIME switch must be placed in the ON position. Conversely, by placing the SPOT TIME switch in the OFF position, spot welding is not available, despite the position of the SPOT TIME control. The spot weld timer begins to time out as soon as an arc is initiated. When the time set on the SPOT TIME control has elapsed, weld output is cut off and the postflow timer starts. Upon closure of the remote contactor control switch, the operator may proceed with establishing an arc provided that the preflow timer, if applicable, has timed out. As soon as an arc is struck, the spot weld timer begins timing out. The remote contactor control switch must remain closed throughout the entire spot welding time interval. If the remote contactor control switch is released prior to the completion of the spot weld cycle, spot weld output ceases and the spot weld timer will reset for the next cycle. After completion of the spot weld cycle, the remote contactor control switch must be released to re- set the spot weld timer. Whenever the SPOT TIME switch is in the ON position, the AMPERAGE switch on the TIG-Unit can be placed in either the PANEL or REMOTE position to suit the desired application. However, the OUTPUT (CONTACTOR) switch on the welding power source must be in the REMOTE position. SECTION 5 – SEQUENCE OF OPERATION WARNING: ELECTRIC SHOCK can kill; MOVING PARTS can cause serious injury; IMPROPER AIRFLOW AND EXPOSURE TO ENVIRONMENT can damage internal parts. • Do not touch live electrical parts. • Keep all covers and panels in place while operating. Warranty is void if the Tig-Unit is operated with any portion of the outer enclosure removed. ARC RAYS, SPARKS, AND HOT SURFACES can burn eyes and skin; NOISE can damage hearing. • Wear correct eye, ear, and body protection. FUMES AND GASES can seriously harm your health. • Keep your head out of the fumes. • Ventilate to keep from breathing fumes and gases. • If ventilation is inadequate, use approved breathing device. HOT METAL, SPATTER, AND SLAG can cause fire and burns. • Watch for fire. • Keep a fire extinguisher nearby, and know how to use it. • Do not use near flammable material. • Allow work and equipment to cool before handling. MAGNETIC FIELDS FROM HIGH CURRENTS can affect pacemaker operation. • Wearers should consult their doctor before going near arc welding, gouging, or spot welding operations. See Arc Welding Safety Precautions in the welding power source Owner’s Manual for basic welding safety information. 5-1. GAS TUNGSTEN ARC WELDING WARNING: Read and follow safety information at beginning of entire Section 5 before proceeding. 1. Make all necessary connections as instructed in Section 4. IMPORTANT: For Gas Tungsten Arc Welding applications, place both the AMPERAGE and the OUTPUT (CONTACTOR) switches on the welding power source in the REMOTE 14 position. 2. Connect the shielding gas supply hose to the side of the GAS valve labeled IN under the front access door (see Section 3-11). 3. Connect the coolant supply hose to the side of the COOLANT valve labeled IN under the front access door (see Section 3-12). 4. If remote control of any type (amperage, contactor, etc.) is desired, connect the remote control to the REMOTE receptacle under the front access door on the TIG-Unit. (See Section 3-10 and Figure 4-1.) 5. Place the GAS/COOLANT switch in the ON position (see Section 4-3). 6. Place the HIGH FREQUENCY switch in the ON position and rotate the HIGH FREQUENCY control to the desired position (see Sections 4-6 and 4-7). 7. Place the POLARITY switch in the desired position (see Section 4-2). 8. Place the AMPERAGE switch in the desired position. Rotate the AMPERAGE ADJUSTMENT control to the desired position (see Section 4-1). 9. If the unit is equipped with a Pulser, and the arc pulsing function is desired, place the PULSES switch in the ON position and adjust the Pulser controls as instructed in Sections 4-9 thru 4-12. If arc pulsing is not desired, place the PULSES switch in the OFF position. 10. If the unit is equipped with an Electroslope, and the sloping function is desired, place the ELECTROSLOPE switch in the ON position and adjust the Electroslope controls as instructed in Sections 4-14 thru 4-18. If sloping is not desired, place the Electroslope switch in the OFF position. IMPORTANT: If an Electroslope is used, the AMPERAGE switch on the TIG-Unit must be in the PANEL position. 11. Wear dry insulating gloves and clothing, and wear welding helmet with proper filter lens according to ANSI Z49.1. 12. Prepare for welding as follows: a. Connect work clamp to clean, bare metal at workpiece. OM-530 Page 19 b. Select and obtain proper tungsten electrode (see Table 6-2). 4. Place the POLARITY switch in the desired position (see Section 4-2). c. 5. Wear dry insulating gloves and clothing, and wear welding helmet with proper filter lens according to ANSI Z49.1. Prepare tungsten electrode according to Section 6-2, and insert into torch). 13. Turn on shielding gas and coolant, if applicable. 14. Rotate the GAS/COOLANT POSTFLOW time control to the desired coolant-gas postflow time (see Section 4-4). 6. Prepare for welding as follows: a. Connect work clamp to clean, bare metal at workpiece. 15. Depress the POWER switch on the welding power source to the ON position. b. Select and obtain proper electrode, and insert into electrode holder. 16. Connect the 115 volts ac plug from the TIG-Unit to its power supply, if applicable. 7. Depress the POWER switch on the welding power source to the ON position. 17. Begin welding. 5-2. SHIELDED METAL ARC WELDING WITH TIGUNIT WARNING: Read and follow safety information at beginning of entire Section 5 before proceeding. 8. Connect the 115 volts ac plug from the TIG-Unit to its power supply if applicable. 9. Begin welding. 5-3. SHUTTING DOWN 1. Stop welding. 1. Make all necessary connections as instructed in Section 4. 2. Allow the unit to idle for three minute with no load applied. IMPORTANT: For Shielded Metal Arc Welding applications, place the AMPERAGE switch in the PANEL position and the OUTPUT (CONTACTOR) switch in the ON position. At this point the AMPERAGE ADJUSTMENT control and AMPERAGE switch on the TIG-Unit are not functional. 3. Depress the POWER switch on the welding power source to the OFF position. 2. Place the GAS/COOLANT switch in the OFF position (see Section 4-3). 3. Place the HIGH FREQUENCY switch in the OFF position (see Section 4-6). 4. Disconnect the 115 volts ac plug from its power supply, if applicable. 5. Turn off the shielding gas and coolant supply if applicable. WARNING: HIGH CONCENTRATION OF SHIELDING GAS can harm health or kill. • Shut off gas supply when not in use. SECTION 6 – MAINTENANCE & TROUBLESHOOTING 6-1. ROUTINE MAINTENANCE (Table 6-1) IMPORTANT: Every six months inspect the labels on this unit for legibility. All precautionary labels must be maintained in a clearly readable state and replaced when necessary. See Parts List for part number of precautionary labels. WARNING: ELECTRIC SHOCK can kill. • Do not touch live electrical parts. • Shut down welding power source, and disconnect input power employing lockout/tagging procedures before inspecting, maintaining, or servicing. OM-530 Page 20 Lockout/tagging procedures consist of padlocking line disconnect switch in open position, removing fuses from fuse box, or shutting off and red-tagging circuit breaker or other disconnecting device. MOVING PARTS can cause serious injury. • Keep away from moving parts. HOT SURFACES can cause severe burns. • Allow cooling period before servicing. Maintenance to be performed only by qualified persons. Table 6-1. Maintenance Schedule Frequency* should not exceed the diameter of the tungsten electrode by more than 1-1/2 times. For example, the end of a 1/8 in. (3.2 mm) diameter tungsten electrode should not exceed a 3/16 in. (4.8 m) diameter end. Maintenance Every month. Units in heavy service environments: Check labels, weld cables, clean internal parts. Every 3 months. Check weld cables (see Section 6-1A). Every 6 months. Check all labels (see IMPORTANT block, Section 6-1). Clean internal parts (see Section 6-1B). *Frequency of service is based on units operated 40 hours per week. Increase frequency of maintenance if usage exceeds 40 hours per week. A. Weld Cables Every three months inspect cables for breaks in insulation. Repair or replace cables if insulation breaks are present. Clean and tighten connections at each inspection. B. Internal Cleaning Every six months blow out or vacuum dust and dirt from the inside of the unit. Remove the outer enclosure, and use a clean, dry airstream or vacuum suction for the cleaning operation. If dusty or dirty conditions are present, clean the unit monthly. 6-2. TUNGSTEN ELECTRODE Figure 6-1 And Figure 6-2) (Table 6-2, B. For DC Electrode Negative Welding (Figure 6-1 And Figure 6-2) CAUTION: HOT FLYING METAL PARTICLES can injure personnel, start fires, and damage equipment; TUNGSTEN CONTAMINATION can lower weld quality. • Shape tungsten electrode only on grinder with proper guards in a safe location wearing proper face, hand, and body protection. • Do not use same wheel for any other job, or the tungsten will become contaminated. Shape tungsten electrodes on a fine grit, hard abrasive wheel used only for tungsten shaping. Grind tungsten electrodes so that grinding marks run lengthwise with the electrode. These procedures reduce the possibility of the tungsten electrode transferring foreign matter into the weld and help reduce arc wander. Grind the end of the tungsten electrode to a taper for a distance of 2 to 2-1/2 electrode diameters in length. For example, the ground surface for a 1/8 in. (3.2 mm) diameter tungsten electrode should be 1/4 to 5/16 in. (6.4 to 8.0 mm) long. For additional information, see your distributor for a handbook on the Gas Tungsten Arc Welding (GTAW) process. TUNGSTEN PREPARATION: IDEAL Use Table 6-2 to select the correct size and type tungsten electrode. Prepare the tungsten electrode using the following guidelines. A properly prepared tungsten electrode is essential in obtaining a satisfactory weld. 1-1/2 Times Electrode Diameter Stable Arc Straight Ground 2-1/2 Times Electrode Diameter Flat (The Dia. Of This Flat Governs Amperage Capacity) AC And DC Electrode Positive DC Electrode Negative TUNGSTEN PREPARATION: WRONG S-0161 Figure 6-1. Properly Prepared Tungsten Electrodes A. For AC or DC Electrode Positive Welding (Figure 6-1) Ball the end of tungsten electrodes used for ac or dc electrode positive welding before beginning the welding operation. Weld amperage causes the tungsten electrode to form the balled end. The diameter of the end Arc Wander Point Radial Ground S-0162 Figure 6-2. Tungsten Preparation OM-530 Page 21 Table 6-2. Tungsten Size Chart Amperage Range - Polarity - Gas Type Electrode Diameter Pure Tungsten (Green Band) DC-Argon Electrode Negative/Straight Polarity DC-Argon Electrode Positive/Reverse Polarity AC-Argon Using High Frequency AC-Argon Balanced Wave Using High Freq. .010” .020” .040” 1/16” 3/32” 1/8” 5/32” 3/16” 1/4” Up to 15 5-20 15-80 70-150 125-225 225-360 360-450 450-720 720-950 * * * 10-20 15-30 25-40 40-55 55-80 80-125 Up to 15 5-20 10-60 50-100 100-160 150-210 200-275 250-350 325-450 Up to 10 10-20 20-30 30-80 60-130 100-180 160-240 190-300 250-400 Up to 25 15-40 25-85 50-160 135-235 250-400 400-500 500-750 750-1000 * * * 10-20 15-30 25-40 40-55 55-80 80-125 Up to 20 15-35 20-80 50-150 130-250 225-360 300-450 400-500 600-800 Up to 15 5-20 20-60 60-120 100-180 160-250 200-320 290-390 340-525 * * * * * * * * * * * * * * * * * * Up to 20 15-35 20-80 50-150 130-250 225-360 300-450 400-550 600-800 Up to 15 5-20 20-60 60-120 100-180 160-250 200-320 290-390 340-525 2% Thorium Alloyed Tungsten (Red Band) .010” .020” .040” 1/16” 3/32” 1/8” 5/32” 3/16” 1/4” Zirconium Alloyed Tungsten (Brown Band) .010” .020” .040” 1/16” 3/32” 1/8” 5/32” 3/16” 1/4” *NOT RECOMMENDED The figures listed are intended as a guide and are a composite of recommendations from American Welding Society (AWS) and electrode manufacturers. S-0009/8-88 6-3. SPARK GAP ADJUSTMENT (Figure 6-3) It is necessary to readjust the spark gaps every three to four months or when intermittent operation occurs. Normal spark gap setting is 0.008 in. (0.203 mm). High-frequency output varies with the spark gap setting. When a great amount of high frequency is necessary, the spark gaps can be adjusted to 0.010 in. (0.254 mm). This, however, increases high-frequency radiation which increases interference with communications equipment. It is suggested that a minimum spark gap setting be used. OM-530 Page 22 IMPORTANT: Spark gaps widen with normal operation. At regular inspections, check and maintain the spark air gap to ensure consistent welding results and compliance with FCC radiation regulations. IMPORTANT: Do not clean or dress points since the material at the tips is tungsten and impossible to file. The entire point should be replaced when the tungsten section has completely disappeared. This unit is provided with a spark gap assembly located inside the unit in the lower right side (refer to Parts List views). To adjust spark gaps, proceed as follows: WARNING: ELECTRIC SHOCK can kill. • Do not touch live electrical parts. no flow of gas and coolant, and no high-frequency output. Shut down welding power source, and disconnect input power employing lockout/tagging procedures before inspecting, maintaining, or servicing. Lockout/tagging procedures consist of padlocking line disconnect switch in open position, removing fuses from fuse box, or shutting off and red-tagging circuit breaker or other disconnecting device. A. Fuse F1 • 1. Remove top cover and right side panel, and locate spark gaps according to Parts List Views. 2. Loosen screws A on both sides. 3. Place feeler gauge of proper thickness between points C. 4. Apply slight pressure against points B so feeler gauge is held firmly in gap. 6. Close and secure front panel access door. C A B A B B. Fuse F2 When the unit is connected to 230 volts in the welding power source, the entire TIG-Unit is protected by a 600 volts, 10 ampere, cartridge type fuse F2. This fuse is located on the center mounting panel below terminal strip 1T. Should this fuse open, the TIG-Unit will completely shut down. 6-5. CIRCUIT BOARD HANDLING PRECAUTIONS WARNING: ELECTRIC SHOCK can kill. • Do not touch live electrical parts. • Shut down welding power source, and disconnect input power employing lockout/tagging procedures before inspecting, maintaining, or servicing. Lockout/tagging procedures consist of padlocking line disconnect switch in open position, removing fuses from fuse box, or shutting off and red-tagging circuit breaker or other disconnecting device. 5. Tighten screws A. C Fuse F1 is a 3 ampere, glass fuse located on the center mounting panel below terminal strip 1T. If this fuse should open, there would be no remote control of the contactor. S-0043 Figure 6-3. Spark Gap Adjustment 6-4. OVERLOAD PROTECTION WARNING: ELECTRIC SHOCK can kill. • Do not touch live electrical parts. • Shut down welding power source, and disconnect input power employing lockout/tagging procedures before inspecting, maintaining, or servicing. Lockout/tagging procedures consist of padlocking line disconnect switch in open position, removing fuses from fuse box, or shutting off and red-tagging circuit breaker or other disconnecting device. INCORRECT FUSE can damage unit. • Use only replacement fuse of same size, type, and rating (see Parts List). The control circuit in the TIG-Unit is protected by a 15 ampere circuit breaker CB1 located under the front access door to the left of the duplex receptacle. Should this circuit breaker trip, it would be necessary to manually reset it by depressing the button. The symptoms of a tripped breaker are no output at the duplex receptacle, CAUTION: ELECTROSTATIC DISCHARGE (ESD) can damage circuit boards. • Put on properly grounded wrist strap BEFORE handling circuit boards. • Transport circuit boards in proper staticshielding carriers or packages. • Perform work only at a static-safe work area. INCORRECT INSTALLATION or misaligned plugs can damage circuit board. • Be sure that plugs are properly installed and aligned. EXCESSIVE PRESSURE can break circuit board. • Use only minimal pressure and gentle movement when disconnecting or connecting board plugs and removing or installing board. 6-6. TROUBLESHOOTING (Table 6-3) WARNING: ELECTRIC SHOCK can kill. • Do not touch live electrical parts. • Shut down welding power source, and disconnect input power employing lockout/tagging procedures before inspecting, maintaining, or servicing. Lockout/tagging procedures consist of padlocking line disconnect switch in open position, removing fuses from fuse box, or shutting off and red-tagging circuit breaker or other disconnecting device. OM-530 Page 23 MOVING PARTS can cause serious injury. • Keep away from moving parts. HOT SURFACES can cause severe burns. • Allow cooling period before servicing. Troubleshooting to be performed only by qualified persons. It is assumed that the unit was properly installed according to Section 3 of this manual, the operator is familiar with the function of controls, the unit was working properly, and that the trouble is not related to the welding process. The following table is designed to diagnose and provide remedies for some of the troubles that may develop in this unit. Use this table in conjunction with the circuit diagram while performing troubleshooting procedures. If the trouble is not remedied after performing these procedures, contact the nearest Factory Authorized Service Station. In all cases of equipment malfunction, strictly follow the manufacturer’s procedures and instructions. IMPORTANT: Be sure that all receptacle connections are secure, and that all controls and switches are in the proper positions before beginning troubleshooting procedures. Table 6-3. Troubleshooting TROUBLE No weld output. PROBABLE CAUSE REMEDY Poor and/or improper connec- Check connections. Be sure that they are tions from TIG-Unit to welding correct and secure (see Sections 3-3 and power source output terminals. 3-4). No output from welding power See welding power source Owner’s Manual. source. AMPERAGE and/or OUTPUT (CONTACTOR) switches on welding power source not in proper positions. Be sure that the AMPERAGE control switch is in the REMOTE position, and the OUTPUT (CONTACTOR) switch is in the appropriate position for the selected welding situation. POLARITY SWITCH S3 not Be sure that the POLARITY SWITCH S3 is making proper contact. placed completely into the desired position. No control of the output; none of Fuse F2; poor connection to Check fuse F2 and replace if necessary. the controls function. welding power source input Check input terminal board on welding power terminal board. source for loose or broken connections. Be sure that all connections are intact and secure. Erratic weld output; controls not Loose connections at amphe- Check both amphenol receptacles and be operating properly. nol receptacles. sure that they are properly tightened. Remote OUTPUT (CONTACTOR) Fuse F1. control does not function. Check fuse F1, and replace if necessary. AMPERAGE ADJUSTMENT con- Circuit breaker CB1. trol and Remote AMPERAGE and/ or OUTPUT (CONTACTOR) function properly; no output at duplex receptacle RC1, gas and coolant does not flow, and high frequency is inoperative. Manually reset CB1. OM-530 Page 24 Diagram 7-1. Circuit Diagram For TIG-Unit With Options Circuit Diagram No. SC-121 852-A SECTION 7 – ELECTRICAL DIAGRAMS OM-530 Page 25 Circuit Diagram No. SA-045 288-C Diagram 7-2. Circuit Diagram For Postflow Timer Circuit Diagram No. SB-088 800-A Diagram 7-3. Circuit Diagram For Pulser (Optional) OM-530 Page 26 OM-530 Page 27 Diagram 7-4. Circuit Diagram For Electroslope (Optional) Circuit Diagram No. SC-080 063-E Circuit Diagram No. SA-096 935-A Diagram 7-5. Circuit Diagram For Preflow Timer (Optional) Circuit Diagram No. SA-049 109-A Diagram 7-6. Circuit Diagram For Spot Timer (Optional) OM-530 Page 28 SECTION 8 – CERTIFICATION FOR HIGH FREQUENCY ARC WELDING EQUIPMENT 8-1. GENERAL The following information is necessary to make a proper installation of the high-frequency arc welding equipment described in this instruction manual. In order to comply with Part 18 of the Rules and Regulations of the Federal Communications Commission (FCC), the certificate in the front of this manual must be filled in completely and signed after the unit has been correctly installed. The certificate must be kept WITH THE EQUIPMENT AT ALL TIMES to comply with the regulation. The manufacturer of the equipment covered herein has conducted approved field tests and certifies that the radiation can be expected to be within the legal limits if the correct installation procedures, as outlined, are followed. The importance of a correct installation cannot be overemphasized since case histories of interference due to highfrequency stabilized arc welding equipment have shown that in most cases, an inadequate installation was at fault. In the event that interference with authorized FCC services occurs, the user is required to take suitable steps to clear the situation. The Factory Service Department personnel will assist the user by supplying technical information. Instead of complying with the installation requirements and the certification of each individual installation, the user may elect to certify the entire plant by having a qualified engineer make a plant radiation survey. In such cases, these instructions could serve as a guide in minimizing interference that might be caused by the highfrequency arc welding equipment. Many processes and applications of processes require open-circuit voltages sufficient to jump from the electrode to the work without making direct contact. The maximum open-circuit voltage (OCV) of a welding power source is not sufficient for this. In the Submerged Arc Welding (SAW) process, granules of flux often get between the electrode and the workpiece making starting of the arc difficult at normal open-circuit voltages. A higher voltage is also required to start and maintain a stable arc in processes like the Gas Tungsten Arc Welding (GTAW) process. In these cases it will take several thousand volts to cause an electrical spark to jump this gap between the electrode and the work, creating an initial path of ionization that the arc current can follow without the hazards that would be present at power frequency. In order to provide these higher voltages, it is common practice to superimpose a high open-circuit voltage on the output of a welding power source by using high-frequency techniques. The high-frequency voltage can be a source of interference and will be discussed in this section. 8-2. DEFINITIONS A. High-Frequency Assisted Arc Welding Power Sources In the arc welding process, high frequency may be used for initiating an arc or stabilizing the arc once it is struck, or for both functions. The energy from the high-frequency source must flow to the welding electrode via a good quality, low impedance, and well insulated connecting cable. B. Welding Circuit The welding circuit consists of all attachments connected to the welding terminals. C. Welding Terminals Welding terminals are the terminals which provide welding power and high-frequency energy to the arc. D. Electrode Terminal The electrode terminal is the terminal to which the electrode cable or welding torch is connected. E. Welding Torch A device used in the Gas Tungsten Arc Welding (GTAW) process to control the position of the electrode, to transfer current to the arc, and to direct the flow of shielding gas. F. Work Terminal The work terminal is the terminal to which the welding workpiece is connected. G. Welding Zone The welding zone is the space within 50 ft. (15 m) in all directions from the midpoint between the power source and the welding arc (see Figure 8-6). H. Bonding Bonding refers to connecting metallic objects together to cause the objects to be at the same potential regardless of any current flow between them (see Figure 8-3 and Figure 8-4). I. Grounding (Earthing) Depending on the practices within jurisdictions, one of these terms is commonly used to indicate the connection, or bonding, of parts of the apparatus to the earth.The terms may be used interchangeably. J. Receiver A receiver is any device normally used for receiving electromagnetic energy and converting it to useful communications purposes. K. Conduction Conduction is the transmission of high-frequency energy via an electrical conductor or conducting medium. OM-530 Page 29 L. High Frequency 8-4. LOCATION High frequency is radio frequency energy, either continuous or pulsed, used to start or stabilize a welding arc. Locate the high-frequency power source as close to the welding process as possible. Also consider the nearness of a suitable ground connection when selecting a site for the installation of the power source. Ideally, the high-frequency power source should be located in an area where there is a limited amount of miscellaneous wiring (lighting, power, telephone, communications, and other unshielded conductors) located within the welding zone. Ungrounded, metallic conductors in the welding zone can act as antennas which will pick up, conduct, or reradiate the high-frequency energy transmitted by the welding circuit. All miscellaneous wiring in the welding zone should be enclosed in grounded, rigid metallic conduit, copper braid, or some other material having an equivalent shielding efficiency, and grounded at 50 ft. (15 m) intervals (see Figure 8-1). M. High-Frequency Assisted Arc Welding High-frequency assisted arc welding refers to any of the arc welding processes requiring high frequency. N. Interference Interference is the unwanted and problematic reception of high-frequency energy. O. Radiation Radiation is the transmission of high-frequency energy through space. 8-3. HIGH-FREQUENCY RADIATION Installations using high frequency, either as an integral part of the power source or as an accessory unit, will produce some high-frequency radiation. Such radiation, if the signal strength is sufficient at the receiving device, can cause an inconvenience or disruption of communications or can cause malfunction in sensitive electronic controls and systems. The four major causes of highfrequency radiation are as follows: Shielded Wire Electrode Holder Ground At 50ft. (15 m) Intervals 50 ft. (15 m) A. Direct Radiation From The Power Source Or High-Frequency Accessory Unit Work Clamp Direct radiation is that radiation emanating directly from the power source or accessory unit. Radiation from the power line and welding power source accessories is not considered to be direct radiation from the power source or accessory unit. B. Direct Radiation From The Welding Circuit Any attachment to the output terminals of the high-frequency source is capable of acting as an antenna and radiating high-frequency energy. Attachments include weld cables, torches, worktables, etc. Since direct radiation from the welding circuit is the major source of radiation, it is important to keep attachments to a minimum. C. Conduction And Radiation From The Power Line Most power lines are capable of conducting high-frequency energy which may cause interference directly or by reradiation from these power lines. Normally such radiation is small when compared to that caused by radiation from the weld cables. D. Reradiation Radiation from the welding circuit can be picked up by ungrounded metal objects or unshielded wiring in the immediate vicinity, conducted some distance, and reradiated. This can be a troublesome source of interference. OM-530 Page 30 Ground High-Frequency Welding Power Source Keep all unshielded and ungrounded wires out of the welding zone. S-0017 Figure 8-1. Requirements To Minimize Reradiation Pickup In The Vicinity Of The Welding Zone 8-5. GENERAL INSTALLATION PROCEDURES A. Weld Cables Keep the weld cables as short as possible and do not exceed 25 ft. (8 m) in length. Position the cables as close together and as close to the floor or ground plane as possible. If the welding operation must be carried out at a point farther than 25 ft. (8 m) from the welding power source, use a portable high-frequency source and locate the portable unit within 25 ft. (8 m) of the welding electrode. B. High-Frequency Assisted Arc Welding Power Sources When the high-frequency assisted arc welding power source is in operation, all service doors and covers must be closed, securely fastened, and adequately bonded to ensure good contact around the entire perimeter of the opening. Except for changes and adjustments allowed by the manufacturer, the high-frequency assisted arc welding power source should not be modified. Place leads on floor or on boards and keep 3/4 in. (19 mm) to 1 in. (25 mm) apart. High-Frequency Welding Power Source Electrode Holder Electrical Input Supply Work Clamp Ground S-0018 Figure 8-2. General Rules For Welding Leads C. Grounding (Earthing) The Weld Cables Be sure that the enclosure of the high-frequency power source is firmly grounded to the WORK terminal. If the high-frequency power source is not labeled as being internally high-frequency grounded, then this ground must be made by grounding the enclosure to the WORK terminal with No. 12 AWG gauge or smaller wire. Connect the ground wire to a driven ground rod or to a water pipe which enters the earth within 10 ft. (3 m) of the highfrequency power source. D. Metal Buildings Installation of a high-frequency power source within a suitably bonded and grounded (earthed) metal building can be an effective means of reducing high-frequency radiation. Wherever possible, install high-frequency power sources in such places. Grounded Copper Screens Figure 8-3. Grounding And Bonding Panels Of Metal Building However, when the high-frequency power source is installed within a metal building, precautions must be taken to be sure that the building is properly bonded and grounded (earthed). This can be accomplished by placing several good electrical ground rods around the periphery of the building. During the construction of a new building of any type having metal in the structure, be sure that all the reinforcing and structural steel is bonded together (as by welding each piece of metal to all other adjacent pieces). For metal buildings, adjacent metal panels should be bolted or welded together at frequent intervals.All windows and doorways should be covered with grounded copper screen or galvanized hardware cloth of not more than 1/4 in. (6.4 mm) mesh. E. Shielding Of Miscellaneous Wiring In The Welding Zone Ungrounded, metallic conductors in the welding zone can act as antennas which will pick up, conduct, and/or reradiate the high-frequency energy transmitted by the welding circuit located within or near the welding zone. This means that all ungrounded water pipes must be grounded, and that all lighting, power, telephone, communications, and other conductors within the welding zone must be enclosed in grounded, rigid metallic conduit, copper braid, or some other material having an equivalent shielding capability (spirally wound, flexible, metallic conduit is not suitable). Shielding of the miscellaneous wiring in the welding zone must be grounded at 50 ft. (15 m) intervals. Excellent low resistance electrical connections must be maintained between conduit sections (see Figure 8-4). Metal Building Panels Copper Strap S-0020 Driven Ground Rod Grounding Wire Figure 8-4. Bonding Method For Poor Conductors Metal Panels F. Metal Panels Bonding Of Metal Panels S-0019 Power Service The high-frequency power source should be connected to the line input power supply as instructed in this manual. If the unit is equipped with a power cord, the supply conductors serving the high-frequency power source should be completely enclosed in solid metallic conduit, or in equivalent shielding, up to the point of connection with the power cord. The solid, metallic conduit, or equivalent shielding, should extend the entire distance from the power entrance location in the building to the high-frequency power source. Shielding should be electrically continuous throughout its length and should be OM-530 Page 31 connected so that good electrical contact is provided between the shield and the high-frequency power source. High-Frequency Welding Power Source a. Have all unshielded power, lighting, and communication wires within the welding zone placed in grounded shields or relocated outside the welding zone. b. Ground all large metallic objects, long guy wires, or support wires within the welding zone. 50 ft. (15 m) Line Input Power Supply c. Solid Metallic Conduit Line Fuse And Switch Box Ground S-0021 Figure 8-5. Installation Of High-Frequency Stabilized Arc Welding Power Source Be sure that there are no external power or telephone wires, which may be off the immediate premises, within the welding zone. High-Frequency Welding Power Source 8-6. GUIDELINES FOR INSTALLATION OF HIGHFREQUENCY ASSISTED ARC WELDING POWER SOURCES 1. Locate the equipment so that the ground wire of the high-frequency power source can be kept as short as possible. 2. Shield the line input power leads up to the point of connection with the enclosure of the high-frequency power source as specified by the manufacture’s requirements (see Section 8-5F). 3. Be sure that there is good electrical contact made at the enclosure of the high-frequency welding power source, through the conduit, and back to the service box. Be sure that the conduit system is continuous to a point at least 50 ft. (15 m) from the equipment, and that the conduit system is one complete run within the high-frequency zone. If rigid, metallic conduit is not used, be sure that the shielding used has equivalent shielding efficiency. Copper sleeving, lead covered cable, or the equivalent, is satisfactory. Spirally wound, flexible, metallic conduit is not suitable. Center Point Electrode Holder S-0022 Figure 8-6. Welding Zone 10. Use driven ground rods which enter the ground 10 ft. (3 m) or less from the ground connection, or cold water pipes, as the ground for the high-frequency welding power source. 11. Be sure that all ground connections are clean and tight. 12. If the high-frequency welding power source is operated within a metal building, be sure that the building is properly grounded. 8-7. INSTALLATION GUIDELINES CHECKLIST 4. Keep WORK and ELECTRODE cables as short and straight as possible. All items may not be necessary or practical for each installation. Complete the necessary items to eliminate interference with authorized FCC services. 5. Keep weld cables to a maximum length of 25 ft. (8 m). 1. Is equipment properly located? (See Sections 8-4, 8-5D, 8-5E, 8-6.1, and 8-6.9.) 6. Keep weld cables as close together and as close to the ground plane as possible. 2. Are ac input power connections properly made? (See Sections 8-5B, 8-6.2, and 8-6.3.) 7. Adjust spark gap setting to the minimum setting given in this manual. 3. Are weld cables and equipment properly installed? (See Sections 8-5A, 8-6.4, 8-6.5, and 8-6.6.) 8. Secure all service and access doors before operating. 4. Are ground connections properly made? (See Sections 8-5C, 8-6.1, 8-6.6, 8-6.11, and 8-6.12.) 9. Visualize the welding zone as a sphere with a 50 ft. (15 m) radius centered on a point between the power source and the electrode holder (see Figure 8-6), and proceed as follows: 5. Is equipment properly set up and adjusted? (See Sections 8-6.7 and 8-6.8.) OM-530 Page 32 SECTION 9 – PARTS LIST Quantity Model Part No. Item Dia. No. Mkgs. Description Basic W/Electroslope W/Pulser W/Pulser & Electroslope Figure 9-1. Main Assembly 1 . . . . . . . . . . 000 527 . . BLANK, snap-in nyl .875mtg hole . . . . . . . . . . . . . . . . . . . . . . . . . . . . . . . . 010 116 . . GROMMET, rbr .375 ID x .500mtg hole . . . . . . . . . . . . . . 2 . . . . . . . . . . 008 251 . . COVER, box (used when unit is separate from power source) . . . . . . . . . . . . . . . . . . . . . . . . . . . . . . . . . . . . 2 . . . . . . . . . . 006 017 . . COVER, box (used when unit is mounted on power source) . . . . . . . . . . . . . . . . . . . . . . . . . . . . . . . . . . . . 3 . . . . . . . . . . 026 627 . . GASKET, lifting eye cover . . . . . . . . . . . . . . . . . . . . . . . . . . 4 . . . . . . . . . . 008 267 . . LIFT EYE . . . . . . . . . . . . . . . . . . . . . . . . . . . . . . . . . . . . . . . . 5 . . . . . . . . . . . Fig 9-2 . . PANEL, control rear w/components . . . . . . . . . . . . . . . . . . 6 . . . . . . . . . . 008 263 . . PANEL, rear . . . . . . . . . . . . . . . . . . . . . . . . . . . . . . . . . . . . . . 7 . . . . . . . . . . 115 104 . . CONNECTOR, clamp cable .500 in . . . . . . . . . . . . . . . . . . 8 . . . . . . . . . . 603 097 . . GROMMET, rbr .843 ID x 1.250mtg hole . . . . . . . . . . . . . 9 . . . . . . . . . . 111 121 . . HF PANEL, (Fig 9-3) . . . . . . . . . . . . . . . . . . . . . . . . . . . . . . 1 ... 1 .... 1 ..... 1 1 ... 1 .... 1 ..... 1 1 ... 1 .... 1 ..... 1 1 1 1 1 1 1 2 1 ... ... ... ... ... ... ... ... 1 1 1 1 1 1 2 1 .... .... .... .... .... .... .... .... 1 1 1 1 1 1 2 1 ..... ..... ..... ..... ..... ..... ..... ..... 1 1 1 1 1 1 2 1 2 1 6 Fig 9-2 7 5 3 4 8 27 26 9 Fig 9-3 22 25 23 24 21 11 13 15 12 10 14 Fig 9-9 17 20 19 18 16 Fig 9-4 ST-059 536-C Figure 9-1. Main Assembly OM-530 Page 33 Item Dia. No. Mkgs. Part No. Quantity Model Description Basic W/Pulser W/Electroslope W/Pulser & Electroslope Figure 9-1. Main Assembly (Continued) 10 . . C8 . . . 009 062 11 . . . . . . . . . . 604 814 12 . . . . . . . . . 604 813 13 . . . . . . . . . 008 994 14 . . . . . . . . . 080 217 15 . . . . . . . . . . Fig 9-9 16 . . . . . . . . . . Fig 9-4 17 . . . . . . . . . 052 246 18 . PLG1 . . 144 310 . . . . . . . . . . . . . 134 732 19 . . . . . . . . . 079 739 20 . . . . . . . . . 21 . . . . . . . . . 22 . . . . . . . . . 23 . . . . . . . . . 24 . . . . . . . . . ............. 152 432 130 155 009 835 604 525 141 162 134 731 25 . . . . . . . . . 143 922 . . . . . . . . . . . . . 601 157 ............. ............. ............. ............. 057 359 110 089 141 162 134 731 . . . . . . . . . . . . . 079 739 . . . . . . . . . . . . . 600 343 . . . . . . . . . . . . . 039 685 . . . . . . . . . . . . . 052 654 . . . . . . . . . . . . . 130 003 . . . . . . . . . . . . . 039 273 . . . . . . . . . . . . . 039 685 . . . . . . . . . . . . . 052 246 . . . . . . . . . . . . . 152 568 . . . . . . . . . . . . . 141 685 . . . . . . . . . . . . . 143 922 . . . . . . . . . . . . . 079 534 26 . . . . . . . . . 27 . . . . . . . . . ............. ............. 080 232 080 231 020 279 087 318 . . CAPACITOR . . . . . . . . . . . . . . . . . . . . . . . . . . . . . . . . . . . . . 1 . . . 1 . . . . 1 . . . . . 1 . . NUT, stl hex reg .750-10 . . . . . . . . . . . . . . . . . . . . . . . . . . . 1 . . . 1 . . . . 1 . . . . . 1 . . WASHER, lock stl split .750 . . . . . . . . . . . . . . . . . . . . . . . . 1 . . . 1 . . . . 1 . . . . . 1 . . SCREW, .750-10 x 2.00 hexhd . . . . . . . . . . . . . . . . . . . . . 1 . . . 1 . . . . 1 . . . . . 1 . . PANEL, bottom . . . . . . . . . . . . . . . . . . . . . . . . . . . . . . . . . . . 1 . . . 1 . . . . 1 . . . . . 1 . . PANEL, control front w/components . . . . . . . . . . . . . . . . . 1 . . . 1 . . . . 1 . . . . . 1 . . PANEL, front w/components . . . . . . . . . . . . . . . . . . . . . . . . 1 . . . 1 . . . . 1 . . . . . 1 . . CABLE, pwr No. 20ga 5/c (order by ft) . . . . . . . . . . . . . . 4ft . . . 4ft . . . 4ft . . . 4ft . . CONNECTOR & PINS, (consisting of) . . . . . . . . . . . . . . . 1 . . . 1 . . . . 1 . . . . . 1 . . . . CONNECTOR, circ pin push-in 20-24ga Amp 213605-1 . . . . . . . . . . . . . . . . . . . . . . . . . . . . . . . . . 14 . . . 14 . . . 14 . . . 14 . . . . CONNECTOR, circ clamp str rlf sz 17-20 Amp 206322-2 . . . . . . . . . . . . . . . . . . . . . . . . . . . . . . . . . . 1 . . . 1 . . . . 1 . . . . . 1 . . SWITCH, control . . . . . . . . . . . . . . . . . . . . . . . . . . . . . . . . . . 1 . . . 1 . . . . 1 . . . . . 1 . . SWITCH, hand remote (consisting of) . . . . . . . . . . . . . . . . . . . . . 1 . . . . 1 . . . . SWITCH w/LEADS . . . . . . . . . . . . . . . . . . . . . . . . . . . . . . . . . . . . . . . . . . . 1 . . . . . 1 . . . . CABLE, port No.18 2/c (order by ft) . . . . . . . . . . . . . . . . . . . . . 25ft . . 25ft . . . . CONNECTOR & PINS, (consisting of) . . . . . . . . . . . . . . . . . . . . . . . . . . 1 . . . . . 1 . . . . . . CONNECTOR, circ pin push-in 14-18ga Amp 213603-1 . . . . . . . . . . . . . . . . . . . . . . . . . . . . . . . . . . . . . . . . . . . . . 14 . . . 14 . . . . . . CONNECTOR, circ clamp str rlf sz 17-20 Amp 206070-3 . . . . . . . . . . . . . . . . . . . . . . . . . . . . . . . . . . . . . . . . . . . . . 1 . . . . . 1 . . BLANK, snap-in metal .500mtg hole (Field installed units only) . . . . . . . . . . . . . . . . . . . . . . . . . . 3 . . . 3 . . . . 3 . . . . . 3 . . BLANK, snap-in nyl .375mtg hole . . . . . . . . . . . . . . . . . . . 2 . . . 2 . . . . 2 . . . . . 2 . . CABLE, interconnecting (consisting of) . . . . . . . . . . . . . . . 1 . . . 1 . . . . 1 . . . . . 1 . . . . CONNECTOR & PINS, (consisting of) . . . . . . . . . . . . . 1 . . . 1 . . . . 1 . . . . . 1 . . . . . . CONNECTOR, circ pin push-in 14-18ga Amp 213603-1 . . . . . . . . . . . . . . . . . . . . . . . . . . . . . . . 14 . . . 14 . . . 14 . . . 14 . . . . . . CONNECTOR, circ clamp str rlf sz 17-20 Amp 206322-2 . . . . . . . . . . . . . . . . . . . . . . . . . . . . . . . . 1 . . . 1 . . . . 1 . . . . . 1 . . . . CABLE, port No. 16 5/c (order by ft) . . . . . . . . . . . . . . 1ft . . . 1ft . . . 1ft . . . 1ft . . . . CONNECTOR, circ clamp str rlf sz 16-16S Amphenol 97-3057-8 . . . . . . . . . . . . . . . . . . . . . . . . . . . . 1 . . . 1 . . . . 1 . . . . . 1 . . . . CONNECTOR, circ 5skt rcpt Amphenol MS-3101A-16S-8S . . . . . . . . . . . . . . . . . . . . . . . . . . . . . . 1 . . . 1 . . . . 1 . . . . . 1 . . CABLE, adapter (consisting of) . . . . . . . . . . . . . . . . . . . . . 1 . . . 1 . . . . 1 . . . . . 1 . . . . CONNECTOR, circ 5 pin plug Amphenol MS-3106A-16S-8P . . . . . . . . . . . . . . . . . . . . . 1 . . . 1 . . . . 1 . . . . . 1 . . . . CONNECTOR, circ clamp str rlf sz 16-16S Amphenol AN-3057-8 . . . . . . . . . . . . . . . . . . . . . . . . . . . . 1 . . . 1 . . . . 1 . . . . . 1 . . . . CABLE, pwr No. 20ga 5/c (order by ft) . . . . . . . . . . . . 2ft . . . 2ft . . . 2ft . . . 2ft . . . . CONNECTOR & SOCKETS, (consisting of) . . . . . . . . 1 . . . 1 . . . . 1 . . . . . 1 . . . . . . CONNECTOR, circ skt push-in 20-24ga Amp 66331-5 . . . . . . . . . . . . . . . . . . . . . . . . . . . . . . . . 14 . . . 14 . . . 14 . . . 14 . . . . . . CONNECTOR, circ clamp str rlf sz17-20 Amp 206070-3 . . . . . . . . . . . . . . . . . . . . . . . . . . . . . . . . 1 . . . 1 . . . . 1 . . . . . 1 . . . . CONNECTOR, circ skt push-in 14-18ga Amp 66358-6 . . . . . . . . . . . . . . . . . . . . . . . . . . . . . . . . . . . 2 . . . 2 . . . . 2 . . . . . 2 . . PANEL, side RH . . . . . . . . . . . . . . . . . . . . . . . . . . . . . . . . . . 1 . . . 1 . . . . 1 . . . . . 1 . . PANEL, side LH . . . . . . . . . . . . . . . . . . . . . . . . . . . . . . . . . . 1 . . . 1 . . . . 1 . . . . . 1 . . CLAMP, stl cush .750dia x .281mtg hole (300 & 400A) . 2 . . . 2 . . . . 2 . . . . . 2 . . CLAMP, stl cush 1.000dia x .203mtg hole (500 & 600A) 2 . . . 2 . . . . 2 . . . . . 2 BE SURE TO PROVIDE MODEL AND SERIAL NUMBER WHEN ORDERING REPLACEMENT PARTS. OM-530 Page 34 Quantity Model Part No. Item Dia. No. Mkgs. Description Basic W/Electro slope W/Pulser W/Pulser Electroslope Figure 9-2. Panel, Control Rear w/Components (Fig 9-1 Item 5) 1 . . TE1 . . 038 894 2 . . . . . . . . . . 008 269 3 . . . 1T . . . 038 782 4 . . . 1T . . . 038 856 . . . . . . . . . . . . . 601 219 5 . . . FL1 . . 084 171 6 . . Shunt ♦030 081 6 . . Shunt ♦030 084 6 . . Shunt ♦079 388 7 . . . . . . . . . . 012 571 8 . . . F1 . . *012 634 9 . . . T1 . . . 008 995 10 . . . . . . . . . 070 404 11 . . . F2 . . *012 641 .. .. .. .. .. .. .. .. .. .. .. .. .. .. BLOCK, term 30A 4P . . . . . . . . . . . . . . . . . . . . . . . . . . . . . . PANEL, mtg components . . . . . . . . . . . . . . . . . . . . . . . . . . BLOCK, term 20A 10P . . . . . . . . . . . . . . . . . . . . . . . . . . . . BLOCK, term 20A 14P . . . . . . . . . . . . . . . . . . . . . . . . . . . . LINK, jumper term blk 20A . . . . . . . . . . . . . . . . . . . . . . . . . FILTER, line power 115/250V . . . . . . . . . . . . . . . . . . . . . . . SHUNT, meter 50MV 500A (300A) . . . . . . . . . . . . . . . . . . SHUNT, meter 50MV 600A (400A) . . . . . . . . . . . . . . . . . . SHUNT, meter 50MV 800A (500&600A) . . . . . . . . . . . . . . HOLDER, fuse mintr . . . . . . . . . . . . . . . . . . . . . . . . . . . . . . FUSE, mintr gl 3A . . . . . . . . . . . . . . . . . . . . . . . . . . . . . . . . . TRANSFORMER, 2kVA . . . . . . . . . . . . . . . . . . . . . . . . . . . HOLDER, fuse crtg . . . . . . . . . . . . . . . . . . . . . . . . . . . . . . . FUSE, crtg 10A 600V . . . . . . . . . . . . . . . . . . . . . . . . . . . . . 2 3 1 1 1 1 6 1 1 1 1 1 1 1 1 1 ... ... ... ... ... ... ... ... ... ... ... ... ... ... 1 1 1 1 5 1 1 1 1 1 1 1 1 1 .... .... .... .... .... .... .... .... .... .... .... .... .... .... 1 1 1 1 3 1 1 1 1 1 1 1 1 1 ..... ..... ..... ..... ..... ..... ..... ..... ..... ..... ..... ..... ..... ..... 1 1 1 1 2 1 1 1 1 1 1 1 1 1 6 5 4 1 11 10 7 9 8 ST-059 535-C Figure 9-2. Panel, Control Rear w/Components ♦Part of Optional Meter Kit (see Optional Equipment for kit number). *Recommended Spare Parts BE SURE TO PROVIDE MODEL AND SERIAL NUMBER WHEN ORDERING REPLACEMENT PARTS. OM-530 Page 35 Item No. Dia. Mkgs. Part No. Description 111 121 . . 1 . . . . . . . . . . . . . 601 838 . . 2 . . . . T3 . . . . . 033 373 . . 3 . . . . T2 . . . . . 074 398 . . 4 . . . . . . . . . . . . . 016 601 . . 5 . . . . . . . . . . . . . 605 742 . . 6 . . . . R6 . . . . . 083 784 . . 7 . . . . C6 . . . . . 106 935 . . 8 . . . C3,17 . . . 096 761 . . 9 . . . . . . . . . . . . . 010 885 . . . . . . . . . . . . . . . . . 602 042 . 10 . . . . . . . . . . . . . 111 181 . 11 . . . . . . . . . . . . 020 623 . 12 . . . . . . . . . . . . 020 622 . 13 . . . . G . . . . . *020 603 . 14 . . . . . . . . . . . . 095 621 . 15 . . . . . . . . . . . . 038 887 . 16 . . . . . . . . . . . . 603 737 . 17 . . . . . . . . . . . . 601 835 Quantity Figure 9-3. HF Panel (Fig 9-1 Item 9) . . NUT, brs hex .375-16 jam hvy . . . . . . . . . . . . . . . . . . . . . . . . . . . . . . . . . . . . . . . . . COIL, coupling air HF . . . . . . . . . . . . . . . . . . . . . . . . . . . . . . . . . . . . . . . . . . . . . . . . TRANSFORMER, high voltage 115V pri 3600V sec 30mA . . . . . . . . . . . . . . . . MOUNTING BOARD, component HF . . . . . . . . . . . . . . . . . . . . . . . . . . . . . . . . . . CLIP, mtg resistor .500 ID . . . . . . . . . . . . . . . . . . . . . . . . . . . . . . . . . . . . . . . . . . . . RESISTOR, WW fxd 100W 10 ohm . . . . . . . . . . . . . . . . . . . . . . . . . . . . . . . . . . . . CAPACITOR, polyp film 10uf 250VAC . . . . . . . . . . . . . . . . . . . . . . . . . . . . . . . . . . CAPACITOR, mica .002uf 10000VDC . . . . . . . . . . . . . . . . . . . . . . . . . . . . . . . . . . STRIP, conductor . . . . . . . . . . . . . . . . . . . . . . . . . . . . . . . . . . . . . . . . . . . . . . . . . . . SCREW, 10-32 x 1.00 rndhd - slt brs . . . . . . . . . . . . . . . . . . . . . . . . . . . . . . . . . . . LINK, connecting . . . . . . . . . . . . . . . . . . . . . . . . . . . . . . . . . . . . . . . . . . . . . . . . . . . . SPARK GAP ASSEMBLY (consisting of) . . . . . . . . . . . . . . . . . . . . . . . . . . . . . . . . . HOLDER, points . . . . . . . . . . . . . . . . . . . . . . . . . . . . . . . . . . . . . . . . . . . . . . . . . . . . POINT, spark gap . . . . . . . . . . . . . . . . . . . . . . . . . . . . . . . . . . . . . . . . . . . . . . . . . . . BASE, spark gap . . . . . . . . . . . . . . . . . . . . . . . . . . . . . . . . . . . . . . . . . . . . . . . . . . STUD, pri bd brs 10-32 x 1.375 . . . . . . . . . . . . . . . . . . . . . . . . . . . . . . . . . . . . . . . SCREW, .375-16 x 1.75 rndhd - slt brs . . . . . . . . . . . . . . . . . . . . . . . . . . . . . . . . . NUT, brs hex 10-32 . . . . . . . . . . . . . . . . . . . . . . . . . . . . . . . . . . . . . . . . . . . . . . . . 3 2 1 4 1 1 1 2 1 2 2 4 1 1 1 4 4 1 2 2 6 4 5 6 16 17 7 15 8 13 14 12 10 9 ST-140 813-A 11 Figure 9-3. HF Panel *Recommended Spare Parts. BE SURE TO PROVIDE MODEL AND SERIAL NUMBER WHEN ORDERING REPLACEMENT PARTS. OM-530 Page 36 Item No. Quantity Model Part No. Dia. Mkgs. Description Basic W/Electro slope W/Pulser W/Pulser Electroslope Figure 9-4. Panel, Front w/Components (Fig 9-1 Item 16) 1 . . . . V . . . . *025 604 . . . METER, volt dc 0-100 scale . . . . . . . . . . . . . . . . . . . . . . 2 . . . . A . . . . *025 608 . . . METER, amp dc 0-500 scale (300A models) . . . . . . . . 2 . . . . A . . . . *025 611 . . . METER, amp dc 0-600 scale (400A models) . . . . . . . . 2 . . . . A . . . . *025 610 . . . METER, amp dc 0-800 scale (500 & 600A models) . . . . . . . . . . . . . . . . 053 420 . . . COVER, opening meters (used only on . . . . . . . . . . . . . . . . . . . . . . . . . . models w/o meters) . . . . . . . . . . . . . . . . . . . . . . . . . . . . . 3 . . . . . . . . . . . . . . . . . . . . . . . NAMEPLATE (order by model and serial number) . . . 4 . . . . . . . . . . . 097 922 . . . KNOB, pointer . . . . . . . . . . . . . . . . . . . . . . . . . . . . . . . . . . 5 . . . . . . . . . . . 019 603 . . . KNOB, ball . . . . . . . . . . . . . . . . . . . . . . . . . . . . . . . . . . . . . 6 . . . . . . . . . . . 129 060 . . . PANEL, front . . . . . . . . . . . . . . . . . . . . . . . . . . . . . . . . . . . 7 . . . . P1 . . . *025 701 . . . FILTER, HF dc volts & amp meter . . . . . . . . . . . . . . . . . 8 . . . . S4 . . . . 011 611 . . . SWITCH, tgl DPDT 15A 125V . . . . . . . . . . . . . . . . . . . . 9 . . . . R1 . . . 072 462 . . . POTENTIOMETER, w/shaft lock (consisting of) . . . . . . . . . . . . . . . . . . . 072 590 . . . . LOCK, shaft pot .375-32 x .250dia shaft . . . . . . . . . . 10 . . . . . . . . . . 010 296 . . . FITTING, hose brs elb M 1/4NPT x .625-18RH . . . . . . 11 . . . GS1 . . 003 538 . . . VALVE, 115VAC 2 way 1/4 IPS port 1/8 orf . . . . . . . . . . . . . . . WS1 . **003 538 . . . VALVE, 115VAC 2 way 1/4 IPS port 1/8 orf . . . . . . . . . . . . . . . . . . . . . . **010 295 . . . FITTING, pipe brs elb M 1/4NPT x .625-18LH . . . . . . . 12 . . VR1 . . 028 001 . . . VARISTOR, 150V . . . . . . . . . . . . . . . . . . . . . . . . . . . . . . . 1 1 1 1 ... ... ... ... 1 1 1 1 .... .... .... .... 1 1 1 1 ..... ..... ..... ..... 1 1 1 1 1 1 3 1 1 2 1 1 1 2 1 1 2 1 ... ... ... ... ... ... ... ... ... ... ... ... ... ... 1 1 3 1 1 2 1 1 1 2 1 1 2 1 .... .... .... .... .... .... .... .... .... .... .... .... .... .... 1 1 3 1 1 2 1 1 1 2 1 1 2 1 ..... ..... ..... ..... ..... ..... ..... ..... ..... ..... ..... ..... ..... ..... 1 1 3 1 1 2 1 1 1 2 1 1 2 1 12 1 2 13 11 3 4 10 5 7 14 – Fig 9-5 & 9-8 9 8 6 15 16 17 18 19 39 Fig 9-7 20 38 Fig 9-6 4 2 21 22 34 33 23 28 35 32 27 26 31 37 36 25 24 23 30 29 ST-059 537-D Figure 9-4. Panel, Front w/Components OM-530 Page 37 Item No. Dia. Mkgs. Part No. Quantity Model Description Basic W/Pulser W/Electro slope W/Pulser Electroslope Figure 9-4. Panel, Front w/Components (Fig 9-1 Item 16) (Continued) 13 . . C19 . . . 028 294 14 . . . S3 . . . . 011 974 14 . . . S3 . . . 048 153 . . . . . . . . . . . . . . 129 755 15 . . C11 . . . 144 906 15 . . C12 . . . 144 907 15 . . C13 . . . 144 908 15 . . C14 . . . 144 909 16 . . RC2 . . 143 976 . . . . . . . . . . . . . . 079 534 . . . . . . . . . . . . . . 134 734 . . . . . . . . . . . . . . 134 731 . . . . . . . . . . . . . . 079 739 . . . . . . . . . . . . . . 143 922 17 . . . R5 . . . 030 738 18 . . . R3 . . . 605 828 19 . . S1,2 . . . 011 609 20 . . CB1 . . 020 278 21 . . . C1 . . . . 113 501 22 . . RC1 . . 604 176 . . . . . . . . . . . . . . 073 690 23 . . . . . . . . . . 039 047 24 . . . . . . . . . . 601 976 25 . . . . . . . . . . 039 045 25 . . . . . . . . . . 039 049 26 . . . . . . . . . . 601 880 27 . . . . . . . . . . 039 044 28 . . . . . . . . . . 601 879 29 . . . . . . . . . . . . . . . *** 30 . . S201 ***011 609 31 . . . . . . . . . . . . . . . **** 32 . . S200 ****011 609 33 . . . C9 . . . 136 736 34 . . . . . . . . . . 010 476 35 . . . . . . . . . +008 259 36 . . . . . . . . . . 605 583 37 . . . . . . . . . . 134 327 38 . . . . . . . . . **041 213 39 . . . . . . . . . **041 212 . . . . . . . . . . . . . . 052 997 . . . . . . . . . . . . . . 052 998 . . . CAPACITOR, polye met film 1uf 250VDC . . . . . . . . . . . 1 . . . 1 . . . . 1 . . . . . 1 . . . SWITCH, polarity (300 & 400A models) (Fig 9-5) . . . . 1 . . . 1 . . . . 1 . . . . . 1 . . . SWITCH, polarity (500 & 600A models) (Fig 9-8) . . . . 1 . . . 1 . . . . 1 . . . . . 1 . . . RECEPTACLE, w/leads (consisting of) . . . . . . . . . . . . . 1 . . . 1 . . . . 1 . . . . . 1 . . . . LEAD ASSEMBLY, elect . . . . . . . . . . . . . . . . . . . . . . . . 1 . . . 1 . . . . 1 . . . . . 1 . . . . LEAD ASSEMBLY, elect . . . . . . . . . . . . . . . . . . . . . . . . 1 . . . 1 . . . . 1 . . . . . 1 . . . . LEAD ASSEMBLY, elect . . . . . . . . . . . . . . . . . . . . . . . . 1 . . . 1 . . . . 1 . . . . . 1 . . . . LEAD ASSEMBLY, elect . . . . . . . . . . . . . . . . . . . . . . . . 1 . . . 1 . . . . 1 . . . . . 1 . . . . CONNECTOR w/SOCKETS, (consisting of) . . . . . . . 1 . . . 1 . . . . 1 . . . . . 1 . . . . . . CONNECTOR, circ skt push-in 14-18ga Amp 66358-6 . . . . . . . . . . . . . . . . . . . . . . . . . . . . . . 14 . . . 14 . . . 14 . . . 14 . . . CONNECTOR, circ 14 pin plug Amp 213571-2 . . . CONNECTOR, circ pin push-in 14-18ga Amp 213603-1 . . . CONNECTOR, circ clamp str rlf sz 17-20 Amp 206322-2 (or) . . . CONNECTOR, circ clamp str rlf sz 17-20 Amp 206070-3 . . . POTENTIOMETER, C std slt 1/T 2W 500K ohm . . . . . 1 . . . 1 . . . . 1 . . . . . 1 . . . RHEOSTAT, WW 50W 1.5 ohm . . . . . . . . . . . . . . . . . . . 1 . . . 1 . . . . 1 . . . . . 1 . . . SWITCH, tgl SPDT 10A 125V . . . . . . . . . . . . . . . . . . . . . 2 . . . 2 . . . . 2 . . . . . 2 . . . CIRCUIT BREAKER, man reset 1P 15A 240VAC . . . . 1 . . . 1 . . . . 1 . . . . . 1 . . . CAPACITOR . . . . . . . . . . . . . . . . . . . . . . . . . . . . . . . . . . . 1 . . . 1 . . . . 1 . . . . . 1 . . . RECEPTACLE, str dx grd 2P3W 15A 125V . . . . . . . . . 1 . . . 1 . . . . 1 . . . . . 1 . . . PLUG, str grd armd 2P3W 15A 125V P & S 5266DF . . . TERMINAL, pwr output red (consisting of) . . . . . . . . . . 2 . . . 2 . . . . 2 . . . . . 2 . . . . SCREW, .500-13 x 1.50 hexhd pln stl . . . . . . . . . . . . 1 . . . 1 . . . . 1 . . . . . 1 . . . . TERMINAL BOARD, black . . . . . . . . . . . . . . . . . . . . . 1 . . . 1 . . . . 1 . . . . . 1 . . . . TERMINAL BOARD, red . . . . . . . . . . . . . . . . . . . . . . . 1 . . . 1 . . . . 1 . . . . . 1 . . . . NUT, stl hex jam .500-13 . . . . . . . . . . . . . . . . . . . . . . . 1 . . . 1 . . . . 1 . . . . . 1 . . . . BUS BAR, term bd . . . . . . . . . . . . . . . . . . . . . . . . . . . . 1 . . . 1 . . . . 1 . . . . . 1 . . . . NUT, stl hex full .500-13 . . . . . . . . . . . . . . . . . . . . . . . . 1 . . . 1 . . . . 1 . . . . . 1 . . . Part of Spot Timer Circuit Card (TD3) . . . SWITCH, tgl SPDT 15A 125VAC . . . . . . . . . . . . . . . . . . 1 . . . 1 . . . . 1 . . . . . 1 . . . Part of Preflow Timer Circuit Card (TD2) . . . SWITCH, tgl SPDT 125VAC . . . . . . . . . . . . . . . . . . . . . . 1 . . . 1 . . . . 1 . . . . . 1 . . . CAPACITOR . . . . . . . . . . . . . . . . . . . . . . . . . . . . . . . . . . . 1 . . . 1 . . . . 1 . . . . . 1 . . . BUSHING, strain relief .625 ID x .570mtg hole . . . . . . 1 . . . 1 . . . . 1 . . . . . 1 . . . DOOR, access front . . . . . . . . . . . . . . . . . . . . . . . . . . . . . 1 . . . 1 . . . . 1 . . . . . 1 . . . CATCH, spr loaded door . . . . . . . . . . . . . . . . . . . . . . . . . 2 . . . 2 . . . . 2 . . . . . 2 . . . LABEL, warning general precautionary . . . . . . . . . . . . . 1 . . . 1 . . . . 1 . . . . . 1 . . . PULSER, (Fig 9-6) . . . . . . . . . . . . . . . . . . . . . . . . . . . . . . . . . . . . 1 . . . . . . . . . . . . 1 . . . ELECTROSLOPE 9, (Fig 9-7) . . . . . . . . . . . . . . . . . . . . . . . . . . . . . . . . . 1 . . . . . 1 . . . COVER, opening module electroslope . . . . . . . . . . . . . 1 . . . 1 . . . COVER, opening module pulser . . . . . . . . . . . . . . . . . . . 1 . . . . . . . . . . 1 *Part of Optional Meter Kit (see Optional Equipment for kit numbers). **Optional ***Part of 041 407 Optional Spot Weld Timer. ****Part of 041 404 Optional Preflow Timer +When ordering a component originally displaying a precautionary label, the label should also be ordered. BE SURE TO PROVIDE MODEL AND SERIAL NUMBER WHEN ORDERING REPLACEMENT PARTS. OM-530 Page 38 Item No. Part No. 011 974 . . 1 . . . . . 017 288 . . 2 . . . . . 103 634 . . 3 . . . . . . 011 948 . . 4 . . . . . 038 769 . . 5 . . . . . . 011 645 . . 6 . . . . . . 011 075 . . 7 . . . . . . 011 953 . . 8 . . . . . . 011 074 . . 9 . . . . . 010 805 . 10 . . . . 103 632 . 11 . . . . 024 694 . 12 . . . . 103 633 Description Quantity Figure 9-5. Switch, Polarity (300 & 400A Models) (Fig 9-4 Item 14) . . BRACKET, mtg switch plrt . . . . . . . . . . . . . . . . . . . . . . . . . . . . . . . . . . . . . . . . . . . . . . . . . . . . MOUNTING BOARD, cmpnt plrt switch . . . . . . . . . . . . . . . . . . . . . . . . . . . . . . . . . . . . . . . . GUIDE, contact movable switch . . . . . . . . . . . . . . . . . . . . . . . . . . . . . . . . . . . . . . . . . . . . . . . CONTACT BOARD ASSEMBLY, movable switch plrt (consisting of) . . . . . . . . . . . . . . . . . . CONTACT ASSEMBLY, movable switch (consisting of) . . . . . . . . . . . . . . . . . . . . . . . . . . . . . SPRING, pressure contact switch . . . . . . . . . . . . . . . . . . . . . . . . . . . . . . . . . . . . . . . . . . . . . . CONTACT, switch . . . . . . . . . . . . . . . . . . . . . . . . . . . . . . . . . . . . . . . . . . . . . . . . . . . . . . . . . . . SPRING, pressure contact switch . . . . . . . . . . . . . . . . . . . . . . . . . . . . . . . . . . . . . . . . . . . . HANDLE, switch plrt . . . . . . . . . . . . . . . . . . . . . . . . . . . . . . . . . . . . . . . . . . . . . . . . . . . . . . . . . PLATE, switch tgl . . . . . . . . . . . . . . . . . . . . . . . . . . . . . . . . . . . . . . . . . . . . . . . . . . . . . . . . . . BEARING, plrt switch . . . . . . . . . . . . . . . . . . . . . . . . . . . . . . . . . . . . . . . . . . . . . . . . . . . . . . . . BUS BAR, shorting switch plrt . . . . . . . . . . . . . . . . . . . . . . . . . . . . . . . . . . . . . . . . . . . . . . . 2 1 2 1 2 1 2 1 1 1 1 2 1 2 3 12 3 11 10 6 7 5 8 4 Includes Items 9 & 10 9 ST-059 558-A Figure 9-5. Switch, Polarity (300 & 400A Models) BE SURE TO PROVIDE MODEL AND SERIAL NUMBER WHEN ORDERING REPLACEMENT PARTS. OM-530 Page 39 Item No. Dia. Mkgs. Part No. Description 041 213 . . 1 . . . R427 . . . . . . 2 . . . R429 . . . . . . 3 . . . RFC1 . . . . . 4 . . . . PC2 . . . . . . . . . . PLG400 . . ................. . . . . . . PLG401 . . ................. .. 5............. .. 6............. .. 7............. .. 8............. .. 9............. . 10 . . . . . . . . . . . . . 11 . . C409 . . . . . 12 . . S400 . . . . . 13 . . R428 . . . . . 14 . . . . . . . . . . . . . 15 . . . . . . . . . . . . . 16 . . . . . . . . . . . . 004 186 035 897 052 978 088 338 135 558 079 747 135 559 079 747 073 756 010 116 072 307 027 144 072 306 008 247 031 670 011 609 030 109 008 250 009 477 097 922 Quantity Figure 9-6. Pulser (Optional) (Fig 9-4 Item 38) . . POTENTIOMETER, C std slot 1/T 2W 5K ohm . . . . . . . . . . . . . . . . . . . . . . . . 1 . . POTENTIOMETER, C std slot 1/T 2W 1K ohm . . . . . . . . . . . . . . . . . . . . . . . . 1 . . CHOKE, 5600uh 98 ohm . . . . . . . . . . . . . . . . . . . . . . . . . . . . . . . . . . . . . . . . . . . 1 . . CIRCUIT CARD, pulser . . . . . . . . . . . . . . . . . . . . . . . . . . . . . . . . . . . . . . . . . . . . 1 . . CONNECTOR & SOCKETS, (consisting of) . . . . . . . . . . . . . . . . . . . . . . . . . . . 1 . . . . CONNECTOR, rect skt 24-18ga Amp 350980-1 . . . . . . . . . . . . . . . . . . . . . 7 . . CONNECTOR & SOCKETS, (consisting of) . . . . . . . . . . . . . . . . . . . . . . . . . . . 1 . . . . CONNECTOR, rect skt 24-18ga Amp 350980-1 . . . . . . . . . . . . . . . . . . . . 12 . . STAND-OFF, 6-32 x .625 lg . . . . . . . . . . . . . . . . . . . . . . . . . . . . . . . . . . . . . . . . . 5 . . GROMMET, rbr .375 ID x .500mtg hole . . . . . . . . . . . . . . . . . . . . . . . . . . . . . . . 1 . . CIRCUIT CARD, filter . . . . . . . . . . . . . . . . . . . . . . . . . . . . . . . . . . . . . . . . . . . . . . 1 . . TUBING, nylon .150 ID x .250 OD x .250 . . . . . . . . . . . . . . . . . . . . . . . . . . . . . 2 . . BRACKET, mtg circuit card . . . . . . . . . . . . . . . . . . . . . . . . . . . . . . . . . . . . . . . . . 1 . . CASE SECTION, top/sides . . . . . . . . . . . . . . . . . . . . . . . . . . . . . . . . . . . . . . . . . 1 . . CAPACITOR, cer disc .05uf 500VDC . . . . . . . . . . . . . . . . . . . . . . . . . . . . . . . . 1 . . SWITCH, tgl SPDT 15A 125VAC . . . . . . . . . . . . . . . . . . . . . . . . . . . . . . . . . . . . 1 . . POTENTIOMETER, C std slot 1/T 2W 5K ohm . . . . . . . . . . . . . . . . . . . . . . . . 1 . . PULSER BOX . . . . . . . . . . . . . . . . . . . . . . . . . . . . . . . . . . . . . . . . . . . . . . . . . . . . 1 . . PLATE, ident . . . . . . . . . . . . . . . . . . . . . . . . . . . . . . . . . . . . . . . . . . . . . . . . . . . . . 1 . . KNOB, pointer . . . . . . . . . . . . . . . . . . . . . . . . . . . . . . . . . . . . . . . . . . . . . . . . . . . . 3 4 1 2 3 5 6 9 8 7 10 14 13 12 11 15 16 ST-059 531-C Figure 9-6. Pulser (Optional) BE SURE TO PROVIDED MODEL AND SERIAL NUMBER WHEN ORDERING REPLACEMENT PARTS. OM-530 Page 40 Item No. Part No. Dia. Mkgs. Description Quantity Figure 9-7. Electroslope 9 (Optional) (Fig 9-4 Item 39) . . 1 . . R92,94 . . . . . 2 . . R93,95 . . . . . 3 . . . . S50 . . . . . . 4 . . . . PC1 . . . . ................. ................. ................. ................. .. 5............. .. 6............. .. 7............. .. 8............. .. 9............. . 10 . . . . . . . . . . . . 009 398 073 562 011 622 079 523 135 559 079 747 079 748 079 747 073 756 015 715 008 704 008 705 007 648 097 922 . . POTENTIOMETER, C std slot 1/T 2W 10K ohm . . . . . . . . . . . . . . . . . . . . . . . 2 . . POTENTIOMETER, C std slot 1/T 2W 10K ohm . . . . . . . . . . . . . . . . . . . . . . . 2 . . SWITCH, tgl 3PDT 15A 125VAC . . . . . . . . . . . . . . . . . . . . . . . . . . . . . . . . . . . . 1 . . CIRCUIT CARD, electroslope 9 . . . . . . . . . . . . . . . . . . . . . . . . . . . . . . . . . . . . . 1 . . CONNECTOR & SOCKETS, (consisting of) . . . . . . . . . . . . . . . . . . . . . . . . . . . 1 . . . . CONNECTOR, rect skt 24-18ga Amp 350980-1 . . . . . . . . . . . . . . . . . . . . 12 . . CONNECTOR, rect 18skt plug Amp 1-640250-8 . . . . . . . . . . . . . . . . . . . . . . . 1 . . CONNECTOR, rect skt 24-18ga Amp 350980-1 . . . . . . . . . . . . . . . . . . . . . . 18 . . STAND-OFF, 6-32 x .625 lg . . . . . . . . . . . . . . . . . . . . . . . . . . . . . . . . . . . . . . . . . 5 . . GROMMET, rbr .687 ID x 1.000mtg hole . . . . . . . . . . . . . . . . . . . . . . . . . . . . . 1 . . CASE SECTION, top/sides . . . . . . . . . . . . . . . . . . . . . . . . . . . . . . . . . . . . . . . . . 1 . . ELECTROSLOPE BOX . . . . . . . . . . . . . . . . . . . . . . . . . . . . . . . . . . . . . . . . . . . . 1 . . PLATE, ident . . . . . . . . . . . . . . . . . . . . . . . . . . . . . . . . . . . . . . . . . . . . . . . . . . . . . 1 . . KNOB, pointer . . . . . . . . . . . . . . . . . . . . . . . . . . . . . . . . . . . . . . . . . . . . . . . . . . . . 4 4 3 5 2 1 6 1 7 2 9 8 10 ST-059 532-A Figure 9-7. Electroslope 9 (Optional) BE SURE TO PROVIDE MODEL AND SERIAL NUMBER WHEN ORDERING REPLACEMENT PARTS. OM-530 Page 41 Part No. Item No. Description 048 153 ... ... ... ... ... ... ... ... ... ... ... ... ... ... ... ... ... ... 1 2 3 4 5 6 7 8 9 10 11 12 13 14 15 16 17 18 . . . . 011 080 . . . 038 769 . . . . 011 645 . . . . 011 074 . . . . 011 953 . . . . 011 075 . . . 023 121 . . . 601 836 . . . 052 413 . . . 103 633 . . . 103 634 . . . 024 694 . . . 020 484 . . . . 011 948 . . . 053 044 . . . 010 086 . . . 021 193 . . . 010 805 Quantity Figure 9-8. Switch, Polarity (500 & 600A Models) (Fig 9-4 Item 14) . . SPACER, contact switch 1/8 in . . . . . . . . . . . . . . . . . . . . . . . . . . . . . . . . . . . . . . . . . . . . . . . . CONTACT BOARD ASSEMBLY, movable switch plrt (consisting of) . . . . . . . . . . . . . . . . . . CONTACT ASSEMBLY, movable switch (consisting of) . . . . . . . . . . . . . . . . . . . . . . . . . . . . . SPRING, pressure contact switch . . . . . . . . . . . . . . . . . . . . . . . . . . . . . . . . . . . . . . . . . . . . . . CONTACT, switch . . . . . . . . . . . . . . . . . . . . . . . . . . . . . . . . . . . . . . . . . . . . . . . . . . . . . . . . . . . SPRING, pressure contact switch . . . . . . . . . . . . . . . . . . . . . . . . . . . . . . . . . . . . . . . . . . . . PLATE, tgl switch plrt . . . . . . . . . . . . . . . . . . . . . . . . . . . . . . . . . . . . . . . . . . . . . . . . . . . . . . NUT, brs hex .250-20 jam hvy . . . . . . . . . . . . . . . . . . . . . . . . . . . . . . . . . . . . . . . . . . . . . . . . . STUD, brs .250-20 x .875 . . . . . . . . . . . . . . . . . . . . . . . . . . . . . . . . . . . . . . . . . . . . . . . . . . . . BUS BAR, shorting switch plrt . . . . . . . . . . . . . . . . . . . . . . . . . . . . . . . . . . . . . . . . . . . . . . . . . MOUNTING BOARD, cmpnt plrt switch . . . . . . . . . . . . . . . . . . . . . . . . . . . . . . . . . . . . . . . . BEARING, plrt switch . . . . . . . . . . . . . . . . . . . . . . . . . . . . . . . . . . . . . . . . . . . . . . . . . . . . . . . . TUBING, stl .625 OD x 12ga wall x .250 . . . . . . . . . . . . . . . . . . . . . . . . . . . . . . . . . . . . . . . . GUIDE, contact movable switch . . . . . . . . . . . . . . . . . . . . . . . . . . . . . . . . . . . . . . . . . . . . . . . BRACKET, mtg switch plrt . . . . . . . . . . . . . . . . . . . . . . . . . . . . . . . . . . . . . . . . . . . . . . . . . . . . SPACER, plrt switch . . . . . . . . . . . . . . . . . . . . . . . . . . . . . . . . . . . . . . . . . . . . . . . . . . . . . . . . . GUIDE, contact . . . . . . . . . . . . . . . . . . . . . . . . . . . . . . . . . . . . . . . . . . . . . . . . . . . . . . . . . . . . . HANDLE, switch plrt . . . . . . . . . . . . . . . . . . . . . . . . . . . . . . . . . . . . . . . . . . . . . . . . . . . . . . . 4 2 2 1 2 1 1 4 2 4 1 2 1 2 2 2 2 1 2 10 Includes Item 7 3 4 5 6 8 9 1 10 11 18 7 12 12 13 17 16 15 14 ST-048 955-B Figure 9-8. Switch, Polarity (500 & 600A Models) BE SURE TO PROVIDE MODEL AND SERIAL NUMBER WHEN ORDERING REPLACEMENT PARTS. OM-530 Page 42 Item No. Quantity Model Part No. Dia. Mkgs. 300 & 400 Amp Description 500 & 600 Amp Figure 9-9. Panel, Control Front w/Components (Fig 9-1 Item 15) . . 1 . . . CR2 . . . . 000 770 . . 2 . . . . . . . . . . . . . 049 268 . . 3 . . . . 2T . . . . . 038 782 . . . . . . . . . . . . . . . . . 601 219 . . 4 . . . . SR2 . . . . 005 882 . . 5 . . . . . . . . . . . . . 052 194 . . 6 . . . . . . . . . . . . . 039 449 . . 7 . . . . TD1 . . . . 045 874 . . 8 . . . CR1 . . . . 070 744 . . . . . . . . FM . . . . . . 111 931 . . . . . . . . . . . . . . . . . 005 656 . . . . . . . . . . . . . . . . . 010 142 . . RELAY, encl 24VDC 3PDT . . . . . . . . . . . . . . . . . . . . . . . . . . . . . . . 1 . . . . . . . . . . PANEL, mtg components . . . . . . . . . . . . . . . . . . . . . . . . . . . . . . . . . 1 . . . . . . . . . . BLOCK, term 20A 10P . . . . . . . . . . . . . . . . . . . . . . . . . . . . . . . . . . . 1 . . . . . . . . . . LINK, jumper term blk 20A . . . . . . . . . . . . . . . . . . . . . . . . . . . . . . . . 1 . . . . . . . . . . RECTIFIER, integ 6A 600V . . . . . . . . . . . . . . . . . . . . . . . . . . . . . . . 1 . . . . . . . . . . TIMER, delay on make 0-60 sec (consisting of) . . . . . . . . . . . . . . 1 . . . . . . . . . . . . BRACKET, mtg circuit card . . . . . . . . . . . . . . . . . . . . . . . . . . . . . 1 . . . . . . . . . . . . CIRCUIT CARD, timer . . . . . . . . . . . . . . . . . . . . . . . . . . . . . . . . . 1 . . . . . . . . . . RELAY, voltage sense 80V 3PDT . . . . . . . . . . . . . . . . . . . . . . . . . . 1 . . . . . . . . . . MOTOR, fan 115V 2600RPM 50/60 Hz . . . . . . . . . . . . . . . . . . . . . . . . . . . . . . . . . BLADE, fan 6 in 4 wg 30deg . . . . . . . . . . . . . . . . . . . . . . . . . . . . . . . . . . . . . . . . . . CLAMP, nyl .312 clamp dia . . . . . . . . . . . . . . . . . . . . . . . . . . . . . . . 1 . . . . . . . . 1 1 1 1 1 1 1 1 1 1 1 1 3 2 1 8 7 4 5 6 ST-059 534-D Figure 9-9. Panel, Control Front w/Components BE SURE TO PROVIDE MODEL AND SERIAL NUMBER WHEN ORDERING REPLACEMENT PARTS. OM-530 Page 43 Dia. Mkgs. Part No. Description Quantity Optional Equipment . . . . . . . . . . . . . . . . . . . 041 236 . . . METER KIT AMP & VOLT DC 0-500 w/FILTER, (Fig 9-2 & 9-4) . . . . . . . . . . . . . . . . . . . . . . . . . . . 041 238 . . . METER KIT AMP & VOLT DC 0-600 w/FILTER, (Fig 9-2 & 9-4) . . . . . . . . . . . . . . . . . . . . . . . . . . . 041 240 . . . METER KIT AMP & VOLT DC 0-800 w/FILTER, (Fig 9-2 & 9-4) . . . . . . . . . . . . . . . . . . . . . . . . . . . 041 404 . . . PREFLOW TIMER (consisting of) . . . . . . . . . . . . . . . . . . . . . . . . . . . . . . . . . . . . . . . . . CR3 . . . . . . . 006 393 . . . . . RELAY, encl 24VAC DPDT . . . . . . . . . . . . . . . . . . . . . . . . . . . . . . . . . . . . . . . . . . . . . CR4 . . . . . . . 000 174 . . . . . RELAY, encl 24VAC 3PDT . . . . . . . . . . . . . . . . . . . . . . . . . . . . . . . . . . . . . . . . . . . . . . TD2 . . . . . . . 044 744 . . . . . CIRCUIT CARD, preflow timer . . . . . . . . . . . . . . . . . . . . . . . . . . . . . . . . . . . . . . . . . . . . . . . . . . . . . . 135 558 . . . . . CONNECTOR & SOCKETS, (consisting of) . . . . . . . . . . . . . . . . . . . . . . . . . . . . . . . . . . . . . . . . . . 079 747 . . . . . . CONNECTOR, rect skt 24-18ga Amp 350980-1 . . . . . . . . . . . . . . . . . . . . . . . . . . . . . . . . . . . . . 097 922 . . . . . KNOB, pointer (illustrated on Fig 9-4) . . . . . . . . . . . . . . . . . . . . . . . . . . . . . . . . . . . . . . . . . . . . . . . . 006 301 . . . . . BRACKET, mtg component . . . . . . . . . . . . . . . . . . . . . . . . . . . . . . . . . . . . . . . . . . . . . . . . . . . . . . . . . 106 625 . . . . . SPACER, nyl .250 OD x .140 ID x 1.000mtg hole . . . . . . . . . . . . . . . . . . . . . . . . . . . . . . . . . . . . . . . . . . . . . . . . . . . See Fig 9-4 for additional parts. . . . . . . . . . . . . . . . . . . . 041 407 . . . SPOT WELD TIMER, (consisting of) . . . . . . . . . . . . . . . . . . . . . . . . . . . . . . . . . . . . . . . TD3 . . . . . . . 048 325 . . . . . CIRCUIT CARD, spot timer . . . . . . . . . . . . . . . . . . . . . . . . . . . . . . . . . . . . . . . . . . . . . . . . . . . . . . . . . 135 558 . . . . . CONNECTOR & SOCKETS, (consisting of) . . . . . . . . . . . . . . . . . . . . . . . . . . . . . . . . . . . . . . . . . . 079 747 . . . . . . CONNECTOR, rect skt 24-18ga Amp 350980-1 . . . . . . . . . . . . . . . . . . . . . . . . . . . . . . . . . . . . . 097 922 . . . . . KNOB, pointer (illustrated on Fig 9-4) . . . . . . . . . . . . . . . . . . . . . . . . . . . . . . . . . . . . . . . . . . . . . . . . 000 821 . . . . . STRIP, mtg pot/circuit card . . . . . . . . . . . . . . . . . . . . . . . . . . . . . . . . . . . . . . . . . . . . . . . . . . . . . . . . . 106 625 . . . . . SPACER, nyl .250 OD x .140 ID x 1.000 lg . . . . . . . . . . . . . . . . . . . . . . . . . . . . . . . . . . . . . . . . . . . . . . . . . . . . . . . . See Fig 9-4 for additional parts. . . . . . . . . . . . . . . . . . . . 041 212 . . . ELECTROSLOPE 9, (Fig 9-7) . . . . . . . . . . . . . . . . . . . . . . . . . . . . . . . . . . . . . . . . . . . . . . . . . . . . . . . . 041 213 . . . PULSER, (Fig 9-6) . . . . . . . . . . . . . . . . . . . . . . . . . . . . . . . . . . . . . . . . . . . . . . . BE SURE TO PROVIDE MODEL AND SERIAL NUMBER WHEN ORDERING REPLACEMENT PARTS. OM-530 Page 44 1 1 1 1 1 1 1 1 7 1 1 4 1 1 1 7 1 1 4 1 1 Notes OPTIONS AND ACCESSORIES TIG-RIG ACCESSORIES METERS FOR TIG–RIG With 300SS Power Source (#041 236 Factory) (#041 237 Field) With 400SS Power Source (#041 238 Factory) (#041 908 Field) With 500SS and 600SS Power Sources (#041 240 Factory) (#041 909 Field) PC–SS PULSER (#041 213 Field) ELECTROSLOPE 9 (#041 212 Field) GAS PREFLOW TIMER (#041 404 Factory) (#041 405 Field) Adjustable 0.1 to 15 seconds. SPOT WELD TIMER (#041 407 Factory) (#041 408 Field) Adjustable 0.1 to 5 seconds. REMOTE EXTENSION CABLES (#122 973) 25 ft. (7.6 m) (#122 974) 50 ft. (15.2 m) For use between TIG–RIG and power source. Can also be used to extend FTC–14 from power source or TIG–RIG. AMPSET CORDLESS REMOTE CURRENT CONTROL A simple cordless control that changes welding current at any distance from a Miller SS Series power source. The control can be clipped to the operator’s belt. Before welding, the highest current setting required is set at the power source. To change current, the operator replaces the welding electrode in the holder with the AMPSET control and moves the indicator on the control to the desired higher or lower setting. The control is then touched to the workpiece for a few seconds and the current is reset. Reinsert the electrode, and weld at the new setting. Multiprocess capabilities – do air carbon arc gouging at high amperage, and weld with 1/8 in. (3.2 mm) Stick electrode without returning to the power source. AMPSET can be considered… • when cable–connected box–type remote hand controls are impractical • when operating a long distance from the power source and accurate amperages are required • when welding in varied positions (flat - vertical - overhead) requiring frequent amperage changes • when distance and multiprocess usage is a dual consideration (Stick electrode, Air Carbon Arc Cutting and Gouging, and touch–start TIG). RFC–14 FOOT CONTROL (#129 339) Foot current and contactor control. Includes 20 ft. (6 m) cord and 14–pin plug. TORCH–MOUNTED REMOTE HAND CONTROLS AMTV REMOTE CONTACTOR AND CURRENT CONTROL (#152 608) Fastens to TIG torch handle using two Velcro strips. The control allows complete current and contactor control at the operator’s fingertips — a practical alternative to a foot control. Includes 28 ft. (8.5 m) control cord with 14–pin plug. RMLS–14 (#129 337) Momentary– and maintained–contact rocker switch for contactor control. Push forward for maintained contact and back for momentary contact. Includes 20 ft. (6 m) cord and 14–pin plug. EXTENSION CABLES FOR FTC–14 14–pin plug to 14–pin socket. 10 ft. (3 m) (#122 972) 25 ft. (7.6 m) (#122 973) 50 ft. (15.2 m) (#122 974) 75 ft. (22.8 m) (#122 975) GOLD STAR SS ACCESSORIES REMOTE CONTROLS RHC–14 HAND CONTROL (#129 340) Miniature hand control for remote current and contactor control. Dimensions: 4 in. (102 mm) x 4 in. (102 mm) x 3–1/4 in. (82 mm) Includes 20 ft. (6 m) cord and 14–pin plug. 9/92 Effective January 1, 2000 (Equipment with a serial number preface of “LA” or newer) This limited warranty supersedes all previous Miller warranties and is exclusive with no other guarantees or warranties expressed or implied. Warranty Questions? Call 1-800-4-A-MILLER for your local Miller distributor. Your distributor also gives you ... Service You always get the fast, reliable response you need. Most replacement parts can be in your hands in 24 hours. Support Need fast answers to the tough welding questions? Contact your distributor. The expertise of the distributor and Miller is there to help you, every step of the way. * LIMITED WARRANTY – Subject to the terms and conditions below, Miller Electric Mfg. Co., Appleton, Wisconsin, warrants to its original retail purchaser that new Miller equipment sold after the effective date of this limited warranty is free of defects in material and workmanship at the time it is shipped by Miller. THIS WARRANTY IS EXPRESSLY IN LIEU OF ALL OTHER WARRANTIES, EXPRESS OR IMPLIED, INCLUDING THE WARRANTIES OF MERCHANTABILITY AND FITNESS. Within the warranty periods listed below, Miller will repair or replace any warranted parts or components that fail due to such defects in material or workmanship. Miller must be notified in writing within thirty (30) days of such defect or failure, at which time Miller will provide instructions on the warranty claim procedures to be followed. Miller shall honor warranty claims on warranted equipment listed below in the event of such a failure within the warranty time periods. All warranty time periods start on the date that the equipment was delivered to the original retail purchaser, or one year after the equipment is sent to a North American distributor or eighteen months after the equipment is sent to an International distributor. 1. 5 Years Parts – 3 Years Labor * * 2. 3 Years — Parts and Labor * * * * * * 3. Original main power rectifiers Inverters (input and output rectifiers only) Transformer/Rectifier Power Sources Plasma Arc Cutting Power Sources Semi-Automatic and Automatic Wire Feeders Inverter Power Supplies Intellitig Engine Driven Welding Generators (NOTE: Engines are warranted separately by the engine manufacturer.) 1 Year — Parts and Labor * * * * * * * * * * * * * * * * * DS-2 Wire Feeder Motor Driven Guns (w/exception of Spoolmate 185 & Spoolmate 250) Process Controllers Positioners and Controllers Automatic Motion Devices RFCS Foot Controls Induction Heating Power Sources Water Coolant Systems HF Units Grids Maxstar 140 Spot Welders Load Banks Miller Cyclomatic Equipment Running Gear/Trailers Plasma Cutting Torches (except APT & SAF Models) Field Options (NOTE: Field options are covered under True Blue for the remaining warranty period of the product they are installed in, or for a minimum of one year — whichever is greater.) 4. 6 Months — Batteries 5. 90 Days — Parts * * MIG Guns/TIG Torches Induction Heating Coils and Blankets * * * * * APT, ZIPCUT & PLAZCUT Model Plasma Cutting Torches Remote Controls Accessory Kits Replacement Parts (No labor) Spoolmate 185 & Spoolmate 250 Canvas Covers Miller’s True Blue Limited Warranty shall not apply to: 1. Consumable components; such as contact tips, cutting nozzles, contactors, brushes, slip rings, relays or parts that fail due to normal wear. 2. Items furnished by Miller, but manufactured by others, such as engines or trade accessories. These items are covered by the manufacturer’s warranty, if any. 3. Equipment that has been modified by any party other than Miller, or equipment that has been improperly installed, improperly operated or misused based upon industry standards, or equipment which has not had reasonable and necessary maintenance, or equipment which has been used for operation outside of the specifications for the equipment. MILLER PRODUCTS ARE INTENDED FOR PURCHASE AND USE BY COMMERCIAL/INDUSTRIAL USERS AND PERSONS TRAINED AND EXPERIENCED IN THE USE AND MAINTENANCE OF WELDING EQUIPMENT. In the event of a warranty claim covered by this warranty, the exclusive remedies shall be, at Miller’s option: (1) repair; or (2) replacement; or, where authorized in writing by Miller in appropriate cases, (3) the reasonable cost of repair or replacement at an authorized Miller service station; or (4) payment of or credit for the purchase price (less reasonable depreciation based upon actual use) upon return of the goods at customer’s risk and expense. Miller’s option of repair or replacement will be F.O.B., Factory at Appleton, Wisconsin, or F.O.B. at a Miller authorized service facility as determined by Miller. Therefore no compensation or reimbursement for transportation costs of any kind will be allowed. TO THE EXTENT PERMITTED BY LAW, THE REMEDIES PROVIDED HEREIN ARE THE SOLE AND EXCLUSIVE REMEDIES. IN NO EVENT SHALL MILLER BE LIABLE FOR DIRECT, INDIRECT, SPECIAL, INCIDENTAL OR CONSEQUENTIAL DAMAGES (INCLUDING LOSS OF PROFIT), WHETHER BASED ON CONTRACT, TORT OR ANY OTHER LEGAL THEORY. ANY EXPRESS WARRANTY NOT PROVIDED HEREIN AND ANY IMPLIED WARRANTY, GUARANTY OR REPRESENTATION AS TO PERFORMANCE, AND ANY REMEDY FOR BREACH OF CONTRACT TORT OR ANY OTHER LEGAL THEORY WHICH, BUT FOR THIS PROVISION, MIGHT ARISE BY IMPLICATION, OPERATION OF LAW, CUSTOM OF TRADE OR COURSE OF DEALING, INCLUDING ANY IMPLIED WARRANTY OF MERCHANTABILITY OR FITNESS FOR PARTICULAR PURPOSE, WITH RESPECT TO ANY AND ALL EQUIPMENT FURNISHED BY MILLER IS EXCLUDED AND DISCLAIMED BY MILLER. Some states in the U.S.A. do not allow limitations of how long an implied warranty lasts, or the exclusion of incidental, indirect, special or consequential damages, so the above limitation or exclusion may not apply to you. This warranty provides specific legal rights, and other rights may be available, but may vary from state to state. In Canada, legislation in some provinces provides for certain additional warranties or remedies other than as stated herein, and to the extent that they may not be waived, the limitations and exclusions set out above may not apply. This Limited Warranty provides specific legal rights, and other rights may be available, but may vary from province to province. miller_warr 7/00 Owner’s Record Please complete and retain with your personal records. Model Name Serial/Style Number Purchase Date (Date which equipment was delivered to original customer.) Distributor Address City State Zip For Service Call 1-800-4-A-Miller or see our website at www.MillerWelds.com to locate a DISTRIBUTOR or SERVICE AGENCY near you. Always provide Model Name and Serial/Style Number. Contact your Distributor for: Welding Supplies and Consumables Options and Accessories Personal Safety Equipment Service and Repair Miller Electric Mfg. Co. An Illinois Tool Works Company 1635 West Spencer Street Appleton, WI 54914 USA Replacement Parts Training (Schools, Videos, Books) International Headquarters–USA USA Phone: 920-735-4505 Auto-Attended USA & Canada FAX: 920-735-4134 International FAX: 920-735-4125 Technical Manuals (Servicing Information and Parts) Circuit Diagrams European Headquarters – United Kingdom Phone: 44 (0) 1204-593493 FAX: 44 (0) 1204-598066 Welding Process Handbooks www.MillerWelds.com Contact the Delivering Carrier for: File a claim for loss or damage during shipment. For assistance in filing or settling claims, contact your distributor and/or equipment manufacturer’s Transportation Department. PRINTED IN USA 2000 Miller Electric Mfg. Co. 6/00