1
Sharp AR-C360P
Software Installation Guide
Table of Contents
About this Guide
This guide describes the initial printer driver
installation. For more detailed information, refer to
the EFI User Software Installation Guide and EFI
Configuration Guide provided on the User
Documentation CD (CD3).
Network Installation................................... 2
Windows ................................................2
Novell ....................................................7
The general steps for installing the software are as
follows:
Windows® Installation ............................... 8
USB Connection ......................................8
• Install the PostScript printer driver or PCL
printer driver and corresponding printer driver
files.
• Set up the printer driver to communicate with
the Fiery.
• Install Fiery utilities and user software.
Parallel Connection ................................ 11
Macintosh® Installation ............................ 13
OS 9.2 or above .................................... 14
OS 10.2.4 or above ............................... 16
Configure Fiery utilities and user software
You must also configure either a local connection
for printing directly to your printer or a network
connection for printing over a network.
Service and Support ................................. 18
NOTE
A full set of user documentation, where
procedures are described in detail, is provided on
the User Documentation CD (CD3).
1
Network Installation
Windows
Selecting a printer driver in Windows
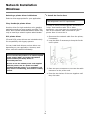
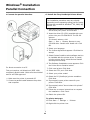
1 Install the Ferrite Core
Select a driver appropriate for your application.
IMPORTANT!
This safeguard is an FCC requirement.
Fiery PostScript printer driver
In order to reduce electromagnetic interference—
”noise” that interferes with TVs or other
appliances—you must place the enclosed ferrite
core on the network cable connected to your
printer. Here is how to do it:
Use this driver for high-resolution color graphics
applications and pre-press graphic proofing. This
driver also includes advanced features which may
only be used by a network system administrator.
PCL printer driver
1. Disconnect the network cable from the printer,
if necessary.
PCL and PCL6 printer drivers are included mainly
for compatibility with legacy systems.
2. Loop the cable if necessary to keep the ferrite
core in place.
You can install both drivers and use either one
depending on your application. However, each
driver must be installed individually.
CAUTION!
Do not connect this product to an uninterruptible
power supply (UPS). For further information
please contact your Sharp dealer or
www.sharpusa.com.
Be sure to use the 15A AC power cord supplied
with the printer. Use of a power cord NOT
supplied with this printer, or an extension cord,
may result in overheating, and could be a safety
hazard.
3. Place the open core about 1 inch from the cable
connector on the printer end.
4. Press the two halves of the core together until
they click shut.
2
Network Installation
Windows (cont’d)
2. Press ∇ key until [Admin Setup] appears. Press
the Enter key.
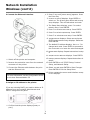
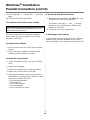
2 Connect the Ethernet Interface
3. Continue to Setup? displays. Press ENTER to
select Yes. The printer goes offline and Running
Setup displays. This will take about a minute.
4. The Setup Menu displays, press ∇ to select
Network Setup. Press ENTER.
5. Press ∇ to select Protocol Setup. Press ENTER.
6. Press ∇ to select TCP/IP Setup. Press ENTER.
7. Press ∇ to select Ethernet Setup. Press ENTER.
8. TCP/IP Ethernet displays. Select YES and press
ENTER. Enable AutoIP Config? displays. Select NO.
Press ENTER.
9. The default IP Address displays. Use ∆ or ∇ to
change each octet. Press ENTER to proceed to
the next octet or to leave the octet unchanged.
10. Subnet Mask displays. Repeat instructions in step
9.
11. TCP/IP bound to Ethernet displays. Press ENTER.
1. Switch off the printer and computer.
12. Gateway Address displays. Repeat instructions in
step 9.
2. Remove the protective cover from the network
connector on the printer.
13.Press ENTER to exit TCP/IP Setup, Protocol
Setup, and Network Setup.
3. Connect the Ethernet cable between the print
and the Ethernet hub.
14.Select Yes and press ENTER to Save Changes.
Press ENTER to Exit the Setup Menu.
15.Printer restarts the server and initializes. Ready
to Print displays.
NOTE
For more information, see the Configuration Guide
on the User Documentation CD.
3 Assign an IP address to the printer
If you are not using DHCP, you need to obtain an IP
Address from your network Administrator and
enter it using the front panel:
1. Confirm that the printer displays [Ready to
print].
3
Network Installation
Windows (cont’d)
4 Install the Fiery PostScript® Printer Driver
NOTE
1. Insert the drivers CD (CD1) into your CD-ROM
drive. The CD will autorun.
In order to send documents to the printer, the
LPR utility must be installed. LPR installs
automatically when the drivers are installed using
the Menu Installer as instructed here. If drivers
are installed using Windows Add Printer Wizard,
you must manually load the LPR Utility from the
Menu Installer on CD1. To do this, click Custom
Install → Network Software → InstallationConfig
→ Sharp LPR.
If it doesn’t autorun, click Start → Run →
Browse. Browse to your CD-ROM drive.
Double-click Install.exe. Click OK.
2. Select your language.
3. Click Next to accept the License Agreement.
4. Select Custom Install to install the printer driver
and the software utilities.
5 Install Printer Utilities
To install only the printer driver, select Minimal
Install and skip the next step.
6. Select Network Printer. Click Next.
Select Custom Install in the Menu Installer on the
driver CD (CD1). Choose from these software
tools:
7. Select Directly to the Network using TCP/IP.
• Network Software
5. Click the Printer Driver Installer button.
8. The TCP/IP Connection screen displays. Select
Search Address. Click Next.
Click Installation → Config to select utilities for
network printing, installation, and
configuration.
9. Highlight your printer model. Click Next.
10.Select Printer Emulation. Click Next.
Click Administration Tools to select network
management tools.
11.Follow the on-screen instructions to complete
the installation.
• Productivity Software - Select Windows printer
software.
Discover the printer
Follow the on-screen instructions to install the
utilities.
The LPR Utility is automatically installed with the
network printer driver. To discover the printer, do
the following:
1. Click Start →
Utility.
Programs →
Sharp → LPR
2. Click Remote Print. Then, click Add Printer.
3. Select your printer model from the drop-down
list, then either enter the IP Address manually,
or click Discover and wait for the printer to be
discovered. Click OK.
4
Network Installation
Windows (cont’d)
In PCL emulation, click the Device Options tab
and specify the options installed on the
AR-C360P.
6 Install EFI Fiery Utilities
1. Insert EFI Utilities CD (CD2), into your
CD-ROM drive.
2. Select your language.
3. Click Next to accept the License Agreement.
4. Select your printer model. Click Next.
5. Select Quick Install to install only Command
WorkStation, or, select Custom Install to install
your choice of these EFI tools:
>
>
>
>
>
Command WorkStation
Fiery Mail Port
Fiery Printer Delete
Fiery Downloader
Fiery ColorWise Pro Tools
5. Select an installed option from the Available
Options list.
NOTE
6. Click Add to move the option to the Installed
Options list.
If the computer will not be used by an AR-C360P
administrator, Command WorkStation may not be
required.
7. Click Apply. Click OK.
To Configure Options Automatically
7 Activating Printer Options
If you have a TCP/IP-enabled network, you can
automatically update your printer driver to reflect
the options currently installed on the printer.
After you have completed the printer driver
installation, you must configure the printer for the
installed options. You can configure the options
manually or, for TCP/IP network connections, you
can use the Two-Way Communication feature to
configure the options automatically.
1. Click Start →
Settings →
Printers.
2. Right click the Sharp AR-C360P EFI Fiery icon.
3. Click Properties.
4. Click the Installable Options tab.
To Configure Options Manually
1. Click Start →
Settings →
Printers.
2. Right click the Sharp AR-C360P EFI Fiery icon.
3. Click Properties.
4. Click the Installable Options tab.
5
Network Installation
Windows (cont’d)
5. Select Two-Way Communications.
6. Type the Fiery IP address or DNS name.
7. To display the printer’s current default settings
when opened, select Update Fiery Driver When
Opened.
8. Click Update. Click OK.
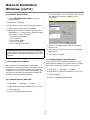
8 Install the User Documentation
1. Insert the User Documentation CD (CD3) into
your CD-ROM drive. The CD will autorun.
If it doesn’t, click Start → Run → Browse.
Browse to your CD-ROM drive. Double-click
Install.exe. Click OK.
2. Follow the on-screen instructions.
6
Network Installation
Novell
1 Install the Utility
Launching the Utility
This utility installs, configures, and manages Sharp
network print server devices.
To launch the utility click
Start → Programs → Sharp Setup
Utility → Admin Manager.
1. Insert the printer driver CD (CD1) into your
CD-ROM drive. The CD will autorun.
3 Activating Printer Options
If it doesn’t autorun, click
Start → Run → Browse. Browse to your
CD-ROM drive. Double-click Install.exe. Click
OK.
If your printer has optional paper trays or a finisher
installed, they must be activated in the printer
driver. See page 6 for instructions on how to do
this.
2. Select your language.
3. The Licence Agreement appears. Click Next to
accept.
NOTE
For more information, see the Configuration guide
on the User Documentation CD.
4. Select Custom Install.
5. The Menu Installer screen appears.
6. Click the Network Software button.
7. Click the Installation/Config button.
8. Click the Admin Mgr/Quick Setup button.
9. Setup Assistant displays. Select your language.
10.Follow the on-screen instructions to complete
the installation.
Note: You can either install the software while
running the utility off the CD, or you can choose to
install the utility on your computer and then launch
it from there.
2 Install the Printer on a Novell® Network
Novell Client for Windows must be loaded, the
Admin Manager software must be running, and you
must be logged in to NDS.
1. Run Discover.
2. Select Setup from the menu.
3. Click Create a NetWare Queue.
4. Select NDS Mode. Click Next.
5. Select the container. Click Next.
6. Select Print Server Mode. Click Next.
7. Select or create a queue. Click Execute.
7
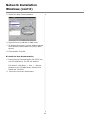
Windows® Installation
USB Connection
2 Install the Fiery PostScript Printer Driver
1 Connect the USB Cable
NOTE
The installation procedure may vary slightly
depending on the operating system you are
using. Drivers are provided for Windows® XP,
2000, Me, and 98.
1. Make sure the cable is connected to your printer
and PC and your printer is turned OFF.
2. Insert the printer driver CD (CD1) into your
CD-ROM drive. The CD will autorun.
If it doesn’t, click Start → Run → Browse.
Browse to your CD-ROM drive. Double-click
Install.exe. Click OK.
3. Select your language.
4. The License Agreement appears. Click Next to
accept.
5. Select Custom Install to select software tools to
be installed with the printer driver.
To install only the printer driver, select Minimal
Install and skip the next step.
6. The Software Installation screen appears. Click
the Printer Driver Installer button.
7. Click Local printer. Click Next.
8. Select the USB port. Click Next.
9. Select your printer model.
For connection to a PC running Windows 98 or
above
10.Select the PS (PostScript) printer emulation.
Click Next.
Requires a USB cable version 2.0 or above. Printer
operation is not assured if a USB compatible device
is connected concurrently with it.
11.If prompted, type a printer name for your
printer. Click Next.
12.If prompted, select “do not share this printer”
Click Next.
1. Turn printer power OFF.
2. Connect USB cable between the printer and
computer.
13.Drivers are copied. If Connect cable message
appears, follow on-screen instructions.
14.Switch the printer ON.
8
Windows® Installation
USB Connection (cont’d)
To print a test page:
NOTE
10.Click Start →
If New Hardware Found Wizard displays:
3 Install Printer Utilities
Win XP and Win Me: Select “Install the
software Automatically” or “Automatic
Search.... Click Next.
1. On the printer driver CD (CD1) select Custom
Install.
2. Click Productivity Software and choose
Windows printer software to install.
15.Click Finish to complete the Installation.
16.If Connect cable screen is open, click Finish to
close it.
To print a test page:
Settings →
4 Install EFI Fiery Utilities
Printers.
1. Insert the EFI Utilities CD (CD2), into your
CD-ROM drive.
18.Right-click the printer icon.
19.Click Properties →
Page.
General Tab →
Printers.
11.Click the General Tab. Click the Print Test Page
button.
Win 98: Select “Search for the best driver for
your device”. Click Next. Select CD-ROM
drive, clear other choices. Click Next twice.
17.Click Start →
Settings →
Print Test
2. Select your language.
3. Click Next to accept the License Agreement.
4. Select your printer model. Click Next.
To Install the PCL Printer Driver as Well
5. Select Quick Install to install only Command
WorkStation, or, select Custom Install to install
your choice of these EFI tools:
NOTE
If you have installed the PostScript driver, you
must reboot your system.
>
>
>
>
>
1. Make sure the printer is powered OFF.
2. Follow the instructions to install the PostScript
driver. When prompted to select a port for your
printer, select LPT1 temporarily.
3. When prompted to select the printer emulation,
select PCL.
4. When installation is complete, click Finish.
5. Select Restart if prompted.
Enable the USB port:
6. Click Start →
Settings →
Printers.
7. Right click the printer icon. Then, click
Properties.
8. On the Ports (or Details) tab, select USB001
port (or OP1USB1) in the Print to the following
port list.
9. Click OK. Then, close the Printers dialog box.
9
Command WorkStation
Fiery Mail Port
Fiery Printer Delete
Fiery Downloader
Fiery ColorWise Pro Tools
Windows® Installation
USB Connection (cont’d)
5 Install the User Documentation
1. Insert the User Documentation CD (CD3) into
your CD-ROM drive. The CD will autorun.
If it doesn’t autorun, click
Start → Run → Browse. Browse to your
CD-ROM drive. Double-click Install.exe. Click
OK.
2. Follow the on-screen instructions.
6 Activating Printer Options
If your printer has optional paper trays or a finisher
installed, they must be activated in the printer
driver. See page 6 for instruction on how to do this.
10
Windows® Installation
Parallel Connection
2 Install the Fiery PostScript Printer Driver
1 Connect the parallel Interface
NOTE
The installation procedure may vary slightly
depending on the operating system you are using.
Drivers are provided for Windows® XP, 2000, Me,
and NT 4.0.
1. Make sure the cable is connected to your printer
and PC and your printer is turned OFF.
2. Insert the driver CD (CD1) supplied with your
printer into your CD-ROM drive. The CD will
autorun.
If it doesn’t autorun, click
Start → Run → Browse. Browse to your
CD-ROM drive. Double-click Install.exe. Click
OK.
3. Select your language.
4. The License Agreement appears. Click Next to
accept.
5. Select Custom Install to select software tools to
be installed with the printer driver. To install
only the printer driver, select Minimal Install
and skip the next step.
6. The Software Installation screen appears. Click
the Printer Driver Installer button.
For direct connection to a PC
7. Click Local printer. Click Next.
8. Select the LPT1 port. Click Next.
This port requires a bi-directional (IEEE 1284
compliant) parallel cable. Cable must be shielded
and UL and CSA approved.
9. Select your printer model.
1. Make sure the printer is powered off.
10.Select the PS (PostScript) printer emulation.
Click Next.
2. Connect a parallel cable between the printer
and computer.
11.If prompted, type a printer name for your
printer. Click Next.
12.If prompted, select “do not share this printer.”
Click Next.
13.Follow the on-screen instructions to compete
the installation. Click Finish.
14.Switch the printer ON.
To print a test page:
15.Click Start →
Settings →
16.Right-click the printer icon.
11
Printers.
Windows® Installation
Parallel Connection (cont’d)
17.Click Properties →
Page.
General Tab →
5 Install the User Documentation
Print Test
1. Insert User Documentation CD (CD3) into your
CD-ROM drive. The CD will autorun.
18.Click the Print Test Page button.
To Install the PCL Printer Driver as Well
If it doesn’t, click Start → Run → Browse.
Browse to your CD-ROM drive. Double-click
Install.exe. Click OK.
NOTE
If you have installed the PostScript driver, you
must reboot your system.
2. Follow the on-screen instructions.
Follow the instructions to install the PostScript
driver. When you are prompted for the Printer
Emulation, select PCL.
6 Activating Printer Options
If your printer has optional paper trays or a finisher
installed, they must be activated in the printer
driver. See page 6 for instruction on how to do this.
3 Install Printer Utilities
1. On the printer driver CD (CD1) select Custom
Install.
2. Click Productivity Software and choose the
Windows printer software to install.
4 Install EFI Fiery Utilities
1. Insert EFI Utilities (CD2), into your CD-ROM
drive.
2. Select your language.
3. Click Next to accept the License Agreement.
4. Select your printer model. Click Next.
5. Select Quick Install to install only Command
WorkStation, or, Select Custom Install to install
your choice of these EFI tools:
>
>
>
>
>
Command WorkStation
Fiery Mail Port
Fiery Printer Delete
Fiery Downloader
Fiery ColorWise Pro Tools
12
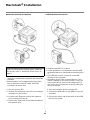
Macintosh® Installation
USB Interface Connection
Network Interface Connection
IMPORTANT!
• Requires Mac OS 9.2 or above
• Printer operation is not assured if another USB
compatible device is connected concurrently with
it.
• If a USB hub is used, it must be connected
directly to the computer.
• Depending on the size of the document, if the
memory setting for the print monitor is low, you
may not be able to print in the background. To
correct for this, increase the memory setting for
the print monitor.
Before connecting the network cable, install the
Ferrite Core. See “1 Install the Ferrite Core” on
page 2.
• Requires Mac® OS 9.2 or 10.2.4, and above,
running on a Macintosh computer with EtherTalk
interface.
• Ethernet cable is not supplied with the printer.
Use an Ethernet crossover cable with RJ45
connectors at either end.
1. Turn the printer OFF.
1. Turn the computer and the printer OFF.
2. Remove the protective cover from the network
connector on the printer.
2. Connect the USB cable to the USB port on the
computer.
3. Connect your Ethernet cable to the network
port on the printer server.
3. Connect the other end of the cable to the USB
port on the printer.
4. Connect the other end of the Ethernet cable to
the network port.
13
Macintosh® Installation
OS 9.2 or above
2 Create the Desktop Printer for a Network
1 Install the Driver
1. Activate Chooser from the Apple menu.
1. Turn the printer ON, then turn the computer
ON.
2. Select the Adobe PS Driver icon and highlight
the printer name (print server ID#).
2. Place the driver CD (CD1), supplied with the
printer, in the CD-ROM drive.
3. Click Create.
3. Double-click the Sharp CD icon that appears on
the desktop.
4. Select Sharp AR-C360P PPD. Click Select.
5. Close Chooser.
4. Double-click the MAC icon.
Note: For additional information, see Chapter 2,
“Installing User Software on a Mac OS Computer”
in the EFI Software User’s Guide on the User
Documentation CD (CD 3).
5. Double-click the MAC OS 9 folder.
6. Double-click Mac Installer AR-C360P.
7. Click Continue.
8. The License Agreement appears. Click Accept to
accept the terms.
9. Click Install for Easy Install to install PPD Files,
Adobe PS Package, and Printing Plug-ins.
Select Custom Install to install your choice of
Adobe PS Package, PPD Files, Adobe PS Options
Plug-ins, SDM for MAC, Swatch Utility, Admin
Setup Utility, Printing Plug-ins.
10.Click Install and follow the on-screen
instructions.
11.Click Continue to install additional utilities.
12.When the installation is complete, click Quit.
14
Macintosh® Installation
OS 9.2 or above (cont’d)
3 User Documentation
For additional information on using printer features
as well as printer utilities, see the on-line
documentation.
Requirements
• Microsoft Internet Explorer version 4.0 or higher
and Acrobat Reader.
To Load
1. Insert the User Documentation CD (CD3) into
your CD-ROM drive.
2. From the CD contents folder, drag the Manual
folder to the desktop.
15
Macintosh® Installation
OS 10.2.4 or above
1 Install the Driver
1. Turn the printer ON, then turn the computer
ON.
2. Place CD 1, supplied with the printer, in the
CD-ROM drive.
3. Double-click the Sharp CD icon that appears on
the desktop.
4. Double-click MAC icon.
5. Double-click the OS X icon.
6. Double-click OS X Installer.
Note: If you are using USB, select USB and
disregard the following step.
7. License Agreement appears. Click Accept to
accept the terms.
8. Click the Install button.
4. Enter the printer's IP address.
9. Click Quit.
5. From the Printer Model drop down menu, select
the correct PPD for your printer model. Click
Add.
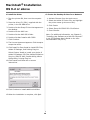
2 Add the Printer
1. To add the printer, run the Printer Setup Utility
or Print Center.
Note: The Printer Setup Utility is found in the
Applications/Utilities folder.
2. Select Add.
3. Select the Protocol: IP Printing, Rendezvous,
Bonjour, Appletalk, or USB.
Note: In order to use the IP Printing connection,
you need an IP address. Also, you may need to
enter the Queue name as “Direct,” “Print,” or
“Hold” instead of the default blank.
6. After the printer is added, the Printer Info
screen appears (OS 10.4). Printer options can
be added as shown below.
16
Macintosh® Installation
OS 10.2.4 or above (cont’d)
3 Install the Fiery EFI Utilities
Install Printer Options
1. Go to the Printer Setup Utility.
1. Place CD2 in the CD-ROM drive.
2. Click Printer Info.
2. Double-click the Sharp CD icon that appears on
the desktop.
3. Select Duplex Unit.
4. Select the number of Available Trays.
3. Double-click the MAC icon.
5. Select Finisher Option.
4. Double-click User Software.
6. Click Apply Changes.
5. Double-click the OS X icon.
Note: To select the Finisher Option, 4 or 5 trays
must first be selected.
6. Double-click Command Workstation LE.
7. Enter your login password. Click OK.
8. Accept the License Agreement.
9. Click Install.
Note: For additional information, see “Installing
User Software on a Mac OS Computer” in the EFI
Software User’s Guide included on the User
Documentation CD (CD3).
4 User Documentation
For additional information on using printer features
as well as printer utilities, see the on-line
documentation.
Requirements
• Microsoft Internet Explorer version 4.0 or higher
and Acrobat Reader.
To Load
1. Insert the User Documentation CD (CD3) into
your CD-ROM drive.
2. From the CD contents folder, drag the Manual
folder to the desktop.
17
Service and Support
• Consult the Sharp Authorized Dealer where you
purchased your printer.
• To find the authorized Sharp servicing dealer
closest to you, please vist us on-line at
www.sharpUSA.com.
18
Trademarks
Adobe and PostScript are trademarks of Adobe Systems, Inc. Which may be registered in certain jurisdictions.
Microsoft, Internet Explorer and Windows are either registered trademarks
or trademarks of Microsoft Corporation in the United States and other countries.
Microsoft, MS-DOS and Windows are registered trademarks of Microsoft Corporation.
Apple, Macintosh, Mac and Mac OS are registered trademarks of Apple Computer.
Other product names and brand names are registered trademarks or trademarks of their proprietors.
Command WorkStation, EFI, Fiery, the Fiery logo are registered trademarks of Electronics for Imaging, Inc.,
in the U.S. Patent and Trademark Office and/or certain other foreign jurisdictions.
All other terms and product names may be trademarks or registered trademarks of their respective owners, and are hereby
acknowledged.
Pantone, Inc. is the copyright owner of color data and/or software which are licensed to Electronics for Imaging, Inc., to distribute
for use only in combination with the products, or software of Electronics for Imaging, Inc. PANTONE Color Data and/or Software
shall not be copied onto another disk or into memory except as part of the delivery of the Electronics for Imaging, Inc., products
or software.
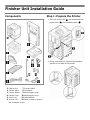
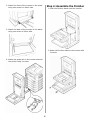
Finisher Unit Installation Guide
Components
Step 1: Prepare the Printer
1. Turn the printer off (!) and disconnect the
power cord (") and interface cable (#).
2. Using a screwdriver, remove the breakout
panels on the side of the printer.
1
2
3
4
5
6
Finisher Unit
7
Finisher stand
8
Finisher Stacker
9
Finisher Cover
10
Power Cord
11
Inverter Unit
12
Inverter Stand
Clear Band
Band Stopper, Small
Band Stopper, Large
Metal Brackets
Cable (inverter to printer)
Not illustrated: Screws
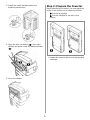
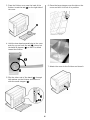
Step 2: Prepare the Inverter
3. Install the metal brackets where the
breakout panels were.
Before assembling the finisher, you must adjust the
height of the inverter unit to match the finisher:
! Inverter as supplied
" Inverter changed for use with 4-tray
finisher.
4. Open the face-up stacker (!), then open
the flap and press it onto the stacker surface
(").
1. Unpack the inverter and remove any packing
materials.
5. Close the stacker.
2
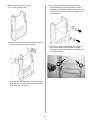
2. Remove the two bottom caps:
a. Turn the inverter over.
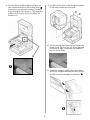
3. Turn the inverter around and remove the
screws holding the metal brackets in place.
Keep the screws and brackets handy: they are
used to help secure the extension plate once it
is repositioned.
b. Remove the two screws securing the bottom
caps on either side of the inverter.
4. Turn the inverter around and remove the
two screws holding the extension plate.
Keep them handy to reattach the plate once
it is repositioned.
c. Remove the end caps and store them along
with the four screws in case you ever need
to convert the unit back.
3
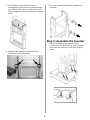
5. Pull forward on the extension plate to
disengage the pins from the top channel stops,
then slide it down into the inverter and push
back to engage the pins on the bottom channel
stops.
7. Turn the inverter around and reinstall the
brackets.
Step 3: Assemble the Inverter
1. Place the hooks on the bottom of the
inverter into the slots on the inverter stand,
then slide the inverter to lock the hooks in
place.
6. Reattach the extension plate using the
screws you removed earlier.
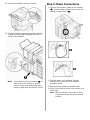
4
Step 4: Assemble the Finisher
2. Attach the front of the inverter to the stand
using two screws on either side.
1. Hook the finisher stand onto the inverter.
3. Attach the back of the inverter to the stand
using one screw on either side.
2. Attach the finisher stand to the inverter with
2 screws.
4. Attach the guard rail on the inverter stand to
the printer using 2 screws.
5
3. Place the finisher cover near the back of the
finisher. Locate the tab (!) on the right side of
the cover.
6. Place the large stopper over the tab on the
cover and turn it to lock it in position.
4. Hold the clear band perpendicular to the cover
and slip one end over the tab (!), then pivot
the band 90 degrees (") so that it is aimed
toward the finisher:
7. Attach the cover to the finisher and close it.
5. Slip the other end of the band (!) through
the retainer on the finisher and secure it
with the small stopper (").
6
8. Pull the finisher platform about half way out,
then loosen the screw on the locking piece (!:
viewed from the opposite direction) so that it
drops through the slot below it. This keeps the
platform from moving while you attach the
finisher to it.
9. Position the finisher on the stand and attach
it with two screws from the back.
10. Lift the locking piece back up and tighten the
screw firmly. Be sure it’s out of the way and
the screw is tight—otherwise the platform
will not move freely.
11. Install the stacker, making sure the hooks
are firmly engaged and that the lever on the
finisher is positioned above the stacker (!).
7
12. Secure the stacker with four screws.
Step 5: Make Connections
1. Connect the finisher’s cable to the inverter
(!). Use the cable supplied to connect the
inverter to the printer (").
13. Push the finisher against the printer until the
prongs on the printer brackets fit into the
holes in the finisher.
Note:
If you need to, turn the levellers (!) on
either side of the finisher to raise or
lower it so the holes and prongs align
properly. Make sure the finisher is level.
2. Plug the power cord supplied into the
inverter, then connect it to a suitable
grounded outlet.
3. Reconnect the printer’s interface cable.
4. Plug in the printer’s power cord and turn on
the printer.
Note: When the printer is turned on, power
is supplied to both the printer and the
finisher.
Application Notes & Tips
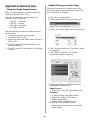
Saddle Stitching on Letter Paper
This section explains how to saddle stitch with
Letter size paper, using the Postscript Driver (PS)
and MS Word as an example.
Using the Single Staple Feature
There is a Staple dropdown selection within the
Finishing Properties of the Fiery.
There are 4 single staple options within that
dropdown. The choices are:
•
•
•
•
Top
Top
Top
Top
Left
Left
Right
Right
1. Click File then Page Setup.
2. Under Page Setup click on the Paper tab.
Horizontal
Vertical
Horizontal
Vertical
3. Choose the correct Paper size. then click Ok.
Use the following procedure for these choices to
work correctly.
1. Configure the trays for the proper
orientation (SEF or LEF).
2. Select the Page Size within Paper Source to
SEF or LEF.
3. For SEF, select Top Left Horizontal or Top
Right Horizontal.
4. For LEF, select Top Left Vertical or Top Right
Vertical.
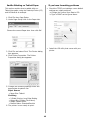
4. Click File and select Print. The Printer dialog
box appears.
5. Click Printer Properties. The Printer
Properties dialog box appears.
6. Change the following settings under the
appropriate dropdown list.
Paper Source
• Paper Size: Letter SEF (Short Edge Feed)
Finishing
• 2-Sided Printing: Long Edge Binding
• Output Bin: Finisher (Face-down)
• Staple: Saddle Stitch
• Booklet Maker: Standard Booklet
7. The printer is now ready to print.
• Make sure that at least one tray has SEF
paper loaded.
9
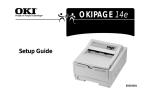
Saddle Stitching on Tabloid Paper
If you have formatting problems
This section explains how to saddle stitch on
Tabloid size paper, using the Postscript Driver (PS)
and MS Word as an example.
•
Check the TCP/IP port settings—some default
settings can create problems:
a. Change the Protocol from Raw to LPR.
b. Type in PRINT as the Queue Name.
•
Install the LPR utility that comes with your
printer.
1. Click File then Page Setup.
2. Under Page Setup click on the Paper tab.
Choose the correct Paper size. then click OK.
3. Click File and select Print. The Printer dialog
box appears.
4. Click Printer Properties. The Printer
Properties dialog box appears.
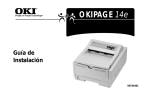
5. Change the following settings under the
appropriate dropdown list.
Paper Source
• Paper Size: Tabloid
Finishing
• 2-Sided Printing: Long Edge Binding
• Output Bin: Finisher (Face-down)
• Staple: Saddle Stitch
• Booklet Maker: Standard Booklet
6. The printer is now ready to print.
10