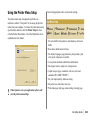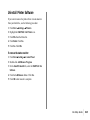
1
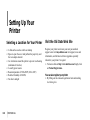
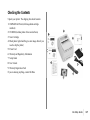
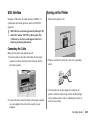
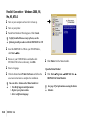
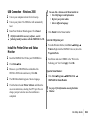
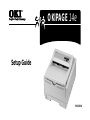
OKIPAGE 14e Setup Guide 59334301 Document Title and Part Number OKIPAGE 14e Setup Guide, 2nd Revision 59334301 Disclaimer Every effort has been made to ensure that the information in this document is complete, accurate, and up-to-date. Oki Data assumes no responsibility for the results of errors beyond its control. Oki Data also cannot guarantee that changes in software and equipment made by other manufacturers and referred to in this document will not affect the applicability of the information in it. Mention of software products manufactured by other companies does not necessarily constitute endorsement by Oki Data. Copyright Information Copyright 2001 by Oki Data. All rights reserved. Written and produced by the Oki Data Training and Publications Department. Contact Information Please address any comments on this publication to: Web Site Please visit Oki Data’s multilingual web site at: http:// www.okidata.com e-Mail Address [email protected] E-2 | OKIPAGE 14e Mailing Address Oki Data Americas, Inc. Training & Publications Dept. 2000 Bishops Gate Blvd. Mt. Laurel, NJ 08054-4620 Trademark Information OKI and MICROLINE are registered trademarks of Oki Electric Industry Company, Ltd. OKIPAGE is a trademark of OKI America, Inc. Energy Star is a registered trademark of the United States Environmental Protection Agency. TrueType is a registered trademark of Apple Computer Company. Hewlett-Packard, HP, and PCL are registered trademarks of Hewlett-Packard Company. IBM is a registered trademark of International Business Machines Corp. Microsoft, MS-DOS, and Windows are either registered trademarks or trademarks of Microsoft Corporation in the U. S. and other countries. Intellifont is a registered trademark of Compugraphic Corporation. Epson is a registered trademark of Seiko Epson Corp. Year 2000 Compliance All products currently sold by Oki Data are Year 2000 Compliant. Each product contains information technology that accurately processes date and time data between the years 1999 and 2000, and carries no issue for the September 9, 1999 (9999) programming concern. These products, when used in combination with products purchased from other manufacturers, whose products properly exchange data and time information, will accurately process the date and time. All future products are committed to meeting the same Year 2000 compliance. 14e Setup Guide | E-3 Energy Star As an ENERGY STAR Partner, Oki Data has determined that this product meets the ENERGY STAR guidelines for energy efficiency. E-4 | OKIPAGE 14e Contents Year 2000 Compliance ...................................................... 3 Energy Star ............................................................................. 4 Setting Up Your Printer ........................................... 6 Selecting a Location for Your Printer .............................. 6 Visit the Oki Data Web Site ............................................... 6 Checking the Contents ...................................................... 7 Remove the Image Drum Protective Paper ................. 8 Remove Protective Film ..................................................... 8 Installing Toner .................................................................... 9 Loading Paper .................................................................... 11 Using Legal Size Paper ................................................ 11 Paper Exit Paths ................................................................. 12 Top Paper Exit ............................................................... 12 Rear Paper Exit .............................................................. 12 Choosing Paper ................................................................. 13 Printing the Demo and Menu Pages ........................... 13 Interfacing with Your Computer .........................14 Parallel Interface ................................................................ 14 USB Interface ...................................................................... 15 Turning on the Printer ...................................................... 15 Printer Software ......................................................16 Printer Drivers ..................................................................... 16 Status Monitor .................................................................... 17 Installing Printer Software ............................................... 17 Parallel Connection - Windows 2000, 98, Me, 95, NT4.0 ........................................................................ 18 USB Connection - Windows 98, Me ....................... 19 USB Connection - Windows 2000 ......................... 21 Using the Status Monitor ............................................... 22 Using the Printer Menu Setup ...................................... 23 Using Power Save to Minimize Warm-up Time ....... 24 To Disable Power Save ................................................... 24 Uninstall Printer Software ............................................... 25 Internet Support .................................................... 26 14e Setup Guide | E-5 Setting Up Your Overview Printer E-6 Selecting a Location for Your Printer Visit the Oki Data Web Site • A firm surface such as a table or desktop • Space to open the cover and pull out the paper tray and the rear output extender • Air circulation around the printer to prevent overheating (minimum of 4 inches) • A nearby power source • Room temperature of 50° to 90°F (10° to 32°C) • Relative Humidity of 20-80% • No direct sunlight Register your printer and create your own personalized support center with my.okidata.com. Get support, news and information, and the latest software upgrades especially tailored to your printer. To register: • Visit our website at http://www.okidata.com. Simply click on Product Registration. | OKIPAGE 14e You can also register your printer • By filling out the enclosed registration form and mailing it or faxing it in. Checking the Contents Unpack your printer. The shipping box should contain: 1 OKIPAGE 14e Printer (with image drum cartridge installed) 2 CD-ROM (includes printer drivers and software) 3 Toner Cartridge 4 Black plastic light-shield bag (to store image drum if you need to ship the printer) 5 Power Cord 6 Warranty and Regulatory Information 7 Setup Guide 8 User’s Guide 9 Warranty Registration Card If you are missing anything, contact Oki Data. 14e Setup Guide | E-7 Remove the Image Drum Protective Paper 3 Without turning the drum cartridge over, remove the protective paper from the image drum. 1 Press the cover release button and lift the cover READY MAN FEED ATTENTION DATA LETTER LEGAL A4 OTHER ENV 2 Lift out the image drum cartridge. Do not touch the drum’s green surface or remove the sponge. 4 Reinstall the cartridge into the printer. Remove Protective Film Lift up the corner and peel the protective plastic film from the operator panel. OTHER ! E-8 | Only the OKIPAGE Type 8 Image Drum will fit in this unit (Part# 41331601). OKIPAGE 14e ENV Installing Toner 3 Peel tape off the bottom. 1 Remove the sponge. 4 Grasp the lock lever and place the left side of the toner cartridge under the end tab. 2 Unwrap the toner cartridge. Shake the cartridge to distribute the toner. Only the OKIPAGE Type 5 Toner Cartridge will fit in this unit (Part# 52109001) ! 14e Setup Guide | E-9 6 When the cartridge is in place, push the lock lever forward until it stops. PU SH 5 Lower the right side into the toner well, aligning the lock lever slot with the ridge in the drum cartridge. E-10 | OKIPAGE 14e 7 Lower the printer cover and press firmly to close. Loading Paper 1 Slide the tray out of the printer. ! The paper gauge (1) indicates how much paper remains in the tray; you don’t have to slide the tray out to check. 2 Adjust the tray guides for the correct paper size. 3 Fan a stack of paper and place it in the tray under the tabs. Do not fill above the “PAPER FULL” mark. The tray will hold 250 sheets of 20 lb. paper. ! ! Recommended paper weight for the tray is 16 to 28 lb (60 to 105 g/m2). 4 Place the tray into the printer then push closed until the tray locks in place. Using Legal Size Paper To load legal size paper, open out the tray extender and adjust the rear paper guide. 14e Setup Guide | E-11 Paper Exit Paths Two paper exit options are available. Select the paper path that is appropriate for the media you are using. Top Paper Exit Use the top paper exit for most printing jobs. • Printed pages exit face down • Pages are stacked in the order printed • Exit bin holds 150 sheets of 20-lb. paper 1 Pull the front exit extender forward. 2 Lift out the support bar. Don’t change paper paths while printing - paper jam may occur. ! E-12 | OKIPAGE 14e Rear Paper Exit The rear paper exit tray provides a straighter paper path. Use rear exit when printing on heavy paper, envelopes, labels, and transparencies. • Printed pages exit face up in reverse order • Maximum output is 50 sheets of 20-lb. paper • Use rear exit for printing on heavy paper, envelopes, labels, transparencies or odd size paper 1 Pull out the rear exit extender until it locks in place. 2 Lift out the support bar. To return to the top exit, close the rear support bar and push the rear exit extender firmly back in place; paper will then exit into the top bin. See Operating Your Printer in the User’s Guide for information on using special print media. ! Choosing Paper • For best results, use paper that is smooth and of high quality. • Store paper in its ream wrapper until you are ready to use it, and keep it away from moisture or other conditions that can cause it to wrinkle or curl. • Avoid printing on both sides of the paper for more than a few pages, or preprinted documents that have been in a photocopier. • Try paper before you buy it in quantity. See Operating Your Printer in the User’s Guide for information on using recycled print media. ! When purchasing paper, use the following specifications for best results: Basic Weight Paper cassette: 16 to 28 lb (60 to 105 g/m2) Manual feed: 16 to 32 lb (60 to 120.5 g/m2) Composition 100% chemical wood pulp and/or cotton fiber Fusing Compatibility Must not scorch, melt, offset, or release hazardous emissions when heated to 392°F. (200°C) Printing the Demo and Menu Pages With the printer powered up but off line (Ready light is off), press down on the printer’s operator panel switch (a) for two seconds. The Ready light will blink and the printer prints the demo page and the menu page. Note: Press the switch again to put the printer back on line. a 14e Setup Guide | E-13 Interfacing Overview with Your Computer Parallel Interface Your printer has a high-speed, bi-directional parallel IEEE 1284 interface port. Purchase a cable marked IEEE 1284 compliant. To comply with FCC regulations, the cable must be shielded and UL and CSA approved. Consult your PC manual for details on cable requirements and interface ports on your computer. OKI DATA has tested and approved the following bidirectional cable: Part Number 70000803. See Service and Support in the User’s Guide for purchasing information. ! Connecting the Cable Make sure the printer and computer are off. 1 Insert the printer end of the cable firmly into the proper connector on the back of the printer. Fasten the cable to the printer securely. E-14 | OKIPAGE 14e 2 Connect the other end of the cable to the proper connector on your computer. Fasten the cable securely to your computer. USB Interface Turning on the Printer Requires a USB cable. The cable must meet USB Rev 1.1 specification for normal operation, and be UL/CM/CSA approved. OKI DATA has tested and approved the following USB cable: Part Number 70037901. Cable Length: 10 ft. (3.048 meters). See Service and Support in the User’s Guide for purchasing information. 1 Make sure the printer is off. ! POWER ON OFF F Connecting the Cable Make sure the printer and computer are off. 1 Insert the printer end of the cable firmly into the proper connector on the back of the printer. Fasten the cable to the printer securely. 2 Connect the other end of the cable to the proper connector on your computer. Fasten the cable securely to your computer. 2 Plug the cord into the printer first, then into a grounded outlet. 3 Turn the printer on. It takes about 10 seconds for the printer to initialize and warm up, and for the Ready light on the operator panel to turn on, indicating the printer is ready to receive data. 14e Setup Guide | E-15 Printer Drivers Printer Software Overview The CD-ROM provided with your printer includes printer drivers and the on-screen printer status monitor and operator panel required to use all the OKIPAGE 14e features. Follow the steps in this guide to install the appropriate printer software on your computer system. E-16 | OKIPAGE 14e Printer drivers must be installed so your software application can communicate with your printer and support all of its features. The OKIPAGE 14e CD-ROM includes printer drivers for printing in the following environments: • Windows Me • Windows 2000 • Windows 98 • Windows NT 4.0 • Windows 95 Status Monitor The status monitor program allows you to monitor and configure an OKIPAGE 14e. In addition to displaying printer status messages, the status monitor provides remote access to the printer’s operator panel. See page 22 for information on using the Status Monitor. Installing Printer Software Determine your computer’s interface connection and operating system. Then proceed to the page listed for instructions to install the appropriate printer software. Parallel Connection Windows Me, 2000, 98, 95, NT 4.0 see page .....................................................18 USB Connection Windows 98, Me see page ........................19 Windows 2000, see page ........................... 21 14e Setup Guide | E-17 Parallel Connection - Windows 2000, 98, Me, 95, NT4.0 q Turn on your computer and wait for it to boot up. q Turn on your printer. q Found New Hardware Wizard appears. Click Cancel. ! To fully install all the necessary software, use the following install procedures with the OKIPAGE 14e CD. q Insert the OKIPAGE 14e CD into your CD-ROM drive, click Start →Run. q Browse to your CD-ROM drive and double-click INSTALL.EXE in the root directory, click OK. q Select a language. q Click the button beside Printer Software and follow the ! E-18 | on-screen instructions to complete the installation. You can click a button on the Menu Installer to: • View Help Support and Information • Register your printer online • Select a different language OKIPAGE 14e q Click Finish. Exit the Menu Installer. Open the Status Monitor: q Click Start →Programs → OKIPAGE 14e → OKIPAGE 14e Status Monitor. ! See page 22 for information on using the Status Monitor. USB Connection - Windows 98, Me q Turn on your computer and wait for it to boot up. q Turn on your printer. q Add New Hardware Wizard appears. Click Next. q Insert the OKIPAGE 14e CD into your CD-ROM drive. q Select “Search for the best driver for your device (Recommended).” Click Next. q Select “CD-ROM drive.” Clear other choices. Click Next. q The OKI USB Device driver is located. Click Next. q The files are copied. Select Finish. q The printer is detected and the Add New Hardware Wizard ! appears. Click Cancel. To fully install all the necessary software, use the following install procedures with the OKIPAGE 14e CD. Install the Printer Driver and Status Monitor With the CD in your CD-ROM drive: q Click Start → Run. q Browse to your CD-ROM drive and double-click INSTALL.EXE in the root directory. Click OK. q The OKI Menu Installer appears. Select a language. q Click the button beside Printer Software and follow the on-screen instructions, selecting the LPT1 port. You can change your port selection once the installation is completed. ! You can click a button on the Menu Installer to: • View Help Support and Information • Register your printer online • Select a different language q Click Finish. Exit the Menu Installer. Select the USB printer port: q From the Windows Taskbar, click Start → Settings → Printers. Right-click the OKIPAGE 14e icon, then click Properties\Details. 14e Setup Guide | E-19 q Scroll down and select OP1USB1:OKIPAGE 14e in the “Print to the following port” list. Click Apply. Click OK. Open the Status Monitor: q Click Start →Programs → OKIPAGE 14e → OKIPAGE 14e Status Monitor. ! E-20 | See page 22 for information on using the Status Monitor. OKIPAGE 14e USB Connection - Windows 2000 q Turn on your computer and wait for it to boot up. q Turn on your printer. The USB driver will automatically ! q Found New Hardware Wizard appears. Click Cancel. q Click Finish. Exit the Menu Installer. You can click a button on the Menu Installer to: • View Help Support and Information • Register your printer online • Select a different language load. ! To fully install all the necessary software, use the following install procedures with the OKIPAGE 14e CD. Install the Printer Driver and Status Monitor q Insert the OKIPAGE 14e CD into your CD-ROM drive. q Click Start → Run. q Browse to your CD-ROM drive and double-click INSTALL.EXE in the root directory. Click OK. q The OKI Menu Installer appears. Select a language. q Click the button beside Printer Software and follow the on-screen instructions, selecting the LPT1 port. You can change your port selection once the installation is completed. Select the USB printer port: q From the Windows Taskbar, click Start → Settings → Printers. Right-click the OKIPAGE 14e icon, then click Properties\Ports. q Scroll down and select USB001 in the “Print to the Following port” list. Click Apply. Click OK. Open the Status Monitor: q Click Start →Programs → OKIPAGE 14e → OKIPAGE 14e Status Monitor. ! See page 22 for information on using the Status Monitor. 14e Setup Guide | E-21 Using the Status Monitor With the status monitor open, printer status messages pop-up on your computer screen, and printer menu settings can be modified using the on-screen operator panel. Printer features selected in your application software will override settings in the on-screen operator panel. Three tabs include the following information: • Printer State - (shown here) shows the printer status and current job status. • Printer Setup – gives you access to the Printer Setup dialog (printer driver control). • Preferences - sets the behavior and appearance of the status monitor. ! Click the Help button for a description of each feature. Refer to the User Manual for information on status monitor troubleshooting. E-22 | OKIPAGE 14e Using the Printer Menu Setup Click on the appropriate tab to see the menu settings. The printer menu setup is designed to perform as an interactive software “front panel” for accessing the printer’s menu from your computer. To invoke the printer menu setup, open the status monitor, click the Printer Setup tab, then click the Printer Menu button. Click the Help button for an explanation of each feature. ! Printer features set in your application software will override printer menu settings. 1 Set raster buffer, font protection, total memory, and receive buffer. 2 Reset menu, drum count, interface. 3 Set display language, page placement, print position, print error report, and power save enable. 4 Access printer hardware and firmware information. 5 Select paper source, weight, size, transparencies. 6 Adjust lines per page, orientation, edit size, and select emulation (PCL, IBM, EPSON). 7 Set print output quality, darkness setting. 8 Set power save delay time, toner save. 9 Print demo page, font page, menu settings, cleaning page. 14e Setup Guide | E-23 Using Power Save to Minimize Warm-up Time To minimize the printer’s warm-up time between print jobs, adjust the Power Save feature in the Printer Menu Setup: 1 From the Windows Taskbar, open the Windows Programs list. 2 Choose OKIPAGE 14e and click OKIPAGE 14e Status Monitor. The Status Monitor appears. 3 Select the Printer Setup tab and press Printer Menu. 4 In the Printer Menu Setup, select the Economy tab as shown below. E-24 | OKIPAGE 14e 5 In the Power Save menu, choose a higher setting to delay power save mode (default setting is 15 min.) 6 Click Apply. Click OK. To Disable Power Save 1 2 3 4 5 6 Open the Status Monitor. Select the Printer Setup tab. Click the Printer Menu button. Select the Maintenance 2 tab. Under Setting Power Save, click the Setting button. Clear in the Enable Power Save box. Click OK. Uninstall Printer Software If you want to remove the printer driver or status monitor from your hard drive, use the following procedure: 1 Click Start → Settings → Printers 2 Highlight the OKIPAGE 14e Printer icon. 3 Click File from the Menu bar. 4 Click Delete. Click Yes. 5 Click Yes. Click OK. To remove the status monitor: 1 Click Start → Settings → Control Panel. 2 Double-click Add/Remove Program. 3 On the Install/Uninstall tab, select the OKIPAGE 14e Software. 4 Click the Add/Remove button. Click Yes. 5 Click OK when removal is complete. 14e Setup Guide | E-25 Internet Support www.okidata.com Your Gateway to OKI Products and Services www.okidata.com is Oki Data’s web site. It provides general information about all of the OKI products and services available to you. You can use our web site to: • Get web-based support for all OKI products: 24 hours a day, 7 days a week—no waiting! • Download the printer drivers you need. • Read about how other customers use OKI products to improve their productivity and enhance their documentation. • Use the Dealer Locator to find a dealer location close to you. • Find out about Oki Data’s special promotional offers and breaking news. • And more... E-26 | OKIPAGE 10e my.okidata.com Your Personal Solutions Center my.okidata.com is a powerful area of Oki Data’s web site designed to help you personalize the information and service you get from Oki Data. When you register for my.okidata.com, you: • Personalize the web-based support for the OKI products you own: 24 hours a day, 7 days a week—no waiting! • Automatically register your product. • Access on-line versions of your product documentation (manuals) and support information. • Control your contact, profile, and preference information. • Receive automatic notification of new printer drivers, key updates, and support information. • Track your e-mail support history. • And more... Start using my.okidata.com today! Register your printer and sign up: • Using the OKIPAGE 14e CD Menu Installer, simply click the On-Line Registration button. • By visiting our website at http://www.okidata.com and clicking on Product Registration. • You can also register your printer by filling out the enclosed registration form and mailing it or faxing it in. 14e Setup Guide | E-27