1
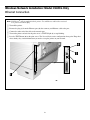
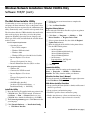
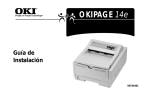
C5400 & C5400n
Computer Connections
& Software Install Guide
Installation Overview:
Windows
Network Installation:
Model C5400n Only
□ Ethernet Connection ............................... 2
□ Software: TCP/IP ..................................... 3
□ Software: Novell ...................................... 8
USB Port Installation
□ Computer Connection .......................... 10
□ Driver Installation, Windows XP .......... 11
□ Driver Installation, Windows 2000 ....... 12
□ Driver Installation, Windows Me .......... 13
□ Driver Installation, Windows 98 ........... 14
Parallel Port Installation
□ Computer Connection .......................... 15
□ Driver Installation .................................. 16
Additional Software
□ Utilities, Activating Accessories, etc. .. 17
Installation Overview:
Macintosh
□ Network Connection ............................. 18
□ USB Connection .................................... 19
□ Software, OS 9.1+ .................................. 20
□ Software, OS 10.1 and higher .............. 22
Windows Environment
Considerations
USB Versus Parallel
Installation instructions are included for both USB and
parallel connections. We recommend using a USB
connection, as your printer is performance optimized for a
USB interface.
Printer Drivers Available
Model 5400
Model C5400 comes with a PCL driver.
Model C5400n
Model C5400n comes with a PCL driver and a Postscript
emulation driver.
When to Use the PCL Driver
If you use TrueType fonts and you do not print
PostScript® graphics (including “.eps” files), choose the
PCL driver. This will be more efficient and give good
results.
When to Use the Postscript Emulation Driver
If you use PostScript fonts or you will be printing
PostScript graphics, choose the Postscript emulation
driver. Performance will be faster and graphics will be
printed at their best quality.
Service and Support
First …
Consult the store where you purchased your printer.
Additional OKI Resources
Available 24 hours a day, 7 days a week
• Visit our multilingual web site: www.okidata.com.
• Visit my.okidata.com.
• Call 1-800-654-3282.
OKI, OkiLAN ® Oki Electric Industry Company, Ltd. Microsoft, Windows, Internet Explorer ®/™ Microsoft Corporation in the United States and other
countries. Netscape, Netscape Navigator U.S. ™, Netscape Communications Corporation. Novell, NetWare ® Novell Corporation in the U.S. and other
countries. PCL ® Hewlett Packard Company. Adobe, Acrobat, Acrobat Reader, PostScript ™ Adobe Systems, Inc. which may be registered in certain
jurisdictions. Ethernet ® Digital Equipment Corporation. EtherTalk, LaserWriter, Mac, Macintosh ® Apple Computer, Inc.
Windows Network Installation: Model C5400n Only
Ethernet Connection
Note: No Ethernet® cable is supplied with the printer. Use an Ethernet cable with two twisted
wire pairs and an RJ45 plug.
□ Turn off the printer.
□ Remove the plug (1) from the Ethernet port (2), then connect your Ethernet cable to the port.
□ Connect the other end of the cable to the network port.
□ Turn on the printer and wait for the print server’s STATUS light (3) to stop blinking.
□ Press the TEST button (4) on the print server. The Network Information configuration sheets print. Keep these
sheets handy: they contain information you need to set up the printer on your network.
2
Windows Network Installation: Model C5400n Only
Software: TCP/IP
Note: Installing a printer on a network is best handled by
someone familiar with networks (such as a network
Administrator).
For more detailed information on the OkiLAN®
8100e SoftNIC print server, see the OkiLAN
8100e User’s Guide on the Manuals CD supplied
with your printer.
PrintSuperVision
Provides access to network printer data for monitoring,
reporting and managing networked printers.
• Installs on either IIS or PWS Microsoft Web
servers.
Included Network Software for
TCP/IP
Job Accounting
Tracks network printer usage by job, user, or Account ID
for internal reports and bill-back purposes.
Your driver CD includes the following network software:
Network Printer Status
Creates an additional STATUS tab in the printer
Properties dialog box.
Oki LPR
Supports TCP/IP printing. Creates an OKI printer port
and installs a pop-up utility to monitor the printer status.
The IP Address
An IP address is required to install the drivers. If you are
using DHCP, the IP address will automatically be detected.
If you are not using DHCP, you need to obtain the IP
Address from your network Administrator and enter it using
the front panel:
Admin Mgr / Quick Setup Utility
Use this to set up the various computers on your network
for use with the printer. Can be run directly off the CD or
installed on the computer.
□ Press + until you see NETWORK MENU on the display,
then press ENTER.
• For users who do not have/want IIS loaded on
their system.
• This utility has a Quick Setup button for users
not familiar with network administration.
□ Press + until you see IP ADDRESS SET, then press
ENTER.
□ Press + to change the setting to MANUAL, and press
ENTER, then BACK.
Storage Device Manager Utility
Manages the hard disk drive (optional on most models)
and the printer’s built-in flash memory.
□ Press + (IP ADDRESS appears), then press ENTER.
□ Use the + and – to set each set of digits in the IP
Address, pressing ENTER to go to the next set of digits.
Web Driver Installer Utility
Use this to discover printers connected to a TCP/IP
network and to display discovered printers on a web page
so that clients can download the necessary drivers
directly from that URL.
□ Press BACK, then press ON LINE.
• Requires Microsoft IIS 4 or above.
(continued on next page)
3
Windows Network Installation: Model C5400n Only
Software: TCP/IP (cont.)
Set Up the Network
□ Select from the following buttons:
• Please read before using. Readme file containing
Use either one:
information and instructions for this utility.
• OkiLAN 8100e Softnic Standard Setup. If you
are experienced in network setup and want access
to all the setting options, click this button and
follow the on-screen instructions for completing
the installation, leaving the Menu Installer open.
Admin Mgr / Quick Setup utility (see below)
• does not require IIS
• has Quick Setup option for users less familiar
with network configuration
Web Driver Installer utility (see page 6)
• requires IIS4 or above.
Note: With Standard Setup, you can either set up
the network while running the utility off the
CD, or install the utility on your computer
and then launch it from there
[Start → Programs → Oki Setup
Utility → AdminManager].
• for more experienced users
• Clients are informed of the new printer by
email and can click the URL line in the email
to download the printer driver(s) from the
web page set up by the administrator.
• OkiLAN 8100e Softnic Quick Setup. This
The Admin Mgr / Quick Setup Utility
setup is for less experienced users and does
not provide as many setting options as the
Standard Setup. To use Quick Setup, click
this button and follow the steps below.
Run the Utility
□
Insert the Drivers CD supplied with your printer in the
CD-ROM drive. The CD will autorun. (If it doesn’t,
click Start → Run → Browse. Browse to your
CD-ROM drive, double-click Install.exe, click OK.)
□ The Welcome dialog box appears. Click Next.
Note: If the Ethernet Address information does not
□ The License Agreement appears, click Next.
automatically appear, click Search and wait
for the utility to locate and load in the
printer.
□ Select your language.
□ The Menu Installer Software Installation dialog box
□ Click the Ethernet information displayed for your
appears. Click the Network Software button.
printer, then click Next.
□ Click the Installation/Config button.
□ Select Yes for TCP/IP protocol and click Next.
□ Click the Admin Mgr / Quick Setup button.
□ Select Obtain an IP Address automatically, then click
□ The OkiLAN 8100e Softnic Setup Utility dialog box
Next.
appears. Select your language.
□ Select No for NetWare protocol, then click Next.
□ Select No for EtherTalk protocol, then click Next.
□ Select No for NetBEUI protocol, then click Next.
□ Click Execute.
□ Click Finish.
□ Click the Exit button, then click Yes.
□ Click the Back button twice.
(continued on next page)
4
Windows Network Installation: Model C5400n Only
Software: TCP/IP (cont.)
Install the Drivers
To Install the Postscript Emulation Driver
□ Click the Printer Driver Installer button.
□ The Local or network printer dialog box appears.
Select Network Printer. Click Next.
□ The Connection type dialog box appears. Select
Directly to the network… and click Next.
□ The TCP/IP Connection dialog box appears. Follow
the on-screen instructions to complete the installation.
To Install the PCL Driver
Use the Add Printer wizard:
□ Click Start → Settings → Printers [Printers and
Faxes for XP] → Add Printer.
The Add Printer Wizard appears.
□ Follow the on-screen instructions.
Note: When prompted. select Local port, then
select LPT1 temporarily. After the driver is
installed, go back and set its port up for the
network.
The PCL driver is located on the Drivers CD
under
Drivers\C5400n\english\win2k_xp\ok725.inf
□ Click Finish.
Use the Oki LPR Utility to discover the printer:
□ To activate/install the LPR utility: from the Menu
Installer Software Installation dialog box on the
driver CD, click Network Software → Installation/
Config → Oki LPR.
□ Click Remote Print, then click Add Printer.
□ Select your printer model from the list, then either enter
the IP Address manually, or click Discover and wait
for the printer to be discovered.
□ Click OK.
(continued on next page)
5
Windows Network Installation: Model C5400n Only
Software: TCP/IP (cont.)
□ Follow the on-screen instructions to complete the
The Web Driver Installer Utility
installation.
Use this utility to create a web page and set up the printer
and groups of clients who have access to the printer. Once
the new printer has been registered by the administrator, the
utility automatically sends a email to each registered client.
□ Close the Menu Installer.
Register Printer Drivers
Before using the Web Driver Installer, register any printers
connected to the network.
The client then clicks the URL included in the email and is
taken to the web page where they can select the printer,
appropriate Windows Operating System, language and
driver type (PCL or PS) and download the selected drivers
to their system.
□ Click Start → Programs → Okidata → Web
Driver Installer → Register Driver Tool.
□ Select a printer from the list, then click the Register/
Update Driver button.
Server Computer Requirements
□ Enter the full path of the inf file for the printer driver.
• Operating System:
For the OKI C5400n printer:
– Server 2003 computer
• inf file locations
– Windows XP Professional
\drivers\5400n\english\win2k_xp
\drivers\5400n\english\w9x
\drivers\5400n\english\nt4
• inf file names
Postscript driver: Ok725ps.inf
PCL driver: Ok725.inf
□ Click OK.
– Windows 2000
– Windows NT Server 4.0 with Service Pack 6a
• Internet Explorer 5.5 or above
or
Netscape Navigator 6.0 or above
• Internet Information Services (IIS) 4 or above
Client Computer Requirements
Launch the Utility
To launch the utility for setting up the network, click
Start → Programs → Okidata → Web Driver
Installer. The utility launches within your browser.
• Windows OS
• Connected to TCP/IP network
• Internet Explorer 5.5 or above
or
Netscape Navigator 6.0 or above.
• Email access
• Oki LPR utility installed
[on driver CD, Network Software →
Installation/Config → Oki LPR]
View the On-Line User’s Manual
To view the manual, click Manual in the upper right corner
of the Web Driver Utility window.
Web Driver Installer Functions
• Set up your Login Name (default = admin) and Password
(default = password).
Install the Utility
□ Insert the Drivers CD supplied with your printer in the
CD-ROM drive. The CD will autorun. (If it doesn’t,
click Start → Run → Browse. Browse to your
CD-ROM drive, double-click Install.exe, click OK.)
• Set up (register) and maintain groups
• Establish a specific client to maintain a group.
• Enable Auto-discovery (clients are informed of any
newly added printers at preset intervals via email).
□ The License Agreement appears. Click Next and select
your language.
□ Click Network Software → Installation/Config
→ Web Driver Installer.
(continued on next page)
6
Windows Network Installation: Model C5400n Only
Software: TCP/IP (cont.)
Configuring the Print Server via
the Embedded Web Page
Windows 2000, XP and NT 4.0:
Note: For more detailed information, see the OkiLAN
□ Click Duplex, then click Installed. Do the same
□ Click the Device Settings tab.
□ Scroll down to Installable Options.
thing for Hard Disk. If you have the optional
paper tray installed, click Available Tray and
select 2.
8100e SoftNIC User’s Guide on the Manuals CD
supplied with your printer.
□ Activate your web browser (Netscape Navigator®
Windows Me, 98 and 95:
version 4.0 or higher, or Microsoft® Internet Explorer®
version 4.0 or higher), then enter the IP Address for the
printer (this will be found on the Network Information
configuration sheets generated when you press the Test
button on the back of the printer).
□ Click the Device Options tab.
□ Select Duplex Option Unit, Printer Hard Disk,
and select the optional second paper tray if
installed.
□ From this page you can
□ Click OK, then close the Printers dialog box.
• Enable/disable protocols.
To Activate in the PCL Driver:
• Change the IP address, Subnet Mask and
□ Click Start → Settings → Printer.
default Gateway to meet the requirements for
your particular network environment.
□ Right click the PCL printer icon, then click Properties.
□ Click the Device Options tab.
□ When done, save and submit your changes to the print
□ Select Duplex Option Unit, Printer Hard Disk, and/or
server to make them permanent. When prompted, enter
the following:
set Available Tray to 2.
□ Click OK, then close the Printers dialog box.
• User Name = Root.
• Password = Last 6 digits of the MAC Address
The On-Line Printer User’s
Guide
(this will be found on the Network
Information configuration sheets generated
when you press the Test button on the back of
the printer).
Note: In order to open the on-line User’s Guide, you must
have Acrobat Reader installed.
Activating the Optional
Accessories
Insert the Manuals CD into your CD-ROM drive and follow
the on-screen instructions to view or install the User’s
Guide.
If your printer has an optional duplex unit, internal hard
drive or second paper tray installed, you must enter the
driver and activate it.
Readme File
Please refer to the readme file on the Drivers CD supplied
with your printer for the latest information on printer
drivers.
To Activate in the Postscript Emulation
Driver:
□ Click Start → Settings → Printer.
□ Right click the Postscript emulation printer icon, then
click Properties.
7
Windows Network Installation: Model C5400n Only
Software: Novell
Admin Mgr / Quick Setup
Note: Installing a printer on a network is best handled by
someone familiar with networks (such as a network
Administrator).
□ Insert the Drivers CD supplied with your printer into
your CD-ROM drive. The CD will AutoPlay. (If it does
not AutoPlay, click Start → Run → Browse.
Browse to your CD-ROM drive and double-click
Install.exe, then click OK.)
For more detailed information on the OkiLAN®
8100e SoftNIC internal print server, see the OkiLAN
8100e SoftNIC User’s Guide on the Manuals CD
supplied with your printer.
□ The Software License Agreement appears. Click Next
and select your language.
Included Network Software for
Novell®
□ Click Network Software → Installation/Config
Your Driver CD includes the following network software:
□ Select your language, then click the OkiLAN Softnic
→ Admin Mgr / Quick Setup.
Standard Setup button.
□ Follow the on-screen instructions to complete the
installation.
Note: You can either set up the network while running the
[Oki LPR: TCP/IP only]
utility off the CD, or you can choose to install the
utility on your computer and then launch it from
there (Start → Programs → Oki Setup
Utility → AdminManager).
Admin Mgr / Quick Setup Utility
Use this to set up the various computers on your network
for use with the printer.
Use the Utility to Install the Printer on a
Novell Network
Storage Device Manager Utility
Load this utility to manage the hard disk drive (optional
on most models) and the printer’s built-in flash memory.
• Novell Client for Windows must be loaded.
• The Admin Manager software must be running.
• You must be logged in to NDS.
□ When the AdminManager utility opens, it
automatically discovers any printers on the network. If
no printers appear, click the Search button ( ) and
wait for the utility to discover the printer.
[Web Driver Installer Utility: TCP/IP only]
PrintSuperVision
Provides access to network printer data for monitoring,
reporting and managing networked printers.
□ Select the discovered printer.
□ Click Setup → Create a NetWare Queue.
Installs on either IIS or PWS Microsoft Web servers.
□ Select NDS Mode. Click Next.
Job Accounting
Tracks network printer usage by job, user, or Account ID
for internal reports and bill-back purposes.
□ Select the container. Click Next.
□ Select Print Server Mode. Click Next.
□ Select or create a queue. Click Execute.
Network Printer Status
Creates an additional STATUS tab in the printer
Properties dialog box.
(continued on next page)
8
Windows Network Installation: Model C5400n Only
Software: Novell (cont.)
The On-Line Printer User’s
Guide
Activating the Optional
Accessories
□ If your printer has an optional duplex unit, internal hard
Note: In order to open the on-line manual, you must have
Acrobat Reader installed.
drive or second paper tray installed, you must enter the
driver and activate it.
Insert the Manuals CD into your CD-ROM drive and follow
the on-screen instructions to view or install the User’s
Guide.
To Activate in the Postscript Emulation
Driver:
□ Click Start → Settings → Printer.
Readme File
□ Right click the Postscript emulation printer icon, then
Please refer to the readme file on the Drivers CD supplied
with your printer for the latest information on printer
drivers.
click Properties.
Windows 2000, XP and NT 4.0:
□ Click the Device Settings tab.
□ Scroll down to Installable Options.
□ Click Duplex, then click Installed. Do the same
thing for Hard Disk. If you have the optional
paper tray installed, click Available Tray and
select 2.
Windows Me, 98 and 95:
□ Click the Device Options tab.
□ Select Duplex Option Unit, Printer Hard Disk,
and select the optional second paper tray if
installed.
□ Click OK, then close the Printers dialog box.
To Activate in the PCL Driver:
□ Click Start → Settings → Printer.
□ Right click the PCL printer icon, then click Properties.
□ Click the Device Options tab.
□ Select Duplex Option Unit, Printer Hard Disk, and/or
set Available Tray to 2.
□ Click OK, then close the Printers dialog box.
9
Windows USB Port
Computer Connection
Note: No USB interface cable is supplied with the printer.
Use a USB cable that is compatible with USB specification 1.1 or 2.0.
□ A USB interface will only operate using Windows 2000, Windows XP, Windows Me, and Windows 98. Windows
95 and NT 4.0 do not support USB.
□ Printer operation is not assured if another USB compatible device is connected concurrently with it.
□ If a USB hub is used and you encounter problems, connect the printer directly to the computer.
□ Turn off the printer, then connect the USB cable to the computer.
□ Connect the USB cable to the black USB port (1)—not the plugged Ethernet port!—on the printer.
10
Windows USB Port
Driver Installation, Windows XP
Install the Printer Driver
□ Click Yes to confirm printing of the test page, then click
OK and close the Printers dialog box.
□ Make sure the USB cable is connected to your printer
and PC and your printer is turned OFF.
Model C5400n Only: To Install
the Second Driver as Well
□ Insert the Driver CD supplied with your printer into
your CD-ROM drive. The CD will autorun. (If it
doesn’t, click Start → Run → Browse. Browse to
your CD-ROM drive and double-click Install.exe, click
OK.)
□ With the Menu Installer Software Installation dialog
box open, click the Printer Driver Installer button.
□ Select Local printer. Click Next.
□ The License Agreement appears. Click Next.
□ Select LPT1 temporarily. Click Next.
□ Select your language.
□ Select the emulation to install. Click Next.
□ Click the Printer Driver Installer button.
□ Follow the on-screen instructions to complete the
□ Click Local printer. Click Next.
installation.
□ Select the USB port. Click Next.
□ Click Finish.
□ Model C5400: Click Next.
Note: If you will be installing the utilities, leave the Menu
Model C5400n: Select the emulation to install—the
Postscript (PS) emulation is the default—then click
Next.
Installer dialog box open.
When the installation is complete:
□ The printer driver installs.
□ Click Start → Settings → Printers.
□ The Connect cable dialog box displays.
□ Right click the printer icon for the emulation you just
□ Switch your printer ON.
installed, then click Properties.
□ The Add New Hardware wizard starts. Click Next.
□ On the Ports tab, select USB01 port in the Print to the
following port drop-down list.
□ Select “Search for the best driver for your device.”
□ Click OK, then close the Printers dialog box.
Click Next.
□ Select CD-ROM drive. Clear other choices. Click Next.
When you’re done installing
drivers, skip to page 17 for:
□ The USB driver is located. Click Next. Click Finish.
□ Click Finish.
•
•
•
•
Note: If you will be installing the second driver (Model
C5400n only) or the utilities, leave the Menu
Installer dialog box open.
Print a Test Page
□ Click Start → Settings → Printers.
□ Right-click the printer icon.
□ Click Properties.
□ Click the Print Test Page button.
11
Printer Software Utilities
Activating the Optional Accessories
Manuals
Readme File
Windows USB Port
Driver Installation, Windows 2000
Model C5400n Only: To Install
the Second Driver as Well
Install the Printer Driver
□ Make sure the USB cable is connected to your printer
and PC and your printer is turned OFF.
□ With the Menu Installer Software Installation dialog
□ Insert the driver CD supplied with your printer into your
box still open, click the Printer Driver Installer
button.
CD-ROM drive. The CD will autorun. (If it doesn’t,
click Start → Run → Browse. Browse to your CDROM drive and double-click Install.exe, click OK.)
□ Select Local printer. Click Next.
□ The License Agreement appears. Click Next.
□ Select LPT1 temporarily. Click Next.
□ Select your language.
□ Select the emulation to install. Click Next.
□ Click the Printer Driver Installer button.
□ Follow the on-screen instructions to complete the
installation.
□ Click Local printer. Click Next.
□ Select the USB port. Click Next.
□ Click Finish.
□ Printer model and emulation displays.
Note: If you will be installing the utilities, leave the Menu
Installer dialog box open
□ Model C5400: Click Next.
Model C5400n: Select the emulation to install—the
Postscript (PS) emulation is the default—then click
Next.
When the installation is complete:
□ Click Start → Settings → Printers.
□ Right click the printer icon for the emulation you just
□ The printer driver installs.
installed, then click Properties.
□ If the Digital Signature Not Found dialog box appears,
□ On the Ports tab, select USB01 port in the Print to the
click Yes. Printer drivers are installed.
following port drop-down list.
□ The Connect cable dialog box displays.
□ Click OK, then close the Printers dialog box.
□ Click Finish.
Print a Test Page
Note: If you will be installing the second driver (Model
□
C5400n only) or the utilities, leave the Menu
Installer dialog box open.
Switch your printer ON.
□ Click Start → Settings → Printers.
□ Right-click the printer icon.
□ Click Properties.
□ Click the Print Test Page button.
□ Click Yes to confirm printing of the test page, then click
OK and close the Printers dialog box.
When you’re done installing
drivers, skip to page 17 for:
•
•
•
•
12
Printer Software Utilities
Activating the Optional Accessories
Manuals
Readme File
Windows USB Port
Driver Installation, Windows Me
Install the Printer Driver
□ Click Yes to confirm printing of the test page, then click
OK and close the Printers dialog box.
□ Make sure the USB cable is connected to your printer
and PC and your printer is turned OFF.
Model C5400n Only: To Install
the Second Driver as Well
□ Insert the driver CD supplied with your printer into your
CD-ROM drive. The CD will autorun. (If it doesn’t,
click Start → Run → Browse. Browse to your CDROM drive and double-click Install.exe, click OK.)
□ With the Menu Installer Software Installation screen
still open, click the Printer Driver Installer button.
□ The License Agreement appears. Click Next.
□ Select Local printer. Click Next.
□ Select your language.
□ Select LPT1 temporarily. Click Next.
□ Click the Printer Driver Installer button.
□ Select the emulation to install. Click Next.
□ Click Local printer. Click Next.
□ Follow the on-screen instructions to complete the
□ Select the USB port. Click Next.
installation.
□ Model C5400: Click Next.
□ Click Finish.
Model C5400n: Select the emulation to install—the
Postscript (PS) emulation is the default—then click
Next.
Note: If you will be installing the utilities, leave the Menu
Installer dialog box open.
□ The printer driver installs.
When the installation is complete:
□ The Connect cable dialog box displays. Click Finish.
□ Click Start → Settings → Printers.
□ Switch your printer ON.
□ Right click the printer icon for the emulation you just
installed, then click Properties.
□ The Add New Hardware wizard starts. Click Next.
□ On the Details tab, select OP1USB1 in the Print to the
□ Select “Specify the location of the driver.” Click Next.
following port drop-down list.
□ Select “Specify a location.” Clear removable media.
□ Click OK, then close the Printers dialog box.
Click Browse.
□ Scroll down and click on your CD-ROM drive. Click
When you’re done installing
drivers, skip to page 17 for:
OK.
□ Click Next. The USB driver is located.
□ Click Next. Click Finish.
•
•
•
•
Note: If you will be installing the second driver (Model
C5400n only) or the utilities, leave the Menu
Installer dialog box open.
Print a Test Page
□ Click Start → Settings → Printers.
□ Right-click the printer icon.
□ Click Properties.
□ Click the Print Test Page button.
13
Printer Software Utilities
Activating the Optional Accessories
Manuals
Readme File
Windows USB Port
Driver Installation, Windows 98
Model C5400n Only: To Install
the Second Driver as Well
Install the Printer Driver
□ Make sure the USB cable is connected to your printer
and PC and your printer is turned OFF.
□ With the Menu Installer Software Installation screen
□ Insert the driver CD supplied with your printer into your
still open, click the Printer Driver Installer button.
CD-ROM drive. The CD will autorun. (If it doesn’t,
click Start → Run → Browse. Browse to your CDROM drive and double-click Install.exe, click OK.)
□ Select Local printer. Click Next.
□ Select LPT1 temporarily. Click Next.
□ The License Agreement appears. Click Next.
□ Select the emulation to install. Click Next.
□ Select your language.
□ Follow the on-screen instructions to complete the
□ Click the Printer Driver Installer button.
installation.
□ Click Local printer. Click Next.
□ Click Finish.
□ Select the USB port. Click Next.
Note: If you will be installing the utilities, leave the Menu
Installer dialog box open.
□ Model C5400: Click Next.
Model C5400n: Select the emulation to install—the
Postscript (PS) emulation is the default—then click
Next.
When the installation is complete:
□ Click Start → Settings → Printers.
□ Right click the printer icon for the emulation you just
□ The printer driver installs.
installed, then click Properties.
□ The Connect cable dialog box displays. Click Finish.
□ On the Details tab, select OP1USB1 in the Print to the
□ Switch your printer ON.
following port drop-down list.
□ The Add New Hardware wizard starts. Click Next.
□ Click OK, then close the Printers dialog box.
□ Select “Search for the best driver for your device.”
When you’re done installing
drivers, skip to page 17 for:
Click Next.
□ Select CD-ROM drive. Clear other choices. Click Next.
□ The USB driver is located. Click Next. Click Finish.
•
•
•
•
Note: If you will be installing the second driver (Model
C5400n only) or the utilities, leave the Menu
Installer dialog box open.
Print a Test Page
□ Click Start → Settings → Printers.
□ Right-click the printer icon.
□ Click Properties.
□ Click the Print Test Page button.
□ Click Yes to confirm printing of the test page, then click
OK and close the Printers dialog box.
14
Printer Software Utilities
Activating the Optional Accessories
Manuals
Readme File
Windows Parallel Port
Computer Connection
□ Turn off both the computer and the printer.
□ Attach a standard IEEE-1284 parallel cable (not supplied) to the parallel port (1) on the printer,
securing it with the spring clips.
□ Attach the other end to the parallel port on the computer and secure it in place with the screws.
15
Windows Parallel Port
Driver Installation
Model C5400n Only: To Install
the Second Driver as Well
Drivers Supplied
Drivers are supplied for the following Windows systems:
• Windows XP, 2000
• Windows Me, 98, 95B
• Windows NT 4.0
□ With the Menu Installer Software Installation dialog
box still open, click the Printer Driver Installer
button.
□ Follow the on-screen instructions to install the second
Install the Printer Driver
driver.
□ Be sure the cable is connected and your printer is
Note: When prompted to select a port, select LPT1.
powered OFF.
□ Click Finish.
□ Insert the Printer Driver Installation CD into your
Note: If you will be installing the utilities, leave the Menu
CD-ROM drive. The CD will AutoPlay. (If it doesn’t,
click Start → Run → Browse. Browse to your
CD-ROM drive and double-click Install.exe, then click
OK.)
Installer dialog box open.
Print a Test Page
□ The License Agreement appears. Click Next.
□ Turn printer power ON.
□ Select your language.
□ Click Start → Settings → Printers.
□ Click the Printer Driver Installer button.
□ Right-click the printer icon.
□ Select Local printer. Click Next.
□ Click Properties.
□ Select the LPT1 port. Click Next.
□ Click the Print Test Page button.
□ Model C5400: Click Next.
□ Click Yes to confirm printing of the test page, then click
Model C5400n: Select the emulation to install—the
Postscript (PS) emulation is the default—then click
Next.
OK and close the Printers dialog box.
When you’re done installing
drivers, skip to page 17 for:
□ Follow the on-screen instructions to complete the
installation.
•
•
•
•
□ Click Finish.
Note: If you will be installing the second driver (Model
C5400n only) or the utilities, leave the Menu
Installer dialog box open.
16
Printer Software Utilities
Activating the Optional Accessories
Manuals
Readme File
Windows Software Installation
Utilities, Activating Accessories, etc.
Color Print Utilities
To Activate in the Postscript Emulation
Driver (Model C5400n Only):
• Color Swatch Utility: Prints swatches of color samples
with RGB values. Enter the corresponding RGB value in
your software application to print a color matching the
associated swatch.
□ Click Start → Settings → Printer.
□ Right click the Postscript emulation printer icon, then
click Properties.
• Color Correct Utility: Use to compensate for nonlinear
Windows 2000, XP and NT 4.0:
color characteristics of the printer or the pages being
printed. Gamma curve adjustments can also be used to
change contrast and brightness.
□ Click the Device Settings tab.
□ Scroll down to Installable Options.
□ Click Duplex, then click Installed. Do the same
Installing the Utilities
thing for Hard Disk. If you have the optional
paper tray installed, click Available Tray and
select 2.
To install the software utilities, click the Productivity
Software button in the Menu Installer Software Installation
dialog box, then select and install the utilities you want
following the on-screen instructions.
Windows Me, 98 and 95:
□ Click the Device Options tab.
To access the utility programs from your desktop, click
Start → Programs → OkiData.
□ Under Installable options, select Duplex Option
Unit, Printer Hard Disk, and select the optional
second paper tray if installed.
Activating the Optional
Accessories
□ Click OK, then close the Printers dialog box.
On-Line Manual
If your printer has an optional duplex unit, internal hard
drive or second paper tray installed, you must enter the
driver and activate it.
Note: In order to open the on-line User’s Guide, you must
have Acrobat Reader installed.
To Activate in the PCL Driver:
Insert the Manuals CD into your CD-ROM drive and follow
the on-screen instructions to view or install the User’s
Guide.
□ Click Start → Settings → Printer.
□ Right click the PCL printer icon, then click Properties.
□ Click the Device Option tab.
Readme File
□ Select Duplex Option Unit, Printer Hard Disk, and/or
Please refer to the readme file on the Drivers CD supplied
with your printer for the latest information on printer
drivers.
set Available Tray to 2.
□ Click OK, then close the Printers dialog box.
17
Macintosh Installation: Model C5400n Only
Network Connection
Notes:Requires Mac OS 9.1 or above, running on a Macintosh® computer with EtherTalk
interface.
The Ethernet cable is not supplied with the printer. Use an Ethernet cable with RJ45 connectors at either end.
□ Turn off the printer.
□ Connect your Ethernet cable to the network port on the hub or switch.
□ Remove the plastic cap from the Ethernet port (1) on the printer.
□ Connect the other end of the cable to the port (1).
□ Turn on the printer and wait for the print server status light (2) to stop blinking.
□ Press the Test button (3) on the print server. The Network Information configuration sheets print. Keep these sheets
handy: they contain information you need to set up the printer on your network.
18
Macintosh Installation: Model C5400n Only
USB Connection
Note: No USB interface cable is supplied with the printer. Use a cable that is compatible with
USB specification 1.1 or 2.0.
□ Requires Mac OS 91 or higher
□ Printer operation is not assured if another USB compatible device is connected concurrently with it.
□ If a USB hub is used and you encounter problems, connect the printer directly to the computer.
□ Depending upon the size of the document, if the memory setting for the print monitor is low, you may not be able
to print in the background. To correct for this, increase the memory setting for the print monitor.
□ Depending on the model you have, you may need to install updates to the operating system in order to use USB:
e.g., iMac Update 1.0, iMac Update 1.1, iMac Firmware Update, etc. For further information, contact Apple
Computers.
□ Turn off the computer and the printer.
□ Connect the USB cable to the USB port on the computer.
□ Connect the other end of the cable to the black USB Port (1)—not the plugged Ethernet port!—on the printer.
19
Macintosh Installation: Model C5400n Only
Software, OS 9.1+
Create the Desktop Printer
Install the Driver
□ Turn on the printer, then turn on the computer.
Networks
□ Place the Drivers CD supplied with your printer into the
□ Activate Chooser from the Apple menu, then wait for
CD-ROM drive.
the network printer to appear.
□ Double-click the CD icon that appears on the desktop.
□ Select the LaserWriter8 icon and highlight the printer
□ Open the MAC folder, then open the PSDRV folder.
name (print server ID#).
□ Open the folder for your language.
□ Click Create.
□ Double-click the MAC Installer icon, then click
□ Close Chooser.
Continue and accept the License agreement.
Note: If you need to verify the printer name, press the print
□ Select Mac OS 9.1+ from the drop-down box located in
server test button (1) to print the Network
Information configuration sheets.
the left corner. This will install printer drivers, utilities,
and plug-ins.
USB
□ Navigate to your local hard drive → Application
(Mac OS 9) → Utilities.
□ Double-click the Desktop Printer Utility icon.
□ Highlight Printer (USB) under Create Desktop.
Notes
□ In the drop-down box, select LaserWriter 8 and click
OK.
To customize the installation, click the arrow icon,
then select the specific items you wish to install.
□ Under Postscript Printer Description (PPD) file, click
Change.
For more information on utilities, see the Utilities
section of the on-line Mac Technical Reference on
the Manuals CD supplied with your printer.
□ Make sure the Printer Descriptions folder is selected
in the drop-down box.
□ Highlight your printer model, then click Select.
□ Click Install.
□ Under USB Printer Selection, click Change.
□ When the installation is complete, click Quit.
□ Highlight the printer model you have, then click OK.
□ Click Create. The printer icon appears on the desktop.
□ Click Save.
(continued on next page)
20
Macintosh Installation: Model C5400n Only
Software, OS 9.1+ (cont.)
Accessing Advanced Features
On-Line Manuals
□ Select File on the desktop menu.
Two on-line manuals are provided on the Manuals CD
supplied with your printer:
□ Click Print Desktop from the drop down menu.
• User’s Guide
□ Select Plugin Preferences from the pull-down menu.
Includes media recommendations, loading print media,
information on using the printer menu, troubleshooting,
specifications, etc.
□ Check Print Time Filters, Job Accounting, Job Type
and Job TypExec Mod.
□ Click Save Settings. Click OK.
• Mac Technical Reference
Includes information on color matching and on using the
printer’s features and utilities.
Requirements
• Adobe® Acrobat® Reader is required to view the
manuals.
To Load the Manuals
□ Insert the Manuals CD into your CD-ROM drive.
□ Double-click the CD icon which appears on the
desktop.
□ Either double-click the pdf files to view them directly
from the CD or drag them to the desktop.
Readme File
For the latest printer driver information, see the Readme file
on the Drivers CD supplied with your printer.
21
Macintosh Installation: Model C5400n Only
Software, OS 10.1 and higher
Install the Driver
Adding the Printer
Note: Be sure to switch off antivirus software before
□ Mac 10.1-10.2:
Run the Print Center (Local
HD → Applications → Utilities → Print
Center).
Mac 10.3+:
Run the Printer Setup Utility (Local
HD → Applications → Utilities → Printer
Setup Utility).
installing a printer driver.
□ Turn on the printer, then turn on the computer.
□ Place the Drivers CD supplied with the printer in the
CD-ROM drive.
□ Double-click the CD icon that appears on the desktop.
□ Open the MAC folder.
□ Click Add.
□ Open the PSDRV folder.
□ Select IP Printing from the drop down menu.
□ Open the folder for your language.
Note: If you are using USB select USB, then select your
□ Double-click the Mac Installer icon, then click
model from the list and click Add. Disregard the
following steps.
Continue and accept the License agreement.
□ Select the appropriate MAC OS 10 driver from the
□ Enter the printer’s IP address.
drop-down menu located in the left corner, then select
Utilities MAC OS X.1+ and Color Profiles MAC OS
X.1+.
□ From the Printer Model drop down menu, select the
correct model for your printer. Click Add.
□ Quit Print Center/Printer Setup Utility.
On-Line Manuals
See page 21 for instructions to load the manuals.
Readme File
For the latest printer driver information, see the Readme file
on the Drivers CD supplied with your printer.
□ Click Install.
□ When the installation is complete, click Quit.
22
Oki Data Americas, Inc., 2000 Bishops Gate Blvd., Mt. Laurel, NJ 08054-4620
Tel: 1-800-654-3282 Fax: (856) 222-5320 www.okidata.com my.okidata.com
© 2004 Oki Data Americas, Inc.
59360801