1
Ol/17/o2 Tml II:Sl
FAX 864 964 3314 RYOBI CUSTOMER SERVICE
_002/012
Owner's Manual
i
RRFTSMRN1
2.4 VOLT CORDLESS SCREWDRIVER
Single Speed / Reversible
Model No.
•973.111380
Save this manual for
future reference
CAUTION:
•
•
•
•
•
Read and follow all
Safety Rules and Operating InstrucUons
before first use of this product,
Customer Help Line: 1-800-932-3188
Sears, Roebuck and Co., Hoffman Estate6, IL 60179
Visit the Craftsman web page: www.saars.com/crartsman
972000-921
8-01
USA
Safety
Features
Operation
Maintenance.
Parts List
ol/17/o2
THU 11;51_
FAX 864
964
3314
RYOEI CUSTOMER SERVICE
_003/012
TABLE OF CONTENTS
•
General Safety Rules ......... _.......................................................................................................................................
2-3
•
Specific Safety RuleslSymbole
3-5
•
Features .................................................................................................................................................
•
Operation ....................................................................................................................................................................
•
Maintenance ...... ... ............ _......................................
..................................................................................................................................
_............................................................................
• _=Baf_ry Removal ...............................................................
........................ 6
7-8
:....................... 8
:.............................................................................................
9
•
Accessories ....................................................................................................................................................................
•
Wamanty ......................................................................................................................................................
•
Fjr_olodedView And Repair Parts List ..........................................................................................................................
11
•
Pads Ordering ISewice
12
...............................................................................................................................................
WARNING: Read and'understand all instructions.
Failureto follow ell Instructtonslistedbelow,may
resultin electric shock,fire and/orserious personal
in_Jry.
Personal
•
Do not operate power tools In explosive atmost=k_res, such as in the presence of flammable
liquids, gases, or dust. Power tools create sparks
which may ignite the dust or fumes.
III
Keep bystanders, children, and visitors ewsywhile
opm'atlng a power tool. DistRIctions can cause you
to k=secontrol.
Efecbical
II
Ig
Dress properly, Do not wear loose clothing or
jewelry. Contain tong heir. Keep your hair, clothing,
and gloves away from moving parts. Loose clothes,
jewelry, or long heir can be caught in moving parts,
•
Avoid accidental starting, Be sure switch is in the
locked or off position before inserting battery
pack. Carrying tools wi_ your finger on the switch or
Inserting the batte.'y pack into e tool with the ewtt_:hon,
Invites accidents.
II
Remove adjusting keys or wrenches before bJmleg the tool on. A wrench or a key that Is left attached
to a rotating pad of the tool may result In personal
III
•
Safety
Doltot abuse the cord. Never use the cord to carry
the ©haqier, Keep cord away from heat, oil, sharp
edges, or moving parts. Replace damaged cords
brm)edlately. Damaged cards may create e fire.
A battery operated tool With integral batteries or a
separate battery pack must be recharged only with
the specified charger for th e batter/, A charger that
may be suitable for one type Of battery may create a
dskof tim when used with another battery, Use battery
onlywith charger listed.
MODEL
CHARGER
923.111380
7221801
Use battery operated tool only with specifically
de.signeted battery pack. Use of any other batteries
may create a dsk of fire. Use only with battery pack
IJstetl.
Safety
Stay alert, watch what you are doing and use
common sense when operating it powe('tool.
Do
not use tool white tired or under the Influence of
drugs, alcohol, or medioatlon, A moment of inattention while operating power tools may result in sedous
personal injurY.
Work Area
Keep your work area clean and well lit. CJuttered"
benches and dark areas Invite accidents.
:.................. 9
II
SAVE THESE INSTRUCTIONS
•
9
inju .
II
Do not overreach. Keep proper footing and balance at all times. Proper footing and balance enables
better control of the tool in unexpected situations. Do
not use on e ladder or unstable support
i
Use safety equipment. Always wear eye protection.
Dust mask, nonskid safety shoes, hard hat, or headng
protection must bo used for appropriate oondltions.
Ol/17/02
THU 11:51
FAX 864
964
3314
R¥OBI
CUSTOMER
Tool Use and Care
ill
•
•
•
•
•
Use clamps or other practical way to secure and
support the workpiece to a stable platform, Holding
the work by hand or against your body is unstable and
may lead to tess of control.
Donotforce
toot. Use the correst tool for your
_pplication.
The ¢on'e_t tool will do the Job better and
safer at the rate for which it is designed.
Do not usa tool if switch does not turn it on or off.
A fool that cannot be controlled with the switch Is
dangerous and must be repaired.
Dtaconnect battery pack from tool or place the
switch in the locked or off position before making
any adjustments, changing accessories, or storing
the tool. Such preventive safety measures reduce risk
of starting the tool accidentally.
Store idle tools out of reach of shUdren and other
untrained persons. Tools am dangerous in the hands
of untrained users.
SERVICE
_004/012
•
Maintain tools with Care. Keep cuffing tools sharp
and clean. Propedy maintained tools, wtih sharp
cutting edges are less likely to bind and are easier to
control
I
Chock for mlsalignment or binding of moving
parts, breakage of parts, and any other condition
that may affect the tools operation. If damaged,
have the tool sarvteed before using, Many sCcldenta
are caused by poorly maintained tools.
I!
Use only accessories that are recommended by
the manufacturer
for your model. Accessories that
may be suitable for one tool, may create s dsk Of Injury
when used on another tool.
Service
•
Tool service must be performed only by qualified
repair personnel. Sorw'ce or malrdananee performed
by unqualified personnel could result in e dsk of injury.
•
WTten servicing a tool, use only Identical replace,
ment parts. Follow li_tTUctions In the Maintenance
section of this manuel, Use of unauthodzbd parts or
failure to follow Maintenance Instructions may oreeta a
risk of shcek or injury.
When battery pack Is not In use, keep It away from
other metal objects like: paper clips= €oins, keys,
nails, screws, or other small metal objecte that can
make a connection from one terminal to another.
Shading the battery terminals together may cause
sped_s, bums, or a fire.
Hold tool by Insulated gripping surfaces when p'_rformlng an operation where the cuffing tool may contact hidden
wiring. Contact with e "live" wire will make exposed metal parts of the tool "live" and shock the operator.
Additional
•
•
Rules
Know your power tool. Read operator's manual
carefully. Learn its applications
and limitations, as \
well as the specific
potential hazards related to
this tool. Following this rule will reduce the risk of
electric sho_k, fire. or serious injury.
Make sure your extension cord is in good oonditlon.
When using an eXtension cord, be sure to use one .
heavy enough to carry the current your product will
draw. Awlre gage size (A,W.G.) of at least 16 is
recommended for an extension cord 100 feet or less
in length. A cord exceeding 100 feet Is not recommended, if'in doubt, use the next heavier gage. The
smaller the gage number, the heavier the cord. An
undersized cord will cause e drop In line voltage resultIng in loss of power and overheating.
Important
III
fire or heat. This willreduce the risk of exp_osionend
possibleinjury.
For Safe Operation
Rules
for Battery
Tools
Battery tools do not have to be plugged Into an
electrical outlet; therefore, they are always in
operating condition. Be awai;e of possible hazards
when not using your battery tool or when changlog accessories. Following this rule will reduce the
risk of electric shock, fire, or serious personal injury.
Jlt Do not place battery tools or their batteries .ear
"3
a pilot light. To reduce _e riskof serious injury, never
use any cordless .on=ductin ff_epresence of open
flame. An exploded battery can propel debds and
chemicals. If exposed, flush with water immediately.
II
Do not charge battery tool in a damp or wet
location, Following this rule will reduce the dsk of
electdc shock, fire, or serious personal injury.
Ill
For best results, your battery tool should be
charged in a location where the temperature is
more than 5O=F but less than 10o_F, Do not store
outside or in vehicles.
1
Under extreme usage or temperature conditions,
battery leakage may occur. If liquid comas in
contact with your ak_n, wash Immediately with
soup and water, then neutralize with lemon juice
or vtnegar, If liquid gets into your eyes, flush them
with clean water for at least 10 rnlnutes, then seek
immediate medical attention. Following this rule will
reduce the risk of serious personal injury.
01/17/02
TI_T 11:52_.
FAX 864
964 3314 RYOBI
CUSTO_ER
SERVICE
qualified serviceman. Following this rule will reduce
the risk of dectdc shock, fire, or serious personal
injury.
WARNING:expl0sion
"ToAtOavoi
damaged
d serious
battery
personalinjury,prOperly
is subject
disposeof a damaged battery.
Important
•
Safety
InstructiOns
personal injury.
Before using battew charger, read all InstrUotions
and cautionary markings In this manual, on
battery charger, and product using bsttew
charger. Following this rule _
mdoce the risk of
e!ectflc shock, fire, or seriou F personal injury.
To reduce risk of injury, charge only nickelcadmium and nickel metal hydride type _'echargeable batteries. Other types of batteries may burst
r=ausing personal i_ury and damegQ. FoLlowing this
role will reduce the risk of electric shock, fire. or
serious personal injuw.
•
•
•
•
s_pp s_ r:n¢,;rld ;e_°oC:tee,doTotthaet
ir_t i_nells_ eb:ted _
to damage or stress. Following this rule will reduce
the dsk of serious personal Injury.
•
An eXtension cord should not be used unless
absolutely necessary. Use of improper extension .
cord could result in a risk of fire and electric shock. If
extension cord must be used, make sure:
Do not disassemble charger; take It to a qualified
serviceman when service or repair is required.
incorrect reaseerebly may result In e risk of
electric shock or fire. Following this rule will reduce
the risk of electric shock, fire, or serious'personal
50'
100'
Cord Size (AWG)
16
16
To reduce the risk of electric shock, unplug
charger from outlet before attempting any maintenance or cleaning. Tumlng off Controls will not
reduce this risk. Following this rule will reduce the
risk of etectdc shock, fire, or serious personal i_ury.
•
Do not use charger outdoors.
Followlngthle
_le will
reduce the risk of eleclric shock, fire. or serious
personal Injury.
•
Disconnect charger from power supply when not
in use, Following this rule will reduce the risk of
electdc shock, tim, or sedous personal injury.
_,WARNING:
Some dust created by power sanding,
sawing, grinding, drilling,and other construction
activitiescontains chemicals known to cause
cancer, birth detects or other reproductive harm.
Some examples of these chemicals are'.
• lead from lead-bseed
paints,
• crystalline silicafrom bricks and cement
and other masonry products, and
good electrical cond_'on; and
c. That wire size is large enough for AC ampere
rating of charger as specified below;
Cord Length (Feet) 25'
•
Save these instructions. Refer to them frequently
and use them to Instruct othem who may use this
tool, If you loan someone this tool, loan there
these instructions abe. Following this ruk: will
reduc.e the risk of electric shock, fire, or sedous
personal injury.
e. That pins on plug of extension cord ere the
same number, size end shape as those of
plug on charger.
b. Thel edenslon cord is properly wired and in
• arsenic and chremtum
treated lumber.
from chemically-
Your risk from these exposures varies, depending
on haw often you do this type of work. To reduce
your exposure to these chemicals: work In e well
ventilated area, and work with approved safety
equipment, such as those dust masks that are
specially designed to filter out microscopic particles.
Note: AWG = Amedcan Wire Gage
•
•
CONNECTOR OR UNINSULATED BA'I-rERY
TERMINAL,
To reduce risk of damage to charger body end
cord, pull by charger plug rather then cord when
dl_conneoting charger. Following this rule wil!
reduce the risk of sedous personal injuw.
16
Do not operate charger if h has received a ,=harp
blow, been dropped, or otherwise damaged in any
way; take It to a qualified serviceman. FolloWing
this rule will reduce the risk of electric shock, fire, or
serious personal Injury.
inju_.
Do nat expose charger to rain or snow. Fallowing
this rule will reduce the dsk of electric shock, fire, or
sefioos personal injury.
Use of an attachment
not recommended or sold
by the battery charger manufacturer may result in
a risk of fire, electric shock, or Injury to persons.
Following this rule will reduce the risk of electric
shock, _re, or serious personal injury.
•
III
For Charger
Save these instructions. This manual contains
_lmportant safety end operating instructions for
charger part number 7221801. Following this rele
will reduce the risk of electric shock, f_ro,or serous
•
_005/012
DO not operate charger with s damaged cord or
plug. If damaged, have replaced immediately by a
4
Ol/I?/02
THIT
11:52
FAX
864
964
3314
RYOBI
CUSTOMER
SERVICE
_006/012
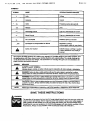
SYMBOLS
i
SYMBOL
V
i
_=.
NAME
DESIGNATIONIEXPLANATIO
Volts
Voltage
i_.,,
N
ji
A
Amperes
Current
Hz
Hertz
Frequency (cycles per second)
rain
Minutes
Time
II
"_,
Altamating
Current
=
Direct Current
Type or a characfedstlc
of current
Type or a characteristic of curt'eat
=1
no
No Load Speed
Rotational speed, at no load
..Jmln
RevoJuUons or Reclprocetfen Par Minute
Revolutions, strokes,
surfaco speed, orbits etc. per minute
Safety Alert Symbo{
Indicates
danger, warning
or caution.
It means attentlonlll
Your safety
Is
involved.
ii
ii
i
,_
i
1"hepurpose of safety symbols is to attract your attention to possible dangers. The safety symbols, and
the explanations with them, deserve your careful attention a.d understanding. The safety wamlngs do
not by themselves
eliminate any danger. The Instructions or warnings they give are not substitutes for
proper accident prevention measures.
SYMBOL
MEANING
m=,
A
A
A
A
SAFETY
ALERT
SYMBOL:
Indicates danger, warning, or caution. May be used in canjunc_ion wilh other symbols or plotogmphs.
iii
DANGER:
Failure to obey a safety warning will result in sedous injury to yourself or to others.
Always follow the safety prec_utioes to reduce the dsk of tim, electric shock and personal Injury_
•
i i
l
WARNING: Failure to obey a safety warning can result in sedous injury to yourself or to ethers,
Always follow the safety precautions to reduce the dsk of Ere, electric shock end personal injury.
CAUTION: Failure to obey a safety warning may resuit In property damage or personal Injury to
yourself or to others. Always follow the safety precautions to reduce the risk of fire, electric shock
and personal injury.
.,
NOTE:
,
,
ill
,
i
.
Advises you of information or instructions vital to the operation or maintenance of the equipment.
,
,
,
SAVE THESE INSTRUCTIONS
_
WARNING;
NI
The operation of any power tool can result in foreign objects being thrown Into your eyes, which can
result in severe eye damage. Before beginning power tool operation, always wear safety goggles or
safety glasses with aide shields and a full face shield when needed. We recommend Wide Vision
Safety Mask for use over eyeglasses or standard safety glasses with side shields, available at Sears
Retail Stores. Always use eye protection which is marked to'comply with ANSI Z87.1.
Ol/17/o2
THU 11:52
FAX 864
964
3314
RYOBI
CUSTOMER SERVICE
[_o07/012
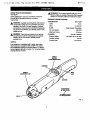
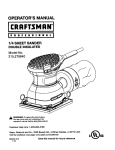
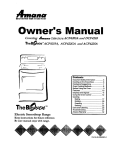
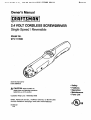
KNOW YOUR SCREWDRIVER
See Figut_ 1.
Beforestt_npting to use your screwdriver,femtHarlza
youmeifwi_ all operatingfee|uPesand safety
requirements.
fraction of a second Is su_cienl to InfliCtsevere injury.
PRODUCT SPECIFICATIONS;
SCRL=WDRWER
973.111380
1/4 in.
Collet
Motor
Switch
attenl_n to the Rules For Safe Ogeral_on,Warrdngs
_and CaulJons. If you usa your screwdriver properly and
only forwhat it ts Intended, you will enjoy years of safe,
reliableservics.
No Load Speed
2.4 Volt DC
Single Speed / Revsm_le
150 RPM
MaximumTorque
30 in./Ibs
CHARGER
Charger Rating
Failut'eto do so could result in possible sedous
personal injury.
ChargerVoltage
Charger Rate
Pert No. 7221801
120 Volts,60 Hz, AC only
2.4 Volt
10-12 Hours
SW1TCH
Yoursu'e_river is equippedwith a rockertypeswitch
whichlurr6 your screwdriverON and OFF. Thisswitch
also cankolbthe forward and reverse feature. Fordriving
screws,dep'essrightside of switch.For removingscrews,
depressIsifside of switch.
SWITCH
FORWARD
TOROUE
ADJUSTMENT
CAP
I#PUl"
JACK
REVERSE
SCREWDRIVER
BiT(mNCLUDSD)
COt,LET
Fig. 1
6
01/17/o2
THU
11:53
FAX
864
964
3314
RyOBI
CUSTOMER
SERVICE
_oo8/o12
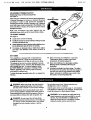
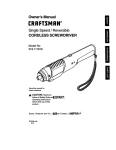
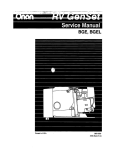
CHARGER
Failure to do so could result in objects being thrown
into your eyes, resulting in possible serious injury.
CI'_ARGINGYOUR SCREWDRIVER
CHARGERPLUG
This tool has been shipped in a low charge condition to
prevent possible problems. Therefore, you should charge it
ovmnlght prior to use.
NoI_= Batteries will not reach full charge the first time they
are charged Allow several cycles (driving screws followed
by recharging) for them to become fully charged.
If _e charger does not charge your screwdriver under
normal droJmstances,
return both the screwdriver and
cha_er to your nearest Sears Service Center for ele_deel
dmdk.
TO CHARGE
•
INPUT
"
_sert dlarger plug Int0 input jack making sure they •
are properly connected,
III Charger can be usod wRh normal household
lq)ltsge of 120 volts, 60 Hz, AC only.
•
Connect chargerto
power supply.
II
A_P.rnormal usage, 8 minimum of 10 hours of charging time is required to be fully charged.
•
Do not place charger In an area of extreme heat or
mid. It will work best at normal room t_mperatore.
Fig. 2
COMET
The miler on your screwdriver has been designed to accept
114in. hex bits. See Figure 3.
TO INSERT BIT
Sea F_urs 3.
bit into collet as far as possible.
N_e: One bit is packed with your screwdriver.
COLLET
Fig. 3
7
01/17/0". TI__Tii:53
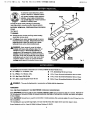
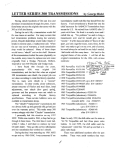
ADJUSTABLE
FAX 864 964 3314 RYOBI CUSTOMER SERVICE
TORQUE
_uou/ulz
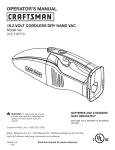
CLUTCH
(lightening Power of Your Screwdriver)
See Figure 4.
70
INCREASE
TORQUE
When usingyour screwdriver for various driving applications,
it becomes necessary to increase or decrease the power
and torque in order to help prevent the possibility of
damaging scmwheads, threads, workpiece, etc=In general.
power andtorque should correspond to the difficulty of the
so'ew to he driven. If torque is too high the screws may be
damaged or broken.
ARROW
Note: Your screwdriver
has been shipped with the
adjustable toKlue clutch set at the lowest torque setting.
TO ADJUST TORQUE
"rOROUE
ADJUSTMENT
CAP
See Figure 4.
I
Locat_ arrow on front of housing,
•
Identify the twenty two torque indicator settings located
on.torque adjustment c_p.
Rotate adjustment ,_p to desired seffing aligning number on adjustment _p with arrow on housing.
•
•
TO
DECREASE
TORQUE
To increase or decrease torque, rotate torque adjustment cap in the direction of the arrows as shown in
Figure 4.
Fig. 4
BATTERIES
Your screwdriver is equipped with 2 nickal-c_dmium
rechargeable batteries. Length of sePli_ from each
charging will depend on the type of work you are doing.
li
The batta_s in this tool have been designed to provide
maximum Uouble free life. However, like all batteries, they
will eveeteally wear out. To remove batteries, follow
BA'I'rERY REMOVAL InstrucUons. Handling of these
batteries, especially when wearing tings land Jewelry.
could result in a serious burn,
=1 Never store batteries in a discharged condition,
Recharge them immediately after they are
discharged.
l
To obtain the longest possible battery life. we suggest the
following:
All ballades gradually lose their charge. The higher
the temperature the quicker they lose their charge. If
you store your tool for long periods of time without
using it. recharge the batteries every month or two.
This practice will prolong battery life.
Do not abuse powertools. Abusive practicescan
damage toolas well as workpiecs.
,_IL WARNING:
When serVicing, use only identical
Craftsman replacement parts, Use of any other
part may create e hazard or Cause product damage.
Onlythe partsshownon parts list,page 11. are intended
to be repairedor replaced by the customer.All otherparts
shouldbe replacedat e Sears Service Center,
Avoidusingsolventswhen cleaning plasticparts.Most
plasticsaresusceptibleto damage from varioustypes of
commercialsolventsand may be damaged by their use.
Us_ cleanclothsto remove dirt, dust, oil, grease, ete.
A
Store and charge your batteries in a cool area.
Temperatures above or below normal room
temperature will shorten battery life.
A
WARNING:
Do not at any tithe let brake fluids,
gasoline, petroleum-based products, penetrating oils,
etc. come in contact with plastic pads. They contain
chemicals that can damage, weaken or destroy
plastic.
8
WARNING:
Do not attempt to modify this tool or
create accessories not recommended for use with
this tool Any such alteration or modification is
misuse and could result in a hazardous condition
leading to possible serious personal InJuw.
oi/17/02
THU 11:53.
FAX 864
964
3314
RYOBI
CUSTO_R
SERVICE
To preservenatural resources,please
recycleor disposeof batteriespmpedy,
This productcontains nickel-cadmium
batteries. Local, state or federal laws
may prohibitdisposal of nickel-cadmium
batteries in ordinary trash.
_olo/olz
COVER
Consultyourlocal waste authorityfor information
regardingavailablerecyclingand/or disposaloptions.
BA'I'I'ERY REMOVAL
CLING
See Figaro5.
TO REMOVE:
•
PREPARATION
FOR RECY-
Remo_ the four screws securing motorhousing
cover,g_en remove cover.
•
Liftbad.rise from motor housing enough to expose
leads sad battery termin'_la. Disconnect leads from
batter/terminals. Note: Be careful not to break
battery tsrmlnals when disconnecting leads.
attempt to destroy or disassemble batteries or
mrnove any of its components. Nickel-cadmium
batteries must be recycled or disposed of properly.
Also, never touch both terminals with metal objects
_znd/or10odyparts as short circuit may result. Keep
away from children. Failure to comply with these
wamTngscould result in fire and/or serious injury.
LEADS
MOTOR
HOUSING
Fig, 5
The follow_ 0 reeammended acoassoriss are currently available at Seam Retail Stores.
•
No. 2 Pldliips / 8-10 Slotted, 2 Ea.
II
7-P¢. Screwdriver Bit Set and Case
•
No. 3 Phillips 1 6-8 Slotted, 2 Ea.
II
13--Pc. Power Screwdriver/Nutdriver
Set and Case
II
5-Pc. He= Shank Drill Bit Set
III
17-Pc. Power ScrewdriverlNutdrlver
Sat and Case
ill
6_Pc. Ezb'a Length Magnite Power Bit Set
•
30-Pc. Power Screwdriver/Nutddver
Set and Case
,_
WARNING;
The use of attachments or accessories not listed might be hazardous.
WARRANTY
FULL ONE YEAR WARRANTY
ON I'RR F'r._MRH CORDLESS
SCREWDRIVER
If this rRRFIB;MRN Screwdriver fails to give complete satisfaction within one year from the date of purchase, RETURN IT
TO THE NEAREST SEARS STORE OR SEARS SERVICE CENTER IN THE UNITED STATES, and Sears will replace
it. free of charge.
If this CRRRrSNRN Screwdriver is used for eammeretal or rental puq_oses, this warranty applies for only 90 days from the
date of pard]ass,
This waiTaz'llygives you specific legal rights, and you may also have other rights which vary from stats to state.
Sears, RoL,ibuck end Co., Dept. 817WA, Hoffman Estates, IL 60179
9
01/17/02
THaT 11:53
FAX
864
864
r
3314
RYOBI
i"
--
CUSTOMER
--
SERVICE
"
I
_011/012
r
r
--
'If
"
i
.
IIHi
i
I
I
U
I
i
•
I I
I
I
I
I
i_
II
I
......
....
I
I
_...1
H
II
IIIII
R
m il
I
.
;
I I
lo
i
CRAFTSMAN
2.4 VOLT CORDLESS SCREWDRIVER
MODEL NO, 973.111380
in
all _orrespondenc.e regardingyourCORDLESS SCREWDRIVER or when orderingrepair parts.
Them_deInumberwi_bef_und_na_ateattachedt_em_rh_usi_A_w_y_men_i_n_em_de_number
I
iml
II I
•
SEE BACK PAGE FOR PARTS ORDERING INSTRUCTIONS
i
,,
PARTS LIST
Key
No.
P_r_
Number
7221801
972000-921
i
DeecdFtlon
Quart.
Charger............................................................................... 1
Owner's Manual
i
11
]