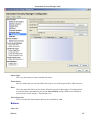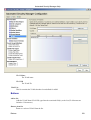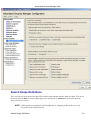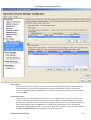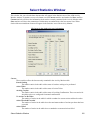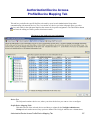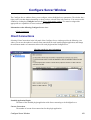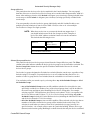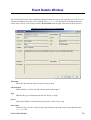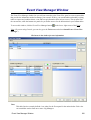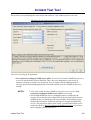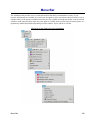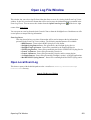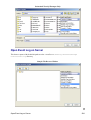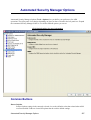
1
Automated Security Manager Help
Table of Contents
Automated Security Manager Help..................................................................................................................1
Automated Security Manager Overview.................................................................................................1
Accessing Help........................................................................................................................................1
Table of Contents Tab ............................................................................................................................1
Search Tab .............................................................................................................................................2
Help Topics with Graphics......................................................................................................................2
NOTICE...............................................................................................................................................................3
Virus Disclaimer.....................................................................................................................................4
Restricted Rights Notice.........................................................................................................................4
CUSTOMER RELEASE NOTES.....................................................................................................................6
INTRODUCTION:..................................................................................................................................6
NetSight Automated Security Manager...................................................................................................7
SOFTWARE CHANGES AND ENHANCEMENTS.............................................................................7
SYSTEM REQUIREMENTS..................................................................................................................7
Supported Platforms..........................................................................................................................7
PRODUCT DEVICE/FIRMWARE SUPPORT:.....................................................................................8
Static Policies....................................................................................................................................8
CDP Implementation.........................................................................................................................9
Optimized Node/Alias Implementation...........................................................................................10
INSTALLATION INFORMATION:....................................................................................................11
Evaluation Copy..............................................................................................................................11
Upgrading Automated Security Manager........................................................................................12
CONFIGURATION CONSIDERATIONS...........................................................................................12
NetSight Automated Security Manager 2.2....................................................................................12
Dragon Intrusion Defense System...................................................................................................13
WindowsTM 2000...........................................................................................................................13
Devices............................................................................................................................................13
OPERATING SYSTEM PATCHES.....................................................................................................13
KNOWN RESTRICTIONS AND LIMITATIONS...............................................................................14
Install/Uninstall...............................................................................................................................14
NetSight Automated Security Manager..........................................................................................14
Help System....................................................................................................................................15
SUPPORTED MIBs..............................................................................................................................16
IMPORTANT URLS:............................................................................................................................16
GLOBAL SUPPORT.............................................................................................................................16
ADDENDUM:.......................................................................................................................................17
NetSight Automated Security Manager Installation.....................................................................................18
General Installation Information............................................................................................................18
System Requirements......................................................................................................................19
Evaluation Copy..............................................................................................................................19
NetSight Plugin Integration.............................................................................................................20
Windows Installation.............................................................................................................................20
Configuring the Environment..........................................................................................................21
Stopping the NetSight Server and Database (Windows).................................................................22
Installing Automated Security Manager (Windows).......................................................................22
i
Automated Security Manager Help
Table of Contents
NetSight Automated Security Manager Installation
Solaris Installation.................................................................................................................................23
Preparing for Solaris Installation.....................................................................................................23
Stopping the NetSight Server and Database (Solaris).....................................................................24
Installing Automated Security Manager (Solaris)...........................................................................24
Linux Installation...................................................................................................................................25
Preparing for Linux Installation......................................................................................................25
Stopping the NetSight Server and Database (Linux)......................................................................26
Installing Automated Security Manager (Linux)............................................................................26
Launching NetSight Automated Security Manager...............................................................................27
Windows Launch.............................................................................................................................27
Solaris Launch.................................................................................................................................27
Linux Launch..................................................................................................................................27
Uninstalling NetSight Automated Security Manager............................................................................27
Uninstalling on Windows................................................................................................................27
Uninstalling on Solaris....................................................................................................................28
Uninstalling on Linux......................................................................................................................28
Support...................................................................................................................................................29
Accessing Help................................................................................................................................29
Technical Support............................................................................................................................29
Documentation................................................................................................................................29
Training...........................................................................................................................................29
Getting Started with Automated Security Manager......................................................................................30
Configure Console's SNMP Trap Service.............................................................................................30
Configuring the SNMPTrap Service Manually...............................................................................31
Using the Trap Receiver Configuration View.................................................................................31
Restart the SNMPTrap Service.......................................................................................................32
Configuring Dragon Intrusion Defense System.....................................................................................32
Configuring Automated Security Manager............................................................................................34
Trigger a Test Trap................................................................................................................................34
What's Next............................................................................................................................................34
How To Use the Automated Security Manager.............................................................................................36
How to Check for Updates...............................................................................................................................37
Performing an Immediate Update..........................................................................................................37
Schedule a Check for Updates...............................................................................................................37
How to Configure Events................................................................................................................................39
Creating a New Event View..................................................................................................................39
Modifying an Existing Event View.......................................................................................................40
Removing an Event View......................................................................................................................41
How to Configure and Manage the NetSight Server.....................................................................................42
Configuring the Server...........................................................................................................................42
Changing Maximum Connections...................................................................................................42
Managing the Database..........................................................................................................................43
ii
Automated Security Manager Help
Table of Contents
How to Configure and Manage the NetSight Server
Changing the Database Password....................................................................................................43
Changing the Database Connection URL.......................................................................................43
Performing a Database Backup.......................................................................................................43
Restoring the Initial Database.........................................................................................................44
Restoring a Saved Database............................................................................................................44
Viewing Client Connections..................................................................................................................44
Disconnecting a Client....................................................................................................................44
Viewing Licenses...................................................................................................................................45
Changing a License.........................................................................................................................45
Upgrading a Console License..........................................................................................................46
Viewing Locks.......................................................................................................................................46
Revoking a Lock.............................................................................................................................47
Viewing the Server Log.........................................................................................................................47
Viewing Server Statistics.......................................................................................................................47
How To Configure Profiles and Credentials..................................................................................................48
Instructions for:......................................................................................................................................48
Managing Credentials............................................................................................................................48
Managing Profiles..................................................................................................................................50
How To Configure Profile/Device Mapping...................................................................................................52
Instructions for:......................................................................................................................................52
Assigning Profiles to Devices................................................................................................................52
How to Configure the SNMPTrap Service.....................................................................................................53
Using the Trap Receiver Configuration Window..................................................................................53
Restarting snmptrapd Service................................................................................................................54
Restarting the snmptrapd service locally on the NetSight Server host system:..............................54
How to Manage Users and Groups..................................................................................................................56
Instructions for:......................................................................................................................................56
Managing Authorization Groups...........................................................................................................56
Managing Users.....................................................................................................................................57
How to Create and Edit Automated Security Manager Rules.....................................................................59
Editing a Rule........................................................................................................................................59
Creating a Rule......................................................................................................................................59
How to Import a Database...............................................................................................................................66
Importing a Database.............................................................................................................................66
How to Manage SNMP Passwords..................................................................................................................67
Instructions for:......................................................................................................................................67
Setting SNMPv1/2 Credentials..............................................................................................................67
Setting SNMPv3 Credentials.................................................................................................................67
iii
Automated Security Manager Help
Table of Contents
How To Send a Test Incident to ASM.............................................................................................................69
To test a response by sending threat information directly to ASM:......................................................69
To perform a more comprehensive test:................................................................................................69
Server Configuration Considerations.............................................................................................................71
Running the Server on a non−DNS Enabled Solaris System................................................................71
Limiting Client Connections on Solaris and Linux...............................................................................71
Accepting Connection from Local Client Only..............................................................................71
Limiting Connections to a Specific IP Address..............................................................................71
Adding Memory to the Server on Solaris and Linux.............................................................................72
Firewall Considerations.........................................................................................................................72
How to Set Options...........................................................................................................................................73
How to Set Automated Security Manager Options.......................................................................................74
Common Functions................................................................................................................................74
Action Limits.........................................................................................................................................74
Dialog Boxes..........................................................................................................................................75
Dragon EMS..........................................................................................................................................75
SNMP.....................................................................................................................................................75
Using the ASM Activity Monitor.....................................................................................................................76
Setting ASM's Operation Mode.............................................................................................................76
Confirming Actions for Selected Log Entries.......................................................................................76
Undo Action...........................................................................................................................................76
Delete Table Entries...............................................................................................................................76
Clean Up Incidents.................................................................................................................................77
NetSight Automated Security Manager Windows.........................................................................................78
Advanced Statistics Window............................................................................................................................79
Automated Security Manager Activity Monitor............................................................................................81
Right−Click Menu.................................................................................................................................92
Buttons...................................................................................................................................................92
Automated Security ManagerConfiguration Window..................................................................................94
Common Features..................................................................................................................................94
Rule Variables........................................................................................................................................94
Day and Time Ranges.....................................................................................................................95
Buttons.............................................................................................................................................96
Event Categories..............................................................................................................................97
Buttons...........................................................................................................................................100
Notifications..................................................................................................................................100
Buttons...........................................................................................................................................101
Policies..........................................................................................................................................102
Buttons...........................................................................................................................................103
Sender Identifiers..........................................................................................................................103
iv
Automated Security Manager Help
Table of Contents
Automated Security ManagerConfiguration Window
Buttons...........................................................................................................................................104
Sender Names................................................................................................................................105
Buttons...........................................................................................................................................106
Threat Subnets...............................................................................................................................106
Buttons...........................................................................................................................................107
VLANs..........................................................................................................................................108
Buttons...........................................................................................................................................109
Search Variables..................................................................................................................................110
Data Source Selection...................................................................................................................110
Search Scope Definitions.....................................................................................................................111
Basic Search Scope.......................................................................................................................112
Advanced Search Scope................................................................................................................114
Exclude Port Types..............................................................................................................................116
Exclude Specific Ports.........................................................................................................................117
Rule Definitions...................................................................................................................................119
Select Statistics Window.................................................................................................................................122
Buttons.................................................................................................................................................123
Authorization/Device Access Users/Groups Tab.........................................................................................124
Add/Edit User Window........................................................................................................................126
Add/Edit Group Window.....................................................................................................................127
Authorization/Device Access Profiles/Credentials Tab...............................................................................130
Add/Edit Profile Window....................................................................................................................132
Add/Edit Credential Window..............................................................................................................134
Authorization/Device Access Profile/Device Mapping Tab........................................................................137
Authorization/Device Access Manage SNMP Passwords Tab....................................................................139
Backup Database Window.............................................................................................................................141
Clean Up Incidents Window..........................................................................................................................142
Configure Server Window.............................................................................................................................143
Client Connections...............................................................................................................................143
Create/Edit Notification Window..................................................................................................................145
E−Mail Notification.............................................................................................................................145
Buttons...........................................................................................................................................146
Syslog...................................................................................................................................................146
Buttons...........................................................................................................................................147
SNMP Trap..........................................................................................................................................147
Script....................................................................................................................................................148
Dragon..................................................................................................................................................151
Group...................................................................................................................................................152
v
Automated Security Manager Help
Table of Contents
Create/Edit Rule Window..............................................................................................................................154
Rule Conditions...................................................................................................................................155
Specify Action to take..........................................................................................................................159
Specify Action for Undo......................................................................................................................161
Create/Edit Search Scope...............................................................................................................................163
Create/Edit Search Scope Rule......................................................................................................................166
Rule Conditions...................................................................................................................................166
Edit Notifications Window.............................................................................................................................168
E−Mail Configuration Window.....................................................................................................................170
Error removing Notification(s) Window......................................................................................................172
Event View......................................................................................................................................................173
Event Details Window....................................................................................................................................176
Event Log Viewer...........................................................................................................................................178
Right−click Menu................................................................................................................................179
Event View Manager Window.....................................................................................................................180
New Log Manager Window...........................................................................................................................183
Log Manager Parameters Window...............................................................................................................184
Custom Pattern Configuration Window.......................................................................................................186
New/Edit (Event) View Window....................................................................................................................189
Open Log File Window...................................................................................................................................191
Open Local Event Log.........................................................................................................................191
Open Event Log on Server...................................................................................................................192
Incident Test Tool...........................................................................................................................................194
Buttons.................................................................................................................................................196
ASM Log Entry Details Window...................................................................................................................197
Details Table........................................................................................................................................197
Buttons...........................................................................................................................................198
Menu Bar.........................................................................................................................................................199
File.......................................................................................................................................................200
View.....................................................................................................................................................200
Tools....................................................................................................................................................200
vi
Automated Security Manager Help
Table of Contents
Menu Bar
Applications.........................................................................................................................................201
Help......................................................................................................................................................201
Open Log File Window...................................................................................................................................203
Open Local Event Log.........................................................................................................................203
Open Event Log on Server...................................................................................................................204
Options Window..............................................................................................................................................206
Automated Security Manager Options.........................................................................................................207
Common Buttons.................................................................................................................................207
Action Limits.......................................................................................................................................208
Dialog Boxes........................................................................................................................................209
Dragon EMS........................................................................................................................................210
Buttons...........................................................................................................................................211
SNMP...................................................................................................................................................212
Restore Database Window.............................................................................................................................213
Server InformationWindow...........................................................................................................................214
Client Connections Tab.......................................................................................................................214
Database Tab........................................................................................................................................217
Locks Tab.............................................................................................................................................218
Server Log Tab....................................................................................................................................220
License Tab..........................................................................................................................................224
NetSight Server Statistics Window................................................................................................................227
snmptrapd.conf Text Editor Window...........................................................................................................228
Restarting snmptrapd Service..............................................................................................................229
Restarting the snmptrapd service locally on the NetSight Server host system:............................229
Specify Program for Action/Undo Window.................................................................................................231
Toolbar.............................................................................................................................................................235
Updates Available Window............................................................................................................................237
Usage Window.................................................................................................................................................239
Reference Information....................................................................................................................................240
Disable Log Entry Details..............................................................................................................................241
NetSight − Supported MIBs...........................................................................................................................245
A...........................................................................................................................................................245
B...........................................................................................................................................................245
vii
Automated Security Manager Help
Table of Contents
NetSight − Supported MIBs
C...........................................................................................................................................................245
D...........................................................................................................................................................247
E...........................................................................................................................................................247
F...........................................................................................................................................................248
G...........................................................................................................................................................248
H...........................................................................................................................................................248
I............................................................................................................................................................248
J............................................................................................................................................................248
L...........................................................................................................................................................249
M..........................................................................................................................................................249
N...........................................................................................................................................................249
O...........................................................................................................................................................249
P...........................................................................................................................................................249
Q...........................................................................................................................................................249
R...........................................................................................................................................................250
S...........................................................................................................................................................250
T...........................................................................................................................................................250
U...........................................................................................................................................................251
V...........................................................................................................................................................251
W..........................................................................................................................................................251
Z...........................................................................................................................................................251
Traps and Informs..........................................................................................................................................252
SNMPv3 Traps....................................................................................................................................252
SNMPv3 Informs.................................................................................................................................253
Restart the SNMPTrap Service.....................................................................................................254
viii
Automated Security Manager Help
TM
Welcome to the online help system for Enterasys NetSight Automated Security Manager (ASM). All ASM
documentation is available in the online help system. Online help is available from the Help menus and Help
buttons throughout ASM. The Help viewer is divided into two panels. The left panel contains two tabs: the
Table of Contents tab and the Search tab. The right panel displays the actual help text itself.
Automated Security Manager Overview
NetSight Automated Security Manager combines the features of a comprehensive intrusion detection system,
such as Enterasys' Dragon Intrusion Defense System (IDS), with ASM's search capabilities and NetSight
Policy Manager to provide an effective defense against threats to your network's security.
In operation:
1. The intrusion detection system detects a security event and notifies ASM of end stations that are the
source of threats on the network. Security events containing information about the threat (category,
etc) and the end stations IP address are sent via an SNMPv3 trap (inform) with AuthPriv enabled. The
use of SNMPv3 with AuthPriv enabled provides a measure of security to minimize the chances of a
malicious user sending traps to the Automated Security Manager and disabling the network.
2. ASM's search capability determines the switch and port.
3. ASM then determines what action should be taken and applies the action on the port (no action,
1
disable port, or apply a quarantine policy ).
2
4. Finally ASM notifies the intrusion detection system of the actions taken via a SNMPv3 trap (inform) .
1. Requires NetSight Policy Manager to be installed.
2. Requires the intrusion detection system to support receiving SNMPv3 trap (inform).
Accessing Help
There are several ways to access the help system:
• For help on any ASM feature, select the Help > Help Topics menu option.
• For help on the Activity Monitor, select the Help > About This Window menu option.
• Help on a particular window is also often available via a Help button on the window itself.
Table of Contents Tab
Click on the Table of Contents Tab in the left panel to display a list of help topics for ASM. The Table of
Contents is "collapsed" when you first open the help. To expand any folder in the Table of Contents,
double−click it. When you click on an item in the Table of Contents, the associated help topic appears in the
right panel. If the help topic you select is located within a long file, you may need to wait a second or two for
the help window to locate your particular topic within the file.
Automated Security Manager Help
1
Automated Security Manager Help
Search Tab
To search for specific instances of a term in all the help topics, click the right tab (magnifying glass) in the left
panel. In the Find box, enter the term for which you want to search and press Enter. A list of topics in which
the term appears is displayed, along with the number of instances found in each file. The first instance in the
first topic is highlighted in the right panel. You can then scroll through that help topic, or select another from
the list, to view the other instances of the search term within the topic.
There is a limit on the number of instances of the criteria that can be highlighted during one search. If the
number of "hits" exceeds this limit, the help window highlights the closest matches within each topic, rather
than all of them, and if the hits greatly exceed the limit, it highlights only the first few hits in each topic. You
can't do searches on terms like "the" and "and."
Help Topics with Graphics
Some of the help topics contain a graphic (image) of an ASM window. These graphics are usually clickable so
that you can navigate easily to the field definition or area of the window on which you need information. If
the full graphic is not displayed in the help window when it first loads, you may need to click once on the
graphic to display it fully before the graphic's hotspots will work.
Search Tab
2
NOTICE
Enterasys Networks reserves the right to make changes in specifications and other information contained in
this document without prior notice. The reader should in all cases consult Enterasys Networks to determine
whether any such changes have been made.
The hardware, firmware, or software described in this manual is subject to change without notice.
IN NO EVENT SHALL ENTERASYS NETWORKS BE LIABLE FOR ANY INCIDENTAL, INDIRECT,
SPECIAL, OR CONSEQUENTIAL DAMAGES WHATSOEVER (INCLUDING BUT NOT LIMITED TO
LOST PROFITS) ARISING OUT OF OR RELATED TO THIS MANUAL OR THE INFORMATION
CONTAINED IN IT, EVEN IF ENTERASYS NETWORKS HAS BEEN ADVISED OF, KNOWN, OR
SHOULD HAVE KNOWN, THE POSSIBILITY OF SUCH DAMAGES.
Copyright © 2002, 2003, 2004, 2005, 2006 by Enterasys Networks. All rights reserved.
Enterasys Networks, Inc.
50 Minuteman Rd.
Andover, MA 01810
Aurorean, Enterasys, Enterasys Matrix, Enterasys RoamAbout, and Enterasys XSR are trademarks or
registered trademarks of Enterasys Networks.
Aurorean, Dragon, Enterasys Dragon, Enterasys Networks, NetSight, and RoamAbout are registered
trademarks of Enterasys Networks.
Windows, Windows NT, Microsoft, Microsoft Windows, and Microsoft Windows for Workgroups are
trademarks or registered trademarks of Microsoft Corporation.
Solaris, Sun, Sun Microsystems, are trademarks or registered trademarks of Sun Microsystems, Inc.
C++ is a trademark of American Telephone and Telegraph, Inc.
AppleTalk is a trademark of Apple Computer, Inc.
Banyan and VINES are registered trademarks of Banyan Systems, Inc.
DECnet is a registered trademark; and DEC is a trademark of Digital Equipment Corporation.
HP OpenView is a registered trademark of Hewlett−Packard, Inc.
NetWare and Novell are registered trademarks; and IPX is a trademark of Novell, Inc.
Raima Database Manager®(RDM) and db_VISTA®are registered trademarks of Centura Software
UNIX is a trademark of The Open Group.
Ethernet is a trademark of Xerox Corporation.
This product includes software developed by L2FProd.com (http://www.L2FProd.com/).
NOTICE
3
Automated Security Manager Help
This product includes software developed by the OpenSSL Project for use in the OpenSSL Toolkit.
(http://www.openssl.org/)
BOOTP Server Software
The BOOTP server software used with this product is a copyrighted product of Carnegie Mellon University,
1988, 1991, All Rights Reserved.
Permission to use, copy, modify, and distribute this software and its documentation for any purpose and
without fee is hereby granted, provided that the above copyright notice appear in all copies and that both that
copyright notice and this permission notice appear in supporting documentation, and that the name of
Carnegie Mellon University not be used in advertising or publicity pertaining to distribution of the software
without specific, written prior permission.
CARNEGIE MELLON UNIVERSITY DISCLAIMS ALL WARRANTIES WITH REGARD TO THIS
SOFTWARE, INCLUDING ALL IMPLIED WARRANTIES OF MERCHANTABILITY AND FITNESS.
IN NO EVENT SHALL CMU BE LIABLE FOR ANY SPECIAL, INDIRECT OR CONSEQUENTIAL
DAMAGES OR ANY DAMAGES WHATSOEVER RESULTING FROM LOSS OF USE, DATA OR
PROFITS, WHETHER IN AN ACTION OF CONTRACT, NEGLIGENCE OR OTHER TORTIOUS
ACTION, ARISING OUT OF OR IN CONNECTION WITH THE USE OR PERFORMANCE OF THIS
SOFTWARE.
Virus Disclaimer
Enterasys Networks makes no representations or warranties to the effect that the Licensed Software is
virus−free.
Enterasys has tested its software with current virus checking technologies. However, because no anti−virus
system is 100% reliable, we strongly caution you to write protect and then verify that the Licensed Software,
prior to installing it, is virus−free with an anti−virus system in which you have confidence.
Restricted Rights Notice
(Applicable to licenses to the United States Government only.)
1. Use, duplication, or disclosure by the Government is subject to restrictions as set forth in
subparagraph (c) (1) (ii) of the Rights in Technical Data and Computer Software clause at DFARS
252.227−7013.
Enterasys Networks, Inc. 50 Minuteman Rd., Andover, MA 01810.
2. This computer software is submitted with restricted rights. It may not be used, reproduced, or
disclosed by the Government except as provided in paragraph (b) of this Notice or as otherwise
expressly stated in the contract.
3. This computer software may be:
a. Used or copied for use in or with the computer or computers for which it was acquired,
including use at any Government installation to which such computer or computers may be
transferred;
b. Used or copied for use in a backup computer if any computer for which it was acquired is
inoperative;
c. Reproduced for safekeeping (archives) or backup purposes;
Virus Disclaimer
4
Automated Security Manager Help
d. Modified, adapted, or combined with other computer software, provided that the modified,
combined, or adapted portions of the derivative software incorporating restricted computer
software are made subject to the same restricted rights;
e. Disclosed to and reproduced for use by support service contractors in accordance with
subparagraphs (b) (1) through (4) of this clause, provided the Government makes such
disclosure or reproduction subject to these restricted rights; and
f. Used or copied for use in or transferred to a replacement computer.
4. Notwithstanding the foregoing, if this computer software is published copyrighted computer software,
it is licensed to the Government, without disclosure prohibitions, with the minimum rights set forth in
paragraph (b) of this clause.
5. Any other rights or limitations regarding the use, duplication, or disclosure of this computer software
are to be expressly stated in, or incorporated in, the contract.
6. This Notice shall be marked on any reproduction of this computer software, in whole or in part.
50 Minuteman Rd.
Andover, MA 01810
(978) 684−1000
Virus Disclaimer
5
CUSTOMER RELEASE NOTES
TM
Enterasys NetSight
Automated Security Manager
Version 2.2
June, 2006
INTRODUCTION:
Refer to the Addendum section at the end of this document for updated release note information obtained
using the Web Update feature.
The most recent version of these release notes can also be found on the NetSight Documentation web page:
http://www.enterasys.com/support/manuals/netsight.html.
NOTE: When this topic is opened from the CD−ROM, the links from this topic to other help topics will
not work. Links within the topic will work and once you've installed NetSight Automated
Security Manager, you can launch the help system and access help for all topics.
This Enterasys Networks product is covered by the following United States Pending Patents:
Publication No. 20050108568
Publication No. 20050076245
CUSTOMER RELEASE NOTES
6
Automated Security Manager Help
NetSight Automated Security Manager
NetSight Automated Security Manager combines the features of a comprehensive intrusion detection system,
such as Enterasys' Dragon Intrusion Defense System (IDS), with NetSight Compass' search capabilities and
NetSight Policy Manager to provide an effective defense against threats to the security of your network.
Automated Security Manager lets you easily configure your responses to threats.
It is recommended that you thoroughly review this document prior to installing or upgrading this
product.
SOFTWARE CHANGES AND ENHANCEMENTS
The following enhancements have been added to release 2.2 of ASM:
• Support for NetSight Console 2.2
• Macrovision® Licensing. Automated Security Manager now supports the Enterasys Online Licensing
System that lets you generate a license for your purchased products. For more information, see
http://www.enterasys.com/products/management/.
• Device Port Name included in E−Mail Notification. E−Mail Notification messages can now be
configured to include the Device Port Name as part of the event information sent when ASM responds
to a network threat.
• Trusted Access Manager Database added as ASM search variable. You can now configure ASM
to include the Trusted Access Manager database when searching for the source of network threats.
SYSTEM REQUIREMENTS
ASM requires installation of NetSight Console Server 2.2.
Supported Platforms
The system requirements for operating NetSight Automated Security Manager are listed here.
TM
• Windows® 2000 w/ Service Pack 4, Windows Server 2003, Windows XP® Professional
w/Service Pack 2 (qualified on the English version of the operating systems)
• Recommended P4−2.4 GHz, 1GB RAM
• Free Disk Space − 500MB
• Solaris® 8, 9, and 10 on Sun® Platforms only (with latest operating system patches installed.)
• Recommended Sun®Ultra 30/60 (or equivalent), 900MHz, 1GB RAM
• Free Disk Space − 800MB
• Linux: Red Hat Version 9, Red Hat Enterprise Linux WS, ES v3, and SuSE Linux
• Recommended P4−2.4 GHz, 1GB RAM
• Free Disk Space − 500MB
NetSight Automated Security Manager
7
Automated Security Manager Help
PRODUCT DEVICE/FIRMWARE SUPPORT:
Static Policies
Devices that support Static Policies must be able to discard traffic at the role level and apply a Quarantine role
that is set up to discard traffic (as defined in NetSight Policy Manager 1.7). The following tables list devices
and firmware revisions for which NetSight Automated Security Manager has been qualified. Firmware
versions other than these may not be fully supported.
Devices/Firmware that support Static Policies:
Product Family
Firmware
Version
Matrix C1
1.01.xx
2.00.xx
SecureStack C2
2.01.24
3.00.xx
Matrix E1
3.00.xx
3.01.xx
3.02.xx
3.03.xx
Matrix E6/E7 (2nd/3rd Generation)
5.06.xx
5.07.xx
5.08.xx
Matrix N3/N7 Platinum
3.00.xx
4.00.xx
4.05.xx
4.11.xx
5.01.xx
Matrix N3/N7 Gold
3.10.xx
4.05.xx
4.11.xx
5.01.xx
RoamAbout R2
NOTE: Static Policy support for
this device does not permit
MAC−level control, only
control at the port level.
5.03.xx
Devices/Firmware that do not support Static Policies:
Product Family
PRODUCT DEVICE/FIRMWARE SUPPORT:
8
Automated Security Manager Help
Firmware
Version
Matrix E5
3.00.xx
Matrix V2
2.03.xx
2.04.xx
Vertical Horizon
VH−2402S
VH−2402−L3
VH−4802
VH−8TX1UM/MF
2.05.19
1.00.16
2.05.05
2.04.07.08
RoamAbout Access Point 3000
1.00.xx
SecureStack B2
1.00.xx
SecureStack C2
1.00.20
CDP Implementation
CDP must be disabled on the downstream devices when attached to a device using multi−user authentication
(such as the Matrix N−Series Platinum). ASM (by design) excludes CDP ports from responding to a threat. If
a device using multi−user authentication has a downstream device attached, such as a RoamAbout R2 that is
running CDP, then ASM will not be able respond to threats from the port where it is attached.
Use NetSight Console's CDP Status FlexView to disable CDP on downstream devices.
For example, from Console:
1. Select the Wireless Device Group in Console's left (tree) panel.
2. Open the CDP Status FlexView in the right panel.
3. Select all rows and use the Table Editor to set the Global Status to disable for all devices.
Devices/Firmware that do not support CDP
Product Family
Firmware
Version
SecureStack C2
1.00.20
Vertical Horizon
VH−2402S
VH−2402−L3
VH−4802
VH−8TX1UM
2.05.19
1.00.16
2.05.05
2.04.07.08
CDP Implementation
9
Automated Security Manager Help
Optimized Node/Alias Implementation
Automated Security Manager processes Dragon events by locating the intruder IP address stored in the event
and then taking action. This search process is completed far more quickly on devices implementing the
"optimized" Node/Alias MIB table. The following table lists devices and firmware revisions supporting the
optimized Node/Alias MIB table.
Devices/Firmware that support "Optimized" Node/Alias:
Product Family
Firmware
Version
Matrix E1
3.00.xx
3.01.xx
3.02.xx
Matrix E6/E7 (2nd/3rd Generation)
5.06.xx
5.07.xx
5.08.xx
Matrix N3/N7
Platinum and Gold
3.00.xx
4.00.xx
4.05.xx
4.11.xx
Matrix V2
2.03.xx
2.04.xx
NOTES: Support for Optimized Node/Alias −− The Automated Security Manager Incident Detail view
(right−click an entry in the Activity Monitor and select View Details) indicates whether a device
supports the optimized Node/Alias table or not:
• "Reading ctAliasTable" means that the device does not support the optimized
Node/Alias table.
• "Reading ctAliasProtocolAddressTable" means that the device does support the
optimized Node/Alias table.
Devices that do not support Node/Alias:
−− Matrix C1
−− SecureStack C2
−− Matrix E5
−− Matrix E1 (1G6xx−xx)
−− Vertical Horizon
−− AP 3000
−− RoamAbout R2
These devices do not support any form of Node/Alias. For these devices, the Automated
Security Manager search resolves the searched IP address to the corresponding MAC address
and does a MAC−based search to locate the physical port. Routers must be included in the
search scope in order to provide access to the routers' ARP cache. In addition, you must select
the ipRouteTable and ipCIDRRouteTable MIBs in the Automated Security Manager Options
Optimized Node/Alias Implementation
10
Automated Security Manager Help
MIB Selection panel.
Disable Node/Alias Learning −− It's important to make sure that inter−switch links are not
learning Node/Alias information, as it would slow down searches and give inaccurate results.
Enabling CDP on inter−switch links disables Node/Alias learning. You can also disable
Node/Alias learning on a switch port by setting the maximum number of entries per interface
(ctAliasConfigurationInterfaceMaxEntries) to 0 on that port, using the Node Alias Control
FlexView in Console.
The following table provides Automated Security Manager search time comparisons between optimized and
not optimized Node/Alias implementations.
Search Time Comparisons:
Node/Alias
Optimized
4000 entries
Number of
Devices
Node/Alias Not
Optimized
4000 entries
Node/Alias
Optimized
200 entries
Node/Alias
Not
Optimized
200 entries
25
3 sec
1 min 40 sec
3 sec
7 sec
100
9 sec
5 min 50 sec
9 sec
25 sec
200
20 sec
11 min 10 sec
20 sec
47 sec
300
25 sec
16 min 52 sec
25 sec
1 min 13 sec
800
1 min 3 sec
58 min 46 sec
1 min 3 sec
3 min 13 sec
INSTALLATION INFORMATION:
When you purchased Automated Security Manager, you received a Licensed Product Entitlement ID that
allows you to generate a product license. Prior to installing ASM, you must redeem your Entitlement ID for a
product license. Refer to the instructions included with the Entitlement that was sent to you. (For more
information, see http://www.enterasys.com/products/management/.)
The NetSight Installer (InstallAnywhere® by Zero G Software, Inc.) leads you through a series of windows
that ask you for all the information required in order to install ASM. In one of the windows, you will need to
enter the license text that you receive when you redeem your Entitlement ID. When you finish with the series
of windows, Automated Security Manager is installed according to your specification.
For complete installation instructions, refer to the installation documentation located on the NetSight
Documentation web page: http://www.enterasys.com/support/manuals/netsight.html.
If you will be installing from a CD, you can also access the installation instructions from the CD with a web
browser by opening the install.htm file located in the top−level directory.
Evaluation Copy
If you have requested an Automated Security Manager evaluation license, you will receive an Evaluation
License Entitlement ID that you must redeem for an evaluation license prior to installation. Refer to the
INSTALLATION INFORMATION:
11
Automated Security Manager Help
instructions included with the Entitlement that was sent to you. (For more information, see
http://www.enterasys.com/products/management/.)
Evaluation requests for each product are limited to three 30−day instances of a single Entitlement ID. To
upgrade from an evaluation copy of Automated Security Manager to a purchased copy, contact your Enterasys
Networks Representative to purchase the software and receive an Entitlement ID. You do not need to reinstall
the software to perform the conversion.
Upgrading Automated Security Manager
You can import a NetSight database (Console release 1.5) containing previously configured ASM components
into the NetSight 2.2 database. The information that is imported from the earlier database replaces any ASM
information that you've configured in the currently open database. Some preparations and caveats should be
understood prior to importing elements from the earlier version into ASM 2.2.
• Make a backup of your current NetSight 2.2 database (use the Database tab of the Server Information
view). Importing components from the 1.5 database into 2.2 will overwrite all existing ASM tables in
the database.
• Log Entry Details are not imported. Log Entries from release 1.1 are imported, however attempting to
open the Log Entry Details view will result in an error message.
• When importing from a remote client, Custom Action Scripts and Custom Undo Scripts must be
manually copied to their proper location on the server. This is because only the paths to scripts are
imported to the server; the scripts themselves are not imported to the server. Copy your custom scripts
to the <install area>\Enterasys Networks\NetSight
Console\server\plugins\AutoSecMgr\scripts directory on the server.
• You must populate the NetSight Database with devices prior to importing ASM components. Either
convert the prior version of the NetSight database or Discover the devices on your network.
• Devices, Device Groups, Profiles, Users, and Authorization Groups that are already in the NetSight
Console 2.2 database will not be changed.
• You must have read and write file access in the directory from where you want to Open an earlier
database and where you will Save the updated database.
Errors detected during the import are reported in the Events View − Automated Security tab. Refer to How to
Import a Database for more specific information on importing from a NetSight (Console release 1.5) database.
To upgrade from a previous version of ASM to version 2.2, follow these instructions.
1. Exit ASM.
2. Verify that Console 2.2 has been installed.
3. Install ASM 2.2 according to the Installation instructions.
4. Launch ASM 2.2.
CONFIGURATION CONSIDERATIONS
NetSight Automated Security Manager 2.2
1. Do not manually remove actions. Do not attempt to manually remove actions that have been applied
to devices by NetSight Automated Security Manager. Use ASM's Undo Action feature in the Activity
Monitor window. Attempting to manually remove actions can leave devices in an unspecified
Upgrading Automated Security Manager
12
Automated Security Manager Help
condition, possibly compromising the security of your network.
2. Disable Log Entry Details. Under extreme network loads, you can improve ASM performance by
disabling Log Entry Details. The Log Entry Details window displays information about a specific
trap/action entry in the Automated Security Manager Activity Monitor, and can be useful for
debugging purposes. The window is launched by double−clicking an entry in the Activity Monitor
table.
To disable Log Entry Details, edit your ASM properties file as follows:
a. Navigate to the Properties file: <your install directory>\Enterasys Networks\Netsight
Console\server\plugins\AutoSecMgr\AutoSecMgr.properties
b. Open the AutoSecMgr.properties file in a text editor and add the following lines:
#asm.logging.summary.useTopic=false
#asm.logging.summary.enabled=false
asm.logging.detail.useTopic=false
asm.logging.detail.enabled=false
c. If you still have performance problems, you can disable all logging by uncommenting the two
lines that control summary logging. Summary logging refers to the events logged in the
Automated Security Event Log tab.
Dragon Intrusion Defense System
1. Alarms should be configured as RealTime to ensure that ASM receives all events from
Dragon. Alarms that are set to Dynamic may filter some events that are needed by ASM.
TM
Windows
2000
1. You should disable the Guest account when running NetSight Automated Security Manager on a
TM
Windows 2000 host system. Windows 2000 allows a user without an account on the machine to
login using the Guest account. This is a potential security problem.
Devices
1. The Matrix N−Series Gold supports up to two users per port, with the possibility that one MAC could
be that of an IP phone. Be careful when configuring the Quarantine role and the ASM rules to avoid
configuring an action that would inadvertently affect the IP phone.
2. ASM resolves IP addresses to MAC addresses using information from routing MIBs
(ipNetToMediaTable, ipCidrRouteTable, and ipRouteTable). Devices which support multiple virtual
routers (Matrix N−Series Gold and Platinum) need to be modeled using the correct SNMPv3 context
for the router, in order to access the routing MIBs.
OPERATING SYSTEM PATCHES
Before installing NetSight Automated Security Manager on the UNIX platform, be sure to install the latest
patches for your operating system. You can download the most recent operating system patches from
http://sunsolve.sun.com/.
Dragon Intrusion Defense System
13
Automated Security Manager Help
KNOWN RESTRICTIONS AND LIMITATIONS
The known restrictions and limitations for this release of NetSight Automated Security Manager are listed
below. Solutions for these restrictions and limitations are noted, if available.
Install/Uninstall
Problem (Windows 2000/XP/Server 2003 only) An evaluation of your system is not automatically
1: performed during the installation. If system requirements are not met, the install will take
place, but results will be unpredictable.
Solution: Verify that all Windows 2000/XP system requirements are met prior to installing NetSight
Automated Security Manager.
Problem (Solaris only) In the Select Destination window of the Installer, if you click Browse and
2: then double click to select a directory, the OK button doesn't work.
Solution: You must select the directory using a single click instead of a double click.
Problem (Solaris only) The Installer does not come up due to path problems.
3:
Solution: Ensure that /usr/usb does not precede /bin in your path. To do this, in a Unix window,
type which chown. If the result is /usr/ucb/chown, replace /usr/ucb with /bin
in your path. If the result is /bin/chown, the path is not the problem.
Problem (Solaris only) When the Installer is started, the following message is reported:
4:
Warning: Cannot convert string
"−monotype−arial−regular−r−normal−−*−140−*−*−p−*−iso8859−1"
to type FontStruct.
Solution: No action is required. The Installer will use a default font.
Problem When there is insufficient space in the selected install area, the installer reports the situation
5: and lets you select an alternate location. If the alternate location does not provide the
required space, the installer again reports the shortfall, but instead of showing the alternate
path, it incorrectly shows the path to the original install area. The space provided by the
alternate path is analyzed correctly; only the path that is reported is wrong.
Solution: Select an install area that provides the required disk space. Refer to System Requirements
for more information.
Problem Uninstall does not uninstall all files. This results in a message, when installing NetSight
6: Console, indicating that ASM is still installed.
Solution: After uninstalling ASM, remove the .com.zerog.registry.xml file. On Windows, this file is
located in the C:\Program Files\Zero G Registry directory. On Solaris or Linux, this file is
located in the /var directory.
NetSight Automated Security Manager
KNOWN RESTRICTIONS AND LIMITATIONS
14
Automated Security Manager Help
General
Problem (Linux and UNIX only) You cannot specify a range of pages when printing from tables on
1: UNIX or Linux systems. If you select Print from the Table Tools popup menu, the
resulting print settings window does not open to a sufficient size (and cannot be resized) to
allow access to the page range fields.
Solution: For these systems, the only option is to print the entire table.
Problem If an action has been taken on a port and a timer has been set to Undo the action, if another
2: trap comes in that implicates the same port, the second action will be taken. At this point,
the first action cannot be Undone because the settings have changed so when the first timer
expires, the Undo will fail.
Solution: If multiple actions are taken on the same ports, they must be undone in reverse order so
that the port can be successfully returned the its original state. Note that in this case, the
rules should be evaluated to insure this is the desired behavior for the Automated Security
Management system.
Problem The SNMPTrap Service synchronizes its timestamp with your system's clock when the
3: service is launched, but does not recognize changing to or from Daylight Savings Time
while running. This causes a one hour discrepancy in the timestamps for Traps and Informs
that appear in Console and Automated Security Manager after making the change.
Solution: Stop and Restart the SNMPTrap Service when changing to or from Daylight Savings Time.
Problem In the Activity Monitor, if several threats are received with the same Sender ID, Sender
4: Name, and Threat IP, and they are Filtered because a Search for that Threat IP is already in
progress, the Status of the incident sometimes stays at Search in Progress, even though the
Search has completed.
Solution: Set the ASM Operation Mode to Disable, which will force all Searches in Progress
(Searches Pending) to be cancelled. Set the ASM Operation Mode to "Search Only" or
"Search And Respond" and subsequent threats received will generate new Incidents in the
Activity Monitor. The entries for the cancelled searches can be deleted, as desired.
Problem Occasionally, importing frozen ports from Policy Manager fails if SNMP Redirect is
5: enabled. This can be an issue depending on the number of frozen ports on a single device,
and varies depending on the device type.
Solution: There are three ways to work around this issue: 1) disable SNMP Redirect while
importing, 2) before importing, verify in Policy Manager that there are no more than eight
frozen ports on a single device, or 3) manually exclude ports that failed to import.
Help System
Problem 1: A graphic hotspot may not work correctly the first time you click it unless the
graphic is fully displayed on the screen.
Problem 2: If you use the JavaHelp search to find a term, then return to the Contents and
navigate to another topic that contains the term you were just searching for, the
viewer takes you to the term inside that topic.
Solution:
NetSight Automated Security Manager
15
Automated Security Manager Help
Return to the Search tab, clear the entry and click Search. Go back to the
Contents and the navigation will work correctly.
Problem 3: Help does not launch from the Help button in the Authorization/Device Access
window.
Solution: You can access Help for the Authorization/Device Access window from the
Help viewer Table of Contents (Help > Help Topics).
Any other problems than those listed above should be reported to our Technical Support Staff.
SUPPORTED MIBs
Click here for a list of the IETF and Private Enterprise MIBs supported by NetSight Automated Security
Manager as of its initial release. For information regarding the latest software available, recent release note
revisions and changes to the supported MIBs, visit the NetSight Automated Security Manager section at the
following Web site:
http://www.enterasys.com/support/manuals/netsight.html.
Additional (indexed) MIB documentation is also available at the following Web site:
http://www.enterasys.com/support/mibs
IMPORTANT URLS:
The following Enterasys URLs provide access to NetSight software products and product information.
• For information on obtaining a software license, visit
http://www.enterasys.com/products/management.
• Download the latest NetSight software products* from the product web pages at
http://www.enterasys.com/products/management/.
• Download previously released NetSight products*, using the Download Library at
http://www.enterasys.com/download/.
• To receive information on Enterasys NetSight management products, including the availability of new
versions and new product releases, sign up for ProActive Notification at
http://sweval.enterasys.com/notify/.
• To register any NetSight products that are covered under a service contract, use the NetSight Service
Contract Product Registration form at http://sweval.enterasys.com/netsight/.
*Software license keys are version dependent and will only operate with the version of software related to the
license key.
GLOBAL SUPPORT
By Phone: (800) 872−8440
By Email: [email protected]
By Web: http://www.enterasys.com/support
By Mail: Enterasys Networks, 50 Minuteman Rd., Andover, MA 01810
SUPPORTED MIBs
16
Automated Security Manager Help
For information regarding the latest software available, recent release note revisions, or if you require
additional assistance, please visit the Enterasys Support web site.
http://www.enterasys.com/support
ADDENDUM:
This section provides updated release information, available to current NetSight Automated Security Manager
customers through the web update operation. Use the Check for Updates feature to determine if updates are
currently available. The updates are listed by date, with the most recent updates listed first.
6/2006
ADDENDUM:
P/N: 9038159−03 Subject to Change Without Notice
F1650−H
17
NetSight Automated Security Manager Installation
NOTE: When this topic is opened from the CD−ROM, the links from this topic to other help topics will
not work. Links within the topic will work and once you've installed NetSight Automated
Security Manager, you can launch the help system and access help for all topics.
This document provides instructions for installing NetSight Automated Security Manager. The most recent
version of this file is located on the NetSight Documentation web page:
http://www.enterasys.com/support/manuals/netsight.html.
• General Installation Information
• System Requirements
• Evaluation Copy
• NetSight Plugin Integration
• Windows Installation
• Configuring the Environment
• Stopping the NetSight Server and Database (Windows)
• Installing Automated Security Manager (Windows)
• Solaris Installation
• Preparing for Solaris Installation
• Stopping the NetSight Server and Database (Solaris)
• Installing Automated Security Manager (Solaris)
• Linux Installation
• Preparing for Linux Installation
• Stopping the NetSight Server and Database (Linux)
• Installing Automated Security Manager (Linux)
• Launching NetSight Automated Security Manager
• Windows Launch
• Solaris Launch
• Linux Launch
• Uninstalling NetSight Automated Security Manager
• Uninstalling on Windows
• Uninstalling on Solaris
• Uninstalling on Linux
• Support
• Accessing Help
• Technical Support
• Documentation
• Training
General Installation Information
You can install Automated Security Manager on the following platforms:
• Windows®XP, Windows Server" 2003, or Windows®2000
• UNIX®Solaris® 8, 9, or 10 on Sun®Platforms only
• Linux: Red Hat Version 9, Red Hat Enterprise Linux WS, ES v3, and SuSE Linux
NetSight Automated Security Manager Installation
18
Automated Security Manager Help
Before you install Automated Security Manager, it is recommended that you read the NetSight Automated
Security Manager Release Notes. You can also access the release notes for Automated Security Manager from
the CD with a web browser by opening the asmnotes.htm. The most recent version of the release notes
can be found on the NetSight Documentation web page:
http://www.enterasys.com/support/manuals/netsight.html
The following tasks comprise the NetSight Automated Security Manager installation process:
• When you purchased Automated Security Manager, you received a Licensed Product Entitlement ID
that allows you to generate a product license. Prior to installing Automated Security Manager, you
must redeem your Entitlement ID for a product license. Refer to the instructions included with the
Entitlement that was sent to you. (For more information, see
http://www.enterasys.com/products/management/.)
• Installing any operating system patches required for Java or InstallAnywhere®(Solaris only).
• Preparing your system for installation.
• Installing NetSight Automated Security Manager.
NOTE: The Automated Security Manager Client and Server license must be installed on a
workstation that has an Enterasys NetSight Console version 2.2 Server already installed.
Automated Security Manager depends on functionality provided by the NetSight Server,
which is a component of Console 2.2. Automated Security Manager Client−only
installations do not have this requirement.
System Requirements
The system requirements for operating NetSight Automated Security Manager are listed here.
TM
• Windows® 2000 w/ Service Pack 4, Windows Server 2003, Windows XP® Professional
w/Service Pack 2 (qualified on the English version of the operating systems)
• Recommended P4−2.4 GHz, 1GB RAM
• Free Disk Space − 500MB
• Solaris® 8, 9, and 10 on Sun® Platforms only (with latest operating system patches installed.)
• Recommended Sun®Ultra 30/60 (or equivalent), 900MHz, 1GB RAM
• Free Disk Space − 800MB
• Linux: Red Hat Version 9, Red Hat Enterprise Linux WS, ES v3, and SuSE Linux
• Recommended P4−2.4 GHz, 1GB RAM
• Free Disk Space − 500MB
Evaluation Copy
If you have requested an Automated Security Manager evaluation license, you will receive an Evaluation
License Entitlement ID that you must redeem for an evaluation license prior to installation. Refer to the
instructions included with the Entitlement that was sent to you. (For more information, see
http://www.enterasys.com/products/management/.)
To upgrade from an evaluation copy of Automated Security Manager to a purchased copy, contact your
Enterasys Networks Representative to purchase the software and receive an Entitlement ID. You do not need
to reinstall the software to perform the conversion. If your evaluation copy has not expired:
System Requirements
19
Automated Security Manager Help
1. In the Automated Security Manager main window, select Tools > Server Information.
2. In the Server Information window, click the License tab.
3. Select Automated Security Manager from the table and click Change License.
4. Read and accept the License and click OK.
5. Enter the license text that you received when you generated the product license. (When you purchased
the software, you received a License Entitlement ID that allows you to generate a product license.
Refer to the instructions included with the License Entitlement ID that was sent to you.)
6. Click Update. The license file will be updated with the new license text.
If you have let your Evaluation Copy expire, when you launch Automated Security Manager a window opens
where you can enter the license text.
NetSight Plugin Integration
NetSight Plugin Applications can be integrated and launched from the Automated Security Manager's
Applications menu. When you install Plugin applications, if you choose an install area other than the default
installation path (Windows: \Program Files\Enterasys Networks Solaris/Linux:
/usr/local/Enterasys_Networks), then you must edit the NetSight.properties file to define
the absolute path to your Plugin applications.
1. Open the NetSight.properties file. On Windows systems, this is a text file located on the top
level of your <install directory>. On Solaris/Linux systems, the properties file is located in the
/var/Enterasys_Networks directory.
2. The path for each Plugin application is defined by its Executable line using the following format:
<Application Name>.Executable=<full path to the executable>
Where:
<Application Name> is the Plugin name that is displayed on the Applications menu.
Windows Example:
NetSight Policy Manager.Executable=C:\Program
Files\MyFolder\Policy Manager.exe
Solaris/Linux example:
NetSight Policy Manager.Executable=/usr/local/MyDirectory/Policy
Manager.exe
3. You can also define a specific icon for each plugin on the Applications menu using the following
format:
<Application Name>.Icon=<full path to the icon image −− must be a .gif file>
4. Save the NetSight.properties file.
Windows Installation
The following instructions can be used for installing NetSight Automated Security Manager on a Windows
2003 Server, Windows XP, or Windows 2000 system. Before you can install Automated Security Manager on
NetSight Plugin Integration
20
Automated Security Manager Help
a Windows platform system, you need to:
• Configure the Environment
• Stop the NetSight Server and Database (Windows)
Once your system is properly configured, you can proceed with:
• Installing Automated Security Manager (Windows)
• Launching Automated Security Manager (Windows)
Configuring the Environment
Following are instructions for configuring the environment on Windows 2003 Server, Windows 2000, and
Windows XP platforms.
NOTE: Some of the operations in the following instructions may generate a message prompting
you to reboot your system. It is not necessary to reboot your system until you have
completed the configuration process.
Windows 2000
1. Open your system's Control Panel (Start > Settings > Control Panel) and double−click the System
icon. The System Properties window opens.
2. Select the Advanced tab and click the Performance options button. The Performance Options
window opens.
3. Verify that the "Application response" section has Optimize performance for: Applications
selected.
4. Click the Change button in the "Virtual Memory" section of the Performance Options window. The
Virtual Memory window opens.
5. Enter the following settings in the "Paging file size for selected drive" section:
Initial size (MB) −− set to a minimum of 128 MB or equivalent to your system RAM.
Maximum size (MB) −− typically set to twice the Initial size. For example, if your Initial size is set to
128 MB, your maximum size would be set to 256 MB.
6. Click Set and OK to close the window.
7. Click OK to close the Performance Options window.
8. Click OK to close the System Properties window.
9. With the cursor in an open area of the desktop, right click and select Properties from the drop−down
menu. The Display Properties window opens.
10. Select the Settings tab, and set Colors to High Color (16 bit) and Screen area to 1024 by 768 pixels
(recommended minimum). The Color setting affects the appearance of Automated Security Manager
windows. Certain window features, such as table rows that appear with a color gradient can only be
enabled with color settings of 24 bit (16777216 colors) and above. Setting the palette lower than 24
bit (16 bit − 65,536 colors) does not support gradients.
11. Click OK to close the Display Properties window.
12. Reboot your system.
Windows XP and Windows 2003 Server
1. Open your system's Control Panel (Start > Settings > Control Panel) and double−click the System
icon. The System Properties window opens.
Configuring the Environment
21
Automated Security Manager Help
2. Select the Advanced tab and click the Settings button in the "Performance" section. The Performance
Options window opens.
3. Select the Advanced tab and verify that the "Processor scheduling" and "Memory usage" sections
have Adjust for best performance of: programs selected.
4. Click the Change button in the "Virtual Memory" section of the Performance Options window. The
Virtual Memory window opens.
5. In the "Paging file size for selected drive" section, select the Custom size option and enter the
following settings:
Initial size (MB) −− set to a minimum of 128 MB or equivalent to your system RAM.
Maximum size (MB) −− typically set to twice the Initial size. For example, if your Initial size is set to
128 MB, your maximum size would be set to 256 MB.
6. Click Set and OK to close the window.
7. Click OK to close the Performance Options window.
8. Click OK to close the System Properties window.
9. With the cursor in an open area of the desktop, right click and select Properties from the drop−down
menu. The Display Properties window opens.
10. Select the Settings tab, and set the Screen resolution to 1024 by 768 pixels (recommended minimum),
and the Color quality to Medium (16 bit). The Color setting affects the appearance of Automated
Security Manager windows. Certain window features, such as table rows that appear with a color
gradient can only be enabled with color settings of 24 bit (16777216 colors) and above. Setting the
palette lower than 24 bit (16 bit − 65,536 colors) does not support gradients.
11. Click OK to close the Display Properties window.
12. Reboot your system.
Stopping the NetSight Server and Database (Windows)
You must stop the NetSight Server and the NetSight Database prior to installing Automated Security
Manager.
1. Go to the Taskbar Notification Area of your desktop (on the lower right of your screen, unless you've
relocated your Taskbar).
2. Right−click the Services Manager icon (
) and select NetSight Server > Stop Server and
Database.
Installing Automated Security Manager (Windows)
Now that you have configured your system, you are ready to install NetSight Automated Security Manager.
1. Log onto your system as the user who will be using Automated Security Manager.
2. Download the ASM software from the Automated Security Manager product web page at
http://www.enterasys.com/products/management/. Or, if you are installing from a CD, insert the
NetSight ASM CD into your system's CD drive.
3. Navigate to install.exe and double−click it.
4. The Installer leads you through a series of windows that ask you for all the information required in
order to install Automated Security Manager. You will need the following information to complete
the Installer Program:
• Client/Server or Client−only Install −− You will need to select whether you are installing a
Client−only or Client and Server version of Automated Security Manager.
• Client−only − This will install the Automated Security Manager client on the system.
Stopping the NetSight Server and Database (Windows)
22
Automated Security Manager Help
No server or database components will be installed. This requires that an Automated
Security Manager Client and Server has been installed on another system with an
Enterasys NetSight Console 2.2 Server.
• Client and Server − This requires that an Enterasys NetSight Console 2.2 Server
already be installed on the system. This provides the server and database components
for the Automated Security Manager features to integrate with Enterasys NetSight
Console 2.2. An Automated Security Manager client will also be installed on this
system.
• License Text −− You will need to enter the license text that you received when you generated
the Automated Security Manager license. (When you purchased Automated Security
Manager, you received a Licensed Product Entitlement ID that allows you to generate a
product license. You must generate the license prior to installing Automated Security
Manager. Refer to the instructions included with the Entitlement ID that was sent to you.)
• Destination Directory −− This is the path to your Automated Security Manager Installation
Directory. In the Destination Directory window, click Browse to navigate to the directory, or
type the path in manually. The Installer will add the NetSight Automated Security Manager
directory to the end of the path.
When you have finished with this series of windows, NetSight Automated Security Manager will be
installed according to your specifications. You are now ready to launch Automated Security Manager.
Solaris Installation
NetSight Automated Security Manager supports the Sun Solaris 8, 9, and 10 operating systems on Sun®
Platforms only. Before installing Automated Security Manager, be sure to install the latest patches for your
operating system. You can download the most recent operating system patches from
http://sunsolve.sun.com.
Before installing NetSight Automated Security Manager from a CD on a Solaris platform, you need to:
• Prepare for Installation on Solaris
Once your system is properly configured, you can proceed with:
• Stopping the NetSight Server and Database (Solaris)
• Installing Automated Security Manager (Solaris)
• Launching Automated Security Manager (Solaris)
Preparing for Solaris Installation
Perform the following steps if you will be installing Automated Security Manager software from a CD. If you
have downloaded the software, proceed to the section on Stopping the NetSight Server and Database. The
following procedures assume that the CD drive from which you are installing is physically attached to the
system where ASM is being installed. The user performing the installation must have privileges to create,
read, write, and execute within the installation directory.
1. Insert the NetSight Automated Security Manager CD into the CD drive.
2. Use an xterm where you are logged in as root using the su − command.
Solaris Installation
23
Automated Security Manager Help
NOTE: You may encounter a Java exception during the install when
becoming the root user with the su − command. Be sure that
your system's root environment has a proper DISPLAY variable
setting. The Installation program will report a Java exception
(InvocationTargetException) if the DISPLAY variable
is undefined.
If this occurs:
• Before using the su − command, set the system display
variable to accept a remote display with the command:
/usr/openwin/bin/xhost +
• After using the su − command, set the display variable
in the environment where the su − was done.
For C shell:
setenv DISPLAY :0.0
For Korn shell:
export DISPLAY=:0.0
3. Using the cd command, cd to the /cdrom/cdrom0 (where 0 is zero) directory. If it does not exist,
make the directory using the mkdir −p command, then cd to the newly created directory.
4. Using the ls command, check to see if the CD drive is mounted. If no files are listed, issue the
following commands:
cd /
mount −r −F hsfs /dev/sr0 /cdrom/cdrom0
(where 0 is zero).
Stopping the NetSight Server and Database (Solaris)
Before you install, you must stop the NetSight Server and the NetSight Database:
1. On the server system, navigate to the <NetSight Console installdir>/server
2. Stop the server and database using the command:
stopserver.sh
Installing Automated Security Manager (Solaris)
The user performing the installation must have privileges to create, read, write, and execute within the
installation directory.
1. Use an xterm where you are logged in as root. (Be sure that your system's root environment has a
proper DISPLAY variable setting. For more information see the above note.)
2. If you have downloaded the software:
cd to the directory where you downloaded the installer and start the Installer with the command
sh ./install.bin.
If you are installing from a CD:
Start the installer with the command /cdrom/cdrom0/Solaris/install.bin
Stopping the NetSight Server and Database (Solaris)
24
Automated Security Manager Help
3. The NetSight Automated Security Manager Installer leads you through a series of windows that ask
you for all the information required in order to install Automated Security Manager. You will need
the following information to complete the Installer Program:
• Client/Server or Client−only Install −− You will need to select whether you are installing a
Client−only or Client and Server version of Automated Security Manager.
• Client−only − This will install the Automated Security Manager client on the system.
No server or database components will be installed. This requires that an Automated
Security Manager Client and Server has been installed on another system with an
Enterasys NetSight Console 2.2 Server.
• Client and Server − This requires that an Enterasys NetSight Console 2.2 Server
already be installed on the system. This provides the server and database components
for the Automated Security Manager features to integrate with Enterasys NetSight
Console 2.2. An Automated Security Manager client will also be installed on this
system.
• License Text −− You will need to enter the license text that you received when you generated
the Automated Security Manager license. (When you purchased Automated Security
Manager, you received a Licensed Product Entitlement ID that allows you to generate a
product license. You must generate the license prior to installing Automated Security
Manager. Refer to the instructions included with the Entitlement ID that was sent to you.)
• Destination Directory −− This is the path to your Automated Security Manager Installation
Directory. In the Destination Directory window, click Browse to navigate to the directory, or
type the path in manually. The Installer will add the NetSight Automated Security Manager
directory to the end of the path.
When you have finished with this series of windows, Automated Security Manager will be installed
according to your specifications. You are now ready to launch Automated Security Manager.
Linux Installation
On the Linux platform, NetSight Automated Security Manager supports the Red Hat Version 9, Linux
Enterprise WS, ES, and SuSE Linux operating systems.
NOTE: Prior to beginning installation, verify that your /etc/hosts file has the local host
name specified. It should have an entry that looks like:
127.0.0.1
localhost
Before installing NetSight Automated Security Manager from a CD on a Linux platform, you need to:
• Prepare for Installation on Linux
Once your system is properly configured, you can proceed with:
• Stopping the NetSight Server and Database (Linux)
• Installing Automated Security Manager (Linux)
• Launching Automated Security Manager (Linux)
Preparing for Linux Installation
Perform the following steps if you will be installing Automated Security Manager software from a CD. If you
have downloaded the software, proceed to the section on Stopping the NetSight Server and Database. The
Linux Installation
25
Automated Security Manager Help
following procedures assume that the CD drive from which you are installing is physically attached to the
system where ASM is being installed. The user performing the installation must have privileges to create,
read, write, and execute within the installation directory.
1. Insert the NetSight Automated Security Manager CD into the CD drive.
2. Use an xterm where you are logged in as root.
NOTE: If you do not have a DISPLAY variable defined for your root user environment, you will
encounter a Java exception during the install upon becoming the root user. Be sure that
your system's root environment has a proper DISPLAY variable setting. For more
information see the above note.
3. Using the cd command, cd to the /mnt/cdrom directory.
4. Using the ls command, check to see if the CD drive is mounted. If no files are listed, issue the
following commands:
mount /mnt/cdrom
Stopping the NetSight Server and Database (Linux)
Before you install, you must stop the NetSight Server and the NetSight Database.
1. On the server system, navigate to the <NetSight Console installdir>/server
2. Stop the server and database using the command:
stopserver.sh
Installing Automated Security Manager (Linux)
The user performing the installation must have privileges to create, read, write, and execute within the
installation directory.
1. Use an xterm where you are logged in as root. (Be sure that your system's root environment has a
proper DISPLAY variable setting. For more information see the above note.)
2. If you have downloaded the software:
cd to the directory where you downloaded the installer and start the Installer with the command
sh ./install.bin.
If you are installing from a CD:
Start the installer with the command /mnt/cdrom/linux/install.bin
3. The NetSight Automated Security Manager Installer leads you through a series of windows that ask
you for all the information required in order to install Automated Security Manager. You will need
the following information to complete the Installer Program:
• Client/Server or Client−only Install −− You will need to select whether you are installing a
Client−only or Client and Server version of Automated Security Manager.
• Client−only − This will install the Automated Security Manager client on the system.
No server or database components will be installed. This requires that an Automated
Security Manager Client and Server has been installed on another system with an
Enterasys NetSight Console 2.2 Server.
• Client and Server − This requires that an Enterasys NetSight Console 2.2 Server
already be installed on the system. This provides the server and database components
for the Automated Security Manager features to integrate with Enterasys NetSight
Console 2.2. An Automated Security Manager client will also be installed on this
system.
Stopping the NetSight Server and Database (Linux)
26
Automated Security Manager Help
• License Text −− You will need to enter the license text that you received when you generated
the Automated Security Manager license. (When you purchased Automated Security
Manager, you received a Licensed Product Entitlement ID that allows you to generate a
product license. You must generate the license prior to installing Automated Security
Manager. Refer to the instructions included with the Entitlement ID that was sent to you.)
• Destination Directory −− This is the path to your Automated Security Manager Installation
Directory. In the Destination Directory window, click Browse to navigate to the directory, or
type the path in manually. The Installer will add the NetSight Automated Security Manager
directory to the end of the path.
When you have finished with this series of windows, Automated Security Manager will be installed
according to your specifications. You are now ready to launch Automated Security Manager.
Launching NetSight Automated Security Manager
Now that you've installed Automated Security Manager, you can launch it.
Windows Launch
From the Start menu, select Programs > Enterasys Networks > NetSight Automated Security
Manager > Automated Security Manager. Evaluation Copy users will see a message indicating that this is
an evaluation copy, and informing you of the expiration date. Click OK to continue.
Solaris Launch
1. Use the cd command to navigate to the NetSight Automated Security Manager Installation Directory.
2. Issue the NetSight Automated Security Manager startup command:
./AutoSecMgr
Linux Launch
1. Use the cd command to navigate to the NetSight Automated Security Manager Installation Directory.
2. Issue the NetSight Automated Security Manager startup command:
./AutoSecMgr
Uninstalling NetSight Automated Security Manager
Use the procedures below to uninstall Automated Security Manager. When you uninstall, only the files which
were distributed with NetSight Automated Security Manager will be uninstalled. Files you generate (such as
logs, FlexViews, device lists, and data files) will not be automatically uninstalled.
Uninstalling on Windows
You must stop the NetSight Server and the NetSight database prior to uninstalling Automated Security
Manager.
Launching NetSight Automated Security Manager
27
Automated Security Manager Help
1. Go to the Taskbar Notification Area of your desktop (on the lower right of your screen, unless you've
relocated your Taskbar).
2. Right−click the Services Manager icon (
) and select NetSight Server > Stop Server and
Database.
You can now uninstall Automated Security Manager:
From the Start menu, select Programs > Enterasys Networks > NetSight Automated Security
Manager > Uninstall Automated Security Manager.
If a different user is uninstalling Automated Security Manager, go to the UninstallerData directory located in
the Automated Security Manager Installation Directory and double−click on Uninstall Automated
Security Manager.exe. In such a case the Uninstaller may not be able to remove certain files due to
permission conflicts.
Uninstalling on Solaris
Automated Security Manager should be uninstalled from an xterm window by a user who is logged on with
the same ID as that of the user who installed the application.
You must stop the NetSight Server and the NetSight Database prior to uninstalling Automated Security
Manager.
1. On the server system, navigate to the <NetSight Console installdir>/server
2. Stop the server and database using the command:
stopserver.sh
You can now uninstall Automated Security Manager:
1. Use the cd command to navigate to the Automated Security Manager Installation Directory (top
level).
2. Start the Uninstaller by issuing the command:
./UninstallAutoSecMgr.sh
Uninstalling on Linux
The user performing the uninstall must be logged in as root.
You must stop the NetSight Server and the NetSight Database prior to uninstalling Automated Security
Manager.
1. On the server system, navigate to the <NetSight Console installdir>/server
2. Stop the server and database using the command:
stopserver.sh
You can now uninstall Automated Security Manager:
1. Use the cd command to navigate to the Automated Security Manager Installation Directory (top
level).
Uninstalling on Solaris
28
Automated Security Manager Help
2. Start the Uninstaller by issuing the command:
./UninstallAutoSecMgr.sh
Support
To locate product specific information, refer to the Enterasys website:
http://www.enterasys.com
Accessing Help
After you have installed Automated Security Manager on your system, the full Help system is available from
the Help menu option on the Automated Security Manager windows, and from any window that has a Help
button on it. The online Help system is also available as a PDF file in the Help directory located in your
NetSight Automated Security Manager installation directory.
Technical Support
If you need technical support related to Automated Security Manager, contact the Enterasys Global Call
Center:
Phone: (800) 872−8440 (24 hours a day, 365 days a year)
Email: [email protected]
Mail:
Enterasys Networks, Inc.
Technical Support
50 Minuteman Rd.
Andover, MA 01810
FTP: ftp.enterasys.com
Login: anonymous
Password: [your E−Mail address]
Documentation
For the latest Enterasys documentation on the web, see
http://www.enterasys.com/support/manuals/netsight.html.
Training
For training on this and other Enterasys products, see http://www.enterasys.com/training.
Support
29
Getting Started with
Automated Security Manager
Automated Security Manager (ASM) can help you manage responses to serious network security threats. This
topic takes you through the configuration steps needed to receive events from Dragon Intrusion Defense
System, then create ASM rules and apply them, either automatically or through manual confirmation, to
respond to network security threats.
Before you begin:
• You should have an SNMPv3 Credential defined in Console with AuthPriv access.
• You should know:
• The IP Address or hostname of the system where you are running Dragon
• The username and password that allows administrator access to Dragon
• The IP Address or hostname of the system where you are running ASM
Getting started consists of the following tasks:
• Populate the Console database. Refer to the Console Help to Discover, Import, or manually Add
network elements that you want to protect with ASM.
TIP: Spend some time creating Device Groups that are meaningful for your network. Although
Console provides pre−defined folders, you'll find that creating your own unique device
groups will make it easier to define ASM Search Scopes later. For example, you could create
new groups for your network elements organized by geographic region, data center,
building, floor, etc., then drag and drop devices into these new groups.
• Configure Console's SNMPTrap Service − This involves identifying user credentials that will be used
with SNMPv3 trap messages.
• Configure the IDS − The IDS must be set to recognize specific events and provide notification
messages to Automated Security Manager (ASM). (The following instructions provide examples of
basic configuration for the Dragon Intrusion Defense System. If you are using a different IDS, refer to
that product's documentation to configure the corresponding features.)
For this topic, we'll configure a predictable event and test the ability of Dragon to notify ASM. More
complex configuration is beyond the scope of this topic.
• Configure Automated Security Manager − The Automated Security Manager Configuration Window
takes you step−by−step through creating Rules that respond to events sent from the IDS.
• Trigger a Test Trap − Attempt to access the Dragon host using the community name PRIVATE.
Configure Console's SNMP Trap Service
Dragon uses Inform messages to notify Console of a threat, which means that Console's SNMPTrap Service
(snmptrapd) must know the user credentials of the sending agent (on the Dragon device) before the message
can be received. If this information is not provided, trap messages will be dropped by SNMPTrap Service. To
learn more about Traps and Informs, read the Traps and Informs help topic. The user credentials configured
here must match the user credentials configured on Dragon.
Getting Started with Automated Security Manager
30
Automated Security Manager Help
There are two ways to configure SNMPTrap information: Using the Trap Receiver Configuration View or by
manually adding user information to the snmptrapd.conf file using a text editor.
Configuring the SNMPTrap Service Manually
1. Open the snmptrapd.conf file located in the NetSight Console\server\bin directory
using your favorite text editor. Security information for Inform messages is defined using the
createUser directive in the snmptrapd.conf file.
2. Add one createUser directive for each Security User: createUser
Example for Informs:
createUser myUser MD5 myauthpassword DES myprivpassword
Where:
myUser
security user name
myauthpassword
MD5
myprivpassword
DES
or SHA − authentication type and authentication password
(optional parameter − do not use when authentication is not used)
− encryption type and encryption password − (optional
parameter − do not use when encryption is not used or leave the
encryption password blank if it is the same as the authentication
password).
Using the Trap Receiver Configuration View
The Trap Receiver Configuration view is accessible from the right−click menu when clicking a device in
Console's left (tree) panel.
NOTES:
1. Changes that you make in this window alter the snmptrapd.conf file. The
snmptrapd.conf file is located on the server in the < install area>\NetSight
Console\server\bin directory. After making changes, you must restart the SNMPTrap
Service on the NetSight Server. Refer to Restart the SNMPTrap Service for more
information.
2. The snmptrapd.conf is not preserved during the Console Uninstall.
1. In Console, expand the left panel, right−click on one or more devices or device groups and select
Trap Receiver Configuration.
2. Click the snmptrapd tab.
3. Click Add Entry. This adds a new row to the table.
For the next step, you'll need an SNMPv3 Credential. If you do not already have a credential defined,
go to the Authorization/Device Access − Profiles/Credentials tab where you can create one.
Otherwise, go on to Step 4.
4. Click in the Credential Name column for the device where you want to set a specific SNMPv3
credential and select your SNMPv3 AuthPriv credential from the drop−down list. The
snmptrapd.conf Text area shows the text of your entry in the configuration file.
Configuring the SNMPTrap Service Manually
31
Automated Security Manager Help
You can also type user credentials directly into the snmptrapd.conf Text area to add entries to the
configuration file. The format for user information is:
createUser username (MD5|SHA) passphrase [DES passphrase]
Example − for an AuthPriv user you might enter the following line in the file:
createUser myAuthPrivUser MD5 mypassword DES myotherpassword
Where myAuthPrivUser is the security user name, mypassword is your authentication password and
myotherpassword is your encryption password. The authentication and privacy parameters are
optional depending on whether you are using authentication and/or privacy.
5. Click Save and Close. The user credentials have been added to the snmptrapd.conf file.
Restart the SNMPTrap Service
Any time that the snmptrapd.conf file is changed, the SNMPTrap Service must be restarted.
To restart the snmptrapd:
Windows
a. Go to the Taskbar Notification
Area of your desktop (on the
lower right of your screen,
unless you've relocated your
Taskbar).
b. Locate the Services Manager
icon (
) and right−click it.
c. Select SNMP Trap >
Restart.
Solaris
a. Navigate to the
etc/rc2.d directory.
b. Type the command:
S99NsSnmptrapd stop
c. Press Enter.
d. Type the command:
S99NsSnmptrapd start
e. Press Enter.
Linux
a. Navigate to the
etc/init.d
directory.
b. Type the
command:
NsSnmptrapd stop
c. Press Enter.
d. Type the
command:
NsSnmptrapd
start
e. Press Enter.
Configuring Dragon Intrusion Defense System
In its simplest form, IDS configuration consists of triggering events related to specific threats, constructing
messages that can be sent to ASM whenever one of these threats is detected, and then configuring the
notification to ASM.
For this exercise, we will set up an event to test the connection from the IDS to ASM. The following steps
create a very simple event trigger (access the Dragon host with the Community Name PRIVATE), then
configures notification to ASM using the SNMPv3 Credential that was added earlier to Console's SNMPTrap
Service.
The following steps provide examples and instructions for configuring Dragon Intrusion Defense System with
this test message.
Restart the SNMPTrap Service
32
Automated Security Manager Help
1. Open a Web browser and navigate to Dragon. The following URL opens the Dragon user interface:
https://<Dragon IP address>/dragon
2. Enter the username and password that grants administrative access to Dragon.
3. Click AlarmTool on the Dragon main menu bar. Dragon's AlarmTool lets you create Event Groups
that describe specific network threats and what to do when those threats are detected.
4. Create a new Event Group.
a. Click EVENT GROUPS in the left panel and then click NEW EVENT GROUP on the
Event Groups menu bar.
b. Use the AlarmTool Wizard in the right panel to expand the Vulnerability category and
select SNMP:PRIVATE.
c. Click the double arrow to the left of SNMP:PRIVATE to include it in your new Event Group.
d. Enter a Name for your new Event Group and click Save.
5. Create a new Notification Rule.
a. Click NOTIFICATION RULES in the left panel and then click NEW NOTIFICATION
RULE on the Notification Rules menu bar.
b. Click the double arrow for SNMPv3 in the right panel. ASM uses SNMPv3 for trap messages
as an added measure of security.
c. Make the following notification settings:
Time
Period
None
Security
Name
<SNMPv3 Credential − User Name>
Transport
UDP
Security
Engine
leave blank
Auth.
Protocol
MD5
Context
Name
leave blank
<ASM host IP address>
Context
Engine
leave blank
Server
Port:
162
Auth
Password
<SNMPv3 Credential − Auth Password>
OID:
.1.3.6.1.4.1.5624.1.2.45.1.0.3
Priv
Password
<SNMPv3 Credential − Priv Password>
Message:
etsysThreatNotificationThreatCategory='ASM_AT
etsysThreatNotificationThreatName='%NAME%'
etsysThreatNotificationInitiatorAddress='%SIP%'
etsysThreatNotificationTargetAddress='%DIP%'
etsysThreatNotificationSenderID='dragon'
etsysThreatNotificationSenderName='dragon−test
Inform:
TRUE
d. Enter a Name for your new Notification Rule and click Save.
6. Create a new Alarm.
a. Click ALARMS in the left panel and then click NEW ALARM.
b. Select Real Time from the drop−down list in the Type field.
c. Leave the Summary Interval set to its default value (3600 milliseconds).
d. Select the name of your new Event Group from the drop−down list in the Event Group field.
e. Select the name of your new Notification Rule from the drop−down list in the Notification
Rule field.
Restart the SNMPTrap Service
33
Automated Security Manager Help
f. Enter a Name for your new Alarm and click Save.
7. Deploy your new trap configuration.
a. Click DEPLOYMENT in the left panel.
b. Click Deploy to activate your trap configuration.
Configuring Automated Security Manager
The following steps create an action rule to recognize any trap from the Dragon host device and record the
event in the ASM Activity Log.
1. In ASM, select Tools > ASM Configuration from the menu bar.
2. In the Groups and Devices tree, select My Network and click Include. Click Continue.
3. Click Continue in the Excluded Port Types view.
4. Click Continue in the Excluded Ports view.
5. Click Create in the Rule Definitions view. The Create Rule window opens.
6. Enter a Name for the new rule and click Apply, then Close.
7. Leave the remaining settings set to their default values. This will allow matching any event category,
recording the event in the ASM Activity Monitor, but no action will be taken.
8. Click Save in the ASM Configuration window.
9. Keep the ASM Activity Monitor window open so you can view the log while triggering a test trap
message.
Trigger a Test Trap
To test the connection between Dragon and ASM, we will use MIB Tools to attempt to access the Dragon host
using the community name PRIVATE.
1. In the ASM Activity Monitor window, make sure that the Operation Mode is set to either Search and
Respond or Search Only.
2. In Console main window, right click on the Dragon device in the left−panel tree and select MIB Tools
from the menu.
3. Select Use SNMPv1 from the Select Protocol drop−down list in the upper right of the MIB Tools
window and enter PRIVATE as the Community Name. Click Contact.
You should see one or more traps recorded in the ASM Activity Monitor. If this does not occur,
review the preceding steps checking for errors.
What's Next
If you were able to successfully trigger and record a trap in ASM, then you're ready to configure additional
Dragon events and enable ASM to provide responses to protect the integrity of your network.
In the preceding exercise we triggered a trap message to ASM for a specific event (logging on using the
community name, PRIVATE). ASM recognized the trap because it was able to match the character string
defined by the Enterasys Networks' Threat Notification MIB object,
etsysThreatNotificationThreatCategory, in this case ASM_ATTACKS, with a corresponding Event
Category defined in ASM. To be recognized by ASM, the text string in the event messages sent by an IDS
must match exactly with an Event Category name defined in ASM. (Event categories are defined in ASM
Configuration − Rule Variables.)
Configuring Automated Security Manager
34
Automated Security Manager Help
Dragon has four default notification rules: netsight−atlas−asm−attacks, netsight−atlas−asm−compromise,
netsight−atlas−asm−informational, and netsight−atlas−asm−misuse. Each of Dragon's default notification
rules has a corresponding default event category in ASM: ASM_ATTACKS, ASM_COMPROMISE,
ASM_INFORMATIONAL, and ASM_MISUSE. ASM uses Rules to compare incoming trap messages with
specific event categories, then determines where and what action to apply as a response.
For ASM's response to a serious threat to be timely and effective, it is important that ASM only be notified of
serious threats. The following table lists the Dragon events for which notification to ASM is recommended:
BACKDOOR:PHATBOT
COMP:MS−DIR
COMP:ROOT−ICMP
COMP:ROOT−TCP
COMP:ROOT−UDP
COMP:SDBOT−LOGIN
COMP:SDBOT−NETINFO
COMP:SPYBOT−DOWNLOAD COMP:SPYBOT−INFO
COMP:SPYBOT−KEYLOG
COMP:WIN−2000
COMP:WIN−XP
GENERIC:UPX−EXE
MS−BACKDOOR
MS−BACKDOOR2
MS−BACKDOOR3
MS−SQL:HAXOR−TABLE
MS−SQL:PWDUMP
MS−SQL:WORM−SAPPHIRE MS:BACKDOOR−BADCMD
MS:BACKDOOR−DIR
SMB:SAMBAL−SUCCESS
SSH:X2−CHRIS
SSH:HIGHPORT
SSH:X2−CHRIS−REPLY
You should also read the Dragon IDS AlarmTool Step−by−Step Instructions to learn more about events,
alarms, traps, and inform configuration in Dragon IDS.
Configuring Automated Security Manager
35
How To Use the Automated Security Manager
The How To help folder contains help topics that give you instructions for performing tasks in NetSight
Automated Security Manager.
Double−click the How To help folder in the left panel to open the folder and navigate to a
specific How To help topic.
How To Use the Automated Security Manager
36
How to Check for Updates
NetSight applications provide an easy way to access and download product updates using a web update
operation. You can perform an immediate check for updates, or schedule a routine check for updates. If your
network is behind a firewall, you must specify the HTTP Proxy server being used via the Web Update view in
the Options window. You must be assigned the appropriate user capability to perform this function.
Instructions on:
• Performing an Immediate Update
• Schedule a Check for Updates
Performing an Immediate Update
You can perform an immediate check for updates. If your network is behind a firewall, you must specify the
HTTP Proxy server being used via the Web Update view in the Options window, prior to performing an
update.
1. Select Help > Check for Updates in the menu bar.
2. The Updates Available window opens where you can view the new updates that are available for
download. Use the checkboxes to select the updates you wish to download, and click Download to
initiate the download operation.
3. After the download, a message is displayed stating that you must restart the NetSight server to install
the updates. Click Restart to restart the server. (You can click Cancel if you wish to restart the server
manually at a later time, but keep in mind that the updates will not be installed until you restart the
server.)
4. When you restart the server, any client connections will be lost. The next time the client connects, any
required client updates will be performed automatically.
Schedule a Check for Updates
You can schedule a routine check for updates.
1. Select Tools > Options in the menu bar. The Options window opens.
2. In the left−panel tree under Suite options, select the Web Update folder.
3. In the right−panel Schedule Updates section, select the desired schedule: Daily or Weekly.
4. If you have specified a Weekly check, use the drop−down list to select the day of the week you wish
the check to be performed, and set the desired time. If you have specified a Daily update, set the
desired time.
5. If your network is protected by a firewall, select the Specify Proxy Server checkbox and enter your
proxy server address and port ID. Consult your network administrator for this information.
6. Click OK to set the options and close the window.
7. When the scheduled update check is performed, a message will inform you if updates are available.
Click Get Updates to update the files.
NOTE: All connected clients will receive this message, but only one client can initiate
the update operation. Only clients assigned the appropriate user capability will be
able to perform an update.
How to Check for Updates
37
Automated Security Manager Help
8. The Updates Available window opens where you can view the new updates that are available for
download. Use the checkboxes to select the updates you wish to download, and click Download to
initiate the download operation.
9. After the download, a message is displayed stating that you must restart the NetSight server to install
the updates. Click Restart to restart the server. (You can click Cancel if you wish to restart the server
manually at later time, but keep in mind that the updates will not be installed until you restart the
server.)
10. When you restart the server, any client connections will be lost. The next time the client connects, any
required client updates will be performed automatically.
How to Check for Updates
38
How to Configure Events
You can use the Event View Manager window to add your own views (tabs) to the Event View panel. You
can create custom tables that capture and combine similar information (same log type) from various sources.
For example, you can combine or merge trap logs into a single Event View.
Instructions for:
• Creating a New Event View
• Modifying an Existing Event View
• Removing an Event View
Creating a New Event View
You can create custom tables that capture and combine alarms, events and/or traps from various sources to
provide the information needed to manage your network.
1. Click the Event View Manager button
in the lower−right corner of the Event View. (If you are
using Console, you can also go to the Tools menu and select Alarm/Event > Event View Manager.)
The Event View Manager window opens.
2. Click Add in the top panel. The New View window opens.
3. Type a Name for your new view. The name can be up to 32 characters long. Spaces and special
characters are not permitted. This is the name that will appear on the tab for your new view in the
Event panel.
4. Check one or more standard columns (System Name, System Location, System Description) to add
those columns to your new view or check Custom to add custom columns. Custom columns can be
added for any column from the NSDEVICES table. The NSDEVICES table can be found in the
NsSchema.xml file in the <install area>\Enterasys Networks\NetSight
Console\client\etc\database directory. One or more columns can be defined as a comma
delimited string using the following format:
objName.objField:columnName
where:
objName.objField is the field name from the NSDEVICES table.
columnName is the name that will appear as the column heading.
For example:
chassisID:Chassis
NOTE: Device data in the Event View is not dynamically updated as the device's data changes.
You will need to Refresh the Event View in order to see any changes.
5. Click OK. Your new tab name now appears in the Title column of the Views table. The Log
Managers column is blank.
How to Configure Events
39
Automated Security Manager Help
6. If the Available Log Managers table lists a log that you want to add to this tab, select that log manager
from the list and click
. The selected log manager is added to the Log Managers in View
table and in the Log Managers column in the Views table.
7. If the desired log is not in the Available Log Managers table, you can add a log manager to the table,
then add it to the Log Managers in View table. To add a new Log Manager
a. Click New. The Log Manager Parameters − New Log Manager window opens.
NOTE: Local Log Managers are not automatically polled and must be refreshed
manually in the Event View. When added, they appear in the Available
Log Managers table as Not Polled.
b. Type a name for your new Log Manager.
c. Enter the path and filename for the log being managed by this Log Manager into the Log File
field or click Browse to open a file browser where you can navigate and select a log file.
d. If you are selecting a Syslog file, select a Pattern from the drop−down list to be used to
interpret the information from the log file. You can select a currently defined pattern or click
the Config button to open the Custom Pattern Configuration window where you can create a
new pattern to match a format that is not parsed by one of the default pattern definitions:
• KIWI Pattern − Parses a basic KIWI Syslog Server file format
• NetSight Syslog Pattern Parses files generated by the NetSight Syslog Service
• NetSight Trap Log Pattern − Parses files generated by the snmpTrapd Service
• UNIX Syslog Pattern − Parses files generated by the built in UNIX/LINUX Syslog
Service
• Console 1.x Pattern − Parses files generated by Console 1.x
• Console 2.0 Pattern − Parses files generated by Console, and its current plugins.
e. Click OK to add your new log manager to the Available Log Managers table and close the
window.
8. With your new log manager selected, click
.
9. When you are satisfied with the list of log managers, click Apply to save your newly configured
Event View.
10. Repeat Steps 2 through 9 to create another tab. Otherwise, click OK to exit from the Event View
Manager window.
Modifying an Existing Event View
The mechanism for modifying an existing Event View is similar to creating a new one. The tab being
modified is selected from the top panel and changes are applied in the two bottom panels.
To modify an existing Events Tab:
1. Click the Event View Manager button
in the lower−right corner of the Event View. (If you are
using Console, you can also go to the Tools menu and select Alarm/Event > Event View Manager.)
The Event View Manager window opens.
2. Select the View being changed from the list in the top panel.
3. Click Edit in the top panel to open the Edit View window where you can change the name of the
View and add columns to the view. For information on adding custom columns, see step 4 above.
Modifying an Existing Event View
40
Automated Security Manager Help
4. If the Available Log Managers table lists a log that you want to add to this tab, select that log manager
from the list and click
. The selected log manager is added to the Log Managers in View
table and in the Log Managers column in the Views table.
5. If the desired log is not in the Available Log Managers table, you can add a log manager to the table,
then add it to the Log Managers in View table. To add a new Log Manager
a. Click New. The Log Manager Parameters − New Log Manager window opens.
b. Type a name for your new Log Manager.
c. Enter the path and filename for the log being managed by this Log Manager into the Log File
field or click Browse to open a file browser where you can navigate and select a log file.
d. If you are selecting a Syslog file, select a Pattern from the drop−down list that will be used
to interpret the information from the log file. You can select a currently defined pattern or
click the Config button to open the Custom Pattern Configuration window where you can
create a new pattern to match a format that is not parsed by one of the default pattern
definitions:
• KIWI Pattern − Parses a basic KIWI Syslog Server file format
• NetSight Syslog Pattern Parses files generated by the NetSight Syslog Service
• NetSight Trap Log Pattern − Parses files generated by the snmpTrapd Service
• UNIX Syslog Pattern − Parses files generated by the built in UNIX/LINUX Syslog
Service
• Console 1.x Pattern − Parses files generated by Console 1.x
• Console 2.0 Pattern − Parses files generated by Console, and its current plugins.
e. Click OK to add your new log manager to the Available Log Managers table and close the
window.
6. With your new log manager selected, click
.
7. When you are satisfied with the list of log managers, click Apply to save your newly configured
Event View.
8. Repeat Steps 2 through 6 to modify another view. Otherwise, click OK to exit the Event View
Manager window.
Removing an Event View
To remove an Event View from the Event View panel:
1. Click the Event View Manager button
in the lower−right corner of the Event View. (If you are
using Console, you can also go to the Tools menu and select Alarm/Event > Event View Manager.)
The Event View Manager window opens.
2. Select the View being removed from the list in the top panel.
3. Click the Remove button.
Removing an Event View
41
How to Configure and Manage
the NetSight Server
Use the Server Information window to manage various NetSight Server functions including viewing server
information, configuring the server, and managing the database. To access this window, select Tools > Server
Information from the menu bar. You must be assigned the appropriate user capability to access this view.
Instructions on:
• Configuring the Server
• Changing Maximum Connections
• Managing the Database
• Changing the Database Password
• Changing the Database Connection URL
• Performing a Database Backup
• Restoring the Initial Database
• Restoring a Saved Database
• Viewing Client Connections
• Disconnecting a Client
• Viewing Licenses
• Changing a License
• Upgrading a Console License
• Viewing Locks
• Revoking a Lock
• Viewing the Server Log
• Viewing Server Statistics
Configuring the Server
Use the Configure Server window to configure various NetSight Server parameters. You can access this
window by clicking the Configure button in the Server Information window.
Changing Maximum Connections
The Client Connections view in the Configure Server window lists the number of current client connections
for each installed plugin application, and lets you change the maximum number of connections allowed for
each plugin and the NetSight Server.
1. Select Tools > Server Information from the menu bar. The Server Information window opens.
2. Click the Configure button. The Configure Server window opens.
3. Select Client Connections in the left panel.
4. In the right panel, you will see the number of current client connections for each installed plugin
application. In the Total Allowed column, you will see the maximum number of client connections
allowed by this plugin application. Select this column and use the arrows to change the number, if
desired.
5. Below the table, the Number of Clients Allowed field shows the maximum number of concurrent
client connections allowed by the NetSight Server. Use the arrows to change the number, if desired.
This number should be set to the total number of clients you want to allow to connect to the server.
How to Configure and Manage the NetSight Server
42
Automated Security Manager Help
6. Click OK.
Managing the Database
Use the Database tab in the Server Information window to change the database server password and
connection URL, as well as perform database backup, initialize, and restore operations. To access the tab,
select Tools > Server Information from the menu bar. The Server Information window opens, where you can
select the Database tab.
Changing the Database Password
Database server properties are used by the NetSight Server when it connects to the database. The database is
secured via a credential comprised of a user name and password. Use the following steps to change the
database password.
IMPORTANT: When Console is installed, it automatically secures the MySQL database server by
removing all the root and anonymous users from the MySQL user database. Console then
adds one generic user name (user = netsight) and password (password = enterasys). It is
recommended that you change this password, since all customers who install Console will
know this generic password.
1. Select Tools > Server Information from the menu bar. The Server Information window opens.
2. Select the Database tab.
3. In the Database Server Properties section, select the Show Password checkbox to display the
password, if desired.
4. Click Change to open a window where you can enter a new password. (The password is masked
unless you selected the Show Password checkbox.) Click OK.
5. You must restart both the NetSight Server and client after you change the database password.
Changing the Database Connection URL
The Connection URL is the URL the NetSight Server uses when connecting to the database. For
troubleshooting purposes, (for example, if you can't connect to the database) you may wish to enter a new
connection URL using the following steps.
1. Select Tools > Server Information from the menu bar. The Server Information window opens.
2. Select the Database tab.
3. In the Database Server Properties section, enter a new URL in the following format:
jdbc:mysql://[hostname]/<database>
where [hostname] is optional. Click Apply.
4. You must restart both the NetSight Server and client after you change the database connection URL.
Performing a Database Backup
You can save the currently active database to a file on the NetSight Server workstation. If the NetSight Server
is local, you can specify a directory path where you would like the backup file stored. If the server is remote,
the database will be saved to the default database backup location.
1. Select Tools > Server Information from the menu bar. The Server Information window opens.
Managing the Database
43
Automated Security Manager Help
2. Select the Database tab.
3. In the NetSight Data Set Operations section, click Backup. The Backup Database window opens.
4. The Database Path field displays the default database backup location. If the NetSight Server is local,
you can specify an alternate backup directory by entering a path to the directory, or using the Browse
button to navigate to the directory. If the server is remote, the database will be saved to the default
database backup location.
5. In the Database Name field, enter a name for the database backup file.
6. Click Backup to begin the database backup operation.
Restoring the Initial Database
Restoring an initial database removes all data elements from the database and populates the NetSight
Administrator authorization group with the name of the logged−in user. This operation will cause all current
client connections and operations in progress to be terminated.
1. Select Tools > Server Information from the menu bar. The Server Information window opens.
2. Select the Database tab.
3. In the NetSight Data Set Operations section, click Restore. The Restore Database window opens.
4. Select the Restore Initial Database option.
5. Click Restore to begin the initialize database operation.
6. You must restart both the NetSight Server and the client following an initialize database operation.
Restoring a Saved Database
You can restore a saved database (from a database backup operation) using these steps. This operation will
cause all current client connections and operations in progress to be terminated.
1. Select Tools > Server Information from the menu bar. The Server Information window opens.
2. Select the Database tab.
3. In the NetSight Data Set Operations section, click Restore. The Restore Database window opens.
4. Select the Restore Saved Database option.
5. Specify the database you wish to restore or use the Browse button to navigate to the database. If the
server is remote, you only have access to databases in the default database backup directory.
6. Click Restore to begin the database restore operation.
Viewing Client Connections
The Client Connections tab in the Server Information window provides information that lets you view and
manage current client connections to this server, and also view a history of client connections. To access the
tab, select Tools > Server Information from the menu bar. The Server Information window opens, where
you can select the Client Connections tab.
Disconnecting a Client
Use the following steps to disconnect a client from the NetSight Server.
1. Select Tools > Server Information from the menu bar. The Server Information window opens.
2. Select the Client Connections tab.
Restoring the Initial Database
44
Automated Security Manager Help
3. In the Current Client Connections table, select the client that you want to disconnect and click the
Disconnect button.
4. The client being disconnected receives a message saying that their connection will be terminated in 30
seconds. Both tables on this tab update automatically when a client connects or disconnects.
Viewing Licenses
The License tab in the Server Information window lets you view a list of all the server plugin applications that
have been installed on this particular NetSight Server and their respective license information. To access the
tab, select Tools > Server Information from the menu bar. The Server Information window opens, where
you can select the License tab.
You can also use this tab to change a license. You would change a license in the event that you want to
upgrade from an evaluation copy to a purchased copy, or upgrade to a license that supports more
users/devices. You can also use the Change License functionality to upgrade a Console license from a
Standalone to a Client−Server configuration on UNIX or Linux systems only (see instructions below.)
Contact your Enterasys Networks Representative to purchase the software and receive a Licensed Product
Entitlement ID that allows you to generate a product license. Prior to changing a license, you must redeem
your Entitlement ID for the new product license. Refer to the instructions included with the Entitlement that
was sent to you. (For more information, see
http://www.enterasys.com/products/management/.)
NOTES:
1. To upgrade from a Client−Only configuration to either a Standalone or
Client−Server configuration, you must re−install with the upgraded license.
2. Installed server plugin license types must be compatible with the Console
license type. In other words, if Console has a Small Enterprise (SE) license,
other plugins must also have an SE license. If Console has an Unlimited (U)
license, the plugins must also have a U license.
Changing a License
Use the following steps to change a license when upgrading from an evaluation copy to a purchased copy, or
upgrading to a license that supports more users/devices.
1. Select Tools > Server Information from the menu bar. The Server Information window opens.
2. Select the License tab.
3. Select the license that you want to change and click Change License. The Change License window
opens.
4. Read and accept the terms of the license agreement and click OK.
5. Enter the license text that you received when you generated the product license. (When you purchased
your Enterasys software product, you received a License Entitlement ID that allows you to generate a
product license. Refer to the instructions included with the License Entitlement ID that was sent to
you.)
6. Click Update. The license file will be updated with the new license text.
Viewing Licenses
45
Automated Security Manager Help
Upgrading a Console License
On UNIX and Linux systems only, you can use the Change License function to upgrade a Console license
from a Standalone to a Client−Server configuration without reinstalling. Windows systems require that you
reinstall Console using a Client−Server license.
To upgrade your Console license from a Standalone to a Client−Server configuration on a UNIX or Linux
system:
1. Navigate to the /var/Enterasys_Networks
2. Edit the run_conf.sh file using your favorite text editor.
3. Modify the hostname line to read:
JBOSS_HOSTNAME=
4. Select Tools > Server Information from the menu bar. The Server Information window opens.
5. Select the License tab.
6. Select the license that you want to change and click Change License. The Change License window
opens.
7. Read and accept the terms of the license agreement and click OK.
8. Enter the license text that you received when you generated the product license. (When you purchased
your Console software, you received a License Entitlement ID that allows you to generate a product
license. Refer to the instructions included with the License Entitlement ID that was sent to you.)
9. Click Update. The license file will be updated with the new license text.
10. Restart the server:
a. Navigate to the <installdir>/server
b. Stop the server using the command: stopserver.sh
c. Start the server using the command: startserver.sh
NOTE: You can set a Console licensed for a Client−Server configuration to allow only a local host to
connect to the server by editing the hostname line to read: JBOSS_HOSTNAME="127.0.0.1".
Restart the server after editing the run_conf.sh file.
Viewing Locks
The Locks tab in the Server Information window lets you view a list of currently held operational locks. To
access the tab, select Tools > Server Information from the menu bar. The Server Information window opens,
where you can select the Locks tab.
Operational locks are used to control the concurrency of certain client/server operations. They are used in two
ways:
• to lock a device while a critical operation is being performed, such as a software download.
• to lock a certain function so that only one user can access it at a time. For example, only one user can
have the Authorization/Device Access window open at a time.
The Locks tab provides information about each lock, such as who owns the lock, the duration of the lock, and
a description of the lock. You can also cancel (revoke) a lock in this tab.
Upgrading a Console License
46
Automated Security Manager Help
Revoking a Lock
Use the following steps to revoke a lock.
1. Select Tools > Server Information from the menu bar. The Server Information window opens.
2. Select the Locks tab.
3. In the Current Locks table, select the lock you want to cancel and click Revoke.
4. A message is displayed on the user's machine informing them that their use of the locked functionality
has been terminated. When the user acknowledges the message, the function closes.
Viewing the Server Log
Use the Server Log tab in the Server Information window to view a log displaying all the events for the
server. To access the tab, select Tools > Server Information from the menu bar. The Server Information
window opens, where you can select the Server Log tab.
A new Server Log is created every day. If the NetSight Server is local, you can view previous logs using the
File tab. The Server Log opens with the log's location and filename displayed in the title bar. Use the Find tab
or Filter tab to perform find and filter operations on Server Log entries, and target specific entries of interest.
Server Log entries are listed by date and time, with newer entries listed at the bottom.
Viewing Server Statistics
Use the Server Statistics window to view NetSight Server statistics such as CPU usage. You can also launch
Advanced statistics that are useful for troubleshooting purposes.
1. Select Tools > Server Information from the menu bar. The Server Information window opens.
2. Click the Server Stats button. The NetSight Server Statistics window opens.
3. Click the Advanced button to open the Advanced Statistics window. You must use the Refresh
button to display current statistical information in this window.
Revoking a Lock
47
How To Configure Profiles and Credentials
Use this tab to manage credentials that define the access privileges required for SNMPv1, SNMPv2c, and
SNMPv3, and profiles that use the credentials for various access levels. NetSight applications access devices
to control certain device functions (SNMP sets) and retrieve information for device properties views,
FlexViews and periodic status polling (SNMP gets).
Instructions for:
• Managing Credentials
• Create Credential
• Edit Credential
• Delete Credential
• Managing Profiles
• Create Profile
• Edit Profile
• Delete Profile
Managing Credentials
Credentials define the SNMPv1/SNMPv2 community names and SNMPv3 values that will be used to access
your network devices. Credentials can be created manually using the Add Credential button in the
Profile/Device Mapping Tab or imported from a file in NetSight Generated Format (.ngf) using Console's
Import from Device List feature.
To create a credential:
1. Click
or choose Authorization/Device Access from the Tools menu. Select the
Profiles/Credentials tab in the Authorization/Device Access window.
2. In the lower half of the tab, click Add Credential. The Add Credential window opens.
3. Type a name (up to 32 characters) for your new credential and select a SNMP version. If you select
SNMPv1 or SNMPv2, the window lets you enter a community name as the password for this
credential. If you select SNMPv3, you can specify passwords for Authentication and Privacy.
SNMPv1/SNMPv2:
a. Type a community name into the Community Name field.
SNMPv3:
a. Type a user name into the User Name field. This is the User Name that will be used for
device access.
b. Select an Authentication Type (MD5, SHA1, or None).
c. Type the same password (between 1 and 64 characters in length) into both the
Authentication Password and the Confirm Password fields. The password fields are
disabled when the Authentication Type is set to None.
How To Configure Profiles and Credentials
48
Automated Security Manager Help
d. Select a Privacy Type (DES or None). Privacy settings are disabled when the Authentication
Type is set to None.
e. Type the same password (between 1 and 64 characters in length) into both the Privacy
Password and the Confirm Password fields. The password fields are disabled when the
Privacy Type is set to None.
4. Click Apply. You can add another credential or click Close to dismiss the Add Credential window.
Your new credential appears in the SNMP Credentials table.
To edit a credential:
1. Click
or choose Authorization/Device Access from the Tools menu. Select the
Profiles/Credentials tab in the Authorization/Device Access window.
2. In the lower half of the tab, select the credential that you are editing from the SNMP Credentials table.
3. Click Edit. The Edit Credential window opens where you can modify the settings for the selected
credential.
4. Type a name (up to 32 characters) for your new credential and select a SNMP version. If you select
SNMPv1 or SNMPv2, the window accommodates entering a community name as the password for
this credential. If you select SNMPv3, you can specify passwords for Authentication and Privacy.
SNMPv1/SNMPv2:
a. Type a community name into the Community Name field.
SNMPv3:
a. Type a user name into the User Name field. This is the User Name that will be used for
device access.
b. Select an Authentication Type (MD5, SHA1, or None).
c. Type the same password (between 1 and 64 characters in length) into both the
Authentication Password and the Confirm Password fields. The password fields are
disabled when the Authentication Type is set to None.
d. Select a Privacy Type (DES or None). Privacy settings are disabled when the Authentication
Type is set to None.
e. Type the same password (between 1 and 64 characters in length) into both the Privacy
Password and the Confirm Password fields. The password fields are disabled when the
Privacy Type is set to None.
5. Click Apply and Close. The changes to the selected credential appear in the SNMP Credentials table.
If the settings are changed for a credential that is currently being used with a profile that is applied to
one or more devices, a confirmation dialog is opened to determine how the changes will be handled.
You will be asked if you want to change the password on the device(s). You can then select the
devices where the password will be changed and, if this user is a valid user on the device(s), then the
new password will be set on the device.
To delete a credential:
1. Click
or choose Authorization/Device Access from the Tools menu. Select the
Profiles/Credentials tab in the Authorization/Device Access window.
2. In the lower half of the tab, select the credential that you are editing from the SNMP Credentials table.
3. Click Delete. The selected credential is removed from the table.
How To Configure Profiles and Credentials
49
Automated Security Manager Help
Managing Profiles
Profiles are assigned to device models in the NetSight database. They identify the credentials that are used for
the various access levels when communicating with the device. Profiles are created using the Add Profile
button in the Profile/Device Mapping Tab, or imported from a file in NetSight Generated Format (.ngf) using
Console's Import from Device List feature.
To create a profile:
1. Click
or choose Authorization/Device Access from the Tools menu. Select the
Profiles/Credentials tab in the Authorization/Device Access window.
2. In the upper half of the tab, click Add Profile. The Add Profile window opens.
3. Type a name (up to 32 characters) for your new profile and select an SNMP version. If you select
SNMPv1 or SNMPv2, you can select credentials for Read, Write, and Max Access. If you select
SNMPv3, you can select credentials and security levels for Read, Write, and Max Access.
SNMPv1/SNMPv2 − Select credentials for Read, Write, and Max Access.
SNMPv3 − Select credentials and security levels to be used for Read, Write, and Max Access.
4. Click Apply. You can add another profile or click Close to dismiss the Add Profile window. Your
new profile(s) appears in the Device Access Profiles table.
To edit a profile:
1. Click
or choose Authorization/Device Access from the Tools menu. Select the
Profiles/Credentials tab in the Authorization/Device Access window.
2. In the upper half of the tab, select the profile that you are editing from the Device Access Profiles
table.
3. Click Edit. The Edit Profile window opens where you can modify the settings for the selected profile.
4. Type a name (up to 32 characters) the selected profile. If you are editing a SNMPv1 or SNMPv2
profile, you can select credentials to be used for Read, Write, and Max Access. If you are editing a
SNMPv3 profile you can select credentials and security levels to be used for Read, Write, and Max
Access.
SNMPv1/SNMPv2 − Select credentials for Read, Write, and Max Access.
SNMPv3 − Select credentials and security levels to be used for Read, Write, and Max Access.
5. Click Apply and Close. The changes to the selected profile appear in the Device Access Profiles
table.
To delete a profile:
1. Click
or choose Authorization/Device Access from the Tools menu. Select the
Profiles/Credentials tab in the Authorization/Device Access window.
2. In the upper half of the tab, select the profile that you are deleting from the Device Access Profiles
table.
Managing Profiles
50
Automated Security Manager Help
3. Click Delete. The selected profile is removed from the table.
Managing Profiles
51
How To Configure Profile/Device Mapping
Use the Profile/Device Mapping tab to specify which profile will be used by each Authorization Group when
communicating with a specific device. The Read credential of the NetSight Administrator profile is used for
device Discovery and status polling. All other SNMP communications will use the profiles specified here.
Instructions for:
• Assigning Profiles to Devices
Assigning Profiles to Devices
Devices selected in the left (tree) panel appear in the table in the right panel together with the current profile
assignments associated with each Authorization Group. The Table Editor button activates the editing row
where specific profile selections can be made.
To assign profiles:
1. Click
or choose Authorization/Device Access from the Tools menu. Select the Profile/Device
Mapping tab in the Authorization/Device Access window.
2. Select one or more devices or device groups in the left (tree) panel.
3. Select one or more rows (devices) in the table and click
Table Editor button.
4. Click in the Table Editor Row (at the bottom of the table) for the Authorization Group that you are
configuring and select a profile from the drop−down list.
5. Repeat steps 3 and 4 until you have finished assigning profiles.
6. Click
NOTE: The NetSight Administrator column shows the profile used by the NetSight
Administrator group. The profile listed/selected for each Authorization Group
column will be used by that group when communicating with the associated
device and, as a result, defines the level of access granted to users that are
members of that Authorization Group.
(Apply) to set the selected profiles for your Authorization Groups/devices.
How To Configure Profile/Device Mapping
52
How to Configure the SNMPTrap Service
Console's SNMPTrap Service (snmptrapd) must know the user credentials of a sending agent (on the device)
before a trap can be received. If this information is not provided trap messages will be dropped by SNMPTrap
Service.
There are two ways to configure Trap Receiver information: Using the Console's Trap Receiver
Configuration window or by manually adding user information to the snmptrapd.conf file using a text editor.
Instructions for the latter are provided in the snmptrapd.conf file located on the server in the <install
area>\NetSight Console\server\bin directory.
Using the Trap Receiver Configuration Window
The Trap Receiver Configuration view is accessible from the right−click menu when clicking a device in
Console's left (tree) panel.
NOTES:
1. Changes that you make in this window alter the snmptrapd.conf file. The
snmptrapd.conf file is located on the server in the <install area>\NetSight
Console\server\bin directory. After making changes, you must restart the SNMPTrap
Service on the NetSight Server. Refer to Restarting snmptrapd for more information.
2. The snmptrapd.conf is not preserved during the Console Uninstall.
1. In Console, expand the left panel, right−click on one or more devices or device groups, and select
Trap Receiver Configuration.
2. Click the snmptrapd tab.
3. Click Add Entry. This adds a new row to the table.
For the next step, you'll need an SNMPv3 Credential. If you do not already have a credential defined,
go to the Authorization/Device Access − Profiles/Credentials tab where you can create one.
Otherwise, go on to Step 4.
4. Click in the Credential Name column for the device where you want to set a specific SNMPv3
credential and select your SNMPv3 AuthPriv credential from the drop−down list. The
snmptrapd.conf Text area shows the text of your entry in the configuration file.
You can also type user credentials directly into the snmptrapd.conf Text area to add entries to the
configuration file. The format for user information is:
createUser username (MD5|SHA) passphrase [DES passphrase]
Example − for an AuthPriv user you might enter the following line in the file:
createUser myAuthPrivUser MD5 mypassword DES myotherpassword
Where myAuthPrivUser is the security user name, mypassword is your authentication password and
myotherpassword is your encryption password. The authentication and privacy parameters are
optional depending on whether you are using authentication and/or privacy.
5. Click Save and Close. The user credentials have been added to the snmptrapd.conf file.
How to Configure the SNMPTrap Service
53
Automated Security Manager Help
Restarting snmptrapd Service
Depending on the system where the NetSight Server is running and your preference, there are several ways to
restart the snmptrapd service.
Restarting the snmptrapd service locally on the NetSight Server host system:
Windows
a. Go to the Taskbar Notification
Area of your desktop (on the
lower right of your screen,
unless you've relocated your
Taskbar).
b. Locate the Services Manager
icon (
) and right−click it.
c. Select SNMP Trap >
Restart.
Solaris
a. Navigate to the
etc/rc2.d directory.
b. Type the command:
S99NsSnmptrapd stop
c. Press Enter.
d. Type the command:
S99NsSnmptrapd start
e. Press Enter.
Linux
a. Navigate to the
etc/init.d
directory.
b. Type the
command:
NsSnmptrapd stop
c. Press Enter.
d. Type the
command:
NsSnmptrapd
start
e. Press Enter.
Restarting the snmptrapd service remotely from a NetSight Client host system:
Windows
Restarting snmptrapd remotely on
Windows host systems, is only
possible if both the Client and Server
are capable of running Remote
Desktop (a feature of Windows XP
Professional) or through the use of a
third−party facility that provides
similar capabilities to Remote
Desktop.
When you can access the Services
Manager on the remote system using
either Remote Desktop or a
third−party program, you can restart
snmptrapd as follows:
a. Go to the Taskbar Notification
Area of the remote desktop.
b. Locate the Services Manager
and right click the icon (
).
Solaris
a. Telnet to the server and
login as an
administrative user.
b. Navigate to the
etc/rc2.d directory.
c. Type the command:
S99NsSnmptrapd stop
d. Press Enter.
e. Type the command:
S99NsSnmptrapd start
f. Press Enter.
g. Log out and close the
telnet session.
Linux
a. Telnet to the
server and login as
an administrative
user.
b. Navigate to the
etc/init.d
directory.
c. Type the
command:
NsSnmptrapd stop
d. Press Enter.
e. Type the
command:
NsSnmptrapd
start
f. Press Enter.
g. Log out and close
the telnet session.
c. Select SNMP Trap >
Restart.
Restarting snmptrapd Service
54
Automated Security Manager Help
For related information:
• Traps and Informs
Restarting snmptrapd Service
55
How to Manage Users and Groups
Use the Users and Groups tab (via the Authorization/Device Access tool) to specify users who are authorized
to access the NetSight database, and assign those users to authorization groups that define their access
privileges to application features. Access privileges (called Capabilities) are associated with authorization
groups. Based on their membership in a particular authorization group, users are granted specific capabilities
in the application. For example, you may have an authorization group called "IT Staff" that grants access to a
wide range of capabilities, while another authorization group called "Guest" grants a very limited range of
capabilities.
Begin by creating your authorization groups and specifying the capabilities for that group. Then, create a list
of your authorized users and assign each user to a specific group.
Instructions for:
• Managing Authorization Groups
• Create Group
• Edit Group
• Delete Group
• Managing Users
• Selecting an Automatic Authorization Group
• Create User
• Edit User
• Delete User
Managing Authorization Groups
A user's access to specific capabilities and features in the application is determined by what authorization
group that user belongs to. So, it makes sense to begin managing user access by creating one or more groups
that define the access and capabilities that will be granted to users.
To create a group:
1. Click
or choose Authorization/Device Access from the Tools menu. The
Authorization/Device Access window opens with the Users/Groups tab selected.
2. In the lower half of the tab, click Add Group. The Add Group window opens where you can define
the capabilities for this group.
a. Type a name for your new group into the Authorization Group field.
b. Select the Capabilities tab and expand the tree, and select the capabilities that will be granted
to users that are members of this group.
c. Select the Settings tab and choose a SNMP Redirect option:
• Allow Users to Configure SNMP Redirect in Options − lets users in this group
determine when it is appropriate to have SNMP requests performed by the server.
Refer to the Client/Server SNMP Redirection in the Options window.
• Always Redirect SNMP to the NetSight Server − all SNMP requests always go
through the server.
How to Manage Users and Groups
56
Automated Security Manager Help
• Never Redirect SNMP to the NetSight Server − SNMP requests are always made
from the client system.
These settings have no effect when both the client and server are running on the same system.
d. Click Apply to confirm your selections and Close to dismiss the Add Group window.
Your new group now appears in the Authorization Groups table.
To edit a group:
1. Click
or choose Authorization/Device Access from the Tools menu. The
Authorization/Device Access window opens with the Users/Groups tab selected.
2. Select a group from the Authorization Groups table in the lower half of the tab.
3. Click Edit Group. The Edit Group window opens where you can change the capabilities for the
selected group.
a. Select the Capabilities tab and expand the tree, and select the capabilities that will be granted
to users that are members of this group.
b. Select the Settings tab and choose a SNMP Redirect option:
• Allow Users to Configure SNMP Redirect in Options − lets users in this group
determine when it is appropriate to have SNMP requests performed by the server.
Refer to the Client/Server SNMP Redirection in the Options window.
• Always Redirect SNMP to the NetSight Server − all SNMP requests always go
through the server.
• Never Redirect SNMP to the NetSight Server − SNMP requests are always made
from the client system.
These settings have no effect when both the client and server are running on the same system.
NOTE: The capabilities and settings for the NetSight Administrator group cannot be
changed.
c. Click Apply to confirm your selections and Close to dismiss the Add Group window.
Your edited group now appears in the Authorization Groups table.
To delete a group:
1. Click
or choose Authorization/Device Access from the Tools menu. The
Authorization/Device Access window opens with the Users/Groups tab selected.
2. Select the group(s) to be deleted from the Authorization Groups table in the lower half of the tab.
3. Click Delete. The selected groups are removed from the table.
NOTE: The capabilities and settings for the NetSight Administrator group cannot be deleted.
Managing Users
The top half of the Users/Groups tab is where you can create, edit, and delete users, and assign each user to
an authorization group. The Automatic User Membership feature lets you specify an authorization group for
users that log in without having been previously assigned to a group.
Selecting an Automatic Authorization Group
Managing Users
57
Automated Security Manager Help
1. Click
or choose Authorization/Device Access from the Tools menu. The Authorization/Device
Access window opens with the Users/Groups tab selected.
2. Check Enable to activate the Automatic User Membership − Authorization Group drop−down list.
3. Select a group that will determine the capabilities granted to users who were not previously created as
an authorized user. When any of these users log in, they are automatically created as an authorized
user as a member of the selected group.
To create a user:
1. Click
or choose Authorization/Device Access from the Tools menu. The Authorization/Device
Access window opens with the Users/Groups tab selected.
2. Click Add User. The Add User window opens where you can define a new Authorized User and
assign it a group membership.
3. Type the user's name and the domain/hostname that will be used to authenticate to the NetSight
database
4. Select an authorization group where this user will be a member.
5. Click Apply to confirm your selections and Close to dismiss the Add User window.
To edit a user:
1. Click
or choose Authorization/Device Access from the Tools menu. The Authorization/Device
Access window opens with the Users/Groups tab selected.
2. Select a user from the Authorized Users table.
3. Click Edit User. The Edit User window opens.
4. Select a new authorization group where this user will be a member.
NOTE: You cannot change group membership for a selected user if the user is the only member
of the NetSight Administrator group.
5. Click Apply to confirm your changes and Close to dismiss the Edit User window.
To delete a user:
1. Click
or choose Authorization/Device Access from the Tools menu. The Authorization/Device
Access window opens with the Users/Groups tab selected.
2. Select the user(s) to be deleted from the Authorized Users table.
3. Click Delete. The selected users are removed from the table.
NOTE: The last user that is a member of the NetSight Administrator group cannot be deleted.
Managing Users
58
How to Create and Edit
Automated Security Manager Rules
Automated Security Manager Rules serve two distinct functions:
1. Examine the source of the threat (switch/port) to determine if certain conditions exist (e.g. threat
category, source of the notifying IDS, policies currently applied to the port, etc.) which warrant a
response.
2. Define the action to be taken when these conditions match the criteria defined by the Rule.
The Create Rule and Edit Rule windows are identical. They are accessed from the Automated Security
Manager Configuration Window's Rule Definitions view. The only difference between the two windows is
that the Edit Rule window contains the definition for a particular rule that you have selected in the Rule
Definitions view.
Information on:
• Editing a Rule
• Creating a Rule
Editing a Rule
To edit an existing rule:
1. Select a rule from the table in the Automated Security Manager Configuration Window's Rule
Definitions view.
2. Click Edit. The Edit Rule window opens.
3. Go on to Step 2 in the Creating a Rule topic to modify the parameters for the rule as necessary.
Creating a Rule
To create a new rule:
1. Click Create in the ASM Configuration Window's Rule Definitions view. The Create Rule window
opens.
2. Type a Name for the rule. The name can be any character string, excluding spaces, up to 64
characters.
3. Define the Conditions To Test For that ASM will use to determine if and how it will respond to a
particular event:
a. Expand the device tree in the Group & Devices panel to select a target device or device
group that will be eligible for the action specified in the rule. For example, you do not want to
select a device/device group for a device type that does not support policy if you are creating
a rule with an action that applies a policy. Or as another example, in some rules, you may
want to apply different actions or more or less permanent actions for certain subnets
containing critical network resources. You can create several rules that address a particular
threat and apply different actions based on your target.
How to Create and Edit Automated Security Manager Rules
59
Automated Security Manager Help
b. Select the Event Categories that will result in applying the action for this rule. To be
recognized by ASM, the text string in the event message sent by the IDS must match exactly
the event category names in the Rule.
• Match Any − This is an unconditional match for the category.
• Match Selected − The event category is compared against one or more categories
selected from the list.
• Exclude Selected − The event category matches if it is not one of the categories
selected from the list.
Dragon has four default notification rules: netsight−atlas−asm−attacks,
netsight−atlas−asm−compromise, netsight−atlas−asm−informational, and
netsight−atlas−asm−misuse. Each of Dragon's notification rules has a corresponding event
category in ASM: ASM_ATTACKS, ASM_COMPROMISE, ASM_INFORMATIONAL,
and ASM_MISUSE.
For ASM's response to a serious threat to be timely and effective, it is important that ASM
only be notified of serious threats. The following table lists the Dragon events for which
notification to ASM is recommended:
BACKDOOR:PHATBOT
COMP:MS−DIR
COMP:ROOT−ICMP
COMP:ROOT−TCP
COMP:ROOT−UDP
COMP:SDBOT−LOGIN
COMP:SDBOT−NETINFO
COMP:SPYBOT−DOWNLOAD COMP:SPYBOT−INFO
COMP:SPYBOT−KEYLOG
COMP:WIN−2000
COMP:WIN−XP
GENERIC:UPX−EXE
MS−BACKDOOR
MS−BACKDOOR2
MS−BACKDOOR3
MS−SQL:HAXOR−TABLE
MS−SQL:PWDUMP
MS−SQL:WORM−SAPPHIRE MS:BACKDOOR−BADCMD
MS:BACKDOOR−DIR
SMB:SAMBAL−SUCCESS
SSH:X2−CHRIS
SSH:HIGHPORT
SSH:X2−CHRIS−REPLY
c. Select the Sender Identifiers that will result in applying the action for this rule. This is a
unique identifier associated with the intrusion detection system that detected the security
event.
• Match Any − This is an unconditional match for the Sender ID.
• Match Selected − The Sender ID is compared against one or more Sender Identifiers
selected from the list.
• Exclude Selected − The Sender ID matches if it is not one of the Sender Identifiers
selected from the list.
d. Select the Policies that will result in applying the action for this rule. This attribute examines
policies currently applied on the port.
• Match Any − This is an unconditional match for a currently applied policy.
• Match Selected − The currently applied policy is compared against one or more
policies selected from the list.
• Exclude Selected − The currently applied policy is not one of the policies selected
from the list.
e. Select the VLANs that will result in applying the action for this rule. This attribute examines
VLANs currently applied on the port.
How to Create and Edit Automated Security Manager Rules
60
Automated Security Manager Help
• Match Any − This is an unconditional match for a currently applied VLAN.
• Match Selected − The currently applied VLAN is compared against one or more
VLANs selected from the list.
• Exclude Selected − The currently applied VLAN is not one of the VLANs selected
from the list.
f. Select the Day and Time Ranges that will result in applying the action for this rule.
4. Define an action to be taken when the event matches the above rule criteria. You can define one of
three Standard ASM Actions, define a Custom Action or define both a Standard Action and a Custom
Action. When both are defined, ASM will attempt to apply both actions. If either one fails, then the
other action may still be applied.
NOTES:
1. You should take care when defining both a standard and custom action for a
rule. The two actions should be independent. For example, you could create a
standard action that applies a PVID on a port together with a custom action that
runs a script that assumes that the PVID was applied only to find that the apply
PVID failed.
2. With one exception, you can undo actions that have been applied. The
exception can occur when two actions are defined within a rule: a standard
ASM action and a custom action. If the standard ASM action fails, the custom
action will be applied and, if successful, cannot be undone. Under these
circumstances, your custom action should be configured to take into account the
potential failure of the standard ASM action.
Standard ASM Actions:
Select one of three standard ASM actions:
• None − Take no action for this event.
• Disable Port − Disable the port that is source of the threat. The port can be disabled
permanently or for a specific interval depending on the Duration setting.
• Apply Policy − A Policy selected from the list can be applied to the port, either permanently
or for a specific interval, depending on the Duration setting.
When the action for a rule is set to Apply Policy and the threat is located on a port on a
device that supports Multi−User Authentication (e.g., Matrix DFE), you can apply a policy to
a specific MAC address or IP address. This lets you isolate a single user instead of affecting
all of the users on the port. You can apply a user−specific policy to an IP address or MAC
address instead of changing the port policy. If the threat MAC Address is unique to a
particular Threat IP (typically on devices at the edge of your network), select MAC to apply
the policy to the MAC address and override its port or dynamic policy. If the threat is on a
device at the core of your network and the MAC Address maps to several IP Addresses, select
IP to apply the policy to the IP Address and override its port or dynamic policy.
NOTE: Policies applied to a MAC source will override policies applied to an IP
source. So, if there is a policy currently applied to a MAC source, applying
a policy to an IP source will have no effect.
• Apply PVID − A PVID can be selected from the associated drop−down list and applied to
the port. The PVID Egress drop−down list lets you either retain the current PVID egress state
by selecting None or change the egress state to Untagged. When Untagged is selected, the
PVID is applied and the egress state is set to Untagged. When None is selected, the egress
state is unchanged and only the PVID is applied. If you have specified a Discard VLAN as
the PVID, selecting None usually means traffic will be discarded.
How to Create and Edit Automated Security Manager Rules
61
Automated Security Manager Help
Custom Action:
Check Custom Action and click Edit to open the Specify Program for Action window where you can
customize the response to an event by selecting a program to be executed.
a. In the Program to run field, type a script name, if known or use the Select button to open a
file browser window and choose a script. The Program to run field does not allow using
options. For example, you cannot enter myscript.bat –i <IP Address> −m <MAC
Address> in the Program to run field.
TIP: To execute a script with options, create a script without options that executes
another script that has options (Windows only). For example:
1. Create a script named, asm_script.bat with an entry to call myscript.bat
such as:
C:\Program Files\My Custom Files\myscript.bat –i %1 −m %2".
2. Uncheck all but the Threat IP and Threat MAC checkboxes and select
Unformatted without spaces (you don't want to send any keyword (thip=
or thmac=) to your script.). The variable %1 returns <Threat IP Address>
and %2 returns the <Threat MAC Address>
If you are using PERL script, you might want to use a different argument
variable, such as $ARGV[0] (First argument) or @ARGV (all arguments).
Also, using the shell script, is similar to a Windows batch file script (%1 for
the first argument, %* for the all arguments).
NOTE: When a custom action script does not specify the path for its
output, the output is placed in the <install area>\Enterasys
Networks\NetSight Console\server\jboss\bin
directory.
b. Select elements of the threat message that you want to pass to your program from the
Parameters to pass to program area.
c. Select a format that will be used for the information that is passed to your program.
• When Formatted with keyword is selected, the parameters are passed using a
format that includes a keyword associated with each parameter (e.g.,
keyword="value"). So, for example, if Sender Name is selected as a parameter, the
keyword sname is used and the information passed to the script would be
sname="dragon_id" followed by a space and then the keyword and value for the next
parameter. The following table defines the keywords for each parameter and the order
that the values are passed to the script (listed from top to bottom in the table).
Parameter
Keyword
Sender Name
sname
Sender ID
sid
Event Category
ecat
Threat IP
thip
How to Create and Edit Automated Security Manager Rules
62
Automated Security Manager Help
Threat MAC
thmac
Device IP
dev
Device Port
port
Rule Name
rname
Action
action
Details
dtls
SNMP Parameters (note 1)
SNMPv1, SNMPv2
Parameter
SNMPv3
Keyword
Parameter
Keyword
SNMP
Read
snmp="v1"
ro
SNMP
Read
snmp="v1"
rw
SNMP
Read,
SNMP
Write,
SNMP SU/
Max Acess
snmp="v3"
user
seclevel
authtype
authpwd
privtype
privpwd
SNMP
Read
Incident
snmp="v1"
su
incident
Note 1:
When any SNMP parameter is selected, the
snmp=value indicates the SNMP version and the
subsequent parameters contain the values assigned for
the credentials associated with the device. When
multiple SNMP parameters are checked (e.g., SNMP
Write and SNMP Read) the values for the highest
access level are used for the script.
Example:
If Sender Name, Sender ID, Threat MAC, and SNMP Write are selected and the
device is configured for SNMPv1 credentials, the information passed to the script
might look like:
sname="my sender name" sid="dragon id" thmac="00.00.1d.11.22.33"
snmp="v1" rw="public"
And, for a script named myscript.bat, the resulting script command would be
executed as:
C:\Program Files\Enterasys Networks\NetSight
Console\server\plugins\AutoSecMgr\scripts\my_script.bat sname="my
sender name" sid="dragon id" thmac="00.00.1d.11.22.33" snmp="v1"
rw="public"
How to Create and Edit Automated Security Manager Rules
63
Automated Security Manager Help
• When Unformatted without spaces is selected, the parameters will be passed as
space delimited, unformatted text, without keywords. For this option, your script
must know which parameters are being passed and in what order. If a parameter
contains any spaces, they will be replaced with an underbar ( _ ).
Example:
Sender Name, Sender ID, Threat MAC, and SNMP Write are selected and the device
is configured for SNMPv1 credentials, the information passed to the script might look
like:
my_sender_name dragon_id 00.00.1d.11.22.33 v1 public
And, for a script named myscript.bat, the resulting script command would be
executed as:
C:\Program Files\Enterasys Networks\NetSight
Console\server\plugins\AutoSecMgr\scripts\my_script.bat my_sender_name
dragon_id 00.00.1d.11.22.33 v1 public
d. Click OK.
5. You can specify a notification to be part of the rule's action. For example, you can specify an E−Mail
notification to be sent in response to a threat. Check Notification and select the desired notification
from the drop−down list. Click Edit to open the Edit Notifications window which lists the configured
notifications. In this window, you can select a Notification to edit, or click Create to open the Create
Notification window.
6. Click Manual Confirmation Required if the action will require manual confirmation before being
applied.
7. Define the Time before Undo for the selected action as Permanent or set to a time span of Minutes,
Hours, Days as defined in the associated field. Permanent means that ASM will not automatically
undo the action after a certain time interval, but it can still be manually undone.
8. Check Custom Undo and click Edit if you want to specify an action that will be taken when an
action is undone. This opens the Specify Program for Undo window.
a. In the Program to run field, type a script name if known, or use the Select button to open a
file browser window and choose a script. The Program to run field does not allow using
options. For example, you cannot enter myscript.bat –i <IP Address> −m <MAC
Address> in the Program to run field. See the Tip above for more information.
NOTE: When a custom undo action script does not specify the path
for its output, the output is placed in the <install
area>\Enterasys Networks\NetSight
Console\server\jboss\bin directory.
b. Select elements of the threat message that you want to pass to your program from the
Parameters to pass to program area.
c. Select a format that will be used for the information that is passed to your program.
d. Click OK.
9. You can specify a notification to be part of the rule's undo action. Check Notification and select the
desired notification from the drop−down list. Click Edit to open the Edit Notifications window which
lists the configured notifications. In this window, you can select a Notification to edit, or click Create
to open the Create Notification window.
10. When you are satisfied with the settings for your rule, click Apply and then Close. Your rule appears
Enabled in the Rule Definitions view table.
How to Create and Edit Automated Security Manager Rules
64
Automated Security Manager Help
How to Create and Edit Automated Security Manager Rules
65
How to Import a Database
You can import a NetSight database (Console release 1.5) containing previously configured ASM components
into the NetSight 2.2 database. Several preparations and caveats should be understood prior to importing
elements from the earlier version into Automated Security Manager 2.2.
• Make a Backup of your current NetSight 2.2 database (use the Database tab of the Server Information
view). Importing components from the 1.5.1 database into 2.2 will overwrite all existing ASM tables
in the database.
• Log Entry Details are not imported. Log Entries from release 1.1 are imported, however attempting to
open the Log Entry Details view will result in an error message.
• When importing from a remote client, Custom Action Scripts and Custom Undo Scripts must be
manually copied to their proper location on the server. This is because only the paths to scripts are
imported to the server; the scripts themselves are not imported to the server. Copy your custom scripts
to the <install area>\Enterasys Networks\NetSight
Console\server\plugins\AutoSecMgr\scripts directory on the server.
• You must populate the NetSight Database with devices prior to importing ASM components. Either
convert the prior version of the NetSight database or Discover the devices on your network.
• Devices, Device Groups, Profiles, Users, and Authorization Groups that are already in the NetSight
2.2 database will not be changed.
• You must have read and write file access in the directory from where you want to Open an earlier
database and where you will Save the updated database.
Errors detected during the import are reported in the Events View − Automated Security tab. Examine ASM
Events View entries following import and correct any errors reported before enabling responses.
Importing a Database
To import a database:
1. Pull down the File menu and select Database > Import ASM 1.5 Database from the menu. A
confirmation window opens, advising that you will be overwriting any existing ASM components in
the database.
2. Click OK to continue with the import. (Or click Cancel to abort the operation.) A file browser
window opens where you can navigate to locate a particular (previously saved) database.
NOTE: When initiating an import from a remote client, the file browser points to the local file
system on the client, not to the file system on the server. The database from the local
system will still be imported, but the result will be imported into the current database on
the NetSight Server.
3. Select the database and click OK. When completed, the information about the import is listed in the
Automated Security Events View.
How to Import a Database
66
How to Manage SNMP Passwords
Use this tab to collectively manage the credentials that have been set on your network's devices.
Instructions for:
• Setting SNMPv1/2 Credentials
• Setting SNMPv3 Credentials
Setting SNMPv1/2 Credentials
When a SNMPv1 or SNMPv2 credential is selected from the drop−down list above the table, the table lists the
devices where that credential is set and you can define a New Community Name for access to the devices in
the table.
To set SNMPv1 or SNMPv2 credentials on your devices:
1. Click
or choose Authorization/Device Access from the Tools menu. Select the Manage SNMP
Passwords tab in the Authorization/Device Access window.
2. Select an SNMPv1 or SNMPv2 credential from the Credential drop−down list. The table will list all
of the devices where the selected credential can be used.
3. Type the new community name that you want to set on the devices listed in the table.
4. Click Test to verify that the credential in the "Use for Set" column can access the applicable MIBs on
the device.
5. If the Test Results are acceptable, click Apply to set the community name on the devices.
Setting SNMPv3 Credentials
When an SNMPv3 credential is selected, you can define a new Authentication password and Privacy
password for access to the devices in the table.
To set an SNMPv3 credential on your devices:
1. Click
or choose Authorization/Device Access from the Tools menu. Select the Manage SNMP
Passwords tab in the Authorization/Device Access window.
2. Select an SNMPv3 credential from the Credential drop−down list. The table will list all of the devices
where the selected credential can be used.
3. Type the new Authentication and Privacy passwords that you want to set on the devices listed in the
table.
4. Click Test to verify that the credential in the "Use for Set" column can access the applicable MIBs on
the device.
5. If the Test Results are acceptable, click Apply to set the passwords on the devices.
How to Manage SNMP Passwords
67
Automated Security Manager Help
Buttons
Test
This button lets you test to verify that the credential in the "Use for Set" column can access the
applicable MIBs on the device.
Apply
Sets your credential changes on the devices in the table.
How to Manage SNMP Passwords
68
How To Send a Test Incident to ASM
This tool lets you test and debug the search scopes, and actions to verify ASM's response to an event. You can
perform a basic test that sends a inform message directly to ASM, bypassing the SNMPTrap Service or you
can configure a more comprehensive test to test the complete path (IDS to SNMPTrap Service/Console to
ASM), simulating exactly the workings of an actual inform message. This more comprehensive test requires
that the SNMP message be correctly specified (including authentication credentials) and that Console's
SNMPTrap Service is running.
NOTES:
1. Your client system must have SNMP access to the server to use the Test response by
sending an SNMP trap to ASM level of testing.
2. The NetSight SNMPTrap Service (snmptrapd) must be configured with Security User
credentials and/or Engine IDs for devices from which Console's SNMPTrap Service
(snmptrapd) will accept SNMPv3 Notification messages. Without this information,
notification messages are dropped by SNMPTrap Service. The traps do not appear in
the Events view and ASM will not receive notification. Refer to How to Configure the
SNMPTrap Service to learn more about configuring SNMPTrap Service.
To test a response by sending threat information directly to
ASM:
1. Select Test a response by sending threat information directly to ASM.
2. Set the parameters under the heading Specify parameters of test incident for the test incident that
will be sent to ASM:
• Sender ID − This is a unique identifier associated with the intrusion detection system that
detected the security event.
• Sender Name − The sender name being tested. This is a unique name associated with the
intrusion detection system that detected the event. Sender Names are case sensitive.
• Threat Category − The event category being tested. ASM's default event categories
categories are ASM_ATTACK, ASM_COMPROMISE, ASM_INFORMATIONAL, and
ASM_MISUSE. Event Category Names are case sensitive.
• Signature − A signature provides a unique identifier for the threat being tested.
• Threat IP − This is the address where the threat was detected and where ASM will apply an
action if one is configured for this threat.
3. Click Send Incident to ASM. Your incident should appear in the table in the ASM Monitor window.
To perform a more comprehensive test:
1. Select Test response by sending an SNMP trap to ASM.
2. Set the parameters for the basic test (Specify parameters of test incident to be sent to ASM).
3. Set the parameters under the heading Specify additional parameters for sending SNMP trap.
• SNMPv3 User Name − The user name of the simulated user.
• Authentication Type − The authentication method used for the inform (MD5 or SHA)
message.
• Authentication Password − The authentication password of the simulated user.
• Privacy Type − The encryption method used for the inform (DES or None) message.
• Privacy Password − The encryption password for the simulated user.
How To Send a Test Incident to ASM
69
Automated Security Manager Help
• Trap Receiver − This is the system where the SNMPTrap Service is running.
4. If necessary, edit the SNMPTrapd.conf file to configure user credentials in Console's SNMPTrap
Service. (Refer to How to Configure the SNMPTrap Service for more information about editing this
file.)
5. Click Send Incident to ASM. Your incident should appear in the table in the ASM Monitor window.
How To Send a Test Incident to ASM
70
Server Configuration Considerations
This Help topic provides configuration information for the NetSight Server, such as running the server in a
non−DNS environment, limiting client connections to the server, adding memory to the server, and firewall
considerations.
Instructions on:
• Running the Server on a non−DNS Enabled Solaris System
• Limiting Client Connections on Solaris and Linux
• Accepting Connection from Local Client Only
• Limiting Connections to a Specific IP Address
• Adding Memory to the Server on Solaris and Linux
• Firewall Considerations
Running the Server on a non−DNS Enabled Solaris System
By default, the NetSight Server obtains the local system's IP address by performing a hostname resolution
when the Console Client is launched. For Solaris systems that are not configured with hostnames (e.g. the
hostname command returns localhost or localhost.localdomain), or are not registered in DNS, use the
following steps to start the server with an IP address.
1. Open the server's run.sh file located in <installdir>/server/jboss/bin/run.sh.
2. Edit the HOSTNAME variable at the top of the file to:
HOSTNAME="<server IP address>"
For example, HOSTNAME="123.123.123.123"
Limiting Client Connections on Solaris and Linux
Use the steps in this section to configure the server to accept connections only from the local system and/or
limit client connections to a specific IP address.
Accepting Connection from Local Client Only
By default, the NetSight Server accepts connections from any client system. To limit connections to clients
connecting from the local system only, use the following steps:
1. Open the server's run.sh file located in <installdir>/server/jboss/bin/run.sh.
2. Edit the HOSTNAME variable at the top of the file to:
HOSTNAME="127.0.0.1"
Limiting Connections to a Specific IP Address
By default, the NetSight Server will accept connections on all IP addresses supported by the server host. If
your server supports multiple IP addresses, it may be desirable to limit client connections to a specific IP
address. To specify an IP address:
1. Open the server's run.sh file located in <installdir>/server/jboss/bin/run.sh.
Server Configuration Considerations
71
Automated Security Manager Help
2. Edit the HOSTNAME variable at the top of the file to:
HOSTNAME="<server IP address>"
For example, HOSTNAME="123.123.123.123"
Clients must use the exact IP address to connect to the server. Clients can no longer use localhost, 127.0.0.1,
or any DNS name that translates to anything but the specified IP address.
Adding Memory to the Server on Solaris and Linux
By default, the NetSight Server is configured to use a maximum of 512 MB of virtual memory. On large
server systems and in large deployments, you can increase the amount of memory. Keep in mind that if the
server attempts to access more memory than it is configured for, it will terminate.
1. Open the server's run.sh file located in <installdir>/server/jboss/bin/run.sh.
2. Edit the MAXMEMORY variable at the top of the file to the desired value:
MAXMEMORY="<number of MB>"
Firewall Considerations
The NetSight Server runs on a set of non−standard ports. These ports (4530−4533) need to be accessible
through firewalls for clients to connect to the server.
4530/4531 −− JNP (JNDI)
4532 −− JRMP (RMI)
4533 −− UIL (JMS)
Adding Memory to the Server on Solaris and Linux
72
How to Set Options
Use the Options window to set options for NetSight functions on a suite−wide and per−application basis. The
Options window has a right−panel view that changes depending on what you have selected in the left−panel
tree. Each view allows you to set different options. You can access the Options window using Tools >
Options in the menu bar.
Instructions on setting the following options:
• Suite Options
• Client/Server SNMP Redirection
• Data Display
• Date/Time Format
• Device Display Name
• Event Logs
• Services for NetSight Server
• SMTP E−Mail Server
• Status Polling
• Updates
• Automated Security Manager Options
• Action Limits
• Dialog Boxes
• Dragon EMS
• SNMP
How to Set Options
73
How to Set Automated Security Manager Options
Automated Security Manager Options (Tools > Options) let you define your preferences for ASM operations.
The right−panel view changes depending on what you have selected in the left−panel tree. Expand the
Automated Security Manager folder to view all the different options you can set.
Information on:
• Common Functions
• Action Limits
• Dialog Boxes
• Dragon EMS
• SNMP
Common Functions
Several functions, available from buttons, are common to all of the Options views:
Restore Defaults
Sets the Options settings in the currently selected view to the (default) values that existed when ASM
was first installed. Fields are cleared for options that do not have default settings.
Apply
Sets the currently defined settings and keeps the Options window open.
OK
Sets the options and closes the window.
Cancel
Cancels any changes you have made and closes the window.
Help
Displays this Help topic.
Action Limits
This view lets you set limits for Automated Security Manager's threat responses.
To define action limits:
1. Select Tools > Options in the menu bar. The Options window opens.
2. Click Action Limits in the left panel of the ASM Options window.
3. Set the Max Number of Outstanding Actions to limit the number of outstanding (pending
execution) actions.
4. Set the Max Number of Action per Threat to limit on the number of actions that can be executed for
a given threat. Both pending and executed actions are counted toward the maximum. When the limit
is reached, no further actions will be executed for the threat.
How to Set Automated Security Manager Options
74
Automated Security Manager Help
5. Click Apply or OK.
Dialog Boxes
This view lets you select whether certain dialog boxes are shown or ignored.
1. Select Tools > Options in the menu bar. The Options window opens.
2. Select Dialog Boxes in the left panel of the ASM Options window.
3. Select or deselect the checkbox depending on whether you want the Edit Mode Required dialog box
displayed or ignored. This dialog appears if you try to make changes in the ASM Configuration
window without first selecting Edit Mode. Deselecting the checkbox means that the dialog will not
appear and you will automatically be put in Edit Mode.
4. Click Apply or OK.
Dragon EMS
This view lets you integrate management of your Dragon EMS host systems into the Application menu in
Automated Security Manager.
1. Select Tools > Options in the menu bar. The Options window opens.
2. Select Dragon EMS in the left panel of the ASM Options window.
3. Enter the hostname or IP address for your Dragon EMS host system.
4. Click Add to List.
5. Click Apply or OK.
SNMP
The number of attempts that will be made to contact a device when an attempt at contact fails. The default
setting is 3 retries, which means that ASM retries a timed−out request three times, making a total of four
attempts to contact a device.
To set SNMP parameters:
1. Select Tools > Options in the menu bar. The Options window opens.
2. Select SNMP in the left panel of the ASM Options window.
3. Set the Number of SNMP Retries. This is the number of attempts that will be made to contact a
device when an attempt at contact fails. The default setting is 3 retries, which means that ASM retries
a timed−out request three times, making a total of four attempts to contact a device.
4. In the Length of SNMP Timeout field, enter the amount of time (in seconds) that ASM waits before
re−trying to contact a device. ASM retries a timed−out request three times, making a total of four
attempts to contact a device.
5. Click Apply or OK.
Dialog Boxes
75
Using the ASM Activity Monitor
The Activity Monitor opens when you launch Automated Security Manager (ASM). It contains a log of ASM
activities, and provides access to features that let you manage responses to network security threats.
Information on:
• Set ASM's Operation Mode
• Confirm Responses
• Undo Selected Actions
• Delete Table Entries
• Clean Up Incidents
Setting ASM's Operation Mode
ASM can be fully enabled, completely disabled, or set to only search for and record network threats:
• Click Disabled to set ASM to an inactive state. In this condition, ASM ignores events from the
intrusion detection system and neither seeks out the sources of network threats nor responds to them.
• Click Search Only to set ASM to recognize security threats, identify their source ports and record
event information in the Activity Monitor but, not to respond.
• Click Search and Respond to enable all of ASM's features. In this state, ASM is fully active; threats
are recognized, sources identified, and responses (actions) applied.
Confirming Actions for Selected Log Entries
Actions that have been configured for Manual Confirmation Required, allow you to examine specific
events before taking an action:
1. Select one or more events from the Activity Monitor.
2. Click Confirm Response to apply the configured actions.
Undo Action
You can reverse the most recent actions on selected event/action entries in the Activity Monitor:
1. Select one or more events from the Activity Monitor.
2. Click Undo Selected Actions.
Delete Table Entries
You can remove selected event/action entries from the Activity Monitor:
1. Select one or more events from the Activity Monitor.
2. Click Delete Table Entry. The entries are removed without further confirmation.
Using the ASM Activity Monitor
76
Automated Security Manager Help
Clean Up Incidents
You can delete incidents from the Activity Monitor based on incident status.
1. Click the Clean Up Incidents button below the Activity Monitor table. The Clean Up Incidents
window opens.
2. Use the checkboxes to select the statuses of the incidents you want to delete. For more information on
each status, see the Icon/Status section of the Activity Monitor Help topic.
3. Click Apply.
Clean Up Incidents
77
NetSight Automated Security Manager Windows
The Windows help folder contains help topics describing NetSight Automated Security Manager windows
and their field definitions.
Double−click the Windows help folder in the left panel to open the folder and navigate to topics
describing a particular window.
NetSight Automated Security Manager Windows
78
Advanced Statistics Window
This window provides advanced server statistics that are useful as a troubleshooting tool. You can access this
window by clicking the Advanced button in the Server Statistics window.
Statistics are provided on the following server functionality. In each tab, you must use the Refresh button to
display current statistical information.
• Server Status
• Topology Manager
• Device Status Poller
• Messaging
• Database Status
• NetSightMBean Status
• EventsAndAlarmsMBean Status
TIP: You may find it useful to copy information from these tabs and paste it elsewhere. For example, you
may want to include the information in an e−mail. However, the text in some of these tabs is in .html
format. On Windows platforms you should copy and paste the text into a word processing program
that preserves .html format, such as Microsoft Word. (Microsoft Notepad and WordPad do not
preserve the .html format.) On Linux and Solaris platforms you can do a Ctrl−c to copy the text and
insert it into vi, however the formatting is not preserved.
The Server Status Tab in the Advanced Statistics Window
Advanced Statistics Window
79
Automated Security Manager Help
Advanced Statistics Window
80
Automated Security Manager Activity Monitor
In addition to the Menu Bar and Toolbar, the Automated Security Manager Activity Monitor window consists
of three major functional areas. The top section provides facilities to control ASM's operational mode to
enable or disable responses to network security threats and select and view statistics. The center section
provides a log of Automated Security Manager activities. The bottom section contains an Events View where
you can view alarm, event, and trap information for ASM, NetSight Console, network devices, and other
NetSight applications.
A record of activities is maintained in date−stamped files in the <install area>\NetSight Console\logs
directory. A new file is opened each day. The information in these files wraps (overwrites the oldest
information) when the file reaches its maximum size (1 Mb) and there is no automatic housekeeping to
remove older files from this directory.
CAUTION: Do not attempt to manually remove actions applied to devices from NetSight
Automated Security Manager. Use the Undo Action button in ASM's Activity
Monitor window to undo a threat response. Attempting to manually remove actions
can leave devices in an unspecified condition, possibly compromising the security
of your network.
Click areas in the window for more information.
Automated Security Manager Activity Monitor
81
Automated Security Manager Help
The panels in the upper half of the view can be closed by clicking the
button. The Operation Mode and
Statistics Summary panels are restored by selections from the View menu. The Incident Filter panel is
restored by a right−click menu selection from the Activity Monitor Table. Refer to the ASM Menu Bar topic
for more information.
Statistics Summary
This area shows Current data and data accumulated Since the last statistics Counter Reset. The
date/time stamp at the top of the area shows the time span during which the accumulated statistics
were collected.
The Tools > Statistics > Configure menu option opens the ASM Statistics window where you can
select the specific data elements to show in the Statistics area. The Tools > Statistics > Reset
Counters menu option resets the counters for the accumulated data and sets the timestamp to the
current date and time. Refer to the ASM Statistics window for a description of specific data elements.
Operation Mode
The full Operation Mode panel can be displayed in the main view or iconized (by clicking the
Automated Security Manager Activity Monitor
82
Automated Security Manager Help
button) to show only the traffic light indicator in the upper right corner. A drop−down menu lets
you make selections as shown here:
ASM can be Disabled, or it can be set to Search and Respond to a threat or to only Search for the
source of the threat.
NOTE: ASM searches are performed by the NetSight Server, using the profile for the server, not
the profile for the ASM client user.
Disabled
When selected, Automated Security Manager is not active. It neither seeks out the sources of
network threats nor responds to them.
Search Only
When selected, security threats are recognized, source ports are identified and the information is recorded in
the Activity Monitor but, no response is applied.
Search and Respond
When selected, Automated Security Manager is fully active. In this state, threats are recognized, source ports
are identified, and responses (actions) applied.
Activity Monitor
Incident Filter
This area lets you select the type of detailed information that is available in the table. Use the
Show Threat Details or Show Action Details checkboxes to show or hide groups of columns
in the Activity Monitor table. At least one detail selection (Show Threat Details, Show Action
Details) must be active at any given time.
You can hide one or more columns in the table using the Table Tools > Settings or the Hide
column from the right−click menu. However, reactivating either filter will override the
settings from the Table Tools or right click menu and the columns associated with the filter
will be restored to the table.
• Show Threat Details − when checked, the table contains several columns that
provide detailed threat information. Show Threat Details controls the Date/Time,
Sender ID, Sender Name, Event Category and Signature columns.
• Show Action Details − when checked, the table contains several columns that
provide detailed action information. Show Action Details controls the Threat MAC,
Automated Security Manager Activity Monitor
83
Automated Security Manager Help
Device/Port, Rule Name, Action, Details, Last Update and Search Time columns.
• Show Excluded − when checked, the table contains entries for when an IP address is
found on a port that has been excluded.
Activity Table
Incident
This is an index of incidents in the Activity Monitor showing the order in which
incidents were recorded. The sequence may be broken when incidents are removed
from the table.
Icon/Status
The Icon and Status columns, taken together, indicate the status of a particular action
response:
Icon
Status
Meaning
Action Taken
Action successfully performed.
• Port disabled
• Policy replaced on port
• Policy replaced for
MAC
• VLAN replaced for
MAC
• Port disabled and
Custom Action
Executed
• Policy replaced on port
and Custom Action
Executed
• Policy replaced for
MAC and Custom
Action Executed
• VLAN replaced for
MAC and Custom
Action Executed
• VLAN replaced on
port and Custom
Action Executed
• Port disabled and
Custom Action Failed
• Policy replaced on port
and Custom Action
Failed
• Policy replaced for
MAC and Custom
Action Failed
Timer in Progress
Undo Action waiting for timer
expiration
Action Awaiting
Confirmation
Automated Security Manager Activity Monitor
• Action was configured
for Manual
Confirmation and has
84
Automated Security Manager Help
not been confirmed
yet.
• The status for this
entry was Action in
Progress when the
ASM Operation Mode
changed to Disabled,
Search Only or
Console was exited
and relaunched.
Action Suspended (these
entries are always eligible for
Undo)
No Action Can Be Taken
Automated Security Manager Activity Monitor
• Operation Mode
changed to Search
Only and the action
was pending or timer
in progress.
• Operation Mode
changed to Disabled
(or Console exits and
relaunches) and the
entry was action
pending or timer in
progress.
• No port found for
threat IP address
• Policy not supported
on device (where
action was Apply
Policy)
• No Rule matches the
criteria for applying
action
• Port already disabled
• Policy already applied
to port
• PVID already applied
to port
• Port already disabled,
Custom action
executed
• Policy already applied
to port, Custom action
executed
• PVID already applied
to port, Custom action
executed
• Policy not supported
on device, Custom
action executed
85
Automated Security Manager Help
• Port already disabled,
Custom action failed
• Policy already applied
to port, Custom action
failed
• PVID already applied
to port, Custom action
failed
• Policy not supported
on device, Custom
action failed
Action Threshold Exceeded
Action Failed
Automated Security Manager Activity Monitor
• Too many ports for
Threat IP address,
action not taken
• Too many actions in
progress, action not
taken
• Too many ports for
Threat IP address,
action not taken,
Custom action not
executed
• Too many actions in
progress, action not
taken, Custom action
not executed
• Device not reachable
• SNMP Profile has
ReadOnly access level
• SNMP Sets fail (Write
parameters do not
match the device)
• Device not in database
• Policy not on device
• Port cannot be disabled
• Incomplete Trap
information
• VLAN ID not on
device
• VLAN Name not on
device
• Device not reachable,
Custom action
executed
• SNMP Profile has
ReadOnly access level,
Custom action
executed
86
Automated Security Manager Help
• SNMP Sets fail (Write
parameters do not
match the device),
Custom action
executed
• Device not in database,
Custom action
executed
• Policy not on device,
Custom action
executed
• Port cannot be
disabled, Custom
action executed
• VLAN ID not on
device, Custom action
executed
• VLAN Name not on
device, Custom action
executed
• Device not reachable,
Custom action failed
• SNMP Profile has
ReadOnly access level,
Custom action failed
• SNMP Sets fail (Write
parameters do not
match the device),
Custom action failed
• Device not in database,
Custom action failed
• Policy not on device,
Custom action failed
• Port cannot be
disabled, Custom
action failed
• VLAN ID not on
device, Custom action
failed
• VLAN Name not on
device, Custom action
failed
Action Undo Failed
Automated Security Manager Activity Monitor
• Current port state does
not agree with ASM
action taken
• Current port policy
setting does not agree
with ASM action taken
• Original policy does
87
Automated Security Manager Help
not exist on device
• Current PVID setting
does not agree with
ASM action taken (this
includes PVID and
tagging parameters)
• Current port state does
not agree with ASM
action taken, Custom
action executed
• Current port policy
setting does not agree
with ASM action
taken, Custom action
executed
• Original policy does
not exist on device,
Custom action
executed
• Current PVID setting
does not agree with
ASM action taken,
Custom action
executed
• Current PVID setting
does not agree with
ASM action taken;
Custom action failed
• Current port state does
not agree with ASM
action taken; Custom
action failed
• Current port policy
setting does not agree
with ASM action
taken; Custom action
failed
• Original policy does
not exist on device;
Custom action failed
• Current PVID setting
does not agree with
ASM action taken;
Custom action failed
Blank
Action Taken and Undone
Automated Security Manager Activity Monitor
• Action undone by
Undo Action button
• Action undone by
Timer
• Action undone by
88
Automated Security Manager Help
Undo Action button;
Custom Undo Action
executed
• Action undone by
Timer; Custom Undo
Action executed
• ASM Action was set to
None; Custom Action
was executed and
undone by Undo
Action button
• ASM Action was set to
None; Custom Action
was executed and
undone by Timer
• Action was undone
when Custom Undo
executed by Undo
Action button
• Custom Action was
undone by Timer
(Standard ASM Action
was set to None)
• Custom Undo Action
was executed by Undo
Action button
(Standard ASM Action
was set to None)
• Custom Undo Action
was executed by Timer
(Standard ASM Action
was set to None)
• Action undone by
Undo Action button;
Custom Undo Action
failed
• Action undone by
Timer; Custom Undo
Action failed
• ASM Action was set to
None; Custom Action
was executed and
Custom Undo Action
failed
• ASM Action was set to
None; and Custom
Undo Action failed
Blank
No Action Taken
Automated Security Manager Activity Monitor
Action set to None
89
Automated Security Manager Help
• ASM Action was set to
None; Custom action
executed
• ASM Action was set to
None; Custom Action
failed
NOTE: This status only
appears when the
ASM Action is set
to None.
Otherwise, the
custom actions are
noted in the
Details column.
Blank
Custom Action Only
Blank
Port Excluded
Blank
Search in Progress
Search has begun, but not
completed
Blank
Action in Progress
Action for this entry has
begun, but not completed.
Blank
Port Query in Progress
Port query has begun, but not
completed
Blank
Search Cancelled
Automated Security Manager Activity Monitor
• Port Type Filtered
• Port Filtered
• Search cancelled by
Cancel Search menu
option.
• Operation Mode
changed to Disabled
while:
• Search in
Progress
• Search
Pending
• Port Query in
Progress
• Port Query
Pending
• Console was launched
while:
• Search in
Progress
• Search
Pending
• Port Query in
Progress
90
Automated Security Manager Help
• Port Query
Pending
Blank
Search Pending
Search for this entry is in the
search queue.
Blank
Action Pending
Action for this entry is in the
action queue..
Blank
Port Query Pending
Port query for this entry is in
the port query queue..
Date/Time
The date and time when the incident was recorded in the Activity Monitor.
Sender ID
This is a unique identifier associated with the intrusion detection system that detected
the security event.
Sender Name
The name associated with the intrusion detection system that detected the security
event.
Event Category
The event category reported from the intrusion detection system. The following table
lists the default categories.
ASM_ATTACK
ASM_COMPROMISE
ASM_INFORMATIONAL
ASM_MISUSE
Signature
This is a unique identifier, assigned to this attack by the intrusion detection system.
Threat IP
The IP address of the device that is the source of the threat (not the device on which
the threat was learned).
Threat MAC
The MAC address of the device that was the source of the threat (not the device on
which the threat was learned).
Device/Port
The IP address and port of the device that was the source of the threat.
Rule Name
The name of the action that was taken.
Action
This column describes the action configured for the rule (disable port, Apply Policy,
No Action).
Details
This is brief (human−readable) description of the status for this incident. Refer to the
Icon/Status descriptions for status information.
Last Updated
The timestamp for the previous action. This is the date and time when the last action
was taken for this same event.
Filtered Traps
This is a count of the duplicate traps that were filtered. A trap is considered to be a
duplicate if it has the same Sender ID, Threat Category, and Threat IP Address as an
incident that is already in the Activity Monitor list. The trap is filtered if the incident
Automated Security Manager Activity Monitor
91
Automated Security Manager Help
in the Activity Monitor has a status of Search Pending.
Search Time (sec)
The amount of time in seconds that it took for ASM to search for the source of the
threat.
Right−Click Menu
A right−mouse click on a column heading or anywhere in the table body (or a left mouse click on the Table
Tools
button when visible in the upper left corner of the table) opens a popup menu that provides
access to a set of Table Tools that can be used to manage information in the table. In addition to these
standard Table Tool options, the right−click menu can include the following:
• Incident Filter − places the Incident Filter panel in the top half of the Activity Monitor window.
• Confirm Response − Confirms actions that have been configured for Manual Confirmation
Required in the Create Rule Window. This is an alternative to the Confirm Response button.
• Undo Action − reverses the most recent action on the selected entries event/action in the Activity
Monitor. This is an alternative to the Undo Action button. Refer to the description of the Undo
Action button for more information on this option.
• Cancel Search − Causes the search for the selected entry to be terminated.
• View Details − Opens the ASM Log Entry Details window. The ASM Log Entry Details window
provides additional information about the selected table entry(ies).
• Delete Table Entry − Removes the selected entries event/action in the Activity Monitor. This is an
alternative to the Delete Table Entry button.
Buttons
Cancel Search
Aborts the currently pending search on the selected incident(s).
Confirm Response
This button confirms actions that have been configured for Manual Confirmation Required. You
can confirm a response in any operational mode (Search And Respond, Search Only, or Disabled).
When an action is configured to be applied for a specific duration, the automatic undo remains
suspended even if the operational mode is set to Search and Respond. Refer to the Create/Edit Rule
view for more information on this feature.
Undo Action
This button will attempt to reverse the most recent action(s) on the selected entries in the Activity
Monitor. When a Custom Undo Action has been configured, this button executes the Custom Undo
Action. Except for the situation noted below, only actions that have actually been applied can be
undone. For example, you cannot undo an action that is waiting confirmation.
NOTE: The exception can occur when two actions are defined, a standard ASM action and a
custom action. If the standard ASM action fails, the custom action will be applied and, if
successful, cannot be undone. Under these circumstances, your custom action should be
configured to take into account the potential failure of the standard ASM action.
Delete Table Entry
Right−Click Menu
92
Automated Security Manager Help
Removes the selected entries event/action in the Activity Monitor. When the entry removed is the last
one for a particular incident, the associated Detail Log information is also deleted.
Clean Up Incidents
Opens the Clean Up Incidents window, where you can select incidents to delete from the Activity
Monitor table.
Right−Click Menu
93
Automated Security Manager
Configuration Window
This feature lets you configure Automated Security Manager (ASM) to automatically respond to a variety of
attacks on your network. ASM uses Enterasys Dragon Intrusion Defense System (IDS) to identify threats to
your network security and data integrity. Working with the NetSight database, an intrusion detection product
(such as Dragon Intrusion Defense System), and Policy Manager, ASM can identify a threat, locate its source,
and automatically take action to isolate an offending port and mitigate a threat.
ASM is configured using the ASM Configuration Window. This window takes you step−by−step through
configuring ASM actions and targets. The content of the ASM Configuration Window is dynamically updated
as you set or change/define settings, always presenting the appropriate options based on your selections. As
you move through the steps, the selections that you make along the way determine the selections that are
appropriate for subsequent steps.
Common Features
Mode: View/Edit
Editing the configuration is only possible when the Configuration Window is set to Edit. Edit mode is
only available to users that are members of a group with its Manage Configuration capability
enabled. Refer to Authorization/Device Access − Users and Groups Tab for more information.
Restore Defaults (Variable settings only)
Restores the default settings to the Variables in the ASM Configuration Window.
Continue/Save/Close
At each step, the Continue button applies your setting and advances to the next configuration step.
You can return to an earlier step by clicking any step in the left panel. At the final step, the Continue
button changes to a Save button. Clicking Save saves the current rule definition. Close dismisses the
ASM Configuration Window.
Rule Variables
This area lets you define elements that can be matched by rules that determine when specific actions are
applied. The View/Edit buttons above the left panel determine the ability to set or change the configuration in
this window.
NOTE: The following Rule Variables views can be accessed from the ASM Configuration window or
from the Qualifier Tabs in the Create Rule window.
Rule Variables View
Automated Security ManagerConfiguration Window
94
Automated Security Manager Help
Day and Time Ranges
This view lets you identify specific time intervals that may be pertinent when applying threat responses.
NOTE: The Day and Time Ranges view can be accessed from the ASM Configuration window (as shown
below) or from the Qualifier Tabs in the Create Rule window.
Click areas in the window for more information.
Day and Time Ranges
95
Automated Security Manager Help
Name
This is a name that you can assign when defining a time interval.
Time
These controls let you select the time interval for this day and time range.
Days of the Week
These controls let you select the days when the Time interval will be applied.
Day/Time Ranges
This table lists the Day/Time Ranges that have been defined.
Buttons
Select All/Deselect All
Checks all of the days in the Days of the Week area. When all days are checked, the button changes to
a Deselect All button.
Buttons
96
Automated Security Manager Help
Add to List
Adds the current Days and Times definition to the Day/Time Ranges list.
Remove from List
Deletes a Days and Times definition selected in the Day/Time Ranges list.
Edit Entry
Opens the Edit Day/Time Entry window where you can adjust the current settings for a Days and
Times definition selected in the Day/Time Ranges list.
Used In
Select a Day/Time Range in the list, and click the Used In button to open a window that displays
which ASM rules are using the range.
Event Categories
This view lets you define the event categories that are used to match events reported by an intrusion detection
system. To be recognized by ASM, the text string in the event message sent by the IDS must match exactly
the event category names here and in the Rule Definitions.
NOTE: The Event Category view can be accessed from the ASM Configuration window (as shown
below) or from the Qualifier Tabs in the Create Rule window.
Click areas in the view for more information.
Event Categories
97
Automated Security Manager Help
Dragon has four default notification rules: netsight−atlas−asm−attacks, netsight−atlas−asm−compromise,
netsight−atlas−asm−informational, and netsight−atlas−asm−misuse. Each of Dragon's notification rules has a
corresponding event category in ASM: ASM_ATTACKS, ASM_COMPROMISE,
ASM_INFORMATIONAL, and ASM_MISUSE.
For ASM's response to a serious threat to be timely and effective, it is important that ASM only be notified of
serious threats. The following table lists the Dragon events for which notification to ASM is recommended:
BACKDOOR:PHATBOT
COMP:MS−DIR
COMP:ROOT−ICMP
COMP:ROOT−TCP
COMP:ROOT−UDP
COMP:SDBOT−LOGIN
COMP:SDBOT−NETINFO
COMP:SPYBOT−DOWNLOAD COMP:SPYBOT−INFO
COMP:SPYBOT−KEYLOG
COMP:WIN−2000
COMP:WIN−XP
GENERIC:UPX−EXE
MS−BACKDOOR
MS−BACKDOOR2
Event Categories
98
Automated Security Manager Help
MS−BACKDOOR3
MS−SQL:HAXOR−TABLE
MS−SQL:PWDUMP
MS−SQL:WORM−SAPPHIRE MS:BACKDOOR−BADCMD
MS:BACKDOOR−DIR
SMB:SAMBAL−SUCCESS
SSH:X2−CHRIS
SSH:HIGHPORT
SSH:X2−CHRIS−REPLY
Event Category List
This list contains all of the Event Categories that have been defined for ASM. The list can be set back
to the default categories by clicking Restore Defaults. The default event category and precedence
settings are:
Precedence
Event Category
Precedence
Event Category
1
ASM_ATTACKS
2
ASM_COMPROMISE
3
ASM_MISUSE
4
ASM_INFORMATIONAL
Precedence
Precedence determines the order that ASM responds to certain Event Categories. A lower
number yields a higher precedence, which means that when multiple events are recognized,
ASM will respond to the highest precedence first. If all of the numbers are the same, then the
events are processed in the order they are received.
The Precedence values for the Default Event Categories are:
1. ASM_ATTACKS
2. ASM_COMPROMISE
3. ASM_MISUSE
4. ASM_INFORMATIONAL
Name
The name of the event category. Dragon has four default notification rules:
netsight−atlas−asm−attacks, netsight−atlas−asm−compromise,
netsight−atlas−asm−informational, and netsight−atlas−asm−misuse. Each of Dragon's default
notification rules has a corresponding default event category in ASM: ASM_ATTACKS,
ASM_COMPROMISE, ASM_INFORMATIONAL, and ASM_MISUSE. ASM uses Rules to
compare incoming trap messages with specific event categories, then determines where and
what action to apply as a response.
NOTE: Event Category names are case
sensitive.
Precedence for unspecified Event Categories
If a threat is received that contains an Event Category that is not defined in the Event Category list, it
will be assigned the Precedence specified here. If you want to process all events according to the
order they are received, you should set this value to be the same as the Precedence of all other Event
Categories. If you want ASM to respond to these Event Categories first (since they are not expected
and indicate an incorrect configuration on the network), the Precedence should be set to be a lower
Event Categories
99
Automated Security Manager Help
number than all the others. If you want ASM to respond to these Event Categories last (since they are
deemed to be the least important), the Precedence should be set to be a higher number than all the
others.
Buttons
Add to List
Adds the Event Category, typed into the associated field, to the list.
Remove from List
Removes a selected Event Category from the list.
Edit Entry
Opens the Edit Event Category window where you can change the Name/Precedence for the selected
Event Category.
Used In
Select an Event Category in the list, and click the Used In button to open a window that displays
which ASM rules are using the category.
Notifications
This view lets you create, edit, and remove Notifications that can be activated together with a threat response.
You can create notifications that send E−Mail, create a Syslog entry, trigger a SNMP trap, execute a script, or
trigger a SNMP trap that will be sent to a Dragon IDS. You can also collect two or more notifications into a
group and treat that group as a single notification, thereby activating multiple notification types for a single
event.
NOTE: The Notifications view can be accessed from the ASM Configuration window (as shown below)
or from the Qualifier Tabs in the Create Rule window.
Click areas in the window for more information.
Buttons
100
Automated Security Manager Help
Notifications
This list shows all of the notifications that have been created.
Buttons
Create
Opens the Create Notification window. This window takes one of several forms, depending on the
type of notification being created (E−Mail, Syslog, SNMP Trap, Script, Dragon, or Group).
Remove
Attempts to remove notifications selected in the Notifications list from the list. Notifications cannot
be removed if they are currently in use by a rule. Attempting to remove a notification that is currently
in use by a rule opens the Error removing Notification(s) window to show the rules where the selected
notifications are used.
Edit Entry
Opens the Edit Notification window for a notification selected from the Notifications list. The specific
form of Edit Notification window opened depends on the type of notification selected in the list
Buttons
101
Automated Security Manager Help
(E−Mail, Syslog, SNMP Trap, Script, Dragon, or Group).
Used In
Select a Notification in the list, and click the Used In button to open a window that displays which
ASM rules are using the notification.
Policies
This view lets you add or remove Policies. Policies serve two purposes: they are used to compare against roles
currently applied to a port and they can also be applied as a response to a threat.
NOTE: The Policies view can be accessed from the ASM Configuration window (as shown below) or
from the Qualifier Tabs in the Create Rule window.
Click areas in the view for more information.
Policy Name
The name of the Policy.
Policies
102
Automated Security Manager Help
Policy List
This list contains the Policies that have been defined for ASM.
Buttons
Add to List
Adds the Policy name, typed into the associated field, to the list.
Remove from List
Removes a selected Policy from the list.
Import
Opens a file browser where you can select a .pmd file to import role names created in NetSight Policy
Manager.
Used In
Select a Policy in the list, and click the Used In button to open a window that displays which ASM
rules are using the policy.
Sender Identifiers
This view lets you add or remove Sender Identifiers that are used to match events reported by an intrusion
detection system.
NOTE: The Sender Identifiers view can be accessed from the ASM Configuration window (as
shown below), from the Qualifier Tabs in the Create Rule window, or from the Rule
Conditions section in the Create/Edit Search Scope Rule window.
Click areas in the view for more information.
Buttons
103
Automated Security Manager Help
NOTE: Sender Identifier names are case sensitive.
Sender Identifier Name
The name of a Sender Identifier.
Sender Identifier List
This list contains the Sender Identifiers that have been defined for ASM.
Buttons
Add to List
Adds the Sender Identifier, typed into the associated field, to the list.
Remove from List
Removes a selected Sender Identifier from the list.
Used In
Buttons
104
Automated Security Manager Help
Select a Sender Identifier in the list, and click the Used In button to open a window that displays
which ASM rules are using the identifier.
Sender Names
This view lets you add or remove Sender Names that will be used to define the ASM search scope when
Dragon notifies ASM of a threat.
NOTE: The Sender Names view can be accessed from the ASM Configuration window (as
shown below), from the Qualifier Tabs in the Create Rule window, or from the Rule
Conditions section in the Create/Edit Search Scope Rule window.
Click areas in the view for more information.
NOTE: Sender Names are case
sensitive.
Sender Name
Sender Names
105
Automated Security Manager Help
The Sender Name.
Sender Name List
This list contains the Sender Names that have been defined for ASM.
Buttons
Add to List
Adds the Sender Name, typed into the associated field, to the list.
Remove from List
Removes a selected Sender Name from the list.
Used In
Select a Sender Name in the list, and click the Used In button to open a window that displays which
ASM rules are using the name.
Threat Subnets
This view lets you add or remove subnets that will be used to define the ASM search scope when Dragon
notifies ASM of a threat.
NOTE: The Threat Subnets view can be accessed from the ASM Configuration window (as shown
below), from the Qualifier Tabs in the Create Rule window, or from the Rule Conditions section
in the Create/Edit Search Scope Rule window.
Click areas in the window for more information.
Buttons
106
Automated Security Manager Help
Subnet Name
This is any name that you want to identify this subnet.
Threat Subnet
Enter the subnet that you want the ASM search scope to use when Dragon notifies ASM of a threat.
Mask
This is the mask that will be used to further define the associated subnet address. The format that is
used for the Mask is determined by the current Network Mask setting (CIDR or Dot−Delimited)
selected in the Console Options − Data Display view.
Threat Subnet List
This list contains the Threat Subnets that have been defined for ASM.
Buttons
Add to List
Buttons
107
Automated Security Manager Help
Adds the Threat Subnet and Mask, typed into the associated fields, to the list.
Remove from List
Removes a selected Threat Subnet and Mask from the list.
Edit Entry
Opens the Edit Threat Subnet window where you can adjust the current settings for the selected
Threat Subnet definition.
Used In
Select a Threat Subnet in the list, and click the Used In button to open a window that displays which
ASM rules are using the subnet.
VLANs
This view lets you add or remove VLANs. VLANs serve two purposes. They are used to compare against
roles currently applied to a port and they can also be applied as a response to a threat.
NOTE: The VLAN view can be accessed from the ASM Configuration window (as shown below) or
from the Qualifier Tabs in the Create Rule window.
Click areas in the view for more information.
VLANs
108
Automated Security Manager Help
VLAN Name
The VLAN name.
VLAN ID
The VLAN ID.
VLAN List
This list contains the VLANs that have been defined for ASM.
Buttons
Add to List
Adds the VLAN Name/VLAN ID, typed into the associated field(s), to the list (VLAN names are
limited to 32 characters).
Remove from List
Removes a selected VLAN from the list.
Buttons
109
Automated Security Manager Help
Import
Opens a file browser where you can select a .pmd file to role names created in NetSight Policy
Manager.
Used In
Select a VLAN in the list, and click the Used In button to open a window that displays which ASM
rules are using the VLAN.
Search Variables
ASM lets you select specific sources to be used when searching for the source of network threats.
Data Source Selection
This view lets you select the data sources and MIB objects that will be used to resolve the IP address to a
MAC address. Refer to the MIB/Table Descriptions topic for information about specific MIB object and data
source selections. The selection for data sources used with ASM are separate from the selection made for
Compass in the NetSight Console Options.
Data Source Selection View
Search Variables
110
Automated Security Manager Help
Search Scope Definitions
This view lets you select the devices that will be searched when Dragon notifies ASM of a threat. You can set
the search scope to Basic to create a single group to be searched or to Advanced to create more than one
group of devices to search.
NOTE: ASM searches are performed by the NetSight Server, using the profile for the server, not
the profile for the ASM client user.
Search Scope Definitions
111
Automated Security Manager Help
Basic Search Scope
With Basic Search Mode selected the Search Scope Definitions view lets you include or exclude selected
devices/device groups from to define the specific devices that will be searched when Dragon notifies ASM of
a threat. You can include or exclude specific devices, according to Device Type, Location, Contact, and
Subnet.
Click areas in the window for more information.
Groups & Devices
This panel shows the device tree for devices modeled in the Console database. You can expand
branches of the tree to select Devices/Device Groups to be searched when Dragon notifies ASM of a
threat. After making a selection, click Include to designate your selection(s) as being included in the
Basic Search Scope
112
Automated Security Manager Help
search scope or click Exclude to designate your selection(s) as being specifically excluded in the
search scope.
You can repeatedly select devices/device groups individually and click Include/Exclude or use
multiple selection techniques (Control−click or Shift−Click) to select or de−select multiple
Devices/Device Groups in a single operation.
NOTE: When there are devices on your network that do not support layer 3,
you should include routers in the list of targets to allow ASM to use
its IP to MAC address resolution feature to locate the end station.
This includes the following devices:
Matrix C1
Matrix E1
(1G6xx Series)
Matrix E5
Matrix V Series
SS9000
Vertical Horizon
1st Generation 1Hxxx Series
ASM resolves IP addresses to MAC addresses using information
from router MIBs (ipNetToMediaTable, ipNetToMediaTable,
ipCidrRouteTable and ipRouteTable), but only if devices that can be
modeled as a switch or a router are created in the Console database
using the router's IP address. ASM cannot query information from the
router MIBs unless devices are created using an IP address for the
router interface.
Selected Groups and Devices
This panel lists the devices/device groups selected from the Groups & Devices panel. The Filter
column in the table indicates whether the device(s)/device group(s) can be included or excluded. The
Device Group Path column shows the specific IP address and branch of the tree for selected
devices/device groups.
Devices/device groups designated as Excluded are excluded from the search scope, regardless of any
Include settings. For example, if a particular device is set to Excluded and the same device is a
member of a device group that is set to Included, then the excluded device will not be searched.
You can further refine your search scope by selecting either Any of the Included Groups or All of
the Included Groups.
• Any of the Included Groups creates an OR condition such that if a selected device (not
specifically excluded) is a member of any of the selected groups, then it will be included in
the search scope and appear in the Resulting Device/Device Group table. For example,
selecting a specific Vertical Horizon device that is not in subnet 172.18.19.xx together with
the Vertical Horizon and IP Subnet 172.18,19.xx Device Groups and clicking Any of the
Included Groups includes all Vertical Horizon devices (including the individual VH device)
and all devices from the 172.18,19.xx subnet.
• All of the Included Groups creates an AND condition. When selected, only devices that are
members of all of the selected device groups will be included in the search scope. This
selection is useful when you want to select all of a particular device type, but only in a
Basic Search Scope
113
Automated Security Manager Help
specific location−−for example, all the routers in a particular building. When a device type
(Routers) and a location group (Building2) are both selected, then only the devices contained
in both groups (Routers in Building2) will be included in the search scope.
Resulting Devices
The resulting list of devices that will be searched when Dragon notifies ASM of a threat. The table is
dynamically updated according to your device/device group selections and include/exclude
arguments.
Send Notification...
This checkbox allows you to select a notification to be performed in the event no port is found for the
Threat IP. For example, you can specify an E−Mail notification to be sent when no port is found.
Select the desired notification from the drop−down list. Click Edit to open the Edit Notifications
window which lists the configured notifications. In this window, you can select a notification to edit,
or click Create to open the Create Notification window.
Buttons
Include/Exclude
Adds your tree selections to the Selected Groups and Devices table and sets the Filter column to either
Include or Exclude.
Remove
Deletes one or more rows selected from the Groups and Devices table
Continue
Confirms the selected Devices/Device Groups and takes you to the Exclude Port Types view.
Advanced Search Scope
With Advanced Search Mode selected, the Search Scope Definitions view lets you create search scope rules
to determine which devices you want to include or exclude from the ASM search when Dragon notifies ASM
of a threat. Search Scope Rules are evaluated in order (from top−to−bottom) to examine the attributes of a
threat (Sender ID, Sender Name and Sender Subnet) and when the threat matches the rule, the Search Scope
Group associated with the rule is included in or excluded from the ASM search scope, according to the
include/exclude arguments.
Click areas in the window for more information.
Advanced Search Scope
114
Automated Security Manager Help
Search Scopes
This panel lists the Search Scopes that can be associated with Search Scope Rules, which ultimately
determine the devices that will be searched when Dragon notifies ASM of a threat. New Search
Scopes can be added using the Create button or existing Search Scopes can be selected and modified
by clicking Edit.
Search Scope Rules
This panel lists the Search Scope Rules. The rules are evaluated in order (from top−to−bottom) and,
when the attributes from a threat match the rule, the Search Scope associated with the rule is used to
determine the devices that will be searched when Dragon notifies ASM of a threat. New Search Scope
Rules can be added using the Create button or existing Search Scope Rules can be selected and
modified by clicking Edit. The order of rules can be adjusted by selecting a rule in the table and using
the Move Up/Move Down buttons to change its position in the table.
Advanced Search Scope
115
Automated Security Manager Help
Buttons
Create (Group)
Opens the Create Search Scope Group window where you can create groups of devices that will be
searched when Dragon notifies ASM of a threat.
Edit (Group)
Select a Search Scope in the table and click Edit to open the Edit Search Scope Group window where
you can edit the set of devices included.
in the group.
Move Up/Move Down
Search Scope Rules are evaluated from top to bottom in the order in which they appear in the table.
These buttons let you arrange the order by selecting a particular rule and clicking the Move Up or
Move Down button to move it to the desired position.
Create (Rule)
Opens the Create Search Scope Rule window that lets you create rules that determine which search
scope will be used when a specific threat arrives.
Edit (Rule)
Select a Search Scope Rule in the table and click Edit to open the Edit Search Scope Rule window
where you can edit the conditions of that rule.
Remove
Deletes one or more rows selected from the associated table.
Continue
Confirms the defined Search Scopes and Search Scope Rules and takes you to the Exclude Port
Types view.
Exclude Port Types
This view lets you exclude specific ports from threat management actions based on port type. This allows you
to safeguard critical port types. Several check boxes list the port types available from the devices that are
targeted for ASM actions. A check for a particular port type excludes that port type from threat management
actions. Link Aggregation, CDP, Backplane, and Host Data ports are always excluded, by default.
Click areas in the window for more information.
Exclude Port Types
116
Automated Security Manager Help
Exclude Specific Ports
This view lets you select specific ports that you want to exempt from the actions by ASM to prevent shutting
down critical ports.
Click areas in the window for more information.
Exclude Specific Ports
117
Automated Security Manager Help
MAC Address Count
This feature lets you distinguish between single−user ports and multi−user ports (routers). When
checked ASM will expand its query to determine the number of MAC addresses connected through
each port. The number of MAC addresses found appears in the MAC Address Count column of the
Groups and Devices table.
Groups & Devices
The device tree shows the devices and port elements that have been modeled in the Console database.
The tree can be expanded to allow selecting one or more devices/port elements whose ports you want
to exclude from ASM actions. Clicking the Get Port Info displays the ports available on the devices
in the table to the right of the tree.
Excluded Ports
This table lists the ports that have been designated as exempt from the actions of ASM.
Buttons
Exclude Specific Ports
118
Automated Security Manager Help
Get Port Info
Queries the Port Elements and device(s) selected in the tree to obtain a list of available ports.
Import
Opens a file browser to allow importing a .pmd file from Policy Manager to allow excluding Frozen
ports.
Exclude Selected Ports
Adds the selected port(s) to the Excluded Ports table.
Remove
Removes port(s) selected in the Excluded Ports table.
Rule Definitions
This view lets you arrange the order of rules and enable or disable rules for the actions to be taken in response
to intrusion threats. Upon notification of a trap from the intrusion detection system, the rules are executed
from top to bottom, as they appear in the table. The Create button allows adding new rules to the table. The
Edit button allows modifying an existing rule selected in the table.
Click areas in the window for more information.
Rule Definitions
119
Automated Security Manager Help
Enabled
When checked, the action associated with the rule will be executed in response to an intrusion threat.
Rule Name
This is the name assigned to the rule.
Groups and Devices
The devices/device groups on which a threat is suspected of ingressing the network.
Day and Time Ranges
The day and time ranges defined for the rule.
Event Categories
Rule Definitions
120
Automated Security Manager Help
The event categories defined for the rule.
Sender Identifiers
The sender identifiers defined for the rule.
Policies
Port policies defined for this rule. Depending on how the rule is created, these are policies that may be
overridden by this rule.
Action to Take
Identifies the action executed in response to the threat (None, Apply Policy, Disable Port, Apply
PVID) when the rule matches the event criteria.
Confirmation
Indicates whether manual confirmation is required to execute the action.
Buttons
Move Up/Move Down
Rules are executed from top to bottom in the order in which they appear in the table. These buttons let
you arrange the order by selecting a particular rule and clicking the Move Up or Move Down button
to move it to the desired position.
Create
Opens the Create Rule window where you can define a new rule to be added to the table.
Edit
Opens the Edit Rule window where you can modify an existing rule selected from the table.
Remove
Deletes a rule selected in the table.
Rule Definitions
121
Select Statistics Window
This window lets you select the data elements that will appear in the Statistics area of the ASM Activity
Monitor window. It contains two sets of columns, one for Current statistics and another for Since statistics.
Current statistics will show the information about entries currently contained in the Activity Monitor table.
Since statistics will show the summation of information accumulated since the last counter reset. When
checked the associated data element will appear in the Statistics area of the Activity Monitor.
Click areas in the window for more information.
Current
These statistics reflect the data currently contained in the Activity Monitor table.
Search Pending
The number entries in the table with a status of searches waiting to be performed.
Action Taken
The number entries in the table with a status of Action Taken.
Awaiting Confirm
The number entries in the table with a status of Awaiting Confirmation. These are entries for
which the rules were configured for manual confirmation.
No Action Can Be Taken
The number of entries in the table for which a standard or custom action could not be taken.
Action Threshold Exceeded
The number of entries in the table where the maximum number of actions per threat has been
exceeded.
Action Failed
The number of entries in the table where a standard or custom action has failed.
Select Statistics Window
122
Automated Security Manager Help
Action Undo Failed
The number of entries in the table where a standard or custom undo has failed.
Action Taken and Undone
The number of entries in the table where a standard or custom action was taken and then
undone by a timer, or Undo Action button
Incidents
The total number of incidents in the table.
Average Search time (sec)
For incidents in the table, the average time per incident spent searching.
Since
These statistics are an accumulation of data since the last time that the counters were reset.
Action Taken
The number of times standard or custom action was successfully taken since the last reset.
No Action Can Be Taken
The number of times a that a standard or custom action could not be taken since the last reset.
Action Threshold Exceeded
The number of times a that the maximum number of actions per threat was exceeded since the
last reset.
Action Failed
The number of times a standard or custom action failed since the last reset.
Action Undo Failed
The number of times a standard or custom undo failed since the last reset.
Action Taken and Undone
The number of times a standard or custom action was taken and then undone by a timer, or
Undo Action button since the last reset.
Average Search time (sec)
The average time per incident spent searching since the last reset.
Incidents
The total number of incidents since the last reset.
Buttons
Reset Counters
This button resets the counters for the accumulated data and sets the timestamp to the current date and
time.
Buttons
123
Authorization/Device Access
Users/Groups Tab
Use this tab to specify users who are authorized to access the NetSight database, and assign those users to
authorization groups that define their access privileges to application features. Access privileges (called
Capabilities) are associated with authorization groups. Based on their membership in a particular
authorization group, users are granted specific capabilities in the application. For example, you may have an
authorization group called "IT Staff" that grants access to a wide range of capabilities, while another
authorization group called "Guest" grants a very limited range of capabilities.
NOTE: The NetSight Administrator authorization group is automatically created during
installation and is granted Full capabilities. The NetSight Administrator group cannot
be deleted and its capabilities cannot be changed.
Begin by creating your authorization groups and specifying the capabilities for that group. Then, create a list
of your authorized users and assign each user to a specific group. For complete instructions, see How to
Manage Users and Groups.
Click areas in the window for more information.
Authorization/Device Access Users/Groups Tab
124
Automated Security Manager Help
Automatic User Membership
The Automatic User Membership feature lets you specify an authorization group for users that log
in without having been previously assigned to a group. This lets you control the capabilities for these
users. Users that are automatically added to a group by this feature are indicated by a Yes in the
Automatic Member column of the Authorized Users table.
Enable
When checked, users who are not in the Authorized Users table are automatically added to the
selected group the first time that they log in.
Authorization Group
Use the drop−down list to select the desired authorization group.
Authorized Users Table
This table lists all of the users who are authorized to access the NetSight database. From here you can
add, edit, and delete users and define a user's membership in an authorization group. Each entry
shows the user name, domain, and group membership for the user. Users can be members of only one
group.
User Name
This column lists users that have been created as authorized users.
Domain/Host Name
The user's domain/hostname that will be used to authenticate to the NetSight database.
Authorization/Device Access Users/Groups Tab
125
Automated Security Manager Help
Authorization Group
The authorization group where the user is a member.
Automatic Member
Yes indicates that the associated user was not a previously authorized user and, as a result
was automatically added to the Automatic User Membership − Authorization Group. No
indicates that the associated user is an authorized user that was created by the NetSight
Administrator.
Authorization Groups Table
This table lists all of the groups that have been created.
Group Name
This is the name assigned to the group. The NetSight Administrator group is created during
installation and is granted Full capabilities and access. The NetSight Administrator group
cannot be deleted and its capabilities can be viewed, but cannot be changed.
Number of Group Members
This is the number of current members in the associated group.
Capabilities
This column summarizes the capabilities granted to the associated group: Full (all
capabilities) or Customized (a subset of capabilities).
Buttons
Add User
Opens the Add User window where you can define the username, domain, and authorization group
that will be used by a new user.
Edit (User)
Opens the Edit User window where you can modify the domain or group membership for a selected
user.
Delete (User)
Removes a selected User from the Authorized Users table.
Add Group
Opens the Add Group window where you can define the capabilities and settings for a new group.
Edit (Group)
Opens the Edit Group window where you can modify the capabilities and settings for a selected
group.
Delete (Group)
Removes the selected Group from the Groups table.
Add/Edit User Window
This window lets you define an authorized user's user name, domain, and membership in an authorization
group.
Click areas in the window for more information.
Add/Edit User Window
126
Automated Security Manager Help
User name
The name used for this authorized user.
Domain/Host name
The user's domain/hostname that will be used to authenticate to the NetSight database.
Authorization Group
Use the drop−down list to select the authorization group where this user will be a member.
Add/Edit Group Window
This window lets you define a new group or edit an existing group.
Click areas in the windows for more information.
Add/Edit Group Window
127
Automated Security Manager Help
Group Name
This is the name given to the group. When adding a group, you can enter any text string that is
descriptive of the members of this group.
Capabilities Tab
Expand the Capabilities tree in this tab and select the specific capabilities to be granted to users that
are members of this group. The capabilities are divided into suite−wide and application−specific
capabilities. Access to a particular capability is granted when it is checked in the tree.
Add/Edit Group Window
128
Automated Security Manager Help
Settings Tab
The Settings tab configures how SNMP requests will be handled for users that are members of this
group.
Allow Users to Configure SNMP Redirect in Options
Lets users that are members of this group edit the Suite−wide Option setting for Client/Server
SNMP Redirect.
Always Redirect SNMP to NetSight Server
Redirects all SNMP requests to the NetSight Server for users that are members of this group,
regardless of the Suite−wide Option setting for Client/Server SNMP Redirect.
Never Redirect SNMP to NetSight Server
Never redirects SNMP requests to the NetSight Server for users that are members of this
group, regardless of the Suite−wide Option setting for Client/Server SNMP Redirect.
Add/Edit Group Window
129
Authorization/Device Access
Profiles/Credentials Tab
NetSight applications access devices to control certain device functions (SNMP sets) and retrieve information
for device properties views, FlexViews and periodic polling (SNMP gets). This tab lets you manage
credentials that define the access privileges required for SNMPv1, SNMPv2, and SNMPv3, and profiles that
use the credentials for various access levels. Two elements are involved with access management:
• Credentials − define the SNMPv1/SNMPv2 community names and SNMPv3 values that will be
used to access your network devices. Credentials are created:
• Manually using the Add Credential button
• Imported from a file in NetSight Generated Format (.ngf) using the Import from Device
List.
• Profiles − are assigned to device models in the NetSight database. They identify the credentials that
are used for the various access levels when communicating with the device. Profiles are created using
the Add Profile button.
Click areas in the window for more information.
Authorization/Device Access Profiles/Credentials Tab
130
Automated Security Manager Help
Default Profile:
This drop−down list lets you specify a profile that will be used by default to access a device.
Profiles Table
This table lists all of the profiles that have been created.
The public_v1_Profile is automatically created during Console installation and cannot be deleted.
Name
This is the name assigned when the profile was created.
Version
This is the SNMP protocol version for the profile. Profiles can be configured for SNMPv1,
SNMPv2c, or as SNMPv3.
Read, Write, Max Access Credential
When the Version is SNMPv1 or SNMPv2c, the Read, Write, and Max Access columns in
the table contain the Community Name for each access level. When the Version is SNMPv3,
the Read, Write, and Max Access columns in the table contain the credential specified for
each access level.
Credentials Table
Authorization/Device Access Profiles/Credentials Tab
131
Automated Security Manager Help
This table lists all of the credentials that have been created in the NetSight database. The public_v1
credential is automatically created during Console installation and cannot be deleted.
Name
This column lists names assigned to credentials that have been created in the NetSight
database.
Version
This is the SNMP protocol version for the credential. Credentials can be configured for
SNMPv1, SNMPv2c, or as SNMPv3.
Community
For SNMPv1 or SNMPv2c credentials, this is the Community Name used for device access.
User Name
For SNMPv3 credentials, this is the User Name used for device access.
Auth Type, Priv Type
For SNMPv3 credentials, these columns show the authentication protocol (None, MD5, or
SHA) and privacy protocol (None or DES) used by the credential.
Show passwords in clear text
When this option is checked, passwords and community names appear as text. The default setting for
this option is unchecked, and passwords and community names appear as a string of asterisks.
Buttons
Add Profile
Opens the Add Profile window where you can select the SNMP version and define the profile name
and passwords/community names used by the profile.
Edit (Profile)
Opens the Edit Profile window where you can modify the SNMP version and passwords/community
names used by a selected profile.
Delete (Profile)
Removes the selected Profile from the Groups table. You cannot delete the profile that is currently
selected to be the Default Profile.
Add Credential
Opens the Add Credential window where you can define new credentials.
Edit (Credential)
Opens the Edit Credential window where you can modify a credential selected from the Credentials
table.
Delete (Credential)
Removes a selected credential from the Credentials table.
Add/Edit Profile Window
This window lets you define the SNMP Credentials for SNMPv1/SNMPv2 Community Names and for
SNMPv3 users that will be granted access to your network devices. The Add Profile window lets you create a
new profile and the Edit Profile window lets you modify an existing profile.
Add/Edit Profile Window
132
Automated Security Manager Help
Click areas in the windows for more information.
Profile Name
A unique name (up to 32 characters) that you assign to this profile.
When editing an existing profile, you can select a profile from the table to modify its settings.
However, you cannot change the name of an existing profile.
SNMP Version
This is the SNMP protocol version for the profile. Profiles can be configured for SNMPv1,
SNMPv2c, or as SNMPv3. When either SNMPv1 or SNMPv2c is selected, the editor provides fields
where you can configure access levels using Community Names. With SNMPv3 selected, you can
configure access levels using Credentials and Security Levels.
Read, Write, Max Access
SNMPv1, SNMPv2c
The Read, Write, Max Access define the community names used for these levels of access.
• Read − This Community Name is used for get operations.
• Write − This Community Name is used for set operations.
• Max Access − This Community Name is used for set operations that require
administrative access, such as changing community names.
SNMPv3
The Read, Write, Max Access levels are defined by Credentials and Security Level:
Credentials
Credential Names are assigned to each of the three SNMPv3 access levels that are
used for the Read, Write and Max Access operations.
• Read − used for read operations (gets).
• Write − used for write operations (sets).
Add/Edit Profile Window
133
Automated Security Manager Help
• Max Access − used for write operations (set ) that require administrative
access.
Security Level
Each access level can be assigned a security level:
• AuthPriv − Highest security level requiring authentication and privacy
(encrypted information).
• AuthNoPriv − Requires authentication, but unencrypted information.
• NoAuthNoPriv − Neither authentication nor privacy required.
Add/Edit Credential Window
This window lets you define or edit the names and community names/passwords for credentials.
Click areas in the window for more information.
Add/Edit Credential Window
134
Automated Security Manager Help
Credential Name
A unique name (up to 32 characters) that you assign to this access credential. You can define
a new credential or select a name from the table to modify settings for an existing credential.
You cannot edit the name of an existing credential.
SNMP Version
This is the SNMP protocol version for the credential. Credentials can be configured for
SNMPv1, SNMPv2, or as SNMPv3. When either SNMPv1 or SNMPv2 is selected, the
window provides fields where you can configure access levels using Community Names.
With SNMPv3 selected, you can configure access levels using Authentication and Privacy
Types.
Community Name
For SNMPv1 or SNMPv2c credentials, this is the Community Name used for device access.
User Name
For SNMPv3 credentials, this is the User Name used for device access.
Authentication Type
For SNMPv3 credentials, select MD5, SHA1, or None, from this drop−down list .
Specify/Confirm Password
This is the password (between 1 and 64 characters in length) that will be used to
determine Authentication. These fields are disabled for Authentication Type, None. If
an existing password is changed and the credential is currently used with a profile
that is applied to one or more devices, a confirmation dialog is opened to determine
how the changes will be handled. You will be asked if you want to change the
password on the device(s). You can then select the devices where the password will
be changed and, if this user is a valid user on the device(s), then the new password
will be set on the device.
NOTE: SNMPv1 profiles can be set on device(s) using Console's Set Profile on Device
feature of the Properties (Access) tab.
Privacy Type
For SNMPv3 credentials, select DES or None from this drop−down list. These settings are
disabled if Authentication Type None is selected.
Specify/Confirm Password
This is the password (between 1 and 64 characters in length) that will be used to
determine Privacy. These fields are disabled for Privacy Type, None. If an existing
password is changed and the credential is currently used with a profile that is applied
to one or more devices, a confirmation dialog is opened to determine how the
changes will be handled. You will be asked if you want to change the password on
the device(s). You can then select the devices where the password will be changed
and, if this user is a valid user on the device(s), then the new password will be set on
the device.
NOTE: SNMPv1 profiles can be set on device(s) using the Set Profile on Device feature
of Console's Set Profile on Device feature of the Properties (Access) tab.
Show passwords in clear text
When this option is checked, passwords and community names appear as text. The default
setting for this option is unchecked and passwords and community names appear as a string
of asterisks.
Add/Edit Credential Window
135
Automated Security Manager Help
Add/Edit Credential Window
136
Authorization/Device Access
Profile/Device Mapping Tab
This tab lets you define the specific Profiles to be used by users in each Authorization Group when
communicating with network devices. The view consists of a device tree in the left panel where you select
devices, and a table in the right panel that lists the current device profile assignments. The Table Editor button
activates the editing row where profile selections are made.
Click areas in the window for more information.
Device Tree
The left panel contains a device tree, where you select the devices you want to view or configure.
Profile/Device Mapping Table
This table lists all of the selected devices and shows a column for the NetSight Administrator
Group and each Authorization Group you have defined. The NetSight Administrator column shows
Authorization/Device Access Profile/Device Mapping Tab
137
Automated Security Manager Help
the profile used by the NetSight Administrator group. The Profile listed/selected for each
Authorization Group column will be used by that group when communicating with the associated
device and, as a result, defines the level of access granted to users that are members of that
Authorization Group.
Table Editor Row
This row is visible when the Show/Hide Table Editor button is toggled to make the Table
Editor visible. The drop down list for each Authorization Group column contains all of the
Profiles that have been created in the NetSight database, including Ping Only, No Access, and
the profile selected on the Profiles/Credentials tab as the Default profile. Selecting a profile in
the Table Editor row alters the value for that entry in the row(s) selected in the table. Once
you select a profile to be changed for your selected column(s), a green exclamation mark ( )
marks the cells that have been changed (but not Applied) and the
active. Clicking the
Apply button becomes
(Show/Hide Table Editor button) at this point cancels your changes,
restores the original profiles, and hides the Table Editor.
Clicking
Apply sets the profiles that you've changed for the selected devices, removes the
, and hides the Table Editor row.
Buttons
Show/Hide Table Editor
This button toggles the Table Editor, a row at the bottom of the table that allows you to define a
profile for each Authorization Group. Use the drop down list to select a profile for each group, and
then click
Apply.
Apply
This button is active when the Table Editor is enabled. Apply sets your profile selections for the
Authorization Groups, clears the from the table, and hides the table editor row.
Authorization/Device Access Profile/Device Mapping Tab
138
Authorization/Device Access
Manage SNMP Passwords Tab
This tab lets you collectively manage the credentials that have been set on your network's devices. When a
particular credential is selected from the drop−down list above the table, the table lists the devices where that
credential/password is set. When an SNMPv1 or SNMPv2 credential is selected, you can define a New
Community Name for access to the devices in the table. When an SNMPv3 credential is selected, you can
define both the Authentication password and the Privacy password for access to the devices in the table. You
can assess the impact of applying new passwords on your devices before actually applying them by clicking
Test and checking the information in the Test Results column.
Click areas in the window for more information.
Select Credential
This drop−down list contains all of the Credentials that have been created in the NetSight database.
New Community Name
The new (SNMPv1/2) community name that will be used for access to the associated device(s).
Authorization/Device Access Manage SNMP Passwords Tab
139
Automated Security Manager Help
Authentication/Privacy
The new SNMPv3 passwords that will be used for access to the associated device(s).
Show Passwords in Clear Text
When checked, the passwords are shown in text. When unchecked, the passwords are shown as a
string of asterisks.
Credentials Table
This table lists all of the devices where the selected credential can be used.
Device
The list of devices where the currently selected credential can be used to access the device.
Auth Group
This is the Authorization Group(s) that are granted access to the associated device.
Profile
This is the profile used by the associated Authorization Group for access to the device.
Read, Write, Max Access
These columns show the credential used for each access level.
Use for Set
Shows the credential that is used with the SNMP Set to change the credential on the device.
Test Results
After clicking Test, this column shows the results that can be expected if the credential
changes are actually applied to devices.
Results
After clicking Apply, this column shows the results of the credential changes that were
applied to devices.
Buttons
Refresh
Updates the table when information has changed.
Test
This button lets you view the results that can be expected if your credential changes are actually
applied to the devices.
Apply
Sets your credential changes on the devices in the table.
Authorization/Device Access Manage SNMP Passwords Tab
140
Backup Database Window
Use the Backup Database window to save the currently active database to a file on the NetSight Server
workstation. If the NetSight Server is local, you can specify a directory path where you would like the backup
file stored. If the server is remote, the database will be saved to the default database backup location. You can
access this window by clicking the Backup button in the Database tab of the Server Information window.
Click the graphic for more information.
Database Path
The default database backup location. If the NetSight Server is local, you can specify an alternate
backup directory by entering a path to the directory, or using the Browse button to navigate to the
directory. If the server is remote, the database will be saved to the default database backup location.
Database Name
Enter a name for the database backup file.
Buttons
Backup
Starts the backup operation.
Backup Database Window
141
Clean Up Incidents Window
The Clean Up Incidents window lets you delete incidents from the Activity Monitor table based on incident
status. Use the checkboxes to select the statuses of the incidents you want to delete. For more information on
each status, see the Icon/Status section of the Activity Monitor Help topic.
The Clean Up Incidents window is accessed by clicking the Clean Up Incidents button in the Activity
Monitor window.
Clean Up Incidents Window
Clean Up Incidents Window
142
Configure Server Window
The Configure Server window allows you to configure various NetSight Server parameters. The window has a
right−panel view that changes depending on what you have selected in the left−panel tree. You can access this
window by clicking the Configure button in the Server Information window. You must be assigned the
appropriate user capabilities to access and use this window.
Information on the following Configure Server view:
• Client Connections
Client Connections
Selecting Client Connections in the left panel of the Configure Server window provides the following view
where you can see the number of current client connections for each installed plugin application, and change
the maximum number of connections allowed for each plugin and the NetSight Server.
Click the graphic for more information.
Installed Application Plugins
The name of the installed plugin application with clients connecting to the NetSight Server.
Current Connections
The number of current client connections for this plugin application.
Configure Server Window
143
Automated Security Manager Help
Total Allowed
The maximum number of client connections allowed for this plugin application. Select this field and
use the arrows to change the number, if desired.
Clients Currently Connected
The total number of clients currently connected to the NetSight Server.
Number of Clients Allowed
The maximum number of concurrent client connections allowed by the NetSight Server. Use the
arrows to change the number, if desired. This number should be set to the total number of clients you
want to allow to connect to your server.
Buttons
Refresh
Refreshes the current connection information.
Configure Server Window
144
Create/Edit Notification Window
This window lets you create or edit notifications that are activated with your response to network threats. The
window takes several forms depending on the type of notification being created or edited. Use the drop−down
menu at the top of the window to select the type of notification you want to create. The appropriate fields are
automatically provided.
E−Mail Notification
This window lets you configure E−Mail (message) notifications that will be triggered with your response to
network threats.
Click areas in the window for more information.
Name
The name assigned to this notification.
Type
Set the Type to E−Mail for this window.
Send E−Mail message to:
Use this drop−down menu to select one of your pre−defined E−Mail lists. If no lists have been
defined, the menu will be empty and you should click the Edit E−Mail List button to define a list.
Subject
Enter the subject for the notification E−Mail message here.
Set E−Mail Config
This button opens the Options − SMTP E−Mail Server view where you can specify an Outgoing
SMTP E−Mail Server and a Sender address that will appear as the sender in E−Mail notifications.
Create/Edit Notification Window
145
Automated Security Manager Help
Specify information to include in E−Mail message
These check boxes let you select elements of the event information to be added to your E−Mail
notification message. The Select All button places a check in all of the boxes and the Deselect All
button removes checks from all of the boxes. The information is added to your message as
unformatted, space−delimited text.
Buttons
Test
This button allows sending a test message to simulate a notification sent in response to a network
threat.
Syslog
This window lets you configure notifications to create a Syslog entry.
Click areas in the window for more information.
Name
The name assigned to this notification.
Type
Set the Type to Syslog for this window.
Syslog Server IP/Name
This is the IP address or hostname that identifies the Syslog server where the message will be sent.
Specify information to include in Syslog message
These checkboxes let you select elements of the event information to be added to your Syslog
notification message. The Select All button places a check in all of the boxes and the Deselect All
button removes checks from all of the boxes. The information is added to your message as
unformatted, space−delimited text.
Buttons
146
Automated Security Manager Help
Buttons
Test
This button allows sending a test syslog message to simulate a notification sent in response to a
network threat.
SNMP Trap
This window lets you configure notifications that send a SNMP Trap that will be triggered with your response
to network threats.
Click areas of the window for more information.
Name
The name assigned to this notification.
Type
Set the Type to SNMP Trap for this window.
SNMPv3 User Name
This is the user name for the credential that will be used when sending the trap to the Trap Receiver.
Authentication Type
MD5 or SHA1 or None, selected from this drop−down list.
Authentication Password
This is the password (between 1 and 64 characters in length) that will be used to determine
Authentication. This field is disabled for Authentication Type, None.
Privacy Type
DES or None, selected from this drop−down list. These settings are disabled if Authentication Type
None is selected.
Privacy Password
Buttons
147
Automated Security Manager Help
This is the password (between 1 and 64 characters in length) that will be used to determine Privacy.
This field is disabled for Privacy Type, None.
Trap Receiver
The IP address for a trap receiver (the system where devices will send traps). Valid trap receivers are
systems running a SNMPTrap Service.
Script
This window lets you identify a script that will be executed with your response to network threats.
Click areas in the window for more information.
Name
The name assigned to this notification.
Type
Set the Type to Script for this window.
Program to run
This field defines the script that will be launched as this Custom Action. Scripts must be stored in the
<install area>\Enterasys Networks\NetSight Console\server\plugins\AutoSecMgr\scripts directory.
Type a script name, if known, or use the Select button to open a file browser window and choose a
script.
Script
148
Automated Security Manager Help
The Program to run field does not allow using options. For example, you cannot enter
myscript.bat –i <IP Address> −m <MAC Address> in the Program to run field.
TIP: To execute a script with options, create a script without options that executes another script
that has options (Windows only). For example:
1. Create a script named, asm_script.bat with an entry to call myscript.bat such as:
C:\Program Files\My Custom Files\myscript.bat –i %1 −m %2".
2. Uncheck all but the Threat IP and Threat MAC checkboxes and select
Unformatted without spaces (you don't want to send any keyword (thip= or
thmac=) to your script.). The variable %1 returns <Threat IP Address> and %2
returns the <Threat MAC Address>
If you are using PERL script, you might want to use a different argument variable,
such as $ARGV[0] (First argument) or @ARGV (all arguments). Also, using the
shell script is similar to a Windows batch file script (%1 for the first argument, %*
for the all arguments).
Working Directory
This is the path to a directory from which the script will be executed. Any path references within your
script that are not absolute paths, will be relative to this directory. Enter a path or use the Select
button to open a file browser window and choose a directory.
Specify parameters to pass...
These check boxes let you select elements of the event information to be passed as parameters to your
program. The Select All button places a check in all of the boxes and the Deselect All button removes
checks from all of the boxes.
Specify format to use...
This area lets you select the format that will be used to pass the selected parameters to your program:
Formatted with keyword...
When selected, the parameters are passed using a format that includes a keyword associated
with each parameter (e.g., keyword="value"). So, for example, if Sender Name is selected
as a parameter, the keyword sname is used and the information passed to the script would be
sname="dragon_id" followed by a space and then the keyword and value for the next
parameter. The following table defines the keywords for each parameter and the order that the
values are passed to the script (listed from top to bottom in the table).
Parameter
Script
Keyword
Sender Name
sname
Sender ID
sid
Event Category
ecat
Threat IP
thip
Threat MAC
thmac
149
Automated Security Manager Help
Device IP
dev
Device Port
port
Rule Name
rname
Action
action
Details
dtls
SNMP Parameters (note 1)
SNMPv1, SNMPv2
Parameter
SNMPv3
Keyword
Parameter
Keyword
SNMP
Read
snmp="v1"
ro
SNMP
Read
snmp="v1"
rw
SNMP
Read,
SNMP
Write,
SNMP SU/
Max Acess
snmp="v3"
user
seclevel
authtype
authpwd
privtype
privpwd
SNMP
Read
Incident
snmp="v1"
su
incident
Note 1:
When any SNMP parameter is selected, the snmp=value
indicates the SNMP version and the subsequent parameters
contain the values assigned for the credentials associated
with the device. When multiple SNMP parameters are
checked (e.g., SNMP Write and SNMP Read) the values
for the highest access level are used for the script.
Example:
If Sender Name, Sender ID, Threat MAC, and SNMP Write are selected and the device is
configured for SNMPv1 credentials, the information passed to the script might look like:
sname="my sender name" sid="dragon id" thmac="00.00.1d.11.22.33" snmp="v1"
rw="public"
And, for a script named myscript.bat, the resulting script command would be executed as:
C:\Program Files\Enterasys Networks\NetSight
Console\server\plugins\AutoSecMgr\scripts\my_script.bat sname="my sender
name" sid="dragon id" thmac="00.00.1d.11.22.33" snmp="v1" rw="public"
Unformatted without spaces...
When selected, the parameters will be passed as space delimited, unformatted text, without
keywords. For this option, your script must know which parameters are being passed and in
what order. If a parameter contains any spaces, they will be replaced with an underbar ( _ ).
Script
150
Automated Security Manager Help
Example:
Sender Name, Sender ID, Threat MAC, and SNMP Write are selected and the device is
configured for SNMPv1 credentials, the information passed to the script might look like:
my_sender_name dragon_id 00.00.1d.11.22.33 v1 public
And, for a script named myscript.bat, the resulting script command would be executed as:
C:\Program Files\Enterasys Networks\NetSight
Console\server\plugins\AutoSecMgr\scripts\my_script.bat my_sender_name
dragon_id 00.00.1d.11.22.33 v1 public
Dragon
This window lets you configure a SNMPv3 trap notification that will be sent to a Dragon IDS when ASM
responds to a network threat. This is similar to the SNMP Trap notification, except that for Dragon, you must
specify an Authentication Type and Privacy Type.
Click areas of the window for more information.
Name
The name assigned to this notification.
Type
Set the Type to Dragon for this window.
Name
This is the user name for the credential that will be used when sending the trap to the Dragon IDS.
Authentication Type
MD5 or SHA1 or None, selected from this drop−down list.
Authentication Password
This is the password (between 1 and 64 characters in length) that will be used to determine
Authentication. This field is disabled for Authentication Type, None.
Dragon
151
Automated Security Manager Help
Privacy Type
DES or None, selected from this drop−down list. These settings are disabled if Authentication Type
None is selected.
Privacy Password
This is the password (between 1 and 64 characters in length) that will be used to determine Privacy.
This field is disabled for Privacy Type, None.
Group
This window lets you combine notifications in a group to provide multiple notifications when ASM responds
to a network threat.
Click areas in the window for more information.
Name
The name assigned to this notification.
Type
Set the Type to Group for this window.
Group
This list shows all of the notifications (including other groups) that can be included in this group.
Checking selected groups and clicking Apply creates/edits the group with the checked notifications as
members.
Group
152
Automated Security Manager Help
Group
153
Create/Edit Rule Window
The features and fields in the Create Rule and Edit Rule windows are identical, except for their title. These
windows are used to define new rules or modify existing rules to be used as Automated Security Manager
responses to network security threats. The Edit Rule window opens with information for the rule selected in
the Rule Definitions view, while the Create Rule window opens with blank or default settings.
Rules have two distinct functions:
• Examine the source of the threat (switch/port) to determine if certain conditions exist (e.g. threat
category, source of the notifying IDS, policies currently applied to the port, etc.).
• Define the action to be taken when these conditions match the criteria defined by the Rule.
Click areas in the window for more information.
Create/Edit Rule Window
154
Automated Security Manager Help
Name
The name given to this rule. The name can be any character string, excluding spaces, up to 64
characters.
Rule Conditions
The following attributes are compared against the device(s) located by the ASM search and the event
information reported by the IDS to determine the applicability of the specified action. When the information
from the search and the event information match these attributes, then the action specified below will be
applied.
Groups &Devices
The tree in this panel can be expanded to select a target device or device group that will be eligible for
the action specified in the rule. You can create several rules to respond to a particular threat and apply
Rule Conditions
155
Automated Security Manager Help
different actions based on the device/device group selected here. For example, if you are creating a
rule with an action that applies a policy, you do not want to select a device/device group for a device
type that does not support policies. Or as another example, in some rules, you may want to apply
different actions or more or less permanent actions for certain subnets containing critical network
resources.
Qualifier Tabs
Summary
This tab shows a summary of the currently defined qualifiers for this rule. Clicking a
particular heading selects that tab.
Event Categories
This tab lets you select one or more event categories, reported by the IDS, to determine
whether or not to apply an action.
• Match Any − This is an unconditional match for the category.
Rule Conditions
156
Automated Security Manager Help
• Match Selected − The event category is compared against one or more categories
selected from the list.
• Exclude Selected − The event category matches if it is not one of the categories
selected from the list.
Sender Identifiers
This tab lets you select one or more unique identifiers, associated with the intrusion detection
systems that detected the security event, to determine whether or not to apply an action.
• Match Any − This is an unconditional match for the Sender ID.
• Match Selected − The Sender ID is compared against one or more Sender Identifiers
selected from the list.
• Exclude Selected − The Sender ID matches if it is not one of the Sender Identifiers
selected from the list.
Policies
This tab lets you select one or more policies to determine whether or not to apply an action.
Rule Conditions
157
Automated Security Manager Help
• Match Any − This is an unconditional match for a currently applied policy.
• Match Selected − A match occurs when the currently applied policy is one of
policies selected in the list.
• Exclude Selected − A match occurs when the currently applied policy is not one of
the policies selected in the list.
IMPORTANT:
Whether or not a policy matches a selection from the Policy List depends on the operational
mode/features supported on specific device types:
• MatrixDFE−Platinum:
• Multi−auth − The specific policy being matched is determined by the Apply
Policy action. If the action is Apply Policy to Port, then only port policies
are compared to your selection(s) from the Policy List.
For example, if you create a rule to Apply Policy to Port, the policy matching
is only checked against the policy that is applied to the port, even when there
may be an authenticated MAC or IP based policy currently in effect.
• StrictX − Same as Matrix N−Series Platinum in multi−auth mode, except
that the port−based policy is used for authentication. In any case, the policy
matching works the same way as the N−Series Platinum (multi−auth).
• MatrixDFE−Gold
• Multi−auth − Matrix N−Series Gold does not support MAC/IP override. As
a result, the only ASM action that can be taken for applying a policy is to
Apply Policy to Port. Policy matching always compares the policy(ies)
selected in the Policy List against the policy that is currently in effect.
• MatrixC2 − Functions the same way as the Matrix N−Series Gold (StrictX).
• Non−DFE (MatrixE1/E7) − Policy matching always compares the policies selected
from the Policy List against the policy that is currently in effect on the port.
VLANs
This tab lets you select one or more VLANs, currently applied on the port, to determine
whether or not to apply an action.
• Match Any − This is an unconditional match for a currently applied VLAN.
Rule Conditions
158
Automated Security Manager Help
• Match Selected − The currently applied VLAN is compared against one or more
VLANs selected from the list.
• Exclude Selected − The currently applied VLAN is not one of the VLANs selected
from the list.
Day and Time Ranges
This tab lets you select one or more of your previously defined intervals, covering specific
days and times, to determine whether or not to apply an action.
Specify Action to take...
This area defines the actions to be taken when the event matches the above criteria set by a rule. It allows
taking a specific action on a port, MAC address, or IP address or taking a Custom Action (launching a
program to be run).
Action
Use this drop−down list to select a response to the threat: None, Disable Port, Apply Policy, or
Apply PVID.
Apply Policy
Use the Policy drop−down list to select a policy to be applied on the device. The available
policies are listed in the Policies tab. You must also specify whether to apply the policy to the
MAC source, IP source or the port.
Notify Trusted Access Manager. Select this checkbox if you want to configure ASM to
notify Trusted Access Manager when it quarantines a MAC address. Upon notification,
Trusted Access Manager automatically creates a MAC override and enforces the override to
all Trusted Access Gateways, effectively preventing the quarantined end−system from
accessing the network from any other location. When Trusted Access Manager creates the
override, it configures the policy passed by ASM as the Accept policy, and does not perform
a scan. If ASM reverses the quarantine, it notifies Trusted Access Manager, and the MAC
override is automatically deleted and removed from the gateways. You can view ASM
overrides in the Trusted Access Manager MAC Overrides tab.
Specify Action to take...
159
Automated Security Manager Help
Multi−User Authentication
When the action for a rule is set to Apply Policy and the threat is located on a port on a
device that supports Multi−User Authentication (e.g., Matrix DFE), you can apply a policy to
a specific MAC address or IP address. This lets you isolate a single user instead of affecting
all of the users on the port. You can apply a user−specific policy to an IP address or MAC
address instead of changing the port policy. If the threat MAC Address is unique to a
particular Threat IP (typically on devices at the edge of your network), select MAC to apply
the policy to the MAC address and override its port or dynamic policy. If the threat is on a
device at the core of your network and the MAC Address maps to several IP Addresses, select
IP to apply the policy to the IP Address and override its port or dynamic policy.
NOTES:
Policies applied
to a MAC source
will override
policies applied
to an IP source.
So, if there is a
policy currently
applied to a
MAC source,
applying a
policy to an
IP−source policy
will have no
effect.
See also the
IMPORTANT
Policy Matching
notes, above.
Apply PVID
Use the PVID drop−down list to select the PVID that will be applied to the port. The
available VLANs are defined in the Automated Security Manager Rule Variables − VLANs
view. The associated PVID Egress drop−down list lets you either retain the current PVID
egress state by selecting None or change the egress state to Untagged. When Untagged is
selected, the PVID is applied and the egress state is set to Untagged. When None is selected,
the egress state is unchanged and only the PVID is applied. If you have specified a Discard
VLAN as the PVID, selecting None usually means traffic will be discarded.
NOTE: Applying a PVID to a port does not clear the VLAN from egress lists for
non−PVID VLANs. This is normal operation. If Apply PVID is selected,
change the egress state to Untagged or apply a quarantine policy to the
port.
Custom Action
Check Custom Action and click Edit to open the Specify Program for Action window where you can
customize the response to an event by selecting a program to be executed.
Specify Action to take...
160
Automated Security Manager Help
NOTE: When a custom action script does not specify the path for its output, the output is placed
in the <install area>\Enterasys Networks\NetSight Console\server\jboss\bin
directory.
Notification
You can specify a notification to be part of the rule's action. For example, you can specify an E−Mail
notification to be sent in response to a threat. Check Notification and select the desired notification
from the drop−down list. Click Edit to open the Edit Notifications window which lists the configured
notifications. In this window, you can select a Notification to edit, or click Create to open the Create
Notification window.
Manual Confirmation Required
When checked, the selected action requires human intervention before executing. The action/event
must be selected in the Automated Security Manager Activity Monitor and confirmed with the
Confirm Response button.
Automatically confirm after
When checked, the selected action will be automatically confirmed if not manually confirmed
prior to the specified time.
Specify Action for Undo
With one exception, you can undo actions that have been applied. The exception can occur when two actions
are defined within a rule: a standard ASM action and a custom action. If the standard ASM action fails, the
custom action will be applied and, if successful, cannot be undone. Under these circumstances, your custom
action should be configured to take into account the potential failure of the standard ASM action.
Time before Undo
This setting determines whether the action will be Permanent or set to a time span of Minutes,
Hours as defined in the associated field. Permanent means that ASM will not automatically undo the
action after a certain time interval, but it can still be manually undone.
Undo Action
This field shows an Undo Action that corresponds to the Action previously selected/applied to a port.
It cannot be edited.
Custom Undo
Check Custom Undo and click Edit if you want to specify an action that will be taken when an
action is undone. This opens the Specify Program for Undo window where you can select a program
to be executed.. This doesn't alter the Undo Action. The Custom Undo is executed in addition to the
Undo Action.
NOTE: When a custom undo action script does not specify the path for its
output, the output is placed in the <install area>\Enterasys
Networks\NetSight Console\server\jboss\bin directory.
Notification
You can specify a notification to be part of the rule's action. For example, you can specify an E−Mail
notification to be sent in response to a threat. Check Notification and select the desired notification
from the drop−down list. Click Edit to open the Edit Notifications window which lists the configured
Specify Action for Undo
161
Automated Security Manager Help
notifications. In this window, you can select a Notification to edit, or click Create to open the Create
Notification window.
Specify Action for Undo
162
Create/Edit Search Scope
This window lets you create and name groups of devices that will be searched when Dragon notifies ASM of
a threat. It operates the same way as the settings for the Basic Search Scope Definitions, but allows you to
create multiple search scope groups so that you can search several non−contiguous groups of devices. You
can include or exclude specific devices, according to Device Type, Location, Contact, and Subnet.
You can access this window from the ASM Configuration window's Search Scope Definitions panel. Select
the Advanced Search Mode, then click the Create or Edit button in the Search Scopes section.
NOTE: ASM searches are performed by the NetSight Server, using the profile for the server, not
the profile for the ASM client user.
Click areas in the window for more information.
Search Scope Name
The name given to this search scope. The name can be any character string, up to 64 characters.
Create/Edit Search Scope
163
Automated Security Manager Help
Groups &Devices
This panel shows the device tree for devices modeled in the Console database. You can expand
branches of the tree to select Devices/Device Groups to be searched when Dragon notifies ASM of a
threat. After making a selection, click Include to designate your selection(s) as being included in the
search scope or click Exclude to designate your selection(s) as being specifically excluded in the
search scope.
You can repeatedly select devices/device groups individually and click Include/Exclude or use
multiple selection techniques (Control−click or Shift−Click) to select or de−select multiple
Devices/Device Groups in a single operation.
NOTE: When there are devices on your network that do not support layer 3,
you should include routers in the list of targets to allow Compass to
use its IP to MAC address resolution feature to locate the end station.
This includes the following devices:
Matrix C1
Matrix E1
(1G6xx Series)
Matrix E5
Matrix V Series
SS9000
Vertical Horizon
1st Generation 1Hxxx Series
Selected Groups and Devices
This panel lists the devices/device groups selected from the Groups &Devices panel. The Filter
column in the table indicates whether the device(s)/device group(s) can be included or excluded. The
Device Group Path column shows the specific IP address and branch of the tree for selected
devices/device groups.
Devices/device groups designated as Excluded are excluded from the search scope, regardless of any
Include settings. For example, if a particular device is set to Excluded and the same device is a
member of a device group that is set to Included, then the excluded device will not be searched.
You can further refine your search scope by selecting either Any of the Included Groups or All of
the Included Groups.
• Any of the Included Groups creates an OR condition such that if a selected device (not
specifically excluded) is a member of any of the selected groups, then it will be included in
the search scope and appear in the Resulting Device/Device Group table. For example,
selecting a specific Vertical Horizon device that is not in subnet 172.18.19.xx together with
the Vertical Horizon and IP Subnet 172.18,19.xx Device Groups and clicking Any of the
Included Groups includes all Vertical Horizon devices (including the individual VH device)
and all devices from the 172.18,19.xx subnet.
• All of the Included Groups creates an AND condition. When selected, only devices that are
members of all of the selected device groups will be included in the search scope. This
selection is useful when you want to select all of a particular device type, but only in a
specific location−−for example, all the routers in a particular building. When a device type
(Routers) and a location group (Building2) are both selected, then only the devices contained
Create/Edit Search Scope
164
Automated Security Manager Help
in both groups (Routers in Building2) will be included in the search scope.
Resulting Devices
The resulting list of devices that will be searched when Dragon notifies ASM of a threat. The table is
dynamically updated according to your device/device group selections and include/exclude
arguments.
Send Notification...
This checkbox allows you to select a notification to be performed in the event no port is found for the
Threat IP. For example, you can specify an E−Mail notification to be sent when no port is found.
Select the desired notification from the drop−down list. Click Edit to open the Edit Notifications
window which lists the configured notifications. In this window, you can select a notification to edit,
or click Create to open the Create Notification window.
Buttons
Include/Exclude
Adds your tree selections to the Selected Groups and Devices table and sets the Filter column to either
Include or Exlude.
Remove
Deletes one or more rows selected from the Groups and Devices table
Apply
Creates the search scope group and adds it to the Search Scopes table in the Advanced Search Scope
Definition view of the Automated Security Manager Configuration Window.
Create/Edit Search Scope
165
Create/Edit Search Scope Rule
This view lets you create rules that determine which search scope will be used when a specific threat arrives.
Each search scope rule defines a set of conditions (sender id, threat subnet, etc.) and a search scope to use
when the conditions are met.
You can access this window from the ASM Configuration window's Search Scope Definitions panel. Select
the Advanced Search Mode, then click the Create or Edit button in the Search Scope Rules section.
Click areas in the window for more information.
Rule Name
The name given to this rule. The name can be any character string, up to 64 characters.
Rule Conditions
The following conditions are compared against the information returned from Dragon to determine the
applicability of this rule. When the information from the event information matches these conditions, then the
Search Scope specified is used as the ASM search scope.
Select Sender Identifiers
This area lets you select one or more sender identifiers to be compared against the sender identifier
returned in the event, to determine whether or not to use the Search Scope specified as the ASM
search scope.
• Match Any − This is an unconditional match for the Sender ID.
Create/Edit Search Scope Rule
166
Automated Security Manager Help
• Match Selected − The Sender ID is compared against one or more Sender Identifiers selected
from the list.
• Exclude Selected − The Sender ID matches if it is not one of the Sender Identifiers selected
from the list.
Use the Edit List button to open a window where you can add or remove sender identifiers to use in
your rule definitions.
Select Sender Names
This area lets you select one or more sender names to be compared against the sender name returned
in the event, to determine whether or not to use the Search Scope specified as the ASM search scope.
• Match Any − This is an unconditional match for the Sender Name.
• Match Selected − The Sender Name is compared against one or more Sender Names selected
from the list.
• Exclude Selected − The Sender Name matches if it is not one of the Sender Names selected
from the list.
Use the Edit List button to open a window where you can add or remove sender names to use in your
rule definitions.
Select Threat Subnets
This area lets you select one or more subnets to be compared against the subnet returned in the event,
to determine whether or not to use the Search Scope specified as the ASM search scope.
• Match Any − This is an unconditional match for the Threat Subnet.
• Match Selected − The Threat Subnet is compared against one or more Threat Subnets
selected from the list.
• Exclude Selected − The Threat Subnet matches if it is not one of the Threat Subnets selected
from the list.
Use the Edit List button to open a window where you can add or remove threat subnets to use in your
rule definitions.
Search Scope
This drop−down list lets you select a Search Scope Group that will be used as the ASM search scope
when an event matches the conditions defined for this rule.
Create/Edit Search Scope Rule
167
Edit Notifications Window
This window lists all the notifications you have created, and lets you edit or remove a notification, or create a
new one.
Click areas in the window for more information.
Name
The name assigned to this notification in the Create/Edit Notification window.
Type
The type of notification, as selected in the Create/Edit Notification window.
Summary
The variables configured for this notification in the Create/Edit Notification window.
Buttons
Create
Opens the Create Notification window. This window takes one of several forms, depending on the
type of notification being created (E−Mail, Syslog, SNMP Trap, Script, Dragon, or Group).
Remove
Attempts to remove the selected notifications from the list. Notifications cannot be removed if they
are currently in use by a rule. Attempting to remove a notification that is currently in use by a rule
opens the Error removing Notification(s) window to show the rules where the selected notifications
are used.
Edit Notifications Window
168
Automated Security Manager Help
Edit Entry
Opens the Edit Notification window for the notification selected in the list.
Used In
Select a notification in the list, and click the Used In button to open a window that displays which
ASM rules are using the notification.
Edit Notifications Window
169
E−Mail Configuration Window
The E−Mail Configuration window lets you create an E−Mail recipient list to use when configuring E−Mail
notification settings. The window is accessed from the Edit Mail List button in the Create/Edit Notification
window.
Click the graphic for more information.
Defined Mail Lists
Displays the currently defined mail lists. Use the New List button to add a mail list name to the list.
Mail List Definitions
Use the E−Mail List entries field to configure the "send to" E−Mail addresses for the selected list.
Addresses in the list can be separated with a comma or a semicolon. The list is not verified for valid
addresses.
Buttons
New List
Lets you create a new mail list name.
Delete List
Deletes the selected list.
Rename List
Lets you rename the selected list.
E−Mail Configuration Window
170
Automated Security Manager Help
E−Mail Configuration Window
171
Error removing Notification(s) Window
This window automatically opens if you attempt to remove one or more notifications that are currently in use
by ASM. The table lists the specific notification(s) that caused the error and where each notification is being
used.
Sample Error removing Notification(s) Window
Error removing Notification(s) Window
172
Event View
NetSight's Event View lets you view alarm, event, and trap information for the NetSight Console, network
devices, and other NetSight applications. Each tabbed view in the Event panel lets you scroll through the most
recent 10,000 entries in the logs that are configured for that view. A Console tab, showing Console events and
a Traps tab that captures traps from devices modeled in the NetSight database are provided when NetSight
Console is initially installed. The Syslog tab shows events from devices that are configured to use the
NetSight Syslog Server. You can add your own tabs that capture local logs. Local logs are not automatically
polled, but can be manually refreshed using the Refresh button.
With the Event tables, you can:
• Configure your own tables to capture and combine similar information from various sources. For
example, you can combine event logs from other NetSight applications or merge trap logs into an
single Event View.
• Find, filter, and sort table information.
• Print table information or export the information to a file in HTML or delimited text format.
• Trigger e−mail notification, when a particular alarm, event, or trap occurs.
Sample Event View
Tabs
Depending on your installation, up to three default tabs are available with the initial installation of NetSight
Console. You cannot remove or change these tabs. However, you can add your own tabs to create custom
tables that provide the information needed to manage your network. The three default tables are:
Console
This tab records Console events, such as devices created deleted, discovery started, ended, poll
activity.
Traps
Shows trap information for devices modeled in the NetSight database.
NOTE: If no trap information is being collected in the Traps tab, you may have more
than one trap daemon running on your system. NetSight Console includes an
SNMP trap daemon that must be the only trap daemon running on your system. If
there is another trap daemon running, either the OS trap daemon or with another
Event View
173
Automated Security Manager Help
application (HPOV, NetSight Element Manager, etc.), you must shut it down
before launching Console.
Syslog Tab
This tab maintains a record of all the BOOTP messages received for devices modeled in the NetSight
database.
Console Tab Table
Acknowledge
This column can be checked which lets you hide items that have been acknowledged. Click
the check box to acknowledge the item and then click the Show Acknowledged Events button
to hide or show the checked items.
Severity
Indicates the potential impact of the event or trap. For traps, this column shows the Severity
as defined in the trapd.conf file.
Category
For traps, this column shows the cagtegory defined in the trapd.conf file. For other events,
it indicates the source of the of the information, either a Console Poller, local log, syslog, trap
log, Error (java exceptions), etc.
Timestamp
Shows the date and time when an event, or trap occurred.
Source
Shows the IP address of the host that was the source of the event, or trap.
Client
Is only applicable to Console events and shows the hostname of the source of the event.
User
Associates an event with the user that performed the action that triggered the event.
Type
Identifies the type of information for this row (event, or trap).
Event
Shows the type of event or trap. For traps, this column shows the name of event as defined in
the trapd.conf file.
Information
Shows an summary explanation of the event, or trap.
Right−click Menu
A right−mouse click on a column heading or anywhere in the table body (or a left−mouse click on the Table
Tools
button when visible in the upper left corner of the table) opens a popup menu that provides
access to event options and a set of Table Tools that can be used to manage information in the table. The
right−click menu for the Event View provides the following options in addition to those available as standard
options:
• Acknowledge Selected − places a check in the Acknowledge column for all of the selected rows.
• Unacknowledge Selected − removes the checks in the Acknowledge column from all of the selected
rows.
• Acknowledge All − places a check in the Acknowledge column for all rows.
• Unacknowledge All − removes the checks in the Acknowledge column from all rows.
• Event Details − opens the Event Details window which provides additional information about a
Event View
174
Automated Security Manager Help
selected event or trap.
Buttons
Show/Hide Acknowledged Events
This button hides or shows items in the table that have been acknowledged by a check in the
Acknowledge column.
Event View Manager
This button opens the Event View Manager window where you can change the elements in the
selected table or define additional tabs for the Event View panel.
Open Event Log
This button lets you open an event log file located on the NetSight Server or Client. The popup menu
offers two options:
• Open Local Event Log − opens the Open Log file browser with the default path set to the
<install area>\Enterasys Networks\NetSight Console\client directory.
• Open Event Log on Server − opens the Open Log file browser with the default path set to
the <install area>\Enterasys Networks\NetSight Console\server\logs directory.
Refresh
This button forces a poll to update the selected table in the Event View panel.
Clear Current View
Clears entries from the current table.
Clear Cache and Roll Logs on Server
Writes the current table entries to a timestamped file and clears entries from the table and the server
cache. This button acts only on the currently selected tab in the Event panel. Console log files are
saved to the <install area>\NetSight Console\server\logs directory. Syslog and Traps log files
are saved to the syslogs and traps directories respectively, in the <install area>\NetSight Atlas
Shared directory.
Event View
175
Event Details Window
The Event Details window shows additional information about an event or trap selected in the Event View. It
combines information about the event as defined in the trapd.conf file and specific information about the
source of the event. It is accessed by choosing Event Details from the right−click menu in the Event View.
Click areas in the window for more information.
Timestamp
Shows the date and time when an event, or trap occurred.
Acknowledged
Shows whether or not the selected event has been acknowledged.
Type
Identifies the type of information for this row (Event, or Trap).
Source
Shows the IP address of the host that was the source of the event or trap.
Event Name
Shows the type of event or trap. For traps, this field shows the name of the event as defined in the
trapd.conf file.
Event Details Window
176
Automated Security Manager Help
Client
Only applicable to Console events and shows the hostname of the source of the event.
Severity
Indicates the potential impact of the event or trap. For traps, this field shows the Severity as defined in
the trapd.conf file.
Category
For traps, this field shows the category defined in the trapd.conf file. For other tabs, it indicates the
source of the of the information, either a Console Poller, local log, syslog, trap log, Error (java
exceptions), etc.
User
Associates an event with the user that performed the action that triggered the event.
Information
Shows a summary explanation of the event or trap.
Enterprise
Only applicable to traps and shows the Enterprise for this event (Cabletron, Enterasys, snmpTraps,
rmonEventsV2, dot1dBridge)as defined in the trapd.conf file.
Trap Number
Only applicable to traps and shows the Event OID for this event as defined in the trapd.conf file.
Description
Only applicable to traps and shows the description for this event as defined in the trapd.conf file.
Buttons
Acknowledge/Unacknowledge
Places a check or removes a check in the Acknowledge column for the selected row.
Event Details Window
177
Event Log Viewer
NetSight Options set limits on the size of log files that record events on your network. When the limit is
reached, the information is saved to a log file. This viewer is where you can view historic alarm, event, and
trap information for the NetSight Console, network devices, and other NetSight applications.
Sample Event Log Viewer
Severity
Indicates the potential impact of the event or trap. For traps, this column shows the Severity as
defined in the trapd.conf file.
Category
For traps, this column shows the category defined in the trapd.conf file. For other events, it
indicates the source of the information, either a Console Poller, local log, syslog, trap log, Error (java
exceptions), etc.
Timestamp
Shows the date and time when an event, or trap occurred.
Source
Shows the IP address of the host that was the source of the event, or trap.
Client
Is only applicable to Console events and shows the hostname of the source of the event.
Event Log Viewer
178
Automated Security Manager Help
User
Associates an event with the user that performed the action that triggered the event.
Type
Identifies the type of information for this row (event, or trap).
Event
Shows the type of event or trap. For traps, this column shows the name of event as defined in the
trapd.conf file.
Information
Shows an summary explanation of the event, or trap.
Right−click Menu
A right−mouse click on a column heading or anywhere in the table body (or a left−mouse click on the Table
Tools
button when visible in the upper left corner of the table) opens a popup menu that provides
access to event options and a set of Table Tools that can be used to manage information in the table. The
right−click menu for the Events Log Viewer provides the following options in addition to those available as
standard options:
• Acknowledge Selected − places a check in the Acknowledge column for all of the selected rows.
• Unacknowledge Selected − removes the checks in the Acknowledge column from all of the selected
rows.
• Acknowledge All − places a check in the Acknowledge column for all rows.
• Unacknowledge All − removes the checks in the Acknowledge column from all rows.
• Event Details − opens the Event Details window which provides additional information about a
selected event or trap.
Buttons
Open Event Log
This button lets you open an event log file located on the NetSight server or client. The popup menu
offers two options:
• Open Local Event Log − opens the Open Log file browser with the default path set to the
<install area>\Enterasys Networks\NetSight Console\client directory.
• Open Event Log on Server − opens the Open Log file browser with the default path set to
the <install area>\Enterasys Networks\NetSight Console\server\logs directory.
Close
This button dismisses the Event Log Viewer.
Right−click Menu
179
Event View Manager Window
The Event View Manager window lets you add your own tabs to the Event View panel to create custom tables
that provide the information needed to manage your network. With it, you can add tables and modify existing
tables to capture and combine alarm, event and/or trap information from various sources. The top panel lists
the current tabs, while the bottom two panels let you define sources for the information in your custom tables.
To access this window, click the Event View Manager button
in the lower−right corner of the Event
View. (If you are using Console, you can also go to the Tools menu and select Alarm/Event > Event View
Manager.)
Click areas in the window for more information.
Views
This table lists the currently defined views (tabs) for the Event panel in the main window. Each view
can consolidate entries from one or more Log Managers.
Event View Manager Window
180
Automated Security Manager Help
• Title − The name that appears on the tab in the Event panel.
• Log Managers − A comma−separated list of the Log Managers that contribute entries to the
view.
Available Log Managers
• Name − This is the name assigned to the Log Manager.
• Type − Defines the source of the log information: Server or Local.
• Poll Interval − Streaming logs are constantly updated. Polled logs are updated at the
specified interval. Local Log Managers are Not Polled and must be manually refreshed in the
Event panel.
Logs Managers in View
This is a list of the log managers that have been configured for the currently selected view. When you
select multiple logs, the information that they provide is merged chronologically in the resulting table
in Event tab.
Buttons
Add
This button opens the New View window where you can define the settings for a new Event View and
add it to the Views table.
Edit (Event View)
This button is active when a View is selected in the Views table. It opens the Edit View window
where you can modify the settings for an Event View.
Remove
This button deletes the selected Event View from the Views table. The Console, Traps, or Syslog
Event Views cannot be removed.
This button adds a Log Manager selected from the Available Log Managers table to the list in the Log
Managers in View panel.
This button deletes a Log Manager selected from the list in the Log Managers in View panel.
New
This button opens the New Log Manager window where you can define parameters for a new log
manager.
Edit (Log Manager)
This button opens the Log Manager Parameters window where you can modify parameters for an
existing log manager.
Delete
This button removes a log manager selected from the Available Log Files.
Apply
Event View Manager Window
181
Automated Security Manager Help
This button applies the current Event Configurations, but leaves the Event View Manager window
open to allow additional configuration.
Event View Manager Window
182
New Log Manager Window
The New Log Manager window lets you create local log managers to use when configuring Event Views. It is
opened from the New button in the Available Log Managers area in the Event View Manager window.
Click areas in the window for more information.
Log Manager Name:
The name of this log manager.
Log File:
The path and filename of the log being managed by this log manager. You can type the path and name
or click Browse to open a file browser that you can use to select the appropriate log.
Pattern
If you are selecting a syslog file, select a Pattern from the drop−down list to be used to interpret the
information from the log file. You can select a currently defined pattern or click the Config button to
open the Custom Pattern Configuration window where you can create a new pattern to match a format
that is not parsed by one of the default pattern definitions:
• KIWI Pattern − Parses a basic KIWI Syslog Server file format
• NetSight Syslog Pattern Parses files generated by the NetSight Syslog Service
• NetSight Trap Log Pattern − Parses files generated by the snmpTrapd Service
• UNIX Syslog Pattern − Parses files generated by the built in UNIX/LINUX Syslog Service
• Console 1.x Pattern − Parses files generated by Console 1.x
• Console 2.0 Pattern − Parses files generated by Console, and its current plugins.
Buttons
Config
Opens the Custom Pattern Configuration window where you can create a pattern that will be used to
interpret information from a non−standard syslog file.
New Log Manager Window
183
Log Manager Parameters Window
This window displays parameters for a selected log manager. It is opened from the Edit button when a log
manager is selected in the Available Log Managers area in the Event View Manager window. The window
looks different depending on the type of log manager you have selected: server or local.
Use this window to configure the Poll Interval for the Traps Log Manager and the Syslog Log Manager, and
to configure the Pattern that will be used to interpret (parse) syslog information managed by the Syslog
Manager. You can also use this window to edit parameters for local log managers you have created.
Click areas in the window for more information.
Log Manager Name
Use this field to edit a local log manager name, if desired.
Log Directory/Log File
For the Syslog Log Manager, use the Edit Path button to edit the path to the requested syslog file. The
path must be a full path residing on the server. For a local log manager you have created, you can edit
the path and name or click Browse to open a file browser that you can use to select the appropriate
log.
Pattern
This drop−down list is only active when the Syslog Log Manager or a local log manager is selected.
You can select a currently defined pattern or click the Config button to open the Custom Pattern
Configuration window where you can create a new pattern to match a format that is not parsed by one
of the default pattern definitions:
• KIWI Pattern − Parses a basic KIWI Syslog Server file format
• NetSight Syslog Pattern Parses files generated by the NetSight Syslog Service
• NetSight Trap Log Pattern − Parses files generated by the snmpTrapd Service
• UNIX Syslog Pattern − Parses files generated by the built in UNIX/LINUX Syslog Service
• Console 1.x Pattern − Parses files generated by Console 1.x
• Console 2.0 Pattern − Parses files generated by Console, and its current plugins.
Log Manager Parameters Window
184
Automated Security Manager Help
Poll Interval
This field is only active when the Syslog or Traps Log Manager is selected. This is the time interval
(in seconds) between retrieving information from the log.
Buttons
Edit Path
Opens the Edit Log Path window where you can edit the path to the requested syslog file. The path
must be a full path residing on the server. This button is only available when the Syslog Log Manager
is selected.
Config
Opens the Custom Pattern Configuration window where you can create a pattern that will be used to
interpret information from a non−standard syslog file. This button is only available when the Syslog
Log Manager or a local log manager is selected.
Log Manager Parameters Window
185
Custom Pattern Configuration Window
This window lets you create a pattern that will be used to interpret information from a non−standard syslog
file. A sample line is shown un−parsed in the Sample Log Line. The Pattern line contains Fields and
Delimiters that determine how each data element in the sample line will be parsed and placed in a column in
the Event View. The Parsed table shows how the results will be presented in the Event View panel.
You can access this window from the Config button in the Log Manager Parameters window or the Log
Manager Parameters − New window.
Click areas of the window for more information.
Name
This is the Pattern name. You can select one of the standard patterns or a previously defined pattern,
or click New and type a name for a new pattern. The following standard patterns are available:
• KIWI Pattern − Parses a basic KIWI Syslog Server file format
• NetSight Syslog Pattern Parses files generated by the NetSight Syslog Service
• NetSight Trap Log Pattern − Parses files generated by the snmpTrapd Service
• UNIX Syslog Pattern − Parses files generated by the built in UNIX/LINUX Syslog Service
Custom Pattern Configuration Window
186
Automated Security Manager Help
• Console 1.x Pattern − Parses files generated by Console 1.x
• Console 2.0 Pattern − Parses files generated by Console, and its current plugins.
Fields
This table lists the field types that identify the column in which a particular element of parsed
information should be placed. Selecting a field type full pattern is enclosed within angle brackets (< ,
>) to signify beginning and end. A newline (\n) is assumed at the end in this case, but could be made
required. Words within percentage symbols represent the column in which a piece of parsed
information should be put. The percentage symbol words used here are listed as follows:
• %pri% = Priority string
• %pdate% − Parsed Date − Console is capable of interpreting several date formats. Use this
field with %ptime% for most standard date/time formats. If this does not present the date
correctly, use the following fields to parse the individual elements in the date.
• %date% − parses date elements and places the parsed information into the Date/Time column.
• %month%, %day%, %year% − separately parsed date elements. The parsed results are placed
in the Date/Time column.
• %ptime% − Parsed Time − Console is capable of interpreting several time formats. Use this
field with %pdate% for most standard date/time formats. If this does not present the time
correctly, use separate fields to parse the individual elements in the time.
• %time% − parses the time elements and places the parsed information into the Date/Time
column.
• %hour%, %min%, %sec%, %ampm% − separately parsed time elements. The parsed results
are placed in the Date/Time column.
• %cat% − Category provides a means for sorting events (e.g., Poller, Application, Error)
• %sev% − Severity
• %user% − Username associated with the event.
• %ip% − Host IP Address associated with the event.
• %type% − Type (Event or Trap)
• %event% − a more specific keyword/phrase (i.e. “Contact Lost”, “Contact Established”)
• %info% − The information string.
• %discard% − information that is not used. This is information that is skipped over to parse the
next piece.
Delimiters
This table lists the characters that are used in the selected file to separate information types. The list
contains two types of whitespace delimiters (\w for whitespace and \t for tab). Use the \t when a single
tab separates elements in the sample line. Whitespace can be used when the separator in the sample
line is a tab, a series of tabs or series of spaces. Reserved characters must be preceded by a backslash
(\)., The following delimiters are available:
• \r − return
• \t − tab
• \n − new line
• \w − whitespace
• , − comma
• . − period
• : = colon
• ; − semicolon
• − − dash
Pattern
Custom Pattern Configuration Window
187
Automated Security Manager Help
Displays the the selected Fields and Delimiters that determine how each data element in the sample
line will be parsed and placed in a column in the Event View.
Sample Log Line
This is a sample of raw log information.
Parsed
This table shows how the information will be presented in the Events tab. Cells are filled with the
sample line information as field types are selected and delimited.
Buttons
New
This button places a default name into the name field and clears the Pattern field, allowing you to
define a new pattern. You can swipe the default name and type a name of your own choosing.
Delete
This button removes the currently selected pattern.
(Add Field)
This button (below the Fields list) adds the currently selected field to the Pattern field. You can also
double click a field type to add it to the pattern or you can type field types directly into the pattern.
(Add Delimiter)
This button (below the Delimiters list) adds the currently selected delimiter to the Pattern field. You
can also double click a delimiter to add it to the pattern or you can type a delimiter directly into the
pattern.
Apply
Applies the current pattern to the Pattern Name, but leaves the window open to allow
creating/modifying another pattern.
OK
Applies the current pattern to the Pattern Name and closes the window.
Custom Pattern Configuration Window
188
New/Edit (Event) View Window
This window lets you define the name and any columns that you want to add to a new or existing Event View.
It is opened from either the Add or Edit button in the Views area in the Event View Manager window.
Click areas in the window for more information.
Name
The name for the Event View. This is the name that will appear on the tab for this view in the Event
View panel.
Additional Columns
You can choose one or more of the three standard column choices (System Name, System Location,
System Description) or define your own Custom columns. Custom columns can be added for any
column from the NSDEVICES table. The NSDEVICES table can be found in the NsSchema.xml file
in the <install area>\Enterasys Networks\NetSight Console\client\etc\database directory.
One or more columns can be defined as a comma delimited string using the following format:
objName.objField:columnName
where:
objName.objField is the field name from the NSDEVICES table.
columnName is the name that will appear as the column heading.
For example:
chassisID:Chassis
NOTE: Device data in the Event View is not dynamically updated as the device's data changes.
You will need to Refresh the Event View in order to see any changes.
New/Edit (Event) View Window
189
Automated Security Manager Help
New/Edit (Event) View Window
190
Open Log File Window
This window lets you select a log file from either the client or server for viewing in the Event Log Viewer
window. It also lets you select the format that will be used to parse the information that is presented in the
Event Log Viewer. You can access this window from the Open Event Log button
in the lower−right
corner of the Event View.
You can open an event log from the local Console Client or from the NetSight Server. Both browsers offer
several parsers to interpret the log information.
Event Log Parser
This drop down list lets you select a Pattern that will be used to interpret the log information
presented in the Event Log Viewer window. The following standard patterns are available:
• KIWI Pattern − Parses a basic KIWI Syslog Server file format
• NetSight Syslog Pattern Parses files generated by the NetSight Syslog Service
• NetSight Trap Log Pattern − Parses files generated by the snmpTrapd Service
• UNIX Syslog Pattern − Parses files generated by the built in UNIX/LINUX Syslog Service
• Console 1.x Pattern − Parses files generated by Console 1.x
• Console 2.0 Pattern − Parses files generated by Console, and its current plugins.
• 1.x Plugin Pattern − Parses files generated by NetSight (version 1.x) Plugin Applications
• Red Hat LINUX Syslog Pattern − Parses files containing Red Hat LINUX Syslog entries
Open Local Event Log
This browser opens with the default path set to the <install area>\Enterasys Networks\NetSight
Console\client directory.
Sample File Browser Window
Open Log File Window
191
Automated Security Manager Help
Open Event Log on Server
This browser opens with the default path set to the <install area>\Enterasys Networks\NetSight
Console\server\logs directory.
Sample File Browser Window
Open Event Log on Server
192
Automated Security Manager Help
Open Event Log on Server
193
Incident Test Tool
This tool lets you test and debug the search scopes and actions to verify ASM's response to an event.
Click areas in the window for more information.
Two levels of testing can be performed:
• Test response by sending an SNMP trap to ASM − this level uses Console's SNMPTrap Service to
receive the trap and notify ASM of the threat. This is the more comprehensive test because it
simulates exactly the workings of an actual trap. This test requires that the SNMP message be
correctly specified (including authentication credentials) and that Console's SNMPTrap Service is
running.
NOTES:
Incident Test Tool
1. Your client system must have SNMP access to the server to use the Test
response by sending an SNMP trap to ASM level of testing.
2. The NetSight SNMPTrap Service (snmptrapd) must be configured with
Security User credentials and/or Engine IDs for devices from which Console's
SNMPTrap Service (snmptrapd) will accept SNMPv3 Notification messages.
Without this information, notification messages are dropped by SNMPTrap
Service. The traps do not appear in the Events view and ASM will not receive
notification. Refer to How to Configure the SNMPTrap Service to learn more
about configuring SNMPTrap Service.
194
Automated Security Manager Help
• Test response by directly invoking ASM − this level bypasses the SNMP trap mechanism, sending
the trap directly to ASM. ASM processes the threat as if it were received as a real SNMP trap
message. If ASM is in Search and Respond mode, the configured action will be applied.
Specify parameters of test incident to be sent to ASM
These parameters are used with both levels of testing. Your settings here define a simulated threat that
will be sent to ASM. You should specify parameters that match your settings for the Rule that you are
testing.
Sender ID
This is a unique identifier associated with the intrusion detection system that detected the
security event.
Sender Name
The sender name being tested. This is a unique name associated with the intrusion detection
system that detected the event. Sender Names are case sensitive.
Threat Category
The event category being tested. ASM's default event categories are ASM_ATTACK,
ASM_COMPROMISE, ASM_INFORMATIONAL, and ASM_MISUSE. Event Category
Names are case sensitive.
Signature
A signature provides a unique identifier for the threat being tested.
Threat IP
This is the IP address of the end station attached to the port where the threat was detected.
Specify additional parameters for sending SNMP trap
These parameters allow Console's SNMPTrap Service to receive a test trap and notify ASM of the
threat. They allow more comprehensive testing that simulate the receipt of an actual trap by Console's
SNMPTrap Service.
SNMPv3 User Name
The user name of the simulated user that will be used for testing.
Authentication Type
The authentication method used for the inform (MD5 or SHA) message.
Authentication Password
The authentication password of the simulated user.
Privacy Type
The encryption method used for the inform (DES or None) message.
Privacy Password
The encryption password for the simulated user.
Trap Receiver
This is the system where the SNMPTrap Service is running.
Trap Sender
This is the system that is sending the SNMP trap.
Save Password (clear text)
When checked, the password information is saved as human readable text in the
automatedSecurity.properties file in the <install area>\NetSight Automated Security
Manager\Resources directory.
CAUTION: This feature is intended for use in a test environment and could present a
security risk in your live network environment. It is recommended that it not
be checked in a production environment.
Incident Test Tool
195
Automated Security Manager Help
Buttons
Send Incident to ASM
Sends the test (inform) message that you've configured to ASM. If you've configured your ASM
Rules correctly, the message information should appear in the ASM Monitor.
Buttons
196
ASM Log Entry Details Window
This window displays detailed information about a specific trap/action entry selected in the Automated
Security Manager Activity Monitor. Activities related to the selected Activity Monitor entry are listed
chronologically, by default, with newer activities at the bottom. You can change the arrangement by clicking a
heading to sort the table in ascending or descending order. The Log Entry Details window is launched by
double−clicking an entry in the Activity Monitor table or from the View Details option on the ASM Activity
Monitor right−click menu.
Log details are maintained in date−stamped files in the <console install area>\NetSight
Console\server\logs directory. A new file is opened each day. Entries in these files wrap around
(overwrite the oldest information) when the file reaches its maximum size (1 Mb) and there is no automatic
housekeeping to remove older files from this directory.
Click areas in the window for more information.
Details Table
Acknowledge
This column can be checked which lets you hide items that have been acknowledged. Click the check
box to acknowledge the item and then click the Show Acknowledged Events button to hide or show
the checked items.
Severity
Indicates the potential impact of the event.
Category
For traps, this column shows the event category for the event.
ASM Log Entry Details Window
197
Automated Security Manager Help
Timestamp
Shows the date and time when the event occurred.
Source
Shows the IP address of the host that was the source of the event.
Client
Shows the hostname of the source of the event.
User
Associates an event with the user that performed the action that triggered the event.
Type
Identifies the type of information for this row (event, or trap).
Event
Shows the type of event or trap.
Information
Shows an summary explanation of the event, or trap.
Right−click Menu
A right−mouse click on a column heading or anywhere in the table body (or a left−mouse click on the Table
Tools
button when visible in the upper left corner of the table) opens a popup menu that provides
access to event options and a set of Table Tools that can be used to manage information in the table. The
right−click menu for the Event View provides the following options in addition to those available as standard
options:
• Acknowledge Selected − places a check in the Acknowledge column for all of the selected rows.
• Unacknowledge Selected − removes the checks in the Acknowledge column from all of the selected
rows.
• Acknowledge All − places a check in the Acknowledge column for all rows.
• Unacknowledge All − removes the checks in the Acknowledge column from all rows.
• Event Details − opens the Event Details window which provides additional information about a
selected event or trap.
Buttons
Refresh
This button updates the table information.
Buttons
198
Menu Bar
The ASM menu bar provides access to tools and functions that help you maintain the security of your
network. ASM menus are available in several forms, designed for your convenience when accessed in a given
situation. Many of the options available from menus are also available as buttons the toolbar. Icons associated
with these menu options indicate when the same option is available from a toolbar. Specific menu options are
dynamically enabled and disabled depending on which window, object, and tab is selected.
Click areas in the window for more information.
Menu Bar
199
Automated Security Manager Help
File
Database > Import v1.5 ASM Database
Opens a file browser where you can select a Netsight Console version 1.5 database and import ASM
components into your Console 2.2 database. A confirmation dialog warns that you will overwrite
ASM components in the current database. Refer to How to Import a Database for more information
about importing ASM components into a database.
Database > Initialize ASM Components
Initializes the ASM components in the current database, restoring them to the default settings that
existed immediately after installation. This option does not affect other Console database components.
Exit
Terminates an ASM session.
View
Show Statistics Summary Panel
When checked, the Statistics Summary panel is presented in the Activity Monitor window.
Show Operational Mode Panel
When checked, the Operational Mode panel is presented in the Activity Monitor window.
Show Incident Filter
When checked, the Incident Filter panel is presented in the Activity Monitor window.
Tools
Authorization/Device Access
Opens the Authorization/Device Access window where you can configure users and groups and
control their access to features in NetSight applications.
Server Information
Opens the Server Information window where you can view and configure certain NetSight Server
functions.
Incident Test Tool
Opens the ASM Incident Test Tool where you can create a simulated trap message and send it to
ASM to verify the response that you've configured. This button is only active in Search Only and
Search and Respond operational modes.
Modify snmptrapd.conf
Opens a text editor window where you can define user credentials in the TrapService configuration
file (snmptrapd.conf). Refer to snmptrapd.conf Text Editor Window more information about editing
the snmptrapd.conf file.
ASM Configuration
Opens the Automated Security Manager Configuration window. The Configuration Window takes
you step−by−step through configuring Automated Security Manager actions and targets. The window
File
200
Automated Security Manager Help
is dynamically updated as you set or change/define settings, always presenting the appropriate options
as your configuration progresses. As you move through the steps, the selections that you make along
the way determine the selections that are appropriate for the following steps.
Statistics
This option provides access to a submenu that gives you selections that determine the statistics
presented in the Activity Monitor window:
• Configure − opens the ASM Statistics window where you can select the specific data
elements to show in the Statistics Summary panel.
• Reset Counters − resets the counters for the accumulated data and sets the timestamp to the
current date and time. Refer to the ASM Statistics window for a description of specific data
elements.
• Show Summary Panel − when checked, displays the Statistics Summary as a panel in the
upper half of the ASM Activity Monitor window.
Operational Mode
This option provides access to a submenu that controls ASM's operational mode:
• Show as Panel − when selected, displays a full Operational Mode panel in the ASM Activity
Monitor window.
• Show as Icon − when selected, displays an iconized version of the Operational Mode panel as
a traffic light in the upper right corner of the ASM Activity Monitor window.
• Disabled − when selected, Automated Security Manager is not active. It neither seeks out the
sources of network threats nor responds to them.
• Search Only − when selected, security threats are recognized, source ports are identified and
the information is recorded in the Activity Monitor but, no response is applied.
• Search and Respond − when selected, Automated Security Manager is fully active. In this
state, threats are recognized, source ports are identified, and responses (actions) applied.
Options
Opens the Options window where you can set various parameters used by the Automated Security
Manager.
Applications
The Applications menu provides links to Console and other NetSight applications that are installed as
NetSight Clients on this system.
Help
Help Topics (Contents)
Opens the help browser to the Automated Security Manager Help System Welcome topic where you
can access all of Automated Security Manager's online help topics.
Release Notes
Opens the help browser to the Release Notes that were effective when this version was installed. For
more current information, visit the Enterasys documentation Web site:
www.enterasys.com/support/manuals, and open/download the latest version of the
NetSight Automated Security Manager Release Notes.
Support Center (Help Center)
Applications
201
Automated Security Manager Help
Opens your system's Web browser and takes you to the Enterasys Global Support Web page.
Check for Updates
Allows you to update Automated Security Manager with the latest version of release notes and critical
changes. Refer to Web Update for more information.
Getting Started
Opens the Getting Started Help information to introduce first−time users to the features in NetSight
Automated Security Manager.
About This Window
Displays help for the content currently displayed in the Main window.
About NetSight Automated Security Manager
Displays the revision and copyright notice information for the currently installed version of NetSight
Automated Security Manager.
Applications
202
Open Log File Window
This window lets you select a log file from either the client or server for viewing in the Event Log Viewer
window. It also lets you select the format that will be used to parse the information that is presented in the
Event Log Viewer. You can access this window from the Open Event Log button
in the lower−right
corner of the Event View.
You can open an event log from the local Console Client or from the NetSight Server. Both browsers offer
several parsers to interpret the log information.
Event Log Parser
This drop down list lets you select a Pattern that will be used to interpret the log information
presented in the Event Log Viewer window. The following standard patterns are available:
• KIWI Pattern − Parses a basic KIWI Syslog Server file format
• NetSight Syslog Pattern Parses files generated by the NetSight Syslog Service
• NetSight Trap Log Pattern − Parses files generated by the snmpTrapd Service
• UNIX Syslog Pattern − Parses files generated by the built in UNIX/LINUX Syslog Service
• Console 1.x Pattern − Parses files generated by Console 1.x
• Console 2.0 Pattern − Parses files generated by Console, and its current plugins.
• 1.x Plugin Pattern − Parses files generated by NetSight (version 1.x) Plugin Applications
• Red Hat LINUX Syslog Pattern − Parses files containing Red Hat LINUX Syslog entries
Open Local Event Log
This browser opens with the default path set to the <install area>\Enterasys Networks\NetSight
Console\client directory.
Sample File Browser Window
Open Log File Window
203
Automated Security Manager Help
Open Event Log on Server
This browser opens with the default path set to the <install area>\Enterasys Networks\NetSight
Console\server\logs directory.
Sample File Browser Window
Open Event Log on Server
204
Automated Security Manager Help
Open Event Log on Server
205
Options Window
The Options window allows you to set options for NetSight functions on a suite−wide and per−application
basis. The Options window has a right−panel view that changes depending on what you have selected in the
left−panel tree. Each view allows you to set different options. You can access the Options window using
Tools > Options in the menu bar.
Information on the following options:
• Suite Options
• Client/Server SNMP Redirection
• Data Display
• Date/Time Format
• Device Display Name
• Event Logs
• Services for NetSight Server
• SMTP E−Mail Server
• Status Polling
• Updates
• Automated Security Manager Options
• Action Limits
• Dialog Boxes
• Dragon EMS
• SNMP
Options Window
206
Automated Security Manager Options
Automated Security Manager Options (Tools > Options) lets you define your preferences for ASM
operations. The right−panel view changes depending on what you have selected in the left−panel tree. Expand
the Automated Security Manager folder to view all the different options you can set.
Click Option headings for more information.
Common Buttons
Restore Defaults
Sets the Options settings in the currently selected view to the (default) values that existed when ASM
was first installed. Fields are cleared for options that do not have default settings.
Automated Security Manager Options
207
Automated Security Manager Help
Apply
Sets the currently defined settings and keeps the Options window open.
OK
Sets the options and closes the window.
Cancel
Cancels any changes you have made and closes the window.
Help
Displays this Help topic.
Action Limits
This view lets you set limits for Automated Security Manager's threat responses.
Click areas in the view for more information.
Action Limits
208
Automated Security Manager Help
Max Number of Outstanding Actions
This parameter limits the number of outstanding (pending execution) actions.
Max Number of Action per Threat
This parameter sets a limit on the number of actions that can be executed for a given threat. Both
pending and executed actions are counted toward the maximum. When the limit is reached, no further
actions will be executed for the threat.
Dialog Boxes
This view lets you configure whether certain dialog boxes are shown or ignored.
Click areas in the view for more information.
Dialog Boxes
209
Automated Security Manager Help
Show Edit Mode Required Dialog
The Edit Mode Required dialog appears if you try to make changes in the ASM Configuration
window without first selecting Edit Mode. Deselecting this checkbox means that the dialog will not
appear and you will automatically be put in Edit Mode.
Dragon EMS
This view lets you integrate management of your Dragon EMS host systems into the Application menu in
Automated Security Manager.
Click areas in the view for more information.
Dragon EMS
210
Automated Security Manager Help
NOTE: Dragon EMS host names are case
sensitive.
Dragon EMS Host/IP
The Dragon EMS hostname or IP address.
Dragon EMS List
This list contains the Dragon EMS hosts that have been defined for Automated Security Manager.
Buttons
Add to List
Adds the Dragon EMS host, typed into the associated field, to the list.
Remove from List
Removes a selected Dragon EMS host from the list.
Buttons
211
Automated Security Manager Help
SNMP
The SNMP view lets you specify options that define the ASM's SNMP polling parameters.
Click areas of the window for more information.
Number of SNMP Retries
The number of attempts that will be made to contact a device when an attempt at contact fails. The
default setting is 3 retries, which means that ASM retries a timed−out request three times, making a
total of four attempts to contact a device.
Length of SNMP Timeout
The amount of time (in seconds) that ASM waits before re−trying to contact a device.
SNMP
212
Restore Database Window
Use the Restore Database window to restore the initial database or restore a saved database. Both functions
will cause all current client connections and operations in progress to be terminated. You can access this
window by clicking the Restore button in the Database tab of the Server Information window.
Click the graphic for more information.
Restore Initial Database
Restoring an initial database removes all data elements from the database and populates the NetSight
Administrator authorization group with the name of the logged−in user. You must restart both the
NetSight Server and the client following an initialize database operation.
Restore Saved Database
Specify the database you wish to restore or use the Browse button to navigate to the database. If the
server is remote, you only have access to databases in the default database backup directory.
Buttons
Restore
Starts the restore operation.
Restore Database Window
213
Server Information
Window
The Server Information window lets you view and configure certain NetSight Server functions, including
management of client connections, database backup and restore, locks, and licenses. It also provides access to
the server log and server statistics. To access this window, select Tools > Server Information from the menu
bar. You must be assigned the appropriate user capabilities to access and use this window.
Information on the following tabs:
• Client Connections
• Database
• Locks
• Server Log
• License
Client Connections Tab
The Client Connections tab provides information that lets you view and manage current client connections to
this server, and also view a history of client connections.
Click the graphic for more information.
Server InformationWindow
214
Automated Security Manager Help
Current Client Connections
This table lists all of the currently connected clients for this server, with the most recent connection at the top.
The list is automatically updated when clients connect or disconnect.
User:
The name of the user that has connected to the server as a client.
Authorization Group
The authorization group the user belongs to.
Client Type
The type of client, which will be NetSight Console or a NetSight plugin application such as Inventory
Manager.
Client Host
The name of the client host machine.
Connection Started
The date and time the client connection started.
Disconnect Button
Server InformationWindow
215
Automated Security Manager Help
Disconnects the selected client. The client being disconnected receives a message saying that their
connection will be terminated in 30 seconds. You must be assigned the appropriate user capability to
disconnect clients.
Client Connection Log
The client connection log displays a list of all client connect and disconnect activities, and allows you to track
the history of a particular client connection. The table displays the last 50,000 log entries, and updates
automatically when a client connects or disconnects. The current log file is automatically archived when its
size reaches 1 megabyte and opens a new log.
Acknowledge:
This checkbox lets you acknowledge an event and also hide items that have been acknowledged.
Click the checkbox to acknowledge the item and then click the Show Acknowledged Events button
to hide or show the checked items.
Severity
The event's severity.
Category
The category of event: user connection.
Timestamp
The date and time when the event occurred.
Client
The name of the client host machine that triggered the event.
User
The name of the user that triggered the event.
Type
The type of information: event.
Event
The type of event.
Information
Information about the client authentication or disconnect.
Show/Hide Acknowledged Events
This button hides or shows items in the table that have been acknowledged by a check in the
Acknowledge column.
Refresh
Refreshes the log.
Clear Log
Server InformationWindow
216
Automated Security Manager Help
Clears the log. If you want to retain a copy of the log that you are clearing, you must manually copy
the date−stamped file in the <install area>\Enterasys Networks\NetSight
Console\server\logs\admin.log.
Database Tab
This tab allows you to manage the password and connection URL for the database, and perform database
backup and restore operations. You must be assigned the appropriate user capabilities to perform these
functions.
IMPORTANT: When Console is installed, it automatically secures the MySQL database server by
removing all the root and anonymous users from the MySQL user database. Console then
adds one generic user name (user = netsight) and password (password = enterasys). It is
recommended that you change this password, since all customers who install Console will
know this generic password.
Click the graphic for more information.
Database Server Properties
Database server properties are used by the NetSight Server when it connects to the database. The database is
secured via a credential comprised of a user name and password (see the Important note above). This area lets
Database Tab
217
Automated Security Manager Help
you modify that password, and also view and modify the connection URL for the database.
Password
Click Change to display a window where you can enter a new password. The password is masked
unless you select the checkbox to Show Password. You must restart both the NetSight Server and
client after you change the database password.
Connection URL
Displays the URL the NetSight Server uses when connecting to the database. For troubleshooting
purposes, (for example, if you can't connect to the database) you may wish to enter a new connection
URL. Enter a new URL in the following format, and click Apply:
jdbc:mysql://[hostname]/<database>
where [hostname] is optional.
You must restart both the NetSight Server and client after you change the Connection URL.
NetSight Data Set Operations
This area lets you perform database backup and restore operations.
Backup Button
Opens the Backup Database window where you can save the currently active database to a file. If the
NetSight Server is local, you can specify a directory path where you would like the backup file stored.
If the server is remote, the database will be saved to the default database backup location.
Restore Button
Opens the Restore Database window where you can restore the initial database or restore a saved
database. Restoring an initial database removes all data elements from the database and populates the
NetSight Administrator authorization group with the name of the logged−in user. Both functions will
cause all current client connections and operations in progress to be terminated. You must restart both
the NetSight Server and the client following an initialize database operation. When restoring a
database, if the server is remote, you only have access to databases in the default database backup
directory.
Locks Tab
The Locks tab lets you view a list of currently held operational locks. Operational locks are used to control the
concurrency of certain client/server operations. They are used in two ways:
• to lock a device while a critical operation is being performed, such as a firmware download.
• to lock a certain function so that only one user can access it at a time. For example, only one user can
have the Authorization/Device Access window open at a time.
In the Current Locks table you can view information about each lock, such as who owns the lock, the duration
of the lock, and a description of the lock. You can cancel a lock by selecting it in the table and clicking the
Revoke button. When a lock is revoked, a message is displayed on the user's machine informing them that
their use of the locked functionality has been terminated. When the user acknowledges the message, the
function closes. You must be assigned the appropriate user capability to revoke a lock.
Click the graphic for more information.
Locks Tab
218
Automated Security Manager Help
User:
The name of the user who initiated the lock.
Authorization Group
The authorization group the user belongs to.
Client Type
The type of client: Console or a NetSight plugin application.
Client Host
The client host machine.
Duration
The amount of time the lock has been held.
Description
A description of the lock.
Refresh Button
Refreshes the table and obtains updated lock information.
Revoke Button
Removes the selected lock. When a lock is revoked, a message is displayed on the user's machine
informing them that their use of the locked functionality has been terminated. When the user
acknowledges the message, the function closes.
Locks Tab
219
Automated Security Manager Help
Server Log Tab
The Server Log displays all the events for the server. Server Log entries are listed by date and time, with
newer entries listed at the bottom. A new Server Log is created every day. If the NetSight Server is local, you
can view previous logs using the File tab.
You can perform Find and Filter operations on Server Log entries to target specific entries of interest. The last
Filter and Find settings you enter remain in the Server Log display until you refresh the display.
Information on the following tabs:
• Find Tab
• Filter Tab
• File Tab
Find Tab
The Find tab lets you search the Server Log (filtered or unfiltered) for a specific set of characters, like a word,
phrase, or number. Enter your search criteria in the Find field, and when you click the Find button, any search
terms found will be highlighted in the Server Log display. You can search forward or backward from your
current position, and restrict your search to match the exact upper or lowercase, and/or whole word.
Click the graphic for more information.
Display:
Server Log Tab
220
Automated Security Manager Help
Use the drop−down list to select the number of lines you would like displayed in the log.
Find:
Enter the text or numeric value you want to find.
Case Sensitive
Select this checkbox to search based on an exact match of the upper or lowercase of the text entered
in the Find field.
Match Whole Word
Select this checkbox to search based on an exact match of the whole word or numeric value entered in
the Find field.
Forward
Select Forward to search from your current position to the end of the Server Log.
Backward
Select Backward to search from your current position to the beginning of the Server Log.
Server Log Entries
Lists the events by date and time, with the more recent entries at the bottom. Directly above the
entries you can see the status of whether the entries are filtered or not filtered. Any search terms found
are highlighted.
Find Button
Performs the Find operation on the information currently displayed in the Server Log.
Clear Filter Button
Removes any filters currently in effect.
Refresh Button
Displays and updates log entries, and removes any filters. The Server Log does not refresh
automatically. If the Server Log is open and new entries are written to the log, you must click Refresh
to update the log.
Filter Tab
The Filter tab lets you specify which entries to display in the Server Log. Enter the information you want to
see, and only matching log entries will be displayed. You can use any combination of filter options, and you
can perform consecutive filters on the filtered events.
Click the graphic for more information.
Server Log Tab
221
Automated Security Manager Help
Display:
Use the drop−down list to select the number of lines you would like displayed in the log.
Filter:
Enter the text or numeric value you want to use as a filter.
Case Sensitive
Select this checkbox to search based on an exact match of the upper or lowercase of the text entered
in the Filter field.
Match Whole Word
Select this checkbox to search based on an exact match of the whole word or numeric value entered in
the Filter field.
Entire Text
Select the Entire Text scope option to filter all text by the value in the Filter field. If you have
already performed a filter, this will enable you to perform a new filter on all entries instead of just the
filtered entries.
Filtered Text
Select the Filtered Text scope option to perform a new filter on the results of the previous filter.
Server Log Entries
After running the filter, this area displays the matching Server Log entries by date and time, with the
more recent entries at the bottom. Click Clear Filter to remove the filter currently in effect. Directly
Server Log Tab
222
Automated Security Manager Help
above the entries you can see the status of whether the entries are filtered or not filtered.
Filter Button
Performs the filter and displays the results.
Clear Filter Button
Removes any filters currently in effect.
Refresh Button
Displays and updates log entries, and removes any filters. The Server Log does not refresh
automatically. If the Server Log is open and new entries are written to the log, you must click Refresh
to update the log.
File Tab
The File tab lets you specify which day's server log you wish to view. You can select the current day's log file,
or a previous day's log file. The NetSight Server must be local in order to view previous logs.
Click the graphic for more information.
Display:
Use the drop−down list to select the number of lines you would like displayed in the log.
Current Log
Server Log Tab
223
Automated Security Manager Help
Select this button to view the current day's log. The name of the log and the path to where it is located
is displayed in the field to the right.
Previous Log
Select this button to view a previous day's log. Click the Open button to open a file selection window
where you can select the log you want to view. The file names are dated, in the format
YYYY_MM_DD_events.log. The NetSight Server must be local in order to view previous logs.
Server Log Entries
Lists the entries in the currently selected Server Log, by date and time, with the more recent entries at
the bottom. If you apply a filter to the log, only the entries that match the filter are displayed on this
tab.
Clear Filter Button
Removes any filters currently in effect.
Refresh Button
Displays and updates log entries, and removes any filters. The Server Log does not refresh
automatically. If the Server Log is open and new entries are written to the log, you must click Refresh
to update the log.
License Tab
The License tab displays a list of all the server plugin applications that have been installed on this particular
NetSight server, and their respective license information. You can also use this tab to change a license. You
would change a license in the event that you want to upgrade from an evaluation copy to a purchased copy or
upgrade to a license that supports more users/devices. You can also use the Change License functionality to
upgrade a Console license from a Standalone to a Client−Server configuration on UNIX or Linux systems
only (see Upgrading a Console License for more information.)
Contact your Enterasys Networks Representative to purchase the software and receive a Licensed Product
Entitlement ID that allows you to generate a product license. Prior to changing a license, you must redeem
your Entitlement ID for the new product license. Refer to the instructions included with the Entitlement that
was sent to you. (For more information, see
http://www.enterasys.com/products/management/.)
Click the graphic for more information.
License Tab
224
Automated Security Manager Help
Server License Limitations
Information on the selected server license:
• whether the server accepts connections from remote clients.
• the maximum number of devices that can be managed by the server.
• the maximum number of unique client hosts allowed to connect to the server.
Installed Server Plugin
The name of the installed server plugin application.
Version
The version of the server plugin application.
License
The license number of the server plugin application. This is the license text that was entered during
installation.
Expires
If the plugin is an evaluation copy, this column displays the date the license expires.
Refresh Button
Refreshes the table and obtains updated license information.
Change License Button
Opens the Change License window. Read and accept the terms of the license agreement and click
OK. Enter the license text that you received when you generated the product license. (When you
purchased your Enterasys software product, you received a License Entitlement ID that allows you to
License Tab
225
Automated Security Manager Help
generate a product license. Refer to the instructions included with the License Entitlement ID that was
sent to you.) Click Update. The license file will be updated with the new license text.
Buttons
Configure
Opens the Configure Server window where you can configure various NetSight Server parameters
such as the maximum number of concurrent client connections supported by the NetSight Server.
Server Stats
Opens the Server Statistics window where you can view NetSight Server statistics such as CPU usage,
and also launch Advanced statistics used for troubleshooting purposes.
License Tab
226
NetSight Server Statistics Window
Use this window to view NetSight Server statistics. You can access the window by clicking the Server Stats
button in the Server Information window.
Click the graphic for more information.
CPU
The percentage of CPU being used by the NetSight Server.
Object Heap Memory in Use
The amount of object heap memory (in kilobytes) being used by the server. Heap memory refers to
the amount of free memory available to the program.
Buttons
Advanced
Opens the Advanced Statistics window, which provides server statistics that can be used for
troubleshooting purposes.
NetSight Server Statistics Window
227
snmptrapd.conf Text Editor Window
This window lets you edit the content of the snmptrapd.conf file to define credentials that will be used by
Console when receiving Inform messages. The File and Edit menus and toolbar provide facilities for editing
and saving the snmptrapd.conf file. The SNMPTrap Service must be restarted after editing the file. For more
information about Trap and Inform messages, refer to Traps and Informs.
Sample snmptrapd.conf file editor
Security information for Inform messages is defined using the createUser directive in the snmptrapd.conf
file. Add one createUser directive for each Security User: createUser
Example for Informs:
createUser myUser MD5 myauthpassword DES myprivpassword
Where:
myUser
security user name
snmptrapd.conf Text Editor Window
228
Automated Security Manager Help
myauthpassword
MD5
or SHA − authentication type and authentication password
(optional parameter − do not use when authentication is not
used)
myprivpassword
DES
− encryption type and encryption password − (optional
parameter − do not use when encryption is not used or leave
the encryption password blank if it is the same as the
authentication password).
Any time that the snmptrapd.conf file is changed, the SNMPTrap Service must be restarted.
Restarting snmptrapd Service
Depending on the system where the NetSight Server is running and your preference, there are several ways to
restart the snmptrapd service.
Restarting the snmptrapd service locally on the NetSight Server host system:
Windows
a. Go to the Taskbar Notification
Area of your desktop (on the
lower right of your screen,
unless you've relocated your
Taskbar).
b. Locate the Services Manager
icon (
) and right−click it.
c. Select SNMP Trap >
Restart.
Solaris
a. Navigate to the
etc/rc2.d directory.
b. Type the command:
S99NsSnmptrapd stop
c. Press Enter.
d. Type the command:
S99NsSnmptrapd start
e. Press Enter.
Linux
a. Navigate to the
etc/init.d
directory.
b. Type the
command:
NsSnmptrapd stop
c. Press Enter.
d. Type the
command:
NsSnmptrapd
start
e. Press Enter.
Restarting the snmptrapd service remotely from a NetSight Client host system:
Windows
Restarting snmptrapd remotely on
Windows host systems, is only
possible if both the Client and Server
are capable of running Remote
Desktop (a feature of Windows XP
Professional) or through the use of a
third−party facility that provides
similar capabilities to Remote
Desktop.
When you can access the Services
Manager on the remote system using
Restarting snmptrapd Service
Solaris
a. Telnet to the server and
login as an
administrative user.
b. Navigate to the
etc/rc2.d directory.
c. Type the command:
S99NsSnmptrapd stop
d. Press Enter.
e. Type the command:
S99NsSnmptrapd start
f. Press Enter.
Linux
a. Telnet to the
server and login as
an administrative
user.
b. Navigate to the
etc/init.d
directory.
c. Type the
command:
NsSnmptrapd stop
d. Press Enter.
229
Automated Security Manager Help
either Remote Desktop or a
third−party program, you can restart
snmptrapd as follows:
a. Go to the Taskbar Notification
Area of the remote desktop.
b. Locate the Services Manager
and right click the icon (
).
g. Log out and close the
telnet session.
e. Type the
command:
NsSnmptrapd
start
f. Press Enter.
g. Log out and close
the telnet session.
c. Select SNMP Trap >
Restart.
Restarting snmptrapd Service
230
Specify Program for Action/Undo Window
When creating a rule, this window lets you:
• customize the response to an event by selecting a program to be executed (Specify Program for
Action)
• specify an action that will be taken when a rule action is undone (Specify Program for Undo)
In either case, the information you configure is the same for both windows, only the title of the window is
different. The window is accessed from the ASM Configuration Window's Rule Definitions view.
Click areas in the window for more information.
Program to run
This field defines the script that will be launched as this Custom Action or Custom Undo. Scripts
must be stored in the <install area>\Enterasys Networks\NetSight
Console\server\plugins\AutoSecMgr\scripts directory. Type a script name, if known, or use the Select
button to open a file browser window and choose a script.
The Program to run field does not allow using options. For example, you cannot enter
myscript.bat –i <IP Address> −m <MAC Address> in the Program to run field.
TIP: To execute a script with options, create a script without options that executes
another script that has options (Windows only). For example:
1. Create a script named, asm_script.bat with an entry to call
Specify Program for Action/Undo Window
231
Automated Security Manager Help
myscript.bat
such as:
C:\Program Files\My Custom Files\myscript.bat –i %1 −m %2".
2. Uncheck all but the Threat IP and Threat MAC checkboxes and select
Unformatted without spaces (you don't want to send any keyword
(thip= or thmac=) to your script.). The variable %1 returns <Threat IP
Address> and %2 returns the <Threat MAC Address>
If you are using PERL script, you might want to use a different
argument variable, such as $ARGV[0] (First argument) or @ARGV (all
arguments). Also, using the shell script, is similar to a Windows batch
file script (%1 for the first argument, %* for the all arguments).
Working Directory
This is the path to a directory from which the script will be executed. Any path references within your
script that are not absolute paths, will be relative to this directory. Enter a path or use the Select
button to open a file browser window and choose a directory.
Specify parameters to pass...
These check boxes let you select elements of the event information to be passed as parameters to your
program. The Select All button places a check in all of the boxes and the Deselect All button removes
checks from all of the boxes.
Specify format to use...
This area lets you select the format that will be used to pass the selected parameters to your program:
Formatted with keyword...
When selected, the parameters are passed using a format that includes a keyword associated
with each parameter (e.g., keyword="value"). So, for example, if Sender Name is selected
as a parameter, the keyword sname is used and the information passed to the script would be
sname="dragon_id" followed by a space and then the keyword and value for the next
parameter. The following table defines the keywords for each parameter and the order that the
values are passed to the script (listed from top to bottom in the table).
Parameter
Keyword
Sender Name
sname
Sender ID
sid
Event Category
ecat
Threat IP
thip
Threat MAC
thmac
Device IP
dev
Device Port
port
Rule Name
rname
Specify Program for Action/Undo Window
232
Automated Security Manager Help
Action
action
Details
dtls
SNMP Parameters (note 1)
SNMPv1, SNMPv2
Parameter
SNMPv3
Keyword
Parameter
Keyword
SNMP
Read
snmp="v1"
ro
SNMP
Read
snmp="v1"
rw
SNMP
Read,
SNMP
Write,
SNMP SU/
Max Acess
snmp="v3"
user
seclevel
authtype
authpwd
privtype
privpwd
SNMP
Read
snmp="v1"
su
Incident
incident
Note 1:
When any SNMP parameter is selected, the snmp=value
indicates the SNMP version and the subsequent parameters
contain the values assigned for the credentials associated
with the device. When multiple SNMP parameters are
checked (e.g., SNMP Write and SNMP Read) the values
for the highest access level are used for the script.
Example:
If Sender Name, Sender ID, Threat MAC, and SNMP Write are selected and the device is
configured for SNMPv1 credentials, the information passed to the script might look like:
sname="my sender name" sid="dragon id" thmac="00.00.1d.11.22.33" snmp="v1"
rw="public"
And, for a script named myscript.bat, the resulting script command would be executed as:
C:\Program Files\Enterasys Networks\NetSight
Console\server\plugins\AutoSecMgr\scripts\my_script.bat sname="my sender
name" sid="dragon id" thmac="00.00.1d.11.22.33" snmp="v1" rw="public"
Unformatted without spaces...
When selected, the parameters will be passed as space delimited, unformatted text, without
keywords. For this option, your script must know which parameters are being passed and in
what order. If a parameter contains any spaces, they will be replaced with an underbar ( _ ).
Example:
Sender Name, Sender ID, Threat MAC, and SNMP Write are selected and the device is
configured for SNMPv1 credentials, the information passed to the script might look like:
my_sender_name dragon_id 00.00.1d.11.22.33 v1 public
Specify Program for Action/Undo Window
233
Automated Security Manager Help
And, for a script named myscript.bat, the resulting script command would be executed as:
C:\Program Files\Enterasys Networks\NetSight
Console\server\plugins\AutoSecMgr\scripts\my_script.bat my_sender_name
dragon_id 00.00.1d.11.22.33 v1 public
Specify Program for Action/Undo Window
234
Toolbar
The ASM toolbar provides easy access to some of the more commonly used Automated Security Manager
menu functions. Some Toolbar buttons may not be available, depending on your current selection within
ASM. Pausing with your mouse pointer over toolbar icons displays tool tips showing each button's function.
The Toolbar offers the following shortcuts to frequently used menu selections:
Click areas in the window for more information.
Exit
Exits the application
Authorization/Device Access
Opens the Authorization/Device Access window where you can configure users and groups and
control their access to features in NetSight applications.
Server Information
Opens the Server Information window where you can view and configure certain NetSight Server
functions.
Incident Test Tool
This button opens the ASM Incident Test Tool where you can create a simulated trap message and
send it to ASM to verify the response that you've configured. This button is only active in Search
Only and Search and Respond operational modes.
ASM Configuration
Opens the Automated Security Manager Configuration window. The Configuration Window takes
you step−by−step through configuring Automated Security Manager actions and targets. The window
is dynamically updated as you set or change/define settings, always presenting the appropriate options
as your configuration progresses. As you move through the steps, the selections that you make along
the way determine the selections that are appropriate for the following steps.
Help − About This Window
Displays help for the content currently displayed in the main window.
Toolbar
235
Automated Security Manager Help
Toolbar
236
Updates Available Window
NetSight applications provide an easy way to download product updates using a web update operation
accessed from Help > Check for Updates in the menu bar. The Updates Available window displays any new
updates that are available for download, and lets you initiate the download operation. You must be assigned
the appropriate user capability to access this view.
Click the graphic for more information.
Download
Use the checkboxes in this column to select or deselect updates to be downloaded.
Product
The name of the product the update is for.
Available
The package version number for the available update.
Current
The package version number currently installed in the application.
Requires
Lists any dependencies for the update.
Download Progress
A progress bar showing the percent completed of the download operation.
Buttons
Download
Initiates the download operation.
Updates Available Window
237
Automated Security Manager Help
Details
Opens the NetSight Updates Details window where you can see details on what each update includes.
Updates Available Window
238
Usage Window
This window lets you view where rule variables are in use by ASM rules. The title of the window changes
depending on the rule variable you have selected. The window lists the selected variables and the rule
definition where each variable is used.
The Usage window is accessed by clicking the Used In button in the Rule Variables views in the ASM
Configuration window.
Sample Usage Window.
Usage Window
239
Reference Information
The References help folder contains information that is referenced by other help topics.
Double−click the References help folder in the left panel to open the folder and navigate to topics
describing a particular window.
Reference Information
240
Disable Log Entry Details
If you experience ASM performance problems while under extreme network load, you can improve
performance by disabling Log Entry Details. The Log Entry Details window displays information about a
specific trap/action entry in the Automated Security Manager Activity Monitor, and can be useful for
debugging purposes. The window is launched by double−clicking an entry in the Activity Monitor table.
To disable Log Entry Details, edit your ASM properties file as follows:
1. Navigate to the Properties file: <your install directory>\Enterasys Networks\Netsight
Console\server\plugins\AutoSecMgr\AutoSecMgr.properties
2. Open the AutoSecMgr.properties file in a text editor and add the following lines:
#asm.logging.summary.useTopic=false
#asm.logging.summary.enabled=false
asm.logging.detail.useTopic=false
asm.logging.detail.enabled=false
3. If you still have performance problems, you can disable all logging by uncommenting the two lines
that control summary logging. Summary logging refers to the events logged in the Automated
Security Event Log tab.
ipNetToMedia
Dot1dTpFdb
Dot1qTpFdb
802.1X (PAE)
Enterasys 802.1X Ext.
PWA
MAC Locking
Node/Alias (ctAlias)
MAC Authentication
Enterasys IGMP MIB
IGMP Standard MIB
RMON host table
RMON addressMap
IP Route
IP CIDR Route
Dot1q VLAN Static
Dot1q VLAN Current
Enterasys Multiple
Authentication
ipNetToMedia
IP Address Translation table used for mapping from IP addresses to physical addresses. This table is
read whenever an entry is found by IP Route or IP CIDR Route searches, regardless whether the
IPNetToMedia is checked. Checking the IPNetToMedia checkbox only affects whether or not the
entire IPNetToMedia table is read.
Check this MIB when your network includes devices that do not support Node/Alias (ctAlias MIB).
You should include your routers in your search scope when this MIB is checked.
This selection can be un−checked when your network is comprised only of devices that support
Node/Alias, thus improving search performance.
Disable Log Entry Details
241
Automated Security Manager Help
802.1x Authentication (PAE)
Port Access Entity module for managing IEEE 802.1X.
Check this MIB to find other occurrences of an IP address or MAC address within your search scope.
The values returned by searching this MIB are often duplicates of the values returned from other
MIBs, so checking this MIB is usually not necessary.
Enterasys MAC Locking
Provides configuration and status objects pertaining to per port MAC Locking.
Check this MIB to find other occurrences of an IP address or MAC address within your search scope.
The values returned by searching this MIB are often duplicates of the values returned from other
MIBs, so checking this MIB is usually not necessary.
Enterasys IGMP
Extends the Standard IGMP MIB for configuration of IGMP on Enterasys devices.
Check this MIB to find other occurrences of an IP address or MAC address within your search scope.
The values returned by searching this MIB are often duplicates of the values returned from other
MIBs, so checking this MIB is usually not necessary.
RMON addressMap
MAC address to network address bindings discovered by the probe and what interface they were last
seen on.
Check this MIB to find other occurrences of an IP address or MAC address within your search scope.
The values returned by searching this MIB are often duplicates of the values returned from other
MIBs, so checking this MIB is usually not necessary.
Dot1dTpFdb
This table contains information about unicast entries for which the bridge has forwarding and/or
filtering information. This information is used by the transparent bridging function in determining
how to propagate a received frame.
Check this MIB to resolve MAC addresses to a port.
Enterasys 802.1x Extensions
Supplements/used in connection with the standard IEEE 802.1x MIB. It provides a convenient way to
retrieve authentication status for Supplicants living on shared−media ports that use station−based
access control. (Here, a MAC address is a much more natural table index than a port or interface
number.)
Check this MIB to find other occurrences of an IP address or MAC address within your search scope.
The values returned by searching this MIB are often duplicates of the values returned from other
MIBs, so checking this MIB is usually not necessary.
Node/Alias (ctAlias)
This MIB defines objects that can be used to discover end systems per port, and to map end system
addresses to the layer 2 address of the port.
Check this MIB to resolve IP addresses to MAC addresses when the devices in your network support
Disable Log Entry Details
242
Automated Security Manager Help
the Node/Alias (ctAlias) MIB.
IGMP Standard
MIB module for IGMP Management, it contains an IGMP Interface Table, having one row for each
interface on which IGMP is enabled, and an IGMP Cache Table with one row for each IP multicast
group for which there are members on a particular interface.
Check this MIB to find other occurrences of an IP address or MAC address within your search scope.
The values returned by searching this MIB are often duplicates of the values returned from other
MIBs, so checking this MIB is usually not necessary.
IP Route
An entity's IP Routing table. This selection provides the ability to resolve IP addresses to MAC
addresses.
Check this MIB when your network includes devices that do not support Node/Alias (ctAlias MIB).
You should include your routers in your search scope when this MIB is checked.
This selection can be un−checked when your network is comprised only of devices that support
Node/Alias, thus improving search performance.
Dot1qTpFdb
A table that contains information about unicast entries for which the device has forwarding and/or
filtering information. This information is used by the transparent bridging function in determining
how to propagate a received frame.
Enterasys Port Web Authentication (PWA)
Check this MIB to find other occurrences of an IP address or MAC address within your search scope.
The values returned by searching this MIB are often duplicates of the values returned from other
MIBs, so checking this MIB is usually not necessary.
Enterasys MAC Authentication
Used for authentication using source MAC addresses received in traffic on ports under control of
MAC−authentication.
Check this MIB to find other occurrences of an IP address or MAC address within your search scope.
The values returned by searching this MIB are often duplicates of the values returned from other
MIBs, so checking this MIB is usually not necessary.
Enterasys Multiple Authentication
Used for authentication using multiple authentication mechanisms.
Check this MIB to find other occurrences of an IP address or MAC address within your search scope.
The values returned by searching this MIB are often duplicates of the values returned from other
MIBs, so checking this MIB is usually not necessary.
RMON Host Table
Contains entries for each address discovered on a particular interface. Each entry contains statistical
data about that host. This table is indexed by the MAC address of the host, through which a random
access may be achieved.
Disable Log Entry Details
243
Automated Security Manager Help
Check this MIB to find other occurrences of an IP address or MAC address within your search scope.
The values returned by searching this MIB are often duplicates of the values returned from other
MIBs, so checking this MIB is usually not necessary.
IP CIDR Route
The IP CIDR Route Table obsoletes and replaces the ipRoute Table current in MIB−I and MIB−II
and the IP Forwarding Table. It adds knowledge of the autonomous system of the next hop, multiple
next hops, and policy routing, and Classless Inter−Domain Routing.
Check this MIB when your network includes devices that do not support Node/Alias (ctAlias MIB).
You should include your routers in your search scope when this MIB is checked.
This selection can be un−checked when your network is comprised only of devices that support
Node/Alias, thus improving search performance.
Dot1q VLAN Static
A table containing static configuration information for each VLAN configured into the device by
(local or network) management. All entries are permanent and will be restored after the device is
reset.
Dot1q VLAN Current
A table containing current configuration information for each VLAN currently configured into the
device by (local or network) management, or dynamically created as a result of GVRP requests
received.
Disable Log Entry Details
244
NetSight − Supported MIBs
A B C D E F G H I J L M N O P Q R S T U V W Z
A
ACCOUNTING−CONTROL−MIB
ADSL−LINE−MIB
ADSL−TC−MIB
AGENTX−MIB
APPC−MIB
APPLETALK−MIB
APPN−TRAP−MIB
APPLICATION−MIB
APPN−DLUR−MIB
APPN−MIB
ATM−ACCOUNTING−INFORMATION−MIB
ATM−MIB
ATM−TC−MIB
B
BGP4−MIB
BRIDGE−MIB
C
cabletron−traps
cabletron−traps−irm
CHARACTER−MIB
chassis−mib
CLNS−MIB
COFFEE−POT−MIB
community−mib
COPS−CLIENT−MIB
ctatm−config−mib
ct−broadcast−mib
ct−cmmphys−mib
ct−container−mib
ctELS100−NG−mib
ct−els10−mib
ct−flash−mib
ctfps−mib
ct−fps−services−mib
ctframer−config−mib
ct−hsimphys−mib
ctif−ext−mib
ctinb2−mib
ctinb−mib
ct−pic−mib
ct−priority−classify−mib
ct−priority−queuing−mib
ctrmonxt−mib
ctron−alias−mib
ctron−appletalk−router−mib
ctron−appn−mib
ctron−bdg−mib
ctron−bridge−mib
ctron−bus−mib
ctron−cdp−mib
ctron−chassis−mib
ctron−common−mib
ctron−csmacd−mib
NetSight − Supported MIBs
245
Automated Security Manager Help
ctron−dcm−mib
ctron−deciv−router−mib
ctron−device−mib
ctron−dhcp−mib
ctron−dlsw−mib
ctron−download−mib
ctron−elan−mib
ctron−environment−mib
ctron−ethernet−parameters
ctron−etwmim−mib
ctron−fddi−fnb−mib
ctron−fddi−stat−mib
ctron−fnbtr−mib
ctron−frontpanel−mib
ctron−if−remap−2−mib
ctron−if−remap−mib
ctron−igmp−mib
ctron−ip−router−mib
ctron−ipx−router−mib
ctron−mib−names
ctron−nat−mib
ctron−oids
ctron−orp−hsim−mib
ctron−portmap−mib
ctron−power−supply−mib
ctron−ppc−bad−packets
ctron−priority−classify−mib
ctron−priority−extensions−mib
ctron−q−bridge−mib−ext
ctron−rate−policing−mib
ctron−remote−access−mib
ctron−routers−internal−mib
ctron−routers−mib
ctron−sfcs−mib
ctron−sfps−base−mib
ctron−sfps−bindery−mib
ctron−sfps−call−mib
ctron−sfps−chassis−mib
ctron−sfps−common−mib
ctron−sfps−connection−mib
ctron−sfps−conn−mib
ctron−sfps−diagstats−mib
ctron−sfps−directory−mib
ctron−sfps−esys−mib
ctron−sfps−eventlog−mib
ctron−sfps−flood−mib
ctron−sfps−include−mib
ctron−sfps−l4ss−mib
ctron−sfps−mcast−mib
ctron−sfps−path−mib
ctron−sfps−pktmgr−mib
ctron−sfps−policy−mib
ctron−sfps−port−mib
ctron−sfps−resolve−mib
ctron−sfps−sflsp−mib
ctron−sfps−size−mib
ctron−sfps−softlink−mib
ctron−sfps−tap−mib
ctron−sfps−topology−mib
ctron−sfps−vlan−mib
ctron−sfps−vstp−mib
ctron−smarttrunk−mib
ctron−ssr−capacity−mib
ctron−ssr−config−mib
ctron−ssr−hardware−mib
ctron−ssr−l2−mib
ctron−ssr−l3−mib
ctron−ssr−policy−mib
ctron−ssr−service−status−mib
ctron−ssr−smi−mib
ctron−ssr−trap−mib
ctron−timed−reset−mib
ctron−translation−mib
ctron−tx−queue−arbitration−mib
ctron−ups−mib
ctron−vlan−classify−mib
ctron−vlan−extensions−mib
ctron−wan−imux−mib
ctron−wan−mib
ctron−wan−multi−imux−mib
ctron−webview−mib
ctsmtmib−mib
cttraplog−mib
NetSight − Supported MIBs
246
Automated Security Manager Help
D
DECNET−PHIV−MIB
DIAL−CONTROL−MIB
DIRECTORY−SERVER−MIB
DISMAN−EVENT−MIB
DISMAN−EXPRESSION−MIB
DISMAN−NSLOOKUP−MIB
DISMAN−PING−MIB
DISMAN−SCHEDULE−MIB
DISMAN−SCRIPT−MIB
DISMAN−TRACEROUTE−MIB
dlm−mib
DLSW−MIB
DNS−RESOLVER−MIB
DNS−SERVER−MIB
DOCS−BPI−MIB
DOCS−CABLE−DEVICE−MIB
DOCS−IF−MIB
dot5−log−mib
dot5−phys−mib
DOT12−IF−MIB
DOT12−RPTR−MIB
DS0BUNDLE−MIB
DS0−MIB
DS1−MIB
DS3−MIB
DSA−MIB
E
EBN−MIB
els100−s24tx2m−mib
enterasys−802do
enterasys−8021x−extensions−mib
enterasys−configuration−change−mib
enterasys−config
enterasys−convergence−end−point−management−mib
enterasys−diagnostic−message−mib
enterasys−encr−8
Replace 8021
enterasys−encr−8021x−rekeying−mib.txt Replace
8021
enterasys−eswitch−mib
enterasys−flow−l
enterasys−ieee8023−lag−mib−ext−mib.txt
enterasys−ietf−bridge−mib−ext−mib.txt
enterasys−ietf−p−
enterasys−jumbo−ethernet−frame−mib.txt
enterasys−mac−authentication−mib.txt
enterasys−mac−l
enterasys−mib−names
enterasys−mib−org
enterasys−mstp−
enterasys−oids−mib
enterasys−policy−profile−mib
enterasys−pwa−m
enterasys−R2Management
enterasys−radius−acct−client−ext−mib
enterasys−radius
enterasys−radius−auth−client−mib
enterasys−secure−shell−server−mib.txt
enterasys−service
enterasys−snmp−persistence−mib.txt
enterasys−sntp−client−mib.txt
enterasys−spanni
enterasys−ssh−server−mib.txt
enterasys−syslog−client−mib
enterasys−tls−mi
enterasys−vlan−interface−mib.txt
enterasys−wifi−protected−access−mib.txt
ENTITY−MIB
ETHER−CHIPSET−MIB
EtherLike−MIB
event−actions−m
D
247
Automated Security Manager Help
F
fast−ethernet−mib
FLOW−METER−MIB
FRAME−RELAY−DTE−MIB
FDDI−SMT73−MIB
FR−ATM−PVC−SERVICE−IWF−MIB
FRNETSERV−MIB
FIBRE−CHANNEL−FE−MIB
FR−MFR−MIB
G
garp−mib
H
HCNUM−TC
HOST−RESOURCES−TYPES
HOST−RESOURCES−MIB
HPR−IP−MIB
HPR−MIB
I
IANA−ADDRESS−FAMILY−NUMBERS−MIB
IANAifType−MIB
IANA−LANGUAGE−M
IANA−RTPROTO−MIB
IANATn3270eTC−MIB
IEEE802dot11−MIB
IEEE8021−PAE−MIB
IEEE8023−LAG−MIB
IF−INVERTED−STACK
IF−MIB
IGMP−STD−MIB
INET−ADDRESS−MIB
INTEGRATED−SERVICES−GUARANTEED−MIB
INTEGRATED−SERVICES−MIB
INTERFACETOPN−MI
IPATM−IPMC−MIB
IP−FORWARD−MIB
IP−MIB
IPMROUTE−STD−MIB
IPOA−MIB
IPV6−ICMP−MIB
IPV6−MIB
IPV6−MLD−MIB
IPV6−TC
IPV6−TCP−MIB
IPV6−UDP−MIB
ipx.txt
irm3−mib
irm−oids
ISDN−MIB
J
Job−Monitoring−MIB
F
248
Automated Security Manager Help
L
lan−emulation−client−mib
M
MAU−MIB
MIP−MIB
Modem−MIB
MTA−MIB
MIOX25−MIB
N
netlink−specific−mib
NETWORK−SERVICES−MIB
network−diags−mib
NHRP−MIB
NOTIFICATION−LOG−MIB
O
OSPF−MIB
OSPF−TRAP−MIB
P
P−BRIDGE−MIB
PINT−MIB
PPP−SEC−MIB
PARALLEL−MIB
PPP−BRIDGE−NCP−MIB
Printer−MIB
PerfHist−TC−MIB
PPP−IP−NCP−MIB
PTOPO−MIB
PIM−MIB
PPP−LCP−MIB
Q
Q−BRIDGE−MIB
L
249
Automated Security Manager Help
R
RADIUS−ACC−CLIENT−MIB
RADIUS−ACC−SERVER−MIB
RADIUS−AUTH−CLIENT−MIB
RADIUS−AUTH−SERVER−MIB
RDBMS−MIB
repeater−mib−2
repeater−rev4−mib
RFC1065−SMI
RFC1155−SMI
RFC1213−MIB
RFC1269−MIB
RFC1271−MIB
RFC1285−MIB
RFC1316−MIB
RFC1381−MIB
RFC1382−MIB
RFC1414−MIB
RFC−1212
RFC−1215
ripsap.txt
RIPv2−MIB
RMON2−MIB
RMON−MIB
roamabout−mib.txt
router−oids
RS−232−MIB
RSTP−MIB
RSVP−MIB
RTP−MIB
S
SIP−MIB
SLAPM−MIB
SMON−MIB
SNA−NAU−MIB
SNA−SDLC−MIB
SNMP−COMMUNITY−MIB
SNMP−FRAMEWORK−MIB
SNMP−MPD−MIB
SNMP−NOTIFICATION−MIB
SNMP−PROXY−MIB
SNMP−REPEATER−MIB
snmp−research−mib
SNMP−TARGET−MIB
SNMP−USER−BASED−SM−MIB
SNMP−USM−DH−OBJECTS−MIB
SNMPv2−CONF
SNMPv2−MIB
SNMPv2−SMI
SNMPv2−TC
SNMPv2−TM
SNMPv2−USEC−MIB
SNMP−VIEW−BASED−ACM−MIB
SONET−MIB
SOURCE−ROUTING−MIB
SYSAPPL−MIB
system−resource−mib
T
TCP−MIB
TN3270E−MIB
TOKENRING−STATION−SR−MIB
TCPIPX−MIB
TN3270E−RT−MIB
trap−mib
tms−common−mib
TOKEN−RING−RMON−MIB
TUNNEL−MIB
tms−l3−mib
TOKENRING−MIB
R
250
Automated Security Manager Help
U
UDP−MIB
UPS−MIB
ups2−mib
usm−target−tag−mib
V
VRRP−MIB
v2h124−24−mib.txt
W
wrs−master−mib
WWW−MIB
Z
ziplock−mib
U
251
Traps and Informs
SNMP Notification messages (Traps and Informs) provide the mechanism for one SNMP application to notify
another SNMP application that something has occurred or been noticed. The SNMPv3 protocol mandates that
all notification message be rejected unless the SNMPv3 user sending the notification already exists in the
remote SNMP agent's user database. The user database in an SNMPv3 application is actually referenced by a
combination of the user's name (Security Name) and an identifier for the given SNMP application (engineID).
Console's snmptrapd Configuration window lets you configure the Security User credentials and/or Engine
IDs for devices from which Console's SNMPTrap Service (snmptrapd) will accept SNMPv3 Notification
messages. If this information is not provided as part of the SNMPTrap Service configuration, all Notification
messages are dropped by SNMPTrap Service. They do not appear in the Console's Trap/Event log and they
are not acknowledged by SNMPTrap Service.
SNMPv3 traps and SNMPv3 inform messages differ in operation. When two SNMP agents communicate, one
agent is always designated as authoritative. This authoritative designation depends on the type of message.
When an SNMP message expects a response (e.g., SNMPv3 Inform), then the receiver is authoritative. When
an SNMP message does not expect a response (e.g., SNMPv3 Trap), then the sender is authoritative. This is
important because it is the authoritative agent's EngineID together with a Security User Name that must be
recognized before the receiver will accept the message.
SNMPv3 Traps
Traps are one−way notification messages. They are not acknowledged by a receiving SNMP application. The
Security User and Engine ID of the sending agent is included in SNMPv3 trap messages. So, before trap
messages can be received in Console, the SNMPTrap Service needs to know both the Security User
credentials and the engine ID of the sending SNMP agent.
Because of this, you must define the Security User credentials and engineID of the SNMP agents for every
device from which you want to receive SNMPv3 traps. This information is defined using the createUser
directive in the snmptrapd.conf file. So, if you want to have 100 SNMP agents send SNMPv3 traps to the
SNMPTrap Service, you need 100 createUser directives (defining both the security user credentials and
engine ids) in the configuration file.
createUser
Example for Traps:
createUser −e 0x01:02:03:04:05:A1:B2:C3:D4:E5 myUser MD5 myauthpassword DES myprivpassword
Where:
−e <engine:id>
Traps and Informs
specifies the engineID of the sending agent
252
Automated Security Manager Help
myUser
security user name
myauthpassword
MD5
myprivpassword
DES
or SHA − authentication type and authentication password
(optional parameter − do not use when authentication is not
used)
− encryption type and encryption password − (optional
parameter − do not use when encryption is not used or leave
the encryption password blank if it is the same as the
authentication password).
SNMPv3 Informs
Inform notifications require two−way communication. Inform messages expect a response. An Inform
notification is essentially a Trap that gets acknowledged by the SNMP application that receives it. The
sending SNMP application will repeat the Inform message until it gets an I got it response from the receiving
SNMP application. In this case, the receiving SNMP agent is authoritative, which means the inform message
should include the Security User credentials and the EngineID of the receiving agent. However, because this
is a two−way communication, it is possible for the sender to discover the Engine ID of the receiving agent.
And because the engineID can be discovered, it is not necessary to specify an engineID in the SNMPTrap
Service's configuration file. It is only necessary to provide security user/credential information in this file and
let the sender discover the engine ID as illustrated here.
Security information for Inform messages is defined using the createUser directive in the snmptrapd.conf
file.
createUser
Example for Informs:
createUser myUser MD5 myauthpassword DES myprivpassword
Where:
myUser
SNMPv3 Informs
security user name
253
Automated Security Manager Help
myauthpassword
MD5
or SHA − authentication type and authentication password
(optional parameter − do not use when authentication is not
used)
myprivpassword
DES
− encryption type and encryption password − (optional
parameter − do not use when encryption is not used or leave
the encryption password blank if it is the same as the
authentication password).
Restart the SNMPTrap Service
Any time that the snmptrapd.conf file is changed, the SNMPTrap Service must be restarted.
To restart the snmptrapd:
Windows
a. Go to the Taskbar Notification Area of
your desktop (on the lower right of your
screen, unless you've relocated your
Taskbar).
b. Locate the Services Manager icon (
)
and right−click it.
c. Select SNMP Trap > Restart.
Restart the SNMPTrap Service
Solaris, Linux
a. Navigate to the etc/rc2.d directory.
b. Type the command:
S99NsSnmptrapd stop
c. Press Enter.
d. Type the command:
S99NsSnmptrapd start
e. Press Enter.
254