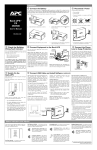
1
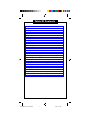
2
PARTNER ® Plus / II Release 3.1
Communications System and
PARTNER MAIL VS™
Voice Messaging System
Quick Reference
518-322-103
PARTNER MAIL VS QR GUIDE
Copyright © 1994 AT&T
1
4/1/96, 2:21 PM
Help!
If you have problems with your phone, contact your System Manager. If
the problem is not solved, in the continental U.S. please call our toll-free
Helpline, available 24 hours a day, at 1 800 628-2888.
Outside the continental U.S., contact your local AT&T Authorized Dealer.
PARTNER MAIL VS is a trademark and MLS-34D, MLS-18D, MLS-12D, MLS-12,
MLS-6, and PARTNER are registered trademarks of AT&T.
PARTNER MAIL VS QR GUIDE
2
4/1/96, 2:21 PM
Table Of Contents
Telephone Buttons and Indicators ................... 2
Using the Phone ................................................ 4
Ringing Patterns ............................................................ 4
Lights ..............................................................................4
System Lines ................................................................. 4
Programming ................................................................. 5
System Features ............................................................ 6
Making a Call ................................................................. 8
Entering a Password ...................................................... 8
Entering an Account Code ............................................. 8
Answering a Call ............................................................ 9
Transferring a Call ......................................................... 9
Making a Conference Call ........................................... 10
Joining a Call .............................................................. 10
Making a Call to a Calling Group ................................. 10
Loudspeaker Paging .................................................... 10
Putting a Call on Hold .................................................. 11
Answering a Call Ringing at Another Extension .......... 11
Forwarding a Call ......................................................... 11
Using the PARTNER MAIL VS System ............ 12
Helpful Hints ................................................................ 12
Logging In to the Voice Messaging System ................. 13
Listening to Messages ................................................. 13
Recording Your Personal Greeting .............................. 14
Changing Your Password ............................................ 14
Using the Tutor Service ............................................... 15
Programming a Voice Mail Messages Button ............... 15
Personal Speed Dial Numbers ........................ 16
System Extensions ...................................................... 16
1
PARTNER MAIL VS QR GUIDE
3
4/1/96, 2:21 PM
Telephone Buttons and Indicators
MLS-18D
09/10 TUE
10:24a
1
2
Intercom
Intercom
Ext.
Volume
3
Speakerphone
Spkr
Mic
HFAI
Message
ABC
DEF
1
2
3
GHI
JKL
MNO
4
5
6
PQRS
TUV
WXYZ
7
8
9
0
#
Feature
Conf
Transfer
Hold
Intercom Buttons. Press either button to place an inside (intercom) call to another extension.
Volume Control Buttons. Press to decrease (▼) or increase (▲) the volume of the ringer,
speaker, and handset:
■ To adjust ringer volume, while phone is idle and handset is on the phone, press ▼ or ▲.
■ To adjust speaker volume, press ▼ or ▲ while listening through the speaker.
■ To adjust handset earpiece volume, while listening on a call lift the handset and press ▼ or ▲.
■ To adjust background music volume, press ▼ or ▲ while listening to music through the
phone’s speakers.
To adjust the display brightness on an MLS-18D phone, when the phone is idle and the handset
is on the phone: press *; then press ▼ to decrease brightness, or ▲ to increase brightness.
Message Indicator. Lights when someone signals you using Message Light On (see page 7)
or if you have a message in your mailbox. To turn off, dial f 1 0 and your extension
number, or call PARTNER MAIL VS to retrieve then delete your messages.
2
PARTNER MAIL VS QR GUIDE
4
4/1/96, 2:21 PM
1 Display
[MLS-34D,® MLS-18D,® and MLS-12D ®only] When dialing, shows the
number dialed, duration of call, and feature messages. When receiving an
intercom call, shows the number (and name if programmed) of the extension
calling. When in programming mode, displays programming messages.
When not using the phone, displays today's date and time or Caller ID
information (if available–on PARTNER II systems only). (You can adjust the
display contrast on the MLS-18D; see “Volume Control Buttons” on page 2.)
2 Line/ Programmable Buttons
A line can be assigned on any button with status lights.
(The MLS-34D and MLS-18D have status lights for all of these buttons; the
MLS-12D and MLS-12 ® are identical to the MLS-18D, except that they
do not have lights for the 6 buttons shown above the white line on the left.)
When an outside line is assigned, press the button to make and receive
calls. You may have to enter an account code to get an outside line (see
page 6). When no line is assigned to a button, you can program the button
with one-touch dialing features (no status lights are required for most
features). Dial-code features are listed on pages 6 and 7; programming
instructions are on page 5. Once programmed, press the button to dial the
number or use the feature.
NOTE: The MLS-6 ® phone has 4 line/programmable buttons. When 4 lines
are assigned, it has no programmable buttons; with 2 lines assigned, it has
2 programmable buttons.
3 Speakerphone Operation
[MLS-34D, MLS-18D, MLS-12D, and MLS-12]
Press S to dial and speak on your phone without lifting the handset.
When you press S , both the speaker and the microphone come on
(indicated by the lights next to the S and m buttons). When the party
on the other end answers, you can speak without lifting the handset. (On the
MLS-6, press to dial without lifting the handset; when the party you are
calling answers, lift the handset to speak.)
Mic (Microphone) Button. [MLS-34D , MLS-18D, MLS-12D, and MLS-12 only] Press m to
turn your microphone on and off. When the green light next to m is on, the microphone is on.
To answer calls without lifting the handset, leave the microphone on (see “HFAI” below). On a
speakerphone call, press m to mute your voice.
HFAI (Hands-Free Answer on Intercom). For more convenient speakerphone operation, leave
the microphone on all the time (press m if the light next to the button is off). When you receive
a voice-signaled call (you hear a beep), the person calling can talk to you over your phone’s
speaker; simply begin speaking to have a hands-free, two-way conversation.
Feature Button. Press to program (page 5) or to use dial-code features (pages 6 and 7).
Conf (Conference) Button. Press to conference (add) other parties to your call (page 10).
Transfer Button. Press to transfer a call to another extension (page 9).
Hold Button. Press to put a call on hold for later pickup (page 11).
3
PARTNER MAIL VS QR GUIDE
5
4/1/96, 2:21 PM
Using the Phone
Ringing Patterns
You can tell the type of call coming in by the way the phone rings:
Ring…Ring…Ring…Ring…Ring…Ring…
Outside Call
Ring-BEEP…Ring-BEEP…Ring-BEEP…
Inside Call
Ring-BEEP-BEEP…Ring-BEEP-BEEP…
Transferred Call
Lights
Red (top) light shows activity at another extenstion.
Green (bottom) light shows activity at your extension.
Steady on: Line is busy.
Off (off continuously): Line is idle, available for use.
Flash (long on, long off): Call is ringing on the line.
Alternating Red/Green Flash: (red on, green on, red on,
green on): Appears at all extensions in a conference or joined call.
Wink (long on, short off): Call is on hold (anyone with line can pick up).
Flutter (short on, short off): Call is on exclusive hold (only extension
that put call on hold can pick up) or a transferred call is returning to you,
or on PARTNER II systems only Caller ID Inspect feature button is on or
you are being manually signaled by an extneison.
Broken flutter (short on and off followed by long off): Fax trouble.
System Lines
Line No.
01
02
03
04
05
06
07
08
09
10
11
12
Phone No. or Description
Line No.
13
14
15
16
17
18
19
20
21
22
23
24
Phone No. or Description
* Shading indicates lines that apply only to the PARTNER II system.
4
PARTNER MAIL VS QR GUIDE
6
4/1/96, 2:22 PM
Programming
To Program Buttons
Use programming to store dialing sequences on programmable buttons (see
diagram, pages 2–3). Then simply touch the button to dial automatically.
1. Press f 0 0 to enter programming mode.
2. Press a programmable button.
3. Press the buttons you normally press to dial another extension, to dial an
outside telephone number, or to use a system feature (see examples below).
NOTE: To store i on a button, press the left i button.
To program more buttons,or to change the programming, repeat Steps 2 and 3.
4. Press f 0 0 to exit programming mode.
Examples:
Autodial another extension number
To ring extension 11 with one touch, program i 1 1; to voice signal
extension 11, program i * 1 1.
You can also use this button to:
■
Transfer calls with one touch.
■
See when the extension is busy (red steady light) or calling you (green flashing
light), or when a transferred call is returning to you or (on PARTNER II systems
only) when you are being manually signaled by the extension (green fluttering light).
Autodial an outside telephone number
To dial 555-5678 with one touch, program 5 5 5 5 6 7 8 .
Any dial-code feature on page 6 or 7
Program the dial code on a button. For example, to use Do Not Disturb with one
touch, program f 0 1 on a button with lights. For some features, you can
also program an extension number or group number on the button, as indicated in
the descriptions on pages 6 and 7. For example, to use Call Pickup for calls ringing
at extension 12, program i 6 1 2 on a button.
To Program Personal Speed Dial Numbers
1. Press f 0 0 to enter programming mode.
2. Press f, then the two-digit Dial Code (80–99) for the phone number.
3. Enter the outside phone number (up to 20 digits).
To add more Speed Dial numbers, repeat Steps 2 and 3.
4. Press f 0 0 to exit programming mode.
To change a number, follow Steps 1–4 but enter the new number in Step 3.
Special Dialing Functions
You can enter the following special functions in Speed Dial or Auto Dial
numbers:
Function
Button Display Description
Pause
h P
1.5-second pause
Recall
S
R
Timed switchhook flash
Stop
m
S
Stops dialing sequence until button is
pressed or code is dialed again
Touch-Tone Enable t T
Sends touch tones over a rotary line
5
PARTNER MAIL VS QR GUIDE
7
4/1/96, 2:22 PM
System Features
Feature
Manual
Button
Account Code Entry
Enters a code of up to 16 digits for an incoming
or outgoing call. You may have to enter an
account code to access an outside line.
Dial f 1 2,
the account code, then
f 1 2 again
Press the button*,
dial the account
code, then press the
button again
Background Music
Plays Music On Hold through the speaker on
your idle system phone (except MLC-6).
Dial f 1 9 to
turn on and off
Press the button*
to turn on and off
Call Forwarding/Call Follow-Me
Dial f 1 1
Forwards calls (to cancel, enter your extension
+ Your Ext. No.
as destination). Unless Do Not Disturb is on,
+ Destination Ext. No.
phone beeps when a call is forwarded. On
PARTNER II, extension numbers are optional on
a button (must be entered manually if not stored).
Call Pickup
Picks up a call ringing at an extension. On a
programmed button, include extension number.
Press the button*
+ Your Ext. No. (if
not stored) +
Destination Ext. No.
(if not stored)
Dial i 6
+ Ext. No.
Press the button
Not available
Press the button,
then press a line
button; press the
button again to turn off
Caller ID—Name Display (PARTNER II only)
Switches between caller’s phone number and
name (if available). To use, program f
1 6 on a button with lights.
Not available
Press the button* to turn on and off
Conference Drop
Drops the last outside party added to a
conference call.
Dial f 0 6
Press the button
Direct Line Pickup—Active Line
Accesses a ringing, held, or active call on a line
that is not assigned to your phone.
Dial i 6 8
+ Line Number
Press the button +
Line Number
Direct Line Pickup—Idle Line
Accesses an idle line that is not assigned to
your phone.
Dial i 8
+ Line Number
Press the button +
Line Number
Do Not Disturb
Prevents your incoming calls from ringing (use
only if someone covers your calls). To use,
program f 0 1 on a button with lights.
Not available
Press the button*
to turn on and off
Exclusive Hold
Places a call on hold so other extensions
cannot pick it up.
Dial f 0 2
Press the button
Group Calling—Ring/Page
Simultaneously rings or pages all extensions
in a Calling Group†, or (on PARTNER II
systems only) transfers a call to a Calling
Group. You are connected to the first group
extension that answers.
Ring: Dial i 7
Press the button
+ Group Number (1–4)
Page: Dial i *
7 + Group Number (1–4)
Transfer: Dial t 7
+ Group Number (1–4)
Caller ID—Inspect (PARTNER II only)
Shows information for another line (without
disconnecting a current call or putting it on hold).
To use, program f 1 7 on a button with
lights (button light flutters when feature is on).
*
†
On a button with lights, light is on when feature is on.
If programmed on a button, include the group number (see your System Manager for group assignments).
Feature must be programmed onto a button with lights (see page 4).
Button with lights recommended (not required).
6
PARTNER MAIL VS QR GUIDE
8
4/1/96, 2:22 PM
Feature
Manual
Group Hunting—Ring/Voice Signal
Rings, voice signals, or (for PARTNER II
systems only) transfers a call to the next
available extension in a Hunt Group.†
Button
Ring: Dial i 7 7 Press the button
+ Group Number (1–7)
Voice: Dial i * 7
7+ Group Number (1–6)
Transfer: Dial t 7
7 + Group Number (1–7)
Group Pickup
Picks up a call ringing at any extension in a
Pickup Group.†
Dial i 6 6
+ Group Number (1–4)
Press the button
Last Number Redial
Redials the last outside number you dialed.
Dial f 0 5
Press the button
Loudspeaker Paging
Connects you to the loudspeaker system.
Dial i 7 0
Press the button
Not available
To beep:
Press the button
To ring or voice
signal: Press
i, then
press the button
Message Light On/Off
Turns a phone’s message light on or off. On
PARTNER II, an extension number is optional on
a button (must be entered manually if not stored).
On: f 0 9
+ Ext. No.
Off: f 1 0
+ Ext. No.
Press the button +
Ext. No. (if not
stored)
Privacy
Prevents others from joining your calls. To use,
program f 0 7 on a button with lights.
Not available
Press the button* to turn on and off
Recall
“Recalls” dial tone when you are on a call, to
access a PBX or Central Office service.
Dial f 0 3
Press the button
Save Number Redial
Saves the last outside number you dialed into
memory (but not a System Speed Dial number).
Save a number before you hang up; the number
stays in memory until a new one is saved.
Dial f 0 4
before hanging up
To redial later, dial
f 0 4 again
Press the button
before hanging up
To redial later, press
the button again
Touch-Tone Enable
Sets to touch-tone dialing for the rest of a call.
Dial f 0 8
Press the button
Not available
Press the button*
to turn on and off
Not available
Press the button* to turn on and
off
Voice Mail Messages
Dials PARTNER MAIL VS to check messages.
Dial i 7 7 7
Press the button
Voice Mailbox Transfer
Transfers a call directly to a subscriber’s voice
mailbox, so a caller can leave a message.
Dial f 1 4 +
Ext. No.
Press the button +
Ext. No.
Manual Signaling—Ring/Voice Signal
(PARTNER II systems only)
When on-hook or on an outside line, beeps an
extension; when on intercom, rings or voice
signals. Program f 1 3 and the
extension on a button to ring, or f 1
3 * and the extension to voice signal. On a
button with lights, lights show calling activity.
VMS Cover
Turns voice mail coverage on and off. To use,
program f 1 5 on a button with lights.
Voice Interrupt on Busy Talk-Back
Lets you respond to a voice interrupt on
busy call. To use, program f 1 8
on a button with lights.
*
†
On a button with lights, light is on when feature is on.
If programmed on a button, include the group number (see your System Manager for group assignments).
Feature must be programmed onto a button with lights (see page 4).
Button with lights recommended (not required).
7
PARTNER MAIL VS QR GUIDE
9
4/1/96, 2:22 PM
Making a Call
To call an outside party:
Outside:
l + Phone Number
or
i 8+
Line Number +
Phone Number
If a password is needed, enter it before Step 1. Also, to get outside dial
tone, you may have to enter an account code before Step 2. If this
applies to your phone, contact your System Manager for instructions.
1. Lift handset.
2. Press an idle (not lit) line button. To dial on a line not assigned to your
phone, press i 8 followed by the line number.
3. Dial telephone number.
Inside—Ringing:
i+
Extension Number
To call an inside party (another extension):
Inside—Voice-Signaled:
i +*+
Extension Number
You can lift the handset or press S before dialing.
1. Press an idle i button.
You hear intercom dial tone, and the light next to the i button
is steady green.
2. To ring the extension, dial the two-digit extension number.
To voice-signal a system phone at the extension, press * plus the twodigit extension number:
■ If you hear one beep, you have reached an idle system phone.
You can speak after the beep.
Your voice is heard through the other extension’s speaker. If the
recipient is present, he or she can reply.
■ If you hear two beeps, you have reached a busy system phone
with Voice Interrupt On Busy Assigned. You can speak after the
beeps. Be aware that the third party to whom the recipient is
speaking will probably also hear the two beeps and the faint
sound of your voice.
If the recipient has a Voice Interrupt On Busy Talk-Back button,
wait for a response.
h + Password
Entering a Password
1. Press h and enter the four-digit password.
f 1 2+
Entering an Account Code
1. While off-hook, dial f 1 2.
Account Code +
f12
2. Enter an account code of up to 16 digits (manually or using an Auto Dial
button or Speed Dial number). See your System Manager for a list of
account codes.
3. Dial f 1 2.
8
PARTNER MAIL VS QR GUIDE
10
4/1/96, 2:22 PM
Answering a Call
You can answer a call on any line that is ringing, or select a
specific line if more than one is ringing:
■
At Your Extension:
l
■
When the telephone is ringing, lift the handset.
To answer a calll on a specific line, press the line button for the line you
want to answer, then lift the handset.
If you are already on a call:
hl
1. Press h to put the first call on hold.
2. Press the flashing line button to pick up the new call.
To answer a voice-signaled call (your phone beeps):
1. If the microphone is on, begin speaking (if not, pressm or lift handset).
To respond to a voice interrupt on busy call (your phone beeps
twice):
1. Press the Voice Interrupt On Busy Talk-Back button, then begin speaking.
Transferring a Call
t+
Extension Number,
7 7 + Hunt Group
Number (1–7),
or
7 + Calling Group
Number (1–4)
t +* +
Extension Number
To pass a call to another extension:
1. While active on the call, press t .
The call is put on hold and you hear intercom dial tone.
2. Dial the extension number, 7 7 and a Hunt Group number
(1–7), or (for PARTNER II systems only) 7 and a Calling Group
number (1–4)*.
3. When someone answers, announce the call, then hang up.
If no one answers or the call is refused, to reconnect to the caller,
press the line button next to the winking green light.
To make a voice-signaled transfer:
1. While active on the call, press t .
The call is put on hold and you hear intercom dial tone.
2. Dial * and the two-digit extension number:
■ If you hear one beep, you have reached an idle system phone.
You can speak after the beep.
Your voice is heard through the other extension’s speaker. If the
call is accepted, hang up. If no one answers or the call is refused,
press the line button next to the winking green light to reconnect to
the caller.
■ If you hear two beeps, you have reached a busy system phone with
Voice Interrupt On Busy Assigned. You can speak after the beeps.
Be aware that the third party to whom the recipient is speaking will
probably also hear the two beeps and the faint sound of your voice.
Your voice is heard through the recipient’s handset or speaker. If
the recipient has a Voice Interrupt On Busy Talk-Back button, wait
for a response. To complete the transfer, hang up—the call rings at
the recipient’s extension. If the call is refused, press the line button
next to the winking green light to reconnect to the caller.
* See your System Manager for Calling Group, Pickup Group, and Hunt Group assignments.
9
PARTNER MAIL VS QR GUIDE
11
4/1/96, 2:22 PM
Making a Conference Call
To add parties to a call (max. 4 parties plus you):
Telephone or
Extension Number +
C+
Telephone or
Extension Number +
C
To Drop:
f06
1. Call the first party (can use Speed Dial or Auto Dial buttons).
2. After the first party answers, press C .
3. Press an idle line button and call the second party (or press
iand extension number to add an inside party).
4. After the second party answers, press C again; you are
connected with both parties.
The lights at all extensions in the conference flash red and green.
5. To add others, repeat Steps 2–4.
To drop the last outside party added to the call:
1. Press f 0 6 .
NOTE: You cannot add more than 2 outside parties, transfer a
conference call, or join a conference call.
Joining a Call
l
or
i68 +
Line Number
To connect yourself to an outside call being conducted at
another extension:
1. Press the line button (steady red light) or dial i 6 8 and
the two-digit line number.
2. Lift handset.
NOTE: You cannot join an inside call, a conference call, or a call at an
extension with Privacy turned on.
Making a Call to a Calling Group
Ringing Call:
i 7+
Group Number (1–4)
Paging Call:
i*7+
Group Number (1–4)
To call everyone in a Calling Group* :
1. Press i .
2. Lift handset.
3. Dial 7 and a group number (1–4) to ring the group, or dial * 7
plus a group number to page those in the group who have idle
MLS–model phones with speakers.
You are connected to the first extension to answer.
Loudspeaker Paging
i70
To make an announcement over the loudspeaker paging
system (if one is connected to your system):
1. Press i.
2. Lift handset.
3. Dial 7 0 , then follow the instructions for your paging system to
make your announcement.
* See your System Manager for Calling Group, Pickup Group, and Hunt Group assignments.
10
PARTNER MAIL VS QR GUIDE
12
4/1/96, 2:22 PM
Putting a Call on Hold
To hold so anyone with the line can pick it up:
Hold:
h
1. Press
h.
To hold so only you can pick it up (Exclusive Hold):
Exclusive Hold:
f02
1. Press
f 0 2.
To pick up a held call:
To Pick Up:
l
1. Press the line button next to the winking green light.
2. Lift handset.
Answering a Call Ringing at Another
Extension
At a specific extension:
i 6+
Extension Number
or
At any extension:
i68+
Line Number
At any extension in the
Pickup Group:
i66+
Group Number (1–4)
To answer a call ringing at any other extension:
1. Press i .
2. Lift handset.
3. Dial 6 plus the number of the ringing extension (or if you know
which line is ringing—but not the specific extension—dial 6 8
plus the two-digit line number).
To answer a call ringing at any extension in a Pickup Group:*
1. Press i .
2. Lift handset.
3. Dial 6 6 plus the group number (1–4).
NOTE: On PARTNER II systems, you can answer an outside, intercom,
or transferred call ringing at any extension in a Pickup Group. On a
PARTNER Plus system, you can answer only outside calls.
Forwarding a Call
To forward intercom, outside, and transferred calls:
f1 1
+
Source Extension
Number +
Destination Extension
Number
1. Press f 1 1.
2. Dial your extension number.
3. Dial the destination extension number. (To cancel Call Forwarding,
enter your own extension number as the destination.)
Your system phone beeps once each time a call is forwarded from
your extension.
* See your System Manager for Calling Group, Pickup Group, and Hunt Group assignments.
11
PARTNER MAIL VS QR GUIDE
13
4/1/96, 2:22 PM
Using the PARTNER MAIL VS System
The voice messaging system serves as your personal answering machine. Callers from inside and
outside your company can hear your personal greeting and leave messages in your mailbox, which
you can listen to, save, or discard. A password you create keeps messages private.
Helpful Hints
■
■
■
■
■
■
While using Voice Mail Service, you can:
- Dial the next step of any procedure without waiting for a greeting or
prompt to finish.
- Press * # to go back to the previous menu.
- Use the following key sequences:
* E or * 3 to delete a message
* H or * 4 to access help
* Q or * 7 to restart
* T or * 8 to transfer
Additionally, you can press * *X or * * 9 to exit Voice
Mail Service and make other calls without having to hang up the
handset. (This is useful when you are calling from a pay phone or
making credit card calls.)
The PARTNER MAIL VS system turns on the message light on your
system phone when a message is sent to your mailbox, and turns off
the message light after you delete all of your messages.
Your mailbox accommodates up to 10 minutes of stored messages
(or 40 messages). The receptionist’s mailbox at extension 10
accommodates up to 30 minutes of stored messages (or 120
messages).
When your mailbox is 80% full, you will hear the “Mailbox is 80% Full”
warning when you first log in to Voice Mail Service. If your mailbox is
100% full, you will hear the “Mailbox is Full” warning.
You can transfer to another extension:
- While logged in to Voice Mail Service,
- After hearing someone’s personal greeting,
- From a system extension or a remote telephone,
To transfer:
1. Press * T to transfer to another extension.
The prompt says, “Please enter extension number.”
2. Enter the extension number to which you want to be connected.
To transfer to the receptionist’s extension, press 0 .
Intercom and transferred calls to covered extensions ring 4 times at the
extension before Call Answer Service plays your personal greeting.
If you want intercom and transferred calls to go immediately to the
PARTNER MAIL VS system, you can use the Do Not Disturb feature in
conjunction with voice mail coverage. The green light next to the Do Not
Disturb button is lit when this feature is on.
12
PARTNER MAIL VS QR GUIDE
14
4/1/96, 2:22 PM
Logging In to the Voice Messaging
System
1. If you are calling from:
Outside your company:
- Call in on a line answered by the PARTNER MAIL VS system.
- Press * Q to access your mailbox when you hear either the
Automated Attendant Service greeting or a suscriber’s personal
greeting.
If someone answers the call, ask them to transfer you to the PARTNER
MAIL VS system by dialing t 7 7 7 (or pressing a
programmed button).
■ Inside your company:
- Press a programmed button to log in to the PARTNER MAIL VS
system or:
■
- From a system phone, press i
7 7 7.
- From a standard phone, press 7 7 7 after you hear intercom
dial tone.
2. Enter your extension number followed by # .
NOTE: When dialing from your extension, just press # .
3. Enter your password followed by # .
NOTE: Until you change it, the password is 1 2 3 4.
The system announces the number of messages in your mailbox.
4. Select an option from the Voice Mail Menu:
Press
2
3
5
to get messages.
*T
to transfer to another extension.
0
to transfer to the receptionist at extension 10.
to change your personal greeting.
to change your password.
Listening to Messages
1. Log in to the PARTNER MAIL VS system.
The Voice Mail Menu plays.
2. Press 2 to get messages.
The message header plays.
3. Press 0 to play the message.
The message plays.
4. After the message plays:
■
■
■
■
Press 2
Step 3.
3 to replay the current message header. Go back to
Press 0 to replay the current message.
Press # to save the message and skip to the next message header.
Go back to Step 3.
Press * E to delete the message.
The prompt says “Deleted” and the next message header plays.
Go back to Step 3.
13
PARTNER MAIL VS QR GUIDE
15
4/1/96, 2:22 PM
Using the
PARTNER
VS System
Recording
YourMAIL
Personal
Greeting
Before you record, note that callers who hear your personal greeting can
enter * T to transfer to another extension, or they can enter 0 to
reach the receptionist before or after your message plays. You may want
to prompt the caller to press * T or 0 in your personal greeting.
Note: If your mailbox is full, callers hear your personal greeting and then
the message ”Sorry Mailbox is Full.” To leave a message, they must
either transfer to the receptionist’s extension or to another subscriber’s
extension.
1. Log in to PARTNER MAIL VS.
The Voice Mail Menu plays.
2. Press 3 to change your personal greeting.
The Greeting Menu plays.
3. If you would like to listen to the current greeting before you change it,
press 0 . If not, go to Step 4.
4. Lift the handset and press 1 to change your greeting.
The prompt says, “After recording, press 1. Record at the tone.”
5. After you hear the tone, record your personal greeting (two minutes
maximum).
Example: “This is Joe Conlin. I’m in the office today but away from my
desk. If you would like to talk to the receptionist, press 0 . Otherwise,
please leave your name, phone number, and a brief message at the
sound of the tone.”
6. Press 1 after recording.
7. Choose an option or go to Step 8:
■
Press 2 3 to play back the greeting.
■
Press 2 1 to re-record the greeting. Go to step 5.
■
Press * E to delete the greeting. The old greeting remains
in effect.
8. Press *
# to approve the greeting.
Changing Your Password
To prevent unauthorized use, select a password composed of random,
non-sequential digits.
1. Log in to the PARTNER MAIL VS system.
The Voice Mail Menu plays.
2. Press 5 to change your password.
The prompt says, “Enter new password and # sign.”
3. Enter up to four digits for the new password followed by # . You
should use random, non-sequential digits.
The prompt says “Re-enter password.”
4. Enter the new password again followed by # .
14
PARTNER MAIL VS QR GUIDE
16
4/1/96, 2:22 PM
Using the Tutor Service
The TUTOR Service is a help feature that allows you to access and listen
to information about commonly-used phone system features.
To access the TUTOR Service menu:
1. Dial i777.
2. Press * 4 after you hear the “Please enter extension number”
prompt.
Voice prompts request you to enter the topic and subtopic numbers.
3. At any time during the voice prompts, enter a topic and subtopic
number:
1 Autodial Features
3 Fixed Features
1 Last Number Redial
1 Transfer
2 Save Number Redial
2 Conference
3 Personal Speed Dial
4 About Your Phone
4 Intercom Auto Dial
1 Buttons and Lights
5 Outside Auto Dial
2 Display
2 Internal Calls
3 Speakerphone
1 Hands Free Answer on Intercom
4 Volume
2 Voice Interrupt On Busy
5 Ring Patterns
3 Group Page
One beep after an information segment means there is more
information about the subtopic. Two beeps indicate the end of the
information.
At one beep:
Press * 4 to replay the previous segment.
or
■
Press # to play the next segment.
■
At two beeps:
Press * 4 to replay the previous segment.
or
■
Press # to return to the main menu.
■
Programming a Voice Mail Messages
Button
To program an Auto Dial button on your system phone for one-touch
dialing into the PARTNER MAIL VS system:
■
Press f 0 0 .
■
Press a programmable button.
■
Press left i 7 7 7 .
15
PARTNER MAIL VS QR GUIDE
17
4/1/96, 2:22 PM
Personal Speed Dial Numbers
To dial a Personal Speed Dial number: Press f followed by the two-digit Dial Code.
See page 5 for programming instructions. Your system may also be programmed with System Speed
Dial numbers (Dial Codes 20-79), which are similar to Personal Speed Dial numbers except anyone
on the system can dial them. If programmed, a list is available from your System Manager.
Record your Personal Speed Dial numbers below, in pencil.
DIAL
CODE
80
81
82
83
84
85
86
87
88
89
DIAL
CODE
90
91
92
93
94
95
96
97
98
99
NAME
NAME
To call the receptionist at extension 10: Dial i 0 or i 1 0 .
System Extensions
EXT
10
11
12
13
14
15
16
17
18
19
20
21
22
23
24
25
NAME
EXT
26
27
28
29
30
31
32
33
34
35
36
37
38
39
40
41
NAME
EXT
42
43
44
45
46
47
48
49
50
51
52
53
54
55
56
57
NAME
* Shading indicates extensions that apply only to the PARTNER II system.
16
PARTNER MAIL VS QR GUIDE
18
4/1/96, 2:22 PM