1
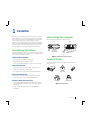
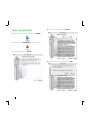
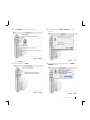
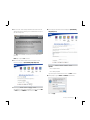
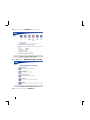
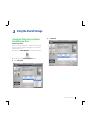
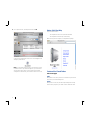
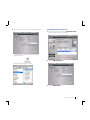
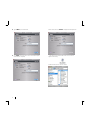
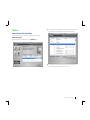
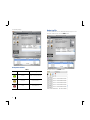
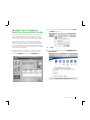
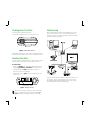
3
1
in Network Drive
Shared Storage Plus+
Macintosh User’s Guide
PN: 20297501
Contents
1 Introduction . . . . . . . . . . . . . . . . . . . . . . . . . . . . . . . . . . . . . . . . . . . . . . . . . . . . . . . . .
1
Shared Storage Plus Features . . . . . . . . . . . . . . . . . . . . . . . . . . . . . . . . . . . . . . . . . . . . . 1
Shared Storage Plus Components . . . . . . . . . . . . . . . . . . . . . . . . . . . . . . . . . . . . . . . . . . 1
Included in this Kit . . . . . . . . . . . . . . . . . . . . . . . . . . . . . . . . . . . . . . . . . . . . . . . . . . . . . . 1
Minimum System Requirements . . . . . . . . . . . . . . . . . . . . . . . . . . . . . . . . . . . . . . . . . . . 2
Handling Precautions . . . . . . . . . . . . . . . . . . . . . . . . . . . . . . . . . . . . . . . . . . . . . . . . . . . . 2
About this Guide. . . . . . . . . . . . . . . . . . . . . . . . . . . . . . . . . . . . . . . . . . . . . . . . . . . . . . . . 2
Where to Go for Help . . . . . . . . . . . . . . . . . . . . . . . . . . . . . . . . . . . . . . . . . . . . . . . . . . . . 2
2 Installing the Shared Storage. . . . . . . . . . . . . . . . . . . . . . . . . . . . . . . . . . . . . . .
3
Connect Your Drive . . . . . . . . . . . . . . . . . . . . . . . . . . . . . . . . . . . . . . . . . . . . . . . . . . . . . 3
Power up Your Drive . . . . . . . . . . . . . . . . . . . . . . . . . . . . . . . . . . . . . . . . . . . . . . . . . . . . 3
Set up Your Drive . . . . . . . . . . . . . . . . . . . . . . . . . . . . . . . . . . . . . . . . . . . . . . . . . . . . . . . 4
3 Using the Shared Storage
.......................................... 9
Using the Drive . . . . . . . . . . . . . . . . . . . . . . . . . . . . . . . . . . . . . . . . . . . . . . . . . . . . . . . . 9
Drag and Sort . . . . . . . . . . . . . . . . . . . . . . . . . . . . . . . . . . . . . . . . . . . . . . . . . . . . . . . . . 23
Backup . . . . . . . . . . . . . . . . . . . . . . . . . . . . . . . . . . . . . . . . . . . . . . . . . . . . . . . . . . . . . . 26
Advanced Settings . . . . . . . . . . . . . . . . . . . . . . . . . . . . . . . . . . . . . . . . . . . . . . . . . . . . . 33
Using Media Server . . . . . . . . . . . . . . . . . . . . . . . . . . . . . . . . . . . . . . . . . . . . . . . . . . . . 41
Shutting Down Your Drive . . . . . . . . . . . . . . . . . . . . . . . . . . . . . . . . . . . . . . . . . . . . . . . 42
Resetting Your Drive . . . . . . . . . . . . . . . . . . . . . . . . . . . . . . . . . . . . . . . . . . . . . . . . . . . 42
Media Serving. . . . . . . . . . . . . . . . . . . . . . . . . . . . . . . . . . . . . . . . . . . . . . . . . . . . . . . . . 42
1
Introduction
Thank you for selecting the Maxtor Shared Storage Plus drive. Connecting
this storage solution to your network in a home or small office is a simple
and economical way for users to share and backup files. Your new Maxtor
Shared Storage Plus drive offers a winning combination of capacity,
simplicity of use and helpful software features that automate configuration,
privacy and more. The simple installation allows you to start using your drive
as quickly as possible. You can also change settings on your drive at any
time, and manage user access through Safari or other web browsers.
Shared Storage Plus Features
Instantly add storage to your network, back up files across every compatible
Macintosh on your network, and stream music, videos and photos from your
drive to your home entertainment system.
Shared Storage Plus Components
Review the features shown before you begin installation.
Back
Front
Power
Button
Power
Reset
USB Ports
Connector
Button
Network ID Panel
Security
Ethernet port
Locking
Slot
Status Light
(Flashing Green
and Amber Lights)
Figure 1. Shared Storage Plus Drive Features
Simple Installation and Setup
• Automatically configure the drive to your network
Included in this Kit
• Manage the drive using our simple user interface
• Connect and share additional hard drives using the drive’s 2 USB ports
The Shared Storage Plus drive comes complete with the components
shown in Figure 2.
Instant Shared Storage
• Easily store and share access to files, photos, music and videos
• Organize files automatically using Drag and Sort™
• Give users full access to public folders, while keeping others private
Vertical Stand
Quick Start CD
Shared Storage Plus Drive
Back up what Matters Most
• Protect data on all of your networked Macs using Maxtor® Backup
• Get backup and storage status for all users with SimpleView™
Playback of Videos, Music and Photos
• Use our media streaming feature to play digital photos, music and video
on a networked home entertainment system - even without turning on
your Macintosh
Power Adapter
Cat5 Ethernet Cable
Figure 2. Included in this Kit
• Connect automatically through a UPnP™ AV compatible digital
media adapter
Introduction
1
Minimum System Requirements
About this Guide
The following are the minimum system requirements.
The following symbols and conventions are used in this guide:
•
•
•
•
OS X 10.2.8 or later
128 MB RAM or more as required by operating system
Safari 1.0.3 or later for management interface of Shared Storage Plus
Wired or wireless router with available 10BaseT or faster Ethernet port
• Internet access or updates
• Networked Media Adapter
• CD-ROM drive
Note: Special considerations for immediate media file access are required.
See Media Serving for more information.
Handling Precautions
Handle your drive with care! Follow the precautions listed here or you could
damage your drive and void your warranty. Review the Maxtor Limited
Warranty, included in the Maxtor Shared Storage Plus Quick Start Guide, for
more information.
The following precautions can prevent loss of data:
• Do not bump, jar, drop or move the drive while in operation.
• Do not stack drives.
• Do not set the drive on its side without using the vertical stand as it
could fall over and cause damage.
• Do not remove any cables or power cords without powering down the
drive, using the front panel button.
• Do not set any liquids or drinks on the drive. Liquids will damage the
internal electronics.
• Do not attempt to open the drive’s case. This will void your warranty.
2
Bold
Used for menu, command, and keyboard
selections you make and screens you will see.
Helpful information about a particular topic.
Important information to prevent problems and
ensure that you are successful in using the drive.
Where to Go for Help
Maxtor provides a comprehensive support section on its website, including
the latest software, user guides and a knowledge base for its customers.
Maxtor Support Website
http://support.maxtor.com/sharedstorage
Maxtor has provided Shared Storage – Troubleshooting and FAQ Portal from
within its Knowledge Base providing you with one link from which you can
obtain answers to common questions and problems.
Support Phone Numbers
Check the Contact Us section on the Maxtor support website, for phone
numbers in your region.
2
Installing the Shared Storage
Step 1 - Connect Your Drive
Step 2 - Power up Your Drive
Connecting the Ethernet Cable
Press the button on the front of your Maxtor Shared Storage Plus drive.
1. Plug one end of the Ethernet cable into your network, router or switch.
Your drive will now start. The startup process can take up to one minute
to complete.
2. Plug the other end of the Ethernet cable into the Ethernet port on your
Shared Storage Plus drive.
• The light inside of the button will turn amber.
• When the light pulses green, your drive is ready and you can go
to Step 3.
Your drive will be accessible on your network approximately
10 seconds after the light turns green.
Router/Switch
Ethernet Ports
Figure 3. Connecting the Ethernet Cable
Connecting the Power
1. Plug the round female connector from the power adapter into the drive’s
power connector.
Power Button
Figure 5. Pressing the Power Button
2. Plug the female connector on the power cord into the power adapter.
3. Plug the standard electrical plug from the power adapter into your
power source.
Figure 4. Connecting the Power
Installing the Shared Storage
3
Step 3 - Set up Your Drive
4. Review the License Agreement and click Continue.
1. Insert the Maxtor Quick Start CD and double-click the Install CD icon.
2. Then double-click the Quick Start.pkg icon to launch the program.
3. From the Welcome screen, click Continue.
5. To accept the terms of the License Agreement, click Agree.
4
6. Select a destination to install the Quick Start software
…and click Continue.
7. To start the installation, click Install.
8. When prompted, type your Name and Password of the user to
authenticate.
Click OK to proceed.
9. A restart is required to complete the installation. Click Continue
Installation to proceed.
Installing the Shared Storage
5
10. The Quick Start software will install on your computer.
12. When the computer is ready, double-click the Quick Start icon.
13. The Quick Start software will begin locating Shared Storage Drives
detected on the network.
11. When finished, click Restart.
14. When found, you will see the Network ID number and IP address for the
located drive(s).
For example: MSS-0170CA (192.169.1.108).
6
15. The Quick Start - Shared Storage Administrator Password window will
appear for all new drives, allowing you to set administrative security on
the Shared Storage drive.
18. Quick Start opens the web browser and displays the Quick and easy
setup (Step 2 of 2).
Click Yes to launch the Web User Interface and set an administrative
password.
Note: Skip to Step 18 if No is selected.
16. The Quick Start software will then connect to and open the web
browser and displays the Quick and easy setup (Step 1 of 2).
Optional:
• Enter a Computer Name
• Enter a Workgroup Name
Type and re-type the Administrator Password. Click Next to continue.
19. When prompted, type the Name and Password to authenticate,
17. Click the pop-up menu to select the language. Click the Date/Time
radio buttons to change settings as needed. If necessary, enter the date
and time, adjust the AM/PM radio buttons and click Next.
then click Login.
Installing the Shared Storage
7
20. When authenticated, the Congratulations window is displayed.
Print or write down the information for future reference.
21. Click OK to return to the Maxtor Shared Storage Plus – Home Page.
22. Close the browser to return to the Quick Start menu.
8
3
Using the Shared Storage
Using Quick Start with your Maxtor
Shared Storage Drive
4. Click Select Drive.
Select Your Drive
Make sure your Shared Storage Drive is connected to your network and
turned on. Its name and IP address will appear in the “Select a Maxtor
Shared Storage Drive” list.
1. Double-click the Maxtor Quick Start icon located on your Desktop.
2. Click the name of your Shared Storage Drive in the list.
3. Select a user account.
Using the Shared Storage
9
5. If it is a private account, enter the password and click OK.
Maxtor Quick Start Help
Help can be accessed from:
• The Help Button located on the Quick Start Main Menu.
• The Help Menu located at the top of the desktop.
When selecting one of these options, the Help Menu is displayed.
A shortcut to the shared folder for this user account will appear on the
desktop of your Macintosh.
Note: If you are already connected to an account and want to connect
to another account on your Shared Storage Drive, you do not need to
select the drive (step 3, above). If you are setting up your Shared
Storage Drive for the first time, you will need to create a user account.
Create and Use Shared Folders
User Account Types
Public
With a public account, all of your files are accessible to anyone who has
an account on your Shared Storage Drive.
Private
With a private account, all of your files are password-protected except
for those which you place in your “Public” folder to share with others.
10
Name and Password
Business Folders
Table 2:
Length
Name may be up to 20 characters in length. Password may be up to
32 characters in length.
Characters
Both may contain letters, numbers, and underscores (_), but no spaces
or symbols.
Home Folders
Appropriate for
My Backup
Backed-up files
My Documents
Word processing files
My Projects
Project files
Creating Shared Folders
My Spreadsheets
Spreadsheet files
Shared Folder Types
Home
My Presentations
Business presentations
My Photos
Digital photos and artwork
With this folder type, a series of sub-folders are created that help with
organizing files/folders commonly used in the Home environment (My
Music, My Documents, etc.). A shortcut to the Public folder is provided
as well.
My Sites
Web pages
My Software
Software storage
Public
Sharing files with others
Home Folders
None
Table 1:
Home Folders
Appropriate for
My Backup
Backed-up files
My Documents
Word processing files
My Library
Electronic books
My Movies
Home videos
My Music
Digital music collection
My Photos
Digital photos and artwork
My Sites
Web pages
My Software
Software storage
Public
Sharing files with others
With this folder type, no sub-folders are created; however,
there is a shortcut to the Public folder.
Note: The Public account, for all users, contains a set of folders
identical to the Home folders shown above, but using the name
“Our.” For example: “Our Music.”
Using the Shared Storage
11
Creating a Public/Home User Account
4. Type a Name for your shared folder.
1. From the main Quick Start screen, click the Create a User Account
button at the lower left of the Quick start menu.
5. Click Create. At this point, the account is created (this may
take a few minutes to complete).
2. Select the Public User Account type.
3. Select the Home Folder type.
12
6. When created, the word “Success” will appear near the help button…
Creating a Public/Business User Account
1. From the main Quick Start screen, click the Create a User Account
button at the lower left of the Quick start menu.
…and a shortcut to the shared folder for this user account will
appear on the desktop.
2. Select the Public User Account type.
Double-click the shortcut to view its contents.
3. Select the Business Folder type.
Using the Shared Storage
13
4. Type a Name for your shared folder.
When created, the word “Success” will appear near the help button…
5. Click Create. At this point, the account is created (this may take
a few minutes to complete).
…and a shortcut to the shared folder for this user account will
appear on the desktop.
Double-click the shortcut to view its contents.
14
Creating a Public/None User Account
4. Type a Name for your shared folder.
1. From the main Quick Start screen, click the Create a User Account
button at the lower left of the Quick start menu.
5. Click Create. At this point, the account is created (this may take
a few minutes to complete).
6. When created, the word “Success” will appear near the help button…
2. Select the Public User Account type.
…and a shortcut to the shared folder for this user account will
appear on the desktop.
3. Select the None Folder type.
Using the Shared Storage
15
Double-click the shortcut to view its contents.
2. Select the Private User Account type.
Creating a Private/Home User Account
1. From the main Quick Start screen, click the Create a User Account
button at the lower left of the Quick start menu.
3. Select the Home Folder type.
4. Type a Name for your shared folder.
5. Type and re-type a Password.
16
6. Click Create. At this point, the account is created (this may take a few
minutes to complete).
Double-click the shortcut to view its contents.
Creating a Private/Business User Account
7. When created, the word “Success” will appear near the help button…
1. From the main Quick Start screen, click the Create a User Account
button at the lower left of the Quick start menu.
…and a shortcut to the shared folder for this user account will
appear on the desktop.
Using the Shared Storage
17
2. Select the Private User Account type.
6. Click Create. At this point, the account is created (this may take
a few minutes to complete).
3. Select the Business Folder type.
4. Type a Name for your shared folder.
5. Type and re-type a Password.
18
7. When created, the word “Success” will appear near the help button…
…and a shortcut to the shared folder for this user account will
appear on the desktop.
Double-click the shortcut to view its contents.
2. Select the Private User Account type.
Creating a Private/None User Account
1. From the main Quick Start screen, click the Create a User Account
button at the lower left of the Quick start menu.
3. Select the None Folder type.
4. Type a Name for your shared folder.
5. Type and re-type a Password.
Using the Shared Storage
19
6. Click Create. At this point, the account is created (this may take
a few minutes to complete).
Double-click the shortcut to view its contents.
Using Shared Folders to Connect to User Accounts
There are two (2) methods for connecting to User Accounts. This section
provides you with the steps for connecting a Public or Private User:
7. When created, the word “Success” will appear near the help button…
…and a shortcut to the shared folder for this user account will
appear on the desktop.
20
Method 1 – Connect a Public User Account
1. From the main Quick Start screen, click the Connect to a User Account
button at the lower left of the Quick Start main menu.
The Connect to User Account windows is displayed.
4. When connected the word “Success” will appear near the help
button…
2. Select the Public User Account that you wish to connect.
…and a shortcut to the shared folder for this user account will appear on
the desktop.
Method 2 – Connect a Private User Account
1. From the main Quick Start screen, click the Connect to a User
Account button at the lower left of the Quick Start main menu.
3. Click Connect. At this point the Quick Start software connects to the
user account.
Using the Shared Storage
21
The Connect to User Account windows is displayed.
4. Click Connect. At this point, the Quick Start software connects to the
user account.
2. Select the Private User Account that you wish to connect.
5. When connected the word “Success” will appear near the help
button…
3. Type the Password.
…and a shortcut to the shared folder for this user account will appear on
the desktop of your Macintosh.
22
Drag and Sort™
Note: Drag and Sort can also be enabled and/or disabled from the
Settings
Drag and Sort menu.
What is Drag and Sort?
Drag and sort is an easy and powerful way to sort files on your Shared
Storage Drive. When you drag a group of files to the Shared Storage Drive
icon, each file is automatically sorted into a specific folder, based on its
file type.
Enable Drag and Sort
This turns Drag and Sort on or off. It is turned on by default when you install
the Shared Storage Drive software. You may also control this setting using
the Drag and Sort button in the main Quick Start screen.
Using the Shared Storage
23
Folders and their Sorted File Types
“Our” Public Folders and their Sorted File Types
Two types of folder sets exist on your Shared Storage Drive:
• “My” folders - a set of folders unique to each user.
Table 4:
Folders
File Types (by extension)
Our Documents
asc, bak, csv, doc, dot, dwg, dxf, eml,
maq, mar, mdb, mpp, msg, pdf, pm3,
pm4, pm5, pm6, pot, pps, ppt, ps, pst,
rtf, txt, wpd, wpt, wri, xtl
Our Movies
avi, moov, mov, movie, mpeg, mpg, qt,
rm, wmv, swf, asf, rmvb, ogm, vob,
ape
• “Our” folders - a set of folders for all users.
Files dragged to a user-specific shared folder are sorted into the “My”
Personal Folders. Files dragged to the Public shared folder are sorted
into the “Our” Public Folders.
“My” Personal Folders and their Sorted File Types
Table 3:
Folders
File Types (by extension)
Our Music
aiff, au, mid, midi, mp3, wav, wma,
ogg, ram, ra, cda, mp1, mp2
My Documents
asc, bak, csv, doc, dot, dwg, dxf, eml,
maq, mar, mdb, mpp, msg, pdf, pm3,
pm4, pm5, pm6, pot, pps, ppt, ps, pst,
rtf, txt, wpd, wpt, wri, xtl
Our Photos
bmp, eps, ico jfif, jpeg, jpg, psd, raw,
tif, tiff, wmf, msp, png, psp, pcx, ras,
tga, wpg, img, gif, bm, psd
My Movies
avi, moov, mov, movie, mpeg, mpg, qt,
rm, wmv, swf, asf, rmvb, ogm, vob,
ape
Our Sites
html, htm, xsl, xml, asp, css, jsp, php,
jar, cgi, php3, phtml, bin, asmx, js, pl,
htmls
My Music
aiff, au, mid, midi, mp3, wav, wma,
ogg, ram, ra, cda, mp1, mp2
Our Software
exe, bat, iso, bin, reg, sys, tmp, cab, dll,
jav, js, cue, rar, zip, ace, com, dat, ini,
ocx, sql, swp, frm
My Photos
bmp, eps, ico jfif, jpeg, jpg, psd, raw,
tif, tiff, wmf, msp, png, psp, pcx, ras,
tga, wpg, img, gif, bm, psd
My Presentations*
ppt
My Projects*
mpp
My Sites
html, htm, xsl, xml, asp, css, jsp, php,
jar, cgi, php3, phtml, bin, asmx, js, pl,
htmls
My Software
exe, bat, iso, bin, reg, sys, tmp, cab, dll,
jav, js, cue, rar, zip, ace, com, dat, ini,
ocx, sql, swp, frm
My Spreadsheets*
xls, mdb
* Business user account folders.
24
Adding Drag and Sort Folders
Adding Drag and Sort File Types
To add a new folder:
To add a new file type:
1. Click the plus sign (+) at the bottom of the column.
1. Select the folder in which you want to store the new file type.
A sheet will drop down where you can enter the new
folder name.
2. Click the plus sign (+) at the bottom of the File Types column.
A sheet will drop down where you can enter a new file type.
2. After clicking OK, the new folder will appear in the list
in alphabetical order.
Using the Shared Storage
25
3. After clicking OK, the new file type will appear in the list in
alphabetical order.
Backup
Backup Settings
To Launch Backup
1. From the Quick Start menu, click Settings.
Note: To add a file type, you need to know its extension.
For example: DOC for a text file.
2. This will launch the Quick Start Settings menu. By default, Backup is
selected. If necessary, click the Backup tab. You will see the following:
26
Select Folders to Back Up
4. At this point, the backup will prepare.
1. Click the plus sign (+).
2. From the Finder window displayed, select a folder and click Open.
Repeat steps 1 and 2 to add additional folders or select multiple folders
in a list by holding down the command key while clicking each folder.
Files will start backing up to the Shared Storage Drive.
3. To launch an immediate backup, click Back Up Now.
Using the Shared Storage
27
5. When finished, a message displays notifying that you that the
backup completed.
Editing Backup Settings
Set Day and Time
1. Choose a time for your backup by clicking the arrow buttons or typing.
28
2. Choose day(s) by clicking them.
Enable Scheduled Backups
This turns scheduled backups on or off.
You may also control this setting using the Scheduled Backup button
in the main Quick Start screen.
Using the Shared Storage
29
Back Up Now
Historical Versions
After you've selected the folders to back up, the day and the time,
you can back up your folders immediately by clicking Back Up Now.
When you back up your files, you have the option to store previous, or
“historical,” versions of each file. You can then restore any historical version
based on the date when it was backed up.
1. Click the drop menu.
30
2. Choose the number of historical versions from the pop-up menu.
Delete History
This deletes all but the most current historical version of each backed-up
file, creating extra space on your Shared Storage Drive.
1. Click Delete History.
By default, 5 historical versions of each file are stored.
The deletion begins.
Using the Shared Storage
31
2. When finished, the message “Delete history” will be displayed.
Delete Unused
This deletes all backed-up files from your Shared Storage Drive that no
longer exist on your Macintosh, creating extra space on your Shared
Storage drive.
1. Click Delete Unused.
The deletion begins.
32
2. When finished, the message “Delete Unused” has completed
message is displayed.
Advanced Settings
To open, click Settings Advanced. The following options are displayed.
Using the Shared Storage
33
Scheduled Backup
Start my Macintosh if it is not running
Note: These backup features are only available for Mac OS X 10.3 or later.
Select this option to automatically start your Macintosh, so that backup
can take place.
Wake my Macintosh if it is asleep
Select this option to automatically wake up your Macintosh, so that backup
can take place. If you do not select this option, you will need to manually
wake up your Macintosh before backup can start. This option is checked
by default.
This requires that the “automatically log in…” option is selected for your
Mac OS X user account.
If you currently log in manually and would like to switch to automatic login:
1. Go to the Apple Menu and choose System Preferences.
2. Click Accounts.
3. Click the lock at the bottom of the window.
4. Type your password and click OK.
5. Select your user account.
6. Click Login Options.
7. Click Automatically log in as.
8. Choose your user name from the drop-down list.
9. Type your password and click OK.
34
Shut down my Macintosh when backup is finished
To launch the Web User Interface (UI)
Select this option to automatically shut down your Macintosh when backup
is finished. This feature is disabled if “Automatic Login” feature is disabled.
From the Quick Start main menu, click Settings Advanced.
1. Click the Shared Storage Administration button.
Connect to my selected User Account at login
Select this option to make the shared folder for your currently selected user
account automatically accessible from the desktop and the Finder every
time you log in to your Macintosh.
Note: Drag and Sort must be turned on for this feature to work.
Shared Storage Administration
From the Shared Storage Drive home page, you can do the following:
• Create or modify user accounts and shared folders
• Set or modify the language, date and time
• Adjust network and power settings
• View drive status
• Set up shared USB devices
• Perform diagnostics and run disk utilities
2. This will launch your browser. When prompted, type the User Name
and Password to authenticate.
Additional Web UI Informaton
Please refer to page 34 of the Maxtor Shared Storage Plus Windows User’s
Guide (separate Adobe PDF file titled “20297401_Windows.pdf” on the
Maxtor Quick Start CD) for information about the Web User Interface.
Using the Shared Storage
35
3. Click Login.
Backup
If configured through settings, you can launch a backup from Quick Start.
1. Click the Back Up button.
4. The browser then launches to the Maxtor Shared Storage Drive –
home page.
The backup prepares to launch.
And then starts to backup the files to your Shared Storage Drive.
2. When finished, a screen notifies you that the Backup completed.
Click the red button to close the screen.
36
Restore
2. Click the arrow next to the hard drive where the current files are stored
to reveal the folders from which files or folders were backed up.
Restore Recent Files and Folders
You can restore the most recent version of backed-up files and folders.
Select a File or Folder.
1. From the Quick Start Main Menu, click the Restore button.
3. Click the arrow next to each folder to reveal its contents until you find
the specific files and/or folders you wish to restore.
Using the Shared Storage
37
4. Click the checkbox next to the files and/or folders you wish to restore.
Select a Restore Location
Original: Restores file(s) to their original location, replacing the existing version.
or
To restore a historic version of a file, click the latest drop down menu
and select the Historic file version that you wish to restore.
38
Temporary: Restores files to the temporary location in the Documents
folder of the current user
For example: /Users/John/Documents/Maxtor Restore.
Historical Versions
When you back up your files, you have the option to store previous, or
“historical,” versions of each file. You can then restore any historical version
based on the date when it was backed up.
You can choose the number of historical versions from the Historical
Versions pop-up menu in the Backup Settings window. By default, 5
historical versions of each file are stored.
SimpleView™ Storage and Backup Status
This screen provides you with an overview of each user's storage and
backup information:
Table 5:
Last Backup
Date of the user's latest backup
Space Used
Total size of all user's files
Backup Status
Success of user's last backup
Click SimpleView.
Restore the files and folders
After you've selected the file(s) and the restore location, click Restore.
Using the Shared Storage
39
Backup Log File
The following displays:
You can see the details of a user's backup by reading the log file. To view
the log file, double-click the icon in the Status column.
Backup Status Indicators
The log files launches in a Console window.
Table 6:
Icon
40
Status
Meaning
Complete
All files successfully backed up
Incomplete
Some files backed up
Failed
No files backed up
Use Media Server to Manage your
Digital Photo, Music and Video Collection
2. This will launch your browser. When prompted, type the user Name
and Password to authenticate.
If you have a networked home entertainment system, you can use Media
Server to manage your digital photo, music and video collection on your
Shared Storage Drive and use it with your entertainment system. Media
Server can even search your iTunes Music folder for music and video files.
Media Server recognizes files in the following folders on your Shared
Storage Drive: Our Photos, Our Music, Our Movies, My Photos, My Music,
My Movies or My Multimedia. By placing your files in these folders, they will
automatically be available for use with your entertainment system. In order
to use Media Server, your entertainment system will need to be compatible
with UPnP (Universal Plug and Play).
3. Click Login.
To enable Media Server on your Shared Storage Drive, click the Media
Server button in the main Quick Start screen. To enable Media Server:
4. This will launch your browser directly to the Manage Digital Photos,
Music, and Video page.
1. From the Quick Start main menu, click the Media Server button.
Using the Shared Storage
41
Shutting down Your Drive
Media Serving
To safely shut down your Shared Storage Drive:
With the Shared Storage Drive’s Media Serving capabilities, you can view
videos or photos and listen to music on your home entertainment center
without ever turning on your computer. The Media Server feature is disabled
by default on the Shared Storage Drive.
Press and hold the button on the front of your drive for 5 seconds.
Press the button.
Figure 6. Shutting down your drive
The button light will change from green to amber, indicating that the drive is
shutting down. When the light goes off, your drive is completely shut down.
Resetting Your Drive
If you can not access your drive after moving it to another network or turning
it on after it has been off for a period of time, it may need to be reset.
To reset your drive:
• With the drive turned on, use a small pointed object, like the tip of a pen
or paperclip, press and hold the reset button on the back of your drive
until the button light turns amber, and then release. (See figure 7).
• After a few seconds, the drive will reboot.
• When the light changes to green, the reset is complete and your drive
is ready for use.
Once your Shared Storage Drive is properly connected to your network, you
can copy music, movies, or videos directly to it. Next, connect an UPnP™
AV compatible digital media adapter (DMA) through your router, and your
home network becomes a home entertainment center.
Press and hold the reset button.
Figure 7. Resetting your drive
After you reset your Shared Storage Drive, its name will be will be
reset to the original name when you installed it. (Example: MSS000335). In addition, the workgroup will be reset to MSHOME.
42
Considerations for home media networks
Additional Web UI Information
• Some data may not be available for access for up to two (2) hours after
being copied to the Shared Storage Drive. To obtain immediate access
to these media files, click the Refresh button located in Web UI.
Please refer to page 34 of the Maxtor Shared Storage Plus Windows User’s
Guide (separate Adobe PDF file titled “20297401_Windows.pdf” on the
Maxtor Quick Start CD) for information about the Web User Interface.
• Take a survey and note all of the wireless devices in your household
(e.g., radio’s, stereo’s, speakers, phones, cell phones, microwave
ovens, alarms, etc.).
• Use of a hand held WiFi detector will help determine strength and
weakness of WiFi signals in your home.
• Be suspicious of any wireless devices in the same general area and
remove them from the WiFi paths of your routers and media players.
• In some cases, firewalls may need to be disabled and re-enabled.
• Most wireless devices broadcast a wireless frequency by default.
Check the documentation of your wireless media players for
configuration (WEP) settings.
• Check that your wireless router (WEP) security settings will allow
detection and connection of new devices.
• Try moving your media player within a couple of feet of your wireless
router for configuration and connection.
• When configuring and detecting wireless devices, keep an Ethernet
cable handy to hard wire the devices together for diagnosis.
• If you continue to have problems with your WiFi connection dropping
off line, consider hardwiring the devices with Cat5e Ethernet cabling.
• If you’re still having detection issues, reset all network devices by
physically unplugging them from power. Power on all routers, switches,
the Maxtor Shared Storage Plus, computers, and finally media players.
Using the Shared Storage
43
Copyright © 2006 Maxtor Corporation. All rights reserved. Changes are periodically made to the information herein which will be incorporated in revised editions of this publication.
Maxtor may make changes or improvements to the product(s) described in this publication at any time and without notice. Maxtor is a registered trademark of Maxtor Corporation.
All other brands or products are trademarks or registered trademarks of their respective holders. Maxtor Corporation, 500 McCarthy Blvd., Milpitas, California 95035 USA.
PN: 20297501